#graphics: tutorial
Text


jagged, crystalized and pixelated tumblr banner masks!
for the 2 anons that asked!
okay to repost, just dont claim as yours. and free to use (its what they were made for, duh!)
keep in mind gifs dont mesh well with translucent colors if youd like to use these with them :0
#🌫️ i know what you dread | creations#anonymous#carrd resources#rentry resources#rentry#web graphics#rentry tutorial#rentry inspo#rentry gif#rentry decor#rentry graphics#rentry template#image masks#edit resources#editing resources
566 notes
·
View notes
Text
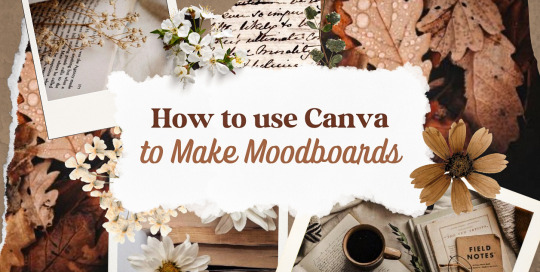
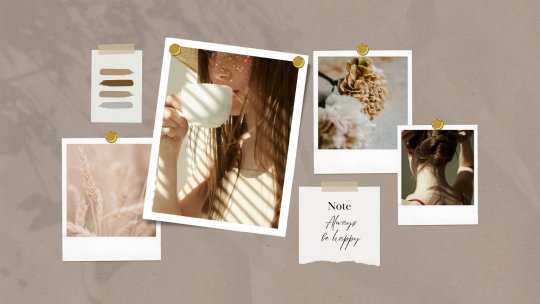
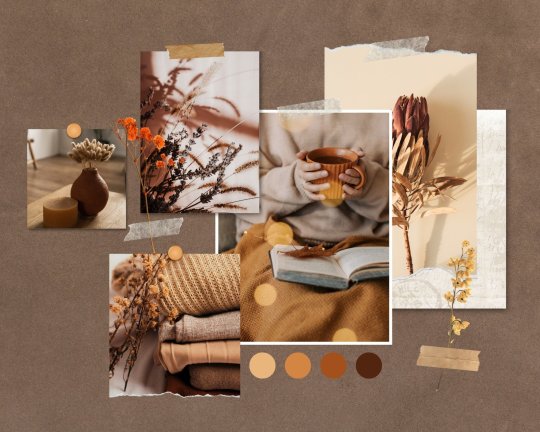
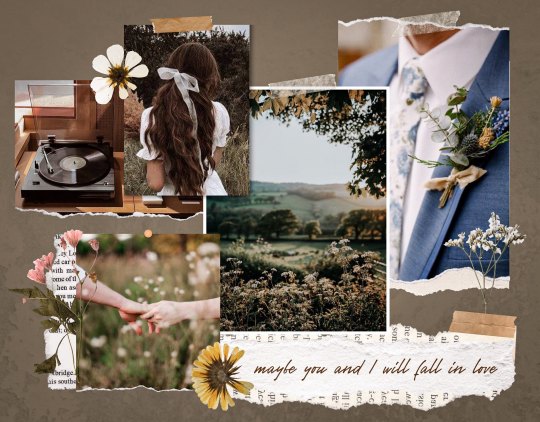
—HOW TO USE CANVA TO MAKE MOODBOARDS

I got a kind message asking how I make moodboards in Canva, so I wanted to do a little tutorial! Canva is a free graphic design app/website, and I use it for everything.
To start - open the app/page and use the search bar at the top to search for a template. I usually use: photo collage, scrapbook, aesthetic moodboard - all of these will pull up pre-made templates for you to use.
[I have a couple linked below that I’ve used and liked, or have bookmarked to try:]
one | two | three | four | five | six | seven | eight
Anything with a crown is for Canva Pro members - you used to be able to use the templates as a free member (just not the paid assets) but that changed recently. The linked templates above are all free ones that you can use right away.
PHOTOS:
Once you’re in the template, you can press the + in the bottom corner to bring up the menus. The Elements tab have items you can add in (more on that later) - for now you want to go to Uploads, and add the photos you want to use. I mostly get mine from Pinterest and Google Images.
[If you are writing an x reader fic and are looking for tips for creating an inclusive moodboard, there are some awesome resources here: one | two !]
After that, go back to your template and click on the different photo frames, and use the Replace button in the toolbar - it will let you replace the template photos with your own. Double tap to move and resize your image within the frame, (and there are also filters you can use if you want!)
When working on moodboards, I like to move things around. You can replace the frames they use by clicking on the item and then clicking the Trashcan. Then go back to the + menu, and then Elements, and scroll down to Frames. You can scroll through them all, but my fave keywords to use in the search bar is: polaroid, torn, and ripped.
Once they’re added, you can move them wherever you want. There’s a button on the toolbar that says Position, and you can shift the object forward/back between the items around it.
DETAILS:
Once you add your photos, then comes the details! You can change the background color and add/change the fonts (or upload your fave font to use!) Try out all the tools on the toolbar to see what you can do, there’s a lot of options.
I love love layering with my moodboard, so I will go back to the + / Elements tab, and then search for things to layer in. My fave searches for Graphics recently are: ripped paper, grunge patterns (to use in the background), star patterns, dried flowers, and dried leaves.
You can use the Position tool on them to fit them in-between or in front of your photos. I usually use them to hide harsh edges or in places that look a little empty.
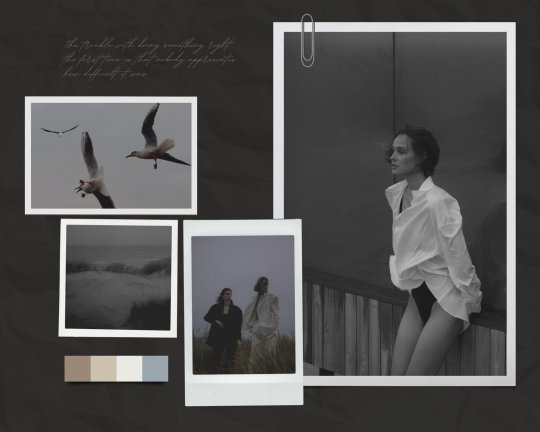
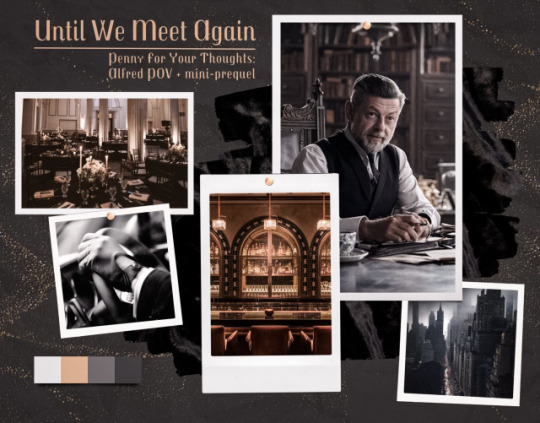
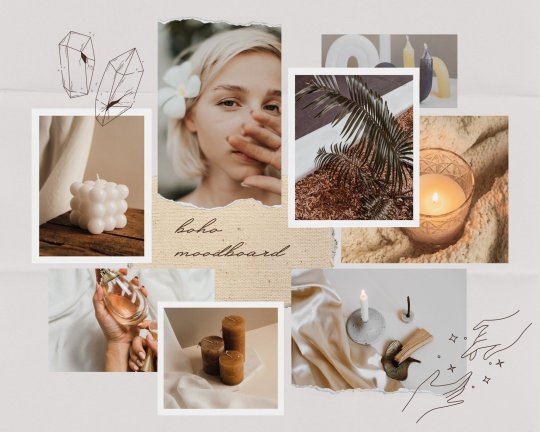
I also like adding fabric texture to the backgrounds, to fill the space between the photo frames. There isn’t an easy way to do this - the best way I figured out is to find an image of the texture you want, and then to add a photo frame with a torn or jagged edge in the very back (and then use your new texture there). You can duplicate and move it, to cover the space (you can see some examples below - the beige flower pattern in the Din one, the black velvet for Alfred).
Here are some examples of the original templates, and then what my finished ones look like. You can see what I swapped out, moved, and added:
original image | my moodboard

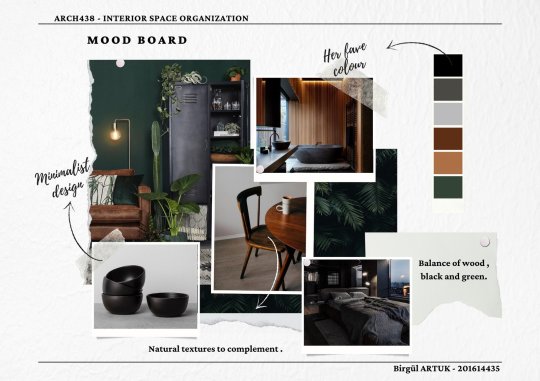
EDITING:
Once I am happy with the design I download it, and then edit. I love this part - pop it into your fave editing app, and play around with the exposure/contrast/hues/sharpness. I will mess with the color balance & vibrancy as well - this can really take a moodboard I like, to one I love.
Here’s some gifs I made showing before /after editing - both are pretty before but I think the after has an oomph that I really appreciate.

[When you finish with one and want to use the same template, you can click Make a Copy, and it will duplicate it. I began with templates but everything I do now are copies of heavily/edited templates or ones I’ve made from scratch. But for starting off, I think a template is the way to go!]
And that’s it!! I would really suggest just opening it up and seeing what you can do. Not all of mine turn out great, but each time I think I get a better handle on all the different options and what my moodboard style is.
I really hope this helps! And feel free to tag me if you post any you make, I’d love to see them (or drop me an ask if you have any questions!) 💖💕
#please give this a reblog if it was helpful! 💖#and just a note the 4th example is an OC x Character fic moodboard#moodboards#graphics#tutorials#aesthetic moodboard#resources#fic moodboard#fan fic meta#fic writing#writing resources
686 notes
·
View notes
Text

really happy with how this (unspesified) (heavily velociraptor inspired) raptor lineart is turning out, this is from a comic project i'm working on so stay tuned if you like historical fiction settings with victorians, domesticated dinosaurs and time travel shenanigans !!
#comic art#comic#paleobr#paleoart#paleontology#graphic novel#antikythera comic#original comic#webcomic#webtoon#art tutorial#paleoillustration#paleomedia#paleo art#theropod#velociraptor#its basically a velociraptor but some kind of very close unspesific species dont look into it too much dfghdfgh
514 notes
·
View notes
Text
5K notes
·
View notes
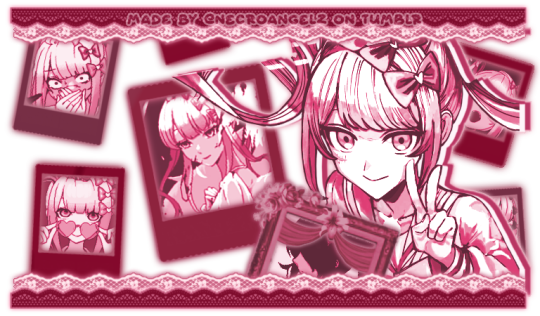
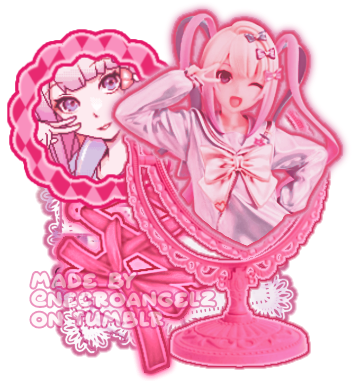
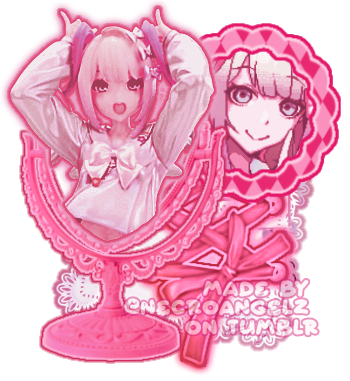
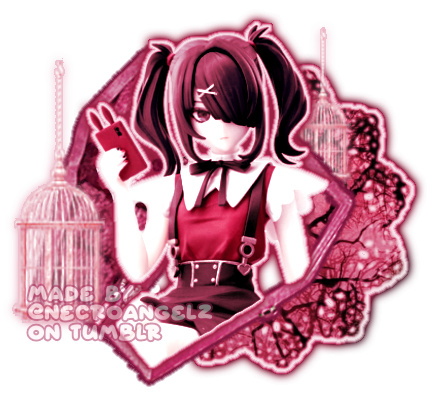
Text
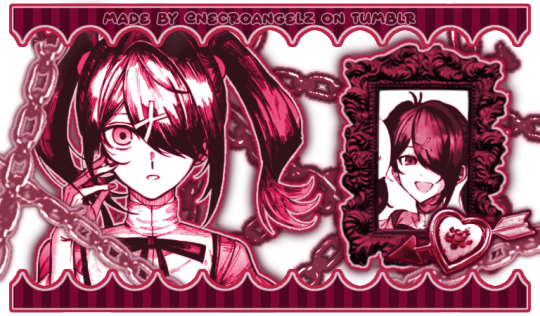
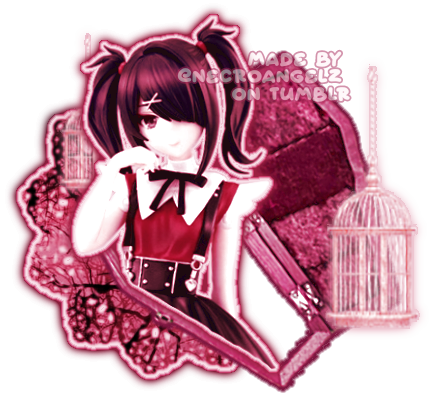
☆ ❛ STREAM ALERT !! ❜ NECROANGELZ is streaming ♡ ⁓⁓ Come watch ?
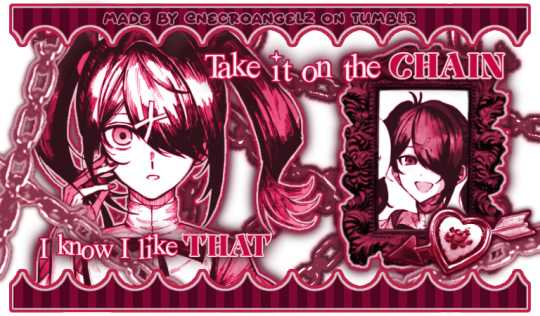
❛ i'm a mess in distress but we're still the best dressed. fearless, say yes, we don't dress to impress. ❜ —- EVE, PSYCHE & THE BLUEBEARD'S WIFE.

♡ NOW WATCHING : Needy Streamer Overload Graphics ☆ ⁓⁓ Enjoy the stream !!
—- semi-requested by @lavendergalactic
—- OH MY GOD. IF ANYONE WERE TO ASK ME WHAT GRAPHICS I HAD THE HARDEST TIME EDITING I WOULD SAY THESE GRAPHICS. THESE WERE IN THE MAKING SINCE A MONTH AGO AND I PROBABLY SPENT 10+ HOURS TOTAL ON THEM. THESE WERE SO HARD TO MAKE BUT THEY'RE NOT THAT BAD I THINK. ANYWAY I'M GOING TO CRY NOW.
—- alts under the cut.
—- "angel why is one of the graphics a different color-" we don't talk about that. (i had a hard time making it with the color palette i decided, ok. i toiled for four hours, ok. i had to change the colors or else i would die, ok.)
—- likes and reblogs are always appreciated. thank you for supporting the angelic streamer.
#🌠﹕ a wishing star 𝜗𝜚 ︵#👁️🗨️﹕ from the archives 𝜗𝜚 ︵#needy streamer overload#needy girl overdose#kangel#omgkawaiiangel#kangel nso#ame chan#ame nso#ame needy girl overdose#ame needy streamer overload#kangel needy girl overdose#kangel needy streamer overload#needy streamer overdose#needy girl overload#rentry graphics#editblr#rentry resources#rentry edit#rentry tutorial#rentry guide#rentry divider#tumblr layouts#nso icons#kangel icons#ame icons
238 notes
·
View notes
Note
hai lav.. have you by chance ever explained how u do the glitch-y character to character (like w yr natsuki graphics...) if not can u.. its fine if not trust!!!!!
(i just really wann know how to make those bc i just want to make a new mikoto graphic HELP)

it is time for another certified lilay tutorial!

168 notes
·
View notes
Text
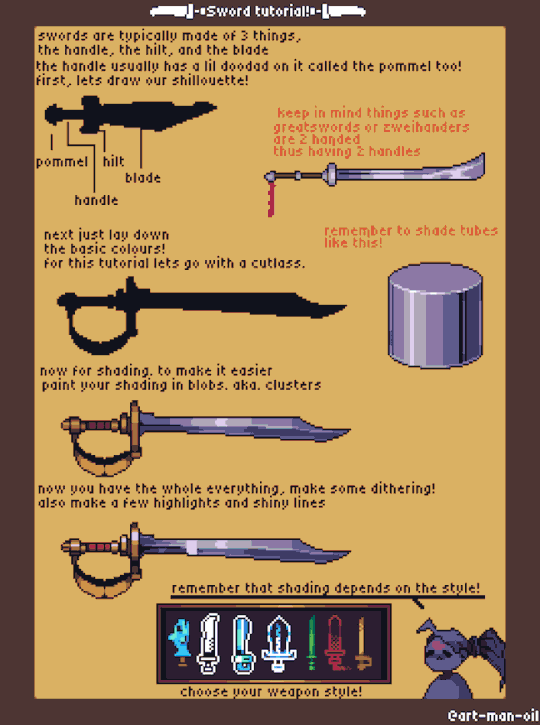
lil sword tutorial
#art#original art#artwork#illustration#artists on tumblr#design#pixel art#pixel graphics#pixelated#pixelart ドット絵#art tutorial#tutorial
349 notes
·
View notes
Text
A Complete Guide on how to Fix & Optimize The Sims 2 on Windows 10/11
I've made a video tutorial and written guide on everything you need to know on how to Fix & Optimize The Sims 2 on Windows 10/11, with Performance, Stability, and Graphics Enhancements.
Watch the Video Tutorial on YouTube:
youtube
Read the Written Guide on my Website
#sims 2#the sims 2#ts2#sims 2 2024#sims 2 windows 11#sims 2 windows 10#fix sims 2#graphics rules maker#sims 2 RPC#sims 2 4gb patch#Empty standby list#empty standby memory#sims 2 shadow fix#sims 2 George#Sims 2 Settings#Sims 2 Ultimate Collection#Sims 2 Resolution Fix#Sims 2 tutorial#Sims 2 help#Sims 2 crash fix#Sims 2 error fix#Sims 2 video#BellaDovah#Youtube
181 notes
·
View notes
Note
Hiiii!! How do you make your pixels bounce? I’m using Ibispaint and Ezgif ^_^
if you mean like this


i use alight motion (auto-shake & sway effect)
i use alight for all of my my complicated pixels like these, also i do not have pro ! i just crop the watermark out in ezgif


#♥️ ˚𖾜 pixels ˳#decor#pixels#rentry#favicon#favicons#carrd resources#cute pixels#web graphics#tutorial
363 notes
·
View notes
Note
PLEASE GIVE A TUT ON HOW TO MAKE PIXELS I AM BEGGING YOU

HKEGDUSHDGDGD okay this is gonna probably be really overexplained since i talk a lot BUT ITS VERY EASY tuto under cut
What i personally do is start on picsart with a blank canvas (make sure its a perfect square, anything like 700x700, 400x400 whatever), What i do is use some of the cute stickers i can find by using certain search terms and rotate/move it to each frame id want it to be, picsart lets u see where its centered or not so its a lot easier than just winging it
this would be so much easier to explain if picsart allowed me to take screenshots on this DAMN PHONE!
But anyway save each frame to whatever ur using and go to Ezgif.com's gif maker to combine those frames together :3 theres a delay option on the bottom of each frame u saved, i usually set that from around 50-80 so it doesnt go too fast

Once u set that and u have ur frames in order, remember to set THIS option
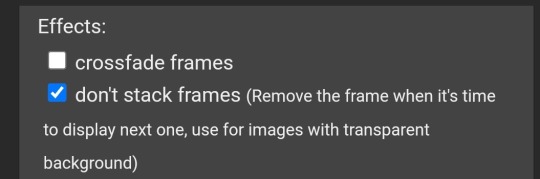
And then u click "make gif" at the bottom and horray :3 u can still edit things on the page if u might not like it
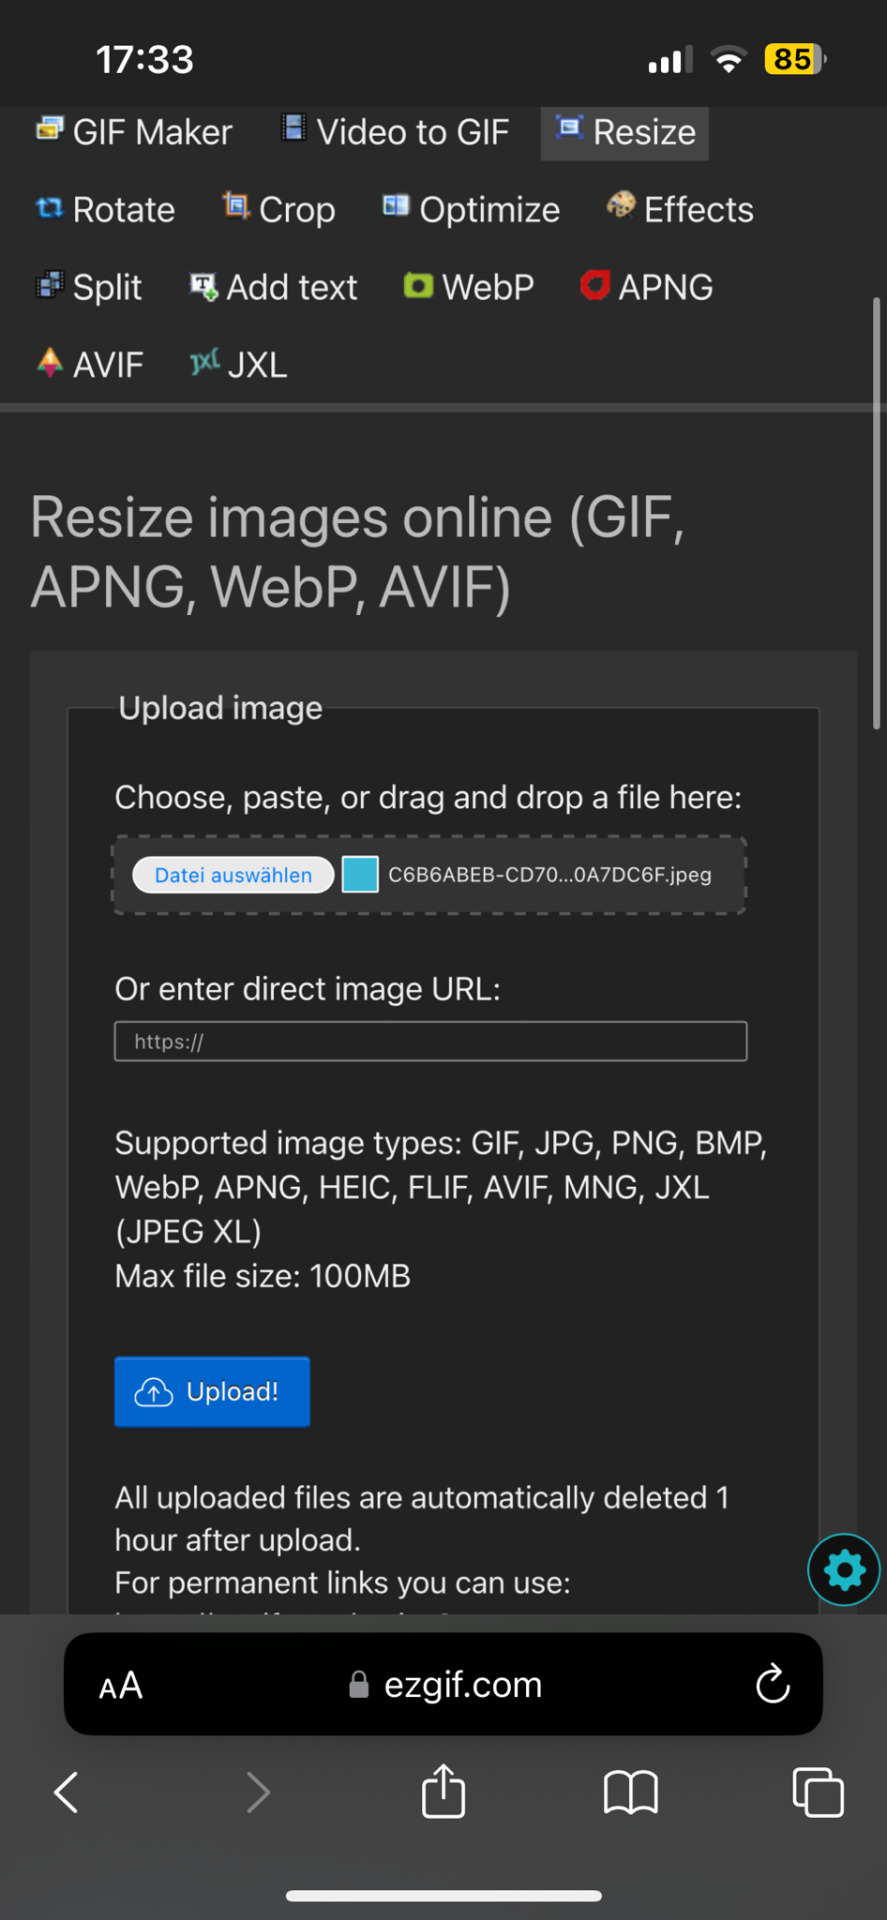
Once u get the finishing gif, u can save it as the original size (if youd like to have an extra), and go to Resize at the bottom

U should get to this, what i do is make the width and length 60x60 or 80x80 but it doesnt really matter tbh, if u want it bigger or smaller then go ahead
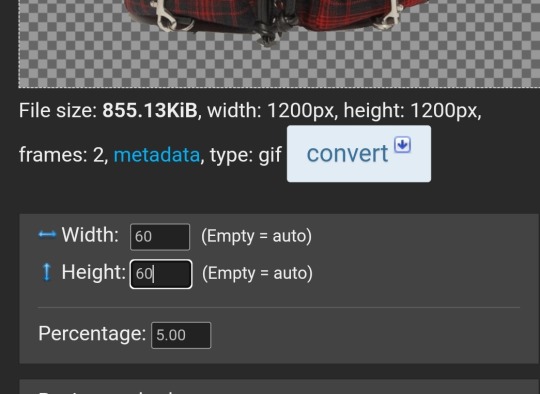
Disregard everything else after that and click Resize image :D and boom we did it

Both original and teeny size IF I DIDNT MAKE SENSE THATS TOTALLY MY BAD but i hope this helps😅😅😅 maybe..
232 notes
·
View notes
Note
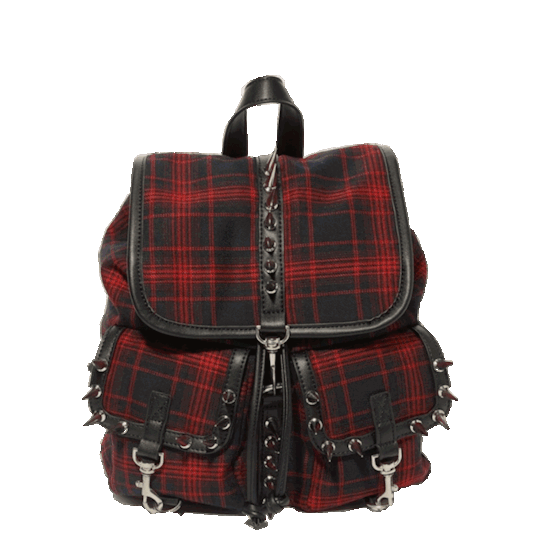
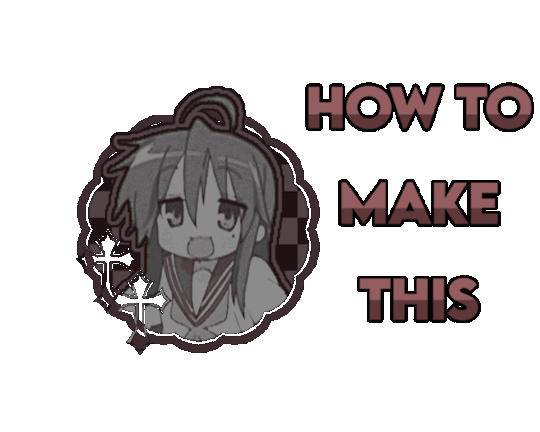
hi ^-^! Can you do a tutorial on how to make this icon? I would like to learn :3
https://64.media.tumblr.com/64eb5472b1d49fc941ccefbae558846e/cb2b70c34ebba0a7-b4/s1280x1920/d9e44a125324b309a533a1e56be842355046d740.gifv
Hello! I apologize in advance for my poor explanation skills, and also for how convoluted this process can get 😭 But I saw this as a worthy challenge, so here’s how you too can make a gif icon where the character comes out of the frame like this and this:
This is going to be very long so the full tutorial is under this cut!
Programs I use: IbisPaintX and Procreate*
*full disclosure, procreate is exclusively for iPad and costs 10 USD. however every thing I do in procreate you should also be able to do in Photopea
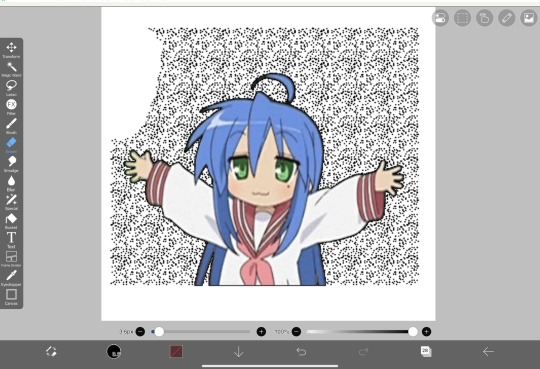
1. First things first, after finding the gif you’ll want to use, you’ll need to download each individual frame. By importing it into either procreate, photopea, or any program that’ll allow you to view individual frames, you’ll be able to save each frame
A note about gifs: The best gifs to use are ones with less frames due to the fact you’ll be editing the individual frames. Not to say you can’t use gifs with higher frame counts, however it is much more time consuming the more frames there are
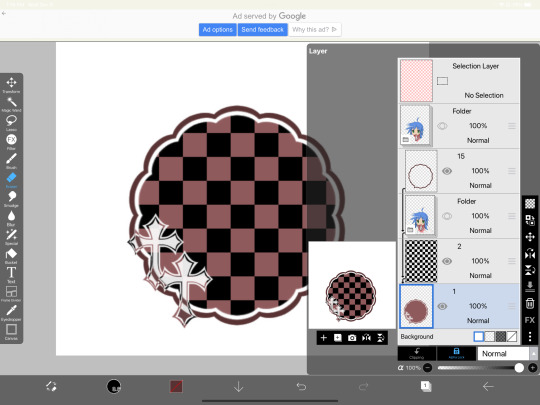
2. Next you’ll have to remove the background from each frame. You can remove the background by hand, but I like to use this website to help make things a bit easier. Just pop your frames into it and download each one

It is unfortunately not always accurate and often misses things on images where the background isn’t clearly defined or is lower quality, and you most definitely will have to do touch ups on your frames For example here, for some reason, the first two frames (on the left) were left with a semi transparent gray background and in the image in the middle, you can see sizable areas where the website missed. And also as of recently there as been practically invisible dots it leaves where the background once was that stroke filter picks up some how. You’ll need to hit each frame with the magic wand tool or similar to remove these dots if you plan on adding strokes

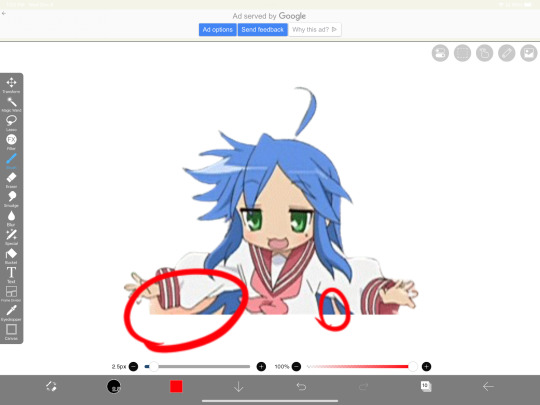
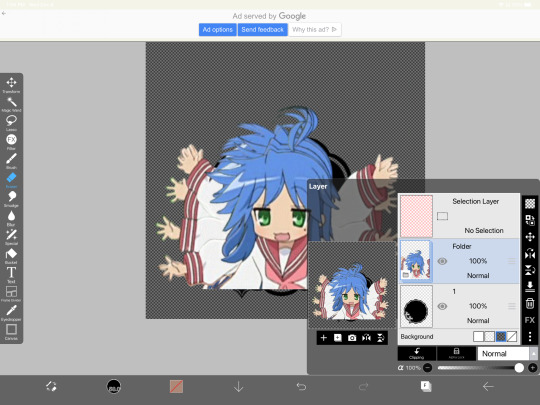
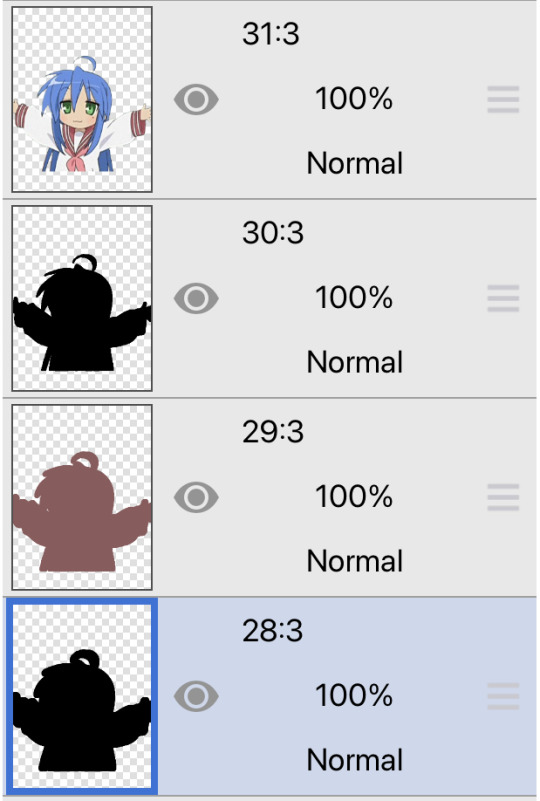
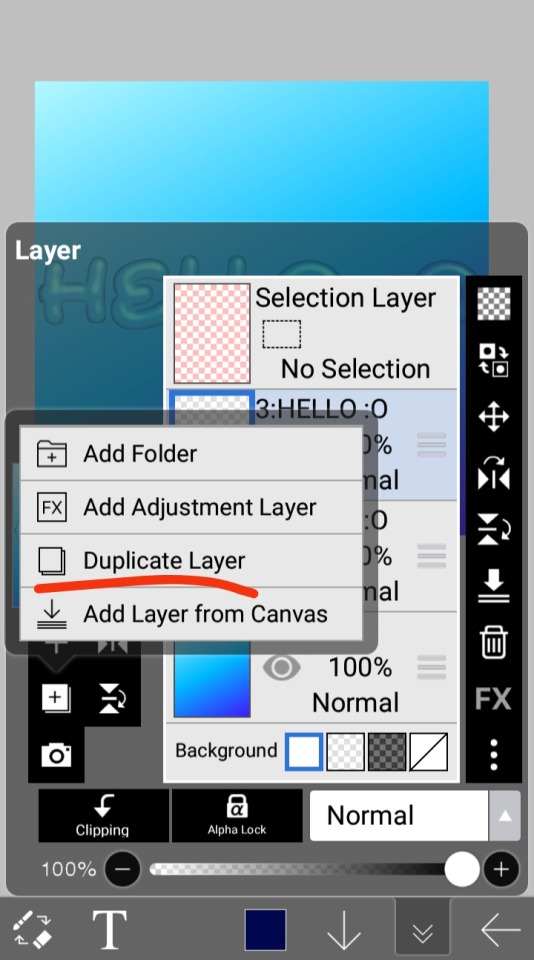
3. Now add all your frames into your program and stick them in a folder. Then, reposition the frames on top of the image mask you are using (in ibis, make sure all frames are visible and select the folder before repositioning the frames, in other programs, you should just be able to select multiple layers and move them that way). Once you’ve repositioned them, duplicate the folder then select clipping on the bottom folder like shown in the right image (I know I forgot to duplicate the folder then 💀)

4. Now here’s where the tedious stuff comes in. Make sure you number your frames, because it’ll help you out a lot. In the top folder, erase the bottom part of your gif that you want to be in the frame (I’ll call this the clipping layer) but keep the top where you want to be coming out of the frame intact (this’ll be the overlapping layer). Repeat this process for all of the frames
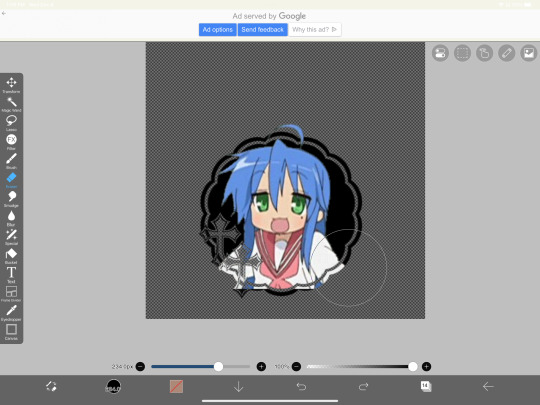
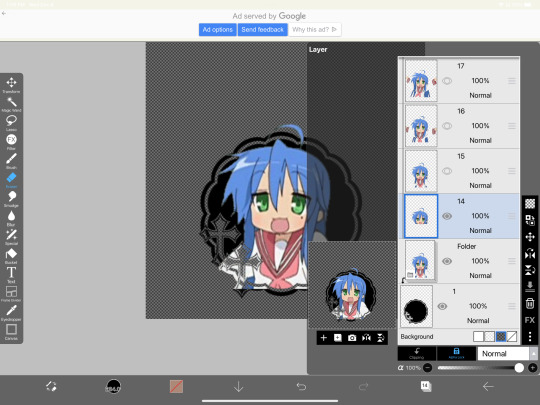
Note: Try to use a simple shaped frame for these kinds of icons. However, if you choose to use something with a more complex shape, be weary of where you erase! You will need to be more precise with shapes like these depending on where you want things to go
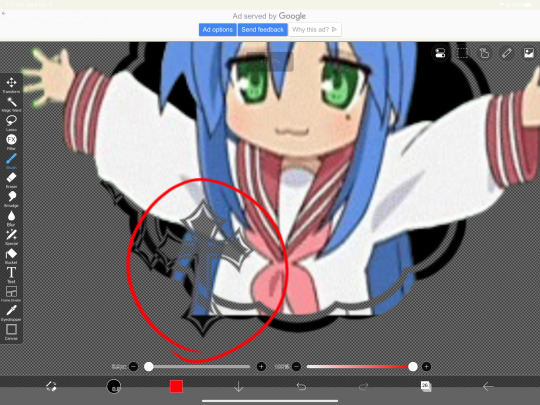
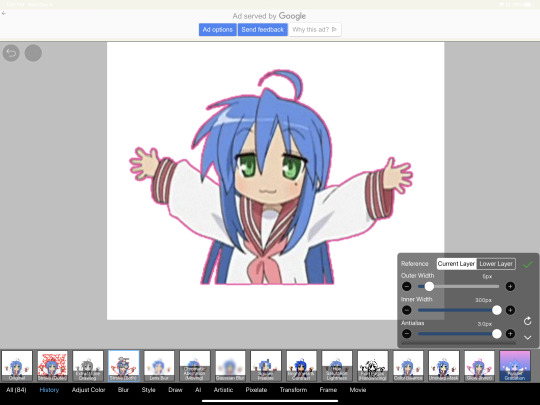
And if you haven’t edited the frame itself, you should do so now
5.5. After that, you can leave things off there and skip this step if that’s what you’re going for! However, if you want to add things like strokes, it’ll get a lil more complicated
Firstly, I duplicate my clipping layer and then select stroke (both). You can also use stoke (outer) or whatever your program has, but this is my personal preference. I then duplicate that layer and keep applying stroke till I get what I want (if you use stroke (outer) duplicating your layer isn’t necessary). I think merge my stroke layers together, but I keep it separate from my main frame
That way I can duplicate my stroke layer and add it to my overlapping layer. Then I erase the unnecessary parts shown on the left. You may need to clean up the stroke on certain frames or reapply it depending on the position of things and what you’ve erased and what not. It takes a lot of trial and error. You can also apply the stroke before you make your overlapping layers, however when I was making this graphic I fucked it up in the process of making this tut and had to remake it so that’s what I did the second time around 💀 if you were wondering why I didn’t just do that in the first place, now you know


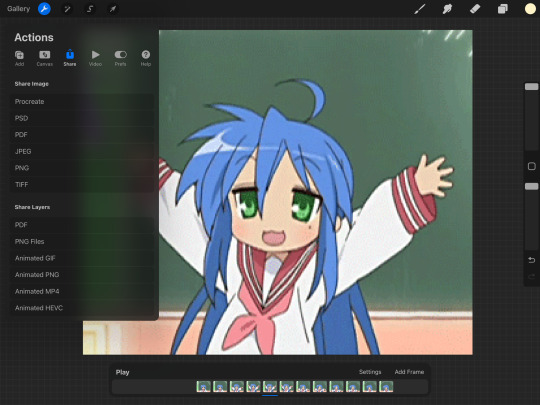
6. Now it’s time to export your layers as a psd and import it into procreate/photopea! You’ll now have to merge your clipping layer into your image mask then merge your overlapping layer on top of it to create one layer. Repeat this for all the frames and you’ll be finished!
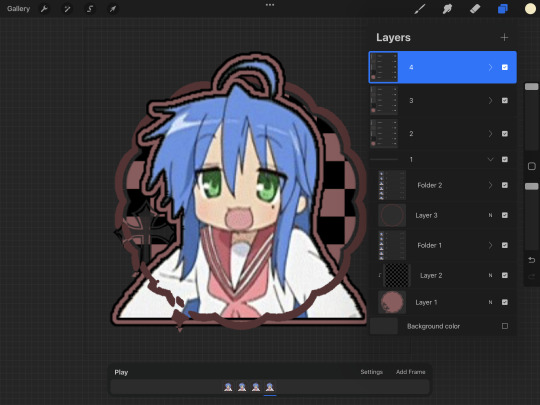

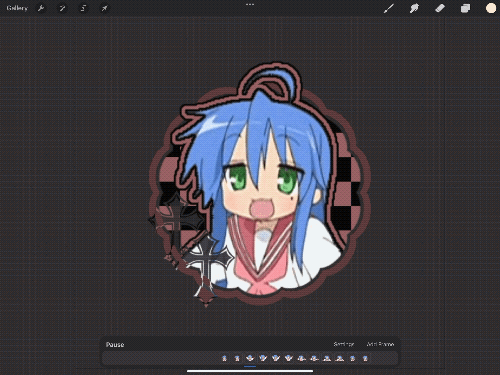
Tada! Now you can add filters and whatever else if so desired. And that’s my process for making these kinds of graphics! There’s definitely an easier way of doing this but that’s just what I’ve got figured out for now. Don’t hesitate to ask any questions for the things that make zero sense lol
268 notes
·
View notes
Text

jelly text tutorial! (works with shapes as well)
what you need: ibis paint x, premium or free version doesnt matter
step 1: color
yes we're starting with color! I highly suggest using multiple colors for a prettier finish. I prefer parallel gradiation but as long as its blurry anything should look nice. pick analogous colors for the best result.

step 2: write the text or draw/import the shape.
as it says! if youre drawing it, make sure its on a new layer above the gradient! I suggest using rounder, bubblier fonts/shapes, one of my favorites to use is starborn on all uppercase. the color you use does not matter as it will be the background color in a short bit
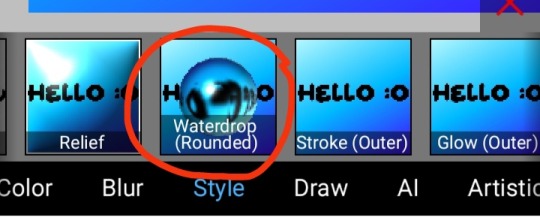
step 3, the jellificationing
this little friend called "water drop (rounded)" in effects under style is your best pal. its here to help you and make the process so much easier.
so just press it and fiddle around with it until you're happy with the result.
step 4 (optional): refracting
to help it make look more 'realistic' I tend to add another layer of the water drop. to do this I simply copy the previous one and go do the same effect on the top layer
step 4.5: tips
you need to make sure the refractive index for the second one is turned down all the way, or itll look weird, streaky, etc. make sure the highlight and highlight size settings are lower than the previous time you used this effect. and make sure the little sun symbol (the light source) is on the edge of the opposite direction of the previous time you used the effect. so if the first layer of jelliness had the light source coming from the top right, the second layer should br on the very edge of the bottom left.

step 5: begone, background
yeah, we're done with that, this will also be the big reveal of the final image

and then you just crop to fit and then save as a transparent
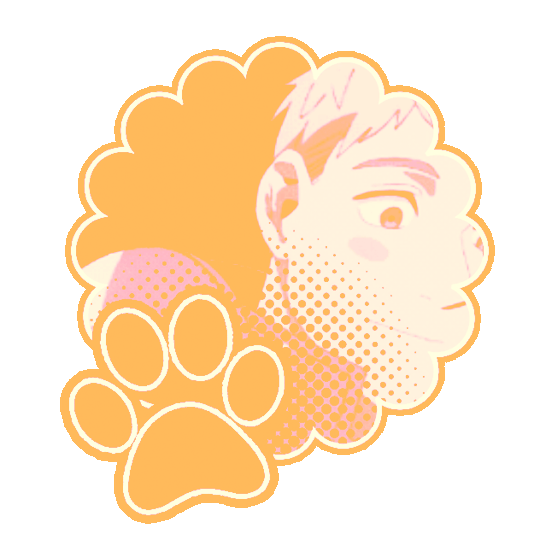
bam! heres the final thing!

I dont know how good I am at explaining but I hope this helped! if youre confused dont be afraid to ask!
#🌫️ i know what you dread | creations#rentry#rentry inspo#rentry resources#editing resources#editing#editing tutorial#edit tutorial#edit resources#rentry decor#rentry graphics#carrd resources#web graphics
386 notes
·
View notes
Text


🍳⌒*⠀⇉⠀LET HIM COOK 🔥⠀☆⠀credit if use
#( 🍓 ) renty graphics . . .#gif#MAKING THAT GIF TOOK ME SO LONG CAUSE SOME OF THE TUTORIALS WERE NOT BEGINNER FRIENDLY 。゜(`Д´)゜。#LIKE WHY DID NO ONE TELL ME HOW TO CONVERT GIFS INTO SMART OBJECT#RAGGHHHHHHH#graphics#rentry graphics#rentry#editblr#gif edit#rentry gif#edit#editing#dungeon meshi#delicious in dungeon#dunmeshi#laios touden#laios dungeon meshi#laios#dunmeshi laios#queued post
59 notes
·
View notes
Text
every so often i get an idea and then obsessively work on it for hours and hours and sometimes it turns out good.
anyway the other day @follivora made a post with joker out as mucha art and that sparked this:

#joker out#jan peteh#songbird arts#i might do the rest of them too but my hands are tired and i have some other projects to do first#i have a nice reference pic of nace saved#i am SO proud of this i was using a vector tutorial for the style and working in raster graphics and still managed#definitely could have been more efficient but i was learning and learning is important
107 notes
·
View notes
Text
Hello silly hamsters 🫶 looking at my asks (and dms) it seems like a lot of people don't know how to make basic line dividers so I hope to change that!
✨Simple line divider tutorial below✨
So to start off, you don't need much and it looks more confusing than it actually is!
You need an app that lets you color a space - for example Picsart, canva, procreate, photoshop, or you simply google a color and screenshot it.
(Left: Canva. Right: Picsart)


It doesn't matter which dimensions you use here but I use my standard of 1000x40 pixels which I use for my thick - non line- dividers.
You need to save this picture and use a site that lets you resize it. For example ezgif. This is a site i use for various things like making gifs and also removing background from images and gifs.
Here you will upload the picture and choose the size you want it to be cropped to. Personally I have my width for simple lines at 1000 but the height will depend on its purpose. (Size variations further down)
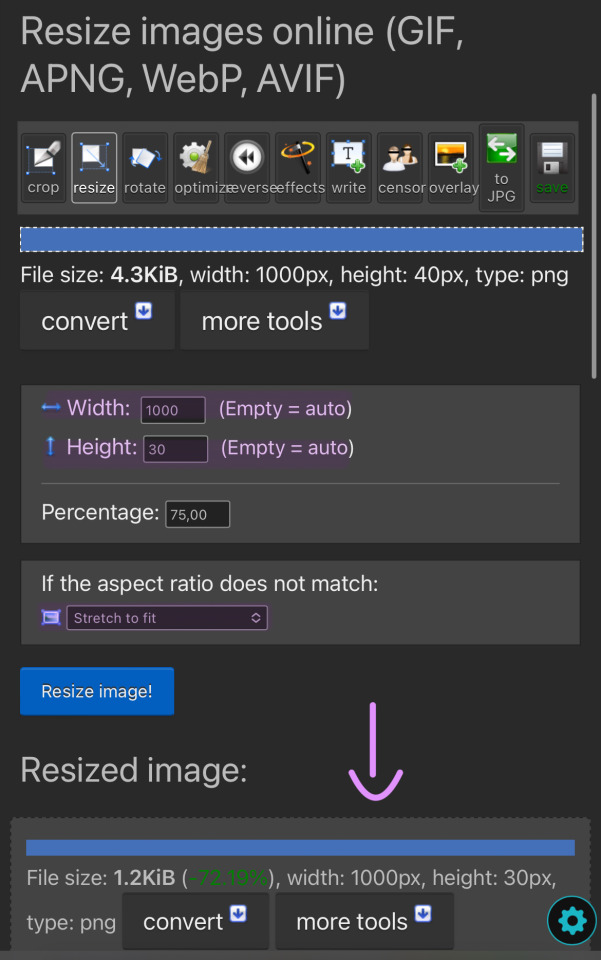
You can then simply save and use the resized image to your liking. You made it too thick? No problem. Simply change the height and click on "resize image!" again. Don't be afraid to play around and try out different sizes!
The sizes i use for the thick lines are 1000x12 and for the thin ones 1000x6!
Size examples:
1000x40

1000x30

1000x20

1000x12

1000x6

1000x3

#rhy speaks ♡#divider#line dividers#tutorial#divider tutorial#helpful#cute dividers#simple dividers#if you want to know anything else graphics wise don't be scared to ask!#I'll gladly make more tutorials or drop my sites
86 notes
·
View notes
Text
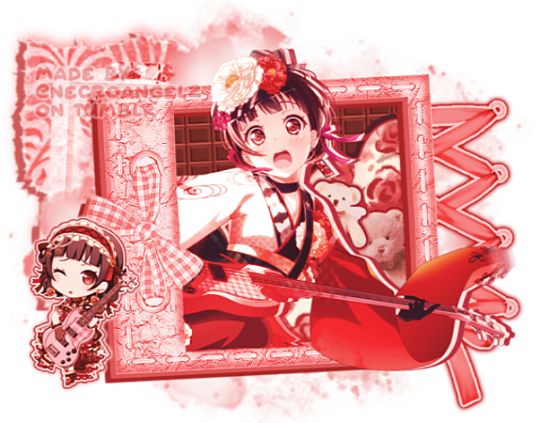
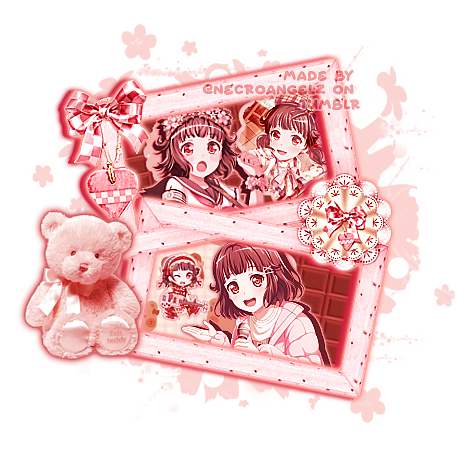
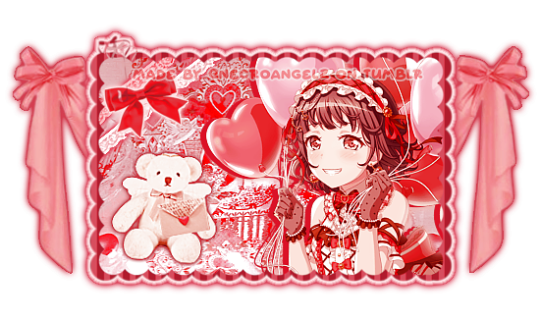
cho~! cho~! cho~! so sweet, sweet! cho~chocolate . . . !
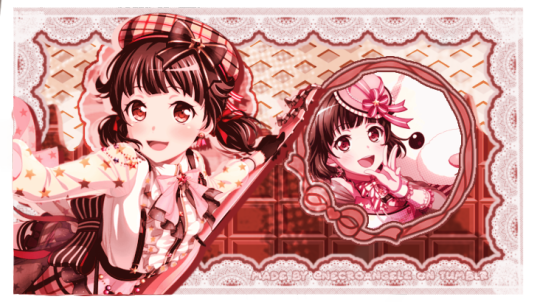
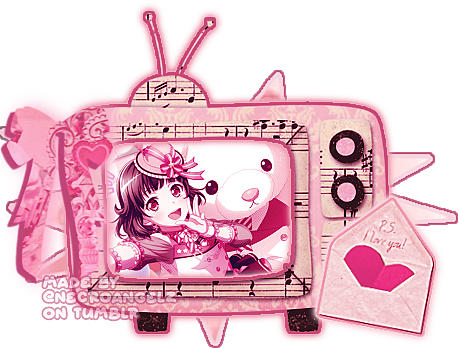
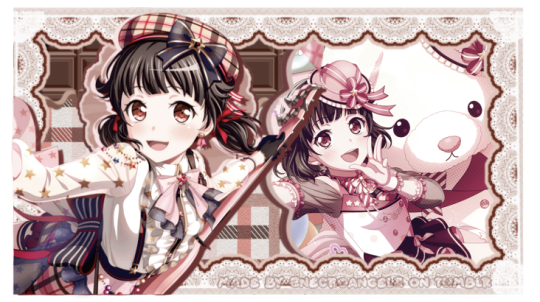
but somehow this sweetness and happiness just isn't enough !!
event prize for @battampria
RIMI USHIGOME GRAPHICS! aaahh oh my god i had SO MUCH FUN MAKING THESE!! i hope these are okay bc i might've went too far and strayed away from the requested theme... (。ŏ﹏ŏ) bandori characters are low-key so easy to edit and the final product always looks nice lmao
like/rb and creds appreciated!
NOW PLAYING: Chocolate Bass Recipe by Rimi Ushigome !!
#🌠﹕ a wishing star 𝜗𝜚 ︵#👁️🗨️﹕ from the archives 𝜗𝜚 ︵#bandori#bandori garupa#rimi ushigome#bandori rimi#rimi bandori#bang dream#bandori edits#rentry graphics#rentry resources#transparent png#bandori png#rimi ushigome png#rentry frame#rentry decor#pixel decor#bundlrs graphics#popipa#poppin party#bundlrs resources#rentry help#bundlrs help#rentry tutorial#bundlrs tutorial
82 notes
·
View notes
Last Seen Blogs

knifechair
OKAY????


terabetavirus
Aye! It's BetaVirus!
butterfly27gal
Never Too Old to Believe In Magic
yur-huckleberry2
Kate Whitfield | Wandering Widow