#fff1c6
Photo

Egg White Screamin' Green (#fff1c6 to #95f768)
11 notes
·
View notes
Note
could you do a pallete for the name Joaquim? Thank you so much ^^
Of course, here you go. I hope you like these!
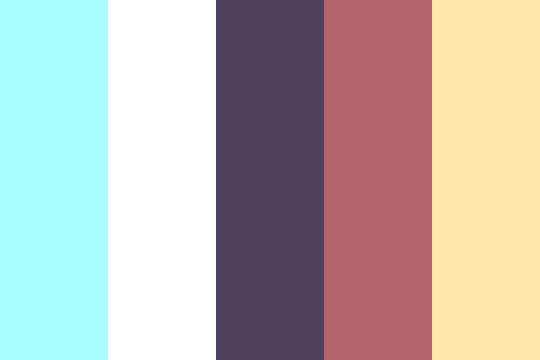
#a7fdff | #ffffff | #4f415e | #b2646b | #ffe5aa

#626574 | #4c5391 | #fbe0ab | #ffffff | #7c2a36
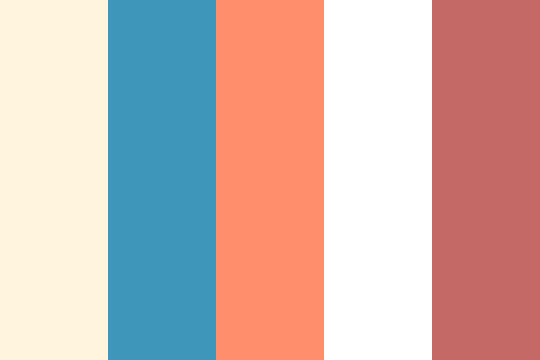
#fff4dd | #3e96ba | #ff8f6c | #ffffff | #c56966

#3c3c47 | #efd8c5 | #ffffff | #55c7c1 | #772e36

#6d0c25 | #b19577 | #ffffff | #d5efe4 | #ef877d

#595c6d | #c5607e | #ffffff | #fff1c6 | #430a10
#Palette#Colour palette#Cyan#White#Purple#Red#Yellow#Grey#Gray#Blue#Orange#Pink#Teal#Brown#Long Post
26 notes
·
View notes
Text
How to Draw a Hamburger and a Hot Dog in Adobe Illustrator
What You'll Be Creating
In this tutorial, you will learn how to use the Mesh Tool in Adobe Illustrator to create a hot dog and a hamburger!
If you want to skip the tutorial and just use these items in your work, you can purchase the Hot Dog and the Hamburger from GraphicRiver!
the Hot Dog
the Hamburger
1. How to Create a Hot Dog Mesh
Step 1
Let's start off by drawing the top bun with Gradient Mesh.
Create an orange rectangle—the color is #CF6822.
Next, grab the Mesh Tool (U). By clicking, create nodes, which in turn create a Mesh Grid. When you have four rows and four columns of mesh, grab the edges of the rectangle and move them to make the shape rounder. It should resemble the top half of a bun.
Once you're done with the shaping, select the bottom two rows of nodes and color them with #F5CD99.
Finally, color the top two rows of nodes with #A3320E.
Step 2
Finish off drawing the top visible half of the hot dog bun by placing more Mesh nodes and coloring them as in the screenshot below.
Always look for the nodes that are selected in each step and color them with the hex code that is present under each image.
You will need these colors:
#E19843
#F0AF4B
#F6D4AF
#DB9559
Step 3
Begin drawing the bottom part of the bun. Follow the screenshot, as in the previous steps.
#CF6822
-
#A0330F
#EDC089
Step 4
Finish coloring the bun.
#F3BE5E
#F9E3C0
#E2A36A
#8F2609
Step 5
Begin drawing the sausage in the same manner.
#C94D21
-
#89190C
#F9ECE8
Step 6
Add a few more touches.
#D37550
#6D0800
Step 7
Change some colors on the right tip of the sausage.
#A0321A
#881E0E
Step 8
Color some nodes with #BD4E31.
Then, modify the nodes on the right and left tips of the sausage as indicated below.
Step 9
Let's draw the mustard!
#FBD020
#D6560A
Step 10
To make it wavy, create some more Mesh nodes. Then, select every other column, alternating them, and press the Down key a couple of times, moving the nodes downwards.
Repeat until the image looks like a wavy strip of mustard.
Step 11
Tweak the shape and the colors a bit more.
#D98911
#FFFFFF
Step 12
Now we need some shadows. Draw two shapes and fill them with #5B1B0C and #C94D21, as indicated below.
Place the smaller shape inside the bigger one.
Step 13
Change the Opacity of the big shape to 0%.
Step 14
Next, select both objects and go to Object > Blend > Blend Options. Set the mode to Specified Steps with an amount of 30. Object > Blend > Make to create the shadow.
Step 15
Create a thinner copy of the Blend. Change the Transparency of both objects to Multiply.
Step 16
Place the shadows under both buns.
Step 17
Add the sausage in the back and the mustard strip on top.
Step 18
Let's draw another shadow! Use #5B1B0C and #FFFFFF.
Step 19
Create another Blend like we just did in Steps 13-14.
Step 20
Place the shadow under the hot dog!
2. How to Create a Texture
Step 1
In this optional section, we will create a texture for the meat in our burger.
You can choose to skip this one, but if you don't, head over to my autumn tutorial and complete Steps 13-14 in the first section.
Select and isolate only the indicated cluster of paths, as indicated in the screenshot below.
Step 2
Clone this particular part until you create a fairly long line.
Step 3
Group (Control-G) these elements, and then change their Transparency to Overlay and Opacity to 50%.
3. How to Draw the Hamburger
Step 1
Begin drawing the top bun with Mesh, just as we did with the hot dog.
#FDCC8D
#933800
#D8883B
Step 2
Continue coloring.
#BC681E
#FFF1C6
#FFBF6A
Step 3
Add some more final touches.
#FFCC82
#7E2403
#E1C5B2
Step 4
Modify the nodes on the bottom edge to give the bun a more realistic look.
Step 5
Draw another Blend shadow, just as we did before in Steps 12-14 of the previous section.
#5B1D07
#AA4B0B
Step 6
Place the shadow under the bun.
Step 7
Draw the first piece of cheese.
-
#FFE885
#CB7B0E
#CC7D10
#FCC94E
Step 8
Finish the cheese.
#FFFBEC
#FEF1B4
#CF7F12
#520300
Step 9
Draw the cucumber.
#437000
#8EA456
#567902
Step 10
Finish the vegetable.
#8BA152
#2C4500
#365900
Step 11
Create two copies of the Mesh side to side. Then, draw a green ellipse representing the top of each cucumber.
Step 12
Place the ingredients under the bun.
Step 13
Draw the tomato.
#D10C07
#FD6853
#690100
Step 14
Finish the tomato.
#3A0000
#FFFFFF
#B90100
Step 15
Add a #A51500 top to the tomato.
Step 16
Begin the second piece of cheese.
#FFE36C
#E59000
#A42B08
Step 17
Color the cheese.
#913B00
#FFFFFF
#FFF49B
Step 18
Draw the meat.
#874115
#340902
#A6591D
Step 19
Finish the meat.
#FFE36C
#E59000
#A42B08
Step 20
If you made the texture before, apply it to the meat.
Step 21
Draw the onion.
#FAF5C8
#3D1506
#FFFFF2
#E9E1AC
#E3CC98
Step 22
Add the ingredients to the burger.
Step 23
Finally, draw the bottom bun.
#FBCE73
#EB9626
#A75C1D
#A0780D
Step 24
Finish the bun.
#945D1B
#F9DC9B
#EB982A
#B5681B
Step 25
Draw the seeds for the bun.
#ECB369
-
#FBEDAC
#FAC781
Step 26
Finish drawing the seeds.
#FDE5A1
#D89748
#C4711E
#E5A75B
Step 27
Add seeds on top of the burger.
Step 28
Grab the shadow we created for the hot dog and place it under the burger!
Awesome Work, You're Now Done!
Thank you for following along, and please feel welcome to post your result in the comments. I'll be looking forward to seeing it!
In this tutorial, you learned how to create a pair of fast food items using the Mesh Tool.
I hope you've enjoyed this tutorial and learned how to use some useful tools for the future! Check out some of my other vector tutorials on my instructor profile.
You can purchase these items (Hot Dog, Hamburger) as well as other similar designs in my portfolio on GraphicRiver.
Hamburger
Hot Dog
from Envato Tuts+ Design & Illustration http://ift.tt/2ylUVdT via http://ift.tt/1dVCCOJ
0 notes
Note
If u r open, can I request a palette named "Space-Time"?
It's for a story I'm writing and I can't find the perfect colors for it
Take as much time as u need! Ur palettes give me life, BTW! Keep up the amazing work!👍🏾😊✌🏾💙💙😊😁
:D Thank you! That means a lot 😊 🤎🧡💛💙💜
I’m terribly sorry for how long it took, but I hope you still find these useful for something!

#0747a1 | #f3f8fc | #ffa662 | #513148 | #2a2658

#32364f | #f7edba | #ffb138 | #ab5e2a | #3938ff

#262338 | #406766 | #fff1c6 | #f8fcfd | #e87c50

#522953 | #a56e71 | #e18793 | #303749 | #fffdd8

#ffcf79 | #fcf6f6 | #72c7c2 | #534664 | #644659

#815177 | #fafff6 | #ffe8a8 | #50a5e8 | #395964
41 notes
·
View notes
Last Seen Blogs

whey-up
Blessed

certifiedmattl0ver
certifiedmatts1mp

polarurchin
PolarUrchin

3rd-destroy-finale
bro is LITERALLY too hot to suck 💀