#edit: added an image description. this is my first time writing an image description so please let me know if i need to change anything!
Text
Please, if possible, add alt text to your images. (Describe every image, please.)
I've seen people post before about how every image posted, ideally ought to have an image description. They generally get a lot of support from people already doing it, but also some objections, questions and even anger.
So let me first say: I understand that not everyone can add image descriptions for a variety of reasons. But, if i grab 100 random posts with images here it's lucky if one or two have a description. Now I know that not that many of you have some serious reason why you can't describe the damn images.
This simply isn't the case on other social platforms I frequent. Mastodon would be well above 60% described. Even twitter (before I left that hell-hole) had like 20% of the images described. Now both of these platforms have popular tools that will remind you if you forget a description, and frankly it's easier to edit descriptions there... so some of this is Tumblr's Fault. Tumblr make image descriptions easier and make a reminder!
But it's also about user culture. People here just don't think image descriptions matter. But they do!
I WILL NOT reblog posts if they don't have image descriptions. So I end up adding them myself, and frankly I pass over MANY posts that I would have quickly reblogged but I don't have the time to be everyone's mom and describe everything. So, I just do that for the really great posts I can't pass up. But having a description will make more people share your work since you aren't making work for us if we want to share it.
Why do I need to describe images? Because many people use screen readers and if a post makes no sense unless you know what's in the image your post is useless to all of those people.
Why do I need to describe art? Because people who are blind, and people with vision impairments also like art. My brother's kid loves my ant drawings. They're legally blind, but they can see if they enlarge an image and look close up, the description give them the context they need to understand what they are looking at. Frankly, I read image descriptions all the time myself when I find a post confusing, so it's helpful to... literal minded people too. And it just makes your post seem more complete and exciting. Why miss out on putting a neat description.
I don't know what to write! Imagine you are reading the post over the phone to a friend. What would you say "And then there is that meme with the guys in the hot tub, sitting five feet apart" put that. Even something short is better than nothing. Just explain the post for everyone. Since it's YOUR post you know best what matters most about the image. When I add descriptions after the fact they can get a little long since it's not my post and I don't know what matters most. OP's description in the alt text is the best description.
If you have other questions you can ask me. I'll find out if I don't know.
(Did you know you can add alt text to your images by clicking the "…" symbol in the lower-left corner of an image when writing a post? Having the description attached to the image is the best way and only the OP can do this, but I also often add descriptions in brackets [ ] when I reblog cool art, cats and ant stuff. So, if you can't add a description yourself, it's OK, there are people who will help.)
150 notes
·
View notes
Text
"it's not an accessibility problem or a symptom of systemic ableism if the OP doesn't add the image description to the original post, people can just reblog it from you if they want to. Asking people to add the ID to their post is rude and self-absorbed"
the only people who think this way are ableists.
You know all the Mickey Mouse art I hurt my wrist frantically writing image descriptions for?
Yeah, a lot of it is being reblogged without any image description now with thousands of notes, because people only see the original post, they don't bother to check the notes to see that there's an ID right there that I took the time to write.
Tumblr encourages you to reblog a post as soon as you see it, and people who don't make a conscious effort to stop and try to be accessible do not take the time to stop and check the notes for an ID before rebloggging.
Adding an image description to your original post, and any important reblogs, is the most accessible thing you can do, second only to writing the post with an image description in the first place.
If you actually care about disabled people (or disabled people other than yourself and a select few family members), then when someone takes the time to write an image description for your art, add it to the original post or reblog. I don't care how many notes the post has, if you care about disabled people and care about accessibility, do it.
Especially if you're ablebodied. Many people have said it before me, but it's absolutely evil how most of the people on this site who write image descriptions are physically disabled, the people who have to put in the most amount of effort to do so, at the highest cost to ourselves.
It's been 4 days since I hurt my wrist typing so many image descriptions. It's probably going to continue hurting for another few days at best.
If you are physically abled and will not be put in literal physical pain from writing image descriptions, then you need to start writing them. It shouldn't always be left to disabled people to do all the heavy lifting for accessibility. If you call yourself a leftist or a communist or an anarchist but won't even write an image description for your art or memes or even edit it into your original post, then just stop pretending you care about disabled people, because you clearly don't.
See this post for tips on writing image descriptions.
If you do nothing else please start checking the notes for an image description before you reblog undescribed art. It's the absolute bare minimum.
#ableism#systemic ableism#image descriptions#accessability#Mickey Mouse#art#artist on tumblr#small artist#cripplepunk#cripple punk#actuallyphysicallydisabled#actually physically disabled#physically disabled
142 notes
·
View notes
Text
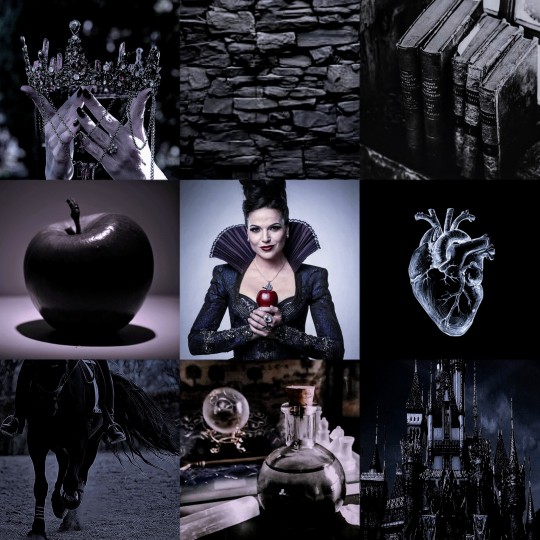
White Lies 🤍 0: Introductions

Yoongi is everything you could ask for. He is attractive, confident, and smart. And his partner Taehyung is as possessive as he is beautiful. Too bad a relationship would be a major conflict of interest.
You need to have them at all costs.

🤍 Yoongi x Female Reader x Taehyung
🤍 word count: 0; screencaps of twitter feeds & text messages.
🤍 college au, cop au, partial social media au with a lot of written story, strangers to lovers & established relationship, yandere, hurt/comfort, smut, fluff, angst, slash, poly, minor character injury & death, graphic violence, nsfw, 21+.
🤍 warnings: ACAB includes our MC, sorry you found out this way.
🤍 this is a sequel to Boy Blue! i highly recommend that you start at the beginning to fully understand the the dynamic & history between Yoongi & Taehyung. there will be a lot of references to Boy Blue; this fic will spoil the shit out of it. this MC/reader character is not the same MC/reader character from Boy Blue.
🤍 for full notes & warnings, see the master list.
🤍 note: those of you who read Boy Blue...you finally get to meet one of the characters for the first time. are you excited??? this is the first of several surprises hehe.
🤍 posted nov. 2023 | read on ao3
INDEX | NEXT
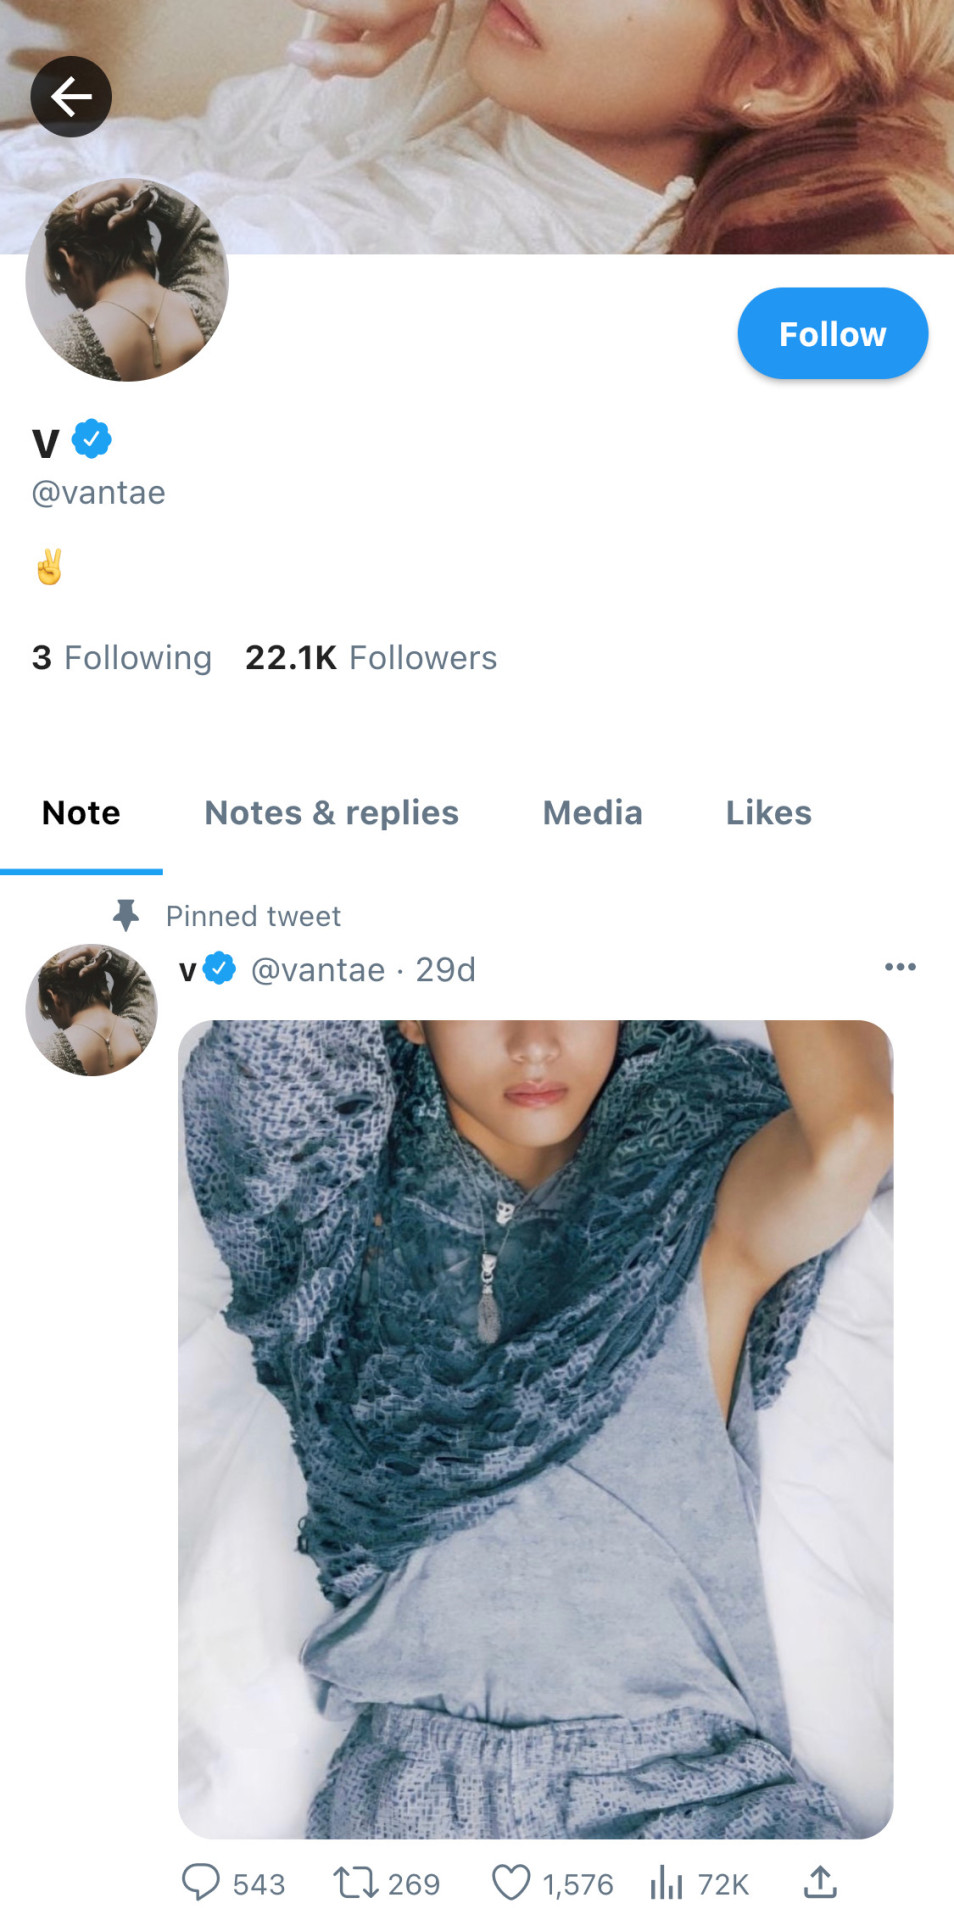
Profiles of starting characters:
reader/mc:
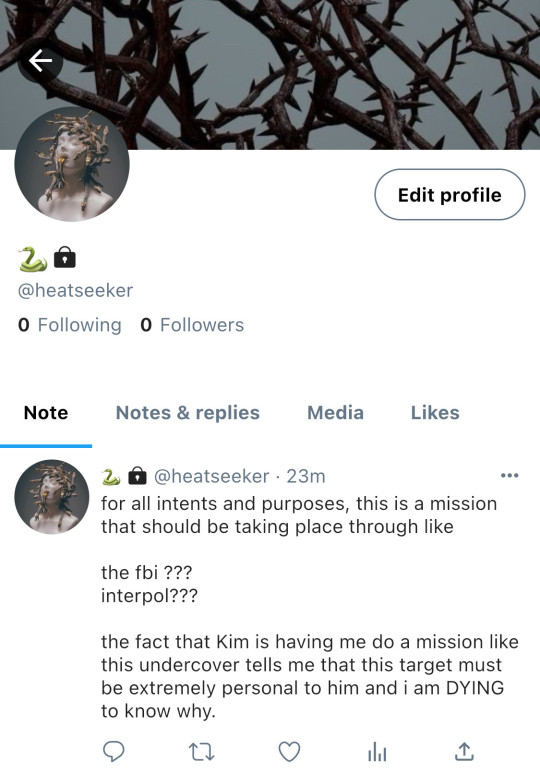
Yoongi & Taehyug:
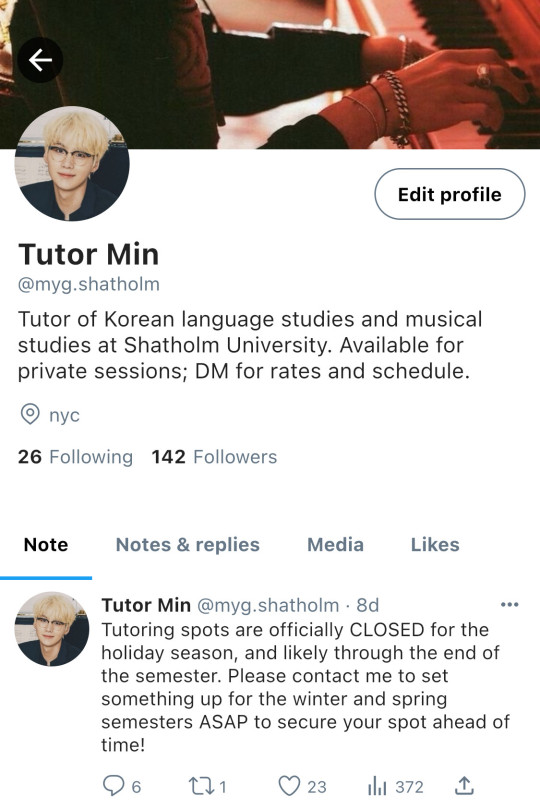


Seokjin:

note: time stamps & dates are important but also a bit loose. if you see a mistake just pretend you don't! more profiles are likely to be added, and i may or may not remember to edit this post so just vibe with it. 🤍
also note: the image for mc is a statue of medusa, and it is not meant to suggest that she is white. her physical description is going to be kept as vague as possible.
* * *
Teaser for Chapter 1 because i love you:
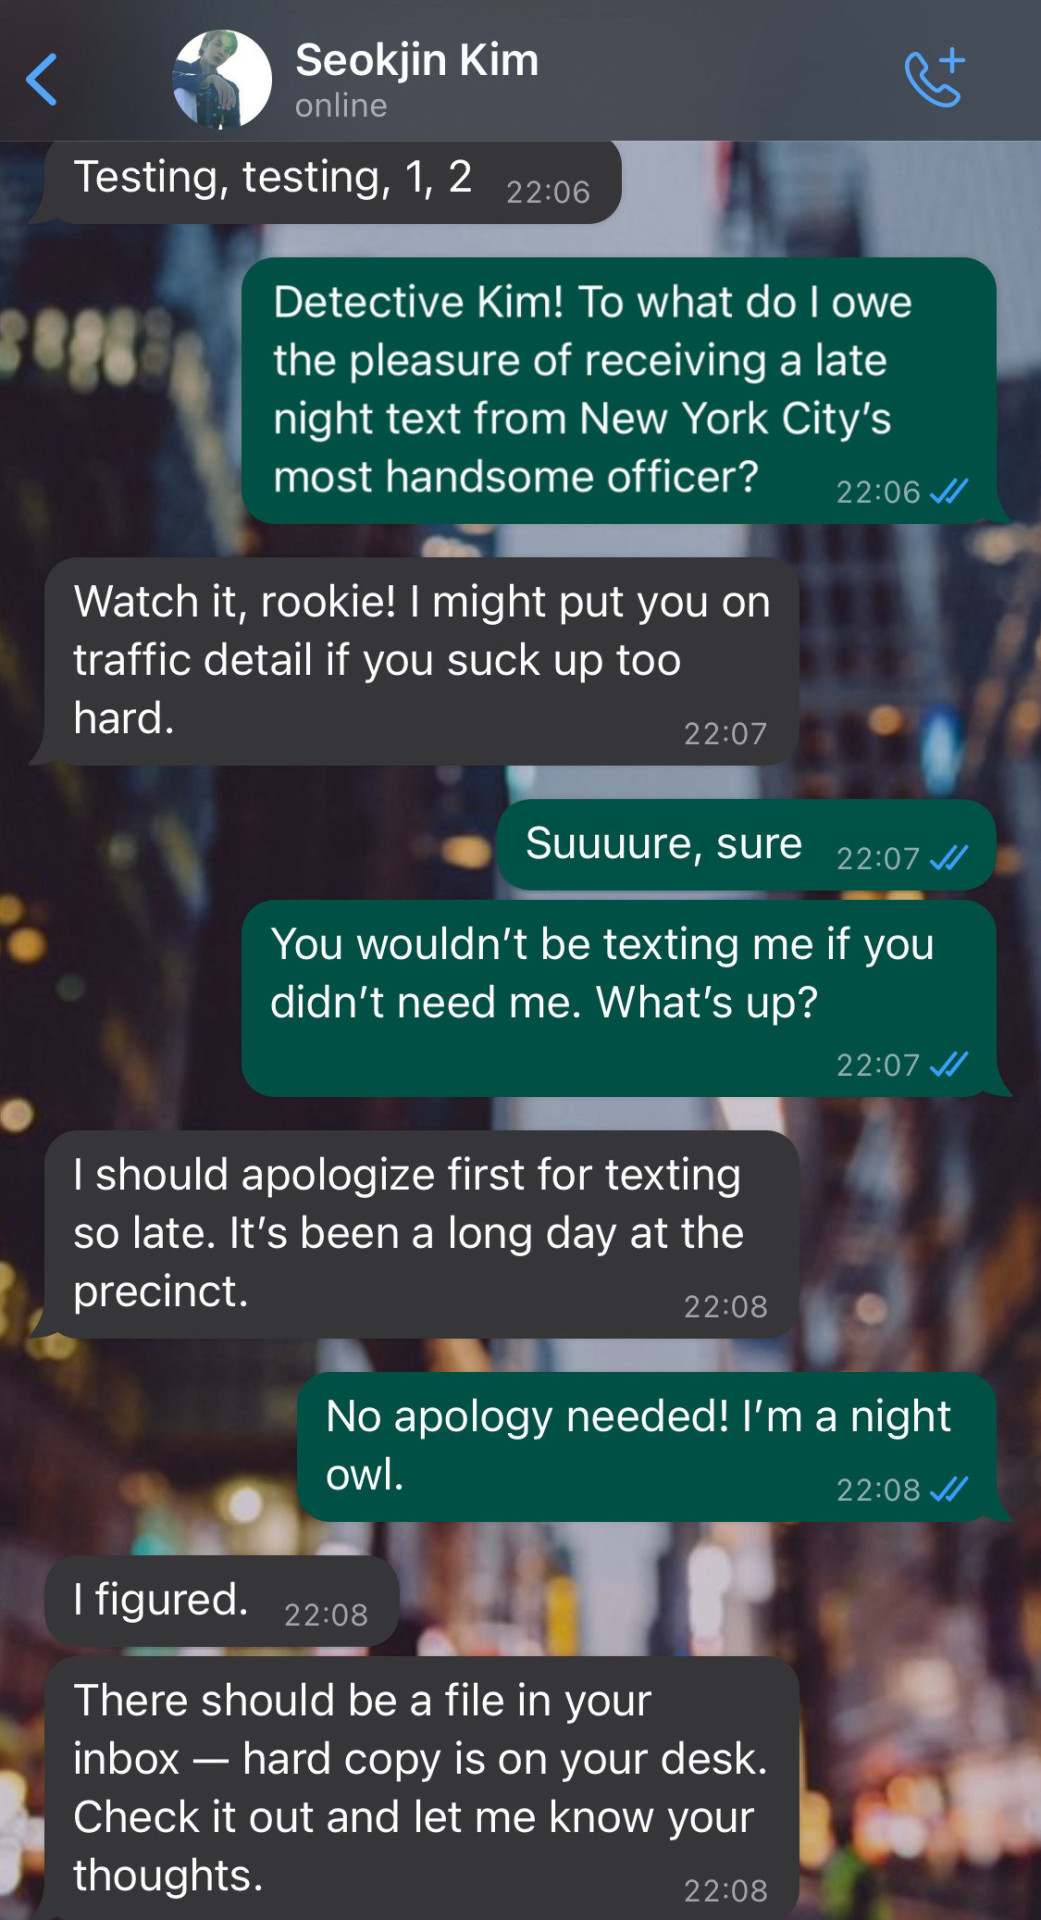
😈😈😈 HELLO, MY LOVES!!! ARE WE READYYY??? i am still trying to wrap up Collateral before i get too far into this fic, but the muse has been wanting to work on this and nothing else, so here is a teaser. and yes, you are not mistaken, Kim Seokjin is alive. 😈😈😈
i cannot thank you enough for keeping the hype for Boy Blue alive. it was such a wild ride that i thought people would hate me for, and it became somewhat of a cult classic. this fic will have all the twists and turns that you have come to expect from Boy Blue, with some wild new additions because my writing style has changed a bit in the last two years.
REBLOGS AND COMMENTS ARE THE LIFEBLOOD OF THIS SITE, BUT LIKES ARE ALSO SUPER APPRECIATED!!! 🤍🤍🤍 BUCKLE UP BECAUSE THIS IS GOING TO BE A WILD RIDE!!!
tag list: @bangtan-tee-86 @ffion451 @fluffybuns69 @here4kpopfics @iloverubberduckiez-blog @lovemeforeternity @mgthecat @moonleeai @oceansmerchild @unsureofwhathappens 🤍 visit the master post to read the warnings & request to be tagged!
INDEX | NEXT
White Lies is copyright 2023 theharrowing, all rights reserved. No translations or reposts allowed!
#taehyung x reader#yoongi x reader#tagei x reader#bts smut#bts angst#bts yandere#social media au#undescribed images#undescribed#fic: white lies
64 notes
·
View notes
Note
any tips on making moodboards? I been trying & am not very good lol
*cracks knuckles* boy oh boy do I have some tips! or more like a walkthrough i guess?
The first step is to find a good app. I've found InShot to be simple to use (for photos, collages, and videos.) It's available on both android and apple, and while there is a paid version [which takes away ads, gives a few bonus filters, and removes the watermark from video files,] I've found it works just as well to use the paid version. It allows for many different layouts and canvas sizes, and up to nine images.
Next, find images! Think about what kind of moodboard you want to make, and think of some things that are iconic for it. For example, a Wonderland themed moodboard might include clocks and mushrooms and teacups, while a Rapunzel themed moodboard might include flower crowns and chalk drawings. I've found the best way to find an image to use is to google "[thing] aesthetic" or "[color] [thing] aesthetic." I've also found it can give the eye a nice break to include textures, like "[color] crochet blanket texture" or "wooden plank texture aesthetic." It gives your moodboards an almost palpable feel when put together properly.
Once you've found all the images you need, compile them into one image using the collage function on the app. Be sure to pick a layout and size you like. A basic 3 by 3 square is typical, but you can expand beyond that! Some layouts might even let you make some images cut off on the diagonal, or make one image larger than another. Also, this isn't insta; there's no law saying your moodboards have to be square- you could even make them the right size for a phone/computer wallpaper! Make sure to use the in-app crop feature to custom crop them so they're focused on exactly the part of the image you want them to be on. It also helps to rearrange images with a little symmetry (balancing similar colors, shapes, or patterns in opposite corners, thematic elements on opposite sides, ext.)
Next, edit each image. Yes, all of them. Yes, individually. No, don't just slap a filter on it. Trust me, this is so worth it! Here's a before and after of a moodboard's editing phase:


Find whatever "adjust" button your application uses (on inshot it just says "adjust)" and then tap the individual image. Play around with the sliders until you get the look you want for it. This is probably the most time-consuming part of the process, but trust me, it's worth it! The unique, custom filtering of each image will make a difference.
I recommend playing around with the sliders until you find the ones you feel most comfortable with. I tend to use sharpen, vignette (VERY sparingly!) hue, saturation, tint (usually just for green or purple moodboards) warmth (especially for red, orange, or blue moodboards,) contrast, and lightness.
Once you've edited all the images in your moodboard, tap "save" to download it.
Now, most people would be finished right now, but not us! One of my top secrets to making moodboards is, once you've made your moodboard, edit the whole entire thing together- again, using the adjust sliders instead of filters. Editing the whole thing at once adds this rich, uniform feel to it, making it one collage instead of a bunch of images. As an example, here's a moodboard I've made, before and after the bonus filtering:
Another thing I wanna say: whether you're posting on tumblr, insta, or pinterest (or all three, as I do, because I have too much free time,) you can always add alt text! Accessibility should be the standard, and when you add alt text, blind/vision impaired people who use screenreaders can know what your moodboard's about! If you don't know what to write in the alt text box, click the "alt" button on the above images, and you can read the description I used and base it off that!
Lastly, have fun! If moodboards aren't fun for you, don't feel pressured to make them! If you get a request for one you don't want to make, you're totally cool to deny it. Have a blast, babe!
#kazzy's moodboards#kazzy's guide to life#digital editing#moodboards#tutorials#tricks and tips#how to make a moodboard#aesthetic
31 notes
·
View notes
Text
Accessible agere #2: image descriptions
Time to talk about image descriptions!
What are they?
An image description is using words to say what's happening in a picture. For example, a photo of a red ball would be described as "a red ball."
Why are they used?
Image descriptions help people who are blind or have low vision, as well as some people who have visual processing issues, to be able to know what an image is, the same way most people would with their eyes.
How do I write one?
I'm not the best person to explain, because my language issues make them difficult for me to do, so I'm using information from other websites (linked at the bottom of the post.)
Think about what's most important to you or jumps out right away when you look at the image you're describing. What is the main focus of it? If you were telling someone about it, what would you say to them?
Don't over complicate it! Use simple, easily understandable language and put the most important parts first and in the most detail. Try to keep it to 125 words or less if possible.
How do I add them to my images?
Tumblr has the ability to add descriptions to images! Click the three dots that appear on an image in a post you're making and select "add alt text." Pictures that have alt text added will have a badge that says ALT that you can click to show the text.
Can I add them to someone else's post?
You can't directly add them to an already posted image without editing the post, but you can reblog and add a description in regular text.
Do I have to do them for every image? What if I can't?
Ideally, every image would be described, but that's not always possible. You might not know how to describe something, or you might not have the energy for it. You can try reaching out to other people for help with it. If it's an image of text, like a interaction banner or a screenshot, you can put it through an image to text converter. If you can't describe it at all, tagging the post as "undescribed" can help people who need image descriptions to avoid it by filtering it out!
(Sources / recommended reading: https://uxdesign.cc/how-to-write-an-image-description-2f30d3bf5546
https://www.accessiblepublishing.ca/a-guide-to-image-description/ )
Thank you for reading! Questions? Comments? Requests? Feel free to reply or send asks, just keep things polite!
#accessibleagere#digital accessibility#agere community#age regression#image descriptions#guides#disability
24 notes
·
View notes
Note
any writing advice for someone writing their first novel? (*cough, cough, aka me*)
<3

Disclaimer: what works for me might not work for you, so feel free to take, twist and scrap whatever you need. I recommend asking/shopping around for ideas and other authors' processes, and it'll take some trial and error before you find what works best for you. But here's how I personally write.
Disclaimer disclaimer: this got real long while I was writing it and I realised how terrifying it must look to a first time writer. Take it step by step, at your own pace. It's not as scary as it looks xx
BEFORE YOU WRITE
(I'm going to be focusing on the story itself, but I'm sure it goes without saying that you should have your characters planned out first)
First things first: have a basic idea of the story beats. It doesn't have to be a Big Old Detailed Outline, just a basic compass to keep you going in the right direction so you're less likely to hit a roadblock. Personally I use the Plot Embryo! Here's my favourite video explaining it:
youtube
It's a nice simplified, easy to use tool for plotting. Here's a page from one of my journals breaking it down in a way I can personally come back to and understand:

hopefully you can read my shitty handwriting but I've put a little breakdown in the image description.
I then use these prompts to scribble down the basic idea of what journey I want my main character/s to go through, and use that as my blueprint for when I write.
WHILE WRITING
First things first: if you're like me, and seeing errors or plot holes in the stuff you've already written will bug you forever, do what I do and NEVER READ BACK OVER YOUR WORK WHILE IT'S STILL IN PROGRESS. Sometimes I have to skim back to remember where I am but as a rule, once something is written it's no longer my problem until the whole thing is done.
Don't worry about chapters and other such structure. I use the plot embryo to split things up so I know where I am, but otherwise chapters and scenes Do Not Exist until the editing process. Here's the "chapters" of a WIP as an example (this is a slightly different embryo adapted for romance but you get the idea)

Then just keep going until you're done. You don't even have to do it in order. If I'm stuck on a scene, I'll just put a big word in all caps that I can ctrl+f easily (usually either ELEPHANT or PENIS sklfsgskjf) and move on to the next bit I have ideas for, then come back to it later.
This first finished story will be bad. It'll be rough, patchy, full of holes. THAT'S OKAY. This is what we sometimes call the "Zero Draft". The draft that literally exists just to get the story out of your head to make the whole thing easier.
EDITING
Warning: editing is the longest, hardest part of writing a novel. Your book will go through several different versions, be scrapped and torn apart and put back together again. This is what makes the story great.
This is where every author differs, and there's a whole bunch of ways this can go. Personally, the first thing I do once the zero/first draft is done is put it down. Don't look at it, don't touch it, don't think about it. For at least a month. This allows you to come back to it with fresh eyes that haven't been staring at the same words for so long they just hate the whole thing regardless (and you WILL HATE IT. This is normal).
Then, the first thing I do is read back over the whole thing, adding notes and reactions as if I am a reader. If a part of what I've written makes me go 🥺🥺🥺, I'll write that down. If something could be worded better, I write that down. If you think a certain thing that you would put in the tags of a tumblr post, write it down. Treat it like you're someone else's beta reader, note down every negative, every positive, every ???? part. This will give you an idea of what is and isn't working. Here's some of my funniest notes from my zero draft of book 2 just to prove how literal I'm being here:


Then, and this is a controversial move that doesn't work for everyone but it works for my autistic adhd self-loathing brain: WRITE THE WHOLE THING AGAIN. FROM SCRATCH.
This sounds daunting and it is, but you've already written it once, so the second time is easier. Usually I don't worry about making this perfect because again, this is just another draft. I'll copy from my zero draft anything that I think is fine and write new bits or scrap bits as I go.
Sometimes, the story is fine. Sometimes this is an easy refining process. However, if you're anything like me, sometimes the whole thing is messy and you'll realise halfway through rewriting that the whole thing needs restructuring. Do not despair. This is normal.
I'm using book 2 of the Truth Saga as an example for this. I got 40k words into rewriting it before I realised that the reason it felt so 'off' was because the whole thing was sagging in the middle, characters were being left behind, and the whole thing needed restructuring.
It was a rough realisation, as Reckless Truth (book 1) was such a comparatively easy process. I only did three drafts and didn't have to restructure much. Book 2 is giving me so much grief and I'm gonna slap it when it's done.
If you hit this roadblock, it might be time to do what all mood writers hate. Detailed plotting. Go right back to basics. Write down every plot point in detail this time. Act like you're spoiling the whole entire story for someone. Have you ever watched a movie or book review where the reviewer does a full breakdown of the plot? Do that. In this you'll find out exactly where you're going wrong and be able to tweak and fix it. If you have more than one main character, I recommend doing a separate plot thing for each of them and one for the book as a whole so that you can make sure their emotional arc is getting the attention it deserves.
Then, when you're happy with the new plot you've written based on the draft of your story, go back and try to rewrite it again. If this sounds like a nightmare, it is. But it's worth the work, I promise.
From there it's a case of rinse and repeat, reread, rewrite, re-edit until you're mostly happy with what you've got. Then send it to beta readers and editors to tear apart even more and put it back together until you think it's ready! I also recommend joining some writing discords, watching streams or videos about writing, just research research research basically
Happy writing!
#writing advice#author advice#writeblr#authorblr#novel planning#writing process#authors of tumblr#answered#mine#writing#sagetheenbymage
18 notes
·
View notes
Text
Weekly check in. Some little stuff, some bigger stuff.

Current word count: 23.323 (Ch.5), >8k (Ch.6)
And we're finally back on track with Harcourt, babyyyy. After a month of eh from both me (with the editing) and MelS (writing the next chapter), we both managed to break through our respective blocks.
As of a few days ago, I sent back the edited Chapter 5 to MelS, so he could answer my comments and check the changes. I finally got to read the missing bits (and they are creepy and yucky)... Can't wait to code all of that when it is ready.
We definitely need another round of MelS editing the text and me checking it, before I can add that to the file.
Until I get the file back, I'll focus on other projects.
Like...

Yerup... I ended up finishing it. A little binksi with more vibes than story. Click if you dare :P
Making a binksi (or a bitsy/bipsi) had been something on my bucket list for a while now (almost a year actually), and I finally got to make one for realsies!
Honestly, the hardest part in all of this... was making the tiles/sprites in 8x8 pixels ;-;
Anyway, the code is freely available on itch and my GitHub.

Fixed some accessibility issues yesterday:
textbox not getting in focus properly
links/buttons not changing state when in focus but not hovered
added image descriptions to pictures in French/English
Also added the logos of Twine and SugarCube when the game loads. Those are clickable too.

I have worked a tad more on the UI/missing elements. But not as much as I should have.
Next week, the final update should be out.

This is what I'll be fixing this month. Officially reopened the code files, stared at it, and cried. It's so bad. It's such a mess...
Not looking forward to it, but it needs fixing!
(I've asked the Forum for help too in the commands...)
ALSO, I've decided there will be a hyperlink version of this game. Instead of the commands, click on words. It will be in the same file, and you get to choose at the start.

I’ve finished reviewing the EctoComp entries (except the Spanish-only ones because I suck at Spanish...) and have started reviewing the Bare-Bones Jam entry. An updated version of the reviews have been queues on the IFDB and @manonamora-if-reviews.
I will probably go back to the IFComp entries after that (probably after the voting deadline... I've done 40 already...).
-_-
I've made a completely new intro post with all of the place I'm at (if you'd rather not be on Tumblr). It was a long time coming, and now I have clear channels of where I'm posting about stuff.
Just need to be consistent...
I've also started migrating old dev logs and posts to my blog, especially the longer ones where I have a lot to say. Since the search function and archive on Tumblr is eh, I get to keep the important ones (not all of them are) in a more organised place.
They are still on Tumblr, btw. It's not gone, just copied.
It's been nice to revisit old dev logs, and see how far I've come (it's been a long way). It's pretty humbling (especially the typos, omg... I fixed so many of those).
-_-
The IFComp and EctoComp, are always looking for players/voters. If you want to play a few short-ish games, take advantage of that!
There is only a few days left for the IFComp and a few weeks for the EctoComp.
The @seedcomp-if is always looking for inspiration (text, images, code, etc…) in this current first round. If you have half-baked ideas or anything, really, come submit something!
Over @neointeractives, ShuffleComp! is looking for playlists and participats :)
-_-
And that's it I think...
12 notes
·
View notes
Text
So @spookyprincetothesun added these tags to this post:
[Image ID: #op PLEASE talk about how you figured out the timeline I'm fascinated #taz #edit if he'd done Magnus first it would've been such cool foreshadowing for bringing Barry back though omg End ID]
And I thought I'd make it a separate post lol
(Also, you're super right about how great foreshadowing it would have been if Magnus came back first lol)
So, I figured out first that Midsummer would obviously be in June, right? Because that's when the summer solstice/midsummer is in our world, so that would be the equivalent reference for Faerûn. And the Suffering Game happens right before Midsummer because it was only a few days before the Hunger was due to arrive and a year after the festival.
Then during the interlude after SG, Griffin said it was about 14 months since their adventure began, which would have made Here There Be Gerblins happen in April of the previous year.
At the beginning of Murder on the Rockport Limited, Griffin said it was about 3 weeks since Phandalin which would have made that arc happen in around May
Then there's no specified time that he said Petals to the Metal happened during that arc, but he did say that the Crystal Kingdom happened a couple of months after Petals did. Crystal Kingdom happened on Candlenights, so that would be at the end of December, and two months before December is October.
Then at the beginning of the Eleventh Hour, he said it was a month or two after Crystal Kingdom, but he also said it was late winter/early spring. Bringing us to late February/early March. (I personally head canon that it happens early March because in writing the Julia Burnsides vs Canon Lore fic, I want to write a couple of scenes where the boys, Lucretia, and Davenport are dealing with the anniversary trauma of the Hunger and how Julia helps with that, and I wanted that to happen before TEH arc. And I head canon that to happen in also late winter/early spring because it doesn't make sense to me that the crew would have left on their mission on New Years like I've seen some people head canon that happening because New Years is a holiday, and it would be weird for the Institute to have them leave on a holiday. So I'm making that happen at the end of February)
Then, of course, Suffering Game is Midsummer, so the timeline is:
Here There Be Gerblins: April
Murder on the Rockport Limited: May
Midsummer Harvest Festival: June
Petals to the Metal: October
The Crystal Kingdom: December
The Eleventh Hour: late February/early March
The Suffering Game/Story and Song: June
(Also, as someone who lives in a desert, it is absolutely still hot in October, so Griffin's description of them sweating their balls off in the crate and out on the track still makes sense lol)
Thank you for coming to my TED talk lmao
Edit: Oh yeah! I guess I can talk about how long Lup was in the umbrella for too lol
So it had been ten years from when Lucretia erased everyone's memories to the start of the adventure right? And Lup disappeared about a year before that (because Griffin said that she left 14 months into being on Faerûn, and then the erasing happened 2 years into being on Faerûn.)
Then it took a little over a year to get to S&S which added all together would have made Lup being stuck in there for about 12 years lol
#thank you for asking!! I love dumping my thoughts on taz; I honestly have too many of them fjflahdlabdlak#taz#taz balance#Julia Burnsides vs Canon Lore#kind of but not really but I do mention it and use this timeline in it so I'm going to add this to the tag anyway lol
64 notes
·
View notes
Text
Oops. When I was first setting up the blog, I got a message requesting/suggesting image descriptions for the posts taken from notes on @inspectorlyfra‘s pitch post.
Since then, there was a death in the family, so I was unable to respond, and I’ve added another mod to the blog. Apparently you can’t do messages on group blogs, SO your message got eaten, I’m sorry.
If you or anyone else would like to write image descriptions for the starter posts, that would be greatly appreciated. Feel free to send them through asks or reblogs, and I’ll do my best to find them and edit them into the original posts.
If nobody does so, I’ll still write some up as soon as I find the time! Don’t worry, I won’t just Leave Them Like That.
Thank you all!
13 notes
·
View notes
Text
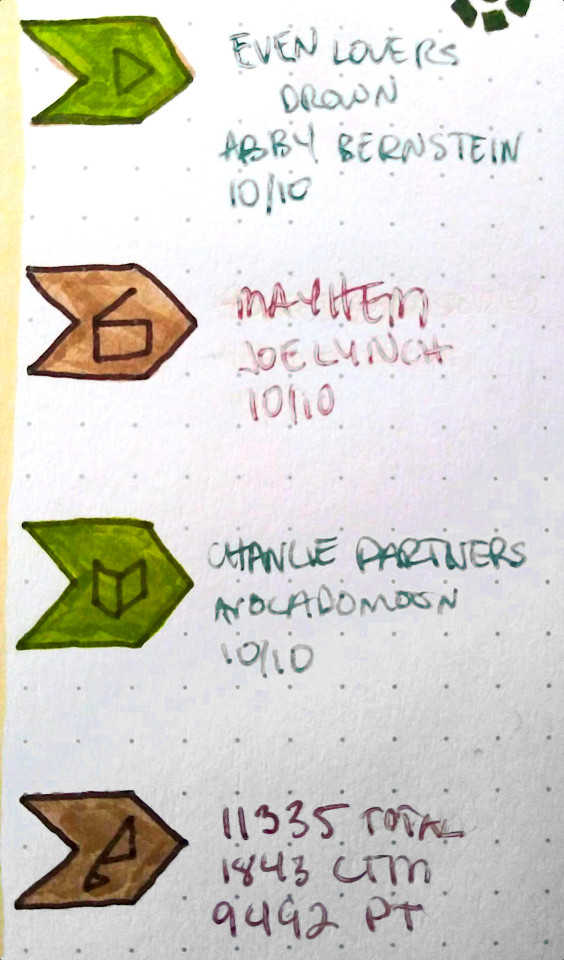
[image description: a cropped photo of a bullet journal page showing four banners with geometric icons in green and brown. the icons are a play button, a scene board, an open book, and a writing quill. by each banner is listed something that corresponds to the icon in a matching color. /end ID]
Media I Loved Last Week
My favorite thing I listened to last week was Even Lovers Drown by Abby Bernstein. I was reminded of this song from seeing the poem it's inspired by and quotes in the lyrics and sought it out to listen to again. It's not on Spotify, which is the main place I listen to music so it's been a good long while since I've heard it. I first listened to it back in ye olde days of Grooveshark. Anyway, it's fun and I really like the poem and just the whole vibe. 10/10
My favorite thing I watched last week was Mayhem (free to rent at this link as of 5/12/23). It stars Steven Yeun, he gets covered head to toe in blood, he fucks Samara Weaving, he has so many fun little ideas, and he absolutely obliterates a couple dozen corporate lawyers. And he doesn't suffer any consequences whatsoever! Love that for him. And his bestie really got all tangled up in my heartstrings despite only being on screen for like five nonconsecutive minutes maybe. 10/10
My favorite thing I read last week was Change Partners by avocadomoon. Pretty much immediately post Chapter Two, Richie gets his phone hacked and the contents sold to papparazzi, and thus is outed. The fic manages to be mostly about him and his relationships more than the actual outing though, which is interesting and quite nice. I think it's really in character for the entire ensemble, which with so many characters is a feat. It also never has Richie ascribe to any particular label (aside from in the press, which is Different), which I personally really really like. 10/10
I wrote ~11k words total last week. Most of that was on the second draft of Paid Training, so tbh a lot of that is really more like words edited than words written. I'm re-writing it for the second draft, as I always do with originals, but not much is being added in just yet. I changed the names like usual, but this time I've also changed two main characters' genders. I've gotten to the part in the draft where that actually becomes relevant and a lot more will have to be changed from draft one, so it'll be a lot slower going from here on. I got about 2k added to Curse The Messenger, which I'm not very happy with because I'm still months behind on my ideal schedule lmao. At the same time I'm giving myself some lenience on that because, like, it's tough to write about something horrific as it's actually happening to you in real life even with twelve degrees of fantastical separation. And also it's hard to write a research montage that isn't boring as hell. But hopefully that'll be picking up soon idk, we'll see. I have to figure out how to insert the interesting stuff in there without it being obvious, and then how to move tf on. I'm creeping up on the current end of my outline too, man, idk. Whatever.
4 notes
·
View notes
Note
Hihi I’m nosy!! For the fic writer questions thing you reblogged: number 4 (about earth and moon), number 10, number 17, and number 27!!
Feel free to ignore any if you want to, I’m just very curious hehe big love you!!
jules!!! big love back to you and i’m booping your nose!! 💖💖💖
4.
For the little details in earth and moon, my favorite is that Atsumu’s introduced in a mini chapter titled apollo (since he’s the sun to Osamu’s moon) and Kiyoomi is later described as having hyacinth curls.
In Greek mythology, Hyacinth and Apollo are lovers. So, that’s a little inside joke for me :)
Other little details include:
Rin comes home late in the final mini chapter because he got lost in the grocery store just like Osamu dreamed about. They then talk about hanging jerseys on his wall and slow dance to the song stuck in his head just like they fantasized about
Rui wears Star Wars pajamas when we first meet her. When she meets Motoya he is too
Osamu is constantly compared to the moon, “borrowing light and regifting it without the burn,” only to receive a bad burn at work
The (b)romance between Sato and Underwood
The first mini chapter in earth and moon is called afternoon eclipse (rin finds a moon at midday) the first chapter in sakuatsu’s story is called midnight dawn (because kiyoomi finds the sun in the middle of the night)
There are a ton more but those are the ones I thought of off the top of my head :)
10.
So I tend to create stories by taking a series of related images, lines, and ideas that I’ve had in my head and seeing what connects them. From there, I’ll take I’ll take those major concepts and try to fill in the gaps to create a story that I feel best expresses them if that makes sense? So I’ll draft out a basic outline, with room for revision, as well as select some major motifs and themes and go from there.
With earth and moon, I had several monologues and descriptions I had written at random that I felt fit sunaosa, as well as a series of images/scenes in my head. I took these things and combined them with my desire to write a sunaosa story that not only explored their relationship but it’s impact on their senses of self from when they met all the way through adulthood. I also thought about what I felt was missing from the existing canon (pun semi intended) of sunaosa stories and sought out to put it in my fic!
17.
So iwaoi will always be my first and forever loves. I have an idea for an AU that involves exploring oikawa’s origins as the demon king (there’s a twist I want to spoil but won’t unless I ever do write this), as well iwaizumi’s history as holy knight (in this universe he’d be a nephilium). It also involves shiratorizawa as demon hunters. I’ve always wanted to write it and daydream about it a lot. I love biblical imagery and metaphor so maybe one day!
27.
I don’t super know how to describe my writing process other than that I write almost every day. I don’t necessarily write A LOT every day (a good deal of the time I get caught up editing), but I try to sit in front of my computer at least once a day.
I have two notes on my phone. One for lyrics (I just started writing music!) and one for lines (both for scripts and fics). I try to write down ideas as they come to me. Sometimes they’re fully fleshed out. Other times they’re a vague idea of something and I’ll put in parentheses (develop this later)
I’m also someone who likes to write long form, so I’ll dump all of my ideas for one (mini) chapter and then go back and tighten it up later. I have a second doc for all my fics where I put all the lines I cut in case I want to use them for something later.
I’m also a fan of writing out all of the dialogue for a scene and then going back and adding action and description, just because I can over write both of those if I do them as I go. I love to wax poetic like the nerdy little lass I am, but ya gotta keep it in check.
I like writing to ambient sounds? Sometimes I write to music but I like using atmosphere instrumental music to set the vibes for whatever piece I’m writing.
I tend to write chronologically too. I really struggle to leave a section unfinished and move onto the next. So I’ll just stare at same paragraph for four hours until I get it Right™️.
The only other thing I can think of is that I like to write very rhythmically/musically. I tend to accidentally rhyme a lot. I find the pace of a piece very important and I feel like I have a fairly distinct style that relies on that. That and imagery. I love imagery and metaphor. I thoroughly enjoy creating visual throughlines, like in earth and moon I used different silver/gray imagery to represent Osamu and how Rin sees him. The gray, the storm, the moon. All introduced in the first chapter and used throughout.
anywho, that’s a bit of looksie into how I write! I hope that makes sense?
also thank you for all the queries jules I adore you and am kissing your forehead 💖
#I did not really proof read this so I hope this all makes a semblance of sense 🫠#jules!!#burning the trees#sunaosa#iwaoi#asks#writing#writeblr#ao3#fic writing#evie’s jeevies
5 notes
·
View notes
Note
what do u mean by "writing new ones on ur webs"
i make those web weaving posts occasionally and i always write my own image descriptions on them but a fair amount of people end up writing their own which annoys me for two reasons. the first being that since my webs tend to be really long adding image descriptions in the reblogs makes the post even longer, and i don't want my posts to be causing unnecessary irritation by clogging up people's dashboards. secondly, to me that means the person isn't bothering to take the time to fully read my caption which is just basic reading comprehension lol. i know some people said that putting ids under read mores is less accessible but when i was learning to write ids i asked a few different blogs and was told it doesn't really matter if i include a sentence saying the id is under a read more in the caption itself.
if my ids are incomplete/inaccurate i would prefer someone send me an ask so that i can edit the original post and make a note that the post was edited so that there aren't a bunch of different, conflicting ids running around on one post. also ids are kind of like commentary because i can let readers know what i personally focus on in the image (subconsciously or not) so they are an extended version of the analysis imo.
3 notes
·
View notes
Text
Reflective Journal - Lim Lin Year 1 Production Arts for Screen
Leaving Singapore to a new country, and then starting classes the next day had made me disoriented and lost as a stranger in a foreign land. On the other hand, this transitional period has also shown me the promising pathway for a new door I had opened.
The identity lecture gave me a closer look at an individual’s sense of self in the modern world. With various analogies and thought experiments, we were taught different interpretations of this idea. A concept I thought was interesting is the way identity is linked to our contemporary society. We were asked to question how identity can be maintained in a vulnerable and unpredictable world. As someone who enjoys the sci-fi genre, the idea that many of these stories can be viewed as a metaphor for addressing current societal concerns was intriguing.
An example from the lectures that struck me was the real-life “brain worm” incident. A woman had a parasitical infection that caused a worm to grow in her brain and led her to become extremely ill. This non-fictional unnatural violation of the human body shocked me as a horrifying reality to live in could happen from a mundane situation of physical contact with nature. Not only was it unpredictable and terrifying, but it also confirmed fears of the inability of man to live in harmony with nature. This also acts as a real-life metaphor for broken natural boundaries, and the trespassing of personal space.
For the film project, we were tasked to film and edit a two-minute film using the theme of Identity. Although I had little experience with filming, I was thankful to be in a group of talented people who helped me along the way. We brainstormed several ideas and narrowed them down to personal experiences with identity. Our film was titled “Overload” which used a first-person point of view to convey the experience of autistic individuals. I learned a lot from my groupmates who have more experience in filming, such as different editing techniques and art direction that I had never thought of before.
After those two weeks, we resumed our course tutorials and the first unit commenced. We were tasked to create a character with the prompt “What's Behind The Door?”. The main struggle I had during this stage was to make the character believable. Initially, I wanted to create a grotesque man-eating creature as I like horror games. However, this led to a conflict I was unable to solve, as I did not know how to justify why a character would behave this way. The creature acted as a mindless killing machine, so I decided to start over with a new idea.
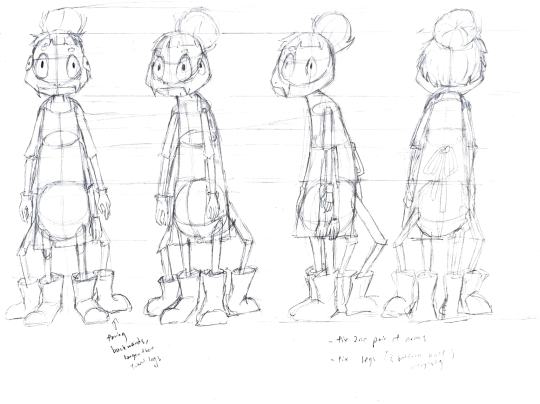
On my second attempt, I focused more on the personality of the character than its setting. Using the list of questions provided in the tutorial, I created a spider housekeeper who spends most of its time cleaning the room behind the door.

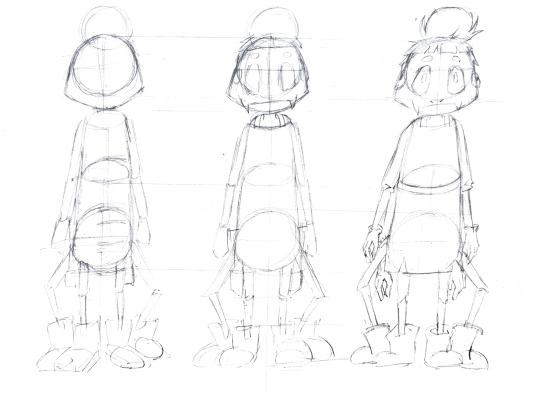
The above image shows concept sketches I made after writing the description of the character. I wanted to base the creature off a spider as the contrasting volume of the compact body mass and thin legs makes it appear more fragile, adding to its frantic personality. The second design was chosen, and the next tutorial allowed me to understand ways to convey a character’s personality through their body language. We were tasked to draw our character in four different poses representing different emotions.

A problem I encountered was the stiffness and awkwardness of the way I first drew the lying pose. This was because I used textual descriptions rather than visual references to draw the character, so this tutorial has taught me the importance of using photos when depicting body language. As such, for the rest of the task, I made sure to use visual references that effectively convey the mood and personality of the character.
Afterward, we were taught how to do three-dimensional drawing. This involves three main elements; simple volumes, basic perspectives, and overlapping forms. I found this lesson to be extremely useful for backgrounds as using these rules to create depth and structure achieves the illusion of 3D on a flat surface. This can also be applied to organic forms, such as foreshortening when drawing body parts. For this tutorial, we were tasked with drawing different objects from three different perspectives.

In hindsight, I should have given myself a larger space to do this exercise as gridding the paper into nine parts caused most of the drawings to appear too cramped or overly exaggerated. I was disappointed with the outcome as I could not fit the three-point perspective drawing of the piano in the last grid as it will look extremely distorted with that scale. The details on the objects are also inaccurate, so I would have to work on these problem areas when doing more perspective drawings in the future.
Another exercise related to improving our structure was the practice used for drawing human heads. As someone who is used to making photo studies with loose guidelines and editing the proportions during the rendering stage, I was not used to the methods used to break down features of the head. While drawing the basic forms was manageable separately, applying these steps to a face is challenging as you would also need to consider the proportions of the person.
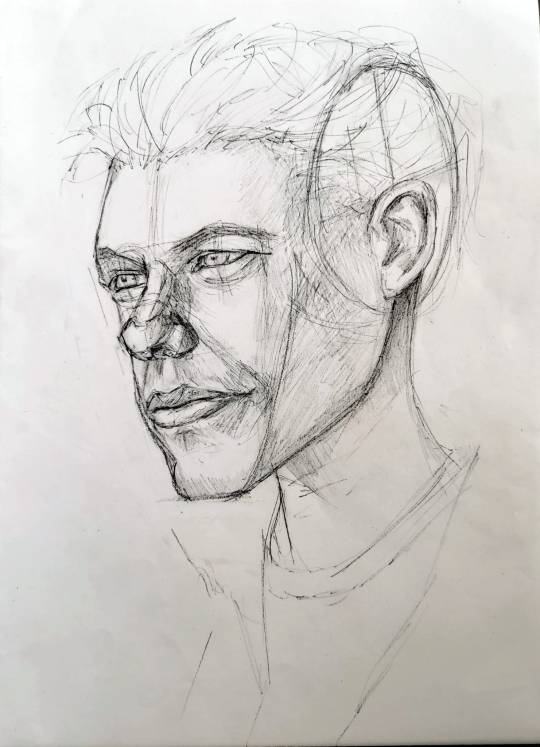
While drawing Matt Damon’s face, I tried to follow the structure and created this portrait. The key issues I had were the proportions and the lower half of the face.
The following tutorial gave us pointers when designing characters and finding an art style for them. Drawing how the characters will be like rather than appear like would aid in creating a being capable of thought. We were recommended to use primary and secondary research and to base the character on something rather than to create one out of our imagination. We were also reminded to exaggerate the line of action while drawing with references and to consider how it affects the angle of hips, shoulders, and head.
Related to the technical aspects of drawing, we were taught how to draw clothing that belongs to the character. The lesson's outcome is to draw fabric that enhances the character's three-dimensionality rather than flatten it. To do this, the key point is to focus on structure and observation as it gives believability to the characters who should also have surface and form.
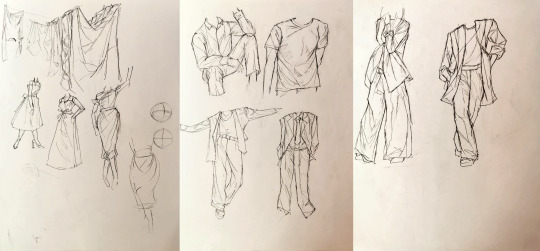
Some of the fabric I drew looked stiff as I either drew too many folds or did not follow the curve of the body. With the help of my tutor's drawing shown in the bottom right of the first page, I was able to make the fabric complement the form of the person more.
When drawing facial expressions, we were given points to take note of for more effective drawings. The expressions should convey the personality of the character, and this can be achieved by following design rules and establishing consistent structure and volume.
I faced many problems trying to exaggerate my character’s expressions. As the mouth was placed at the lowest point of its skull, it was difficult to create an “open mouth” expression without obscuring the eyes. Moreover, when trying to make the eyes expressive, distorting its size made the character not look like itself. In the end, I managed to convey its emotions by changing the length of the jaw and adjusting the height of the eyeballs.

The last practice we had in this unit covered the attitude of a character. With a simple prompt, a character’s audience appeal could be evoked with attitude. This can be achieved by giving characters a thought process, reflecting it with their design, and making the way they carry themselves consistently. Establishing the character’s point of view creates an expectation in the audience and reveals the person in the design. Afterward, we were given time to work on our character designs, so I worked on the turnaround and construction sheet during this time and digitalized these sketches for the final hand-in.
At the end of this unit, I was able to learn new rules of character design that helped me to communicate my ideas better to an audience. This has also helped to improve my technical skills in drawing and I will continue to practice more in the future to achieve better results in my art and storytelling.
0 notes
Text
How to Write an Eye-catching Blog Post That Will Get Your Post Read

Writing an awesome blog post is not as daunting a task as it may seem. With the right approach and some practice, anyone can become an effective blogger in no time. In this article, we will be providing you with seven simple steps that will guide you through creating a powerful blog post that can engage your readers and draw them into your story. By following these steps, you'll have all the tools necessary to write a compelling piece of content that captures the attention of your audience. So let's get started!
Step 1. Brainstorm Blog Topics
Before you dive into the writing process, it's essential to take some time to come up with ideas for your blog post. Consider researching current news stories, industry trends, and topics that are relevant and interesting to your readers. Additionally, look into what topics have been covered by other bloggers in your niche and see if there is an angle or unique perspective that you can bring to the table. Ask yourself questions such as “What do my readers care about?”, “What knowledge can I share with them?” or “How does my topic fit into the bigger picture?” With this information at hand, write down a few potential blog post ideas that you can explore further.
Step 2. Refine Your Topic with Keyword Research
Once you have identified a few blog post ideas, it’s time to refine and narrow down your topic. Conduct keyword research to find out which phrases and terms people use when searching for information related to your blog post. This will help you create content that is both relevant and optimized for search engines. Additionally, from a personal point of view, try exploring related topics and subtopics to create content that covers more than one angle on your topic.
Step 3. Google the Term to Understand your Audience's Search Intent
Before you start writing, it’s important to understand the intent behind people's searches. Google your topic and take a look at what kind of content appears on the first page of the results, it will help you better understand what type of information readers are looking for when they search for this topic.
Pay attention to other aspects such as the length of the articles, type of content (e.g. video, article, infographic), and level of difficulty, to help you create content that meets readers’ expectations.
Step 4. Write an Outline For Your Post
Before you start drafting your post, spend some time creating an outline. This is a great way to structure and organize your content, making it easier to write the actual blog post. Start by writing down the main points that you want to cover in the post and then expand on each point with supporting information. Additionally, add links, images, quotes, and other elements that could help enhance your post.
What to Add? 🤔
add links, images, quotes, and other elements that could help enhance your post.
Step 5. Write Engaging Content
Once you have an outline in place, it’s time to dive into the actual writing process. Start by creating a strong introduction that will capture your readers’ attention and make them want to read on. Additionally, use a conversational tone that is easy to understand and engaging for the reader.
Pro-tip ❗❗
When appropriate, consider adding anecdotes, stories, or humor to your post as these elements can help keep your readers engaged throughout the article.
Step 6. Optimize for SEO
With the content of your blog post written, it's time to focus on optimizing it for search engines. This includes selecting the appropriate keywords and phrases that people may use when searching for information related to your topic. Furthermore, make sure to include these terms in your title and meta description as this will help draw readers into your post. Additionally, add relevant links throughout your post to help readers find more information on the topic.
Step 7. Edit and Publish Your Post

In summary, How to Write an Awesome Blog Post in 7 Steps?
Step 1. Brainstorm blog topics
Step 2. Refine your topic with keyword research
Step 3. Google the term to understand your audience's search intent.
Step 4. Write an Outline For Your Post
Step 5. Write engaging content
Step 6. Optimize for SEO
Step 7. Edit and publish your blog post
And there you have it—seven simple yet awesome steps for writing an awesome blog post.
Writing a great blog post doesn’t have to be difficult. As to what WiX Blog once highlighted in a same-topic article last May 24, 2021, “when you create a blog, you have the opportunity to dive deep into your favorite topics”, so make every word of your piece an experience!
By following the seven steps outlined in this article, you can create content that is both engaging and optimized for search engines and will surely help you rank higher in Google and engage your readers. With these tips at hand, you'll be well on your way to becoming a successful blogger and should be able to craft amazing blog posts that will draw readers to your website or blog. So, what are you waiting for? Start writing your own blog now! Good luck!
1 note
·
View note
Text
Manuskript
First thought: do not like the layout.

this is awkward and took me a minute, but it could just be me being an idiot tbh. Also probably more useful for someone who is better at planning ahead. You can edit it later, though.
Going tab by tab:
General is alright, I like the book information you put down. Title, subtitle, series, volume, genre, Author Name, Author email.
The Summary is pretty nice! You start with the situation - a "What if..." that you finish. Then you do a one sentence summary, then a one paragraph summary. Then you turn that into a one paragraph summary, then into a full/proper summary.
The character tab is nice! You can sort your characters under Main, Secondary, and Minor. Each character you can assign a color, either from a 'list' of colors or the color wheel, to go by their name, then whether they are a POV character or not. Then there are places for their motivation, goal, conflict, and epiphany, then their one sentence and one paragraph summary. There are three more tabs under each character - summary (for a longer summary), Notes, and Detailed Info, where you can pick a trait then a description. I always prefer to have a place for images, but you can link them in notes or somewhere else. Not my favorite layout for characters, but better than just a blank document.
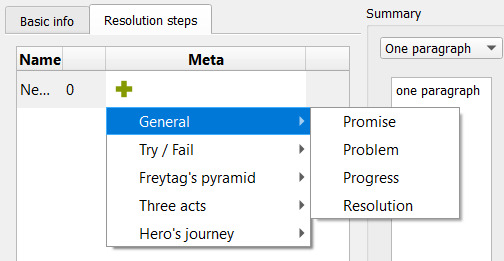
Plots: I really like this! You can make a Main, Secondary, or Minor plot. These can be titled, and you can add characters from your character lists. There's a spot for a description, then a result, as well as a one paragraph, one page, and full summary. Under the second tab for each plot is the 'resolution steps', where you can insert what beat it is on various plot structures such as Hero's Journey, then a summary for that. Really love the plots tab!

Under the world tab you can insert any number of items, rules, laws, etc. If you press the heart (I missed this at first), you can auto populate with a large amount of empty tabs for Fantasy Worldbuilding. These include Physical (such as flora, races, climate), Culture (education, food, customs, medicine), Magic Systems (rules, objects), Important Places, and Important Objects. I hope they'll be adding others! Under each of these you can add sub items, with names, descriptions, and other notes.
Outline is really good too! You can set the POV character, the status (To-Do, First Draft, Second Draft, Final), and label it 'Idea, Note, Chapter, Scene, Research' in case you've opened the tab for something other than writing proper. You can also choose a word count goal for each chapter and scene, and it will track how many words you have for each, as well as what percent you are to that goal. There's also a tic box to mark the chapter/scene complete.
Editor is where you'll actually write. You can open one chapter at a time, which will show each scene as a note card, or Outline, or you can view all the text depending on how you set it. You can give each scene a title, or leave it as 'New'. While I love everything else about Manuskript, I feel like the writer proper is the weakest part. I could not find a way to change the font type or size, or indent. And while some people prefer markdown, I'm not personally a fan.

So as a plotter, I'd rate Manuskript at 8/10. But the writer proper at 2/10. So overall it's a 6-7/10.
0 notes
Text
Manuskript
First thought: do not like the layout.

this is awkward and took me a minute, but it could just be me being an idiot tbh. Also probably more useful for someone who is better at planning ahead. You can edit it later, though.
Going tab by tab:
General is alright, I like the book information you put down. Title, subtitle, series, volume, genre, Author Name, Author email.
The Summary is pretty nice! You start with the situation - a "What if..." that you finish. Then you do a one sentence summary, then a one paragraph summary. Then you turn that into a one paragraph summary, then into a full/proper summary.
The character tab is nice! You can sort your characters under Main, Secondary, and Minor. Each character you can assign a color, either from a 'list' of colors or the color wheel, to go by their name, then whether they are a POV character or not. Then there are places for their motivation, goal, conflict, and epiphany, then their one sentence and one paragraph summary. There are three more tabs under each character - summary (for a longer summary), Notes, and Detailed Info, where you can pick a trait then a description. I always prefer to have a place for images, but you can link them in notes or somewhere else. Not my favorite layout for characters, but better than just a blank document.
Plots: I really like this! You can make a Main, Secondary, or Minor plot. These can be titled, and you can add characters from your character lists. There's a spot for a description, then a result, as well as a one paragraph, one page, and full summary. Under the second tab for each plot is the 'resolution steps', where you can insert what beat it is on various plot structures such as Hero's Journey, then a summary for that. Really love the plots tab!
Under the world tab you can insert any number of items, rules, laws, etc. If you press the heart (I missed this at first), you can auto populate with a large amount of empty tabs for Fantasy Worldbuilding. These include Physical (such as flora, races, climate), Culture (education, food, customs, medicine), Magic Systems (rules, objects), Important Places, and Important Objects. I hope they'll be adding others! Under each of these you can add sub items, with names, descriptions, and other notes.
Outline is really good too! You can set the POV character, the status (To-Do, First Draft, Second Draft, Final), and label it 'Idea, Note, Chapter, Scene, Research' in case you've opened the tab for something other than writing proper. You can also choose a word count goal for each chapter and scene, and it will track how many words you have for each, as well as what percent you are to that goal. There's also a tic box to mark the chapter/scene complete.
Editor is where you'll actually write. You can open one chapter at a time, which will show each scene as a note card, or Outline, or you can view all the text depending on how you set it. You can give each scene a title, or leave it as 'New'. While I love everything else about Manuskript, I feel like the writer proper is the weakest part. I could not find a way to change the font type or size, or indent. And while some people prefer markdown, I'm not personally a fan.

So as a plotter, I'd rate Manuskript at 8/10. But the writer proper at 2/10. So overall it's a 6-7/10.
1 note
·
View note
Last Seen Blogs
what-dat-ritalin-do
Human Lab Rat Records
abookshadow
✦ Francesca.
timeholesvlep
Timeholes

dharmasastra
Untitled
habitodemeexpressar
Motivação