#dst exports
Text
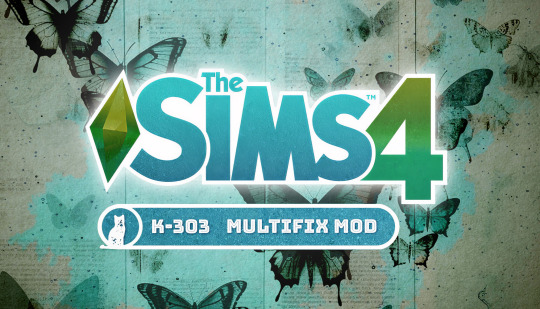
K-101 - K-303 - K-505 - NEWS - TECH & CO
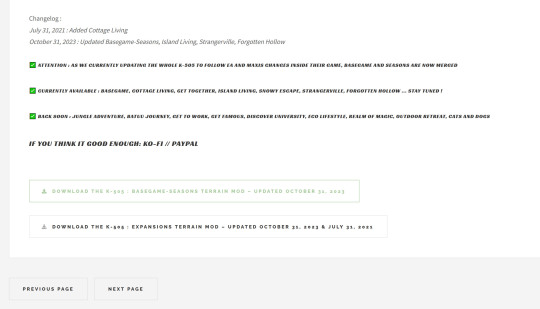
So it has begun ... the K-303 is on its own road and the first objects ready to be downloaded :) Our databases seem fully repaired and we can now focus on our projects ;)
But let's talk at first about the silent update of the K-101 ... @yuroge ( thanks for the feedback ! ) noticed that after a recent patch of the Sims 4, when uploading something to the Gallery, it was claimed as cc content, even when it was cc-free, only because of the K-101 use.
We found the solution. So, better to share it :) We stripped all the translations, info files and so on from the K-101 and we kept only the DST images. This way, whatever you use, it doesn't affect your exports to the Gallery.
Now, all you have to do is to re-download the K-101 :D
DOWNLOAD HERE


As you may noticed, we added on our website a kinda sims 4 expansions fundraiser for all people who really wish the K-505 for expansions AFTER Cottage Living ... The Wedding Story is already funded at 80 % :) So, I have only one word. As soon as an expansion is funded, I work on it, before my own projects and deliver it to all. Thanks to all the volunteers. I love you for this !
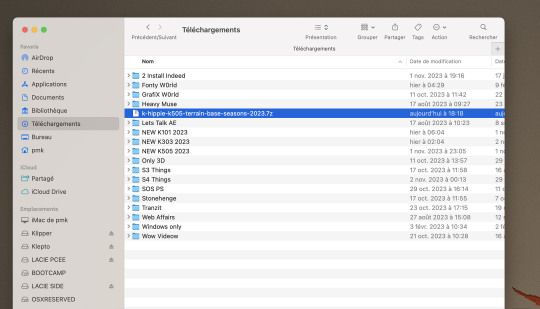
And now, as we receive messages about, let's make a bit of information for Simmers who have difficulties to download ... I made some pictures to show you that every K-Mod is fully downloadable :D
on PC :
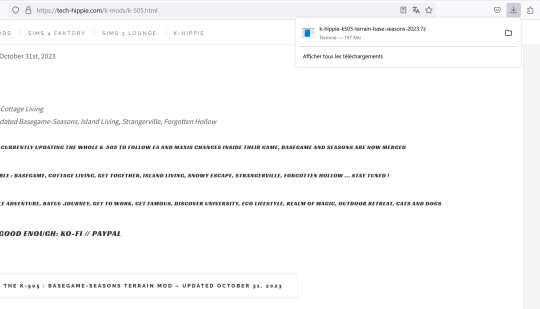

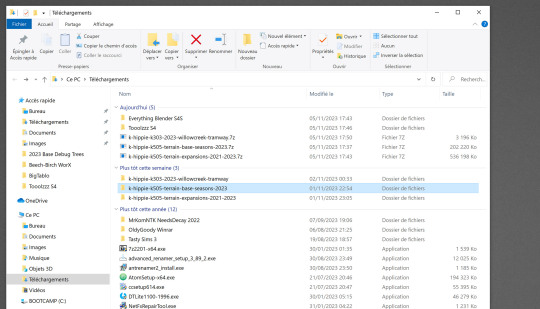
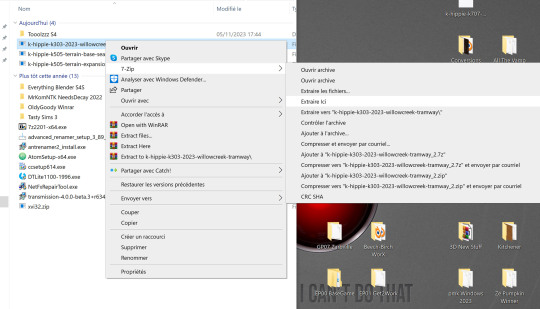

As you see, no problem at all. At first, my firewall is stated on the medium and I do not have Anti Virus except the Microsoft ones.
My browser on PC is Firefox. Then I use 7z.exe to extract : it is free, easy to use and very very safe. I extract all my files inside the download folder then I add them manually into my Mods folder.
on Mac, it is even much more easy :
Downloaded with Safari, double-click the 7z files, extracted, done.

I'm not a PC guy but I'm pretty sure you may find some help and information among other Simmers.
Crinrict is an excellent website for many things Sims 4 related :) Courage to you ! I'm pretty sure you may do it ;)
That was a late Sunday afternoon post. See you soon !
#sims 4#sims 4 custom content#sims 4 download#sims 4 cc#k-hippie talk#ts4#sims 4 floors#sims 4 wysiwyg#k 101#k 303#k 505#k hippie#the sims 4#sims 4 expansions
93 notes
·
View notes
Text
thank you for the kind words :) of course i can make a tutorial, it's actually super simple!
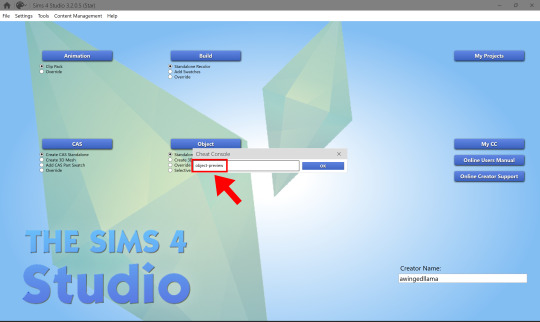
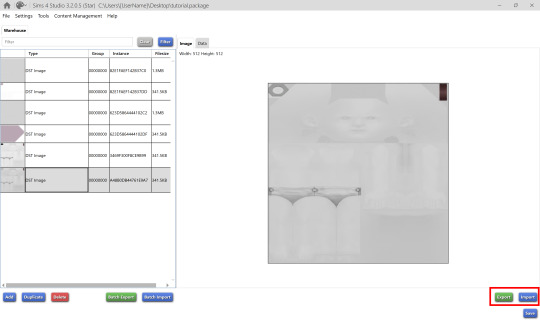
1: Open up Sims 4 Studio and press CTRL+Shift+C, like you would in-game. Type 'object-preview' into the Cheat Console.
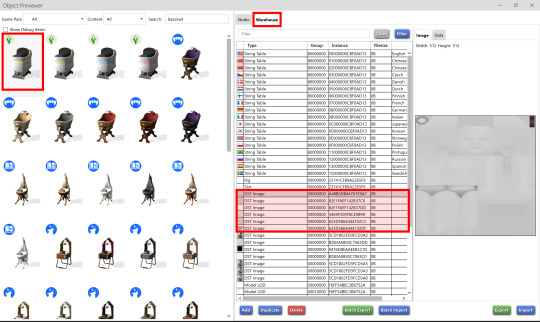
2: Search 'bassinet' and click on the Warehouse on the studio tab. The resources in red are EA's default newborn skin.
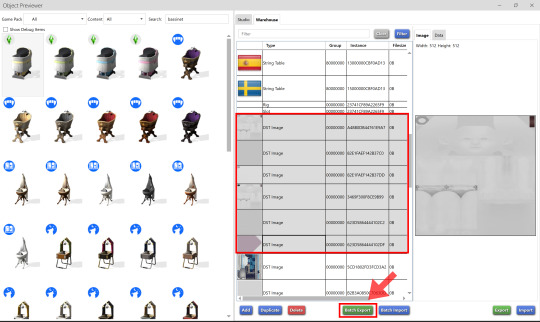
3: Shift+click to select multiple resources - make sure the instance numbers match the ones in the pic above. Then click on 'Batch Export'. Don't change the file name from 'export.binary'.
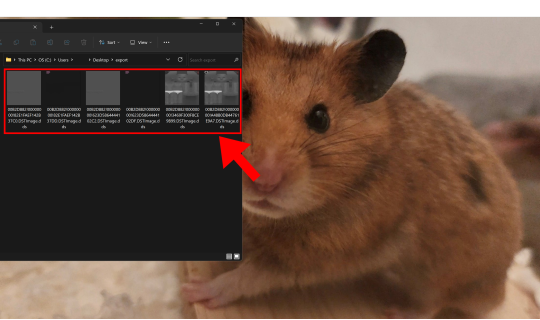
4: This is how the images should be named after saving, for reference. (this step is really just an excuse to sneak in a lil pic of my son hamster, heh)
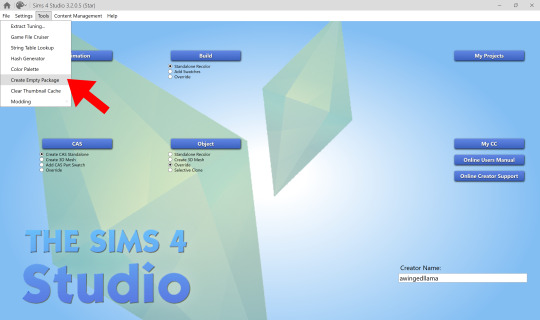
5: Once you've got your images, close the object previewer. Click on 'Tools' to create an empty package.
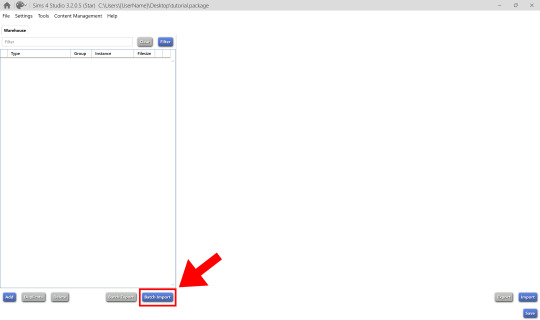
6: Click 'Batch Import' and select the images you've just saved.
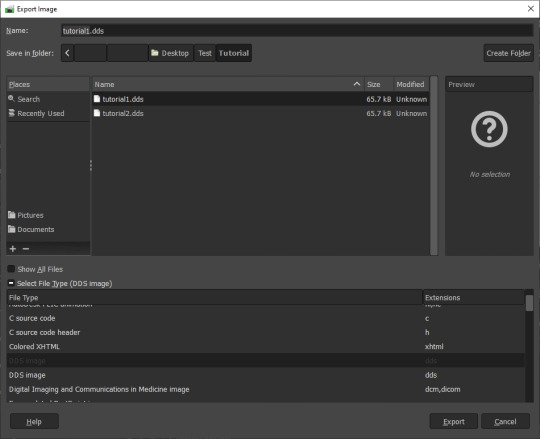
And you've got your default replacement package! Now you can export the images (as .dds to preserve the alpha channel!) and edit them however you like, then re-import them.
The two light grey DST images are the normal maps (just a diaper by default). The pink ones are specular maps (just the eyeball). The greyscale ghost-looking ones are the actual overlay texture.
and if this seems like too much work feel free to just use my replacement .package as a base lol
208 notes
·
View notes
Text
5th try at writing the guide on custom pet paint mode brushes, if tumblr manages to mess this one up i will have a fit
16/10/2023 Edited: Updated to add better hash ID generating practices.
Things you'll need:
Sims 4 Studio
GIMP
Notepad
Guide:
Tools that we will be using:

We'll begin by creating a new, empty package.
Save it somewhere convenient and easy to access.
Once you've saved the package, you'll be met with this screen:

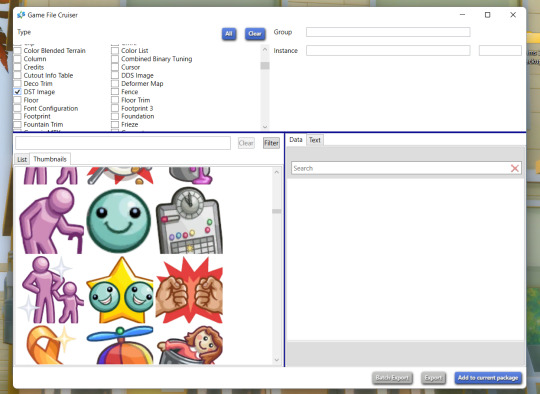
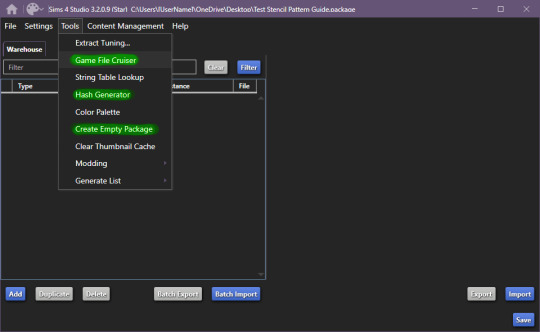
From here, we'll go to Tools > Game File Cruiser
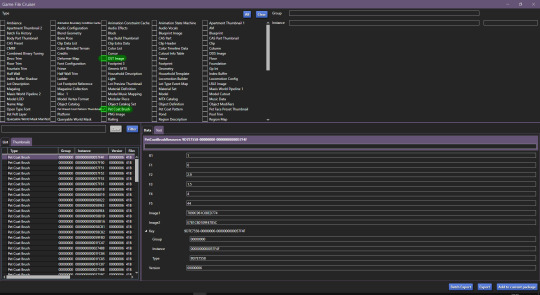
We'll be working with Pet Coat Brush files and DST Image, but for now we'll only select Pet Coat Brush file, so that it's easier for us.
I've selected the first brush file and I've highlighted the piece of data we'll need to use.
We'll have to use the Game File Cruiser search function, but first, press "Add to current package". When you've gotten the hang of this, you can explore the pre-existing brush files and decide which one you'd prefer to use as your base, all are different and correspond to different brushes/stamps in-game.
Once you've clicked on "add to current package" your package editor should look like this:

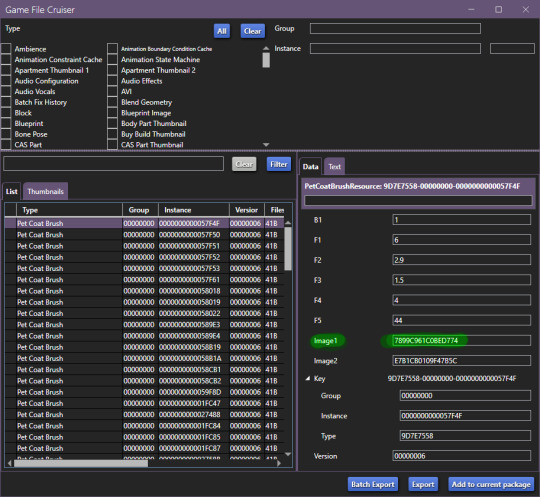
Now we'll copy the Image1 ID and go back to Game File Cruiser, select DST Image from the file type list and enter the ID into the search bar:

Now, click "Add to current package" and now the package file you're working on will look like this:

Before we move further, we need to generate new instance ID's, we'll need 3 of them.
Go to Tools > Hash Generator

Edited 16/10/2023: When generating your hash ID's, please use your creator name ie.: "[YourCreatorName/Blogname]TutorialCustomFurCoat1", this will give you a more unique hash code than hoping to be as descriptive as possible when generating the hashes (in this case instance ID's).
Thanks to Mizore Yukii for this advice, from Creator's Musings.
In the "text" field, enter whatever text you want, I just go with the item name/description + a number, to indicate which ID it is.
We'll need 3 of FNV64 hash codes.
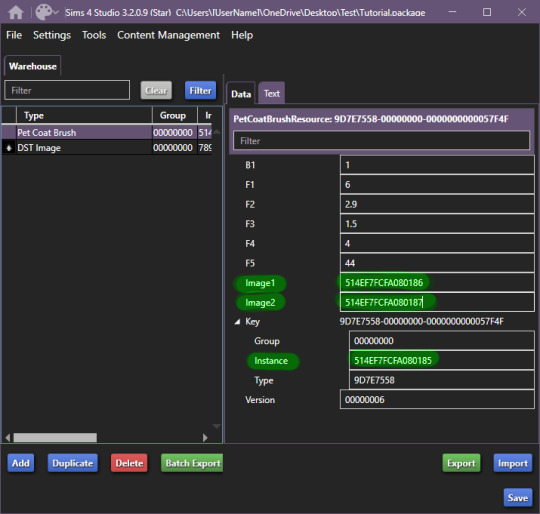
These are the 3 ID's that I've generated:
514EF7FCFA080185
514EF7FCFA080186
514EF7FCFA080187
We'll use the first code for the Pet Coat Brush file, the second code for Image1 (Brush file) and the third for Image2 (Brush icon file).
Your Pet Coat Brush file should look like this now, with the updated ID's.
Moving forward, we'll be changing the ID for the DST Image1 (Brush in-game) -

Now that you've done this, you need to right click on DST Images > Duplicate, you'll be prompted with this window:
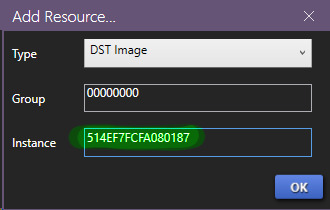
In this window, you'll use the last hash code you generated for the Image2 new ID (in-game icon).
Now! It'll all look like this:

To edit the brush we'll be seeing in-game, we'll now have to edit the image, begin by exporting the image available in DST Image.
Once that's done, open it up in whatever editing software you want to use, I'll be using GIMP, because it has built in DDS exporter, I recommend you do the same, however if not interested in doing so, make sure your program can export DDS images in L8 format, if not, edit in preferred software and use GIMP to export as DDS.
Once you've made your brush, you'll want to do as follows:


IMPORTANT
It MUST be exported in the format L8, it will appear broken in-game otherwise.
Then, import your custom made brush into S4S package editor:
Do the same for the icon:

You've got the easiest part down, now, comes the part with testing how well the brush works and behaves in-game.
The responsibility of this falls onto the values you may have seen in Pet Coat Brush file -
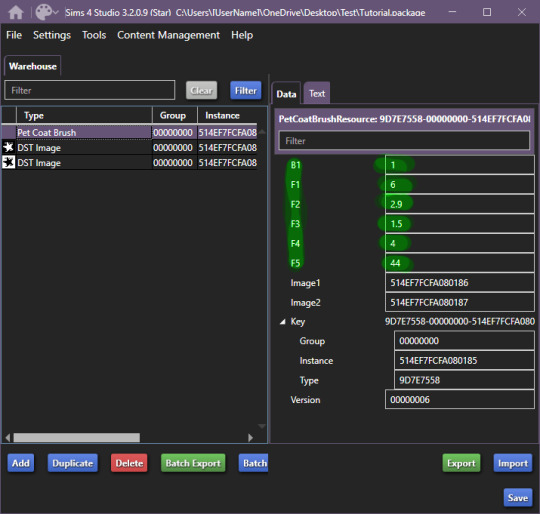
These are the values responsible for how the brush works in-game.
I'll be upfront right now, I can't get the rotation value to work, I'm not sure if I'm doing something incorrectly, but if I figure it out, I'll add to the guide eventually. I haven't had time to test this further, but as far as I've been able to test it, it works like a charm.
These are the value meanings -
Sorry for how lazy this is presented, as once I figured out the basic meaning, I moved forward.
B1 is responsible for sorting on whether your brush is considered a Brush or a Stamp. 0 & 2 - Brush, 1 & 3 Stamp EDITED 24/10/2023: 0 is non-rotating brush, 2 is a rotating brush!
For F1, I do NOT recommend using 0 or 5, when I tested these values in-game, they were extremely laggy when attempting to paint. 1 - Smooth Painting, 2 - Spaced Apart Slightly, Overlap, 3 - Spaced One After Another, Some Overlap, 4 - Spaced One After Another, No Overlap
F2 changes the size of the brush in-game, meaning how small it can be, I believe. 0 - 1px smallest size brush, scaling up changes how small the brush can get.
F3 I suspect is brush rotation, but I could not make it work on any of the brushes I tried making, so I'm not 100 sure. This is one of the brushes you'll have to look at values for in the existing in-game brush files, as I could not get this to work for myself.
F4 is the maximum the size of the brush will become. Maximum size the brush can get, I've tested it from 0 to 5, 5 is quite large, so I recommend that, but go for smaller as well.
F5 I'm not entirely sure, however during my testing, I found that this changes where exactly the brush appears in both stamps and brush tabs in-game. There may be more to it, however, I could not figure it out. The values I tested for this were 0, 1 and 2, this affected where the item appeared - 0 - First Row, First Item, 1, First Row, 2nd Item, 2 - 2nd Row, First Item, I've seen that these can go quite high, ie the base file I used being 44, so keep that in mind while changing this setting. For my personal brushes I use 0.
I recommend comparing existing brush files to the one you're looking to edit.
I believe this is it. If there are any questions, I'll try to answer as best as I can. If anyone wants to add anything to this, please do so, I'll be elated to update and credit you for the information shared.
This all came to be because I could not find a guide, but fortunately for me, I'm too good at figuring things out and even though I didn't quite understand how the Game File Cruiser worked a few days ago, I've consumed so much information it hurts my brain.
Forgot to add: Finished product
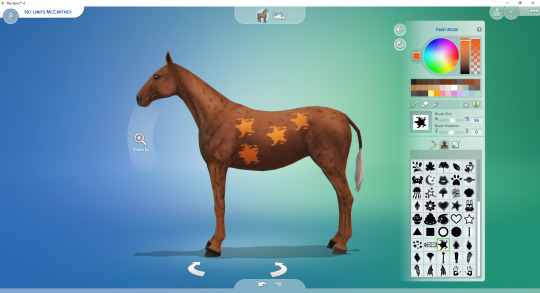
Because I didn't edit the Pet Coat Brush file I was working on, I've made a stamp, I recommend messing around for a while though and finding what you prefer. The values themselves are pretty easy and forgiving to edit.
So account for that, you'll definitely want to edit the values responsible for the brush working correctly. If you have any questions, please let me know, I tried to make this as clear as possible, and I know this is probably over the top for a guide, but I'm the kind of person who needs every small direction, to even know what I'm doing, when I'm following a guide.
UPDATED AGAIN, I FORGOT TO ADD THE ACTUAL VALUES I FOUND.
#The Sims 4 Guide#The Sims 4 Horse Ranch#The Sims 4 Custom Brushes#The Sims 4 CC guide#TS4 CC Guide#TS4 Horse Ranch#TS4 Horses#The Sims 4 Horses#Sims 4 Horses#Sims 4#Sims 4 Horse Ranch#The Sims 4 Tutorial#Sorry if this isn't a great guide#i tried really had and nearly had an aneurysm because tumblr deleted my previous attempts like 4 times
85 notes
·
View notes
Note
For the art asks thing, 5, 11 or 27? Or all three if you’d like! :)
I'll gladly answer all of these
5. Estimate of how much of your art you post online vs. the art you keep for yourself
Most of it! Well, most of it since I got in the dst hole this year
Before that I would almost exclusively draw for myself, my Oc's specifically.
Stories I won't be working for a looong time, not sure if I'll ever will honestly, but it's fun to visit them from time to time.
(And some. . . weird tastes that remains hidden in the archives of my tablet)
11. Do you listen to anything while drawing? If so, what
I either play long videos in the background cuz I like to have some noise (right now Plate Up gameplays cuz I love the game)
I also have a playlist on Youtube that I update every month or so with songs that currently give me comfort (not good with listening EVERYTHING I like at once)
Current highlights of said playlist
° Unlike Pluto's recent songs (As They Bloom and Fata Morgana are my faves so far)
° Father's Day (CG5's Don't Hug Me I'm Scared Song)
°Jekyll and Hyde - Dangerous Game, His work and Nothing More and Confrontation (Transformation is also there but it brings me memories of the thing I haven't touched in months Cough cough)
° Phantom of the Opera by Jonathan Young Cuz I have a crossover idea with Maxwil and that is like "the end song" of the whole thing. The crossover has nothing to do with the original story but whatever
Oooooor The Prince of Egypt if I'm feeling down or overwhelmed (currently 10hrs of the Stone Tower Temple. . . )
27. Do you warm up before getting to the good stuff? If so, what is it you draw to warm up with
I. . . don't?
Most of my stuff are like doodle pages so I don't really plan anything or warm up. The Warm Up IS the drawing itself. Not even when I have a clear idea in mind, I just push through and deliver whatever comes out. That's why they're so sketchy.
Silly doodles are just for fun.
BUUUUUUUT I do do some figure sketch sessions whenever I feel stuck in my drawing skills, practicing the line of actions really unclogs my brain when nothing seems to go right
Anyway, I exported the timelapse of the starvetover piece cuz that's an idea that exploded in my head in my head and was transferred almost immediately
Sorry if it's a long post but those are 3 questions so you should've expected that haha
61 notes
·
View notes
Text
learn to digitizing your embroidey designs
From Sketch to Stitch: A Comprehensive Guide to Digitizing Your Embroidery Designs
The world of embroidery has embraced the digital age, allowing you to transform your own unique designs into stunning stitched masterpieces. But how do you bridge the gap between a simple vector graphic and a complex stitching pattern? This comprehensive guide, crafted with 2500 words, will teach you the art of digitizing your embroidery designs, from software choices to stitch considerations and finishing touches.
Before We Embark: Understanding SVGs and Embroidery Files
Scalable Vector Graphics (SVGs): These text-based descriptions of images offer infinite scalability, making them perfect for digital design.
Embroidery files: These contain specific instructions for your machine, including stitch types, colors, and placement (DST, EXP, JEF, PES formats are common).
Step 1: Choosing the Right Software
Consider these factors when selecting your digitizing software:
Skill Level: Are you a beginner or an experienced digitizer? Some programs cater to novice users, while others offer advanced features.
Budget: Free and paid options exist, each with varying capabilities and functionalities.
Compatibility: Ensure the software outputs files compatible with your embroidery machine.
Here are some popular choices:
Free:
Inkscape: A free vector graphics editor with the Ink/Stitch plugin for basic digitizing.
Sewing & Embroidery Software (SERF): Free software with limited but beginner-friendly digitizing features.
Paid:
Wilcom Embroidery Studio: Offers powerful tools for advanced digitizing and editing.
Embrilliance Enthusiast: User-friendly software with various features at a good price point.
Brother PE Design: Ideal for beginners with Brother embroidery machines.
Step 2: Preparing Your SVG
Simplify the design: Remove unnecessary details or intricate lines that might not translate well to embroidery.
Optimize colors: Limit your color palette to what your machine can handle (usually 6-12 colors).
Convert to paths: Ensure all elements in your SVG are outlines (paths) for proper stitching.
Step 3: Importing and Converting
Import your cleaned-up SVG into your chosen software.
Follow the software's specific instructions for converting to an embroidery file. This typically involves:
Choosing stitch types: Select appropriate stitches for different parts of your design (satin stitch for filling, backstitch for outlines, etc.).
Setting stitch parameters: Adjust stitch density, length, and direction for desired effects.
Color mapping: Assign thread colors to different parts of your design.
Step 4: Digitizing Tweaks and Adjustments
Preview and test: Most software allows you to preview your design on a virtual embroidery machine. Check for stitching issues and adjust paths or settings if needed.
Refine stitch types and parameters: Experiment with different stitch combinations to achieve the desired look and texture.
Consider thread types and colors: Choose thread that complements your fabric and design aesthetic.
Step 5: Export and Embroider!
Once you're happy with your design, export it in a file format compatible with your embroidery machine.
Transfer the file to your machine and prepare your fabric and thread.
It's finally time to see your creation come to life! Embroider your design, following your machine's instructions.
Bonus Tips for Success:
Start simple: Begin with basic shapes and designs to get comfortable with the conversion process.
Practice digitizing: The more you experiment, the better you'll understand how different stitches and settings affect your final outcome.
Join online communities: Connect with other embroidery enthusiasts for tips, advice, and inspiration.
Don't be afraid to ask for help: If you get stuck, consult software manuals, online tutorials, or seek assistance from experienced digitizers.
Remember, with a little practice and this guide as your compass, you'll be well on your way to transforming your SVG dreams into beautiful embroidered realities!
Further Resources:
Websites: Needlework Tips and Techniques: https://www.needlework-tips-and-techniques.com/
Books: "The Complete Book of Digitizing" by Jeannette Douglas, "Digitizing Designs" by Laura Ashley
YouTube Tutorials: CreativeBug Cutwork Embroidery Masterclass, Bluestone Creations Cutwork Basics
Online Forums: Embroidery Forum
With these additional resources and the knowledge you've gained, you
Read the full article
2 notes
·
View notes
Text

Balasan komentar buat banyak orang. Kita orang Asia semua.

@yorithesims
どうもありがとうございます yori さん!I don't know if you play The Sims 4 too, glad you like my creation and I hope you like Indonesian food as well. You can try there are many restaurants that sell Soto Betawi and other Indonesian food in Japan.
List of Indonesian restaurants in Japan based on TripAdvisor
@tommyandsean
Iya, bro. Jaman gua dulu convert ke TS4 settingan SSAO intensity-nya di edit dari 1 jadi 0 gara-gara ada garis item nembus di CC nya. Lama-lama capek jadinya bolak balik klik klik material... phong... material... material lagi... terus save... cuma buat edit settingan SSAO intensity nya.
Karena gua pake metode yang diajarin tutorial yang tinggal import specular dari export-an TS3 TSR Workshop dimasukin ke semua DST image, ternyata malah jadinya ada muncul bayangan gelap. Harusnya yang diimport ke s4studio itu DST paling bawah dijadiin normal map ngikutin format alpha dari .dds original EA, bukan specular semua. Sekarang udah gak ada bayangan gelap nembus ke CC jadi settingan SSAO intensity gak perlu diedit lagi.
Dulu:
DST image atas bawah semuanya sama Spec dari export-an dari TSR Workshop tanpa diedit lagi. Makanya alphanya beda sendiri dan ngaco.
Sekarang:
DST image bawah: Normal Map
DST image atas: Specular

EA original
DST image bawah & atas


@fantashit
Apanya yang cantik nih, tempat sumpitnya atau model Sim yang ceweknya... hahaha. Kalo maksudnya tempat sumpitnya... Makasih, bro! Model ceweknya gua download dari gallery bukan gua yang bikin... cantik juga doi
Sekalian mau ngasih tau ada Sims player dari Malaysia yang request ke Sandy aroundthesims buatin CC kamar mandi khas Indonesia & Malaysia yang ada bak mandi, ember, gayung, toilet jongkok, semprotan buat cebok. Silahkan di-klik LINK nya.

@nerogreen Hahaha terima kasih ^_^ Moga-moga CC buatanku berkat buat kamu ya.

@moonxstr Terima kasih banyak atas pujiannya ^_^ Mesh-nya bukan asli buatanku, tapi senang lah CC-ku sudah membawa kesenangan dan representasi yang baik buat Sims player dari Malaysia. Aku juga suka makan Nasi Lemak, terakhir aku makan Nasi Lemak 10 tahun yang lalu di Kopitiam (warung kopi Malaysia).
#reply#balasan#the sims 4#the sims#thebleedingwoodland#ayo semua sims player dari Asia kumpul semuanya di sini#huifu
6 notes
·
View notes
Text
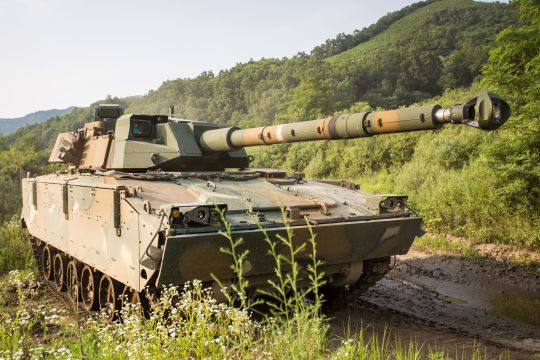
A South Korean K21-105. This vehicle is a fire support / light tank version of the South Korean K21 Infantry Fighting Vehicle (IFV), armed with the Belgian CT-CV 105HP turret, intended for the export market. Developed jointly by Doosan DST of South Korea and CMI Defence of Belgium, it has not seen any export orders since its reveal in 2014.
3 notes
·
View notes
Note
hope you're having a good timezone! could i ask where you found the picture in your header? the one with the person in the pink dress - if you used s4s, how did you get it? <3
thank you, i hope you have a good timezone too! ♥️
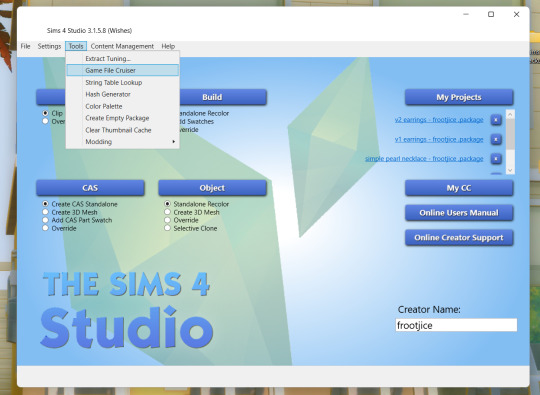
Go to Tools at the top then click on Game File Cruiser
Then you look for DST Image and i go to Thumbnail to see them clearer but you can look under List too then just Export, hope it helped!
30 notes
·
View notes
Note
hi! i love your medieval windenburg, and it inspired to try and making my own version of henford-on-bagley, inspired by the 1900s period of my country for my own sims stories! but something that is really bothering me is how green the world's grass texture is, and was wondering if you would know how to change it since i believe you did it with your own world? i just want to make the grass look more dead, nothing fancy, but i didn't see any resources on how to do it haha ty beforehand!
Hello sweet heart !
First, thank you very much to appreciate my mod, I am so glad that it inspires you ^^
Then, you will have to find the grass texture in the clientfullbuild0 of this EP (I don't remember the numer but you can find the info easily), this package is in your installation path of the game.
Open the package with sims 4 studio and go to the warehouse, filter by type and search in the dst images the ones looking like the grass you want to replace then batch export them.
Once you have the one you want, simply edit the color and tone in photoshop or gimp or whichever software witout changing the name of it so that it overrides the resource in the game and then batch import it in a blank package file !
Another way if you don't want to search too long is to open an already existing retexture package of this EP grass, copy the instance and paste it in the ClientFullBuild0 package search box to find it directly and then do the same as I said above ^^
Good luck with your wonderful project ! If you need any further help don't hesitate to private message me 🥰
Xoxo
TheSenseMedieval
12 notes
·
View notes
Photo
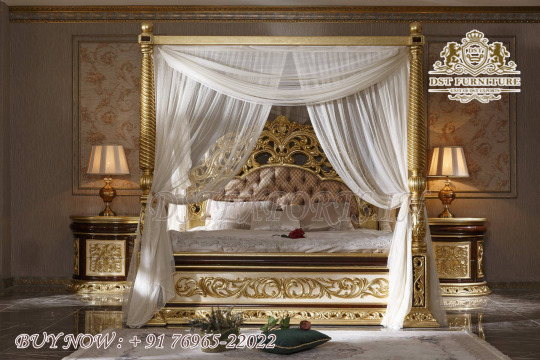

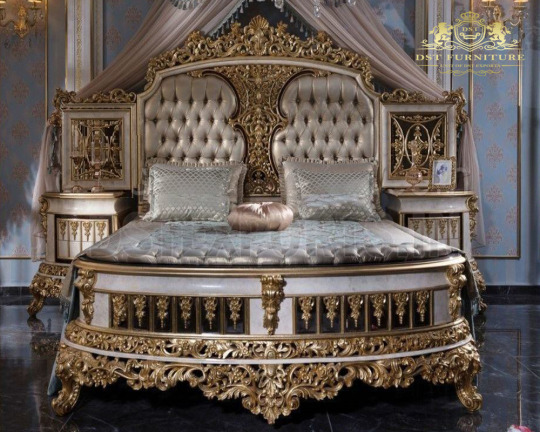
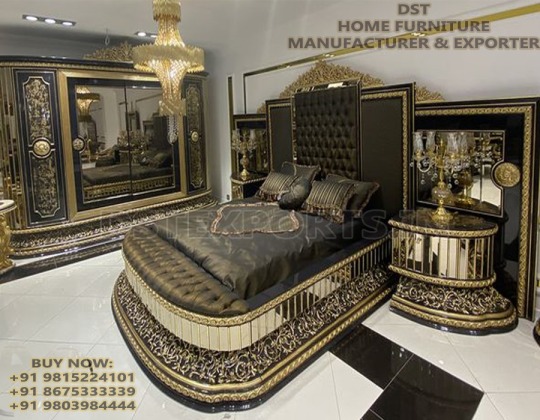
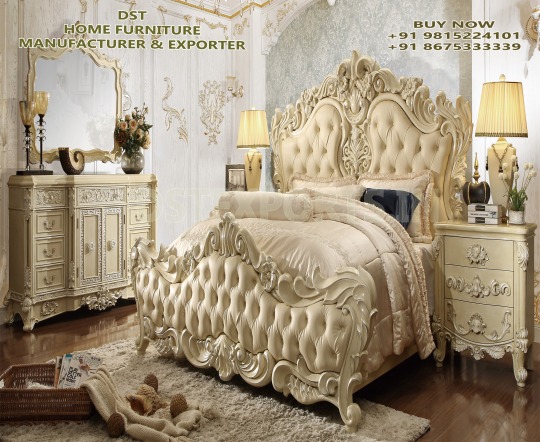
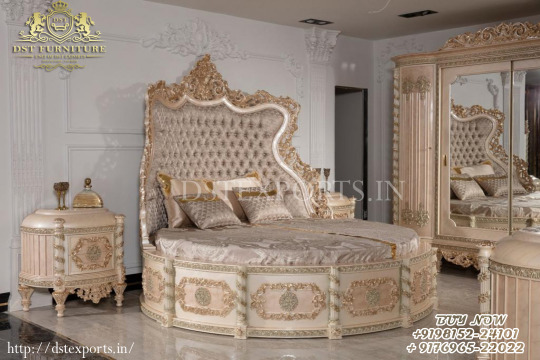
Luxury and Modern Bedroom Furniture Collection
Dst exports offering the high end & luxury collection of bedroom furniture to decorate your home. We have wide range of furniture for different bedroom themes from traditional, contemporary to modern furniture. Check Out the category and find the exclusive range of beds, night stands, dressers, chesters, sette & benches, and wardrobes/almirah
DST Furniture Store
We are Just One Phone Call Away
{+91 76965-22022}{+91 98152-24101}
2 notes
·
View notes
Text
CO2 Laser Cutting and Engraving Machine in Hyderabad

CO2 Laser Cutting and Engraving Machine in Hyderabad:
Miracle Machineries:
Miracle Machineries is a Manufacturer, Exporter, and Supplier of CO2 Laser Cutting and Engraving Machine in Hyderabad, Telangana, India.
The company specializes in manufacturing Laser Cutting Machines, focusing on CO2 laser technology.
CO2 laser machines utilize a high-energy laser beam generated from a carbon dioxide gas mixture to cut or engrave materials with precision.
These laser engravers/cutters are designed to deliver quick, clean, and quality results for a wide range of engraving applications and requirements.
The machines are capable of enhancing products, adding value, and increasing turnover through precise cutting and engraving processes.
They are suitable for both single-piece or small series production as well as cost-efficient serial production.
Practically any design can be realized using a laser, providing total freedom for designing inscriptions, logos, barcodes, serial numbers, and even photos.
CO2 laser cutting and engraving machines can work on various materials including plastic, wood, glass, MDF, acrylic, textiles, leather, handicrafts, card, paper, films, and more.
These machines find applications in industries such as advertising, craftwork making, mold making, toy manufacturing, and more.
The proprietary software supports the output of various file formats such as PLT, BMP, DXF, DST, AI, T100, etc.
Applications:
Acrylic Cutting
MDF Cutting
Gift Articles
Leather Cutting
Fabric Cutting
Rubber Engraving
Trophies
Sign Boards
Technical Specifications of CO2 Laser Engraving & Cutting Machines:
Laser Tube: EFR, Reci, Yongli
IV Brand Original Lens with American Technology 3 Mirror
Latest Trojan Controller
Leadshine Company's Motor and Drive
Operating Power: 500 W/ 220 Volt, 50 Hz single phase
Hexacool Water Cooler with 2 Pipes
Compressor
Blower with 2 Pipes
Tool Kit (with Lens Cleaner)
Strip Bed or Honeycomb (Distance between 2 strips less than 10mm)
Miracle Machineries serves as a CO2 Laser Cutting and Engraving Machines in Hyderabad, covering areas such as Uppal, Madhapur, Ameerpet, Begumpet, Somajiguda, Gachibowli, Manikonda, Miyapur, Kondapur, Bhardari, Sanathnagar, Azamabad.
For further information and inquiries, please feel free to contact Miracle Machineries.
Read the full article
#Ameerpet#Azamabad#Begumpet#Bhardari#CO2LaserCuttingAndEngravingMachine#CO2LaserCuttingandEngravingMachineinIndia#CO2LaserCuttingandEngravingMachineinTelangana#Exporter#ExporterofCO2LaserCuttingandEngravingMachine#Gachibowli#India#Kondapur#Madhapur#Manikonda#Manufacturer#ManufacturerofCO2LaserCuttingandEngravingMachineinHyderabad#ManufacturerofCO2LaserCuttingandEngravingMachineinIndia#Miyapur#Sanathnagar#Somajiguda#Supplier#SupplierofCO2LaserCuttingandEngravingMachineinHyderabad#Uppal
0 notes
Note
I was just looking over your Sims 4 PackIDs resource. How does one search for basegame DST images in the Game File Cruiser? It's not on your list.
Honestly, these days it's easier to use Lot51's Image Search tool to search for something via keyword (if it doesn't have an EP/GP/etc. tag - starts with "InGame", it's Base Game) and grab the instance number that way. Put that into the Game File Cruiser's instance number box (make sure DST Image is checked) and you can add the image to your package or export it that way. Game File Cruiser is good for exporting stuff, but less good at doing your initial filtering.
1 note
·
View note
Note
hey! i'm not sure if this is a super complex question or not, but how difficult would it be to use your bg road/grass replacements and convert them to other worlds?? i love the khippie replacements but they arent updated to include every world and i hate having my game look so mismatched :( again sorry if this is a weird ask or complex or not !! love u <3
hi! <3 not a weird ask and not complex, just a bit time consuming! you'd go into the clientfullbuild for each expansion/game pack with a world, find the textures for the road and grass, batch export them, then batch import into an empty package. then you'd replace them individually by importing my textures. some of them might not match though!
and some worlds do use a couple of base game textures, which saves you a little time, but it's still an undertaking. it's an awful lot of scrolling to do, i'd do it for you if it wouldn't take me about a week to find all the DST images
18 notes
·
View notes
Text
A guide for making a horse stencil (but it also works for cats and dogs, technically).
Edited 16/10/2023: Updated to add more info on hash ID generation and better practice.
If you've read my previous guide on making custom brushes, you'll find that it's relatively similar.
If you're brand spanking new to making any mods, this will probably take you through every single step, because I have an issue with being over-detailed.
Things you'll need:
Sims 4 Studio
GIMP
Notepad
Tools in S4S we'll be using:
Begin by making a new, empty package file, after that, open up the game file cruiser.
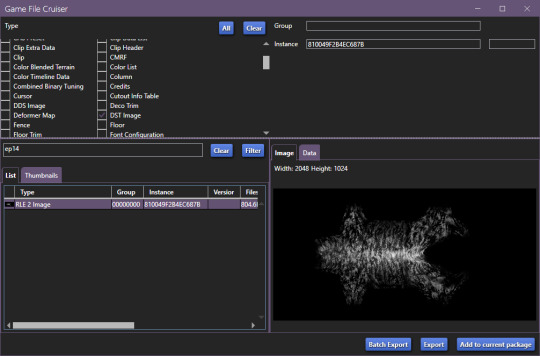
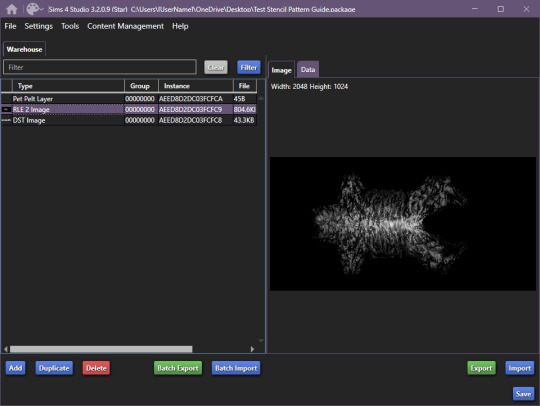
Find the "Pet Pelt Layer" and tick the box, after that, in the search box below the file types, write in "EP14", as this will hide cat and dog stencils that will show up.
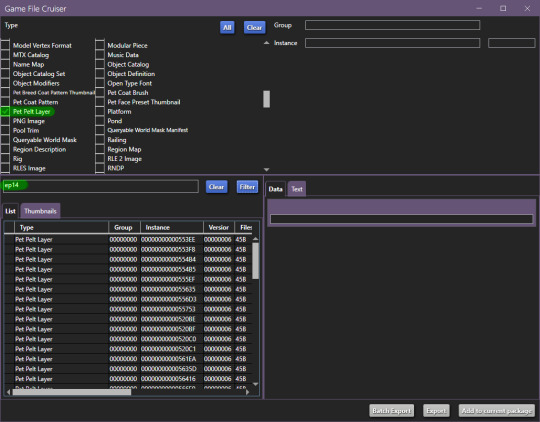
From here, it's important that we find the right one to work with, it has to be tagged as "Stencil", in this case, it'll be the 3rd from the top of the list or - 00000000000554B4
You can definitely work with just the first one which is a pattern if you want to, but if you're completely new to modding, it will be much easier with the one I've linked. If you do choose the pattern route, remember to change it from pattern to stencil and ThumbnailKey is responsible for the thumbnail you'll see in game.
Now, grab your trusty notepad and make note of these ID's:

In our case it's:
810049F2B4EC687B
CF239313C7BCBD54
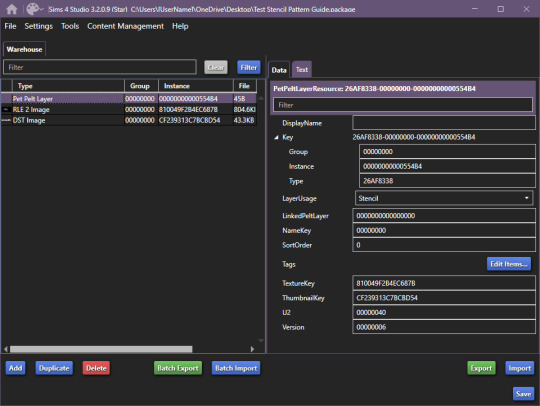
Once you've made note of these ID's, make sure you add the file to your current package. You can also skip writing down the ID's and just view them from your package editor screen, but I find it helps keep the workflow more compact, however it is up to you.
Now, go back to your filetype list and select "DST Image" and "RLE 2 Image":
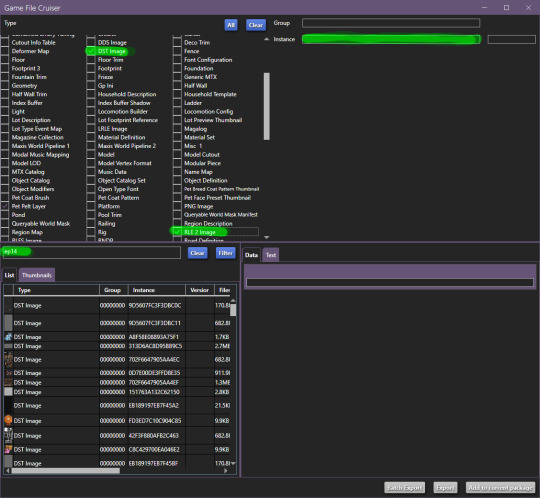
Additionally, make sure you still have "EP14" in the search bar, for the next part we'll be using the instance search bar, as marked on top right.
Enter your first ID -
Add to package and do the same with the second ID.
Now, your new package file should look like this:
Once you're at this point, it's relatively easy sailing.
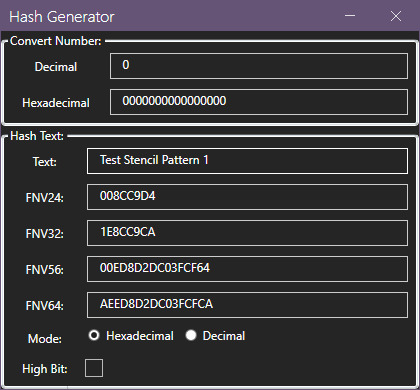
Start by going to Tools > Hash Generator and generate 3 ID's:
Edited 16/10/2023: When generating your hash ID's, please use your creator name ie.: "[YourCreatorName/Blogname]TutorialCustomFurCoat1", this will give you a more unique hash code than hoping to be as descriptive as possible when generating the hashes (in this case instance ID's). PS. You should still be descriptive.
Thanks to Mizore Yukii for this advice, from Creator's Musings.
I do it this way, descriptor + numbers, but you can do it whatever way you want to.
After that, we'll assign your newly generated ID's.
These are the ID's I generated:
AEED8D2DC03FCFCA
AEED8D2DC03FCFC9
AEED8D2DC03FCFC8
Respectively, my first ID will be used on the Pet Pelt Layer, Second ID will be used on the RLE 2 Image and 3rd ID will be used for the DDS image:
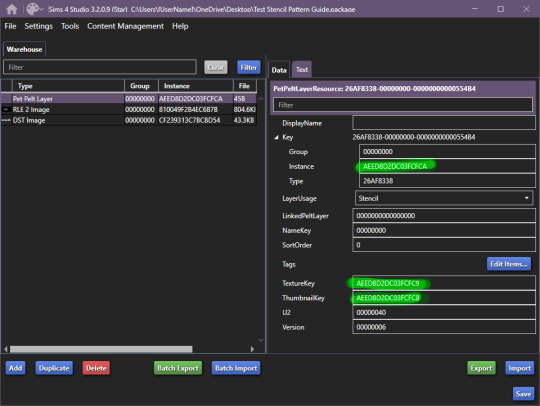


The package you're working on should now look something like this:

After this, you should save your package (so you don't lose your progress, I had a bluescreen happen and I'm still mad, so don't make my mistakes, it's easy to fix, just takes too much time).
Once you've saved your package, we can begin exporting/importing images.
For editing, I recommend actually grabbing the horse skin file. I've uploaded it to SimFileShare, it comes in two flavours .dds and .png, .png will be easier to work with, since it won't have the same layers are .dds.
Anyway, back on track we go:
Export the RLE2 image, it'll be saved as a .png, keep that in mind for later.
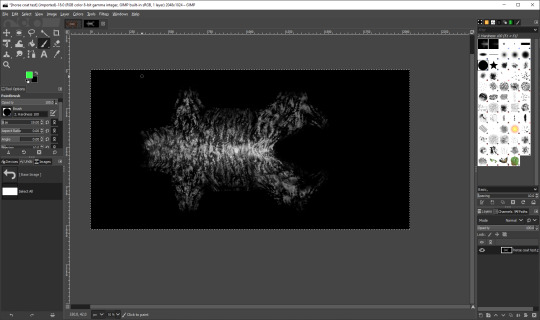
Once you're happy with your results, get to exporting your image.
IMPORTANT: remember to export the file in L8 format.
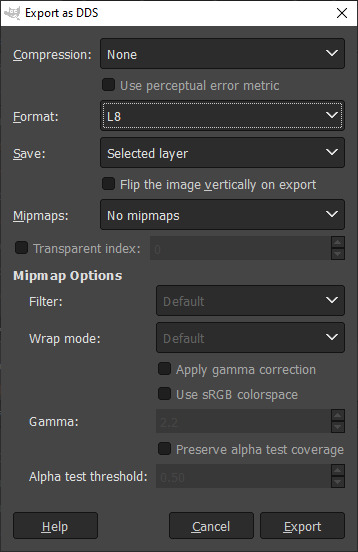
Once you're done with that, go ahead and import your picture into the package:

Repeat the same steps for the DST image, and you're done.
Now, save your file and load it into the game:
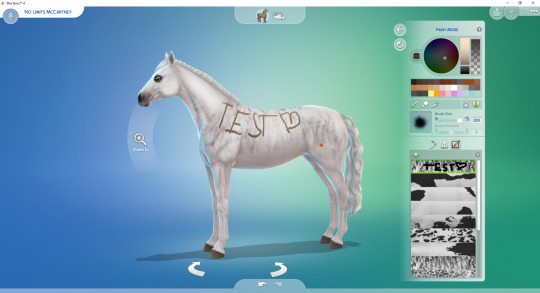
And you're all set and done.
If you have any questions, let me know.
#Sims 4 Horses#Sims 4 Horses CC#Sims 4 Horse Ranch#sims 4 equestrian#Sims 4 CC#Sims 4 CC Guide#Sims 4 CC Resources#ts4 tutorial#ts4 guide#ts4 cc#The SIms 4 Horse CC#The Sims 4 Horses#The Sims 4 Horse Ranch#The Sims 4 Equestrian#The Sims 4 cc
79 notes
·
View notes
Text
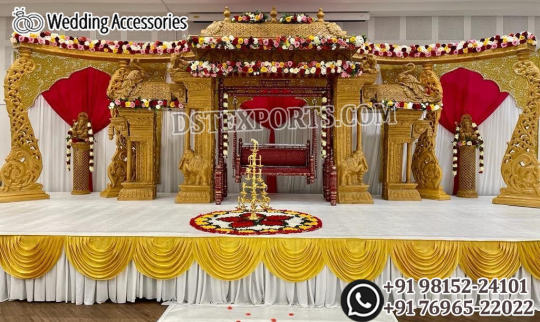
Traditional Tamil Wedding Wooden Mandap Decoration
The mandap is the ‘sanctum sanctorum’ of hindu wedding customs. It is the focal component in wedding improvements. An extraordinary mandap configuration isn’t just about satisfying feel yet in addition about the significance behind setting up a shelter with four support points that denotes the favor ability of a productive wedded life. Just a select number of individuals are permitted in the mandap under its shade, in particular, the lady, groom, groups of the lady and husband to be, and the directing minister who will bring the customs. As a leading company of Mandaps Manufacturing and exporting, DST Exports offers a wide range of luxury and unique wedding mandap designs that meets the highly expectations of the new era people. We are the professional Manufacturer of Wedding Wooden Mandaps from past 25 years. We are specialized in manufacturing wooden mandaps, and have a well experienced team who designing and making all the unique mandaps.
First we understand your requirements and themes, and visualize your dream into reality by making drawing. That’s How its start and goes on with real setup. We Have thousands of designs that can bling your wedding with joy and shine….Here is One of the latest Model of Our Mandaps specially designed for our customer in UK. This Mandap is renowned as Traditional Tamil Wedding Wooden Mandap Decoration
Traditional Tamil Wedding Wooden Mandap Decoration:
These Mandaps are made of Premium Quality Treated wood and its delightfully manufactured with hand-cutting/carving. This is an Indian Wedding Mandap that is made for performing Indian ceremonies on a wedding event. The Manavarai Mandap bring a modern but traditional look to any marriage ceremony with its deep and hand carvings. Combination to any color theme, the heavy Carved Mandap Pillars will surely make sure that it creates the perfect atmosphere and memorable setting for the ceremony as well as a trend setter for your photo album for everlasting memories.
Wedding accessories lounge new mandap designs day by day. It a unit of DST Exports (leading company of Wedding Mandap Manufacturer and Exporters). We just not discover the designs but we understand the quality and quantity of Items a wedding couple needs. We offer a perfect package to our customer which perfectly fit according to their desires and dreams.
send the query on our whatapp no. +91 9815224101, +91 76965-22022, +91 9803984444 , +91 8675333339
#mandap#wedding mandap#mandap decoration#wooden mandap#indian mandap#manavarai mandap#mandap decor#wedding stage mandap#fiber mandap#metal mandap#crystal mandap#new mandap
1 note
·
View note
Text
How to convert an SVG file to an embroidery design
From Sketch to Stitch: A Comprehensive Guide to Converting SVGs into Embroidery Designs
The world of embroidery has gone digital! Gone are the days of meticulously tracing patterns onto fabric. Now, with the power of SVG files and clever software, you can transform your own unique designs into stunning embroidered masterpieces. But how do you bridge the gap between a simple vector graphic and a complex stitching pattern? Fear not, crafty friend! This comprehensive guide will walk you through every step of converting an SVG file into an embroidery design, from software choices to stitch considerations and finishing touches.
Before We Begin: Understanding SVGs and Embroidery Files
SVG (Scalable Vector Graphics) files are text-based descriptions of images, making them infinitely scalable and perfect for digital design.
Embroidery files, on the other hand, contain specific instructions for your embroidery machine, including stitch types, colors, and placement. Common formats include DST, EXP, JEF, and PES.
Step 1: Choosing the Right Software
Several software options can help you convert your SVG. Consider these factors:
Skill Level: Are you a beginner or an experienced digitizer? Some programs offer user-friendly interfaces, while others cater to advanced users.
Budget: Free and paid options exist, each with varying features and capabilities.
Compatibility: Ensure the software outputs embroidery files compatible with your machine.
Here are some popular choices:
Free:
Inkscape: A free vector graphics editor with the Ink/Stitch plugin for basic embroidery conversion.
Sewing & Embroidery Software (SERF): A free program with limited digitizing features but good for simple designs.
Paid:
Wilcom Embroidery Studio: Offers powerful tools for advanced digitizing and editing.
Embrilliance Enthusiast: User-friendly software with various features and a good price point.
Brother PE Design: Great for beginners with Brother embroidery machines.
Step 2: Preparing Your SVG
Simplify the design: Remove unnecessary details or intricate lines that might not translate well to embroidery.
Optimize colors: Limit your color palette to what your machine can handle (usually 6-12 colors).
Convert to paths: Ensure all elements in your SVG are outlines (paths) for proper stitching.
Step 3: Importing and Converting
Import your cleaned-up SVG into your chosen software.
Follow the software's specific instructions for converting to an embroidery file. This typically involves:
Choosing stitch types: Select appropriate stitches for different parts of your design (satin stitch for filling, backstitch for outlines, etc.).
Setting stitch parameters: Adjust stitch density, length, and direction for desired effects.
Color mapping: Assign thread colors to different parts of your design.
Step 4: Digitizing Tweaks and Adjustments
Preview and test: Most software allows you to preview your design on a virtual embroidery machine. Check for stitching issues and adjust paths or settings if needed.
Refine stitch types and parameters: Experiment with different stitch combinations to achieve the desired look and texture.
Consider thread types and colors: Choose thread that complements your fabric and design aesthetic.
Step 5: Export and Embroider!
Once you're happy with your design, export it in a file format compatible with your embroidery machine.
Transfer the file to your machine and prepare your fabric and thread.
It's finally time to see your creation come to life! Embroider your design, following your machine's instructions.
Bonus Tips for Success:
Start simple: Begin with basic shapes and designs to get comfortable with the conversion process.
Practice digitizing: The more you experiment, the better you'll understand how different stitches and settings affect your final outcome.
Join online communities: Connect with other embroidery enthusiasts for tips, advice, and inspiration.
Don't be afraid to ask for help: If you get stuck, consult software manuals, online tutorials, or seek assistance from experienced digitizers.
With a little practice and this guide as your compass, you'll be well on your way to transforming your SVG dreams into beautiful embroidered realities! Remember, the journey is just as rewarding as the destination, so have fun exploring the creative possibilities and enjoy the magic of bringing your digital designs to life, stitch by stitch.
Read the full article
0 notes
Last Seen Blogs