#but it worked out
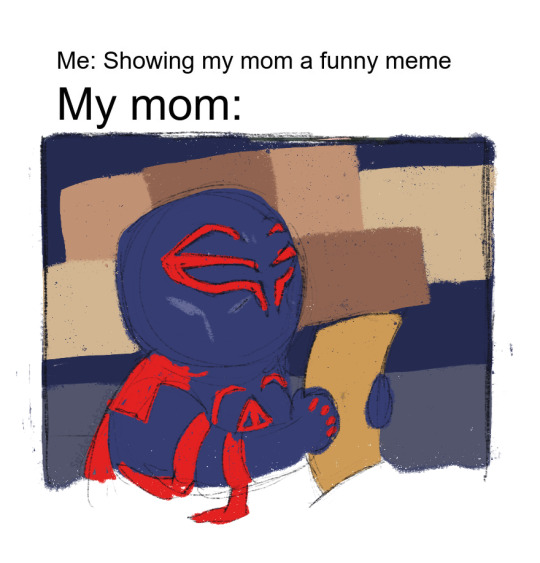
Text
MIZUKI FUCKING AKIYAMA THE MV MAKER EVER
somehow it actually popped off on the ... other... socmed which is wild
#artists on tumblr#digital art#25 ji nightcord de#fanart#illustration#drawing#mizuki akiyama#prsk fa#project sekai#i rushed this#but it worked out#i love them#sobs
915 notes
·
View notes
Text

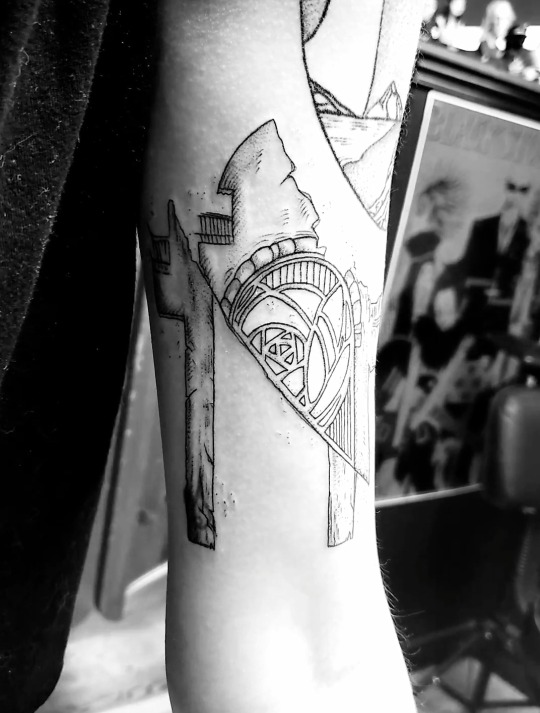
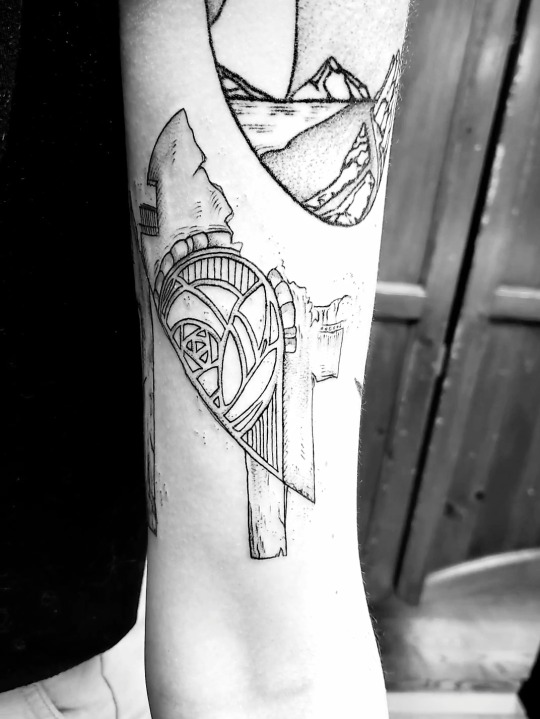
Commission for Neibolt!
please open in another tab for full size i am begging you.....
#figuring out earth primal was a curse and a blessing#but it worked out#gems are fun#frfanart#fr art#fr veilspun#veilspun dragon#dragon#flight rising#art#digital art#artist on tumblr
173 notes
·
View notes
Text
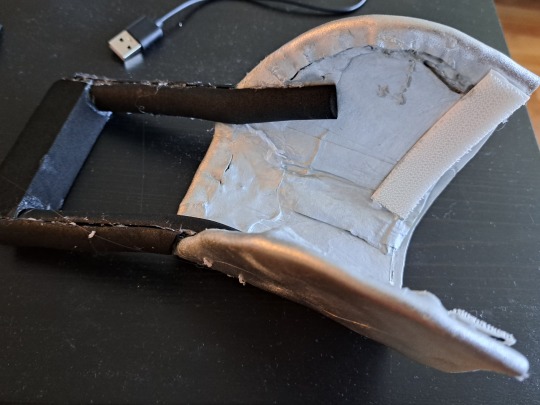
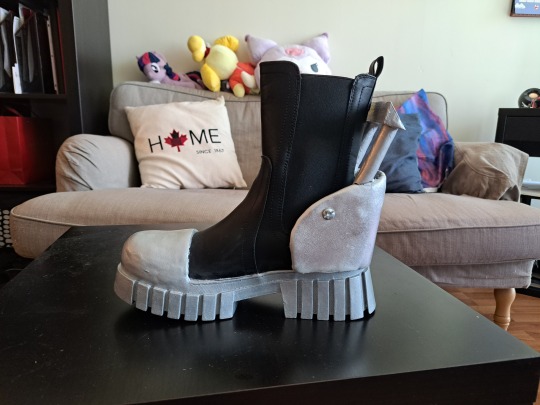
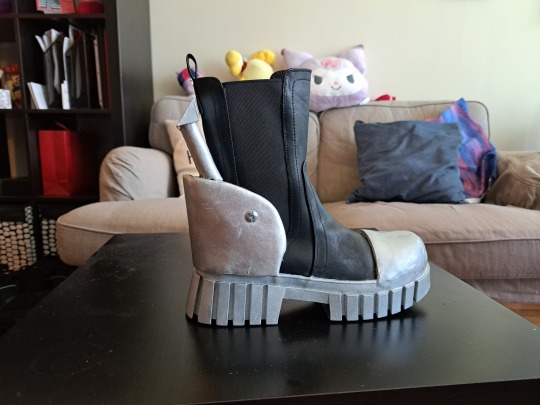
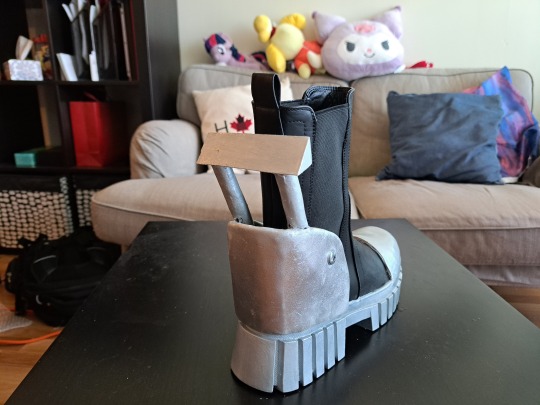
Infinity Train Boots!
Made these a while back as part of my Simon cosplay, must have been almost a month, but I didn't post the process!
(EDIT: hey I did some fixing up of my cosplay which you can see here in this post!)
Not actually sure if anybody would care because it's so niche, unlike my Spider-Gwen suit, but I did write about how I did the Infinity Train harpoon pack, so I'll discuss this too!
STEP 0: Acquire reference pictures:


Yep, pretty straightforward.
Note that Simon's boots have an extra bar/strap thingy, whereas Ryan and Min-Gi's do not.
I didn't include it because it kinda looks ugly and I didn't know how fragile the strap might be.
NEXT!
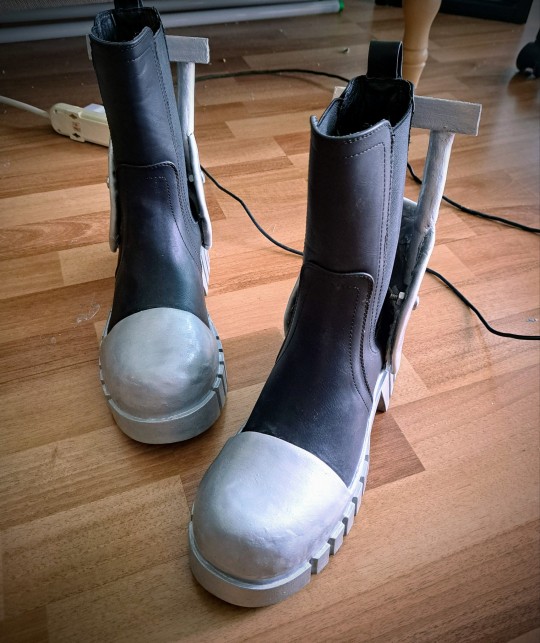
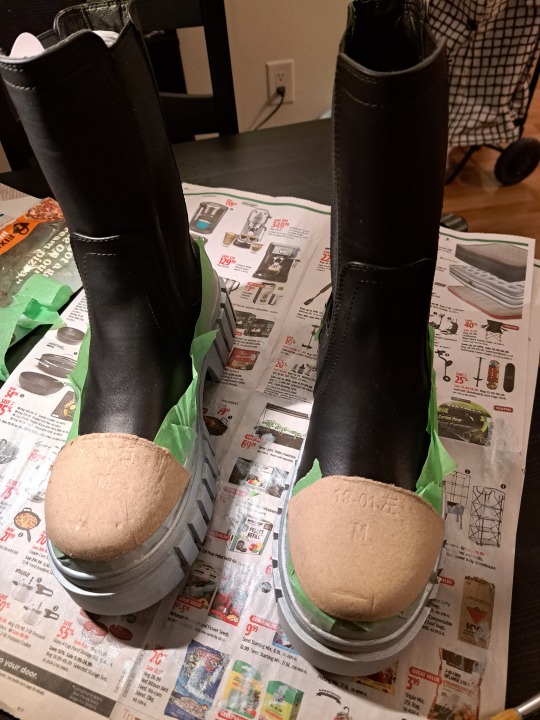
STEP 1: Acquire Boots!
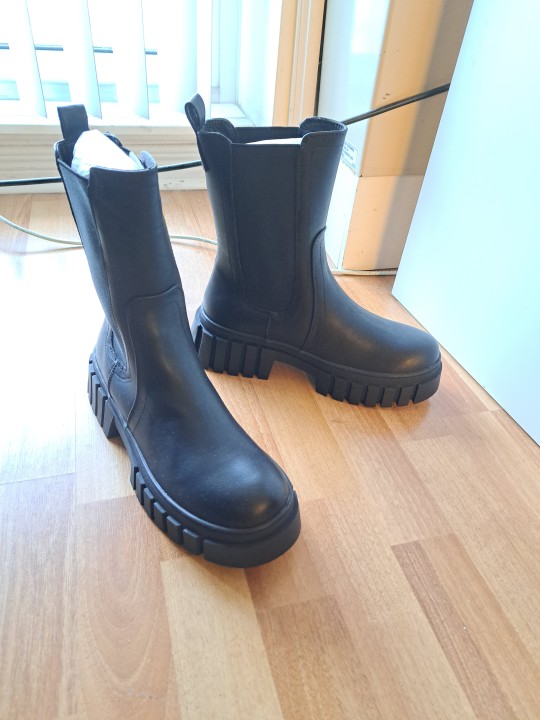

I got these MIA boots from Journeys Canada. They only cost around 60 bucks which is a bit pricey for cosplay, but I'm not about to go thrift shopping when I'm in a time crunch and I can just order online and get free delivery within 2 days. (Also these days 60 bucks for boots from a retail store is considered cheap. Inflation is nasty.)
They came with these cardboard thingies inside to keep the structure of the boots. They have "left" and "right" written on them in Chinese which was helpful for me when I got a bit confused about which side was which.
Save those for later. You'll need them.
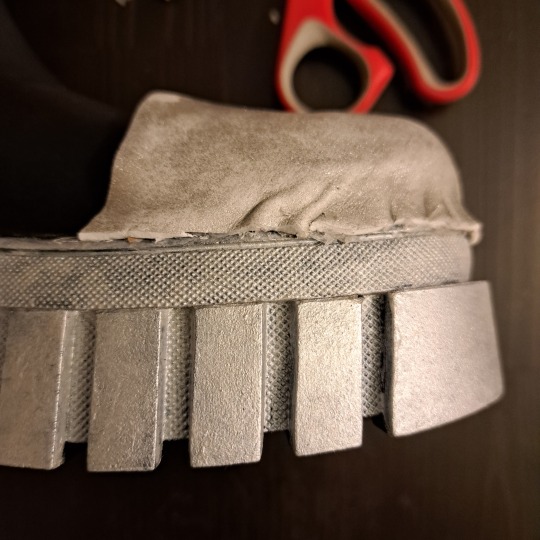
STEP 2: Paint the soles silver
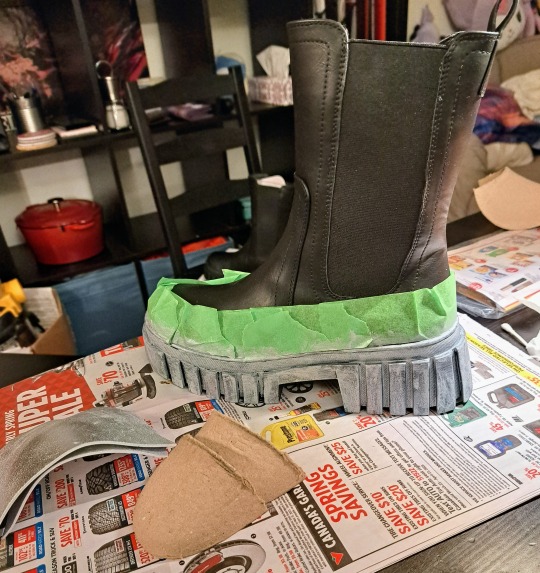
Literally any acrylic silver paint works. May take several layers. Make sure to put masking tape around the top edge of the soles.
I didn't use a primer on the base but you probably should. Any white acrylic paint or Gesso would do and you wouldn't need like 8 coats of silver. Do as I say not as I do.
And make sure to seal everything with a varnish or mod podge!
Here are also the cut toe caps and some silver craft foam. The craft foam was kind of a mistake I'll get into it soon.
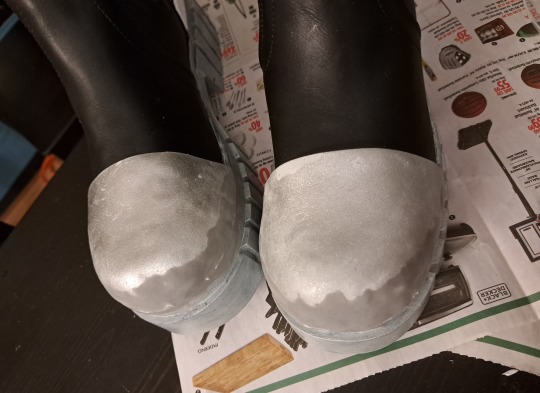
STEP 3: Make toe caps
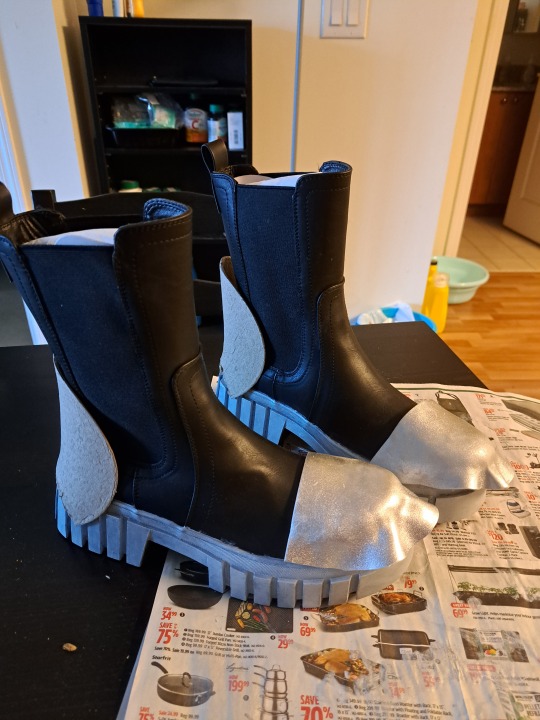
Here's me making sure the placement is good.
I glued the craft foam onto the cardboard caps, and then I was thinking "well the little bit hanging over it isn't going to be a problem, nope! I'll just glue them down and it'll blend right in!"
HAHAHAHA. WRONG.
STEP 3.1: Fuck up the toe caps because you were winging this and you have no idea how crafting materials work you idiot
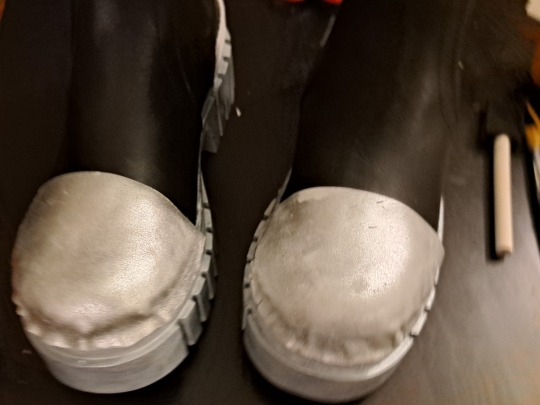
GROSS. DISGUSTING. VILE.
The hot glue melted the craft foam and now it's got this weird melty edge all around it that's all goopy and shit. Anyway you dont want your boots to look fucked up, you want them to look smooth like polished steel, or whatever they were made of in the show.
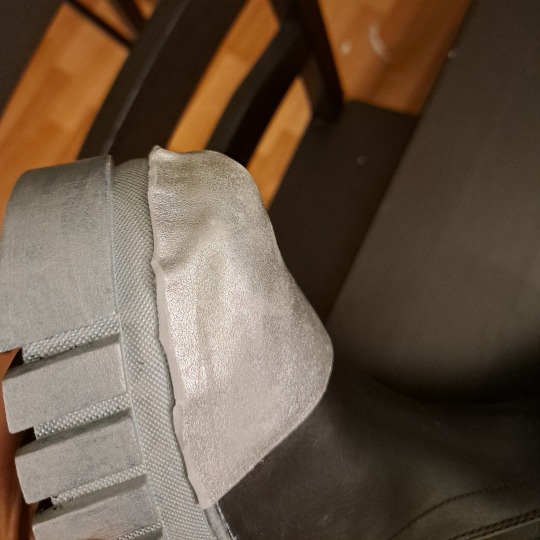
STEP 3.2: Fix toe caps
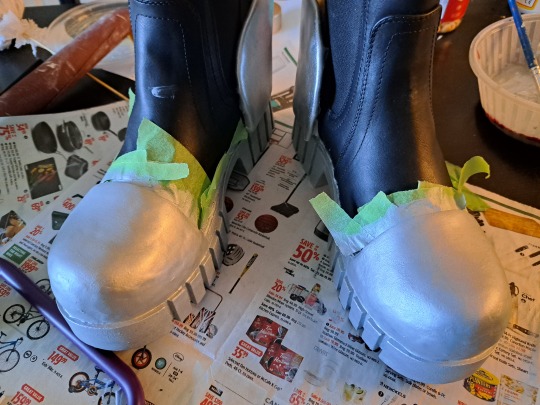
Everything can be fixed with Model Magic and acrylic paint! (and seal your paint with a sealant again!)
I just took some model magic (a type of lightweight air dry clay from Crayola, the cheapest you can get. Other more legit craft supply brands make similar materials as well), and squished it into the ugly bits, making a mostly seemless transition from craft foam to clay to sole.
TIP: to make model magic smooth before sanding, dab your fingers in some water to smooth it out! This also works for Paperclay as well if you decide to use a more higher end type of air dry clay.
STEP 4: Make the back metal thing that goes around the heel
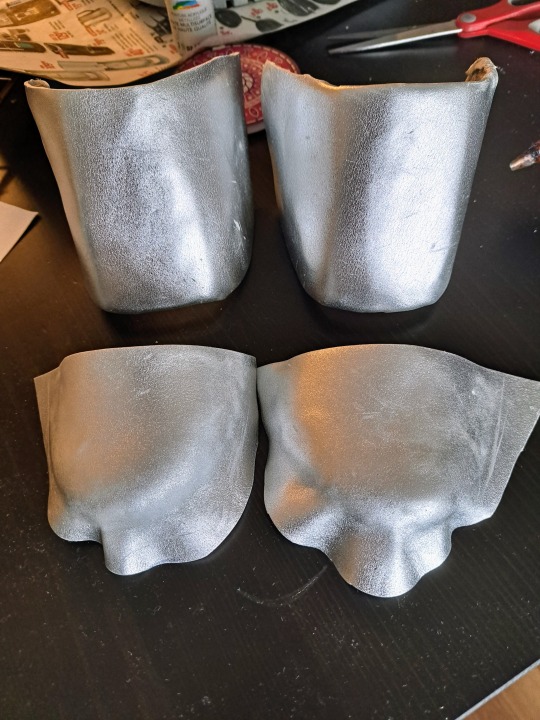
So I did this kinda in tandem with the toe caps which is why the pics will look a little out of order but essentially, I took the parts of the cardboard that I cut off, and I cut them in half, put some other cardboard in between, and then sandwiched the thing in metallic craft foam.
This time it was a bit more successful because I was able to hide the weird gross melted edges on the inside. Also paint that shit silver!
Now you can glue the "heel caps(?)" directly to your boots, but I decided to use stick-on velcro instead so they're kinda removable, and may be easier to transport or clean or something? ehhh.
STEP 5: Make those handle things
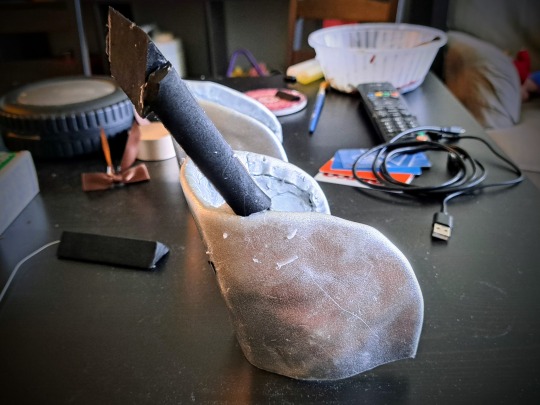
So I also hit a bit of a snag with these. I ordered EVA foam dowels with a semi-circle cross-section as well as a triangular one, but I quickly realized they would be too flimsy sticking out like that unless I put something hard in between them.
So this isn't pictured, but I got some thin crafting wire from Dollarama and just bent them into L shapes, and glued the smaller dowels around them. I also shoved them into the bigger down and glued it down.
You can also see from these pictures that that leaves a weird gap in between the smaller dowels. Again I just used model magic to cover them up. There's probably a better solution but this was the one I went with.
I also lengthened the top "handle" part eventually because it looks better that way. (Please ignore the mess on my desk >_<)
Then I just paint them silver like everything else!
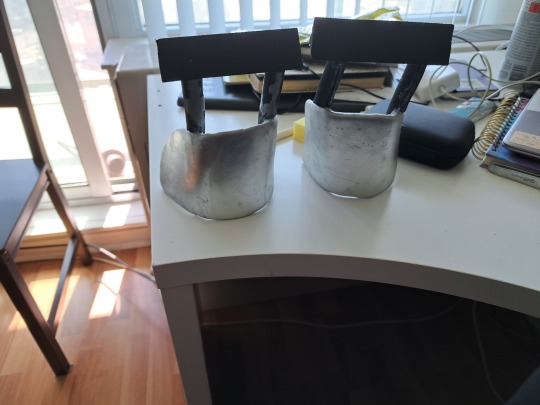
COMPLETE!
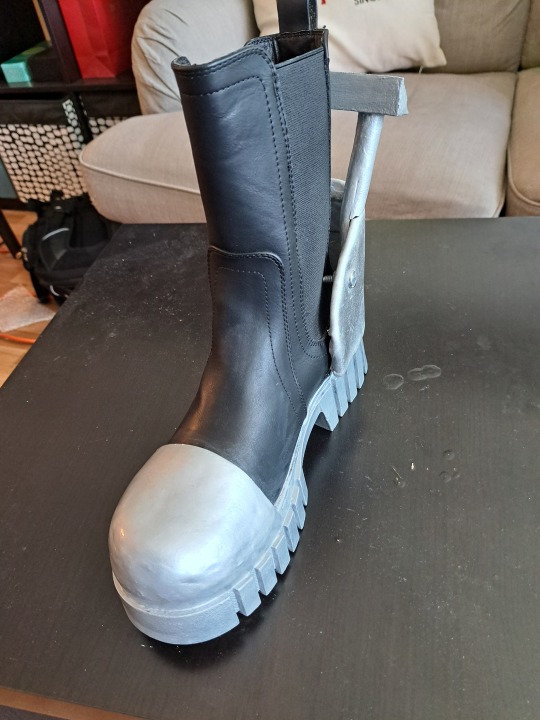
The nut and bolts are actual nuts and bolts. Since the base was just craft foam and cardboard, you can poke a hole in them easily and insert the bolt.
Hope you found this helpful! Or are just willing to indulge me and my notes on my silly crafting journey!
#cosplay#infinity train#infinity train cosplay#simon laurent#ryan akagi#min gi park#tutorial#crafting stuff#i have no idea what im doing#but it worked out#infinity train book 3#infinity train book 4#stuff i made#diy
218 notes
·
View notes
Text

DAY 11: ESCAPE -- DAY 12 DAMAGE
Out of the fire, into the frying pan...
#hk artober '22#hkartober22#hollow knight#hk#bv#broken vessel#infection#my art#a little angsty one today#them going in pairs wasn't planned I just didn't feel like drawing yesterday lol#but it worked out
506 notes
·
View notes
Text
He’s a single mom 🍷
#I had to do it#my last piece reminded me of it#I drew this before work!#idk how I’m usually bad at cartoonish stuff#but it worked out#I’m proud of myself#miguel o'hara#miguel spiderman#atsv miguel#miguel ohara#across the spiderverse#spider man#spiderman 2099#spider man 2099#spiderman#spider man art#miguel spiderverse#spiderverse fanart#across the spider verse fanart
48 notes
·
View notes
Text

Another entry for my innumerable trespasses against all that is sacred
#WoW#World of Warcraft#Wrathion#made in ms paint#the lashes weren't supposed to be glittery#but it worked out
7 notes
·
View notes
Text
God did not intend for me to be popular with friends, but he did send me the most important friend of all, a good husband. ღ

#tradfem#mumblr#sahm#feminine#girl mom#traditional femininity#housewife#loves#friends#friendships#i had a lot of bad luck with friends#girls can be mean#but it worked out
11 notes
·
View notes
Note
I wanna say both of them but I have to pick one then Mei
HA 😭
Since Mei likes nature, I imagine Paige would actually take her on land (while promising Enoki to do the same for him some other time because otherwise he'd never let up about it) to visit his vacation home in the woods.
There, Paige would take out Mei onto little trips around the woods and teach her about the different land animals and plants around the area. Perhaps they'd go on some hiking with Jade some other time!
Fun fact: Paige, being a half Pegasus and all, is highly knowledgeable about different plants in different regions, since he tends to travel often. He also eats plants. Raw. Like a horse.
Tagging: @cyanide-latte
#Uncle+niece bonding moments 😍#It took a lot of convincing Finn to let Mei go on her own with Paige#but it worked out#finn clearcove#Paige Pegasus#Tws ocs#Quinny 🐙
4 notes
·
View notes
Text
Kevin McCallister did nothing wrong
#regarding his family#and behavior#taking on 2 hardened criminals by himself is not a good move#but it worked out#home alone#home alone 2#christmas movies
4 notes
·
View notes
Text
T'was time for me to finally commit

#utena#animetattoo#revolutionary girl utena#rgu#sku#it turned out pretty good??#i was a bit worried about the wrapping#but it worked out#shoujo kakumei utena#kunihiko ikuhara#ikuhara
128 notes
·
View notes
Text
btw the vod for my local is up in RECORD time so if u wanna watch my 4th place tekken run or my winning strive run here it is
youtube
#random ramblings#i havent watched all this so i have no clue what the commentators say about me honestly#dont uh. dont mind anything then#god the controller failure is still so unfortunate#but it worked out#Youtube
6 notes
·
View notes
Text


stockholm you were so good to us 😭
#the 1975#matty healy#polly money#Stockholm#the way I was sat stressing at breakfast bc my bff didnt fancy missing it for the queue#original plan was to join at like 8pm the night before but breakfast won out 😅#BUT IT WORKED OUT#so happy
2 notes
·
View notes
Text
Not me trying to figure out if I was having a mild allergic reaction or if the increase in beans and food that might actually be sort of good for me like peppers and such has finally gotten to me 😅 either way it mildly ruined my afternoon
#jen talks#but it worked out#like if it was allergic reaction#i probably got it at the ice cream truck#or at lunch#and both is possible#but also it could just be the food#hard to say#but im feeling better#thankfully
2 notes
·
View notes
Text

I will not be taking questions at this time
#sike#I'll infodump about this if you'll let me#Christopher Columbus did 1 good thing#but it was also stupid#it could've been terrible#but it worked out
9 notes
·
View notes
Text
a month away from the english paper 2 leaving im feeling the urge to do MORE indpeendant study for the comparative... literally stop it like
#im already doing dorian gray and my teachers would be reeeallly :/ if they knew i was doing my own thing even more#but like im not getting anything out of studying w teachers as is#and i dont like talking abt casablanca so.... looks up list of assigned materials#like worst come to worst i CAN talk abt casablanca w the whole polyamoury question but like. yeah#like as far as theme or issue goes (which is the one ill be doing) im flying by the seat of my pants like#in the pre i did the topic of youth w dorian n phic TOTALLY unplanned which i SHOULD NOT HAVE DONE#but it worked out#so shrug ill go look at that list#oh pleeeease dont let me be siren called by oedipus rex. i am being tempted by god and the devil
4 notes
·
View notes
Text
My biggest piece of advice for the Eras Tour is if they convert the men’s bathroom into a women’s bathroom at your stadium like they did to several at mine, do not use that one. I made that mistake the first night and didn’t realize I was waiting for a men’s bathroom that had been converted. It only had four stalls. I waited an entire hour in the bathroom line, missed all of Beabadoobee’s set, and made it to my seat with literally five minutes to spare before Taylor came on stage. The next night, I made sure to wait in the line for an actual women’s restroom. The line was about the same length, and I was in and out in 20 minutes. Please learn from my mistake and make sure you’re not waiting in line for a men’s restroom.
#also Taylor started her show 8 minutes early which didn’t help anything#if necessary I would’ve gotten out of line#I was not risking missing the start of the show#but it worked out
2 notes
·
View notes
Last Seen Blogs

crows-mature-ttte-blog
A blog for my mature TTTE stuff

biancml
Bianca

rudyboxman57
Rudy Boxman DIGITAL ADVERTISEMENT DESIGNER
idonotcare11
@uyuzbayanblog

hakiarleon
rereading ans and making it everyones problem