#black knot fungus spray
Text
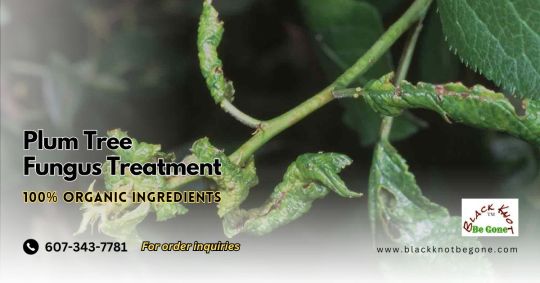
Get superior Plum Tree Fungus Treatment from Black Knot Be Gone. We offer unique products made up of organic plant ingredients which helps cure black knot diseases in fruit trees, apple trees, cherry trees, etc. Apply the black knot fungus spray any time the tree is absorbing nutrients up through the root system, from early spring to late fall. Available in 30, 60 & 120 ML.
Order now! For more details please contact: 607-343-7781.
For more details, visit our website: https://www.blackknotbegone.com/products/black-knot-disease-treatment-all-organic-plant-ingredients
#plum tree fungus#black knot diseases#black knot be gone#plum tree diseases treatment#black knot fungus spray
1 note
·
View note
Text
How to Make Lime Sulfur Spray At Home? Cheap & Best Organic Fungicide For Plants
Lime sulfur is a low-cost alternative to fungicides that may be used as part of a fungal management strategy. It is based on sulfate and calcium oxide, both of which are used to control pests and diseases.
A systemic fungicide is required if the incidence or attacked area of infected trees is already more than 10%; lime sulfur is best used as a preventative measure.
In Mediterranean-style settings with plentiful spring and summer rains, harmful molds and bacterial fungus thrive. The lime-sulfur spray works well on deciduous fruit trees to combat insects and fungus.
When used as a winter wash or spring spray, lime sulfur is effective against scale, mildew, rust, twig borer, and spider mites. In addition to buying the commercial lime-sulfur spray, home orchardists may make their lime-sulfur concentrate apply to roses, grapevines, and fruit trees.
It is most often sprayed on roses in Australia after trimming as a winter protectant. You may find it for sale in most construction and gardening shops under various commercial labels.
Here you will find out how to make lime sulfur spray at home with every detail if you don't want to pay for it, or need in big quantities.
How to Make The Best Organic Fungicide Lime Sulfur Spray For Plants?
What is Lime Sulphur?
Lime sulfur is soluble in reddish-yellow water with a pronounced rotten egg odor. It is a blend of several calcium polysulphides, and its usage in organic gardening is approved since it is produced by reacting sulfur and builder's lime (calcium hydroxide), which is not the same as garden lime (calcium carbonate).
Lime sulfur has a pH of 10.5–11.5, making it extremely alkaline. Although it is regarded as caustic or corrosive, its alkalinity is comparable to ammonia and magnesia milk (pH 10.5, which is used to treat indigestion) (pH 12).
It is 1,000 times less alkaline than caustic soda, which has a pH of 14, by three pH points (10x10x10). In any case, as with any horticultural chemical, keep your skin and eyes away from touch.
Origin
There are two views on the invention of lime sulfur back in time:
- In order to combat powdery mildew on grapevines and protect their priceless wine supplies, France utilized lime sulfur in the 1840s, which is said to be the first synthetic chemical ever used as a pesticide.
- The fungicide lime-sulfur, which is made of inorganic sulfur and lime, is often used to treat various ailments, including plum pockets, black knots, rose black spots, and many raspberry diseases. Grison, the chief gardener of the vegetable houses at Versailles, France, invented lime sulfur in the year 1851. For 10 minutes, Grison cooked "flowers of sulfur," newly slaked lime, and water. He then removed the clear liquid and reconstituted it with water. He then used this remedy to shield plants against mildew. The "Grison Liquid" or "Eau Grison" was the original name of the remedy. Lime sulfur was used in California in 1886 to prevent peach leaf curl.
What is inside a lime-sulfur mixture?
The sole component of the mixture that is poisonous to pathogens is sulfur. It may kill pathogens by direct contact or fumigation (sulfur vapors). Powdery mildew spores must be killed for the fungicide to be effective at a distance due to sulfur's vapor action.
After being absorbed by the fungus, sulfur interferes with the flow of electrons, leading to its reduction to hydrogen sulfide (H2S), which is poisonous to the majority of cellular proteins.
How Does Lime Sulphur Work?
An eradicant, lime sulfur, works by instantly destroying fungus. After application, it disintegrates and releases sulfur. The sole component harmful to fungus is sulfur, which may either kill them directly via touch or indirectly by sulfur vapor fumigation.
When to use lime sulfur?
Lime sulfur may be sprayed during the growing season or used as a fungicide during the dormant season. Applications for the dormant season must be made when temperatures are above freezing but before the plant produces any leaves, which is in the late winter or early spring.
Applications during the growing season may be made after the plant has leaves; however, they should be made in the early morning or late afternoon to prevent scorching. When it's dry out, and the temperature rises to 80 to 95 degrees F, lime sulfur damage to plants is at its worst.
Benefits of lime sulfur
Lime sulfur may be used to manage a number of fungi, including Black Spot, Powdery Mildew, Freckle, Leaf Curl, Rust, Shot Hole, and Brown Rot, as well as many Scale and Mite pests.
Is lime sulfur toxic to humans?
Lime sulfur is toxic and damaging to the eyes if ingested, breathed, or absorbed via the skin. When applying lime sulfur, the proper safety measures should be implemented in accordance with the label. Before buying, handling, or using lime sulfur, carefully read the label.
How to Use Lime Sulphur
Although it may be applied throughout the growing season, lime sulfur is typically utilized when plants are dormant.
Applications for the dormant season are made in the late winter after the last frosts have melted and before leaves have emerged.
Applications throughout the growing season may be performed while leaves are present, but to prevent leaf burn, they should be made early in the morning or late in the day.
To avoid plant damage caused by lime sulfur, DO NOT spray when:
- Temperatures exceed 32 °C (89.6 °F)
- When soil is dry, plants suffer from moisture stress.
- When freezing weather is expected.
- Within 14 days of an oil spray.
Avoid polluting fishponds and streams while spraying, and make sure the spray does not float over aquatic ecosystems. Till the spray has dried, keep kids, dogs, animals, and birds away from affected areas.
On apples, pears, stone fruit, citrus, grapes, tomatoes, roses, and ornamentals, lime sulfur may be used to manage a variety of fungal diseases and pests.
Since it has minimal toxicity, there is no withholding time, and crops may be picked as needed.
It's the perfect winter cleanup spray; use it to prevent powdery mildew on apples before they blossom, leaf curl on peaches and nectarines, and scale on stone fruit trees. To combat powdery mildew and mites, spray roses after trimming.
When to Spray Lime Sulphur?
The optimal times to spray certain crops are often mentioned on the label of commercially manufactured products; the timing depends on the crop and the insect or disease. As a general rule:
Stone While trees are asleep and before bud swell, fruit, including almonds, apricots, nectarines, peaches, and plums, are sprayed. Once flowers start to bloom, it is too late to spray.
To encourage late bud swell, pome fruit like apples are treated when they are dormant.
There are a few safety measures to be aware of while eating apples. After the late green tip, using lime sulfur will limit growth and lower production.
On Delicious or Cox's Orange Pippin apples, avoid using lime sulfur.
Use of lime sulfur beyond the late green tip stage, when the buds begin to exhibit green tips from the developing leaves, can inhibit growth and reduce output.
Spraying occurs as close to bud burst as is practical for grape vines.
Roses and many other ornamentals may be sprayed either during their growing season, which runs from spring through fall, or during their dormancy as a winter spray. Be careful to moisten the leaves and repeat as necessary.
During the growing season, from spring to fall, tomatoes and other crops may be sprayed; be sure to soak the leaves and repeat as necessary.
Can I use lime sulfur with all the plant varieties?
No. You should avoid applying lime sulfur to some plants since they are sensitive to sulfur. Apricots, raspberries, cucurbits, and peaches are among plants that are sensitive to sulfur and should not be treated when they are in leaf during the growing season. Before spraying during the growing season, find out whether the plants are sulfur sensitive.
Lime sulfur safe plants:
Lime sulfur is safe to use even on fruits that include:
- Pears
- Roses
- Ninebark
- Peaches
- Blackberries
- Phlox
- Apples
- Dogwoods
- Raspberries,
- Blueberries
- Plums
- Cherries
- Rudbeckia, etc.
Lime Sulfur or Copper Fungicides?
While copper fungicides just act as a fungicide, lime sulfur also acts as an insecticide. Another crucial factor to take into account is the fact that copper does not degrade at all and is harmful to plants at high soil concentrations.
The soil is not best served by the routine seasonal application of fungicides based on copper. Never use copper on strawberries since it will cause severe phytotoxicity (plant toxicity) in almost all cases.
Using copper fungicides is not recommended when using lime-sulfur (but using a copper fungicide itself is! ). In such situations, apply just enough spray to moisten the plant surfaces without causing runoff.
Disadvantages of lime sulfur
Due to its high alkaline content, it could harm leaves if the dosage is too high.
Smelly. Strong acids may react with lime sulfur to create very dangerous hydrogen sulfide, which often has a characteristic "rotten egg" smell. Although lime sulfur is not very flammable, burning results in sulfur dioxide gas, which is exceedingly unpleasant.
May injure someone physically. Strongly alkaline lime sulfur solutions are harmful to live organisms and may result in blindness if splashed in the eyes (average commercial concentrations have a pH of above 11.5). (from Wikipedia). When dealing with lime sulfur, safety goggles and gloves should be used.
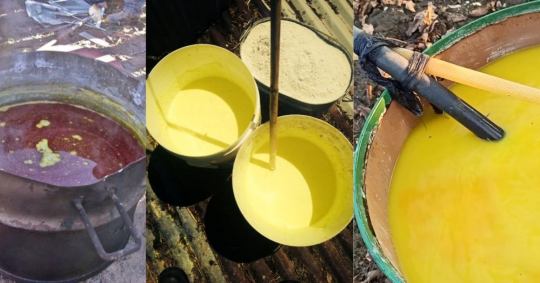
How to Make Lime Sulfur Spray At Home?
A combination of calcium polysulphides known as lime-sulfur is created when calcium hydroxide, or "brickies lime," reacts with sulfur. It often creates a reddish-yellow liquid with the well-known sulfuric odor when used as an aqueous solution for ease of application.
Ingredients and Equipment
Lime
Mix up 100L (22 Gallon) at a time, but you may easily create a smaller batch by adjusting the ratios. Sulfur is far less expensive when purchased by the bag, but it will keep well.
Sulfur
Your agricultural supplier should be able to provide you with pure (98 percent) sulfur, and any hardware shop should have brickies lime or quick lime.
- 20 kg (44 Pounds) of pure Sulfur
- 10 kg (22 Pounds) hydrated lime / quick lime / 'brickies' lime
- 100 L (22 Gallon) water
Water
1. Choose an Outdoor Location
To make the lime and sulfur mixture, use open and outside space. Sulfur has a pungent scent, and most people find the "rotten egg" smell to be quite offensive. Find a place to cook where the fumes won't contaminate your house or bother the neighbors. Plan to boil the powdered lime-sulfur combination on a windy day. The wind will spread the smell of the gases.
2. Create a Fire Pit
Set up a spot for an open fire. Create a tiny fire pit and level the ground. To support the cooking pot, arrange many large concrete blocks in a triangular shape around the fire pit. Ensure that the blocks are sturdy and level. Build a roaring fire that you can maintain for a while.
3. Set a Steel Boiler On The Fire
Set a big pot (between 15 and 30 gallons) or steel drum on the fire. Heat the saucepan by adding water. Put the sulfur in a different container or bucket and add enough water to produce a thick paste while the water is heating to a boil. Set aside after thoroughly stirring. (Part of the water should be used to combine the sulfur paste, part to fill the pot, and the remaining water should be added to the pot while the mixture is being cooked down.)
Add the lime all at once, stirring carefully as you do so until the water is almost at a boil. Stir the pot with a broom handle or a heavy wooden spoon. Add the sulfur paste once the lime has completely dissolved in the water and swirl to combine.
4. Cook and Stir
Get a fire going below your drum and place it on some bricks.
Keep the hose close by and fill the drum with water until it is half full ( about 100 L).
Add all the lime at once when the water is at a boil and stir until it dissolves. A sturdy stick or broom handle is required.
When all the ingredients have dissolved, and the mixture is a rich reddish-brown color, cook for one to two hours while stirring often. The liquid will continue to have some yellow scum on top of it. As the mixture cooks down, keep adding water. To get the required hue, continue to cook.
5. Wait for the Liquid to Cool
By letting the fire burn out, you may naturally cool the liquid in the pot. Cover the pot while the liquid cools to keep the insects and dust carried out by the wind.
6. Strain the Liquid
Fill glass gallon containers with the lime-sulfur concentration. As you fill the jugs, filter the liquid using a large-mouth funnel coated with cheesecloth. The jars should be labeled, sealed, and kept away from freezing. When you're ready to spray, the liquid has to be diluted.
To prevent your arm from breaking, you may wish to tag team. It may be a nice exercise to move the heavy sediment to the bottom, but it works best when done in groups of two or more. The second set of hands should be on duty to keep the fire going, and the water drum should be filled up to maintain the volume as it evaporates.
While doing so, embrace your inner alchemist, savor the enticing fragrance of boiling sulfur, and wonder as your soup turns from pasty white to orange-hued to deep crimson.
If necessary, strain the liquid through a sieve, sock, or other materials after allowing it to cool (usually overnight) and depending on how it will be utilized. Strain the solution into bottles after removing it from the top of the sediment.
Normally, I dilute 1L with 10L of water. In order to perhaps cure the phytophthora fungus common to the tropics and subtropics, I have most recently begun using this method across a custard apple orchard. Dousing the root zone with water and sprinkling around 1L over the trunk and lower branches (avoid the foliage).
Warning
When handling lime-sulfur spray, put on long-sleeved gloves, safety gear, and safety goggles. The liquid may burn the skin since it is caustic. Keep the liquid out of children's reach. Do not ignore seeking emergency medical attention if you come into touch with the liquid, breathe it in, or consume it. Make sure you wear a face mask before you start the spraying process.
All fungicides, pesticides, herbicides, and fertilizers have a negative impact on bee populations. Spraying shouldn't be done while the trees are in blossom and bees are present to pollinate the flowers.
Is lime sulfur poisonous to dogs?Although exact lethal doses are unknown, they most likely surpass 4 g/kg. Lime-sulfur, a combination of sulfides, may irritate the skin, produce pain, or even blistering, although it seldom results in mortality.Can I use lime sulfur in summer?Yes. However, the growing season is when it is most often used. Choose an overcast day and below 89 °F (32 °C) if you wish to apply it in the summer.
How to use lime sulfur spray with Roses?
Fungus may infect roses, as it does with other plants. In the past, the idea was to spray them with a variety of chemicals to keep them from developing blackspot, mildew, and other diseases. That's not something I buy into myself. In general, garden roses are more resistant to disease than other types of roses, and I don't enjoy pouring so many pesticides into the environment when they may not even be necessary.
Instead, I've devised a simple method for dealing with a disease epidemic in your roses. Sulfur and Lime Spray is required. A decent garden center should have it on hand.
In nature, sulfur acts as a disinfectant and deodorizer. Exactly what do I mean by "that"? A simple fact about this product is that it quickly destroys any fungus that has taken root in the garden. It's a component of the traditional "Bordeaux Mixture," which was used to spray French vineyards.
How to use lime sulfur on roses?
Make sure to do it early in the morning or on a cloudy day. Leaves will be burned by the combination of sunlight and lime/sulfur.
Spray the roses with a combination of 1 tbsp of lime/sulfur per gallon of water. Nothing else should be used in conjunction with it. Lime/sulfur and water are all you need. To ensure that the plants are thoroughly sprayed, You can use a hose-end sprayer.
Wait 15 minutes, then use the hose to rinse it all away.
It's done! Any fungus spores in the garden will be swiftly killed by the lime/sulfur mixture. You can use this method for years and years with tremendous success. The only drawback is that sulfur smells a little, but it quickly fades.
You may save time and money by treating any outbreaks that arise rather than continuously spraying your roses with pesticides. Roses, the environment, and you will benefit from this method.
Why is Lime sulfur banned in some countries?
Applying the techniques for creating organic, do-it-yourself fertilizers that give plants better, more nutrient-dense growth. As a result, the soil is improved, and harmful accumulation is stopped in the soil, waterways, and farmers themselves. Everyone gains! Except for the producers of traditional fertilizers. They absolutely dislike this concept.
It's a huge thing when a farmer can produce their own fertilizer on-site and at a reasonable cost, especially when you consider the fact that most traditional farmers across the globe regularly take out substantial loans simply to be able to acquire the fertilizer they need to cultivate the foods that you and I eat every day.
What you have here is a very, very huge thing. Add to this a set of organic handmade fertilizers (and not dangerous to the soil life, the land, the farmer's family, etc.) and provide larger yields than conventional fertilizers.
Agricultural usage is intended for this prophylactic anti-fungicide. There are a ton of weird organic anti-fungal products you might use in your garden (like garlic spray). The amounts of components needed are just too vast, and producing them would be excessively costly and time-consuming. As a result, creating your own garlic spray for 100 acres (or more) of crops isn't particularly feasible.
This is where solutions like lime sulfur come into play. A basic, affordable, non-toxic anti-fungicide that can be produced by anyone at an appropriate scale for agriculture.
Legal disclaimer: In many countries, lime sulfur is not restricted to use and is available as a commercial product. However, check your own country's regulations before using them.
Read the full article
0 notes
Text
Lord of Discord (Team Plasma - Ghetsis)

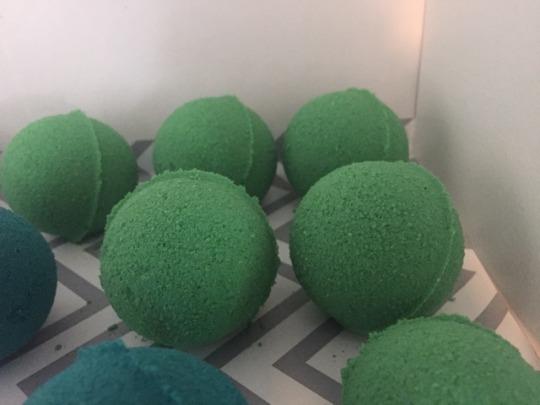
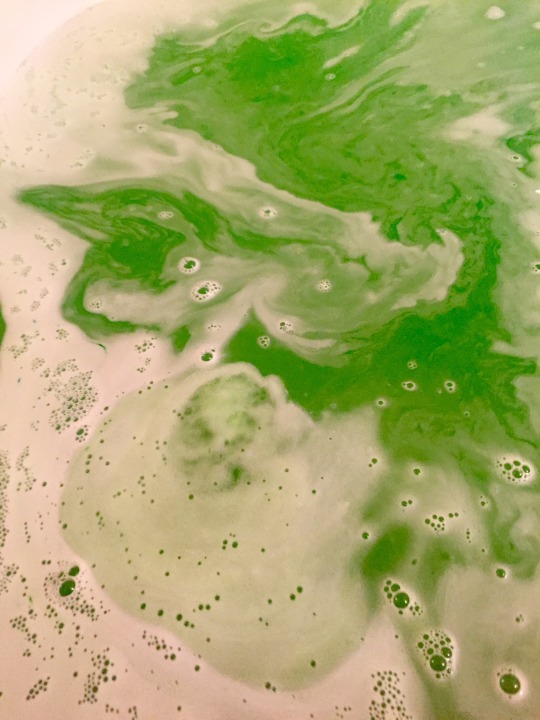
This isn’t just a bath…it’s a Plasbath!
When designing a blend for Ghetsis, my first thought was, “Whatever I do, it needs to have Patchouli in it.” And whenever I think of patchouli, I think of my favorite Lush autumn release: Lord of Misrule!
Lord of Misrule is a dark green bath bomb that is predominantly patchouli and black pepper-based, but it also contains an ingredient that typically tends to give me headaches: Vanilla Absolute. I switched that for Peru Balsam (which has a vanilla-like smell) and added Copaiba Balsam on top of that because I wanted to add some woodsy, masculine undertones to this bomb.
The end result is an aggressively energetic green bomb that refuses to be taken lightly. The Black Pepper in the blend wakes you back up after an exhausting day, the Peru Balsam cleanses your skin, the Copaiba Balsam boosts your confidence, and the Patchouli leaves you feeling like you can conquer the world…or at least Unova.
And fun fact: the white froth this bath bomb makes will hiss at you if you pull it closer to your body!
Now it’s time to talk about the pros and cons of these oils from a safety perspective…
Aromatherapy isn’t just about pretty smells and scented bath water. Essential oils are in such a high concentration that even absorbing them through your skin can leave you with the therapeutic (and potentially toxic) benefits.
If you are allergic to a plant, you are 100% without question going to be super allergic to the essential oil.
There’s also such a thing as contraindications: where some oils may affect you in weird ways if you have a certain medical condition or take certain medications.
The information below is for your safety if you want to attempt to make this blend at home (as a bath bomb, a body spray, or even scented bath salts). And do be sure to wear gloves. Some of these oils have recommended dilution rates as small as 0.4%. You don’t want that to slide on bare skin!
Patchouli Leaf Essential Oil (50% of Synergy)
If you aren’t familiar with the smell of patchouli, stoner shops tend to burn it as incense to hide the smell of cannabis. It’s spicy, smoky, and very distinct. It blends with a lot of different oils and is one of the few that actually grows stronger with age!
Patchouli Essential Oil has a familiar smell. This scent was a favorite among the Hippie Counterculture of the 1960s and we still associate it with stoners and smokers today. It covers the scent of marijuana and blends wonderfully with so many things.
It has a slight peppery aroma and is also the key ingredient in my favorite Lush fragrance (Lord of Misrule).
Pros:
Aside from being the quintessential pot deodorizer, patchouli oil is also used as medicine for colds, tumors, headaches, nausea, vomiting, diarrhea, and abdominal pain.
Also, if you’re an alcoholic and suffer from chronic bad breath, patchouli oil can be used to hide the smell.
I also love the fact it can be used to increase your libido!
Cons:
Patchouli Leaf Essential Oil is generally considered to be safe, but is best avoided if you suffer from asthma. We found that one out the hard way in my family.
Black Pepper Essential Oil (20% of Synergy)
Black Pepper brings to mind the scent of black peppercorns, but without any of the sneeze factor! There are also faint floral undertones to this oil and it works wonders inside a “wake-up” blend. It’s a key ingredient in Plant Therapy’s InvigorAid, which I swear by. That synergy is like liquid brainpower.
However, I’ll be honest with you. I mainly put it in here because in one study, Black Pepper Essential Oil was determined to be a possible anti-smoking aid. You can diffuse it if you’re trying to cut your nicotine addiction!
Pros:
Black Pepper Essential Oil promotes better circulation and can improve aches and pains brought about by exercising or grueling manual labor.
It’s also a boost for blends where you want to stay alert and focused. I recommend diffusing it if you’re studying, because it’s perfect for term paper composition, cram sessions, and annoying piles of homework!
Another neat trick you can do while diffusing Black Pepper Essential Oil (and I’ve done this) is eat your favorite spicy or savory foods. It will taste even more flavorful!
Cons:
If you want to sleep tonight, don’t use Black Pepper Essential Oil before bed. This is a wake-up smell and will keep your brain active!
Keep out of the reach of children. Don’t use with children under the age of 6.
This is not a cat-safe oil.
Copaiba Balsam Oleoresin (15% of Synergy)
Copaiba is an oleoresin taken from the sap of a tree in the Copaifera genus. It’s one of the best anti-inflammatory substances on earth and has a mild, honey-like smell with woody undertones. It’s rather mild, however, so it’s best to mix it with other things and simply reap its benefits.
Pros:
Add it to your skin and hair care regimen! Copaiba Oleoresin’s astringent properties tighten the skin for a more youthful, radiant appearance. It can reduce the intensity of existing wrinkles and strengthen your skin and scalp to reduce risks of lesions with age. It’s also great for eliminating blisters, pimples, and even mild scars.
Decongest with Copaiba! This is an asthma-safe oil and also a good oil to have if you suffer from congenital congestion problems. The anti-inflammatory properties of Copaiba relax the airways and work the knots out of your muscles. Irritation may dramatically reduce.
Having a sore, rough day? Maybe Copaiba can help you! Copaiba’s analgesis properties can help loosen tight muscles, reduce pain, and even ease bad headaches.
Cheer up! Copaiba Oleoresin has often been used to break up the blues and boost your mood. Its sweet, gentle smell can be blended with other soothing oils (like Basil Linalool, Bergamot Mint, or Ho Wood) to put you in a peaceful state of mind.
Boost your immune system! Copaiba Oleoresin has a strong antibacterial nature. It can protect your skin (even if you have mild cuts) from developing an infection. Just be sure to use a carrier if you decide to apply this oil on your skin. Safe dilutions are important!
Lower your blood pressure! Copaiba’s combination of anti-inflammatory and soothing properties can help reduce tension and strain on blood vessels.
Copaiba is an antifungal oil! The terpenes inside Copaiba Oleoresin are super effective against a lot of fungi (including nail fungus and athlete’s foot). If you’ve got one of these types of infections, consider applying Copaiba to the infected area. It should speed up the healing process!
Reduce water weight and detoxify the body! Copaiba is a mild diuretic. It stimulates your kidneys and bladder to expel urine more regularly, which in turn helps your body flush out toxins.
Cons:
Like most other wood-based essential oils, this is not a cat-safe oil. Do not diffuse with a cat in the room.
Excessive use of Copaiba Oleoresin may result in stomach problems.
Essential oils should never be taken internally without first consulting your physician. This oil is for diffusion and application purposes only.
Since this oil lowers blood pressure, exercise caution if you have atherosclerosis, diabetes, low blood pressure, or a history of stroke.
Balsam of Peru Essential Oil (15% of Synergy)
Balsam of Peru is a resinous substance that comes from the Myroxylon balsamum plant. It smell is reminiscent of vanilla with a touch of clove and cinnamon. As a result, it pairs beautifully with those oils–as well as orange oils!
It’s one of the most versatile oils not only with its scent, but with its therapeutic benefits…so long as it’s done in moderation.
Note: Balsam of Peru only makes up about 15% of Lord of Discord, but you can certainly smell it. Please read.
Pros:
Balsam of Peru has been used for centuries to treat tumors, expel intestinal worms, and flush out your kidneys by overstimulating them. It’s a powerful diuretic.
Some people occasionally put Balsam of Peru directly on the skin for infected and slow-healing wounds, burns, scrapes, ulcers, rashes, and itchy areas…though I’d caution against this. Plant Therapy, the company I bought my oil from, recommends 0.4% dilution for Balsam of Peru, so definitely do NOT apply that stuff directly on your skin. Diffusing it in your tub should be OK. Just make sure the bath is full before you go in!
Some dentists use this essential oil to treat dry sockets: a painful condition that occurs when a tooth is extracted and a clot forms in the gums too soon.
It’s an immunity booster! Not only have some studies shown that Balsam of Peru can stimulate the immune system and eliminate free radicals in the body, but it’s also got strong astringent and antimicrobial properties. People can even use it to treat mites and bedbugs!
It fights your anxiety! Balsam of Peru’s calming scent contains a slew of chemicals that promote a peaceful, calm mind. It makes it easier to breathe and brings about a comforting scent.
Breathe more easily! Balsam of Peru has natural expectorant properties, making it easier for you to blow out whatever’s left of your stuffy nose or clogged-up throat. Just be sure to inhale. Don’t swallow!
Pamper your hair and scalp! Balsam of Peru can help you combat dandruff and a dry, itchy scalp.
Cons:
Despite its many benefits, Balsam of Peru is one of the most allergenic substances known to man. If you get headaches over artificial vanilla, strong perfumes, or scented things in general; chances are you’re allergic to Balsam of Peru.
Although Balsam of Peru can be used over short periods of time (never more than 1 week), people can build up a tolerance to it and suffer allergic skin reactions if the substance is abused.
If you use this essential oil, use plenty of sunblock when you go outside: especially if you have light skin. Balsam of Peru increases your sensitivity to the sun.
Do not use this essential oil if you are nursing or pregnant, as not enough is known about Balsam of Peru to say it’s safe. Ere on the side of caution.
Since Balsam of Peru is a powerful diuretic, prolonged usage of the oil may result in kidney damage (even failure). Do not use this oil if you have kidney problems. Period.
#Ghetsis#Team Plasma#Team Plasma Bath Bomb#Pokemon Bath Bomb#Lord of Discord#Skye makes bath bombs#DIY#My Stuff#ProfessorPalmarosa#Professor Palmarosa
30 notes
·
View notes
Text
09102021
Firstly, some health news that turns out not to be news after all, for which we are very grateful- I had a cancer scare! A few weeks ago I had my yearly regular mammogram and they said they wanted me to go back in because something looked weird. So I did that last week, and they said there's definitely something going on, and they did an ultrasound right then. I watched, and it was clearly something- it looked like when you have a smooth piece of wood and there's a knot in the wood grain pattern. So a needle biopsy was done Wednesday, and I got the results back quickly:
"Good news! The biopsy of your breast shows a benign results of fibroadenoma. These are not cancerous but you should have a discussion with breast surgeon about the possibility of removing it before it grows. I can refer you to breast surgeon for discussion."
I'll be talking to my doctor about that in the near future, but the worst did not come to pass, thank the gods. On to photos! It's going to be a planty update this week, since I assume you'd rather not see the photo of the ultrasound. So, on to the garden report!
1. My potato plant looks like shit - you may recall, one of our 50 cent plain ol' baking potatoes got forgotten in the pantry and sprouted, so I planted it. It made a big, green beautiful plant but about 75% of it has died of some unknown malady. I tried to research it, but it turns out that a *lot* of things can fuck up a potato plant. There's a list as long as your arm with things like potato weevils, potato mites, black potato smut, southern weeping potato blight, potato melting fungus, Cooper's horrible potato worms, and on and on. I have no idea what has been afflicting it, and so I cut off all the dead growth, sprayed some shit on it, and am hoping for the best but not really getting my hopes up. God clearly hates potatoes.
2. My tomatoes also look like hell. I have gotten just tons of tomatoes off of them, but maybe a third of the foliage has turned brown from... also, endless possibilities. I've seen stink bugs messing with the fruits, and I've picked off a couple of hornworms which are these horrifically gigantic caterpillars that are almost the side of a goddamn hot dog (they make lovely big moths, I'm told) and I was wondering if they were done for, but they've gotten a bunch of new green happy-looking growth (including flowers) so I'm leaving them alone to see what happens. I think it's safe to say that my style of gardening is best described as 'benign neglect', and I've met with a satisfying amount of success with it.
3. Beleaguered artichoke - it continues to live, but it's clearly not happy. Again, I'm not sure why, but it doesn't seem to be from some pest but like it doesn't like the growing conditions. It's been blasted by sunlight all day long, and when I think about the ones I saw when I went to California, they all seemed to be thriving in the foggy, cool weather so maybe they're not a fan of the heat. So I've given it extra water, and it's hanging in there.

4. Cat plants - because I have become a crazy cat person, I've noticed that the older cat is sad about the lack of grass in the back yard since it has been taken over by the sea of beige rocks. Eric had some leftover wood from the big planter boxes and I talked him into making a planter for a grass bed. He finished it yesterday, and I've just now filled it with soil and put a couple of little catnip plants in it, and sowed it with cat grass seeds from the pet store (which are, if I recall, barley, oats, wheat and rye) and some alfalfa seeds from the health food section of the store. I'm hoping this will make a nice little bed for the cats to lay in and munch on and they (the cats) will be less sad.
5. A latecomer - the blackberry, which has been in the ground for almost a year, has exploded in growth in the last few weeks. It lived through the freeze but stayed less than a foot tall well into the summer then just went nuts. Not sure what made it so happy now, and I'm about 95% sure it's not going to produce anything this year, but that's fine. And I think that's how this variety of blackberry do anyway- growing out the first year then fruiting in the second year. I'll look for flowers on it next spring.
6. Back yard - closing out the letter with a little bit of peace. You can almost hear the water splashing and feel the warm breeze. It's still very much summer here, but the days are noticeably shorter, and the light looks a little more golden. Soon it will be fall and I can't wait.

All my love.
0 notes
Text
How to Protect Your Plants from Pests & Bugs?
Figuring out how to get rid of indoor plant bugs is extremely frustrating, and it can be very difficult to control houseplant pests. In this post, I’ll show you how to identify the most common pests. Then you’ll learn how to get rid of bugs on houseplants naturally, and get tons of tips for how to keep bugs off indoor plants in a marijuana grow tent, for good.
Common Cannabis Pests
The most common cannabis pests include thrips, whitefly, spider mites, leaf miners, aphids, and cabbage loopers, among others. In the ganja community, the inchworm-like looper caterpillars are also referred to as “bud worms”. If you aren’t familiar with all these insects, consider browsing this article about common garden pest identification too. Finally, powdery mildew and fungal diseases can also be an issue for cannabis.
Our area is prone to all of these things! During our first year growing cannabis, we struggled with cabbage loopers the most. And just as I said, we didn’t realize how bad it was until too late. The caterpillars don’t just eat the buds. They also poop in them, which then creates mold. Some of our first flowers were so full of caterpillar shit, we had no choice but to compost them. Lesson learned. Now we know how to stay on top of it, and nip the problem in the bud… before it damages our bud!
HOW TO DETECT BUGS IN YOUR GROW ROOM EARLY
Pest infestation can be one of the biggest headaches in an indoor grow room. Early detection is key in pest control to prevent from an unfortunate outbreak.
Hanging sticky-traps can be of major benefit in the grow room for two reasons.
The strips catch any flying pests
They act as a good meter of how many (if any) pests are appearing in your grow room
The more insects you see stuck on a trap, the more insects are in the room, so act immediately. Flystrips, or “ribbon” strips, can be hung from the ceiling with a tack. These traps spiral down, creating a landing surface for the flying pests.
Other styles of applicators include trays and square paper. Trays can be set on any horizontal surface, such as a table or desk. Square paper can be mounted onto a vertical surface such as a wall or hung from the ceiling like the ribbon strips.
Once pests are stuck on the strips you can act immediate to prevent an outbreak. No matter which option you choose, be sure to read the instructions and warnings on the packaging.
[PRO TIP] Different insects are attracted to different colors. Select the color of your traps based on the type of insect you are trying to remove.
HOW TO KEEP BUGS OUT OF YOUR GROW ROOM
Is your grow room sealed? This includes door jams, windows, baseboards, and even air vents.
Pests can and will infiltrate any place they can for food. Be sure to caulk up any cracks or holes, and seal under the doors with a door sweep or other alternative bottom door seal.
Ventilation is important in the grow room for a number of reasons. A good suggestion would be to inspect the ventilation system before bringing any plants into the space. The air duct system(Inline Duct Fan) can be set up in a number of ways, but the important thing is that it is sealed.
Duct “Mastic” is the most secure and recommended way to seal up a leaky or drafty duct, but duct tape can be used as well. The more secure the room is beforehand, the easier it will be to maintain if the need arises.
[PRO TIP] In the indoor garden the “ease of clean” factor is very important. There should not be many surfaces to scrub or intricate fixtures where pests can hide away. Milar is commonly applied to walls, ceilings, and floors for this very purpose. It is nonporous and is very easy to clean/wipe down. Remember the easier the space is to clean the easier it is to maintain.
Early detection is key to managing pests
Finding pests before they become a problem is the best way to keep insects at bay.
Thoroughly examine all plant parts and containers before bringing them home from the store or indoors for the winter.
You may need to use a magnifying lens as some pests are very small.
Inspect tops and undersides of leaves for insects, webbing, holes and eggs.
Examine leaves that are discolored as this may be evidence of a pest problem.
A ten-power hand magnifying lens is helpful when looking for pests. There are also magnifier apps for smartphones.
Small, shiny, sticky spots on greenish-yellow leaves
Watch for honeydew, a shiny, sticky substance made by aphids, mealybugs and scale insects found on the upper surface of leaves as well as on tabletops and other items around and under the plant.
Check plant containers for signs of pests along edges, rims, the bottom of pots, saucers, crevices. Remove if found.
Isolate newly acquired plants for one to two weeks to allow any possible pest problems to become visible.
Check for pests when you water, fertilize or clean plants.
Two yellow sticky cards hung above some green plants. Tiny, black flies can be seen trapped on them.
Yellow sticky card trapping flies
Some insects like springtails and fungus gnats will move due to the water, making it easier to detect them.
Use yellow or blue sticky traps to detect flying insects like whiteflies, fungus gnats, winged aphids and thrips.
Feed your soil to feed (and protect) your plants.
Did you know that soil quality directly influences a plants susceptibility or resistance to disease, stress, drought, and pests? By creating a healthy environment for your plants to live and grow in – full of rich organic matter, worms, and plenty of high quality compost – the stronger the plant’s immune system will be. Just like humans, and our lifestyle and food choices. We explored this concept in our introductory post on garden pest control, which applies to all types of plants – not just cannabis! Stressed plants will get “sick” easier, and more readily attract and succumb to pest damage. The same goes for those that rely on synthetic fertilizer and chemicals for food. Most important, light is essential for plant growth, if you want to choose a light which is similar with natural light, a full spectrum LED grow light can take for a consider.
Growers may add certain amendments that naturally deter pests to their cannabis soil, either as part of the initial soil mixture, or later as top-dressings. For example, neem seed meal is dual-purpose. It is an amendment that provides modest amounts of micro and macronutrients to the plant, increases soil microbial activity, and also deters pests. In general, most pests don’t like the smell of neem. It can help control unwanted nematode populations, fungi, and soil pathogens.
Crustacean or crab meal fits the same profile and has similar benefits, particularly protecting against root knot nematodes.
The use of aloe vera and silica in routine waterings or foliar sprays help to enhance a plants immune system and overall resilience, as we explored in the posts linked below.
Final thoughts
Some growers leave a change of clothes close to the entrance of the grow room that they can change before entering. Others perfer to use full hazmat suits. Equipment can be cleaned relatively easily before and after every session using soap and water. A spray bottle of hydrogen peroxide or rubbing alcohol can also be used. A little cleanliness goes a long way in preventing pests in your cannabis plants. What's more, a best advice for beginners, you need to buy lots of tools, may be a marijuana grow tent kit can help you.
0 notes
Text
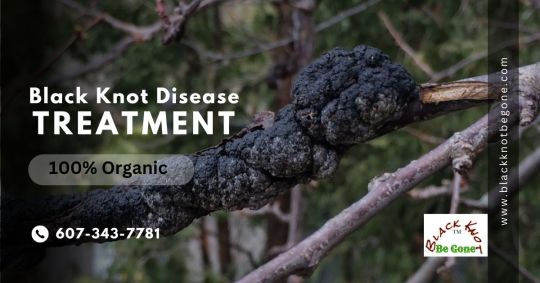
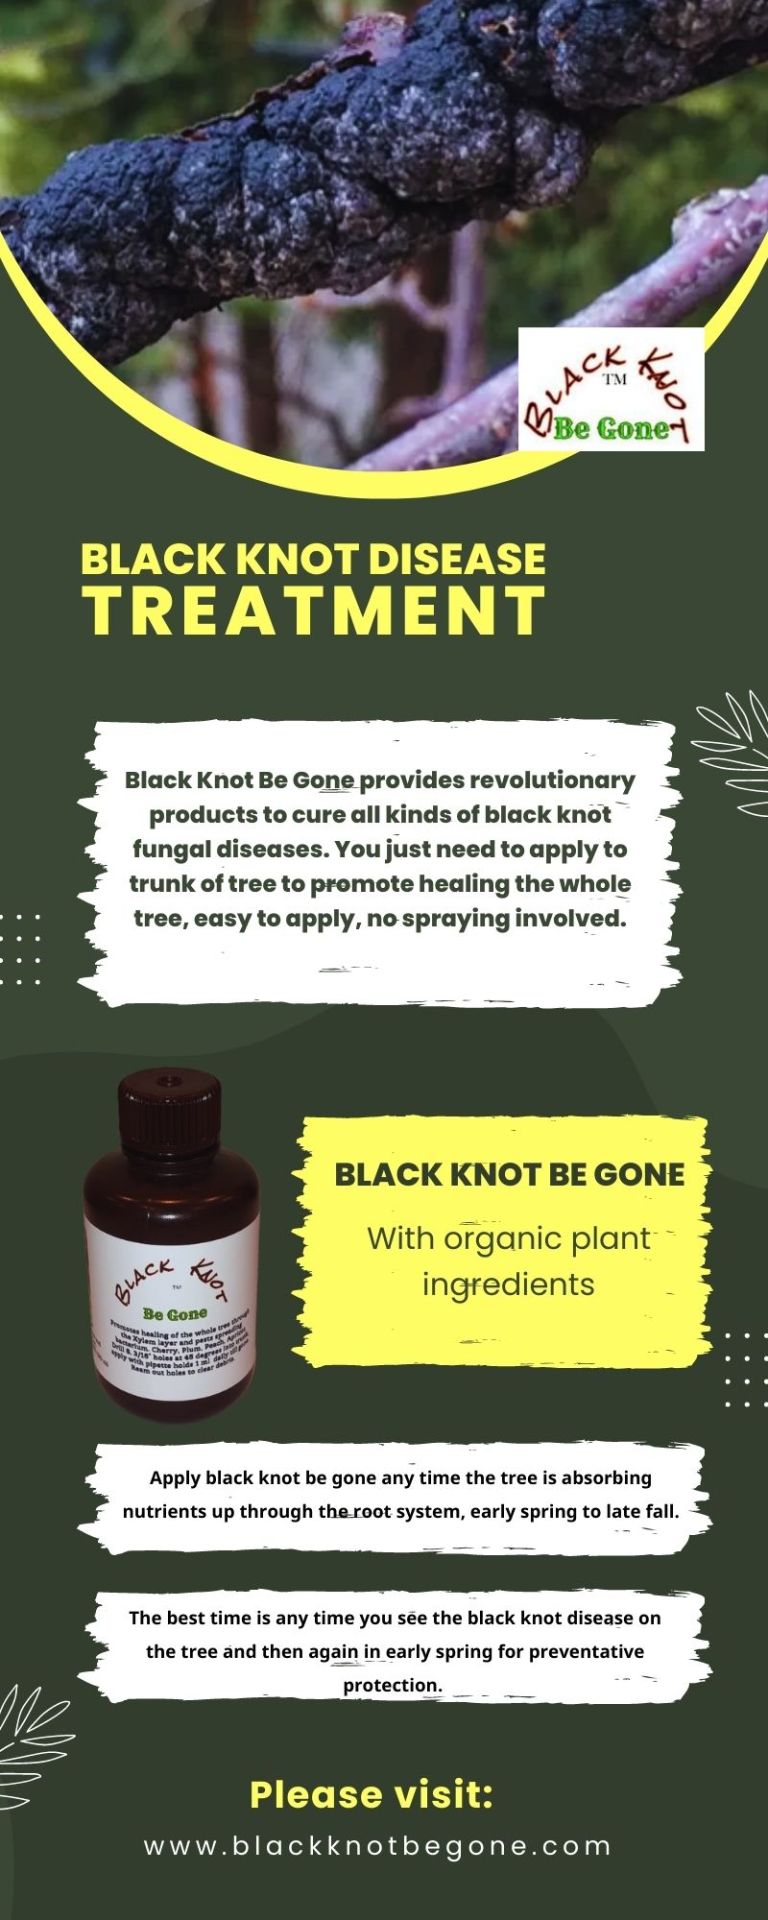
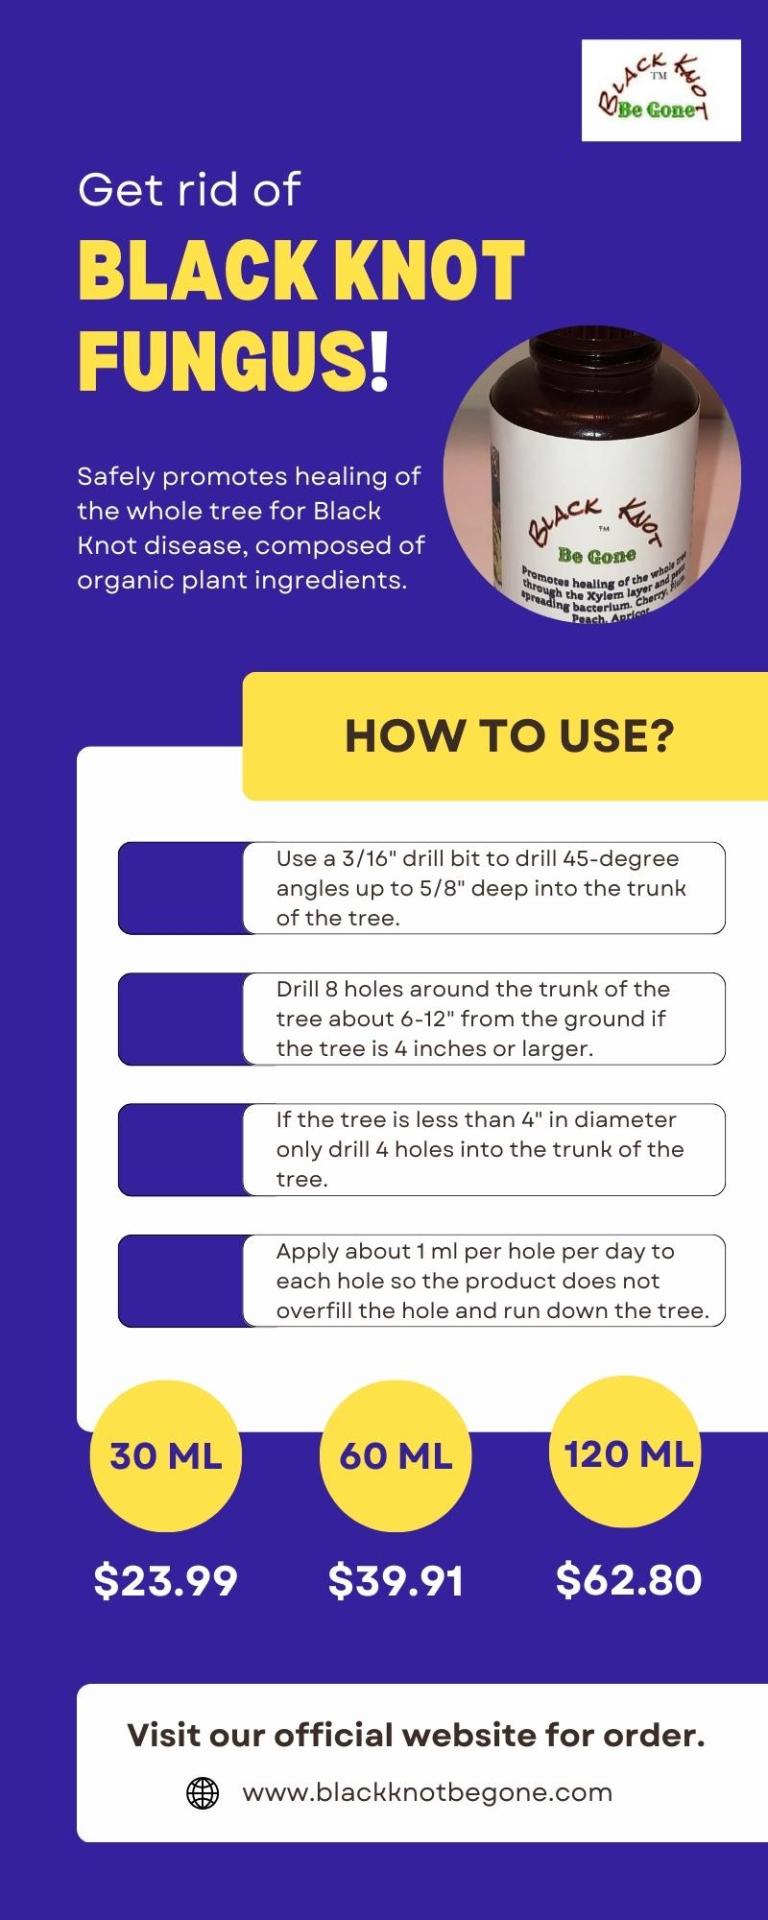
Get superior Black Knot Disease Treatment from Black Knot Be Gone. We offer unique products made up of organic plant ingredients which helps cure black knot diseases in fruit trees, apple trees, cherry trees, etc. Apply the black knot fungus spray any time the tree is absorbing nutrients up through the root system, from early spring to late fall. Available in 30, 60 & 120 ML.
Order now! For more details please contact 607-343-7781. For more details, visit our website: https://www.blackknotbegone.com/products/black-knot-disease-treatment-all-organic-plant-ingredients
1 note
·
View note
Text

Black Knot Be Gone provides the best organic products made up of plant ingredients which help cure black knot disease for grape vines, apple trees, etc with 100% organic black knot be gone. Apply the black knot fungus spray any time the tree is absorbing nutrients up through the root system, from early spring to late fall. Available in 30, 60 & 120 ML.
Order now! For more details please contact 607-343-7781.
For more details, visit our website: https://www.blackknotbegone.com/
0 notes
Text
Get better black knot disease Treatment for grape vines, apple trees, etc. with the 100% organic black knot be gone. Apply the black knot fungus spray any time the tree is absorbing nutrients up through the root system, from early spring to late fall. Available in 30, 60 & 120 ML.
Order now! For more details please contact 607-343-7781.
To buy this product visit our website.
0 notes
Text
Get better black knot disease Treatment for grape vines, apple trees, etc with the 100% organic black knot be gone. Apply the black knot fungus spray any time the tree is absorbing nutrients up through the root system, from early spring to late fall. Available in 30, 60 & 120 ML.
Order now! For more details please contact: 607-343-7781.
For more details, visit our website: https://www.blackknotbegone.com/
0 notes
Text
Get better black knot Fungus Treatment for grape vines, apple trees, etc with the 100% organic black knot be gone. Apply the black knot fungus spray any time the tree is absorbing nutrients up through the root system, from early spring to late fall. The best time is any time you see the black knot disease on the tree.
For more details, visit our website: https://www.blackknotbegone.com/
#black knot#black knot fungus#black knot fungus treatment#black knot be gone#fruit tree fungus#black rot#fruit rot
0 notes
Photo

Apply the black knot fungus spray any time the tree is absorbing nutrients up through the root system, from early spring to late fall. The best time is any time you see the black knot disease on the tree.
For more details, visit our website: https://www.blackknotbegone.com/
#black knot fungus#black knot disease#black rot treatment#fruit rot treatment#cherry tree fungus#apple pear scab
0 notes
Photo
Apply Black Knot Be Gone’s products to get better black knot Fungus Treatment composed up of organic plant ingredients, also suitable for grape vines, apple trees, etc. Apply the black knot fungus spray any time the tree is absorbing nutrients up through the root system, from early spring to late fall. The best time is any time you see the black knot disease on the tree.
For more details, visit our website: https://www.blackknotbegone.com/
#black knot fungus#black knot fungus treatment#fruit rot#black rot#fruit tree fungus#black knot disease
0 notes
Photo
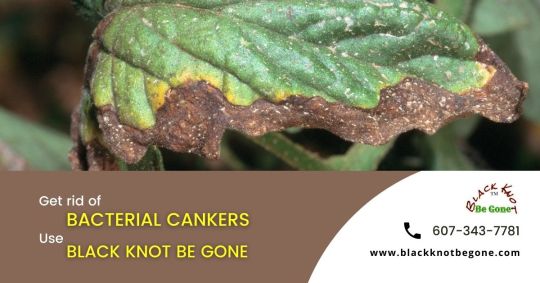
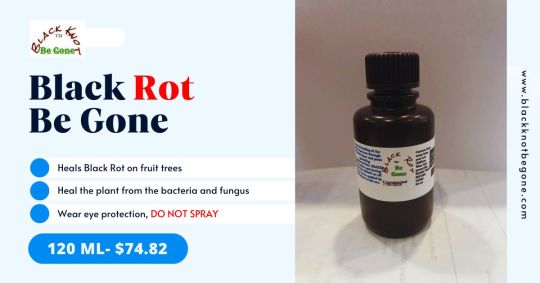
Black Knot Be Gone is the one-stop solution for all kinds of bacterial diseases found in plants. Bacterial canker usually occurs in plants due to two closely related bacteria that infect the stems and leaves of plums, cherries, and related Prunus species. Flower, leaves, and stem infection can be seen during the mid-spring. Use the black knot fungus spray to get a unique bacterial canker treatment. For more info please contact 607-343-7781.
Visit: https://www.blackknotbegone.com/
#bacterial cankers#black knot fungus#black knot be gone#black knot disease treatment#fruit tree fungus treatment
0 notes
Link
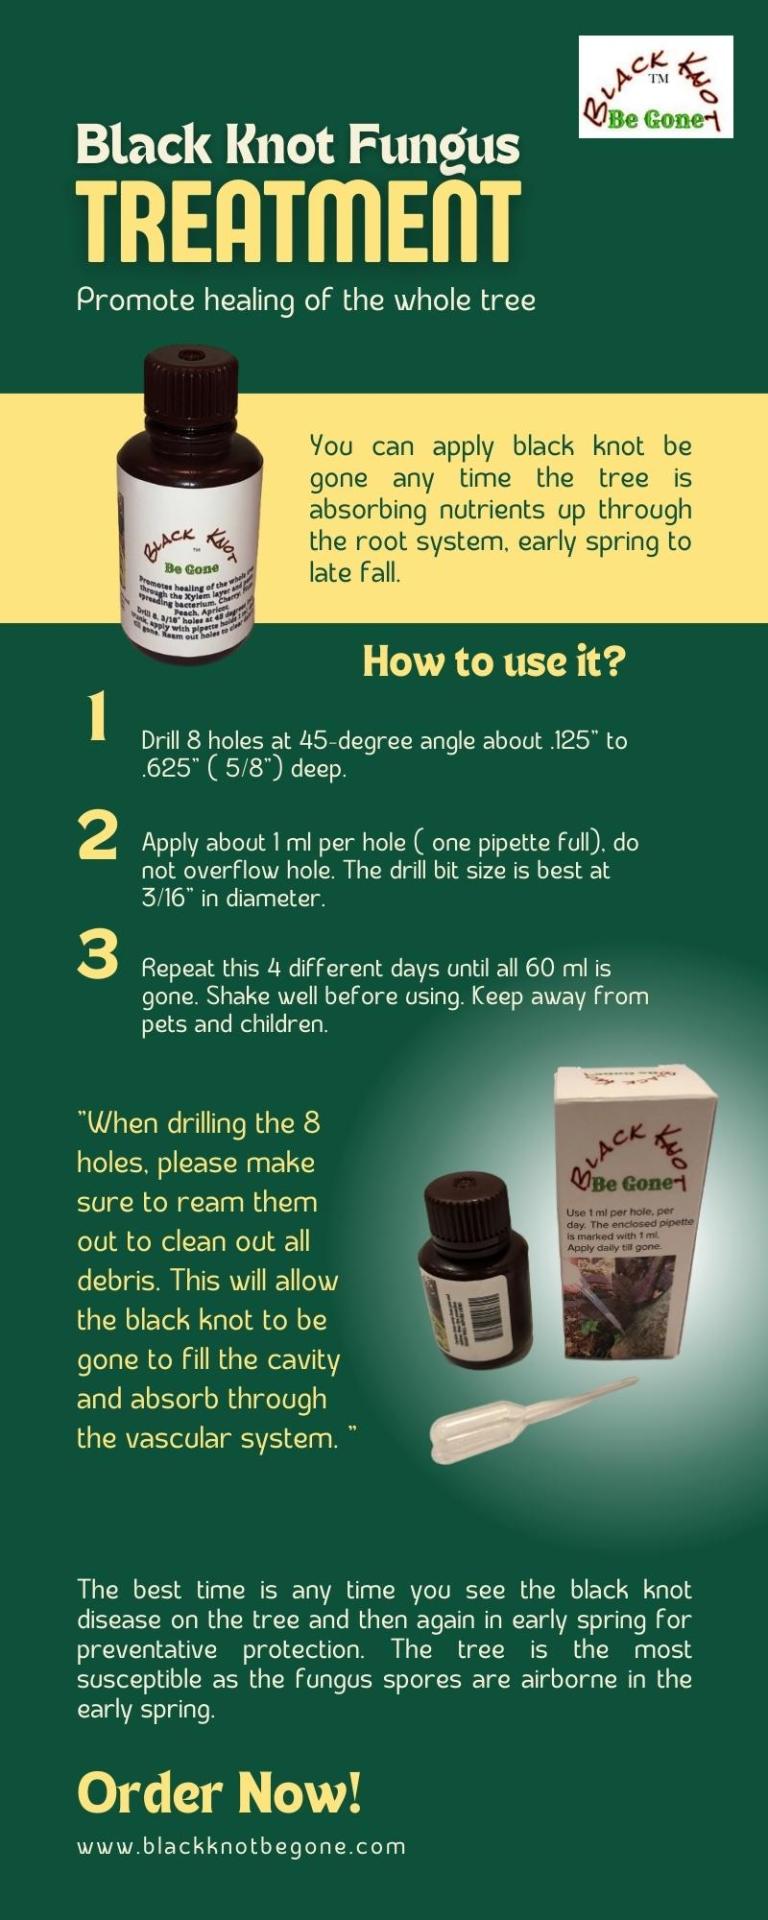
Cedar Rust Be Gone™ Safely promotes healing of the whole tree for black knot disease, contains all organic plant ingredients. Easy application apply to just base of the tree with pipette. 4 daily doses to use all 30 ml. Do Not Spray. Notice improvement in 2-4 weeks, depending on severity. Video crumbles in hand.
0 notes
Link
Are you looking to black knot fungus treatment for Olive Oil, Cherry & Fruit Tree? Our product is first of its kind; apply in whole tree of a single 30 ml bottle. Buy Now!
#Black Knot Fungus Spray#Black Knot Disease#Pear Scab Fungus Treatment#Fruit Tree Fungus Treatment#Black Knot Fungus Treatment
0 notes
Photo
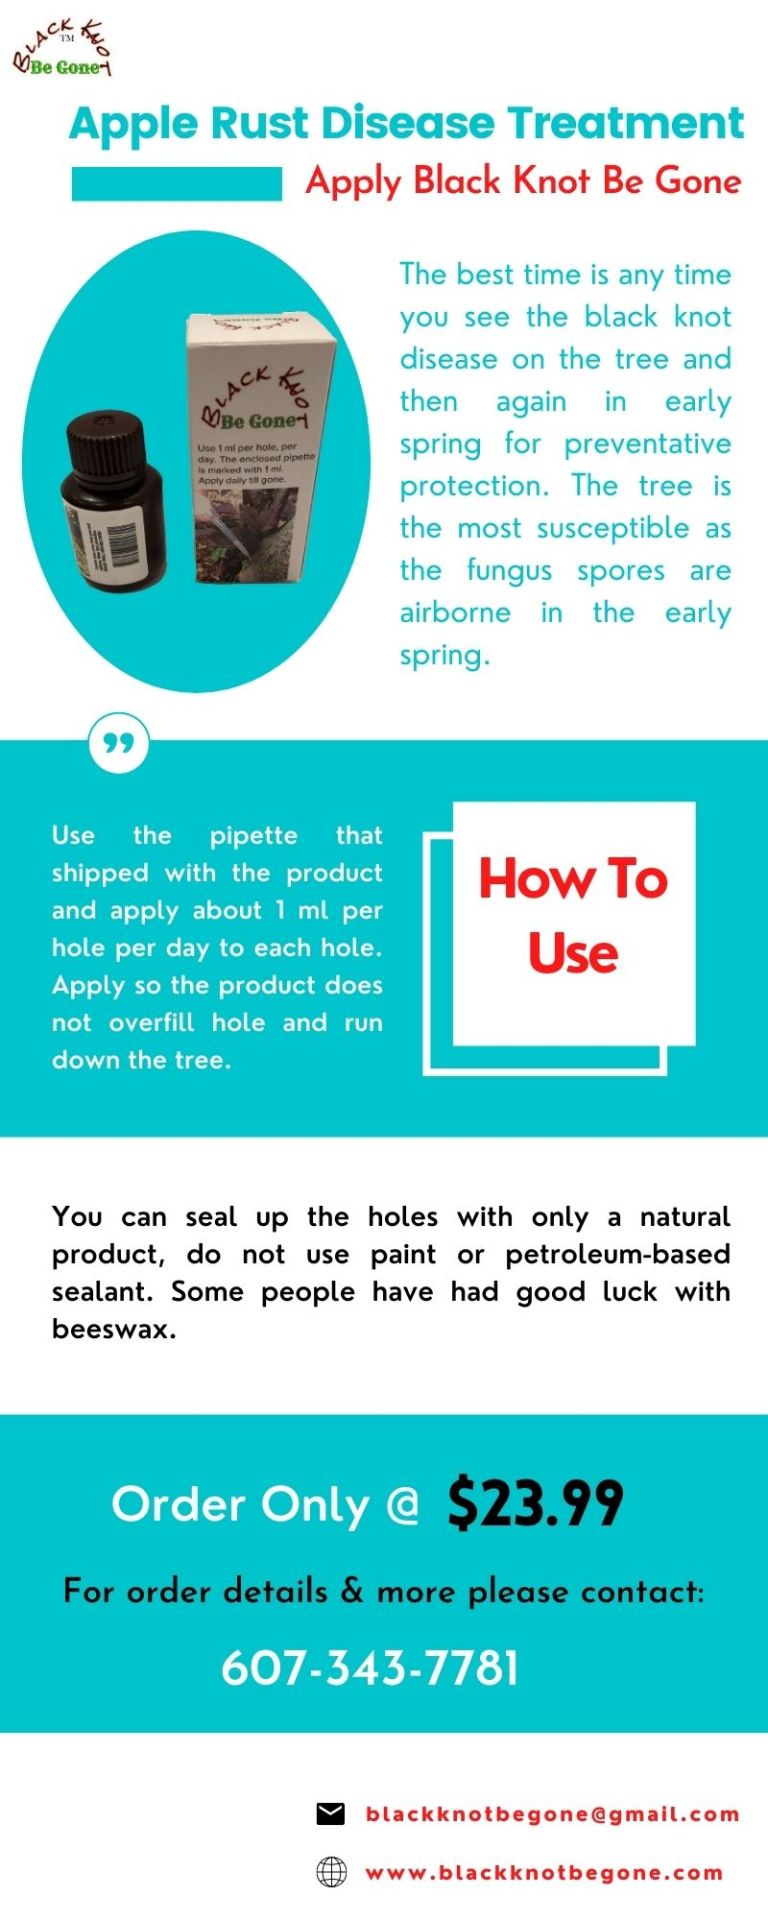
The different species of fungus Gymnosporangium causes the apple rust diseases with infecting by rust fungi. Black Knot Be Gone provides unique products to recover your trees & helps in apple rust disease treatment too. You can apply black knot be gone any time the tree is absorbing nutrients up through the root system, early spring to late fall. Order at $23.99. Contact: 607-343-7781.
Visit: https://www.blackknotbegone.com/products/black-knot-disease-treatment-all-organic-plant-ingredients
#Black Knot Fungus Treatment#Fruit Tree Fungus Treatment#Black Knot Disease#Black Knot Fungus Spray#Pear Scab Fungus Treatment
0 notes
Last Seen Blogs