#and decided to not upload it for months again. Also the 'export process' is driving me crazy so I figured this would be the best
Text
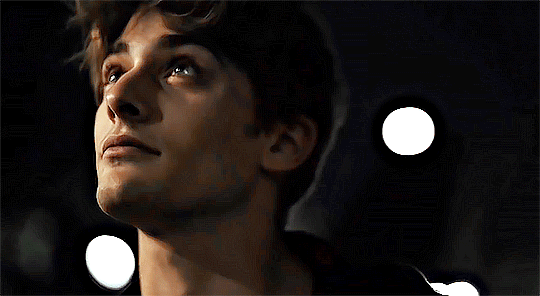
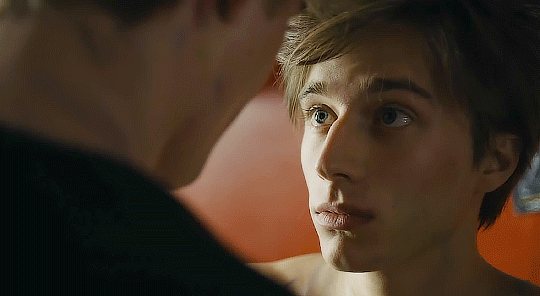
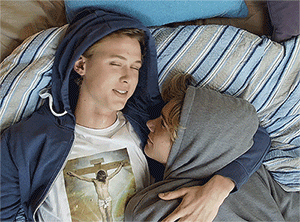
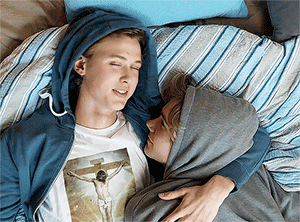
好きだから -- ぼ虹の日 edit
This is very self indulgent and I wasn't even expecting to finish it in time for boniji day. Maybe I just love the pairing so much I wanna make something for it also cuz I still haven't drawn anything about them lately cuz depression go brrrrr
This is initially from Nijika's POV towards Bocchi but some lyrics strayed from that especially the dog part and the last one. But this could also be from Bocchi's POV visualizing Nijika's feelings about her since the edit did start and end with Bocchi in it so...yeah that's how this edit is interpreted (also I kinda got stuck of not knowing what clips that could fit in some parts so ignore if most of the clips are from episode 8)
Btw at the 「またね」 and 「また明日」 part, I was originally going to put the same lines by both Nijika & Bocchi from the show but it sounds out of place so I scrapped it. Tho if I'm better at editing I could make it work and blend it along with the song without it sounding weird (but I'm not :P)
Another thing is that although the lyrics did say 授業 (class) / 放課後部 (after-school club) / LINE in some parts, I changed it to バイト (part time job or in this case I chose work) / 帰宅部 (go-home club) / LOINE to fit the terms in BTR
#boniji#bocchi x nijika#hitori x nijika#hitori gotoh#nijika ijichi#hitori gotou#ijichi nijika#yuri#my edit#anime edit#amv#edited with yt link for the amv and added more tags. but still too shy to tag the main tag lol >.<#apologies for the lyrics & translations covering half of the video#reason why it's there is to cover the embedded subs cuz that's the only Bocchi eps I have downloaded#also sorry if this looks laggy the thing is I can't export this video cuz my editing software doesn't let me#so the only solution I could think of is screen recording on my PC#idk if the recording or the editing software makes it laggy but it's the only way I could think of to 'export' the video#it also crunched up the quality rip :')#methinks this could be better especially with the font and template but this is what I could finish before I overthink#and decided to not upload it for months again. Also the 'export process' is driving me crazy so I figured this would be the best#And to anyone reading the tags… please ignore it. This is just my useless ramblings. Don't read it it's embarrassing =w=
6 notes
·
View notes
Photo
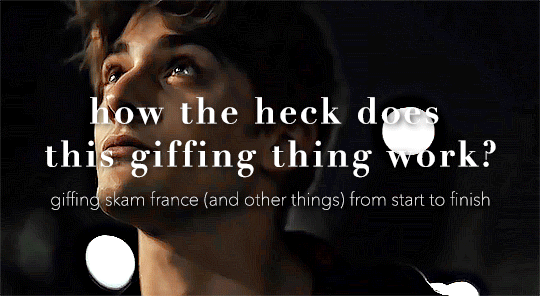
so here’s my disclaimer: I hardly know what I'm doing. This is my glued together homemade giffing method that I’ve created over months of just random experimentation and bits and pieces from all kinds of tutorials. there are probably better or more correct ways to do a lot of these things! this also isn’t a completely universal tutorial, some of the specifics are geared towards giffing skam, specifically skam france.
I gif in photoshop cc 2020 on a macbook. Some things like keyboard shortcuts and little things about the photoshop interface will probably vary if you are on a pc/ other version of photoshop!
this is very long and very unprofessional, but I hope there is something in here that someone will find helpful!
we’ll be going from this:
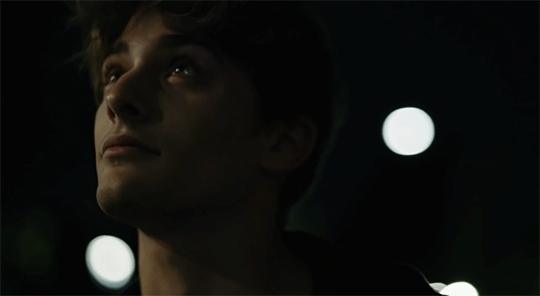
to this:

up to date as of October 25, 2020
downloading clips
selecting what part you’re going to gif
cropping
my action for resizing, converting to a smart object, and sharpening
coloring
exporting and setting the delay
tldr tips
1. downloading clips
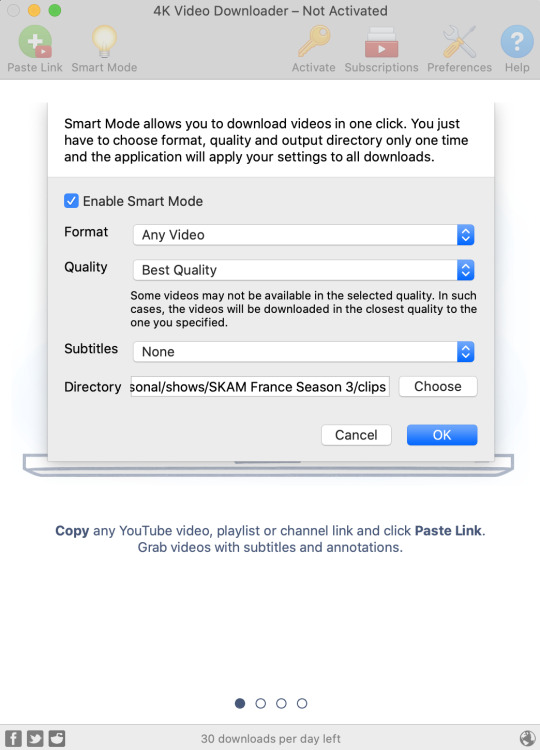
4k video downloader (which you can get for mac or pc here) is great for things posted to youtube, especially from skam france because all the clips are on their youtube with no weird geoblocks or anything! it’s really easy, you just have to open the clip in youtube, copy the link, and go into the program and hit paste link. I like to put on smart mode first and set the destination folder so all my clips go into the place I want.
There is a 30 video per day download limit, so if you’re thinking you really want to gif lots of stuff from the show, and want a big chunk or a full season it’s definitely worth hunting for a mega or google drive with full episodes to download because it’s just less hassle! I might come back to this post later and compile a list of all of those, but for now if you type “[remake] no subs google drive” or “[remake] no subs mega” into a google search, you’ll probably find something! the all of skam website has no subs for several remakes, but not all!
If you don’t have enough space on your computer to be keeping full seasons, I know there are methods to get screencaps without having to download (generally for giffing movies and regular tv I think this is a common method), but I’ve never done it so I’ll redirect you to this tutorial that explains it! you should probably just go there for the whole thing tbh it’s much more coherent than this, but I digress.
2. selecting the piece of the video you want to gif
now that you’ve got your episode or clip you’ll want to just open it in photoshop! if you go the screen capping route the way to do that is a bit wonky, so you can keep following the tutorial I linked above and join back in here at coloring if you like!
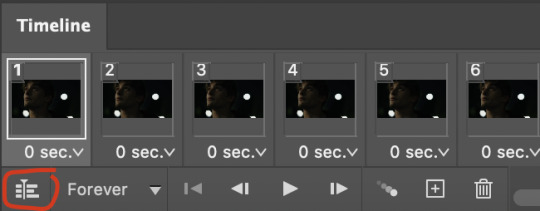
if the timeline at the bottom doesn’t pop up automatically you can go to window > timeline and turn it on! now you can use the scrubber bar thing to find the moment you want to gif!
The advantage of this over screen capping is you can scrub with more precision. the arrows circled in blue below let you jump only one frame, where in screen capping I'm pretty sure you can only go by ten second or one minute intervals.
I usually drag the scrubber as close as I can to the start of the shot/moment I want to use, fiddle with the arrows circled in blue below to jump forward or back one frame at a time until I'm at the first frame I want. I move the left grey handle to the scrubber and then I hit the play button and let the whole shot/moment play. Pause and repeat the shuffling with the arrows until you’ve landed on the last frame you want to use and move the other grey handle.
the moment you want to use should be between your handles (it’ll look like what I have circled in red), and if you hit play, you should see the thing you want to gif playing on loop above the timeline. the speed will probably be weird, but we’ll deal with that at the end.

now I recommend doing command or control + s to save your gif as a psd (photoshop document). this is a working, editable file which means if photoshop crashes you can open your file right back up and keep working as long as you’re hitting command or control + s at regular intervals as you work. later we’ll go through exporting in gif format that can actually be uploaded to tumblr.
3. cropping
next I crop out any logos or black space at the top and bottom. Just click on the crop tool on the lefthand side of the screen, drag the edges and hit enter when you’re done. you can of course crop out more than just that, but regardless of what you crop out, now is the time to do it.
you can set an aspect ratio for your crop at the top of the screen if you’d like to be positive that all the gifs in your set will be the same:

4. my trusty action: resizing, converting to a smart object, and sharpening with one click
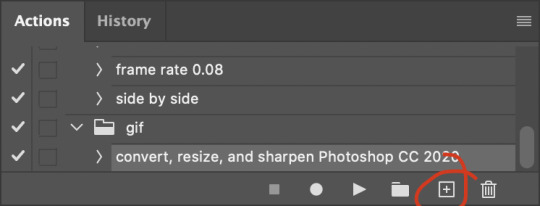
Now is when I use an action I made that does all the resizing, converts to a smart object, and sharpens. I’ll take you through the steps so you can conceptually get what’s going on, but I highly recommend using the actions window to record your process as you follow along so you have this action as well. It easily shaves at least 5-10 minutes off of the whole process, and these steps will be the same every time.
here’s how you make an action: go to window > action and open the action panel. click the plus symbol to start recording a new action:
in the window that pops up, give it a name and hit record:

now just continue with the steps below, and it will save them!
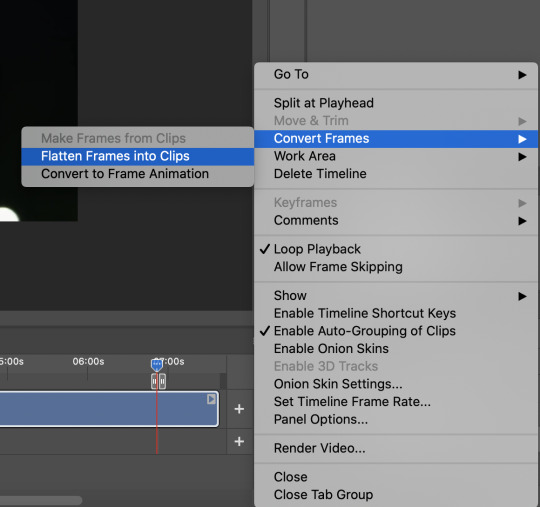
first you flatten frames to clips (I think it says flatten to layers on older versions of photoshop). this is in the menu at the top right corner of your timeline:
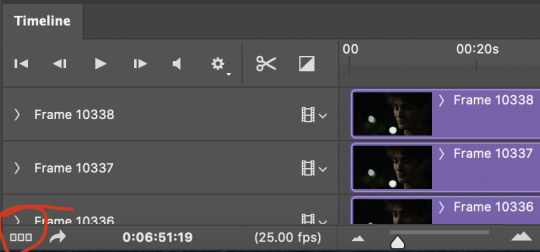
next you convert to frame animation by clicking on the symbol in the bottom left, circled in red:
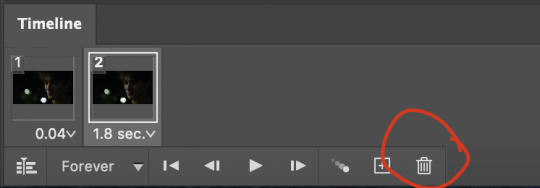
if there is more than one thing in the frame animation, delete the extra one. you don’t need to keep the last one but it won’t let you remove it until there are other frames in there. also go into your layers and delete video group 1 and its contents. don’t ask me why these steps are necessary, I don’t really know, but I’ve noticed it sometimes gets wonky if you don’t do this:

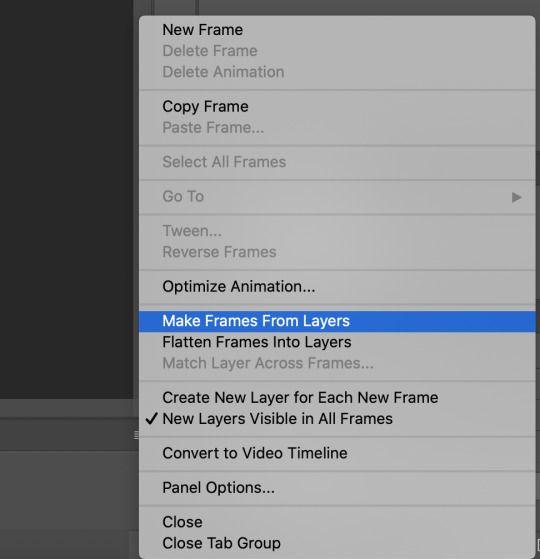
now you want to make frames from layers and delete that first frame that was there before:
then we return to the timeline:
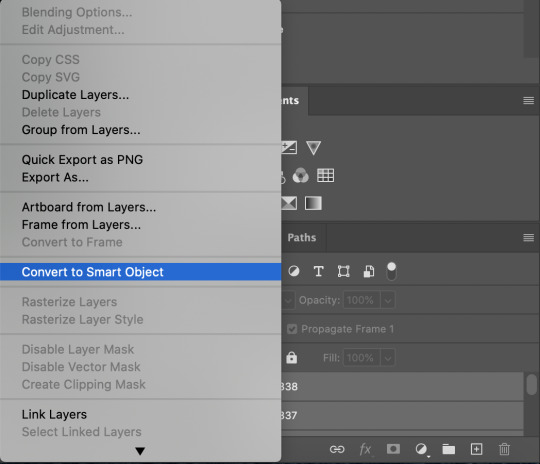
use command + option + a (control + alt + a for pc I'm pretty sure) to select all layers and then right click within your layers window and select convert to smart object. It’s important to convert to smart object after you go back to the timeline, or the gif won’t move:
next I resize. gifs for tumblr should be 540 pixels wide. for recording your action you should just go into image > image size and only change the width to 540 in case you ever have gifs cropped to different aspect ratios. don’t touch the height, let constrain proportions figure it out!

now, here’s what our base gif looks like, no sharpening, no coloring:
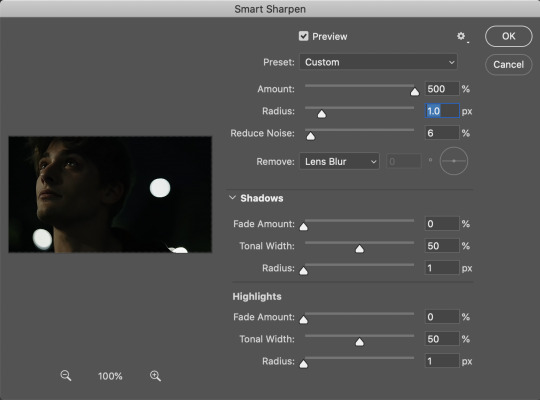
now to sharpen. go to filter > sharpen > smart sharpen. this is up to personal preference, but my go to settings are:
this is what we have after sharpening:

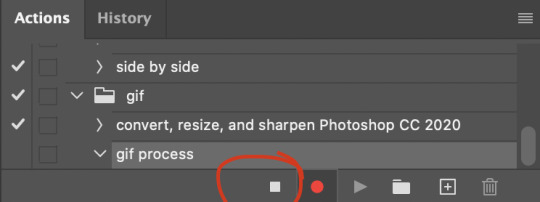
now is when you can stop recording your action.
just press the stop button in the action window:
this action is pretty much universal and after I select the moment the gif will be and crop however I want, I use it on every gif I make! so although this initial setup is tedious, now you’ll never have to do these steps again, and the process is magically much quicker.
5. it’s time to jump into coloring!
I typically start with exposure and sometimes some brightness/contrast. with really dark gifs like this, you kind of have to make it worse before you make it better. I did this:
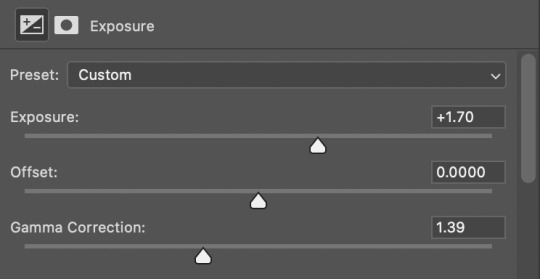
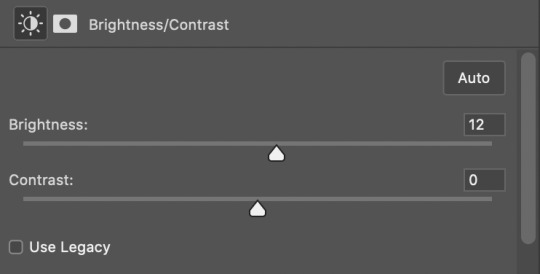
now the gif looks like this:
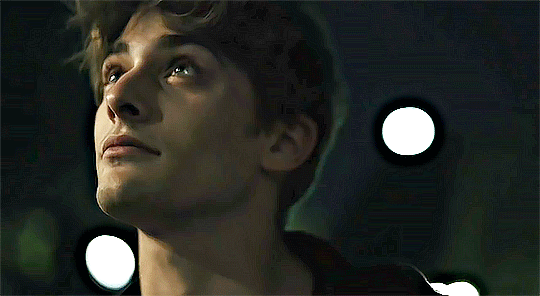
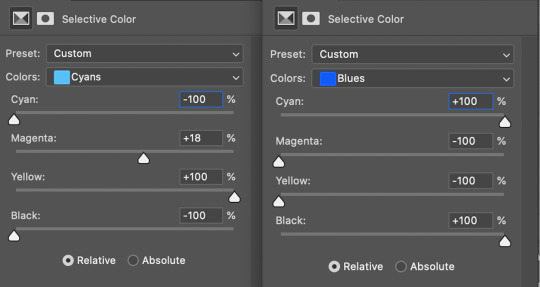
we have some static and some ugly bits, and this is where selective color comes in to fix it! boost blacks like this:
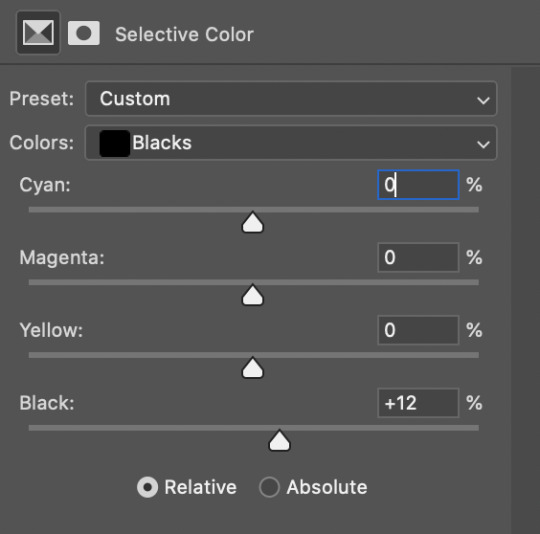
and now your gif looks like this:

the skin tone is looking a little sickly and weird, so I go into the yellows and reds in my selective color layer to fix it! I also messed with the greens here because I didn't want color in the background (that part is totally optional and just up to your preference):
now we have this:
to really take the color 100% out of the background, I did one more separate selective color layer for cyan (again, I just felt like it but this is optional!):

and now the finished gif:
there’s lots of fun extra things you can add like text and tints and overlays and all that I won’t get into, but feel free to reach out for help on those types of things!
this gif was certainly not the most complicated to color. some ridonkulously dark clips (*cough cough* vendredi 20h27 *cough cough*) take tons and tons more effort than this and a lot of the time you’ll want to use color balance layers and vibrance layers and all of that to mess with your coloring.
with all of this coloring business, I really just learned by doing. I don’t know all the technical purposes of each type of adjustment layer, and I tend to stay away from curves just because I find them confusing and annoying. The bottom line is that you should always experiment and find out whatever coloring works for you and run with it! I’m sure every gif maker you talk to does things at least a little differently!
I highly recommend taking the time to go through all the types of adjustment layers and just move the sliders around to see what they do! That’s honestly one of the best ways to learn and decide what you like!
6. now to export and adjust the delay!
the keyboard shortcut for exporting on mac is command + option + shift + s, control + alt + shift + s for pc, otherwise you can go to file > export > save for web
my settings are here:
the settings only need to be configured once! otherwise just hit save and follow the pop ups to choose where to save and what name you want to give your gif. Since you saved as a psd way back, that will be the name it’s automatically given, but call it whatever you want!
then I adjust my delay by opening the gif I just exported (not the psd, the .gif file) and using one of my delay actions. I’ve made an action for each delay between 0.05 (real time) and 0.08 (really slow mo for certain super short shots, typically for more ~artsy~ sets).
all my action does is select all frames:
adjust the delay (which will differ based on whether you want them slowed down and by how much):

for reference, this is a 0.05 delay:
and this is a 0.08 delay
now you just export the same way you did before!
remember if you’re recording this as an action, you don’t want to touch the file name, just say yes when it asks if you want to replace the file. if you always save your gifs to the same place, your action will now enable you to override any gif with the incorrect delay with the correct one with one click!
7. tldr: the main tips
for downloading 4k video downloader works well for non geoblocked youtube videos, the all of skam website is another place you can look to download with no subs, here’s the screen capping method if you don’t want to download
The main way I combat dark lighting is to bump exposure to the right, gamma correction to the left, and then enhance black in a selective color layer. The amount of these three adjustments will vary gif to gif. I know lots of people use curves, but I find them really confusing for some reason, so this is my method! As my graphics teacher likes to say: there are always at least 3 different ways to reach the same result!
there’s a little bit of additional coloring on this one, but here’s another before and after example so you can get an idea of how those steps get you a better lit result without making the lighter parts super over exposed:

besides those three steps, you have free rein to use the other selective color channels, as well as color balance, vibrance, hue/saturation, etc. to restore color that was lost or to change the colors altogether! mess around with it and have fun experimenting!
7a. bonus coloring tip:
sometimes you can make use of selective color to completely alter an isolated color in your gif. You can get very adventurous with this, but here's a simple example of changing blue tones to teal (I got away with these gifs being longer because they were in rows of two in the set I posted them in. I'm too lazy to trim frames so I can put them here at 540 px without going over the 10mb limit so just ignore the quality ok):
7b. actions, actions, actions!
if you find yourself doing a certain thing over and over, always record it as an action. the amount of time they will save you is honestly really impressive.
You can duplicate actions, so, for example, if you have different sharpening preferences for different shows or scenes, you can duplicate your gif process action and go into the steps, double click smart sharpen, and alter it however you want!
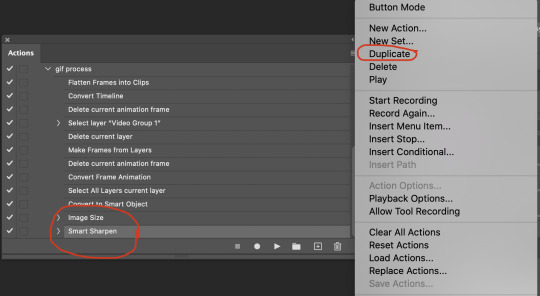
This could also be good to do for the different widths for tumblr if you ever do sets with rows of two or three! Duplicate actions is also how I made my actions that set delay at 0.05, 0.06, 0.07, and 0.08!
when in doubt, always make an action! it’s worth minimizing the tedious bits of the process as much as possible so you can focus on the fun part of seeing your awesome gifs come to life! any little task you find yourself doing often, make an action!
and for now that’s all I have. if any of this made no sense, if you want to suggest a correction or addition I could make, if you’re ever curious how I did something on any gifs I post, or if you have any other sort of questions, feel free to send me an ask or a dm! if I can’t answer your questions I’ll be happy to try to direct you to someone who can or a tutorial to help! again, I'm no expert, not even close, but I hope at least one person will find one thing in this mess that helps.
#this got . so long omg#mystuff#mytutorial#gif tutorial#tutorial#resources#fellow gif making peeps feel free to correct me or give input on how to improve or add to this tutorial!
31 notes
·
View notes
Text
6. EDITING
Hey you, how-is-it-going? Still there? So you’ve shot a movie, you little Scorsese, hey?
You rock girl/boy. You have done the hardest part. Congratulations again.You’re ready to edit your film.
“Finally, I’m so happy, in a week, I’ll be done with my editing and my movie will be finished”
You are joking are you not?This started so well and now you want to mess it all up. You are going to chill down and to take your time buddy. Alright let’s get to it.

A few things to know before you start. I know I said it about most steps of this filmmaking process, but editing is so important, maybe the most important part.
It will really be the occasion for you to give your film its own spirit and vibe, to pursue its uniqueness. It doesn’t matter how great your shots are, you can make a crappy movie editing it. If your shots are crappy as well, then it’s going to be complicated, but hey, I am pretty sure your shots are cool. Because you’re cool.
1. “Editing, OK, but where? On what?”
Good question. To edit you need : A good computer, a good software, a good USB hard drive, and of course an internet connection.
Good computer : If you are not part of a film school program, it could be yours, or your father’s, all it needs is to have some available space on it, a good processor and sufficient RAM memory. If you are part of a film school, you should try to use their computers, especially since they have all the software you need and since these computers are here just for that. Also you don’t necessarily have the official and legal version of the software, which can cause problems. Your school has all that super fancy legal stuff.
Good software : Adobe premiere is my personal favorite, but other editers use Final cut 7, Final cut X, or AVID. For Final cut, you need an Apple computer, which is why I use Adobe.
Good USB hard drive : really useful, this will help you not to lose your film clips, what you edited, your film in general, your life, your shit. That’s also why you need the internet connection, to upload your adobe/FC project on google drive so that you are sure that you are not losing it. Better having saved it on as many different places as possible.
2. “I’ve got what you said, how do I start?”
Start by being organized. Organize your clips, one separate folder for each scene, then within this folder create another folder in which you will put all the shots you decided to use for the film. DO NOT DELETE THE OTHER SHOTS, they might come very handy if you need a special sound, or a word you don’t have in the shot you chose.
3. “I am a very organized person, can I start now?”
I’m not your mom or dad. You do whatever you want, this is just an advices blog, CALM DOWN NOW.
Well sorry about that, it really came out of nowhere. Yes you can start,
Don’t edit all the scenes at the same time, do it one by one, create a sequence for each scene and then you’ll add up all the sequences together afterwards.

4. “OK, my film was supposed to last 10 minutes maximum, and it’s 18 minutes long...”
Don’t worry, nothing really surprising here. When we make a film and we edit it ourselves, it’s really painful sometimes to cut it. The shots, we like them all, and it feels more “real” when it’s longer. Also, we really cannot choose which shot we should delete if we have to choose some.
That’s how we feel, but that’s a feeling you have to fight. Forget about all the time you took to do this specific really complicated shot. If it doesn’t feel completely right, delete it. The hardest part of this step will be to look at your film as objectively as possible when you finish editing it.
As you know, this is not possible, so you will have to ask your best friends, your brother and sister, your parents, whoever you feel like you can trust, to watch your movie and give you feedback. Ask the persons who already helped you on your script, they’ll feel like they’re really involved in your art and will give you more constructive critics.
This WILL feel painful, especially since your film is not completely done yet, but their feedback is crucial, they haven’t shot your film, so they don’t know the story behind each shot. They won’t care if you took an hour to shoot it or two seconds, if they get bored, they need to tell you. If your film is too long, they also need to tell you.
When I edit, I usually try to cut as much as possible between shots, the only time I let a much longer shot is when I really feel like it’s vital. You’ll like your movie better after that, promised.
As for the sound, if you can find someone who knows how to edit and mix it, that would be great, if not, good luck.
This is the name of your new best friend : Crossfade. Use it everywhere, you hear me?? Everywhere!!! (It softens the transition between shots). Your second best friend is a number : -9dB, try to set the audio level around 9dB, it shouldn’t go over -6dB, and under -12dB.
5. “Say, I feel like I’m done. What’s next”
Just like for your script, you shouldn’t feel like you are done, you should know it. If you’re not sure, watch your film over and over again, until you know. After that, there will be no other chance to change it, so take your time, this is really important, it does not matter if your film is finished one year after, or even two. There is a reason Terrence Malik does not make a film every six months (I know, I just compared you to Terrence Malik, how do you feel about that?)
Now if you really finished editing, you are going to need to export it, hence to chose a format. Let’s be clear and short, for internet, choose H.264 and match the output dimensions with your input ones, most likely : 1080p. Make sure the frame rate is right too.
For screenings, choose Apple Pro Res 422, but we will come back to that part in a later step. Next week, we will talk about the music in your film, so wait a little bit before exporting it. See ya. (Bernie says bye)

1 note
·
View note
Text
Best Tools for Blogging
I spent weeks at the end of the year trying to find the best tools to organize my digital life, thus blogging, for writing, reading, storage, imagery, picture editing, organizing, searching + testing. In the end, I've decided for these simple apps:
This was the year that I saw many apps being and the monopoly of Google + Microsoft grow even more. Thus, I had to export thousands of pictures from extinct apps and re-think all again where to keep them stored from now on. I had to adapt and spend hours that became days of backups. Without mentioning that it took me weeks to even find and like new apps.
So that's my favorite and most comprehensive useful list at the beggining of the year.
Writing
1. iNotes
As a matter of fact, I had written this post, and almost all the others using the simple default notes app in my iPhone.
1. Bear
Other new app I've found in this category: Notion.
Lists
1. MinimaList
A very minimalist list, that has obtained full of functionalities over the past year.
1. Diem
An even more minimalist list.
Files
1. iDrive or iFiles
It has easily became my favorite in 2019, after the new update IOS 13. I use it not only to see my iCloud files but also to access all of the other apps (below).
1. Google Drive
That's the app I've been using for some years now to keep of all my fonts, designs and stock images. It's the most practical to me for switching between phones and computers.
1. One Drive
Photos
1. Scene
I use this app to organize my pictures into neat little folders organized by subjects I want to address throughout the year. I too use it to see the progress of my daughter for her extra activities during the year. The main advantage compared to iPhotos (my second main app) was the possibility to clean my phone's storage, which is limited to 64GB at the moment. I do have to pay for a monthly subscription to upload videos. Keep in mind it's not a backup, it's just a syncing service. I do backup my pictures before uploading there using either Family Album or Ever. It currently looks like this for me:
1. iPhotos
I still use the defaut photos app for its practically for editing + sharing pictures. I keep albums stored in my iCloud subscription for the best already edited pictures of a subject.
1. Google Photos
The most classical and considered the best for most. I use it for storing my best pictures alongside with little texts to use in the blog.
1. Ever
That's where I backup all the pictures without any processing. Here, they're sorted by albums of places, holidays. For me, it comes as a substitution to my still loved, yet extinct Shoebox app.
1. OneDrive
My husband has been paying the yearly subscription, and according to the last time we talked, don't plan to stop, so honestly, that's the reason I keep using. The subscription comes with the whole Microsoft package. I found it the mosf unpractical app for storage, though its biggest pro to me is the amount of features that comes in the, which is very useful to me to highlight words and write small notes in my homeschooling. It's the most complete app, all in one.
Saving
1. Collect
I had just discovered this app recently surprisingly during my search, I wasn't looking for anything like this, but it my expectations. It's a lovely and beautiful app, one that I use the most. It allows me to save from pictures to links, including notes and.
Editing + Planning
1. A Color Story
I use two grids in for my personal profile (link) and my daughter's profile (link).
1. Planoly
It's the app I use for my store exclusively. though Planoly is a favorite of mine, lovely and practical to use
1. UNUM
The con of this app is that it's limited to only 30 uploads at the same time in the free version. The main feature of this app is the ability to transform. your grid into a big, beautiful puzzle. Other pros include:
I also would like to mention here that I've used Preview for many years, and up to this day, I look at their Instagram for tips, tricks and advices. Honestly, I wanted to have stopped using it long ago, but their (paid) filters were my favorite (for a dark theme). A big pro of this app is the possibility to add as many pictures as we wish, repost from other accounts, search for and use free stock images. The reason I stopped using it was that I considered it a bit slow. Nowadays, I switched my theme to Full Moon in ACS (paid).
New Apps for Instagram 2020: Milkshake [link soon]
Basically, my whole November as I finished the exams in my universities (link), have been dedicated to organizing a homeschool year, our first pre-school year, a new routine in a new home and country and organizing all my life, from real life to digital life and get back to blogging with a full year strategy in place. I'm normally a messy person so I'm quite surprised and proud of myself (link to mindset stuff).
¹ All of the apps are free to use some with payment options. I'm only using an affiliate link for Planoly, which is the only app from the list that has an affiliate program. You'll not pay anything more for using my link though I'll gain a free month of use to keep supporting my small business.
² I use an IOS account in Europe and I honestly hadn't checked if they are all available to other phone systems or countries. But most probably yes.
See also:
Best Family Apps
How to Organize Pictures
0 notes
Text
Guest Blog: Architecture and Airplane Photographer Mike Kelley
How My Career Turned Into One Massive Personal Project
In 2011, I had just moved to Los Angeles from northern California. I got a little sick and tired of living the snowboard bum life, even though I found a nice little niche working as a real estate photographer in the Lake Tahoe area. Unfortunately by this time, the injuries (and the associated depression) were piling up. On nearly a whim, I moved to Los Angeles in an attempt to snap out of the funk I was in.
This decision was based on the fact that I had heard one way or another that it was sort of the capital of art and design in America, a title which may or may not be true depending on who you ask. I knew essentially nothing of the city beyond also hearing that people were self-absorbed and the traffic was ridiculous, but I’d made my decision, and in August of 2011 I packed everything into a tiny uHaul and drove the 6 hours south to a city my entire prior experience with consisted of transiting LAX.
For the first few weeks I was like a deer in the headlights. I grew up in New England and Los Angeles is a serious departure from that – windy mountain roads and corner stores turned into boulevards and 405 gridlock – but it offered tons of new photographic material. I would shoot nearly constantly, putting a tripod down in front of any new-ish looking building I could find and taking pictures to fill out my portfolio, which at that time consisted of mostly Tahoe log cabins.
I’d arrived in Los Angeles with around $2,000 to my name and it was dwindling quickly, as it tends to do when you show up in a new city for the first time. All I knew was that I had to start making money somehow, and I had decided a few years prior that photography was going to be my career. Being a rather naive 23 year old (I’m now 31 and not much better), I spent probably half of my at that point $600 net worth on $300 worth of printed brochures and started going to door to door to the office of any business that could require photos of architecture. Architects, interior designers, realtors, developers, couch designers, if they worked in the architectural industry in even a tangential way, I was there.
95% of those first efforts ended with me being laughed out the door or stopped by a secretary, but by the 10th or so attempt I had this down like clockwork. Of the 5% who actually stopped to talk to me, 2% weren’t interested, another 2% said they might call me back in the future but thanks for stopping in, and 1% – probably four or five business in total out of hundreds – wanted to work with me right then and there. I’d hit them at the perfect time they said, and they needed a photographer for something or other. And how much did I charge, by the way? Okay – great – we’ll call you.
The unintentional beauty of this was that before I went around knocking on doors, I had been out building my portfolio, fueled by the need to create something mixed with necessity and boredom. Since I wasn’t being paid, I got to pick and choose exactly what I wanted to photograph. Los Angeles is full of incredible architecture, and I’d sit on Google searching for the best examples of new architecture to photograph – it was pretty simple, to be honest. Pull up a car, get out the tripod, and make some shots at the right time of day. Sometimes I’d screw it up and make another trip out at sunrise instead of sunset, daytime instead of morning, whatever. I had all the time in the world and none of the money, but we’re gonna get there. Occasionally get busted for not asking permission to be on private property, but occasionally get away with something great, work ’em a little bit in Photoshop and I had the beginnings of a portfolio of interesting architecture. This is a theme that ends up recurring over and over in my career, so make a note here.
My first clients from my door-to-door extravaganza ended up being a realtor from Boston (they heard my accent from across the office when I walked in and we hit it off), a small-time architecture firm that had me photograph some office spaces for them, a couple of interior designers, and a car dealership (I told you, I annoyed literally everyone who would listen!). The beautiful thing was because I’d spent enough time building a portfolio in my own style, I was, for the most part, expected only to shoot what I had done previously. In a sense, I’d been hired on the back of my personal style. The majority of my portfolio was not influenced by clients, it was almost entirely my vision.
And that’s Lesson #1: Only put in your portfolio what you want to be hired to photograph.
About a year later, I had finally moved into a decent part of town and business seemed to be doing alright; the rent was paid and I was feeding myself, though hardly eating at steakhouses every night. Somewhere along the line I picked up some work editing paparazzi photos on the side. This was done in an attempt to smooth out the ups and downs of self employment income and half out of curiosity; the gigs I wanted just weren’t consistent enough and when the opportunity presented itself, curiosity got the better of me and I just couldn’t say no. It was the most LA job one can possibly have; but I learned a lot from it.
This job was enough to pick up around $2,500 every month, mostly from working on the weekends, which was absolutely perfect. Here’s how it would work: the paparazzi would deliver the photos to me on memory cards, and I would upload, edit, keyword, and export the images to our servers. Part of the process was also negotiating some of the licensing deals that came our way – if we had a big scoop, say, some Kardashian making out with someone she wasn’t supposed to be, or whatever it was, I had to deal with news agencies from around the world who wanted to call and buy those photos from us. The numbers were crazy, tens of thousands of dollars and in some cases even more depending on how juicy the gossip was and whether or not we got the exclusive, meaning we were the only company who got photos of the event.
The beauty here was that I was fast learning the value of licensing images, knowing how to negotiate in a fast-paced environment, and retaining control of your intellectual property. Even though the subject matter wasn’t my favorite, the business experience I learned at this side gig would prove to be invaluable. The income from this gig would also allow me to be very selective in what jobs I would take on – because I knew there was some money coming in (there’s always money in the banana stand…), I could turn down the jobs I didn’t want to shoot and spend time building my portfolio with exactly the images I wanted in there. I had enough extra cash to smooth over the gaps and really focus on going after the work I wanted.
Which is Lesson #2: Be open to learning things from unexpected places (like the paparazzi industry).
My New England genes were catching back up to me sometime around late 2012, and after a year in the city I decided I needed a bit of a break from Los Angeles. By no means was I rolling in the dough, but with a little coaxing from some friends and family, I made another decision that was probably half-baked on the surface but turned out for the best in the long run.
I spent about $2500 of my $5000 net worth (see, we’re getting somewhere!) to go spend 3 weeks on my own in Iceland to build a portfolio of images to promote my business. The goal was that by having images that nobody else in my market had and by filling my portfolio with amazing architecture that I actually wanted to photograph, I’d attract more clients that were both interested in my work and who were designing buildings similar to those in Iceland (clean, modern, set in nature).
The trip was a resounding success, and I’m continuing to use images from that project in my portfolio today. I also made some fantastic connections in the architecture community there, and I’m still in communication with many of the architects that I initially contacted when asking for advice on where to go and what to photograph. I’ve returned a few more times since then to continue building my portfolio of Nordic architecture and it’s always great to meet up with the same architects I met on that original trip six years ago.
Lesson #3: Use your marketing budget for personal projects, creative fulfillment, and travel to new and exciting places, not just mailers and web design.
—
Before getting too deep into this next saga, which is a brief departure from architecture photography, let me make it clear that I’ve had four longstanding interests in my life: art, design, aviation, and music. To some degree, these four things have never stopped being a constant in my life, and at times they’ve all been an outright obsession. Perhaps this was what contributed to me being a photographer in the first place instead of just following a more standard approach of high school-college-desk job – thank goodness!
It should come as no surprise then, that I’m one of those guys who lines up along the fence at the local airport on weekends hoping to get a glance of rare aircraft or interesting liveries (that’s what us nerds call the paint job), or driving hours out of his way to go to airshows when they’re nearby. For nearly the entire period that I’ve lived in Los Angeles, trips to LAX to watch planes have been a regular occurrence. It was not unexpected then, that on the weekend of March 29th, 2014, I was again at LAX with a camera in hand taking pictures of planes as they arrived and departed.
But I’d been doing this for years, and man, I’d taken every variation of airplane picture possible. Closeup, far away, sunlight, daylight, cloudy light, from below, from the side, whatever, you name it. So I was trying to something a little bit different when I was struck by the idea of applying some architectural photography techniques to aviation photography. When photographing architecture, I’ll often leave the camera on a tripod in the same spot for 20 or 30 minutes while pedestrians and cars pass by, and I’ll photograph all of them to later reconstruct a temporally expanded image of the subject. This allows me to pick the best looking people, most interesting cars, the most balanced objects within the frame as life unfolds in front of the camera; essentially extending the decisive moment from a fraction of a second to minutes or even hours. My idea for this airplane photo was much the same – leave the camera in the same spot for a few hours and capture all of the departing traffic from LAX and then composite it into one photo.
On the next day I returned with my new idea in mind. After about an hour of doing this and scrolling frantically through my pictures on the back of the camera, I realized that this was just too damn cool to quit early. So I made the decision to stay outside, completely unprepared without food, water, or bathroom, for about eight hours in total, photographing every airplane that took off from LAX on March 30th, 2014. Sunburned to the shade of lobster, I headed home around 6pm and remember being struck by this insane inspiration. I ended up staying up almost all night editing this photo together, and the resulting image was the single most career-altering event in my entire life.
After posting it online, (reddit, to be specific) this thing went viral. Stupidly viral. I’m talking Good Morning America viral, Guest-on-a-Japanese-Talk-Show-Viral, spreads in countless magazines, newspapers, websites, shot out of a cannon viral. I was lucky enough to be able to use my background as a paparazzi photo rate negotiator or whatever you’d call my job in a past life to manage the rights to this image and turn it into the single most profitable event of my life (pro tip: copyright your work, I know you’re lazy about it, so learn how to do it!).
This was another completely personal project that changed the course of my career (and life)! I used the income from this single image to plan a round-the-world project featuring over 20 airports where I’d repeat the same concept with different variations. The project, known as Airportraits, has become one of my brand hallmarks and has been displayed in endless publications, museums, galleries, and more. All of the exposure lead to a great deal of interest by people interested in purchasing prints, which spawned the birth of my online print store which has been a great success by all measures. By carefully managing the printing, licensing and usage of these images, it’s been an incredible investment that has allowed me a great deal of financial freedom and the ability in my own career to only photograph the projects (both architectural and otherwise) that I am interested in.
Lesson #4: Explore photographing the things you are passionate about, even if it’s not what you’re usually paid to photograph.
I realize that there was certainly an element of luck, timing, and other factors outside of my control that played into the success of the Airportraits series, but my combined experience with personal projects, rights managing, and commercial photography all came together to help me get the most out of this massive project. There is a compounding effect at play as well that I am just beginning to truly understand: when you are able to grow your brand around personal projects, you are able to create only the photographs that you want to create.
You can generate income from these projects that allows you to be more selective in what commissioned work you choose to take on. Since you’re more selective in your commissioned work, your portfolio of commissioned work becomes very tightly curated; so much so in fact that you only get contacted to do the high-end jobs that you show. And at this point, since you’re such a specialist, you can charge top dollar for your work which then allows you more time and freedom to pursue personal projects. And if you’re able to monetize those personal projects…you see where I’m going with this. You’re able to create exactly the career you want for yourself, (mostly) taking the pictures that you want to take.
Lesson #5: Set aside time every year to really knock out a personal project, even if there is a financial risk involved. A well-calculated risk is a risk worth taking in artistic careers.
At this point, I’ve got my career in a place that I’m quite happy with. I’m able to break up the year between personal and commissioned work more or less as I see fit, and every year I try to expand my catalogue of personal and niche commissioned work. Recent projects include photographing the creation, use, and destruction of aircraft in my series Life Cycles, investigating NASA’s assembly process and the myriad stories it contains, and setting aside three months earlier this year to create a coffee table book for a major publisher of some of the greatest architectural works in California.
All of these projects, while requiring tons of planning and time, end up refining my style, growing my brand, and in the long run, paying dividends both in terms of artistic and financial fulfillment. I think it’s absolutely critical for any successful photographer to set aside time each year not only for a literal creative break, but also to create work that inspires you. While it may seem daunting at first, with proper planning, you can absolutely get your personal projects working for you. It’s a concept that I believe transcends genres: no matter what you shoot, there’s something out there that will both inspire you and further your career as a photographer. Who ever thought that taking photographs of airplanes would help me as an architectural photographer? But these personal projects have unequivocally made me a more successful photographer in almost every way. Get out there and make it happen!
So, to recap:
Big lesson #1: Only put in your portfolio what you want to be hired to photograph.
Big lesson #2: Be open to learning things from unexpected places (the paparazzi industry, for one).
Big lesson #3: Use your marketing budget for personal projects, creative fulfillment, and travel to new and exciting places, not just mailers and web design.
Big lesson #4: Explore photographing the things you are passionate about, even if it’s not what you’re usually paid to photograph.
Big lesson #5: Set aside time every year to really knock out a personal project, even if there is a financial risk involved. A well-calculated risk is a risk worth taking in artistic careers.
You can see more of Mike’s work at MPKelley.com, purchase prints from him at MikeKelley.art, and keep up with him on Facebook, Twitter, and his architectural/commercial Instagram and fine art/personal Instagram accounts.
The post Guest Blog: Architecture and Airplane Photographer Mike Kelley appeared first on Scott Kelby's Photoshop Insider.
from Photography News https://scottkelby.com/guest-blog-architecture-and-airplane-photographer-mike-kelley/
0 notes
Text
Complete Step By Step Wedding Photography Workflow
You may have spent months planning a wedding with your client. After countless emails, meetings, and the actual wedding day itself; it’s time for the lengthiest part of your work to begin, the post-processing. Your wedding photography workflow is the part of the job that clients never see (and most never think about) after the event is over. Post-processing for digital photography starts from the moment you return to your home or office up until the clients receive their final images.
Wedding photography workflow
Every photographer has their own speed and style to post-processing and most will have their own aesthetic or editing programs they prefer to use. However, after owning a busy wedding photography studio for the past five years, I have created an efficient workflow that works well, while giving images a personal aesthetic. In this article you’ll find what to do after the wedding day is over, to delivering the final product to your clients using an efficient workflow.
Step 1: Back Up
You may have been shooting for eight or more hours, but when you get home, don’t crawl in that sweet, comfy bed just yet – your night isn’t over. It’s imperative that you back your client’s images up in several places as soon as possible. Not only did your client pay a lot of money for your time and expertise, but for the safety of their images as well. Until their images are backed up safely in several locations, no naps allowed! Don’t learn the hard way, back those things up.
Part one – download
On your computer, create a folder with the client’s name, and a sub-folder called “RAWS” (assuming you shoot in RAW, which you should. More on that later). You will need to copy the images from all of your memory cards into the new “RAWS” folder on your computer.
Note: RAW files are huge, s,o you will probably need to upgrade the amount of storage space on your computer, and get some more RAM while you’re at it to run your computer programs efficiently. If you’re using a Mac, make sure your computer is scheduled to back up using Time Machine as well.
Part two – make a copy
After all the files are on your computer, back them up again to a client folder on an external hard drive. When not in use, the external hard drive should be kept securely in a place like a fireproof safe. Some photographers back up on more than one external hard drive.
Part three – backup online
Lastly, when you don’t think you can stay awake another second, you need to start your RAW file back up to an online or cloud location. I use Zenfolio for my RAW storage, although there are other storage sites available. The good news? You can go to sleep while the files upload overnight (and maybe the next few days if you have a slower internet connection).
Step 2: Importing and Culling
The most exciting part of your job – not!
I’m going to be honest here, culling, or going through every image you took of a wedding, rating them, and deciding which to keep and which to trash, is the most tedious, eye-bleeding part of your job. This is why it’s not a good idea to “spray and pray” throughout a wedding day with your cameras. The more selective you are with the photos you take, the faster your post-wedding workflow will be. Alternatively, there are companies you can use to cull your images for you if that is within your budget.
In Lightroom, create a new Lightroom catalog for your client in their client folder: File>New Catalog. Then import your RAW files from the client folder you created while in the Library module.
Once all the images are imported, make sure all cameras are set to the correct time, and do a “sort by capture time” so everything from the wedding day on all cameras is in chronological order.
Culling
Next, start to cull your photos by lens. I have found this is the quickest way to make a decision on which images to keep. You can do this in the Library Module, going to Metadata (or hitting the / key), and selecting the lens you want to cull (see below). Rate your images on what to keep (hit P for picks or keepers) and what to toss (hit X for rejects). Repeat your rating process with each lens, and after they are finished filter by “all lenses” in the Library module to see the images all together. From there, do a second (or third) round of culling in the Library module until you have your final number.
For the step above, you’ll need to choose a rating system that works well for you. My rating system is 1 stars are rejects, 2 stars are keepers, and 3 stars are keepers that need Photoshop retouching. I often find that if I took a series of photos at once (like I do for the family formals to ensure no eye blinks) the last ones in the set are usually the best, so I will look at those images first for my 2-star keepers.
For more on rating and flags in Lightroom read: How to Organize Your Photos in Lightroom OR Organizing Images in Lightroom.
Step 3: Basic Edits
This is where the magic happens!
You have your final number of culled images, and can now begin your basic Lightroom edits. This is where your cropping, straightening, and adjustments for exposure, contrast, shadow, highlights, etc., come into play. This part is very personal to each photographer and this is where your style begins to emerge. This is also why shooting in RAW is so important, as you will have greater flexibility in editing as compared to a JPG. Many photographers may stop after this step, and that’s A-Okay if you’re happy with your result! However, if you want to push your images further – there are a few more steps involved.
Quick tip! If you have a series of photos in the same lighting situation taken with the same camera, edit the first photo in the set, select the rest of the photos that match, then hit the “Sync” button to apply your edit to all of the photos in that set at once.
Step 4: Polishing
Making your images sparkle using Alien Skin or Presets.
Many photographers may polish their images (a.k.a. color tone) with a chosen preset after the basic edits are done. You can buy Lightroom presets from a plethora of sources online or create your own. I found the Alien Skin program years ago and fell in love. For me, Alien Skin gives me the pop, sharpness, and great skin tones that I absolutely adore. It also has beautiful lens flares and light leaks that I use for enhancing natural sunlight. If you choose to try Alien Skin, see the steps below, otherwise skip to Step 5.
Choose your favorite images (or all of them) to put through Alien Skin by selecting them in Lightroom, right-clicking and choosing “Edit in Alien Skin” (once the program is installed, this will be an option).
You can create your own presets in Alien Skin for a faster workflow and a likely favorite will emerge. Select your most used preset and apply to all. Then deselect all.
Go through each photo individually, and make sure that’s the Alien Skin preset you want to use and see what tweaks are needed for each image.
When you’re finished, click save and your images will automatically import back into Lightroom (as copies) with the filters applied. Hit the 1 key, to discard the originals that you’re not going to use. (Occasionally, I end up liking my Lightroom edit better than my Alien Skin edit, so it’s nice to compare them side-by-side).
Step 5: Photoshop – Retouching Your Images
Now that your images have all your basic edits and color toning, select the images that need to be retouched with Photoshop by filtering for the 3-star rated images. Retouching can include editing out acne, stray hairs, doing head swaps or editing out any distracting objects in the image. On a Mac, you can hit command+E (Window is Control+E) in Lightroom to open your image in Photoshop. After retouching is complete, you can select CMD/CTRL+S (or File>Save) to return your retouched image to Lightroom.
Step 6: Black and White Images
This is the quickest part of my post-production and one my favorites, as well, because I love black and white images so much. Many wedding photographers provide a mix of color and black and white photos, with the color versions of each black and white as well. This where Alien Skin comes into play again. Not only are the black and white filters so dreamy, but they automatically make a copy for you, making your job really easy.
In Lightroom, select the images you want to be in black and white by using CMD/CTRL+click to individually select them.
Right-click and select “Edit in Alien Skin”. From there, all the selected images are uploaded to Alien Skin.
It’s easiest if you already have a black and white preset that you love saved, and apply that to all images, then deselect all. Go through each image individually using the color sliders (especially the reds and yellows) to edit and ensure each black and white image is perfect.
Save all black and white images back to Lightroom where the edited color version and the edited black and white version will be side by side.
Black and white images can also be made in Lightroom by creating a virtual copy, Photo>Create Virtual Copy (or CMD/CTRL+’). Then select “Black and White’ in your Basic Edits box, and adjust the color sliders until they’re perfect.
Step 7: Exporting. The Home Stretch!
Hooray! All of your images have been backed-up, culled, edited, polished, retouched, and you have your black and white copies. Now you just need to export the final versions to your client’s folder on your computer (I create a folder called “Edited:).
Select all of your completed images in Lightroom, go to File>Export. Choose your file location, file name (I have mine set to custom name and sequence), file settings (Mine is set to jpeg, sRGB, quality 100), and then select export when you are finished.
Step 8: Importing to an Online Client Gallery
Once all of your high-resolution JPGs are exported to the Edited client folder on your computer, you can then upload to the online gallery of your choice. Some online galleries allow you to upload your high-res JPGs directly from Lightroom using a plug-in, letting you skip a step in the process. I use Pixieset for my galleries, as I like the modern look, ease of use, and their customer service.
Step 9: At Long Last…
After you upload your images to an online gallery, copy your final edits to your external hard drive in their client folder. Once your edited files are safely online and on an external hard drive, you can delete the RAW files from your computer, because they take up a lot of space and you already have them safely backed up online and to an external hard drive (or two). If you ever want to use that Lightroom catalog again, it’s easy to sync the RAW files on your external hard drive with the Lightroom catalog that’s stored on your computer. I like to leave the edited JPGs on my computer for easy access.
Conclusion
This entire workflow process time will vary for every photographer. For me, I need 4-5 full days of nearly uninterrupted work. As you know, photographers are humans too. With life and other weddings/shoots in between – delivery time can take weeks or months after the event, depending on how busy your season is, how many photos you have, and how much retouching is required. You may need to mail prints, albums, USB drives, etc., as well, so keep that in mind for your total post-production time.
With a lot of practice and knowing your style, you’ll see your post-processing time get shorter and shorter. If you’re lucky enough to find a post-processing company that fits your style and budget, you’ll have extra time in life for the things you love, like photography. Until then, get to work!
The post Complete Step By Step Wedding Photography Workflow by Misti Marquette appeared first on Digital Photography School.
from Digital Photography School https://digital-photography-school.com/complete-wedding-photography-workflow/
0 notes
Last Seen Blogs

xbruised-peachx
@xbruised_peachx

bedobecef
Untitled

coxuwugenata
Untitled

ziangxu
无标题

ultimate-lie
Say Nope To Hope