#also first time doing my own camera panning of a landscape... i like the extra oomph it gives
Text


"But a bard can tell you all the rest. As for all the things they cannot... well. I shall just have to keep those for myself."
#em: edit#the way her voice breaks/crack at the beginning of third panel gets me#also first time doing my own camera panning of a landscape... i like the extra oomph it gives#jaheira#bg3#baldur's gate 3#gamingedit#bg3edit
2K notes
·
View notes
Text
What’s in my Bag
This is the most asked question I get. So, I thought that since I recently finished 11 days up in the Canadian Rockies, in the dead of Winter, I’d share what was in my bag, and why.
First, I needed a bag that I could carry, that would stand up to the rigors of the cold AND would protect my gear. For these types of trips, my go to is the Tamrac Expedition 9X. No longer made, this is a staple in my collection for the above the reasons.
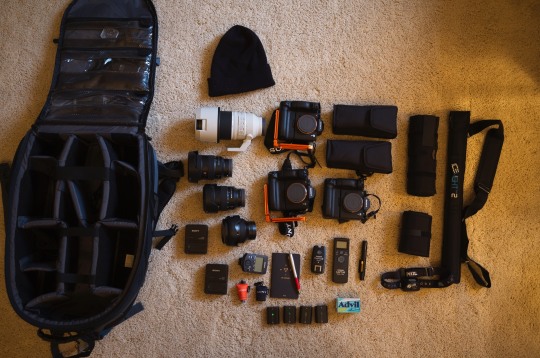
Bodies
Knowing I was going to be doing some heavy astrophotography and landscapes, I took two Sony ar7iii’s, and one Sony a9.
I always travel with an extra body because you never know what might happen. It’s also nice to have a spare body in case my primary is being used for a time-lapse or video. Additionally, the ability to have a different lens on each is great in rough environments when I would rather not expose my sensor to elements with a lens change (like the snow blown frozen lake for example). The Scout motto still rings true: Be Prepared.
What? An a9? Yup.
As a sports photographer, I always have a fast body\lens combo with me as you NEVER know when you’ll need it. Once, and ONLY once - I traveled and regretted not having the right gear with me. I vowed to never let that happen again.
With the ar7iii, I get incredible resolution, use and functionality. With my a9, I had speed.
Go Pro Hero 6:
I just love having a small, compact video tool that can take a quick snap. During times fo waiting, I can transfer and edit directly on my iPhone, ready to post at days end.
Lens
I did some research and made sure I had a great wide open lens for my astrophotography efforts. My Sony 24mm didn’t arrive in time - (it came the day after I left), so I opted for the Zeiss 18mm Batis. Stunningly sharp, this lens never left a body. I had no idea how light this lens was. It feels as if there was nothing there - but oh the images. Simply stunning!

I also brought the Sony G Master 16-35mm, which offered flexibility, tack sharp images across the range of focal lengths and was light.
Just as a precaution, I added the Sony 24-105 F/4 to my bag. There is something about having one lens to cover virtually everything. I think this is a holdover from my days with Nikon. None the less, I enjoyed having it as it provided a small measure of peace of mind.
I mentioned above that I brought the a9. There was no way I was carrying my 400 f/2.8, but I added the 100-400mm, and was I ever glad I did! Compact, light and with incredible reach, I was ready for anything the trip through at us - camera wise.
I gave careful consideration to both my 24-70mm and the 70-200mm, f/2.8’s. Knowing I had a sports event I had to covert the day I returned meant I opted to keep these safe and at home.
Lights
The original plan had us heading up to Jasper to shoot the ice caves. Unfortunately, the weather had other pans as we had over 50cm of snow, closing the road after the Saskatchewan crossing. My vision was to use the Sony HVL-F60RM’s, blog with Honl Lighting gels to create an otherworldly scene.
I also brought along the Westcott Ice Light, again planning to use it to creatively add light to the scene.
Honl Light gels, in rool-ups. I have over 64 colors at my disposal in easy to use gels. If you haven’t seen these, visit Honl Lighting. Dave developed these after his years as a correspondent and it shows. Killer gear, great effects.

Batteries
All of my cameras have hand held grips, which allows for dual batteries. Still, being winter, I opted to bring four additional batteries - just in case. You can never be too prepared!
Memory Cards
Sony TOUGH & Sony G SD Memory Cards: I exclusively use the Sony TOUGH and ultra-fast Sony G SD memory cards. I’ve yet to have one fail and the read/write speeds do more than keep up with the demands of my cameras and the environments I use them in.
Extra Batteries: One of my favorite upgrades to the Sony α7R III was the inclusion of the newer Sony Z batteries. I’ll often be able to get through a whole day of shooting with my α7R III with just one battery, but it’s still always a good idea to bring along a few spares.
GITZO Carbon Fiber Travel Tripod and A Really Right Stuff Ball Head
Any long exposure photography, astrophotography, time-lapses, etc. – they all require a tripod to alleviate camera shake. This one is great because of its compact size and weight, which is important for travel and long carry. When I need extra weight, I’ll hang my bag from the hook below the center column for added stability.

Assorted Lens Filters from B&W, Hoya and Lee: Primarily polarizing and neutral density filters (and a few step up rings to minimize the number of filters needed for different lens thread sizes) are key ingredients in my kit. These filters help to cut glare, create proper exposures in camera, slow shutter speeds, and so much more.

Apple 15” MacBook Pro
Besides my camera and lenses, this is the next most important element in my kit. All of my post-processing is done in Adobe Lightroom and Photoshop.
Apple iPad Pro (2nd Gen)
On long trips, I load up with movies, music and reading material. It’s lighter, fast and so easy to edit a few images during down time and when I don[t have the space for my MBP.
Lacie Rugged Hard DriveI
I travel with multiple hard drives that I store my RAW files and Lightroom catalog on. Even when I’m traveling, I like to keep a backup in case of drive failure. Assuming I have internet access, my computer and drives are also backed up to cloud storage.
Headlamp
Whether it be for lighting a trail, just around camp after dark or helping me find something in my bag when light fades, a headlamp is an integral part of any outdoor photographer’s kit.
Lens Cleaning Kit
Keeping the optics clean is simply essential, especially when I’m subjecting it to some pretty gnarly environments sometimes. I’d much rather spend a few minutes cleaning my lenses and blowing out dust on my sensor ahead of time rather than hours of spot removal in post.
Beanie/Gloves
In cold weather, these are key. I actually can recommend the following if you are headed to extreme cold. Not only were my hands warm, but I was able to use my fingers for fine tuning as well.
Hand Warmers
I use these for either their intended use (keeping my hands warm) or sometimes to keep my batteries warm, helping to extend battery life in cold climates. I also tape several feet of gaffer tape around my tripod legs, so that I can wrap these around my battery grip.
Bose QC-35 Headphones
The best headphones I’ve ever owned, hands down. They’re comfortable for extended wear (long flights, for example) and have incredible noise cancellation, which is key to getting some rest or listening to hours of my electronic Jax, chill and ambient tunes on international flights without being interrupted by engine noise or screaming babies.
Passport
Like my American Express, I never leave home without it (on a trip). I’m not going far without it.
Not many think of this last pieces as essential, but I don’t shoot without it - Insurance.
My company, Taylor & Taylor ROCKS! Anytime I am on the road, I let them know and should anything bad happen, I’m covered. No questions asked. Not to mention my liability coverages exceeds most job requests.
Advil
Sitting on ice, shooting multiple sports, hiking miles into the backcountry - this helps alleviate the aches and pains.
#Canada#Alberta#"Abraham Lake#Emerald Lake#Banff#icefields parkway#Camera#Sony#a7riii#sony a9#bealpha#sonyalpha#alphacollective#Astrophotography#winter#Landscapephotography#Zeiss#Apple#skylum
6 notes
·
View notes
Text
Snapchat Spectacles 3 review: Pretty, pricey
No one’s going to pay $380 for decent point-of-view video glasses and some trippy filters. But that’s kind of the point of Snapchat Spectacles 3. They’re merely a stepping stone towards true augmented reality eyewear — a public hardware beta for the Snap Lab R&D team that Apple and Facebook aren’t getting as they tinker in their bunkers.
Still, I hoped for something that could at least unlock the talents of forward-thinking video creators. Yet the unpredictable and uncontrollable AR effects sadly fail to make use of Spectacles‘ fashionable form factor in premium steel. The clunky software requires clips be uploaded for processing and then re-downloaded before you can apply the 10 starter effects like a rainbow landscape filter or a shimmering fantasy falcon. This all makes producing AR content a chore instead of a joy for something only briefly novel.
Spectacles 3 go on sale today for $380 in black ‘Carbon’ or rose gold-ish ‘Mineral’ color schemes on Spectacles.com, Neiman Marcus, and Ron Robinson in the UK, shipping in a week. Announced in August, they’re sunglasses with two stereoscopic lenses capable of capturing depth to produce “3D” photos, and videos you can add AR effects to on your phone. You also get a very nice folds-flat leather USB-C charging case that powers up the glasses four times, and a Google Cardboard-style VR viewer.
“Spectacles 3 is a limited production run. We’re not looking for massive sales here. We’re targeting people who are excited about these effects — creative storytellers” says Matt Hanover of the Snap Lab team.
Gen 1 featured a “toy-like design to get people used to wearing tech on their face”, while Gen 2 and 2.1 had a more subdued look abandoning the coral color schemes to push mainstream adoption. What Gen 3 can’t do is force a $40 million write-off due to poor sales, as V1 did after only shipping 220,000 with hundreds of thousands more gathering dust somewhere. Snap is already losing $227 million per quarter as it scrambles to break even.
So it seems with Spectacles 3 that Snap is gathering data and biding its time, trying to avoid burning too much cash until it can build a version that overlays effects atop a user’s view through the glasses. “We’re still able to get feedback from the customer and inform the future of Spectacles. That’s really the goal for us” Hanover confirms.
His CEO Evan Spiegel agrees, telling me on stage at TechCrunch Disrupt that it would be 10 years until we see augmented reality glasses worthy of mainstream consumer adoption. That’s a long time for an unprofitable company to spend competing to invest in R&D versus cash-rich companies like Facebook and Apple.
tl;dr
Spectacles could be worth the steep $380 if you’re a videographer for a living, perhaps making futuristic social media clips like Karen X Cheng, a creator Snap hired to demonstrate the device’s potential. They’re cool enough looking that you could wear them around Cannes or Coachella without people getting weirded out like they did with Google Glass. And as Snap’s Lens Studio lets anyone build 3D effects for Spectacles 3, perhaps we’ll see some filters and imaginary characters that are more than just a momentary gimmick.
youtube
But for those simply seeking first-person camera glasses, I’d still recommend the Spectacles 2 at $150 to $200 depending on style which remain available. The 3D features don’t carry the weight of paying double the price for Spec 3s. And at least the 2nd-gen Specs are waterproof, which make them great for ocean play with fun underwater shooting when you don’t want to risk losing or fizzling your phone.
“We’re testing the price point and the premium aesthetic to see if it lands with this demographic” Hanover says. But Snap’s Director Of Communications Liz Markman notes that “there isn’t this perfect one-to-one overlap with the core Snap users.”
The result is that Spectacles 3 are really more for Snap’s benefit than yours.
Slick Eyewear, Now Where’s The AR?
The Spectacles 3 software is disappointing, but you’ll be delighted when you open the box. Slick black packaging reveal sturdily built metal sunglasses with a luxury matte finish. As they magnetically dislodge from their charging case, you definitely get they sense you’re trying on something futuristic.
The style concurs, with a flat black bar at the top connecting the round lenses with a camera on both corners. Unlike the old Specs that sat right on your nose, feeling heavy at times, Spectacles 3 offers adjustable acetate non-slip nose tips to keep the weight off. All the tech is built discreetly into the hinges and temples without appearing too chunky.
Tap the button either arm, and LED light swooshes in a circle to let people know you’re recording a video for 10 seconds, with multiple presses growing that to up to 60. Tap and hold to shoot a photo, and the light blinks. There’s no obnoxious yellow rubber ring to shout “these are cameras”, and the defused LEDs are more subtle than Gen 2’s dots while remaining an obvious enough signal to passersby so they’re not creepy.
One charge powers up to 70 captures and transfers to your phone over a combined Bluetooth built-in Wifi connection. The 4 gigabyte storage holds up to 100 videos or 1200 photos, and Spectacles 3 even have GPS and GLOSNASS on-board. A 4-mic array picks up audio from others and your own voice, though they’re susceptible to windshear if you’re biking or running. They shoot at 60-frames per second in 1216 x 1216 pixels resolution while photos come in at 1642 x 1642
The magnetically-sealing folding leather USB-C charging case is my favorite part. I wish I could get an even flatter one without a battery in it for my other sunglasses. It’s a huge improvement on the unpocketable bulky triangular case of the previous versions.
A Toy Not Fun Enough For The Price
So far so good, right? But then it comes time to actually see and augment what you shot.
Pairing and syncing is much easier than Gen 1. The glasses forge a Bluetooth connection, then spawn a WiFi network for getting media to your phone faster.
If you just want to share to Snapchat, you’re in luck. Spectacles content posts to Stories or messages in its cool circular format that lets viewers tilt their phones around while always staying full-screen to reveal the edges of your shots. Otherwise, you still have to go through the chore of exporting from Snapchat to your camera roll. Spectacles can at least now export in a variety of croppings for better sharing on Instagram and elsewhere.
What’s new are the 3D photos and videos. They utilize the space between the stereoscopic cameras in the corners of Spectacles employ parallax to sense the depth of a scene. After tapping the 3D button on a photo, you can wiggle the perspective of the image around to almost see around the edges of what you’re looking at. Spectacles will automatically pan back and forth for you, and export 3D photos as short Boomerang-esque six-second videos.
Unfortunately, I found that I didn’t get much sense of depth from most of the 3D photos I shot or saw. It takes a very particular kind of three-dimensional object from the right angle in the right light to much sense of movement from the wiggle. Snapchat’s algorithms also had a bad habit of mistakenly assigning bits of the foreground and background to each other, breaking the illusion. Occasionally you’ll have someone’s ear or their hair left behind and disembodied by the 3D effect.
Don’t expect these to flood social media or convince prospective Spectacles buyers. The 3D selfies you can shoot on Snapchat for free look better anyways.
The biggest problem comes with the delay when playing with 3D videos. Snapchat has to do the depth processing on its servers, so you have to wait for your video to upload, get scanned, and be re-downloaded before you can apply the 3D AR filters. On WiFi that takes about 35 seconds per 10 second video, which is quite a bore. It takes forever over a mobile connection. That means you often won’t be able to apply the filters and see how they look until you’re home and unable to reshoot anything.
The filter set is also limited and haphazard. You can add a 3D bird or balloons around you, wander through golden snow or neon arcs, overlay flower projections or rainbow waves, or sprinkle on sparkles and light-bending blobs. While the bird is cute, and the rainbows and flowers are remarkably psychedelic, none of them are more than briefly entertaining.
The 3D objects often glitch through real pieces of scenery, and you can’t control them at all. No summoning the bird mid-video. My favorite trick, learned from Karen X Cheng, was to export unedited and filtered versions of a video and splice them together on my computer as scene in my demo video above. You can’t actually do that from within Snapchat.
One extra feature the team is working on is to let you see a special colored light flash on the glasses’ internal recording-on signal to alert you to incoming Snaps from certain friends. If that’s popular, would Snap try giving us more notifications through that light? Hanover says “potentially in the future.”
Snap will have to build a lot cooler filters with interactivity if they’re going to compel creators to fork over $380 for Spectacles 3. It could hope to rely on its Lens Studio community platform, but so few developers or users will have the glasses that most will stick to making and using filters for phones.
Spectacles 3 are too expensive to be a toy, but don’t excel at being much more. Videography influencers might enjoy having a pair in their tool bag. But it’s hard to imagine anyone not sharing content professionally paying for the gadget.
youtube
Iteration vs Ideation
“We’re now pushing to elevate the technology and the design to master depth technically” Hanover tells me. “Holing ourselves up within an R&D center for years and years? That’s not our approach. It’s important to meet the customer where they are today and continue to iterate and get that feedback.”
But this iteration doesn’t feel like Snap meeting the customer where they are. That raises the question of whether Snapchat is really getting enough data out of the whole endeavor to justify publicly releasing Spectacles at all. The company will have to hope that testing short-term is worth thinking short-term, when it’s trying to win the long-term war in augmented reality eyewear.
from iraidajzsmmwtv https://ift.tt/2KcBlWS
via IFTTT
0 notes
Link
No one’s going to pay $380 for decent point-of-view video glasses and some trippy filters. But that’s kind of the point of Snapchat Spectacles 3. They’re merely a stepping stone towards true augmented reality eyewear — a public hardware beta for the Snap Lab R&D team that Apple and Facebook aren’t getting as they tinker in their bunkers.
Still, I hoped for something that could at least unlock the talents of forward-thinking video creators. Yet the unpredictable and uncontrollable AR effects sadly fail to make use of Spectacles‘ fashionable form factor in premium steel. The clunky software requires clips be uploaded for processing and then re-downloaded before you can apply the 10 starter effects like a rainbow landscape filter or a shimmering fantasy falcon. This all makes producing AR content a chore instead of a joy for something only briefly novel.
Spectacles 3 go on sale today for $380 in black ‘Carbon’ or rose gold-ish ‘Mineral’ color schemes on Spectacles.com, Neiman Marcus, and Ron Robinson in the UK, shipping in a week. Announced in August, they’re sunglasses with two stereoscopic lenses capable of capturing depth to produce “3D” photos, and videos you can add AR effects to on your phone. You also get a very nice folds-flat leather USB-C charging case that powers up the glasses four times, and a Google Cardboard-style VR viewer.
“Spectacles 3 is a limited production run. We’re not looking for massive sales here. We’re targeting people who are excited about these effects — creative storytellers” says Matt Hanover of the Snap Lab team.
Gen 1 featured a “toy-like design to get people used to wearing tech on their face”, while Gen 2 and 2.1 had a more subdued look abandoning the coral color schemes to push mainstream adoption. What Gen 3 can’t do is force a $40 million write-off due to poor sales, as V1 did after only shipping 220,000 with hundreds of thousands more gathering dust somewhere. Snap is already losing $227 million per quarter as it scrambles to break even.
So it seems with Spectacles 3 that Snap is gathering data and biding its time, trying to avoid burning too much cash until it can build a version that overlays effects atop a user’s view through the glasses. “We’re still able to get feedback from the customer and inform the future of Spectacles. That’s really the goal for us” Hanover confirms.
His CEO Evan Spiegel agrees, telling me on stage at TechCrunch Disrupt that it would be 10 years until we see augmented reality glasses worthy of mainstream consumer adoption. That’s a long time for an unprofitable company to spend competing to invest in R&D versus cash-rich companies like Facebook and Apple.
tl;dr
Spectacles could be worth the steep $380 if you’re a videographer for a living, perhaps making futuristic social media clips like Karen X Cheng, a creator Snap hired to demonstrate the device’s potential. They’re cool enough looking that you could wear them around Cannes or Coachella without people getting weirded out like they did with Google Glass. And as Snap’s Lens Studio lets anyone build 3D effects for Spectacles 3, perhaps we’ll see some filters and imaginary characters that are more than just a momentary gimmick.
But for those simply seeking first-person camera glasses, I’d still recommend the Spectacles 2 at $150 to $200 depending on style which remain available. The 3D features don’t carry the weight of paying double the price for Spec 3s. And at least the 2nd-gen Specs are waterproof, which make them great for ocean play with fun underwater shooting when you don’t want to risk losing or fizzling your phone.
“We’re testing the price point and the premium aesthetic to see if it lands with this demographic” Hanover says. But Snap’s Director Of Communications Liz Markman notes that “there isn’t this perfect one-to-one overlap with the core Snap users.”
The result is that Spectacles 3 are really more for Snap’s benefit than yours.
Slick Eyewear, Now Where’s The AR?
The Spectacles 3 software is disappointing, but you’ll be delighted when you open the box. Slick black packaging reveal sturdily built metal sunglasses with a luxury matte finish. As they magnetically dislodge from their charging case, you definitely get they sense you’re trying on something futuristic.
The style concurs, with a flat black bar at the top connecting the round lenses with a camera on both corners. Unlike the old Specs that sat right on your nose, feeling heavy at times, Spectacles 3 offers adjustable acetate non-slip nose tips to keep the weight off. All the tech is built discreetly into the hinges and temples without appearing too chunky.
Tap the button either arm, and LED light swooshes in a circle to let people know you’re recording a video for 10 seconds, with multiple presses growing that to up to 60. Tap and hold to shoot a photo, and the light blinks. There’s no obnoxious yellow rubber ring to shout “these are cameras”, and the defused LEDs are more subtle than Gen 2’s dots while remaining an obvious enough signal to passersby so they’re not creepy.
One charge powers up to 70 captures and transfers to your phone over a combined Bluetooth built-in Wifi connection. The 4 gigabyte storage holds up to 100 videos or 1200 photos, and Spectacles 3 even have GPS and GLOSNASS on-board. A 4-mic array picks up audio from others and your own voice, though they’re susceptible to windshear if you’re biking or running. They shoot at 60-frames per second in 1216 x 1216 pixels resolution while photos come in at 1642 x 1642
The magnetically-sealing folding leather USB-C charging case is my favorite part. I wish I could get an even flatter one without a battery in it for my other sunglasses. It’s a huge improvement on the unpocketable bulky triangular case of the previous versions.
A Toy Not Fun Enough For The Price
So far so good, right? But then it comes time to actually see and augment what you shot.
Pairing and syncing is much easier than Gen 1. The glasses forge a Bluetooth connection, then spawn a WiFi network for getting media to your phone faster.
If you just want to share to Snapchat, you’re in luck. Spectacles content posts to Stories or messages in its cool circular format that lets viewers tilt their phones around while always staying full-screen to reveal the edges of your shots. Otherwise, you still have to go through the chore of exporting from Snapchat to your camera roll. Spectacles can at least now export in a variety of croppings for better sharing on Instagram and elsewhere.
What’s new are the 3D photos and videos. They utilize the space between the stereoscopic cameras in the corners of Spectacles employ parallax to sense the depth of a scene. After tapping the 3D button on a photo, you can wiggle the perspective of the image around to almost see around the edges of what you’re looking at. Spectacles will automatically pan back and forth for you, and export 3D photos as short Boomerang-esque six-second videos.
Unfortunately, I found that I didn’t get much sense of depth from most of the 3D photos I shot or saw. It takes a very particular kind of three-dimensional object from the right angle in the right light to much sense of movement from the wiggle. Snapchat’s algorithms also had a bad habit of mistakenly assigning bits of the foreground and background to each other, breaking the illusion. Occasionally you’ll have someone’s ear or their hair left behind and disembodied by the 3D effect.
Don’t expect these to flood social media or convince prospective Spectacles buyers. The 3D selfies you can shoot on Snapchat for free look better anyways.
The biggest problem comes with the delay when playing with 3D videos. Snapchat has to do the depth processing on its servers, so you have to wait for your video to upload, get scanned, and be re-downloaded before you can apply the 3D AR filters. On WiFi that takes about 35 seconds per 10 second video, which is quite a bore. It takes forever over a mobile connection. That means you often won’t be able to apply the filters and see how they look until you’re home and unable to reshoot anything.
The filter set is also limited and haphazard. You can add a 3D bird or balloons around you, wander through golden snow or neon arcs, overlay flower projections or rainbow waves, or sprinkle on sparkles and light-bending blobs. While the bird is cute, and the rainbows and flowers are remarkably psychedelic, none of them are more than briefly entertaining.
The 3D objects often glitch through real pieces of scenery, and you can’t control them at all. No summoning the bird mid-video. My favorite trick, learned from Karen X Cheng, was to export unedited and filtered versions of a video and splice them together on my computer as scene in my demo video above. You can’t actually do that from within Snapchat.
One extra feature the team is working on is to let you see a special colored light flash on the glasses’ internal recording-on signal to alert you to incoming Snaps from certain friends. If that’s popular, would Snap try giving us more notifications through that light? Hanover says “potentially in the future.”
Snap will have to build a lot cooler filters with interactivity if they’re going to compel creators to fork over $380 for Spectacles 3. It could hope to rely on its Lens Studio community platform, but so few developers or users will have the glasses that most will stick to making and using filters for phones.
Spectacles 3 are too expensive to be a toy, but don’t excel at being much more. Videography influencers might enjoy having a pair in their tool bag. But it’s hard to imagine anyone not sharing content professionally paying for the gadget.
Iteration vs Ideation
“We’re now pushing to elevate the technology and the design to master depth technically” Hanover tells me. “Holing ourselves up within an R&D center for years and years? That’s not our approach. It’s important to meet the customer where they are today and continue to iterate and get that feedback.”
But this iteration doesn’t feel like Snap meeting the customer where they are. That raises the question of whether Snapchat is really getting enough data out of the whole endeavor to justify publicly releasing Spectacles at all. The company will have to hope that testing short-term is worth thinking short-term, when it’s trying to win the long-term war in augmented reality eyewear.
from Social – TechCrunch https://ift.tt/34Pxas3
Original Content From: https://techcrunch.com
0 notes
Text
The Unconventional Guide to Preschool Science
As we prepare our children for the future, we want preschoolers to get excited about science at an early age. Some things we can do for them as toddlers are finding some activities they can build on. There are plenty of fun activities for toddlers to do to get them excited for learning about science. Let’s see how we can set these build blocks up now, while they are young and like sponges soaking everything up.
Guide to preschool science:
Sensory activities, Preschool Science
One of the easiest things to build on is something that you may have already done with your child. Sensory activities. Giving them a rattle or playing music with a ceiling light in their crib we do what we can to develop our children’s senses. You can expand on this with your toddler. Take an empty plastic bottle (recommended One below) and have your child help you fill them with different objects, like small plastic toy squares, beads, glitter you can really use your imagination.
Plastic bottles (recommended Link below 👇 because of its strong plastic) I have made these 3 or 4 years ago with my daughter and my daycare, they are still holding up strong.
Disclaimer- This post contains affiliate links which means I receive a small commission at no extra cost to you.
Buy On Amazon
Strong bottles please use strong bottles the small pieces you put in these to make sensory bottles could come out if not and cause a choking hazard, I have tested many bottles in my home daycare these are very strong bottles.
Open up bottles pour into a pitcher or drink it.
For glitter bottles
Fill the bottle with 1/2 corn syrup and 1/2 water glitter and optional food coloring.
Put a little E6000 glue inside the bottle cap rim before screwing it on (try not to put too much so it doesn’t get on the outside of the lid, this is a strong glue).
The corn syrup will make the glitter fall slowly and sparkle on its way down, like a snow globe.
Here are my Amazon affiliate store links to the products I used.
Disclaimer- This post contains affiliate links which means I receive a small commission at no extra cost to you.
Buy On Amazon
Buy On Amazon
Amazon store link
Sensory bottles
Guessing Game:
Another fun thing to do with sensory is having different small containers with maybe playdoh in one, smashed grapes in another, play sand in another, (rice, dry cereal, oats) you get the idea. Have children close their eyes and put their hands in each container to feel the differences.
Water activities, Perfect for Preschool Science:
Kids LOVE playing with water! That goes without saying. Take a long plastic container, or an old casserole dish and layer it with gravel. You can use gravel for a fish tank, its easy to find and color. Now just add some water and you have a fun way for the kids to learn how water affects the land around us. Pour the water from a pitcher into one end, and see how a river or stream would cut into the landscape of the gravel to create valleys and hills.
Now have the kids dive in with their hands to move the gravel around to create their own river valley.
Another fun activity with water is to take a pan of water and use two pieces of wood, try to make them the same size or close to. Use the wood to move back and forth in the middle of the pan to create waves. This demonstrates what happens when there is an earthquake at the bottom of the ocean. A tsunami (giant tidal wave) is formed.
Disclaimer- This post contains affiliate links which means I receive a small commission at no extra cost to you at no extra cost to you.
You can also buy a reasonable price volcano kits here is my Amazon Affiliate store link to a great volcano set
Buy On Amazon
With just some vinegar and baking soda, you can wow the kids with a mini volcanic eruption!!! What makes things even better is that many of the kits have you create the volcano out of plaster so it can be reused. It’s a great decoration for their room too.
Rainbow Glass, Preschool Science
Kids LOVE this one
Everyone loves a rainbow in the sky! You can have one right in your kitchen with some glasses of water, food coloring and paper towels. Fill about four to five glasses halfway to the top with water. Add different food coloring drops to each glass. Then make a bridge of paper towels going into each glass. Give it about an hour or two for the paper towels to soak up the water. It will make a beautiful rainbow.
Gravity Preschool science
Don’t forget the simple lessons, like gravity. Yes just having them let go of one of their favorite toys, pillows, stuffed animals etc., just to demonstrate how gravity works.
Outside
Sometimes things can be as simple as going outside and looking up. Have the kids look at the clouds in the sky and see what they look like to them. (don’t look at the sun!)
Take full advantage of the loose bedtime schedule that goes along with homeschooling to go outside at night and look up. Point out the stars to the kids. Wait for a good full moon and point out the various features of the moon. During summer time get a blanket out and lay with your kids under the stars.
Usually, the first “star” you see in the sky at sundown is actually the planet Venus. How cool for the kids to know that they are looking at another planet. Venues is very bright and easy to find in the sky.
Solar System
Another fun activity for kids is to make their own solar system. This could be as simple as cutting out different size circles out of cardboard and using markers to color in as the planets of the solar system.
You can buy Solar system kits, here one that I recommend on my affiliate store on Amazon
Buy On Amazon
Pay-Doh Science
Homemade
Ingredients and materials:
1 cup white flour
½ cup table salt
2 teaspoons cream of tartar
1 cup water
2 tablespoons of vegetable oil
Measuring cup
Teaspoon measure
Bowl
Wide, shallow pan
cook med-high heat for 5 minutes let cool and PLAY!
Let’s get our kids excited about science now! It can open so many doors for them in the future plus it’s a lot of fun for the whole family.
Thank you for reading XO,
Tiffany @royalhomeschoolmomblog
The Unconventional Guide to Preschool Science The Unconventional Guide to Preschool Science As we prepare our children for the future, we want preschoolers to get excited about science at an early age.
#blog#blogger#education#homeschool#homescoolblog#littlekids#momblog#parents#SAHM#SAT#science#study#teachers#unschooling#youtubers
0 notes
Photo

New Post has been published on https://zitseng.com/archives/17252
Hands-On Google Pixel 3 XL

Two years ago, Google decided they’d make and sell their own smartphones. This year, we have the third generation of their Pixel smartphones, the Pixel 3 and Pixel 3 XL, just unveiled earlier this week. Here’s my quick hands-on experience with the Pixel 3 XL.
Pixel smartphones might not sell anywhere as well as Apple or Samsung flagships, but they are still much interest in them, and many people were looking forward to Google’s 9th October hardware event. However, so much has leaked about the Pixel 3 smartphones this year before the actual announcement that there wasn’t much left for Google to surprise us.
That isn’t to say that there isn’t anything interesting about the Pixel 3. Google still wowed us with new software features, especially to do with the camera, which while not earth-shattering, are definitely cool and something that sets the Pixel 3 smartphones apart from the competition.

Three generation of Pixel XL smartphones
The three generations of Pixel smartphones have been mostly an evolutionary process. They sport the same design language, which may start to feel stale, but I think subtle design changes have added to a more polished and refined product.
In terms of physical body dimensions, the Pixel 3 XL is identical to the Pixel 2 XL. In fact, a case designed for the older device will probably accommodate the Pixel 3 XL, if the cutouts are not too tight-fitting, and you don’t mind the cutouts not being perfectly aligned. The newer device is slightly heavier, but that 9 grams difference isn’t going to matter. The phone feels very solid, and it is very well-built.

Pixel 3 XL’s notch evokes strong emotions
That notch on the front has evoked strong reactions from numerous people, mostly negative. No notch is best, and less of it is certainly better than that much we’re getting on the Pixel 3 XL. However, now that the notch is there, we should ask ourselves if that aesthetic anomaly impairs or encumbers the use of the phone.

I’m not trying to make excuses for Google. I’ll be happy if there was some symmetry in the notch height with the button chin. They need to shave off at least 1 mm from the notch. The notch looks as ugly as it is, to me, because it is more than the chin. No, please don’t fix that by enlarging the chin.
We still do get two front-facing stereo speakers. This year, the speakers are not just louder, but also have a deeper bass. They sound much better, with more full body in the music output. My review unit exhibits some rattling noises, though I’m not sure if this is just mine or representative of Pixel 3 XL devices. That aside, the speakers are great for enjoying YouTube and videos.
The new 6.3-inch OLED screen is beautiful. It has a resolution of 2960×1440, which I’m not sure if you should label as 19:9 or 18:9 aspect ratio, as it depends on whether you want to count the notched portion. The screen looks brighter, supports HDR, and everything looks crisp and colour accurate.
Speaking of colours, Google seems to have given in to the preferences of most users wanting vibrant, saturated, colours by making Adaptive colours the default. The Adaptive colours aren’t as saturated as you might see on other smartphones, but that appears to be a choice that Google has made. They say their Adaptive mode has been tuned to limit over-saturation of skin tones and reds in particular. In other words, Adaptive mode saturates colours, but does not go overboard.

Pixel 3 XL (left) and Pixel 2 XL (right)
The new Pixel 3 smartphones are all glass front and back. The change on the back is every so subtle, the matte metal on the back of the older device now replaced with matte glass. They may look visually similar at first glance, but you can feel the difference instantly. That soft-feel glass feels very nice. It’s as slippery as the matte metal though, but thankfully, instead of the matte metal wrapping around the sides like on the older device, the Pixel 3 has the regular glass like on the top portion of the back wrapped around all the sides.
Some people are disappointed to see that the Pixel 3 smartphones still make do with just one main camera on the back. Google thinks their single camera, software, and AI, are more than enough to make up for dual and triple camera setups. We’ll have to see if that is the case in detailed photo analysis. In casual tests, the camera on the Pixel 3 XL works marvelously. It is most definitely one of the best cameras there is to have on a smartphone.
This year, the Pixel 3 smartphone camera sports a couple of new features:
Night Sight lets you take natural-looking photos in low-light conditions without using a flash. Google provided a sample comparison between the iPhone XS and Pixel 3 cameras, showing how the latter was able to brighten shadows that could hardly be seen in the former.
Playground replaces AR Stickers, with new animations which Google now calls “Playmoji”, which you can quite impressively interact with. IN addition to the Star Wars themed characters launched last year, we now have a
Marvel-themed playmoji set.
Motion Auto Focus enables you to keep moving subjects in focus. This will make it far easier to take photos of young children and pets who won’t keep still for your perfect shot.
Top Shot uses AI will help you capture the perfect shot. If you missed the perfect timing, Top Shot will recommend the best one from a series it has been recording automatically, making sure that everyone is smiling, eyes wide open, and facing the camera.
The improved Panoramic mode finally takes panoramas just like most other smartphones, just pan around the phone naturally. Previously, the Pixel camera required you to pause and aim the dot and circle as the viewfinder directs you.
Although Google doesn’t see the need for a second rear camera, they see fit to include two cameras on the front. In addition to a regular selfie camera, the Pixel 3 smartphones include an extra wide-angle camera which provides 184% more coverage for easier wefie shots without needing selfie sticks.
As in previous years, you still get free and unlimited photo and video storage in Google Photos, until 31st January 2022. You would have probably upgraded the Pixel 3 XL by then.
With the glass back, the Pixel 3 XL finally supports Qi-compliant wireless charging. Google sells the Pixel Stand accessory especially designed for the Pixel 3 smartphones, which can turn them into smart Google Assistant display. I’ll review the Pixel Stand in a separate post.

Pixel 3 XL on Pixel Stand
A small but notable improvement is with the vibration motor. I’m not sure how to describe it, but it’s more crisp, like it is with the haptic feedback on iPhones, though perhaps not as strong. It’s much better than it was on the Pixel 2 XL.
Not surprisingly, there is no 3.5 mm audio jack on the Pixel 3 smartphones. However, this year, Google has included wired Pixel Buds in the box. You still get a USB Type-C to 3.5 mm audio adapter, in case you prefer to continue using your wired headphones.

Pixel 3 XL retail box contents
You’ll also find a 18 Watt USB Type-C PD power adapter included, together with a USB Type-C charging cable.
Under the hood, the Pixel 3 smartphones are powered by Qualcomm’s flagship Snapdragon 845. All models come with 4 GB of RAM, with options for either 64 GB or 128 GB of flash storage. There are three colours: Just Black, Clearly White, and Not Pink.
The pure Google software experience is one of the most outstanding features of all Pixel devices. The fluid and uncluttered software is such a joy to use. Google’s new Call Screening feature, unfortunately, won’t be available in Singapore at launch later this month. This feature helps to answer your calls using Google’s Duplex technology, asking who’s calling and why they’re calling, and transcribing into text. It’s an excellent way to deal with telemarketers, and can also help you discreetly decide if you need to take a call while you’re in a meeting. I really need this.
Out of the box, the Pixel 3 smartphones run Android 9.0 Pie, with Android OS updates and security patches from Google promised for three years, until October 2021. In light of the mobile security threat landscape, it is really important that your smartphone gets all the updates it can, and as quickly as it can.
Sales in Singapore commences on 1st November, although you can pre-order the Pixel 3 smartphones now. Prices start at S$1249 for the smaller Pixel 3 (S$1349 for 128 GB), and S$1399 for the Pixel 3 XL (S$1549 for 128 GB). You can buy all variants, all colours and storage capacities, from Google Store Singapore directly. You can also buy selected models from SingTel and StarHub.

Pixel 3 and Pixel 3 XL
Google’s third generation Pixel smartphones are an evolutionary upgrade. The Pixel 3 XL feels remarkably good. The hardware is polished and refined. While the notch may evoke strong emotions, I feel it’s something we can live with until someone comes up with another way to accommodate front cameras, speakers, and other sensors.
This is most definitely the Android flagship to get if you’re after the pure Google software experience. If not, the camera, photo storage, software features, and direct Google software updates for three years, may be good enough reasons to get one of the Pixel 3 devices.

I’ll have a more in-depth review coming up soon. You may also be interested in the Google Fabric Case. Watch my blog, or follow my Facebook Page, if you are interested in updates.
0 notes
Text
15 Hours Inside a Small Photo Blind
Everything outside the small photo blind is silent except for the two ravens perched on the top of a dead tree cawing and a few flies quietly buzzing around. I’ve mounted the 500mm lens on the camera and pointed it towards the pine trees far away. My huge, directional Sennheiser microphone is aimed in the same direction.
I am in the wild Taiga of Finland, the home of brown bears and wolves, and these fascinating animals are the reason I am here. To photograph them and to share the behind the scenes videos on my YouTube channel and also, most importantly, to experience the beauty of this wild Taiga and get close to the animals living here.
I really hope to see a bear, and I wish so badly for even just a glimpse of a wolf…
I am pouring myself a cup of coffee while I let my eyes browse the meadow in front of me. I am excited. One hour passes. Then suddenly, I register a movement in my periphery vision. It is here.
The brown bear is walking along the edge of the forest some one hundred meters away and, even at this distance, it looks impressive. Its movements look as if it were in slow motion, and in my binoculars, I can see how the water drips from its large paws every footstep it makes in the wet, swamped tundra.
It is still way too far away to take a nice photo, and the light is still too sharp and flat to make a moody photo of this beautiful bear in its environment. I am watching the bear while I pour myself a cup of warm coffee. This is so cozy.
I arrived at the blind at 6pm and I have now been here for a few hours. Both the bears and the wolves are most active during the night, so I will have to stay awake. It is a strange feeling to have to turn the day’s rhythm around, even though I have been sleeping during the day, my inner watch still tells me that it is evening.
I look around in the blind and everything is nicely organized now. I have prepared lenses, batteries, and memory cards so that they are easy to get hold of if I should need them in a hurry. The coffee, water, and food each has their place, and so has the extra clothes and other equipment. It’s so comfortable to sit here and watch this bear slowly pass in the distance.
Kuhmo is located in the Eastern part of Finland close to the border to Russia. Actually, some of the photo blinds are located in what they call No Mans Land – an area between Russia and Finland that neither have the rights to use. The photo blinds are owned and managed by Wildlife Safaris Finland.
When renting a blind you usually stay at the Kuikka Base Camp where you sleep and eat and talk to the other photographers. There are usually between 3 and 4 locations to choose between, and each location has a number of photo blinds where you can either choose to sit alone or with one or more other photographers. It depends on the price you pay.
Most photographers come to see the brown bear, the wolf, and the wolverine but you will most likely also see the raven, eagle and other birds. It is also possible to rent a boat to go and see beavers. Some photographers have even been lucky to see owls.
The light is getting weaker now and the ISO is slowly climbing up. The mist gives the landscape a mystery look. It is so hard to capture this mood in a photo – even in a video. There are so many things that we can’t capture. The smell of the Taiga, the gentle breeze that hits my warm skin through the little window, and the feeling of sitting here, surrounded by wilderness.
I am torn from my thoughts when, suddenly, a movement in the forest to the left catches my attention. It is another bear, and this time it is closer – much closer.
I slowly point the 500mm in its direction and I snap my first photo. I love to shoot in manual mode with auto ISO as it is so flexible and fast. This method lets me take control of both shutter speed and aperture, while still letting the camera decide the exposure.
But in this situation, with this dark scene and the few light spots where the brighter evening sky shines through the treetops, I am shooting 100% manual and have full control.
My camera equipment for the trip.
Shooting at ISO values above 10000, I don’t have room for errors. I will not be able to recover much from an under or overexposed photo.
The bear walks behind some trees and I follow it in the viewfinder as it passes me no further than 30 meters from the blind. Such a beautiful animal.
There is something else behind these trees. I can sense a movement. Something bright, but I can’t really see it. It is moving towards an open area. It is so hard to see anything when the light is so weak. Then it slowly reveals itself in the dark, and I hold my breath… it is the wolf.
This is the moment I have been dreaming about ever since I was here more than 4 years ago – watching a wild wolf in its natural environment. In Denmark, where I live, we killed the last wolf about 200 years ago and, when the miracle happened a few years ago and this fascinating mammal once again immigrated to Denmark from Germany, it didn’t exactly receive a warm welcome.
The first female wolf has been illegally shot by a hunter and, despite the fact that it is protected by law, I reckon it won’t be the last. I wish that we, as a race, would somehow, once again, reconnect with nature and try to think of ourselves as a small part of nature, instead of killing things we feel threatened by.
But here in the wild Taiga of Finland – just outside my photo blind – is the wolf, and I feel truly humbled to experience this amazing moment. I manage to capture this experience – on photos and on film and, for me, watching the wolf was probably the strongest experience I have had this year so far.
youtube
My camera is set up to make stills right now and I am totally focused on achieving the right mood in the photo. I simply love these faint, almost washed out, colors of the landscape and then there is this wolf slowly walking over the tundra – almost like a ghost of the forest. I try to keep the ISO down, making a slightly longer exposure which means I have to pan to follow the movements of the animal – this also creates a slight movement which I like.
In the back of my mind, I feel that I should make just a short video recording for my YouTube vlog. Such a dilemma.
The wolf stops and puts her nose in the air to catch a scent. I quickly press the little movie button, turn the wheel a few clicks and press the live view button – I am now in movie mode with 50 frames per second and the dual pixel AF locks onto the wolf immediately. Once again, the wolf moves slowly, and I get my first recordings. This is simply fantastic. I mean, what more could I wish for.
The wolf slowly disappears into the forest, and here I am. Left in the small blind – suddenly I feel alone and slightly sad that I can’t just follow the wolf like an invisible spirit. I want to see where it is going and where the rest of the family are and how they are when they are together and what they do. It would be awesome. Just for a day or maybe a month…
It is now almost completely dark outside and impossible to photograph. I decide to take a one hour nap – just to be a little less tired when the sun once again rises in the east.
I wake up to the incredibly annoying sound of a very loud crow. I really have to change that alarm tone on my phone, but it is very smart because it doesn’t disturb or scare the animals around me when I am out. Ohh it is just so tempting to take another 30 minutes under the blanket, but it is getting brighter outside. Nothing to see and nothing to see. Nature definitely sleeps now, and so should I, but you never know.
A no longer warm cup of coffee and a loaf of bread is actually quite nice right now. Just sitting here watching how nature slowly wakes up. The fog starts to come in like a thick smoke over the damp grass-covered land. It’s so beautiful.
It is now around 3am and there is still about 5 hours until I will leave the blind.
Bear… It is there again. and then one more from the other direction. Two bears at the same time…
Wow. And just as I am looking through the photos, another bear is coming.
What I thought would be a long and quiet morning turned into something completely different. Three bears, a wolverine, an eagle, and some ravens.
And then suddenly it is 8am and I am in a hurry to get everything packed together before the pick up in a few minutes. Now it is time to get back to the Base Camp, get some breakfast, a trip to the Finnish sauna and, of course, a swim in the forest lake before a good long sleep.
What a night in the blind, what a day to come, and what a place this beautiful and fascinating wild Taiga of Finland is.
About the author: Morten Hilmer is a professional wildlife photographer, author and former special force soldier in the Danish military unit in Greenland – the Sirius Dogsled Patrol. The opinions expressed in this article are solely those of the author. Hilmer uses his work to draw attention to the importance of taking care of planet Earth. You can find more of his photos on his website, Facebook, Twitter, YouTube, and Instagram.
from Photography News https://petapixel.com/2018/09/20/15-hours-inside-a-small-photo-blind/
0 notes
Text
Book Excerpt: It's Okay With Me: Hollywood, The 1970s, and the Return of the Private Eye by Jason Bailey
We're proud to present an excerpt from a new book by Jason Bailey, "It's Okay With Me: Hollywood, The 1970s, and the Return of the Private Eye."
Synopsis (from Amazon.com): One of the cornerstones of the 1970s New Hollywood movement was the reinvention of genres from the studio era, with Westerns, musicals, and gangster movies getting the “revisionist” treatment by the so-called Film Brats who were raised on them. But few genres were revisited with as much vigor as the private eye movie – which found New Hollywood icons like Robert Altman, Roman Polanski, and Arthur Penn putting their distinctive spin on the timeworn conventions of the gumshoe film. So what was it about the private eye movie that was so compelling at that particular juncture, in both film history and American life? In It’s Okay With Me, author Jason Bailey dives deep into the essential detective pictures of the era, breaking down how they bridged past and present, while examining how each film was not only representative of New Hollywood, but of the wider cultural moment.
“At first I said, I don’t want to do Raymond Chandler,” Robert Altman recalled, of the initial offer to direct the 1973 film version of The Long Goodbye. “If you say ‘Philip Marlowe,’ people just think of Humphrey Bogart.” But when Gould’s name was floated, “then I was interested. So I read Leigh Brackett’s script, and in her version, in the last scene, Marlowe pulled out his gun and killed his best friend, Terry Lennox. It was so out of character for Marlowe, I said, ‘I’ll do the picture, but you cannot change that ending! It must be in the contract.’ They all agreed, which was very surprising. If she hadn’t written that ending, I guarantee I wouldn’t have done it."
Brackett’s participation was a key link to the character’s past – her second screenwriting credit, shared with William Faulkner and Jules Furthman, was for Hawks’ Big Sleep. “I met Chandler only once,” Brackett said. “I know he wanted Marlowe to be depicted as an honest man, and somebody who was his own man. I wanted to get that into the screenplay. But I also had to show Marlowe the way he looks to us now in the Seventies… Because Marlowe, as Chandler saw him, would be unthinkable in the Seventies.” Altman agreed: “I think it’s a goodbye to that genre - a genre that I don’t think is going to be acceptable anymore.” To convey that displacement, Altman and Brackett hit upon their guiding principle. “I decided we were going to call him Rip Van Marlowe,” Altman said, “as if he’d been asleep for twenty years, had woken up and was wandering through this landscape of the early 1970s but trying to invoke the morals of a previous era.”
To drive the point home, Altman starts the film with Gould’s Marlowe literally waking up from a deep sleep. These opening shots are the only time he’s not in a full suit, which he even wears to take out his laundry. Throughout the picture, he’s the only one wearing a tie (even the gangsters are in turtlenecks), and he only removes it when he goes into the ocean (though he leaves his coat on). Marlowe’s the only one smoking – and he’s doing it constantly – the “Marlboro Man” sticking out like a sore thumb in the New Age, health-conscious enclave of Malibu. (He doesn’t stop smoking until the very end, when he needs that hand for his gun.)
The world has changed around him: his neighbors are naked yoga flower children, his cellmate is a chatty revolutionary, and he finds his missing person in a smiley/happy rehab facility. But this Marlowe is a walking anachronism – he just keeps smoking his cigarettes, tying his tie, and doing his job. He is surrounded by his time, yet he is not of it.
"He is a knight errant, and like Don Quixote imperfectly understands the world he inhabits,” Roger Ebert wrote of Gould’s Marlowe, noting that, in contrast to the sardonic narrators of the earlier Chandler pictures, his is a “meandering dialogue that plays as a bemused commentary to himself.” And perhaps he is, though “to himself” seems too purposeful a description for this Marlowe’s sideways mumble, which is less Bogart than W.C. Fields – and seems to point the way towards another muttering Altman protagonist, Robin Williams’ Popeye. His frustrated asides (“Boy, that cockamamie cat”) and nonplussed reactions (“Why don’tcha go over there and tell the girls they’ll catch a cold”) seem a coping mechanism, a way of at least amusing himself in a world where nothing else makes sense.
Altman’s refusal to play by the rules is made clear right from the jump, as he spends no less than eleven minutes on an opening sequence in which Marlowe goes on a late-night grocery store run to feed his finicky cat. It could just be one of Altman’s oddball touches, like the unexplained baby shoe in Marlowe’s apartment or the inexplicable carnival photo booth that takes his mug shot; maybe it’s just a character beat, establishing the proper anything-goes mood. But author William Luhr positions it as a miniature version of the complex mystery that follows, in which Marlowe shuttles his pal Terry Lennox off to Mexico, is accused of assisting in Terry’s murder of his wife, is hired to track down drunken, suicidal Hemingway-esque author Roger Wade, and ends up discovering (wouldn’t ya know it) that his two cases are connected. Yet in both the cat food jaunt and the Lennox/Wade mystery, Luhr argues, “empty characters and empty actions begin and end with Marlowe alone, feeling betrayed, and without the resources to understand or to cope with his situation.”
The opening sequence is one of three that comes up most often in discussions, both laudatory and critical, of The Long Goodbye, along with gangster Marty Alexander smashing a Coke bottle on his mistress’s face (a brutal echo of James Cagney and his grapefruit) and the surprise ending. All three scenes, significantly, are nowhere to be found in Chandler’s source novel, and anyone approaching the film looking for straight adaptation will find little to hold on to. Even casual viewers will likely find its borderline perverse visual style – with the camera in constant motion via zooms, dolleys, pans, and shifting focal points – disorienting or even off-putting. (Cinematographer Vilmos Zsigmond also inserts an extra dose of smoggy California haze by “flashing” the negative.) But these flourishes give the picture the wild, improvisational feel of a free-form jazz number – Altman as Mingus. More importantly, it’s of a piece with the storytelling; Marlowe cannot figure out his place in this world, and Altman never lets him (or, consequently, us) settle comfortably into his surroundings.
And as a result, it’s hard not to notice that Marlowe isn’t much of a detective. The payoff of his unsuccessful 3am cat food run is that he can’t even fool his own pet. When Terry Lennox arrives shortly thereafter, they pay “liar’s poker” – and Marlowe loses, an apt metaphor for the adventure to follow, in which he pledges constant allegiance to his friend, a conniving murderer who has exploited that friendship. The lug who gives Marlowe a lift home from jail puts it bluntly: “Sorry, Marlowe. Sorry you’re so stupid.” Other movies have their detective stumble around a bit, as is necessary to preserve the suspense of their mysteries; this one explicitly calls its hero dumb, and takes its time disproving the thesis.
Yet even this sap eventually wises up. When a drunken Marlowe presses Wade’s wife for the truth about his suicide, the mumble disappears; when he asks her, “Are you gonna tell me what really happened here,” he speaks plainly and clearly. Most people slur their speech when they’re drunk. Marlowe stops slurring. (Is it an affectation? Something to keep people off-guard?) When he chases her car down a busy street and she strangely ignores him, his sense of self is finally reignited – he plays the fool, but he will not be played for a fool. He finds the supposedly dead Terry luxuriating in Mexico and waiting for his newly single mistress Ellen Wade; Terry grins, “I guess if anybody was gonna track me down, it’d be you,” but he certainly doesn’t seem concerned about betraying his friend, or the consequence of that betrayal. Confronted with his crimes, Terry is unmoved. “What the hell, nobody cares,” he shrugs (a key concluding statement of Hickey & Boggs the previous year).
“Yeah, nobody cares but me,” Marlowe replies.
“That’s you, Marlowe,” Terry says. “You’ll never learn. You’re a born loser.”
“Yeah, I even lost my cat.” And with that, Marlowe shoots the fucker dead.
It’s a shocking, repugnant, and glorious moment, all at once – a “fuck you” to not only the customary hero code of the private eye movie, but the easy-come-easy-go spirit of the character until that moment. Throughout the film, he is passive in both action and in attitude; Terry’s “What the hell, nobody cares” isn’t that far removed from Marlowe’s own refrain of “It’s okay with me,” except that he’s finally encountered something that’s not okay. It’s the moment at which his anachronistic hero becomes, at long last, the modern man – evening the score for a personal slight, and thus philosophically equipped for the “Me Generation.” The ending doesn’t make him a better man; many would argue (and did, loudly, following the picture’s release) that it makes him a lesser one. But it certainly makes him a man of his time.
Considering its unconventional approach and unapologetic torching of genre norms, it shouldn’t come as a surprise that critics and audiences greeted The Long Goodbye with such hostility. It premiered at one of critic Judith Crist’s famed Terrytown weekends (fictionalized and immortalized in Woody Allen’s Stardust Memories) in perhaps the worst possible circumstances: following screenings of all the previous Marlowe pictures. West Coast critics fumed; Variety dubbed it “an uneven mixture of insider satire on the gumshoe film genre, gratuitous brutality, and sledgehammer whimsy,” while the Los Angeles Times’ Charles Champlin called Gould’s Marlowe “an untidy, unshaven, semi-literate dimwit slob who could not locate a missing skyscraper and would be refused service at a hot dog stand,” and sneered, “He is not Chandler’s Marlowe, or mine, and I can’t find him interesting, sympathetic or amusing, and I can’t be sure who will.” Kenneth Turan (also later of the Times) included it on a late-‘70s list of the worst movies ever made.
Box office was bad in its initial Los Angeles engagements, and runs in Chicago, Philadelphia, and Miami were likewise disappointing. Its New York premiere was cancelled at the eleventh hour, even though press screenings had already been held, and it was withdrawn from release nationwide. Rumors circulated that it would be re-edited, shortened, or abandoned altogether; it turned out, United Artists had re-jiggered its marketing campaign, torpedoing the initial posters and ads, which framed it as a straight thriller, for new posters by Mad magazine illustrator Jack Davis, which made it look like a madcap comedy. Opening in New York months later, it was a modest hit, championed by the New Yorker’s Pauline Kael (“Altman, who probably works closer to his unconscious than any other American director, tells a detective story, all right, but he does it through a spree—a high-flying rap on Chandler and the movies and that Los Angeles sickness”) and the New York Times’ Vincent Canby, who put it on the paper’s year-end top 10 list and praised its creators for having “the courage to create an original character and almost an original story that, by being original, does more to honor Chandler's skills than would any attempt to make a forties movie today."
But Farewell, My Lovely, a much more faithful Marlowe picture (with Robert Mitchum taking on the role) released two years later, was a much bigger commercial and critical success. By preferring that traditional appreciation to the tart aftertaste of Long Goodbye, contemporary critics were letting their own notion of nostalgia gloss over the blackness at the heart of true noir. That view, Luhr writes, “belies an understanding of the profoundly anti-nostalgic, anti-sentimental cynicism and despair that pervaded the actual films themselves, as well as The Long Goodbye.”
Films like Farewell, My Lovely regarded private eyes shallowly, refusing to wrestle with what a character like Marlowe truly meant in this era. It was easier to slap a trenchcoat on him, to put him in a window covered in streaming rain to a saxophone theme, and let us stash him in the past. Farewell was safe, a museum piece, a humorless presentation of fixed images, while the variation Altman presented was unbalancing – in his words, in his actions, even in the way his director framed him – and viewers resisted. "I suspect that people are reluctant to say goodbye to the old sweet bull of the Bogart Marlowe because it satisfies a deep need,” Kael wrote. “They’ve been accepting the I-look-out-for-No. 1 tough guys of recent films, but maybe they’re scared to laugh at Gould’s out-of-it Marlowe because that would lose them their Bogart icon. At the moment, the shared pop culture of the audience may be all that people feel they have left.” And that tension – between who was onscreen and what we needed them to be – would only pull tighter as the decade continued.
“It’s Okay With Me: Hollywood, The 1970s, and the Return of the Private Eye” is available now in paperback and Kindle editions.
from All Content https://ift.tt/2uJTy5Q
0 notes
Text
5 ways to INSTANTLY make BETTER VIDEOS!
youtube
Today we’re talking about five ways to instantly make better videos. I wanna tell you guys about five ways to instantly make better videos that you can start doing today. They don’t require money, it doesn’t require buying extra gear. They’re just five things that you can do, five things that you can think about, just to instantly up that quality, up that video game quality.
Not the actual video games, we’re talking about video, like your game in, you get it. Number one, lighting. Okay, lighting is the most important thing when it comes to photography, cinematography, film, videos, photos. Lighting controls all. I’m not just talking about forced lighting, or stuff that we’re gonna set up, or lights that we have to buy, or DIY lighting setups, outdoor light, just lighting as a whole, be it that it’s from natural light, or that it’s from something that you’ve bought that you’ve set up in-studio, nailing that and locking that down is one of the most important aspects of what it is that we’re doing here.
And I’ve mentioned this before, window light is the best light for run-and-gun, get-it-done, have it look amazing, reliable. You wanna shoot near a window, okay? So, for instance, watch this. Now, this is a great example of good window light. The window is literally right here. It’s a nice, soft light coming in. It’s not too harsh, but it illuminates me nicely, makes me nice and clear, which means it’s easy for you to understand, and concentrate, and focus on what it is that I’m saying. Now, because this shot is so clean, and the light is so even on my face, it really gives me a good, wide range of capabilities when it comes to color correcting this footage and grading it, because it’s lit so evenly and so nice. Opposed to if I moved away from the window in this same room, you can see how that light loss is significantly different. It’s much darker over here, which means you’re gonna lose detail, it’s gonna look a little bit more muddy, opposed to just standing close to the window and having the whole scene well-lit.
This is also, this clip right here, is gonna be more difficult to color grade, and it’s probably gonna come out a little bit more grainy because we don’t have enough light on the image as a whole. You see what a difference that makes? We’re in the same room right now, lit by window light, but just by moving closer to it, or moving further away, or shooting in the corner of a room opposed to closer to the window makes all the difference in how the quality is gonna be perceived in your videos. And the same thing goes for if you’re actually setting up studio lights or using the light that’s just in your ceiling. The difference is substantial. If you wanna see more on how to do a DIY lighting setup, I’ll link the video below that I did.
Super budget, you can go to Home Depot, buy everything you need for less than $50. But being able to lock that down and just think about where you wanna shoot in your house, where you wanna shoot in whatever building that you’re in ahead of time, it’s gonna make your videos easier to watch, it’s gonna make that color grading easier. The overall outlook of your videos will be tenfold better if you just think about the lighting first. Use those windows. Point number two is proper music and sound. Now, don’t worry, I get asked about 500 times a day where I find my music, how I get music for my videos.
However, having the proper music and sound effects will 100% change the way people view and see your videos, yourself included. If you use the wrong track for some incredible footage, that footage could be very well perceived as not as good, or not as epic, or not as sad. It’s all in the song choice. If you’ve got some home footage of a baby crawling across the floor and it’s some gangster rap, probably not gonna set the tone as well as something a little more family-friendly. And vice-versa, that works as well. If we’ve got footage of an R8 ripping down the streets, or some people skateboarding, some soft, happy piano might not be the way to go. So song choice is a huge factor when you’re thinking about your videos. If it’s a cheesy song, your footage is gonna be viewed, and the piece as a whole, is gonna be viewed as cheesy.
If it’s a really, really epic song, but the footage doesn’t match the epicness of the music, then you’re gonna have a disconnect. That brings me to my next point is, you wanna actually edit to the music. A lot of times, in music, there are some incredible things that happen audibly. If you match the visuals to the audio, you can enhance that tenfold. It’s one thing to have great music, it’s one thing to edit to the beat, but when you have sounds of the forest, or if you have the ambient noises of cars going, or you have that egg cracking, the typing, the shuffling of cards, paper being ripped, it doesn’t matter. When you have those extra ambient sound effects on top of the great music and great footage, it’s the full package, it’s the full experience.
They’re things that are often overlooked, but having proper sound effects makes all the difference. Okay, so what I’ve done here to show you an example real quick is plug this Road Video Micro. I’ve mounted it to this external monitor arm that I’ve clamped to the desk. So in a second, I’m gonna bring that camera closer and plug this directly in, to give me a more rich sound source to show and prove a point to how much better even something random and mundane or normal of a task can sound a lot better when you have good, rich audio to it.
Now I’ll show you a few of the same clips, but without a microphone to show you that you don’t have as much immersion into the clip that you’re watching when it does sound as rich. Point number three is learning your software. Look up tutorials, watch different videos, attend seminars, buy training, find training, free training, friends that know how to use the program better than you, ask questions, do everything that you can to learn that software, because that’s only gonna help you when you’re shooting in the field, and what I mean by that is you wanna plan those shots ahead of time, so that you know how you’re gonna edit.
So if I think to myself, okay, I’m going to film my friend walking by the screen, and then I’m gonna do a transition that masks him out into the next clip. So I’m gonna shoot accordingly to get those clips, so that I can bring them into my editor, and then edit that transition to make it actually come to life and happen. Now, if you don’t know how to do that kind of stuff in your editing software, you might not know that you need to shoot those clips ahead of time. Or, if you have a mistake, maybe something happened where you forgot to pan up and pan down, you can do that in your editing software. Maybe you forgot a slider, but you can digitally fake sliding moves in the software. So when you know your editing software as best as you possibly can, and the skill aside with a camera, it really, really helps you figure out how to get the most out of what is is that you just shot.
So learn that software, people. Just get into it, dive in. Lock the door, crack a Red Bull, and just go. Point number four is motion in your shots. This is one of my favorite things, and probably one of the most overlooked things by people who are just starting or more beginners. A lot of people will just set their camera up on a tripod, film whatever it is they need to film, and then move to the next shot. But then you’re left with a sequence of static, still shots. They may as well be images. Or, if you’re filming an event, a lot of people just throw the camera on the tripod, they hit record, they record for five minutes, they move the tripod to somewhere else, hit record again. But you’re really not filming anything. You’re not inviting us in to that atmosphere. I don’t know how it feels, I don’t know what it looks like, I’m just watching it from a distance. I may as well be an outsider just looking in, trying to see what’s happening.
Oh, that looks fun. Does it look fun? No, not really. Motion in shots is so important. It could be the most mundane thing, but if the camera’s moving, it’s helping move the story along. More motion is gonna give you more cinematic results, more motion is gonna look more professional. When you have moving shots, it looks like you put more work into it, and that’s because you did. And the results are definitely a massive improvement over someone that just puts the camera on a tripod, or you’re only cutting from static shot, to static shot, to static shot. Point number five and the last point for this video is the location and time of day. Now, obviously with locations, if you have an incredible landscape in front of you, you’re standing at the outlook over the Golden Gate Bridge, if you are in the mountains, if you’re canoeing through Lake Louise, if you are at the tip of a volcano or deep in the jungle, yes, that footage is gonna look good inherently because where you are is just insane.
It’s a magical landscape, it looks incredible. However, these rules still apply to even if you’re just shooting in your own office. Now, the angle of those shots in those locations is important as well. If you’re in a nice jungle and you’re shooting way too low but you’re missing all the nice trees above, that’s stuff you gotta think about. If you’re in your office filming a talking head sequence, like what I’m doing right now, if I was on a low angle, this just doesn’t look as good. It’s just fact. There’s way too much space above. There’s nothing interesting enough above to justify why my camera is at such a stupid angle. If the angle was too high, you would all instantly be like, “Okay, pause one second, why is that camera “so freaking high?” All of these little adjustments make a big deal. Another quick tip that I’ve seen a lot of people do that drives me nuts is, clean up the background. Take the stuff off your desk. If you’ve got boxes in the corner, move them out of the way for the shot. Move them behind the camera.
So many people just leave and garbage hanging around everywhere, and that stuff just looks messy. It looks cluttered. It doesn’t look like you took the time to actually set this up nicely. That kills the level of professionalism. That kills some of the cinematic or the quality feel of the video that you’re putting out. And the time of day is also very important when you’re choosing a location and what you’re gonna shoot. The best times of day, for me, I like to shoot early in the morning or in the evening to later at night. Early in the morning and the evening because the light is usually the softest. The sun hasn’t come all the way up, the light isn’t harsh yet, the colors are usually really, really nice, and in the evening, you get that nice sunset, you’ve got golden hour right after sunset where that residual light is still kind of illuminating the sky.
You’re not gonna have any shadows, but the colors you’re gonna get are gonna pop significantly better than they would if you were shooting at or pm on a really sunny day. Okay, so to wrap it up, we want good light. Find that window light or set up some studio lights. We wanna have good music. We wanna edit to the beat. We wanna keep those sound effects in mind for ambient noise. We wanna know our editing software so that we know what shots we wanna get when we come back and edit.
We wanna pick good locations, good time of day, and we wanna keep motion in mind with our shots. Try these tips. If you’re filming anything in the next couple of days, change up the location, change the time of day, film it near a window, look up a little bit more on your editing software and learn how to do a couple extra nifty things and think about those things when you’re shooting. Your stuff’s gonna go through the roof right away. I 100% guarantee it.
As found on Youtube
Use These Amazing Templates Today
The post 5 ways to INSTANTLY make BETTER VIDEOS! appeared first on Magic Money Success Your Trick To Freedom.
from 5 ways to INSTANTLY make BETTER VIDEOS!
0 notes
Text
Take flight over Australia: aerial photos by Scott McCook
Take flight over Australia: Aerial photos by Scott McCook
Originally a tailing pond image, I have created a fictional piece of work to convey a story about Australia riding the mining boom, Boddington Western Australia
Scott McCook is a native Australian and an award winning landscape photographer with a serious passion for aerial photography. All of the images that you see in this article were shot from the skies high above remote areas of Australia and New Zealand. His goals are to not only highlight the beauty in areas that are remote and far removed from the public eye, but also to illustrate the impacts that industry can have on the world around us.
To see more of his work, check him out on Facebook and Instagram.
What inspired you to begin your aerial work?
Big Lagoon Shark Bay, an isolated birrida, these birridas are gypsum clay pans that used to be saline lakes
I have two main sources of inspiration, the first of which is my drive to photograph what hides in plain sight. This started many years ago with astrophotography, which was something I pursued in my earlier days of landscape photography. The idea of something so beautiful hiding above cities and street lights every night with many people never even seeing the Milky Way with their own eyes drove me to the dark spots of Western Australia (of which there are many) to capture the incredible beauty of the Milky Way and show people here in Western Australia what’s in their backyard every night.
This concept of showing people, via my imagery, what hides just below the surface (or above your head) is what fanned my obsession for aerial photography. It’s the very same principals, the idea that these beautiful and sometimes abstract landscapes that we see every day from the ground can explode into life from the air.
My second source of inspiration is to show people the impact of mankind on nature, as in the case of my mining aerial imagery. It’s showing people areas that they would never normally be able to see on that scale. It has the possibility to empower people to make their own opinion on these landscapes and how far man will go to chase our precious resources.
I should also mention that there are a number of truly amazing landscape photographers based out of Australia that inspire me on a daily basis. The collective of landscape photographers from ND5 put life back into the aerial genre here in the last 10 or so years and their work sparked my interest in what our beautiful country has to offer from the air. Photographers like Tony Hewitt, Christian Fletcher and Peter Eastway have not only supplied inspiration over the years but have been great mentors for myself and many other budding landscape photographers here in Australia.
What’s your favorite aspect of aerial photography?
Shark Bay Western Australia, coastal floodplain
It really comes down to two questions: Is it the unique photography? Or the thrill of being in a plane or chopper?
I think it’s the pure thrill and enjoyment of flying that keeps bringing me back and then it’s the excitement of having no idea what incredibly unique moment or landscape you’ll capture from the air. Often with aerial photography, it feels like you’re an early explorer, going over uncharted territory, the feeling is quite amazing because often we are lucky enough to be the first people shooting a location from the air.
This is often the case because you can travel to very remote locations in a short amount of time. You can really feel the excitement come over you when you know you’re shooting something completely new. So let's go with 50% the thrill, 50% the photography, how’s that for a safe answer?
What lenses and equipment do you normally shoot with?
Perth, Western Australia. Alcoa Tailing Ponds
Everything!!! Would be my short answer, but the slightly extended answer is as follows:
My Full-frame Go to Kit:
Nikon D810
Nikon 24-70 F2.8
Nikon 70-200mm F2.8 VR2
Sigma 35mm F1.4 Art
My Medium Format combo:
Phase XF + IQ150
80mm blue ring Shnieder
Mamiya 35mm
When it comes to aerial photography I have found shooting large sensor MF images really helps with not only print but the editing process, but the extra data can make all the difference to your creative vision and post processing.
How do you go about composing a shot from that high up in the sky?
Useless Loop salt farm, the different colors coming from varying stages of the process and product, Western Australia
You often have a very small window space to shoot from and you’re traveling 160km an hour at around 1500 ft, so the ground is going fast, very fast! This means you need to be on your game, with the camera settings tuned into something you would possibly find in sports photography: high shutter speeds, high ISO and looking for that sweet spot aperture.
Research using Google Maps is the key to this scenario – often I will know what is coming up, so I’m preparing myself physically (putting my arms in positions thought not humanly possible) and mentally as well, thinking 'What orientation do I want this area in?' Then in a matter of seconds your shooting window comes and before you know it, it’s gone. You can ask the pilot to lock into a loop pattern over the area, but time is money and I find if you can nail it first go, you can be onto the next location and maximize your shooting time and minimize your wallet taking a beating.
How much planning goes into a single aerial photography trip?
Southern Alps, New Zealand, this is an image of the ice that feeds the Fox Glacier in the South Island
Weeks or months. I did two very different aerial expeditions last year which I’ll touch on because of the difference in planning. The first was to Shark Bay Western Australia, a World Heritage Listed area and a location that is totally mind-blowing from the air. I spent around four weeks using Google Maps (My Maps) to scan areas of Shark Bay to shoot. Once I found a potential location I would run a screen grabbed image through Lightroom and the de-haze filter, along with some minor color balance adjustments – this helps me envision what I will be shooting when I arrive to the location.
The satellite images provided by Google are pretty good but with a little tweaking you can really get some detail from them and this helps me know what I’ll be coming across when we’re in the air. I would then save these screen grabs along with the location drawn onto a map, these will then be loaded onto my iPad and used when I’m discussing the flight plan with the pilot. This is extremely helpful because it allows our pilot to see exactly what we want to shoot and where it is, allowing him/her to be more precise.
The other shoot I did was in the Southern Alps of New Zealand in May last year. This was from a Hughes 500 Helicopter with all the doors off. Now, this shoot was different because using Google Maps to do reconnaissance is very limited. Why? Well because it’s a mountainous region it’s a lot harder to use the aerial perspective for a gauge on what you’re going to see. Adding to the difficulty is the fact that the snow in such areas is highly reflective, meaning large areas of Google Maps data can be blown out.
Being in a chopper allows us to hover and hold locations, so there's no need to try and capture that one moment in a split second. We can now spot an amazing location and tell our awesome pilot (thanks Michael from Mountain Helicopters Fox Glacier, complete legend!) to head on over and bank the chopper in just the right spot. This type of aerial expedition feels far more like exploring on foot, just with the added bonus of a multi million dollar piece of machinery giving us the gift of flight wherever we want.
Okay, so slightly different than traveling by foot but I have to admit it’s an incredibly beautiful experience when you fly with all the doors off in such a location.
How do you think drones will impact aerial photography?
Shark Bay, Western Australia
How do I think drones will impact aerial photography? EVERYWHERE! That happened fast didn’t it? I’m still waiting on drone delivery of alcohol in bars, so I feel they haven’t quite achieved their full potential yet.
On a more serious note it’s impacting photography right now, the whole aerial genre has exploded in the last few years. The effect I think is largely positive, if anything it’s sparking the passion of photography in more and more people. I notice many drone operators will start off just wanting to fly drones as their primary objective and in time they develop a love for photographing the world from above, and proceed to learn the photography side of things properly.
On the not-so-positive side I’ve seen it very rapidly develop a bad name in some areas due to pilots breaking the rules and flying dangerously. This puts a bad spin on aerial photography, and in most cases the actions of very few are ruining the potential for some amazing shots for many people. But in general, I think drones are having a positive impact. Do I fly drones? Not yet, I still need my buzz! Looking at the world fly past via an iPad or iPhone just doesn’t quite do it for me yet, I like to be up there experiencing it.
What’s your favorite aerial image to date and how did you go about getting the shot?
Dirk Hartog Island, Western Australia. Coastal Sand Dunes, spot the Kangaroo tracks coming in from top of frame
It's really hard to pick just one image, but I’m going to have to go with an image I captured near Dirk Hartog Island Western Australia. It was around 7:30am in the morning on our 5th and last day of shooting the an area called Shark Bay. Paul Hoelen and I had decided that we would burn some fuel and head over to a remote strip of sand dunes. This particular area wasn’t shot often because you had to spend a fair bit of time and money to just get there so we were pretty excited about finding some untouched landscape.
Upon our arrival we found what we were after, beautiful clean dunes, we shot the location and both nodded to each other in appreciation of our gamble paying off. We then spoke to our pilot Ryan and said lets head south then home, as we made our way down the coast something happened, Paul can barely contain himself, he’s just waving his arm and pointing down “Scott, Scott, Scott!!! Down, look down!”, I look over and this gorgeous half moon shaped sand dune just appears from nowhere. It was so out of place in relation to the rest of the landscape, like mother nature had just created the most stunning sand dune possible then placed it hidden away for Paul and I to find.
I haven’t got to the really cool bit yet, so after shooting this mind blowing sand dune, we get back to our motel that night and load up the images, I go straight to the sequence of this stunning half moon dune and start looking at the images, I zoom in 50% and suddenly spot tracks, it’s kangaroo tracks! This perfect set of Kangaroo tracks is cutting into my composition and up the spine of the sand dune. I couldn’t believe it, the chances of all those things lining up were incredibly rare and it’s why I love photography so much. Yes it’s skill and creativity, but it has equal doses of luck.
How do you keep yourself inspired?
The Salt Farms of Useless Loop Shark Bay, Western Australia
I get much of my inspiration from the amazing, kind-hearted and adventurous landscape photographers I’ve made friends with along the way. It’s so cool in this amazing field we’re in, the community is a place you can draw many things from and inspiration is available everywhere. Beyond that I gain much inspiration from the people who have come before me, I read a lot and attempt to piece together the past as it helps pave the road to my future in this craft.
What are your aerial photography goals for 2017?
Arteries of coastal floodplains pump across the land, Carnarvon, Western Australia
Push the aerial genre to new heights, pardon the pun! I love aerial photography, I am well and truly hooked. I look at 2017 as my chance to challenge myself within this genre, I enjoy story telling via my aerial imagery and look forward to sharing that this year.
Behind the Scenes
This is the Hughes 500 Helicopter with all the doors taken off that was used for the flight over the Southern Alps of New Zealand. Huge thanks to Michael from Mountain Helicopters Fox Glacier!
The below video was shot when I snagged my favorite image to date. It gives you a great idea of the feverish pace at which you are taking images while shooting aerials in a plane.
youtube
from DIYS http://ift.tt/2jiGHAA
0 notes
Text
The Art of the Image
Because of the moment of Rock Age Guy, when images of the animals and guys hunting were initially utilised to decorate the walls of the cavern, we have been interested in the recorded image. Although it was not till the innovation of digital photography that truly made this fascination into an art form that everybody might take pleasure in regardless of artistic capacity. Individuals throughout the globe take pictures of themselves, relatives and also pals, pet dogs and also landscapes whether or not there is a particular circumstance or reason for doing so. But how much do we recognize when it concerns digital photography? Below are some of the different sort of photography that will certainly help us discover more concerning the various ways of taking photographs.
Amateur Digital Photography has grown recently with the advent of cheap digital cameras as well as this digital photography that has ended up being quickly accessible to the amateur as a result of the affordable of both equipment and also the recreation of the pictures, which we will certainly have a quick check out in this post.

Black and White or Monochrome Digital Photography
The first are to consider is black and white or monochrome photography. This is not just presenting a photo in black and white. Black and white photography checks out the contour as well as personality, tone as well as appearance, the visual art as well as an appeal of the topic. Both elements of black and white photography that offer depth and also sensation to the photo are the darkness and highlights, if we learn how to use them then we can create terrific pictures.
Colour often covers the texture and form of subjects, it draws our focus the means flowers bring in insects and also birds, and ripe fruit captures your eye on a tree. Sometimes that's exactly what we desire, however, black and white can emphasise the structure of the subject.
The range of manner ins which different colours transform at various greys implies that you can have rather fine control over just exactly what parts of your picture will be light and also dark, along with lights degrees. The lack of light can be as vital as the highlights. Excellent thick darkness can offer a deepness as well as strength to a picture. It allows us to separate out the effects of colour and also luminosity, rephrased black and white digital photography enables us to utilise colour better.
Activity Digital Photography
Action Photography could be where the digital photographer takes pictures of a sporting occasion, or of youngsters playing, anything undamaged where there is motion. Either establish the shutter rate to freeze the activity or attempt a slower shutter speed to obscure the action. This blur effect can produce the sense of dramatisation and also the business. If the topic is moving across the framework attempt to track the subject, this is called planning, the impact as soon as refined is the subject is sharp, yet the history has the motion blur providing the result of speed.
Capturing Activity Shots of Athletes, people and pets moving, and also other relocating things create beautiful photo ops. Nonetheless, capturing the rapid action on an electronic video camera can be difficult.
Individual settings on many digital cameras permit digital photographers to photo activity in a point-and-shoot mode mainly designed for moving topics. Other times it is up to the professional photographer to manipulate the electronic video camera to achieve the most efficient possible photos.
Digital cams with less shutter lag capture far better activity shots. No matter your camera's specs, you can additionally lessen shutter lag by pre-focusing before you break the picture. To do this, hold down the shutter button halfway and afterwards once the cam has focused; press it down completely to take the shot.
Quick shutter rate permits professional photographers to catch great shots of relocating subjects. If your electronic cam sustains a slower shutter rate, it is still feasible for you to fire some remarkable activity shots. It may take some technique, but attempt panning the video camera, maintaining the lens on the subject's action.
Fire in continuous setting if it is offered to you. You might feel like the paparazzi when you initially begin, yet you will certainly love how this fast setting doesn't let you miss a shot! Digital video cameras that support continuous shooting work perfectly for action shots because they can write all the pictures to memory at the same time instead of one at a time.
Prepare for the activity as well as setting yourself appropriately. If you are shooting sporting activities, camp out by the goal line or find a good place where you could get clear shots of the professional athletes.
Buy an excellent lens. Many action shots will benefit most from a digital cam with a 200mm lens, though you could swap lenses for different results. Zoom lenses job wonders for sports action shots.
Aerial Photography
Airborne Photography is ideal if you want to picture a landscape or cityscape. Unfortunately, we can not all afford to have our very own helicopter. However, significant results can be achieved from the top of high structures, bridges or mountains. So although actual aerial digital photography might run outreach, we can still have the impression of aerial photography.
Travelling Digital Photography
Travel Digital photography is not nearly your vacation snaps. It is about catching something of the feeling, the emotion, the essence of an area. It has to do with informing the story of individuals as well as the landscape; it captures the state of mind and the setting. You don't require expensive foreign holidays; travel photography can be your record of the following community or city and even neighbourhood. As a is a fantastic local city for me to discover, but with the included benefit that it is not far to take a trip to.
When photographing people in their local context, there are some methods that I aim to utilise however bear in mind the concept of dealing with people with respect.
I've currently discussed making shots contextual however one terrific means to do this is to consider just what remains in the background behind the people you're photographing. Ideally, you want something that's not too disruptive, but that includes in the context of the area you're firing in. Another technique for shooting shots of individuals that neglects the 'contextual' policy is to discover a brightly lit position with a dark history. This could help the face you're shooting to pop out and also catch the viewer's interest.
Some of the most efficient shots I've taken of people while making a trip have been where I have snugly framed individuals' faces. This indicates either entering near to the person or having and using a high zoom lens.
Choose all-natural (un-posed shots) - While often the presented shots could function rather well they could additionally lack a particular authenticity. Photograph your subject doing something from their regular life, at the workplace, the marketplace, residence, or simply crossing the street, etc
The majority of the shots I've taken of people over the years while travelling have been of only subjects alone in the shot. This is partially simply my design but is something I have come to be reasonably aware of in the last few months. Including a second person right into a picture takes a photo right into a various place. No more is the shot nearly an individual and their atmosphere but it in some way ends up being relational. The customer of the photo begins to question the connection and also a brand-new layer is contributed to your image.
Quite often it's the shots of people dressed in the nationwide costume that has the tendency to bring in professional photographers when travelling. While these shots can be very reliable, I question if they are always actually representative of culture. Frequently these individuals have spruced up especially for a show or traveller attraction, and the majority of people in that country look rather different. Mix up the types, sex and ages of people you take pictures of, and also you can wind up with an incredibly solid collection of faces of a country.
It goes against the nature of most traveling digital photography which is usually really rapid as well as spontaneous, but if you can hang around with individuals, if you have the possibility to rest with a person for a longer amount of time and picture them in an extra prolonged fashion this enables you to inform the story of the individual and also could cause some terrific series of shots using various photo strategies, lenses and circumstances, while the person becomes more loosened up around the video camera.
Maintain your calm to the eye for taking those spontaneous shots between the extra posed ones. It's impressive what photos that you could locate when the individual isn't really 'prepared' for you to fire. These shots usually include people engaging with others or sharing a real feeling. I discover establishing my cam to regular shooting mode often results in some fantastic candid shots. If conditions allow doingn't replace your lens cap till you pack your video camera away.
When it involves choosing the lens, I find that a focal length in between 24mm as well as 135mm is an excellent array to collaborate with. Opting for wide angle lenses could also generate interesting shots, yet you will typically find that they do misshape your topic's face a little. Selecting a longer focal length can be valuable for placing your questions a little extra secure.
Underwater Digital Photography
Undersea Digital photography has come to be much more available for the development of cheap underwater cams. Whether you intend to take a photograph in a swimming pool, lake, river, or the sea underwater digital photography can be among one of the most exciting as well as gratifying points to do.
The difficulties you experience when in capturing undersea can be summed up in one word, "restriction." Interaction and travel below the surface area are limited. All-natural light, as well as visibility, are limited. Just how you take on these restrictions depends upon your ability undersea and your photographic equipment.
Nevertheless, one of an essential advice you could get has little to do with photography, and everything to do with your safety. A thin atmosphere can be an unsafe one, even if it is a swimming pool. No photo is worth your life. Depending upon the type of underwater digital photography you desire to practise, you have to acquire the proper specialised knowledge initially and also training and obtain certification from a certified teacher. This puts on every aspect of undersea activity, from fundamental swimming skills to advanced below aqua diving methods.
This list is by no means exhaustive; they are just several of the different kinds of photography you can discover. There are so many various other types of digital photography from infrared to clinical, road, landscape, picture, macro and Breathtaking digital photography. Photo job can be split into lots of classifications, numerous with great deals of sub-categories. But also for now, just go and also have fun with your video camera and uncover the pleasure of photographing you picked the subject!
0 notes
Last Seen Blogs

sanavogue
Sana Vogue

na1129
事務局長通信

minowly
Tout est chaos

analubeleza
AnaLuBeleza

siscon-stsg
minors dni