#a maximum of 5 minutes on each rectangle
Text


Template
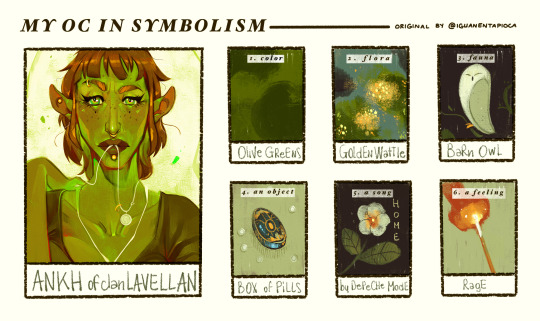
This was too cute, I couldn't miss the chance ;; also I like this low effort painterly style, immediacy is fun!
#my oc in symbolism#elanor cousland#kerry#ankh#ndo sta l'art tag#I gave myself like#a maximum of 5 minutes on each rectangle#the approach was similar to doodling while on the phone#no perfection just splashes of colors and a few lines if things get too confusing#...notoriously fleur de lis is a flower key to hawkes story#in kerry's case it's the only flower he can take care of#except for cauliflowers but you know what I mean lmao#flowers are too delicate for him << he prefers to grow vegetables#and berries! like tomatoes or peppers#those are his forte u-u
121 notes
·
View notes
Text
5 Minute Presentation
Chakra
Enlarged loom
Round loom
Achievement
Colour psychology
Today, I had a 5 minute presentation, where I presented how my work has progressed and what research I have been exploring, including my findings. I talked about how I am continuing to experiment with weaving and how it can be applied in a health setting/environment. During the presentation, I was questioned how weaving can be linked to art and health or how it can be related to health settings. I explained how, from research, there have been some people who have used the craft of weaving to improve their health. One example, is a man who had severe head trauma from an accident which resulted in losing some strength in one side of his body that mainly affected his arm/hand. This man used weaving to help to improve his hand to eye coordination and subsequently build strength. Another example was of a middle aged woman who lives with MS. She weaves to help distract herself from the pain of the debilitating illness and in turn, helps her mental health. That being said, after creating a weaving, there is a huge sense of achievement. The piece has gone from pieces of yarn or cotton or thread, to a full hanging piece that can be exhibited anywhere. There is no maximum size, it depends on where you are creating the warp.
I talked about how I mainly work intuitively. When I start a fresh piece, I don’t think about how I want it to look once it is complete because the process is far more important than the outcome. The action of weaving can be meditative due to the monotonous nature. I never really pay attention to the colours of yarn I am using, I just automatically grab whatever ball is in front of me, but after reflecting on my weaves, I realise that maybe there is an unconscious reasoning behind each colour I use? This is something I am going to explore on a deeper level. Why do I naturally reach for pink or purple? What about the days where I use green or blue, why have I opted for these colours? I am going to explore the psychology of colours, how colours affect an individuals perceptions and behaviours. In line with what I spoke about colours, Jaine suggested I look at the chakras. The chakras are the energy points of in your body and have relation to colour. There are 7 main chakras in the human body which all have a corresponding colour.
I also talked about how I do want to move away from the traditional wooden rectangle loom and experiment with everyday objects to create a weave. In the past I have used a broken deckchair, which was exciting and full of improvisation but it was still more or less the same as a traditional loom. I want to step outside of my comfort zone and use things that are quirky, things that you would not associate being or creating a weave from. One student suggested exploring round looms, they are circular and wooden. This could be exciting however the purpose of it is being a loom to create weavings, I want to experiment with objects that are not associated to weaving. I think I could create some really adventurous work, but most importantly the process of creating it would be exciting.
Research / Essay / Article findings.
After the 5 minute presentation, I then presented my findings from the first task. Task 1 was to find an article or publication (podcast, film, video etc etc) that inspired me artistically, made me feel something emotionally or related to my practice.
I found the Baker-Miller Pink study, by Alexander Schauss in the book, ‘Feminists don’t wear pink and other lies’. This book is curated by Scarlett Curtis and has approximately 50 contributing authors involved. The Baker-Miller Pink study was talked about by Scarlett Curtis. This is the first time I had heard about this study from this book and I am currently doing some further research into it.
0 notes
Text
Daisy Keech Hourglass Workout: Does It Work For Everyone

Have you watched the Daisy Keech hourglass workout on YouTube and want to try it but are still unsure if it really works or not? Surely it works. Daisy Keech's hourglass workout focuses on targeting the midsection, and still, in 2023, people are following her workouts. Let’s first know who Daisy Keech is and why her workouts are becoming popular.
Who is Daisy Keech
Daisy Keech is a fitness influencer on YouTube and works on other social media networks. She is famous due to her hourglass physique. Her amazing booty structure makes her famous on social media, especially on Instagram and TickTok. She guides people through bodyweight workouts at home and helps them achieve an attractive figure.
Daisy always talks about fitness and workouts. She gained around 5 million followers on Instagram and TikTok and is increasing her list of followers day by day.

daisy keech hourglass workout
Here are a few facts about Daisy Keech:
Date of birthAugust 12, 1999Height5 feet 6 inchesNationalityAmerican (Santa Rosa, California)Net worthAround 2 million dollarsYoutube channel DaisykeechInstagram pageDaisykeechTicktok Daisykeech
She is known for her booty program and talks about home workouts and bodyweight workouts to get a perfect figure.
What is Daisy Keech Hourglass Workout
The Daisy Keech hourglass workout is mainly targeted at the midsection. She claims that this ab workout helps her to squeeze waistline. She said that she would do 10 workouts for 10 minutes without taking a rest in between. All her workouts have been done by simply lying down on the floor and working on the abdominal muscles.
https://www.youtube.com/watch?v=5cWxgnJgHHs
Her main intention is to squeeze her waist size into an hourglass. She talked about all her favorite ab workouts and how she does them to get a flat stomach. She also said that it works differently for each one, but it gives most of the burn to her abs.
It all helps to get a flat stomach; to get an hourglass figure, you need to work on your upper body, midsection, and lower part.
What is an Hourglass Physique
An hourglass physique or figure is always what every girl desires. An hourglass figure means the body is in perfect hourglass shape; it means the hips and bust are appropriately equal in size and have a narrow waistline. This is the physique every woman desires to grab an attractive figure. Famous people with an hourglass physique are Marilyn Monroe, Kim Kardashian,Jennifer Lopez, etc. They all have attractive figures.
1 workout for 1 minute without taking rest helps burn the maximum calories and exhaust anyone fully.
Do your workout in a proper and perfect way to grab all the benefits.
We have added some gifs and videos that help you find the perfect way to do each workout. She has just done it, but not in a perfect manner. By doing it regularly, you will know the perfect way to target each muscle.
Daizy Keech physique is already good. It's due to her genetics and also a good diet.
Can Anyone Grab an Hourglass Figure
Of course, anyone can improve their physique with dedication, but it takes time to see the changes. You need to build up muscles around the bust and hips and work on squeezing the belly area. All of this takes time, which is why some celebrities resort to surgery, which is a risky and costly solution.
Simply enjoy your physique as it is. It is a misconception among people that only hourglass figures are attractive; most girls look attractive in an apple, pear, rectangle, or inverted triangle due to their amazing fitness. So you should first consider working on your fitness and reducing your unhealthy weight with regular workouts.
The Daisy Keech hourglass workout definitely helps people grab an attractive figure, but you need to include a more effective workout into your session. Like squats and pushups, too. Simply see your whole body in the mirror and see in which area you need to work.
Is Daisy Keech Hourglass Workout Effective
Yes, definitely. It works to get a flat stomach. Many people also give positive feedback to Daisy Keech's hourglass workout. But you need to maintain consistency and increase repetition. Daisy Keech's ab workout only works on the midsection, or mainly on the abs; only doing this will not help you grab an hourglass figure. You should also work on your upper and lower parts to grab some muscles to achieve a perfect hourglass figure. The Daisy Keech abs workout is good for trimming belly size. The best part of this workout is that you can do it anywhere and anytime, with no equipment or special things required. Only your willpower and determination matter.
Daisy Keech Hourglass Workout List

Daisy Keech Hourglass Workout List
Now you should take a look at Daisy Keech's workout list. All the ab workouts she has done by lying on her back on the ground. Here is the list of workouts she did in almost 10 minutes:
- Basic crunches for 1 minute
- Bicycle kicks for 1 minute
- Jack Knives for 1 minute ( 15 per side)
- Russian twist (1 minute) her favorite
- Toe Tap for 1 minute
- Bicycle crunches for 1 minute
- Scissor Kicks for 1 minute
- Reverse crunches
- Butterfly kicks
These are nine workouts. We know in her video she talks about doing 10 workouts in 10 minutes, but she has done nine workouts. And you can also try it as per capacity.
Let’s know Daisy Keech's hourglass workout steps in brief, which specific workout targets which part, and how to do it perfectly.
#1. Basic Crunches Targets Six Packs

(Image sourced: YouTube/Daisy Keech)
The basic crunches target the six-pack abs (rectus abdominis) and oblique muscles. It helps build strength in the ab muscles. On the first day, it feels difficult and causes sweet pain in the muscles, but after regular practice, your body starts adapting to the changes and your abs get stronger.
Basic Crunches Benefits
- Improve body posture
- strengthen the core area
- A good workout for beginners
- Tone up your abdominal muscles.
These are the few benefits you can grab when you do it perfectly. Daisy Keech has done it quickly because she does it regularly. But when you are a beginner and doing it for the first time, do it slowly and feel the contraction of the muscles.
Precautions You Need To Take
Warm up and stretch your muscles. If you don't do it right, you can get muscle injuries.
The proper way to do crunches
- First lay down on the mat.
- Your neck and back must be in a straight line.
- Tighten the abdominal area.
- Bend your knees and place your hands behind your neck.
- Initially, place your legs on the floor, and when you grab strength, you can lock the legs with angles. It engages the lower abdomen area.
- Start to lift the upper body slowly and feel the pressure on the abdomen.
- Come back and do it again.
Do it for at least 1 minute or as per your capacity on the initial day. Now after that, go to the next workout, which is bicycle kicks.
#2. Bicycle Kicks Strengthen Lower Abdominal Muscles

Daisy Keech Hourglass Workout
The bicycle kicks work on the lower abdominal muscles and help improve your posture. Where the basic crunches target the upper abdominal muscles, the bicycle kicks work mostly on the lower area. It feels like you are paddling a bicycle on a mat.
Benefits of Bicycle Kicks
- Improve flexibility and stability.
- Increase core strength.
- Shape your lower area.
- Easy workout to do anywhere
The Perfect Way to Do Bicycle Kicks
- Be in the same position( lay on your back).
- The body should be in a straight line.
- If you are a beginner, then place your hands on the floor to handle your body weight.
- Legs should be above the floor.
- Bend the knees.
- First, start with the right leg; slowly take the leg toward the chest and kick, and then do it with your left leg.
In the video, Daisy Keech has placed her hands on her head and slightly lifted her upper body. You can do it if it does not feel difficult to you.
Do it for one minute or as per your capacity, but you need to improve your performance to get the best results. Now do the next Daisy Keech ab workout, and that is Jack Knives.
#3. Jack Knives Complete Ab Workout

Daisy Keech Hourglass Workout
Jack Knives is a difficult ab workout. Jack knives target the abs, lower back muscles, oblique, legs, hips, and shoulders. This workout affects the transversus abdominis, the deepest layer of abdominal muscle that goes from the lower ribs to the pelvis. It supports the torso, protects the internal organs, and also helps stabilize the spine.
So it's important to build good strength with regular workouts. Here are some amazing benefits you can grab by doing jack knives regularly: This is also known as the V-UP workout. It can be easy when you do it with an exercise ball.
Benefits of Jack Knives Workout
- Strengthen the entire core
- Builds abs
- Improve body posture
- Increase flexibility
The Perfect Way to Do Jack Knive
https://www.youtube.com/watch?v=8a8UpEABFmk
- Lay on your back on a mat.
- Keep the body in a straight line.
- Tighten the core.
- The hand should be straight above the head.
- Slowly make a V shape by raising up the legs, hips, and upper body, and try to touch the feet.
- Repeat it.
Surely you will feel a sweet pain in the core area. It is an effective workout to strengthen the core muscles. Do it for at least 1 minute or as per your capacity, but don't push hard in the initial days.
But you can see that in the video, Daisy Keech has not done it properly; she doesn't make a proper V-UP shape. But if you want to get all the benefits of a jack knive, you must make a V-UP shape.
After doing this, you can take a rest in between to do the next workout effectively. The next Daisy Keech ab workout is the Russian Twist.
#4. Russian Twist Cinched Waistline

Daisy Keech Hourglass Workout
The Russian Twist is a quick and easy workout that is effective in targeting the obliques and giving shape to the belly. She said that it is her favorite workout to cinch her waistline. Twisting the waist like wringing out a cloth.
Benefits of the Russian Twist
- Build up your core strength.
- Give strength to the spinal muscles.
- Improve balance and stability.
- Tone up your love handles and waistline.
The Perfect Way to Do a Russian Twist
via GIPHY
- Simply lay down on the mat.
- Bend knees and place legs on the floor.
- Tighten your core.
- Lift the upper body and be in this position; it creates a V-shape position.
- Combine hands or take a ball.
- Slowly twist the belly left and right and feel compression on the sides.
Do it for at least 1 minute, or as per your capacity. Your oblique muscles become stronger and leaner. After that, do the next Daisy Keech hourglass workout, which is toe tap.
#5. Toe Tap Targets lower body muscles

Daisy Keech Hourglass Workout
Toe tap gives strength to lower body muscles such as the hips, glutes, and calves. This also helps to shape your lower body. It can be done in a versatile style, such as standing or with a bowl; here, Daisy Keech shows a lying toe tap workout.
Benefits of Lying or Pilate Toe Tap
- Improve flexibility in the lower body.
- Target lower abs
- Strengthen your core muscles.
The Perfect Way to Do Toe Tap
https://www.youtube.com/watch?v=Ml2xTP45jVQ
- Lay down on your back.
- The core must be tight, and the body must be straight.
- Hands should be on the floor.
- Bend the legs at the knee, and the ankle should be straight.
- Now tap the toes on the floor one by one.
- Repeat it
It looks easy but is effective for lower muscles. In the video, Daisy Keech has done it very quickly and has also not tapped the toe, but you need to do it in a proper manner. Tapping the toe on the floor engages the carve muscles.
Do it at least for 1 minute and improve performance as per capacity. And then start the next Daisy Keech ab workout, which is bicycle crunches.
#6. Bicycle Crunches Target All Abdominal Muscles
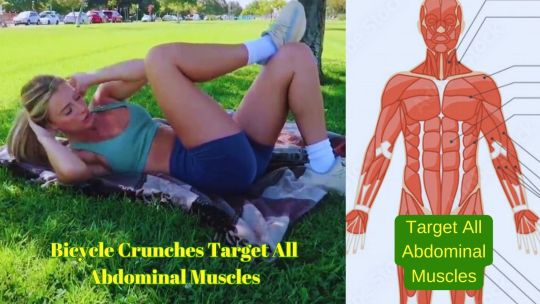
Daisy Keech Hourglass Workout
Bicycle crunches are the most effective workout for all abdominal muscles. But you need to do it perfectly to enjoy all the benefits. In the video, Daily Keech makes it a little simpler by folding one leg on another and doing a crunch from one side at a time. You can follow her style. But this does not target all the muscles. Before doing the workout, you need to understand its amazing benefits.
Benefits of bicycle crunches
- Slim down your waistline.
- Tone up the midsection.
- Builds six-pack abs
- Make your body more flexible.
The Right Way to Do Bicycle Crunches
via GIPHY
- Lay down on the mat.
- Put your hands behind your head and join the fingers.
- The body should be in a straight line.
- Legs should be straight and above the floor.
- Start to bend one leg and pull up your upper body.
- Joint the opposite elbow and knee.
- Do it one by one on each side.
- Repeat it.
Focus on your breath and keep your body straight. It burns the maximum calories and also helps you trim your belly. Do it for at least 1 minute, as per your capacity. After that, do the next Daisy Keech ab workout (scissor kicks).
#7. Scissor Kicks Strengthen Lower Abs
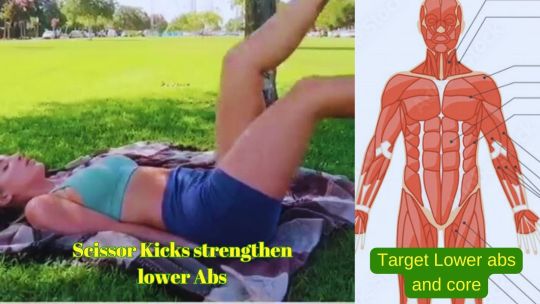
Daisy Keech Hourglass Workout
Scissor kicks are also a good workout for your core and abdominal muscles. By doing this workout regularly, you can tone up your pelvic area.
Benefits of Scissor Kicks
- Strengthen your core muscles.
- Works on the glutes
- Works on the hip area
The Perfect Way to Do Scissor Kicks
- Lay down on your back.
- Hands should be behind the back
- Legs should be straight and above the floor.
- Start your scissor (right leg over left and repeat same).
Do it at least for 1 minute, or as per your capacity.
#8. Reverse Crunches Target the Lower Body

Daisy Keech Hourglass Workout
Reverse crunches not only target the lower abs; they also target the hips and make the lower body more flexible. Let's start with some more advantages of reverse crunches.
Benefits of Reverse Crunches
- Easy and quick bodyweight workout
- Helps to burn more calories
- Improve balance and coordination.
- Works on all parts to get an hourglass figure.
The Right Way to Do Reverse Crunches
- Be in the same position( lie on the floor)
- Hands should be behind the back.
- Slowly pull up the lower body and slightly bend the knees.
- Feels the strength in the abdominal muscles
- Repeat it
Do it at least for 1 minute, or as per your capacity. Now do the next Daisy Keech hourglass workout.
#9. Butterfly Kicks Builds Core Strength

Daisy Keech Hourglass Workout
This is also known as flutter kicks, and this is the last workout in the list of Daisy Keech's hourglass workout. It will give more burn to your abs after the above workouts.
Benefits of Butterfly Kicks
- Get a stronger core.
- Improve balance and stability.
- Strengthen thigh muscles.
- Alleviate back pain
Do it correctly.
- Lay on the mat straight.
- Hands should be on the floor.
- Legs must be straight and above the floor.
- Start the butterfly kicks, like you swim or run in the air.
The focus should be on your core and keeping the body straight. It will look difficult in the beginning, but you will gain strength after enough practice.
All this workout will exhaust you completely and burn out maximum calories, and surely it will also give you pain in the first few days.
You need to do this ab workout on alternate days. It helps to rest the muscles and build strength to improve performance.
Depending on the above workout is not enough; you need to include other workouts in your schedule to work on every body part.
Here are a few lists you must include:
- Squats: Target hip area
- Lunges: Shape your legs
- Deadlift: Target all muscles (do
Read the full article
0 notes
Text
Roller hockey (in British English), rink hockey (in American English) or quad hockey is a team sport played on roller skates. It is the only quad skate team sport in existence where two teams face-off against one another at the same time. Two teams try to drive a hard ball with their sticks into the opposing teams' goalnet. Each team has five players on the rink at a time, four of whom are skaters and one who is the goalkeeper. The ball can only be put in motion by a stick, not the skate, otherwise a foul will be stated. The game has two 25-minute halves, with 15-minute halftime intermission, plus up to two 5-minute golden goal (a.k.a. "sudden death") periods to settle ties with the clock stopping when the ball becomes dead. If the tie persists, a penalty shootout will determine the winner.


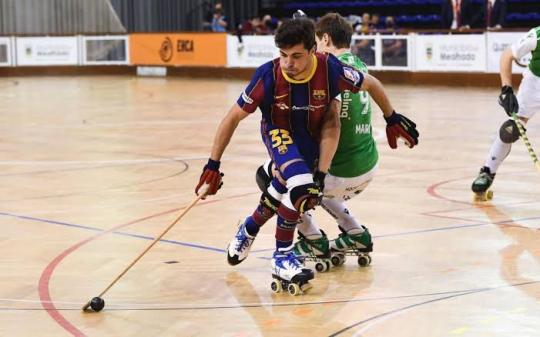
Players – including the goalie – use quad skates, whereas inline skates are used in inline hockey. Excessive contact between players is forbidden in rink hockey, unlike inline hockey.
Since 2017, the World Championships for the sport have been part of the World Roller Games organised by World Skate.[1]
Roller hockey was a demonstration rollersport in the 1992 Summer Olympics in Barcelona. There have been 44 editions of the Roller Hockey World Cup. Countries with the most world titles since the 1940s are: Spain (17 World titles), Portugal (16 World titles), Argentina (5 World titles) and Italy (4 World titles). Other countries, such as France, Brazil, Germany, Switzerland, Andorra and England are regular international competitors, but rarely overcome the traditional powers.
Roller hockey is a very fast sport, which may create a problem for TV transmissions, and new rinks are built using blue or white pavement to make the ball more visible on TV
RINK :-
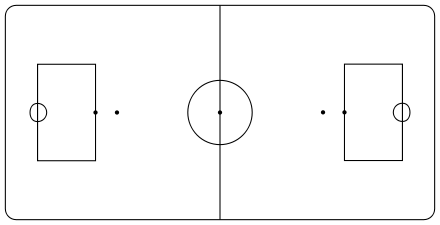
The rink has usually a polished wooden surface, but any flat, non-abrasive and non-slippery material such as treated cement is acceptable. Likewise, it is allowed for rink owners to put advertisements in the playing area, as long as they don't interfere with ball or skate motion, which includes both physically (must be at exactly the same level as the remaining area) and visually (dark colours or any other pattern which can mask the ball).
There are three standard rink sizes: 34x17 meters (minimum), 40x20 meters, and 44x22 meters (maximum). Rinks can also be any size between the minimum and maximum values that has a 2:1 size ratio with a 10% margin of error.
The rink has rounded corners (1 m radius) and is surrounded by a 1 m wall. The wall also has a wooden base 2 cm wide and at least 20 cm high. Behind the goals there is a 4 m high net, even if there are no stands (to avoid the ball bouncing back from a wall and hitting a player). If the ball hits the net, it's considered to be out of bounds.
The markings are simple. The halfway line divides the rink into halves, and 22 m from the end wall an "anti-play" line is painted. The area is a 9x5.4 meters rectangle, placed from 2.7 to 3.3 m ahead of the end table. It has a protection area for goalkeepers, a half-circle with 1.5 m radius. All markings are 8 cm in width. The goal (painted in fluorescent orange) is 105 cm high by 170 cm wide. Inside the goal there is a thick net and a bar close to ground to trap the ball inside (before, two extra referees stayed behind the goal to judge goal decisions), and 92 cm deep. While not attached to the ground, it is extremely heavy to prevent movement.
EQUIPMENTS :-
- The clothing is similar to that used in association football—socks up to the knee, shorts and a shirt.
- Sticks are different for skaters and goalkeepers. They can be of any material approved by the World Skate (although wooden sticks are still most often used), with a minimum length of 90 cm and maximum of 115 cm. They cannot be wider than 5 cm or weigh over 500 g.
- The ball is made of pressed cork, has a 23 cm in circumference, and weighs 155 g
- The skates must have two pairs of wheels, with a minimum diameter of 3 cm. Players are allowed to use brakes in the front of the skate, with a diameter or larger side not larger than 5 cm.
- Protective material includes shin guards, knee caps, jock strap and gloves. Specifications for helmets and elbow caps vary from federation to federation.
- Goalkeepers (or netminders) use protective padding on the torso (plus shoulders) (the maximum amount is being regulated, since, as in ice hockey, many goalkeepers have been using massive protection to make them larger and broader), neck guard, large shin guards (not longer than 75 cm), gloves protecting the whole forearm and a helmet with either a grid or unbreakable transparent material. Unlike the inline goalie who uses a catch glove to catch the shot on goal, the rink hockey goalie uses a flat batting glove that provides rebound characteristics when blocking a shot on goal.
RULES :-
World Skate provides the current rulebook at its website. According to the rule book, the playing time can be reduced depending on the age of the players (competitions played by younger players will have a lower playing time) and the sequence of the competition's matches (a competition disputed in consecutive days can have the playing time reduced with the aim to preserve the health and recovery of the players). The playing time must be defined before the start of each competition.
HISTORY :-
The first recorded hardball roller hockey game was played in 1878 at the Denmark Rink in London, England. It was first known as "roller polo" due to the introduction of polo in 1876, skaters took polo to the rinks.The sport was introduced into the United States in 1882 with the formation of the National Roller Polo League in Dayton, Ohio, with teams in seven cities. In 1884, the Massachusetts Roller Polo league was operating with 14 teams.Organized roller skating sports developed as the popularity of roller skates increased in the late 19th and early 20th centuries. Roller hockey teams were playing throughout Europe as early as 1901. Roller Hockey was played by the famous silent film stars, Stan Laurel and Charlie Chaplin, in the early 1900s.The first World Championships in roller hockey were held in 1936 in Stuttgart, Germany.
During its existence, British Pathé produced a handful of film reels showing roller hockey outdoors as a part of life in different areas of the world. A number of reels were shot between 1940 and the end of the 1950s, mostly in London, UK. One reel shows British children on a street in London having a match.The contest was between the Vincent Harriers and Page Street Monarchs. Another reel taken in the UK shows men competing in an outdoor enclosure and titled, "Roller Hockey at Victoria Park, London (Wasps v Wanderers)". Another is simply titled, "Roller Hockey (1950-1959)".
One reel was shot in Europe in 1940 with young male players, specifically in "Holland, Netherlands", however the players use sticks with blades resembling ice hockey sticks rather than bandy sticks or curved sticks styled in the manner seen today. This particular reel is titled, "Pathetone Lightens The "Blackout" With - ROLLER HOCKEY!". The film was shot at a seaside town in southern Holland at a popular resort called Scheveningen while crowd of people watched, "from the sea front promenade".
Rink hockey was not organized by the Roller Skating Rink Operators Association (RSROA) in the United States until 1959.The sport debuted at the US National Championships in 1961. The Pan American Games introduced roller skating as a sport in 1979 and debuted roller hockey the same year. It was one of the Pan American Games sports in 1979, 1987, 1991 and 1995. It has since been discontinued. Roller hockey was present as an exhibition sport at the 1992 Summer Olympics in Barcelona, Spain.
INTERNATIONAL CHAMPIONSHIP :-
There are several international competitions with national teams.
WORLD
There are three world championships: men's, women's, and men's U20. Since 2017, World Skate has organised the World Roller Games, comprising all three of the world championships as regulated by the World Skate international federation.
-World Roller Games
Roller Hockey World Cup (men)
Women's Roller Hockey World Cup
Roller Hockey World Cup U-20
-Africa
Roller Hockey African Championship
-America
Roller Hockey Pan American Championships
-Asia
Asian Cup
-Europe
Rink Hockey European Championship
European Women's Roller Hockey Championship
World Skate Europe competitions
3 notes
·
View notes
Text
Shandian GO - December 2020 Claims


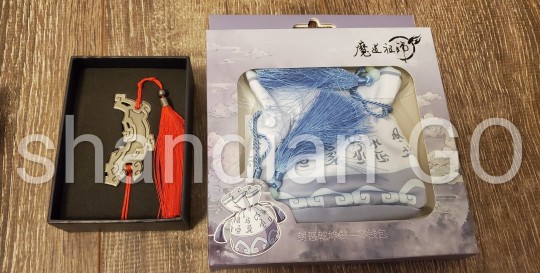
The above items will be available for claims on Saturday, December 5, 2020 at 2:00 PM EST!
All of the items are limited stock i.e. they are either out of stock permanently in stores or are items that I won't be placing anymore orders for. So if something catches your eye, this is probably your last chance to get them!
Available items
SVSSS x Camphong - Bingqiu Keychain Set - 10.00 CAD or 7.60 USD per set
MDZS x Camphong - Wangxian Keychain Set - 10.00 CAD or 7.60 USD per set
TGCF x Camphong - Hualian Keychain Set - 10.00 CAD or 7.60 USD per set
TGCF x Camphong - Poster (A or B) - 3.65 CAD or 2.80 USD each
MDZS x Omodoki - Wangxian Rectangle Acrylic Charm Set - 11.50 CAD or 9.00 USD per set
CQL Official Light Stick - 7.05 CAD or 5.25 USD each
MDZS x Tencent - Yin Tiger Tally - 4.50 CAD or 3.50 USD each
MDZS x Tencent - Qiankun Pouch - 4.00 CAD or 3.15 USD each
*Please note that prices do not include any shipping costs, which will be calculated when I process your claim
How it works
Each person can claim a maximum of 3 items in total and I will allocate them on a first come first serve basis.
To participate, you will have to fill out a Google form. You can list as many items as you want on the form and rank them in order. This way, even if you aren’t quick enough to claim your top 3 choice, you may still be able to get some of the merch on your list!
You can claim a maximum of 1 per type of item (e.g. you can claim 1 TGCF Poster A and 1 TGCF poster B but not 2 of poster A)
The form will be available a few minutes before claims open so that you can enter the responses ahead of time. Once the clock hits 2 PM, you can go ahead and press submit. The time stamp of your submission is what determines the order in which I allocate the items. Any forms submitted before 2:00:00 PM will be disqualified!
Once I’ve allocated the items to the successful claimants, I will send them a payment e-mail and they will have 24 hours to transfer the payment. The payment will include the cost of the item plus shipping costs. If I do not receive the payment within 24 hours, I will contact the next participant on the waitlist.
If you have other open pre-orders and you succeed in claiming an item, please note that I will not hold your claim item and will send everything to you immediately. If you have items that have already arrived at my address that are being held, I will automatically combine them with your claim items and ship them together.
**For the Camphong keychains, I don't have many sets available and I know a lot of people are interested so to make it more fair, each person will only be able to claim a maximum of 1 set of keychains. You can list all 3 on your form but you will only get 1 set.
If you have any additional questions, please DM/ask!
29 notes
·
View notes
Text
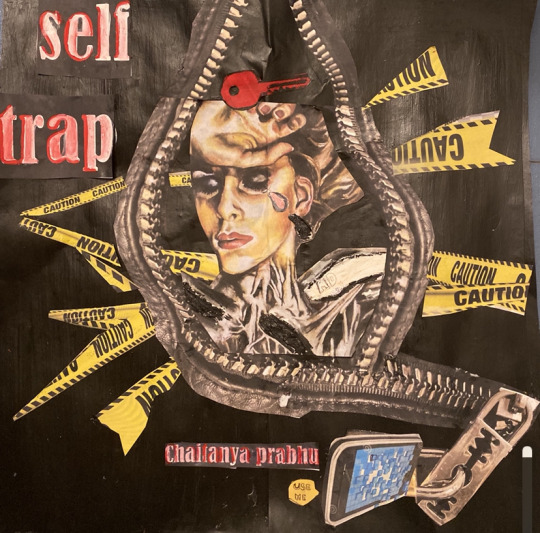
#Blog 2 Rock
BY CHAITANYA PRABHU(2D DESIGN)
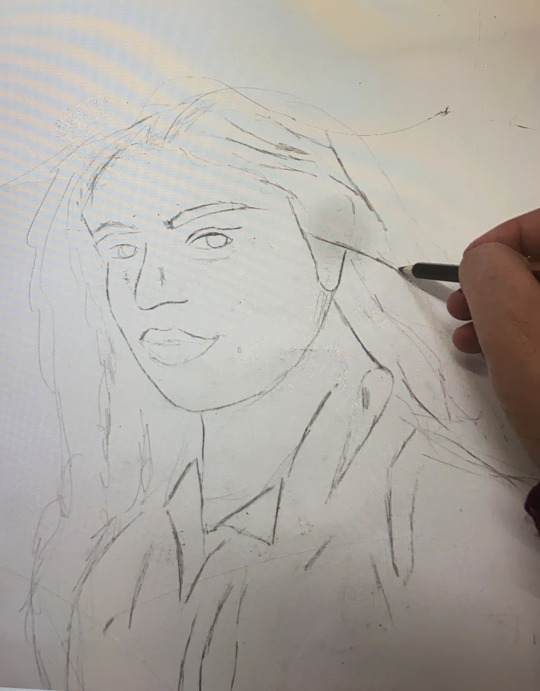
ASSIGNMENT 1:self portrait
The first assignment was to do a self-portrait.This assignment was based on previous abilities and also expressing yourself. This artwork was a chance for me to introduce myself and the type of person I am.
Development of this assignment
step 1
Every amazing piece of artwork begins with a good plan.I first started working on a plan through a web diagram

STEP2
Once the plan was all done I started working on the plan of selecting a picture.
what in realized was that I am a very camera conscious person in general, so I tend not to have many pictures of myself.so I decided to take selfies, I chose this particular picture of as it tends to create a sense of curiosity to any person whether I was happy or sad in the picture.

STEP3
I decided to sketch myself using the computer screen using my previous sketching abilities, and I was very much happy that I could successfully do that.
step4
I started working on the hair, I wanted to portray my characteristics so I decided to make my hair look colourful by using vibrant colours such as yellow, green and blue because they portray happiness and shows my love towards these colours.

step5
I worked on the face I have made use of brown paper using the mosaic technique by sticking out small pieces all together
step6
for the background, I decided to sketch London bridge as it makes me nostalgic when I visit London bridge as it takes me back into time when I was about 6years when I visited with my whole family

step7
I have made use of torn out wallpaper as it portrays that I sometimes tend to become very angry in some situations.

step8
The final outcome of this painting

assignment 2 : week 1
aims and objectives of 2d design
Name: Chaitanya Prabhu
submission date 23/9/19
2-D Designing
As a design student my intention to study product designing (bsc) comes for the fact that this course allows me to conceptualize, design, think out of the box
this is because product design is purely based on avoiding errors and minimizing the negative consequences on any tangible product.
just like any strong building requires a strong foundation so therefore in my foundation year I would be seeking to develop some of these skills that include:
· Analytical and problem-solving skills.
· Technical details
· Creativity and innovative thinking.
· Attention to details.
· Awareness of issues and problems
· communication skills, both verbal and written
The reason why I chose product designing over any other course it is purely based human-centred design approach. As a responsible citizen, I would love to actively and wholeheartedly contribute to the disadvantaged society by making products.
As a kick start to my journey in Brunel I have planned to set out some long term and short term goals. However, my short term goals vary depending on the subject and feedback from all my teachers. Perhaps some of my long term goals include:
· Improving time management skills
· utilising all of the tutorial contribution so that I become more efficient at my work
· Consistency of my work so that I don’t lose interest at any point of my course
· Improving my research skills for my classwork and my assignments
What I would be expecting from Brunel university is to guide me and support me throughout my journey.I n order to do so, I would be expecting relevant feedback on how I can improve my grades and level of productivity.A\ also providing me with relevant resource(various books) that would help me in this course.
assignment 3:extra work
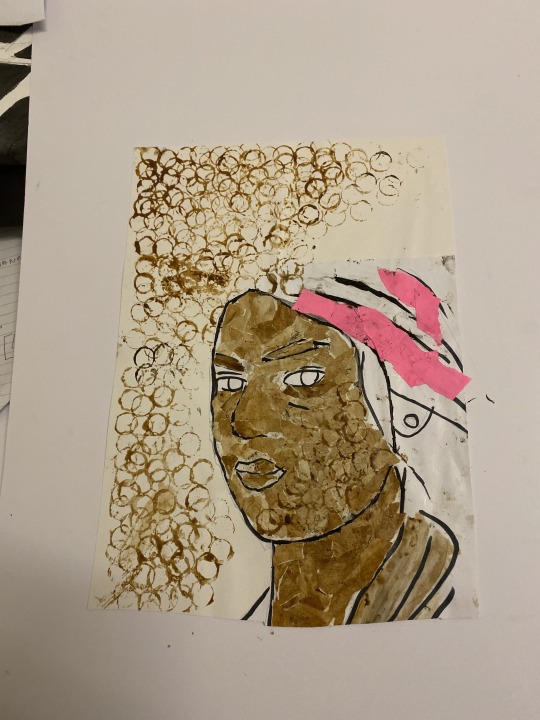
#brown girl
this self-portrait is very close to my heart as it tells a story of my identity and very I belong from and it makes me feel very proud of skin colour that io should be never ashamed of
for this specific piece, I have made use of brown paper which was that of my shopping bag and I have used about 3 shoe polish as they as it is one of the most non-conventional idea to use.
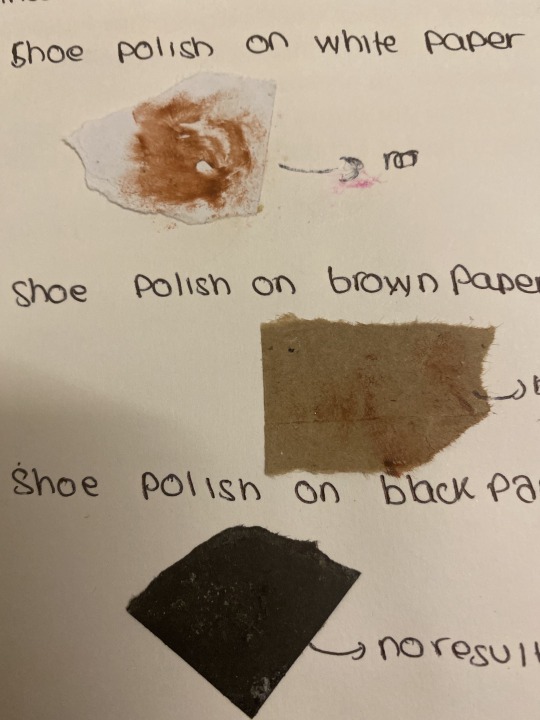
trial and error methods that lead to a beautiful piece of work.
#super women
this painting not just represent myself but also all the ladies on planet earth that are superheroes in real life, because ladies have that tendency of conquering the world from there idea and actions.it is a tribute to all hardworking ladies, especially the once who have made sacrifices there whole life for their family.

#i hate coffee
a fact about me and my close friends and family know that I hate coffee, which is probably the worst thing I have ever said .but that does not stop me from using that in my art
#masked?
sometimes I wonder why is external beauty so important and why are we always compared to people that we can never look like or be like .but i believe internal beauty is the one that should decide how a person is not external.

so I decided to use thick acrylic paint on my face so that my external identity through the picture can be masked.
Assignment (week2)
Chaitanya prabhu
1920947
1. enclosed space
For an enclosed space I went to the kitchen right next to my room thinking of sitting there for about 3 to 4 minutes. The kitchen is the smallest space in our accommodation it was Adifferent experience on its own ,because our kitchen tends to be crowded most of the time with fusion of different aromas in the surrounding however I chose to go a little early to be the only one in the kitchen .The first minute I was all fine as I was looking at all the details that I have never noticed in the kitchen .The second minute something that annoyed me the most that someone earlier on the day had kept the tap open ,so every second a drop of water was wasted making a distinct annoying sound that caught my attention however I went near the tap and shut it close properly ,as me saving water was more important than just sitting in the enclosed space .However I felt much better doing this ,the 3rdminute I noticed that a lot of food has been wasted in our kitchen ,my observation skills had increased during this task even though I had never realized it even If I came to the kitchen every day.

2.crowded place
For a crowded place I thought of going to the bus at a peak time the bus from Brunel to uxbridge on Friday at 1 pm tends to be the most crowded as there can be chances of having no place to even sit. I missed the first bus because it was way too crowded ,after 10 minutes the second bus came in I finally got an opportunity to get in ,it was quite suffocating in the bus with no place to move which made me more anxious and uncomfortable .With less space to breath .The 3rdminute we moved to the next station which was uxbridge high school more number of kids were let into the bus which made the surrounding completely change as as kids were enthusiastic and discussing about their plans on their weekend in a loud manner .The 4thminute my body was used to the surrounding the 5thminute my bus stop was here.

3.open space
I visited the open area next to my accommodation, a place that I usually go on a walk to. Firstly I enjoyed the greenery for the first minute because greenery is something that I admire the most and gets a deep smile on my face .second minute my eyes was noticing the flow of the pinn river in Brunel ,enjoying the sound of flowing river and eventually I realized that the breeze was a lot more intense than before because suddenly ,I realized that it started drizzling so I head back to my room and could not complete all 4 minutes ,it made me realize that life is very uncertain for everyone, it does not go according to plans.

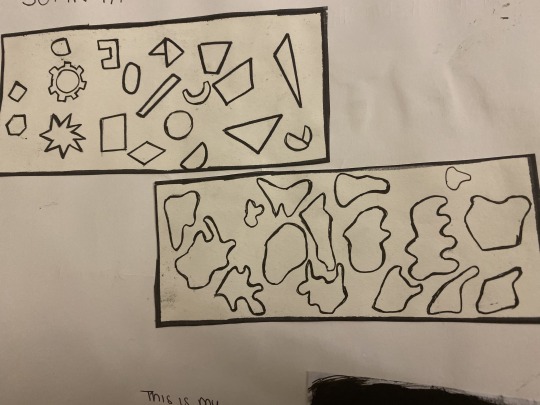
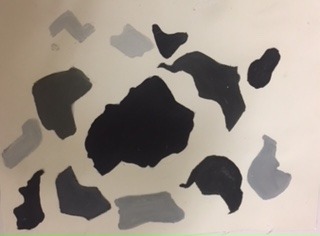
week 3:positive and negative space
to start this assignment i started with a plan

step 2.according to the teachers brief the keywords highlighted was the organic and geometric shape I personally had no idea what was organic and geometric shape investigated the difference between organic and geometric shapes what
Whatis the organic shape?
shapes that have a natural look and a flowing curving appearance and can be found on leaves, plants and animals organic shapes are associated with things from the natural world.
what is geometric shape?
geometric shapes have clear edges achieved by using tools to create them for example circles, rectangles, squares, triangles and so on
organic vs geometric shapes
exploring organic shapes in everyday life
product designers make use of organic shapes while designing products
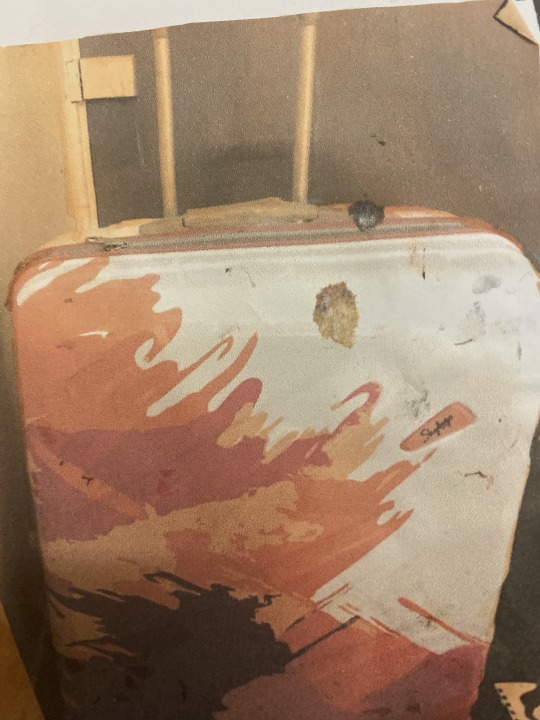
the suitcase with which i had shifted to uk had also made use of organic shape and i had not known that until i carried on this research
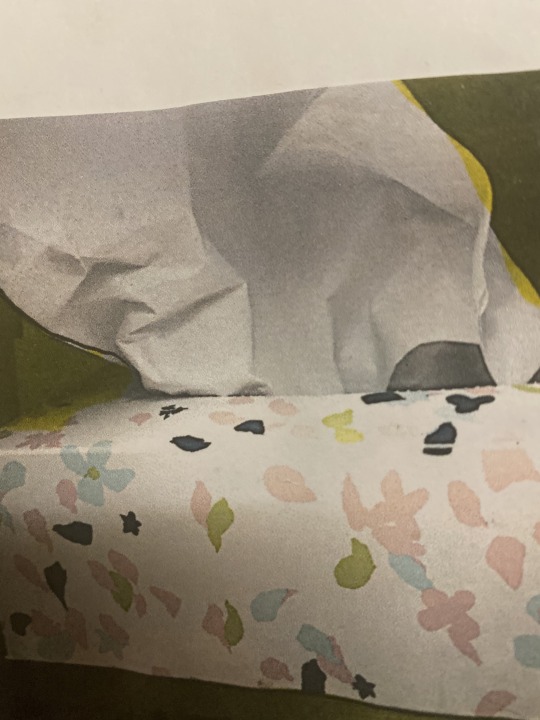
this is a picture of my tissue box that makes use of organic shape which is quite attractive
artist that make use of geometric shapes
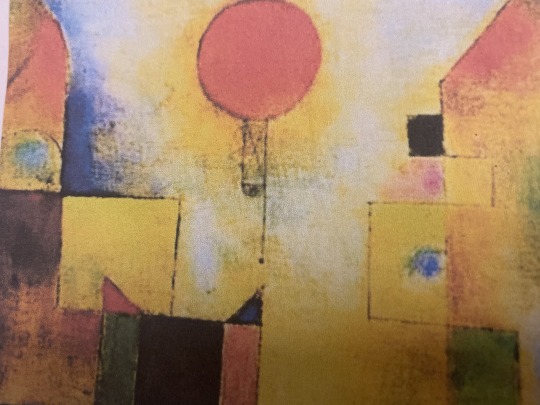
1.paul Klee (the red balloon )
paul Klee was born in Switzerland .paul influenced a range of artistic movements such as cubism and expressionism.
one of his most famous work involves the red balloon it makes use of geometric shapes .this artwork represents floating geometric shape while portraying cityscape .the colour illustrate the consecutive gesture of a figure in motion for this specific painting he has made use of thinned flowing paint.
2.Henri Matisse (icarus)
Henri Matisse was a French artist, he used a stencil technique known as pochoir. This picture portrays a person in nighttime sky .it is an artwork that makes use of organic shapes.

my composition of geometric art using geometric shape

SUMMARY OF MY RESEARCH
STEP 3.Once i understood the difference between organic and geometric shape i decided to look at the organic form in nature and then i selected 1 organic for that had a maximum number of organic shapes within.
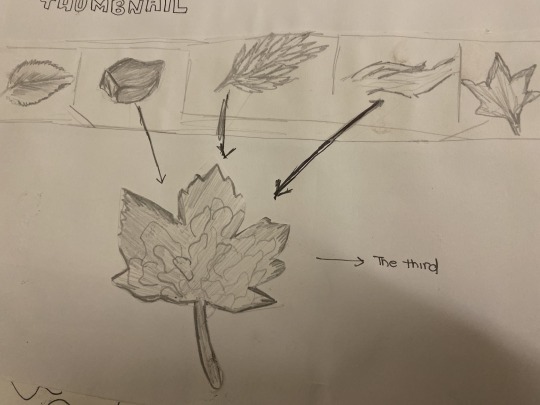
i sketched 30 organic forms that i could see within the leaf
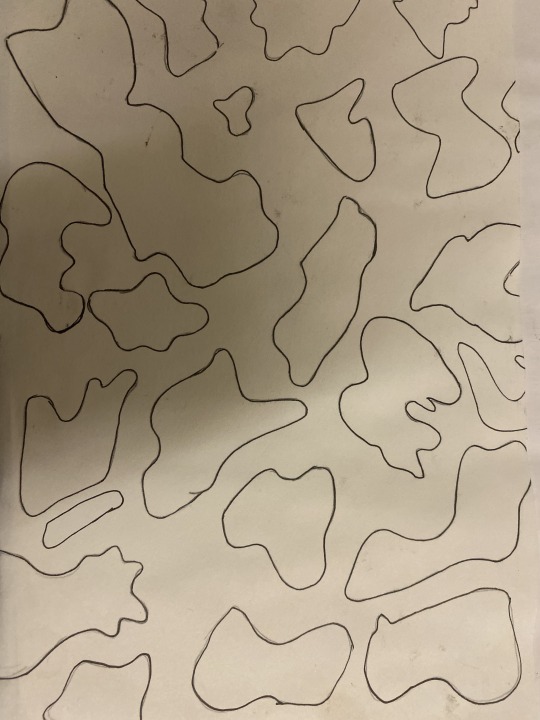
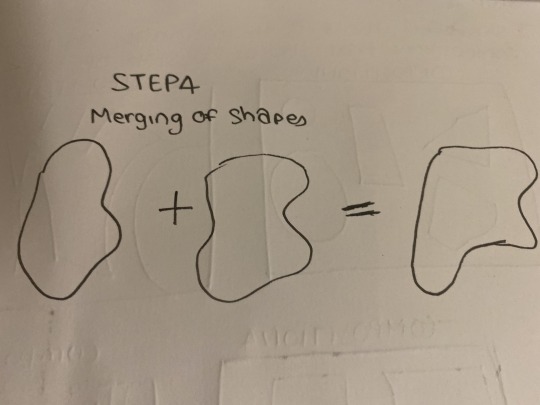
development of the organic shape composition
step 1
merging geometric shapes that were close to each other
step 2
identifying the best composition through thumbnails
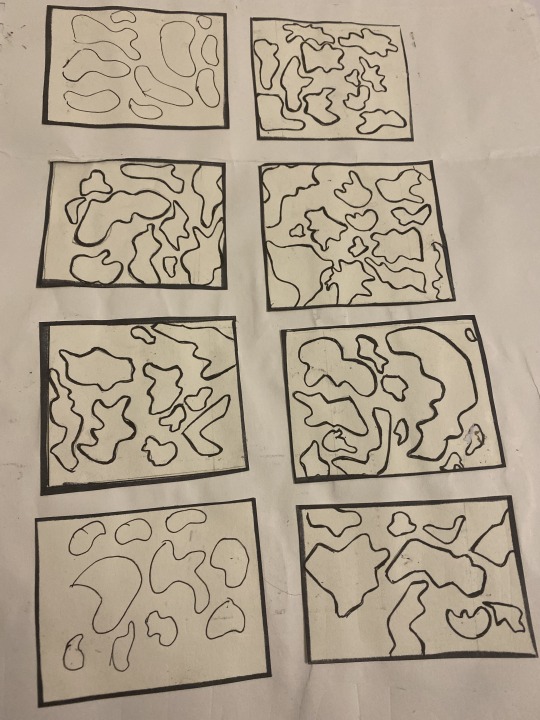

i selected composition number 8 as it was the most balances composition of all
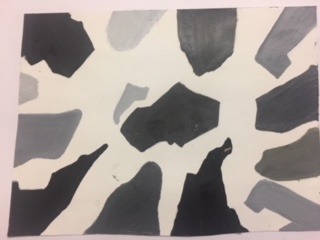
the final outcomeof :
1.organic
2.geometric

3.combined

Importance of balance in negative and positive space
Balance
Balance is one of the basic principles of design and refers to how well all the elements are balanced with each other. balance is likely to be the most important aspect of negative and positive space and making thumbnail allows to explore the most balanced composition.

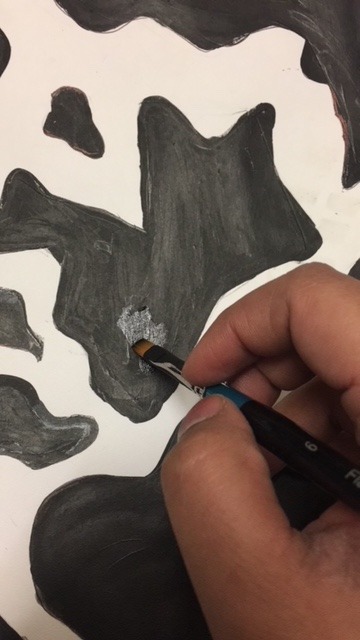
assignment 6
we had to brake china bowl or glass into pieces.i have a crazy compilation of pictures on how i broke the china plate into several pieces.


I traced the pieces onto thin cardboard to make templates so I use it for my further compositions as templates
step 3
mixing colours
In order to get a range of values I had to mix colours . to change the intensity of black and white in order to get a wide range of greys so in order understand mixing colour we had to use the magazine to create a value chart that would guide us throughout the assignment

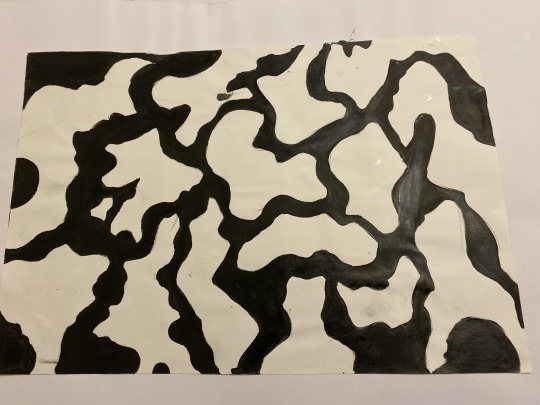
the final outcome
COMPOSITION 1

COMPOSITION 2
COMPOSITION 3

COMPOSITION 4
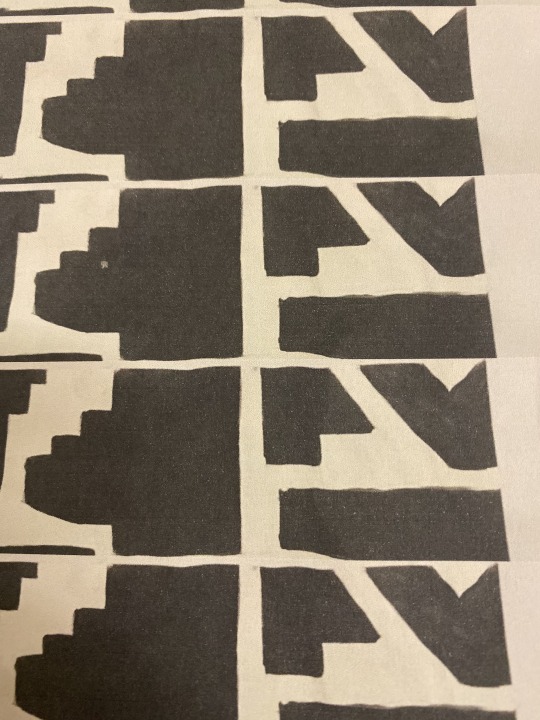
ASSIGNMENT 7:
USING ADOBE PHOTOSHOP TO CREAT PATTERN
COMPOSITION 1

composition 2
FOR WEEK 7: we had to visit the design museum
Chaitanya Prabhu (1920947)
SUBMISSION DATE:4thNovember 2019
REPORT
My visit to the design museum was an overall amazing experience, was definitely worth all the time I spent in the museum. something that I noticed and I still reflect on is the fact that every designer and his/her work always has some or the other connection to the principles that were set in past, for example, the Bauhaus movement and using of geometric shapes is still being used and was very much evident in the museum.
My first impression on the museum was for the fact that I could sense a lot of positive vibes it gave via the architecture and interior of the museum and how every floor was segregated and the fact that the people who came to the museum were very diverse as art is a language that connects people from all around the world.
The ground floor consisted of exhibitions and items for sale which was quite fascinating
The first floor was one of my my favorite once, because this specific floor was one of the most innovative sections as designers have made use of raw material to make spoon glasses and plates that I could have never imagined which eventually raised my expectations to the next level and I made sure that I captured all the memories by taking pictures, so that I could always look back on them.
The second floor consisted of products influenced by the Bauhaus movement and it gave a true picture of how history can never be erased and how it still makes a large influence on most of the works in today’s world.
Finally visiting the pedestrian crossing of London Design Festival 2019 and the fact that it pays homage to the women of the Bauhaus, whose achievements are all too often overlooked in design history was truly interesting the evident bright colour chosen did stand out the most it shows how the work of over 100 years before is still acknowledged and is always relatable to us. Overall it was an amazing learning experience.
Chaitanya prabhu (1920947)
SUBMISSION DATE:4thNovember 2019
REPORT
My visit to the design museum was an overall amazing experience, was definitely worth all the time I spent in the museum. something that I noticed and I still reflect on is the fact that every designer and his/her work always has some or the other connection to the principles that were set in past, for example, the Bauhaus movement and using of geometric shapes is still being used and was very much evident in the museum.
My first impression on the museum was for the fact that I could sense a lot of positive vibes it gave via the architecture and interior of the museum and how every floor was segregated and the fact that the people who came to the museum were very diverse as art is a language that connects people from all around the world.
The ground floor consisted of exhibitions and items for sale which was quite fascinating
The first floor was one of my my favorite once, because this specific floor was one of the most innovative sections as designers have made use of raw material to make spoon glasses and plates that I could have never imagined which eventually raised my expectations to the next level and I made sure that I captured all the memories by taking pictures, so that I could always look back on them.
The second floor consisted of products influenced by the Bahaus movement and it gave a true picture of how history can never be erased and how it still makes a large influence on most of the works in today’s world.
Finally visiting the pedestrian crossing of London Design Festival 2019 and the fact that it pays homage to the women of the Bauhaus, whose achievements are all too often overlooked in design history was truly interesting the evident bright colour chosen did stand out the most it shows how the work of over 100 years before is still acknowledged and is always relatable to us. Overall it was an amazing learning experience.

week 9:Team work
We were assigned to work in a team, each team consisted of 3 members my team had 1.chaitanya 2.shaun 3.Nelly.As a team, we distributed work amongst each other. and the final outcome looks like this.

DO NOT JUDGE BOOK BY ITS COVER
The book cover is called self trap .most people in today's generation are trapped to use the phone they are addicted to a point that every meal they have they need their phone. I Noticed my teacher always telling students in my class not to use the phone, however they never stop doing so.
2 notes
·
View notes
Text
Benefits Of Puzzles For Child Development

Your toddler's hands are chubby and grasp at the puzzle pieces and try to force them together. You cringe as your child puts the pieces together. But, with training, in just a few short months, not only will the same jigsaw puzzle turn out to be effortless Your child will also be able to solve other similar puzzles. Why?
The brain of your child will be changed.
A beloved toy for educators as well as parents, puzzles are deceptively simple. It is all you need to do is put pieces together to create the puzzle. Despite their simplicity, puzzle table can be an excellent educational tool for youngsters. It helps them learn numerous life techniques. What exactly are they?
Here are some tips and top benefits for this educational toy.
Concentration
Is your child's attention span only a minute?
You're not alone. This is a common problem for children in the early years.
According to child development experts, your child should be able to focus for anywhere between 2 and 5 minutes every day. A toddler may be able to focus on a task for between 6 and 15 minutes, whereas an older child could require 8-20 minutes.
And you know what? Puzzles are such perfect tools to help build concentration for kids.
Attention is the ability to concentrate and to focus on a single thing for an extended duration of time. Children can complete the same puzzle from start to end, which allows them to focus on one task at one time.
However, for kids to reap the maximum benefit of concentration puzzles, make sure you select one that is appropriate for your child's age. Children are likely to quit if the game is too difficult. But, adjustable puzzle table that are too easy do not provide enough challenge to boost your child's ability to focus and remain calm.
Spatial Awareness
Your child may try to drive the toy car across the bridge while playing. The bridge is too small as you can tell. However, your child will discover this when the car bumps across the bridge. Your child is developing spatial awareness with this scenario.
It's basically being aware of yourself in space and how other objects relate to each other and to you. Spatial awareness also involves knowing how the relationships between objects change as one or more of them is moved.
Recognition of shapes
Toddlers must learn to recognize different shapes, such as triangles, squares, rectangles and rectangles. At first, they might think they are similar to rectangles and squares. However, as time passes they start to realize the distinct characteristics of shapes.
Simple puzzles, especially those with knobs, can help you understand the shapes or outline of animals, people or vehicles.
Specific Knowledge for a Topic
Perhaps you've ever encountered the map puzzle. Perhaps a dinosaur-themed puzzle?
Puzzles can help your child understand more about the world. From habitats to geography, organs and more, this educational toy can help kids become familiar with anything.
The Montessori program is well-known for the use of puzzles in order for teaching children botany and zoology. Beautiful wooden puzzles divide the parts of a flower, tree, fish, and many other animals, making them a perfect learning tool.
Fine motor ability
The baby's hands are chubby and struggle to grasp a small toy. However, they lose it after banging it on the floor a few times. Babies can be extremely awkward.
Even toddlers are unable to press buttons, write or pour liquids without spilling.
This is because children who are very young are still developing their fine motor skills.
This skill requires small movements made with fingers, wrists, hands, feet, and toes.
Children take time to learn fine motor abilities. In particular the muscles in the young hands require lots of practice moving and holding small objects accurately. This is what happens when the kid engages in puzzles.
Hand-Eye Coordination
Your preschooler's eyes track the pen while she uses her hands to write. The information they gather is transmitted into her brain to assist her in learning to make use of the pen. The pen wobbles and your child gets frustrated that her efforts didn't create a perfect "b". Slowly, she is improving her hand-eye coordination that is vital for handwriting.
The ability to speak to children as soon as they are able to use their hands and eyes together. It starts from the moment children raise their hands over their heads and learn how to place them in their mouths.
Puzzles are particularly effective in helping children develop hand-eye coordination.
To complete a puzzle, youngsters must carefully move pieces to the right place. First, they must be able to pinpoint the exact place in which the piece is placed using their eyes. Next, the toddler must move the piece using their hands to this exact spot.
Problem Solving Skills
Putting a jigsaw puzzle together presents a basic problem. All pieces must be placed in a specific order and then assembled. This creates a chance to master problem-solving.
The main point of Puzzle Benefits
Puzzles have many benefits for children's development. They help increase fine motor abilities and problem-solving, as well as self-esteem as well as self-esteem. This toy for learning is essential for children to develop the cognitive, physical and emotional abilities, which will support them later on throughout their lives as they grow older.
0 notes
Text
ZTE Blade A3 Prime Review
Times are tough and budgets are tight. You might be wondering whether to keep an aging phone for another year or replace it with something relatively inexpensive. Decent smartphones priced under $100 are rare, but Visible's ZTE Blade A3 Prime ($99) is one of the better ones in that bracket. It handles basic tasks with relative ease and has solid connectivity with surprisingly good call quality. You'll notice a bit of lag when you're using it, and battery life could definitely be better, but it's a fine option for the price. However, if you're willing to spend just a little more and shop around for discounts, you can probably find much better phones for $130 to $180.
Design: Blast From the Past
Remember "candy bar" budget phones from a few years back? The Blade A3 Prime feels just like one. It's a rectangle with a plastic back and a relatively small display. It measures 5.8 by 2.8 by 0.4 inches (HWD) and weighs 5.7 ounces, making it nicely balanced and easy to hold in one hand.
On the front of the Blade A3 Prime you'll find a 5.45-inch LCD with thick bezels. That's a little smaller than the 6.2-inch display you'll find on the slightly more expensive Motorola Moto e ($149.99). The screen has a resolution of 1,440 by 720 pixels for a density of 291ppi. Despite its low resolution, the display is pretty crisp. Color accuracy skews cool; in direct sunlight, seeing the display becomes a challenge.
The top is home to a headphone jack. The USB-C charging port is on the bottom. The left side is bare; a volume rocker and textured power button are on the right. The buttons are easy to identify and reach, though there is a bit of lag in response when pressing the buttons.
The back is a textured gray plastic shell that can be removed to swap out the battery—a rarity in today's phones—and insert SIM and microSD cards. There's a small camera stack in the upper left-hand corner and a grille for the speaker on the bottom right side. A fingerprint sensor sits top center; it's easy to reach with small hands and unlocks the phone quickly.
With the exception of the Motorola Moto e's strengthened glass display and water-resistant body, durability for just about any entry-level phone is a pain point. The Blade A3 Prime is no exception. If you drop it on its back, the back might fly off and let the battery pop out, which isn't a big deal. But the display appears to be made out of traditional glass. Drop it face down and you'll likely be shopping for a new phone. The phone also has no water protection whatsoever and its removable back makes it very easy for water to seep in from a spill. If you plan to use this phone daily, you'll want to get a sturdy case.
Clear Calls, Adequate Connectivity
The Blade A3 Prime is a Visible exclusive and has limited LTE band support. The phone supports LTE bands 2/4/5/12/13, which effectively locks it to Visible and Verizon's networks. Band 66, a superset of band 4 that Verizon uses to improve coverage in highly populated areas, is noticeably absent.
We tested the Blade A3 Prime on Visible's network in downtown Chicago and recorded poor speeds. Average download speeds came in at 15.8Mbps, and uploads averaged 6.3Mbps. Those speeds are fine for streaming and just about everything else but fail to compare to speeds we've recorded on other phones on the same network. We are pretty confident the reduced speeds are due to the phone's aging modem more than the network.
Call quality is excellent. We made several calls on the phone and the connection was perfect each time. Peak earpiece volume comes in at 78dB, which should be loud enough to hear the other party in most situations.
Dual-band Wi-Fi is onboard, as is Bluetooth 4.2. There's no NFC, which should come as no surprise for an entry-level phone.
The bottom-firing speaker has a maximum volume of 92dB. Audio quality is acceptable, though timbre is aggressive, with overly bright mids and not a hint of bass to be found. Overall, the speaker is fine for video calls or scrolling through your TikTok feed, but you'll want to take advantage of the headphone jack or a decent pair of Bluetooth headphones for Spotify or Netflix binges.
Entry-Level Cameras
The Blade A3 Prime sports a very basic camera setup and performs as well as you'd expect for an entry-level phone. It has an 8MP rear-facing camera with an f/2.0 aperture and a 5MP front-facing camera with an f/2.4 aperture.
In good light, the front camera does an adequate job. Our test shots appeared a little flat and there was noticeable loss of fine detail.
Low-light performance, on the other hand, is an absolute mess. Nearly all our test shots were flat, muddy, and filled with edge noise.
The 5MP camera on the front of the phone is fine for a quick selfie in good light. Most of our test shots lacked depth of field, but color accuracy was spot on. In low light, however, our selfies were completely blurred, with noise throughout the image.
Though we're not impressed by the cameras on the Blade A3 Prime, we think they're acceptable for the price. Smartphone manufacturers often cut corners with hardware in order to keep prices low, and camera sensors tend to be one of the first concessions made.
If image quality is important to you, your cheapest bet is the Moto G Power ($249)—though it's more than double the price of the Blade A3 Prime, unless you find a discount deal. The Google Pixel 4a takes flagship-worthy shots but also has a $349 price tag.
Fine for Basic Tasks, But Gaming Is a No-Go
A MediaTek Helio A22 chipset and 2GB of RAM provide moderate power for the Blade A3 Prime. It has 32GB of storage, of which a little over 19GB is available out of the box. You can add up to an additional 2TB of storage with a microSD card.
The Helio A22 is an entry level smartphone chipset that can most closely be compared with the Qualcomm Snapdragon 429 processor. Both are 12nm process semiconductors, and both have 4 CPU cores. The Helio A22 is technically a little faster than its Qualcomm competition, running at 2GHz per core versus 1.95GHz. The Helio A22's 1,600Mz RAM is also an improvement over the 933MHz RAM supported on the Snapdragon 429 but, to be perfectly honest, you're not going to see much difference in performance between the two chipsets.
It's hard to compare the Blade A3 Prime to other similarly spec'd smartphones simply because there aren't a lot of phones sold in the US with the Helio A22 or Snapdragon 429 chipsets. For the most part, these processors are shipped on budget phones sold in China and in emerging markets like Africa and India.
For the price, performance is adequate. The Blade A3 Prime does well with basic tasks like web browsing and checking emails, but stutters when given more difficult tasks. There's a noticeable lag when opening apps or searching for apps, but it's not unbearable.
The Blade A3 Prime is not a phone for gamers—end of story. Basic games such as Candy Crush work fine, but anything that requires more resources is a no go. We attempted to load Asphalt 9: Legends and the app continuously crashed.
The 2,660mAh capacity battery is underwhelming. While using the phone, we noticed the battery drained quickly; over an eight-hour idle period, the battery depleted by nearly 20%. In our battery drain test, which streams HD video over Wi-Fi, the Blade A3 Prime eked out just 6 hours and 3 minutes before dying. That's a far cry from the Motorola Moto e's battery life of 10 hours and 2 minutes. If you're planning to use this phone for a full day, you'll want to pick up a spare battery or power bank.
The phone comes with a 10W charger and a USB-A–to–USB-C charging cable. Wireless charging is missing—which isn't unexpected for a phone at this price—and there's no fast charging option either. It takes about two and a half hours to recharge the phone from empty to full.
Stock Android 10, Missing Security Patches
The stock version of Android 10 that ships with the Blade A3 Prime is blissfully free of bloatware, usually a given on budget phones. Visible is one of the few carriers that doesn't add preloaded software on any of its phones.
Neither ZTE nor Visible has announced plans for software updates, and we don't believe the phone will get an Android 11 update. It also looks like the phone will not get frequent security patches, since the last update on our phone was from April 2020.
Good for Ultra-Tight Budgets
If you're on a tight budget, the ZTE A3 Prime is a decent choice. For $99, you get a phone that handles simple tasks well, offers good call quality, and gets a reliable, albeit slow, network connection. That said, mediocre battery life and infrequent Android security patch updates are significant concessions to make in the name of saving money.
The Motorola Moto e, though slightly more expensive, addresses both of these pain points and is a better value for your money. If you're looking for a relatively inexpensive phone that will last several years, the Google Pixel 4a is your best bet.
0 notes
Text
High Steaks in Kobe
“I’ve been working every single day for the past 20 years,” says the chef at Steak Aoyama. Gesturing to his father - the owner of the restaurant, standing on the other side of the shop to keep a keen eye on his son, he whispers to us conspiratorially, “He never lets me rest.”

Steak Aoyama is a humble family-run restaurant in the heart of Kobe, Japan. The nondescript storefront opens up to a small dining area that seats a maximum of 20 people if fully occupied. A reservation had to be made prior to our visit, with only Lady Luck on our side that we managed to have the whole place to ourselves for dinner service. We were seated in front of the glistening silver teppan (a large Japanese iron griddle), the centerpiece of the small restaurant. The chef was a friendly man that kept us entertained throughout the evening with his rather impressive English, to which he confessed: “I say the same things to customers for 15 years. I don’t know a lot of English.”
The waitress - the wife of the chef, handed us the menus with minimal English. She was endlessly patient in translating and helping us make the order. In the limited selection on the menu, Kobe beef was the star of every single one. If the city of Kobe prided themselves in producing the best beef in the world, Steak Aoyama prides themselves in serving the best Kobe beef the city has to offer.
As his father sharpens his rather intimidating knife to portion out the meat that would be our meal, the chef laid out neatly cut rectangles of aluminium foil on the teppan in front of each of us. The reason why the 30-year-old teppan is so shiny, he boasted proudly, is because he cleans it religiously after every service. “My teppan is the cleanest in Japan,” he preened. We were given plastic bibs to wear, a protection from his nefarious teppan.
Insisting that a photo be taken when the meat was set down in front of us, he warned us that his photos are precious commodity and should not be shared carelessly. We asked if it was because he didn’t want girls to start obsessing over him.
“Yes! I am single,” he declared to us, his wife’s small smile indicated that this was a regular occurrence. “But I am sorry, I only date Japanese women,” he directed a frown at me.


“My smile is very expensive,” he joked. “My photo can buy many [Petronas] Twin Towers. Very expensive.”


Before grilling up the steak, the chef first served us an array of vegetables and tofu grilled lightly on oil. Neatly arranging them after every flip, he took care to make sure every step of the process was picture perfect. I’d never seen such attention and care when grilling even vegetables, but it was after all my first time in such a highly regarded restaurant in Japan. The respect demonstrated for each ingredient was unparalleled and it was evident in the results. Served with crisp garlic chips, the vegetables somehow tasted better than I ever imagined and the chef didn’t even season them. It must be magic, whatever they do there at Steak Aoyama. Even for something so seemingly uncomplicated, the garlic chips were sliced and cooked so perfectly that I had to wonder if they had dedicated years of research to achieve such precision. Such finesse enhancing the subtle nuttiness of the garlic chips, giving an extra depth to the clean flavors of the vegetables. All that was served was nothing short of perfect, a feat only achievable by a master of the art.
Then, the time for the main attraction came.

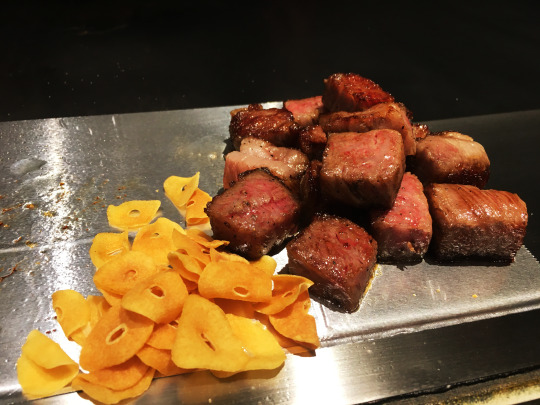
Sliced up into smaller cubes, the chef grilled them for no more than a few minutes before the meat was served to us. It smelled as good as it looked; perfect little capsules of medium-rare goodness that seemed almost criminal to touch. If you think you know beef, allow me to be the one to say in full confidence that the beef here in Steak Aoyama will spoil you for everything else. I’ve had my fair share of superb steaks, and it is safe to say that everything else pales in comparison to the true artistry they perform here in Steak Aoyama. The meat is succulent and tender. When picking one piece up with chopsticks, the juices oozed out with the slightest pressure on the meat. Each piece of beef melted the moment it hits the tongue, as if it were butter. Truth be told, there was a point that evening I had make sure I wasn’t biting into a block of butter. A very delicious block of butter, at that.
We were also given a small bowl of Himalayan sea salt and a Ponzu sauce with grated daikon to complement the meat. The salt was an excellent touch to such a fine cut of meat. Just a small dab of salt did the trick. The extra hint of saltiness brought out the umami of the beef, its deliciousness amplified tenfold. I would recommend forgoing the Ponzu sauce however, it doesn’t contribute much to the flavor of the meat. Pairing the meat with the garlic chips gave an extra crunch, but as with the dipping sauce, it didn’t do much for the Kobe beef itself. The flavor of the beef was enough to mask the delicate flavors of the two.
It is near impossible to put into words the delicate nuances of the meat, the slight saltiness of the juices and the richness of the fats mingled together with the soft buttery texture of the beef. It was an experience unlike any other. Be careful not to overindulge - as tempting as it may be, the true key to the best experience here is balance.
Steak Aoyama specializes in none other than Kobe beef and through the many years of running the business, they have undoubtedly perfected the art. Even though the price point is high, I would argue that it is worth every cent paid. Each ingredient is treated with the highest regard - even a carrot was handled with as much care as the Kobe beef itself. This all translates to the quality of the food served, which is to say the preparation was almost like a ritual and the food itself almost felt sacred. Not only was the food excellent, the service was impeccable too. The chef endeavors to entertain, as much as he can, the customers seated to watch him cook. At some point that evening, he even showed us his (very impressive) collection of foreign currency. The rest of his family constantly checked on us throughout the dinner service to make sure all was well, even occasionally quipping in on the chef’s antics.
The restaurant has been in business since 1968, culinary secrets passed down generations only to be more refined as time goes on. The family takes pride in what they do, and that pride is rightfully earned. If you ever find yourself in the area, consider paying them a visit.
--------------------------------------------------------------------------------------------------------------------------------------

Tor Road Steak Aoyama ステーキ青山
2 Chome-14-5 Shimoyamate-dori, Chuo-ku, Kobe, Hyogo 650-0011, Japan. Closed every Wednesday (Thursday, if Wed is a national holiday), 12PM to 10PM (last order 9PM).
Tel: +81 78-391-1858
http://www.steakaoyama.com/
0 notes
Text
hhhhhhhhhhhhhhh i started getting into makeup again bc i just want to get better. i have very sensitive dry skin and i’ve always really really hated the feel of makeup and always immediately wash it off when i get home. ive never found the right shade, never had a makeup that didnt make my face look weird/cover my scars and never had one that didnt make me feel gross. i always wanted some magical product that does maximum coverage in one easy step and then boom im out the door but it just.doesnt exist.
i wanna look good and try new things and honestly esp for cosplay too. i cant get better w/o practising though so i broke out my ben nye kit from stage makeup and kinda played with it, trying to remember what i learned. the ben nye is cream and honestly i think its not a great start for contouring bc im not good at blending- either i blend too much or too little and its like aaaah a solid dark line on my face lol. I also dont have very many tools so im thinking after i get my computer im gonna try and invest some money into decent supplies to build from.
im also not?? entirely sure about what shape my face is. is it square? rectangle? oblong? theres different contouring and highlighting rules for each one and sometimes i just want to submit a photo of me to someone and be like hey, can you just. tell me what to put where. please. draw on the picture idc i just wanna know.
but also i gotta learn how to do my own face before i can really start to dabble into making my face look like other faces. Assumpta Serna and I have similarly shaped faces, but our noses, lips, and i believe cheekbones are a bit different. hers are a little sharper and her nose is too, and when i get my cosplay done of her I want to be able to look like her too, not just like myself in her outfit.
another major problem i have with makeup is never finding the right shade. Looks fine in store? horrifically pink in sunglight. Looks fine in sunlight? Horriffying under other lighting. I'm not sure if theres a perfect balance. I don't know how to find my undertone either, and it kills me. My face is very sensitive so it gets red easily and it's almost impossible for me to tell. (I'm also...not great at differentiating between certain colors, like certain shades of green and blue, so the wrist trick for the vein color doesnt really work for me). I'm thinking of maybe trying out that new thing that one makeup brand came out with where you like, use a phone to match your skin tone and you get your own custom shades but. i dont really trust that?? but also im desperate so when i get more money im gonna try.
so anyways I just played around a bit and I think I should probably get a powder set once i can maybe find a decent foundation tone. Maybe I can have the cream ben nye foundation and then a powder contour? I also didnt realize how many steps there were for...makeup in general, i guess. the lighting in my room is really poor so i looked a bit silly with my too pale highlighter (i used white instead of my lightest color bc in the dark it didnt look great, but in the mirror i looked like a vampire lol).
i think another thing is that i was really miserable in that stage makeup class for months. I was the only one there with 0 prior experience to makeup, and the professor graded me harder bc i had a background in art so i would know where shadows fell or whatever and i just- i dont! I dont know shit about how to apply art to makeup and I was on the verge of tears so many nights bc of it. Also bc the girl next to me had a degree in cosmetology and had flawless makeup and was done with everything in like 5 minutes- when you're seated next to two other people and theyre done an hour before you it's a mortifying and humiliating experience, even if i shouldnt be comparing myself i still did. i still dont really felt like i learned a lot, and fashion makeup is a lot different from stage makeup- stage makeup being very pronounced and over the top so it reaches the furthest rows and doesnt wash out in the light, so i always blended too much. it was frustrating. reminds me to invest in lights too, i guess?
i dont really know where to go from here, but i guess its just practice. i dont usually look up tutorials just bc either they use different products or have a different face shape and im usually too tired to go and look for something that could work for me but oh well. i guess the first real step is figuring out just what my face shape is and then work from there.
#tbd#maybe#kiran liveblogs learning about makeup#probably the last post i make in here lol#(i think college is also a liberating experience too)#not just a hard one#when i first began my art class i was frustrated and i NEVER let anyone see my work- not even the professor#and as the class went on i got way more comfortable bc i wasnt in a place where everyone expected me to be good#i was learning and not performing#and would actually seek HIM out to give me critiques#and the same with makeup#i never went anywhere w/o makeup#and i actually started to stop wearing makeup some days when i knew i had stage makeup bc i didnt feel like taking it off#i wouldnt say it gave me confidence but it made me care a little less how others perceived me#i have bad skin and scars so ive always been self conscious of them#but yeah i still dont have the best experience to start with makeup and that wasnt a great place to start#but i did get more comfortable#maybe not better but more comfortable#i went from not being able to look at my professor or even at MYSELF in the mirror#to being able to do so and not be on the verge of tears LMFAO#not a very large improvement on the grand scale of things but an improvement nonetheless
2 notes
·
View notes
Text
How to Make Homemade Pasta Recipe

With pasta, it is possible to prepare it with a few ingredients and some patience. In no time you will learn How to make homemade pasta. The pasta is also easy to modify according to your tastes. The trick for how to make homemade pasta recipe is to mix the dough so that it has a good consistency and cut it into a shape that is manageable.
This article will give you instructions you can follow to prepare pasta, plus some variations you can try to make if you feel like something different. Fresh Homemade Pasta Recipe:
How to Make Homemade Pasta Recipe:
Ingredients:
Base mass:
400 g (14 oz) flour, sifted
½ teaspoon (2.5 ml) of salt
4 large eggs at room temperature
2 tablespoons (30 ml) water, if necessary
Variations of the Base Mass:
¾ cup (180 ml) frozen spinach leaves, but previously cooked
2 tablespoons (30 ml) tomato extract
1 beet or 2 tablespoons (30 ml) of cooked, grated beet
1 medium sweet potatoes or 2 tablespoons (30 ml) sweet potato
3 tablespoons (45 ml) of green herbs (oregano, parsley, cilantro)
How To Make Homemade Pasta
Make the Base Dough:
Mix the flour and salt. Mix the sifted flour and salt until smooth. If you are mixing the dough by hand, mix everything directly on a floured top. Then, with the flour, make a "volcano": Knead it and from there make a hole in the middle.
Break the eggs inside the "volcano". Add the eggs to the flour, breaking them into the hole in the middle of the flour heap. Mix it, until it is homogeneous. Slowly mix the flour and eggs with your fingers. Continue mixing in this way to form the dough.
Knead all for at least 3 minutes. Knead by hand until the dough is not sticky. If the dough is sticky, add a little flour and knead it for a while. Let the dough rest for 1 hour. Wrap the dough in lukewarm paper and let it rest at room temperature for at least 1 hour.
Variations in the Base Mass:
Make dough with a spinach. Before adding the egg, mix pureed spinach into the flour, to create the green dough. Make a spinach puree with ¾ cup (180 ml) of spinach leaves cooked in a food processor or blender. Squeeze spinach before and after to remove excess water.
Mix the spinach puree with the flour before following the recipe of the base dough. Color the dough with tomatoes. The tomato extract can be mixed with the flour and the egg to make a mass of red colour. Add 2 tablespoons (30 ml) of tomato extract to the flour while adding the eggs. Decrease the number of eggs from 4 to 3. Keep up the same recipe.
Add beets to the base dough. Roasted beets can be mixed with flour and eggs, but you will need to puree or grate them first. Place the beets in the oven at 205 ºC (400 ºF) for 45-60 minutes, or until they are soft. Let them rest until they cool down. Grate the beets or mash them in a food processor. Add 2 tablespoons (30 ml) of beet to the flour next to the eggs. Decrease the number of eggs from 4 to 3. Continue to prepare pasta as usual.
Make sweet potato paste. You can add sweet potato to the dough next to the eggs, too. Click a medium sweet potato several times with a fork. Cook in the microwave at high temperature for 4-5 minutes, or until smooth. Make a sweet potato puree with a food processor or blender. Add 2 tablespoons (30 ml) of the puree to the flour when you add the eggs. Decrease the number of eggs from 4 to 3. Prepare the recipe as usual.
Make a paste with herbs. You can chop fresh herbs to add to the flour mixture with salt. Use green herbs, such as oregano, parsley or cilantro. You can use a single herb or mix them if you want. Use at least 3 tablespoons (45 ml). You can add more if you like. Mix the herbs with the flour before adding the eggs. Continue with the rest of the recipe as usual.

Easy Homemade Pasta Recipes
Stretch the Dough:
Flour the table. Spray the worktop with enough flour to cover it slightly but evenly. Although the dough should not be very sticky at this time, as you work with it, the heat of your hands will cause the dough to start sticking more. Flushing the hob will make this less.
Cut the dough into several pieces. Use a knife to cut the dough in 6 to 8 equal parts. Pass the dough through a pasta machine. The easiest way to flatten the dough is with a pasta machine. Flatten each piece of dough one at a time. Start by passing a portion of the dough through the machine, as wide as possible. Fold the dough in half before passing through the machine again.
Repeat once more as wide as possible. Pass the dough through the machine a few more times, closing the opening a little after each pass. Keep doing this until the pasta is as thin as you want. Repeat the same with each piece of dough. If not, flatten the dough with a rolling pin.
Use a floured roll to stretch each serving of dough until it is as flat as possible. Make sure that the surface where you work and the roller are well floured. Stretch the dough until it is as thin as possible. If it does not have the thickness of a paper yet, continue to stretch until the dough becomes even thinner.
Shape the Pasta:
This is the most important part in how to make homemade pasta recipe. Cut the pasta into strips. The simplest way to cut pasta is in strips. You can use the machine to make pasta if you have the necessary accessory, but if not, you can cut the pasta easily using a kitchen knife or a pizza cutter.
You can make lasagna noodles by cutting the pasta into 3 "(7.6 cm) strips. The noodles for capellini or fettuccine are 2.5 cm (1 ") in maximum width, or thinner. Spaghetti noodles are the thinnest and cannot be wider than 6.35 mm (¼ "). Make pasta garganelli. Garganelli pasta is shaped like small tubes. Cut the dough into 5-7.6 cm (2 "-3") squares using a pizza knife or cutter.
Wrap each square around a wooden skewer or Chinese chopsticks. Press the corners together to form the tube. Make pasta farfalle. Farfalle pasta is better known as a "tie". Cut rectangles that are about 3 "long and 5 cm (2") wide. Use a knife or a pizza cutter. Pinch the rectangles in the middle to bring them together.
Cook the Pasta:
Boil water in a large saucepan. Fill a pan with cold water and boil over medium-high heat. Put salt in the water to prevent the noodles from sticking while they are cooking. Cook the pasta for 2 to 3 minutes. Put the noodles in the water and cook, stirring occasionally. Check if they are ready after 3 minutes; otherwise, continue cooking until they are ready. The pasta will be ready when it feels soft but not sticky. Pour the contents of the pan into a sieve. Serve cooked pasta with butter or sauce to taste.
Read the full article
0 notes
Video
youtube


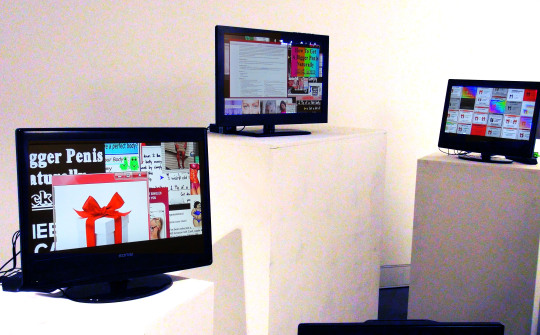

Video and photograph documentation of Interruption
Interruption (2018) is a 5 channel video work set up on 5 monitors on 5 plinths of varied sizes. Each monster plays a 7 minute and 30 second long video which explore imagery related to navigating the internet, clickbait and malware ads and youtube conspiracy theory videos on the mysterious hum. The name interruption refers to how clickbait ads and the urban legend of the hum are intrusions into the domestic everyday life and violate our sense of privacy and security with a threat of the unknown. Another aspect of this work is relating it to mythology, wanting to combine the myth of the siren - a beautiful bird-women who lures men to their death with her voice- with the concept of a sentient internet entity. This was to create a contemporary reimagining of this myth, who lures men with the clickbait ads which promise beautiful women and knowledge. The siren is reflected in the work through the women’s faces and through the text which references passages from Homer’s Odyssey in both English and the original greek.The hum is an ominous unexplained phenomena which in this work represents the siren’s voice, as well as being its own unseen ominous entity. This interest in conspiracy and myth and the culture tabloid aesthetic in the clickbait/ low quality conspiracy videos are combined to reflect on how our our understanding of myths and urban legends has changed based on contemporary society and technological development. The platform we use to tell these stories on has changed and with it, the forms monsters/gods/ entities take has also changed. Furthermore, this work also functions as a reflection of how human anxieties and fears have evolved as reflective of new technological threats.
From a formal perspective, this work reflects the architecture and frameworks that define the internet and computer interface, with use of the window and rectangles and squares chosen to reflect this. The different heights and positions of the monitors were chosen to reference the heights of various desks and chairs, and to reference multiple people all accessing the internet from different places. The dark room , and the ghost girl like ‘jumpscare’ like sequence when the face from the “Like Asian women?” Ad is influenced by the cheap horror movie tactics, e.g.: The Ring or internet creepypastas and thus can be read as something threatening and disruptive.
Reflection:
Overall, I think this work is good and reflects the research, conceptual ideas and development of practical video editing skills I have worked on this semester. For the Grad show installation, I plan to change and improve a few parts however. Main considerations will be potentially getting some brightsign video looping players to allow the videos to sync up more perfectly and prevent the loading sequence in-between each loop. While the work does work without being synchronized, for maximum effectiveness I would like all screens to start glitching and flashing at the same time when the siren entity appears on screen.
Other consideration include using more audio channels and using headphones on some works for a more intimate viewing experience. The types of monitors I also plan to change for more varied types and sizes. Other changes will include slight video editing for quality and making sure every video is exactly 7:30.
Possible flaws in this work include my reference to the siren being very abstract and only a small connection with few references. However, this work is such that I want the meaning to be hidden and for the audience to spend a lot of time viewing each screen to get clues and ideas, so that they can form their own ideas about what clickbait ads and mysterious hums. The link to the siren is only a small part of the work, and one theme of many.
0 notes
Text
Instructions for the Graco Newborn Napper Pack 'n Play
Instructions for the Graco Newborn Napper Pack 'n Play
Instructions for the Graco Newborn Napper Pack 'n Play
Instructions for the Graco Newborn Napper Pack 'n Play
Instructions for the Graco Newborn Napper Pack 'n Play
Instructions for the Graco Newborn Napper Pack 'n Play
Instructions for the Graco Newborn Napper Pack 'n Play
Instructions for the Graco Newborn Napper Pack 'n Play
Instructions for the Graco Newborn Napper Pack 'n Play
Instructions for the Graco Newborn Napper Pack 'n Play
Instructions for the Graco Newborn Napper Pack 'n Play
Instructions for the Graco Newborn Napper Pack 'n Play
Instructions for the Graco Newborn Napper Pack 'n Play
Instructions for the Graco Newborn Napper Pack 'n Play
Instructions for the Graco Newborn Napper Pack 'n Play
Instructions for the Graco Newborn Napper Pack 'n Play
Instructions for the Graco Newborn Napper Pack 'n Play
Instructions for the Graco Newborn Napper Pack 'n Play
Instructions for the Graco Newborn Napper Pack 'n Play
Instructions for the Graco Newborn Napper Pack 'n Play
Instructions for the Graco Newborn Napper Pack 'n Play
Instructions for the Graco Newborn Napper Pack 'n Play
Instructions for the Graco Newborn Napper Pack 'n Play
Instructions for the Graco Newborn Napper Pack 'n Play
Instructions for the Graco Newborn Napper Pack 'n Play
Instructions for the Graco Newborn Napper Pack 'n Play
Instructions for the Graco Newborn Napper Pack 'n Play
Instructions for the Graco Newborn Napper Pack 'n Play
Instructions for the Graco Newborn Napper Pack 'n Play
Instructions for the Graco Newborn Napper Pack 'n Play
Instructions for the Graco Newborn Napper Pack 'n Play
Instructions for the Graco Newborn Napper Pack 'n Play
Instructions for the Graco Newborn Napper Pack 'n Play
Instructions for the Graco Newborn Napper Pack 'n Play
Instructions for the Graco Newborn Napper Pack 'n Play
Instructions for the Graco Newborn Napper Pack 'n Play
Instructions for the Graco Newborn Napper Pack 'n Play
Instructions for the Graco Newborn Napper Pack 'n Play
Instructions for the Graco Newborn Napper Pack 'n Play
Instructions for the Graco Newborn Napper Pack 'n Play
Instructions for the Graco Newborn Napper Pack 'n Play
Instructions for the Graco Newborn Napper Pack 'n Play
Instructions for the Graco Newborn Napper Pack 'n Play
Instructions for the Graco Newborn Napper Pack 'n Play
Instructions for the Graco Newborn Napper Pack 'n Play
Instructions for the Graco Newborn Napper Pack 'n Play
Instructions for the Graco Newborn Napper Pack 'n Play
Instructions for the Graco Newborn Napper Pack 'n Play
Instructions for the Graco Newborn Napper Pack 'n Play
Instructions for the Graco Newborn Napper Pack 'n Play
Instructions for the Graco Newborn Napper Pack 'n Play
Instructions for the Graco Newborn Napper Pack 'n Play
Instructions for the Graco Newborn Napper Pack 'n Play
Instructions for the Graco Newborn Napper Pack 'n Play
Instructions for the Graco Newborn Napper Pack 'n Play
Instructions for the Graco Newborn Napper Pack 'n Play
Instructions for the Graco Newborn Napper Pack 'n Play
Instructions for the Graco Newborn Napper Pack 'n Play
Instructions for the Graco Newborn Napper Pack 'n Play
Instructions for the Graco Newborn Napper Pack 'n Play
Instructions for the Graco Newborn Napper Pack 'n Play
Instructions for the Graco Newborn Napper Pack 'n Play
Instructions for the Graco Newborn Napper Pack 'n Play
Instructions for the Graco Newborn Napper Pack 'n Play
Instructions for the Graco Newborn Napper Pack 'n Play
Instructions for the Graco Newborn Napper Pack 'n Play
Instructions for the Graco Newborn Napper Pack 'n Play
Instructions for the Graco Newborn Napper Pack 'n Play
Instructions for the Graco Newborn Napper Pack 'n Play
Instructions for the Graco Newborn Napper Pack 'n Play
Instructions for the Graco Newborn Napper Pack 'n Play
Instructions for the Graco Newborn Napper Pack 'n Play
Instructions for the Graco Newborn Napper Pack 'n Play
Instructions for the Graco Newborn Napper Pack 'n Play
Instructions for the Graco Newborn Napper Pack 'n Play
Instructions for the Graco Newborn Napper Pack 'n Play
Instructions for the Graco Newborn Napper Pack 'n Play
Instructions for the Graco Newborn Napper Pack 'n Play
Instructions for the Graco Newborn Napper Pack 'n Play
Instructions for the Graco Newborn Napper Pack 'n Play
Instructions for the Graco Newborn Napper Pack 'n Play
Instructions for the Graco Newborn Napper Pack 'n Play
Instructions for the Graco Newborn Napper Pack 'n Play
Instructions for the Graco Newborn Napper Pack 'n Play
Instructions for the Graco Newborn Napper Pack 'n Play
Assembling your baby gear can seem like one of the hardest parts of preparing for your baby, especially when the item in question is a play yard with multiple parts and functions. However, you can assemble your Graco Pack 'n Play with Newborn Napper by following the product's instructions.
Assembly
Check to ensure you have all the necessary parts for the Pack 'n Play with Newborn Napper. Your product should include the main body of the play yard; a diaper stacker bag; two long and two short straight metal poles; a mesh bassinet and a thin mattress; two curved metal poles, which form a rectangle when held next to one another, one of which has pegs at its corners; a fabric changing table; two very short metal tubes with buttons on their sides; an electronics module and vibration unit; a short cord; two metal poles, which form an oval when held next to one another; and the newborn napper, headrest and canopy.
Unsnap the Velcro straps holding the play yard together. Pull the legs far enough apart for you to access the side rails, but not so far that the play yard's floor lies flat. Pull sharply on the center of each side rail until you hear it snap into place, then push the center of the play yard's floor down until it lies flat. If the rails will not lock, pull the center of the play yard's floor higher, as all four rails cannot snap into place if the floor has locked first.
Missing The Graco Sweetpeace Swing? Try One Of These Instead
Missing The Graco Sweetpeace Swing? Try One Of These Instead
Locate the two snaps on the side of the play yard. Snap the corresponding buttons on the diaper stacker into those two snaps.
Insert a long metal pole into each short side of the mesh bassinet. Lower the bassinet into the play yard and snap the plastic clips on its side into place on the sides of the play yard. Insert the short metal poles into the fabric tubes at the bottom of the bassinet. Lower the thin mattress into the bassinet.
Insert one of the two metal tubes which forms half a rectangle into the fabric tube on the outside of the changing table. Because the tube is curved, you will need to guide the fabric of the changing table around the tube carefully to keep it from catching. Push the metal tube through until both ends of it are visible at the end of the fabric. Insert the other tube into the opposite side of the changing table in the same manner.
youtube
Press the button at the end of the changing table tube which has a button, then insert that tube into the adjacent tube. You will hear an audible snap as it clicks into place. Insert each of the short metal tubes into the "feet" at the bottom of the changing table, then lower the tubes into the corresponding plastic holes on the corners of the play yard. You will hear another audible snap.
Insert a screwdriver into the back of the vibrator unit to remove the lid. Insert a D battery and replace the lid. Unscrew the lid from the electronics module, insert three AAA batteries and screw its lid into place.
Place the newborn napper upside down on a flat surface. Open the vibration unit pocket at the bottom of the napper. Plug one end of the cord into the vibration unit, then place the vibration unit into the pocket. Close the pocket, leaving one end of the cord loose.
Pull the strap on the head support through the matching slot on the newborn napper until the strap is taut. Secure the strap.
Locate the snap button on the plastic end of one of the remaining tubes. Insert the tube into the fabric loop on the newborn napper as you inserted the tubes into the changing table in Step 6, plastic end first. The snap button should face downward into the napper.
Insert the final tube into the other fabric loop, putting the plastic end in first and keeping the snap button downward. The plastic end of each tube should touch the metal end of the other tube.
Place the newborn napper into the bassinet. Slide the metal ends of each tube through the fabric loops on the bassinet, then snap them into the plastic ends.
Plug the cord from the vibrator unit into the electronic module. Snap the electronics module onto side of the play yard with the light facing in toward the napper.
Lower the canopy onto the head end of the napper. Clip the canopy into place on the sides of the napper and fasten the hook and loop closures to the bottom of the napper.
Electronics Module
Press the button with wavy lines to activate the vibrator. Press once for high, twice for low and three times to deactivate. The vibrator will automatically turn off after 25 minutes.
Press the light bulb button once to turn on the top light, twice to turn on both lights, three times to turn on the bottom light and four times to turn off both lights.
Press the music note button to play music. Each time you press the button, a new song will play. The fifth time you press it, the music will turn off.
Press the bird button to play nature sounds. Each time you press the button, a new sound will play. The fifth time you press it, the sounds will turn off.
Press the volume button to increase the volume. Each time you press it, the volume will increase by one level. If you press it after the volume reaches its maximum level, the music or sounds will stop.
Press the clock button once to set the timer for 5 minutes, twice for 10 minutes and three times for 15 minutes.
via Blogger http://ift.tt/2sB0xj9
July 04, 2017 at 10:14AM
via Blogger http://ift.tt/2ukmFM0
July 04, 2017 at 10:14AM
via Blogger http://ift.tt/2tEwI0C
July 04, 2017 at 12:33PM
via Blogger http://ift.tt/2ul3C3Y
July 04, 2017 at 03:45PM
via Blogger http://ift.tt/2tEHe8i
July 04, 2017 at 05:45PM
via Blogger http://ift.tt/2uGyZoV
July 04, 2017 at 07:45PM
via Blogger http://ift.tt/2te7jK8
July 04, 2017 at 09:45PM
via Blogger http://ift.tt/2sJzVaM
July 04, 2017 at 11:45PM
via Blogger http://ift.tt/2sKff2w
July 05, 2017 at 01:45AM
via Blogger http://ift.tt/2sKlJ1i
July 05, 2017 at 03:45AM
via Blogger http://ift.tt/2uI0AGr
July 05, 2017 at 05:45AM
via Blogger http://ift.tt/2tP3sVJ
July 05, 2017 at 07:45AM
via Blogger http://ift.tt/2sKYlkf
July 05, 2017 at 09:46AM
via Blogger http://ift.tt/2tPQZkp
July 05, 2017 at 11:45AM
via Blogger http://ift.tt/2tHNtbn
July 05, 2017 at 01:45PM
via Blogger http://ift.tt/2sFPgOI
July 05, 2017 at 03:45PM
via Blogger http://ift.tt/2uJNYyL
July 05, 2017 at 05:45PM
via Blogger http://ift.tt/2thbyF9
July 05, 2017 at 07:45PM
via Blogger http://ift.tt/2uL1YYM
July 05, 2017 at 09:46PM
via Blogger http://ift.tt/2ti7nZA
July 06, 2017 at 01:46AM
via Blogger http://ift.tt/2uM18uY
July 06, 2017 at 03:45AM
via Blogger http://ift.tt/2sI45jK
July 06, 2017 at 05:45AM
via Blogger http://ift.tt/2trsqHn
July 06, 2017 at 07:45AM
via Blogger http://ift.tt/2uMI7bA
July 06, 2017 at 09:45AM
via Blogger http://ift.tt/2uMZRUx
July 06, 2017 at 11:45AM
via Blogger http://ift.tt/2utb3pX
July 06, 2017 at 01:45PM
via Blogger http://ift.tt/2uNjXOs
July 06, 2017 at 03:45PM
via Blogger http://ift.tt/2utudMr
July 06, 2017 at 05:45PM
via Blogger http://ift.tt/2tlpJck
July 06, 2017 at 07:46PM
via Blogger http://ift.tt/2sQX0sn
July 06, 2017 at 09:45PM
via Blogger http://ift.tt/2tNvYGP
July 06, 2017 at 11:45PM
via Blogger http://ift.tt/2uPCBp1
July 07, 2017 at 01:45AM
via Blogger http://ift.tt/2uw8cMZ
July 07, 2017 at 03:46AM
via Blogger http://ift.tt/2uQfcn1
July 07, 2017 at 05:45AM
via Blogger http://ift.tt/2uwhE2X
July 07, 2017 at 07:45AM
via Blogger http://ift.tt/2tYiDfa
July 07, 2017 at 09:45AM
via Blogger http://ift.tt/2tYM9S6
July 07, 2017 at 01:45PM
via Blogger http://ift.tt/2tYSmgR
July 07, 2017 at 03:45PM
via Blogger http://ift.tt/2sOwEfb
July 07, 2017 at 05:45PM
via Blogger http://ift.tt/2tQnPBb
July 07, 2017 at 07:46PM
via Blogger http://ift.tt/2tyKJKW
July 07, 2017 at 09:45PM
via Blogger http://ift.tt/2u0RfNx
July 07, 2017 at 11:45PM
via Blogger http://ift.tt/2uzVlcB
July 08, 2017 at 01:45AM
via Blogger http://ift.tt/2uAwHsp
July 08, 2017 at 03:45AM
via Blogger http://ift.tt/2u23PMI
July 08, 2017 at 05:45AM
via Blogger http://ift.tt/2szsyUc
July 08, 2017 at 07:45AM
via Blogger http://ift.tt/2sQSyhZ
July 08, 2017 at 09:45AM
via Blogger http://ift.tt/2sQTxi0
July 08, 2017 at 01:45PM
via Blogger http://ift.tt/2sAc8uG
July 08, 2017 at 03:45PM
via Blogger http://ift.tt/2uVO0n6
July 08, 2017 at 05:45PM
via Blogger http://ift.tt/2sRyQm7
July 08, 2017 at 07:45PM
via Blogger http://ift.tt/2sRM8Pw
July 08, 2017 at 09:45PM
via Blogger http://ift.tt/2tYmkR6
July 08, 2017 at 11:45PM
via Blogger http://ift.tt/2u4CedS
July 09, 2017 at 01:45AM
via Blogger http://ift.tt/2u4EYrp
July 09, 2017 at 03:45AM
via Blogger http://ift.tt/2uXw1g4
July 09, 2017 at 05:45AM
via Blogger http://ift.tt/2uXIDUm
July 09, 2017 at 07:45AM
via Blogger http://ift.tt/2tv0KmH
July 09, 2017 at 09:45AM
via Blogger http://ift.tt/2sSTdzH
July 09, 2017 at 11:45AM
via Blogger http://ift.tt/2uXYa6v
July 09, 2017 at 01:45PM
via Blogger http://ift.tt/2tZNCqy
July 09, 2017 at 05:45PM
via Blogger http://ift.tt/2sDtaIm
July 09, 2017 at 07:45PM
via Blogger http://ift.tt/2twl7A4
July 09, 2017 at 09:45PM
via Blogger http://ift.tt/2u0F02U
July 09, 2017 at 11:45PM
via Blogger http://ift.tt/2sUcO2k
July 10, 2017 at 01:45AM
via Blogger http://ift.tt/2sUVBWu
July 10, 2017 at 03:45AM
via Blogger http://ift.tt/2sEUben
July 10, 2017 at 05:45AM
via Blogger http://ift.tt/2u8cSM8
July 10, 2017 at 07:45AM
via Blogger http://ift.tt/2tELJx1
July 10, 2017 at 09:45AM
via Blogger http://ift.tt/2uHBcBF
July 10, 2017 at 11:45AM
via Blogger http://ift.tt/2uHTH8S
July 10, 2017 at 01:45PM
via Blogger http://ift.tt/2t4PXw6
July 10, 2017 at 03:45PM
via Blogger http://ift.tt/2tzCjVv
July 10, 2017 at 05:45PM
via Blogger http://ift.tt/2tA2VWa
July 10, 2017 at 07:46PM
via Blogger http://ift.tt/2sXAwuE
July 10, 2017 at 09:45PM
via Blogger http://ift.tt/2sIyFWn
July 10, 2017 at 11:45PM
via Blogger http://ift.tt/2sJ75bw
July 11, 2017 at 01:45AM
via Blogger http://ift.tt/2sJgW11
July 11, 2017 at 05:45AM
via Blogger http://ift.tt/2sJL7VA
July 11, 2017 at 07:45AM
via Blogger http://ift.tt/2tCij4f
July 11, 2017 at 09:45AM
via Blogger http://ift.tt/2tDhNmT
July 11, 2017 at 01:45PM
via Blogger http://ift.tt/2u3Txep
July 11, 2017 at 03:45PM
via Blogger http://ift.tt/2t9C3sP
July 11, 2017 at 05:45PM
via Blogger http://ift.tt/2t0D770
July 11, 2017 at 07:46PM
from Blogger http://ift.tt/2tK4H5o
via IFTTT
0 notes
Text
Building an AdSense Commercial enterprise With Free Blogs
New Post has been published on https://netmaddy.com/building-an-adsense-commercial-enterprise-with-free-blogs/
Building an AdSense Commercial enterprise With Free Blogs
I feel like it’s about time that I paid back to the community for all of the knowledge and help that I received along the way. Hopefully, this post will help you get started in the AdSense business even if you have little or no money to spare but desperately want to try your hand at it.
Normally Google won’t approve AdSense applications for free websites, but there is one exception. So if you’re short on cash for hosting and are eager to get started, you might give this a try.
Not long after Google bought Blogger.com, they made AdSense available to Blogger blog owners. Blogger is great because it has an easy interface, Google and Yahoo crawl the blogs quickly, and best of all if you’re broke–they’re free, and Google loves to give out AdSense accounts to Blogger owners. 🙂
So if you’re looking to get started with AdSense and not spend much money, Blogger is a great way to get started.
Before I talk about how to setup a Blogger blog for AdSense, though, let me tell you what an RSS feed is and how it works. If you already know this you can skip ahead. I make reference to this in the setup instructions, so it’s important to understand.
An RSS feed (as it applies to a blog) is basically a list of all of the recent posts made to your blog. People can use “RSS Aggregators” (software that continually checks up on your RSS feed to see if there’s anything new) to keep up with new posts on your blog. Websites will also want to publish your RSS feed on their sites if your content is good. This gives them fresh content for their visitors. And we all know that content is King in the world of website building.
Blogger blogs come with an RSS feed built-in, and you can use this to your advantage to generate traffic to your blog. I’ll discuss that in a bit, but first, let’s get into building the blog.
Create Your Blogger.com Account
Determine Your Blog Topic First
Before you create the blog, you need to figure out what topic the blog will focus on. Think about your skills or hobbies that you’re really good at. You might not be a mechanic, but if you’re really good at working on cars on the weekend, and you love to do it, that would make a great blog topic. Brainstorm your skills and interests to determine what you would enjoy writing about. It’s important that you like to write about it since you will have to do so to build up the blog!
I will say this: If you have some knowledge on a commercial or industrial topic, this will usually get higher paying AdSense ads. But a hobby blog can do very well also (I know this from experience!).
Create the Blog
Once you have a topic chosen, it only takes about 5 minutes to setup a blog. From the Blogger homepage clicks the “Create Your Blog Now” link and follow the blog wizard instructions. I won’t get into detail about them because it’s pretty straight-forward, but there are a few points I want to make.
First of all, when you choose your blog URL, make sure that the URL contains the keywords for your topic. For example, if you’re creating a blog about health insurance, is ideal, or “health insurance” or even “health-insurance-blog” or “health-insurance-12345”. Just make sure that your keywords are in the URL, that will help you be found when people search for your keywords in the search engines.
Also, be sure to pick one of the professional looking templates. I suggest you just pick the plain white one that is first in the list of templates when you’re creating the blog. Once the blog is created, then click on the “Templates” tab and select one of the nicer ones shown there. I’m not sure why Blogger doesn’t show you all of the available templates in the blog setup wizard, but they don’t.
The Settings Tab.
A discussion of the important points of each settings tab is outlined below.
Basic
On the “Basic” settings tab, set your blog title to the keywords you want to show up for in the search engines. That will help you get ranked.
Give a good, detailed description of the benefits of reading your blog daily. You want to get people to add your RSS feed to their aggregators and websites so you can get traffic, and this will help.
Answer “Yes” to the question “Add your Blog to our listings?”. This will have your blog appear on the main page of Blogger when you make new posts (albeit for a brief period of time), and allow people to search and find your blog using Blogger’s search tool.
One other, lesser known detail about setting that question to “Yes” is that if you set it to “No” Blogger will shove “no follow/no index” meta-tags into your blog template header, which will prevent your site from getting crawled or indexed. I believe this was done to fight what Blogger called “spam blogs”.
Publishing
Set the “Notify Weblogs” setting to “Yes”. This will send a notification to Weblogs every time you make a new post. Weblogs is a site that lets people (and search engine crawlers) know when new content appears on a blog. You want the crawlers (and visitors) to hit your pages when you add new content, so be sure this is set to Yes.
Formatting
You can do what you want on this tab–I personally set the number of posts on the main page to between three and five.
Comments
Allow comments unless your blog topic is really controversial and you’re likely to get a lot of flaming (people lashing out at you for what you have to say). Allowing comments is good because it gives more food to the search engines and keeps your blog updating and fresh even when you’re not posting to it.
I usually let anyone comment and don’t limit it.
Don’t show the comments in a pop-up window, because that will prevent the crawlers from being able to get to the content since it’s javascript-based.
If you’re concerned that people might flame you, but you want to allow comments, enable comment moderation so that you have to approve each comment that is added before it goes live.
If you want to be notified when a comment is made, set the Comment Notification Address to your email address.
Archiving
Set your archiving to daily if you post every day, or weekly if you only post every few days. If you post every day daily is the best way to go, because it gives the search engines unique pages to crawl and index. A unique content means more traffic to your blog and more clicks on your AdSense ads (I’ll get to adding your AdSense to the template in a bit).
If you don’t do a daily archive (and maybe even if you do), enable post pages so that each post will still have its own unique page even if multiple posts appear on the same archive page. Having multiple posts on one archive page is not a bad thing if you have post pages enabled, since the posts tied all together make for yet another unique page on the blog.
Site Feed
Definitely, enable the site feed. If your posts tend to be very short, you might enable full descriptions. But if you have long posts (which I recommend), do not enable the full feed, use the short feed. Here’s why:
If you put the full post in your RSS feed, then the person reading the feed doesn’t have a reason to go back to your blog since they have already read the full post. No visitors to the blog means no clicks on your ads. AdSense has an “AdSense For Feeds” in beta testing, but it’s not open to all publishers yet, so at least for now you need to induce people to visit the blog.
If they can only read part of the blog post, then if they want the whole story they will need to go to your blog. You can plan for this by making sure that your title and the first 255 characters (about the first 50 words) really pull in the reader’s attention. You need to use those first 50 words to make them just have to read the rest.
Also, if your RSS feed appears on websites, you don’t want to give away the farm by showing the whole post. You’re letting websites use your feed so you can get clicks on the posts in that feed and get visitors to your site to build AdSense revenue.
So set the “Descriptions” to Short, write long posts and make the title and the first 50 words count.
The Templates Tab
If you haven’t already picked a nice template from the list, click on the “Pick New” link under the templates tab and select one of the templates that you like and that fits your topic.
If you don’t already have an AdSense account, you can click on the “AdSense” link and apply for one straight from the blog instead of having to go to Google.com to apply. That’s how badly Google wants Blogger blog owners to use AdSense on their blogs! 🙂
Once you’ve done that, it’s time to paste your AdSense code into your template. Click on the “Edit Current” link if you’re not already there.
There are two methods of setting up your template. You will generate the most clicks by doing the following:
1) Find the section of the template that looks like this:
<!– Begin #main – Contains main-column blog content –>
<div id=”main”>
<div id=”main2″>
2) Paste your AdSense code for a 336×280 large rectangle directly after the second <div> tag. Be sure to format the colors of the AdSense to blend in with the background of your blog for maximum results.
3) Optionally, if you want to show a second 336×280 block at the bottom of the list of posts, look for this code in the template:
<xmp>
Put your AdSense code between the
tag and the first
tag.
Click the “Preview” button to make sure the AdSense blocks look correct and did not mess up the look of the template. If all is well, click “Save Template Changes”.
Note: Once you’ve made changes to your template, if you go and select a different template with the “Pick New” link it will overwrite your changes and you will have to put your AdSense code back into the template.
Setup Your Profile
Once your blog is setup, you want to setup your profile. To do this, click the “Back to Dashboard” link at the top of the browser window. Once at the dashboard, click on the “Edit Profile” link in the right-hand column.
Check the “Share my Profile” box, and the “Show my Real name” box, unless you have a really good reason not to. It helps build trust if you have this information showing on your blog because people can see you’re a real person and not some anonymous nobody. Your profile by default will be shown on your blog.
If you don’t mind people contacting you via email, you can select “Show my email address”.
Click “Select blogs to display” and make sure that your new blog is checked.
If you have a photograph somewhere on a website, you can point to it with the Photo URL. I recommend doing this because again, it builds trust and makes you more real and personal to your readers. If you don’t have a picture on the web or don’t have a website, I’ll gladly host a picture of you on one of my servers for free. Sticky mail me and we’ll arrange it. Just one of my little ways of paying back to the Webmasterworld community. 🙂
Go through and fill out the rest of the information. Focus on the “About Me” box, because that will show on your blog pages. Use that description to establish yourself as an expert on the topic that your blog is about. People like to know that they’re reading an expert opinion that they can trust. This box is your chance to prove you have an expert opinion!
Save your profile when you’re finished.
Getting Traffic to Your Blog
Once your blog is properly configured, spend about a week making a good, informative post or two per day. You don’t want to go advertising an empty blog, so it pays to make some good posts first.
You can post to the blog by clicking the “Posting” tab. Make your title be eye-catching while still containing the keywords that the post is most relevant to. For example, if your post is going to be about how to build blue widgets from scratch, and you want to be found when people search the engines for “Build blue widgets”, try and make your title at least start with those keywords. For example, “Build blue widgets – from scratch”. The dashes help the search engines differentiate the keywords from the rest of the title.
You might get some stray traffic from people searching for blogs on Blogger, and your posts appearing in the “most recent posts” list, so don’t be surprised if you get some traffic and AdSense clicks even before you start advertising.
Submit Your Blog to Blog Directories
To get the traffic rolling you need to submit your blog’s RSS feed to as many Blog Directories as you can. If you search Google for “RSS submission site”, the number one result as of right now lists off 55 directories that you can submit your feed to.
With a Blogger blog, your RSS feed is always your blog URL plus “/atom.xml”. For example, if your blog URL is:
Your RSS feed URLs is:
This is very important, because it will help attract the attention of the search engines as well as get your blog noticed by people who are searching for information and for content for their websites.
All of this will result in getting inbound links to your site. Most people will use the title of your blog as the link text for the link to your site, and that’s why it’s important for your title to be the keywords that you want your blog homepage to rank for in the search engines. Having inbound links that contain the keywords you want to rank for is a very powerful way to get ranked well. I have blogs that rank on the first page of search results for my keywords because of this (some even in the first or second position).
But you don’t want to sit around and wait for the links to start to gather. You want to…
Trade Links With Related Websites
Another thing I do to help get my blog ranked is to trade links with other webmasters who have sites on similar topics. I find them by searching for the keywords I want to rank for. If the blog category is not a competitive, commercial category, you can write directly to the webmasters of the top 20 – 50 results and see if they will exchange links with you.
If it’s a more competitive, commercial category, you can find out who links to the top websites for your keywords by searching for “link. That will show a list of URLs that link to your competition. Write to the webmasters who own those linking sites and see if they will trade links with you, too.
When you request a link exchange, be sure and make the request personal. Mention something that you like about the webmaster’s site and why you think that your blog is a good match for a link. You might even go a step further and put up a link to the webmaster’s site before emailing them. That way you can say “I’ve already put up a link to your site on my blog and wanted to see if you felt that my blog was a good match for a link back from your site”–or something like that. Take the first step, it’s a good gesture and it helps you get more links. Of course, if they don’t agree you can always take their link down. 😉
If they agree to exchange links, make sure that you have them link to your site using the keywords that you want to rank for. For example, if you want your blog to rank well for “Home Made Widgets”, be sure to have them use the link text “Home Made Widgets”.
You can manually insert the webmaster’s link and description text into your blog by modifying your template. I try to put it on the left or right hand column just below the archive links. To do this, modify your template and look for this code:
And finally, below the links, add this:
Every time you make a new link exchange with a webmaster, just go in and repeat the
code with the new link and description just above the
tag.
The more competitive your blog topic is, the more links you will need to get to rank well. But if your posts are informative, witty and humorous where appropriate, word will soon spread about your blog and your traffic will grow as people link to you without you even asking for a link. Growth in traffic means growth in AdSense revenue.
0 notes
Last Seen Blogs

kouhsuu
treat's scrimblo

crocheddar
Crocheddar Cheese

grandmothersaidthis-blog
walking the path of heaven

bjoernaroundtheworld
Unbetitelt

ihartkimchi
In my writer era~