#Which is the best organic NPK fertilizer? How do you make natural NPK fertilizer at home? Which organic fertilizer has the highest NPK? What
Text
Organic Fertilizer
Organic Fertilizer
We believe that every gardener deserves access to the best organic fertilizers possible to support their vegetable garden.
That's why we work to connect small farms across the United States that specialize in producing high-quality, environmentally-friendly fertilizers with gardeners who are passionate about growing healthy, delicious vegetables.
Compost
Manure
Liquid Fertilizer
Organic Fertilizer FAQ
Why Choose Organic Fertilizer Over Synthetic?
Organic fertilizer is made from natural materials that improve the quality of your soil, such as manure, compost, and leaves. Synthetic fertilizer is made from chemicals that can harm your soil, plants, and animals. Here are four reasons to choose organic fertilizer over synthetic:
1. Organic fertilizer improves the quality of your soil. Over time, synthetic fertilizers can break down the structure of your soil, making it harder for roots to penetrate. This can lead to water runoff and soil erosion.
2. Organic fertilizer is safer for your plants. Chemicals in synthetic fertilizers can burn your plants’ roots, especially if you use too much or apply them during hot weather.
3. Organic fertilizer is safer for wildlife. Animals can be harmed by eating plants that have been treated with synthetic fertilizers.
What Is NPK?
NPK stands for nitrogen, phosphorus, and potassium, which are the three essential nutrients that all plants need to thrive. NPK fertilizer is a type of fertilizer that contains these three nutrients in varying proportions, depending on the specific formulation.
Nitrogen is responsible for promoting leaf growth, phosphorus helps with root development and flowering, and potassium aids in overall plant health and vigor.
By using NPK fertilizer, gardeners can ensure that their plants are getting the right balance of nutrients to grow healthy and strong.
What Fertilizers Do For Plants?
Fertilizers are important for plant growth and development. They provide essential nutrients that plants need to survive and thrive. Fertilizers can be organic or inorganic, and each has its own benefits and drawbacks.
Organic fertilizers are made from natural materials like compost or manure. They release nutrients slowly, so they need to be applied more often than inorganic fertilizers. However, organic fertilizers improve soil health and help build up beneficial microbes that support plant growth.
Inorganic fertilizers are made from synthetic materials like nitrogen, phosphorus, and potassium. They release nutrients quickly, so they don’t need to be applied as often as organic fertilizers. However, inorganic fertilizers can damage soil health and harm beneficial microbes if they’re not used carefully.
Are Higher NPK Amounts Better?
When it comes to fertilizers, the three key nutrients are nitrogen (N), phosphorus (P) and potassium (K). These are typically represented by the NPK value on the fertilizer package. For example, a 10-10-10 fertilizer has an NPK value of 10-10-10 and contains 10% nitrogen, 10% phosphorus and 10% potassium.
So, are higher NPK amounts better? It depends.
If your soil is already high in one or more of these nutrients, adding more of that nutrient isn’t going to help your plants. In fact, it could actually do more harm than good.
For example, if your soil is high in phosphorus and you add a fertilizer with a high phosphorus content, you could end up with an imbalance that could hurt your plants.
How Do I Know If My Plants Need Fertilizer?
Organic fertilizer is made from natural materials and helps to improve the quality of your soil while providing essential nutrients for your plants.
You may need to add organic fertilizer to your garden if you notice that your plants are not growing as well as they should, or if the leaves are yellowing or falling off.
If you are unsure whether your plants need fertilizer, it is best to consult with a gardening expert. They will be able to help you determine which type of fertilizer is best for your garden, and how often you should apply it.
How Long Does Fertilizer Last In Soil?
Organic fertilizer is a great way to add nutrients to your soil, but you may be wondering how long it will last. Here is a general guide to the shelf life of organic fertilizer:
Composted manure – 1 to 2 years
Uncomposted manure – 6 months to 1 year
Poultry manure – 6 months
Cottonseed meal – 2 to 3 years
Alfalfa meal – 2 to 3 years
Bone meal – 1 to 2 years
Seaweed/kelp meal – 1 year
As you can see, there is a wide range of shelf life for different types of organic fertilizer. In general, composted manure and cottonseed meal will last the longest in your soil, while un composted manure and poultry manure will break down more quickly. Bone meal and alfalfa meal are somewhere in the middle.
How Often Should You Fertilize Flowers?
If you want your flowers to stay healthy and vibrant, you should fertilize them regularly. But how often should you fertilize them?
It depends on the type of fertilizer you’re using. If you’re using an organic fertilizer, you should fertilize your flowers every two weeks. If you’re using a chemical fertilizer, you can fertilize them every week.
Either way, it’s important not to over-fertilize your flowers. too much fertilizer can burn their roots and damage their leaves. So, be sure to follow the directions on your fertilizer label carefully.
How Often Should You Fertilize vegetables?
It is generally recommended to fertilize vegetables once a week. However, some vegetables may need to be fertilized more or less frequently depending on the type of vegetable and the specific growing conditions.
For example, leafy greens may need to be fertilized more often than root vegetables. In general, it is best to err on the side of too little fertilizer rather than too much. Over-fertilizing can lead to nutrient burn, which can damage plants.
Click To Grow
Organic Seeds
Shop Fertilizer
Shop
Helps Us Grow - Share If You Like
Facebook
Twitter
LinkedIn
Pinterest
Reddit
WhatsApp
Read the full article
0 notes
Text
Moon planting
First of all, it is essential to understand why is not healthy to use or consume regular menstrual pads and tampons. The vagina is a mucous membrane that absorbs everything, good and bad or not so good.
tampons and pads have asbestos, dioxins, and rayon.
Asbestos is a mineral composed of flexible fibers that are resistant to heat, electricity, and corrosion. These qualities make the mineral useful. However, asbestos exposure is highly toxic. One of the main reasons they use this component, studied by the University of Illinois, is to make women bleed more during their menstrual period to favor the consumption of this merchandise.
Dioxins are decoloring chemicals that whiten the fibers used on tampons and pads. It is potentially cancerous and toxic for the immunologist and reproductive systems, it can also cause endometriosis.
Rayon is an absorbent element that helps the dioxins stay in the vagina. It can cause toxic shocks when it has been accumulating in the vagina with dioxins, it also can cause streptococcus and staphylococcus.
Also, it is important to note that all of these components and non-biodegradable and very pollutant for our planet, there is an estimate that says that a woman can generate up to 300 pounds of period-related pollution over her lifetime. Not good for our health but also for our Pacha Mama.
So the alternative products we can choose between are: reusable silicone menstrual cups or discs, reusable cotton or bamboo fiber pads (if the cotton is organic, even better), reusable cotton period panties, and marine or sea sponges. All of them are good it will all depend on your preferences and what makes you feel more comfortable. It is also good because we can see our blood and check the quality of it, remember we can know a lot about our reproductive system health by understanding the color, texture, and odor of our blood. (I will make an entry on this too :))
So why do we plant our moon or menstrual blood?
Planting our moon is returning your menstrual blood to the earth, whether in plant pots, in a garden, or wherever else your heart commands. Our blood contains a lot of nutrients and essentially nitrogen, phosphorus, and potassium, the famous NPK trio, and also mother cells that are very good fertilizers for our plants.
Nitrogen: absorbed in the form of ammonia or nitrate by the roots, it is used to manufacture proteins (in the form of enzymes) and nucleic acids. It is the second most important substance for plants, right after water, and directly affects the development of plant tissues and their reproduction. Because it is part of chlorophyll, it has a direct influence on photosynthesis. Phosphorus: it is associated with the transformation of energy in the plant and the regulation of protein synthesis. When added to the soil, it promotes root growth and gives resistance to cold. So, like nitrogen, its synthesis is also important. Potassium: is an enzyme activator, which makes the plant better control its vital functions such as breathing, water loss, and resistance to pests. This makes the roots stronger and increases the resistance to aridity.
Also, we can put an intention to it, that is one of the best parts of doing this. Remember that we are energy and during our menstrual cycle we liberate a lot of energy that we "used" during the cycle; planting this energy is a way to thank mother nature for our cycle, our achievements, our creations, to let the "bad moments" and energies go and let the earth transmute that energy. We can transmute and heal energies from our ancestors, our sexual relations, feelings, etc. We can really put any intention on our planting moon, thank for projects, achievements, relationships; heal any physical, relationship, or energy-related thing, really anything you want or need to put on your energy with the Goddess's support.
Step by step - how to plant your menstrual blood
Step 1: To plant your moon, you will need to collect menstrual blood in some way. Two very practical ways are the menstrual collector (cups, discs, or sponge) or absorbent cloths such as reusable pads or panties.
Step 2: in a glass or clay container, mix with about ⅔ of water to ⅓ of blood. Keep this container covered with a cloth, in a ventilated environment, until planting.
Step 3: at the chosen time, water your plants with the mixture made. Remember not to take too long to do this, as the blood is organic and starts to decompose as soon as it comes in contact with the air.
While you water your plants connect with your intention and keep your feet on the ground, to connect even more to the energy of the element. Thank mother nature for taking this energy and for transmuting what it needs to be transmuted and for everything she does for you.
Hope you enjoy this beautiful ritual and the blessing that is being a woman.
#mothernature#moon#plant#plant mom#plantingmoon#goddess#health#energy#heal#uterus#period#cycle#blood
8 notes
·
View notes
Link
What is Cannabis Fertilizer?
How Do You Choose the right cannabis fertilizer?
Cannabis needs light, oxygen, and fertilizer to grow. Fertilizer can be made up of many organic and inorganic elements. Depending on the stage of growth a cannabis plant will require different ratios of these elements.
Choosing a fertilizer designed specifically for cannabis is usually the easiest and best choice. Reefertilizer Grow and Bloom are designed for the vegetative and flowering stages of cannabis.
Does Cannabis Need Fertilizer to Grow Big Buds?
To get big buds, you need the right set of nutrients during the flower period. Flowering plants will require plenty of potassium but less nitrogen than before. Elements such as calcium and magnesium help produce dense buds.
The difference between miracle-gro and Reefertilizer is that Miracle Gro was designed as a general fertilizer for many types of plants. Reefertilizer Bloom is blended to the specific nutritional needs of cannabis during flower. Helping you get those big thick buds.
What Nutrients Does Cannabis Need to Grow?
Plants all require the same types of nutrients, but each plant will have a preference for a certain ratio depending on its current needs.
You should feed your cannabis plants a fertilizer that contains all major nutrients; nitrogen, potassium, and phosphorus.
There are other essential nutrients that are required in smaller amounts. Plants will get some of these lesser nutrients from compost in the soil and trace amounts in tap water. But with a full spectrum cannabis fertilizer all the major and minor nutrients will be available.
What Are The Major Nutrients (N-P-K)?
When you buy fertilizer it should have 3 numbers on the front of the package. These numbers represent the ratio of the three major building blocks for plant growth; Nitrogen, Phosphorus, and Potassium. This is the NPK ratio. The “N” and “P” stands for nitrogen and phosphorus, the K represents the greek name for potassium.
Nitrogen plays an important role in plant growth, it helps develop new leaves and branches during the vegetative phase. During flower nitrogen takes a much lesser role while phosphorus and potassium are needed in higher amounts to help work on bud/flower development.
What’s a Good Cannabis Fertilizer Ratio?
The NPK ratio numbers represent the percentage by weight of each major nutrient. During the veg phase of cannabis your plants will need a higher percentage of nitrogen than potassium or phosphorus. For example, Reefertilizer Grow has an NPK ratio of 20-5-10 while bloom has a ratio of 5-30-20. During flowering your plants need a different ratio for their new focus on growing flowers.
Why are NPK numbers higher on synthetic fertilizer than organic? I answer that down below.
What Are Minor and Micro-Nutrients For Cannabis?
Nitrogen, phosphorus, and potassium are 3 of the 17 essential nutrients for plant life. The others are minor nutrients. They are required, but in a much smaller quantity.
Calcium, magnesium, iron, manganese, and copper are just a few elements that cannabis will need to facilitate healthy growth.
This is why I like to grow in soil, many of these trace elements are already present and available when the plants need them.
Which fertilizer works well for Cannabis?
The best fertilizer for cannabis growers is the one that best meets your situation requirements.
Going fully organic and making your own compost teas and soil mixes will result in big healthy plants, but will require a lot of space, time, and experience to apply these techniques.
Using a synthetic fertilizer like Grow and Bloom makes it easier to guarantee your plants are getting what they need with very little oversight. It’s also cheaper and easier to apply.
Synthetic fertilizer is sometimes called “chemical”. In some circles the word chemical has a negative stigma around it, which is silly. All fertilizers are chemical in nature, water is a chemical. “Organic” fertilizer is made from natural sources like potash and compost that are broken down and applied to plants. Synthetic fertilizers are further processed so they are more concentrated, they are also faster acting since they take way less time to break down than organic.
What Are The Advantages of Using Powder Fertilizer for Cannabis?
Fertilizers will come in the form of a liquid or a powder. Both work well and the best choice depends on the grower.
Different elements will react with each other when in a liquid form causing it to lose potency over time. Because of this you will see many different variations of liquid fertilizers with different nutrient ratios. All these liquid fertilizers need to be mixed to the correct ratio for whatever phase of growth your plant is currently in.
What’s great about powder fertilizer is that you don’t need to mix several products together just to feed you plant. The powdered elements won’t react with each other when dry. A few scoops of Bloom mixed into water accomplishes the same as several bottles of liquid nutrients. Powdered fertilizer saves the grower time, prevents any guesswork, and utilizes far less packaging.
How Do I Use Cannabis Fertilizer?
When Do You Start Using Powder Fertilizer on Cannabis?
You’ll want to start feeding your plants with a diluted dose of fertilizer when they have developped 3 or 4 sets of leaves. Check out our blog post on “When should you start feeding your cannabis plants fertilizer”, it answers this question in more detail.
As the plant grows it will require larger amounts of fertilizer to fuel that growth.
How Much powder Fertilizer Does Cannabis Need?
The amount of fertilizer your plants need depends on a few outside factors. Large plants will require more nutrients than smaller ones. The planter size is a good indicator of how big a plant will probably grow. Cannabis grown in soil can grow very tall since their roots can go deep into the ground.
You need to feed your plants enough fertilizer that the soil around the roots is completely saturated. A small planter might need only 4L of nutrient water every feeding, while a plant in a 12 gallon planter will need more nutrient water to saturate it fully.
How often do I give fertilizer?
This depends on the grower preference, but in general you want to be feeding your plants at least once a week.
We recommend feeding plants Reefertilizer Grow or Bloom once a week and watering with correct pH water as needed, this keeps it super simple.
Others will split the weeks nutrients into two diluted feedings. Other growers like to feed plants two weeks on and one week off. Experiment with your plants and see how they react and what type of schedule you prefer. Reefertilizer is meant to be versatile in this respect.
Some big plants will need a feeding every few days. It depends on the needs of the individual plants. If you’re feeding a large plant once a week and it’s showing signs of a nutrient deficiency, as long as it isn’t being caused by a bad pH, you may need to feed them more often.
What’s The Feeding Schedule for Cannabis?
Take a look at the instructions of your cannabis fertilizer. They will give you the best recommendation on the feeding schedule. The Reefertilizer schedule is a gradual approach. Start low and increase the dose every week until you get to full dose. This helps prevent any fertilizer burn, and starting with lower doses at the beginning of flower helps reduce nutrient buildup.
How do I Feed Cannabis?
Feeding cannabis can be very simple. It usually involves mixing a liquid or powder into some water and pouring that around the base of your plants.
With Reefertilizer Grow and Bloom you add a few scoops to some water and mix it up really well. It’s good to mix the powder with a small amount of water first to make sure it’s dissolved evenly, then add more water after.
It’s good practice to measure the pH of the nutrient water, this will help prevent nutrient lockout. If the pH is not in the desired range (between 6 and 6.8 for soil), use a product called pH up or pH down to adjust it. Natural ingredients like lemon juice and baking soda will also lower or raise the pH.
How much fertilizer do I give?
If your unsure of how much you should be feeding your plants, start low and gradually increase the dosage every week. Don’t worry too much about over fertilizing your plants, that’s really easy to fix. If you see signs of fertilizer burn (brown tips and other symptoms), just flush your plants with extra water that week and start feeding them again when the soil is dry, but this time with a lower dose.
When do I stop fertilizing my cannabis plants?
You want to stop feeding your plants a week before harvest. During this time your plant will utilize the remaining nutrients and energy in the plant for bud growth.
There’s a lot of debate on the topic of whether or not you should flush your plants with water during this period to leach nutrients from the soil and plant. Many professional growers say that flushing your plants a week before will improve the flavour and quality of your buds. Other professional growers say it doesn’t make a difference and they feed their plants right up to harvest.
In my opinion, flushing can’t hurt so why not give it a try. Do your own experiments and see what you prefer after drying and curing the bud.
Do I Need to Flush powder Cannabis Fertilizer Before Harvest?
If you’re going to flush your plants before harvest, you need to use plenty of water. You want to use enough water to fill your planter 2-3 times. That means if your growing in a 5 gallon planter, you need to flush it with 15 gallons of water. Soilless growing mediums like coco coir or peat moss are easier to flush, so you can use less water than with soil.
You can perform this flush once a week or more. I like to use a TDS meter to monitor the total dissolved solids in the flush runoff water. Each time I flush, that number should be getting lower.
Don’t worry about using pH perfect water for flushing. Since you will be harvesting soon, it won’t make a difference.
What Else Do I Need to Know About Cannabis Fertilizer?
Is Too Much Fertilizer Harmful?
It can be easy to go overboard with fertilizers, but using more than what your plant can suck up will cause you problems. Depending on your plants size and the environment it’s in, there’s a finite amount of nutrients it can metabolise in a given period.
Using too much fertilizer may cause nutrient burn and symptoms of excess or deficient nutrients. If you over fertilize it’s not the end of the world. A good flush can bring most plants back to a healthy state.
Why is There Growth or Bloom Fertilizer?
Cannabis plants have two major phases of growth; The vegetative stage and the flowering stage. The nutritional needs are slightly different during these two phases. Using the correct cannabis Bloom or Grow fertilizer will guarantee the correct level of nutrients the plant needs at that time.
Can Nutrients Make Cannabis Taste Bad?
Many things can affect the final taste of cannabis, most importantly the drying process and the curing process.
Many growers will say that if a cannabis plant is not flushed properly before harvest it will develop a harsh taste not stay lit when rolled into a joint. Flushing could be a factor but perhaps a minor one. Cannabis will definitely get a bad taste if it’s dried to quickly or not enough. A lot of harsh flavours come from chlorophyll which slowly breaks down during the curing process.
What’s The Difference Between Organic And Synthetic Nutrients?
Organic nutrients come from a direct natural source. Synthetic are produced from natural sources but processed further to be more concentrated. If you compare the NPK ratio of organic fertilizers and synthetic, you will notice the numbers on synthetic fertilizers are higher. This is because the higher concentration from the extra processing.
Organic nutrients are slowly broken down by the root system. Since they are less concentrated, you need to apply them more often.
Reefertilizer Start soil conditioner is organic and helps generate a healthy soil. This in tandem with synthetic fertilizers gives you the best of both worlds.
Synthetic nutrients are immediately available to plants and can give them a real noticeable boost in growth. Synthetic is usually cheaper and easier to use, but care must be taken not to over fertilize plants.
What is Cannabis Fertilizer Burn?
Fertilizer burn happens when you feed your plants too high a concentration of fertilizer. If left untreated it can seriously damage or kill a plant entirely. Good news, fixing an overtilized plant is really simple and done soon enough your plant will bounce back quickly.
To fix a plant that is over fertilized, flush the soil with 3 times the volume of the planter size. If you’re growing in a 5 gallon pot, flush with 15 gallons of water. What the water does is leach out any nutrient build up in the soil.
After flushing, give your plant about a week to recuperate, then you can start feeding them again.
What is Nutrient Lockout?
Nutrient lockout occurs when the pH of the growing medium is in the incorrect range. Cannabis roots can only chemically metabolize nutrients if the soil is in a specific pH range. If the pH is too low or high, certain nutrients will be “locked out” and the plant will suffer from a nutrient deficiency even though they’re in the soil. Adding more nutrients won’t help and might cause a harmful build up in the soil.
Most cannabis problems start from an incorrect pH. If you see signs of nutrient deficiency in your plants, the first thing to check is the pH. Measuring and logging the pH of the nutrient water is a good mesure to determine if you have a deficiency or a nutrient lockout.
How Do I Use Compost and Worm Castings as Fertilizer?
There are so many great things you can add to your soil that will help enhance growth and taste. Worm castings is basically worm poop, there’s also bat guano (also poop), and sheep manure (yes poop too), they are all great for adding to your cannabis soil.
Typically you would mix the compost with a potting soil or a soiless mix like coco coir or peat moss.
There are other things you can add that aren’t compost but benefit the roots. Using Reefertilizer Start in your soil will innoculate it with a helpful fungus. Adding perlite will help the soil hold oxygen and water.
Reefertilizer Start is an organic compost made from water hyacynth. It’s organic and fully renewable. It can be added to your potting soil mix along with other composts and manures.
What these natural fertilizers do is slowly breakdown in the soil and feed your plants a variety of additional nutrients. These additions can affect the taste and quality of your weed and should be experimented with.
What About Slow Release Granular Cannabis Fertilizers?
Another option available are slow release fertilizers. These can be added to the soil, or sprinkled around the base of the plant. The only problem with them is that if you use too much, you’re going to have a hell of a time trying to flush them out.
They are very popular for those who cannot tend to their plants on a weekly basis.
How Much Fertilizer do I give Autoflowering Cannabis Plants?
Autoflowering plants are ready to harvest sooner than photoperiod plants. Because of this they require less fertilizer overall.
When it comes to autoflowers you’re best starting low and increasing a bit every week. If using reefertilizer a medium dose is the higest you should go.
The post Everything You Need To Know About Cannabis Fertilizer appeared first on Reefertilizer.
2 notes
·
View notes
Text
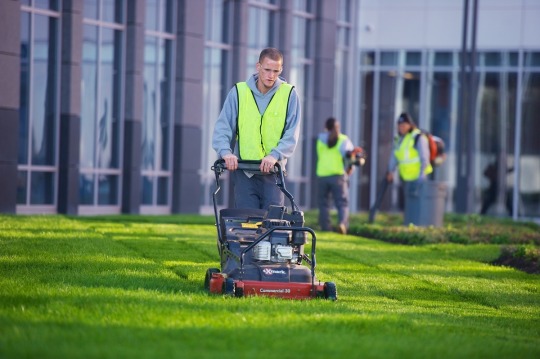
Best Lawn Fertilizers & Spreaders HandyGuyPros
Spring and fall are the best times to fertilize your lawn. Depending on the grass type and the amount of use the yard gets, you might apply nutrients up to 4 times a year. Of course, you want those applications to make the grass as green and lush as possible without burning it.
Let’s begin with a quick overview of the basics of lawn fertilization.
What kind of fertilizer do you need for your grass?
First, how much fertilizer do you actually need for your lawn? If it looks green and healthy and doesn’t get a lot of use, you may get by with just leaving grass clippings on it. Or you may apply nutrients only once a year.
If you have a yard that gets more use from your family, you may find yourself applying fertilizer from two up to four times a year, especially if you don’t leave grass clippings on the lawn after mowing.
When to fertilize?
If you have northern turf like Bluegrass, ryegrass, or fescue, you can lay down fertilizer around Memorial Day in May. If you have Southern grasses like St. Augustine, Bermuda, Centipede and Zoysia, you can fertilize early in April when the grass begins to grow.
Nitrogen, the base nutrient for grass
The single most-needed nutrient for grass is nitrogen (N). The typical dose is 1 pound of nitrogen per 1000 square feet per application time. Grass clippings break down into nitrogen, so you can save money by simply leaving them on your lawn. Clippings can cut down the amount of fertilizer you need by up to half. Shaded parts of your yard also need less nitrogen.
Nitrogen makes grass grow thicker and faster and gives it a nice dark green color. If your yard doesn’t get enough nitrogen, you can find yourself battling erosion from thin turf. Too much nitrogen and you’ll increase the number of weeds in your yard. Over time, this nutrient’s levels change depending on grass growth and soil conditions. If you have sandy soil, use turf fertilizers that have slow-release nitrogen so you don’t leach too much into the groundwater.
P and K
Healthy lawns also need phosphorous (P) and potassium (K). Phosphorous is usually only needed if you’re planting new grass. It helps seedling roots grow quickly. If you have your soil tested, you may find that you already have enough phosphorous in your ground. Don’t overdo it with this nutrient because it can cause algae blooms and kill fish if your runoff gets into water supplies.
Potassium helps grass resist environmental stress (like cold winter weather) and take in enough water. If you add potassium to your soil, many times it comes in the form of potash.
A complete package–N P K fertilizers
If you have a new lawn, you’ll probably invest in an NPK fertilizer. The proportions of each nutrient are designated on the bag or bottle. It could show something like “10-6-4” (10 parts N, 6 parts P, 4 parts K).
10-6-4? How to read the proportions?
If you have a 50-pound bag of lawn fertilizer and it’s marked 10-6-4, this is what it contains:
5 pounds of nitrogen, or 10%
3 pounds of phosphorous
2 pounds of potassium
The rest of the weight in the bag is sand or clay to help you spread out the nutrients.
Other nutrients for healthy grass
Too much or too little acid in your soil is bad for grass. If you test the pH level, you can see if it’s in the ideal zone of 6.5, slightly acidic. If it’s too low, or acidic below 6.5, you can add lime. If it’s too high above 7.5, or alkaline, you can lay down an acidic fertilizer like sulfur, ammonium nitrate, or ammonium sulfate.
Water-soluble? Granules? Organic? Synthetic? Which is best?
Water-soluble simply means you need to mix it with water before you apply it to your lawn. Miracle Grow is a well-known example. You may have a sprayer that you attach to a garden hose or a tank pulled by your lawn tractor.
Organic fertilizers have a slower release rate than most water-solubles, but they may be safer for use around your family and pets. They may also cost more than a synthetic fertilizer.
Granulated nutrients need to be sprinkled across your lawn, or mixed into the soil when you plant seed. You may use a spreader for granules.
The best lawn fertilizers for lush, healthy grass
Now it’s time to reveal our top picks for feeding your lawn.
Milorganite 62036-MW Organic Milorganite Fertilizer, 36-Lb
Our review begins with Milorganite’s 36-pound bag of organic fertilizer with iron. It’s a slow-release granule that doesn’t burn grass if you accidentally over-apply it, and it doesn’t stain pavement. It’s even used on golf courses that demand strong turf and tender-loving care.
This fertilizer is not straight manure. Instead, Milorganite captures waste water, treats it with microbes, then heat-dries the microbes. Their process is basically recycling. And their products are regulated by the EPA for safety.
Milorganite recommends applying one bag to a 2500 sq. ft. lawn four times a year. If you lay down new seed, mix one-part seed with four-parts fertilizer. Typically, each bag is 5-4-0, with 5% nitrogen, 4% phosphorous, and no potassium. It works on both clay and sandy soils, and the phosphorous in it is “slow-moving” so it doesn’t leach into groundwater. Just don’t apply it within 10 feet of any waterway.
Although Milorganite is more expensive than some synthetic products, it’s less likely to burn your grass because it has no chemical salts. It has a loyal fan base and lots of positive reviews from customers.
Scotts Turf Builder EdgeGuard Mini Broadcast Spreader
When you need to spread granulated fertilizer, this spreader from Scotts makes the job a lot easier. This is one designed to work for yards up to 5000 square feet in size. The Edge Guard keeps fertilizer off driveways.
Scotts Wizz Hand-Held Spreader
The hand-held Wizz Spreader from Scotts is even more fun to use than the spreader cart. While it only holds enough for a 2500-square-foot lawn, it’s got a battery-powered sprayer. All you have to do is hold it and walk. Plus, you can use it to spread ice melt in the winter.
Safer Brand 9333 Ringer Lawn Restore II Fertilizer
If you liked Milorganite’s organic products but are wary of using phosphorous, take a look at Safer Brand’s Lawn Restore II. It has no phosphorous content so can use it near wells, creeks, and other waterways. In fact, after you apply it to your lawn, it’s important to water it and keep it moist for three or four days to activate it.
Like many organic fertilizers, you can use it any time during the growing season once the grass begins to grow until the early fall.
Safer Brand is made from plant-based nutrients, not manure. They use non-GMO soybean meal, sulfate of potash for potassium, and dried distiller’s grains from ethanol production. This combination of nutrients results in a greener lawn in just a few days. Its NPK ratio is 10-0-6.
You can use the Lawn Restore II on any type of grass, northern or southern. It won’t burn your lawn because it has no chemical salts. It’s safe for kids and pets, too. One bag covers up to 5000-square-feet, double the square footage of Milorganite, or the Scotts Turf Builder below.
Espoma ELF20 20-Pound Organic All Season Lawn Food
This organic 15-0-5 formula comes from a company that’s been in business for almost a hundred years. Espoma knows their stuff, and their All-Season Lawn Food is proof. It’s safe to use around kids and animals, plus it contains iron to green your grass without staining your concrete.
This is their all-season fertilizer for any type of grass. They have other related products for boosting your lawn at specific times of the year. This one is made from sulfate, urea, sulfate of potash, ferric oxide, and elemental sulfur. It has 7.70% slow-release nitrogen from pasteurized poultry manure, methylene urea, amonium sulfate and urea—animal waste products.
Users comment that their lawns are lush and green when using the Espoma products. It doesn’t burn their grass and doesn’t smell bad. It does need a light watering after application.
Scotts Turf Builder Lawn Food
If you live in North America, you’ve probably heard of Scotts products. Most garden centers sell them. The Turf Builder is one of their most popular products. One bag covers up to 2500-square-feet of lawn. You can buy it in different varieties to tackle problems like crab grass, weeds, and for specific seasonal applications and Southern grasses.
The Turf Builder we’re reviewing is for any kind of grass at any season. You can apply it up to 4 times a year if needed. The ratio of nutrients listed on the package is 32-0-4, so it contains lots of nitrogen but no phosphorous. It also has 7% sulphur and 2% iron. It seems to work well, and isn’t very expensive compared to some organic products.
A look at the fine print on the package reveals that Scotts uses urea nitrogen, Ammoniacal nitrogen, and “other water soluble nitrogen” for the bulk of their fertilizer. We weren’t able to discover the source of their ingredients.
If you have Southern grasses, you might prefer to use their Southern Lawn Fertilizer described below.
Scotts Turf Builder Southern Lawn Fertilizer with 2% Iron
The Turf Builder for Southern Lawns has a ratio of 26-2-13 and includes 2% iron. You can apply it in any season on either a wet or dry lawn.
Scotts Natural Lawn Food
If you’re interested in an OMRI-listed organic fertilizer, Scotts Natural Lawn Food is made from hydrolyzed feather meal, meat, bone, and blood meal, and sulfate of potash. It’s safe for pets, children, and you can walk on the grass right after you apply the granules It’s for any kind of grass at any season. But this is a product with sales restricted in several jurisdictions like Connecticut, Maryland, Maine, Minnesota, New Jersey, New York, Washington, and Wisconsin.
Scotts Liquid Turf Builder Lawn Food
It’s super easy to use the Scotts Liquid Turf Builder Lawn Food. It’s a 32-ounce bottle that attaches directly to your garden hose. Just be careful to not lay down too much at one time so you don’t burn the grass.
Miracle-Gro Water Soluble Lawn Food
Did you know that Miracle-Gro is part of the same manufacturing group as Scotts? You may know Miracle-Gro already because they sell liquid food for house plants.
Their Soluble Lawn Food is made of granules designed to It’s made for all lawn types and covers up to 4000-square-feet per box. Be sure to follow mixing directions because it can burn your lawn if it’s too strong.
If it’s applied properly, users say Miracle-Gro can revive your nearly dead lawn and keep it looking healthy. You can put it on your lawn every 2 to 3 weeks while grass is growing. Its ratio is 36-0-6 and it also contains a small percentage of iron.
If you want to have a healthy green lawn, you’ll most likely need to fertilize it even if you leave clippings or mulched grass on it after mowing. It’s a great idea to have your soil tested once a year, too.
Your choice of fertilizer may be restricted by local laws. Be careful to not contaminate water sources. Synthetic formulas are more likely to burn your grass if you over-apply them. Organic formulas are generally safe to use if you have animals and children.
Happy gardening! We wish you a lush green lawn this year! Check back soon for more helpful product reviews with the best value for the money.
Source : https://handyguypros.com/best-lawn-fertilizer-reviews/
0 notes
Text
Why Are My Cannabis Leaves Turning Yellow?
You've taken great care of your cannabis plants; you water them, feed them nutrient-rich foods, provide the ideal light cycle for their different developmental phases, and prune them just enough to promote light exposure and optimum growth in a marijuana grow tent. You've done everything right and yet your marijuana plants just don't look as lively as they should. Specifically, your cannabis plants are showing signs of stress through yellow leaves. Despite all the love and attention you've given them, they just aren't growing into the bountiful beauties you had hoped.
Fear not fellow cannabis cultivators! Just because your cannabis leaves are turning yellow does not mean they are done-for. In fact, there are steps you can take right now to correct yellow cannabis leaves and prevent it from occurring again. But first, let's discuss why cannabis leaves turn yellow in the first place
Yellow Marijuana Leaves? How to Obtain an Accurate Diagnosis
In scientific terms, the yellowing of leaves is called chlorosis. This is a process wherein plant leaves lose their chlorophyll (the compound that keeps them green).
Chlorosis may be the result of a specific issue (environmental problems, sunlight deficiency, etc), or it may simply be due to senescence – the process of change due to biological aging.
Natural senescence is nothing to worry about. In fact, at the end of each growing season, many plants in a crop will start to turn yellow and drop their leaves (think of deciduous trees during autumn). Some growers “flush” their crops with pure water or a flushing solution at this late stage in cultivation. This helps to get rid of any excess nutrients, and will speed up the natural process of senescence.
Of course, other factors may be responsible for the yellowing of your marijuana crop. Rarely, however, is chlorosis a cause for panic. Often times it’s something simple that is preventing photosynthesis. If you act quickly, you can generally help your plants recover without issue.
Let’s explore several diagnostic tools that you can consider to help figure out what’s causing the leaves on your cannabis plant to turn yellow.
Improper Watering Habits
When you over-water your cannabis plants you prevent the roots from getting oxygen. This will prevent your plants from metabolizing nutrients and cause yellow leaves.
The leaves of an over watered plant will look droopy because they are full of water.
Under watering your cannabis plants will cause the leaves to wilt and turn yellow over time.
The solution is simple: adjust your watering habits. If you see over-watering symptoms, water your plants less frequently and vice-versa.
The rule of thumb is to water your cannabis plants once the top inch of soil is dry. Cannabis plants like soil that dries out a little between watering. Finding the right balance will depend on the size of the plant, the size of the planter, and temperature.
“Water your cannabis plants once the top inch of soil is dry.”
The Fix: Stop watering over-watered plants and increase watering for under-watered ones. Sounds easy, but it’s one of the most common mistakes beginner growers make. Lift your containers if you can to get an idea of what they feel like when soaked and how much less they weigh when dry.
pH is Too High or Low
Another common issue is pH imbalance. If the pH of the water you feed your plants is off, they will have a hard time absorbing nutrients through their roots. pH is the measurement of acidity or alkalinity of a liquid, it’s determined by the concentration of hydrogen ions in the water.
In most cases, your tap water will have a pH around 7.0, but this will vary from location to location. Adding nutrients to your water can change the pH. Keep an eye on the pH of the water you use to feed your plants. You will get the best results from your cannabis grown in soil by maintaining a pH around 5.8 or 6. It makes sense when you realize the pH of rainwater is slightly acidic with a pH of around 6.0.
For hydroponics solutions you will want a slightly more acidic pH of around 5.5
By using a pH level measuring pen or kit you can monitor the acidity of what your feeding your plants. If your levels aren’t in the optimal range, add a base (pH up) or acid (pH down) to either raise or lower the pH.
Incorrect pH is the usual culprit for most cannabis related growing problems.
The Fix: Use a pH meter to measure the level of acidity or alkalinity of your soil and nutrient solution. Adjust using pH up or down accordingly. Bear in mind that these solutions come in concentrated form, so add them sparingly to raise or lower pH incrementally.
Light Burn
Are the tops of your plants turning yellow, crispy, and starting to curl? One reason could be light burn.
The leaves closet to the light source will be showing the most severe symptoms. The heat from your lights is frying these leaves damaging them.
Typically, the more powerful, high-intensity lights will result in light burn. LEDs usually give off the least amount of heat.
You will need to raise the lights a few inches to fix the problem. The optimal range is usually one or two feet away.
If your hand is uncomfortably hot where the light hits the leaves, then your leaves are also feeling the burn. The temperature at the canopy (uppermost leaves) shouldn’t go over 30°C (86°F).
The Fix: Increase the amount of light the plant is getting. This could mean lowering an existing grow light to the proper level above your plants’ canopy or investing in a stronger lighting unit. I highly recommend using HID (High Intensity Discharge) lighting, such as MH (Metal Halide) or HPS (High-Pressure Sodium) lighting for growing pot plants indoors. LED (Light Emitting Diodes) such as full spectrum LED grow light is best for plant growth and Compact Fluorescents are a decent, if not perfect, alternative if heat or power usage is an issue.
Cold Shock or Heat Stress
Next on the list is temperature. Normally, heat is going to be the enemy here, either from the lights or poor air circulation. If you’re growing outside or in your basement, a quick cold spell in the night could harm your plants as well.
For heat stress, the leaves will turn yellow and dry. At the other end, cold shocks, the plant will droop and turn yellow. Either extreme could kill your plants very quickly.
Keep a thermometer (or two) near your plants to check the temp. The ideal range is between 18°C and 28°C. Proper air circulation will keep the temperature balanced throughout the room and help the exchange of CO2 and oxygen.
The Fix:
Make sure the light source is the right distance away from your crop. You will need to monitor it and change it regularly as the plants grow. You should also invest in a thermometer. If it’s too hot, then add air conditioning or inline duct fans.
Plants that have experienced heat stress may need to be moved away from the light. Keep them at a further distance until they begin to recover.
Deficient Nutrients
If the pH is spot on and the plant is being watered correctly, then the most likely problem is nutrients (or the lack thereof). For chlorosis, the usual culprits are iron, nitrogen, magnesium, phosphorus, potassium, sulfur, or zinc.
Take note of where the yellowing occurs on the plant and the leaves. These are your clues to finding out what nutrients are deficient.
Using a fertilizer designed for cannabis is a good first start. Finding one that contains all the essential macro and micro nutrients cannabis needs is the easiest way to avoid deficiencies.
Nutritional needs may vary from strain to strain, but having those base line nutrients will save you a lot of trouble.
This is a reason why many growers love organic living soil. Soil contains all sorts of nutrients that are broken down by roots and microbes within the soil itself. With nutrient rich living soil you may even need to use less fertilizer.
The Fix: Water with a nutrient solution high in nitrogen. Plant food bottles typically display NPK ratio on the labels. N is for nitrogen, P for phosphorus and K for potassium. Choose the nutrient with a higher number at the beginning. They’re labels will say “Grow” or “Vegetative” as opposed to “Bloom” or “Flowering.” If you decide you have a lack of iron, foliar feed with chelated iron. You should see your leaves greening up within a few days.
The plant in the photo is showing signs of an iron deficiency (and a few others as well). It was caused by a pH that was too high which locked out several nutrients.
Using too much fertilizer can also cause problems that would result in yellow leaves with burnt looking tips. Fixing over fertilized cannabis plants is simple. Flushing the soil with water will remove the build up of nutrients in the soil.
Final Thoughts on Yellow Cannabis Leaves
Whenever you see yellow leaves on your marijuana plants, the first step is not to panic. Yellow leaves are not always a death sentence. Sometimes, the leaves turn yellow for no particular reason, even though there’s no harm to your plant.
In other circumstances, you may need to act to save your crop from complete ruin. If you spot any leaves that are severely wilted and frail, it’s time to defoliate (remove the affected leaves). Make sure you identify the underlying issue so you can address it.
Hopefully, this guide has provided you with some tips to help you save your beloved cannabis plants. Do you have any more tricks to rescue yellowing plants? Drop them in the comments below!
0 notes
Text
Organic Vs. Synthetic — What Is The Best Fertilizer For Grass?
What exactly is organic fertilizer, and does a synthetic lawn care program really make grass greener? What about hybrid fertilizers—what do they contain, and is this a way to get the best of both worlds?
Fertilizer can be confusing, and our commercial clients who value sustainability often want to know, “What’s the real difference between these fertilizers?”
There is an abundance of information out there about the pros and cons of various fertilizers: synthetic vs. organic vs. hybrid. Unfortunately, a lot of what you read and hear can be grounded in bias marketing.
Commercial lawn care companies that promote synthetic programs talk about “quick green-up,” while organic-based landscape services promote a natural solution (you’ve heard you’ll have to put up with some weeds here and there). Hybrid fertilizer is just confusing. What is it exactly?
Let’s halt the fertilizer debate for a minute and run through the pros and cons of each type of fertilizer.
How Does Lawn Fertilizer Work?
Before we launch into details about synthetic, organic and hybrid fertilizers, it’s important to understand what fertilizer is actually made of and how it works. So here is a brief chemistry lesson. Stick with us here.
The active ingredients in fertilizer are nitrogen (N), phosphorus (P) and potassium (K). Nitrogen is responsible for making grass green, phosphorus is slower-acting and promotes root development, and potassium feeds the lawn over time and works to keep it strong during drought and other stressful conditions.
All fertilizers contain NPK, but the source of that NPK is what makes the difference between a synthetic and organic product. Synthetic fertilizers contain NPK that is derived from chemicals. Organic fertilizers get their NPK active ingredients from natural elements, including biosolids, manure and other protein byproducts.
The NPK is what makes fertilizer work, but it’s not as simple as putting the product on your grass. Fertilizer is activated when the soil beneath your grass “digests” the NPK ingredients, so the health of your soil is a critical factor in whether your lawn will take up fertilizer efficiently and effectively. If soil lacks microbiology (ability to break down nutrients in fertilizer), then the products you apply to your lawn—organic or synthetic fertilizer—will run off and potentially drain into your water supply.
Why Is Fertilizer Runoff Bad?
There are a couple of reasons why you want to avoid fertilizer runoff. For one, you are wasting product, which means you’re watching money literally wash down the drain. Secondly, fertilizer runoff contributes to harmful environmental scenarios. Nitrogen and phosphorus do the same work in lakes that they do on your yard: promote green, leafy plant growth.
When this happens in lakes, the fertilizer runoff can stoke the growth of toxic algae blooms that consume vital oxygen from water and cause existing wildlife (fish, beneficial organisms) to suffer. Eventually you end up with “dead zones” where wildlife cannot live because there is not enough oxygen or nutrients for them to survive.
The bottom line: We believe that fertilizer runoff is an important environmental issue that we must all consider when choosing commercial lawn care products like fertilizer.
Fertilizer 101: Synthetic Vs. Organic Vs. Hybrid Fertilizers
Now that we covered what makes fertilizer work (NPK), why synthetic and organic fertilizers are different, and why soil quality is important, let’s move on to a pro-con analysis of different fertilizer types — synthetic, organic and hybrid — and answer the age-old question: “What is the best fertilizer for grass?”
Synthetic Fertilizers
Synthetic fertilizers are the standard product traditionally used in commercial lawn care programs to prevent weeds and disease, and to help grass grow green and healthy. Synthetic fertilizers have been used for years on lawns, and they generally involve up to six applications of products throughout the season that blanket the lawn with weed, disease and pest control. An emerald green lawn is the hallmark of synthetic fertilizers or at least what companies selling these products promote.
The downside of synthetic fertilizers is that they do not address soil health and instead focus on maintaining the lawn’s appearance. Also, synthetic products tend to be more water soluble, making runoff a greater concern. The benefit of synthetics for many commercial property owners is cost. Because the products are readily available on the mass market and the labor involved in applying them is minimal, landscape companies can offer synthetic fertilizers at competitive prices.
Organic Fertilizers
Organic fertilizers are comprised of ingredients found in nature, not produced in a lab. Quality organic fertilizers are made from bionutritional products, and they act like probiotics that improve soil’s ability to digest fertilizer and absorb nutrients. Not all organic fertilizers are created equally.
When seeking out an organic fertilizer, you want to choose a formula that is designed to enhance soil quality, which lays the groundwork for a healthy lawn. Organics that are simply spread on a lawn with poor soil quality will run off just like synthetic fertilizer. That nitrogen and phosphorus in runoff can threaten the water supply. Remember, healthy soil must take up the fertilizer in order to keep it in place and prevent harmful runoff.
The pros of organic fertilizers are that you’re putting a product that nature intended on your commercial property. The grass is safe for people and animals to walk on immediately after it is applied because there are no chemicals involved.
In a pure organic fertilizer program, no synthetic weed control is used, which can result in labor-intensive processes (hand-pulling weeds) that may drive up cost. The price of organic fertilizer tends to be higher than synthetics, but the product you’re getting is improving the overall health of your lawn. That means that over time, you will need less organic fertilizer to do the job, whereas with synthetics you’re continuing to “cure” the façade of the lawn and not addressing the root of weed and disease problems.
Hybrid Fertilizer
When it comes to choosing the right fertilizer for your grass, there’s more to it than deciding between organic vs. synthetic fertilizer. For commercial property owners who want to bridge from a synthetic fertilizer to organic, a hybrid fertilizer program allows them to move the needle toward a sustainable program that’s cost-conscious and focused on the health of their landscape.
The reality is, some property owners steer away from organics because they think that means they will have to tolerate weeds in the lawn—and that is sometimes true. A hybrid approach uses organic fertilizers and addresses weeds by micro-spot treating problem areas. That way, chemical use on the property is tightly contained and minimal.
The benefit of a hybrid fertilizer approach is that you are building soil health which results in green, weed- and disease-free grass. By using organic fertilizers with probiotics that improve soil, you can use up to 75 percent less nitrogen and phosphorus (N and P). Less product, organic or synthetic, is always better.
A word of warning with hybrid fertilizer: companies can claim to use “organics” and “hybrid fertilizer” on your property, but find out how the fertilizer actually works. How much of it is applied to the lawn? How is the company addressing soil health? A true hybrid or organic program does not overlook these factors.
Choosing The Right Fertilizer: Think Long-Term About Your Lawn’s Health
There are three types of fertilizer approaches you can take on your property, and two of those involve using organic products. At Schill, we provide a hybrid fertilization program that gives our commercial property owners the benefits of improving their lawn’s health and getting the green grass they want, while addressing weeds as they crop up so they do not proliferate into a problem that’s harder to control and requires more chemicals.
We take a less-is-more approach to using synthetics in the landscape, and we work with our commercial property owner clients to help them move from a total synthetic program to organics in an effective, cost-conscious way.
Schill can help you figure out which fertilizer is best for your commercial property’s turf. Let’s talk more about fertilizer options including the Holganix organic fertilizer that is giving clients like you the results they want. Contact us any time at (440) 327-3030, or fill out this simple contact form, and we’ll get in touch with you.
Source: Schill Grounds Management
0 notes
Text
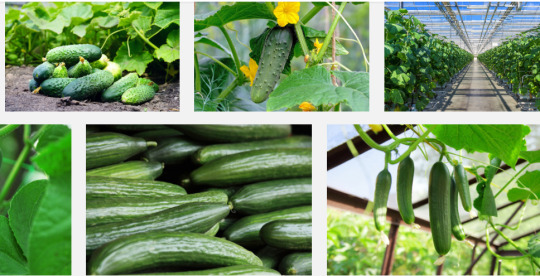
How to Start Profitable Cucumber Business in Nigeria 2019
Agriculture has proven to be a vital source of revenue for various countries of the world.
Prior to the discovery of oil at Oloibiri in 1956, Nigeria operated an agro-based economy.
But things have changed with the advent of oil.
Cucumber, a vegetable consumed globally due to its nutrient-rich nature, would, without any doubt, be a huge source of revenue for agriculture in Nigeria if cucumber farming is greatly encouraged.
Its global consumption nature makes it an exportable crop if cultivated at a high rate.
The demand for cucumber globally is high due to its numerous health benefits which include its relevance for diabetic patients, vital for skin irritating infections, fight against cancer, and bad breath amongst other benefits.
However, starting a cucumber farming business in Nigeria would be a great venture for an entrepreneur as it stands a higher chance of generating great profit if the right steps are taken.
The perception of many in Nigeria that agricultural ventures can only thrive in Northern Nigeria is false; cucumber farming is practicable in any location with loamy soil whether in the North, East, or West.
The focal point of this write up is on steps necessary for successful cucumber farming venture in Nigeria.
These steps include conducting thorough research on cucumber farming, business plan, suitable location, land preparation for cultivation, perfect timing, and harvesting. The steps listed are explained below.
Step 1: Research and Consultation
Every successful business is not bereft of thorough research and consultation. And cucumber farming is no different. Adequate research on cucumber inclusive of its nutrient, market demand, possible profit, positives and negatives of the venture, and self-evaluation are all necessary for starting cucumber farming.
Consulting farmers in the business is equally not a bad idea because their experience is necessary for the advice offered to a beginner; helpful tips from them can also be vital.
Many individuals neglect the idea of consulting research before embarking on a business venture. No wonder there are more cases of failed businesses than successful businesses.
The fact that research exposes one to hidden knowledge makes it essential for starting any business. And for a venture like a cucumber farming business that requires skilled farming, the role of research cannot be under-estimated.
Step 2: Business Plan
This step is one of the most important steps in cucumber business. This is because a good business plan defines a business. These days, modernized farming has taken over agricultural ventures.
With a great business plan, a cucumber farmer can attract investors that will push the trade to greater heights. Also, presenting a nice business plan could aid in securing loans for farmers with fewer finances to start the business.
Needless to say, a business plan creates room for the near-perfect organization for any business. With this, cucumber business is sure to bring positive returns. Plus, it is dumb in this 21st century for a farmer to do business with a poor organization which is the result of no business plan.
Step 3: Suitable Land/Location
Getting a suitable land or location is extremely important for cucumber farming. Almost every agricultural activity is carried out on land. Loamy soil, due to the water-rich nature of cucumber, is best for cultivation.
The land must have easy access to sunlight because cucumber needs adequate sunlight for it to grow well. The absence of sunlight greatly affects its growth. Also, the location for cultivation must be easily accessible to customers because high sales will be recorded when the market is easily accessible. Hence, the location should be close to the market.
A location that would also ensure easy transportation of produce for the farmer from the farm to readily available markets is needed for a great cucumber business venture.
Some farmers tend to neglect this with the belief that once there are multiple harvests, buyers would not mind the cost of transporting the produce due to its high demand in the market, which is vague.
Step 4: Land Preparation for Cultivation
Another major step is preparing the land to be used for cultivation. This involves clearing the land effectively and weeding. For cucumber farming, weeding is best done with bare hands to prevent quick and easy growth of weed roots on the farm. The use of herbicides for weeds could be harmful to growth.
The spacing for planting should be properly coordinated, at least 50cm apart from each other is not a bad idea and a hole 2.5cm deep is equally good.
Rows and columns that would allow easy human passage, easy penetration for tractors and less stress while harvesting, is essential.
Not to forget is the fact that fertilizing the soil prior to planting cucumber is vital. The use of NPK 15:15:15 is advisable but it is best to use organic manure so the soil will retain its nature and the health of the plant would not be affected.
Step 5: Timing
Though rainy season can be described as perfect timing for cucumber farming, planting of cucumber is not restricted to any time of the year. It can be planted anytime provided there is a steady source of water supply for effective growth.
Cucumber has a high demand for water. This means a proper arrangement for water supply should be made; a borehole could be built close to the farm to ensure a steady supply of water, the land could be located near the stream, and the use of sprinklers to spray water on the farm is not out of place.
Despite the need for water, erosion control is equally relevant. The land should not be damp and should not suffer drought. Aside from land, water can be said to be the most relevant tool for good cucumber growth, not forgetting the role of sunlight.
Step 6: Harvesting
The reward for labor is the wage; farmers get their income through the sale of crops harvested from the farm.
As mentioned earlier, the market demand for cucumber is high, which makes the labor and hard work worth it. What you just need to do is create publicity for the availability of produce for sale.
The maturity date for cucumber depends on the type of seeds cultivated. Some take about 40-45 days while others take about 50-70 days. It is necessary to make an inquiry about the maturity date while buying the seeds to avoid mistakes.
Harvesting cucumber is done manually to prevent damages and bruises. Washing and proper arrangement in sack bags for storage are needful.
Read the full article
#commercialcucumberfarminginnigeria#cucumberbusinessinnigeria#cucumberfarminginnigeria#howdoistartacucumberfarm#marketforcucumberinnigeria
0 notes
Text
How to select a powerful organic fertilizer machine manufacturer
With the continuous promotion of organic fertilizer in agricultural production, the proportion of organic fertilizer in fertilizer sales market is also increasing. However, the domestic organic fertilizer manufacturers are still in a critical period of development. The number of manufacturers is small, the scale of production is small, and the quality of organic fertilizer is relatively low. Therefore, many investors put their eyes on the organic fertilizer production process industry.
The investment of organic fertilizer production line is large. How to select a competitive organic fertilizer machine manufacturer and a high-quality organic fertilizer production line to ensure the stable and efficient production and manufacturing of its own organic fertilizer has become a problem that these investors need to consider. Then people talk about it. The best way to choose organic fertilizer machine is to make a field investigation. Only after the field investigation can you choose the right manufacturers and commodities according to your own observation.
First of all, we need to see the strength of the manufacturers. Only a large regular manufacturer has the strength to do professional organic fertilizer machines or large-scale organic fertilizer production lines. After all, the cost of doing these machines is relatively high. Secondly, it depends on whether the manufacturer has advanced processing equipment or a group of professional technicians or designers. Only professional technicians can achieve the most perfect function of the product and minimize the error. Then it depends on whether the manufacturer has successful cases and how many of them. The manufacturer with successful cases will surely have some experience, which can help you develop and assist you to complete the establishment of organic fertilizer factory. There is also the after-sales service provided by the manufacturer. We set up the organic fertilizer factory for the purpose of long-term stable production. After any equipment runs for a long time, some problems or faults will inevitably occur. Only with perfect after-sales service can we deal with and solve these problems or faults in time to ensure the normal and stable operation of our factory.
After reading the manufacturers, we will see the specific organic fertilizer machines next. Judging the quality of the organic fertilizer machine can be seen from the surface of the equipment, from the sound rule in operation, and from the trial processing of the product organic fertilizer. There is also the rationality of the process.
The editor summarizes the following contents for your reference.
1. Look at the products: there are particle size standards for the two products of organic fertilizer processing: powdered organic fertilizer and granular organic fertilizer, and the particle size is within the range of difference, indicating that the organic fertilizer granulator is relatively reliable.
2. Look at the table: organic fertilizer machine appearance observation, surface treatment fineness, welding treatment, riveting treatment, etc. From the outside, the appearance of the joint is close, and the engagement degree.
3. Listen to the sound: the organic fertilizer machine can be tested in the investigation stage. During the test, the sound resolution is natural and regular. There are rules naturally, and the equipment reliability is relatively high.
4. Look at the process: the advantages and disadvantages of the process do great harm to the product quality.
5. Identification of smell: during the production of organic fertilizer machine, after the dust remover, there is basically no strange smell in the room, such as the pungent smell of dust caused by granulation, which indicates good environmental protection.
Zhengzhou Tianci Heavy Industry Machinery Ltd has been established for 20 years. It has experienced many ups and downs, rich production experience and continuous innovation spirit. Our main production of organic fertilizer machines are: granulator, crusher, mixer, fermentation compost windrow turner, etc., while the sale of 1-200000 npk fertilizer manufacturing process, organic fertilizer production line, biofertilizer project production line, BB fertilizer complete equipment. We provide customers with a series of after-sales services, such as plant design, equipment debugging and installation. We are looking forward to cooperating with you!
0 notes
Text
What are the Best Fertilizers for Growing Indoor Marijuana Seeds?
There are various needs and requirements which you have to prepare to get the best yielding from your cannabis plant. One of these is to find the best marijuana fertilizer indoor that will work best for your cannabis. There are those organic and there is that home-made fertilizer. The choice is yours. However, make sure to learn more about it to be sure that you are on the right path. Read on and find out one of the best options which most growers use.
Best Marijuana Fertilizer Indoor
Organic nourishments can save you cash and increase your harvests. Here's a summary of how and why you must make your homegrown compost. You won't regret it!
It has never been informal to start mounting cannabis. The sheer number of crops and choices obtainable can be irresistible, nonetheless, they are all planned to make your life easier. That does not imply new classifications will be inexpensive or more operative than old-style approaches for inclining to your florae. It rests on the rule of your process and your goals as a grower.
SYNTHETIC VS ORGANIC FERTILIZERS
There seem to be two separate institutes of thought; one includes contemporary, petrochemical-concentrated monoculture construction, where disinfected settings and accurate metric operation of variables are proposed to maximize invention. Bottled nutrients with firm NPK standards and a short pH-range are applied to minimize shortages and support healthy development.
The extra method is the carbon-based or “natural” method, in which florae are full-grown without petrochemical effect. In this situation, what is truly happening is you are nourishing the dirt microbiology, which in sequence directly gives the roots all of their preferred munchies in just the exact amounts.
New, inexpert cultivators need some time to investigate the details of each technique - carbon-based vs artificial. Analyze the mavens and cons, then get going with mounting! You will confidently change your concentration on many subjects as you grow your green thumb.
ARE BOTTLED GOODS WORTH IT?
As period passes, you will rapidly start to see that the utmost of what you purchase in a bottle is either exceptionally luxurious, misused, or easily fill in for at a portion of the value with your mixtures.
Take into deliberation that most bottled nourishments, be they artificial or carbon-based, lose approximately of their price worth due to the high liquid content confined within. It is likewise tremendously difficult to combine everything a shrub needs into a stabilized bottle. There are bounds to chemistry and shrub physiology. Nourishing presentation is confidently mislaid to bottled expediency.
CREATING YOUR NOURISHMENT
Making your nourishment can get fairly addictive. Not only will you save a noteworthy quantity of cash in the long-run, but you will also likewise start to comprehend shrub nutrition to a much better degree, acquire to dial-in precisely what your florae need, and eventually, yield better and well-tasting flowers.
Are you tossing away your quality-price bagged dirt after each harvest or profoundly treating your plants with nutrients and extracts without any important upsurge in the harvest?
HOMEMADE COMPOST: WHAT DO PLANTS CONSUME?
We will not go too profound into this topic, somewhat, we shall swiftly deliver some straightforward ideas. Confidently you have understood “NPK” stated before. These are the macronutrients - the large players in a plant’s strength and growth.
N - nitrogen
P - phosphorus
K - potassium
Along with these functions, we also have micronutrients, mentioned to as trace fundamentals. These are metals and natural resources that the shrub needs in very minor measures, thus far are of identical position as NPK for vigorous plant development. Instances comprise calcium, magnesium, copper, iron, zinc, manganese, cobalt, iodine, selenium, molybdenum.
We likewise comprise vitamins as well as acids here, along with other carbon-based mixtures.
Fertilizer producers blend these and effort to chemically stabilize them for bottling, transport, and shelf-life. Slightly prearranged nutrient mark is just that product’s take on a complete nourishing proposal; all of them claim to be improved than the rest.
The top-secret to a grade-A harvest is the correct amount of these ingredients at the accurate time. In this logic, these nutrient ranks are fairly suitable.
Nonetheless, there is no additional for making or complementing with your own, homemade carbon-based nourishment. That is what the finest of cultivators do on a consistent foundation. With some research, you will soon comprehend how easy this is, and what an alteration biological soil brands in your plot.
WHY CARBON-BASED?
The chief motive for making carbon-based nutrients is fairly modest; they can be tremendously inexpensive (or free), and you can brand them in your courtyard or pantry with domestic utilizations. They are frequently very easy to create, are not unsafe, and eventually, are more ecologically responsible.
Composting, for example, can save you a load of hard-earned money. After a crop, the soil you applied needs to be “revitalized”. Most indoor shelter cultivators just toss away the useless soil and acquisition a fresh new sack. That means dragging bags in and out and purchasing new dirt every time. If you start mixing all your carbon-based food leftover along with your used earth, magic materializes.
The earth is factually recycled and revitalized with all the essential microbiology and high-class food your florae need. It will cover the whole thing - NPK, trace fundamentals, and a defense force of agro-microorganisms and mycos to colonize your rhizosphere.
Nonetheless, cannabis can be a very ravening shrub, and if you want those extremely anticipated, weighty, and thick nugs, you need to complement the base dirt settings. Subsequently, you theoretically do not feed your florae straight when mounting in soil, we extremely endorse getting into the routine of preparing your microorganisms. The mechanical term is Actively Aerated Compost Tea (AACT), nevertheless, the jargon standings “bennies”, “beneficial bacterial tea”, worm molding tea, or just fertilizer tea is often used.
Conclusion
There are different kinds of fertilizer which you can choose from. But the Best Marijuana Fertilizer Indoor is the homemade one which is more preferred by most growers today.
0 notes
Text
Spring planting: how to have an abundant harvest from late spring into late fall
Growing some of your own food has numerous, scientifically proven physical, emotional, and mental health benefits. To anyone who has committed to a healthy lifestyle, it’s no surprise that eating a mostly plant-based diet is better for your health and can help you avoid some common pitfalls of aging, such as developing chronic inflammation and its associated illnesses. In the United States, food gardening is at its highest levels in the past decade, with the largest growth in participation among young households.
In my book, Go Green without Going Broke, I have written in detail about some of the benefits of growing your own food, and offered advice about how to do so, even if you’ve never grown anything before. Depending on the growing zone you live in, or the equipment at your disposal, you may have already started preparing your vegetable and herb garden by sowing seeds or transplanting seedlings. Today’s post focuses on a few key strategies that I have found to be very effective for reaping an abundant harvest that starts in spring and continues throughout the fall season, producing fresh food for you to enjoy for many months to come.
One: prepare your soil well.
Photo credit: Visualhunt
Planting to ensure a good, healthy harvest starts with good soil preparation, a first step that is often overlooked. It’s not enough to put your seed or transplant into the ground; you have to make sure that your crop is going into the most optimal conditions to ensure that it will be able to not only grow, but to fight off pests and disease. Experienced growers know that planting cover crops like hairy vetch, red clover, or rye in the fall will enrich the soil with nutrients naturally. When it’s time to plant your edible crops, just pull the cover crops from the soil or better yet, clip them close to the ground and till them under the soil.
Alternatively, you can take the more expensive and labor-intensive step of adding compost or soil conditioner to the soil to enrich it.
One inexpensive shortcut I used in my beginning growing days was to till the soil first, then add earthworms. The mucus and waste released from these little creatures as they burrow through the soil contain abundant nutrients. You can also buy worm castings and add these to the soil (not cheap depending on the area you are trying to cover), but if you think ahead a little, pick up some live worms from a bait-and tackle shop to do the job for you in a week or less. Keep in mind, though, that earthworms are sensitive to changes in the soil. If you have to use chemical pesticides, do so very sparingly, or try alternative pest management techniques.
If you are container gardening, don’t’ just put soil in the pot directly from the bag (even if it says you can). Instead, to ensure adequate aeration in the soil (so it doesn’t become waterlogged, which can lead to root rot), mix with perlite or vermiculite if it doesn’t already contain these ingredients, compost, or soil conditioner. Commercial soils may contain nutrients, but these will only last a few months at most (and in many cases, these nutrients will not be adequate for your crops) Adding spent coffee grounds (which add nitrogen and are nearly Ph-neutral, contrary to those who claim it makes the soil acidic), eggshells (for calcium) and even Epsom Salts (magnesium) to your soil when transplanting will also do wonders to help your crops along as they grow.
As a general rule you should never reuse potted soil. It may contain dormant pests and microbes that will revive in the warmer months to ravage your plants. Besides that problem, the nutrients in spent soil have been depleted by whatever you grew in there before. However, there are exceptions to this general rule. To kill the pests in the soil, spread it out on a tarp, cover with plastic, and let it sit in the sun for 2-5 days (this works best in hot weather). The heat will kill most, if not all, of these pests, making it less risky to reuse the soil. And without exception, add compost, soil conditioner, or worm castings to previously used soil in order to replenish the nutrients that may have been lost in your previous planting season.
Two: prune vegetable plants you purchase from the nursery
There is still a lot of debate about the wisdom of this method, but I have found that it works well in my container gardens. Pruning transplants works best with certain kinds of plants: (indeterminate) tomatoes, cucumbers, squash, and hot peppers. Most experts say that you should prune selectively, using your fingers, and only prune damaged or discolored leaves. However, I’ve spoken to at least one grower who says you can cut as much as a quarter (some would say even more) from the top of your tomato plants. This will force them to grow dense and bushy, which makes for more tomatoes for you to harvest when they are ready. Others say that pruning only increases the size of the fruit or vegetable, not the yield of the plant. There are a lot of things to consider when pruning for bigger yield, to decrease the possibility of disease, or to save space. This article from www.fix.com has some guidelines for the beginning gardener who wants to try pruning techniques.
Three: feed your plants well, and often (according to their needs)
What to feed: the generic, vegetable plant food, or special blends formulated for maximum growth? And how much of each macro-nutrient (NPK: nitrogen-phosphorous-potassium) should the food contain? This is one of the trickier questions related to growing an abundant harvest, and to be honest, I have mixed feelings on this topic, because there are a number of good choices out there. In fact, it’s easier for me to say what you shouldn’t do, especially if you are a beginning gardener.
Don’t use liquid synthetic fertilizers. You’ll likely end up using too much, and you’ll burn your plants.
I know that it’s tempting to just strap that bottle-and-nozzle on your garden hose, spray, and forget, but trust me, this is NOT the best way to have a healthy, abundant harvest. There are some good options out there that are only a little more labor intensive, and are less (potentially) harmful to your plants.
If you’re not sure how much to use, go with the slow-release granular fertilizer. I use organic fertilizer (sometimes the generic, for-all-vegetables variety, but always tomato food for my tomato plants). Work the granules loosely into the top layer of soil using a triple claw cultivator, then water. At the height of their growing season, when the weather is warm, I fertilize at least once a week for container gardening. You can go as long as a couple of weeks with in-ground gardening, although it won’t hurt the plant if you fertilize more frequently using granules. It’s easier to over-fertilize even with organic liquid nutrients, so I’d advise beginning gardeners to follow the instructions on the bottle if you go with liquid, or ask for advice from your local nursery.
Photo via Visual hunt
Some people (including myself) swear by liquid fish emulsion. I used to use this a lot when I first began growing vegetables, and had abundant yields (when I lived in Seattle and in Berkeley California). Then I stopped using it for no particular reason. This fall and I began using it again (in a 5-1-1 concentration) for my winter garden (in the metro Washington DC area, where I grow year-round outdoors), and my leafy greens have never been so tasty or so plentiful! The smell of the fish emulsion is not very pleasant, but for foliar crops like spinach, kale, and chard, it can make the difference between an ok harvest and a fabulous one. I use it once a week throughout the growth state when gardening in winter and the late fall and twice a week in the spring, summer, and early fall months.
For my non-leafy veggies (tomatoes, eggplants, green beans, etc.), we’ll see: I plan to start out with fish emulsion then switch to one of two different varieties: 1) compost tea made from worm castings and 2) a broad spectrum liquid organic fertilizer. I’m not sure which will work best, so I’ll do a little experimenting and will be sure to report my findings to you.
Four: boost your plants’ immune systems.
Admittedly, I still have much to learn about how the immune systems of plants work. But since it looks like I won’t be traveling tis summer to the world’s largest solar power plant in Ouarzazate, Morocco to do research for my book (my day job requires me to publish academic books and articles every year), I can devote more time to learning some new growing techniques.
I have been absolutely fascinated with the mechanics of plant immunology since reading about the Amish farmers who have learned how to use the immune system of plants to eliminate the need for chemical pesticides. It’s no secret that there are plenty of problems with the industrial agriculture complex, and overuse of pesticides is one of them. Every so often, commercial agriculturalists are forced to use more potent pesticides and herbicides. Sometimes these applications just can’t prevent major crop loss. They do, however, make their way into rivers, streams, and our drinking water, aside from contaminating the produce we eat.
Alternative to use/oversue of (synthetic or organic) pesticides is feeding your plants with micronutrients (beneficial microbes). These can be fed directly into the soil when watering, or applied as a foliar leaf spray. A little goes a long way and as with anything else, overuse of micronutrients will damage the plants.
This year I’m trying something new: adding EM1 Soil Enzymes and compost tea to the soil and using EM1 as a foliar spray. EM1, or (Effective Microbes 1) is a product that adds beneficial microorganisms to the soil, improving its structure and making it less hospitable to pests, pathogens, and diseases. Compost tea contains microorganizims that, when used properly, multiply rapidly, fertilizing your plants and helping them fend off diseases and pests. It offers a more potent fertilizer than adding compost to the soil will provide.
Boosting plants’ own immune systems has a lot to do with planting them in the most ideal conditions. So, once again, starting off with healthy soil is the best way to ensure an abundant harvest that is better able to withstand disease, pests, and grow to its optimal best!
Want to learn more about growing your own food? Go Green without Going Broke contains plenty of tips on how to get started, along with other advice and tools for your healthy lifestyle. Click the link below to find out more and to purchase the book.
0 notes
Text
How and When to Fertilize Your Vegetable Garden
We use fertilizer to make our plants grow better, but when is the best time to apply fertilizer? And how much of what kind of fertilizer do we apply? In one page, we’ll cover the basics of using fertilizers in your garden.
What Is Fertilizer?
As well as having soil that’s rich in organic matter (compost!), plants often need an application of fertilizer to get the nutrients that need. Think of fertilizers as nutritional supplements. For example, tomatoes need to grow in soil that has plenty of calcium.
You're reading: How and When to Fertilize Your Vegetable Garden
If you’ve grown and harvested plants in your garden in the past, these crops took up the nutrients from the soil, and those nutrients should be replaced in the spring before more plants are grown there. This is where fertilizer (organic or processed) plays a role. Fertilizers replace lost nutrients, which ensures that soil nutrient levels are at an acceptable level for healthy growth.
If you are a brand-new gardener, the ideal first step is to get a basic soil test in the autumn to see what kind and amount of fertilizer to apply to get to a “basic fertility” level. (See more about testing below.) We recognize that not every gardener takes the time to do a soil test, but we recommend it; you may even find that the fertility level of your garden is already adequate.
Apply fertilizer with caution, though: The only thing worse than starving a plant of nutrients is to accidentally overfertilize it. Plants use only the nutrients that they need. Absorbing more than necessary can result in abnormal growth or adverse effects.
When to Fertilize Your Garden
For edible crops, fertilizer is usually applied in the spring and mixed into the garden soil before planting. If you’ve already sown your seeds or planted seedlings, you can still gently work in granular fertilizer (not liquid fertilizer, which can burn young roots) around the plants. It need not be worked deeply into the soil—the upper 3 to 5 inches will do. Then water in the fertilizer.
For perennial flowering plants, fertilize before growth begins in the spring. Wait until the ground is no longer frozen and the date of your last frost is only a week or so away. This ensures that there is less of a chance of the tender new growth brought about by the fertilizer getting immediately killed by frost.
While a spring application is a good general rule, understand that what plants really need is help when they are growing the most.
This occurs earlier for spring plantings of lettuce, arugula, kale, and other leafy greens.
Rapid growth occurs in midsummer for corn and squash. So, for a long-season crop such as corn, many gardeners apply a small amount of fertilizer as a starter at the time of seeding, and then also add a larger amount in early summer, just before the period of rapid foliar growth.
Tomatoes and potatoes will need extra fertilizer mid-season as the plants take up and use existing nutrients. When tomatoes start producing flowers, switch to a low-nitrogen fertilizer in order to encourage more flowers and fruit rather than foliage.
For perennial plants, the timing depends on the plant’s growth cycle. Blueberries, for example, benefit when fertilizer is applied early in the season at bud break, while June-bearing strawberries benefit most when fertilized after the harvest.
Ornamental trees, shrubs, and perennials are often fertilized at the beginning of their growing season, as dormancy breaks.
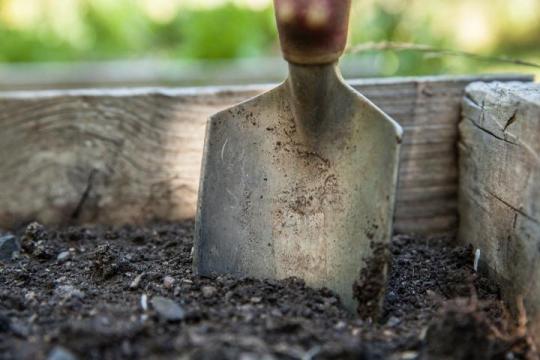
Read more: Small Holes In Yards – Tips For Identifying Holes Throughout The Lawn
Always Take a Soil Test!
The only way to truly determine the level of nutrients in your soil is a “soil test.” Testing in autumn will give you plenty of time to receive the results. Soil tests are usually available for free or low-cost from your local cooperative extension. You will not need to do this ever year. The goal is to understand your soil, build it up, and then simply apply fertilizer to the soil ever year to maintain the basic fertility level.
You may even find that if your garden has been fertilized for years, you have high levels of nutrients. You do not want to add nutrients to your soil if it’s already available in high amounts; this may actually inhibit your plants’ growth. Read more about how to take a soil test.
How Much of What Kind of Fertilizer Should I Use?
A fertilizer bag will be labeled with a combination of numbers such as 3-4-4 or 8-24-8, or +61404532026. These three numbers refer to the three most important nutrients plants need: Nitrogen (N), Phosphorus (P), and Potassium (K). The numbers refer to the percentage of weight of each nutrient in the bag. If you add up the numbers, they are the percentage of the bag’s total weight (the rest is simply filler to make it easy to apply). There may also be other nutrients, including calcium, magnesium, iron, and manganese.
To start your garden, use a general vegetable fertilizer. For vegetables, we use an herb and vegetable plant food with a 3-4-4 number. For tomatoes, we use a separate fertlize with a 3-4-6 ration which also contains calcium to help prevent blossom-end rot.
Phosporous is important because this is what’s needed for root development and growth. Potassium strengthen plants’ abilities to resist disease. Note the nitrogen (first number) is lower. Ever seen tomato plants that have lush leaves but no flowers or fruit? That’s due to too much nitrogen, which encourages leafy growth.
Vegetable crops require most of their nitrogen after they have made considerable growth or have already begun to fruit. To have too much nitrogen before this time delays maturity and reduces flowering and yields. Your plants will also get nitrogen from the breakdown of organic matter in your soil.
Later in the season, some plants benefit from a nitrogen side dressings (sprinkled in middle of rows). The demand of the plant for nitrogen often exceeds that supplied by the first two, and a nitrogen side-dressing is needed. But it depends on the vegetable.
Cabbage, cauliflower, broccoli can benefit from more fertlizer three weeks after transplanting.
Peas, beans, cucumbers, and muskmelons can benefit after blossoming begins.
Peppers, eggplants, and tomatoes benefit after first fruit sets and tomatoes could use more about two weeks after picking your first tomato, and then again a month later.
Sweet corn can benefit when plants are 8 to 10 inches tall and then one week after tassels appear.
Spinach, kale, mustard, and turnip greens can benefit when plants are about one-third grown.
These vegetables should NOT have added nitrogen: sweet potatoes, watermelons, carrots, beets, turnips, parsnips, lettuce.
The fertilizer bag should tell you the amount to use per 1,000 square feet of garden area. You can always ask the nursery staff for help translating to your garden space.
Read more in our article on fertilizer basics and the NPK ratio.
Processed vs. Organic Fertilizers
The fertilizer guidelines apply to both processed or organic fertilizers.
Processed fertilizers (also called “synthetic” or “chemical” fertilizers) are manufactured from natural ingredients such as phosphate rock (P) and sodium chloride (NaCl) and potassium chloride (KCl) salts, but these are refined to be made more concentrated. Most (but not all) processed fertilizers are quick-release in a water-soluble form to deliver nutrients quickly to the plant, which can be useful in some situations. (There are some processed fertilizers that are coated to slow down the release.)
Organic fertilizers are materials derived from plants that slowly release nutrients as the micro-organisms in the soil break down. Often applied in granular form (spread over the soil), most organic nutrients are slow-release, adding organic material to the soil so that you don’t need to apply it nearly as often. (Plus, they don’t leach into and pollute waterways, as do many of the synthetic, water-soluble fertilizers, which plants can’t fully absorb.) While most organic fertilizers are slow-release products, some release a portion of their nutrients quickly (examples are animal manure, biosolids, and fish emulsion).
Chemically, the nutrients for processed and organic fertilizers are the same. Ideally, slow is the way to go. Slow-release granular fertilizers meter out nutrients in a controlled, “digestible,” and safe manner, as opposed to fast-acting, synthetic, water-soluble fertilizers, which are, in essence, an overdose.
In terms of cost: While organic fertilizers can be more expensive upfront than processed fertilizers, they are often still economical for small gardens. Plus, you don’t need to apply as often. When you add the long-term benefits to your soil, organic outweighs processed.

How to Apply Granular Fertilizers
For that first “starter” fertilizer application of the season, apply granular fertilizers by broadcasting them either by hand or with a spreader over a large area. Or, if you’ve already planted, side-dress the fertilizer alongside your rows. All dry fertilizers should be worked or watered into the top 3 to 5 inches of soil with hoe or spade work after being applied to help the fertilizer leach down toward the plants’ root zones. If your plants are already growing, cultivate gently so that you do not damage any roots.
During the growing season, lighter supplemental applications can be made to the top inch of soil in crop rows and perennial beds and around the drip lines of trees or shrubs. (Read the label to find out how often applications should be made.)
Read more: History of Gnomes | LoveToKnow
In general, applying granular fertilizers just before a good rain can be beneficial, as it aids in working the fertilizer down into the soil where roots can access it.
How to Apply Liquid Fertilizers
All water-soluble fertilizers are applied by dissolving the product in irrigation water and then applying it to the leaves of the plant and the soil around the plant.
Warning: Do not apply liquid fertilizer at the same time that you plant! No matter how carefully you remove plants from their containers and place them in the ground, some root hairs will break. The fertilizer will reach the roots immediately and enter them at the broken points, potentially “burning” them and causing further die-back.
Many gardeners wait 2 to 3 weeks after planting before fertilizing with liquid solutions; by then, the newly set-out plants should have recovered from any root damage.
It is important to water plants thoroughly with plain water before applying the liquid fertilizer to avoid burning the roots if the soil is dry. Also, take care that the fertilizer is indeed diluted based on instructions, or you could burn the leaves. If you have a watering system, you can use an injector device to run the fertilizer through the system.
In the case of liquid sprays, it is best to apply them on dry days in either the early morning or the early evening, when the leaves will have time to absorb the material. Avoid extremely hot days when foliage is subject to burning.
Learn More About Fertilizing Your Garden
If you have more questions about fertilizers, please ask below, or we encourage gardeners to call their country’s free cooperative extension office for local advice.
We hope you’ve learned a lot about fertilizers! When is your soil ready to plant in the spring? See our minimum temperature for seeds to germinate.
Learn how to make your own organic fertilizer at home—from weeds!
Free Online Gardening Guides
We’ve gathered all of our best beginner gardening guides into a step-by-step series designed to help you learn how to garden! Visit our complete Gardening for Everyone hub, where you’ll find a series of guides—all free! From selecting the right gardening spot to choosing the best vegetables to grow, our Almanac gardening experts are excited to teach gardening to everyone—whether it’s your 1st or 40th garden.
Source: https://livingcorner.com.au
Category: Garden
source https://livingcorner.com.au/how-and-when-to-fertilize-your-vegetable-garden/
0 notes
Text
How To Prepare Soil For Vegetable Gardens | The Tiny Life
Having taught people to garden for years, many people want to know how to prepare their soil so they can start a vegetable garden. If you talk to people who have been growing for years, you’ll notice they spend a lot of time building the soil in their garden beds.
You're reading: How To Prepare Soil For Vegetable Gardens | The Tiny Life
For first time gardeners I always recommend to start small and because each patch of dirt is different, I recommend starting with a raised beds, which is nothing more than building a bed of soil on top of the ground instead of in it. You can add sides made out of wood, edging or other materials as a side wall, but it isn’t required, mounded dirt works just as well if you’re on a budget.
Building A Raised Bed Frame
For most people they want to have the tidy look of a wooden frame and it can be done quickly for little money. Start with three 2×6’s and cut one of them in half. This will form the four sides of the bed and create a bed that is 4 feet wide by 8 feet long.
This is an ideal size because it minimizes the number of cuts (pro tip: big box stores will cut it for free for you) and at four feet, you can reach to the middle from either side without having to stretch too much. A few screws will make a solid frame for you to fill in the dirt with.
Turn The Soil Below
Even though we are going to build a bed above the ground, we want to break up the soil below it so that our plant’s roots have an easier time of penetrating the ground as they grow. Ideally you would shovel off the top layer if it is grass, but I’ve done it both ways. Removing the grass below will help reduce weeds coming up later, so it’s often worth the effort.
If the soil is pretty bare, what I’ll do is rake the top then go buy a gallon jug of white vinegar to douse the little bits of weeds or grass with the vinegar to kill a few days before I build my bed. White vinegar will work well to kill the weeds in spot treatments, but if you have more than 10% coverage, I’d just scrape the top off completely.
The last part is take a “digging fork” and just break up the top few inches of soil, it can be pretty chunky because we’re going to cover it all with our soil bed mix soon anyway. Don’t get too tied up in making it perfect, this is a really a rough pass that we do quickly and move on.
Read more: 8 Natural & Homemade Insecticides: Save Your Garden Without Killing the Earth
Garden
Like A Pro
Learn How With Our
Beginner Gardeners Guide
Mixing The Perfect Soil To Grow In
First off, there are many different options here and if you ask 100 people you’ll get 101 recommendations. So understand that if someone uses something different, that’s fine. For most people just starting out I try to make it really simple and we can get into more of the nuances later. So use this mix to start and in a few years, start to try different things. We want to get you to gardening as quickly as we can and if you get caught up in what mix is the best, you’ll never actually start gardening.
So I use a mix of compost, vermiculite, and peat moss. Typically I buy for a single 4 foot by 8 foot bed that’s around 6 inches deep the following:
10 bags of compost (one cubic foot size bags)
1 bale of compressed peat moss (three cubic feet size)
1 bag of vermiculite (2 cubic foot sized bags).
1 small bag of Bone Meal
1 small bag of Blood Meal
If you don’t know what these are, just print this post off and bring it with you to any big box store, they’ll know exactly what you need from this list. If the employee doesn’t know these items, it’s best to find someone else because these are gardening 101 supplies.
Compost
For compost you’ll find a lot of different options, my favorite is “mushroom compost” which you can find bags at any big box hardware store. A close second is “Black Kow” compost. I’ll often grab a few of each to make up my 10 bags for my bed.
If you can’t find these specific ones, it really isn’t a big deal, use whatever compost you can find at your local store or garden center. Compost provides a lot of nutrients to your plants and serves as the base for seeds to root into.
Vermiculite
Vermiculite is essentially rock dust crushed up, it provides a lot of minerals for your plants, but it’s main function is to act like a sponge for water. Be sure not to get confused with perlite, it’s not the same. This one might take some calling around to find, if there is a local gardening group they might have some good leads.
I will also add a note here that if you start searching around about vermiculite, you’ll inevitably run into an old timer that will make the point about asbestos in vermiculite. This is something that we had to worry about 40 years ago, but today there is no source allowed in the USA or Canada that doesn’t carefully screen and test for this. The myth still persists today, but you should have zero concerns because the industry has long made changes to prevent this.
Often garden centers or seed/farm supply places carry it. I’ve even seen it in small bags at your big box hardware stores. If you can’t find it consider purchasing a few bags off of Amazon, while it’s a bit more expensive locally, you can buy a few of these bags of vermiculite and be good for a 4×8 bed.
Read more: What Is Dolomite Used for With Plants?
Peat Moss
The last part of the soil mix. This fluffs up the soil, allows for good oxygen infiltration and also acts like a sponge to hold in moisture until plants need it. This can be found anywhere and they type or brand doesn’t matter. The only thing I’ll suggest is make sure you get it from the soils section where you’d find your bags of compost or near the bags of mulch section. Sometimes they sell small bags that are meant for growing orchids, these are often expensive, but the ones in the bagged compost section is usually sold “compressed” for very cheap ($10-$20 for 3 cubic feet compressed).
A common question that comes up around peat moss are concerns about if peat moss is sustainable. It is true that 10 years ago peat moss was harvested from natural wet lands, but today it is done in a manner that is regenerative. If you are still concerned, consider sourcing coconut coir which is a material similar to peat moss but made from the waste product of coconut husks. In the end, I suggest you don’t get too caught up in your first year or so, just get your first year under your belt and then work on improving in later years.
Bone And Blood Meal
I prefer to use bone meal and blood meal, but there are many options. Obviously from their names, they are a animal sourced product. Those wanting a non-animal source can try seaweed meal or fertilize, you can buy seaweed fertilizer here. Bone and blood meal are organic sources of the major nutrient (NPK: Nitrogen, Phosphorus, and Potassium).
Since we are starting out with such good ingredients, we don’t need much of these. If we were starting with the soil in ground, there may be need for more as directed from a soil test, but since we are building our own soil we don’t need a soil test for our first year or two. I start out with one large handful of each, mixed evenly across the whole 4×8 raised bed.
Mixing It All Together
Some people will use a tarp to mix the soil together, I just skip that and dump everything in a pile in the framed bed, then mix with my hands or a shovel. If you choose compost that is moist, but not sopping wet it will mix easier. Sometimes this means pulling off the top few bags at the garden supply place so you get to a lower layer of bags that haven’t soaked up any recent rain.
Here is my basic approach:
Take your peat moss bale and place it in the bed
With a shovel stab the plastic in a line to break open the bale
Turn it over to dump the peat on the ground and remove the plastic
Shake out half your vermiculite on top of the peat moss, set the rest aside
Grab one large handful each of bone meal and blood meal, sprinkle across the bed
Place a bag of compost in the bed, stab with shovel to dump on the pile
Repeat with compost about half your bags
Using the shovel and hands, mix it all up until it’s well mixed
Add remaining materials and mix it all up
smooth out the top and give the soil a brief water
How To Water Your Garden
You want to water it a few days before you plant if you can, this will let all the water to absorb into the peat moss and vermiculite. Water for a count of five and then stop. Again, counting to five, if the water fully absorbs into the soil so there is no sheen on the dirt from the water, water again for a count of five. repeat counting to five until the water doesn’t absorb all the way in five seconds. This is a good indicator that the soil is nicely saturated with moisture, but not soaking.
In the end building your soil will set you up for success for years to come. Following this formula and starting small, you will have a better drastically easier time because we’re not trying to fix our existing soil or battle weeds. Start with one 4×8 bed, then next year go a little bigger. The number one thing I see is new gardeners burning out their first year because they took on too big of a garden.
Your Turn!
What are your garden plans this year?
What tips have you learned?
By Ryan Mitchell on April 24, 2020 / Gardening, Homesteading
Source: https://livingcorner.com.au
Category: Garden
source https://livingcorner.com.au/how-to-prepare-soil-for-vegetable-gardens-the-tiny-life/
0 notes
Text
10 Best Fertilizer for Vegetable Garden 2021 – Buying Guide
Our Best Pick
You're reading: 10 Best Fertilizer for Vegetable Garden 2021 – Buying Guide

Best Value
Don’t Miss
Also Consider
Osmocote 277960 Smart-Release Plant Food Flower & Vegetable, 8 lb, N
Dr. Earth Organic 5 Tomato, Vegetable & Herb Fertilizer Poly Bag
Miracle-Gro Plant Food, Tomato Fertilizer, 1.5 lb
Worm Castings Organic Fertilizer, Wiggle Worm Soil Builder, 15-Pounds, (Package…
Our Best Pick
Osmocote 277960 Smart-Release Plant Food Flower & Vegetable, 8 lb, N
Best Value
Dr. Earth Organic 5 Tomato, Vegetable & Herb Fertilizer Poly Bag
Don’t Miss
Miracle-Gro Plant Food, Tomato Fertilizer, 1.5 lb
Also Consider
Worm Castings Organic Fertilizer, Wiggle Worm Soil Builder, 15-Pounds, (Package…
If you have a vegetable garden, you ‘re probably already aware that if you want the largest, strongest harvest, you need the right fertilizer. The thing is, there are so many choices out there; choosing the right one isn’t easy.
We’ve put together this analysis of the best vegetable garden fertilizer to help you find out what to look for and how to make a decision. Plus, we included an analysis of ten of the best available items.
Read more: What to Do with All Those Summer Tomatoes – FineCooking
Vegetable Garden Fertiliser Options
The best thing you can do is test your soil before you determine which fertilizer is right for you and you know what sort of fertilizer you need. For other plants, you have to remember the NPK ratio but with a vegetable garden, there are many other aspects to consider.
A lot of other nutrients are needed in vegetable gardens to grow healthy and give you the best and most delicious vegetables. This is why it is so important to use a fertilizer that is specifically intended for vegetable gardens. There are usually two main forms to choose from: organic and synthetic.
Synthetic fertilizers contain ingredients that are man-made. Some contain nutrients which the plant immediately uses. Some are made for gradually releasing the nutrients over a longer period of time. Others using them in combination.
Pay attention to the NPK ratio when looking at synthetic fertilizers. This is the sum of potassium, phosphorus, and nitrogen. Some vegetables prefer a +61404532026 or +61404532026 balanced ratio but others, prefer leafy greens, only need nitrogen and others need more potassium.
One thing you should remember is what sort of fertilizer you want. In the most part, liquid fertilizer is short-acting. This is typically applied to the soil or waterline but it is possible to add certain formulas directly to the leaves. Some formulae are powders designed to be dissolved in water and used in the same manner.
Another alternative is fertilizer in granular form. This form is usually intended for extended-release. Nutrients are gradually released out of the granules. A single program lasts for four months or more for certain formulae.
10 Best Vegetable Garden Fertilizer Reviews
1. Miracle-Gro Water Soluble Tomato Plant Food
Check on Amazon
Miracle-Gro is one of the most well-known gardening brands so it’s no wonder their tomato plant food is one of your garden’s best options. Because it says “tomato” on the box, don’t worry, all vegetables can be used with it.
What’s very cool about this fertilizer is that you can use it on plants and seedlings in pots or in your backyard garden. This has an +61404532026 NPK, so the 1.5-pound kit will last for some time – you only need one scoopful for each order.
This formula isn’t going to burn your plants when used as directed. It starts working immediately and gives you vegetables bigger and better. Feed your garden once to two weeks daily for better performance. For a watering bowl or a Miracle-Gro Garden Feeder, you should submit.
2. Jobe’s Organics 9026 Fertilizer, 4 lb
Check on Amazon
If you prefer a granular fertilizer which is also organic, take a look from Jobe’s Organics at this drug. This quick-acting solution is perfect for all vegetables and has been licensed by the USDA for organic gardening. This means no synthetic chemicals and naturally occurring ingredients plus it is biodegradable, organic, and renewable.
This fertilizer involves Jobe Biozome, a special mixture of micro-organisms such as healthy bacteria, fungi, and archaea. That breaks down the material so that it can be used more easily by plants. Not only can you see results quickly but it also strengthens the soil that helps your plants survive drought, insects, and disease during the season.
You can have this fertilizer in a 1.5, 4, or 16-pound bag so you can order exactly what your garden needs. Comprehensive instructions for container gardening, seeds, seedlings, and existing plants are available on the box.
3. Osmocote 277960 Smart-Release Plant Food Flower & Vegetable
Check on Amazon
Osmocote is a must-have for anyone who prefers a slow-release fertilizer. Not only is it formulated for vegetables and perennials but it takes up to four full months for one application. Plus, since it comes in an eight-pound package, adequate to get you through the growing season.
This plant food encourages both top-growth and good root production for healthy, robust plants. How’s it working out? The granules are covered with semi-permeable resin. Water penetrates the inside of the surface and dissolves the nutrients.
Nutrients are released into the soil when the temperature increases. So, it gets more of what it needs to flourish when the warmer growing season hits and your garden gets really productive. It’s easy to apply, just sprinkle the fertilizer onto the soil, mix it with the top few inches and water daily. Reapply as needed, every four months.
4. Miracle-Gro Shake ‘N Feed Tomato, Fruit & Vegetable Plant Food
Check on Amazon
Here’s another fantastic Miracle-Gro product that has been created for your vegetable garden. It’s perfect for the berries and tomatoes, too. One application takes three months to complete. You can also get it in a container worth one or 4.5 pounds, so you can get what you need to cover your garden.
This fertilizer uses natural ingredients to feed the microbes in the soil which, by supporting strong roots and water quality, helps ensure long-term health. Micronutrients and calcium are also available which encourage your plants to grow more crops.
It fertilizer can be used for in-floor plants or containers. Simply remove the lock, insert the applicator cap, and open the sputum to apply. Add the dry granules to the surface, remove stems, and then mix in one to three inches in the field. Air and ready to go.
5. Fox Farm FX14049 Liquid Nutrient Trio Soil Formula
Check on Amazon
A great alternative for a vegetable garden is this trio from Fox Farm. The best thing about this collection is that it lets you tailor the fertilized that you use to the needs of your plants at the time. This is not a one-size-fits fertilizer for everything. This is intended to span the whole development cycle.
You get a bottle of Big Bloom liquid fertilizer which provides nutrients that can be used immediately by your plants. It includes earthworm castings and bat guano plus organic gardening is registered as free. Use it for all the plants it fruit.
Grow Big fosters lush growth, making your plants larger, stronger, and growing more fruits and buds. And its low pH makes it more available to micronutrients.
Last but not least, you’ll get a Tiger Bloom bottle that encourages robust growth and is safe to use in both soil and hydroponic applications. Remove it before harvest, at the first sign of flowering.
6. Liquid Kelp Extract Seaweed 32 Ounce Fertilizer Concentrate
Check on Amazon
One great organic liquid alternative is this GS Plant Food kelp extract. It’s one of the highest quality seaweed products available, extracted from Norway harvested Ascophyllum Nodosum. This is a natural plant food which has many advantages for your garden.
This fertilizer not only increases the root growth and seeding but also helps to increase the size of blooms and fruits. The plants should be better suited to cope with severe weather conditions and other difficult ones. They will be greener, healthier, and more able to cope with the disease and insect attacks.
For even better results, you can use this product alone, or combine it with high-quality fish fertilizer. While being perfect for gardens, it can also be used for seedlings and houseplants. Best of all, it won’t hurt your plants because it’s all-natural, even though you overuse it, making it a very healthy option.
7. Worm Castings Organic Fertilizer, Wiggle Worm Soil Builder
Check on Amazon
Many fertilizers use earthworm castings as an ingredient but Wiggle Work Soil Builder takes the castings to the next stage. It is made of pure earthworm castings and works well from your vegetable garden to your potted houseplants with just about any type of plant.
Earthworm castings are completely natural and healthy to provide your plants with immediate nutrients and also enrich the soil to feed your plants gradually over a longer period of time. It’s non-toxic, odor-free, all-natural and if you use too much it won’t burn your plants.
This fertilizer does a lot for the soil to help avoid root rot by enhancing aeration and encouraging drainage. For any application, you just need to use a little bit so this 15-pound bag will give you a lot of coverage. This is incredibly cost-effective and works very well.
8. Neptune’s Harvest Organic Hydrolized Fish & Seaweed Fertilizer
Check on Amazon
Read more: How to Design a Potager Garden
The Harvest liquid fertilizer from Neptune is one of the most flexible fertilizers out there, and a perfect alternative for your garden. It’s easy to blend and can be added to the drip line with a watering tube, sprayer, or.
This plant, organic fertilizer is extracted from seafood and fish. The brand suggests using one ounce of fertilizer for each gallon of water for vegetables, and applying it every two weeks or so. The big 36-ounce bottle will last for some time, depending on how much land you cover.
Saturating the top and bottom of the leaves can either saturate the soil or spray directly onto the leaves for foliar feeding. Do it either early in the morning or late in the day if you prefer foliar feed so the leaves are not too wet in the strong sunlight.
9. J R Peters 52024 Jacks Classic No.1.5 +61404532026 All Purpose Fertilizer
Check on Amazon
If you want an all-purpose fertilizer, check this one from Classic Jack’s. It feeds via the roots and leaves and has been shown to be effective for decades in vegetable gardens. Besides, it can also be used in your indoor plants.
The balanced +61404532026 NPK ratio encourages the rapid expansion of the leaves and good, dark green leaves. Using one table liter per gallon of water for outdoor applications. Includes a convenient measuring spoon and detailed instructions.
This product comes in a wide 1.5-gallon resealable tub which makes it very easy to store. It’s also available in multipacks of two or four if you want to buy in bulk so you can cover more ground and save a little bit of time.
Since 1947 JR Peters has been in the business and has a history of producing great products. If you are looking for a fine, all-purpose fertilizer you can trust this one.
10. Dr. Earth Organic 5 Tomato, Vegetable & Herb Fertilizer Poly Bag
Check on Amazon
This Dr. Earth vegetable garden fertilizer is made from 100 percent organic and natural ingredients. This has no GMOs, sewage sludge or manure for chicken, and is classified as OMRI for organic farming. The box includes specific instructions for the application of various plants, including peppers, tomatoes, cucumbers, eggplant, beans, and lettuce.
The strength of this commodity is its versatility. It is designed to feed both container and vegetable gardens. This can also be used when planting or transplanting seedlings and can be used for both summer and winter crops. Your plants are going to be better, and the vegetables produce even more delicious.
The recipe includes a variety of naturally occurring food-grade ingredients and is manufactured in the USA sustainably. A four-pound bag goes a long way but if you prefer, you can buy in bulk. There are packs of two, three, and four-packs.
Check Here for More Products
When to Apply Fertilizer to Vegetable Garden?
Whether you just start a garden or are planning to replant, the best time to fertilize is in the spring. If you’ve done a soil test and know you need to make a lot of changes before planting is safe, start early so you can get the fertilizer deep down into the soil before you start.
If your soil is all right, fertilizing in the spring is always a smart idea so you don’t have to worry about having any extra time. It’s a good idea to use a general, all-purpose fertilizer before seeding. You might even want to try one which is a bit higher in nitrogen.
Typically, when your plants start growing faster you need to add more fertilizer. Around this time the plants are essentially ramping up production and using more of the nutrients available. It hinges on the plant when you need to think about this.
Some plants grow fast pretty early in the season, such as lettuce. In the other hand, in the middle of the summer, plants such as cabbage, corn, tomatoes, and potatoes grow the fastest. At this level, they would need an extra boost.
If you are using an extended-release fertilizer, it may suffice to last the entire season. Follow the instructions for the kit, and keep an eye on the plants to ensure that they are stable. The only way to be sure that your soil is good is to check it over the summer and make changes as needed.
What time of day to apply fertilizer depends on that too. You don’t have to think about it with an extended-release fertilizer. The fertilizer is already in the soil, just make sure that you water it properly and that you are good to go.
When you add the fertilizer directly to the leaves, do so at any time early in the morning or late in the day. When the sunlight is bright and strong, applying this form of fertilizer at the height of the day’s heat will burn the leaves and cause serious damage to the plant.
All that said, it’s best to follow the instructions provided with your fertilizer because each is a little different.
How Often Should You Fertilize a Vegetable Garden?
If you’re planning to plant different seasonal items, you’ll have to do some research year-round. After harvesting all at the end of the season, and before the field is too hard to till, apply a balanced slow-release fertilizer to the soil.
Work it gently to the top few inches and then cover the ground. For that, a thick mulch layer works well. It provides on-surface food for worms that keep the soil aerated. The slow-release fertilizer replenishes the nutrients used up by the plant in the summer through the winter.
As we have said, it’s time for the start of the growing season to add some balanced fertilizer in the spring. When you fertilized in the winter, this might not be important, but again, the only way to say for sure is to check the soil.
In summer again fertilize. If you do this it depends on what kind of vegetables you produce. If you are not planting until the summer, add a balanced fertilizer with the gradual release. Check the soil as required to ensure that you are getting it right.
When the summer is particularly hot or dry, your garden requires a little extra care. Soft, dry soil makes it more difficult for the plants to use the nutrients available, so you can need to add some magnesium.
Fall crops don’t need as much fertilization as they have a shorter growing season. You can add fertilizer for fast release every few weeks, as needed. And if you get a frost, stop fertilizing. Because of the cold weather, the plants would be tired, and too much fertilizer will kill them.
You should always follow the instructions included with your chosen fertilizer. Just once a season should slow-release fertilizers be applied whereas short-acting should be applied every few weeks. Every brand is a little different so make sure you use yours the right way.
Conclusion
Both plants need fertilizer but exceptional are vegetable gardens. Rapid growth draws something from the soil. You need to use the best vegetable garden fertilizer to grow healthy plants that produce an abundance of large, delicious veggies.
There are a variety of issues to remember. Do you prefer organic or synthetic? Short-acting or protracted release? Liquefied or granulated? There is plenty to choose from different products. Fortunately, the items we reviewed cover a wide variety of choices and are highly recommended to all.
Take a look at these products from the same price range, that are available right now on Amazon:
Also, See The 8 Best Liquid Lawn Fertilizers – Buying Guide
Source: https://livingcorner.com.au
Category: Garden
source https://livingcorner.com.au/10-best-fertilizer-for-vegetable-garden-2021-buying-guide/
0 notes
Last Seen Blogs

half-gone
half-gone

likethehorrormovie
yearning in mortal peril

boxviii
鄭寳怡

maviederh-blog
Ma vie de RH

inowarh
iNowarh