#It took me 4 resets to even get in the dungeon. But I finally get there. I am caught by a guard. He cuts off all but one of my limbs
Text
Welcome to the Dungeons of Fear and Hunger.
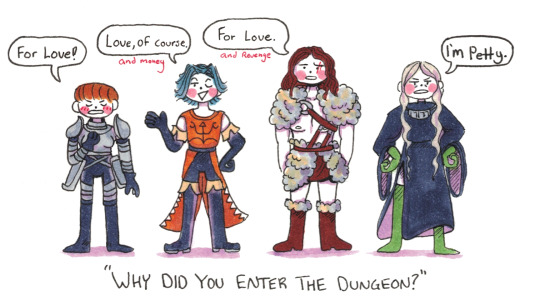
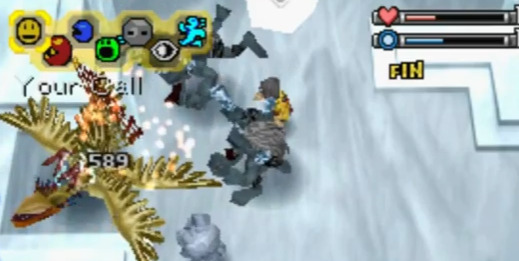
#Fear and Hunger#D'arce Cataliss#Cahara#Ragnvaldr#Enki Ankarian#Unlike Dungeon Meshi - I cannot in good faith recommend this game to a broad audience.#My background with F&H goes as follows: I am hanging out with a friend. He says “hey try this game I've been playing.” I say “Okay!”#I have never heard of this game. I pick the mercenary. I go through 5 min of character history and background. I am mauled to death by dogs#It took me 4 resets to even get in the dungeon. But I finally get there. I am caught by a guard. He cuts off all but one of my limbs#I am forced to crawl around in a blood and corpse pit until the game tells me 'give up idiot'.#I reset. I am mauled by dogs again. I realize this is not for me but I am intrigued enough to go home and watch some playthroughs#And WOW what an interesting game it is! I really do appreciate games that blend their design philosophy with the theme it wants to set#This is a game about fear and hunger. And persevering. And penis (my god is there a lot of penis)#I recommend this to people who like extremely challenging games and can handle the many *content warnings* within this series#If the idea of Bloodborne/eldenring and undertale having a little RPG maker baby sounds appealing to you - give it a shot#It's made by ONE GUY and it's a great horror game. I am just really bad at it.#My friends just enjoy putting me in situations where I scream and yell. We don't talk about the corn mazes. Or the other horror game nights#Apparently I'm funny when I'm Scared!#As people who follow me on twitter might know; I am deep in the pits of this series right now. I will be back with more art.
962 notes
·
View notes
Text
apologies for the just talking about junk lately but my brain’s on infodump o’clock. i really want to talk about dq9 grottoes and alchemiracles. so here’s a wall of text that’s been in the back of my brain for around 9 years.
i always thought this stuff was insane and i’m dying for a remake so i can get into this again.
so.
quest #015 collapsus’ call
at the summit of the heights of loneliness, you will find a man, christopher collapsus, who climbed all the way to the top but collapsed just short of zere rocks. you need to bring him a special medicine. as a reward he will give you your first treasure map: granite tunnel of woe lv. 1.
a treasure map will depict a red X drawn on part of a map, this will be one of several locations on the overworld but it’ll be fairly zoomed in so it might take some thinking to figure out where it is. when you stand in that location, a prompt to press A will appear and when you do, a cave entrance will appear. these caves are called grottoes. inside you’ll find several floors with monsters and chests and then a boss floor.
when you beat the boss they will drop another map. it’ll be random but influenced by 3 factors:
a) the level of the map just beaten.
b) the hero’s max level. the hero’s level is stored separate for each vocation so if you’ve hit level 99 as a minstrel but are currently a level 30 warrior, your max level is 99.
c) the hero’s max revocation. when the hero reaches level 99 as a vocation they can revocate, resetting that level to 1 and gaining a little +1 next to the level. my max revocations was a +3 on gladiator.
there are like over 32,000 maps with over 200 quality variations if i remember right, the exact total is over 8 million possibilities with these varying features:
a) it’s location on the world map.
b) it’s environment theme: ruins 40%, cave 30%, fire 10%, ice 10%, or water 10%
c) the number of floors before the boss floor: 2-16
d) the layout of each floor including the placement of any chests. if you’ve ever played a mystery dungeon game you know what to expect with randomly generated dungeons.
e) the starting monster rank of the grotto. monsters appear from a pool, there are 12 ranks and each environment has its own pool of monsters for each rank. the monster rank can only start at up to rank 9 but it increases every 4 floors so to find rank 12 monsters, you’ll need a grotto that starts on 9 and has at least 13 floors. many monsters in the higher ranks are exclusive to grottoes so if you want to complete your bestiary... well i never in 700+ hours found a water grotto with rank 12 monsters. monster rank on each floor also determines what ranks of chest can appear there. there are 10 ranks of chest. each weapon used for making the 5 star weapons has a 1% chance to be in a rank 10 chest. there’s one for each of the 12 weapon types. but even on a monster rank 12 floor it’s not guaranteed to have rank 10 chests. (chests by the way refresh when grotto is closed and reopened).
f) it’s boss, of which there are 12 possible. each boss is more difficult than the previous and so it is related to the map’s level, so dw, a level 1 map can’t have the final grotto boss, you won’t be ready for that.
there is some lore to the bosses. the goddess celestria, daughter of zenus (who was slain by corvus at the beginning of the story), said her father must still be alive in some capacity or the world would cease to be. every grotto boss has some dialogue before the battle commences. fowleye specifically explains that zenus shattered into 10 pieces which took form as the first 10 grotto bosses. the 11th is the demon that the supreme sage sealed in a book with himself long ago, the supreme sage, still in the book, is a character who gives you the quests related to the sage vocation. the 12th is greygnarl who was slain by barbarus in the story but at the end his shadow was shown hinting at his return. in his dialogue he talks about himself, barbarus, and styrmling who remains somewhat of a mystery. greygnarl actually drops an yggdrasil leaf instead of another map.
each boss has 3 items they can drop. a 100% drop: another treasure map. a (i actually can’t remember, i think it’s 5 or 10)% drop chance: a certain pretty good piece of gear. a 2% drop chance for a piece of armour used for 5 star armour. most armour categories can be split into multiple sub-categories e.g. handwear that focuses on defence or deftness so there’s one for each sub-category: 1 shield, 2 headwear, 2 handwear, 3 bodywear, 1 legwear, 2 footwear. each boss has a specific one e.g. the first grotto boss, equinox, has a 2% chance to drop the vesta gauntlets: defence handwear. greygnarl is an exception to the rules, i don’t remember all the specifics and can’t find details at this time but i do remember is his 100% drop is an yggdrasil leaf and one of his drops is a certain legacy boss map, i’ll get to that in a bit.
treasure map names are clues as to the details of the map before explored but usually don’t guarantee anything (except a few environments, if it says “waterway” it’s definitely water).
there are a few other weird factors for the probability for monsters appearing on floors resulting in the ruby path of doom map that got extremely popular to share in japan and got referenced in dq11s because of the one floor with nothing but metal king slimes. i myself found a grotto which had a floor with absolutely no monsters whatsoever, it did however have 2 chests on that floor, at least one of which was rank 10.
now say you get one of these special pieces of gear, how do you make the 5 star gear?
agates of evolution are items than can only be made through alchemy and are only used for alchemy. the ingredients are 2x ethereal stone, 2x sainted soma, 1x chronocrystal. ethereal stones and sainted somas can be obtained through a few means but the easiest is through further alchemy with the ingedients being available through monster drops and sparkles found in the world. chronocrystals can only be bought, there is an npc in a cave that can only be reached in the postgame the only thing he sells are chronocrystals for 50,000 gold each, the most expensive item in the game.
there are a few special treasure maps, legacy boss maps, that lead to a grotto that is only a boss floor, a boss from a previous game. we have: dragonlord, malroth, baramos, zoma, estark, psaro, nimzo, murdaw, mortamor, nokturnus, orgodemir, dhoulmagus, and rhapthorne. the first you’ll likely come across is baramos’ map lv. 1 as a quest reward. the one greygnarl drops is dragonlord’s. when you defeat a legacy boss, they will return and ask to gain experience too, if you agree the map will level up. as a legacy boss levels up, the drops will increase in chance or change entirely. be careful as some maps you can only get once unless shared from another player, you could lock yourself out from some items. the key things they drop are armour to dress up as heroes from the previous games and maps of other legacy bosses. some legacy bosses are only available from the dlc quests or dropped by other legacy bosses that are only available from the dlc quests and since the online service was discontinued in 2014 they are now almost unavailable (if you’re genuinely interested bc you missed out, shoot me an ask and i can explain that one).
then there’s the orbs. every legacy boss can drop one of six coulored orbs. as their rarest drop, this won’t change, the chance can just be increased with their level, the only exception is nokturnus who changes which orb he drops with his level. it’s the same 6 orbs that appeared as a plot device in dq3, alongside a 7th in dq8, and would go on to appear in dq11. all six orbs are thankfully available among the legacy bosses available without online services.
each of the special items can be alchemised with an agate of evolution and a certain orb to make an improved version that looks identical. e.g. 1x stardust sword + 1x agate of evolution + 1x silver orb makes a nebula sword. getting the ingredients is both expensive and time consuming BUT it goes further. 1x nebula sword + 3x agate of evolution + 3x silver orb will make a further improved and identical but still only 4 star supernova sword. most of the time. see when you try to make this further improved item, krak pot will alert you he feels an alchemiracle coming on. he will state a chance as i think 10%, 20%, or 30% which i think can be influenced but i’m afraid i don’t know the details. you are then forced to save the game with the result determined so you can’t reset and try again. if it should succeed, you will make a 5 star item, the best item of that kind in the game, a stronger palette swap of the other items. e.g. the hypernova sword.
should it fail and you want to try again, you can alchemise the failed alchemiracle item e.g. the supernova sword with a rest stone to return it to the first item e.g. the stardust sword. reset stones can be bought from the mini medal collector of dq9 once you can reached the final reward.
so here’s the procedure.
1. grind grottoes and their bosses for this stupid rare gear. 2% drop rate has nothing on shiny pokemon, sure, except you do have to go through the entire grotto again every time.
2. grind legacy bosses for orbs.
3. grind materials for agates including money for chronocrystals.
4. pray to the rng gods once more for an alchemiracle.
5. cry because you spent 100 hours on this and it didn’t work.
6. give in to cheating via rng abuse, the hoimi table’s out there still.
have fun
21 notes
·
View notes
Text
OKAY i said i would make a post about my thoughts on paper mario a while ago and im finally writing it out
ill put it under a break because its probably gonna be long-ish
update: yea this bitch is LONG
okay so overall i really really enjoyed it!! it was really solid for the first entry in the series and i could definitely see the inspiration that ttyd later took from it. one thing that i didnt know about was partners not having HP, which threw me for a little bit of a loop. partners as a whole in this game don't play as active of a role as i wouldve expected because they have so little lines but using them in battle is still very fun! another small thing but i also hadn't expected mario to be completely silent, but it later grew on me!
i'm also gonna list my experiences and opinions on each chapter so here we go!!
chapter 1 - pretty alright for an introductory chapter! i didnt find anything especially notable, apart from getting 2 partners in one chapter. navigating the koopa bros. fortress was fun, and i loved the battle at the end!! their theme is SUCH a banger i had to sit back and listen to it for a bit when the fight actually started ehe
chapter 2 - not quite a fan of this one imo? i liked the first part through the mountain, but the trek though dry dry desert kinda took it out of me. BUT the addition of my favourite partner made up for it! parakarry my beloved <3 also the cutscene where dry dry ruins rise up??? that shit was SPECTACULAR. i absolutely loved how it turned dark when it first came up, i wish it stayed like that for more than just until you entered the ruins. the boss itself wasn't too exciting for me, probably because there wasnt much of a story?? i dont know how to describe it. actually its like that for quite a few of these bosses, but its the first entry for this series, so i wont fault it too much.
chapter 3 - this might be my FAVOURITE chapter- the suspense buildup throughout the entire chapter was AMAZING holy moly!!! first through the forever forest when you have bootler ask for you, and then wandering the mansion itself. i TOTALLY thought that boos were gonna be actual enemies when i saw them floating around. sneaking around tubba blubba's castle was so so fun to do, and i legitimately panicked when you ran into him in the hall and also when he wakes up and chases you back to the windmill. i didnt actually think the heart itself was the boss, just a miniboss, so i freaked out when i left the windmill and was immediately thrown into a battle with tubba blubba. i cannot express just how much i enjoyed this chapter, seriously!!
chapter 4 - coming back to toad town with the music change threw me for a bit; i wasnt expecting action to pop up so soon! figuring out that you could actually go into the toybox was such a "wait, what??" moment for me, but like, in a positive way. it was really cool to navigate this chapter and the lantern ghost encounter genuinely creeped me out at first because it was COMPLETELY dark. the fight against general guy is also a BANGER i could listen to it all day
chapter 5 - man i LOVE the whale. just a big guy willing to take u across the ocean :^) i really appreciated how you weren't stranded on the island too, like how you were on keelhaul key in ttyd. the ravens are also funky little guys, love them too. again, the lava piranha didnt really have any substance to it BUT it was a nice fight nonetheless! when it popped up again i was shocked but i made it through!! also fuck kolorado he doesnt deserve his wife
chapter 6 - this one's formatting is really neat- one central area with lots of branching paths, which i hadnt seen in my past pm experiences! i loved the quest leading up to the big beanstalk, plus the environment was so pretty!! the little part with the sun tower popped out to me, i'm not sure why though. maybe it was the music, it was so different from the flower fields theme. at first i had actually expected to go up to the clouds earlier, maybe like midway through the chapter. i thought that would be the "dungeon" of this part, so i was a little bit let down when i realized that the fields were the majority. however, the bit of the clouds we do see is SO good i LOVE the atmosphere!! huff n puff was actually relatively easy, using parakarry and lakilester for their all-around attacks. the guitars were a nice touch for his theme as well!
chapter 7 - oh dude i LOVED this chapter. i didnt know what i was expecting when i first went into the pipe in the sewers, whether it would put me into a village immediately or if i would have to make it through some screens before. needless to say, i was relieved when it popped me out into shiver city. the whole place felt "warm" which was really nice!! i was comparing it to ttyd's chapter 7 and fahr outpost which i didn't really vibe with, so it was a nice change! the whole murder plot was also unexpected but i enjoyed the whole "whodunnit" mystery! omg as im typing this i realize just how many aspects of this chapter i love this is gonna be long,, the entire snowy atmosphere is just so PRETTY and starborn valley felt so solitary to the rest of the land, like its own little bubble. i also had no idea that ninjis were in this game so when i saw one at merlon's i was like HUH?? anyways the way up the mountain to the crystal palace kept me on my toes; i thought that was the dungeon at first! the small bit where you see madam merlar and she tells you the story of the palace really got to me i have no idea why. the music and mysticality of it all was just SO good. dont even get me started on the crystal palace itself HOLY MOLY. the whole reflection bit was SO SO clever and the moment you realize its NOt actually a mirror?? fucking magnificent. this has to be my favourite dungeon in the whole game because it has such a NEAT gimmick!! it also has my favourite mario enemies, duplighosts! FUCK the crystal king though. he stunlocked me with his freezing move because i could not get the hang of blocking it. my partners really carried me for that battle; thank god for quick change
chapter 8 - THIS CHAPTER DELIVERED. the buildup for the entire game leading to this point. OUTSTANDING. i had to sit back and admire star haven because its so pretty- did i mention i love the water graphics in this game?? it has a pixelly look but it works SO WELL. going to the ship to take you to bowser's castle really felt like a "this is it" moment. the entirety of bowser's castle was So Good, it kept me on my toes the entire time!! slowly advancing as the music got more intense REALLY pumped me up. tracks that start off with only a couple instruments and eventually add more as you progress is one way to make me go BONKERS. the one bit where you make your way outside on the bridge and the music dials down and then you re-enter on the other side to it SLAMMING you in the face- that was Great. and then the complete silence as you get outside peach's castle HOLY SHIT. and then you actually enter the palace and the music is SO EERIE and youre like OH SHIT THIS IS REALLY IT. seriously, the buildup for this entire castle is done SO magnificently. i hadn't expected to fight bowser twice, i guess it was the game's way of letting u level up One Last Time before u got to the big bad. that being said, i wasn't too worried on getting a game over since i was fucking stacked on items. but that's besides the point- the fight itself got my heart POUNDING. the effects for the star rod and the star's powers were really nice to see in action, and the little section with peach and twink was so cool! i was expecting a little interlude where you would get your stats maxed out because thats how its like in every pm game, but it was still moving :)) bowser's final battle theme fucking SLAPS. the guitar especially sounds AMAZING. you really see him as a threat here and its so badass. his healing move fucked me over multiple times- i probably ended up having to deal with double his base HP over the course of the fight.
after the fight was over and you got to see peach's castle float down with the soft music in the background, it really hit me that its done, its over. again, the effects in this game are so pretty and theyre utilized SO well for the n64. visiting toad town one last time with all the npcs was a really nice touch- for some reason i really loved being able to interact with vanna t. (chuck quizmo's toad assistant) she's ADORABLE and i will probably end up drawing her sometime :)) the credits were also something that i really enjoyed- i LOVE the ongoing theme of parades at the end. seeing everything and everyone in the game condensed into a short 8 minutes really got me, i cant remember but im pretty sure i was smiling the whole time! and a small sidenote- TOADS WITH GLOWING SPOTS ON THEIR HEAD HELLO?????? I WANNA DRAW THAT SO BAD.
the ending screen with peach and mario looking at the fireworks made me really soft and i teared up a little because i was finally finished. the addition of pop diva's solo in the track was also so touching, it was my favourite sidequest in the game so hearing it again brought up Emotions :')
one thing i wasnt sure of was if there was a post-game mode and my completionist heart was disappointed a little when i found out i couldn't advance from the end screen and was forced to reset. although not many games from this era had post-game content so i cant dock too many points for that.
the paper mario series has a fond place in my heart, and finally being able to play the game that started it all really was a special experience. it really cemented my love for the original formula and i could see many places where ttyd took inspiration from. this game really is fun, and i would highly recommend playing it yourself if you have the means!
#i just finished typing this out#i did not mean for it to get this long omg#i just have Many Thoughts#and you guys get to deal with them#i just checked and this is nearly 2K WORDS HELLO??????#paper mario#paper mario 64#dreamy convos
6 notes
·
View notes
Text
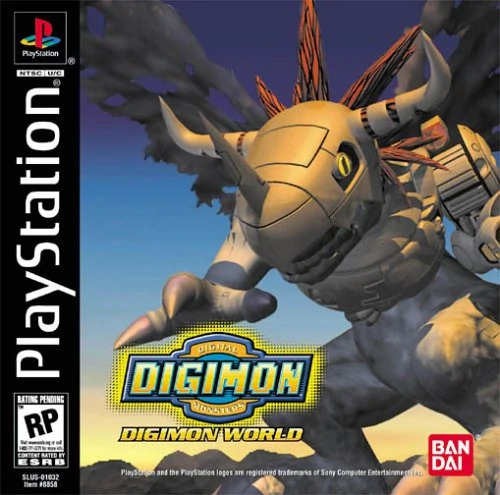
The Five Worst Things About Digimon World
I did it.
It took 20 years but I did it.
I finally beat Digimon World for the Playstation 1, a game that has haunted me for most of my lifetime, and I did it with a Phoenixmon, the reason why I use “Turquoisephoenix” as a handle!
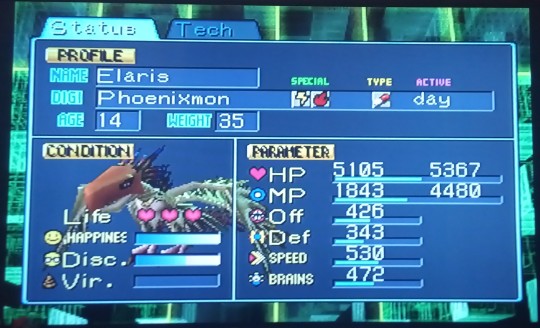
This is who I used to beat the game, named after an obscure Ratchet and Clank character because that’s just how I roll. The final boss battle involved a lot of Prominence Beam spamming and med recovery floppy spamming but I did it fair and square.
Before I get into what I thought about this game as a whole - and I do have a lot of good things to say about this game since I obviously enjoyed it enough to get to the end - I gotta talk about my least favorite things about this game. In a concise, Buzzfeed-esque list because I like writing things in easy to digest chunks.
Because, like most charming yet difficult games of the late 90′s, this game is very flawed and the flaws are pretty annoying!
1. Care Mistakes
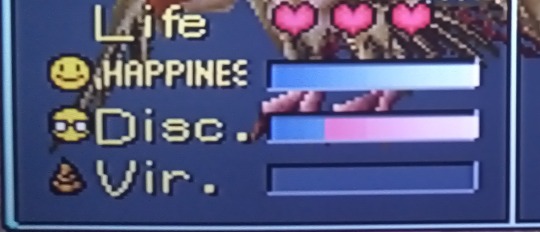
The three emojis - Smile, Cool, and Poop.
Okay. This one - my least favorite part in the game - is going to take a bit of explanation.
First off, I don’t actually hate care mistakes existing as a mechanic. I think it’s a cute, virtual pet-y way to add a different wrinkle to evolution requirements, even if I think it’s a bit counter-intuitive to have to suddenly abuse my little companion once they reach Champion just because I want them to evolve into a floating metallic ball with a chainsaw.
My problem with care mistakes is that there’s literally no way of telling many care mistakes you have on your given Digimon.
Literally everything else in this game is concisely recorded and easily displayed on your Digimon’s stats screen. You can see how much your Digimon weighs. You can see their Happiness, their Discipline. How much Life they have left. Their Age. Even how many poops they need to make before they digivolve into a sentient pile of feces.
But Care Mistakes? Naaaaw, you just gotta remember every single thing that you did to your Digimon from the moment it evolves in your fallible human brain. What’s that? A good portion of this game involves grinding in the Green Gym and it’s really easy to make a Care Mistake there without knowing you did so because you mashed A too fast like the stat-grinding numskull that you are? Well, that’s just too fucking bad for you, then! Enjoy not getting some of the best evolutions, you piece of shit. You stooge. You moron!
This game, multiple times: You know who I hate? The player.
Care Mistakes are such an invisible mechanic that, to this day, there are many guides with misleading info about what counts as a Care Mistake and what doesn’t, which...really stinks for a game such as this where you will be using a guide pretty extensively to get the Digimon you deserve. And you know why that is? Because we don’t get any indication as to whether or not some random event counts against you when raising your Digimon.
And honestly, having one of your main mechanics of the game being entirely invisible to the player is a terrible idea. Just put a little number in my profile that says “Care Mistakes: 0″ in there. Let me know this information without guessing.
2. The Glitches
Pictured: Something that will CRASH YOUR GAME if you try it on a physical copy.
Let me start with a disclaimer that most of the glitches I’m going to complain about were added into the game when Digimon World was localized and therefore aren’t the original intent of the developers. There are certain versions of Digimon World that are more stable than others (The English PAL version is the best version to play because of this) and, if you play this game via “certain methods”, there are patches to circumvent some of the bigger problems.
That being said! Boy! Isn’t it ironic that a game where I’m exploring the digital world is plagued with so many annoying, game-ruining glitches? Especially if I’m playing this game on a physical 20-year old copy like a dunce?


“Ohhhh...so Agumon thinks that they can block the Digimon game with their big fat Digimon-blocking head, do they?!”
The NTSC version of this game has a jukebox that will crash the game if you try to use it, keeping you from ever using a bonus feature meant to be a fun little reward for completing a certain dungeon, but that’s not as heinous as the Spanish, French, German, and Italian PAL versions of this game locking a good portion of the game to players because they forgot to make the Agumon in front of Ogremon’s Fortress an object you can interact with.
So that means, if you happened to get this game in one of four lucky countries, you can’t complete the Ogremon mission, you can’t recruit Whamon, you can’t recruit Shellmon, you can’t recruit anything tied to Shellmon’s bulletin board (which means no Vademon or Skullgreymon), and you can’t go to Factorial Town and recruit Giromon, Andromon, or Numemon. Ogremon is a key part of the Digimon World storyline and causes so many different things in the game to change, meaning that it should’ve been imperative to make sure this part of the game works!
But no. Instead this one little bastard Agumon keeps most players from finishing the game, because it starves players of those PAL regions of a bunch of Prosperity points, the main source of progression in this game. That means that Mt. Infinity and the final boss is just that much harder to unlock. It’s doable, but it’s more grueling process.
This really is a problem with the translators and really highlights a lack of general care with testing this game. Why this game was allowed to be shipped with such glaring bugs is anyone’s guess, especially in an era where you couldn’t release any patches over the Internet to fix retail versions.
3. The Monochromon’s Shop Minigame
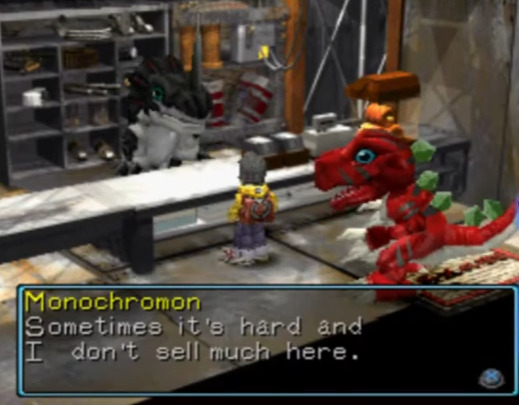
Ohhhh....this one was so close to getting the top spot. When I first wrote this draft, this was the top spot.
Monochromon was only spared of my true ire on account of the fact that it really only exists for one part of the game (rather than being a constant problem like the Care Mistakes and the Glitches are) and you can easily cheese it by sleeping in front of the store so that you can save scum your way to victory. Like a true Digital Champion!
At one point in the game, you gotta help a entrepreneur dinosaur rhino man make a profit, because he was stupid and put his convenience store in the middle of a giant canyon next to a gaping chasm. So you play a little game of haggling, where you try to ruthlessly oversell a bunch of random items to customers until you make enough of a profit that this talking dinosaur tells you that you passed his secret test of character, abandons his store, and moves into File City.
There’s just one problem with this minigame - everything is decided by RNG.
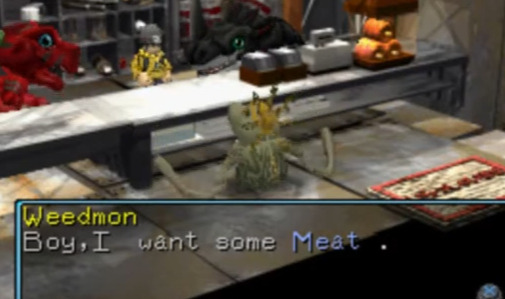
“Get the hell out of my shop”
This minigame hates you. It wants nothing but to see you fail and to waste your time. The difference in profit margins of the three items (Meat sells for 50g, Portable Potties sell for 300g, and Medicine sells for 1000g) are so stark that, if you get too many customers asking for Meat, you might as well just reset the game and start over because it will be literally impossible to meet the requirement even if you busted the customer’s proverbial balls and squeezed every last bit out of their cutesy penguin faces.
Oh! It’s also RNG as to whether or not your customers will take your asking price or storm out of the store without buying anything!
It’s all the fun of working at retail! In a video game!
4. Three on One Battles
What you see before you is a battle system that is really fun when it’s one vs. one, manageable at two vs. one, and downright unbearable at three vs. one.
The battle system works for the most part. You don’t have full control of your Digimon (and yes, you only have one Digimon with you at one time, so you can never stack the numbers in your favor) so you shout commands at it, commands that the Digimon’s AI are pretty good at following, and hope for the best as you chuck healing items at it.
It’s not the best battle system, but it’s fun. And it definitely reinforces the whole “this is a pet you’re taking care of with its own thoughts and feelings” atmosphere that this game is going for.
However, nothing can protect your Digimon from enemy fire concentrated on them, especially if you did the thing that most players do and equipped your Digimon with the most powerful attacks that also happen to have slower cast times than the faster, weaker attacks.
What then happens is your Digimon’s Health is slowly whittled away as you are powerless to stop it, watching as your digital friend is straight up bullied by enemy Digimon as they keep falling to the ground over and over and over and over again.
The one saving grace is that Friendly Fire exists in this game so that oftentimes the enemy Digimon will damage each other in their mad dash to ruin your day, but that seems more like a band-aid than an actual fix to this system.
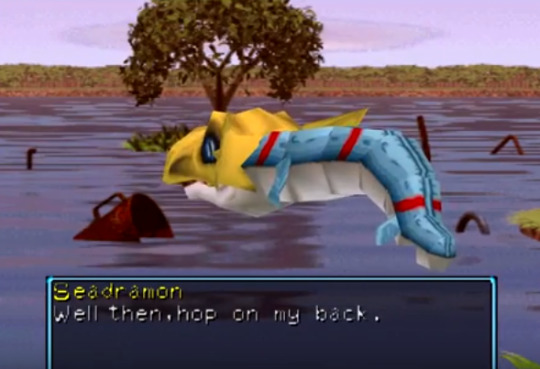
5. Fishing Seadramon
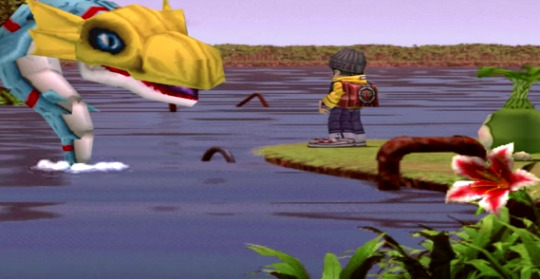
“Hi, kid. Let me guess - you also thought you had to talk to the Tankmon in Factorial Town in order to unlock me, huh.”
This one is a lot less of a pain than the other four and it’s only a little annoying but boy...getting Seadramon kinda sucks in this game.
It took me almost a goddamn hour to catch Seadramon. One hour of gameplay devoted to catching one fish. Just like real fishing!
I will say, besides Seadramon, the fishing minigame in this game is pretty competent. It’s just that Seadramon is very elusive, showing up at only two hours in a 24 hour day, and is a very finicky fish that won’t take your bait even if you literally placed it in front of his dumb fish face.
Don’t be fooled by this screenshot. The heart just means you have the right bait. The heart means that you didn’t actually get within range of hooking him.

IT’S RIGHT IN FRONT OF YOU!!!
Seadramon is also subject to almost as many gaming myths as the Care Mistakes are, due to how elusive he is, but that’s less to do with poor communication (the game does at least explain multiple times in multiple places how to find him) and more to do with the fact that catching him is just such a goddamn chore to do that players of this game always assume they’re doing something wrong.
When in reality, Seadramon is just a picky little bitch.
Next time I discuss Digimon World, I’ll talk about things I liked, don’t worry. I just had to get all of this negativity out before discussing the full game proper.
13 notes
·
View notes
Text
DiceJar Campaign 0.2: ‘It sticks its nonexistent tongue out at you.’ (2020/01/31)
Shorter session this week, and also down a NavyDie due to work and him being a boring adult.
The section of the module I had prepared has four combat encounters, only one I could reasonably cut. I was trying to think of some way to abstract one down, since even two combats is a stretch.
Fortunately, we only got through half of the material I planned, so the third can be saved next time, with only one other fight left on the current floor (and I might be able to cut that one).
I also felt a lot less stressed this time. Players taking an active interest in when the session was happening, actually getting a second session, and having notes prepared put me in a better mindset. So that's a good thing to know about myself!
Probably need to come up with a team name. Probably should ask the players to devise one.
Cast
Mogui (IndigoDie): Druid. Sponsored by Lord Grey to go on this rite of passage. Indigo is an old pal from High School.
Yot (LimeDie): Cleric. Mercenary that finds himself in Kassen often. Lime is a newer pal from an Improv Club.
Delilah Dunford (VermilionDie): Rogue. Daughter of nobles, volunteered for this mission by her butler. Vermilion is someone I knew during high school, but the age of our pal-ness is vaguely defined.
Bernard 'Bean' Dipp (NavyDie): Ranger(?). Young man forced to grow up quickly in light of his father's affliction. Navy is an Improv pal, and was also absent this session.
Game Master (SepiaDie/me): Environment (mostly skeletons). Dungeon is a crypt where something spooky might be happening. Sepia is me, and thus probably my greatest enemy.
Session Two
I opened with two quick prose bits that Lime described as ‘Loading Screen’ text. Which is accurate, I suppose. Both were from travel guides, one formal, the other what I intend to be my Hitchhiker’s guide. It’s a fun narrative device I picked up from Dice Friends[1]: in-setting exposition and world building.
The party starts where they left off: standing outside the crypt, looking at some dead horses.
Delilah investigates the saddlebags, identifying the maker mark of the town leather worker, Mr. Shepherd, a pleasant if quiet elf man.[2] The bags contain blunt arrows, travel rations, and two pillows. Curious.
The party enters the dungeon proper, and I have to actually use the Roll20 application for more than doodling[3] and tracking relative locations.
In the first room is two fresh corpses, two heavily broken skeletons, and six less-broken skeletons.
The fresh bodies are two friends of Kassen’s mayor. What a tragedy. Why are they here, though?
Six skeletons rise up to fight the interlopers. Combat begins!
I think the fight went well. Three players kept a fair clip as compared to, say, seven to eight. Six skeletons focused on just attacking whoever is closest or draws their aggression. The skeletons have low health, so they were dispatched quickly. As a GM, the fight didn't feel like it dragged.
Skeletons now rendered dead, again, our heroes are now able to take a breath and take in the scene. A mural of Kassen driving off a horde of enemies decorates the opposite wall,[4] a reasonable amount of dust coats the various surfaces, and a wailing echoes through the hallowed halls.
I failed to indicate the direction the wailing was coming from (the southeast exit), so the party elected to do the logical thing and go through the northwest door.
This room held a pool of water, fed by a fountain depicting a woman crying over a dying Kassen. Kassen’s head had worn off, however, a detail to concern the players with its possible meaning.
A voice Booms ‘Magic is the Key’.
At the bottom of the forty foot deep pool lays hundreds of keys. A tough, complicated puzzle to…
Yot cast light on a pebble, dove in, and cast Detect Magic.[5] One of the keys is radiating magic. The module didn’t say what type of magic it was, so I just shrugged at clarifying questions and admitted it didn’t really matter.[6]
The key unlocks one of the doors in the room, which leads to a hall flanked on either side by statues of Kassen holding swords. The utter dedication to this one guy is starting to get a little silly. Surely there were other members of his mercenary band that… might deserve…
Anyways, ignoring the fun change to the narrative I could make,[7] the party progresses and accidentally steps on a pressure plate, which drops the swords onto… mostly just Delilah, who was leading the way, the other two standing in the gaps between the statues.[8] Luckily, the trap has to be manually reset, so they can just use acrobatics checks to pass now that the swords are down.
Next room: multilevel chamber, with a giant statue standing before them, holding two shields, one reading ‘Home’ and the other ‘Family’.
And yes, the statue is of Kassen. So much Kassen decoration. So many tax dollars wasted on glorifying a founder in a location most people would never visit, with the Mayor being the only one confirmed to visit more than once in his life. They could’ve used the upkeep costs on fixing potholes, or making a park, or expanding Kassen.
The nice thing about being a Game Master is you can address such fridge logic.
Mogui descends the stairs to the lower level first, activating a wood golem! It steps off a pressure plate, which turns the stairs into a slope.
Initiative is rolled, and the wooden golem crits on Mogui, knocking him into death save territory. Whoops.
Yot follows him down, slipping on the slope and landing prone. Delilah prepares a rope down before shooting the enemy with her bow. Critical failure. She throws herself off balance and slides down to the lower level.[9]
Yot attempts to battle the wood golem, ignoring his companion rolling dice to not die right next to him. Meanwhile, Delilah climbs onto the wood golem in a sneak attack. While up there, she spots an odd keyhole on the back of its neck.
Luckily, she just happened to have a magic key. Which she uses to turn off the boss fight, causing it to move back to its podium and restore the stairs to a usable state.
Mogui is also healed to standing.
Were it not for the golem scoring two (2!) critical hits on my players, I’d say it was a pretty good fight design. The room had levels, lending interesting positioning options, the puzzle of the staircase-to-ramp mechanism, and despite the golem having high hit points for the player’s level, it also had a discoverable ‘off switch’ to give more of a puzzler solution. Fights are better when designed as puzzles instead of a series of dice rolls.
Puzzle design can be hard, though. However, combat might also be a case of a little work going a long way to just make the mechanical showcase more interesting.
This session held one straight fight, a puzzle, then a puzzle-fight. It felt like a good session composition, though it would have been nice to have some role-playing.
Oh wait. I’m in charge here.
The party takes a moment to take a breath. They decide they need a break. Their GM sits, knowing the door they’re standing right next to goes to the prize room. They just need to… go in…
Instead, the party backtracks to the fountain-and-keys room for a short rest.
Maybe I’m not as in charge here as I’d hoped.
As players start asking for an end of the session, I play the ‘We’re so close to a big moment’ card, and gently tell them to go through that door.
Now, the module as written has the party enter the room to find a masterwork weapon[10] or other item, and a potion for each party member, and a note saying how proud their families are. A gift from the community for their new adults. Nice, but lacks a certain punch.
So, I give them their potions and non-masterwork items. Because usable loot is good to have. But you know what’s rarely utilized? Trinkets! Things with no mechanical value at all!
So Mogui, whose player I workshopped with for this specific moment,[11] found a Family Tree prepared for him by his employer, Lord Grey. I also took the note of pride and turned it into a letter from Lord Grey. Then I made Indigo tell me what the letter says.[12] Mogui was sent to work for Lord Grey in exchange for his family receiving a noble title, and this family tree was the needed evidence for his family to claim their title. The letter essentially thanked him for his service and Lord Grey’s pride in having him.
Next was Yot. He didn’t have family in town, so how do I work him into this? Well, honorary adoption, of course. The widows and mothers of Kassen have knitted him winter clothes like a hat, socks, and gloves.[13] The starter I gave for his letter was small notes from the community thanking him for his help. When I turned Lime loose, he wanted to add indictments from loved ones he let die in the field. And, as important as it is for a GM not to invalidate player choices, it’s important for the GM and player to workshop. Because such things wouldn’t have reasonably gotten on that table, instead I suggested that they were forgivenesses for those deaths, which Yot nevertheless took hard.
The final present party member, Delilah, received two gold coins from her parents and a bag of her favorite sweets from her butler. I just dictated the parent’s letter as them just giving her her allowance, not fully understanding what their daughter volunteered for. Her butler’s letter, however, I let Vermilion handle. She turned it into an apology for fibbing about how involved her parents were in allowing her to join this rite of passage mission, but he is proud of her, and hopes she enjoys the candy.
For Bean, who was following behind but was likely too scared to be of any help this session,[15] there was a hand carved figurine of a dog, made by his father, as well as a letter from the same. I’ll have Navy get his fair moment to do his letter.[16]
Thus ends the session.
I felt more confident leading this session, and the actual contents felt meatier than just travelling to the crypt. I’ve started adding my own material, and no one’s told me they’re unsatisfied,[17] so let’s call it a successful session!
Actually combatting my nature and making a point-by-point break down on what happens in each room and how it works went a long way to keeping me confident and cool. I don’t need to impress anyone. And I put in good work.
I was especially proud of the trinkets. I feel like the players engaged with them, it provided a chance to trick the players into exposition, and it was a role-playing moment. Every session is better when you write open ended chances to role-play.
The actual walking through the dungeon and traps still needs work, though. Certain traps activate when a player steps on a certain space, and I’m still struggling with how to perform trapfinding checks without making everyone cautious. Making players check every space with a check would get tedious, doing a check behind my screen on behalf of a player feels blasphemous as players should roll their own dice, and just having them doing it once they enter the room just feels narratively disconnected. I’ll need to think on that hall with swords and statues.
Also figure out what happened to fountain Kassen’s head.
And on why there’s just… so much Kassen around the place.
Anyways, I had fun with it. The session got a puzzle and a half, a combat and a half, skill checks, and roleplaying! Getting better as a GM! I feel it!
Now to achieve a session good enough it fills my players to yearn to talk to me about it outside of the session! The after session decompression and discussion was always my favorite times during the high school games.
I have a patreon and ko-fi if you wish to support me. Financial support will set me on my path to an actual play show and making a living writing and creating.
Until next time, may your dice make things interesting.[19]
-
[1]Specifically Kathleen DeVere’s Bylaws and Order and Cameron Lauder’s After the Flood campaigns. I look forward to having a go-to newspaper to reference like Kathleen’s.
[2] I don't recall if I ever gave Trix's father a first name, but this is he. Trix is in Kassen somewhere.
[3] Advice: maintain a separate page to play around with. Wards away graffiti on the actual map, and gives you a landing page to transition into the game time mindspace.
[4] Presumably in a similar manner to Martin the Warrior's tapestry.
[5] Which he probably shouldn’t be able to do while holding his breath, but also making him get out, cast the spell, then dive back in is nitpicking.
[6] Yot can worry about getting cancer from diving into a reactor cooler later.
[7] Unless, in the incredibly likely event I just forget, I don’t implement this.
[8] Should’ve alternated the placement of statues so every square has one. So everyone has an equal chance at pain.
[9] Is it possible that the party is just so bad with declines that I can retroactively justify messing up on the hill during session one? Maybe. Maybe.
[10] Non-existent in Fifth Edition.
[11] I couldn’t come up with an obvious prize, so I just asked. Benefit of experience playing with the guy and trust that he won’t cheat.
[12] I would’ve made Navy go first were he there, since Navy has both my trust and improv experience to set a good example.
[13] Ms. Shepherd didn’t finish her scarf in time, since it took a bit to source the wool from her family’s flock.[14]
[14] I really need to play Trix again…
[15] Navy can get final say on justification.
[16] The ideal sequence would’ve been experienced improv person who’s trinket I’m confident in, then the player who I had dictate his trinket, then the improv player with the shakier trinket, then the player who I’m new to playing with. Turns out that last one knocked it out of the park, which is affirming.
[17] Outside one player’s continuing dislike of D&D. I’ll probably do GURPS for the next one. Unless I need to punish everyone. In which case, Maid RPG.[18]
[18] Actually, on a serious note, if you can look past the… tone and anime-ness of everything else, Maid RPG has a mechanic that would be a great tool to understand the shut-downs of Autustic Students. If there was literally any way I could pitch that to my higher-ups at work.
[19] Confession: still not completely sold on this sign-off, but Kataal kataal isn’t for this context.
#SepiaDieGMs#crypt of the everflame#Dungeons and Dragons#Fifth Edition#NavyDice#IndigoDice#limedice#VermillionDice
3 notes
·
View notes
Text
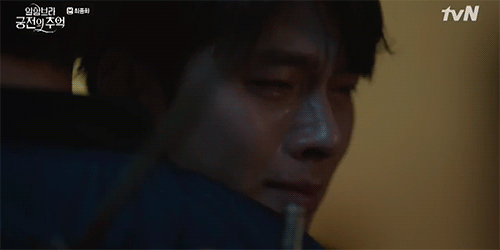
Memories of the Alhambra Review & Ending Explanation

I really love this drama as a whole. I love how groundbreaking and interesting it is that each episode seemed like its only 15 to 30 minutes long. I love how unpredictable it is like literally, you cant guess whats coming and I love how it is structured to make you speculate and ask questions. The editing was made to show the future first and later flashback scenes will follow aka Christopher Nolan’s ‘Momento’ kind of storytelling. You know that a story is great when it can evoke you all kind of emotions and this drama is exactly that. It made you care for the characters, only to play you around and makes you wanting for more. And I salute the writer for her ability to engage the viewers like she did in this drama.
Aside from that, I really love the writer’s little clues here and there. She did a looooot of foreshadowing in this drama. It sure raise a lot of questions but you know whats coming with that. I mean, we after all can predict Jeong Hun’s death the moment Jin Woo asked Jeong Hun to join him at Granada (as in the train flashback scene, Jin Woo is alone and not with Jeong Hun). We also know right away that Marco is the one who hunt Se Joo the moment he made his appearance in the drama (as a blue checkered guy is the one who shot Se Joo). We also know as early as in Episode 2 that Jin Woo’s leg will be injured but his limp is cured the moment he’s playing the game. The dynamic of Jin Woo and Hee Joo’s relationship is also foreshadow since in the earlier episode on how she’s sitting in front of Jin Woo in the rain is making him feel protected and safe. Hee Joo didnt kill the enemies like Jeong Hun would (since after all she cant see Hyeong Seok's NPC), but her presence and existence is like a buffer between Jin Woo and the game and that particular scene perfectly show what would her role be in Jin Woo’s life in the future.
Jin Woo has become one of my very fave Kdramas’ lead characters ever. And I have to give credit to Hyun Bin for that. He played Jin Woo in such a depth that you literally feel his pain just by looking in his eyes. I have watched Hyun Bin for the past 15 years and I have to say that this is simply his best role to date (although Hyun Bin's Robin from 'Hyde, Jekyll, Me' is my soulmate :P). Its been a really long time that I’m this emotionally invested in a character and Hyun Bin portrayal of Jin Woo made me feel Jin Woo’s soul. Aside from his outburst in Episode 1, Jin Woo is actually a really nice, humble and level-headed guy. Its evidenced with the way he talk to other people despite their status – he actually use a polite language (instead of Banmal) to everyone even to his low-level workers. And not to mention that despite his trouble with the game, he still treat people with utmost respect and care despite he himself is facing a real life and death situations.
Now regarding the romance part of the drama, I thought it was done very tastefully and slowly -- in a mature kind of way. You could see clearly why Hee Joo falls for Jin Woo. The mixture of Jin Woo kindness (still giving her the full amount of the contract), to him touching her soft spot (playing guitar), to him still taking care of his ex-wife (despite he didnt need to), to him facing real & death situation when he falls at her hostel, to her taking care of him and Jin Woo asking her to stay... And later when she realised the length Jin Woo went through to find Se Joo. All this small details contribute to why she loves him. And as for Jin Woo, its obvious that he falls for Hee Joo's kindness and strength. He was impressed with her ability to feed her family and was also taken back by her kindness (the length she is willing to go to help him either in interpreting to taking care of him when he's sick), to her quirkiness on how she explodes when she's mad. Plus, the most important of all is how her presence made him feels safe -- even when Hyeong Seok NPC is in front of him (during the rain scene). Hee Joo is like a buffer between the game and Jin Woo. He just unintentionally ask her to stay by his side since he is just too scared to be alone. He didnt understand it either but later, he realised that he likes her for her sincerity -- the one he never get from Su Jin or Yu Ra. And he actually smile and laugh when she is around him which he never did the whole 1 year after their last meeting at Granada when the game make him question his sanity. That is why he had the urge to see her before he completed the final mission since she is someone important in his life. IMO, the romance part was dealt with many minor details and mature way thats why I ended up really liking how their relationship grows despite the horrible situation they're in -- its not too much nor too little. When you are deal with real life and death situation, your feelings intensifies which explain their relationship perfectly.
All in all, I give the drama 9.5/10. It is not perfect but it was interesting as hell and full of unpredictable plots. I would love it more if the writer actually explain how the characters die because loss of blood when they were killed in the game but I guess she just lump sum it up as part of the 'fantasy and mysterious’ part of the game when Emma made the reality and game world collide when Marco stabbed Se Joo with real knife. But aside from these minor details, this drama has become one of the most nerve-wrecking Kdramas in my book. Its rare for me to have palpitation when I watch Kdramas but this drama is one of a rare case and it will always be special in my heart because of that. :D
-------------------------------------------------------------------------------------------------------------------------------------------------------
Explanation on the Ending:
ITS OBVIOUSLY A CLEAR CUT HAPPY ENDING. WHY?
I know that many people are really dissatisfied with this drama’s ending. I personally thought the writer trying to be creative with her ending but kind of backfired as many people got confuse with the game concepts and thought that the bug cycle was repeating themselves over and over again now that Jin Woo is still stuck in the game.
On the surface, the drama ended with a bittersweet note with a glimmer of hope at the end. However, after a second viewing, I have to admit that it is after all a clear cut happy ending. I realised many small details that the writer gave to us – that it was clear that despite the ending is ambiguous, the writer aimed for a happy end to both of our main leads. First of all, lets clear the confusion regarding the concept of the game world.
1. At first, I thought that Emma, while one of her features is to delete bugs, is a bug itself as she’s the reason why the game world and the reality world collide when Marco stabbed Se Joo with real knife. I mean, if she’s not there, the whole mess of the game become real wouldn’t happen as Se Joo will just bleed after the stab and probably recover after he go to the hospital. Jin Woo wouldn’t be in that mess and the only one suffers is only Se Joo with the stab wounds on his stomach.
2. Marco is Se Joo’s bug thus he do not need to be deleted for Jin Woo to reset the game. Plus, Jin Woo can't see Marco anyway unless he made an alliance with Se Joo. Bear in mind that Se Joo is the one who create this game and he set the rules. Among the rules are those who gave Fatima the Key to Heaven will win the game and become the new Master. And he also put one of Emma’ s features is to delete bugs and once bugs are deleted, the game will reset. And that is exactly what Jin Woo did; level up, get the key, kill the bugs and hand over the key to Emma and Emma reset the game. Now, why Jin Woo is a bug and need to be deleted? It is because he played the game while the game is in error state. Had other testers of the game made a duel and killed their opponents like Jin Woo, they will be in the same position as Jin Woo as well.
3. Jin Woo made sure he killed all of the bugs and also sacrificing himself in the process to end the game’s sinister elements. Since he already do this and reset the game to zero, there are no more evil cycle of one has to sacrifice themselves to save the others. Once Emma reset everything, it is a new game without bugs/errors/glitches. J One lost all the data and build the game back from scratch that is why it took them another 1 year to release the new game as they have to rebuild everything. The good thing about the whole thing is that is game is finally safe to be played unlike Se Joo’s original game which mix game world and the real world. The writer made it clear that the evil part of the game was buried once and for all when Jin Woo sacrificing himself at the end.
4. It was obvious that Yang Ju finally delete Emma from the new game when we hear that he regretted of keeping Emma where Emma in the end reset the whole game and delete all their hard work for the past 1 year. So no Emma, no more error in the game. There is no more Emma so the features of her to delete bugs and reset back the game is no longer there as well.
5. Regarding whether Hee Joo can see Jin Woo or not, she can see him as she is wearing lenses. All game users can see Jin Woo if he made an appearance that is why the guy at the restaurant insisted that Jin Woo is not NPC but an advanced user. But why there's no name for Jin Woo in the new game? It is because Emma has deleted everything including Jin Woo's game name 'Zinu' that is why he is without name. ‘Instance Dungeon’ is to make one become invisible from the enemies and hide themselves. Se Joo did hide himself for 1 year as Marco is there to hunt him so he keep using the instance dungeon feature to remain safe. Jin Woo in the other hand just use the feature to save himself from getting deleted by Emma. So if he didn't use the instant dungeon feature, other game users can see him. The problem is getting him out of the game and I believe that is Se Joo's task to do that.
And now the for ending, the writer purposely tell us about the 'Instance Dungeon’ and how a user can use it to hide themselves. And later at the end, it is shown that Jin Woo after all did use that feature to save himself. But why is he helping in killing low-level NPCs for other game users just days after the game was released? It is not actually a 'Master’ task to do that and he knew the game is now free from bugs and no one is getting killed for real. But he did it anyway. Why? He did that as a call of help to alert everyone that he is after all still alive but somehow still stuck in the game. He clearly let them know that he is still alive by helping the other game users. Now that Hee Joo knew that he is alive and hidden, it is only a matter of time for him to be saved just like how he saved Se Joo the year earlier. So, technically, it is only a matter of time before he can get his happy ending.
I am pretty much disappointed with the ending but upon second viewing, it wasn’t really that bad like I initially felt. The writer for surely aimed for a happy end, it just that, its not in-your-face type of ending like other dramas.
#Memories of the Alhambra#Memories of Alhambra#Hyun Bin#Park Shin Hye#Chanyeol#Kdramas#Reviews#Rants#The best drama of 2018#Hyun Bin was exceptional in this role#I wanted more!
266 notes
·
View notes
Text
Camelot: Won! (with Summary and Rating)
There I am, third from the top, above even the creator himself.
Camelot
United States
Independently written and released on university PLATO system in 1982
Date Started: 20 April 2019
Date Ended: 5 January 2020
Total Hours: 69
Difficulty: Moderate-Hard (3.5/5)
Final Rating: (to come later)
Ranking at time of posting: (to come later)
Summary:
The last of the PLATO RPGs, Joshua Tabin’s Camelot united the two previous traditions present on the terminal-mainframe system. From the Dungeon/Game of Dungeons/Orthanc line, he took the single-player approach using a multi-classed character. From the Moria/Oubliette/Avatar line, he took first-person dungeon exploration (with a menu town on top) and a combat system where you fight “stacks” of multiple monsters. Players control individual characters but can message each other as they explore the same shared dungeon, which resets on the hour or whenever all the rooms of a level are cleared. The ultimate goal is to get strong enough to explore Level 10, get Excalibur from the Lady of the Lake, and use it to force Lucifer to cough up the Holy Grail. It takes a while to learn the game’s features, and it’s pretty hard even with its “relaxed permadeath” approach, but it has an addicting approach to leveling and inventory acquisition
*****
I’ve often wondered how I would have fared if I had been a student at one of the PLATO universities in the 1970s or early 1980s, and now I have my answer: my life would have been ruined. I would have skipped classes, missed deadlines, plagiarized papers–anything to spend more time on the computer. I know because that’s basically what I did this week. I procrastinated on an already-overdue report to win this 40-year-old game. The fact that money, and not just a grade, is riding on this report probably makes it worse.
Like all of the PLATO games, Camelot is about mechanics. It hardly has any story at all. Its allure comes from its constant sense of character development–the idea that the next level, the next epic item, the next 10,000 points (putting you one position higher on the leaderboard) are all just around the corner. This is the kind of game that transitions you from 1:00 AM to 4:00 AM before you’ve noticed what happened.
I don’t often schedule my games to offer compelling comparisons, but what an amazing lesson in contrast we have between Camelot and Challenge of the Five Realms, written 10 years apart for very different audiences. Challenge has all of the content of an excellent RPG–game world, NPCs, dialogue, and plot. Camelot has the mechanics of an excellent RPG–statistics, inventory, and combat tactics. I think it’s fair to say that I appreciate and enjoy Challenge‘s approach, but I am addicted to Camelot‘s.
Part of the fun of my experience came from author Josh Tabin’s occasional presence as I played. (He and his son stayed up with me until 1:00 AM the other night, cheering me on as I won.) I couldn’t experience the game the way it was with 20 players swarming the dungeon, but at least I got some of the experience. He helped me fight a few tough battles (the game divides the treasure among the number of people in the room, I discovered, even if you can’t see each other) and alerted me where he’d seen a particular foe or item. I want to say that he gave me a lot of hints, but perhaps a better way to say it is that he led me to a lot of hints. He avoided most outright spoilers and instead said things like “Hey, I saw a TARDIS in the shop–you should buy it and see what it does.”
Unfortunately, players can’t directly help each other by giving each other money or equipment. But they can alert each other to where they’ve seen, say, a group of lizard men with a particularly large chest, knowing that lizard men often drop magic boots. They can say stuff to each other like, “I just sold a Manual of Quickness to the store if anyone wants to buy it.” And of course they can help each other directly in combat.
I think it’s been a while since Tabin had anyone take such active interest in his game. He used the occasion to make some tweaks while my own experience was in progress. One was to add a “difficulty setting.” He said the programming was already in there, but he had never turned it on. Now any player can customize his own difficulty from “easy” to “nightmare.” Easier games make enemies less effective but also give you a lower score. “Nightmare” lets you build your character fast for some extra risk. He also added a few more trap types and introduced a system by which low-level enemies run away from high-level characters. I’d often wondered why some of my charmed companions would up and ditch me for no reason, and it turns out that they do it when you attack other enemies of the same type. In a recent update, he made that explicit by having the companion say “he was my BROTHER!” as he leaves your service.
The author added a difficulty setting during the middle of my session.
In my previous entries, I talked a lot about the game’s difficulty. It is perhaps most accurate to say that like a good roguelike (which Camelot does an excellent job anticipating), it is very difficult until you get a lot of experience and get a natural feel for what’s going on. I was well into my 40th hour before combat tactics really “clicked,” and I started to learn instinctively when to use spells, when to attack, and when to run. It took a while before I got to the point that I always had my hands on the right keys as I entered a room, allowing me to act before the enemy. I died a couple dozen times in the first 30 hours of the game and only half a dozen in the last 30.
Another important insight was learning how to strategically develop inventory. Each item has a label (the game calls it a “table”) from 1-12 associated with it, and these levels are highly calibrated with the monster levels. A mithril sword (Table 3) simply isn’t going to do much against a red dragon (Table 8) no matter how high your level or attributes. So instead of blundering all of the dungeon hoping to find anything, you prioritize trying to upgrade your lowest-level items. The average “table” of a looted piece of equipment is the same as the dungeon level on which you find it. So let’s say that most of your stuff is Table 7, but you’re still stuck with Table 4 armor (Frosty Plate Mail). Hopefully, you’ve noticed that dragons tend to drop armor, so you want to be on dungeon Level 7 looking for a Table 7 dragon (blue dragon) carrying Tale 7 Azure Plate Mail. If you’ve mapped carefully, you’ve noted that dragons tend to show up in rooms with scorch marks on the walls, and you thus head for that room on Level 7. No luck? Wait for the hour to roll around and the dungeon to reset, or reset it yourself with a TARDIS.
Running into a high-level enemy with a high-level chest in a “stud room,” I use my Scroll of Identification to check the odds.
I had originally thought that a lot of the dungeon room messages were just flavor text, but they actually alert you to the type of enemy you’re most likely to find there. Monsters of the “slime” table (green slimes, yellow molds, ochre jellies, black puddings) are usually found in rooms that say “the ground is very soft here.” If you want to avoid slimes, you avoid those rooms. If you’re trying to find enemies from the “bad cleric” list and the potions and scrolls that they often carry, you look for rooms described with “crosses and an altar.” Thieves are in rooms with “empty wallets” on the floor. The specific composition of the rooms resets on the hour, but the locations of the rooms of each description do not.
The dungeon levels are full of the types of navigational obstacles that you’ve experienced if you’ve played any first-person wireframe game. These include spinners, pit traps, one-way chutes, and teleporters. Some of these are necessary to navigate the dungeon, and you have to map carefully. For instance, you can take regular stairs all the way to Level 6, but to get to Level 7, you need to take a teleporter behind a hidden door on Level 3. Level 8 can only be reached via a teleporter from Level 5, which is in a section that can only be reached via a teleporter on Level 7. Despite the complexity, you learn the steps pretty fast, and I found I could make it from the town on Level 1 to Level 10 in about 3 minutes–faster, of course, if I had the rare Wand of Teleportation.
As you explore downward, it’s a good rule of thumb to make sure that either your weapon or your spell item is one or two levels higher than the current level you’re exploring. You can do this by repeatedly attacking each level’s “stud room”–cued with a note that the walls are covered in blood–which reliably offers monsters and items 1-2 levels higher than the level’s average. So if you defeat the stud room on Level 6, there’s a decent chance you’ll find a Table 8 item.
I was lucky to get a Ring of Wizardry (Table 9) at the stud room on Level 7, and it let me blast my way through the rest of Level 7 and Level 8. (Downside: every time you use a spell item, there’s a chance it will run out of charges, and re-charging it at the store is expensive.) Then, early in my Level 10 explorations, I ran into a “friendly” Asmodeus and bribed him $140,000 to drop his chest and leave the room. It had the Level 12 Ruby Staff of Asmodeus in it, which let me kill most things on the level.
Leveling is pretty constant during this process, but it caps at Level 60. I don’t like level caps, but in this case I think most players would be hard pressed to hit the level cap long before the end of the game.
My map of Level 10. The numbers are all teleporters.
Level 10 has the game’s final encounters with Lucifer and the Lady of the Lake. Lucifer has the Holy Grail but kills you instantly if you don’t have Excalibur. The Lady of the Lake, meanwhile, won’t give you Excalibur unless you’re fully outfitted with Table 12 gear. How do you get Table 12 items when there are only 10 dungeon levels? You can get extraordinarily luck, as I did with Asmodeus, or you can camp out at the Level 10 stud room, which will feature a new Table 12 enemy every hour on the hour. The Table 12 enemies are a rogue’s gallery of pop culture references: Asmodeus, Tiamat, Zeus, Poseidon, The Evil One, beholders, Thor, Jubilex, Lolth, Saruman, Sauron, the Master of Shadows, and–at the top of the “bad clerics” list–Jerry Falwell.
Finding a Level 12 artifact.
There’s no guarantee that these enemies will always drop Level 12 artifacts. And if they do, there’s no guarantee you won’t accidentally destroy them by fumbling the trap. So you have to churn through dozens of encounters to assemble your list. If you don’t want this to take dozens of hours, you have to load up on TARDISes (which reset the dungeon manually) and keep using them. This took me about 6 hours by itself and would have taken longer if Tabin hadn’t sold one of his character’s extra TARDISes to the store.
When you finally have a complete set of Level 12 gear, you go to a water room at the bottom of Level 10, and the Lady of the Lake hands over Excalibur.
Yes, everybody knows it’s no basis for a system of government. Please let it go.
From there, it’s just a few steps to the stairway to HELL, where you meet Lucifer. He cowers the moment he sees Excalibur, hands over the Holy Grail, and flees.
Satan flees and hands over the Holy Grail.
Once you have the Holy Grail, you need only return to the town, where the game gives you the option to retire permanently. If you want, you can keep playing and finding more treasure to increase your score, which affects your position on the leaderboard. I retired with a score of 673,809. That was enough to put me at the third spot on the board, behind two characters fielded by the mysterious “greg” or “gregl.” I could have beaten his high score, but it would have taken another 6 hours of gameplay, roughly.
Am I ever.
When you retire the character permanently, you get the following endgame text, suggesting a never-ending cycle of grail-finding. Then again, there has to be a rationale for more than one winner.
In a GIMLET, Camelot earns:
0 points for the game world. I thought about giving it 1, but I couldn’t even justify that. Despite its name and the presence of the Lady of the Lake (nonsensically on the bottom of a dungeon), the game doesn’t make any use of Arthurian themes, nor does it replace or supplement them with any story or sense of place. This was the norm with the PLATO series.
4 points for character creation and development. There are a few choices in character creation–particularly the race–which make a big difference during gameplay. I chose to take the elf, a weak character who has a low risk of dying of old age (he ended the game about 30 years younger than he started, thanks to Potions of Youth). During the game, leveling is continually rewarding even though it doesn’t give you any choices. The little sub-quests to kill specific monsters to reach some levels was a fun addition.
I just turned Level 60. I assess the level of my equipment as the game gives me my next mission.
3 points for NPC interaction. Okay, there are no NPCs. But for past PLATO games, I gave a couple points here for the PC interaction that accompanies those titles, and I like how it works here. You don’t need other players to enjoy the game, but they can enhance your experience. I also gave a point here to the ability to charm monsters to joining your little “party.”
4 points for encounters and foes. The game’s long list of monsters may be derivative, but Tabin did an excellent job programming their various strengths and weaknesses. A player has to balance his desire for treasure with the knowledge that thieves can steal treasure and slimes can destroy it. A careful player has to note what enemies cause sleep, paralysis, petrification, and destruction. The best part is that all of these strengths and weaknesses are determinable with a Scroll of Identification.
4 points for magic and combat. The game has a nice set of options for dealing with creatures, including spells, physical assaults of different types (trading accuracy for power), popping in and out of rooms until you “surprise” the enemies, hitting and running, stealing their treasure out from under them, and bribing them to go away. Only the spell system is underdeveloped, with the character only having access to one “spell” (more of an inventory item) at a time.
6 points for equipment, one of the best parts of the game. The player has 15 equipment slots with 12 levels of items for each slot. Even better is the wide variety of equipment that works in the “Other” slot–scrolls, wands, potions, and the like. There are manuals that permanently improve attributes, cordials that temporarily improve them, scrolls and wands that make navigation easier, items that charm different types of enemies (figuring out what works on which type is a mini-game in itself). Particularly well done is the Scroll of Identification. You can use it at any time, including in-combat and when in the middle of pulling items from a chest. Use it on a monster, and it tells you his hit percentages, damages, and special abilities. Use it on an item, and it tells you what it is and whether it’s cursed. Use it on an unopened chest, and it tells you what trap you’re facing.
The store always held a chaotic selection of items.
6 points for the economy. For most of the game, you’re trying to make enough money just to level up, so deciding whether to sell a potentially useful item for some extra cash, or whether to splurge on that item in the store, or whether to bribe a particular enemy (who may have more gold than the bribe in his chest) presents a continual set of decisions. Even late in the game, when you have plenty (especially after you hit the level cap), finding money contributes to your score.
3 points for quests. There’s only one main quest with no decisions or role-playing options, but there are also sub-quests throughout to kill specific monsters.
3 points for graphics, sound, and interface. The graphics are what they are, although I think the monster portraits are well done. There’s no sound. The keyboard interface for me was easy to master (and the game usually shows you all available commands at the current moment), and I like how everything is always laid out on the main screen, even if it makes the exploration window a bit small.
3 points for gameplay. This is from a 2020 perspective, of course, where I could have fit three other games in the time it took me to win Camelot. There were a lot of moments of frustration, and the linear nature of the dungeon reduces replayability even as the character options (and ever-present leaderboard) increases it. What feels to me today too long, with too many moments of frustration, would have felt the opposite on a college campus in 1982, with plenty of friends around to compare experiences and jockey for high scores.
The final score is 36, which crosses my “recommended” threshold, but not by so much that it would be absurd. It is notably the highest score I’ve given to a PLATO title.
What’s particularly amazing is that Josh Tabin wasn’t even a college student when he wrote Camelot–he was 12! As a member of the Explorer Scouts, he had access to a special program at the University of Illinois at Urbana-Champaign (where PLATO was born) that taught middle- and high-school aged kids how to write code. Tabin explicitly joined the program because he wanted to play Oubliette (1978) and Avatar (1979) on the PLATO system. Somehow, he found time to complete Camelot in 18 months. Years later, he attended the university as a student and kept adding to the program.
It’s an extremely mature game, and the age of the programmer doesn’t come through at all except in a few bits of juvenile humor (in addition to “poison dart,” there is a type of trap that rhymes with it; one of the magic bags is called a “large hairy sack”) and the varied but predictable pop culture references. The game mixes the monster list from Dungeons and Dragons with the TARDIS from Doctor Who and the occasional quote from Blade Runner or monster or item from Lord of the Rings.
(Tabin waited a long time for this review. He first contacted me in 2013, and I assured him I’d play the game eventually. Somehow it disappeared from my master list, so he contacted me again in late 2017 to ask what had happened. I apologized and promised again that I’d get to it “soon.” In anticipation, he sent me a long, enormously valuable set of instructions. Then, it wasn’t until July 2018 that I took an initial look at the game and sent back some questions, then April of 2019 before I fully engaged it.)
I’m one of only four wins in 15 years (since the PLATO system was ported to Cyber1), but there were 43 winners between 1985 (when Tabin started keeping track) and 2003, including an early 2000s war between two users who went by the names “kappes m” and “pilcher,” each of them winning about a dozen times, trying to push each other off the leaderboard, and changing their character names to poke fun at each other. “kappes m” was responsible for a 20-hour speedrun in which he managed to get the Grail at character level 30 using a challenging pixie character, basically exploiting the pixie’s high dexterity to run dungeon levels that should have been out of his league and to steal high-level items from creatures that would normally have been able to stomp him.
But I’m the only one to have documented the ending, which is good enough for me. And with this, we have finally played the last of the PLATO games. I won’t be returning to the setting unless I go insane and decide to try to win Oubliette or Avatar or record some video of the games I’ve already won. It’s been a fun ride seeing the complexity that these amateur games achieved in the pre-commercial era, and Camelot was a fitting capstone to the series. But now I’ve got to stop procrastinating and work on that report.
source http://reposts.ciathyza.com/camelot-won-with-summary-and-rating/
0 notes
Text
the legend of zelda majoras mask n64
http://allcheatscodes.com/the-legend-of-zelda-majoras-mask-n64/
the legend of zelda majoras mask n64
The Legend Of Zelda: Majora’s Mask cheats & more for Nintendo64 (N64)
Cheats
Unlockables
Hints
Easter Eggs
Glitches
Guides
Get the updated and latest The Legend Of Zelda: Majora’s Mask cheats, unlockables, codes, hints, Easter eggs, glitches, tricks, tips, hacks, downloads, guides, hints, FAQs, walkthroughs, and more for Nintendo64 (N64). AllCheatsCodes.com has all the codes you need to win every game you play!
Use the links above or scroll down to see all the Nintendo64 cheats we have available for The Legend Of Zelda: Majora’s Mask.
Also Known As: Majora’s Mask: The Legend Of Zelda and Zelda: Majora’s Mask
Genre: Role-Playing, First-Person Action RPG
Developer: Nintendo
Publisher: Nintendo
ESRB Rating: Everyone
Release Date: October 9, 2000
Hints
How To Fly
To fly in majora’s mask you need project 64 version 1. 61. Put the cheat on that says Press L to Levitate2. Put the zora mask on and go to an area deep for zora link3. Press the A button to swim the hold the L button and the A button while you up in the air let go of L and hold A it should look like you swimming but you flying.
Secret Song Heart.
Go to Zora Hall to the Drum player room, use the Hookshot to go to the higher part, transform to zora and read the diary of Mikau and learn the song, next go to the Guitarist room and play the song, he will give you the second part, next go to the Piano player room and play all the song and he will give you a piece of heart.
Glided Sword
If you want to get the Glided Sword you have to upgrade your Kokiri Sword to a Razor Sword from the blacksmith in Mountain Village, that will take 1 day, don’t forget to beat Goht on the first day and get the Gold Dust from the Goron Racetrack. On the second day talk to the blacksmith and ask him to upgrade it again then you can give him the Gold Dust, use the song of Double Time and warp to the Final Day then get your new and improved Glided Sword. I would reset time or just beat Majora’s Mask whatever you want.
Reach The Top Of Ikana Cayon Before Getting The Ice Arrows
Usually you need to freeze the Octorocks in order to reach the first tree using your hookshot, but it is possible to reach from the other side of the river before obtaining the ice arrows. First kill the Octorocks so they do not distract you, then follow the edge of the river until you can only barely see a sliver of the first tree. Then you should be able to target it with the red dot of the hookshot. It is difficult but it most certainly does work. NOTE: It may seem that even though it is targeted the hook misses the tree, but if you aim low it will usually attach and pull Link up. Using this technique you can get some of the heart pieces up on the top so that the boss of the Great Bay Temple is a little bit easier.
Repeting Heart Peces
This only works if you just started the game on the third day as a deku scrub give the moon tear to the other scrub next to the clock tower and fly to the heart peace in the entrance now when you go to the top let your self get killed by the moon now the screen will say you meet a terrible fate so it starts you on the first day but look at were you got the heart peace when you look up there you will see the heart peace re-spawned and you can do that as long as you want.
Fierce Diety Link Anywere
Ok so when you get the fierce deity mask you want to have it in one of your c buttons. Then go get 20 coins (you will need this for the gorman brothers). Then head in to milk road on epona. Go into the gormans race track and ride straight out go to the save eagle statue (dont get of epona hit z and stop the a button should say check. Save the game quit and reload still don’t get off epona and head to the race track. Speak to the brothers without getting of epona still. Agree to race and before the countdown hit the c button wich you have the mask on and tap repeatedly over and over until you see your guy put it on your guy can’t move so wait till the gorman bros win and you will return off epona agree not to race again and your free! But 2 flaws, 1 if you go into clock town the gaurds will block you from leaving after they say you can leave and 2 if you talk to a bomber kid the game will glitch and freeze.
Large Quvier
To get the large quiver west clock town find the building that looks like the squid monster thing talk to the guy in charge of the shooting gallery pay you fee of 20 rupees beat the high score of 39 and you’ll get rewarded the Large Quiver.
Get Through Fireplace In Skulltula House
Shoot the colored masks above the fireplace with arrows in this order: yellow, blue, green, blue, yellow, green.
Easy Get Past Pirates
An easy way to get past the pirates in the pirates fortress is the stone mask. The only thing you need to get the stone mask is the lens of truth. The stone mask makes you invisible to enemies. So you can just walk right past the guards without being caught.
Lottery Numbers
Here are the clock town lottery numbers
Day one Lottery 922 Day two Lottery 968 Day tree Lottery 443
Bubble Music
Got to the swamp as kid link and hop on one of the lilly pads, right as you get on get out your ocarina thingy and you will be under water playing you ocarina.
A Cheer For Goron Link!
Once you beat the Snowhead Temple, go to the Goron Shrine and the goron elder and everyone else will cheer and praise you! Then the goron elder will thell you to go to the Twin Islands Cave, but I don’t know where that is.
Bottles, Bottles, Everywhere (The First Three Bottles)
There are six bottles. To get the first one you have to go to the Lost Woods and talk to Koume. Go back to the Magic Hag’s Potion Shop and talk to Kotake. She’ll give you a bottle filled with red potion. To get the second one, beat the Snowhead Temple, then get the Powder Keg Title from the big Goron. Blow up the rock in front of the Goron racetrack. Win, and you’ll get a bottle filled with Gold Dust. To get the third one, blow up the rock in front of Romani Ranch on The First Day. Agree to fight the “Aliens” at 2:00 a.m. Fight them until 5:15 a.m. to get a bottle filled with Milk.
Knowing Your Time!
When you enter a hole hit a gossip stone and it will tell you how much time you have left!!
Flying Piece Of Heart
(For this hint you need 200 rupes) When you use the telescope see Clock town, you will see a Deku flying with a bag and he will enter a hole in front of you, after that, go to the hole and you will see the Deku, talk him and he will sell you a piece of heart for only 200 rupes.
Play Songs Without Usual Effect
To play songs w/out their normal effect, press and hold the L button. Release to go back to normal.
Lottery Ticket Numbers
On the first day the lottery ticket numbers are 150 on the second day 064, and on the final day the numbers are 364.
Fierce Diety’s Mask
To get the Fierce Diety’s mask you have to get all of the masks, then go to the moon, talk to the children with the diety masks on.(boss masks) Talk to the children and give them how many masks they ask for(Odolwa-1Goht-2Gyorg-3and Twinmold needs 4 masks). Find each child in each of the 4 dungeons and give them some more masks(they will ask for the same amount that you gave them to get in the dungeon). When you give all of the children on the moon talk to the child with Majora’s mask on, he will give you the fierce diety’s mask. If you want to know everything or anything about Majora’s mask e-mail me, i have eveerything possible on it after a lot of hard work it took me a little less than a year to get everything.
All-Night Mask
On the first night in North Clock Town at 12:30 p.m. stop Sakon from steeling stuff from the lady at the Bomb Shop and go to the Curiosity Shop on the third night which opens at 10:00 p.m. and buy it for 500 rupees.
Bremen Mask
To get the Bremen Mask go to the Laundry Pool on the First or Second Nights at 6:00 a.m.- 6:00 p.m. and talk to the guy thats sitting down and playing an instrument you will here his confession and he will give you the Bremen Mask.
Bunny Hood
To get the Bunny Hood you have to go to Romani Ranch on 1 of the 3 days, go to the Cucoo Shack and talk to Grog he says that he wants to see his chicks turn into cucoos before the moon falls, put on the Bremen Mask and march around untill you get all of the chicks behind you, you will know because they will start to turn into cucoos, but don’t stop marching or the chicks will go away and you will have to start over. After they become cucoos he will give you the Bunny Hood.
Bombers Secret Society Notebook
If you already know the code to get into the hideout go there as a human and give the code, then go in far enough for the screen to go black and then come back out the leader should be there as you try to leave he will stop you and congradulate you on figureing out the code and he will give you the bomners secret society notebook.
Get Into Bombers Secret Hideout Without The Code
If you go out of clock town and go over to the observatory there is a deku flower on the right side. If you put on your deku mask and fly over the fence you will now be able to go into the observatory and if you go down the stairs and follow the path all of the way out. When you go out where the bomber is guarding the door he will not be there he will be to the side and now for the rest of the days you can go in or out all you want.
Save HP With The Bomb Mask
Hold your shild up and press B, with the Bomb Mask on. ka-bloom…You don’t take damage!!!!!!!
How To Get The Stone Mask
You need the Stone Mask to get through the Pirate’s Fortress. To find the mask, head for Ikana Canyon and use the Lens of Truth to look around some stones. There you’ll spot a soldier who will trade the mask for a healing potion.
One-hit KO Sakon Kill
On the night of the first day at midnight, go to north clock town and look at sakon. He will steel the old lady’s lugguage bag. while he is carrying it, shot the bag with an arrow and the bag will blow up along with Sakon too. (If you sclice him with your sword, he will run away and drop the bag. the old lady will give you the blast mask if you want to do that instead)
Old Or Remixed?
If you notice in the Hag’s Magic Shop you will hear music from Lengend of Zelda: Orcarina of Time (from the spirit temple boss), but if you try puting a msk on the music changes to the remixed version. Cool Huh?
Easy And Fun Money
There is an easy way to get money. You need to have beaten the goron temple and be able to race. Make sure you have at least 3 bottles with you. race until you fill the bottles with gold powder. Go to the curiostiy shop and sell it for 200 rupees!!! If you are having trouble winning the goron races get the milk at the bar to give you unlimited magic.
A Silver Rupee On The Third Day
Wait until the third and final day at night and then go to East Clock Town to the Stock Pot Inn and go to the room that Tatl is always telling you that is for “Employees Only”. Nobody should be here so you should be able to just walk right in. When you go in the door, look to your left and there is a treasure chest there with a silver rupee in it. This resets every time you go back in time so you can come back every time the third day comes around. Have fun making money.
Red Super Spin
Collect all stray faries in Woodfall Dungen then talk to the other stray faries in Woodfall.
Get In Bomber’s Hideout Easier
To get in the hideout easier once you turn into kid link in the beggining you dont have to do the bomber’s test again. Just remember what the code to get in is and put that in as kid link.
Idiot Guard Person
Go to east clock town as kid link and talk to the guard to tell him you have a sword. Then when youare about to leave for Termina field, put on the Deku Mask and the guard will be blocking you but he is facing the other way. You can talk to him and he will say what he alwayas says to deku link trying to leave but he is still facing the other way. sheesh, what an idiot! NOTE: You must be behind the guard while putting on the deku mask.
Save Some Magic
I’m not sure if you need to collect all the fairies in Woodfall temple, but I did. To do this, you need to, very guickly spin the joystick around and around will pushing B consecutivly & very fast. If you do it right, you should be able to do the spin attack several times, non-stop, without losing any magic.
Money From Curiosity Shop
As you may have noticed, the Curiosity Shop owner is pretty picky in the items he’ll buy. I have found a couple he is willind to buy. The most expensive on I found was a Big Poe, he’ll sell it for 200 rupees!! If you don’t know what a Big Poe is, you’ll find out in Ikana Canyon. He will also buy some things found in bottles. For 20 rupees, he’ll buy a bug & a fish. I’m sure you’ve seen them all over the place. If not, you have problems.
Ride Epona In Clock Town
You can ride Epona in Clock Town, all you have to do is select the top file and save at the statue in South Clock Town.Next select thebottom file and go outside of town and call Epona.Ride her to the statue in Milk Road and save the game at the statue without getting off Epona.Don’t go to Milk Road then call Epona or the cheat won’t work.After saving at the statue at Milk Road,Go back to the top file and you will be riding Epona!Don’t enter a different area without Epona or she’ll leave.
Different Powder Kegs
There are two different kinds of powder kegs. The first one is from the Goron in the mountains to make you able to use them, it is worth 100 Ruppes and takes longer to blow. The second one is from the Goron in the Bomb Shop, it’s cheaper at 50 Ruppes, and takes shorter time to blow.
Useless Mask?
The circus leaders mask is just about useless, right? Nope, for fun, try wearing it when you go on the trip in the wagon with Cremia. The robbers just sit there!
How To Get And Blow Things Up With The Bomb Mask
Did you now if you go to a wall or to a bad guy that you can blow it up with the bomb mask?Instead of spending money on buying bombs or wasting bombs just use the bomb mask (unless you need to throw it at something). To get the bomb mask it has to be night of the first day and when its midnight a old lady will come through the gate and then if you wait a while it will show a story of a guy stealing her bag. All you have to do is hit him with your sword and he will drop the bag and run. Then the lady will say thank you and she will give you the bomb mask.Note: You need to be regular link to do this.
Rupees For Sale
On clock towere right infront of were you enter for the battle with Majora, take out your bow and shoot an arrow at the spinning clock above. But be sure to shoot the center. 3 rupees will come out.
Easy Spin Without Magic
Twirl the Analog Stick quickly to perform a spin without using any magic.
Wear The Fierce Diety Mask Anywhere!
Once you have the Fierce Diety Mask in your Posession, go to Ikana Canyon wear Sakon’s hideout is during the 2nd day, try to roll at the crack between the door and the wall, eventually you should go throught it. Put on the bunny hood and talk to Kafae. When you are playing as Kafae, change the equiped mask to the Fierce Diety Mask. When you get control of Link again, you will switch masks. Complete the mini game and you will have it on when you leave. WARNING: Do NOT talk to any of the kids inside clock town, it will cause the game to freeze.
Truth Change
At 12.00 on the final day the five minute timer will apear. Go to south clock townand enter the clock tower wearing the mask of truth. Let the moon fall and it will show that movie where Link dies. Arfter that you should apear talking to that mask dude and should be in ether Deka Scub, Goron or Zora form.
Spin Attack Without Magic
If you have the Great Fairy’s Sword than all you have to do is you use the trick to do the swirl attack but you have to do the quick version (twirl the control stick to the right in a circle once then press B right after) It will do the spin attack but your magic will stay the same.
Tingle? Pictograph Guys Son?
Thats right. Tingle is the pictograph guys son. If you get a picture of Tingle then the pictograph guy will give you 100 rupees. (Note: You must get a picture of Tingles whole body. Not just his face.)
Cheating At The Races
Go to the dog race track and put on your mask of truth. When you pick up a dog they will tell you if they will do good or bad.
How To Keep The Moon’s Tear Throughout The Whole Game
First you get the bomber’s secret code. Then you go to the telescope dude. After that you look through the telescope and look on top of the clock tower, you should see Majora, after he jumps off, you should automaticly look up to the moon. The “Moon’s Tear” should fall down, go outside and pick it up. Go into the town and give it to the flower/land owner and give it to him for his anniversary gift, he should give you his flower. Go back to the telescope dude and repeat the process but don’t give the Moon’s Tear to the land/flower owner just keep it and you should have it for the whole game unless you sell it to someone or trade it or do anything with it.
What The? A Seizure?
This code is dumb, but funny. First you need to get the bunny mask on then go to Ikana Canyon. Go to the Hamburglar’s Hideout (Sakon’s hideout) then warp to the the third day. While your over there go to the right wall and try to jump through it(sometimes it takes a while to jump through it). When you go inside go through the door. It will through the Kafei movie. When your Kafei go and switch the bunny hood with the giants mask. Push the block on the switch then when it goes to link again link will put it on. Link will go into a seizure and you will have to reset the game.
Purple Haze
Purple haze is back baby!! First you need to transform into a zora. Then you need to use your barrier attack. While using it keep on holding it. While your still holding it down press start and select the deku mask(any mask will work I havent tried any more so i dont Know). Press start and while its changing back into the normal screen press the c-button that has the mask on it. You need to press it really fast when it goes back you’ll change into the deku scrub. After it’s done metamorphasizing you’ll have a purple background!!!!!!
How To Get Mask Of Truth
Go to woodfall spider house and get all 30 icons. Then go to where you first came in and talk to the guy who should be balk to normal.
Goron Mini-Game
In the goron mini-dungeon, hit the first box of chests and let go of the control stick but still hold down a. Stop when you hit the 2 green jars, you should go all the way. take a right up the ramp and roll down and up the small jump. Walk in the door and the Goht child is waiting for you.
Easy Shortcut From Ikana Canyon To The Swamp
Go in the river that is in Ikana Canyon the one with the octorocs in it. Then once your in there swim the way the current of the water is moving and keep going. You will end up at a cave with the river leading into it. Go in the cave and you will fall down a waterfall and you will land right next to the Witch’s potion shop!!
Get The Great Fiary Mask
When you rescue a fairy, go to North Clock Town. Go to the great frairy she will give you a great fiary mask.
Darth Maul
Go inside the clock tower and look at the mask guy’s bag. There is a mask that resembles Darth Maul!
Stealing Money
Go though the east gate and head towards the telescope. Go to the tree closest to it. Roll into it and that annoying guy from the shop in west clocktown will fall down and hurt himself. Laugh at him all you want. Don’t forget to steal his money.
How To Grow Seeds (Not With The Bottled Water)
To grow a seed without a bottle of water is plant a seed somewhere and it has to be raining. The rain will make the seed grow and you don’t have to use a bottle of water!!
Run Fast Without The Bunny Hood
To do this you have to have the deku, goron, zora, bunnyhood, and the mask to get in the milk bar at night.At night time go to the milk bar with the members mask on then enter and put the bunnyhood on. Talk to the old zora as a deku first and he will ask you to play the pipes on stage. After that play as a goron or zora and play on stage. Last, play as link and put the bunnyhood on and talk to the old zora. Play the ocarina and the curcus leader will give you a mask. After that take the bunnyhood off and you can run as fast as the bunnyhood even though you have the bunnyhood off. NOTE: It may take a couple tries.
Mario??
When you start out in clock town, go in the door behind you. Look on the back of his mask bag and he will have a Mario mask.
Classic ZELDA Music
Go into Temina field and then there will be classic ZELDA music.
Use The Lens Of Truth And Not Waste Any Magic
Equip the Lens of Truth to any C button and then keep pressing that C button repeatedly. You can use the Lens of Truth and not waste any magic!
Turn A Gibdo Into A ReDead
Go to Ikana Canyon and then when you get to the music box there should be 5 Gibdos there. Get out your fire arrows and then shoot one with the fire arrow and then the bandages shouls burn off of it. After that the Gibdo will be a ReDead.
Hide In A Crate
In east clock town there are 2 crates.If you pick one up and you press the shield button,Link will drop the crate and he will be inside of the crate.
Get Romani’s, Cremia’s, And Other Notebook Seals And A Hug From Cremia
To do this hint, you need to have a powder keg. You can get one at the Bomb Shop for 50 Ruppes. Go to the south entrance of town, and at the picture of Skull Kid and the faries, turn right. Avoid the bird, and you’ll reach Milk Road. A boulder is blocking the way, and it won’t open till the 3rd day. To not wait, transform into a Goron and use the powder keg. Transform back, and go to the Romani Ranch. When you enter you’ll see a woman named Cremia. Talk to her to get her into your notebook. Walk up further to the house, and you’ll see Epona, your horse. Talk to Romani, the small girl, and she’ll tell you about “the ghosts.” Agree to help her, and she’ll train you. You’ll ride Epona, and try to shoot 10 ghost balloon in under 2 minutes with your bow (by the way, the record is 1 minute). If you do all that, Romani will teach you Epona’s Song, and you’ll get to keep Epona. The fight begins at 2 a.m., so you’re free to do anything until then. There are some other notebook seals you can get during that time. Go to the place with the chickens on it, and talk to the man by the tree to get him in the notebook. Put on your Bremen Mask (the eagle mask. To get it, go to the Laundry Pool at night and talk to the man by the bench, he’ll tell a story, you’ll get him the notebook, you’ll get the mask, and his seal. If you don’t have it and did all the ranch stuff, get the mask at night before the “ghosts” come), and hit the March button (it’s where your sword was) and go around to find the guy’s chicks. There are 10, so happy hunting! When you get all of them, they’ll turn into chickens, and you’ll get the guy’s notebook seal, and the Bunny Hood, which makes you run faster and jump farther. Hop on Epona and go back to Milk Road (I forgot to mention, with your sword, activate the Owl Statue). You’ll see another path leading to the Gorman Brothers Ranch. If you get to Termina Field, go back, and look for the sign. This has to be done during the day, and during the first day, or the 2nd day if you complete the “ghost” operation. Talk to the brothers, on Epona, and they’ll challenge you to a race for 10 Ruppes. If you win, the brothers will be in your notebook, and you’ll get a ! sticker in the notebook when they give you a Garo’s Mask. At 2 a.m., Romani will go to the barn, and at 2:30, the “ghosts” will come. Most of them are in front but, if you’re in front of the barn, look to your left and you’ll see one going for behind, and behind the house you’ll see one go for behind. If you have a map (buy one from Tingle at Milk Road for 20 Ruppes), use it. The balloon ghosts do disappear, but the real ones come back when you shoot them. If one gets close to you, shoot it, and get the arrows it leaves behind. Roll into a crate nearby to get more, and go into the barn and come back out and the crate will be back. The whole thing lasts till 5:15 a.m. (if you use the backwards Song of Time (or the Inverted Song of Time as it’s called), the operation takes longer, but the ghosts move half as fast). If you manage that time, the ghosts go away, and Romani will give you a Bottle of Milk, and you’ll earn her notebook seal. The morning of the 2nd day, in the barn, talk to Cremia, and learn about a milk delivey to town at 6 p.m. At that time, go to the ranch, and Cremia will give you a ride. The road will be blocked, and you’ll have to go through the Gorman’s farm. The Gorman brothers, wearing Garo Masks, will try to destroy the three bottles in the wagon. With your bow, you have to shoot them (you have an infinate supply of arrows). When one of them yells and raises his pitchfork, fire a volly of arrows. If even one bottle survives, if this is your first time doing all this, you’ll get the Romani Mask so you can enter the Milk Bar. If this is your second or whatever time doing all this stuff, you might get 200 Ruppes, or.a BIG hug from Cremia! This happens on a random basis, and it makes feel great, considering Cremia is very hot and sexy (here’s something to do if you get the hug, imagine you’re Link). Pretty cool, huh? If you get the 200 Ruppes, try the whole thing again. Congratulations! You just got Cremia’s notebook seal, and a big hug from a very hot and sexy woman!
Is That Elvis?
Go to South Clock Town, and go into the door where the guy is that wants you to get Majora’s Mask for him. Look at the his bag, and you will see a mask that resembles Elvis.
Path Through The Woods
The path through the woods differs from day to day. On the first day it’s left, right, right, straight, left, left. On the second day it’s right, left, straight, left, left, right.
Laboratory Code
The code to get the Moon Tears changes from game to game. It is determined by the order you find the five bomber kids. Each of them have a number on their back. The code Their numbers in the order that you found them. To find out what the code is, you must first pop the balloon with a bubble, arrow, or Zora Link’s boomerang (prfferably the bubble). Then, talk to the small kid who was trying to pop it. Tell him you want to try his test, and if you find and catch all five kids before the next morning you will receive the code. To catch a kid, run up to him, when he starts to run away, stand still. After running a short distance the kid will stop running. when he stops, shoot him with a Deku Bubble Attack. The kid should be caught. NOTE: The kid carrying the Cucco must be shot one before he starts running, then again after he stops.
Farther Distance With Deku Link
Use the Following trick while on a lillypad or a place where you need to hop to another place when using Deku Link. Befor you start hopping on the water, do the spinning attack so you can go at a faster speed. The extra speed will allow you to reach a bit farther.
Infinite Rupees
The following requires a Bomb Bag, Bomb, code for observatory (you can use the front door but the back door is better), the Ocarina of time, and the song of time. As an adult buy the bomb bag at the bomb shop (50 coins), then buy a bomb or find them by cutting weeds. Go to the kid that is blocking the observatory and give him the code (you need the code to become a adult). When you get to the water turn left instead of right (stay close to the wall so you don’t get hurt by a skulltula) you’ll find a wall that can be bombed. Bomb it and go inside to find a chest with 100 silver rupees. Go to the bank (the man on the wall opposite to the shops in the west part of clock town). Deposite the coins. Then go to the northeast corner of clock town. Turn and walk south to the edge of the ledge (be careful not to fall off). Turn around and give yourself some speed push A just before you hit the edge and you will land on the next ledge. From there, jump across on the decorations of the bulding going south unitil your are above the shooting gallery. Turn right and follow the roof unitil you get to the treasure chest. The chest contains 100 silver rupees. remember to go to the banker and deposite your money. Then play the song of time to save it (the chests will be reset and then you can do it over and over as long as you save it the occarina of time.Enter Termina field from south clock town and head towards the milk road. There will be a bird that attacks you and steals your items. Use the Deku Mask, target the bird, and shoot bubbles at him in the air. When he attacks, spin attack it. The bird will die after a few hits, and you will get 200 RUPEES. This can be repeated as needed.
Invisible Great Fairy Sword
Go to Clock Town and find a mailbox. When it asks you to deposit something, select the Great Fairy Sword from your inventory, even though it tells you that it only accepts letters. Leave the mailbox and get out the Great Fairy’s Sword and link will look like he’s holding the sword, although there’s nothing there. Swing it around and you’ll see only the trail of the sword! You can try this code this code with other items, too!
Ride Epona In Town
Go to south clock town and save at the owl statue and quit. Go to the second file and call Epona outside of clock town and go to milk road owl statue save on Epona. DON’T GET OFF EPONA! Now go to the first file and you sould be able to ride Epona in town.
Heart Piece
When you are in the swamp area and have the camera get on the boat and go to the Deku Palace. Turn into the Deku then go in and take a good picture of th king. Go back to the guy in the picture place and he will give you a piece of a heart.
Bomb Mask Cheat
First, find a place that you need a bomb. Then hold down R button to raise your shield [does not work while Z targeting]. With your shield up, explode the mask and, if you did it right, you shouldnt get hurt.
Skull Kid
Instead of doing all the stuff to get skull kid off the tower, just get your bubble gun or blow gun and shoot at the top of the clock while your in South clock town.
Be The Fierce Diety Anywhere
Note: To use this code you must have the fierce dietys mask.First, on the night of the second day fo to sakon’s hideout near Ikana Canyon. Find the big door that marks his hidout. first, find the crack on the right hand side of the door, then put the bunny hood on. Roll at the crack in the door at a close range and keep trying until you jump into the crack. hold the joystick left as soon as you hear Link jump, you will now be in sakons hideout. exit behind you and wait until the dawn of the third day. repeat the process you did on the night of the second day, and do not have the fierce dietys mask equiped to any of the c buttons. once inside, enter through the door in front of you. You will find Kafei (still wearing the Keatons mask) and he will trigger the sun’s mask into going on the conveyor belt. Step on the switch Kafei tells you to, and now you are Kafei. run into the next room with Kafei. there will be a movie scene and then you are playing as Kafei again. Now comes the cheat code. pause the game and go to the masks screen. switch the bunny hood with the fierce dietys mask. then complete the puzzle. after you are done. link should turn into the fierce diety, now complete the puzzles and fights until Kafei runs of to go back to town. now jump into the river that runs by sakons hideout. follow the current and you will go off of a waterfall. You are in the woods now. find your way out of the forest and then you can wander around where you want for the remainder of the day. Note: you cant use the ocarina when you are the fierce diety, so your stuck that way until the end of the world. Have a nice day.
Classic Zelda References
Head to Zora City, and enter as Zora. If you enter Japa’s room, you’ll be able to hear and listen to the original dungeon music from the NES Zelda 1. If you go into Enan’s room, the song he’s practicing on the piano is the ending theme from the original NES Zelda.
Ninja Mask
First you have too get your horse and tell Romanithat you will take the job as night watcher. After that, go to the Gorman brothers track and race them if you win they will give you a ninja mask.
Hints
Infinite rupeesNote: The following trick requires a Bomb Bag, Bomb, code for observatory (you can use the front door but the back door is better), the Ocarina Of Time, and the Song Of Time. As an adult buy the Bomb Bag at the Bomb shop (50 coins?), then buy a Bomb or get them free by cutting weeds. Go to the kid that is blocking the observatory and give him the code (you need the code to become an adult). When you get to the water, go left instead of right to find a wall that can be bombed. Bomb it and go inside to find a chest with 100 silver rupees. Go to the bank (the man on the wall opposite the shops in the west part of Clock Town). Deposit the coins and play the Ocarina Of Time. The bank teller has marked you to remember what he owes you, so your cash stays intact in the bank. However, the contents of the chest will reset. This works for all coin chests in the game, so you can use this trick at any time.On any day, go to the northeast corner of Clock Town. Turn and walk south to the edge of the ledge (be careful not to fall off). Turn around and give yourself some speed. Run toward the edge and press A before reaching the edge and Link will roll. You will land on the next ledge. From there, jump across on the decorations of the building going south until you are above the shooting gallery. Turn right and follow the roof until you get to the treasure chest. The chest contains 100 silver rupees. Remember to go to the banker and deposit your money to save it. Play your Ocarina to start at day one and repeat.Enter Termina Field from South Clock Town and head towards the Milk Road. There will be a bird that attacks you and steals your items. Use the Deku Mask, target the bird, and shoot bubbles at him in the air. When he attacks, spin attack it. The bird will die after a few hits, and you will get 200 rupees. This can be repeated as needed.Path through the woodsThe path through the woods differs each day. For example, on the first day it is left, right, right, straight, left, left. On the second day, it is right, left, straight, left, left, right.Laboratory codeThe code for the laboratory to get the Moon Tears changes from game to game. It is determined by the order you find the five bomber kids. Each of them have a number on their back. The code is their numbers in the order that you found them. To find out what the code is, you must first pop the balloon with a bubble, arrow, or Zora Link's boomerang (preferably the bubble). Then, talk to the small kid who was trying to pop it. Tell him you want to try his test, and if you can locate and catch all five kids before the next morning you will receive the code. To catch a kid, run up to him. When he starts to run away, stand still. After running a short distance, he will stop running. When he stops, shoot him with a Deku Bubble Attack. The kid should be caught. Note: The kid carrying the Cucco must be shot once before he starts running, then again after he stops.Change masks fasterSimply press the C button your mask is on a lot. Instead of the sequence where Link puts on the mask he will have the mask on faster.Farther Distance with Deku LinkUse the following trick while on a lillypad or a place where you need to hop to another place when using Deku Link. Before you start hopping on the water, do the spinning attack so you can go at a faster speed. The extra speed will allow you to reach a bit farther then before.
Advance Time Twelve Hours
Play the following notes on the Ocarina: C-Right(2), A(2), C-Down(2) to travel to the next time it will be 6:00. For example, if it is currently 6:00 P.M. on the first day and you play the song, you will go to 6:00 A.M. on the second day (twelve hours forward). However, if you play the song at 4:00 A.M. on the first day, you will go to 6:00 A.M. on the first day (2 hours forward).
Cheats
Become Super Strong Link
Defeat the game once and start a new game entering LINKMAN as the file name. Link will be a lot stronger and faster.
Theme Song Of Simpsons
Play the Ocarina like this- C-Down, C-Right, C-Left, C-Up, Analog-stick Down + C-Up, Analog-stick Down + C-Left, C-Down, A, [Z + Analog-stick Down + A] three times, Analog-stick Down + A
Song Of Soaring
The song of soaring let’s you warp from one bird statue to another. Bring out you flute thing and press C-down, C-left, C-Up. Repeat this one more time.
Sonata Of Awakening
The Sonata of Awakening let’s you awake the undead. To do this press C-up, C-left, C-up, C-left, A, C-right, A.
Elegy Of Emptiness
You have to have your Ornicha of Time to play this song. Bring out your insturment and press C-right, C-left, C-right, C-down, C-right, C-up, C-left. Note: Link will have to learn the songs that he can play. For example,to play the Song of Time, Link would have to learn it by rembering when he was given the Ornicha of Time from Zelda.
Goron Lullaby
Bring out your Ocarina and press A, C-right, C-left, A, C-right, C-left, C-right, A.
Song Of Storms
Take out your Ocarina and press A, C-down, C-up, A, C-down, C-up.
Epona’s Song
For this you need to take out your very helpful Ocarina and press C-up, C-left, C-right, C-up, C-left, C-right.
Advance To The Nearest 6:00
Pull out your Ocarina and play C-right, C-right, A, A, C-down, C-down and you’ll be advanced to the next 6:00, pm or am.
Double Song Of Time
Get out your Ocarina and press Right-C, Right-C, A, A, Down-C, Down-C.
Slower Time With Normal Movement Rate
Play the following notes on the Ocarina (The Song Of Time backwards): C-Down, A, C-Right, C-Down, A, C-Right. Play the song again to return to normal.
Heal Signs
Destroy a sign, then play the following notes on the Ocarina (The Song Of Healing): C-Left, C-Right, C-Down.
Unlockables
Currently we have no unlockables for The Legend Of Zelda: Majora’s Mask yet. If you have any unlockables please feel free to submit. We will include them in the next post update and help the fellow gamers. Remeber to mention game name while submiting new codes.
Easter eggs
Currently we have no easter eggs for The Legend Of Zelda: Majora’s Mask yet. If you have any unlockables please feel free to submit. We will include them in the next post update and help the fellow gamers. Remeber to mention game name while submiting new codes.
Glitches
Funny Glitch
Go to the guy with the telescope and then he will ask you to look in the telescope. Say yes and then look on top of the tower in Clock Town and then you will see the Skull Kid looking at the moon and then Link will look up there and a tear will come out of the moon’s eye. Link will look back at the Skull Kid and the Skull Kid is spanking his butt at Link. It is so funny.
Guides
Currently no guide available.
Currently no guide available.
Currently no guide available.
Currently no guide available.
Currently no guide available.
Currently no guide available.
Currently no guide available.
Currently no guide available.
Currently no guide available.
Currently no guide available.
Currently no guide available.
Currently no guide available.
Currently no guide available.
Currently no guide available.
Currently no guide available.
Currently no guide available.
Currently no guide available.
Currently no guide available.
Currently no guide available.
Currently no guide available.
Currently no guide available.
Currently no guide available.
Currently no guide available.
Currently no guide available.
Currently no guide available.
Currently no guide available.
Currently no guide available.
Currently no guide available.
Currently no guide available.
Currently no guide available.
Currently no guide available.
0 notes
Text
Game 318: Swords and Sorcery (1978)
The castle ramparts depict all of the different enemies in the game.
Swords and Sorcery
United States
Independently developed in 1978 on the PLATO mainframe at the University of Illinois
Date Started: 28 January 2019
Date Ended: 30 January 2019
Total Hours: 7
Difficulty: Medium (3/5)
Final Rating: (to come later)
Ranking at Time of Posting: (to come later)
We’ve had a look at several PLATO games over the years, and most of them fall within two branches. The first is the single-character iconographic maze-crawler, represented by The Dungeon, The Game of Dungeons, and Orthanc, all originally released in 1975. The second is the multi-character, first-person sub-genre, represented by Moria (1975), Oubliette (1978), Avatar (1979), and Camelot (1982). I’ve at least dipped into all of these except for Camelot.
Swords and Sorcery has you navigate a series of map grids with monsters, treasure chests, and obstacles.
But in my survey, I overlooked Swords and Sorcery, which owes its lineage to none of these other titles. Instead, it is a variant of the prolific Star Trek, written originally by Mike Mayfield in 1971 on his California high school’s SDS Sigma 7 mainframe. From there, he ported it to several other systems, and it became so popular that variants of the game began appearing in books of type-it-yourself game code. A decade later, it was tough to find a computer system that didn’t have some version of it. PLATO has one, under the lesson name trek.
Star Trek featured gameplay on a gridded star chart, with 8 x 8 quadrants, each quadrant divided into 8 x 8 sectors. The player piloted the Enterprise through these various sectors, tried to complete his mission to destroy 17 Klingon vessels, and found refuge at the occasional starbase. Stars served as obstacles to navigation and combat.
Gameplay in Mike Mayfield’s Star Trek (1971) took place on a tactical grid.
Swords and Sorcery is a fantasy adaptation of this basic idea. The character gets quests from a king rather than missions from Starfleet. Instead of Klingons, he contends with orcs and goblins, and instead of phasers and photon torpedoes, he fights with a sword and arrows. The tactics associated with positioning and movement are otherwise all present, with trees taking the role of stars in the earlier game.
But Swords‘ developer added some elements that qualify the game as an RPG in the way that its science-fiction predecessor did not. First, the character is persistent. He doesn’t “win” upon killing 17 enemies, but rather turns in the quest for a reward and then gets another. He gains experience, earns gold, finds items, and retains these things between quests. And the quests themselves vary, with the player able to specify the size of the overall game world and thus (to some degree) the quest difficulty.
Creating the game world.
“Character creation” is just a matter of specifying a name. Characters start with a regular sword and nothing else–not even any hit points. As the first mission begins, the player determines the size of the game world, from 1 x 1 to 10 x 10. This in turn determines how many enemies you face, treasure chests you have to open, and safe “magic circles” you can visit.
The first mission is usually just to chop down trees, the specific number dependent on the number of quadrants in the game world. Sometimes you get treasure-collecting missions or monster-killing missions as the first one. Tree-chopping never occurs after the first mission, which is merciful. Game begins in a random quadrant within the world you created.
An early-game mission on a small map.
The most difficult moments are the opening ones. Experience points are the same as hit points, and you have none of either. Monsters will kill you in one hit if they get adjacent to you. You spend these early stages avoiding monsters rather that engaging them. It takes some experience before you get a feel for how quickly monsters can close the distance, and thus how much room you have to play with on a given screen.
One of the oddities of Swords is the movement system, which works like it did in Star Trek but makes less sense than it did there. You specify a direction and “speed,” which is the number of squares you move in one turn. You can choose between 1 and 3. Finding or buying adrenaline phials lets you crank it up to 4. Once you assign these variables, you’ll keep moving that direction and speed each round (after whatever other action you take) until you change it or hit “0” to stop entirely. So if one round brings you adjacent to a creature and you choose to attack him on the next round, you can do that, but then you’ll continue sailing past your foe whether you kill him or not. If you run into an obstacle, you’ll take damage and stop. Any damage is enough to kill you at the beginning of the game, so until you get a feel for the movement system, a lot of your characters will commit suicide by running into trees.
This happened to me a lot in the early game, too.
To survive, you need to find treasure chests. These may contain arrows, which will allow you to kill enemies and build experience at range, or they may contain gold, with which you can buy arrows or experience at magic circles. Rarely, chests will contain magic items like improved swords, shields, armor, boots, and adrenaline phials.
Until you start opening chests, you don’t have many options. These 5 bags of gold will now allow me to buy experience (and thus hit points) or arrows.
Finding chests isn’t as hard as reaching them without encountering any monsters on the way. Fortunately, while the quantity and type of contents on a screen are fixed, the distribution changes every time you leave and return. So if you arrive on a screen to find a treasure chest on the opposite side with four goblins in between, you can pop off and on the screen, and hopefully the next time you’ll find a better arrangement–specifically, one where you can avoid the goblins long enough to reach the chest.
Once you have some arrows and understand the movement system, it’s not hard to keep enemies at bay and kill them from afar. Some arrows have damage multipliers that let you kill more than one enemy along the same trajectory. Once you gain a few hundred points of experience, you can engage enemies in melee combat without worrying about instant death; fighting is just a matter of specifying (S)word and then a direction, the only real “tactics” being the use of movement and terrain to ensure you strike first and don’t get surrounded.
I’m in the upper-right corner. The three goblins lined up to the south will fall to a single arrow, leaving just the zombie at their tail.
“Magic circles,” of which there are about one per four screens, serve in the role of the “starbase” in Star Trek. Monsters can’t attack you while you stand in them. You can sell gems and jewelry that you’ve found and buy arrows, swords (as replacements for those that break), and adrenaline. You can also spend money directly on experience points.
For the tree-chopping quests, I found it easiest to clear out the enemies first, then walk along the border, hewing a tree every step. For monster-killing and treasure-finding quests, you generally complete them as you naturally explore the maps. When you’re ready to go home, you enter one of the magic circles and hit “q.” You’re transported back to the castle and the king gives you gold and experience as a reward. From there, you just hit ENTER to create a new map and get a new quest.
After those initial difficult stages, the game becomes a bit too easy. I played several characters, and if they survived the first quests, they had enough money to keep a large stock of arrows and continue building experience and health. Subsequent missions introduce tougher creatures like werewolves, zombies, wizards, and dragons (along with quests to kill n numbers of them), but their difficulty doesn’t keep pace with your own character development unless you get lazy or sloppy.
In my second quest, I face werewolves, zombies, thugs, and goblins in the same screen. It would be smart to just leave to the north rather than fight them all.
One way to force a greater level of difficulty is to create a map of 1 x 1. This leaves you nowhere to run. While your quest will be easier quantitatively (e.g., killing one dragon instead of seven), it will be functionally harder because you’ll have to clear out all enemies on the confines of a single screen.
Some people must either like the relative ease or find other ways to make it challenging, because the player list shows 31 players who have each amassed more than 1 million experience points in the 18 years since the game was last reset. The top player, with a user name “paley” and a character name of “hi,” has about 1.66 billion experience points. The creator has a character named “goodgulf” with 776 million. Dirk Pellett, one of the authors of The Game of Dungeons, also seems to be a fan: his “Aumkua” has 16 million.
Part of a list of rabid devotees.
Swords and Sorcery was written by Donald Gillies, who first alerted me to its existence in an e-mail. He was a student at Urbana High School, which had access to PLATO, from 1976-1980. Swords was based on a previous title that went under the lesson name think15 before it was deleted by system administrators. Gillies credits the author of that game, Jim Mayeda (a fellow UHS student), on his own title screen. (In between the two, another student’s attempt to replicate think15 as think2 was also deleted.) Gillies wrote a first draft in 1977 but says it only included fighting; the full version was finished in the spring of 1978. By 1980, it was the seventh most popular game on PLATO at the University of Illinois Urbana-Champaign. Gillies–who went on to an undergraduate education at M.I.T., a doctorate at the University of Illinois, and a career as a software engineer in the private sector–kept a printed copy of the source code and re-typed it when Cyber1 resurrected the PLATO system in 2003.
For no particular reason other than I had the time, I chose this game to create a video review, which you watch below or on YouTube. This is the first video I’ve narrated in about 5 years, and I tried to introduce some “production values” that will naturally improve as I gain experience. I’m happy to take recommendations on my approach to videos.
youtube
Swords and Sorcery is left off most lists of the classic PLATO RPGs, so I’m glad Dr. Gillies wrote to me, and I’m glad I had a chance to experience his game’s unconventional approach. In the coming months, we’ll have at least one more PLATO entry covering the last of its RPGs: Camelot (1982).
source http://reposts.ciathyza.com/game-318-swords-and-sorcery-1978/
0 notes
Last Seen Blogs
echooefrost
A Stressed Storyteller

foinixdigitalservices
Digital Marketing Agency in Hyderabad - Foinix Digital Services

keepittightsisters
Keep It Tight Sisters

les-poils-de-matthew-daddario
Les Poils de Matthew Daddario

villacolors
Nico lé