#ISO Rating: 1600
Text
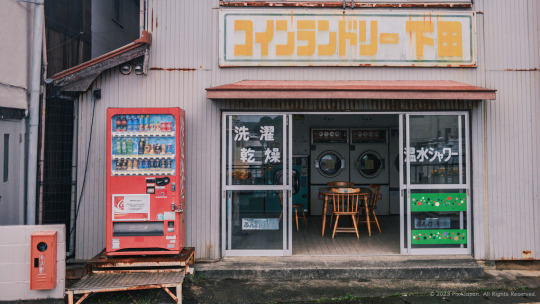
Coin-Laundry & Coin Shower near the Docks
Location: Shimoda, Shizuoka Prefecture, Japan
Timestamp: 16:26 on June 6, 2023
Located directly across from Shimoda Port's docks, this coin laundry immediately caught my attention. What struck me most was how time had weathered its east-facing storefront and signage. The relentless exposure to the morning and afternoon sun had noticeably faded its colors.
However, it wasn't just the sun that had taken its toll over the years. The corrosive effects of airborne saltwater had also left their imprint, resulting in visible rust on certain parts of the shop.
Many of the smaller fishing boats moored to the docks are chartered for recreational fishing, accommodating up to three guests for a day of angling. Depending on the season and desired catch, rates for these charters range from ¥20,000 to ¥40,000 per day.
After spending a day fishing under the scorching sun, this coin laundry must be a welcome relief for fishermen before heading back home to Tokyo or their resort hotel. Without the coin laundry, I can only imagine the smell of opening your laundry bag of “fishing clothes” after returning home from a day of being exposed to ocean waves and the scent of the day’s catch.
Moreover, the shop offers heated showers, allowing fishermen to clean up and feel refreshed after angling under the strong sun and being soaked in sea spray. The convenience of this shop must surely be a welcome respite after a fun day at sea.
Fujifilm X100V (23 mm) with 5% diffusion filter
ISO 1600 for 1/250 sec. at ƒ/2.0
Classic Negative film simulation
#laundromat#coin laundry#coin shower#Shimoda#Shimoda Port#Shizuoka Prefecture#Japan#street photography#Fujifilm#X100V#pix4japan#コインランドリー#下田湾#静岡県#ストリートスナップ
44 notes
·
View notes
Text
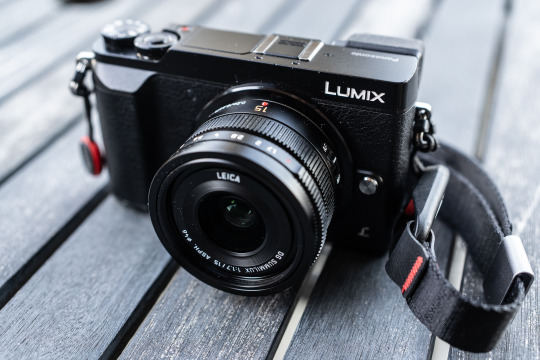
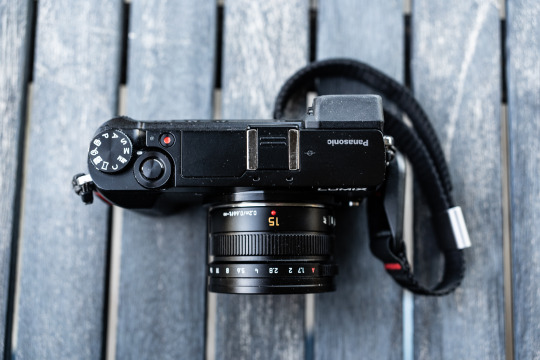
Panasonic GX85 Thoughts After Five Months
PROS:
Much like the GX7, it’s a small and light system. This one kicks it up a notch from that camera with a thinner grip and less of a protrusion for the EVF (while sacrificing the tilting action from the GX7).
The shutter is much quitter. The GX7 was one of the loudest cameras I owned, which always felt odd since it focused so silently and it was so small.
It was cheap. I thought the GX7 was cheap when I got it, but this ended up being a little cheaper when I got it from eBay. The only “issue” is that I also got duplicates of the two lenses I picked up with the GX7.
The autofocus seems a bit better than the GX7, and it focuses surprisingly well in low-light.
The IBIS is pretty damn good. It seems comparable to my Ricoh GR and slightly better than my A7C, although it’s stabilizing a much smaller sensor than those two cameras.
CONS:
While it’s better than the GX7 in a lot of ways, it’s also worse in a few. The shutter is quieter but it maxes out at 1/4000 compared to 1/8000. It also has a worse flash sync speed, which I guess isn’t a huge deal now since I have the GR with its leaf shutter in case I want to do some strobist stuff.
Battery life isn’t great. It takes the same batteries as the GX7 so I already had a few, but you definitely need three or four if you want a whole day of shooting. Looking at DPReview it’s actually rated for only 290 shots compared to the GX7’s 320.
The sensor is pretty much the same sans the AA filter. High ISO performance isn’t the best and it also can struggle with blown highlights.
It still has that issue that the GX7 has where dialing in focal lengths for IBIS doesn’t have enough options. I have a manual focus 25mm and for whatever reason that’s not an option to input on here.
(All sample photos edited in Lightroom Classic, some with additional adjustments from DxO PureRAW 2.)

Panasonic Lumix 25mm f/1.7. f/1.7, 1/320, ISO 800 [Edited in Lightroom Classic.]

Panasonic Lumix 45-150mm f/4-5.6 at 45mm. f/8, 1/1600, ISO 640. [Edited in Lightroom Classic and DXO PureRAW 2]

Panasonic Lumix 45-150mm f/4-5.6 at 65mm. f/8, 1/2000, ISO 400 [Edited in Lightroom Classic.]
Panasonic Lumix 25mm f/1.7. f/2, 1/250, ISO 320. [Edited in Lightroom Classic and DXO PureRAW 2.]

Panasonic Leica 15mm f/1.7. f/2, 1/50, ISO 640. [Edited in Lightroom Classic.]

Panasonic Lumix G Vario 12-32 f/3.5-5.6. [Edited in Lightroom Classic and DXO PureRAW 2.]

Panasonic Lumix G Vario 12-32 f/3.5-5.6. [Edited in Lightroom Classic.]
31 notes
·
View notes
Text
20 question camera worksheet.
20 Questions
1. What does DSLR stand for?
digital single-lens reflex.
2. How does the light get in?
Light enters the camera through the aperture.
3. What is the surface that records the image called?
Capture medium.
4. What records the data of the image?
The lenes and sensor.
5. Looking at the diagram above, what shooting mode does the green indicate?
Automatic mode.
6. What is the shutter?
a curtain in front of the camera sensor that remains closed until you start shooting.
7. What does the shutter measure?
controls the length of time light reaches a sensor.
8. What is the shutter speed?
the speed at which the shutter of the camera closes.
9. What is the shutter speed measured in?
c. F numbers
10. What is the aperture?
the opening of a lens's diaphragm through which light passes.
11. What does the aperture control?
How much light gets into the camera.
12. What is aperture measured in?
b. F stops
13. What is the ISO?
a standard set by the International Organization for Standardization (ISO) that represents sensitivity to light as a numerical value.
14. What does the ISO control?
The light gathering ability. The higher the iso rating, the greater the films ability to capture images taken in low light.
15. Which ISO indicates a faster film/camera sensor: 100 or 1600?
1600
16. What does metering refer to?
the process of how your camera decides to assign the right shutter speed and aperture based on the amount of light the camera can pick up.
17. What does the meter measure?
The intensity of the light.
18. The amount of light or darkness is known as the:
a. Exposure
19. Perfect exposure is the result of the right combination of:
b. Film speed [ISO] + aperture + exposure
20. What does white balance control?
adjusts images to make white subjects look white in the final product.
0 notes
Link
Check out this listing I just added to my Poshmark closet: Canon EOS 5D 12.8 megapixel.Camera Body Only.
0 notes
Text
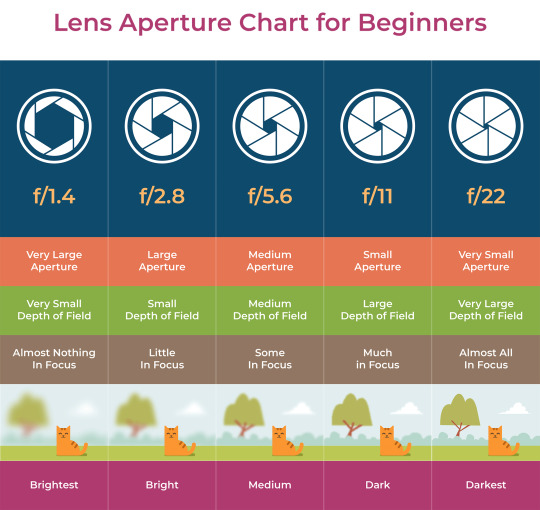
A Complete Beginner's Guide To Understanding Aperture
A Quick Guide To Aperture
Attempt photographing the very same scene with different apertures. Determine the optimal worth for your lens that offers you the sharpest, first-rate image. If you wish to blur the background more or to make all the items in the frame sharper, simply make sure you increase or reduce the shutter speed worth by a number of notches from the ideal worth.
Here's What You Need To Know About Aperture
youtube
Lots of professional photographers are familiar with the golden triad of direct exposure compensation: shutter speed, ISO, and video camera aperture. Together, these three are the artist's very first line of defense when working in the field. While the shutter speed identifies for how long the entryway student of the lens remains open, aperture is a measure of how extensively the hole is held throughout this interval of time.
In the front of any lens, there is a hole called the video camera aperture. It is utilized to manage how much light is allowed into the cam. Fanning blades dilate as the artist opens it, and close as the artist shuts it. The larger you hold the aperture open, the more light falls through, and vice versa.
Here's What You Need To Know About Aperture
As the aperture closes, the slice takes on volume and can enrobe a topic of measurement fully, bringing the entire person or object into focus simultaneously. The size of the aperture need to be among the very first things to consider when making up the image around whatever you want to remain in focus.
A tight aperture will produce a razor-sharp image, and this effect carries on to some degree, even as you move outside from the heart of the focal plane. No lens can keeping whatever in front of it in ideal focus simultaneously, not even one with the narrowest aperture possible.
What Is Aperture?
When you would like every information to ring loud, clear, and real, shooting with a smaller aperture is a sure thing in the very same way that a low ISO and a quick shutter speed will likewise protect you from ruining the image in the heat of the minute. At the other end of things, a bigger lens aperture will result in a slightly softer, more diffuse appearance.
This number, called an f-stop, is utilized to break down the variety of possible sizes so that a boost of one f-stop will always either double the amount of light being let into the video camera or cut it precisely in half. The same factor to consider is taken with shutter speed and ISO, such as when increasing one's ISO from ISO 800 to ISO 1600.
A Complete Beginner's Guide To Understanding Aperture
This supplies a typical language for all three of these various elements to be handled in. The scale of f-stops is not totally universal, but some typical ones include f/1.2, f/1.4, f/2, f/2.8, f/4, f/5.6, f/8, f/11, f/16, f/22, f/32, and f/64. F/4 is concerned by numerous as the sweet spot for a variety of practical types of photography.
One of the benefits of working in a studio setting is having total control over how it is configured. Inside, even something like a 1K fresnel or a low-cost strobe will suffice to support a really narrow aperture. Definition and integrity are easy to attain when working this method.
The Ultimate Guide To Aperture
When shooting something substantial like a mountain at dawn, there typically is no requirement to separate the majesty of the subject from the background. Numerous prefer to see the whole scene in crystal-clear focus. A narrow aperture is a lot more efficient in seeing everything in front of it at as soon as.
While not constantly the method to go, it actually is easy on the eyes when succeeded and at the correct time. Let's discuss when you need to utilize a broad aperture. When light is limited, wide aperture photography supplies the artist with the ways of producing an adequately exposed photo under a variety of conditions.
Understanding Aperture (And How To Use It)
A shallow depth of field acts like a spotlight that lets them shine. When aiming for yourself, there are no rules. Follow the topic's lead and you will rarely be led astray. If your gut is informing you to go wide, we encourage that you take hearken. The ideal aperture to choose? One could state that it's already ideal in front of you.
.
Effortlessly Understanding Aperture
The aperture mechanism in the lens that enables basically light to come in is formed of a series of nontransparent "blades". When the blades are open, your cam sensing unit will capture more light, whereas as the blades progressively close, less light will hit your sensing unit. In a similar way to our eyes, considering that it works like the human pupils: the wider they are, the more light will travel through and vice versa.
Large apertures are likewise referred to as fast apertures given that they permit you to reduce the direct exposure time, and small apertures are likewise known as slow apertures, since they enable you to increase the shutter speed. Depending on what you wish to record, there are certain circumstances where you should not alter your ISO and shutter speed; aperture will be the key to a correct exposure.
Everything You Need To Know About Aperture In Photography
According to the physics laws in optics, you'll have the ability to record, meaning more areas of your images will be out of focus and less sharp. On the other hand, you'll see in your image, indicating a bigger proportion of the image will remain in focus.
The very same thing occurs when you set a little aperture. In that case, there is a phenomenon related to aperture in photography which is an optical result that results in poorer quality throughout the image. You can see this phenomenon as you begin closing the aperture above f/16 values.
All You Need To Learn Aperture And Depth-of-field
To compute this sweet area, approximately move 2 to three F-stop worths from the optimum aperture of your lens. For example, if the maximum aperture in your lens is f/4, this would be between f/8 and f/11/.
Before digital photography, the aperture was manually set on the lens by picking the particular F-value. This altered in digital electronic cameras today. There are still some manual lenses that require you to set the aperture by hand, however all the electronic lenses that work with your digital electronic camera will allow you to easily pick your aperture.
All You Need To Learn Aperture And Depth-of-field
Beyond all the that we've already seen, there are other intriguing side effects of using different apertures in some light situations. To/sunburst or a moonstar, you'll need to have high F-Stop worths from f/16 to the tiniest aperture on your lens. That way, the sun/moon beams will be sharper. This likewise depends upon the variety of blades on the aperture of your lens.
A Quick Guide To Aperture
What is aperture in photography and how does it affect the method our photo looks? Aperture is the most crucial pillar of the exposure triangle after shutter speed and ISO, so it's vital you comprehend it! Terms like f-stops and depth of field may intimidate beginner photographers, however they're really not that made complex.
Smaller sized aperture = darker image. EASY! Utilizing the aperture to control the quantity of light that comes through your lens is sometimes an imaginative option you make. Other times you may be forced to pick a certain aperture based upon the readily available light you have in your scene.
0 notes
Text
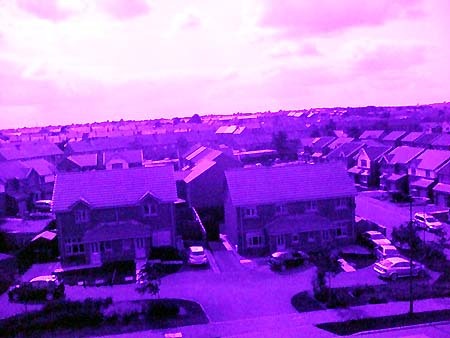
Digital, ultra-violet, kite aerial photo, Armadale, West Lothian, Scotland. (3704016531)Description: Unmodified Fuji F30fd with Hoya U-360 UV-pass + Schott BG39 IR-block, 25mm filters, ISO 1600, f2.8, 1/20 sec. Our first attempt at UV KAP.
For suitable, unmodified cameras, this low shutter speed, low success rate approach can be applied to infra-red photography (using an R72 filter) where images will be much clearer than in the UV. Also, sensitivity to IR is usually higher than to UV.
Date: 9 July 2009
Author: John Wells
#wikipedia#wikimedia#wikimedia commons#bjaodn#digital ultra-violet kite aerial photo#ultraviolet#ultra-violet#uv#armadale#west lothian#scotland#aerial photography#2009#john wells
1 note
·
View note
Text
Bade Bhaiya Packers and Movers
Bade Bhaiya Packers and Movers. We provide all types of Relocation services at a very Low Price with Quality Shifting and Packing processes. Our Aim is Shifting Anything, Anytime, Anywhere without any Losses. Our Packers and movers have been providing the best packers and movers services since 1984. ✅Serving 1600+ Locations ✅ 🛰️GPS enabled Tracking ✅ISO 9001:2008 ✅350+ Corporate Tie-Up.
House Shifting Service
If you're looking for the best packers and movers in town, look no further than bade bhaiya packers and movers. We're a top-rated moving company that provides professional packing and moving services at an affordable price. Whether you're moving locally or long distance, we can help make your move stress-free. Contact us today for a free quote!
1 note
·
View note
Text
Ram memory for macbook pro 2011

Ram memory for macbook pro 2011 serial#
Ram memory for macbook pro 2011 full#
Ram memory for macbook pro 2011 pro#
Ram memory for macbook pro 2011 Bluetooth#
Relative humidity: 0% to 90% noncondensing.60W MagSafe Power Adapter with cable management system.Built-in 63.5-watt-hour lithium-polymer battery.Maximum read: 8x DVD-R, DVD+R, DVD-ROM 6x DVD-ROM (double layer DVD-9), DVD-R DL (double layer), DVD+R DL (double layer), DVD-RW, DVD+RW 24x CD.Maximum write: 8x DVD-R, DVD+R 4x DVD-R DL (double layer), DVD+R DL (double layer), DVD-RW, DVD+RW 24x CD-R 10x CD-RW.8x slot-loading SuperDrive (DVD±R DL/DVD±RW/CD-RW).
Ram memory for macbook pro 2011 serial#
500GB or 750GB 5400-rpm Serial ATA hard drive optional 750GB 5400-rpm hard drive or 128GB, 256GB, or 512GB solid-state drive 6.4GB (two 2GB SO-DIMMs) of 1333MHz DDR3 memory two SO-DIMM slots support up to 8GB.2.4GHz dual-core Intel Core i5 processor with 3MB shared 元 cache or 2.8GHz dual-core Intel Core i7 processor with 4MB shared 元 cache.Multi-Touch trackpad for precise cursor control supports inertial scrolling, pinch, rotate, swipe, three-finger swipe, four-finger swipe, tap, double-tap, and drag capabilities.Full-size backlit keyboard with 78 (U.S.) or 79 (ISO) keys, including 12 function keys and 4 arrow keys (inverted “T” arrangement).HDMI audio and video output using a third-party Mini DisplayPort to HDMI Adapter.Dual-link DVI output using Mini DisplayPort to Dual-Link DVI Adapter supports 30-inch Apple Cinema HD Display (optional).VGA output using Mini DisplayPort to VGA Adapter (optional).DVI output using Mini DisplayPort to DVI Adapter (optional).
Ram memory for macbook pro 2011 full#
Dual display and video mirroring: Simultaneously supports full native resolution on the built-in display and up to 2560 by 1600 pixels on an external display, both at millions of colors.
Intel HD Graphics 3000 with 384MB of DDR3 SDRAM shared with main memory 5.
13.3-inch (diagonal) LED-backlit glossy widescreen display with support for millions of colors.
Meets ENERGY STAR Version 5.2 requirements.
Highly recyclable aluminum and glass enclosure.
Ram memory for macbook pro 2011 pro#
MacBook Pro is designed with the following features to reduce its environmental impact:
Support for Apple iPhone headset with microphone.
Combined headphone/line in (supports digital output).
Ram memory for macbook pro 2011 Bluetooth#
Bluetooth 2.1 + EDR (Enhanced Data Rate) wireless technology.
Wi-Fi wireless networking 2 (based on IEEE 802.11n specification) IEEE 802.11a/b/g compatible.
If you have any thoughts or ideas about this Guarantee or about your experience with us, we invite you to share them with us by sending us an e-mail. We are working very hard to serve you better and listen carefully to your feedback. If you experience a faulty product or an item that has been incorrectly supplied, we promise to rectify the issue as quickly as possible.Įvery Macfixit Australia employee is dedicated to meeting the commitments above and to exceeding your expectations. You can contact us regarding any order/product related issue by call4343 or emailing us via our online Contact Us page We will quickly address any problem you experience. We will answer your questions at your convenience.Ĥ. We will treat you with courtesy and respect.ģ. Simply return all items in good working order and in undamaged original packaging and we’ll refund the cost of the product.Ģ. If you’re not satisfied and wish to return a product for any other reason, you can do so in the first 30 days and get your money back. If your order contains a faulty product or a product incorrectly sent, we will of course take back the product and refund your money or send you a replacement product. This is of course in addition to the standard manufacturer replacement warranties. This means you can test drive the product in the convenience of your home. We will give you a 30-day, money-back guarantee on all our products. The Customer Guarantee lets you know what you can and should expect from Macfixit Australia -and what we’re doing to hold ourselves accountable every day.ġ. Our goal is to provide you with a consistently superior customer experience-whether at the initial purchase, during the shipping of your product and during the course of usage of your product.
0 notes
Text
Pcsx2 not recognizing ps4 controller

#Pcsx2 not recognizing ps4 controller update#
#Pcsx2 not recognizing ps4 controller software#
PCSX2 has many plugins for controller, such as LilyPad, Xpad, MegaPad, etc. Please go to Config > Controllers > Plugin Settings > General > Game Device APIs, uncheck XInput and see if you can configure your gamepad with DirectInput mode.īut if your controller is an Xbox controller, you should use the XInput mode instead of the DInput mode. To fix PCSX2 controller not working issue, you can try changing the game device API mode.
#Pcsx2 not recognizing ps4 controller update#
Xbox One Controller Driver for Windows 10 Download & Update Fix 2. Then, you can check whether the problem is solved. Windows will reinstall the controller driver. Just need to open Device Manager, uninstall the controller driver, unplug the controller and plug it again. Some people report that they have fixed the PCSX2 controller not working issue by uninstalling the controller driver. To solve the problem, you can try the following methods. However, some people may find the controller doesn't work. Many people may like to use controllers to play games on the PCSX2 emulator. PCSX2 allows users to use mouse, keyboards, or controllers to play games.
PassMark G3D Mark rating around 6000 (GeForce GTX 1050 Ti).
PassMark G3D Mark rating around 3000 (GeForce GTX 750).
Four physical cores, with or without hyperthreading.
PassMark Single Thread Performance rating near or greater than 2100.
Two physical cores, with hyperthreading.
PassMark Single Thread Performance rating near or greater than 1600.
#Pcsx2 not recognizing ps4 controller software#
To run PCSX2 software on Windows PC, your PC needs to meet the following requirements: Of course, if you have a game disc and your PC can drive it, PCSX2 allows you to boot the game from the game disc. In general, you can download PS2 game ISO files and then boot the game using PCSX2. PCSX2 is an emulator that can run PlayStation 2 (PS2) games and self-made programs under Microsoft Windows and Linux operating systems. In this post, MiniTool Partition Wizard offers you 3 ways to fix this issue. However, some people may encounter PCSX2 controller not working issue. Many people like to connect a controller to PC and play classic PS2 games using PCX2. PCSX2 is an excellent PS2 game emulator program running on Windows and Linux PCs.
0 notes
Text
It’s all an Illusion - Home Trial & Post Production Workflow
Camera - Canon 2000d with 18-55mm lens
Tripod
Window light
LED light on same side
Coloured card
Lindt chocolate easter bunny
Camera settings -
Aperture - f11
Shutter speed - 1/125
ISO - 1600
Focal Length - 43mm
I forgot I was using a tripod so next time I try I'll lower the shutter speed, which will hopefully allow me to lower the ISO too

Uploaded images from sd card to computer and backup using Adobe Bridge photo uploader

Rate images in review mode

Screenshot of before in Bridge

Screenshot of After in Bridge before opening in Photoshop
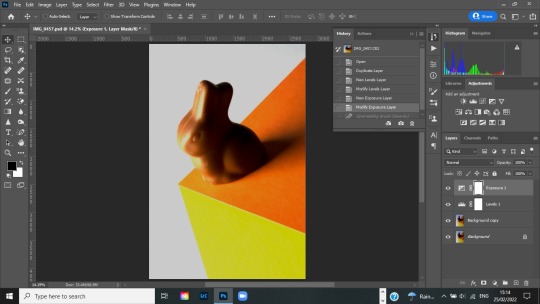
Screenshot of image with optimising stages, so far
My post production workflow for this image -
Uploaded images to computer using Adobe bridge photo uploader - uploaded to two seperate drives
Reviewed images and star rated in review mode
Opened chosen image in camera raw -
Basic optimising
White Balance changed to auto
Cropped / straightened using crop tool auto angle
Then went to optics and ticked profile correction
Then went to detail and did some noise reduction
Opened in Photoshop -
Create copy of background on which to work
Create layer - use white dropper to whiten background
Bring exposure down a bit -0.75 as whitening background made image very bright
Saved work so far as psd and jpeg

Image, so far
What I'd still like to do with this image
Bring the highlights down a bit
Bring the temperature down a bit looking a bit too orange all over
Smooth the line between orange and yellow
What I noticed about the difference between this image and the ones I did in the studio using the soft box
The shadow is a lot darker and longer than those of the studio images, because there is no form of filter on the light used today (light was harsher today)
#nqphotography2021#nqphotography#nqphotoblog#studio#location#3d optical illusion#optical illusion#illusion#colours#colors#color harmony#colour harmony#home studio#homestudio#photography student#folio 2#folio2#cogcphotography#cogc#post production#postproduction
2 notes
·
View notes
Text
3 Simple Techniques For Photography
When you readjust one of them, you would typically have to consider at the very least one of the others, to obtain the desired results. Making use of Auto Setting looks after these controls, however you pay the cost of not getting your photos to look the means you desired them, and also typically disappointing.
It will do all that while shielding your lens. There's no reason that you can not leave it on for every one of your photography. We suggest Hoya Polarizer Filters for the best mix of performance as well as rate. When photographing landscapes, it assists to create a feeling of depth, to put it simply, make the visitor seem like they are there.
Placing an object or individual in the foreground assists give a feeling of range as well as emphasizes just how much away the distance is. Make use of a tripod ideally, as a small aperture usually calls for a slower shutter rate. The basic approach is normally the very best in digital photography, as well as you have to decide what needs to be in the shot, while not consisting of anything that is a disturbance.
You want the eye to be attracted to the centerpiece of the picture as opposed to a patch of color or an odd building behind-the-scenes. This is especially vital in a shot where the model is positioned off-center. Flash can look severe and abnormal specifically for indoor pictures.
Initially, push the ISO up typically ISO 800 to 1600 will certainly make a large difference for the shutter rate you can pick. Use the widest aperture feasible in this manner much more light will reach the sensing unit, and also you will certainly have a wonderful blurred background. Making use of a tripod or an I.S. (Photo Stablizing) lens is additionally a great method to prevent blur.
1 note
·
View note
Text
Rating + Processing for Available Light Portraits - EI 3200 ISO
Rating + Processing for Available Light Portraits – EI 3200 ISO
It bears repeating:
International Center of Photography shooter James Mignogna once told me that a good photographer matches their light, lens, film and developer. Nowhere do I think these decisions are more critical than portraits in dim lighting.
That was the intro I used in my previous entry: Rating + Processing for Available Light Portraits – EL 1600 ISO and it’s as relevant to the entry…

View On WordPress
#1600#1600 ISO#3200#3200 iso#6400#6400 ISO#Available Light#available light portrait#bar hopping#black and white#black and white film#black and white high speed film#black and white processing#box speed#candid#concerts#contrast#contrasty#Delta#delta 3200#dim#documentary#dreamy#dx code#EI 1600#EI 3200#EI 6400#existing light#existing light portrait#fast lens
4 notes
·
View notes
Photo
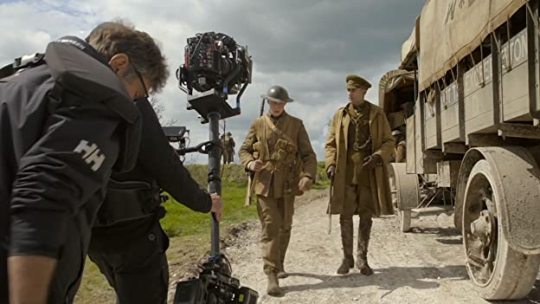
According to Roger Deakins, over 90% of the film 1917 (2019) was shot with ARRI 40mm Signature Primes, the exceptions being a 47mm for the river scenes and a 35mm for the gym basement and tunnels. Using a pair of Alexa Mini LF prototypes for the first time, Deakins was delighted with the color sensitivity and ability to shoot interior night sequences, rated at 1600 ISO, without forfeiting image quality. The first bunker lit with what appears to be oil lamps, are actually prop lamps fitted with 50W electric bulbs dimmed down.
4 notes
·
View notes
Text
GravPool (Steam VR)
New Review - GravPool (Steam VR) - Valve Index, HTC Vive & Oculus Rift
System: Valve Index, HTC Vive & Oculus Rift
Price at Time Of Review: £2.79
Comfort Rating: Green
Genre: Puzzle
Input: Tracked Motion Controllers
Best Playing Position: Standing or Sitting
Multi-Player: Yes
Age Rating: 15+
VR Shop Score 1/100: 70
Description:Since the 1600s, many variations of the game of billiards and cue sticks have been played. In the 1600s it was a noble game, played by King’s and…
View On WordPress
1 note
·
View note
Photo

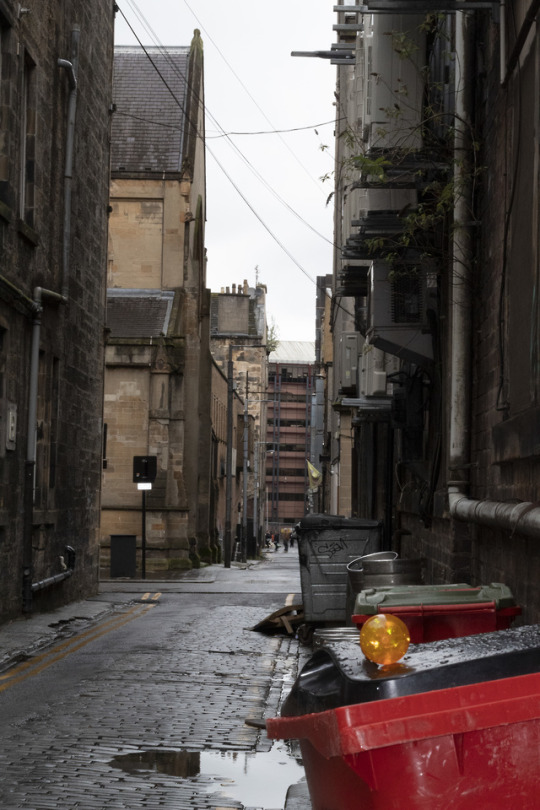


1. I went to an alley way with a wide angle fish eye lens with the vision of trying to get a photo were the buildings are distorted and curved and complement the curvature of the sphere but the buildings weren’t close enough to get the curvature in so I took the image at a different angle and got the light bulbs in the image to complement my sphere, you can also see some curve at the bottom right of the image. The lighting in the image is very nice as even though it was a cloudy day it was still very bright so when you underexposed an image the shadows are very dark but any light that falls on the subject wraps round and melts into the shadows, which you can see on my hand. I also used a shallow depth of field to blow out the background, and it also made the light bulbs blown out as well which made them more spherical.
2. This image isn't the most interesting but it shows the telephoto and depth of field really well, I also used flash to brighten up the sphere as there wasn't any direct light dropping on it which made that corner really dark.
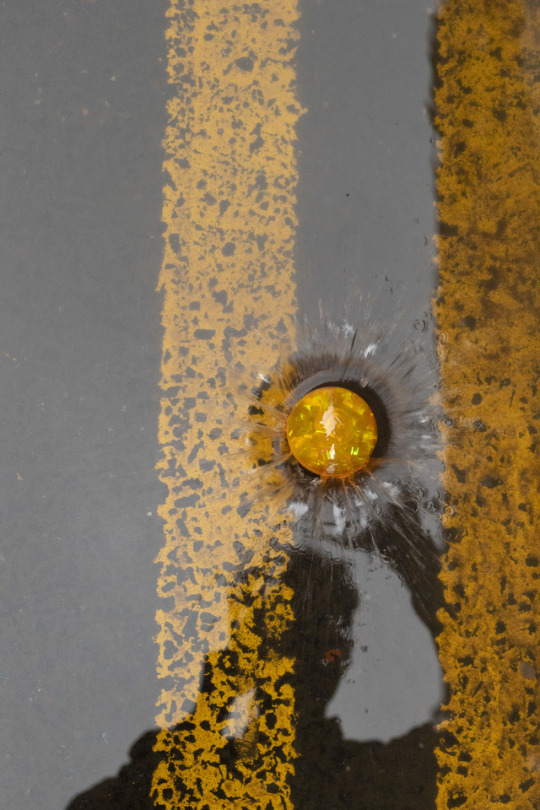
3. In this image I managed to show a freeze motion by dropping my sphere into a puddle and capture the splash of the water coming out under it. The image almost looks like a smashed mirror as there is a slight reflection of me at the bottom of the image and also the splash looks very even and distorted just like a crack in a mirror. I decided to take the image in that puddle because of the double yellow line that is also the same shade as my sphere so it works together.
4. My sphere was a bouncy ball that when hit it would start to light-up which I just new I had to do some light painting with. So I waited until it was dark and rolled down my blind took a tripod and set it up to focus on the corner of the room. I then realised that the frame rate of the light inside of the ball was quite slow so I couldn't move fast with the ball which made me use a much slower shutter speed so that I had time to create the light patterns. I knew that I wanted the ball to end up in the corner of the room because it creates a flowing pattern and an end destination of the light, in the image I picked you can also see my hand holding the ball up in the corner which makes it quite mysterious as it looks like my hand is coming out of the lower pattern.
5. I got my friend to throw the ball in front of a blue mesh and followed the ball with my camera. I managed to get a nice contrast of the orange of the ball and the blue of the mesh making the ball pop from the blue blurred background. You can also clearly see the movement I made whilst following the ball.
2 notes
·
View notes
Text

Panoramic view of Paris from Sacre Couer Basillica in the Montmartre Village. Leica M6 with 50mm lens. Kodak Tri-X film rated at ISO 1600.
#travelphotography#panoramic#filmphotooftheday#rangefinder#leica#black and white#parisphoto#cityscape#kodakfilm#photography
2 notes
·
View notes
Last Seen Blogs

llangernywtree
Something Wicked This Way Comes

kotodeg-corin
stone

jovalencia
I guess it really does take forever to grow up

boxermetal
Boxer Metal

empregospara
Untitled