#DIYhomeimprovement
Text
Mastering Garage Door Spring Replacement: A Comprehensive Guide to Safety and Success

Garage door springs are critical components of your garage door system, providing the necessary tension to facilitate smooth opening and closing. However, due to the wear and tear they endure over time, replacing garage door springs becomes inevitable. Yet, it's a task that requires precision and caution to ensure safety for both you and your property. In this guide, we'll delve into the essential steps and safety measures for replacing garage door springs safely.
Understanding the Risks Associated with Garage Door Spring Replacement
Before embarking on the replacement process, it's crucial to comprehend the potential hazards involved. Garage door springs are under immense tension, and mishandling them can lead to serious injuries or property damage. Therefore, it's advisable to exercise caution and, when in doubt, seek professional assistance.
Step-by-Step Guide to Safe Garage Door Spring Replacement:
Prepare the Workspace: Begin by clearing out any clutter or obstructions around your garage door to create a safe working environment. Ensure ample lighting and gather all necessary tools and equipment, including winding bars, safety goggles, and gloves.
Release the Tension: Before removing the old springs, it's essential to release the tension from the garage door system. This can be achieved by carefully disconnecting the opener and manually lowering the door until it's fully closed.
Identify the Type of Spring: Garage doors typically use either torsion springs or extension springs. Identify the type of spring installed in your system before proceeding with the replacement process. Each type requires different techniques for safe removal and installation.
Remove the Old Springs: Using winding bars and following manufacturer guidelines, carefully unwind and remove the old springs from the torsion tube or track hanger. Exercise caution and avoid applying excessive force to prevent accidents.
Install the New Springs: Once the old springs are removed, it's time to install the new ones. Ensure that the new springs are compatible with your garage door system and follow manufacturer instructions meticulously. Use winding bars to wind the springs to the appropriate tension level.
Test the Door: After installing the new springs, cautiously test the functionality of your garage door by manually opening and closing it several times. Look out for any unusual noises or irregular movements that may indicate an installation error.
Reconnect the Opener: Once you're satisfied with the replacement process, reconnect the garage door opener and test its operation. Make any necessary adjustments to ensure smooth and seamless functionality.
Safety Precautions to Remember:
Always wear protective gear, including safety goggles and gloves, when working with garage door springs.
Never attempt to repair or replace springs without proper knowledge and experience. When in doubt, consult a professional technician.
Avoid standing directly under the garage door or springs while performing maintenance or repairs.
Regularly inspect your garage door springs for signs of wear and tear and replace them as needed to prevent accidents.
By following these steps and safety precautions, you can effectively replace garage door springs while prioritizing safety and minimizing risks. Remember, when it comes to garage door maintenance and repairs, safety should always be the top priority.
#GarageDoorSafety#DIYGarage#HomeMaintenanceTips#GarageImprovement#SafetyFirst#SpringReplacement#GarageDoorDIY#HomeRepair#GarageProjects#SpringSafety#DIYProjects#HomeImprovement#GarageRenovation#SafeRepairs#DIYTips#HomeRenovation#SpringMaintenance#DIYHomeImprovement#GarageUpgrades#HomeSafetyTips
0 notes
Text

Protect and beautify your kitchen cabinets with a flawless seal! Discover how to seal your cabinets for long-lasting durability and style. 🛠️✨
Get Inspired, visit www.kitchenov.com
#KitchenRenovation#DIYHomeImprovement#CabinetCare#Kitchenov#kitchen decor#kitchen sink#kitchen cabinets#dining room#homeimprovement#diyplumbing#kitchen#kitchen appliances#appliances
0 notes
Text
Choosing the Right Tools for DIY Electrical Repairs and Upgrades

Beginning a DIY electrical project is thrilling, but have you ever felt frustration when things go wrong due to the wrong tools? I have. That's why I'm here to guide you. Safety is paramount, and it all begins with the right tools. Let's dive into the essentials for successful DIY electrical repairs and upgrades.
Essential Tools for Every DIY Electrician's Toolbox
Must-haves
Voltage Tester: This tool is your electrical guardian angel, ensuring circuits are dead before you proceed. Non-contact or contact, pen or multimeter – choose wisely based on your project's needs.
Wire Strippers/Cutters: Master safe stripping techniques, matching them with the right gauge. Precision matters, and a smooth wire-stripping dance avoids potential hazards.
Screwdrivers (Various Sizes and Types): Phillips, flathead, Torx – understand the language of screws. Each type has a unique purpose, and having a variety on hand ensures you're ready for any fastening challenge.
Pliers (Needle Nose, Lineman's): Grip and cut wires like a pro. Different pliers serve distinct functions, making your toolbox versatile and your projects seamless.
Flashlight: Shed light on the darkest corners of your electrical endeavours. Consider a headlamp for hands-free brilliance when juggling wires becomes an art form.
Level: Achieve precision in every installation – switches, outlets, and fixtures. A level ensures your upgrades are not only functional but also aesthetically pleasing.
Additional helpful tools
Circuit Breaker Finder: Quickly locate hidden breakers, a time-saving device that eliminates the guesswork.
Utility Knife: A versatile companion for stripping cables, scoring conduits, and other general purposes. This handy tool is a silent hero in your toolkit.
Wire Caps/Connectors: Choose wisely based on wire gauge and material. These little connectors play a crucial role in keeping your connections secure.
Electrical Tape: A multitasking marvel – insulation, marking, and serving various electrical purposes. Don't underestimate the power of a good electrical tape.
Safety Glasses and Gloves: Protect yourself from potential hazards, ensuring your DIY journey is injury-free.
Considerations for Choosing Quality Tools
When it comes to tools, quality should be your steadfast companion:
Safety Features: Prioritize tools with insulated handles, non-conductive materials, and shock protection. Your safety is non-negotiable.
Quality vs. Cost: Invest wisely. Durable tools from reputable brands might cost a bit more, but they pay dividends in the long run.
Functionality: Seek multi-function tools or sets for versatility. A tool that can wear multiple hats is a valuable asset in any DIY project.
Ergonomics: Comfortable grip and design prevent fatigue during prolonged usage. Your hands deserve the best; choose tools that understand that.
Project-Specific Needs: Tailor your tool selection to the specifics of each project. For instance, consider a drywall saw for recessed lighting – a small adjustment that makes a big difference.
Safety First: Working with Electricity the Right Way
Before you embark on any electrical journey, follow these commandments:
Always turn off the power before starting any work.
Double-check and triple-check that the power is off.
Use proper voltage testers and safety gear.
Work within your skill level and know when to call a professional.
Follow local electrical codes and regulations.
Conclusion
Armed with the right tools, knowledge, and a safety-first mindset, your DIY electrical projects are destined for success. Electrical contractors stress the importance of using the right tools, not just for efficiency but, more crucially, for your safety.
So, whether you're a seasoned DIY enthusiast or a novice looking to enhance your home, let this guide be your beacon. Electrical services can be within your grasp with the right tools and a bit of know-how. Before any electrical task, familiarize yourself with What Electrical Work Can Be Done Without A License
#DIYElectrical#ToolboxEssentials#HomeSafety#ElectricalUpgrades#DIYProjects#SafetyFirst#ElectricalTools#DIYHomeImprovement#WiringWonders#HandymanTips#ToolTalk#HomeElectrical#DIYEnthusiast#EmpoweredDIY#SafetyGear#ElectricalKnowledge#PowerUpgrades#HomeRenovation#DIYGuides#HandyHacks
0 notes
Text
0 notes
Link
#beginnerhomeimprovement#budgethomeimprovement#DIYhomeimprovement#easyhomeimprovement#EasyProjects#Homeimprovement#quickhomeimprovement
0 notes
Text

Upgrade your kitchen game with ease! Learn how to Replace Old Faucets with a new sprayer faucet. Read our latest blog now!
#decor#kitchenupgrades#faucetreplacement#sprayerfaucet#kitchenrenovation#DIYhomeimprovement#kitchenfaucet#kitchendesign#kitchenremodel#homeimprovementtips#kitchenupgrade#kitcheninspiration#kitchenideas#homerenovation
1 note
·
View note
Text
Smart Home: Definition, How They Work, Pros and Cons

Smart Home: Definition, How They Work, Pros and Cons
What Is a Smart Home?
A smart home is a practical house design where electronics and appliances can be remotely controlled via the internet from any location using a smartphone or other networked device. The internet connects the devices in a smart home, enabling users to remotely manage features like temperature, lighting, security access, and home entertainment systems.
In a smart home, residents can use a smartphone, tablet, and an internet connection to directly manage lights, appliances, thermostats, and other devices.
Systems that are hardwired or wireless can be used to build up smart homes.
Homeowners can save money and enjoy convenience thanks to smart house technology.
The creation and use of smart house technology are still hampered by security risks and bugs.
Although complete house automation may cost thousands of dollars, smaller, more affordable individual products can get homeowners started with smart home technology.
How Smart Homes Work
The gadgets in a smart house are interconnected and accessible from a single hub, such as a smartphone, tablet, laptop, or gaming console. One home automation system can manage door locks, televisions, thermostats, home monitors, cameras, lights, and even appliances like the refrigerator. The user can set time schedules for specific changes to take affect using the system, which is installed on a mobile device or other networked device.
Self-learning capabilities are built into smart household appliances, allowing them to figure out the homeowner's schedules and make adjustments as necessary. Lighting control in smart homes enables residents to save money on energy costs while using less power. When the owner is away from the house, some home automation systems sound an alarm, while others can contact the police or the fire department in the event of an emergency.
Once linked, IoT technology, a network of physical objects that can collect and share electronic information, includes services like a smart doorbell, smart security system, and smart appliances.
Smart Home Systems
Both wireless and hardwired devices, as well as both, are possible in smart homes. The installation of wireless devices is simpler. A wireless home automation system can be installed for several thousand dollars, making it a very affordable option. It includes features like smart lighting, temperature control, and security.
The drawback of wireless systems is that you probably need reliable broadband service and powerful Wi-Fi coverage throughout your entire home. You might need to spend money on wifi access points that are hardwired or range extenders. Due to their smaller size, wireless smart home devices are typically better suited for smaller existing homes or rental properties.
On the other hand, hardwired systems are thought to be more dependable and usually more challenging to hack. A hardwired system may boost a house's resale worth. Hardwired smart home systems are also simple to scale, so when planning a new construction or significant renovation, this approach is frequently chosen.
It's relatively costly, which is a downside. A high-end, hardwired smart system installation can run into the tens of thousands of dollars for homes. Additionally, you need room for ethernet wires and other network hardware components.
How to Create a Smart Home
Heating

Greater control over heating devices is now possible thanks to smart house products, including the ability to control when products are turned on, off, and controlled. If certain conditions are reached, smart products may be equipped with temperature or humidity sensors to automatically turn on or off. Air conditioners are included in this category of smart house innovations.
Lighting
Lighting goods now improve the capabilities of homeowners, frequently with the help of a mobile phone, table, or specialized remote made specifically for a product. Lights can be turned on and off, put on a schedule, or programmed to vary according to the times of sunrise and sunset. Lights can frequently be configured to change based on motion, just like some more traditional goods. Wi-Fi-enabled smart bulbs can interact with one another and send metrics or statistics to your phone.
This lighting category may also include smart house lighting controls or dimmers. It is possible to install automatic blinds and program them to close on dawn schedules. Electronic drapes, on the other hand, let users control their blinds with a portable device.
Audio/Visual
Many entertainment products are now highly connected to one another and can be managed with a single remote, which is one of the more entertaining features of smart homes. With the help of apps, speakers and televisions can now play content on demand and even be voice-controlled or kept on a schedule.
Security

The improved protection features of a smart home are among its most logical features. Nowadays, many products come equipped with cameras that can record video, detect motion, or provide live video feeds. This can be set to show in specific locations on your property or installed to sync with a ringing doorbell. With the person at your door, these recordings might enable audio-capable video calling.
Modern protection kits are also installed in a lot of smart homes. This includes the ability to automatically lock doors or windows using a phone, house monitoring, notifications and alerts of suspicious behavior, and motion sensor detectors when people shouldn't be at home.
Other
Digital assistants or house hubs make up a sizable portion of smart homes. These products can accept commands, answer queries, manage your calendar, plan conference calls, and provide alerts. They are frequently used in voice-activated interactions. These digital assistants offer a wide variety of controlling smart assets, their schedules, and their statuses, despite not being particularly related to one's home.
Smart smoke and CO detectors can sync to your phone to notify you if you are away from your property in addition to sounding an alarm. These gadgets can frequently be configured to notify specific friends in case of emergencies.
For a while now, automated irrigation devices could be programmed. Smart irrigation systems now take climate and environmental factors into account when creating watering plans. Water conservation is a goal of smart irrigation systems, which track moisture-related circumstances.

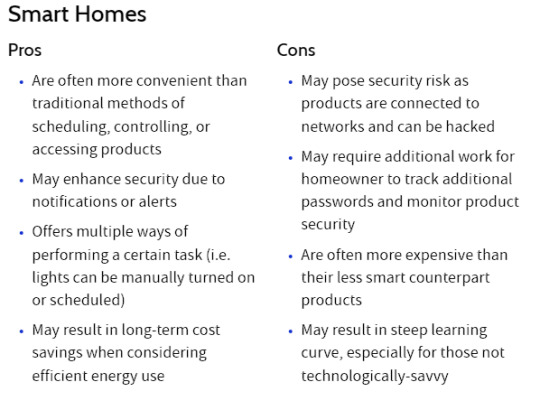
Advantages and Disadvantages of Smart Homes
Pros
The installation of a smart home technology device offers convenience to homeowners. Homeowners can manage all of their features, including lighting, thermostats, and appliances, with just one device, typically a smartphone or tablet.
Users are able to receive notifications and updates about problems in their homes because they are linked to a portable device. For instance, residents can see and speak with visitors at their doors even when they are not home thanks to smart doorbells. The interior temperature, lighting, and utilities can all be set and controlled by users.
Homeowners can save a lot of money by using a smart device after paying for installation. Utilizing electronics and appliances more effectively can reduce energy expenses.
Cons
There are still difficulties even though the smart home provides convenience and expense savings. Both the technology's creators and consumers continue to experience security risks and bugs. For instance, skilled hackers can access the internet-connected appliances in a smart house. In October 2016, a botnet known as Mirai infiltrated networked DVRs, cameras, and routers in order to launch a DDoS assault that brought down a number of important websites.
Protecting smart appliances and devices with a strong password, using encryption when it is available, and only connecting trustworthy devices to one's network are steps one can take to reduce the risks of such attacks.
The price to implement smart technology can range from a few thousand dollars for a wireless system to tens of thousands of dollars for a hardwired system, as was mentioned above. It's a high price to pay, particularly considering that everyone in the household may experience a challenging learning curve as they adjust to the new system.
Home Much Does a Smart Home Cost?
On the one hand, the constant influx of smart home products onto the market will place pressure on suppliers, rivalry, and prices. On the other hand, these amazing innovations are capable of continuously extending their capabilities and may come with price premiums. Consider smart home goods and run a cost-benefit analysis to see if the price outweighs the benefits.
...ect.
Do you want me to continue?
#smarthome#smarthometech#smarthomeideas#smarthomegadgets#smarthome2023#smarthomeautomations#smarthometour#homeautomation#home#smarthouse#smart#smarthomeautomation#smartgadgets#house#homeimprovement#improvement#homeimprovementideas#homeimprovements#homeimprovementreunion#diyhomeimprovement#amazon#amazon4k#amazonforest#amazonhaul#amazonrainforest#amazonprime#amazonwildlife#amazonfinds#scontiamazon#offerteamazon
1 note
·
View note
Photo

🏠🔨✨ Home renovation complete! Check out the incredible before and after transformation. From drab to fab, we couldn't be happier with the results.
#homerenovation#beforeandafter#DIYHomeImprovement#homemakeover#transformyourspace#architecture#ArchitecturalDesign#ArchitecturePhotography#ArchitectureLovers#BuildingDesign#InteriorArchitecture#SustainableArchitecture#HistoricArchitecture#ModernArchitecture
1 note
·
View note
Text
DIY Home Improvement Projects 2023: The Ultimate Beginner's Guide to Tackling Your First Project
Introduction:
If you're looking to upgrade your living space and add value to your home, DIY home improvement projects can be a great option . Whether you're a complete beginner or have some experience, it's understandable to feel a bit overwhelmed by your first project. Fortunately, there are plenty of easy, beginner-friendly ideas to help get you started.
One simple DIY home improvement idea is to repaint a room. Few things can update your space as dramatically as a fresh coat of paint, and you can even add a pop of colour with an accent wall or a painted ceiling . Another idea is to add a front entrance makeover, allowing for a smooth transition in and out of your property .
Other beginner-friendly projects include wallpapering a wall, fixing squeaky floors, adding a roof deck, and sprucing up your outdoor space .
Bathroom remodels can also add value to your home, and simple updates like installing new fixtures, painting, and re-grouting the bathtub can make a big difference . Investing in interior design is also a great way to improve the value of your home .
Remember, the most important thing is to start small and work your way up as you gain more confidence and experience. With these easy DIY home improvement ideas, you can take your first step towards upgrading your living space and adding value to your home.
Painting Projects
Painting projects are a great way to explore your creativity and add a personal touch to your home decor. Whether you are a beginner or an experienced artist, there are many painting project ideas out there for you to try. Here are some of the best painting project ideas:
- JOANN Painting Crafts: JOANN offers a great collection of painting projects and ideas for both kids and adults. You can browse hundreds of projects with easy steps and instructions to get started with your painting project.
- Easy Painting Ideas: If you're looking for some inspiration, check out this list of easy painting ideas inspired by real life. From your favourite coffee mug to a tranquil lake scene, these ideas are perfect for beginners and experienced painters alike.
- Abstract Painting Projects: Working abstract is great as a warm-up with big, unhindered gestures and lots of movement in and around your surface. It can also lead you to discover something about combining materials, unusual marks and effects, and that realism doesn't have to be your aim.
- Easy Painting Ideas for Beginners: Feeling Nifty provides a list of over 60 easy painting ideas for beginners. Whether you're just starting with acrylics or in a painting rut, the ideas are perfect for sprinkling some inspiration into your work.
- Easy Painting Projects: DIYs offers 35 easy painting projects for the entire family to enjoy and experiment with! From beginner-level projects to more advanced projects, there's something for everyone to try.
- Painting Tutorials on YouTube: YouTube provides a plethora of painting tutorials for beginners and advanced painters. From finger painting to drawing flowers, there's a tutorial for every type of painting project.
- Sherwin-Williams Painting Projects: Sherwin-Williams provides a project centre featuring dozens of step-by-step guides that make it easier than ever to live a colourful life at home. Whether you're looking to make your bedroom cosier or turn your backyard into an oasis, they have plenty of painting projects for you to try.
- DIY Canvas Painting Projects: Shutterfly offers some great canvas painting projects, including designing a pixelated pattern by creating a grid of colours that are the same hue or creating a geometric canvas.
- New Painting Ideas: Nevue Fine Art Marketing offers some new painting ideas to work on next, such as painting everyday items found in your home, including drinking glasses, wine glasses, bowls, chairs, and lamps. You'll continue to learn different techniques with the subjects, including proportion and various textures.
- BHG Paint Projects: Better Homes & Gardens offers plenty of DIY paint project ideas that you can use to give all of your home accessories a style update. Their easy paint projects are sure to inspire you to create a space that's filled with personality and style.
Tips for choosing the right paint colour
Choosing the right paint colour can be a daunting task, but the good news is that there are several tips to help make the process easier. Here are some tips:
- Consider the emotional response that colours evoke. Cool colours like blues, greens, and whites are perceived as restful and soothing, while warm colours like red, orange, and yellow create a sense of drama and energy .
- Look to print fabrics for inspiration. Throw pillows, bedding, and table linens can provide you with paint colour ideas. If you're creating an accent wall, look to the boldest colours in the print .
- Consider how morning light will look with a paint colour compared to the glow of your lampshade at night. Look at paint colours in the morning and at night, and put them near your furniture to see how they complement each other .
- Use a colour scheme to guide choices for furniture, rugs, and walls in a room so that they complement each other. A colour scheme is a colour plan .
- Test your paint colours against furniture and fabrics. Don't only test your colours on the wall. Instead of painting an entire open-concept living space all one colour, break it up by painting some rooms or accent walls a few shades lighter or darker on the same colour strip to add depth to space .
- Test the colour you want on a small spot on the wall and then observe it at different times of the day to make sure you like it .
- Choose a paint sheen that affects both the look and durability of your painted walls. A shinier satin or gloss finish is going to make your paint colour look brighter than a flat or matte finish .
- Don't choose paint first. Choose your furniture, artwork, and decor first and then select a paint colour that complements them .
- Paint a poster board with your chosen colour instead of painting the wall. This way, you can easily see how colours will appear around the room .
- Consider breaking up a large space by painting some rooms or accent walls a few shades lighter or darker on the same colour strip. This will add some depth to space .
By following these tips, you can choose the right paint colour with confidence and create a space that reflects your personal style and preferences.
Step-by-step guide to painting a room
Painting a room can seem like a daunting task, but with a little preparation and a step-by-step guide, it can be a manageable DIY project. Here's a comprehensive guide on how to paint a room:
Step 1: Prepare the room
Before painting a room, it's important to prepare the space. Move all furniture out of the room or into the centre of the room and cover it with a drop cloth or protective sheet . Remove any photos or art from the walls . Use low-tack masking tape or painter's tape to protect any trim, moulding, or baseboards that won't be painted .
Step 2: Prep the walls
Prep the walls by filling in any holes or cracks with spackling paste, joint compound, or fibreglass . Once it's dry, sand the areas until they are smooth using 100-120 grit sandpaper . Clean the walls with a damp rag to remove any dust or debris .
Step 3: Choose a paint colour and finish
Head to a home centre or paint store and have them mix three- or four-colour samples for you. Test your colour samples on different parts of the room to get a feel for the paint colours . Choose a paint finish, such as matte, eggshell, satin, semi-gloss, or high-gloss, depending on your desired level of sheen and durability .
Step 4: Paint the ceiling
Start by painting the ceiling. Use a roller and start in the corners of the room, then work your way outwards in sections. Make sure to use long, even strokes and apply a second coat if necessary .
Step 5: Paint any trim, moulding, or baseboards
Remove the painter's tape and wait for the walls to dry before applying tape to them . Start with the trim closest to the ceiling, then move on to the door and window frames. Use a small brush to paint any intricate areas and a larger brush or roller for larger surfaces .
Step 6: Cut in the paint
Cutting in is the process of painting a straight line along the edges of the wall where it meets the trim or ceiling. Use a small brush to carefully paint the edges of the walls, then use a roller to fill in the rest of the wall.
Creative ways to use paint to upgrade your space
Paint is a versatile and affordable way to upgrade your space. Here are some creative ways to use paint to refresh your home:
- Use paint to make a small room appear larger by painting the woodwork the same colour as the walls .
- Give your curtains and throw pillows a fresh look by using fabric paint .
- Transform outdated lighting fixtures into stylish and contemporary pieces by using textured metallic spray paint .
- Freshen up your walls with a new coat of paint. A dramatic bold colour or a crisp white can make a big impact on the overall feel of a room .
- Try using limewash paint on furniture to create a unique and trendy look. This technique works best on bare wood, so be sure to remove any existing finishes or paint layers with a furniture stripper .
- Get creative with paint by using it on unexpected surfaces like planters, door knobs, or even light switch plates .
- Use painted details in colours inspired by other elements in the room to create a cohesive and balanced look .
- Colour drenching a room, or using the same colour throughout the space, can create a cosy and inviting atmosphere .
- Have fun with colour by using paint on unexpected surfaces like floors, furniture, or even the inside of a bookshelf .
In conclusion, the possibilities are endless when it comes to using paint to upgrade your space. Whether you're refreshing your walls or trying out a trendy new technique, paint is an affordable and versatile way to give your home a fresh look.
Furniture Upgrades
Furniture upgrades can be a great way to refresh and revamp your living space without breaking the bank. Here are some ideas and resources to consider:
- Furniture makeovers: There are numerous ways to transform old or outdated furniture pieces into something new and stylish. From upholstered settees and repurposed coffee tables to extended chest-to-desk corners and panelled farmhouse chic dining tables, the possibilities are endless. Check out HomeBNC for some inspiring furniture makeover ideas.
- Amazon furniture upgrades: If you're looking to purchase new furniture, Amazon offers a variety of stylish and affordable options. Architectural Digest has compiled a list of the best Amazon furniture finds, including everything from accent chairs and coffee tables to bookshelves and storage cabinets.
- DIY cushion covers: One simple and inexpensive way to update an old couch is to make new cushion covers out of cloth napkins. Wise Bread offers step-by-step instructions on how to do this, as well as 14 other cheap and ingenious ways to upgrade your furniture.
- Furniture building projects: If you're feeling handy, building your own furniture can be a fun and rewarding way to upgrade your space. Young House Love has a variety of furniture upgrades and building tips, including detailed instructions for building and organizing everything from Ikea hacks to bedroom closet updates.
- Low-cost furniture upgrades: This Old House has a list of seven low-cost, high-style furniture upgrades that you can do yourself on a budget. From adding a charging station to a nightstand to installing new drawer pulls, these simple upgrades can make a big impact on your space.
- Custom Ikea furniture: Norse Interiors offers luxurious, custom-made replacement pieces to turn your Ikea furniture into bespoke works of art. Their Scandinavian-inspired aesthetic is defined by clean lines that are easy to integrate into every room, and their patterns span from refined and elegant to more playful.
- Affordable living room updates: The Spruce has some suggestions for cheap living room updates, including replacing window treatments, creating a gallery wall with your photos, and replacing overhead fixtures with thrift store chandeliers.
- AR-15 furniture upgrades: If you're a gun enthusiast, Pew Pew Tactical has a list of the best AR-15 furniture and accessories, including the Magpul AR-15 MOE Grip, which offers a lighter, more comfortable, and still affordable option.
- Furniture reupholstery: If you have a favourite piece of furniture that needs a refresh, consider re-upholstering it instead of buying something new. Yelp has a list of the best furniture reupholstery services in Ashburn, VA, including David Stiverson Upholstery Repair and Designs Interiors by the Upholstery Shop.
Budget-friendly furniture makeovers
Budget-friendly furniture makeovers can be a great way to revamp your home decor without breaking the bank. There are many creative ways to transform your furniture on a budget, and the internet is full of ideas and tutorials to help you get started:
- Curbly offers a collection of furniture makeovers that were done on a tight budget. These makeovers include spray-painting a $10 desk, polishing brass fixtures, and more.
- Homebnc has a gallery of before and after shots that showcase different ways to rework living rooms of all shapes and sizes on a budget. From making a small room feel more spacious to Feng Shui, there are plenty of ideas to explore.
- Better Homes and Gardens presents before-and-after furniture makeovers that used paint, fabric, and other upgrades to transform thrift-store finds. These makeovers cover a wide range of furniture types, including chairs, dressers, and cabinets.
- 12 Tomatoes provides a step-by-step tutorial for making over furniture using baby powder, glue, and paint. This technique is used to create stencilled designs on furniture.
- For a video tutorial, check out a YouTube video by Creative Living Lifestyles , which shows how to give an affordable desk a makeover using spray paint and other materials.
- The Cottage Market provides a list of charming and budget-friendly farmhouse furniture makeovers. These tutorials will arm you with tons of knowledge to make the right choices while doing your makeover.
In addition to furniture makeovers, there are also many other budget-friendly home makeover ideas to explore. For example, BHG provides a before-and-after gallery of a small but stylish kitchen remodel that was done on a budget. HGTV has a similar gallery of bathroom remodels that were done for under $5,000.
When it comes to buying budget-friendly furniture, The Spruce has a list of the 14 best places to buy furniture on a budget, including Wayfair, Amazon, and IKEA. Finally, Extra Space Storage has a guide to a backyard makeover on a budget, which includes ideas for night-time lighting, patio furniture, and DIY projects like building a deck or patio.
Overall, there are many ways to give your furniture and home decor a fresh look without spending a lot of money. you'll have plenty of inspiration to get started on your own budget-friendly furniture makeover project.
Simple upholstery projects for beginners
Upholstery can be a daunting task for beginners, but there are several simple projects to get started with. Here are some suggestions:
- Chair with Drop-in Seat Pad: This is a common piece of furniture that can be found at thrift stores or online marketplaces. It is a great project to start with because it teaches the fundamental skills needed as an upholsterer .
- Ottoman: A simple to moderate ottoman can be a great project for beginners. It can have a few details like a tack band with a single welt cord and a double welt trim .
- Covered Headboard: This is a simple project that can be like wrapping a present. It requires getting a piece of plywood cut to the size you want and covering it with fabric .
- Small Stool or Bench: Starting with a smaller piece like a stool or bench can make for an easy upholstery project .
- Cushion Cover: A simple cushion cover project can be done without sewing a zipper or piping cord, making it easy for beginners to complete. You can even make a cushion out of bamboo or a wooden sofa with ugly upholstery .
Before starting any upholstery project, it is important to have the necessary tools such as a staple gun, staple remover, hot glue gun, pliers, webbing stretcher, Phillips and flat head screwdrivers, measuring tape, button needle, regulator, fabric scissors, edge roll cutter, curved needles, white and yellow chalk, and a utility knife . It is also helpful to measure twice and cut once and to follow step-by-step tutorials or ask for advice from more experienced upholsterers .
Creative ways to repurpose furniture
Repurposing old furniture can be a fun and creative way to breathe new life into outdated pieces and give them a new purpose. Here are some creative ways to repurpose furniture:
- Turn an old dresser into a TV stand, buffet, or entryway table .
- Transform a crib into a shelf by removing one of the side rails and topping it with a piece of glass or butcher block .
- Repaint and refresh an old bureau to give it a new look .
- Upcycle an old wooden settee into an upholstered table .
- Transform an old, non-working piano into a unique bookshelf .
- Use an old door to create a rustic farm table for your dining room .
- Turn an old cabinet into a kitchen island with a little DIY work .
- Repurpose an old bookshelf into a kitchen island with some creative modifications .
- Transform an old dresser into a bench for seating with a few simple modifications .
- Use an old coffee table to create a kid's art table with a paper-roll holder and separate buckets for organizing art supplies .
These are just a few creative ideas to get you started on repurposing old furniture. With a little bit of creativity and some DIY know-how, the possibilities are endless!
Decorative Touches
Decorative touches are the small details that add personality and character to a room or space. They can range from a simple vase of flowers to a more elaborate wall mural or custom cabinetry design. Here are some ideas for adding decorative touches to your home:
- Coffee table books: Adding two or three relevant coffee table books to a room can make it photo-ready and add a personal touch .
- Silk flower arrangements: A lovely silk flower arrangement, planter, wreath, or swag can add a finishing touch to your decor .
- Wall murals and painted patterns: Painting a mural on a wall or a pattern on your floor can add a unique decorative touch to your home .
Read the full article
#DIYhomedecor#DIYhomeimprovement#DIYhomeimprovementblogs#DIYhomeimprovementbooks#DIYhomeimprovementchecklist#DIYhomeimprovementclassesonline#DIYhomeimprovementcourses#DIYhomeimprovementcoursesonline#DIYhomeimprovementfordummies#DIYhomeimprovementhacks#DIYhomeimprovementideas#DIYhomeimprovementinspiration#DIYhomeimprovementplans#DIYhomeimprovementprojects#DIYhomeimprovementprojectsforbeginners#DIYhomeimprovementshow#DIYhomeimprovementtips#DIYhomeimprovementtutorials#DIYhomeimprovementvideos#DIYhomemaintenance#DIYhomerenovation#DIYhomerepairs#DIYhomeupgrades#DIYprojects#Homeimprovementapps#Homeimprovementbooks#Homeimprovementclasses#Homeimprovementcontractors#Homeimprovementcontractorsnearme#Homeimprovementdoityourself
0 notes
Text
What is Waterproof Tile Adhesive?
Waterproof tile adhesive is a type of adhesive that is designed to be used in areas that are exposed to moisture or water. It is specifically formulated to bond tiles onto surfaces such as concrete, plasterboard, or cement boards in wet areas like bathrooms, showers, swimming pools, and kitchens. The adhesive is water-resistant, which means that it will not break down or lose its adhesive properties when exposed to water or moisture.
There are different types of waterproof tile adhesive available in the market, such as cement-based adhesives and epoxy-based adhesives. Cement-based adhesives are made from a mixture of cement, sand, and water-resistant additives, while epoxy-based adhesives are made from a mixture of resin and hardener. Both types of adhesive have their own advantages and disadvantages, and the choice of adhesive will depend on the specific requirements of the project.
#waterproofing#tileinstallation#constructionmaterials#tiling#waterproofingproducts#buildingmaterials#DIYtiles#tilingtips#tilingideas#waterproofingexpert#tileglue#waterproofingmaterial#DIYhomeimprovement#waterprooftileadhesive
0 notes
Photo
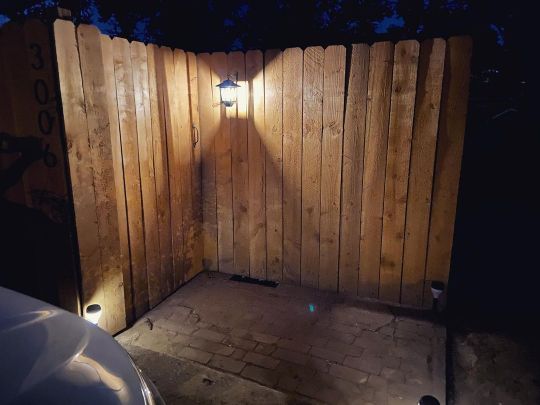
Pretty dang happy with how my #oldbrick backyard entryway turned out. I’m especially pleased with the little solar powered dusk-to-dawn lantern. It looks so nice from the sidewalk! #DIY #diyhomeimprovement #handywoman (at St. Louis, Missouri) https://www.instagram.com/p/CgYNtIGjBbM/?igshid=NGJjMDIxMWI=
0 notes
Photo

Reposted from @jonathanlararealestate If you re-blog please don't remove the credits 🙏🙂 👍Sold my place in the first weekend of visits 👍 Smart technology can enhance your home and your life. Fortunately, there are many smart features you can install without hiring a professional. Here are a few easy upgrades you can make yourself: 🏠 Add smart locks to your doors so you can stop fiddling with keys. 🏠 Install a video doorbell to screen visitors and monitor packages. 🏠 Upgrade to a smart thermostat to save on heating and cooling costs. 🏠 Hang smart smoke and carbon monoxide detectors to receive notifications while you’re away. Tell me in the comments: What smart upgrades have you made to your home? #diyhomeprojects #diyhomeimprovement #smarthometechnology #smarthomeliving #diyhomerenovation #smarthomesolutions #realestateagent #realestatetips #homeownertips #realestate #lavalrealestate #montrealrealestate https://www.instagram.com/p/CfILpwkuiBW/?igshid=NGJjMDIxMWI=
#diyhomeprojects#diyhomeimprovement#smarthometechnology#smarthomeliving#diyhomerenovation#smarthomesolutions#realestateagent#realestatetips#homeownertips#realestate#lavalrealestate#montrealrealestate
0 notes
Text
The Orphaned Hand Saw: A Short Story
I can not drive past a garage sale. So I saw one and found another orphaned old school hand tool that needed to be adaopted. So I applied paid the adoption fee, filled out the required documention….(Not really). And brought the new family member home. Quick clean up and added to my other orphans…..
Every orphan deserves a loving home…just saying
Remember knowledge is a survival skill
The…

View On WordPress
#2CG#learningsurvival#Basic survival#budget knives#BushCraft#camping#camping planning#Camping tips#camping tips hinking#camping tips⁶ hiking#camping website#campingessentials#DIY restoration#DIY wood 8projects#DIY wood projects#diyhomeimprovements#diyprojects#eady restoration projects
1 note
·
View note
Text
The Orphaned Hand Saw: A Short Story
I can not drive past a garage sale. So I saw one and found another orphaned old school hand tool that needed to be adaopted. So I applied paid the adoption fee, filled out the required documention….(Not really). And brought the new family member home. Quick clean up and added to my other orphans…..
Every orphan deserves a loving home…just saying
Remember knowledge is a survival skill
The…

View On WordPress
#2CG#learningsurvival#Basic survival#budget knives#BushCraft#camping#camping planning#Camping tips#camping tips hinking#camping tips⁶ hiking#camping website#campingessentials#DIY restoration#DIY wood 8projects#DIY wood projects#diyhomeimprovements#diyprojects#eady restoration projects
0 notes
Text
How to Fix a Noisy Ceiling Fan Once and for All
Your ceiling fan should be seen and not heard. In most cases, fixing a noisy ceiling fan should only involve a little time and patience. Since ceiling fan issues can range from quick fixes to more complex electrical issues, start by performing basic maintenance to use your time effectively.
1. Clean the Fan
Enough dirt and dust on your fan blades can upset the rotational balance of your fan, causing it to wobble, rattle, and run inefficiently.
To clean the blades, start by using a duster to remove the bulk of dust, dirt, and debris.
2. Tighten Fan Screws
It’s normal for screws and other fasteners to loosen over time due to the consistent rotational force of the fan. Carefully look over each part of your fan, including:
Blades
Fan arms
Brackets
Canopy
If you find any loose screws or fasteners, use a screwdriver or a wrench to tighten them. Some components may have been pushed out of place while the screws were loose, which can cause issues such as the motor cover obstructing the fan blades or the fan blades getting out of position. Make sure these parts are properly aligned and in place before tightening their screws.
3. Oil Your Fan
Depending on the model, your fan may need occasional oiling to keep its parts from overheating, rubbing, and sticking during rotation. Wipe any excess oil off before testing the fan.
4. Replace Damaged Parts
If you notice damaged parts or components at any point, it’s best to replace them to prevent excessive noise or premature wear on your fan components. Depending on your warranty, the manufacturer can generally provide replacement parts.
Check for these common issues:
Deformed brackets
Cracked or bent blades
Frayed wiring
#joyhomerepairexperts #HomeMaintenance #DIYHomeImprovement #SafetyFirst #HandymanHacks #HomeRepairHacks #QuickFixes #HomeDIYProjects #CraftyFixes #EcoFriendlyRepairs #FixItYourself #RepairWithEase #cleaning #ceilingfan


0 notes
Last Seen Blogs


speedycyclepatrol
제목 없음

cururusfc
Sem título

itamiiscribble
Itamii

stungunwolf
PART STUN-GUN, PART WOLF, ALL CYBER COMMANDO.