#ALSO tumblr ruined this edit's quality but that's fine. edit not mine. :)
Video
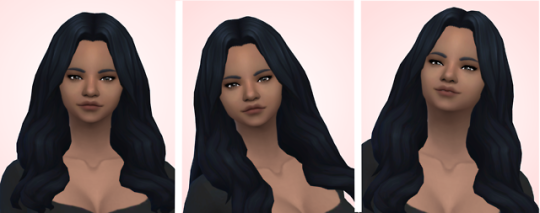
i am so gay
#lorelai gilmore#lorelai gilmore edits#lauren graham#lauren graham edits#gilmore girls#gilmore girls edits#tiktok edits#lgbtq+#lesbian#i'm so gay#ALSO tumblr ruined this edit's quality but that's fine. edit not mine. :)#LMAO just realized i tagged this with only GG stuff even though its legit from bad santa#anyways here u go#bad santa#sue bad santa#i guess i just figured the gilmore girls tag is more popular then bad santa
11 notes
·
View notes
Photo
simple but look how cute she is
#ts4 edit#edit#the sims 4#mine#shes aDORABLE#loOk#im also just really lazy and don't feel like editing#but tomorrow is the last day of school before spring break !!!!#woop#i have a test though#so :(#stress#but i think ill do fine#but :+) spring break is coming and im going to florida#and hangin with friends n stuff#yeah#ilu all have a nice day#click for hd because tUMBLR RUINED THE QUALITY >:((
49 notes
·
View notes
Text
Extensive Guide for Making Gifs
(On Mac and with Photoshop, but the process is basically the same on other platforms.)
Let’s make this gif together (I know it’s not the pretties, but it serves the purpose):

Prerequisites for this tutorial:
gif capture software, e.g. Giphy Capture
Photoshop
Let’s start with the basic. Capturing that gif from your screen.
(If you already know how to do that scroll down until you see a screenshot of photoshop.)
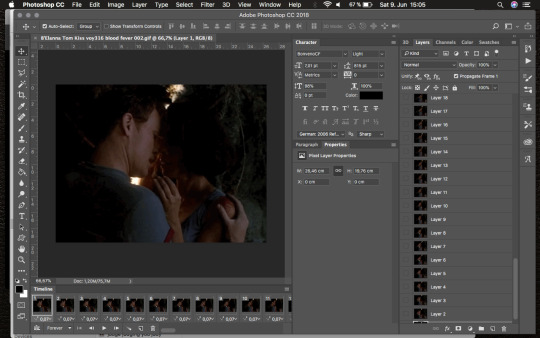
Open Giphy Capture and your video. (I’m grabbing from Netflix, so I’m using chrome to avoid the Netflix Blackscreen)
No need for fullscreen, a fullscreen gif will be too big anyway! Be aware that GC only records 30 seconds at a time. So move a few seconds before your scene - to allow leeway for moving your cursor and for any unwanted details to disappear from the screen (e.g. timeline bars etc.) Adjust the record frame to the size of the video. Start to record one or two seconds before your desired scene.

Stop video and recording when you’re done. Might take two or three tries to get there. don’t worry if it isn’t exact, record too much if you’re unsure. We’re gonna cut this down later.
Now, open your recorded gif by clicking on its icon. Adjust the section you want to export as a gif.

Don’t worry about being exact here either. Better be on the safe side and have a frame or two too many. We can delete frames later in Photoshop. You can also change here if you want it to be a normal loop, ping-pong (back and forth) or reverse, and adjust framerate and size. Don’t worry about the size, we can change that in PS later.
Export your gif. Ignore the file size warning if necessary and save as gif anyway.
Now, open your saved gif in Photoshop.

Look through the gif and delete frames in the beginning or end if you want. Do that in the frame section (timeline), NOT in the layer section. You’ll see why in a bit.

Play the gif every time you change something to make sure it’s what you want, and change things back if needed. (cmd + Z/alt+cmd+Z if more than one step back/shift+cmd+Z if step forward again)
Let’s say I want to remove the first 5 frames. Click on frame 1 and then hold shift and click frame 5. Voila, you selected the first 5 frames. Now delete.
Play gif. Not good? Cmd + Z and try again.
Let’s say we’re happy with your frames, but it’s playing too fast/slow. Select the frames you want slowed down. Let’s say all of them. Click the first frame, then hold shift and click the last frame. Now click on the little number under the frames, on any frame - it doesn’t matter as long as it’s one of those you selected (in case you didn’t select all of them)
Don’t slow down too much or it will look like a slideshow rather than a gif. You want it to still be smooth.
Check and revert if necessary, just as before. Let’s slow ours down to 0.1 seconds instead of 0.07s.

Now that looks fine. Let’s move on and improve the images.
For the sake of this tutorial I’m gonna delete some frames.
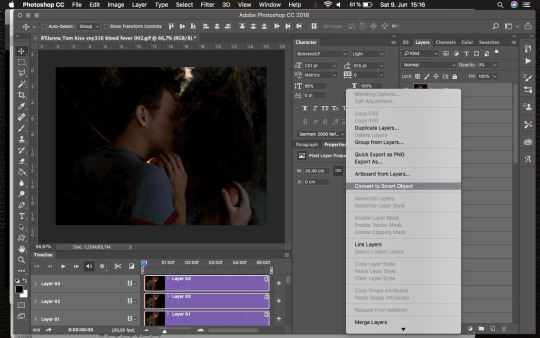
Now we convert the frames to a timeline.

We move over to the layers section now.
You’ll see that not all of them are visible. The invisible ones are those we deleted, so we can go ahead and delete those layers as well.

Now we selected all the layers and convert them into a smart object (Right click --> Convert into Smart Object)
Let’s sharpen our gif and see if that makes it look better. (Undo if you hate it, obviously.)
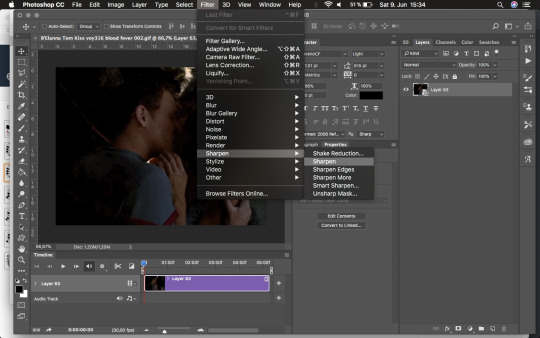
Since our gif is really dark I want to brighten it up.
Right click on layer and Duplicate Layer... (Or use cmd + J)
Set that layer to screen. You can repeat this step as often as you want, but beware, it’ll make your gif look awful at some point.


We can go one forever adding more screened layers, but it’s gonna look bad at some point.

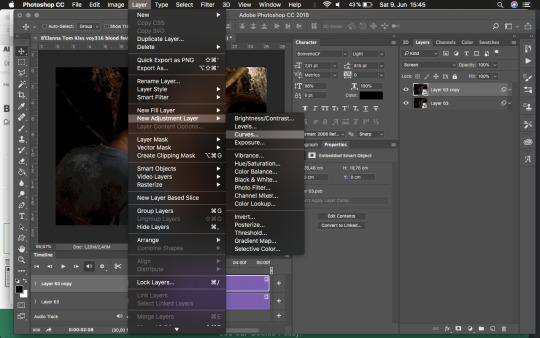
Instead of adding another screen layer, let’s add an adjustment layer instead.
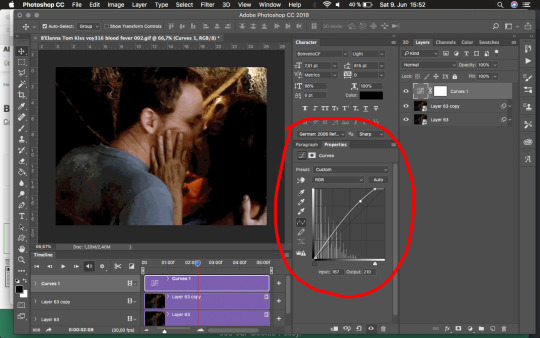
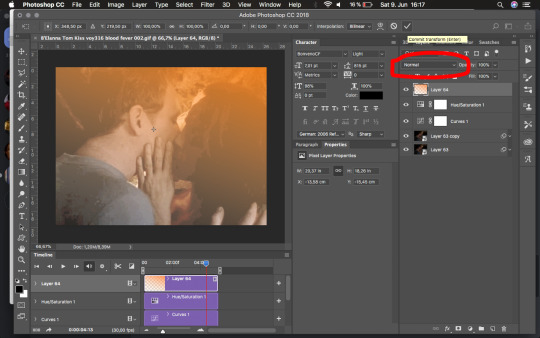
Go to Layer —> New Adjustment Layer —> Curves…
Adjust darkness and light until you’re satisfied. If you’re not happy later on, you can always go back into the layer and adjust it if needed. This goes for every adjustment layer.
From this point on you can basically add as many layers for as many effects as you need/want.
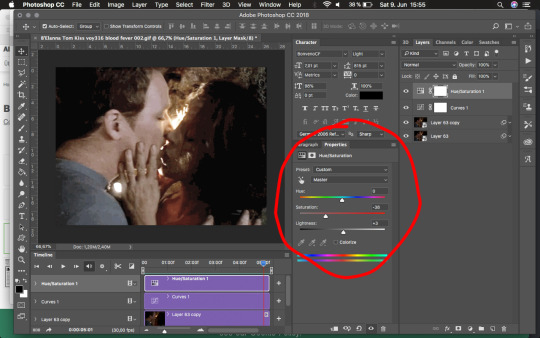
Let’s play a little with saturation.
Layer —> New Adjustment Layer —> Hue/Saturation
I’m lowering the saturation a bit because I want to add an orange glow…you know, create some sunlight streaming in…

I’m adding an empty layer now where I can add the orange glow effect.
Now, if you’ve moved in your timeline, the new layer will appear at your marker. You may have to move it back and adjust the length to the rest of your timeline.

Now let’s get some glow.
Got to the gradient tool in your toolbar (or just press G on your keyboard). This may be set to bucket fill tool, so you’ll have to right click to switch from bucket to gradient.
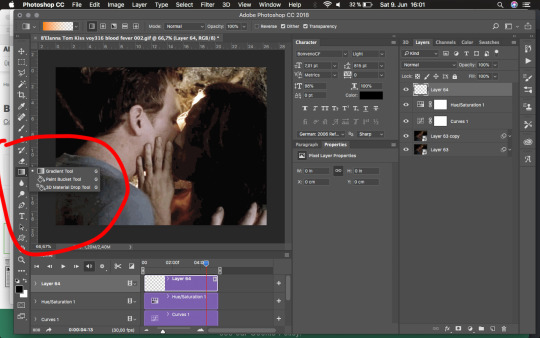
Then go to the gradient picker and click on that field at the top to choose your colour and variation.
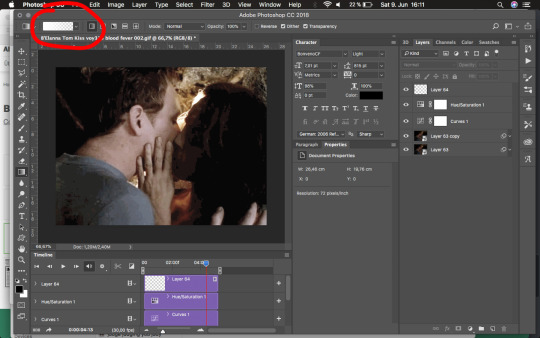
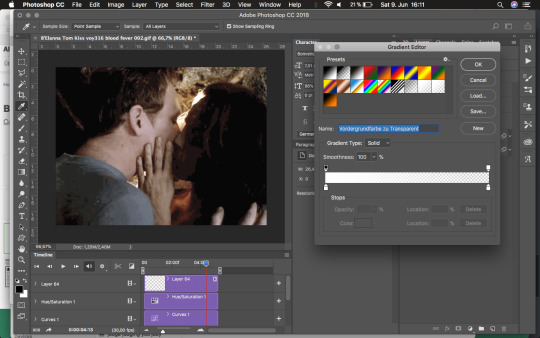
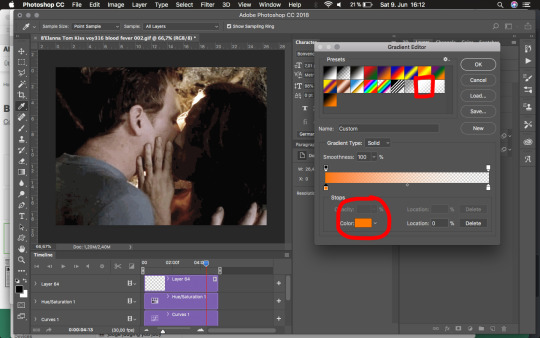
Pick the Foreground colour to transparent and change the foreground colour to what you want (orange here).
Now back to your image and drag that gradient.
Make sure you’re in your empty layer!
Start dragging from where you want the light to shine to the lower part of the image/gif. Don’t worry about being exact. We’ll adjust this anyway.


Now this looks horrible, so let’s adjust it.
Press cmd + T, that allows you to change the size and angle.

Let’s make it a lot bigger to diffuse the transition, and let’s also change the angle to where we want it. (move your cursor along the sides to any of the middle points until you get a curved cursor - that lets you rotate the layer.)

Then move it up a bit so the orange isn’t fully visible, but only a transparent glow over the image.
Play a little with the position, angle and size until you’re satisfied. Press enter or the accept button on top.

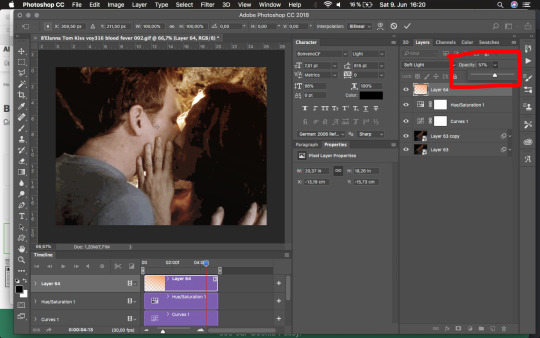
Now, I actually do not want such a blatant orange, so I’m setting my layer to “soft light”…it’s still too much for my taste so I’m going to lower the layer’s opacity a little.

Now that looks fine, let’s check if we like the gif so far.
The quality of mine is terrible, obviously, it’s gonna look much better if the source video has better quality (and maybe other gif capture software can do this better. I think Giphy Capture lowers the image quality drastically.)
Anyway, let’s check the size of this gif. Go to File —> Export —> Save for Web (Legacy)

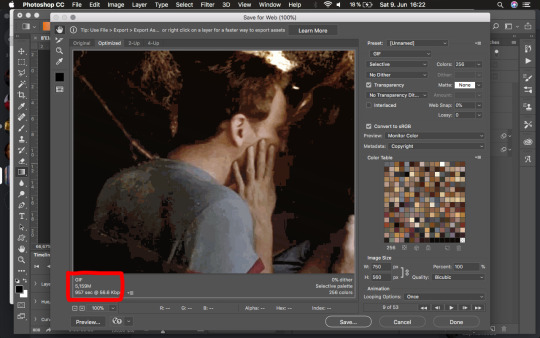
Now, mine is over 5M…that’s not gonna let you play it on tumblr, so we need to scale it down. We have an image of 750x650 pixels. A nice size, but tumblr won’t display that anyway. Close that tab.
Let’s scale the image down to what tumblr can display. Tumblr display pics with only 540 pixels in width anyway, so let’s scale it down to that (make sure the aspect ratio is locked or it’ll distort.) Set it to pixels and change the width to 540.


Checking size again —> Still 3.8M, so we need scale down or cut something. We don’t want to give up image quality just yet. (Make sure transparency is clicked, or the file will be bigger.)
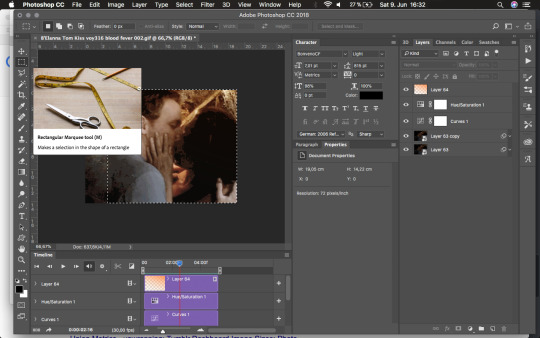
We could crop the image to where we want the focus (obviously, that’ll make the image smaller again) Select part of your image and crop down to that.

Check file size again —> mine is still over 3M —> I’m going in for the presets.
File —> Export —> Save for Web (Legacy)
Then find the field for presets and choose “Gif 128 no Dither”, that drops our colours from 256 to 128…it’s barely noticeable in our case, but it may be in other cases, see if you like it.
What it does do here is drop the file size from over 3.8M down to 2.6M —> file size restriction for moving gifs on tumblr is 3MB, so it should be fine.
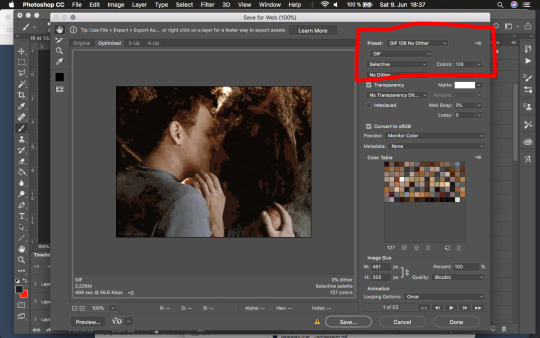
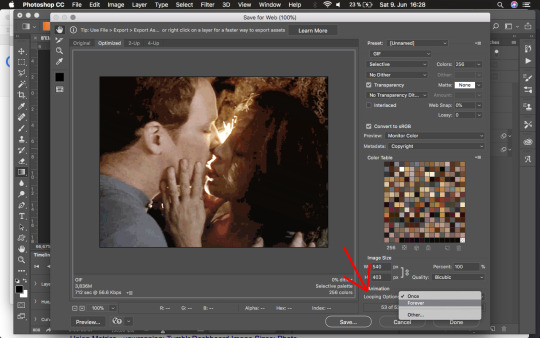
Now make sure that the Looping option is set on forever instead of the default “Once” —> go to Save… and save wherever you want.
Voilà, have fun with your gif.
PS: If you want to watermark your gif do that in a new layer. I watermark mine as follows:
Dependent on whether it’s a dark or bright gif I choose text in black or white. Choose a spot where it doesn’t ruin the gif but is still visible if necessary. I usually go for a corner and type with a small font.
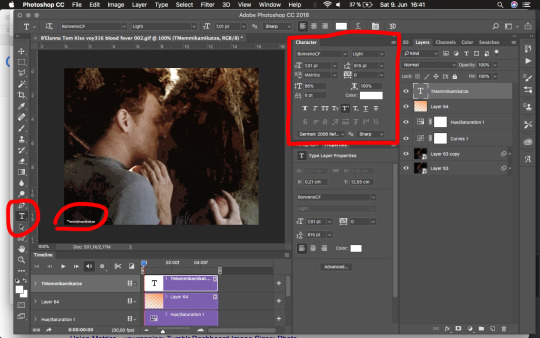
Lower transparency of the layer until it’s barely visible, but still readable. Remember to adjust the length of the clip in your timeline.
If you still have questions about the process don’t hesitate to reply to this post. I can always edit it to add certain info/screenshots of specific steps if necessary.
97 notes
·
View notes
Text
Unit 13 - Final Project
Evaluation
The performance from the actors were fantastic and really did help bring this film to life. How they were asking me about the characters, trying to learn about them just showed me how serious they were taking it. The script was very detailed and they managed to work with it quite well without any issues.The sound was the main problem throughout this process as we were limited with crew members to help us with it and was left for me to deal with.
But eventually I got the hang of it and managed to get controlled sound quality for the rest of the project, it was just the start that was lacking with care. There was one scene in particular that gave us the wakeup call with knowing how important carefully recorded sound and dialogue is. We had to rerecord one of the actors speaking which was time consuming.
The lighting wasn’t too bad and we didn’t even use any LED lighting which is because most of the footage was outside. Although this meant we hard to aim our focus towards white balance, making sure footage wasn’t over exposed. The most we focused on with lighting was the colour grade process and was applied without any issue as we made sure exposure and white balance was correctly used majority of the time.
The shot selection was chosen and filmed by myself and as I felt I chose the wrong cinematographer for the job as he had no idea how to set up equipment or film professional looking shots. I also did all the paperwork he was supposed to do. I’d say he only helped with assisting me with camera rather than making any effort to take the main role of it which I was disappointed with, yet not shocked.
The film clearly meets the target audience that I intended which was 15 – 25 as I wanted this to have relevant humour from the younger characters that the viewers can relate to and also violent scenes showing it is also a horror genre. I feel that 15 - 25 year olds would enjoy the film because of that.
The final edit
23rd of May
The final edit was completed a week before hand in and what I and the editor (Brandon) decided to do was get numerous people to watch it then give us feedback. Some would notice the audio in a certain scene which needed to be adjusted and others thought the colour grade should be darker with certain shots. We agreed with the majority of the criticism we received and decide to make corrections. We exported a copy to see how it would look on a bigger screen and also to know how the audio sounds on proper speakers.
After watching the final edit multiple times, I feel confident that whoever watches the film, will enjoy it in some way and find it entertaining. Brandon who edited the film, did a great job and never fell behind on edit days, always had a rough edit before the deadlines I set. He would also clarify with me whether I like a certain way he’s contracted a scene and would be understanding if I didn't. We shared the same ideas so there were rarely times we has a disagreement over something.
Day 6 - Final day of Filming
21st of May
This was the last day of production and the aim was to get some car shots, establishing shots and the cliff hanger. We had only one hour to achieve this so I made sure everyone arrived early for pick up so no time was wasted. The good thing is we finished on time and managed to get some nice shots which weren’t rushed. I ignored the limited time we had otherwise this would have put me off on set and I would get everything done too quickly. The weather was the same as the week before which saved us a lot of hassle with color grade. Although we did have two problems that day, this caused minor complications.
One problem was that one of the actors was unwell and couldn’t show up which meant I couldn’t get a shot of everyone entering the woods but we were able to work around that issue although it would have been better if she was there. The second problem was that one of the actors left their costume at home therefore I couldn’t do a shot with that person in it. Despite these errors I feel that everything went okay and will be fine, we will still have a fun and entertaining video. The edit is already up to date and we only took a few shots today so editing should be completed early in time for submission.
Posters
The editor (Brandon) had the idea which was to create posters that can promote our film as we are interested in showing it at the Lecture feature. The idea we had for the poster was to have more than one. We wanted multiple versions which (on each poster) will be the characters from the film. This is a good idea because the actors are from the institute so if there's posters around the college it'll be more than likely someone they know will see it and grab their attention.
Creating these posters wasn't too difficult as we had already everything we needed for it which was the camera of course, Smoke bombs that'll be set in the background for more effect and costumes already sorted. The pictures being taken took four hours then editing them was a bit longer to complete. It took more time than I expected it to but I can say it was worth the time seeing the finished versions of it. Below is the posters Brandon took and edited himself.
Group folder and Individual folder
As this year is coming to an end, I have already finished the group folder with every piece of paperwork required. This was something I wanted out of the way early so we can longer worry about it and instead have our focus on the final edit, the evaluation and catching up with blog posts. My individual folder is also completed containing the shot lists I did, an old and new version of the script, production schedules, budget sheet, storyboards and the call sheets.
I have finished the paperwork relatively early so this gives my tutors some time to go through it and clarify all my work is there and done well. If something is missing from either folder I have time to make corrections. Although I feel that I need to ensure the final edit is perfect as can be, finish evaluation and fully update this Tumblr blog. I separated my paperwork from some of the members in the group as they aren't up to date with paperwork and don't want it to affect mine.
Deadline
18th of May
There is one more week till the deadline and that’s when we have to hand in our final film, but our group still has plenty of footage to capture. Therefore I had a long think about how I could reduce the pressure we were faced with and that was to make the short film a two part feature. There’s a point we are currently at in filming that we can turn into a cliff-hanger, meaning we have something to hand in that can end as Part 1 and to achieve that will only require one more day of filming. This way we don’t have a problem meeting the deadline that is on the 25th of May.
Production - Day 5
15th of May
The fifth day went okay, we filmed a scene which I wanted to get finished by the end of the day and it was. I never thought I would be any good with the C-100 and was never keen on getting involved with it to the extent that I have but I can honestly admit that I have come to realize that I do enjoy working with the camera among many other things not just directing. I surprised myself but also others as well were impressed with what I've captured each filming day. Throughout I have filmed most of it as Chris has been either absent or acting throughout. I managed to get everything I wanted done although the absence of a few people made the day a bit more complicated for me.
Three people couldn't make it, one being an actor this meant I couldn't film his scenes that day and the other two people who couldn't show are in my group and they both had work although Brandon (editor) was able to help out with transport. I had to try and do everything by myself which was a challenge but the actors offered their help. In order to not have a repeat of this I will try and narrow down a time in the day that everyone can do. Then hopefully this won't happen again. I will mention whether there was an improvement of attendance in my Day 6 blog.
Production - Day 4
1st May
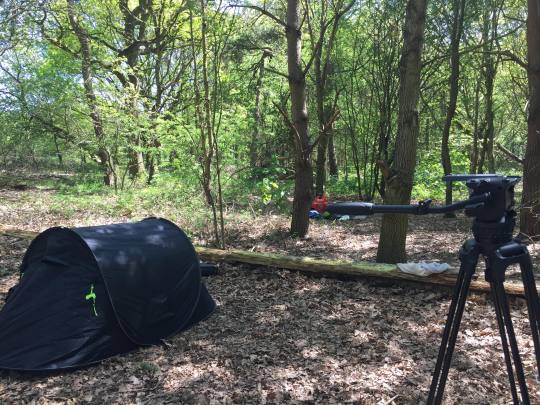
The fourth day of production finally took place in Friday woods; I really looked forward to this as all the exciting and challenging shots will be here and I’m enjoying how the script is coming to life. We shot two scenes today which was more than I expected and came to about 3 minutes of footage, I’m really happy with that as I captured more than I needed, a variety of shots for my editor to choose from. There were a few that really did look great, one in particular was on the track and dolly. Also because we had an induction with some of the equipment, the preparation on the day of filming went a lot smoother, only taking 20 minutes to get everything ready on set. The weather was nice all day so we didn’t have to be concerned about rain or wind ruining footage or the audio but still we did face two problems that day which we dealt with.
The two problems we faced were transport and trying to find our way around the woods. One of our drivers who did the pick up on the previous filming day was unavailable as his car had to be repaired last minute. Therefore we had to find someone who could do it in 40 minutes but somehow we found someone who could. The second problem was trying to find our way around the woods as an area I was familiar with was shut off so we couldn’t get to it and then had to go somewhere else which took a bit of time. What I will do next is double check with the drivers the day before filming to make sure they can definitely do it rather than assuming on the day and being let down. Besides that it was a successful day of filming and everything is ready for day 5.

Equipment Practice - 25th April
After the third day of filming, I realized Chris needed a recap on equipment but I also thought it would be helpful if I took part too. I booked out a tripod, shoulder mount and the C - 100 for Chris's benefit but also for my own personal interest. We now know how to construct a shoulder mount, record clear audio while testing this with a tripod. I feel I have a better understanding as to how it all works and also I have more confidence for next weeks shoot. In my next blog post I will mention whether this benefited and resolved the problem we faced this week as I'm sure it will.
Production - Day 3
April 17th
The third day of filming was to complete all the house scenes and also a scene in a car people. Our group managed to do this before the day was out. I was very pleased with how the actors were communicating with each other showing real desire to portray their roles and because of this their performances they gave really does shows on the footage. Crew and cast were all on time which meant we had an early start and finish to the day, also the early start allowed us to take more time on getting the right shots needed. Although we did have two issues which need to be worked on.
The two problems we faced on set, one being the camera equipment. Chris Gavin was unsure how to use the shoulder mount which was limiting shots that I wanted. The second problem was audio, some scenes came out really badly because it wasn’t examined properly. What I’m going to do is make sure that Chris does an induction on the shoulder mount and checks the audio with more care. I would like to have these problems resolved by the fourth day of filming.

Production - Day 2
April 10th
The second day of filming was more successful as we managed to achieve the goals that was set in the previous blog was achieved. One goal achieved was making sure everyone was on time for filming, this gave me more time to prepare crew and actors for filming. I also built a stronger and more comfortable relationship with the actors – explaining their roles in more detail and also finding out the previous work they’ve done which I conducted in a behind the scenes interview with each of them which went really well and will be part of the behind the scenes footage.
The only minor problem we faced was the paperwork, I felt my shot list and storyboard were lacking in detail which resulted in me having to improvise a lot of the time with how I was to capture certain shots with the cinematographer. Also where I wanted the cast to be positioned on the set took some thought. What I’ll do for next time is make sure I have a detailed shot list and storyboard and to have it checked by crew before our next filming date. The video below is the behind the scenes footage of the actors.
Production - Day 1
April 3rd
The first day of filming took place on the 3rd of April and we learnt that planning and organisation was essential, we didn’t do any of that which meant filming took way longer as people didn’t know what they were doing with equipment. Also getting to location took longer than expected as we were waiting for people to show up, we started an hour late. By the end of the day only 30 seconds of footage was shot and some actors didn’t need to be there so their own time was wasted. They were for their patience. Filming went on from 9:00 – 1:00.
What we are going to do about it is before next week’s shoot, we will ensure that people know what to do with equipment and setting it up in little time and that the group knows exactly who is needed for next weeks shoot. I’ll make sure crew and actors arrive on time telling them to be there for 8:30 when we actually start at 9:00. My goal is also to double the amount of footage we get, try and improve on the time we can film for, so to try and film at least a minute. The next blog post will explain whether my plans worked or not.

Costumes - April 2nd
I wanted each character to have their own unique look so it was important to make sure what they’re wearing fits their characters personality , the names are Roland, Scott, Sarah , Mason and Charlotte. Roland is the main character who is easy going and the clothes I gave him was causal. Scott is cocky and doesn’t care what people think so I got him a baseball jacket to give him a sporty characteristic. Sarah is shy and secretive so I wanted her to wear clothes that covered her whole body showing her self-conscious side. Charlotte is spoilt and only cares about how she looks so I want her to have make up on and bright clothes to show a girly look. Mason is a party animal so he has hipster clothes.
I bought these clothes from numerous websites one being Ebay which I used to purchase Scott and Mason’s costumes, they both costed £15.00 in total. Sarah and Charlottes clothes were bought from the charity shop as they have a wide range and sell cheap items that came to £13.00 in total. Roland’s costume was bought from Wish.com. Wish was also the site I purchased the clown costumes from all including most of the props, this all came to £80 in total. I had to ask actors their size before I bought anything for them. All costumes and props have arrived and is ready to go.

Research - April 1st
I watched a video on Youtube which is behind the scenes from one of my favorite horror films 'Wolf Creek'. This behind the scenes footage was helpful to me as the film was a Low budget of just £1.5 million. My project is low budget too and the footage really helped me understand how to be successful with little money and one essential point is making sure you have the right people on board, people you can rely on and experienced.
Another important point I learnt from the video is that you should probably expect something to go wrong but how you deal with that is the key. The crew of wolf creek were caught off guard with the rainy weather but then they realized it worked better and created more of a sinister atmosphere and really showed a contrast from it started (sunny and warm) then towards the end (rainy and cold).

Research - March 28th
In my final major project I will have two fight scenes and I haven’t got a clear understanding of how to make one look realistic and intense. I searched on YouTube looking for a video showing you how to make one and I was surprised to see how crucial camera movement was to make punching and kicking look more powerful. This information I found very useful and here’s a link. https://youtu.be/1-FMPwJd8iE
I came across another interesting video which is behind the scenes of the movie John Wick which shows all the choreography with the actor Keanu Reeves and stuntmen. Keanu is shown examples of how it should look then practises performing it himself. I understand now the work that is put into a fight scene to make them look genuine and exciting to watch. It also takes a while to achieve this as producer David Leitch said “Keanu went through extensive training for probably four solid months”. Here’s a link. https://youtu.be/Ip2tNK0Zq1A

Budget - March 25th
Over the past 5 months the budget for our final major project has increased from it originally being £150.00 and has now doubled and the has gone up to around £300.00. This is because of costumes, transport, additional equipment and props. I strongly believe the money most of our group has contributed will really benefit the look of this project and I'm excited to see how the costumes will look on the characters. It's going to be very interesting.
We approximately have three boxes which holds the costumes and everything else needed. So due to the amount we have, we are going to have two cars to carry everything including the equipment. Finding an extra car was tricky but we managed to get into contact with someone who could help us. In term of transport we have this all planned and ready for production in April. The two drivers will be paid and this will raise the cost on my budget sheet.
Filming Complications - March 23rd
The Harwich Beacon Hill fort is where the final scenes for our film were going to take place but unfortunately this area has been bought and is now under construction which is a huge inconvenience for my group. We became aware of this when we went location scouting at the fort and came across a new gate that has been built across the area. A sign on the gate which says "construction and CCTV is on site". They chose the perfect time to do it!
I had to do a lot of thinking as to how I'm going to finish this film as Harwich is now out of the picture. What I decided to do first was look at the script and figure out what direction I could change it to. I realized the woods we are filming at has plenty of sinister areas where we can shoot the scenes at. Therefore I worked on the script again re - wrote the ending and now we're back on track.

The Shot list - March 20th
I thought what would be helpful to do as a group is the shot list together and to do it only for the first scene so we don’t get confused. Our group is going to do a shot list a week before filming then once filming day is completed, the next week will be for editing that footage and plan the shot list for the second week of filming - breaking down each scene of the film piece by piece. A screen shot of this is shown below.
The shot list for the first scene is completed, this took a whole day for our group to achieve and made us ahead of schedule for filming next week. We all gave constructive input as to what shots in particular were the most effective for that scene (morning sequence). Every member now has their own copy of this shot list to guide their own individual roles.
Research on shot lists really did save me and my group some time. I came across a website called Videomaker.com which gave me helpful information and advice on how to make a successful shot list. Here’s a quote I found quite useful from the article “Shot lists are the most cost effective way to improve both the quality and efficiency of your next video project”. This website provided me with an example of what one should look like and what should be include to it. Here’s a link to the website https://www.videomaker.com/article/c18/10102-from-shot-lists-to-storyboards

Checklist - March 14th - 16th
There is a lot of items we need for set like props which haven’t been purchased yet; a drone we need for certain scenes and two cars are required as we need to transport actors and equipment. We also need to do two radio recordings which will require voice actor and film a phone call scene.
To ensure our group don’t forget these essentials, I have made a checklist. A checklist to remind us we need to get (all of the above) sorted out. This will rule out the possibility of us forgetting last minute. As in the past I have mistakenly forgot items for set. Below is a image of that checklist.

Timetable - March 12th - 14th
Before filming I will create a timetable for filming days as it will be easy to notice whether we are falling behind schedule or not. Also this will be useful in terms of organization as on my timetable there will be a certain amount of time to complete parts of the filming process for example only having 40 minutes to set up and prepare equipment.
Everyone will receive a copy of this to ensure they know how long they should take depending on the role they have. This saves me having to remind them and myself that crew need to step up if they are getting distracted. I believe this will keep everything on track. Below is a screenshot of the timetable for the first day of filming.
I have also created a three month table which tells me everyone’s availability until college finishes. Now that I know what days people can do this reduces the likelihood of rescheduling and delays. Now I am aware of this I can begin booking equipment for mine and the groups desired days. Below is a screenshot of this three month table.
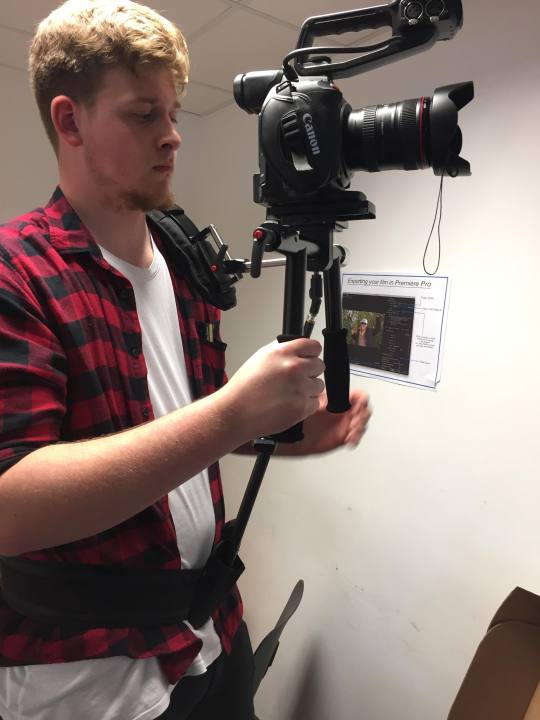
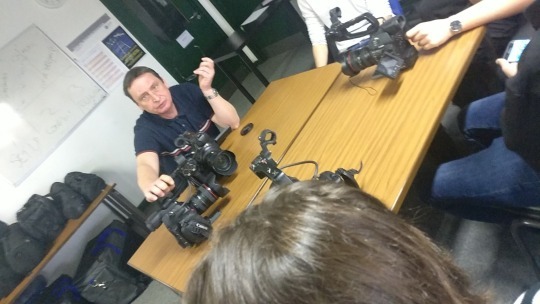
Induction on equipment - March 8th - 12th
I have a camera operator and also an assistant operator who both needed an induction on the C - 100 Camera as this is now accessible for us to use. I also participated because I know I’ll want to take some shots when filming starts. As a result me and my group are relatively confident with the C-100 now after the hour induction.
A week later I decided that the camera dolly is also something I want used in my project because I’d like some interesting tracking shots in this project. Therefore the group was given an induction on that, telling us how to set up and use it correctly. A shoulder mount was also something we had a lesson on.
The Script - March 3rd - 8th
This script took me 5 months to just get a draft that I was keen on continuing with and as I have progressed through this year I have made numerous changes throughout the way making sure everything adds up and there’s no loose ends. I then gave a copy to the crew each so they could mark it in a way that’s relevant to their roles with equipment. This is so there will be high levels of organization with few complications.
Overall I’m very satisfied with the script I have written and believe this will create an entertaining final project which will have moments of shock, laughter and devastation. Filming and editing will take a while because of the amount of dialogue involved within twelve scenes. I do feel some of the dialogue will not be needed and could reduce the running time.
Choosing Actors - February 25th - 3rd March
I had to make many changes to who I’m casting as there was two that had to be dropped because their availability wasn’t very good. After the directing workshop it introduced me to some very talented people and seeing as I’ve worked with them already I decided to cast some. I then asked one of the actors whether they knew anyone else was interested getting involved and he managed to get two more people to join this project.
Once I knew everyone was available I then decided to start rehearsing with everyone like providing them with the script,Directions as to where they should be in front of their camera and having a 1 on 1 with them so I could give more information about their characters. These rehearsals went on for two weeks as I felt that was enough time for the actors.

Location Scouting - February 20 - 25th
Before filming anything I want to get an understanding of all the locations and the first one is Friday woods in Colchester. We drove out there and managed to figure out how we are going to film this scene as we now know the layout of the woods and discovered some interesting areas. By the end of the day we got very interesting recce shots around the woods
I and the group was there for the day trying to figure out where the scenes are going to be taking place and we found a rusty old abandoned bike which I thought would be really nice to include. We believe that they fit very nicely in our project and give an eerie atmosphere. Below is some pictures.

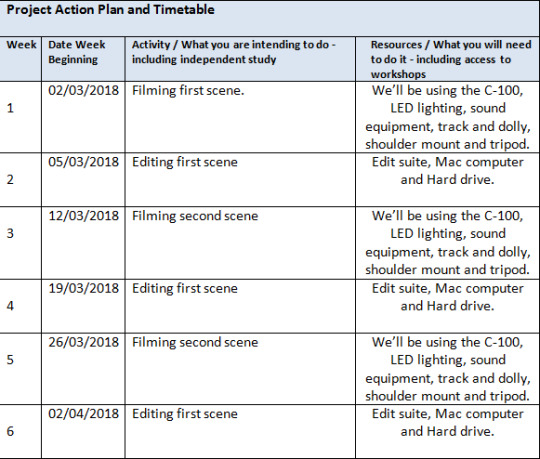
Project Action Plan and Timetable - February 15 - 20th
Project Concept - February 10 - 15th
The project is called Last Resort. This is a story about innocent people who have never associated themselves with violence but when they go on a road trip they later realize that this journey was going to change their lives forever. They encounter ruthless psychopaths who will stop at nothing but to kill the group and that’s when they know that their last resort is violence.
The aim of this project is not just to make a horror but also something entertaining to watch and create character that you feel sympathy for and thats why character development is very important role we must illustrate in this project. Researching Sam Raimi’s work had really helped me create a narrative in our project because of the dark comedy this director has used in his movies. I have made sure that all members of the group have had an induction of all the equipment we want like the C-100 and track and dolly.
My target audience for the final project is 18+ because of the special effects and bad language used throughout, this is so I create a dramatic horror feel. I also want some of the scenes to be disturbing and difficult to watch as I want this to impact the audience. I also want this project to relate to the audience for example the characters personalities and how they handle situations or how they control their emotions and how this might relate to my audience.
Final Major Project Intro - February 5 - 10th
The intro for our final major project has been completed way ahead of schedule as the idea for it Is was very complicated to create so I wanted to get this done early. I am very pleased with how it has turned out, it looks exactly how I wanted it to be. The equipment we were fortunate enough to use was very expensive. A colleague of mine had a member of the family who allowed us to use the Red Weapon with an 8K sensor, a Sevenoak SKLS60 gliderail and a Glidecam GL-HD2 HD2000.
The intro looks so professional that it will be difficult to make the shots in the film live up to it. But I believe with careful consideration we can achieve this with thorough planning with attention to detail. The edit went very smoothly as we knew exactly what we wanted including the soundtrack and credits. I am looking forward to bringing this project to life and gaining even more experience.
2 notes
·
View notes
Last Seen Blogs

music88888-blog
无标题

tempatprakerinmedangratis
WA 0852 7019 0835 Tempat Prakerin Medan Gratis


browngirlspov-blog
BrownGirl

menoasmess
Bubble boy