#*also the rentries link to each other
Text
❝ . . . what's my art doing in a place like this . . ? ❞
#art = personal rentry ⌇ this = edit info#ena ノ enanan ⌇ they ノ them + info in personal rentry#important ♡#edits ♡#requested ♡#inbox ♡#filter ♡#resources ♡#personal fav ♡#others' edits ♡#chatting ♡#mutuals ♡#promo ♡#challenge ♡#*also the rentries link to each other
5 notes
·
View notes
Text
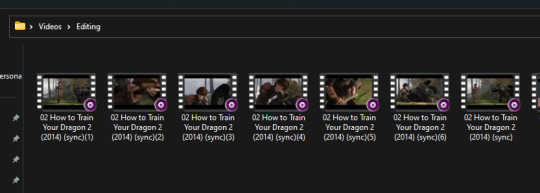
Gif Making Tutorial: Lightworks Edition
I also uploaded this tutorial on rentry and will link it in the source as well.
This is a guide on my own personal gif-making process using lightworks & Photoshop 2023. This does not mean it is the only way, the right one, or anything of the sorts. This is just the way that I have found that works for me and I was asked to share it.
What you need:
Lightworks -> Download Here
Photoshop
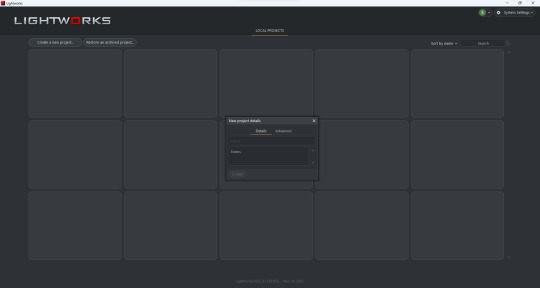
Step #1
When you first boot up Lightworks you'll be greeted with this screen. First, you'll want to hit create a new project which will show the pop-up. You can write whatever you'd like for the title & description as it does not matter here.
Step #2
Now we are greeted with Lightwork's dashboard we want to import the media we will be using. On the left of the screen towards the bottom you are greeted with a container called libraries with a bunch of different options below it.
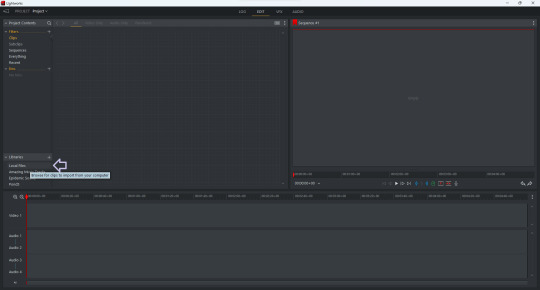
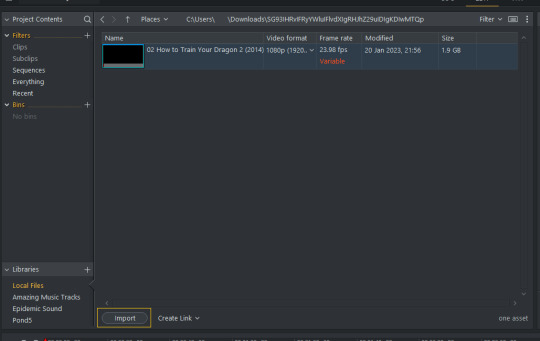
We want to hit Local Files and find our video. You may have to fiddle around and find the correct folder (as I'm unsure where it opens originally).
Once you find your video, select it, and then click the "import" option located at the bottom left.
Step #3
Our next step is a bit much so I have also included a video to help. We are going to drag the media onto the timeline as well as remove the audio. Removing the audio is a personal choice, however, I do so because I do want to hear a movie/show in 3-5 second clips :).
Text Guide:
Select media using left click on your mouse and drag it onto the timeline.
Click however many "audio" tracks you have (and make sure you have selected the video one), right-click, and select delete.
Step #4
This is where/when we'll be making the "clips" that will become our gifs. Lightworks has a similar video scrubber as many other programs (however, it happens to have two, but that matters not) which you can use to quickly go through your video. We'll be using two main functions here -- play/pause & clip.
To start/stop the video you can hit the spacebar & to clip the video you hit the C key on your keyboard.
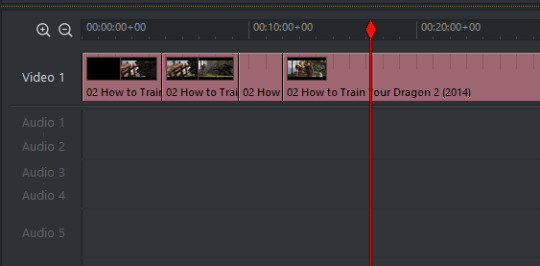
You can let the video play and "clip" as you go, or you can go ahead and clip out parts you know your character isn't in, it truly depends on what you feel flows the best. I will include a screenshot of what a video looks like clipped.
Each spot where you see a "line" through the video is a separate clip, which in turn, is a separate gif. You'll want to do this for your entire video until your timeline has a bunch of little clipped parts.
Step #5
Our next step is taking all of our clips and exporting them as their own seperate files. Follow the steps below
Right click the video one track.
Find the option that says make.
Under make select Syncs....
Select V1 segments from the new pop-up.
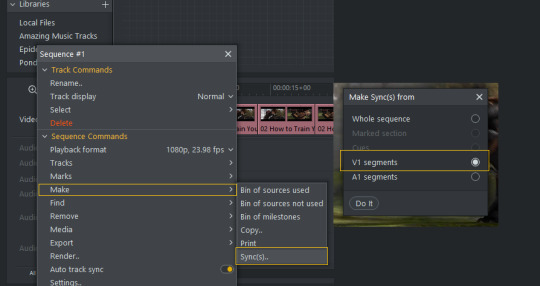
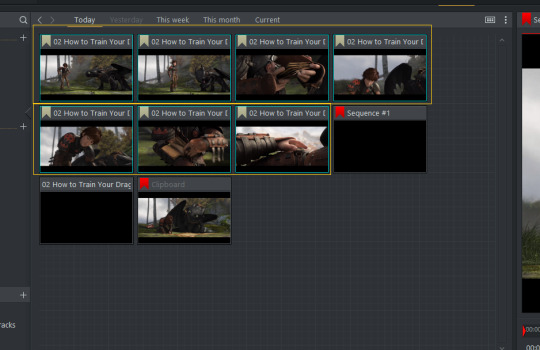
Depending on how many clips you have it might take a few seconds to a few minutes. Once it loads you will see a bunch of new clips!
Step #6
Now we want to export all of these clips and Lightworks makes it really easy!
Select all the NEW clips (click one, hold shift, and select).
Right-click any one and select export.
Scroll down until you see H.264/MP4 & pick that option.
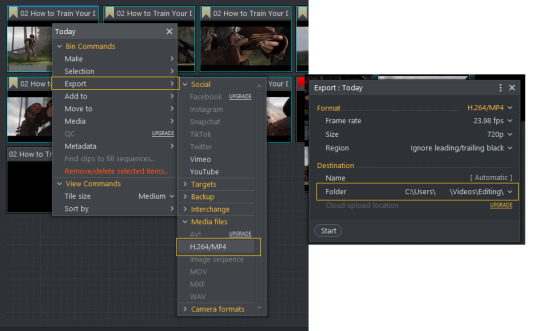
Another pop-up will appear! Make sure that it is exporting to the correct folder and then select start! Two windows will pop-up but do not worry. Window #1 is Lightworks exporting the clips and Window #2 is the tasks log.
If you go to the folder where you set them you save them -- you'll see all the clips ready to be imported into photoshop!
You're now photoshop ready!
And now you are ready to import your clips to photoshop and start gifing away! I hope this helped and if you have any questions -- please do not hesitate to send me an ask, or a DM, and I will do my best to help :)!
20 notes
·
View notes
Text
future plans for this blog
- i will be tagging all common things that need content warnings as needed, if i miss something you can always ask me to tag! either by sending me a pm or an ask, either is fine! i’m unsure if this is needed (esp for like. kn!ves and stuff since thats part of her character in the game), but i still will because u never know <3
- i am going to attempt to create a tag for each of her outfits, but i’m going to do that on a later date since it would involve me retagging every single post this far!
- at some point i think i’m gonna make a rentry with links to all the tags i use and what they’re for! so its easy for you to find a specific post and if you happen to need to blacklist any tags, you can easily find what it’ll be tagged as!
- i will not be tagging things as doodles since it’s not my place to decide what is and isn’t a doodle! so everything that’s drawn will be under the main #art tag, with specific sub tags for digital art and traditional art!
- i always tag the artist to help with future archival uhh.. yknow. if you’d like me to UNTAG your works or to tag them with a different tag, just shoot me a message!
- i’m still undecided on my decision to include ship content or not, so for now the only ship content i will be reblogging is going to be mewdyne since it’s canon that she has a crush on undyne! blacklist #mewdyne if you don’t want to see it!
- i'm also undecided on reblogging au art since i don't know much about any au (other than inverted fate) and a lot of aus are problematic. i don't have time to vet every single au before reblogging content from it. i will probably reblog au content but PLEASE lmk if i reblog something from a problematic au!!
- this is just a little fun fact but i follow/like from @frogdadd since that was the original account i made on tumblr under this username
#I RLY DO HAVE HIGH HOPES FOR THIS BLOG...#i love mad mew mew she deserves so much love#i felt like. i needed to explain the very basics of what i have going so far LOL im trying to make this as accessible as possible#so im trying to set the groundwork with LOTS OF TAGS..#if anyone adds image descriptions to ut (specifically mad mew mew) content i'd love to reblog from them!
3 notes
·
View notes
Last Seen Blogs
neveah-llama
NEVEAH’S HEAVEN. hah,See What I Did?
muimira
muimira

kai-lee
Kai*my precious teddy bear 🐻*
rikilouvre
ver