
Last Seen Blogs

theoptimum
ONLY THE STRONGEST WILL SURVIVE - HIATUS

rocketandonuts
It's an Earthbound reference.
ohiolatex
Latex Lover In Ohio
warsamongstthestar-keen
Wars Amongst the Stars

miyako107
miyako's brain
Text
Introduction to Procedural Generation with Godot
Procedural Generation has gained a lot of momentum in a current times, for multiple reasons, but many of us are still oblivious to the fact of what it actually is so here is a tutorial introducing and explaining the concept of Procedural Generation.
In this tutorial we will learn some of the important topics related to or involved in getting started with procedural generation.
This tutorial is helpful for all types of programmers and designers as it’s a explanation of concepts rather than a programming guide so just dive in.
So let’s get started,
First let’s get started with the official definition of Procedural Generation,
In computing, procedural generation is a method of creating data algorithmically as opposed to manually. In computer graphics, it is also called random generation and is commonly used to create textures and 3D models. In video games, it is used to automatically create large amounts of content in a game.
I just copied it from Wikipedia.
Now my version of definition goes like this,
Procedural Generation in games is the generation of data for use as the content ,i.e. assets and stuff, of the game via code. Simple.
Now to understand some important uses of Procedural Generation to motivate this the effort of learning about it,
Procedural Generation allows us to work with minimum assets creation while providing maximum replay-ability of the games we make which makes a lot of sense in Indie gamedev. Due to time and resource constraints.
Procedural Generation allow for reusing assets in multiple ways that make the game smaller in size as compared to something hand-crafted this makes for a better alternative for the gamer who would NOT need to download a 100GB game because of it.
Lastly it makes, lots of effects like water waves and such possible which would be impossible to make by hand. At the end of the day it’s possibilities are endless.
In the recent times we have had an immense increase in the ability of creating content with the thing called Machine Learning,
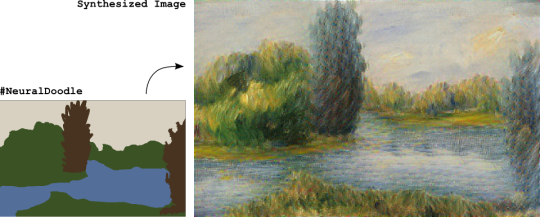
This is an image from Neural Doodle repo from Github. This makes awesome artwork from silly doodles, so just imagine the possibilities this might hold for game development.
But currently this is a slow process with not much optimization abilities so it will be some time before we have this in actual game development pipelines but Machine Learning has already started to make impact.
Moving on with our tutorial let’s create some basic procedurally generated content,
There are mostly 2 types of procedural generation we will deal with today,
Randomized. And, Rule Based Randomized or Evolution. These aren’t really the accurate names but hope they will help you understand things better.
Step one,
Let’s get some assets, create a new Godot Project and create new Scene with Node2D as root and save it.
And then add the icon sprite to the scene and go and hit it’s modulate property to make it look different from usual.
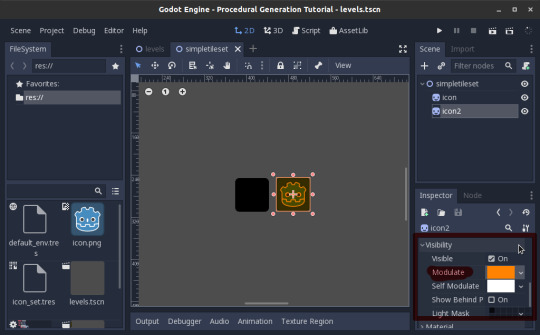
And then finally create a tileset from the scene and get ready to use it in a project.
*Make sure the tileset has atleast 2 items.
Also make sure to save the scene we will use it later.
Step two,
Now create another scene and add a root(any node) and a TileMap node.
Next just add the Tileset we created to the TileMap node and leave everything else as it is.
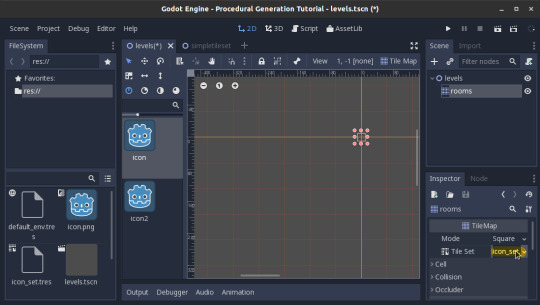
And don’t worry about the colors not showing up in the Tile-Selector in the left.
It will be fine in the end.
Step three,
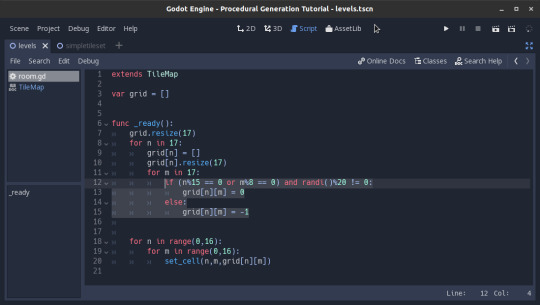
Add a script to the TileMap node and start typing,

Create a new variable called grid.
And then in the _ready() initialize it to make the grid into a 2D array that holds data.
Use the randi() function to create the data needed.
Here we generate random numbers per position on the grid which we can use to generate our content later, I have made the whole thing 17 by 17 you can go beyond that too.
Step 3.5,
Use the grid to generate a random map.

Now hit play and test your code,
you now have a randomly generated map.
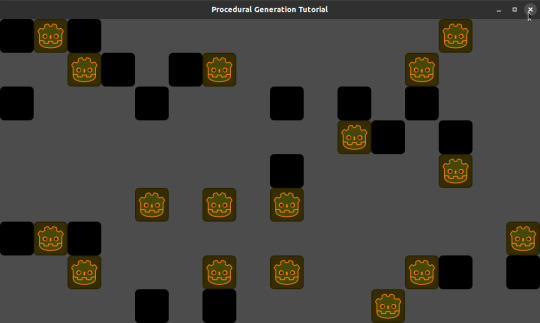
Want to do more. Fine let’s do more,
This time just add some rules to the randomization,
Like make all tiles next to the edges black and and add a hole randomly as an exit.
And then this is the result we get,
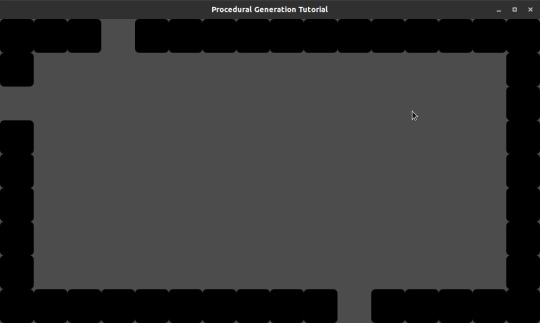
So in this tutorial we learned to create a Procedural Room with nothing but randomization and some very basic rules.
In future I plan to create more complex tutorials about procedural generation and make it so that the Godot Community can use it to make awesome content, but that is if this tutorial is received well within the community.
12 notes
·
View notes
Video
youtube
My RTS Tutorials Video Series...
28 notes
·
View notes
Text
Understanding Maths For Game Development GODOT 3.0

Ok I admit most of us hate Maths, and you will be tempted to skip this article but I recommend sticking out till the end hopefully it will be worthwhile.
Maths is a necessity for Game Development so knowing the basic stuff to be able to use it in practice is something game developers must know about. This helps in all fields of Game Development.
So let’s get started.
The most basic mathematical function(in my opinion) would be
y = x or f(x) = x
Here we see that function 'f' applied on x gives 'x'. So what does this mean? This gives us enough information to create a graph.
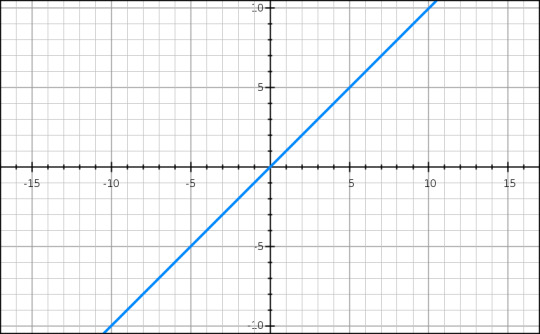
Nice so a function represents a line. Now What?
Well in reality functions don’t just represent a line but 2D coordinates which enable us to create the lines or curves or ellipses. So for this lesson we will be delving into 2D graphs only.
Let’s take a look at another function.
f(x) = x2/10
In this case function f applied on x gives an expression. That gives values that make up a curve.

Ok so I learned Maths end of lesson.? Well not so much now we will apply it in a real example.
So let’s first create an equation to use.
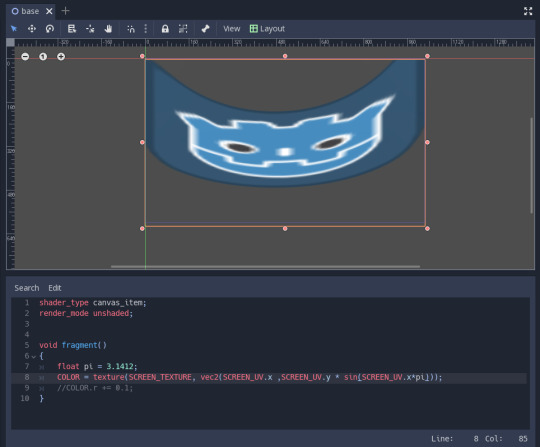
f(x) = sin(x)
Let's open up Godot and try to apply this equation.

I have made the shader a little red so it’s easy to see which part of the image it affects.
So I created a basic screen-shader(add the shader material to a color rect and set it the screen size and use SCREEN_TEXTURE and SCREEN_UV),
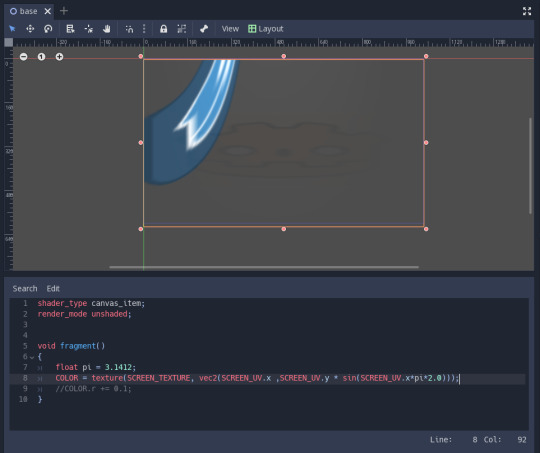
and applied the equation as a multiplier to the SCREEN_UV, all this effect does is using the X value changes the offset of the UV’s making them curve like a sin curve. Let’s see a better example.
Here I only use the sin() to change the Y value of the UV.
What this does is change the Y value to and fro from -1 to 1.
Although according to maths in the range of 0 to pie(which is the effective range here) we only see 0 to 1 and then back to 0.
So what now, that means when the value will be negative it won’t be visible as negative UV.y is not possible. Let’s try it out.
So when the value goes below 0 it’s not visible. Cool.
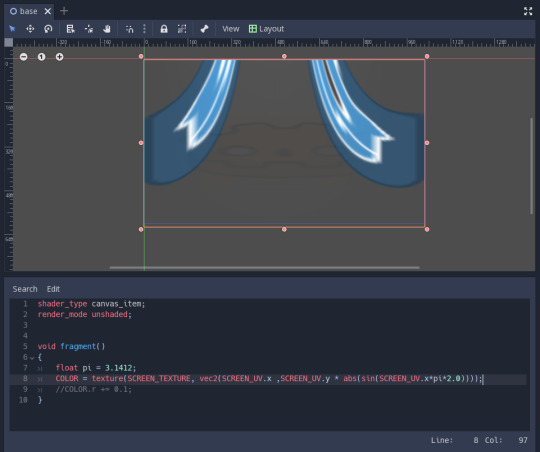
Let’s use the absolute function now, it changes the value of to a positive value if the value is negative and thus we only get values from 0 to 1.
So abs(sin(x)) or |sin(x)| is,

So what will it look like in GODOT,
So that’s it, no not really let’s add another fun little animation.
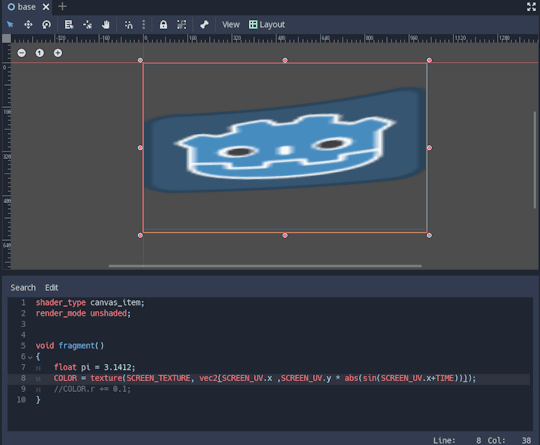
It’s not upto scale so your animation speed will differ.
TIME keyword gives the time value which keeps changing continously.
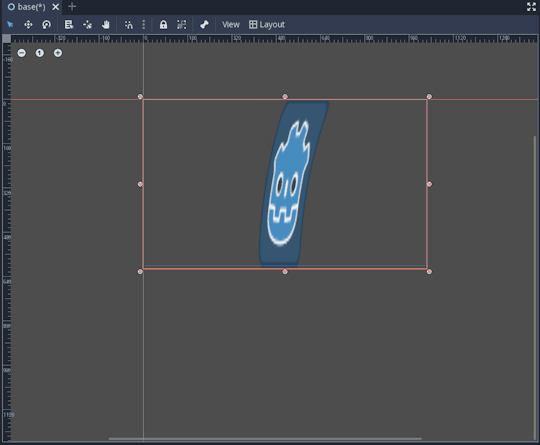
So now’s time for some awesome home-work,
Try creating this,
7 notes
·
View notes
Text
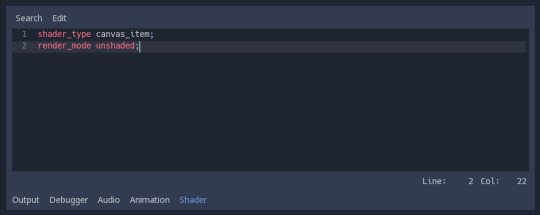
THE SIMPLEST BLUR SHADER GODOT 3.0
Today I created a simple Blur Shader, honestly it was a big mistake at my part but the I wanted to share my discovery with you guys. Here’s the code:
shader_type canvas_item;
render_mode unshaded;
uniform int blurSize : hint_range(0,20);
void fragment()
{
COLOR = textureLod(SCREEN_TEXTURE, SCREEN_UV, float(blurSize)/10.0);
}

Hope You all Like it.
8 notes
·
View notes
Text
THE POWER OF RENDER MODES IN GODOT 3.0
It’s not always necessary to use complex code to produce the effect you want in case of shaders atleast in Godot. For it provides you with quite a lot of pre-built stuff to have fun playing with. So what should we do.
Use the render modes to your advantage.

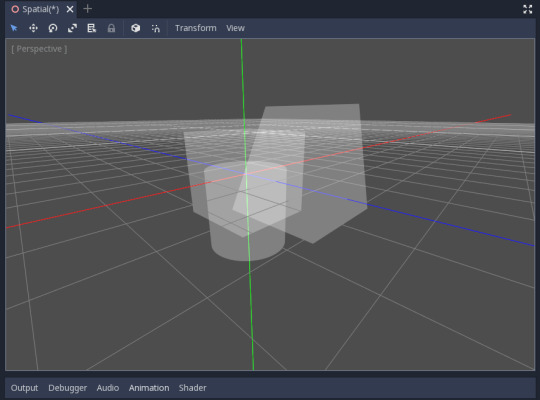
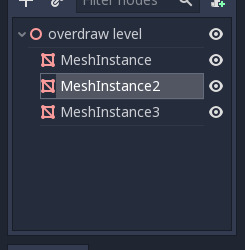
In the above image you see Display type set to overdraw, can you think of any kind of uses for it in a game you might want to create.
I did say it might be useful in some stealth mechanics in a 3D game.
So how do we create it for our game? Well it’s quite easy.
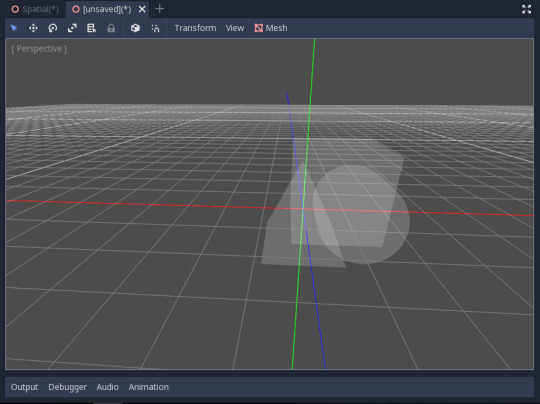
All this view is a Additive Blend of the meshes over a dark background.
So here’s what I created.
So how did I do it.
Step 1: Create a MeshInstance, a new Mesh and add a ShaderMaterial to it.

Step 2: Add a New Shader, give it Shader Type of Spatial.

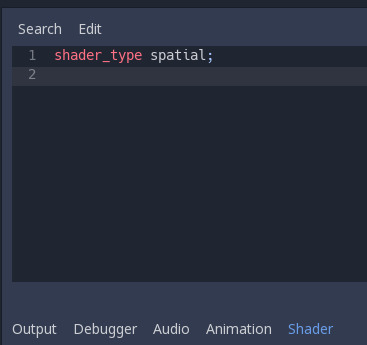
NOTE: Spatial type allows us to use 3D space for shader work.
Step 3: Add a uniform vec4 color : hint_color;
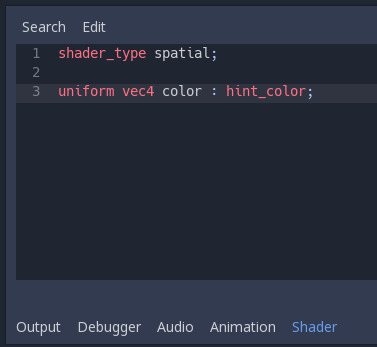
NOTE: uniform are variables accessible from outside and thus can be modified at runtime.
Step 4: In vertex() say COLOR *= color;
Step 5: In fragment() do ALBEDO = COLOR.xyz;

NOTE: vertex() is the only place where we can edit COLOR of our object which is then passed to fragment() as read-only in spatial shader_type.
And ALBEDO is the display color of fragment() which needs to be edited to set our COLOR we get from vertex().
To know more go to the docs.
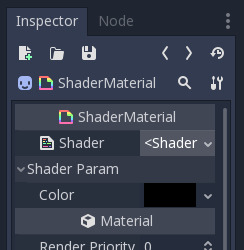
Step 6: Finally the render_mode(s) : unshaded and blend_add.

Now the mesh you had disappears, but don’t worry just go to the MeshInstance and then the ShaderMaterial and under Shader Params edit the color to something more grey. Voila!

NOTE: blend_add sets the object to be a additive blend and so it’s the same effect. _NICE_
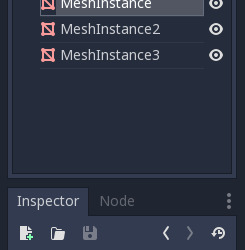
To see the effect clearly add more meshs and set their Materials to the same one. To do this, select the MeshInstance and go to the Inspector and in the Material drop-down select Copy and for the other materials paste it.
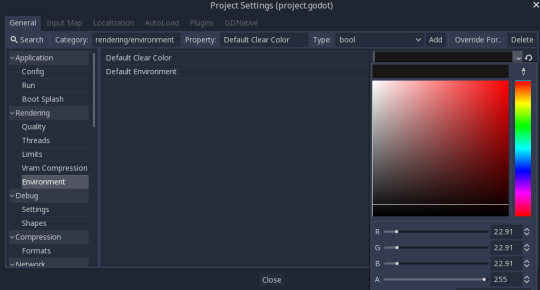
Step 7: If you want to create the scene look even more similar to the overdraw, then go to the project settings under Rendering find Environment and set Default Clear Color to something dark. TADA!!
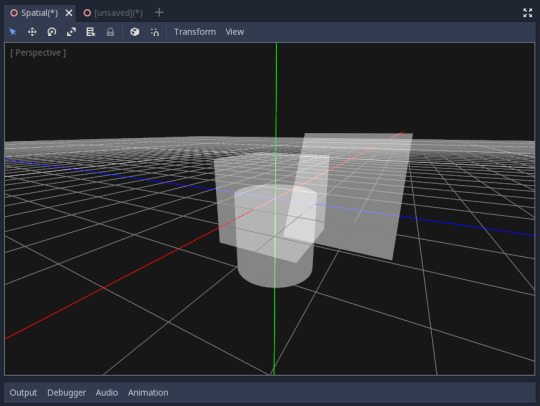
For the curious minds why not you try to create this effect:

And post your findings to this place and if you need any help, don’t be shy to ask.
3 notes
·
View notes
Text
QUICK GRAYSCALE SHADER GODOT 3.0
The shader code is:
shader_type canvas_item;
render_mode unshaded;
void fragment() {
COLOR = texture(TEXTURE, UV);//setup the default image
float lum = (COLOR.r+COLOR.g+COLOR.b)/3.0;//get the average
COLOR.xyz = vec3(lum);//set the average to get grayscale
}
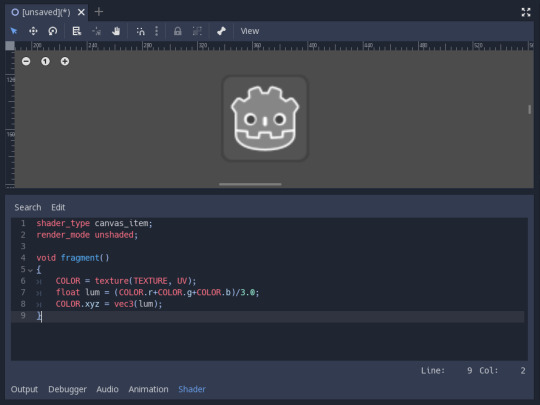
Hope you like it.
2 notes
·
View notes
Text
CREATING Basic Shader in GODOT 3.0 P2
In this short tutorial we will see how to modify the base image with shaders. To produce cool effects.
Step 1: Display the original texture.
Use the same shader setup from last tutorial.
Or to an empty scene add Node2D and then add the Godot icon as a Sprite.
And then to the Sprite, add a New ShaderMaterial, to it add a New Shader.

And paste this code:
shader_type canvas_item;
render_mode unshaded;
uniform vec4 color : hint_color;
void fragment() {
COLOR = texture(TEXTURE, UV);
}
Here the only change from last time is: COLOR = texture(TEXTURE, UV);
This sets the COLOR of the fragments using the default texture[TEXTURE] using the UV to map using the texture() function.
Nothing happens, WHY? Well you see, the thing is you are now displaying the original image from the shader. So nothing was supposed to happen.

So now the fun part.... Yeah the fun part.
Do COLOR.xyz += color.xyz;
This produces the famous “ADD” effect over the image and the color we input.

Set the color to some red and see the results. AWESOME. We now know how to create “ADD” filter.
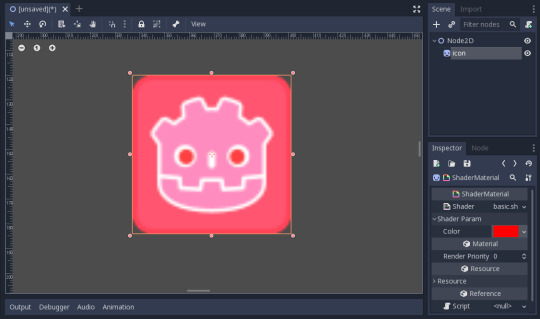
NOTE: Try not to use COLOR.a/COLOR.w because it may mess up the alpha values which you might not want to change.
Next up why not try other math operators and see the results.
Step 2: Using sin();
Try using sin(TIME) to displace the image. [See the image for code]
Voila! You now have animated sprite from Shaders.(Probably setting the Godot icon to Repeat = enabled will help)
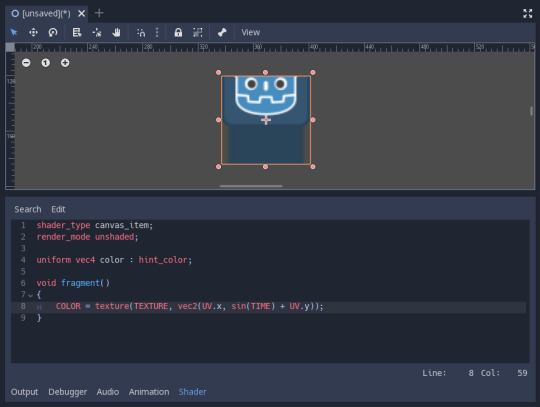
This repeating animation plays because SIN is a function that is clamped between -1 to 1 and so as TIME changes the values goes on moving in a sin wave.
Try using other Math functions as well.
Now that’s it for now see ya later.
Try to get these:


0 notes
Text
CREATING Basic Shader In GODOT 3.0
Godot 3.0 has a new Shading language which bases on GLES3.0 and is much more efficient and better while still providing similar capabilities. So let’s create a simple shader that displays plain COLOR.
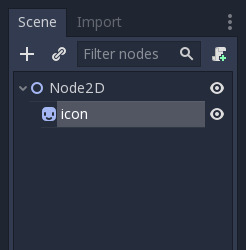
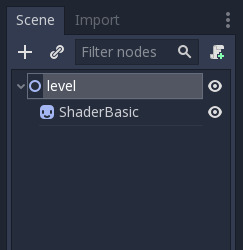
So let’s start with a basic scene with a Node2D and then a Sprite.
Now select the sprite go to Inspector and load icon.png[The Godot ICON].
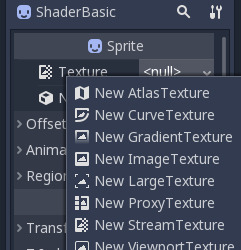
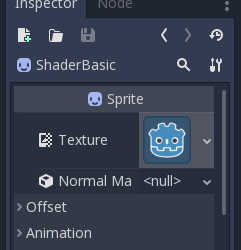
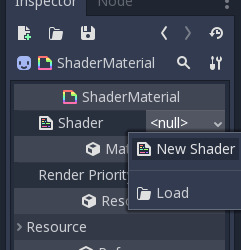
Now go to the Materials section and add a New ShaderMaterial.

Click on the newly created material and then create a New Shader.

Select the shader and a new tab opens.

Let’s start coding our first shader.
As you see the first step is to assign a shader_type and render_mode.
Shader type: for a 2D object is canvas_item, for 3D it’s spatial and for Particles it’s particles.
This tells the shader compiler what kind of rendering system will the shader access and we get variable access accordingly.
render_mode varies with shader_type but the most basic one is unshaded.
This tells the computer what operation the shader will perform over the original texture and/or how will the shader be judged by the rendering system.
The most important(only) shader functions are: fragment() and vertex().
These functions provide access to the vertexes rendered, for vertex() and fragments on screen, for fragment().
So let’s get started with some actual code.
But first go to the documentation and read a little so that we all are on the same page. Link: http://docs.godotengine.org/en/3.0/tutorials/shading/shading_language.htm
CODING
For this tutorial we will be using fragment().

Now set COLOR = vec4(1.0)

Now you see the image turn to a plain white color.
The color changes because we set all the fragments to white color.
Every color is a vec4, it has 4 values:- red, green, blue and alpha.
You can access them by saying: COLOR.rgba or COLOR.xyzw
This is a useless trick, so let’s input a color to display instead of plain white.
Add this above the fragment(): uniform vec4 color : hint_color;
and change vec4(1.0) to color
Open the shader material.

You now see Shader Param and Color inside of it. Change it to something else.

Awesome now what? We now know how to set the color of an object through shader.
Step 2: Change the expression to COLOR.xy = UV;

Cool we finally got something more than plain colors.
We get such colors because UV gets us the position of the current fragment in terms of position on the image from 0 to 1.
So we know that bottom right corner is (1,1) while top left is (0,0).
Now we come to the end of this tutorial but I would like to give you all a little homework. Try making these:


WANT SOME HINT?
..
..
..
..
HINT: COLOR.xyzw can be used as COLOR.xy/COLOR.yz/COLOR.yx
WHERE: COLOR.yx is reverse of COLOR.xy
3 notes
·
View notes