spooniechef
Cooking With Spoons
A cookery blog by a spoonie, for spoonies (and everyone else)
57 posts
Don't wanna be here? Send us removal request.
Last Seen Blogs

alexandracrowley751-blog
Untitled

badidargah20
Untitled

my-brain-is-rotting
My brain is rotting

rmendozafrblogs
Ronald Mendoza's French Blog

lacaletadesants
La Caleta de Sants
Text
Gluten-Free Fish Sticks (1 spoon)
I learned two interesting things today. The first is that if you're struggling for gluten-free breadcrumbs, gluten-free cornflakes are a perfectly acceptable substitute (and yes, you have to specify gluten-free corn flakes Because Reasons). The second is "the spoon test" for frying things. There's apparently a temperature range for deep or deep-ish frying and if you don't have a digital thermometer handy (or if, like me, you can't really be bothered to dig it out of the utensils drawer), dip the handle of a wooden spoon into the oil. If little bubbles start forming on the wood, you're ready to start frying.
This I learned from my Becky Excell Quick + Easy Gluten-Free cookbook. I was determined to try some new recipes, and I tried one that she-called Cornflake-Crusted Cod Goujons but I thought that was kind of pretentious so I call them fish sticks. Well, in my case they were more fish nuggets, but never mind. As the cookbook title indicates, it's pretty easy. A little messy, but it involves cornstarch, so I guess that follows.
Here's what you'll need:
5 tablespoons cornstarch
1 teaspoon salt
1/2 teaspoon pepper
2 medium eggs
4-ish cups gluten-free cornflakes
Two fillets of cod or other white fish (not too chunky)
Neutral oil for frying
I figure you can probably add a few more interesting seasonings if you want to - I don't actually have plain pepper in the house so I used garlic pepper, and that was nice. I might be more adventurous next time.
Here's what you do:
Mix the cornstarch, salt, and pepper (and any other spices you might like); spread onto a good-sized dinner plate
Add the eggs to a separate bowl; beat well
Add the cornflakes to a larger bowl; crush well (don't leave any whole flakes)
Cut your cod into strips about 4" x 1.5" x 1", or nearest estimate (see notes)
Start heating your oil to 180C (356F) or use the spoon test as mentioned above
While the oil is heating, dredge your fish pieces through the cornflour mixture, then the egg, then the cornflakes (press down hard in the last step to make sure the cornflakes stick)
When the oil is ready, add your crumb-coated fish and cook for 5-6 minutes, turning over once halfway through. While they're cooking, line a plate with paper towels to absorb excess oil
Transfer your cooked fish to the plate with the paper towels; cook any pieces of fish that didn't fit in the pan the first time
Apart from the thing about the spoon test and the notes about seasonings, only four things stand out in terms of making things easier on yourself.
This probably goes without saying, but if you're particularly given to brain fog issues for any reason, set-up is key. Make sure all your bowls and plates are set up like the salad section at Subway, so you can just take the fish from cornstarch to egg to crumbs to waiting-to-cook plate in a line. I did not do that and I got turned around a couple of times.
The cookbook recipe says to use your hands to crush the cornflakes, and I am here to tell you no, that is a terrible idea if you have pain issues. Cornflakes, especially gluten-free ones, are surprisingly tough. Use a potato masher or something. I couldn't speak to the efficacy of using a blender, but that might work too.
As mentioned in the recipe part, I don't know if my cod was too chunky or what, but cutting a fillet of fish isn't usually an exact science, because the fillets themselves are irregular and things can fall apart. I ended up with several lumps the approximate size of a chicken nugget, and that works fine. Just as long as all the pieces are approximately the same size, it probably doesn't matter whether you have perfectly shaped sticks or not.
Keep paper towels or a damp J-cloth handy. Between the cornstarch, egg, and cornflake crumbs, your hands will get messy and have lumps of mixture stuck to them, so it's good to have a way of cleaning off the detritus between pieces of fish.
It sounds more involved than it is, honestly. They probably do need additional seasoning in the cornstarch mixture, and definitely some tartar sauce, but overall it's nice to be able to have breaded fish again that didn't come way too expensive and over-processed in the tiny gluten-free shelf in the frozen foods aisle at my local grocery store.
6 notes
·
View notes
Text
Emergency Calories - Potato Salad (0-1 spoon)
I've been largely out of spoons lately, with weather changes, unexpected absences at work and resulting overtime, and all associated pain flares making most things difficult to impossible. I'm feeling better at the moment, so the next few posts are going to involve how I've survived the last few weeks. Because aches or no aches, we still need to eat, and UberEats is too damn expensive for all the time (especially with gluten intolerances).
Now, I've spent a good portion of my adult life fucking up potato salad. Somehow, I thought it was just ... potatoes, mayonnaise, done. Except ... not quite, apparently, because the mayonnaise would always seem to separate and it was never quite right. So I eventually started looking up recipes to find the common thread that makes other people's potato salad work when mine didn't. Took a good bit of searching, but I finally found it: vinegar. Or lemon juice - something acidic, anyway. As well as adding a certain amount of tart zinginess to the potato salad, it also seems to keep the mayonnaise creamy and smooth even when refrigeraged a few days. So while I got recipes from a lot of sources, I've never strictly used any of them, preferring to figure out the best way to do it by guess and by gosh so I can just thow everything together without thinking about it too much. So I'll give a basic overview and some notes for potential additions to jazz it up a bit. The great thing about potato salad is its versatility. Plus, potatoes are relatively cheap.
Here's what you'll need:
~2lbs (or 1kg-ish) potatoes
~1 cup mayonnaise
~1-2 tablespoons vinegar
Additions to taste (see notes)
The easiest way to do this in terms of potatoes is use baby new potatoes, cut into quarters. If you're doing anything larger, you probably want cubes about an inch square. Making sure the pieces are of uniform size is helpful. And I don't know how it is in other countries, but if you're in the UK, get more potatoes than you think you'll need. Our produce has been shit lately, and it's pretty standard to have to cut away bits of yick or just throw whole potatoes away.
Here's what you do:
Chop your potatoes and put them in to boil. Once boiled to reasonable softness (not mashable-soft, but not too firm either), drain and leave to cool and dry.
In a separate bowl, add the mayonnaise, vinegar, and whatever else you're putting into the dressing.
Add potatoes and fold until everything is fully covered.
Serve immediately and/or put in the fridge for later.
As I say, these are largely approximates because I measure it all by eye at the moment. It's pretty easy to get the hang of. Basically you want just enough vinegar to not have the mayonnaise swimming but enough to suit your tastes. And obviously you can jazz it up to suit you - here's some things that have been suggested in various recipes or just sound nice:
Hard-boiled egg
Crispy bacon bits
Dijon mustard
Chunks of dill pickle
Herbs and spices in general (paprika is usually suggested, as are chives, and obviously salt and pepper to taste, but I like adding onion salt, garlic pepper, and a little bit of celery salt)
Onions (I prefer green onions/scallions, but thin-sliced red onion can add some nice colour)
Honestly, play around with it, because potato salad is wonderfully versatile. Googling for recipes showed me that there are as many potato salad recipes as there are people, so I just left it at the absolute basics as a sort of a blank canvas to experiment on.
Potato salad lasts about five days in the fridge, and can be a meal in itself if done right, so it's great for a source of emergency calories. Enjoy!
(Oh, and side note: if you are gluten intolerant, do not try this as pasta salad. I tried to make pasta salad by the same principles and the dressing was fine but gluten-free pasta is disgusting cold. Even the good kind of gluten-free pasta. Sorry, fellow gluten-intolerants; we're going to have to stick with potatoes.)
4 notes
·
View notes
Text
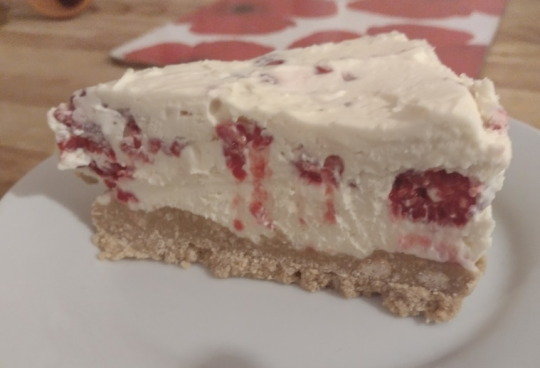
No-Bake White Chocolate Raspberry Cheesecake (1 spoon)
It hasn't been a good few weeks in the Spoonie Kitchen, I have to say. Another two weeks of overtime, one of my relaxation days had to be completely scrubbed because of some major electrical work needing to be done on my flat, and the flat upstairs has got into the noisy parts of their renovations so I've been having to do most of my work-from-home job with banging and power tools drowning out my Spotify playlist, never mind the actual dictation I have to type up.
Still, when I did my grocery order for the month, I was insistent that I get a few ingredients for relatively easy treats, becuase the run-up to Christmas feels like a good time for that sort of thing and anyway, with this amount of spoon expenditure, I deserve nice things. So I pulled out my Quick and Easy Gluten-Free Cookbook (by Becky Excell, comes highly recommended) and looked up a few things that might brighten up my days a little. One of the ones that stood out to me was a gluten-free white chocolate and raspberry cheesecake. I mean, I'm still lactose-intolerant, but that's why we have Lactaid. It didn't sound too hard so I gave it a try. It's easy enough to deserve a place here. Now my only problem is having too much cheesecake, though I solved some of that by giving some to my stepfather.
Also this is largely going to be in metric, but that's what measurement conversion sites are for.
Here's what you'll need:
500g mascarpone
100g (around 3/4 cup) icing sugar
1/2 teaspoon vanilla extract
300ml (1 1/4 cup) heavy cream
250g white chocolate, melted and just cooled
275g fresh raspberries
For the base, you'll need:
320g gluten-free graham crackers (or digestive biscuits)
150g (2/3 cup) butter, melted
I actually have a couple of suggestions right off the bat here. If you're using digestive biscuits instead of graham crackers (which I had to because they don't have graham crackers at all over here, gluten-free or otherwise), you might want to add a little bit of sugar or honey to the butter when mixing with the crumbs, and maybe a tiny pinch of cinnamon. Digestive biscuits are a reasonable substitute but there's some flavour notes missing. Also, to make this dairy-free, just use dairy-free butter, cream, and white chocolate, and substitue dairy-free cream cheese for the mascarpone. It probably won't set quite as well, though.
Here's what you do:
Mash the graham crackers / digestives into crumbs, either putting them in a stand mixer or just putting them in a Zip-Loc bag and beat on them with a rolling pin for awhile.
Pour into a bowl and add the melted butter; stir until well-mixed
Spoon the mixture into an 20cm (8") loose-bottomed or springform pan, compacting it into an even layer at the bottom, before putting it in the fridge to chill
While the base is chilling, add the mascarpone, sugar, and vanilla extract into a bowl and mix until reasonably combined (10-20 seconds with a stand mixer or electric hand whisk on low/medium speed)
Add the cream and blend on medium speed for 1-2 minutes, or until it starts to firm up
Add the chocolate, mix until combined and you have a thick, spoonable mixture (only mix briefly - overmixing will make things start to separate out)
Gently fold the raspberries into the mixture until evenly dispersed
Spoon the mixture into an even layer onto the chilled base; let chill in the fridge for at least 5 hours, preferably overnight
FEAST
The electric hand whisk or stand mixer does most of the work on this one; everything else is all about the spooning and smoothing, so it's pretty ideal for someone whose tolerance for mixing things by hand is pretty low. The results are good, and obviously substitutions can be made for different flavours. I'm already pondering a couple of teaspoons each of cocoa powder and espresso powder sifted into the icing sugar and leaving out the raspberries for a mocha cheesecake. You also probably don't have to use fresh raspberries, but their tartness is a nice contrast to the sweet creaminess of the cheesecake. I'm going to test that theory by defrosting some of the frozen mango I have for smoothies and trying for a mango cheesecake. Basically so long as you have an obscene amount of mascarpone cheese, cream, and enough icing sugar to make it set, you can do whatever you want with this one.
Of course, these do take well to freezing, so you could also probably halve the recipe, use ramekins instead of a springform tin, and have single-serving cheesecakes, taking them out of the freezer to defrost when desired. A good notion for those who like the occasional sweet but can't get through an entire cheesecake by themselves.
Oh, hey, I nearly forgot. I actually took pictures of the results this time! So here you go - No-Bake Gluten-Free White Chocolate Raspberry Cheesecake!
7 notes
·
View notes
Text
Poorman's Ice Cream (0 spoons)
If you're anything like me, you've noticed how godsawful expensive things have got lately. When budgeting for food, it's harder and harder to justify treats. The thing is, treats are kind of necessary. I mean, if nothing else, living with only the bare essentials is a sure-fire route to depression - or existing depression getting worse. No one can just ... survive like that. Believe me, I've tried - it did not go well.
That leaves making one's own treats, and that has its own costs. Some are the financial, depending on how well your kitchen is equipped and if there are any speciality ingredients needed in your treat of choice, but mostly the costs are time and effort. For a spoonie, something quick and easy is really important. That generally leaves out ice cream, since it tends to take a lot of churning and ice cream machines are not exactly a staple household item.
B Dylan Hollis to the rescue! Back in August, his TikTok featured a neat little recipe from an unnamed "dead lady" for a three-ingredient ice cream 'substitute' that turned out remarkably well. And all the equipment you need is a hand mixer.
Here's what you'll need:
1 can evaporated milk
1 1/2 cups powdered sugar
Dash of vanilla extract (see notes)
The comments are full of people flagging up how you could add other flavours to your ice cream - everything from a teaspoon of cocoa powder or some chocolate syrup for chocolate to a teaspoon of instant espresso powder for coffee to a dash of mint extract and some chocolate chips for mint chocolate chip. One option I intend to try is to keep the vanilla but add egg-free chocolate chip cookie dough (because salmonella is no one's friend) from a recipe like this one from Flippin' Delicious. Given that this one doesn't require xanthan gum, you can probably use regular flour in it if you can tolerate gluten. Also, if you want hot chocolate ice cream (which is a different beast from chocolate ice cream altogether), you can probably add some home-made instant hot chocolate mix, though you probably want to reduce the powdered sugar in the main recipe to a half-cup since so much of the hot chocolate mix is powdered sugar anyway.
Here's what you do:
Take your can of evaporated milk and a mid-sized bowl (glass is best) and store it in the fridge overnight
Put all ingredients in the bowl and whip until smooth and foamy; put it in the freezer for an hour or so
Whip again until smooth with a soft-serve consistency; either eat as is or put it back in the freezer for a few hours to set
Now, there are a few notes, because a lot depends on your fridge and freezer. For example, my fridge isn't hugely efficient, so I put my bowl into the freezer for an extra half-hour before I started, because starting with a cold bowl is important. I also had to take a fairly broad definition of "or so" when waiting for it to set a bit the first time; if it doesn't have the soft-serve consistency you want after the first hour, whip it anyway, put it back in the freezer for another hour, and then whip again. Obviously an electric hand mixer is essential to making this a zero-spoon recipe.
However you manage it, the result is a really smooth ice cream. Now, for the vegans among us, vegan evaporated milk is hard to find in a tin but can actually be made. Though I'd recommend that those of us who don't tolerate lactose well just stock up on the Lactaid because making vegan evaporated milk requires simmering oat milk for two hours.
17 notes
·
View notes
Text
Gluten-Free Bread (1 spoon)
Things are a little depressing on the wet little island I currently call home. Okay, by "a little", I mean "this country's government is publicly struggling to find loopholes in human rights law". So as you can probably guess, the whole situation is significantly testing all the coping mechanisms for clinical depression that I learned in therapy.
Therefore, sublimation time - sublimation being where you take all that grief, rage, depression, whatever, and you stuff all that energy into doing something positive and constructive. Now, when I got my fibromyalgia diagnosis, gardening was my primary sublimation activity, but we're into mid-November now and the garden's kind of sleepy right now. That means baking is my primary option. I mean, I need gluten-free bread anyway because I need bread crumbs for various recipes I want to try, and gluten-free bread is expensive, so why not just make my own? Particularly when I might get bread that isn't about 35% air bubble if I make it myself?
I'll say this for those of you who can eat gluten - the consistency of the loaf I baked last night (recipe courtesy the Dish By Dish website) is not the same as your bog-standard supermarket loaf. The results of this recipe are softer, spongier, and somewhere on the texture scale between cornbread and cake. That's not to say it's bad, but if you've got issues with the texture of foods, it's a fair warning. Now, here's the thing that gluten-free bread has over regular bread for those of us with more physical disabilities - no kneading required. Hell, it wasn't even all that hard to mix by hand (though I probably still should have used the hand mixer; still, I was sublimating).
So! Here's what you'll need:
2 1/2 cups gluten-free all-purpose flour
1 teaspoon xanthan gum (unless your flour blend already contains it)
1 teaspoon gluten-free baking powder
2 1/4 teaspoons instant yeast
2 tablespoons sugar
1 teaspoon salt
1/3 cup neutral-tasting oil (vegetable, sunflower, etc) or melted butter
1 teaspoon apple cider vinegar
1 1/2 cups warm milk or milk substitute (110 F / 40 C)
2 large eggs, room temperature, beaten
Having made regular bread with actual gluten in it, this is an unusual combination of ingredients, and is probably why the consistency is closer to cake / cornbread than actual bread. Still, I figure things like the egg and milk are helping to bind the bread dough in same way the gluten molecules ordinarily would.
Anyway, here's what you do:
Combine all dry ingredients, whisk until well-blended
Add oil, vinegar, and milk, mix for 1 minute or until fully combined
Add beaten eggs, mix for 1 minute or until fully combined (consistency should be close to cake batter)
Add dough to greased 8" by 4" loaf pan, cover with a cloth, let rise in a warm place for about 30 minutes, or until it's about doubled in size
Once dough has risen, preheat oven to 350 F (175 C), then bake loaf for 50 minutes, until top is golden brown and the loaf sounds hollow when tapped.
Let cool in the pan for about 10 minutes before transferring to a cooling rack and cooling the rest of the way.
No kneading, remarkably little aggravation, and the only real issue is the number of things to wash up. The result is the sort of bread that probably works best toasted, or as the base for French toast, or turned into bread crumbs for breading things. Then again, almost all gluten-free bread needs toasting or similar to be palatable, and this was nice with butter and jam (in a cakey sort of way) when it was just out of the oven. So all that to say that it was a reasonable sublimation activity that left me feeling a little more accomplished and less helpless in general.
Now I have to go out for the ingredients for cornbread.
6 notes
·
View notes
Text
Gluten-Free Chocolate Mug Cake (0 Spoons)
I've been quiet here for awhile, at least in part because it's been a long month or two. There's been overtime at work, which I should not have been doing but because we're understaffed and half the office got sick, I had little choice. Also I went to what will probably be my last convention a couple of weeks ago, which was objectively hellacious but I got autographs from the entire cast of Critical Role so I regret nothing. But of course I came out of that with a serious pain flare and what might have been con crud but was also quite possibly the flu, so that kind of murdered any chance of my being productive the last couple of weeks. But I have this week off and I have some plans. Mostly because I got cookbooks and very much intend to use them.
Side note - I've been contemplating doing a thing to raise money for Fibromyalgia Action UK, and weirdly, my main thought about something sponsored has been "cook through an entire cookbook in 12 months", like The Julie / Julia Project. I came up with that idea least partly because Julie Powell died a couple of weeks ago, which ... I mean, she was barely older than me, what the fuck? But also because cookbooks don't exactly give a chronic pain-friendly rating to its recipes, and part of it would involve doing an adjunct-document with spoon ratings like I do on the recipes here. Still toying with the idea, at least partly because butter and eggs are expensive as fuck. Don't even get me started on the pecans I need for a recipe I got my mother to bring me Jell-O pudding from North America especially to make. Also there's too much that needs buttermilk and that's not so much a thing over here.
Which brings me to today's bit of cookery notes. See, I have new cookbooks, and I've been trying to decide what I want to make from them. I'm having serious executive dysfunction about so much of it, so for the most part I've been sticking with chocolate chip cookies. But I didn't want to do that this time, but there are so many cookies to try. Eventually I got tired of indecision and just really wanted a sweet treat, and one of my cookbooks (Quick + Easy Gluten Free by Becky Excell, which I heartily recommend) had recipes for mug cakes. I'd never tried one, so I figured, why not? I went for the chocolate one instead of the jam doughnut one because I didn't want to use an egg for just the yolk until I found something to do with the white. (Which probably means the next recipe you'll see here is gluten-free cinnamon roll sugar cookies, but anyway.)
So! Chocolate mug cakes! Here's what you'll need:
1 tablespoon vegetable oil
4 tablespoons milk
2 tablespoons caster sugar
1 tablespoon unsweetened cocoa powder
3 tablespoons gluten-free all-purpose flour
1/2 teaspoon gluten-free baking powder
1 tablespoon chocolate chips
I imagine you could replace both the all-purpose flour and the baking powder with gluten-containing versions and have it be fine. But note - no xanthan gum, no egg. You could probably add the tiniest drop of vanilla extract, though.
Here's what you do:
Put all the ingredients in a microwaveable mug; mix well
Cover the mug with plastic wrap; poke a few holes in the plastic
Microwave on high for 60-70 seconds
Let cool for a couple of minutes (the mug will be really hot)
FEAST (they recommend topping it with ice cream and / or chocolate syrup, so maybe do that and then FEAST)
There is no earthly way I could make this any easier. You could probably add various bits of additional flavour - replace the chocolate chips with fudge chips, a drop of vanilla or orange or mint extract, maybe a pinch of cinnamon - but it's pretty well fine on its own. The only thing I can add is that the cookbook says microwave on high in a 900W microwave, but mine is 800W so I just put it in for 70 seconds and it was fine, so maybe add an extra 5-10 seconds if your microwave is lower wattage than that.
So yeah, this is the perfect spoonie dessert, really. If you're having a bad day and are tired and you just want something nice that requires no effort and isn't a £3 brownie? This is the way to go.
15 notes
·
View notes


Text
Been quiet for awhile but here's a good one!
hey, don't cry. one cup heavy whipping cream, two tablespoons granulated sugar, three tablespoons cocoa powder and whisk until stiff peaks form for three ingredient chocolate mousse, okay?
116K notes
·
View notes
Text
The Dinner Diaries Day 12 - Unconventional Breakfast (Gluten-Free Chocolate Chip Cookies - 1-2 spoons)
I had chocolate chip cookies for breakfast and I regret nothing.
Well, okay, I sort of regret my job right now. The situation at work continues horrific and I'm having to pull overtime until the end of next week. Obviously this is a bad thing for my spoon levels, not to mention my pain and stress levels (those two being rather intrinsically linked, given stress tends to trigger my fibromyalgia pain flares and my migraines). So the next week and a half or so is really going to test my ability to deal with low-spoons cooking.
I do have emergency calories just in case.
Anyway, I mentioned in yesterday's entry that I'd made chocolate chip cookie dough and it needed to chill and I would share the recipe when I knew how it would turn out. As you can probably tell from the first sentence in this post, it turned out pretty damn well. Also my apartment smells of fresh-baked chocolate chip cookies, which is always good. Now, keep in mind this is a gluten-free recipe, and from what I remember from baking chocolate chip cookies in my pre-intolerance days, the ingredient proportions are a little different. Not a big surprise, since even the best gluten-free flour isn't quite the same. You might want to look at a regular chocolate chip cookie recipe if you're using wheat flour. However, if you're not, this is the recipe for you.
Here's what you'll need:
2 1/4 cups flour
1 teaspoon xanthan gum (unless your flour blend already contains it; mine did)
1/2 teaspoon salt
1 teaspoon baking soda (also called bicarbonate of soda, particularly here in the UK)
3/4 cup granulated sugar
3/4 cup packed light brown sugar
8 tablespoons unsalted butter, room temperature
2 eggs (the recipe calls for room temperature and beaten, but I didn't do that and I was fine)
1 tablespoon vanilla extract
12-16 ounces chocolate chips (or a bit more if desired)
Gluten Free On A Shoestring, which is where I got this recipe, went into a few more specifics. As well as asking for the eggs to be room temperature and beaten, it also asked specifically for kosher salt and bittersweet chocolate chips. However, there's definite wiggle room in all those things - I used regular salt and milk chocolate chips, and mine turned out fine. (I might have wanted more chocolate chips, though, thinking about it - err on the high side.) Anyway, the only really important thing about it is making sure that the butter's soft enough to mix but not too soft. Pressing your finger softly onto the surface should make a light impression but not a really serious dent.
As far as the instructions go, a couple of people in the comments on that recipe page made a great suggestion that I'm just going to incorporate into the instructions, since I'm describing what I actually did, not just transcribing a recipe.
Here's what you do (dough prep segment):
Whisk the flour (and xanthan gum if required), salt, baking soda, and granulated sugar together in a large bowl
Add the brown sugar and mix thoroughly, breaking up any stubborn lumps of brown sugar with a fork
Add the butter, eggs, and vanilla; mix until well-combined (see notes)
Add the chocolate chips and mix thoroughly
Roll the dough into a cylinder (or two if that'll make storage easier); put into the fridge and let chill for at least 12 hours.
To preserve spoons, you can and should use a stand mixer to mix the wet ingredients into the dry ingredients. It would be a pain in the ass by hand, and that's what would take this one from one spoon to two. I would still suggest stirring it a little by hand first, though, since it's a little less likely to kick up flour - especially if you're using a hand mixer instead of a stand mixer, like I had to.
Side note: the last time I made these with regular flour, I also added a teaspoon each of cinnamon and ground ginger, and a quarter-teaspoon of ground clove - so basically ginger snap spices. It made a lovely spicy chocolate chip cookie (and there's a whole thing about that and how it encouraged a retired dental hygenist to start playing Dragon Age, but you don't want that story).
Theoretically you could just roll the finished dough into balls and cook them that way, but I understand they hold their shape better and cook more evenly if they're chilled before baking. Also you could theoretically just store the cookie dough in a bowl until ready and roll into balls from there, but chilling it in cylinders actually makes it easier to prepare, kind of turning them into those Tollhouse ready-made cookie dough tubes. You can even stick those tubes in the freezer to keep them longer, if you can't (or don't want to) bake them all right away.
However you want to do it, though, eventually you'll probably want to bake them, so...
Here's what you do (baking segment)
Preheat oven to 350F (175C fan assisted for me)
Cover a baking sheet (or two) with a sheat of greaseproof paper
Cut slices off your cookie dough cylinder and arrange on the greaseproof paper - leaving plenty of room because they will expand
Bake until the cookies are golden brown and set in the centre (about 12 minutes)
Leave to cool on the baking sheet for about five minutes before transferring to a cooling rack
Store in local cookie jar or FEAST (or both; both is good)
Fair warning; there is a lot of butter in these, and it makes a seriously rich cookie. Delicious, but filling. Thankfully, I have many baked cookies and some dough leftover for when I really need a bit more of a pick-me-up.
1 note
·
View note
Text
The Dinner Diaries Days 9-11 - Meat Tips
The last few days haven't exactly been massively exciting in terms of menu stuff. In fact, Monday and Tuesday were pretty much one meal of "heated-up meat, some carbs, something that qualifies as a vegetable" supplemented with fruit smoothies. Today was the tuna broccoli lemon pasta (I finally remembered to go pick up some tinned tuna), so that'll keep me going a little. Just I figured I'd mention a couple of tips and tricks when it comes to meat. I'm sure a lot of this is stuff everyone knows, but ... I didn't know this stuff once, so maybe it'll find someone who needs to know.
Steak: Well, specifically rump steak (other cuts are a whole different beast in some respects, but rump steak is cheaper) but apparently this goes for more or less all red meat. Main thing - let it reach room temperature before cooking. Apparently this helps it cook more evenly. Also, if you spice the steak while it's resting to room temperature, the spices have more time to flavour up the meat. On the subject, one of my favourite things to do with a rump steak for flavouring is to leave it to rest to room temperature in a shallow dish, sprinkled with some garlic salt, some onion powder, a little pinch of celery salt, little bit of dried chilli flakes, and a splash of lemon juice. I'm not sure why lemon seems to enhance chilli, but it does, and that little bit of heat will seep into the steak really well. If you're frying it (which is generally how I do it), heat the pan to very hot but not smoking before putting the steak on - that'll sear the steak and keep it juicy on the inside. Honestly, I figure most of this stuff works for all red meats. As for cooking times, I'm not exactly an expert, because I like my steaks very, very "are we sure they're not a vampire?" rare. I leave them a few minutes per side at most.
Chicken: I'm talking quarter-chicken - thigh and drumstick, still attached to each other, skin on. I'm good at roasting a whole chicken, but I got the general vibe of it from roasting chicken legs on their own. The thing about resting the meat to room temperature before cooking holds true here as well, for pretty much the same reasons. In this case, it's more that whatever salt you're putting in your seasoning mix will permeate the skin and make it nice and crispy - similar principle to making crackling (it's a roast pork thing; I'll handle that one another time). Similar blend, too, though I find the lemon-and-chilli thing a bit overpowering with chicken if not brining it. So I generally stick with garlic salt, onion powder, and a little bit of season-all. Just put it in the oven at about 400F (I generally do 200C fan assist, for those working in celcius) for maybe 15 minutes. If you want to check and don't want to use a meat thermometer, find a small, thin knife and jab it deep into the thickest part of the thigh. If the juices run clear, it's okay to take out. If not, leave it in another few minutes. One of the good bits about the skin being crispy is that it's just another way of searing the meat; not as much moisture escapes so you're not in too much danger of overcooking it if you leave it in a few minutes longer than you need to.
That's basically been the it and all of it - it actually took longer to think about how to describe the tips I used the last couple of days than it did to use them. I do this stuff so often now that I don't even think about it. (Honestly, that was a gripe an ex of mine had with me; he wanted me to tell him how I made his favourite dishes and I gave him so many generalities when he wanted specifics. I measure that shit with my heart, is all.)
Anyway, tomorrow's probably going to be largely about the leftovers, but I'm about to round off today's 'being busy' with making chocolate chip cookie dough from a recipe I found on Gluten Free On A Shoestring. I don't generally post recipes here until I know they actually work, and the dough needs to chill for at least twelve hours, so I'm going to make that now with a view to having at least one mini-break from my work-from-home job involve putting cookies in the oven and maybe rewarding myself for the bullshit my workplace is putting me through right now. I'll keep you posted.
3 notes
·
View notes
Text
This looks like it belongs in my collection. Dark humour cookbook for those with low spoons; it needed to be plugged here.
People with low spoons, someone just recommended this cookbook to me, so I thought I'd pass it on.
I always look at cookbooks for people who have no energy/time to do elaborate meal preparations, and roll my eyes. Like, you want me to stay on my feet for long enough to prepare 15 different ingredients from scratch, and use 5 different pots and pans, when I have chronic fatigue and no dishwasher?
These people seem to get it, though. It's very simple in places. It's basically the cookbook for people who think, 'I'm really bored of those same five low-spoons meals I eat, but I can't think of anything else to cook that won't exhaust me'. And it's free!

104K notes
·
View notes
Text
The Dinner Diaries Day 8 - The Mother of Invention (Butter Noodles, 1 spoon)
Today was a "necessity is the mother of invention" cookery day.
The earlier part of the day was too hot to do much, but I did put some emergency calories in me in the form of a small bag of potato chips and a strawberry-raspberry smoothie. But it did cool down enough that I felt able to make my tuna broccoli lemon pasta.
Except when I had sliced the onion and put the broccoli into the pot, I checked the cupboards and realised I was out of tuna. Guess I failed to put that on the list during this month's grocery shop.
So, since I couldn't exactly unslice my onion or unboil my pasta, I was going to have to improvise. So I checked the fridge to see what else I could put in pasta. I remembered that a friend of mine used to do effectively buttered noodles topped with sliced kielbasa, and while I didn't have kielbasa, I did have bacon. So I figured I could do something with that. It's not a bad recipe, as it happens, and there's some scope for refining it to make it more interesting. As it was, though, I just needed food, and this was Hoover Stew-ish enough to be workable.
Here's what you'll need:
About half a bag of pasta
Some broccoli florets (or whatever frozen veg happens to be handy)
About 6 slices of thick-cut bacon, roughly chopped
1 red onion, roughly chopped
About 6 mushrooms, thickly sliced
1 large-ish pat butter
4-6 cloves garlic or 2 tbsp garlic puree
Seasoning to taste
As you can probably tell, between bacon grease and butter, this is a bit rich. But given how much of all of this gets soaked up by vegetable and pasta, it's generally okay.
Here's what you do:
Boil the pasta; add vegetables to the pot when pasta is nearly al dente; remove from heat when pasta is nearly done
Melt butter in deep frying pan; add bacon, mushrooms, onions, and garlic; sautee on medium-high heat until bacon is browning and onions are clear.
Drain pasta / vegetable mix; add to frying pan with seasonings of choice
Heat entire thing for 4-5 minutes, stirring regularly
It's really simple. It's not very exciting. But it's what I had available, and it tasted good, and that's about all I can ask of an improvised pasta dish invented at the last minute.
1 note
·
View note
Text
The Dinner Diaries Day 7 - Heat Wave (no recipe)
For those of you living in the US, 87F or so is probably not a big deal. However, for those of us in the UK, it's kind of a big deal. Especially when you're hitting 31C or so in early September. Plus air conditioning is not a thing here, as most of the time the objective is to keep the heat in - although ironically a lot of places don't do that very well either, so you end up with thick walls conspiring to keep heat in with shoddy windows that tend to let the heat out. Not to mention that I at least find the heat a lot less bearable now than I did before the fibromyalgia.
Point is, no one really wants to cook in this weather. But of course, they also say that you should eat anyway, even if your appetite's gone to hell because of the heat. So my plans for doing pizza dough today got pretty much scrapped at the outset, and tomorrow doesn't look good either. It tends to get hottest at about 5pm, so around dinnertime, and I'm not turning the oven on to add to the heat.
Which is why today's meals were a little lackluster and don't really require a recipe or anything. Lunch was leftover student Alfredo; dinner was a fried pork chop and a microwaved baked potato. Since I didn't really want to switch on more than one burner, the rest of my fruit and vegetable intake has been strawberry smoothies. The handheld blender thing is a little hard on the wrists and hands, but it's something nice and cool and healthy, so I'll take it.
I'm not sure what I'm going to do about tomorrow, which promises to be just as bad heat-wise. A lot of my dinner plans for the next little while involved the oven, because a lot of the easier things to cook involve just putting something in the oven and waiting for awhile. Unfortunately, that would just be trading one increased discomfort for another at this point. Maybe I should be less hard on myself about not having proper meals and just stick with the emergency calories until the heat dies down next week.
5 notes
·
View notes
Text
The Dinner Diaries Day 6 - Improvement (French toast and poached sea bass; 1 spoon each)
Minor improvement today, in that I produced two actual meals! At least part of it was my desperately wanting a treat, and deciding to go for French toast. I used to make my French toast incredibly basic, but I decided to play around with the "milk / egg / bread / fry / drown in maple syrup" model that my parents taught me. Now, most of the recipes I'm finding for French toast are for multiple people; I'm going to provide my recipe for one. Well, technically French toast and bacon, but ... well, I'll get to that in notes.
Here's what you'll need:
4-6 slices bacon
2-3 slices of bread
1 large egg
3-4 tablespoons milk
Little splash of vanilla extract
Pinch of cinnamon
Pinch of brown sugar
1/4 teaspoon granulated sugar
Now, bacon's good in and of itself, but it also produces enough bacon grease to cook the French toast in, adding a richness to the flavour. But if you're a vegetarian, or can't eat pork for some other reason, just ignore the bacon step and use a teaspoon or two of vegetable oil, or a pat of butter, for frying.
Here's what you do:
Fry your bacon; when crispy, remove from pan and set aside on paper towel (or, if skipping the bacon, add vegetable oil / butter to pan and heat
Add egg, milk, vanilla, cinnamon, and both sugars to a bowl; whisk well
Dip bread into the egg mixture; drop into hot pan for 3-5 minutes or until golden brown on both sides
Serve (with bacon if made)
So that was my brunch. Fairly late brunch, but brunch regardless.
After that, I had plans for clearing various of the meats out of my freezer. I had sea bass, and I decided to do something fairly simple with that. I could have just baked it, but I decided to poach it instead. Hence, recipe the second.
Here's what you'll need:
2 sea bass fillets (or other white fish)
3 cups vegetable stock
1 onion, sliced
4-6 cloves garlic, minced
1-2 tablespoons lemon juice
Seasonings to taste
For the seasonings, I stuck with celery salt, garlic pepper, and a couple of chilli flakes, but like most things, it's all down to what you like. I tend to tart it up a bit because when I was a kid, my mother used to poach fish in nothing but water, a slice of lemon and some celery, and I like something a little livelier. Hence the vegetable stock.
Here's what you do:
In a deep frying pan, bring vegetable stock, onion, garlic, and lemon juice to the boil
Add sea bass fillets; reduce heat and simmer on medium heat for about 10 minutes.
This one's best with rice, because it can absorb the flavoured-up broth, but I couldn't be bothered with boiling rice today so I went with a baked potato instead. Though I did add some frozen broccoli to the pan while poaching the fish, which gave that a nice flavour too. So maybe add whatever veg you're having with the meal to the stock as well.
Honestly, given I was dragged out of bed way earlier than I wanted to be (workmen put up scaffolding right out side my windows and the management company did not warn me about this, which is irritating), managing two meals when underslept and cranky is some kind of miracle. Still, zero-spoon recipes make the miraculous possible, so it's good to have a large collection of those.
Snack midway between those meals involved a can of peaches.
4 notes
·
View notes
Text
The Dinner Diaries, Day 5 - Revamped Old Favourite (alternative Student Alfredo, 1 spoon)
Keeping this diary has been really helpful, because it gets me actually thinking about my eating habits. I'm finding that at least part of my problem with disordered eating is my trying and failing to adhere to the standard "mealtime" thing. I tend not to be hungry when I first wake up, and by the time I am, it's generally past what one would consider 'lunchtime'. This gets me going, "Eh, I can wait until dinner" (because that was the constant refrain when I was hungry as a kid, probably) and hyperfocus past the hunger symptoms. Then "dinnertime" comes around and I'm generally hangry and headachy and nauseous and disinclined to eat.
Today I basically turned around at about 4pm and said, "To hell with this; I'm having lupper". "Lupper" is a thing my dad used to say when I was a kidl; he figured that since you could have brunch as a meal that wasn't quite breakfast and wasn't quite lunch either on the timing or the components of the meal, you could also have a meal that wasn't quite lunch and wasn't quite supper on the same principles. Thus he hybridised "lunch" and "supper" - "lupper". It does seem to help me get over having a full-on meal at 4:30pm, anyway.
Also I had to use up some leftovers. That's the thing with batch cooking; trying to make sure you eat it before any of it goes bad. So I had the last of my chicken from recent roast, and some garlic and chive cream cheese that needed eating. I thought about my Student Alfredo recipe and remembered that a friend of mine ... I think on Facebook ... suggested cream cheese as an alternative to cream of mushroom soup in tuna noodle casserole. I also remembered that cream cheese is a primary ingredient in the sauce for my Chicken Broccoli Pasta Bake recipe. I didn't feel like doing a whole bake, so I sort of combined the two. So, Student Alfredo Redux!
Here's what you'll need:
Half a bag of pasta
3/4 regular-sized container of Philly garlic and chives cream cheese
Maybe 1/3 cup of milk
1 pat butter
1.5 or so cups frozen mixed vegetables
Basically any leftover cooked meat
Spices to taste
The ingredients list is mostly the same as the original, but obviously the coeliac-unfriendly powdered soup mix is gone. Today I did need to use up some mushrooms so I sliced some up and heated them with the meat, and mostly stuck with garlic pepper, garlic salt, and onion salt for seasoning. Once again, you can probably use just about any meat, but I'd probably stay away from red meats, just because they'd overpower things a bit. So the ingredients list is much the same - just the methodology's a little different.
Here's what you do:
Boil the pasta, adding the mixed vegetables when the pasta’s nearly done; set aside
In a deep frying pan, add the butter and melt on low heat. Add the meat (as well as any onions, fresh garlic, or mushrooms you might be wanting to use); saute on medium-low heat until the onion's starting to get tender and everything is warmed through.
Ass the milk, cream cheese, and any other spices you might feel like using; stir and heat on medium heat until the cream cheese has melted and everything is smooth
Add the pasta/vegetable mix; stir until all pasta is coated with the sauce. Heat on medium-low heat for another 2-3 minutes
It's more or less the same recipe - tastes a little creamier, requires actual taking of Lactaid if you're lactose-intolerant, but at least avoids the gluten. You could try going vegan with it by sticking with vegetables and mushrooms and using oil instead of butter, but you'd have to be careful to find a brand of dairy-free soft cheese that melts properly, which I have found ... difficult. Also tends to be a little more expensive.
So that was my lupper, and there will be an actual late supper involving another serving of it, along with some salad. This has ensured that I have eaten my leftover chicken before it goes off. Which unfortunately is more than I can say for the remains of my cucumber. The salad I'm going to have with my late supper will just have to be the last of the lettuce and tomatoes, then. Ah well.
(Also I will be using the benefits of a system full of Lactaid by having some of my Ben & Jerry's Peanut Butter Cup ice cream.)
7 notes
·
View notes
Text
The Dinner Diaries, Day 4 - Knowing Your Limits, Treating Yourself
One of the big things about being a spoonie is knowing your limits and knowing when a treat is not only a good idea but damn near necessary. Even having had days of recovery, I'm still not doing so well after three weeks of nightmare at work.
This is why I keep a small discretionary fund for Emergency Takeaway Dinner. It's not much, but it's enough for maybe once a month or so, depending on the takeaway. My problem is that because I have gluten issues on top of everything else, the types of takeaway I can actually get are ... limited at best. Not entirely cut off, though. A fair few places will do gluten-free options, and if you have anxiety like I do and hate asking for speciality dishes, there are some types of cooking that are gluten-free just by their nature. Here are the three I know about off the top of my head:
Indian: If you avoid samosas and any of the bread options, Indian food is pretty much entirely gluten free. Most of the dishes don't involve flour for thickening the way a lot of sauces do. And even onion bhajis are okay because those use gram flour, which is a type of chickpea flour and naturally gluten-free. I miss naan bread, but at least I can have Indian food (even if the stuff I make at home is much better).
Sushi: While most Japanese food needs to be avoided because of the soy sauce (or, like, breaded things like tempura and katsu), sushi's pretty safe if you make sure to use gluten-free soy sauce (also known as tamari) instead of regular soy sauce. Miso soup is also fine.
Thai: Like Indian, most Thai dishes are naturally gluten-free. They tend to use rice noodles instead of wheat noodles, stuff like that. So by and large, as long as you're avoiding anything breaded and using tamari instead of soy sauce if you want soy sauce on it, Thai's safe.
The options are pretty minimal, but it's better than I thought they were when my gluten issues first started. As for me? Tonight? I haven't had sushi in far too long so I am having some now. I have put in weeks of miserable graft and I deserve raw fish and well-prepared sushi-rice. So if you're feeling like you should treat yourself but struggle to because of gluten issues? Here are some good tips.
13 notes
·
View notes
Text
The Dinner Diaries Day 3 - Duck Legs (0 spoons)
This was not a good day from the point of view of remembering about food. Apparently my appetite is made of fluctuation right now. However, I did eat one nice solid meal, and fortified myself to cook it with a bag of potato chips as fuel.
Like with most roasted things, there's not much to roasting duck legs from an effort point of view. Thing about duck is that because of it being a particularly fatty bird, it wants slower roasting to get the skin nice and crispy. I could have roasted the potatoes with the duck legs - I have recipes for that - but I'm still trying to recover so I went lower effort still; I just followed the directions on the packet. Well. Mostly, because yet again, it suggested "salt and pepper if desired" and I had onion salt and garlic pepper so y'know. Anyway, very, very brief recipe because it does not take much of anything but time.
Here's what you'll need:
Two duck legs
Spices to taste
With that done, here's what you do:
Pre-heat the oven to 350F (ish), 180C, 160C fan assist, gas mark 4
Pat the skin of the duck legs with a paper towel to remove extress moisture. Prick the skin and season to taste.
Place in a roasting tray and cook for 90 minutes, basting with the juices several times during cooking
Remove from oven; rest for ten minutes, then serve
Literally that simple; most of the effort it takes is time. That and the basting, but that's pretty much a necessity because it helps keep the meat juicy and tender.
I served mine with a baked potato (done in the microwave), some broccoli, and a salad.
Of course, now I'm actively still hungry and not for the amount of wacky cake that's currently living in my immediate space. Once again, it's a protein thing. I do have that second duck leg, but I'd like to save that for lunch tomorrow. After all, tomorrow I have plans in the direction of gluten-free pizza dough. So instead I'm going to do corn thins and salami, with either pickles or more salad.
5 notes
·
View notes