
snapcrapplepop-blog
I LIVE I DIE I LIVE AGAIN
15 posts
Don't wanna be here? Send us removal request.
Last Seen Blogs

tum-bakery
My Favorite Shape is Round

inkastevani
happy wife, happy life..happy mom, happy home..

bmw-1
Sans titre

omgitsmitsuri
O(≧∇≦)O

srmcd1
MY tumblr!
Photo
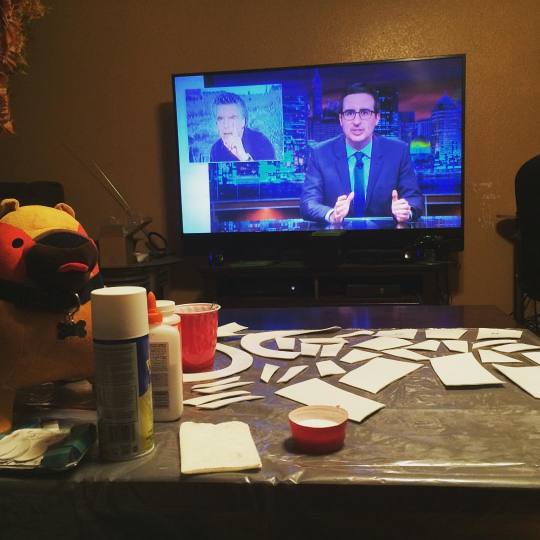
work is slow, but going! waiting for glue to dry suuuuucks. #cosplay
0 notes
Photo
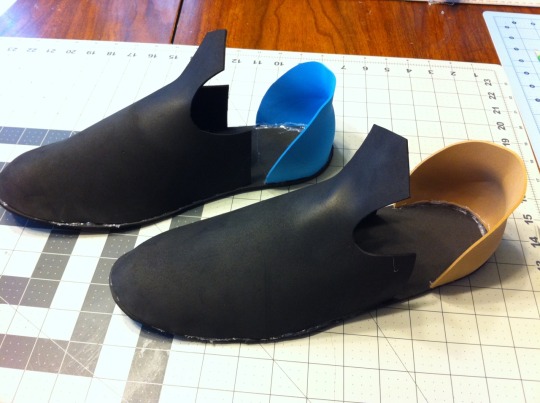
one pauldron done!! I am really super pleased with how this pattern turned out c: next up is one of the faulds. #krem #dragonage #armor #fabrication #cosplay
2 notes
·
View notes
Photo
more progress. the blue bit isn't shaped right which has kind of killed my motivation for the rest of the night, but I dig how it's turning out. gotta finish the rest of the blue bit that extends under the white, but I'm stopping for the night. tired and I think I've earned some dragon age!! #dragonagecosplay #krem #armor #dragonage
1 note
·
View note
Photo
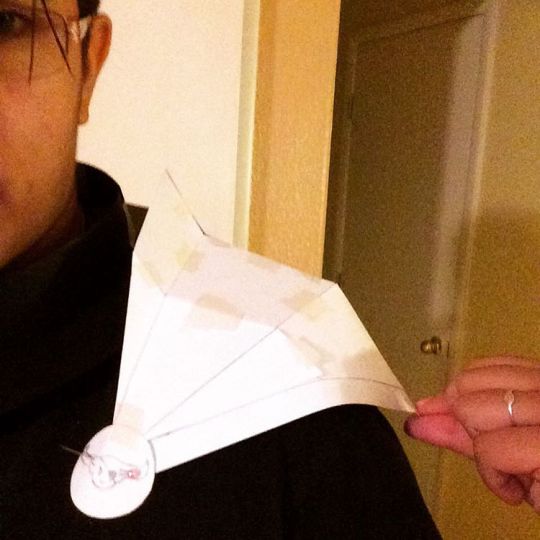
FINALLY got my pauldron down! I'm super pleased with this, and it sits so well with the armor collar thingy I made. now to make the plates that sit under it. #krem #dragonage #dragonagecosplay
0 notes
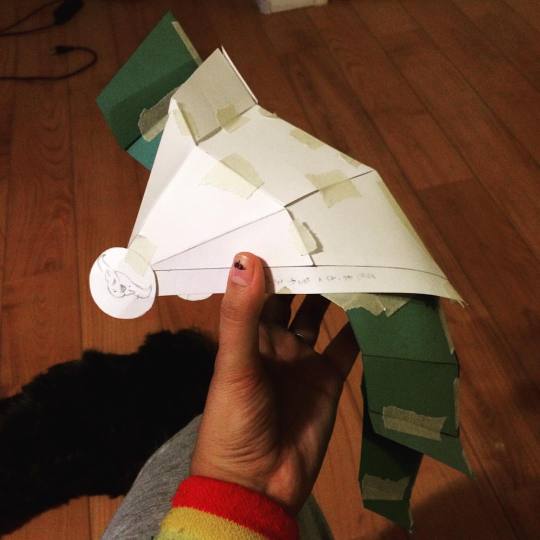
Photo

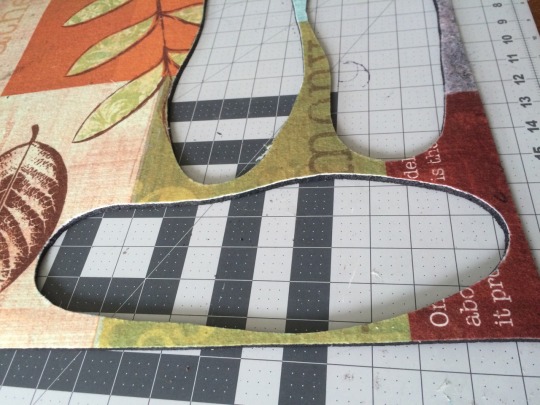
so I underestimated armor marking hahahaaa... I'm glad I'm doing this now, for a costume I need in May. drafting (read: bullshitting) papercraft patterns for it aw yiss. #dragonagecosplay #cremisiusaclassi #krem #armor #papercraft #madeofawesomecosplay
0 notes
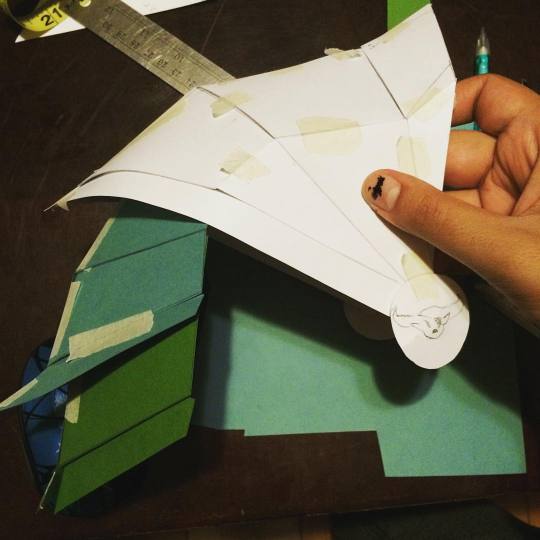
Photo
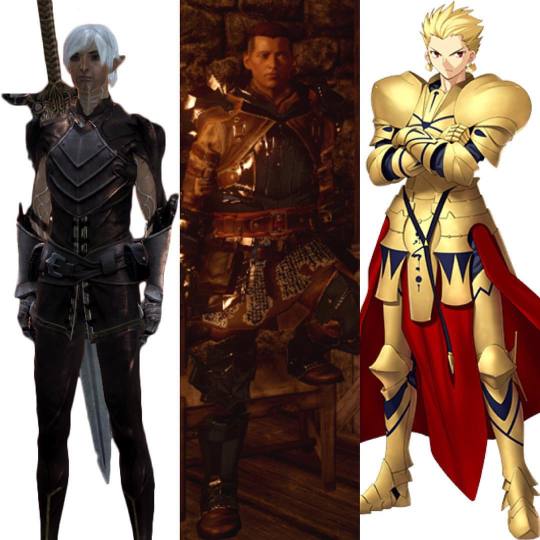
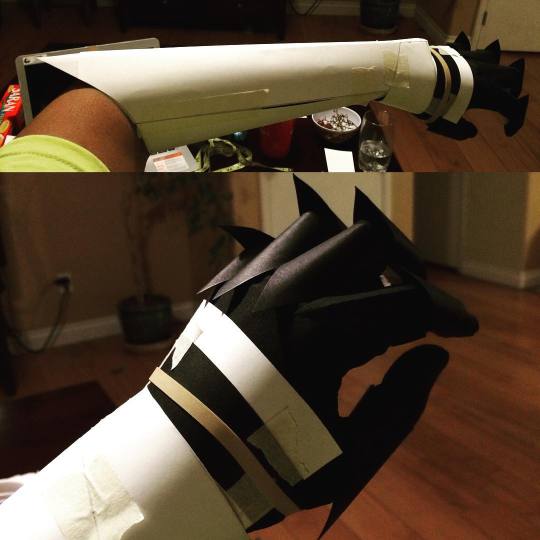
apparently I hate myself, I've decided to do three armor cosplays in the next year, even though I've never actually made armor before. this is gonna be an interesting year 8);; #cosplay #fenris #krem #gilgamesh #whatamidoing
1 note
·
View note
Photo
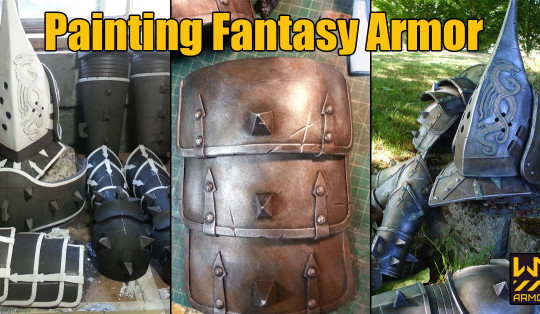
My friend Will who did that Venatori armor (above) just posted a how to step by step! Check it out here!
166 notes
·
View notes
Photo
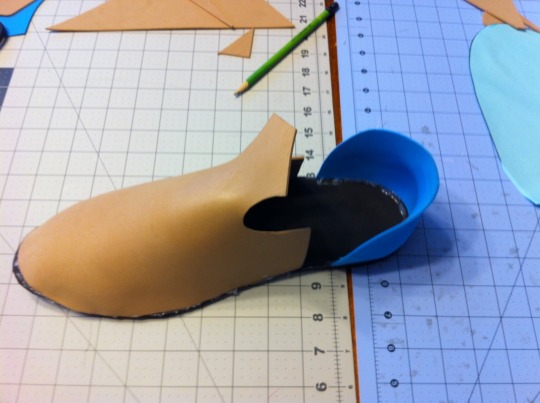
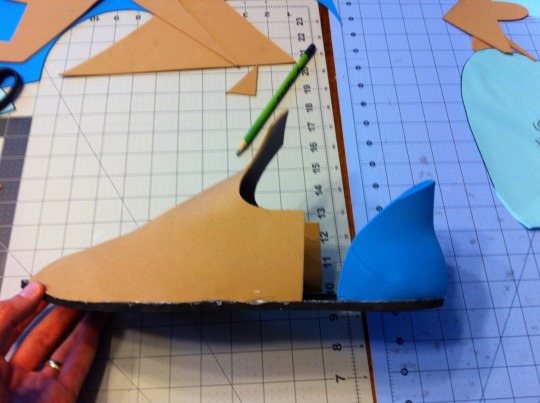
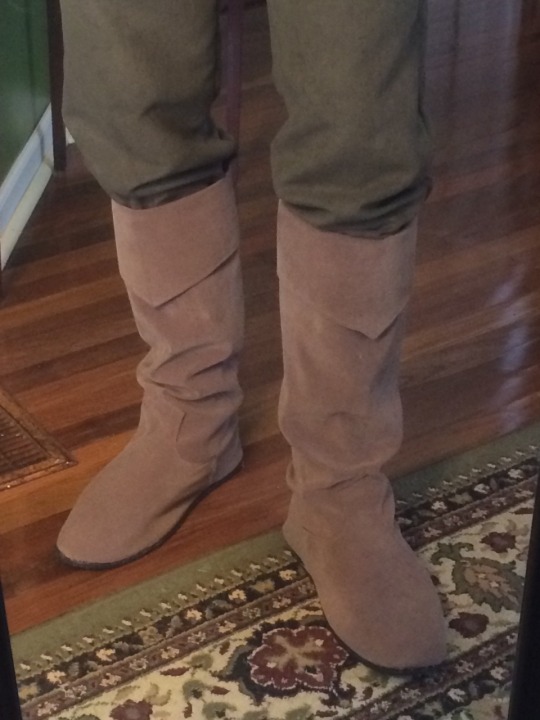
This weekend I decided to take a shot at making boots for my Caspian costume. I used a pattern I found on deviantart for doll boots and scaled it up. The inner soles and structural pieces are craft foam, while the outer soles are cut from a $5 rubber mat. I’m debating adding a heel but otherwise they’re done!
12K notes
·
View notes
Photo
pattern is finally 95% done! gonna cut it out of foam and start doing prep/priming later when I wake up. it's nice doing things a year in advance, now I can make it and decide whether I like it in foam or want to try out worbla c: #cosplay #fenris #dragonage #wip
0 notes
Photo
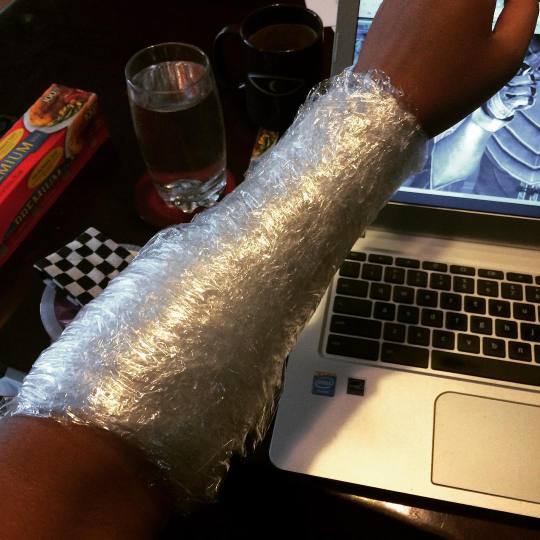
THE THINGS YOU DO FOR COSPLAY. also wow I hadn't realized just how dark my skin really is before now. #cosplay #wip #fenris #dragonage
0 notes
Photo
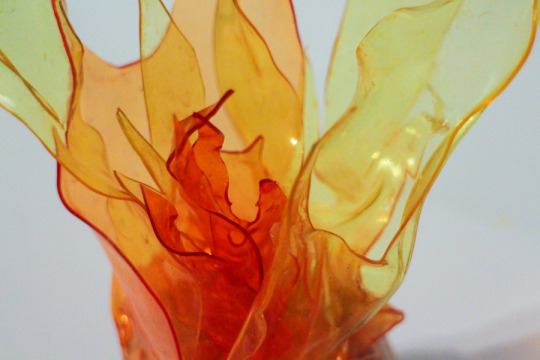
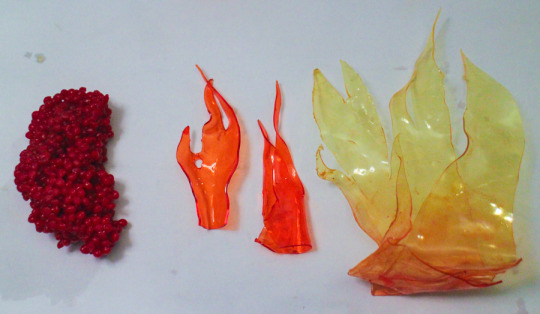
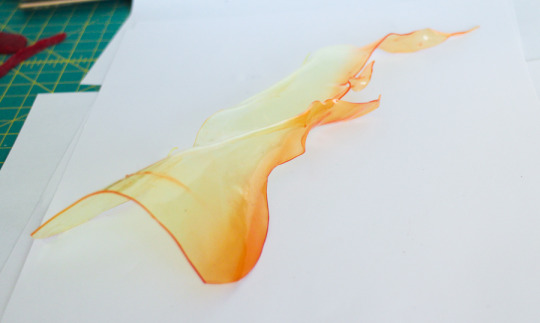
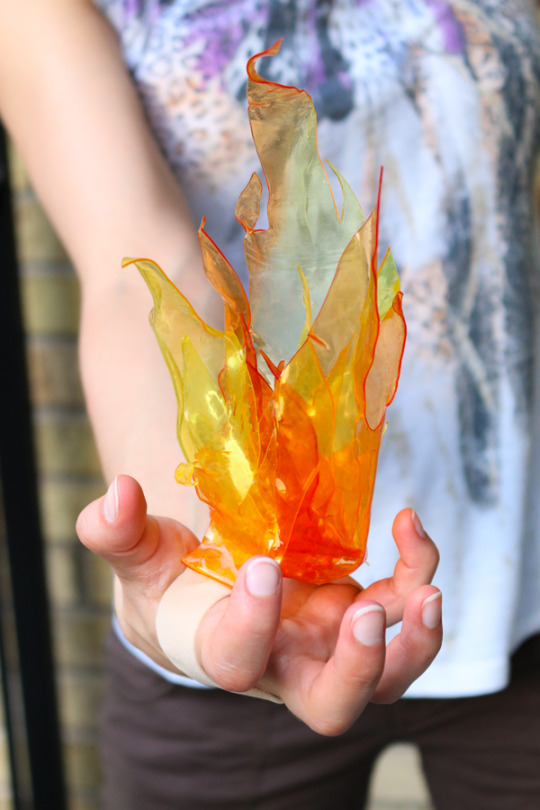
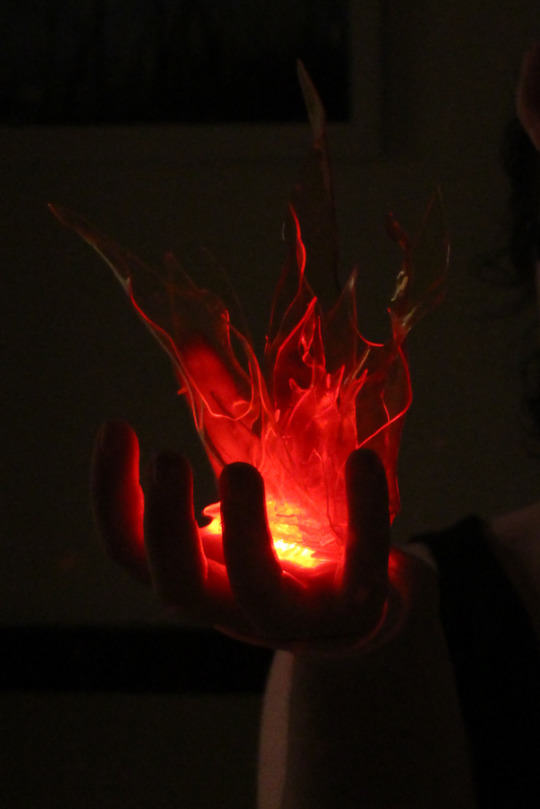
Want to know about dying or tinting TranspArt, Friendly Plastic or DecoArt? I dyed TranspArt with iDye Poly to get a mix of yellow, orange and red for a handheld flame prop - you can use this to dye gems, visors, or anything else you need!
Tutorials can be found here:
Making a Handheld Flame
Dying TranspArt and Friendly Plastic (DecoArt)
As always, signal boosting is appreciated!
4K notes
·
View notes
Text
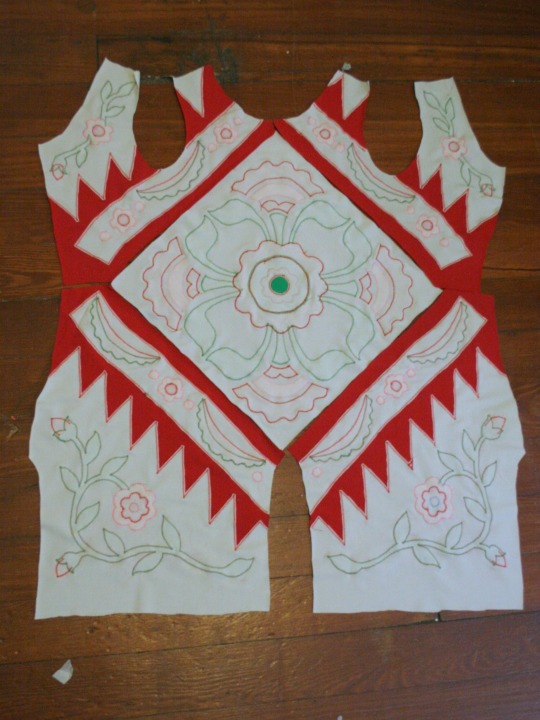
Spandex Applique Process
This is my personal technique for appliqueing on stretch fabrics. It’s a little different than what I might recommend for everyone–I have to work ‘upside down’ or from the back of my pattern because my machine just loves to drag the spandex around if I stitch on the right side of the work. But, I find this way does give nice clean results, so try it out, maybe! The biggest con would be that it does waste a little fabric when your cutting things away, but spandex patterns generally use pretty small yardages anyway.
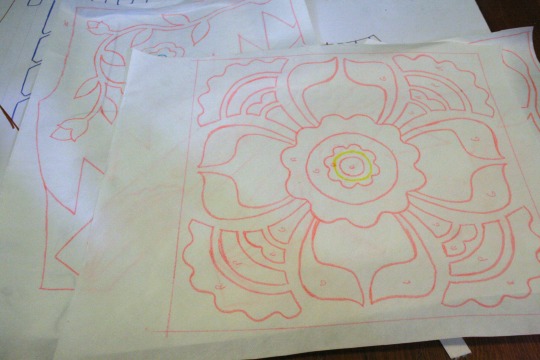
So first thing is to transfer your design to the interfacing. I’m using Pellon Stick-and-Washaway 542 interfacing and it’s pretty much the best thing I’ve discovered recently. It’s water soluble, so you’re not tearing away interfacing and causing ripples in your spandex. Don’t forget to mirror your design!
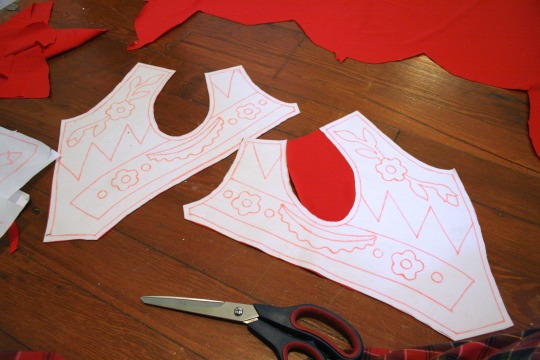
Roughly cut out the interfacing, then peel of the backing and attach to your base fabric. Now that it’s nice and firm with the interfacing, you can cut out the pattern piece more precisely, with none of the shifting that often happens with spandex. I’ve then gone ahead and used temporary spray adhesive to attach a layer of red to the right side of my work (you can see it sticking out in the armhole of the bottom piece. Because there is a lot of red, I just covered the whole piece. The excess will be cut away later.
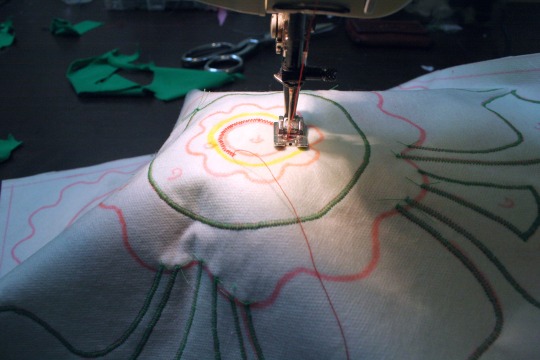
This is on a different piece, but here me zig-zagging on the wrong side of the work, following the lines drawn on the interfacing. I got pretty good at circles and curves on this one, and the biggest advice I can give is ‘Pivot. A Lot.’ You’re going to have to put the needle down and pivot every couple of stitches on a circle or other tight curve. Don’t try and just swing the stiching around as you go, it doesn’t work well.
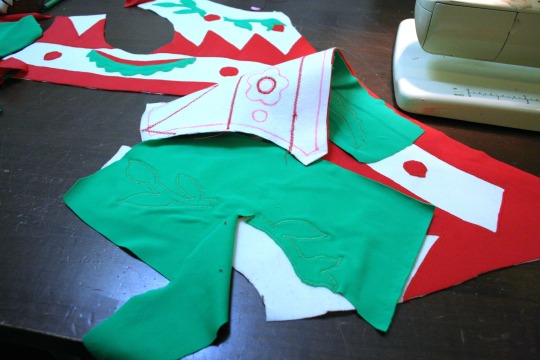
Okay, so I forgot to take a picture of me cutting away the extra fabric on the red layer, but as you can see here, I’ve added and stitched a green layer and am starting to cut it away. Just use sharp little embroidery scissors and gently tug the fabric, getting as close to the zig-zagged edge as you can. It takes a little practice, but I’ve gotten pretty good at getting nice clean edges this way. As you can see with the green fabric, if that color’s design is not all over the piece, you can attach smaller pieces of fabric, just making sure it covers the whole area where it is needed.
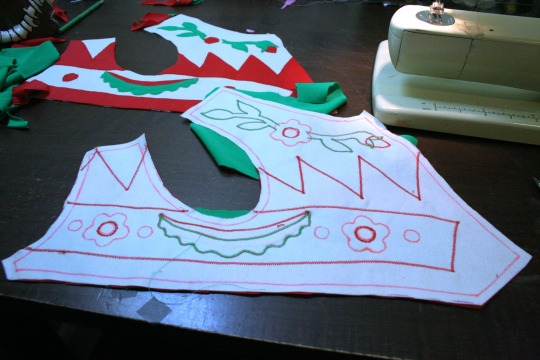
Here’s the back after all the green and red stitching is done. Now time for pink! As you can see, I attached the red centers to the pink flowers already. It’s easier to put them on first with the rest of the red, then cut out the pink center of the flower (like reverse applique) then to go back and do another layer of red. Changing the bobbin and thread between each layer is a pain.
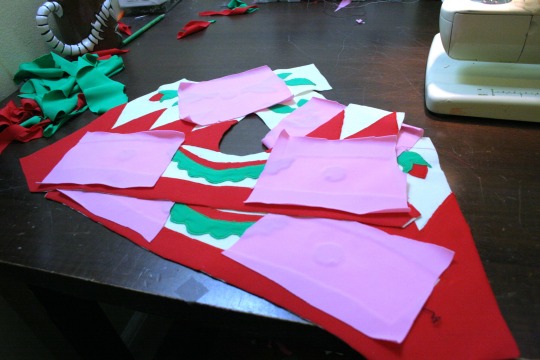
Here you can see the pink attached, it’s used in small areas so I can get away with using small pieces to reduce waste.
No pictures of this step, but once you’re all trimmed up, go ahead and rinse the work in cold water, and the interfacing will magically dissolve, leaving you with nice smooth applique.
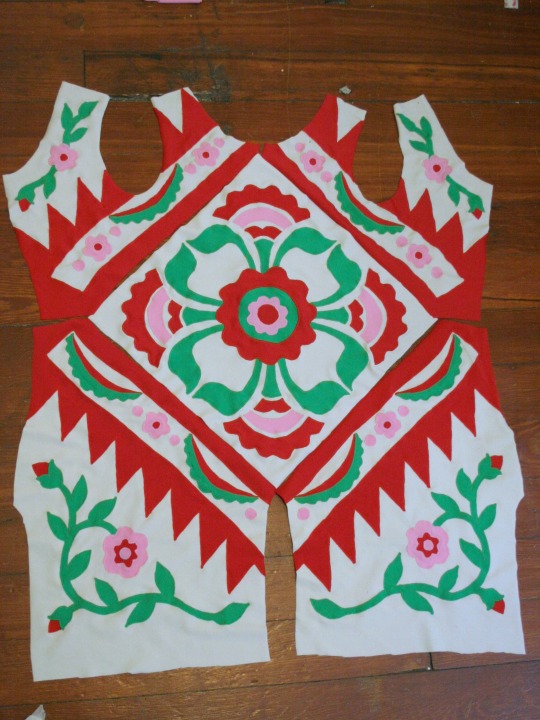
This is all the pieces laid out after being washed out. Before I sewed them all together though, there was one more step.
To reduce bulk (especially where it will be serged together) I cut away the cream base fabric where there was large open areas of the red. In smaller areas I would say it’s not worth it. I did cut the center of the flower away too, just because I ended up with three layers of fabric there.
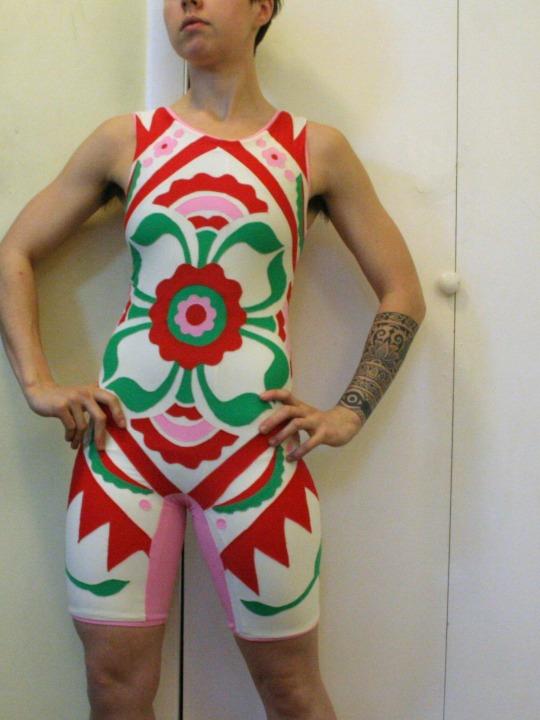
Ta-Da! All sewn up (and lined and what not) More pictures HERE!
4K notes
·
View notes
Photo
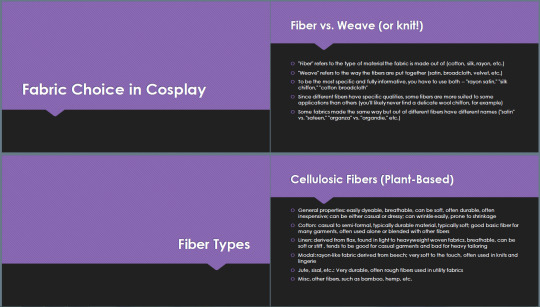
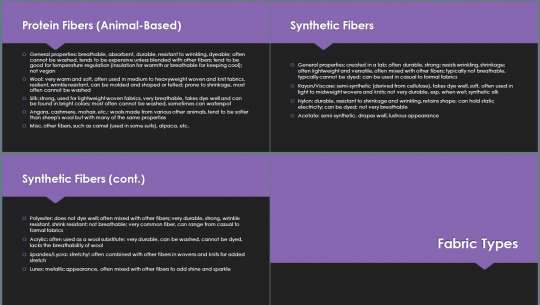
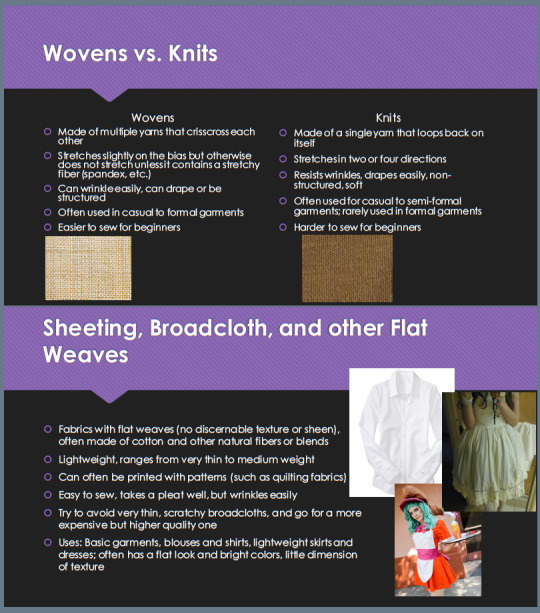
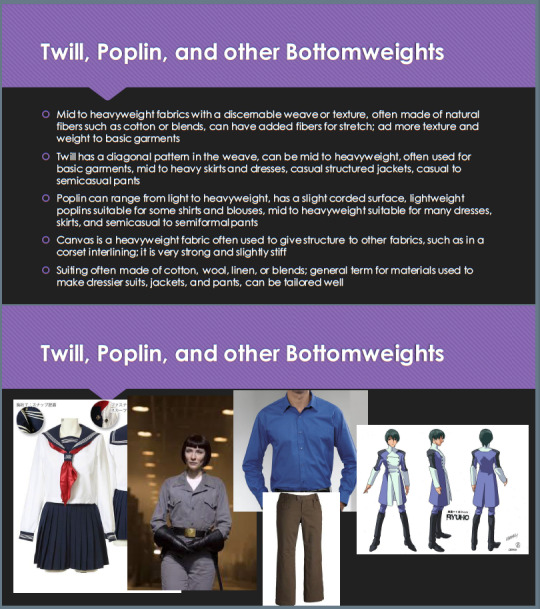
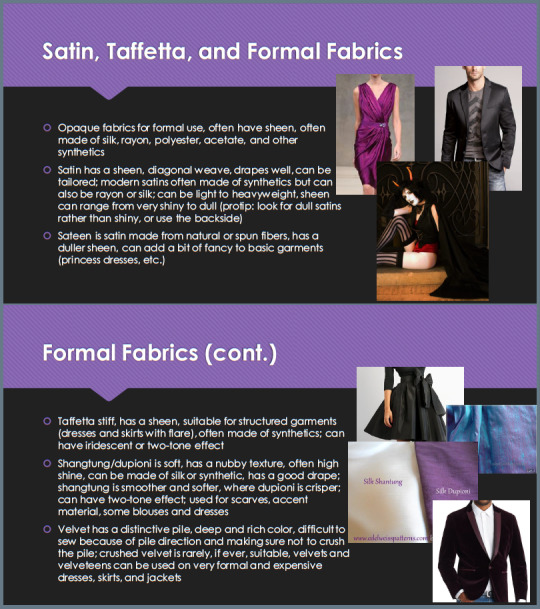

Fabric Choice for Cosplay panel. This is just the bare bones and the examples, since I talked about and explained things in person.
(One thing I’d like to add right here though, since I was asked about it in person – I don’t go into enough detail about the difference between dupioni and shantung. Dupioni is stiffer and more crinkly [it makes a rustling noise] as well as having a more pronounced surface texture; shantung is softer and suitable for draping [where dupioni isn’t] and has a smoother surface texture.)
Nothing in this panel is definitive, and the examples given (even of the different fabric types) are just that – examples. You will encounter many, many more types of fabric than this out in the wild, but this is meant to give you a general overview so you can hopefully find your way.
This information is for personal reference only, and not meant to be used for your own panel. You can share this/reblog this; just don’t re-present it as your own.
Here is a link to the pdf file of the presentation, in case this photoset is difficult to read. It’s slightly confusing but all I could get my computer to do, so here’s how you read it: the 4-slide pictures read left to right, top to bottom. The 2-slide pictures read top to bottom. The 4-slide pictures have to be read across first. I couldn’t get that to switch in the version of Reader I’m using, so sorry for any confusion. The pdf file should read correctly, with one slide per page.
If anyone has any questions, comments, or corrections, please let me know. :]
24K notes
·
View notes
Text
FOR ANY COSPLAYER TIRED OF CRACKS IN THEIR ITEMS OR NOT SMOOTH PROPS
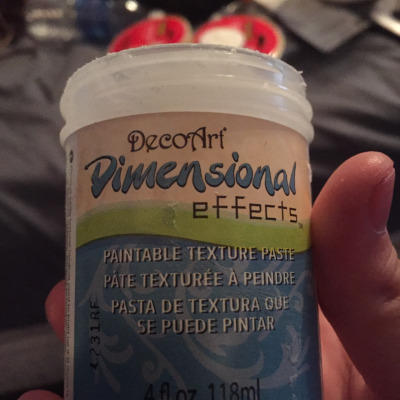
DO YOU SEE THIS STUFF?! IT’S CALLED DECOART DIMENSIONAL EFFECTS. IT’S 6 BUCKS AT HOBBYLOBBY AND 8 BUCKS ON AMAZON FOR FOUR OUNCES AND TRUST ME WHEN I SAY THIS SHIT WORKS.
HERE’S THE PROOF:
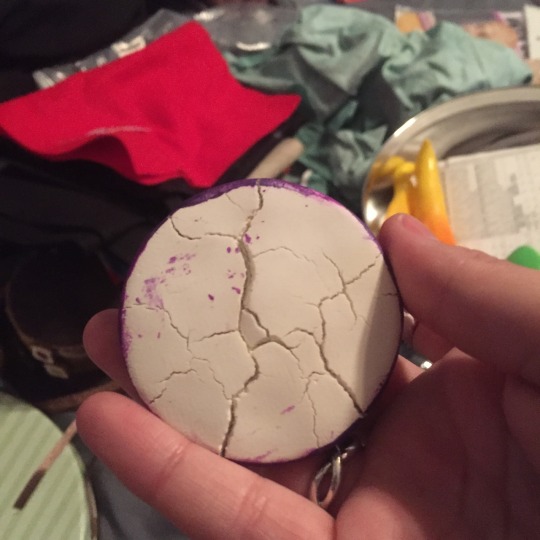
THIS IS THE BACK OF MY SUGALITE GEM I WAS MAKING OUT OF MODEL MAGIC AND IT BROKE REALLY BADLY IN THE BACK BUT I DIDN’T FREAK CAUSE I’VE GOT THIS GREAT STUFF
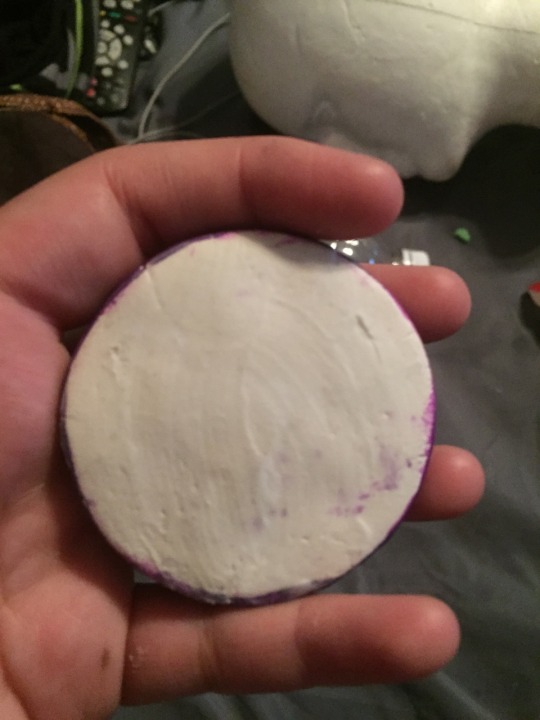
ALL YOU HAVE TO DO IS SCOOP UP THE PASTE IN THE LITTLE BOTTLE AND SPREAD IT WITH YOUR FINGER OVER THE AREAS YOU NEED TO SMOOTH OR FIX AND YOU’RE GOOD TO GO.
THIS IS AFTER ONE COAT AND IT ALREADY LOOKS SO MUCH BETTER AND IT TOOK ROUGHLY 30-45 MINUETS TO DRY BUT IF YOU CLUMP IT UP MORE FOR BIGGER ITEMS IT VARIES.
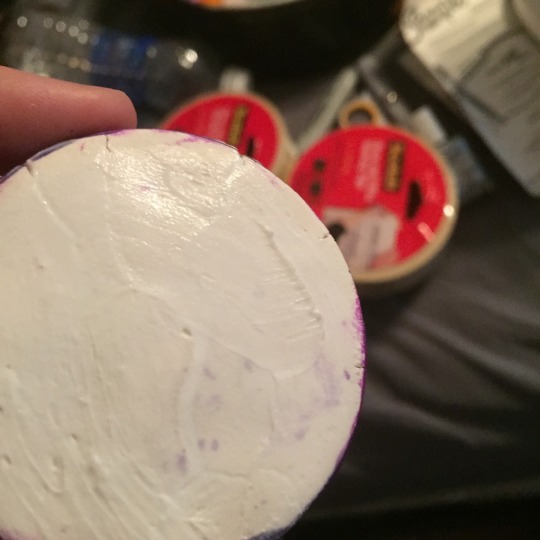
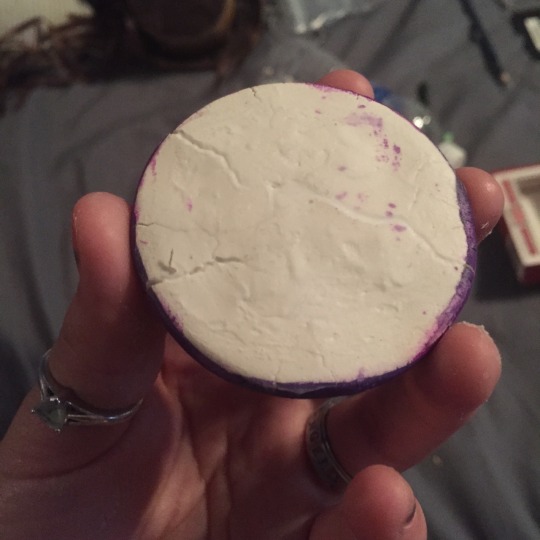
SECOND COAT

BAM SMOOTH AS CAN BE AND PAINTABLE. EVERY COSPLAYER SHOULD OWN SOME OF THIS IT’S REALLY GREAT AND TOTALLY LIGHT WEIGHT AND PERFECTION FOR THINGS TO HORNS FOR HOMESTUCK BECAUSE THIS IS MODEL MAGIC TO LARGE LARGE PROPS THAT WON’T FREAKING BE SMOOTH.
SO GET THIS STUFF SERIOUSLY!!!!!
10K notes
·
View notes
Photo

I got tagged by @taliatastic for a cosplay meme sort of thing! I am such a serious person. #8in1out #cosplay #gurrenlagann #tonystark #dawnofthearcana #captainamerica #inuxboku #tigerandbunny #dragonage #hozukinoreitetsu
#cosplay#8in1out#dawnofthearcana#tonystark#dragonage#hozukinoreitetsu#gurrenlagann#tigerandbunny#captainamerica#inuxboku
1 note
·
View note