
Last Seen Blogs

elegantbutstrange
Totally meant to do that

carmenxreyes
;; the trickster

stroyklimat
Монтаж инженерных систем

funnyfaceflea
i majored in swingology

cherryboys-world365
Untitled
Text
Import an existing ssh key into YubiKey NEO PIV applet
yubico-piv-tool 1.4.0, Mac OS X 10.11.5
While you should generate your ssh keys on card or generate them on a sterile machine for escrow, you can also import an existing ssh key (usually found in ~/.ssh/id_rsa). Below is a walkthrough on how to do that. Be sure to import both the private and public side of your keypair; otherwise, ssh auth might not work. You should probably create an encrypted disk and chdir to that disk when changing the private key to pem form.
Private Key
rchapman@Macbook:~$ cd /Volumes/encrypted/ rchapman@Macbook:/Volumes/encrypted$ openssl rsa -in ~/.ssh/id_rsa -out id_rsa.pem -outform pem Enter pass phrase for /Users/rchapman/.ssh/id_rsa: writing RSA key rchapman@Macbook:/Volumes/encrypted$ head -1 id_rsa.pem -----BEGIN RSA PRIVATE KEY----- rchapman@Macbook:/Volumes/encrypted$ yubico-piv-tool -a import-key -s 9a -i id_rsa.pem Successfully imported a new private key. rchapman@Macbook:/Volumes/encrypted$ rm id_rsa.pem
Public Key
rchapman@Macbook:/Volumes/encrypted$ ssh-keygen -e -f ~/.ssh/id_rsa.pub -m PKCS8 > id_rsa.pub.pkcs8 rchapman@Macbook:/Volumes/encrypted$ head -1 id_rsa.pub.pkcs8 -----BEGIN PUBLIC KEY----- rchapman@Macbook:/Volumes/encrypted$ ~/bin/yubico-piv-tool -a verify -P 123456 -a selfsign-certificate -s 9a -S "/CN=joe/O=Test/" -i id_rsa.pub.pkcs8 -o 9a-cert.pem rchapman@Macbook:/Volumes/encrypted$ ~/bin/yubico-piv-tool -a verify -P 123456 -a import-certificate -s 9a -i 9a-cert.pem ; ~/bin/yubico-piv-tool -a status Successfully verified PIN. Successfully imported a new certificate. CHUID: 3019...fe00 CCC: f015...fe00 Slot 9a: Algorithm: RSA2048 Subject DN: CN=joe, O=Test Issuer DN: CN=joe, O=Test Fingerprint: cf...46 Not Before: Jun 20 19:13:41 2016 GMT Not After: Jun 20 19:13:41 2017 GMT [...] PIN tries left: 15
Move .ssh/id_rsa and restart ssh-agent (otherwise it will be cached by the agent)
rchapman@Macbook:/Volumes/encrypted$ cd ~/.ssh rchapman@Macbook:~/.ssh$ mv id_rsa .. rchapman@Macbook:~/.ssh$ pkill ssh-agent rchapman@Macbook:~/.ssh$ sudo launchctl start org.openbsd.ssh-agent
Set PIN and PIN Retries
You should change the user PIN as well as the PIN Unlock Code (PUK) if you have not already. The YubiKey NEO asks for the PIN every time it signs a nonce (to log you into a ssh server). If you enter the PIN wrong a number of times (3 by default), then the PIN will be locked. You can then use the PUK to unlock the PIN. If you enter the PUK wrong a number of times (again, 3 by default), then the PIV applet will bulk erase it's memory, causing your private keys and certificates to be lost. At that point, you have to reset the PIV applet and re-populate the certs and private keys.
To change the PIN and PUK retries from 3 to 15:
rchapman@Macbook:~$ unset HISTFILE rchapman@Macbook:~$ ~/bin/yubico-piv-tool -a verify -P 123456 -a pin-retries --pin-retries 15 --puk-retries 15
Note that this step will also set the PIN and PUK codes back to factory default, so you'll need to change your PIN/PUK codes after doing this step if you already had PIN/PUK codes set.
To change the PIN and PUK:
In this example, we are changing the PIN from the default value of 123456 to 987600 and the PUK from the default of 12345678 to 98761234
rchapman@Macbook:~$ ~/bin/yubico-piv-tool -a change-pin --pin 123456 --new-pin=987600 rchapman@Macbook:~$ ~/bin/yubico-piv-tool -a change-puk --pin 12345678 --new-pin=98761234
Change the management key
Most security professionals would say you should change the management key as well. This is a 24 byte key which resides in slot 9B. If you forget it, you can still reset the PIV applet, which will reset the PIN, PUK, and 9B key back to defaults.
rchapman@Macbook:~$ ~/bin/yubico-piv-tool -a set-mgm-key -n 123456789012345678901234567890123456789012345678
Logout and log back in, then make sure the PIN, PUK and management key are not in ~/.bash_history
Key Escrow
If you want to encrypt the private key for storage in escrow:
rchapman@Macbook:~$ cat ~/id_rsa | gpg --symmetric | base64
One place where you could store the encrypted base-64 encoded private key would be the password field of a password manager like 1Password.
To decrypt it later:
echo "base64string" | base64 -D | gpg --decrypt
Last steps
Later, when you are sure you are happy with the encrypted version of the file, remove your private key from your workstation (after all, the reason for putting your private key on a hardware token is to prevent someone from stealing it off disk).
rm ~/id_rsa id_rsa.pem
0 notes
Text
SSH with YubiKey NEO
YubiKey NEO, openssh 6.9, Mac OS X 10.11.5
Using a YubiKey NEO to store your ssh private key
Install opensc using brew or downloading a .dmg file from GitHub at https://github.com/OpenSC/OpenSC/releases Find where the opensc-pkcs11 library is located. Linux tends to name the file opensc-pkcs11.so. Mac installs using brew also name the library file opensc-pkcs11.so. Another possibility on Mac is opensc-pkcs11.dylib.
$ find /Library /usr/local/Cellar /lib /lib64 /usr/lib /usr/lib64 -name opensc-pkcs11.dylib -o -name opensc-pkcs11.so 2>/dev/null
So that ssh knows to use the YubiKey NEO for authentication, add the following to the top of your ~/.ssh/config file:
PKCS11Provider /usr/local/Cellar/opensc/0.15.0/lib/opensc-pkcs11.so
If you generated the keypair on card rather than importing it, you'll need to get the public key off the YubiKey NEO so that you can copy it to remote ssh servers in your ~/.ssh/authorized_keys file:
$ printf "$(ssh-keygen -D /usr/local/Cellar/opensc/0.15.0/lib/opensc-pkcs11.so 2>/dev/null) $USER-yubikey-1\n"
When attempting to ssh to a machine with your YubiKey public key in the authorized_keys file, you should be prompted to enter your YubiKey PIN, which will cause the YubiKey to sign the nonce (request) and send it back to the ssh server for login:
$ ssh [email protected] Enter PIN for 'PIV_II (PIV Card Holder pin)': [email protected]:~$
The order that ssh looks for keys to use when logging into remote servers is:
1. public key authentication: PKCS11Providers (for example, YubiKey NEO)
2. public key authentication: ~/.ssh/id_dsa
3. public key authentication: ~/.ssh/id_ecdsa
4. public key authentication: ~/.ssh/id_rsa
5. password authentication
Making Multiple SSH Connections Without Having to Retype PIN Each Time
Under normal circumstances, when you log into a remote server, the ssh daemon on the server generates a random nonce and sends that to the ssh client to be signed with the private key and the result transmitted back. The ssh daemon then checks each public key in ~/.ssh/authorized_keys to see if any match. If they do, you are allowed to log in. If your private key is stored on disk (in ~/.ssh), then you never realize that a nonce is being signed and sent back to the ssh daemon. By design, the YubiKey will require you to enter your PIN each time it signs a nonce. This can become a nuisance when you need to log into the same server many many times (for example when using an automated script). ssh has a feature called multiplexing which comes in handy when using a YubiKey for ssh authentication. Once you have signed into a server via ssh, multiplexing will let your subsequent logins to the same machine succeed without having to re-enter the PIN.
To enable multiplexing, add this to your ~/.ssh/config file:
Host * ControlPath ~/.ssh/conns/%r@%h:%p ControlMaster auto ControlPersist 1
You'll need to create the directory multiplexing will use:
$ mkdir -p ~/.ssh/conns/
0 notes
Text
YubiKey NEO for Physical Access Control
After discovering that many physical access control systems are not secure (for example, proximity cards based on 125kHz), I wanted to figure out if there was a system based on public key crypto, which would be secure. Turns out there is. The U.S. Government has been using physical access control systems based on public key crypto for years. NIST designed the system and called it PIV for Personal Identity Verification. Unfortunately, information on this technology is extremely hard to come by. I started by trying to get info from the PIV card manufacturers, but found they have no interest in speaking to anyone unless they are purchasing a large quantity of cards. Even though I had $1000 in hand I was willing to spend to get a PIV card software dev kit, my requests went unanswered.
I continued to research options and realized that the YubiKey NEO is actually a Java Card, same as the PIV cards being used by government. Yubico had the foresight to realize PIV could be useful, and they include a PIV applet with the NEO. So after some reading of the NIST specs and some help from the excellent people at HID Global and Yubico, I was able to glue the pieces together and get a system working. It's been a fun hobby for the past six months.
It could probably be done with any number of vendor's solutions, but I used HID's pivCLASS system along with Genetec for the physical access control system.
A full write-up with detailed instructions is available at https://docs.google.com/document/d/1fOFzxfpgi8P-HVRdtnWiTNGCDRgeXcvorEqoSXA_4sE
Some code for generating the certificates and populating a YubiKey NEO can be found on GitHub.
Video of the NEO opening a door protected by pivCLASS:
youtube
I also made a video of a traditional PIV card opening the same pivCLASS system:
youtube
Enjoy. If you have questions or suggestions for improvement, please send me a message.
0 notes
Text
Smart card: installing Hello World on a Gemalto IDPrime PIV 2.0 card
GlobalPlatformPro, Gemalto IDPrime PIV 2.0 card, Gemalto IDBridge CL3000 Dual Interface Smart Card Reader, Ubuntu 14.4
Information on how to load your own applets onto a Gemalto PIV card are hard to come by, so below is a quick write up of how to do it. This also gets you GlobalPlatform access to the card, which is difficult to figure out due to little documentation available on the key diversification used. The spec sheet for the Gemalto IDPrime PIV 2.0 card can be found here.
Make sure your smart card reader is attached. If it isn't you may have to restart pcscd to get it to show up:
rchapman@vagrant-ubuntu-trusty-64:~$ opensc-tool -l No smart card readers found. rchapman@vagrant-ubuntu-trusty-64:~$ sudo service pcscd restart [sudo] password for rchapman: * Restarting PCSC Lite resource manager pcscd [ OK ] rchapman@vagrant-ubuntu-trusty-64:~$ opensc-tool -l # Detected readers (pcsc) Nr. Card Features Name 0 No Gemalto Prox-DU [Prox-DU HID_15100775] 00 00 1 Yes Gemalto Prox-DU [Prox-DU HID_15100775] 00 01
Download GlobalPlatformPro
rchapman@vagrant-ubuntu-trusty-64:~$ wget https://github.com/martinpaljak/GlobalPlatformPro/releases/download/v0.3.6/gp.jar --2016-02-10 06:06:51-- https://github.com/martinpaljak/GlobalPlatformPro/releases/download/v0.3.6/gp.jar Resolving github.com (github.com)... 192.30.252.131 Connecting to github.com (github.com)|192.30.252.131|:443... connected. [...] HTTP request sent, awaiting response... 200 OK Length: 995937 (973K) [application/octet-stream] Saving to: ‘gp.jar’ 100%[============================================================================================================>] 995,937 915KB/s in 1.1s 2016-02-10 06:06:53 (915 KB/s) - ‘gp.jar’ saved [995937/995937]
Make sure you can list the applets on the card. Be careful, some cards will lock you out if you fail to authenticate to the card a certain number of times. From my experience with the Gemalto card I bought from the Gemalto WEB store, it didn't lock me out even though it took me over a hundred attempts to get the auth working. The key below works with the Gemalto IDPrime PIV 2.0 cards I purchased from the Gemalto WEB store as well as smartcardfocus.us.
rchapman@vagrant-ubuntu-trusty-64:~$ java -jar ~/gp.jar -visa2 -key 47454D5850524553534F53414D504C45 -mode clr --list AID: A000000003000000 (|........|) ISD INITIALIZED: Security Domain, Card lock, Card terminate, CVM (PIN) management AID: A000000308000010000100 (|...........|) App SELECTABLE: Default selected, CVM (PIN) management AID: A000000308000010000200 (|...........|) App SELECTABLE: CVM (PIN) management AID: A0000000620001 (|....b..|) ExM LOADED: (none) AID: A0000000620002 (|....b..|) ExM LOADED: (none) AID: A0000000620003 (|....b..|) ExM LOADED: (none) AID: A0000000620101 (|....b..|) ExM LOADED: (none) AID: A000000062010101 (|....b...|) ExM LOADED: (none) AID: A0000000620102 (|....b..|) ExM LOADED: (none) AID: A0000000620201 (|....b..|) ExM LOADED: (none) AID: A0000000030000 (|.......|) ExM LOADED: (none) AID: A0000000620202 (|....b..|) ExM LOADED: (none) AID: A000000018100106 (|........|) ExM LOADED: (none) AID: A000000018100201 (|........|) ExM LOADED: (none) AID: A000000018100101 (|........|) ExM LOADED: (none) A000000018534441 (|.....SDA|) AID: A00000015100 (|....Q.|) ExM LOADED: (none) AID: A000000018100108 (|........|) ExM LOADED: (none) AID: A000000018100109 (|........|) ExM LOADED: (none) AID: A000000018100401 (|........|) ExM LOADED: (none) AID: A000000018100402 (|........|) ExM LOADED: (none) AID: A00000030800001000 (|.........|) ExM LOADED: (none) A000000308000010000100 (|...........|) A000000308000010000200 (|...........|) rchapman@vagrant-ubuntu-trusty-64:~$
Download gpshell to obtain the hello world applet, already compiled into a cap file:
rchapman@vagrant-ubuntu-trusty-64:~$ curl -Lo gpshell.tar.gz 'http://downloads.sourceforge.net/project/globalplatform/GPShell/GPShell-1.4.4/gpshell-1.4.4.tar.gz?r=http%3A%2F%2Fsourceforge.net%2Fprojects%2Fglobalplatform%2Ffiles%2FGPShell%2FGPShell-1.4.4%2F&ts=1455092038&use_mirror=superb-dca2' [...] rchapman@vagrant-ubuntu-trusty-64:~$ tar zxvf gpshell.tar.gz [...] gpshell-1.4.4/helloworld.cap [...]
Install the hello world applet:
rchapman@vagrant-ubuntu-trusty-64:~$ java -jar ~/gp.jar -visa2 -key 47454D5850524553534F53414D504C45 -mode clr --install gpshell-1.4.4/helloworld.cap CAP loaded
List applets again to find AID (applet ID) of hello world. It should be D0D1D2D3D4D501.
rchapman@vagrant-ubuntu-trusty-64:~$ java -jar ~/gp.jar -visa2 -key 47454D5850524553534F53414D504C45 -mode clr --list | grep -A 4 'AID: D0D1D2D3D4D501 ' AID: D0D1D2D3D4D501 (|.......|) ExM LOADED: (none) D0D1D2D3D4D50101 (|........|)
Run the applet on the card by selecting the AID D0D1D2D3D4D501, then send any valid APDU (doesn't matter what it is, the app will always return "Hello World!")
rchapman@vagrant-ubuntu-trusty-64:~$ opensc-tool -s "00 A4 04 00 07 D0 D1 D2 D3 D4 D5 01" -s "00:CB:3F:FF:05:5C:03:5F:C1:02:00" Using reader with a card: Gemalto Prox-DU [Prox-DU HID_15100775] 00 01 Sending: 00 A4 04 00 07 D0 D1 D2 D3 D4 D5 01 Received (SW1=0x90, SW2=0x00) Sending: 00 CB 3F FF 05 5C 03 5F C1 02 00 Received (SW1=0x90, SW2=0x00): 48 65 6C 6C 6F 20 57 6F 72 6C 64 21 Hello World!
If you want to uninstall the applet from the card, run:
rchapman@vagrant-ubuntu-trusty-64:~$ java -jar ~/gp.jar -visa2 -key 47454D5850524553534F53414D504C45 -mode clr --delete D0D1D2D3D4D501 --deletedeps rchapman@vagrant-ubuntu-trusty-64:~$
0 notes
Text
Vagrant: show port forwarding for all virtual machines
Mac OS X 10.10.5, vagrant 1.7.4
To get a list of all ports forwarded to vagrant virtual machines, use this one liner:
For example,
rchapman@Chapmans-Macbook-Pro:~$ VB=/Applications/VirtualBox.app/Contents/Resources/VirtualBoxVM.app/Contents/MacOS/VBoxManage; for vm in $($VB list vms | awk '{print $1}' | tr -d '"'); do $VB showvminfo $vm 2>&1 | grep 'State:.*running' &>/dev/null || continue; perl -e 'print "=" x 80 . "\n"'; echo $vm; $VB showvminfo $vm 2>&1 | egrep '^(Name|Guest OS|UUID|Config file|Memory size|Number of CPUs):|NIC.*Rule|Name:.*Host path:'; done ================================================================================ base_dev_8888888888888_88888 Name: base_dev_8888888888888_88888 Guest OS: Ubuntu (64-bit) UUID: ffffffff-fff1-ffff-ffff-ffffffffffff Config file: /Users/rchapman/VirtualBox VMs/base_dev_8888888888888_88888/base_dev_8888888888888_88888.vbox Memory size: 512MB Number of CPUs: 1 NIC 1 Rule(0): name = ssh, protocol = tcp, host ip = 127.0.0.1, host port = 2222, guest ip = , guest port = 22 Name: 'vagrant', Host path: '/Users/rchapman/gitroot/base' (machine mapping), writable rchapman@Chapmans-Macbook-Pro:~$
0 notes
Text
Securely allowing rancid to back up IOS configs
Cisco IOS-XE 3.7, rancid-git 2.3.9 on Ubuntu 14.4, git 1.9.1
I use rancid to back up configs of network devices, but giving an automated process like rancid full access to switches, routers, and firewalls is a horrible idea. If someone breaks into the Linux rancid account (or wherever the rancid program runs), they pretty much own your network because the rancid scripts either have the password or ssh private key for logging into network devices.
You don't have to give rancid full access to IOS though. You can configure a privilege level to provide just what rancid needs to backup the configs and nothing more. There is still a security risk because rancid can see password hashes, so you should make sure your users use strong passwords. You can just generate random strong passwords for users rather than letting them choose passwords.
Configure privilege level 2 to allow only the commands rancid needs:
privilege exec level 2 dir /all bootflash: privilege exec level 2 dir /all disk0: privilege exec level 2 dir /all disk1: privilege exec level 2 dir /all disk2: privilege exec level 2 dir /all harddisk: privilege exec level 2 dir /all harddiska: privilege exec level 2 dir /all harddiskb: privilege exec level 2 dir /all nvram: privilege exec level 2 dir /all sec-bootflash: privilege exec level 2 dir /all sec-disk0: privilege exec level 2 dir /all sec-disk1: privilege exec level 2 dir /all sec-disk2: privilege exec level 2 dir /all sec-nvram: privilege exec level 2 dir /all sec-slot0: privilege exec level 2 dir /all sec-slot1: privilege exec level 2 dir /all sec-slot2: privilege exec level 2 dir /all slavebootflash: privilege exec level 2 dir /all slavedisk0: privilege exec level 2 dir /all slavedisk1: privilege exec level 2 dir /all slavedisk2: privilege exec level 2 dir /all slavenvram: privilege exec level 2 dir /all slavenslot0: privilege exec level 2 dir /all slavenslot1: privilege exec level 2 dir /all slavenslot2: privilege exec level 2 dir /all slavesup-bootflash: privilege exec level 2 dir /all slavesup-slot0: privilege exec level 2 dir /all slavesup-slot1: privilege exec level 2 dir /all slavesup-slot2: privilege exec level 2 dir /all sup-bootdisk: privilege exec level 2 dir /all sup-bootflash: privilege exec level 2 dir /all sup-microcode: privilege exec level 2 more system:running-config privilege exec level 2 show boot privilege exec level 2 show bootvar privilege exec level 2 show c7200 privilege exec level 2 show capture privilege exec level 2 show controllers privilege exec level 2 show controllers cbus privilege exec level 2 show crypto pki certificates privilege exec level 2 show debug privilege exec level 2 show diag privilege exec level 2 show diag chassis-info privilege exec level 2 show diagbus privilege exec level 2 show env all privilege exec level 2 show flash privilege exec level 2 show gsr chassis privilege exec level 2 show idprom backplane privilege exec level 2 show install active privilege exec level 2 show interface privilege exec level 2 show inventory raw privilege exec level 2 show ip interface privilege exec level 2 show ipv6 interface privilege exec level 2 show module privilege exec level 2 show redundancy secondary privilege exec level 2 show rsp chassis-info privilege exec level 2 show running-config privilege exec level 2 show running-config view full privilege exec level 2 show shun privilege exec level 2 show snmp engineID privilege exec level 2 show snmp mib ifmib ifindex privilege exec level 2 show spe version privilege exec level 2 show standby privilege exec level 2 show variables boot privilege exec level 2 show variables boot privilege exec level 2 show version privilege exec level 2 show vlan privilege exec level 2 show vlan-switch privilege exec level 2 show vtp status privilege exec level 2 write term
Now create the rancid user, generate a random password for the account, and only allow the the account to sign in from 192.168.0.55
access-list 95 permit 192.168.0.55 username rancid privilege 2 access-class 95 secret 2NANyrnyxRJie1WtGjtTxcXnesLu ip ssh pubkey-chain username rancid key-string ssh-rsa AAAAB3[...]vv6X rancid exit exit
In my testing, this was enough for the rancid program (I use the git fork at https://github.com/dotwaffle/rancid-git) to download the configuration from IOS devices and push them to the git repo.
1 note
·
View note
Text
Loading an openssh pubkey on Cisco IOS
Mac OS X 10.10.5, Cisco IOS-XE 3.7, JunOS 12.3R6.6
I work primarily on a Mac and want to be able to ssh to Cisco IOS equipment with ssh keys; however, Cisco does not make it easy to load keys. On JunOS, this is as easy as:
Ryans-MacBook-Pro:~ $ ssh 1.2.3.4 -l rac --- JUNOS 12.3R6.6 built 2014-03-13 06:57:48 UTC {master:0} rac> configure Entering configuration mode {master:0}[edit] rac# edit system login {master:0}[edit system login] rchapman# set user test class read-only authentication ssh-rsa "AAAAB3NzaC1yc2EAAAADAQABAAABAQDDMRHIzELLQvj06gxqFnZn150T/OicDkBWwojNgSKdnOQIvEU/xu0LtlVUcZaVxVlZeVbm+UwsMdq1c/QuIsbINx18pRByPcwWWbI+4+du6kq8J6wi1qSD3bnBfGpHt2LG3liTTBHzvXFinWn1oB0BPq9q7zEUb2D1gBqyaurLdKs07DsC2T4xgNbJ1aQJFKP3qtfdTC8Fah7F46VK7eztUpPPJ/TEPxXBahwNxxUBnvYtEryhsOspLwVAtA9Uk5CnWt3q77pijtMj2p4gJ6zRKhMLFM0sWEoe98zyYkutlRkGlaLbR6c+0WpY5fuGdPsEibsVXqx/07OfvF6WAsb [email protected]" {master:0}[edit system login] rchapman# commit check configuration check succeeds {master:0}[edit system login] rchapman# commit configuration check succeeds commit complete {master:0}[edit system login] rchapman# quit {master:0}[edit] rchapman# quit Exiting configuration mode {master:0} rchapman> quit Connection to 1.2.3.4 closed. Ryans-MacBook-Pro:~ $ Ryans-MacBook-Pro:~ $ ssh -i /tmp/id_rsa [email protected] --- JUNOS 12.3R6.6 built 2014-03-13 06:57:48 UTC {master:0} test>
Cisco IOS is a pain in comparison, requiring you to break the key up into lines of no more than 256 characters. When someone hands me their ssh pubkey, I don't want to have to manually break it up into appropriately sized lines, so I wrote a quick bash snippet to do it. This snippet was tested and worked on Mac OS X as well as Ubuntu 14.4 Linux:
IOS_USERNAME=test; KEYFILE=/tmp/id_rsa.pub LANG=C; IOS_PASSWORD=$(cat /dev/random | perl -pe 's/[^A-Za-z0-9]//g' | fold -w $((RANDOM%10+20)) | head -n 1); printf "\nusername $IOS_USERNAME privilege 1 secret $IOS_PASSWORD\nip ssh pubkey-chain\n username $IOS_USERNAME\n key-string\n"; cat ${KEYFILE} | fold -w200 ; printf " exit\n exit\n\n"
That creates an account for the user test, with the pubkey file in /tmp/id_rsa.pub, a random length password (at least 20 characters, but less than 30) for password authentication, and a privilege level of 1. Change the priv to 15 if you want to have all privileges. It splits the key up into lines that are a max of 200 characters just to be safe, even though the documentation says 256 is the max.
rchapman@Chapmans-Macbook-Pro:/tmp$ IOS_USERNAME=test; KEYFILE=/tmp/id_rsa.pub LANG=C; IOS_PASSWORD=$(cat /dev/random | perl -pe 's/[^A-Za-z0-9]//g' | fold -w $((RANDOM%10+20)) | head -n 1); printf "\nusername $IOS_USERNAME privilege 1 secret $IOS_PASSWORD\nip ssh pubkey-chain\n username $IOS_USERNAME\n key-string\n"; cat ${KEYFILE} | fold -w200 ; printf " exit\n exit\n\n" username test privilege 1 secret 53L9rOkcyBcky4eZZpzxM ip ssh pubkey-chain username test key-string ssh-rsa AAAAB3NzaC1yc2EAAAADAQABAAABAQDDMRHIzELLQvj06gxqFnZn150T/OicDkBWwojNgSKdnOQIvEU/xu0LtlVUcZaVxVlZeVbm+UwsMdq1c/QuIsbINx18pRByPcwWWbI+4+du6kq8J6wi1qSD3bnBfGpHt2LG3liTTBHzvXFinWn1oB0BPq9q7zEUb2D1 gBqyaurLdKs07DsC2T4xgNbJ1aQJFKP3qtfdTC8Fah7F46VK7eztUpPPJ/TEPxXBahwNxxUB+nvYtEryhsOspLwVAtA9Uk5CnWt3q77pijtMj2p4gJ6zRKhMLFM0sWEoe98zyYkutlRkGlaLbR6c+0WpY5fuGdPsEibsVXqx/07OfvF6WAsb test@Ryans-MacBook- Pro.local exit exit rchapman@Chapmans-Macbook-Pro:/tmp$ ssh [email protected] core1#conf t Enter configuration commands, one per line. End with CNTL/Z. core1(config)#username test privilege 1 secret 73L7rOgmyBcky4eoZwzxF core1(config)#ip ssh pubkey-chain core1(conf-ssh-pubkey)# username test core1(conf-ssh-pubkey-user)# key-string core1(conf-ssh-pubkey-data)#ssh AAAAB3NzaC1yc2EAAAADAQABAAABAQDDMRHIzELLQvj06gxqFnZn150T/OicDkBWwojNgSKdnOQIvEU/xu0LtlVUcZaVxVlZeVbm+UwsMdq1c/QuIsbINx18pRByPcwWWbI+4+du6kq8J6wi1qSD3bnBfGpHt2LG3liTTBHzvXFinWn1oB0BPq9q7zEUb2D1 core1(conf-ssh-pubkey-data)#gBqyaurLdKs07DsC2T4xgNbJ1aQJFKP3qtfdTC8Fah7F46VK7eztUpPPJ/TEPxXBahwNxxUB+nvYtEryhsOspLwVAtA9Uk5CnWt3q77pijtMj2p4gJ6zRKhMLFM0sWEoe98zyYkutlRkGlaLbR6c+0WpY5fuGdPsEibsVXqx/07OfvF6WAsb test@Ryans-MacBook- core1(conf-ssh-pubkey-data)#Pro.local core1(conf-ssh-pubkey-data)# exit core1(conf-ssh-pubkey-user)# exit core1(conf-ssh-pubkey)#exit core1(config)#exit core1#q Shared connection to 1.2.3.4 closed. Connection to 1.2.3.4 closed by remote host.
Now to verify that it works:
rac@Chapmans-Macbook-Pro:/tmp$ ssh -i /tmp/id_rsa [email protected] core1>
Yep. It works.
1 note
·
View note
Text
ASA: DAP Lua function list
ASA 9.4.2 (which has Lua 5.0.2), AnyConnect 4.0 on iOS
On the internets, I haven't been able to locate a list of Lua functions available for use with Dynamic Access Policies (DAP) on Cisco's ASA firewall. So I decided to just use Lua running on the ASA to tell me what functions and variables are in global scope. Not quite as good as documentation, but it works for now.
To set it up it, open ASDM and
Go to Configuration > Remote Access VPN > Dynamic Access Policies
Add
Policy Name: list_globals
Description: prints a list of Lua globals to the ASA CLI
ACL Priority: 50 (or whatever priority you want to assign)
User had ALL of the following AAA Attribute values...
Add (AAA attribute)
AAA Attribute Type: Cisco
Username: rchapmandap (replace with the username you use to sign into AnyConnect)
OK
Click Advanced below the AAA Attributes
Paste in this code:
assert(function() DEBUG_DAP_TRACE("============\n") DEBUG_DAP_TRACE("GLOBALS\n") for k,v in pairs(_G) do msg = "k=" .. print_value(k) .. ", v=" if (type(v) == "function" or type(v) == "table") then msg = msg .. tostring(v) elseif (type(v) == "string" or type(v) == "number") then msg = msg .. v elseif (type(v) == "boolean") then if (v) then msg = msg .. "true" else msg = msg .. "false" end end msg = msg .. " (" .. type(v) .. ")\n" DEBUG_DAP_TRACE(msg) end return true end)()
For Action, make sure Continue is selected
Now that you have it set up, just need to turn dap tracing on in the CLI and log into AnyConnect one time
Log into the ASA CLI
Enable dap trace debugging
fw1/pri/act# debug dap trace debug dap trace enabled at level 1
Open AnyConnect VPN Client on a device and log in to the VPN so that the DAP rules fire once. Log in make take longer than normal as the DAP trace logs to the CLI.
In the ASA CLI, you'll see something like this:
fw1/pri/act# DAP_TRACE: DAP_open: New DAP Request: A4 DAP_TRACE: Username: rchapmandap, DAP_add_SCEP: scep required = [FALSE] DAP_TRACE: Username: rchapmandap, DAP_add_AC: endpoint.anyconnect.clientversion = "4.0.03016"; endpoint.anyconnect.platform = "apple-ios"; endpoint.anyconnect.devicetype = "iPhone7,2"; endpoint.anyconnect.platformversion = "9.0.2"; endpoint.anyconnect.deviceuniqueid = "XXXXXXXXXXXXXXXXXXXXXXXXXXXX"; endpoint.anyconnect.phoneid = "UNKNOWN:unknown"; endpoint.anyconnect.macaddress["0"] = "unknown"; endpoint.anyconnect.useragent = "AnyConnect AppleSSLVPN_Darwin_ARM (iPhone) 4.0.03016"; DAP_TRACE: aaa.radius["18"]["1"] = "debug_print" DAP_TRACE: aaa.radius["25"]["1"] = "OU=Test_VPN;" DAP_TRACE: aaa["cisco"]["grouppolicy"] = "Test_VPN" DAP_TRACE: aaa["cisco"]["class"] = "Test_VPN" DAP_TRACE: aaa["cisco"]["username"] = "rchapmandap" DAP_TRACE: aaa["cisco"]["username1"] = "rchapmandap" DAP_TRACE: aaa["cisco"]["username2"] = "" DAP_TRACE: aaa["cisco"]["tunnelgroup"] = "SplitTunnel" DAP_TRACE: aaa["cisco"]["sceprequired"] = "false" DAP_TRACE: endpoint["application"]["clienttype"] = "AnyConnect" DAP_TRACE: endpoint.anyconnect.clientversion = "4.0.03016" DAP_TRACE: endpoint.anyconnect.platform = "apple-ios" DAP_TRACE: endpoint.anyconnect.devicetype = "iPhone7,2" DAP_TRACE: endpoint.anyconnect.platformversion = "9.0.2" DAP_TRACE: endpoint.anyconnect.deviceuniqueid = "XXXXXXXXXXXXXXXXXXXXXXXXXXXX" DAP_TRACE: endpoint.anyconnect.phoneid = "UNKNOWN:unknown" DAP_TRACE: endpoint.anyconnect.macaddress["0"] = "unknown" DAP_TRACE: endpoint.anyconnect.useragent = "AnyConnect AppleSSLVPN_Darwin_ARM (iPhone) 4.0.03016" DAP_TRACE: ============ DAP_TRACE: GLOBALS DAP_TRACE: k=EVAL, v=function: 0x00007fffc7c31cb0 (function) DAP_TRACE: k=tostring, v=function: 0x00007fffc5b9f8c0 (function) DAP_TRACE: k=gcinfo, v=function: 0x00007fffc5ba03b0 (function) DAP_TRACE: k=InCommaList, v=function: 0x00007fffc6019f20 (function) DAP_TRACE: k=os, v=table: 0x00007fffc5ba1480 (table) DAP_TRACE: k=dap_records, v=table: 0x00007fffac3b0210 (table) DAP_TRACE: k=smart_table, v=function: 0x00007fffac3b28c0 (function) DAP_TRACE: k=eval_LT, v=function: 0x00007fffc601b800 (function) DAP_TRACE: k=getfenv, v=function: 0x00007fffc5b9f310 (function) DAP_TRACE: k=p, v=Test_VPN (string) DAP_TRACE: k=pairs, v=function: 0x00007fffc5b9f650 (function) DAP_TRACE: k=_TRACEBACK, v=function: 0x00007fffc5ba6e60 (function) DAP_TRACE: k=assert, v=function: 0x00007fffc5b9fa60 (function) DAP_TRACE: k=eval_NE, v=function: 0x00007fffc5723950 (function) DAP_TRACE: k=tonumber, v=function: 0x00007fffc5b9f7f0 (function) DAP_TRACE: k=print_dap_trees, v=function: 0x00007fffc5627ec0 (function) DAP_TRACE: k=io, v=table: 0x00007fffc5ba2c90 (table) DAP_TRACE: k=count, v=1 (number) DAP_TRACE: k=escape_string, v=function: 0x00007fffac6901d0 (function) DAP_TRACE: k=lxp, v=table: 0x00007fffc5ba7900 (table) DAP_TRACE: k=_LOADED, v=table: 0x00007fffc5ba1330 (table) DAP_TRACE: k=_G, v=table: 0x00007fffc5a73950 (table) DAP_TRACE: k=coroutine, v=table: 0x00007fffc5ba0d50 (table) DAP_TRACE: k=install_name_value_pair, v=function: 0x00007fffac690240 (function) DAP_TRACE: k=versionCompare, v=function: 0x00007fffc6019eb0 (function) DAP_TRACE: k=eval_GT, v=function: 0x00007fffc5bbc810 (function) DAP_TRACE: k=loadstring, v=function: 0x00007fffc5ba0620 (function) DAP_TRACE: k=soap, v=table: 0x00007fffc5baec10 (table) DAP_TRACE: k=CheckAndMsg, v=function: 0x00007fffb97f4140 (function) DAP_TRACE: k=string, v=table: 0x00007fffc5ba47a0 (table) DAP_TRACE: k=xpcall, v=function: 0x00007fffc5a73be0 (function) DAP_TRACE: k=evaluate_dap_record, v=function: 0x00007fffb9223990 (function) DAP_TRACE: k=_VERSION, v=Lua 5.0.2 (string) DAP_TRACE: k=endpoint, v=table: 0x00007fffb973d760 (table) DAP_TRACE: k=unpack, v=function: 0x00007fffc5b9fb30 (function) DAP_TRACE: k=oper, v=table: 0x00007fffac68b840 (table) DAP_TRACE: k=require, v=function: 0x00007fffc5ba06f0 (function) DAP_TRACE: k=ret, v=true (boolean) DAP_TRACE: k=install_endpoint_data, v=function: 0x00007fffc63e8350 (function) DAP_TRACE: k=setmetatable, v=function: 0x00007fffc5b9f240 (function) DAP_TRACE: k=next, v=function: 0x00007fffc5b9f4b0 (function) DAP_TRACE: k=indent, v=function: 0x00007fffc646b290 (function) DAP_TRACE: k=aaa, v=table: 0x00007fffb97f5530 (table) DAP_TRACE: k=ipairs, v=function: 0x00007fffc5b9f580 (function) DAP_TRACE: k=init_session_tables, v=function: 0x00007fffac3b3de0 (function) DAP_TRACE: k=msg, v=k=init_session_tables, v=function: 0x00007fffac3b3de0 (function) (string) DAP_TRACE: k=rawequal, v=function: 0x00007fffc5b9fc00 (function) DAP_TRACE: k=lua_dap_debug_trace, v=function: 0x00007fffc5baeda0 (function) DAP_TRACE: k=collectgarbage, v=function: 0x00007fffc5ba02e0 (function) DAP_TRACE: k=result, v=true (boolean) DAP_TRACE: k=newproxy, v=function: 0x00007fffc5ba0c70 (function) DAP_TRACE: k=matchcount, v=1 (number) DAP_TRACE: k=eval_EQ, v=function: 0x00007fffac171d30 (function) DAP_TRACE: k=print_table, v=function: 0x00007fffc6355300 (function) DAP_TRACE: k=dap_names, v=table: 0x00007fffac3b0290 (table) DAP_TRACE: k=dap_messages, v=table: 0x00007fffb9f8bb60 (table) DAP_TRACE: k=eval_LE, v=function: 0x00007fffc5730180 (function) DAP_TRACE: k=rawset, v=function: 0x00007fffc5a73a40 (function) DAP_TRACE: k=EVALone, v=function: 0x00007fffc7c31c40 (function) DAP_TRACE: k=_, v=1 (number) DAP_TRACE: k=getmetatable, v=function: 0x00007fffc5b9f170 (function) DAP_TRACE: k=callbacks, v=table: 0x00007fffac5f8400 (table) DAP_TRACE: k=mt, v=table: 0x00007fffac5f5e80 (table) DAP_TRACE: k=table, v=table: 0x00007fffc5ba5550 (table) DAP_TRACE: k=pcall, v=function: 0x00007fffc5a73b10 (function) DAP_TRACE: k=print_tree, v=function: 0x00007fffc5627e50 (function) DAP_TRACE: k=DEBUG_DAP_TRACE, v=function: 0x00007fffc64fd1b0 (function) DAP_TRACE: k=type, v=function: 0x00007fffc5b9f990 (function) DAP_TRACE: k=print_value, v=function: 0x00007fffc6571520 (function) DAP_TRACE: k=dump_lua, v=function: 0x00007fffc6525ae0 (function) DAP_TRACE: k=get_selected_daps, v=function: 0x00007fffc6525a70 (function) DAP_TRACE: k=eval_GE, v=function: 0x00007fffc64690c0 (function) DAP_TRACE: k=dapxmlxlate, v=function: 0x00007fffac3b3e50 (function) DAP_TRACE: k=rawget, v=function: 0x00007fffc5b9fcd0 (function) DAP_TRACE: k=application, v=table: 0x00007fffbbff7210 (table) DAP_TRACE: k=debug, v=table: 0x00007fffc5ba0900 (table) DAP_TRACE: k=print, v=function: 0x00007fffc5b9f720 (function) DAP_TRACE: k=setfenv, v=function: 0x00007fffc5b9f3e0 (function) DAP_TRACE: k=sign, v=table: 0x00007fffac170bc0 (table) DAP_TRACE: k=dofile, v=function: 0x00007fffc5ba0550 (function) DAP_TRACE: k=error, v=function: 0x00007fffc5b9f0a0 (function) DAP_TRACE: k=loadfile, v=function: 0x00007fffc5ba0480 (function) DAP_TRACE: Username: rchapmandap, Selected DAPs: ,msg_Welcome,msg_tunnel_type,list_globals DAP_TRACE: dap_process_selected_daps: selected 3 records DAP_TRACE: Username: rchapmandap, dap_aggregate_attr: rec_count = 3 DAP_TRACE: Username: rchapmandap, DAP_close: A4
I'm sure there is more info to be found, but this is all I have time for now. If you find more, please share in the comments...
0 notes
Text
ASA: debugging AnyConnect and radius
Ubuntu 14.04 (Linux 3.13.0-48), freeradius 2.1.12, ASA 9.4.2 (which runs Lua 5.0.2), AnyConnect 4.2
Setting up communications between an ASA and a radius server can be tricky, because it's hard to know what attributes the radius server is sending back and are being applied to a user session. One method is to use wireshark to capture the communications between the ASA and radius server. Another is to enable debugging on the ASA with debug dap trace. An easier way is to just have the attributes printed out on the end-user device when they log in.
The dynamic access policy feature of the ASA will let you input Lua functions to get this information. Open ASDM and go to
Configuration
Remote Access VPN
Network (Client) Access
Dynamic Access Policies
Click Add
Policy Name: debug
Priority: 1 (or whatever works in your environment)
In the Selection Criteria area, click Advanced
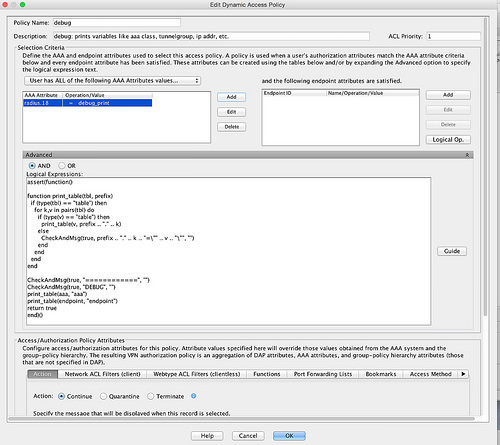
Make sure AND is selected. In the Logical Expressions box, enter:
assert(function() function print_table(tbl, prefix) if (type(tbl) == "table") then for k,v in pairs(tbl) do if (type(v) == "table") then print_table(v, prefix .. "." .. k) else CheckAndMsg(true, prefix .. "." .. k .. "=\"" .. v .. "\"", "") end end end end CheckAndMsg(true, "============", "") CheckAndMsg(true, "DEBUG", "") print_table(aaa, "aaa") print_table(endpoint, "endpoint") return true end)()
Click OK to close the Add Dynamic Access Policy window, then click Apply
Now, if you log in to AnyConnect on a device, you'll notice that a dropdown message box appears and shows you the values of the AV pairs.
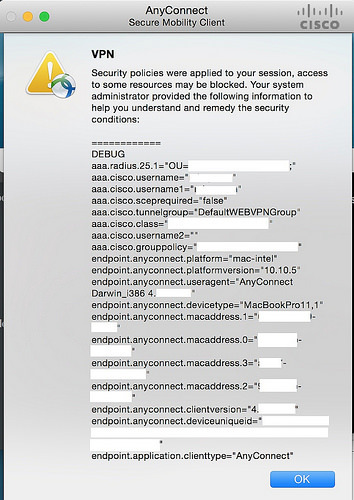
You might want to be able to toggle the display of the debug message from a freeradius server. That will allow you to turn it on when a user calls in and reports problems and you need to know what settings are being applied to their account.
On the freeradius server, change their user record and add Reply-Message = "debug_print". Note that you could use any attribute you want, but I know that Reply-Message does work.
test Cleartext-Password := "test123" Class = "OU=Test_VPN;", Reply-Message = "debug_print"
Back in ASDM, go to the debug policy you created earlier and change it so that it only fires when Reply-Message = "debug_print"
OK and Apply
0 notes
Text
ASA: Deny IP due to Land Attack from a.b.c.d to a.b.c.d
ASA 5516-X in HA pair, ASA 9.5(1)
On an ASA I help manage, the logs were full of messages like "Deny IP due to Land Attack from 1.2.3.4 to 1.2.3.4". A Land attack is defined as when a packet is received that has the same source and destination IP addresses. Some definitions also say that the source and destination ports will match, but that was not true in my case.
Reproducing the issue
To reproduce the issue, I first got my public IP address, which is 1.2.3.4
rchapman@linux:~$ curl icanhazip.com 1.2.3.4
Next, I set up the ASA to capture all packets it drops
fw1/pri/act# capture cap1 type asp-drop all circular-buffer fw1/pri/act#
Then I set up a loop to attempt a connect to my public IP address on a strange port (8955) so that I can search for it in the packet capture on the ASA later.
rchapman@linux:~$ while true; do date; nc -w 1 1.2.3.4 8955; sleep 1s; done Wed Oct 28 20:20:07 EDT 2015 Wed Oct 28 20:20:09 EDT 2015 Wed Oct 28 20:20:11 EDT 2015 [...] ^C rchapman@linux:~$
The logs confirm that I reproduced the issue
fw1/pri/act# sh log | i Land Oct 28 2015 20:20:07: %ASA-2-106017: Deny IP due to Land Attack from 1.2.3.4 to 1.2.3.4 Oct 28 2015 20:44:09: %ASA-2-106017: Deny IP due to Land Attack from 1.2.3.4 to 1.2.3.4 Oct 28 2015 20:44:11: %ASA-2-106017: Deny IP due to Land Attack from 1.2.3.4 to 1.2.3.4 [...]
Looking for the dropped packets, I would expect the ASA to say the reason was a Land Attack since that's what the logs say. Nope, it just says the reason is sp-security-failed.
fw1/pri/act# sh capture cap1 | i 8955 28: 20:20:07.518924 172.16.230.24.33730 > 1.2.3.4.8955: S 2198057225:2198057225(0) win 29200 Drop-reason: (sp-security-failed) Slowpath security checks failed 207: 20:20:09.527835 172.16.230.24.33736 > 1.2.3.4.8955: S 4274950959:4274950959(0) win 29200 Drop-reason: (sp-security-failed) Slowpath security checks failed 290: 20:20:11.536089 172.16.230.24.33742 > 1.2.3.4.8955: S 4072781874:4072781874(0) win 29200 Drop-reason: (sp-security-failed) Slowpath security checks failed [...]
The packet capture shows the source interface before any NAT happened. Let's check packet tracer to see if the ASA is NATing the session
fw1/pri/act# packet-tracer input inside tcp 172.16.230.24 33885 1.2.3.4 8955 Phase: 1 Type: ACCESS-LIST Subtype: Result: ALLOW Config: Implicit Rule Additional Information: Forward Flow based lookup yields rule: in id=0x7fd461841850, priority=1, domain=permit, deny=false hits=12075132, user_data=0x0, cs_id=0x0, l3_type=0x8 src mac=0000.0000.0000, mask=0000.0000.0000 dst mac=0000.0000.0000, mask=0100.0000.0000 input_ifc=inside, output_ifc=any Phase: 2 Type: ROUTE-LOOKUP Subtype: Resolve Egress Interface Result: ALLOW Config: Additional Information: found next-hop 1.2.3.1 using egress ifc outside Phase: 3 Type: CONN-SETTINGS Subtype: Result: ALLOW Config: class-map class-default match any policy-map global_policy class class-default set connection decrement-ttl service-policy global_policy global Additional Information: Forward Flow based lookup yields rule: in id=0x7fd46c7677f0, priority=7, domain=conn-set, deny=false hits=1797218, user_data=0x7fd46e3bcdf0, cs_id=0x0, use_real_addr, flags=0x0, protocol=0 src ip/id=0.0.0.0, mask=0.0.0.0, port=0, tag=any dst ip/id=0.0.0.0, mask=0.0.0.0, port=0, tag=any, dscp=0x0 input_ifc=inside, output_ifc=any Phase: 4 Type: NAT Subtype: Result: ALLOW Config: object network ny-monitor nat (inside,outside) static PAT_Pool Additional Information: Static translate 172.16.230.24/33885 to 1.2.3.4/33885 Forward Flow based lookup yields rule: in id=0x7fd461ab94f0, priority=6, domain=nat, deny=false hits=19022, user_data=0x7fd461ab5c00, cs_id=0x0, flags=0x0, protocol=0 src ip/id=172.16.230.24, mask=255.255.255.254, port=0, tag=any dst ip/id=0.0.0.0, mask=0.0.0.0, port=0, tag=any, dscp=0x0 input_ifc=inside, output_ifc=outside Phase: 5 Type: NAT Subtype: per-session Result: ALLOW Config: Additional Information: Forward Flow based lookup yields rule: in id=0x7fd4611bf480, priority=0, domain=nat-per-session, deny=false hits=874821, user_data=0x0, cs_id=0x0, reverse, use_real_addr, flags=0x0, protocol=6 src ip/id=0.0.0.0, mask=0.0.0.0, port=0, tag=any dst ip/id=0.0.0.0, mask=0.0.0.0, port=0, tag=any, dscp=0x0 input_ifc=any, output_ifc=any Phase: 6 Type: IP-OPTIONS Subtype: Result: ALLOW Config: Additional Information: Forward Flow based lookup yields rule: in id=0x7fd46146a980, priority=0, domain=inspect-ip-options, deny=true hits=98075, user_data=0x0, cs_id=0x0, reverse, flags=0x0, protocol=0 src ip/id=0.0.0.0, mask=0.0.0.0, port=0, tag=any dst ip/id=0.0.0.0, mask=0.0.0.0, port=0, tag=any, dscp=0x0 input_ifc=inside, output_ifc=any Phase: 7 Type: FOVER Subtype: standby-update Result: ALLOW Config: Additional Information: Forward Flow based lookup yields rule: in id=0x7fd461b92d20, priority=20, domain=lu, deny=false hits=804138, user_data=0x0, cs_id=0x0, flags=0x0, protocol=6 src ip/id=0.0.0.0, mask=0.0.0.0, port=0, tag=any dst ip/id=0.0.0.0, mask=0.0.0.0, port=0, tag=any, dscp=0x0 input_ifc=inside, output_ifc=any Phase: 8 Type: USER-STATISTICS Subtype: user-statistics Result: ALLOW Config: Additional Information: Forward Flow based lookup yields rule: out id=0x7fd46e3b3df0, priority=0, domain=user-statistics, deny=false hits=1843176, user_data=0x7fd4611d29a0, cs_id=0x0, reverse, flags=0x0, protocol=0 src ip/id=0.0.0.0, mask=0.0.0.0, port=0, tag=any dst ip/id=0.0.0.0, mask=0.0.0.0, port=0, tag=any, dscp=0x0 input_ifc=any, output_ifc=outside Result: input-interface: inside input-status: up input-line-status: up output-interface: outside output-status: up output-line-status: up Action: drop Drop-reason: (sp-security-failed) Slowpath security checks failed fw1/pri/act#
It is. Phase 4 of the packet trace shows a translation from 172.16.230.24/33885 to 1.2.3.4/33885
The fix
Put a NONAT (NAT exemption) rule in place
fw1/pri/act# sh run object id ny-monitor object network linux1 subnet 172.16.230.24 255.255.255.254 fw1/pri/act# fw1/pri/act# sh run object id PAT_Pool object network PAT_Pool range 1.2.3.4 1.2.3.90 fw1/pri/act# fw1/pri/act# nat (inside,outside) source static linux1 linux1 destination static PAT_Pool PAT_Pool no-proxy-arp route-lookup
What this says is "if the source ip address is 172.16.230.24 and the destination ip address is in the range 1.2.3.4 through 1.2.3.90," then ignore this NAT rule:
fw1/pri/act# sh run nat [...] object network linux1 nat (inside,outside) static PAT_Pool
I tested by again creating lots of connections to 1.2.3.4 from the linux machine and now I don't see Land Attack messages in the ASA system log. Another packet trace confirms that the NAT exclusion is working.
fw1/sec/act# packet-tracer input inside tcp 172.16.230.24 33885 1.2.3.4 80 Phase: 1 Type: ACCESS-LIST Subtype: Result: ALLOW Config: Implicit Rule Additional Information: MAC Access list Phase: 2 Type: ROUTE-LOOKUP Subtype: Resolve Egress Interface Result: ALLOW Config: Additional Information: found next-hop 1.2.3.1 using egress ifc outside Phase: 3 Type: UN-NAT Subtype: static Result: ALLOW Config: nat (inside,outside) source static linux1 linux1 destination static PAT_Pool PAT_Pool no-proxy-arp route-lookup Additional Information: NAT divert to egress interface outside Untranslate 1.2.3.4/8955 to 1.2.3.4/8955 Phase: 4 Type: CONN-SETTINGS Subtype: Result: ALLOW Config: class-map class-default match any policy-map global_policy class class-default set connection decrement-ttl service-policy global_policy global Additional Information: Phase: 5 Type: NAT Subtype: Result: ALLOW Config: nat (inside,outside) source static linux1 linux1 destination static PAT_Pool PAT_Pool no-proxy-arp route-lookup Additional Information: Static translate 172.16.230.24/33885 to 172.16.230.24/33885 Phase: 6 Type: NAT Subtype: per-session Result: ALLOW Config: Additional Information: Phase: 7 Type: IP-OPTIONS Subtype: Result: ALLOW Config: Additional Information: Phase: 8 Type: FOVER Subtype: standby-update Result: ALLOW Config: Additional Information: Phase: 9 Type: NAT Subtype: rpf-check Result: ALLOW Config: nat (inside,outside) source static linux1 linux1 destination static PAT_Pool PAT_Pool no-proxy-arp route-lookup Additional Information: Phase: 10 Type: USER-STATISTICS Subtype: user-statistics Result: ALLOW Config: Additional Information: Phase: 11 Type: NAT Subtype: per-session Result: ALLOW Config: Additional Information: Phase: 12 Type: IP-OPTIONS Subtype: Result: ALLOW Config: Additional Information: Phase: 13 Type: USER-STATISTICS Subtype: user-statistics Result: ALLOW Config: Additional Information: Phase: 14 Type: FLOW-CREATION Subtype: Result: ALLOW Config: Additional Information: New flow created with id 2160780, packet dispatched to next module Result: input-interface: inside input-status: up input-line-status: up output-interface: outside output-status: up output-line-status: up Action: allow fw1/pri/act#
0 notes
Text
Getting shell on a RouterBoard
Cloud Router Switch CRS125-24G-1S-RM, RouterOS 6.24, Mac OS X 10.8.5 (dhcpd/tftp running on Mac)
Ever wondered if you could get a real shell on a RouterBoard? The answer is yes, yes you can. I recently wanted to know how RouterOS on a Mikrotik CRS125-24G-1S-RM actually sets up VLANs internally so that I can duplicate a complicated set up that I already have on a Ubiquiti EdgeRouter. Below is how to get a busybox shell via ssh or the console. Once you are in, you'll see that the busybox included is pretty limited; however, you can upload a fully operational busybox via the RouterOS web admin interface (WebFig) and then execute that one. With the new busybox, things like ifconfig, dmesg, ls, vconfig, and many more will work.
1. Choose a machine that you want to serve the openwrt boot image.
2. Configure your wired ethernet interface to have an IP address of 192.168.88.5 and a netmask of 255.255.255.0
3. Download the openwrt image I compiled for booting into a CRS125 from https://github.com/ryanchapman/openwrt-mikrotik-crs125/raw/master/bin/ar71xx/openwrt-ar71xx-mikrotik-vmlinux-initramfs.elf into /Users/ryan/tftpboot/vmlinux
4. Modify your tftp plist file to look like this:
Ryans-MacBook-Pro:~ ryan$ cat /System/Library/LaunchDaemons/tftp.plist <?xml version="1.0" encoding="UTF-8"?> <!DOCTYPE plist PUBLIC "-//Apple Computer//DTD PLIST 1.0//EN" "http://www.apple.com/DTDs/PropertyList-1.0.dtd"> <plist version="1.0"> <dict> <key>Disabled</key> <true/> <key>Label</key> <string>com.apple.tftpd</string> <key>ProgramArguments</key> <array> <string>/usr/libexec/tftpd</string> <string>-i<string> <string>/Users/ryan/tftpboot</string> </array> <key>inetdCompatibility</key> <dict> <key>Wait</key> <true/> </dict> <key>InitGroups</key> <true/> <key>Sockets</key> <dict> <key>Listeners</key> <dict> <key>SockServiceName</key> <string>tftp</string> <key>SockType</key> <string>dgram</string> </dict> </dict> </dict> </plist> Ryans-MacBook-Pro:~ ryan$
5. Load the tftp plist file and start the tftp server:
sudo launchctl load -F /System/Library/LaunchDaemons/tftp.plist sudo launchctl start com.apple.tftpd
6. Create a dhcpd config file
Ryans-MacBook-Pro:~ ryan$ cat /etc/dhcpd.conf ddns-update-style interim; # option definitions common to all supported networks... #default-lease-time 600; default-lease-time 14400; max-lease-time 7200; authoritative; allow bootp; allow booting; subnet 192.168.88.0 netmask 255.255.255.0 { filename "vmlinux"; next-server 192.168.88.5; range dynamic-bootp 192.168.88.15 192.168.88.254; } Ryans-MacBook-Pro:~ ryan$
7. Start the dhcp daemon with
sudo dhcpd -d en0
(replace en0 with your wired ethernet interface on your Mac, use ifconfig if unsure)
Ryans-MacBook-Pro:~ ryan$ sudo dhcpd -d en0 dyld: DYLD_ environment variables being ignored because main executable (/usr/bin/sudo) is setuid or setgid Internet Systems Consortium DHCP Server 4.1-ESV-R4 Copyright 2004-2011 Internet Systems Consortium. All rights reserved. For info, please visit https://www.isc.org/software/dhcp/ Wrote 3 leases to leases file. Listening on BPF/en0/00:XX:XX:XX:XX:XX/192.168.88.0/24 Sending on BPF/en0/00:XX:XX:XX:XX:XX/192.168.88.0/24 Sending on Socket/fallback/fallback-net
If you see output like above and no errors, exit dhcpd with Ctrl-C then type sudo dhcpd en0 & to get it to run in the background. You may have to press enter a few times to get a prompt to show up again.
8. Attach an ethernet cable to port 1 on the CRS125 and plug the other end into your Mac running dhcpd
9. Connect a cable to the console port of the CRS125 and the other end to a serial port on your Mac (I'm using a Asunflower FTDI USB-to-console cable which you can find on Amazon for less than $20)
10. Install kermit with brew install kermit (visit http://brew.sh if you don't have brew)
11. Start kermit and connect to the console port.
Ryans-MacBook-Pro:~ ryan$ ls -l /dev/tty.usbserial* crw-rw-rw- 1 root wheel 33, 10 Sep 7 23:34 /dev/tty.usbserial-AL00B1FN Ryans-MacBook-Pro:~ ryan$ Ryans-MacBook-Pro:~ ryan$ kermit C-Kermit 9.0.302 OPEN SOURCE:, 20 Aug 2011, for Mac OS X 10.8.2 (64-bit) Copyright (C) 1985, 2011, Trustees of Columbia University in the City of New York. Type ? or HELP for help. (/Users/ryan/) C-Kermit>set line /dev/tty.usbserial-AL00B1FN (/Users/ryan/) C-Kermit>set speed 115200 /dev/tty.usbserial-AL00B1FN, 115200 bps (/Users/ryan/) C-Kermit>set carrier-watch off (/Users/ryan/) C-Kermit>connect Connecting to /dev/tty.usbserial-AL00B1FN, speed 115200 Escape character: Ctrl-\ (ASCII 28, FS): enabled Type the escape character followed by C to get back, or followed by ? to see other options. ----------------------------------------------------
12. Now power on your MikroTik CRS125. You'll have to press any key when prompted on boot to change the boot order, so be ready. You'll change the boot order by pressing o, e, x as you'll see below.
---------------------------------------------------- (/Users/ryan/) C-Kermit>conn Connecting to /dev/tty.usbserial-AL00B1FN, speed 115200 Escape character: Ctrl-\ (ASCII 28, FS): enabled Type the escape character followed by C to get back, or followed by ? to see other options. ---------------------------------------------------- RouterBOOT booter 3.19 CRS125-24G-1S CPU frequency: 600 MHz Memory speed: 200 MHz Memory size: 128 MiB NAND size: 128 MiB Press any key within 2 seconds to enter setup RouterBOOT-3.19 What do you want to configure? d - boot delay k - boot key s - serial console n - silent boot o - boot device f - cpu frequency r - reset booter configuration e - format nand w - repartition nand g - upgrade firmware i - board info p - boot protocol b - booter options t - do memory testing x - exit setup your choice: o - boot device Select boot device: e - boot over Ethernet n - boot from NAND, if fail then Ethernet 1 - boot Ethernet once, then NAND * o - boot from NAND only b - boot chosen device f - boot Flash Configure Mode 3 - boot Flash Configure Mode once, then NAND your choice: e - boot over Ethernet RouterBOOT-3.19 What do you want to configure? d - boot delay k - boot key s - serial console n - silent boot o - boot device f - cpu frequency r - reset booter configuration e - format nand w - repartition nand g - upgrade firmware i - board info p - boot protocol b - booter options t - do memory testing x - exit setup your choice: x - exit setup writing settings to flash... OK RouterBOOT booter 3.19 CRS125-24G-1S CPU frequency: 600 MHz Memory speed: 200 MHz Memory size: 128 MiB NAND size: 128 MiB Press any key within 2 seconds to enter setup.. trying bootp protocol................... OK Got IP address: 192.168.88.16 resolved mac address 00:XX:XX:XX:XX:XX transfer started .............................*............ transfer ok, time=3.01s setting up elf image... OK jumping to kernel code [ 0.000000] Linux version 4.1.6 (root@ny-monitor) (gcc version 4.8.3 (OpenWrt/Linaro GCC 4.8-2014.04 r46796) ) #10 Sun Sep 6 04:19:18 EDT 2015 [ 0.000000] bootconsole [early0] enabled [ 0.000000] CPU0 revision is: 0001974c (MIPS 74Kc) [ 0.000000] SoC: Atheros AR9344 rev 2 [ 0.000000] Determined physical RAM map: [ 0.000000] memory: 08000000 @ 00000000 (usable) [ 0.000000] User-defined physical RAM map: [ 0.000000] memory: 08000000 @ 00000000 (usable) [ 0.000000] Initrd not found or empty - disabling initrd [ 0.000000] Zone ranges: [ 0.000000] Normal [mem 0x0000000000000000-0x0000000007ffffff] [ 0.000000] Movable zone start for each node [ 0.000000] Early memory node ranges [ 0.000000] node 0: [mem 0x0000000000000000-0x0000000007ffffff] [ 0.000000] Initmem setup node 0 [mem 0x0000000000000000-0x0000000007ffffff] [ 0.000000] Primary instruction cache 64kB, VIPT, 4-way, linesize 32 bytes. [ 0.000000] Primary data cache 32kB, 4-way, VIPT, cache aliases, linesize 32 bytes [ 0.000000] Built 1 zonelists in Zone order, mobility grouping on. Total pages: 32512 [ 0.000000] Kernel command line: lcd_ctrl=84 parts=1 boot_part_size=4194304 gpio=233019 HZ=300000000 mem=128M kmac=4C:5E:0C:99:E3:9D board=crs125g ver=3.19 boot=1 mlc=7 console=ttyS0,115200 root=/dev/mtdblock2 rootfstype=squashfs,yaffs,jffs2 noinitrd rootfstype=yaffs noinitrd [ 0.000000] PID hash table entries: 512 (order: -1, 2048 bytes) [ 0.000000] Dentry cache hash table entries: 16384 (order: 4, 65536 bytes) [ 0.000000] Inode-cache hash table entries: 8192 (order: 3, 32768 bytes) [ 0.000000] Writing ErrCtl register=00000000 [ 0.000000] Readback ErrCtl register=00000000 [ 0.000000] Memory: 124004K/131072K available (2516K kernel code, 152K rwdata, 532K rodata, 2104K init, 184K bss, 7068K reserved, 0K cma-reserved) [ 0.000000] SLUB: HWalign=32, Order=0-3, MinObjects=0, CPUs=1, Nodes=1 [ 0.000000] NR_IRQS:83 [ 0.000000] Clocks: CPU:600.000MHz, DDR:400.000MHz, AHB:400.000MHz, Ref:25.000MHz [ 0.000000] clocksource MIPS: mask: 0xffffffff max_cycles: 0xffffffff, max_idle_ns: 6370868154 ns [ 0.000009] sched_clock: 32 bits at 300MHz, resolution 3ns, wraps every 7158278654ns [ 0.008003] Calibrating delay loop... 299.82 BogoMIPS (lpj=1499136) [ 0.080747] pid_max: default: 32768 minimum: 301 [ 0.085611] Mount-cache hash table entries: 1024 (order: 0, 4096 bytes) [ 0.092366] Mountpoint-cache hash table entries: 1024 (order: 0, 4096 bytes) [ 0.102438] clocksource jiffies: mask: 0xffffffff max_cycles: 0xffffffff, max_idle_ns: 19112604462750000 ns [ 0.113071] NET: Registered protocol family 16 [ 0.119033] MIPS: machine is RouterBOARD CRS125-24G-1S [ 0.354096] Switched to clocksource MIPS [ 0.359362] NET: Registered protocol family 2 [ 0.364633] TCP established hash table entries: 1024 (order: 0, 4096 bytes) [ 0.371756] TCP bind hash table entries: 1024 (order: 0, 4096 bytes) [ 0.378331] TCP: Hash tables configured (established 1024 bind 1024) [ 0.384913] UDP hash table entries: 256 (order: 0, 4096 bytes) [ 0.390867] UDP-Lite hash table entries: 256 (order: 0, 4096 bytes) [ 0.397620] NET: Registered protocol family 1 [ 2.745167] futex hash table entries: 256 (order: -1, 3072 bytes) [ 2.765559] io scheduler noop registered [ 2.769538] io scheduler deadline registered (default) [ 2.775165] Serial: 8250/16550 driver, 1 ports, IRQ sharing disabled [ 2.782051] console [ttyS0] disabled [ 2.805831] serial8250.0: ttyS0 at MMIO 0x18020000 (irq = 11, base_baud = 1562500) is a 16550A [ 2.814658] console [ttyS0] enabled [ 2.814658] console [ttyS0] enabled [ 2.821803] bootconsole [early0] disabled [ 2.821803] bootconsole [early0] disabled [ 2.834338] nand: device found, Manufacturer ID: 0x98, Chip ID: 0xf1 [ 2.840909] nand: Toshiba NAND 128MiB 3,3V 8-bit [ 2.845703] nand: 128 MiB, SLC, erase size: 128 KiB, page size: 2048, OOB size: 64 [ 2.853560] Scanning device for bad blocks [ 2.952681] Creating 3 MTD partitions on "ar934x-nfc": [ 2.958010] 0x000000000000-0x000000040000 : "booter" [ 2.964028] 0x000000040000-0x000000400000 : "kernel" [ 2.969968] 0x000000400000-0x000008000000 : "rootfs" [ 2.976146] mtd: device 2 (rootfs) set to be root filesystem [ 2.983880] mtdsplit: no squashfs found in "rootfs" [ 2.989578] mtdsplit: no squashfs found in "ar934x-nfc" [ 3.032821] libphy: ag71xx_mdio: probed [ 3.625988] eth0: Atheros AG71xx at 0xb9000000, irq 4, mode:RGMII [ 3.633482] NET: Registered protocol family 17 [ 3.638221] bridge: automatic filtering via arp/ip/ip6tables has been deprecated. Update your scripts to load br_netfilter if you need this. [ 3.651371] 8021q: 802.1Q VLAN Support v1.8 [ 3.668454] Freeing unused kernel memory: 2104K (80382000 - 80590000) [ 3.688113] init: Console is alive [ 3.691857] init: - watchdog - [ 3.717323] usbcore: registered new interface driver usbfs [ 3.723071] usbcore: registered new interface driver hub [ 3.728703] usbcore: registered new device driver usb [ 3.739186] ehci_hcd: USB 2.0 'Enhanced' Host Controller (EHCI) Driver [ 3.747402] ehci-platform: EHCI generic platform driver [ 3.755732] ohci_hcd: USB 1.1 'Open' Host Controller (OHCI) Driver [ 3.763327] ohci-platform: OHCI generic platform driver [ 4.695771] init: - preinit - [ 4.841933] eth0: link up (1000Mbps/Full duplex) Press the [f] key and hit [enter] to enter failsafe mode Press the [1], [2], [3] or [4] key and hit [enter] to select the debug level [ 7.988790] eth0: link down [ 8.001903] procd: - early - [ 8.005573] procd: - watchdog - [ 8.552079] procd: - ubus - [ 9.557472] random: ubusd urandom read with 79 bits of entropy available [ 9.575446] procd: - init - Please press Enter to activate this console. [ 10.215886] NET: Registered protocol family 10 [ 10.227637] ip6_tables: (C) 2000-2006 Netfilter Core Team [ 10.246244] Loading modules backported from Linux version master-2015-07-21-0-g47cd203 [ 10.254477] Backport generated by backports.git backports-20150626-0-gc1a4168 [ 10.264958] ip_tables: (C) 2000-2006 Netfilter Core Team [ 10.280582] nf_conntrack version 0.5.0 (1970 buckets, 7880 max) [ 10.323471] xt_time: kernel timezone is -0000 [ 10.347230] cfg80211: World regulatory domain updated: [ 10.352542] cfg80211: DFS Master region: unset [ 10.357082] cfg80211: (start_freq - end_freq @ bandwidth), (max_antenna_gain, max_eirp), (dfs_cac_time) [ 10.367154] cfg80211: (2402000 KHz - 2472000 KHz @ 40000 KHz), (N/A, 2000 mBm), (N/A) [ 10.375429] cfg80211: (2457000 KHz - 2482000 KHz @ 40000 KHz), (N/A, 2000 mBm), (N/A) [ 10.383690] cfg80211: (2474000 KHz - 2494000 KHz @ 20000 KHz), (N/A, 2000 mBm), (N/A) [ 10.391962] cfg80211: (5170000 KHz - 5250000 KHz @ 80000 KHz, 160000 KHz AUTO), (N/A, 2000 mBm), (N/A) [ 10.401765] cfg80211: (5250000 KHz - 5330000 KHz @ 80000 KHz, 160000 KHz AUTO), (N/A, 2000 mBm), (0 s) [ 10.411565] cfg80211: (5490000 KHz - 5730000 KHz @ 160000 KHz), (N/A, 2000 mBm), (0 s) [ 10.419921] cfg80211: (5735000 KHz - 5835000 KHz @ 80000 KHz), (N/A, 2000 mBm), (N/A) [ 10.428194] cfg80211: (57240000 KHz - 63720000 KHz @ 2160000 KHz), (N/A, 0 mBm), (N/A) [ 10.511024] PPP generic driver version 2.4.2 [ 10.518067] NET: Registered protocol family 24 [ 17.616533] eth0: link up (1000Mbps/Full duplex) [ 17.644699] device eth0 entered promiscuous mode [ 17.650592] IPv6: ADDRCONF(NETDEV_UP): br-lan: link is not ready [ 18.604159] br-lan: port 1(eth0) entered forwarding state [ 18.609787] br-lan: port 1(eth0) entered forwarding state [ 18.644161] IPv6: ADDRCONF(NETDEV_CHANGE): br-lan: link becomes ready [ 20.604107] br-lan: port 1(eth0) entered forwarding state [ 40.374123] random: nonblocking pool is initialized
12. Press enter and you'll be greeted with the OpenWRT prompt:
BusyBox v1.23.2 (2015-09-05 23:54:48 EDT) built-in shell (ash) _______ ________ __ | |.-----.-----.-----.| | | |.----.| |_ | - || _ | -__| || | | || _|| _| |_______|| __|_____|__|__||________||__| |____| |__| W I R E L E S S F R E E D O M ----------------------------------------------------- CHAOS CALMER (Bleeding Edge, r46796) ----------------------------------------------------- * 1 1/2 oz Gin Shake with a glassful * 1/4 oz Triple Sec of broken ice and pour * 3/4 oz Lime Juice unstrained into a goblet. * 1 1/2 oz Orange Juice * 1 tsp. Grenadine Syrup ----------------------------------------------------- root@OpenWrt:/#
13. Create a temporary mount directory at /mnt2
root@OpenWrt:/# mkdir -p /mnt2 root@OpenWrt:/#
14. Mount the flash chip on the CRS125 into the directory /mnt2
root@OpenWrt:/# mount /dev/mtdblock2 /mnt2 [ 297.951244] yaffs: dev is 32505858 name is "mtdblock2" rw [ 297.956880] yaffs: passed flags "" root@OpenWrt:/# root@OpenWrt:/# ls -l /mnt2 drwxrwxr-x 1 root root 2048 Feb 5 2014 bin drwxr-xr-x 1 root root 2048 Jan 1 1970 boot drwxr-xr-x 1 root root 2048 Jan 1 1970 etc drwx------ 1 root root 2048 Sep 4 14:50 lost+found drwxr-xr-x 1 root root 2048 Jan 1 1970 nova drwxr-xr-x 1 root root 2048 Jan 1 1970 rw drwxr-xr-x 1 root root 2048 Jan 1 1970 var
15. Touch the file /mnt2/nova/etc/devel-login. Credit goes to the person at r00t.cz for discovering this. See www.r00t.cz/Misc/MikrotikBackdoor for more info.
root@OpenWrt:/# touch /mnt2/nova/etc/devel-login root@OpenWrt:/# ls -l /mnt2/nova/etc/ -rw-r--r-- 1 root root 0 Sep 4 14:53 devel-login
16. Unmount /mnt2 and reboot
root@OpenWrt:/# umount /mnt2 root@OpenWrt:/# reboot root@OpenWrt:/# [ 466.597039] br-lan: port 1(eth0) entered disabled state [ 466.614340] device eth0 left promiscuous mode [ 466.618891] br-lan: port 1(eth0) entered disabled state [ 466.628785] eth0: link down [ 466.633361] IPv6: ADDRCONF(NETDEV_UP): eth0: link is not ready [ 470.815364] reboot: Restarting system
17. Change the boot order back to boot from NAND
RouterBOOT booter 3.19 CRS125-24G-1S CPU frequency: 600 MHz Memory speed: 200 MHz Memory size: 128 MiB NAND size: 128 MiB Press any key within 2 seconds to enter setup RouterBOOT-3.19 What do you want to configure? d - boot delay k - boot key s - serial console n - silent boot o - boot device f - cpu frequency r - reset booter configuration e - format nand w - repartition nand g - upgrade firmware i - board info p - boot protocol b - booter options t - do memory testing x - exit setup your choice: o - boot device Select boot device: * e - boot over Ethernet n - boot from NAND, if fail then Ethernet 1 - boot Ethernet once, then NAND o - boot from NAND only b - boot chosen device f - boot Flash Configure Mode 3 - boot Flash Configure Mode once, then NAND your choice: o - boot from NAND only RouterBOOT-3.19 What do you want to configure? d - boot delay k - boot key s - serial console n - silent boot o - boot device f - cpu frequency r - reset booter configuration e - format nand w - repartition nand g - upgrade firmware i - board info p - boot protocol b - booter options t - do memory testing x - exit setup your choice: x - exit setup writing settings to flash... OK
18. The CRS125 will boot again, but this time it will boot RouterOS that is on NAND. If you see an error message, unplug the CRS125 from power and plug it back in for a fresh boot. If all goes well, you'll see a RouterOS login:
MikroTik 6.24 MikroTik Login:
19. Log in with the username 'devel'. For the password, use the same password as is on the 'admin' account, which by default is empty (as in nothing, just press enter):
MikroTik 6.24 MikroTik Login: devel Password: BusyBox v1.00 (2014.12.09-08:43+0000) Built-in shell (ash) Enter 'help' for a list of built-in commands. #
20. Interestingly, the BusyBox provided by RouterOS is extremely limited. It doesn't even have the ls command
# ls bash: ls: not found #
21. No worries, echo * does the same thing:
# echo * MikroTik-19700102-0016.backup auto-before-reset.backup autosupout.old.rif autosupout.rif pub skins # pwd /flash/rw/pckg #
22. This is pretty hard to use, so download a precompiled busybox for the mips architecture that has more applets enabled. Download http://www.busybox.net/downloads/binaries/latest/busybox-mips to your Mac
23. Log into WebFig by visiting http://192.168.88.1/
24. Go to Files on the left hand side, and beside Upload:, press the Choose File button. Select the busybox binary you downloaded in step 21.
25. Back in the RouterOS console, move busybox to /flash/bin because that is already in the PATH environment variable. Also set the executable bit on busybox-mips so we can run it
# echo $PATH /sbin:/flash//bin:/bin # # # echo * MikroTik-19700102-0016.backup auto-before-reset.backup autosupout.old.rif autosupout.rif busybox-mips pub skins # # mv busybox-mips /flash/bin # # cd /flash/bin/ # chmod +x /flash/bin/busybox-mips #
26. Now if you run busybox-mips from any directory, you'll get a list of available applets in this busybox executable
# busybox-mips BusyBox v1.16.1 (2010-03-29 11:53:01 CDT) multi-call binary. Copyright (C) 1998-2009 Erik Andersen, Rob Landley, Denys Vlasenko and others. Licensed under GPLv2. See source distribution for full notice. Usage: busybox [function] [arguments]... or: function [arguments]... BusyBox is a multi-call binary that combines many common Unix utilities into a single executable. Most people will create a link to busybox for each function they wish to use and BusyBox will act like whatever it was invoked as. Currently defined functions: [, [[, acpid, addgroup, adduser, adjtimex, arp, arping, ash, awk, basename, bbconfig, beep, blkid, brctl, bunzip2, bzcat, bzip2, cal, cat, catv, chat, chattr, chgrp, chmod, chown, chpasswd, chpst, chroot, chrt, chvt, cksum, clear, cmp, comm, cp, cpio, crond, crontab, cryptpw, cttyhack, cut, date, dc, dd, deallocvt, delgroup, deluser, depmod, devmem, df, dhcprelay, diff, dirname, dmesg, dnsd, dnsdomainname, dos2unix, dpkg, dpkg-deb, du, dumpkmap, dumpleases, echo, ed, egrep, eject, env, envdir, envuidgid, ether-wake, expand, expr, fakeidentd, false, fbset, fbsplash, fdflush, fdformat, fdisk, fgrep, find, findfs, flashcp, fold, free, freeramdisk, fsck, fsck.minix, fsync, ftpd, ftpget, ftpput, fuser, getopt, getty, grep, gunzip, gzip, halt, hd, hdparm, head, hexdump, hostid, hostname, httpd, hush, hwclock, id, ifconfig, ifdown, ifenslave, ifplugd, ifup, inetd, init, insmod, install, ionice, ip, ipaddr, ipcalc, ipcrm, ipcs, iplink, iproute, iprule, iptunnel, kbd_mode, kill, killall, killall5, klogd, lash, last, length, less, linux32, linux64, linuxrc, ln, loadfont, loadkmap, logger, login, logname, logread, losetup, lpd, lpq, lpr, ls, lsattr, lsmod, lspci, lsusb, lzmacat, lzop, lzopcat, makedevs, makemime, man, md5sum, mdev, mesg, microcom, mkdir, mkdosfs, mkfifo, mkfs.minix, mkfs.reiser, mkfs.vfat, mknod, mkpasswd, mkswap, mktemp, modprobe, more, mount, mountpoint, msh, mt, mv, nameif, nc, netstat, nice, nmeter, nohup, nslookup, ntpd, od, openvt, passwd, pgrep, pidof, ping, ping6, pipe_progress, pivot_root, pkill, popmaildir, poweroff, printenv, printf, ps, pscan, pwd, raidautorun, rdate, rdev, readahead, readlink, readprofile, realpath, reboot, reformime, renice, reset, resize, rm, rmdir, rmmod, route, rpm, rpm2cpio, rtcwake, run-parts, runlevel, runsv, runsvdir, rx, script, scriptreplay, sed, sendmail, seq, setarch, setconsole, setfont, setkeycodes, setlogcons, setsid, setuidgid, sh, sha1sum, sha256sum, sha512sum, showkey, slattach, sleep, softlimit, sort, split, start-stop-daemon, stat, strings, stty, su, sulogin, sum, sv, svlogd, swapoff, swapon, switch_root, sync, sysctl, syslogd, tac, tail, tar, tcpsvd, tee, telnet, telnetd, test, tftp, tftpd, time, timeout, top, touch, tr, traceroute, traceroute6, true, tty, ttysize, tunctl, udhcpc, udhcpd, udpsvd, umount, uname, uncompress, unexpand, uniq, unix2dos, unlzma, unlzop, unzip, uptime, usleep, uudecode, uuencode, vconfig, vi, vlock, volname, wall, watch, watchdog, wc, wget, which, who, whoami, xargs, yes, zcat, zcip
27. The next part is a pain. You have to create a symbolic link for each applet you want to be able to use. For example, if you want ls to work, make sure you are in the /flash/bin directory and create a symlink for ls pointing to busybox-mips
# pwd /flash/bin # ln -s busybox-mips ls #
28. Now ls works
# ls busybox-mips ls #
29. Let's do the same for some other interesting commands on a router:
# ln -s busybox-mips ifconfig # ln -s busybox-mips brctl # ln -s busybox-mips ps # ln -s busybox-mips top # ln -s busybox-mips netstat # ln -s busybox-mips lspci # ln -s busybox-mips route # ln -s busybox-mips grep # ln -s busybox-mips strings # ln -s busybox-mips less # # ifconfig br0 Link encap:Ethernet HWaddr 4C:5E:0C:AC:E3:9D inet addr:192.168.88.1 Bcast:192.168.88.255 Mask:255.255.255.0 UP BROADCAST RUNNING MULTICAST MTU:1500 Metric:1 RX packets:2058 errors:0 dropped:0 overruns:0 frame:0 TX packets:1081 errors:0 dropped:0 overruns:0 carrier:0 collisions:0 txqueuelen:0 RX bytes:1859490 (1.7 MiB) TX bytes:534258 (521.7 KiB) br1 Link encap:Ethernet HWaddr 00:00:00:00:00:00 UP BROADCAST RUNNING MULTICAST MTU:1500 Metric:1 RX packets:0 errors:0 dropped:0 overruns:0 frame:0 TX packets:40 errors:0 dropped:0 overruns:0 carrier:0 collisions:0 txqueuelen:0 RX bytes:0 (0.0 B) TX bytes:4180 (4.0 KiB) eth0 Link encap:Ethernet HWaddr 4C:5E:0C:AC:E3:9D UP BROADCAST RUNNING MULTICAST MTU:1500 Metric:1 RX packets:2075 errors:0 dropped:0 overruns:0 frame:0 TX packets:1685 errors:0 dropped:0 overruns:0 carrier:0 collisions:0 txqueuelen:0 RX bytes:1903564 (1.8 MiB) TX bytes:579157 (565.5 KiB) eth1 Link encap:Ethernet HWaddr 4C:5E:0C:AC:E3:9E UP BROADCAST MULTICAST MTU:1500 Metric:1 RX packets:0 errors:0 dropped:0 overruns:0 frame:0 TX packets:0 errors:0 dropped:0 overruns:0 carrier:0 collisions:0 txqueuelen:0 RX bytes:0 (0.0 B) TX bytes:0 (0.0 B) eth10 Link encap:Ethernet HWaddr 4C:5E:0C:AC:E3:A7 UP BROADCAST MULTICAST MTU:1500 Metric:1 RX packets:0 errors:0 dropped:0 overruns:0 frame:0 TX packets:0 errors:0 dropped:0 overruns:0 carrier:0 collisions:0 txqueuelen:0 RX bytes:0 (0.0 B) TX bytes:0 (0.0 B) eth11 Link encap:Ethernet HWaddr 4C:5E:0C:AC:E3:A8 UP BROADCAST MULTICAST MTU:1500 Metric:1 RX packets:0 errors:0 dropped:0 overruns:0 frame:0 TX packets:0 errors:0 dropped:0 overruns:0 carrier:0 collisions:0 txqueuelen:0 RX bytes:0 (0.0 B) TX bytes:0 (0.0 B) eth12 Link encap:Ethernet HWaddr 4C:5E:0C:AC:E3:A9 UP BROADCAST MULTICAST MTU:1500 Metric:1 RX packets:0 errors:0 dropped:0 overruns:0 frame:0 TX packets:0 errors:0 dropped:0 overruns:0 carrier:0 collisions:0 txqueuelen:0 RX bytes:0 (0.0 B) TX bytes:0 (0.0 B) eth13 Link encap:Ethernet HWaddr 4C:5E:0C:AC:E3:AA UP BROADCAST MULTICAST MTU:1500 Metric:1 RX packets:0 errors:0 dropped:0 overruns:0 frame:0 TX packets:0 errors:0 dropped:0 overruns:0 carrier:0 collisions:0 txqueuelen:0 RX bytes:0 (0.0 B) TX bytes:0 (0.0 B) eth14 Link encap:Ethernet HWaddr 4C:5E:0C:AC:E3:AB UP BROADCAST MULTICAST MTU:1500 Metric:1 RX packets:0 errors:0 dropped:0 overruns:0 frame:0 TX packets:0 errors:0 dropped:0 overruns:0 carrier:0 collisions:0 txqueuelen:0 RX bytes:0 (0.0 B) TX bytes:0 (0.0 B) eth15 Link encap:Ethernet HWaddr 4C:5E:0C:AC:E3:AC UP BROADCAST MULTICAST MTU:1500 Metric:1 RX packets:0 errors:0 dropped:0 overruns:0 frame:0 TX packets:0 errors:0 dropped:0 overruns:0 carrier:0 collisions:0 txqueuelen:0 RX bytes:0 (0.0 B) TX bytes:0 (0.0 B) eth16 Link encap:Ethernet HWaddr 4C:5E:0C:AC:E3:AD UP BROADCAST MULTICAST MTU:1500 Metric:1 RX packets:0 errors:0 dropped:0 overruns:0 frame:0 TX packets:0 errors:0 dropped:0 overruns:0 carrier:0 collisions:0 txqueuelen:0 RX bytes:0 (0.0 B) TX bytes:0 (0.0 B) eth17 Link encap:Ethernet HWaddr 4C:5E:0C:AC:E3:AE UP BROADCAST MULTICAST MTU:1500 Metric:1 RX packets:0 errors:0 dropped:0 overruns:0 frame:0 TX packets:0 errors:0 dropped:0 overruns:0 carrier:0 collisions:0 txqueuelen:0 RX bytes:0 (0.0 B) TX bytes:0 (0.0 B) eth18 Link encap:Ethernet HWaddr 4C:5E:0C:AC:E3:AF UP BROADCAST MULTICAST MTU:1500 Metric:1 RX packets:0 errors:0 dropped:0 overruns:0 frame:0 TX packets:0 errors:0 dropped:0 overruns:0 carrier:0 collisions:0 txqueuelen:0 RX bytes:0 (0.0 B) TX bytes:0 (0.0 B) eth19 Link encap:Ethernet HWaddr 4C:5E:0C:AC:E3:B0 UP BROADCAST MULTICAST MTU:1500 Metric:1 RX packets:0 errors:0 dropped:0 overruns:0 frame:0 TX packets:0 errors:0 dropped:0 overruns:0 carrier:0 collisions:0 txqueuelen:0 RX bytes:0 (0.0 B) TX bytes:0 (0.0 B) eth2 Link encap:Ethernet HWaddr 4C:5E:0C:AC:E3:9F UP BROADCAST MULTICAST MTU:1500 Metric:1 RX packets:0 errors:0 dropped:0 overruns:0 frame:0 TX packets:0 errors:0 dropped:0 overruns:0 carrier:0 collisions:0 txqueuelen:0 RX bytes:0 (0.0 B) TX bytes:0 (0.0 B) eth20 Link encap:Ethernet HWaddr 4C:5E:0C:AC:E3:B1 UP BROADCAST MULTICAST MTU:1500 Metric:1 RX packets:0 errors:0 dropped:0 overruns:0 frame:0 TX packets:0 errors:0 dropped:0 overruns:0 carrier:0 collisions:0 txqueuelen:0 RX bytes:0 (0.0 B) TX bytes:0 (0.0 B) eth21 Link encap:Ethernet HWaddr 4C:5E:0C:AC:E3:B2 UP BROADCAST MULTICAST MTU:1500 Metric:1 RX packets:0 errors:0 dropped:0 overruns:0 frame:0 TX packets:0 errors:0 dropped:0 overruns:0 carrier:0 collisions:0 txqueuelen:0 RX bytes:0 (0.0 B) TX bytes:0 (0.0 B) eth22 Link encap:Ethernet HWaddr 4C:5E:0C:AC:E3:B3 UP BROADCAST MULTICAST MTU:1500 Metric:1 RX packets:0 errors:0 dropped:0 overruns:0 frame:0 TX packets:0 errors:0 dropped:0 overruns:0 carrier:0 collisions:0 txqueuelen:0 RX bytes:0 (0.0 B) TX bytes:0 (0.0 B) eth23 Link encap:Ethernet HWaddr 4C:5E:0C:AC:E3:B4 UP BROADCAST MULTICAST MTU:1500 Metric:1 RX packets:0 errors:0 dropped:0 overruns:0 frame:0 TX packets:0 errors:0 dropped:0 overruns:0 carrier:0 collisions:0 txqueuelen:0 RX bytes:0 (0.0 B) TX bytes:0 (0.0 B) eth24 Link encap:Ethernet HWaddr 4C:5E:0C:AC:E3:B5 UP BROADCAST MULTICAST MTU:1500 Metric:1 RX packets:0 errors:0 dropped:0 overruns:0 frame:0 TX packets:0 errors:0 dropped:0 overruns:0 carrier:0 collisions:0 txqueuelen:0 RX bytes:0 (0.0 B) TX bytes:0 (0.0 B) eth3 Link encap:Ethernet HWaddr 4C:5E:0C:AC:E3:A0 UP BROADCAST MULTICAST MTU:1500 Metric:1 RX packets:0 errors:0 dropped:0 overruns:0 frame:0 TX packets:0 errors:0 dropped:0 overruns:0 carrier:0 collisions:0 txqueuelen:0 RX bytes:0 (0.0 B) TX bytes:0 (0.0 B) eth4 Link encap:Ethernet HWaddr 4C:5E:0C:AC:E3:A1 UP BROADCAST MULTICAST MTU:1500 Metric:1 RX packets:0 errors:0 dropped:0 overruns:0 frame:0 TX packets:0 errors:0 dropped:0 overruns:0 carrier:0 collisions:0 txqueuelen:0 RX bytes:0 (0.0 B) TX bytes:0 (0.0 B) eth5 Link encap:Ethernet HWaddr 4C:5E:0C:AC:E3:A2 UP BROADCAST MULTICAST MTU:1500 Metric:1 RX packets:0 errors:0 dropped:0 overruns:0 frame:0 TX packets:0 errors:0 dropped:0 overruns:0 carrier:0 collisions:0 txqueuelen:0 RX bytes:0 (0.0 B) TX bytes:0 (0.0 B) eth6 Link encap:Ethernet HWaddr 4C:5E:0C:AC:E3:A3 UP BROADCAST MULTICAST MTU:1500 Metric:1 RX packets:0 errors:0 dropped:0 overruns:0 frame:0 TX packets:0 errors:0 dropped:0 overruns:0 carrier:0 collisions:0 txqueuelen:0 RX bytes:0 (0.0 B) TX bytes:0 (0.0 B) eth7 Link encap:Ethernet HWaddr 4C:5E:0C:AC:E3:A4 UP BROADCAST MULTICAST MTU:1500 Metric:1 RX packets:0 errors:0 dropped:0 overruns:0 frame:0 TX packets:0 errors:0 dropped:0 overruns:0 carrier:0 collisions:0 txqueuelen:0 RX bytes:0 (0.0 B) TX bytes:0 (0.0 B) eth8 Link encap:Ethernet HWaddr 4C:5E:0C:AC:E3:A5 UP BROADCAST MULTICAST MTU:1500 Metric:1 RX packets:0 errors:0 dropped:0 overruns:0 frame:0 TX packets:0 errors:0 dropped:0 overruns:0 carrier:0 collisions:0 txqueuelen:0 RX bytes:0 (0.0 B) TX bytes:0 (0.0 B) eth9 Link encap:Ethernet HWaddr 4C:5E:0C:AC:E3:A6 UP BROADCAST MULTICAST MTU:1500 Metric:1 RX packets:0 errors:0 dropped:0 overruns:0 frame:0 TX packets:0 errors:0 dropped:0 overruns:0 carrier:0 collisions:0 txqueuelen:0 RX bytes:0 (0.0 B) TX bytes:0 (0.0 B) lo Link encap:Local Loopback inet addr:127.0.0.1 Mask:255.0.0.0 UP LOOPBACK RUNNING MTU:3584 Metric:1 RX packets:0 errors:0 dropped:0 overruns:0 frame:0 TX packets:0 errors:0 dropped:0 overruns:0 carrier:0 collisions:0 txqueuelen:0 RX bytes:0 (0.0 B) TX bytes:0 (0.0 B) switch0 Link encap:UNSPEC HWaddr 00-00-00-00-00-00-00-00-00-00-00-00-00-00-00-00 UP RUNNING NOARP MTU:1500 Metric:1 RX packets:2070 errors:0 dropped:0 overruns:0 frame:0 TX packets:1685 errors:0 dropped:0 overruns:0 carrier:0 collisions:0 txqueuelen:1000 RX bytes:1913988 (1.8 MiB) TX bytes:592477 (578.5 KiB) vlan30 Link encap:Ethernet HWaddr 4C:5E:0C:AC:E3:9D UP BROADCAST RUNNING MULTICAST MTU:1500 Metric:1 RX packets:0 errors:0 dropped:0 overruns:0 frame:0 TX packets:40 errors:0 dropped:0 overruns:0 carrier:0 collisions:0 txqueuelen:0 RX bytes:0 (0.0 B) TX bytes:4500 (4.3 KiB) # # brctl show bridge name bridge id STP enabled interfaces br0 0000.000000000000 yes eth0 br1 0000.000000000000 yes # # # ps a PID USER TIME COMMAND 1 root 17:10 /init 2 root 6:30 [kthreadd] 3 root 36:47 [ksoftirqd/0] 4 root 0:12 [kworker/0:0] 5 root 212:23 [kworker/u:0] 6 root 0:08 [khelper] 7 root 15:36 [kdevtmpfs] 8 root 0:04 [netns] 9 root 6:00 [sync_supers] 10 root 0:38 [bdi-default] 11 root 0:08 [kblockd] 12 root 0:00 [kswapd0] 13 root 0:47 [fsnotify_mark] 14 root 0:04 [crypto] 18 root 0:00 [mtdblock0] 19 root 0:00 [mtdblock1] 20 root 0:04 [mtdblock2] 21 root 1844:1 [kworker/0:1] 31 root 0:08 [kworker/u:1] 85 root 0:47 catlog -fs -n 10 backtrace 103 root 0:04 [btest] 177 root 165:25 /nova/bin/loader 189 root 8:01 /nova/bin/mproxy 190 root 4:09 /nova/bin/log 191 root 2:34 /nova/bin/moduler 192 root 44:57 /nova/bin/resolver 193 root 2:30 /nova/bin/mactel 194 root 38:34 /nova/bin/bridge2 195 root 2:13 /nova/bin/macping 197 root 130:42 /nova/bin/net 198 root 77:48 /nova/bin/sys2 199 root 4:17 /nova/bin/btest 200 root 10:22 /nova/bin/route 202 root 2:00 /nova/bin/sermgr 203 root 0:25 /nova/bin/diskd 205 root 39:43 /nova/bin/led 206 root 2:17 /nova/bin/quickset 207 root 276:01 /nova/bin/lcdstat 215 root 35:17 /nova/bin/www 237 root 1:43 [khubd] 304 root 13:10 bash 336 root 0:38 [flush-31:1] 365 root 0:04 ps a # # # netstat -anp Active Internet connections (servers and established) Proto Recv-Q Send-Q Local Address Foreign Address State PID/Program name tcp 0 0 0.0.0.0:8291 0.0.0.0:* LISTEN 189/mproxy tcp 0 0 0.0.0.0:80 0.0.0.0:* LISTEN 215/www tcp 0 0 0.0.0.0:2000 0.0.0.0:* LISTEN 199/btest tcp 0 0 0.0.0.0:21 0.0.0.0:* LISTEN 202/sermgr tcp 0 0 0.0.0.0:53 0.0.0.0:* LISTEN 192/resolver tcp 0 0 0.0.0.0:22 0.0.0.0:* LISTEN 202/sermgr tcp 0 0 0.0.0.0:23 0.0.0.0:* LISTEN 202/sermgr tcp 0 0 0.0.0.0:8728 0.0.0.0:* LISTEN 202/sermgr tcp 0 0 0.0.0.0:8729 0.0.0.0:* LISTEN 202/sermgr netstat: /proc/net/tcp6: No such file or directory udp 0 0 0.0.0.0:5678 0.0.0.0:* 197/net udp 0 0 0.0.0.0:53 0.0.0.0:* 192/resolver netstat: /proc/net/udp6: No such file or directory netstat: /proc/net/raw6: No such file or directory Active UNIX domain sockets (servers and established) Proto RefCnt Flags Type State I-Node PID/Program name Path unix 2 [ ACC ] STREAM LISTENING 381 177/loader /ram/novasock unix 2 [ ACC ] STREAM LISTENING 479 190/log /ram/logsocket unix 3 [ ] STREAM CONNECTED 663 190/log /ram/logsocket unix 3 [ ] STREAM CONNECTED 662 197/net unix 3 [ ] STREAM CONNECTED 629 190/log /ram/logsocket unix 3 [ ] STREAM CONNECTED 628 200/route unix 3 [ ] STREAM CONNECTED 527 190/log /ram/logsocket unix 3 [ ] STREAM CONNECTED 526 198/sys2 unix 3 [ ] STREAM CONNECTED 502 215/www unix 3 [ ] STREAM CONNECTED 501 177/loader unix 3 [ ] STREAM CONNECTED 423 207/lcdstat unix 3 [ ] STREAM CONNECTED 422 177/loader unix 3 [ ] STREAM CONNECTED 421 206/quickset unix 3 [ ] STREAM CONNECTED 420 177/loader unix 3 [ ] STREAM CONNECTED 419 205/led unix 3 [ ] STREAM CONNECTED 418 177/loader unix 3 [ ] STREAM CONNECTED 415 203/diskd unix 3 [ ] STREAM CONNECTED 414 177/loader unix 3 [ ] STREAM CONNECTED 413 202/sermgr unix 3 [ ] STREAM CONNECTED 412 177/loader unix 3 [ ] STREAM CONNECTED 409 200/route unix 3 [ ] STREAM CONNECTED 408 177/loader unix 3 [ ] STREAM CONNECTED 407 199/btest unix 3 [ ] STREAM CONNECTED 406 177/loader unix 3 [ ] STREAM CONNECTED 405 198/sys2 unix 3 [ ] STREAM CONNECTED 404 177/loader unix 3 [ ] STREAM CONNECTED 403 197/net unix 3 [ ] STREAM CONNECTED 402 177/loader unix 3 [ ] STREAM CONNECTED 399 195/macping unix 3 [ ] STREAM CONNECTED 398 177/loader unix 3 [ ] STREAM CONNECTED 397 194/bridge2 unix 3 [ ] STREAM CONNECTED 396 177/loader unix 3 [ ] STREAM CONNECTED 395 193/mactel unix 3 [ ] STREAM CONNECTED 394 177/loader unix 3 [ ] STREAM CONNECTED 393 192/resolver unix 3 [ ] STREAM CONNECTED 392 177/loader unix 3 [ ] STREAM CONNECTED 391 191/moduler unix 3 [ ] STREAM CONNECTED 390 177/loader unix 3 [ ] STREAM CONNECTED 389 190/log unix 3 [ ] STREAM CONNECTED 388 177/loader unix 3 [ ] STREAM CONNECTED 387 189/mproxy unix 3 [ ] STREAM CONNECTED 386 177/loader # # # lspci # # lspci -h lspci: invalid option -- h BusyBox v1.16.1 (2010-03-29 11:53:01 CDT) multi-call binary. Usage: lspci [-mk] List all PCI devices -m Parseable output -k Show driver # lspci -k # # # route -n Kernel IP routing table Destination Gateway Genmask Flags Metric Ref Use Iface 192.168.88.0 0.0.0.0 255.255.255.0 U 0 0 0 br0 # # # strings /nova/bin/resolver | grep dnsmasq #
Hmm, I always thought the DNS resolver on MikroTik was dnsmasq under the covers. Guess not.
There you go. Root shell on a MikroTik, step-by-step. If you uncover interesting details about the underlying system, be sure to let me know.
0 notes
Text
Troubleshooting EAP-TLS with freeradius
Ubuntu 14.04 (Linux 3.13.0-53), freeradius 2.1.12, wpa_supplicant 2.4,
I'm in the process of setting up wifi to use one of the more secure authentication methods, EAP-TLS (well, more secure than WPA-PSK or WPA2-PSK). WPA-Enterprise with 802.1x using EAP-TLS uses the same mechanism that protects web sites, TLS. Anyway, I followed the great instructions Thomas Hruska put together at http://cubicspot.blogspot.com/2013/04/setting-up-wpa2-enterprise-aes-with.html but it wouldn't work. After figuring out the problem, I set out to document here the troubleshooting steps.
First, I stopped freeradius with service freeradius stop and restarted it with freeradius -X (you can also start it with freeradius -Xx to get even more debugging info).
Attempting authentication with a Windows computer was becoming time-consuming, so I downloaded wpa_supplicant and compiled the eapol_test program, which can simulate a client authentication attempt from the same machine freeradius is running on.
To compile eapol_test:
Download wpa_supplicant
root@freeradius-vagrant:/tmp# wget http://w1.fi/releases/wpa_supplicant-2.4.tar.gz --2015-07-02 16:17:56-- http://w1.fi/releases/wpa_supplicant-2.4.tar.gz Resolving w1.fi (w1.fi)... 212.71.239.96 Connecting to w1.fi (w1.fi)|212.71.239.96|:80... connected. HTTP request sent, awaiting response... 200 OK Length: 2525648 (2.4M) [application/x-gzip] Saving to: ‘wpa_supplicant-2.4.tar.gz’ 100%[=======================================================================================================================================>] 2,525,648 419KB/s in 6.3s 2015-07-02 16:18:03 (392 KB/s) - ‘wpa_supplicant-2.4.tar.gz’ saved [2525648/2525648]
Decompress
root@freeradius-vagrant:/tmp# tar zxvf wpa_supplicant-2.4.tar.gz wpa_supplicant-2.4/ wpa_supplicant-2.4/wpa_supplicant/ wpa_supplicant-2.4/wpa_supplicant/wpas_glue.c [...] wpa_supplicant-2.4/wpa_supplicant/eapol_test.c [...]
Change to the wpa_supplicant directory where eapol_test.c lives
root@freeradius-vagrant:/tmp# cd wpa_supplicant-2.4/wpa_supplicant/
Copy the default config to .config, which is where make(1) expects it to be
root@freeradius-vagrant:/tmp/wpa_supplicant-2.4/wpa_supplicant# cp defconfig .config
Compile eapol_test
root@freeradius-vagrant:/tmp/wpa_supplicant-2.4/wpa_supplicant# make eapol_test CC config.c CC notify.c [...] CC ../src/utils/ip_addr.c LD eapol_test
Copy eapol_test to root's home directory
root@freeradius-vagrant:/tmp/wpa_supplicant-2.4/wpa_supplicant# cp eapol_test ~
Now that you have the eapol_test binary compiled, you need a config file to feed to it. Following Thomas' directory scheme (see above for his tutorial), we'll put it in /var/certs/freeradius/
root@freeradius-vagrant:/tmp/wpa_supplicant-2.4/wpa_supplicant# cd /var/certs/freeradius/ root@freeradius-vagrant:/var/certs/freeradius# USER_NAME=`grep emailAddress client.cnf | grep '@' | sed 's/.*=//;s/^ *//'`; PASSWORD_CLIENT=`grep output_password client.cnf | sed 's/.*=//;s/^ *//'`; cat eapol_test-eaptls.conf > network={ > ssid="DoesNotMatterForThisTest" > key_mgmt=WPA-EAP > eap-TLS > identity="${USER_NAME}" > ca_cert="/var/certs/freeradius/ca.pem" > client_cert="/var/certs/freeradius/${USER_NAME}.pem" > private_key="/var/certs/freeradius/client.key" > private_key_passwd="${PASSWORD_CLIENT}" > eapol_flags=3 > } > EOF
In a different terminal, start up freeradius with
freeradius -X
Attempt an authentication
root@freeradius-vagrant:/var/certs/freeradius# ~/eapol_test -a10.0.2.15 -p1812 -sSEKRET -ceapol_test-eaptls.conf -r0 Reading configuration file 'eapol_test-eaptls.conf' Line: 1 - start of a new network block ssid - hexdump_ascii(len=24): 44 6f 65 73 4e 6f 74 4d 61 74 74 65 72 46 6f 72 DoesNotMatterFor 54 68 69 73 54 65 73 74 ThisTest key_mgmt: 0x1 [...] EAP: deinitialize previously used EAP method (13, TLS) at EAP deinit ENGINE: engine deinit MPPE keys OK: 0 mismatch: 1 FAILURE
So we got a FAILURE. Back in the freeradius window, I see that the cert could not be verified
rlm_eap_tls: Certificate CN ([email protected]) fails external verification! [tls] chain-depth=0, [tls] error=0 [tls] --> User-Name = [email protected] [tls] --> BUF-Name = [email protected] [tls] --> subject = /C=US/ST=Montana/O=XXXXX, Inc./[email protected]/[email protected] [tls] --> issuer = /C=US/ST=Montana/L=XXXXX/O=XXXXX, Inc./[email protected]/CN=XXXXX Wifi Certificate Authority [tls] --> verify return:0 [tls] >>> TLS 1.0 Alert [length 0002], fatal certificate_unknown TLS Alert write:fatal:certificate unknown TLS_accept: error in SSLv3 read client certificate B rlm_eap: SSL error error:140890B2:SSL routines:SSL3_GET_CLIENT_CERTIFICATE:no certificate returned SSL: SSL_read failed in a system call (-1), TLS session fails. TLS receive handshake failed during operation [tls] eaptls_process returned 4 [eap] Handler failed in EAP/tls [eap] Failed in EAP select ++[eap] returns invalid Failed to authenticate the user. Using Post-Auth-Type Reject # Executing group from file /etc/freeradius/sites-enabled/ruckusAP1 +- entering group REJECT {...} [attr_filter.access_reject] expand: %{User-Name} -> [email protected] attr_filter: Matched entry DEFAULT at line 11 ++[attr_filter.access_reject] returns updated Delaying reject of request 8 for 1 seconds Going to the next request Waking up in 0.9 seconds. Sending delayed reject for request 8 Sending Access-Reject of id 8 to 10.0.2.15 port 34071 EAP-Message = 0x04080004 Message-Authenticator = 0x00000000000000000000000000000000
I wonder why. My certs are in /etc/freeradius
root@freeradius-vagrant:/etc/freeradius/certs# ls -l total 4 lrwxrwxrwx 1 root freerad 28 Jun 24 20:08 ca.pem -> /var/certs/freeradius/ca.pem -rw-r--r-- 1 root freerad 245 Jun 22 22:15 dh lrwxrwxrwx 1 root freerad 32 Jun 24 20:08 server.key -> /var/certs/freeradius/server.key lrwxrwxrwx 1 root freerad 32 Jun 24 20:08 server.pem -> /var/certs/freeradius/server.pem
and they can be read by the freerad user (the user the freeradius daemon is running as)
root@freeradius-vagrant:/etc/freeradius/certs# ls -l /var/certs/freeradius/ca.pem /var/certs/freeradius/server.key /var/certs/freeradius/server.pem -rw-r----- 1 root ssl-cert 2419 Jun 24 23:25 /var/certs/freeradius/ca.pem -rw-r----- 1 root ssl-cert 3394 Jun 24 23:26 /var/certs/freeradius/server.key -rw-r----- 1 root ssl-cert 5878 Jun 24 23:26 /var/certs/freeradius/server.pem
The freerad user is a member of the ssl-cert group, so it can read the certs directory files ok
root@freeradius-vagrant:/etc/freeradius/certs# groups freerad freerad : freerad shadow ssl-cert
Next step is to travel down the rabbit hole of why freeradius cannot verify the client certificate. I do know that freeradius relies on the openssl package to do cert verification, so maybe it is executing openssl. If it is, then strace will catch the command freeradius is running.
root@freeradius-vagrant:/etc/freeradius/certs# strace -eexecve -ttvfo /tmp/tt -s 1024 freeradius -X FreeRADIUS Version 2.1.12, for host x86_64-pc-linux-gnu, built on Feb 24 2014 at 14:57:57 Copyright (C) 1999-2009 The FreeRADIUS server project and contributors. There is NO warranty; not even for MERCHANTABILITY or FITNESS FOR A PARTICULAR PURPOSE. You may redistribute copies of FreeRADIUS under the terms of the GNU General Public License v2. Starting - reading configuration files ... [...]
and execute eapol_test again
root@freeradius-vagrant:/var/certs/freeradius# ~/eapol_test -a10.0.2.15 -p1812 -sSEKRET -ceapol_test-eaptls.conf -r0 Reading configuration file 'eapol_test-eaptls.conf' Line: 1 - start of a new network block ssid - hexdump_ascii(len=24): 44 6f 65 73 4e 6f 74 4d 61 74 74 65 72 46 6f 72 DoesNotMatterFor 54 68 69 73 54 65 73 74 ThisTest key_mgmt: 0x1 [...] EAP: deinitialize previously used EAP method (13, TLS) at EAP deinit ENGINE: engine deinit MPPE keys OK: 0 mismatch: 1 FAILURE
Excellent, another failure
Back in the window where freeradius and strace are running, looking at the file /tmp/tt where strace wrote all execve(2) system call invocations, I see that it did in fact execute openssl to verify the client cert.
[...] Waking up in 1.0 seconds. Cleaning up request 8 ID 8 with timestamp +64 Ready to process requests. ^C root@freeradius-vagrant:/etc/freeradius/certs# cat /tmp/tt 11101 21:18:50.164298 execve("/usr/sbin/freeradius", ["freeradius", "-X"], ["XDG_SESSION_ID=7", "SHELL=/bin/bash", "TERM=xterm-256color", "USER=root", "LS_COLORS=rs=0:di=01;34:ln=01;36:mh=00:pi=40;33:so=01;35:do=01;35:bd=40;33;01:cd=40;33;01:or=40;31;01:su=37;41:sg=30;43:ca=30;41:tw=30;42:ow=34;42:st=37;44:ex=01;32:*.tar=01;31:*.tgz=01;31:*.arj=01;31:*.taz=01;31:*.lzh=01;31:*.lzma=01;31:*.tlz=01;31:*.txz=01;31:*.zip=01;31:*.z=01;31:*.Z=01;31:*.dz=01;31:*.gz=01;31:*.lz=01;31:*.xz=01;31:*.bz2=01;31:*.bz=01;31:*.tbz=01;31:*.tbz2=01;31:*.tz=01;31:*.deb=01;31:*.rpm=01;31:*.jar=01;31:*.war=01;31:*.ear=01;31:*.sar=01;31:*.rar=01;31:*.ace=01;31:*.zoo=01;31:*.cpio=01;31:*.7z=01;31:*.rz=01;31:*.jpg=01;35:*.jpeg=01;35:*.gif=01;35:*.bmp=01;35:*.pbm=01;35:*.pgm=01;35:*.ppm=01;35:*.tga=01;35:*.xbm=01;35:*.xpm=01;35:*.tif=01;35:*.tiff=01;35:*.png=01;35:*.svg=01;35:*.svgz=01;35:*.mng=01;35:*.pcx=01;35:*.mov=01;35:*.mpg=01;35:*.mpeg=01;35:*.m2v=01;35:*.mkv=01;35:*.webm=01;35:*.ogm=01;35:*.mp4=01;35:*.m4v=01;35:*.mp4v=01;35:*.vob=01;35:*.qt=01;35:*.nuv=01;35:*.wmv=01;35:*.asf=01;35:*.rm=01;35:*.rmvb=01;35:*.flc=01;35:*.avi=01;35:*.fli=01;35:*.flv=01;35:*.gl=01;35:*.dl=01;35:*"..., "MAIL=/var/mail/root", "PATH=/usr/local/sbin:/usr/local/bin:/usr/sbin:/usr/bin:/sbin:/bin", "PWD=/etc/freeradius/certs", "LANG=en_US.UTF-8", "SHLVL=1", "HOME=/root", "LOGNAME=root", "LESSOPEN=| /usr/bin/lesspipe %s", "XDG_RUNTIME_DIR=/run/user/1000", "LESSCLOSE=/usr/bin/lesspipe %s %s", "_=/usr/bin/strace", "OLDPWD=/etc/freeradius"]) = 0 11122 21:19:54.483582 execve("/usr/bin/openssl", ["/usr/bin/openssl", "verify", "-CApath", "/etc/freeradius/certs", "/var/tmp/radiusd/freeradius.client.XXnZcbyR"], ["USER_NAME=\"[email protected]\"", "NAS_IP_ADDRESS=127.0.0.1", "CALLING_STATION_ID=\"02-00-00-00-00-01\"", "FRAMED_MTU=1400", "NAS_PORT_TYPE=Wireless-802.11", "CONNECT_INFO=\"CONNECT 11Mbps 802.11b\"", "EAP_MESSAGE=0x020804420d002da2bc70b9dabd6e808364e70cce8f29bca839f5f3f8fa79ce502fccef2fa978810e659ad88b4ef09c854c505afba4ad58d46bb84868cbdc720899b49e4ce7cba798fa33fdd30691b4d076f6899b52a40bb2f887b82ddff9bbb0dc774ff3e04b5565d0340a626df5bf48cc4cddb06d551826199248d6e32f091b1f51d9878e83b49809c0e3524df0a7159e17fe7b0131fee3a1af74d81f8b655fcd275612ae2517835c6c408f14b0d849f33e1efdc3db483a832818a10eb783cb204bda90a7d7349ae660daaec59f78b1713028dc4a6e47e3c01eb43757b82d1fbfe90cec33dc0ba3f0936986b4cb1c9e3b939c64976634c3577a5b6c71", "EAP_MESSAGE=0x71265f3525c485df48f7816eb18dbf6f9a85561413c37283b3bb0dea51f8654122ee549c0a3f6fbbf5916cae5f9055bc19669da55005f21b827bf99dcfc5effbe38890a6f80231759786993a9e33288bcdb6d2838964d77513bd66eb303dafaa0ccbecf501f11f3b9e40d42b37b3e6c67ca154a5f9a129e72fd381e24e46d52cfedc970fbc9b28031b850eecf8ceca78c0eaf4bbae72c6b037e86f8e1150b2f799d0f587d029812d046e0b61b1d4d2726ee66dc31603010046100000424104acd3f28e5f69bdc07945db523a44066d74aa73648e448631f0eb67c11d6b5fc42f2e42f2fbfa9ee0d993f843bb2b756de1f8dfede848b6485834659d69ab", "EAP_MESSAGE=0x4c6e16030102060f0002020200d05242c896fd7ac6a483cde001e4ab4ba1de4e7d7340d618ba3b9e57419fc9b9d4d76cf9a7855bb81821b8469ec50e3c06475f71652c10e0f790d3f112236fbf82c14c2a4a4eeb8c7889bc517eff3768478a6099ea4c81a1133945a45afb6d3c031f034899edc9e93403a580ef8028cc5d2052559c747eb60d831a590c26e9ea748a89835f50de617ea8dfce6e9cd23fdfdcb9949bf1facfa907b1e11e06230e3a0fdf5230ddcfdc1962d394bfa373c6aab10e9e8e10574cec7c6fc5ca1f42cb4f8df2ce92cbfad6e2e10413795d5c2231dad82c30f485a641073e2267e5edfdae45ba62b923a19d2f0d7cf7641bdba1", "EAP_MESSAGE=0x883ed91d6b2e271940f9793025052b2270742cd0cdda10ff3d371af52dc7fd9e7f7259310fa9cb000f1dcc453413e2c203d5f26d50d002c88a3886f61128b214e7c9458af2b719fd37f07b91a09a407b4c72311a12d974cdd93b15675ac681d3c89981151cc6a4c6a4477a8e9dea42b388df96870980405f3af7ea73cfaa8cbf537941f8517e134cbb74dbf4e7658456f23f92a29440142b419c61b8a6be1a0e018a35f1924bd7a4763b476d3e9d9e2a6946ad6fc6f0dad9fb76b2ce305ccfbf3db1f22b19541d96148e46327f4790ad797673148c99d09d7e2e74cb6b3638c469e4950e75f3e26e721f9e17781c06c577be5a9ff68aee5ca66bdd7452", "EAP_MESSAGE=0x677a2de333d1ed17017156a3ad712576535db214030100010116030100302f898135f257599f9fdb3acc07d390f14d03057670c64c1a3faec01fa15cf11ba5b5642b20646e065d7d8b56ce7b7d9d", "STATE=0x91dd759796d5782502cfcac1e7c999b0", "MESSAGE_AUTHENTICATOR=0x6c6da037ca70fffeb5c047426910ce4f", "EAP_TYPE=EAP-TLS", "TLS_CLIENT_CERT_FILENAME=\"/var/tmp/radiusd/freeradius.client.XXnZcbyR\""]) = 0 11122 21:19:54.487938 +++ exited with 2 +++ 11101 21:19:54.488045 --- SIGCHLD {si_signo=SIGCHLD, si_code=CLD_EXITED, si_pid=11122, si_status=2, si_utime=0, si_stime=0} --- 11101 21:21:39.983570 --- SIGINT {si_signo=SIGINT, si_code=SI_KERNEL, si_value={int=2, ptr=0x2}} --- 11101 21:21:39.984023 +++ killed by SIGINT +++
Now I can do the exact same thing freeradius did, by asking openssl to verify my client cert. Let's see what it says
root@freeradius-vagrant:/var/certs/freeradius# USER_NAME=`grep emailAddress client.cnf | grep '@' | sed 's/.*=//;s/^ *//'`; /usr/bin/openssl verify -CApath /etc/freeradius/certs ${USER_NAME}.pem [email protected]: C = US, ST = Montana, O = "XXXXXX, Inc.", CN = [email protected], emailAddress = [email protected] error 20 at 0 depth lookup:unable to get local issuer certificate
Searching Google for openssl unable to get local issuer certificate returns the page https://www.openssl.org/docs/apps/verify.html. That page is simply the man page for openssl verify, and the -CApath option tells me the problem and the solution:
-CApath directory A directory of trusted certificates. The certificates should have names of the form: hash.0 or have symbolic links to them of this form ("hash" is the hashed certificate subject name: see the -hash option of the x509 utility). Under Unix the c_rehash script will automatically create symbolic links to a directory of certificates.
It can't really be that simple. Let's try running c_rehash in /etc/freeradius/certs
root@freeradius-vagrant:/etc/freeradius/certs# c_rehash . Doing . server.pem => 6eacae23.0 server.pem => d01a9214.0 ca.pem => 433869d5.0 ca.pem => c34814f6.0 root@freeradius-vagrant:/etc/freeradius/certs# cd /var/certs/freeradius/ root@freeradius-vagrant:/var/certs/freeradius# USER_NAME=`grep emailAddress client.cnf | grep '@' | sed 's/.*=//;s/^ *//'`; /usr/bin/openssl verify -CApath /etc/freeradius/certs ${USER_NAME}.pem [email protected]: OK
Woohoo! That seems to be it. Let's try a eapol_test again just to make sure
root@freeradius-vagrant:/var/certs/freeradius# ~/eapol_test -a10.0.2.15 -p1812 -sSEKRET -ceapol_test-eaptls.conf -r0 Reading configuration file 'eapol_test-eaptls.conf' Line: 1 - start of a new network block ssid - hexdump_ascii(len=24): 44 6f 65 73 4e 6f 74 4d 61 74 74 65 72 46 6f 72 DoesNotMatterFor 54 68 69 73 54 65 73 74 ThisTest key_mgmt: 0x1 [...] EAPOL: SUPP_PAE entering state AUTHENTICATED EAPOL: SUPP_BE entering state RECEIVE EAPOL: SUPP_BE entering state SUCCESS EAPOL: SUPP_BE entering state IDLE eapol_sm_cb: result=1 EAPOL: Successfully fetched key (len=32) PMK from EAPOL - hexdump(len=32): 74 07 88 20 6e e5 a9 9c 21 33 d7 eb e3 3a 0b c2 f6 7a f7 98 a5 ff 3b fb 9d 4f 8b 49 ee 13 c6 93 No EAP-Key-Name received from server EAP: deinitialize previously used EAP method (13, TLS) at EAP deinit ENGINE: engine deinit MPPE keys OK: 1 mismatch: 0 SUCCESS
Yep, it works now.
0 notes
Note
I actually already got it! But thanks for your help and your page, It was very helpful. Thanks Again!
Cool, glad it all worked out :)
0 notes
Note
Hello, I am a C.S. student at the University of Utah. I am taking an Operating Systems class. For my first assignment I am required to write a function in C that writes an ASCII picture to a file. But I am only allowed to use "syscall()" to do so (i.e. I cannot use open(), write(), and close()). My professor directed me to your page on Linux System Call Table for x86_64. Perhaps I am missing the point, but in C how do ensure the correct values get placed in the right registers? Thanks!
Hi,
Wow, kudos to your teacher. That’s a good exercise for a operating systems course. I don’t want to give it away completely, so i’ll give you a hint.
Let’s assume you want to write something to the screen, which is standard output, or file descriptor number 1. Take a look at the gist at http://bit.ly/1xnkAbK and you’ll see a sample syscall(2) invocation where the first parameter is the syscall number (sys_write, or 1) which will be placed in the %rax register. The second parameter to syscall(2) is file descriptor (stdout, or 1), which will be placed in the %rdi register. The third parameter is a constant character array (“test\n”), and a pointer to the memory address of first character “t” will be placed in the %rsi register. The fourth parameter is the size of the const char array (5). The operating system will start at the pointer value given in %rsi register, dereference it and print the dereferenced value to stdout. The pointer is advanced, and ptr+1 is dereferenced and that is printed on stdout and so on until that has happened 5 times. syscall(2) returns the number of characters it wrote to stdout. This may not be exactly how things occur in the kernel, but it serves to provide an example that you can use to understand what you need to do for your project.
Wonder if your professor would give extra credit if you wrote it using inline assembly instead of syscall(2)?
If you get stuck, feel free to send me a message (look me up on Twitter @ryanchapman) with what you’ve put together so far and I’ll see if I can help out more.
Oh, and hi from Bozeman. :)
Ryan
0 notes
Text
Who changed the permissions on that file?
Linux 3.8.13
Sometimes you have a situation where someone or something is changing the permissions on a file and you need to know who or what process is doing it. Below is one method which uses the Linux audit mechanism, which has been around since 2.6.
[root@web01 /home/ryan]# /etc/init.d/auditd start [root@web01 /home/ryan]# auditctl -a exit,always -S fchmodat -S chmod -S fchmod WARNING - 32/64 bit syscall mismatch, you should specify an arch [root@web01 /home/ryan]# auditctl -w /home/ryan/timmy3 -p a [root@web01 /home/ryan]# auditctl -l -a always,exit -S chmod,fchmod,fchmodat -w /home/ryan/timmy3 -p a [root@web01 /home/ryan]# chmod 111 timmy3 [root@web01 /home/ryan]# less /var/log/audit/audit.log [...] type=SYSCALL msg=audit(1416721355.647:32740): arch=c000003e syscall=268 success=yes exit=0 a0=ffffffffffffff9c a1=64b0f0 a2=49 a3=7fff4bb52f60 items=1 ppid=15195 pid=2405 auid=0 uid=0 gid=0 euid=0 suid=0 fsuid=0 egid=0 sgid=0 fsgid=0 ses=554114 tty=pts0 comm="chmod" exe="/bin/chmod" key=(null) type=CWD msg=audit(1416721355.647:32740): cwd="/home/ryan" type=PATH msg=audit(1416721355.647:32740): item=0 name="timmy3" inode=761912 dev=fb:03 mode=0100644 ouid=0 ogid=0 rdev=00:00 [...]
If you are wanting to watch a file that is hard linked, then it could exist in multiple paths and you'll have to watch activity on the inode. Continuing with the example above, let's hard link it to a file in another directory.
[root@web01 /home/ryan]# df -h /home/ryan Filesystem Size Used Avail Use% Mounted on /dev/vda3 30G 4.0G 25G 15% / [root@web01 /home/ryan]# ls -l /dev/vda3 brw-rw---- 1 root disk 251, 3 Sep 24 13:48 /dev/vda3 [root@web01 /home/ryan]# stat /home/ryan/timmy3 File: `/home/ryan/timmy3' Size: 0 Blocks: 0 IO Block: 4096 regular empty file Device: fb03h/64259d Inode: 761912 Links: 1 Access: (0644/-rw-r--r--) Uid: ( 0/ root) Gid: ( 0/ root) Access: 2014-11-22 21:49:11.000000000 -0700 Modify: 2014-11-22 21:49:11.000000000 -0700 Change: 2014-11-22 21:49:11.000000000 -0700 [root@web01 /home/ryan]# auditctl -a exit,always -S fchmodat -S chmod -S fchmod -F devmajor=251 -F devminor=3 -F inode=761912 No rules WARNING - 32/64 bit syscall mismatch, you should specify an arch Error sending add rule data request (Invalid argument)
and we hit a dead end. You could re-compile audit with the patch at https://www.redhat.com/archives/linux-audit/2013-September/msg00004.html, which would probably work. I didn't try it though.
0 notes
Link
Hi Randy,
any proxy does not expose the URL request. The only thing an upstream proxy can see is the SSL certificate that the endpoint server presents, so while they can see you are talking to Google for instance, they cannot see the URL that you requested. This is by design and although I've had several requests to change the way it works so that the URL can be exposed, I'm not going to do that. any proxy will always be this way, because I believe it is the only ethical way to proxy traffic.
Ryan
Hi Ryan,
I was just curious about something with your go-any-proxy server. Does your method of proxying HTTPS traffic allow for URL request exposure / filtering by the upstream proxy? Meaning if you’re transparently proxying my https traffic from my client machine, is the upstream proxy able to...
2 notes
·
View notes
Text
Question about go-any-proxy.
Hi Ryan,
I was just curious about something with your go-any-proxy server. Does your method of proxying HTTPS traffic allow for URL request exposure / filtering by the upstream proxy? Meaning if you’re transparently proxying my https traffic from my client machine, is the upstream proxy able to see which URLs I’m requesting, and can it block or allow the requested traffic based on proxy (squid) rulesets? Or is the encrypted connection completely preserved, and the traffic then effectively invisible to the upstream proxy?
Randy A.
2 notes
·
View notes