
Last Seen Blogs

luna-has-some-thoughts
Luna's weird thoughts

vibris-shitposting-hub
VI B;RI RIBBO NFAN

sheltershelter
ramble on rose

adultbabystories
AdultBabyStories

hudogniknet
HUDOGNIK.net
Text
Ratt's patch projects masterlist!
was inspired by @threecirclingbuzzards (who was inspired by @genderfluid-and-confuzled ) to post a masterlist of my patch projects! Pins regularly get moved around, so they may not be 100% accurate, but c'est la vie
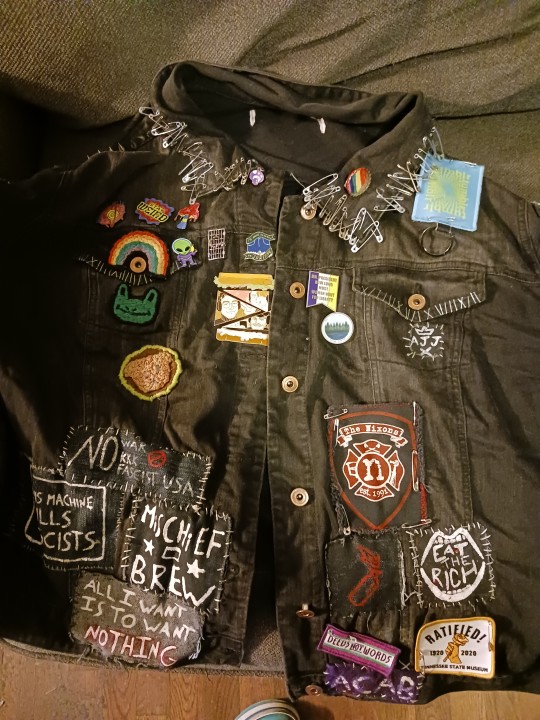
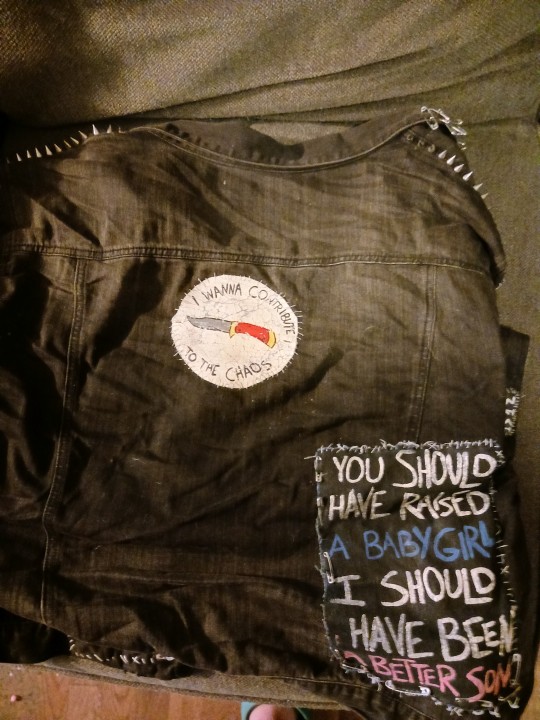
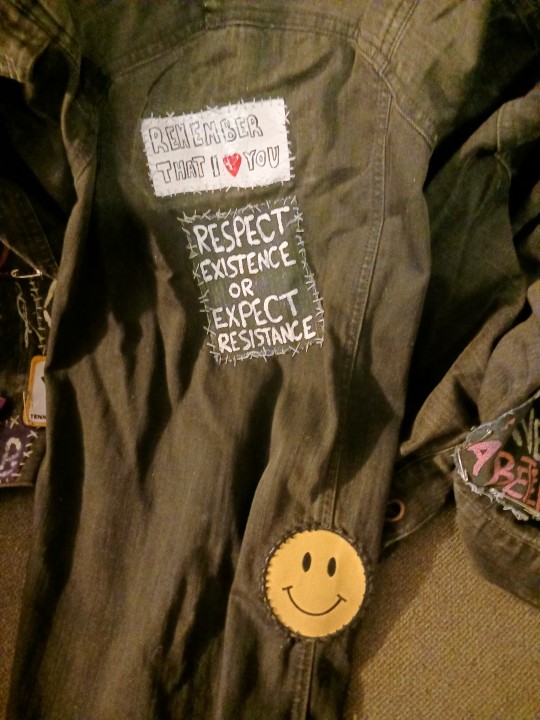
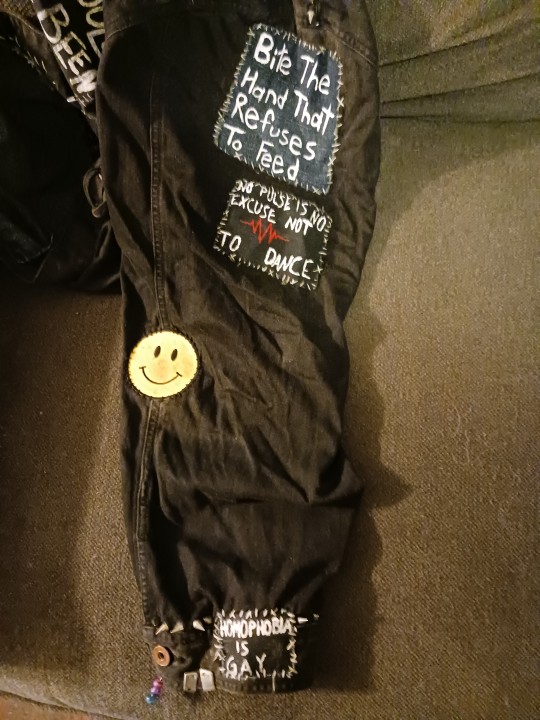
(front, back, and sleeves)
my jacket is what started it all! I believe I got the jacket itself for Christmas 2018. The first patches I made for it were the embroidered rainbow and frog on the pocket. it's my most prized possession, my favorite object in the world. I say I've been working on it for around 3 years, because I didn't really start making painted patches until late 2019- early 2020.
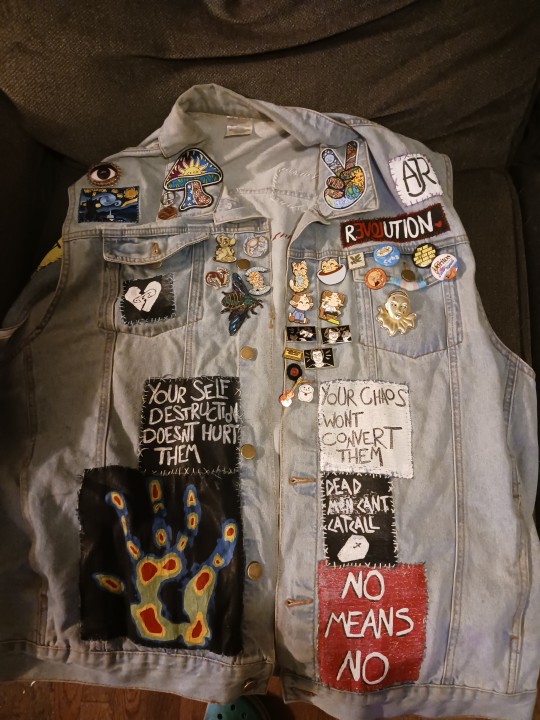
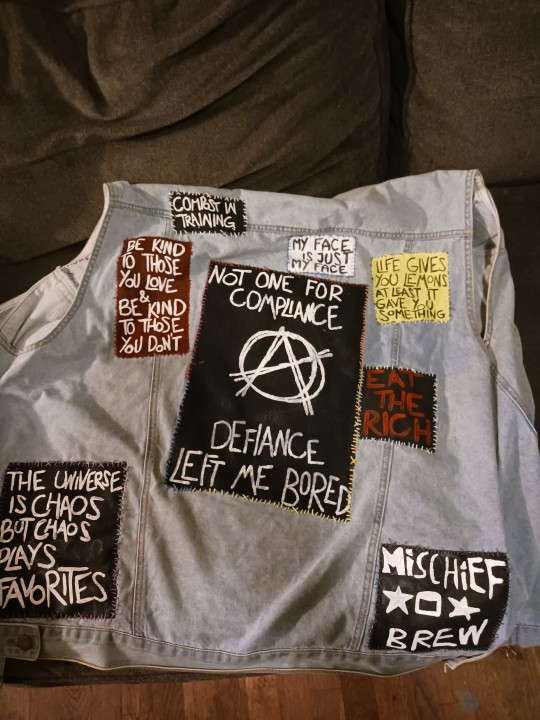
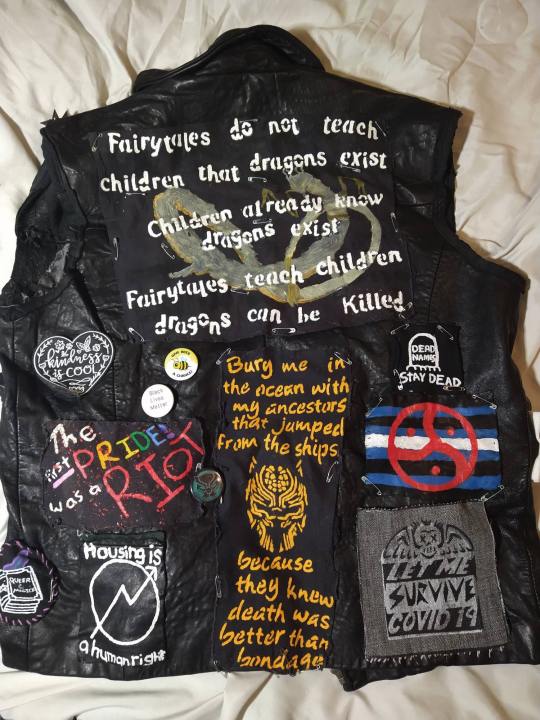
the vest!! I've been working on this for less than a year, I believe? I focused more on larger patches than on my jacket, which has smaller patches. It's not too "punk" at the moment bc I got really into AJR and put their lyrics on it lol, but I'm working towards adding more folk punk and politics to it! I've been wearing this for the better part of this year :)
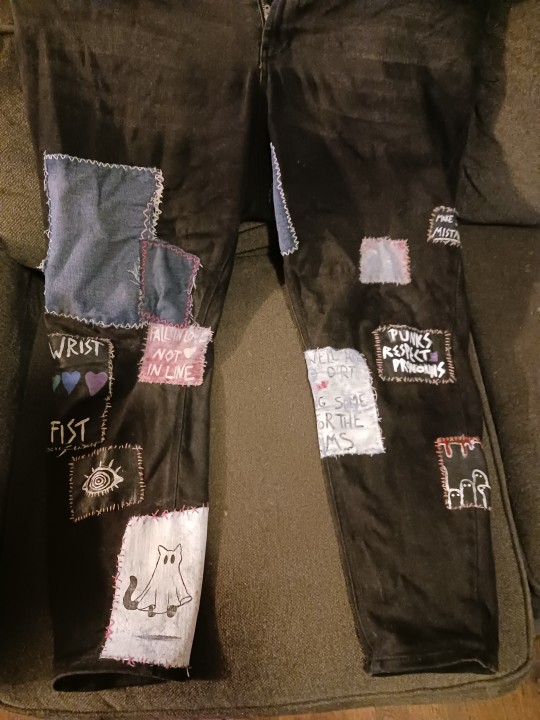
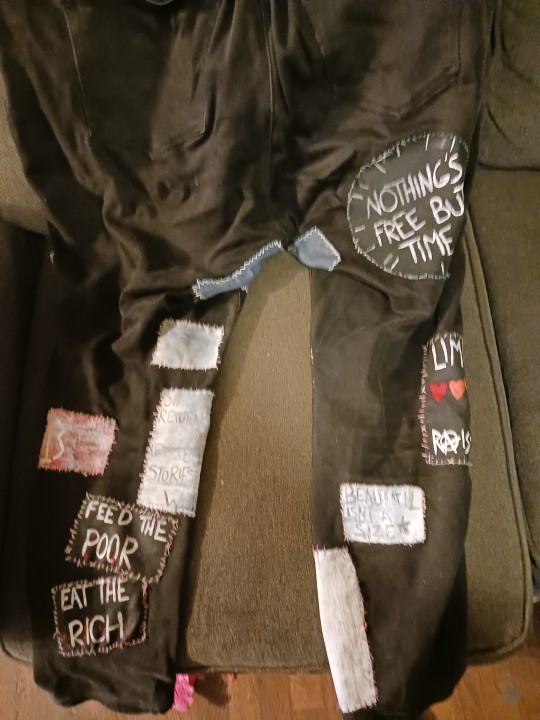
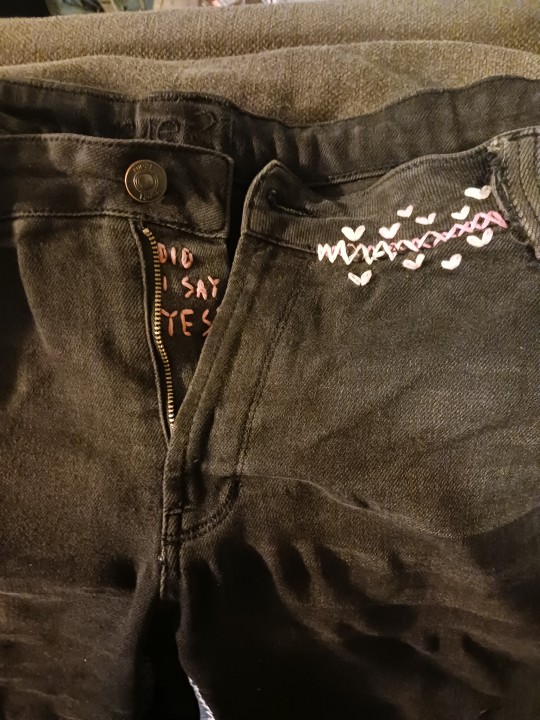
and my pants!! I've had these pants for over 3 years! The first mend I did was the hearts on the waist band, where it had started ripping away from the leg. After that, a hole generated between the thighs, so I decided to start adding patches to them! I've been working on these for over a year, their first wear after being patched being in May of 2022! a lot of the paint has flaked off, rendering a few previously-painted patches unreadable, but that's alright. I'll keep adding to them and mending them when they get ripped, and hopefully they'll last for as long as I can put them on!
121 notes
·
View notes
Text

More blackwork shading, this time inverted. Cross-stitched candle casting a blackwork glow. My own design.
583 notes
·
View notes
Text
A(narchy)utism patch design requested by @days-n-daze

feel free to use for your own stencils/freehanding and request other patch ideas - i'll design them for free so that you can easly print them and cut into a stencil or trace onto your fabric or reference or do whatever. I want to make patchmaking even more accessible than it already is <3
478 notes
·
View notes

Text
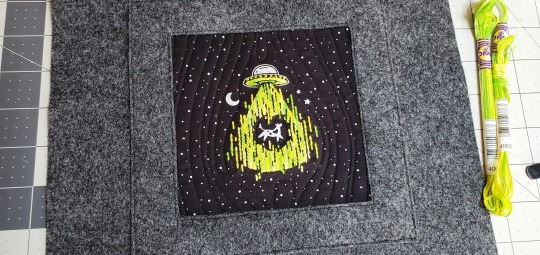
Next stage of the ufo embroidery piece (the grey felt continues up and down out of the photo frame like a hanging banner). I feel apprehensive about starting the next step because I only have a vague plan of continuing the light beam stitches around the felt.
123 notes
·
View notes
Text
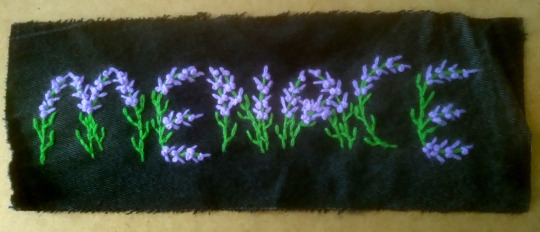
Pride month vest project, a patch a day #1: Lavender Menace
2K notes
·
View notes
Text
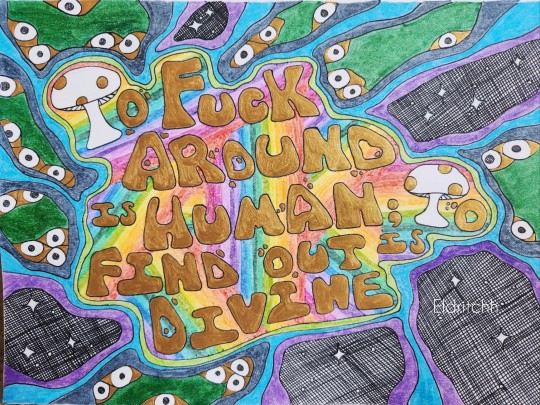
"To fuck around is human, to find out is divine."
Ink, marker, acrylic
106 notes
·
View notes
Text
It honestly warms my heart to see how much others love it too. Thank y'all for the kind words. Sorry I have no idea how to directly tag comments or tags x.x

My baby :3
#I can't leave the house much these days#and when I do it's not a place I ought to vest up for#so it really does mean a lot for this part of me to be seen#and seen by eyes who can appreciate
290 notes
·
View notes
Text
Had a few folks interested in how I made the patches I posted for Solarpunk Aesthetic Week, so I thought I'd give y'all my step-by-step process for making hand-embroidered patches!

First, choose your fabric and draw on your design. You can use basically any fabric for this - for this project I'm using some felt I've had lying around in my stash for ages.

Next, choose your embroidery floss. For my patches I split my embroidery floss into two threads with 3 strands each, as pictured. You can use as many strands in your thread as you prefer, but for the main body of my patches I prefer 3 strands.
Next you're going to start filling your design using a back stitch.

First, put in a single stitch where you want your row to start.

Poke your needle up through the fabric 1 stitch-length away from your first stitch.

Poke your needle back down the same hole your last stitch went into so they line up end-to-end.
Repeat until you have a row of your desired length (usually the length of that colour section from one end to the other). Once you have your first row, you're going to do your next row slightly offset from your first row so that your stitches lay together in a brick pattern like this:

Make sure your rows of stitches are tight together, or you'll get gaps where the fabric shows through.
Rinse and repeat with rows of back stitch to fill in your patch design.

When you're almost to the end of your thread, poke your needle through to the back of the fabric and pull the thread under the back part of the stitching to tuck in the end. Don't worry if it looks messy - no one's gonna see the back anyway.
This next step is fully optional, but I think it makes the patch design really pop. Once your patch is filled in, you can use black embroidery floss to outline your design (or whatever colour you want to outline with - it's your patch, do what you want). I use the full thread (6 strands, not split) of embroidery floss to make a thicker outline.

I use the same back stitch I used to fill the piece to make an outline that adds some separation and detail. You could use most any 'outlining' stitch for this, but I just use back stitch because it's just easier for me to do.
Once you're finished embroidering your patch, it's time to cut it out!

Make sure to leave a little border around the edge to use for sewing your patch on your jacket/bag/blanket/whatever, and be careful not to accidentally cut through the stitches on the back of the patch.
If you have a sturdy enough fabric that isn't going to fray, you can just leave it like this. If not, I recommend using a whip stitch/satin stitch to seal in the exposed edges (I find that splitting your embroidery floss into 3-strand threads works best for this).

And then you're done! At this point you can put on iron-on backing if you want, or just sew it on whatever you wanna put it on. Making patches this way does take a long time, but I feel that the results are worth it.
Thanks for reading this tutorial! I hope it was helpful. If anyone makes patches using this method, I'd love to see them! 😁
17K notes
·
View notes
Text


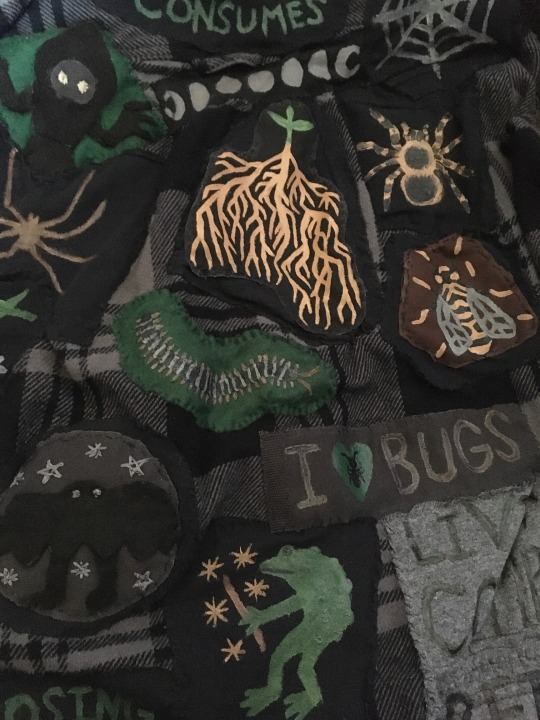


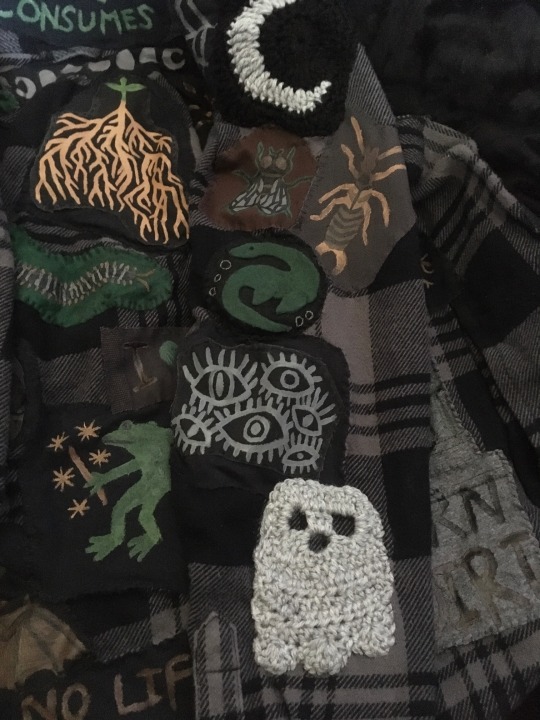

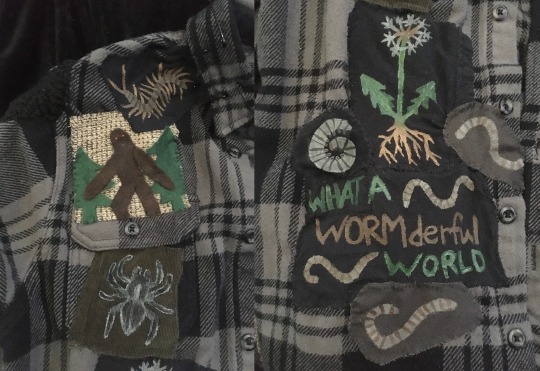
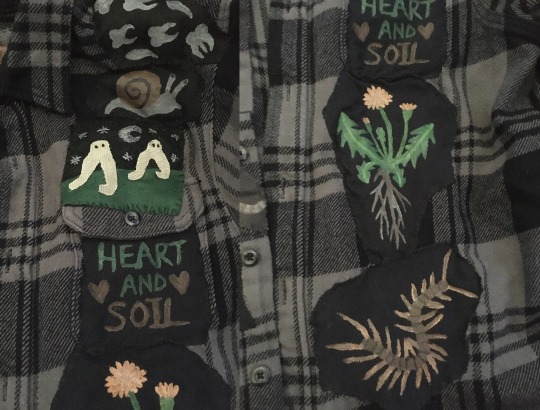

Here's my (mostly) finished patch jacket!! (ง •̀ᵥᵥ•́)ง
There's still room for some patches in the smaller blank areas, but I've added all the main ones I could. The jacket ended up having sort of a theme to it: soil, plants, bugs, cryptids and decay, all things I enjoy! :3
I've still got plenty of other patches made and ideas for more, so I may try out some patch pants soon [I've got a pair of old work pants from my brother that I'm planning to use, they've got plenty of pockets too >:) ].
(The paint I used for the patches is weather-resistant, so it has a bit of a "shiny" finish that doesn't always show up great in photos. There are better photos in previous posts. )
#ohhhh this is one of the best ones I've seen in a while#so many patches to choose from#that I just ADORE#not to mention it just looks comfy ah
942 notes
·
View notes
Text
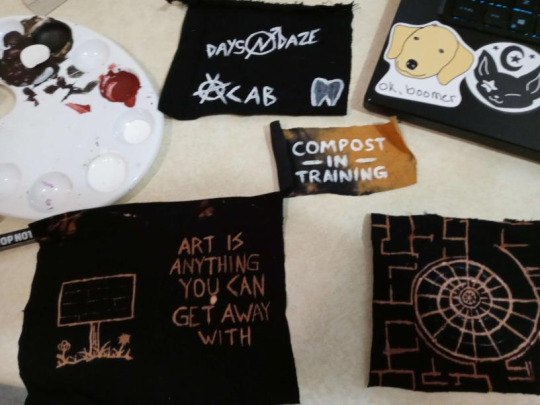
hi look at my wip patches for my new jacket
29 notes
·
View notes
Text

"ALL HAIL" the goth croc, finished this digital update of a linocut i carved forever ago. had this almost finished before i got sick and did the whole trying not to die thing while in and out of the ER for a month. finally home and getting to work again. so fatigued. but i'm starting on catching up my anxiety inducing mountain of physical orders today. still feel like shit but i'm so behind on my deadlines that i'm just going to have to deal with it. my etsy is currently on vacation and my depop i let the listings expire on for now. redbubble is my only open shop until i'm caught up
**DO NOT EVER USE MY ART IN ANY WAY WHATSOEVER**
27 notes
·
View notes