
ohthehypocrisy
Challenge thinking
All I do here is write fanfics and make my own fan-updates to games I like. You'll find Pokemon, Animal Crossing, and Smash Bros. stuff here, and also my fanfics and drabbles here. Reblogs go on my other blog down there.
104141 posts
Don't wanna be here? Send us removal request.
Last Seen Blogs

achingxbones
'sylphlike'

gfnmyles
GeforceNOW

tornioduva
Tornio Duva

veorulfr
You Are My Heart's Song

wood-lesbian
[insert title here]
Text
Magnezone for Pokemon Unite!


Season 1
Season 2
Prev: Cradily - Hatterene - Tropius - Cacturne - Ditto - Weavile - Ogerpon - Coalossal - Gogoat - Galarian Slowbro - Luxray - Breloom - Uxie, Mesprit, & Azelf - Wobbuffet - Obstagoon - Lanturn - Castform - Dusknoir - Persian - Tatsugiri & Dondozo
Ah, Magnezone, one of my favorite new evolutions from Gen 4, having evolved from the quirky Magneton which ironically makes it the honorary Steel Type of Gen 1, before the typing existed. What a lovely pokemon with such a convoluted history, despite it's awkward magnet designs, I will always be there for Magnezone, much like how it will always be there for me.
Seriously, this thing is one of my go-to's for teambuilding, especially for Trick Room teams. It's so easy to use, I've grown fond of it. Maybe that's why I'm attracted to the idea of Magnezone for Pokemon Unite, and I'm not just saying that because of the metal implants in my body.
Of which there are none. I'm being facetious.
-

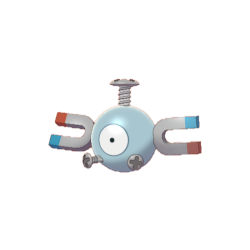
Well, onto the stats, and would you look at that. There's a reason I never hesitated to put a Magnezone on my teams. Extremely high Sp. Attack coupled with high Defense makes the magnet monster bulky enough to take hits and dish them back. The rest of its stats are serviceable, particularly the Sp. Defense is decent enough that Magnezone's bulk is only held back by its below average HP.
While it may appear to have the makings of a Defender, Magnezone is often specialized in taking on specific threats that hinder the entire team. Remember how effective it used to be at trapping opposing Steel Types and removing them from the equation? I mean, it still is, you just gotta watch out for Terastilization. Outside of that, it's hyper focused in a sense that it lacks any other optimizations, and as such it doesn't have many options in sustaining itself. Lack of recovery greatly hinders its walling capabilities, but as long as it eliminates the target, it will have done its job. Yes, this is one of those pokemon that desperately needs support from Supporters and Bulky All-Rounders. What does that make Magnezone? A...
Defender
-
Basic Attack - Ranged/Sp. Attack
The user generates a magnetic field around itself, slowly damaging all enemies within range. After dealing a certain amount of damage, affected enemies will be stunned and pulled towards the user.
The basic attack damages all enemies within range of the user. As damage is dealt, a magnet icon graphic appears over affected enemies that slowly fills. The magnet icon fills in when 15% of the opposing pokemon's HP is lost through the basic attack. When this happens, affected pokemon are Pulled a short distance towards the user.
The magnet icon disappears when the affected enemy is Pulled or leaves the range of the basic attack, or if the basic attack ends from releasing the attack button or when the attack is stopped forcefully through a hindrance. If it disappears from activating the Pull effect, the magnet icon will not reappear until the basic attack ends and restarts.
The magnet icon doesn't deplete if the target restores HP. The mark keeps track of how much HP the target has lost.
Now, the thing about magnets is that they're always on. You ever put a magnet in a small cup of honey, sprinkled in some metal fillings, and watched the particles slowly pull towards the nodes? I mean, aside from having made the world's worst snack, it's pretty fascinating to observe.
In Pokemon Unite, this is how Magnezone and its evolutions attack, by constantly filling the space around it with powerful electric currents. It deals weak damage, but the effect is powerful. If an enemy lingers in the area of effect for too long, they'll get magnetized and will be forcefully dragged towards the user. It's not a very strong pull, but if you coordinate with an ally, you can score some easy KO's this way.
Of course, once the magnetization takes effect, you have to wait for it to become active again. You can't magnetize an enemy multiple times, not unless you turn off the basic attack or let them leave the area of effect. Speaking of which, since you are holding the basic attack button to magnetize opposing pokemon, one disruptive hindrance is all it'll take to stop the magnet waves from taking hold. And there are some opposing pokemon you don't want to pull in, like Bulky All-Rounders. Remember what I said about Magnezone's lack of sustainability? Yeah, that'll become apparent much later on.
For now, work with your allies to make the most of your magnetization skills. You can improve your magnetism with your ability, Magnet Pull.
-
Ability: Magnet Pull
The user's Pull effects are strengthened the more Aeos orbs you have in your Score Pocket. Aeos Orbs on the ground are collected from further away.
Each Aeos Orb in your Score Pocket adds 1% to the power of your Pull effects. This maxes out to 30% from Level 1 to Level 7, 40% from Level 8 through Level 11, and 50% from Level 12 onwards.
This Pull strength multiplier is based on the power of the pull effect, not the distance. Otherwise, it might be possible to Pull an enemy all the way out of their Home Base after they escape into Hoopa's Hyperspace Hole.
Stray Aeos Orbs on the ground are drawn in to you from further away than normal. You will only attract stray Aeos Orbs if you have the space for them in your Score Pocket.
This ability affects only your own Score Pocket, and not the combined Score Pocket of you and an ally Comfey or other future effects.
There are weak magnets, and then there are strong magnets. And then there are really strong magnets, the kinds they use to pick up scrap in a junkyard, like a floating saucer. Hey, that's just like Magnezone!
Magnet Pull powers up your Pull effects by 1% for each Aeos Orb in your Score Pocket. This means that the boost is limited by the size of the Score Pocket, and the only way to increase it is to Level Up during the match. Now, that's easy enough, but when you make a score, you go back down to 0, which can cause moments of bad timing if you score during a hotly contested fight around a Goal Zone. Can't really pull anything without any power, huh?
Thankfully, Magnet Pull has a secondary effect of pulling in Aeos Orbs from further away than other pokemon. You ever find it tedious to manually walk over all the stray Aeos Orbs on the ground to collect them? Well, thanks to Magnezone's magnetic personality, you can just suck them all up like a hungry vacuum just by being nearby. It only works on the points you have space for, so don't forget to make a score with all those points you have.
One other thing to note is that, since it only pulls in Aeos Orbs, dummy Aeos Orbs thrown by Sableye's Feint Attack will be ignored, so that's a handy way of foiling that foolish folly.
Now, you'd think there are no downsides to this ability, and for the most part, there isn't. It's just that, Magnezone has some really strong moves with Pull effects that instantly become weaker if you were to score them all. It might be worth it to hold on to a full Pocket of Aeos Orbs for defending purposes, but don't forget to actually make goals when you need to.
It's a good thing we know how magnets work, in spite of the lack of knowledge in this field of science, nor the insistence of such ignorance.
-
At the start of the game, Magnezone will start out as Magnemite. You can choose between Magnet Bomb and Thunder Shock as your first move. By Level 3, you'll have learned both.
-
Move 1: Magnet Bomb (Ranged/Hindrance)
The user launches metal orbs that fly and stick to any enemy in range. Afterwards, the orbs explode, Pulling affected enemies towards the user. 8s cooldown.
Little metal orb projectiles are shot forward in a conical shape, sticking to enemies within range. This effect is purely visual, as even one hit will cover an enemy with the magnetically charged beads.
After 1.5 seconds, the beads spark and explode, Stunning for 0.25 seconds and Pulling the affected enemies a very short distance towards the user. The distance Pulled is lengthened by Magnet Pull.
I will never not be mad about moves that get cut in between generations, no matter how useless they may have been. I mean, a Steel Type move that never misses? How novel! It's just too bad that the signature user is a Sp. Attacker and that Move was decidedly Physical for whatever reason.
Well, we can remedy this injustice by turning it into an actually useful move in Pokemon Unite. Magnet Bomb is a short ranged move that causes little magnetically charged beads to stick to whatever it hits. The beads explode a short while later, causing Stun and Pulling the affected enemy towards the user. At the beginning of the game, this won't be all that strong of an effect, unless you diligently stockpile Aeos Orbs in order to maximize the Pull power of this move.
The short delay makes the move tricky to use, since opposing pokemon can easily just Dash away from you in order to minimize the impact of the Pull effect. You do threaten big damage, though, when Magnet Bomb is combined with your other move, Thunder shock.
-
Move 2: Thunder Shock (Area)
The user unleashes a bolt of electricity all around itself. The closer enemies are, the more damage is dealt. 6s cooldown.
Electricity is launched all around the user, damaging all enemies nearby.
The damage is multiplied the closer opposing pokemon are to the user. At the edge of the attack, the multiplier is 0.75x. Halfway it is 2.25x. Right next to the user, it becomes 4.5x increased damage.
With both your basic attack and Magnet Bomb being able to Pull enemies in, Thunder Shock is the coup de grace when the opposing pokemon is close enough. It deals pretty solid damage thanks to a proximity multiplier, which is intended to make up for Magnemite's lack longevity in a fight.
The idea is that you target a troublesome enemy like a frail Attacker, pull them in with your effects, then finish them off with Thunder Shock before they can escape. It's a solid plan, especially since ranged Attackers like to keep their distance in the first place. If an enemy Attacker is coming out of Central Area and into your Lane, you and your allies can amass a lot of EXP by coordinating a KO with your Pull effects.
And you're going to need to work together, since Magnemite is a bit of a late bloomer for a Defender.
-

At Level 4, Magnemite evolves into Magneton.
Since they make Magnemite hold a camera for these Unite Battles, do you think they ever get Magneton in on it? I mean, 3D Movies are a thing, and the multiple perspectives would make for a trippy viewing experience.
Yeah, I'm glossing over this section since Magneton evolves early, but you don't reach your full potential until Level 7, when you fully evolve into Magnezone.

At Level 7, Magneton will evolve into Magnezone. At the same time, Magnet Bomb becomes either Magnet Rise or Magnetic Flux.
-
Move 1a: Magnet Rise (Buff/Hindrance)
The user begins floating with electromagnetism, making it immune to damage and effects for a short while. At the same time, a blast of magnetically charged electricity is unleashed around the user, charging all enemies nearby. When the user crashes down, all charged enemies will be damaged and pulled towards the user. 9.5s cooldown.
At Level 12, Magnet Rise becomes Magnet Rise+.
Expands the area of effect.
A short ranged wave of electromagnetism is unleashed all around the user, marking affected enemies with a lightning bolt icon. Magnet Rise+ expands the range of this burst by 50%.
When the user floats into the air, it is completely invincible, similar to Talonflame's Fly, though it is clearly visible. It becomes capable of floating over walls and obstacles and ignores all field effects, whether they be friendly or from foes. Tall Grass also doesn't hide you anymore. This effect lasts only for 1.5 seconds.
When Magnet Rise ends, the user crashes down with a heavy thud, damaging enemies nearby. Those marked with the bolt icon will also be damaged, even if they weren't nearby, and will be Pulled towards the user a short distance. An arrow line is drawn on the ground between the marked enemies and the user, showing where the direction of the Pull effect is. Magnet Pull can increase this Pull strength.
Magnet Rise cannot Pull enemies through walls.
Apologies to Orbeetle, but Magnezone was the first flying saucer pokemon, what with its powerful magnetic tractor beam grabbing things from the earth and pulling them towards it. Don't be surprised that it floats just like a flying saucer as well. And yet, for some reason, it can't have the Levitate Ability...
Anyways, Magnezone is heavy, like ridiculously heavy. So much so, that when it turns on its magnetic powers to fly, the magnetic waves are powerful enough to fry you if you're standing too close to it. That's what happens to nearby enemies when Magnet Rise is used, as it marks them with a quaint little lightning bolt icon.
Now, while Magnezone is flying, it is completely immune to all effects, negative and positive. Yeah, it's immune to damage even, but allies can't affect it with buffs or healing moves either, just like Cinderace's Feint. Magnet Rise only makes you invulnerable for a short while just as well, only you come crashing down with a heavy thud.
The charged enemies you hit with the jump get their polarities reversed when this happens. What this means is, that those marked by Magnet Rise will suddenly get pulled towards Magnezone when it comes down, wherever that happens to be. Magnezone is only in the air for a very short amount of time, so it's not likely you'll get a lot of distance between you and the enemy.
However, it is a Pull effect, which gets strengthened by Magnet Pull, and it is a delayed Pull effect at that. If the enemy gets caught, they can expect to be pulled in the direction you're moving towards, which can be coordinated with your allies. There's a whole electric current drawn on the ground to illustrate this effect, so its their own fault if they let themselves get pulled like dumb little fish on a fishing line.
The invincibility effect is very useful too, as Magnezone lacks any way to heal or empower itself. However, this invulnerability means that you can't pull off any silly tricks like diving into Hoopa's Hyperspace Hole when it opens, since you are immune to all effects, harmful or helpful. You can't even hide in Tall Grass while floating. Being able to avoid Unite Moves is pretty nifty though, but the cooldown of the move means it'll be an extensive wait time if you miss the timing.
Plus, you're depending on a full Score Pocket to power up the Pull effects of Magnet Rise. You really need those Aeos Orbs. It's just too bad that you can't really steal them from opposing pokemon by magnetizing the orbs right out of their Score Pocket.
Or can you?
-
Move 1b: Magnetic Flux (Ranged/Hindrance)
The user fires a beam of magnetically charged electricity forward, damaging all enemies in range. The affected enemies will have their Aeos Orbs taken and added to the user's Score Pocket. When the move ends, the enemies will be pulled towards the user. The user receives reduced damage and the affected opposing pokemon deal less damage to the user while Magnetic Flux is in use. 9.5s cooldown.
At Level 12, Magnetic Flux becomes Magnetic Flux+.
Expands the range of the magnet beam and increases the damage reducing effects.
A magnetic electro beam is launched forward in a conical shape, burning enemies within range with charged radio waves. Magnetic Flux+ expands the range of this beam by 40%. Magnezone can move while using Magnetic Flux, though the direction will maintain constant.
All enemies within range of the beam will have their Aeos Orbs taken from their Score Pocket and added to the users at a rate of 2 Points per second. If the user doesn't have room in their Score Pocket, the excess is left behind on the ground. This doesn't affect Wild Pokemon.
The user receives 15% less damage from opposing attacks and opposing pokemon affected by the magnet beam deal 15% less damage to the user while within the area of effect. Magnetic Flux+ increases both of these effects to 25% each. These effects stack.
Magnetic Flux lasts for 5 seconds or until the attack is cancelled, manually or from a hindrance. When the attack ends, all opposing pokemon within range will be Pulled a short distance towards the user.
Magnezone's third eye, the big red circle in the middle of its face, is fully functional, despite the fact that it doesn't blink. That's because it's specialized to perceive magnetic waves and other strange wavelengths flying about in our world. Oh, and also because it shoots laser beams from it.
While Magnetic Flux is a passive status move, I've turned it into a sneaky little attack. Also, Magnetic Flux can only be learned by Magnezone, not Magneton, which is why Magnezone starts learning its moves at this Level and not at Level 5 as a Magneton.
Anyway, the magnetic waves launched out of Magnezone's eye magnetize the Aeos Orbs in the Score Pockets of opposing pokemon within range. What this does is that the loose change slips out of their pocket and floats into Magnezone's own deep coffers, completely of its own volition. It's not a lot of points passively, but any amount of points getting stolen is sure to illicit a violent response by the opposing team.
Normally Magnet Pull drags in stray points off the ground and towards you, but if there are none nearby, you can 'borrow' some from nearby enemies. It's too bad you get this move at Level 7 and not the early game, where it becomes much more lucrative to score and power up stacking items like Aeos Cookie.
Now, the move only runs for 5 seconds, but during that time, you get a small defense boost, reducing the damage you receive while the move is active. Those in range of Magnetic Flux will also have their damage output reduced, and these two effects can overlap, meaning that Magnezone gets a 30% total damage reduction from those it is directly harming with Magnetic Flux. That's enough to stifle most burst damage attacks coming your way. When upgraded to Magnetic Flux+, it comes out to 50% damage reduction, thwarting nearly all burst damage aimed at the giant magnet.
When the move ends, all opposing pokemon getting zapped by the beam will then get pulled towards the user. Because you are stealing Aeos Orbs, Magnet Pull will slowly increase in power. Magnetic Flux runs for 5 seconds, which totals 10 Aeos Orbs taken from each pokemon within range. More pokemon hit by the beam means more points taken, but that does naturally contribute to the risk of trying to affect the entire enemy team with this move.
While the defense boost is very nice, you can manually end the move early by using the attack a second time. Whether it ends from getting interrupted or the time has run out, Magnetic Flux pulls pokemon in when it goes away. Maybe a particularly twitchy enemy is liable to make a run for it to escape from your tractor beam. In that case, the defense boost of Magnetic Flux won't be all that useful to you since the enemy is choosing to flee instead of fight, so Pulling them in as soon as the beam hits is a great way to finish them off.
Just one thing to note. Magnetic Flux deals damage, but it doesn't hinder the enemy until it ends. You get a defense boost while using the move, but those outside of the beam's range can continue to pelt you with long range attacks like Decidueye or Inteleon, as they won't have to worry about the damage debuff. Speaking of which, hindrance resistance effects like Full Heal or Blissey's Safeguard can snub the damage reduction effects of Magnetic Flux, as well as the Pull effect if they time it right.
There's also the fact that, at this stage, your only other move is Thunder Shock, a pitifully weak move at your power level. Not to worry, as just one level later, you'll replace it with a much more impactful attack like Discharge or Flash Cannon.
-
At Level 8, Thunder Shock will become either Discharge or Flash Cannon.
-
Move 2a: Discharge (Area)
The user builds up a massive surge of electricity before unleashing it all around itself, Stunning nearby enemies. The closer they are, the more damage they receive. Affected opposing pokemon are more vulnerable to the Pull effect of your basic attack. 5.5s cooldown.
At Level 13, Discharge becomes Discharge+.
Decreases the charge time for the move.
Opposing pokemon are Stunned for 0.75 seconds when hit by Discharge.
The damage multiplies the closer they are to Magnezone, just like with Thunder Shock. The damage multiplier maxes out to 5.5x.
For 4 seconds afterwards, opposing pokemon receive a 150% stronger Pull effect from your basic attack. This stacks with Magnet Pull.
It takes Discharge 1.5 seconds to come out, causing the user the crackle with electricity right before it is unleashed. Discharge+ reduces this charge time to 0.75 seconds.
As a direct upgrade to Thunder Shock, Discharge has Magnezone let loose a powerful volley of lightning bolts all around itself. Not only does it hit hard, it also Stuns the enemy briefly, since electric attacks have a tendency to paralyze opposing pokemon that get hit.
It's not completely free to use, though, as Discharge has a short windup to it. It takes an entire second and a half for Discharge to come out when you use it, giving the opposing team plenty of time to try and dash away from your violent volt surges. Now, I would argue that limiting the space the enemy can play in is one of the defining traits of a Defender, as a direct hit can deal massive damage to slower enemies.
Just like Thunder Shock, Discharge has a proximity multiplier that increases the damage dealt to enemies too close for comfort. If they get hit at the edge of the attack, Discharge won't deal a whole lot of damage. In fact, it'll hit for a lot less than normal to those it just barely managed to graze. If opposing pokemon are shoulder to shoulder with Magnezone, however, Discharge will deliver a massive 5.5x damage multiplier to those directly nearby, potentially electrocuting frail Attackers and Speedsters.
Now, a powerful move like this would have some drawbacks, such as the charge time before the move comes out. However, Magnezone lacks the ability to empower itself with healing or shields, so it's putting itself at risk trying to maximize the damage of Discharge. As such, Discharge has a shockingly low cooldown of 5.5 seconds, which makes it ridiculously free to use at any point during a fight. Pokemon that lack sustainability need these sort of crazy cooldowns in order to be threatening to the opposing team as a Defender.
One last thing to note. The residual electricity of Discharge makes it so that your basic attack's Pull effect become much stronger, even if the attack just barely clipped them. If the move didn't successfully KO the opposing pokemon, you can have easier time Pulling the affected enemy towards you and your team with your followup attack.
Of course, you do need to coordinate with your allies to get this done.
-
Move 2b: Flash Cannon (Area)
Let loose a brilliant light all around you, damaging enemies and makes it easier to Pull enemies with your basic attack. The closer they are, the greater the damage increase. 6s cooldown.
At Level 13, Flash Cannon becomes Flash Cannon+.
Movement Speed increases while Flash Cannon+ is active.
Flash Cannon scatters light particles around Magnezone that damage nearby enemies continuously for 5 seconds. The damage dealt increases the closer they are to the user. The damage multiplier maxes out to 4.75x.
The cooldown of Flash Cannon kicks in when the move ends.
While Flash Cannon is active, the basic attack only needs to fill in 10% of the magnet icon in order to Pull opposing pokemon closer.
Flash Cannon+ increases your Movement Speed by 25% while in use.
You ever wonder why Flash Cannon is a Steel type move? Because Steel types manipulate the light refracting off of their polished metal exteriors and focus it into an attack. I mean, that doesn't explain why the non-Steel types are able to use it, but at least it gives pokemon like Magnezone some way to deal Sp. Attack damage with their Same Type Attack Boost.
While Discharge lets loose a big wave of dangerous electricity all around itself, Flash Cannon is a bit weaker in exchange for consistency. It will deal small amounts of damage passively all around itself, which it will continue to do for 5 seconds. It can't even get stifled by hindrances, which is a weakness of Discharge if opposing pokemon are good at timing their attacks.
It also has a proximity multiplier, just like Discharge, though the maximum damage output is a bit weaker. Being able to deal continuous damage is effective, but it can be too weak when engaging opposing pokemon, as it may not deal enough damage to threaten them. It lets Magnezone float up to Wild Pokemon and get the last hit on objectives more often than not, so it's up to opposing Defenders to keep the area safe from this chromatic creature.
Since Flash Cannon is active at all times, it means that you can use other effects while the move is running. If you really want to abuse the proximity multiplier to its full effect, you should use Magnet Rise or Magnetic Flux while Flash Cannon is running to Pull the enemy closer towards you. Flash Cannon also makes the basic attack have an easier time of Pulling enemies inward, requiring only 10% damage to fill in the mark as opposed to 15%.
All these potential effects combined make Flash Cannon a very solid move with no downsides, though the low damage rate may be a deal-breaker for some players. It lacks the immediately threatening power of Discharge in exchange for passive safety, so it's up to you on how you employ Magnezone's defensive capabilities.
Admittedly, it is dangerous to always be pulling enemies towards you in order to Defend the team. Luckily, you have one final gambit to use to fulfill your true potential as a Defender.
-
Unite Move: Polarity Swing
Launches an oversized magnet at the designated area. The magnet damages and pulls enemies inward, dealing more damaging the closer they are. Any Stun effects applied to enemies in range will strengthen the Pull effect. The magnet’s pull effect out-prioritizes your own.
The giant magnet damages enemies on hit, but it doesn't behave as an obstacle. It starts generating powerful magnet waves that damages enemies over time slowly in a large area around it. The damage dealt multiplies the closer they are to the center, maxing out to 7.5x.
While dealing damage, opposing pokemon are constantly being Pulled towards it. However, the Pull effect is very weak and can easily be moved away from. Magnet Pull strengthens the Pull effect.
If affected opposing pokemon are incapacitated by a Stun Effect, the Pull Effect increases drastically, more than tripling in power. This will only remain in effect while the affected opposing pokemon are Stunned.
Your own Pull effects stop working while within the area of effect.
Wild Pokemon are unaffected by Polarity Swing's Pull effect.
Polarity Swing lasts for 8 seconds.
When Magneton evolves into Magnezone, it goes from 6 horseshoe magnets to 3, so where did the other 3 go? Well, it turns out that these parts got disassembled into magnetic sand and float in the air around Magnezone, so that whenever it needs a big fat magnet to start pulling things into it like a localized black hole, it can just reconstitute it and throw it onto the ground. Please note that I am not a pokemon professor and that this is purely hypothetical, as I really don't know where that magnet came from.
Polarity Swing immediately starts generating a gravitational field all around itself, pulling in enemies on the opposing team towards the giant magnet wherever it was thrown. This pull effect can be increased with a full Score Pocket thanks to Magnet Pull, but it's still pretty easy for opposing pokemon to dash away from the magnetic field with moves. They are also just as easily capable of walking away, as the Pull effect doesn't stop them from moving.
The true power of Polarity Swing comes in its opportunistic behavior. While opposing pokemon are perfectly capable of walking away and out of the pull range, the Pull effect boosts dramatically if they are Stunned from any move, whether it be yours or your allies. This means that any Stunned enemy will be suddenly pulled towards the center of Polarity Swing, which can aid in defense, offense, or positioning for your team. Oh, and did I forget to mention that Polarity Swing is dealing damage continuously in its area of effect?
Just like with Discharge and Flash Cannon, Polarity Swing has a proximity multiplier that deals increasing damage to enemies caught in or near the center of the area of effect. The Pull effect is bad enough, but it is also hurting everything in range. This means that it is in the best interest of you and your team to unload all of your Stun moves at the opposing pokemon, since the longer they stay within the middle of the attack, the more damage they receive overall.
The only downside to this Unite Move is that your own Pull effects stop working, aside from the effects of Polarity Swing. If you try to Pull an enemy towards you while you're both in the area of effect, the Pull attempt will fail, since the giant magnet has a much stronger presence. You can Pull enemies that are outside the range of the Unite Move towards you into the area of effect, though. Although, good luck Pulling an enemy deep enough to be significantly affected by Polarity Swing, because if they want to leave, they'll more than likely escape.
It goes without saying, but try to avoid throwing Polarity Swing into a wall or obstacle. The move deals more damage when opposing pokemon are close to the center of the attack, but that won't happen if the center happens to be out of bounds within an object or big wall. Also, the Pull effect won't affect Wild Pokemon, which is actually a good thing in most situations, except for when you're trying to pull Regieleki away from your Goal Zone.
Biased magnets, how do they work?
-
Achievements
Move the opposing team a total of 100 meters through your Pull Effects in a single battle.
Now, most achievements are easy enough to track, what with the formula being based on damage numbers, usually. But for Magnezone, the Achievement is based around the accumulated distance you pull enemies.
Now, everything that I've written down here, everything that I've written in the past, and everything that I will ever write about Pokemon Unite is based purely on conjecture, since I'm supposed to convince you of the idea of any one of these pokemon joining the game. As such, it isn't really possible for me to convey the distance and reach every single move may have, so you'll just have to take my word for it when I say, 'this move reaches far'.
Now, 100 meters is a lot of distance to cover, especially since your Pull effects cover about 2 to 3 meters each. Assuming you Pull each member of the opposing team, you'd have to drag each one for 20 meters to fulfill this achievement. In order to pull 100 meters, you'd need to maximize your Pull effects with Magnet Pull and a full Score Pocket.
The Unite Move, Polarity Swing, is big enough that it can pull the entire enemy team at once and will contribute to the Achievement. But you'd need to guarantee that it affects all opposing pokemon with good placement of the move as well as followup attacks used by you and your allies. Remember, any Stun effect causes Polarity Swing to intensify the Pull effect, so if Magnezone is on your team, give it a helping hand.
Gotta stick together.
-
Holowear
Now, Magnezone is far from the typical body standards we adhere to when it comes to clothing, but that doesn't mean it can't be fashionable. Anything can walk the runway, even if they don't walk.
Starting things off, Movie Style Holowear gives Magnezone a big beret with a hole for its antennae to peek through, a director's clapper in one magnet, a megaphone in the other, a big projector light on one 'shoulder' and a big bulky video recorder on the other. Next, Cook Style Holowear gives it a tall chef's hat and apron, as well as spoons, ladles, pots, pans, knives, and a spatula all magnetically stuck to its body, which makes it always ready to cook. In Mechanic Style Holowear, it's wearing a baseball cap and is covered in wrenches, screwdrivers, and nuts and bolts. Similarly, Musical Style Holowear gives it a big hat that marching band leaders wear, along with an assortment of trumpets, big drums, cymbals, and an accordion stuck to its body. Finally, Space Explorer Style Holowear has it covered in star pins, starry veils, model exoplanets, and a pair of wriggly antennae headbands to give Magnezone an out-of-this-world look.
You'll notice that I like to give Magnezone costumes that has it covered in objects like an overpowered magnet. I'm a sucker for good visual jokes.
-
Strategy
Remember what I said in the beginning? About how Magnezone is overly specialized in what it can do, it can do it well at the cost of general utility? Well, in Pokemon Unite, Magenzone is good at pulling enemies in, but that's it. It can't heal or sustain itself in battle and has to rely on its allies to follow up its Pull effects with burst damage or the like. It's kind of like Crustle and Mamoswine in this regard, as they're also really solid Defenders, but their potential is based on how well the team can back them up.
In order for Magnezone to be effective, you have to have smart teammates that can capitalize on the openings you provide with your Pull effects. Likewise, not every situation calls for a timely Pull, like say dragging an overleveled enemy towards your underleveled Speedster or Attacker. You gotta read the room and figure out how to best Defend the team in this instance. Usually it means to drag the enemy away from your allies, sacrificing yourself in the process, but if it gives your team some breathing room in order to catch up in EXP, it'll be worth the trade.
Starting a match off as Magnemite, your defensive capabilities are much stronger than normal. You have an automatic Pull attack with your basic attack, a ranged Pull move, and a short ranged area attack that deals increased damage to nearby enemies. This is almost unfair, but Magnemite is a bit of a late bloomer, so it's stuck with this moveset for the first 6 Levels. You evolve two times before you learn the first half of your end game moveset, so you need to focus on EXP while you're playing defense.
Because of the Pull effects you have access to at the beginning of a game, you're better off partnering with a bulky All-Rounder that is capable of dealing heavy damage up close, like Buzzwole or Azumarill. The idea is that you supplement your high EXP need with KO's scored against the opposing team, so you should target frail enemies like opposing Attackers or Speedsters. Do this enough times and you'll reach Level 7 fairly quickly.
If things go awry and you fall behind in EXP, it can be very hard to catch up. Losing the first Goal Zone may be your only recourse, since more Wild Pokemon spawn on your side of the map to compensate for the zone loss. Of course, this is assuming you can get this EXP unobstructed by the opposing team, but greedy pushes like this tend to result in a team wipe sometimes.
If you manage to make it to Level 7, then the fun can truly begin. You'd have to choose between Magnet Rise and Magnetic Flux, but both are very solid moves when playing Tag with the enemy team. Magnet Rise offers a very brief moment of invulnerability while also putting the enemies through magnetic shenanigans. It's also one of the safest ways you can grab multiples enemies at once, since you can move over obstacles while flying, though your Pull victims cannot be dragged through walls with this move.
Magnetic Flux hits a slightly wider area but offers two different boons over invulnerability. Firstly, there's the defense buffs you get from the move while it's running, which is arguably worse than invulnerability. However, the magnetic beam will also start stealing Aeos Orbs passively from those hit by the attack. It's not a lot of points, but any amount will passively boost Magnet Pull, increasing the power of your Pull effects. Speaking of which, when the move ends, whether manually, forcefully, or when the move duration runs out, all enemies hit by the beam will be Pulled towards the user, giving you a lot of dominion over how the attack works. You can either let the move run its course in order to steal the most amount of Aeos Orbs possible, or you end the move prematurely to drag those hit by the beam right away, which you'd prefer to do if you have a full Score Pocket anyway. The defense buff really helps out if you are boldly robbing the entire enemy team.
One Level later and you'll learn the upgrade to Thunder Shock, Discharge or Flash Cannon. Discharge is a little slower with the buildup charge, but it hits really hard, especially if you get an enemy nearby. Even the bulkiest opposing Defender will take a huge chunk of damage from an up close Discharge, so it's a matter of risk versus reward when engaging a Magnezone running this move. Of course, it is vulnerable to hindrances stopping the attack before it comes out, so Flash Cannon is a weaker but safer alternative to proximity damage.
Both of these moves also affect how your basic attack affects enemies. Discharge will make the Pull effect of your basic attack stronger, which stacks with Magnet Pull, so you can keep an enemy really close to you if you managed to land the attack. Flash Cannon speeds up the Pull effect taking hold, which is handy for keeping the enemy in range of the high proximity multiplier of the attack. It's all well and good, but the point of keeping your enemies close is that your friends also need to be close by to take advantage of the vulnerable enemies dragged in by your effects. You can deal high damage, yes, but not burst damage or KO damage. That's the job of your allies.
Speaking of allies, the best time for them to pull their weight would be during your Untie Move, Polarity Swing. As it constantly emits a Pull effect that gets stronger when enemies are Stunned, it's the best time for you and your teammates to unload all of their Stun attacks and burst damage at all enemies caught in the Pull. Of course, you can contribute too, but the giant magnet has a stronger Pull effect than you, so you won't be able to accidentally drag enemies away from the center of the Unite Move. Instead, you should use your moves to drag in enemies outside of the Unite Move's Pull range into it, so that everyone can get in on the magnetic waves.
When two opposing forces meet, the breaking point is at the point of contact. You're going to be pulling the enemy towards you to fight on your turf as Magnezone, so you gotta remember to stay positive.
-
And that's Magnezone for Pokemon Unite! One of my favorite pokemon introduced in Gen 4, I always loved using this thing in battle, as it never disappointed. Of course, if it were to show up in Pokemon Unite, it'd be the most attractive pokemon for me to play, and not just because of the magnets covering its body. I favor playing Defenders if the team needs it.
That'll be it from me this week. Until next time, see ya!
2 notes
·
View notes
Text
Skipping a week of my Pokemon Unite Season 3 posts again.
Hey y'all. I have to skip this week again, so no Pokemon Unite post today.
It's not just because I don't have a draft ready. I actually got really sick last Monday and couldn't really do anything. I was able to recover, but I got summoned for Jury Duty, so I've been occupied with that. Even now I'm still feeling 100% just yet, so I don't have anything to show you this week.
Now, I would maybe probably tide you over with a hint, but given the unique identity of the pokemon itself, any sufficient hint would give it away. Instead, I can tell you that there are 6 posts left in Season 3, so look forward to those.
I'm also dealing with some money trouble. I've been trying to find employment, but I haven't been able to land anything. I never mentioned it before, but I did turn on donations for this blog. I don't want to be pitied, though, I just thought that if people felt like it, they'd donate out of their own volition. That said, if anyone feels like helping out, I'd appreciate whatever you'd be able to give me. I understand if you can't though.
I should have the draft ready by next week. See ya then.
1 note
·
View note
Text
Tatsugiri & Dondozo for Pokemon Unite!

Season 1
Season 2
Prev: Cradily - Hatterene - Tropius - Cacturne - Ditto - Weavile - Ogerpon - Coalossal - Gogoat - Galarian Slowbro - Luxray - Breloom - Uxie, Mesprit, & Azelf - Wobbuffet - Obstagoon - Lanturn - Castform - Dusknoir - Persian
Pokemon Unite lets you control only one pokemon at a time due to how synchronization works. The mental strain of controlling additional pokemon at once is too much for trainers, so it's just you and your pal versus the world, oh, and your teammates too, sometimes.
There are a few workarounds to this, though. Some pokemon are capable of controlling others, like Vespiquen or Salazzle, but those are through pheromones. In the case of Tatsugiri, it seems like Dondozo are very partial to its suggestions and will obey its orders without question. If we were to make a Unite License for Tatsugiri, there's no doubt that you'd also have control over Dondozo as well.
Like a proxy chain of command.
-
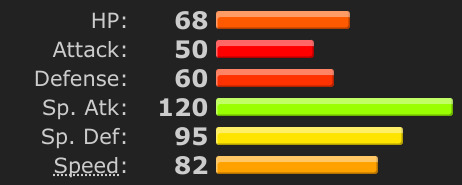
First off, these are the stats for Tatsugiri, which is described by the PokeDex as being small and weak. Now, I understand that you can't help being short, but I find it hard to believe that Tatsugiri is considered weak with a high Sp. Attack stat. I mean, yeah, the low HP and Defense make it easy to knock out, but it has a powerful friend to help cover for this shortcoming.

In contrast, these are the stats for Dondozo, sporting a magnificently high HP, Attack, and Defense stat, but lacking in everything else. It's big for a fish creature, but it's not very smart either, relying on Tatsugiri's instructions to bait and catch prey. Being able to command a powerful brute like Dondozo means that Tatsugiri has an easy time dealing huge amounts of damage with its help. For that reason, I designate these two with the role of an...
Attacker
-
Basic Attack - Ranged/Sp. Attack
Becomes a boosted attack after two hits. The boosted attack deals increased damage and decreases the cooldown of Commander.
The boosted basic attack reduces the cooldown of Commander by 3 seconds.
This'll be quick, as Tatsugiri's basic attack is meant to supplement its Ability. Yes, due to its unique two-for-one nature, Tatsugiri & Dondozo's Unite License has some stipulations revolving around how to play as both pokemon.
More specifically, you switch control between the two by using its Ability, Commander.
-
Ability: Commander
When the pokemon faints, it will shift into Bait Mode instead of returning to its PokeBall. Dondozo can be summoned by activating this ability while Tatsugiri is in Bait Mode. Upon activation, Dondozo appears and takes the user into its mouth. The user will be in control of Dondozo for a short while afterwards. This ability goes on cooldown afterward. If Dondozo is summoned while the user has fainted, it will begin restoring HP over time, ending when Dondozo leaves the battlefield and returns control to Tatsugiri.
The Tatsugiri you control is known as Curly Form, and will resemble a piece of shrimp sushi when in Bait Mode. If you faint, you will not return to your PokeBall until your respawn timer hits 0, at which point, you'll be transported back to base.
When Dondozo is summoned, Tatsugiri will be taken into its mouth and put you in control of Dondozo for a while. A huge splash of water is made at the location, dealing major piercing damage and Shoving enemies away on hit.
The duration of control depends on Dondozo's HP. More specifically, Dondozo has its own base stats that scale with Tatsugiri. The higher your Level, the better Dondozo's stats are.
Dondozo's HP scales very high naturally, and also increases by adding your HP stat to its own. However, Dondozo cannot actually be damaged by enemy attacks. Its HP stat becomes more like a timer, decreasing in duration by percentage and continues to decrease when it gets hit by opposing pokemon. Damaging enemies while in control of Dondozo stalls the timer going down by 1 second.
Tatsugiri deals Sp. Attack damage while not using Commander. Dondozo deals Attack damage, combining its own Attack with Tatsugiri's Sp. Attack stat. In this way, Tatsugiri can boost its Sp. Attack freely without having to accommodate Dondozo.
Dondozo is immune to damage and hindrances while in control. Dondozo cannot also be affected by moves and buffs used by allies.
Dondozo's basic attack is a wide sweeping tail attack that Shoves enemies away on hit. The attack is slow on recovery.
If Tatsugiri was KO'd when Dondozo is summoned, its HP restores by 5% each second. When Dondozo disappears, Tatsugiri will respawn at its current location with whatever HP it managed to restore.
Commander goes on cooldown for 60 seconds when Dondozo disappears.
This here is the crux of Tatsugiri & Dondozo and how you're supposed to play as the two. By activating Commander, you'll dive into Dondozo's mouth and switch from controlling a small dragon that looks like lunch to a writhing giant catfish that can split a boat in half with a tail swing.
We're getting ahead of ourselves, though. Firstly, Tatsugiri doesn't have a traditional 'fainting' animation like other pokemon. When it goes down, it'll switch to 'Bait Mode' and curl up like a piece of shrimp tail sushi. It's mostly for show, though this trap will remain on the battlefield for a while until your respawn timer actually ends.
The point of Bait Mode is to lull your enemies into a false sense of security. See, Tatsugiri likes to play dead to lure in prey looking for a cheap meal, but in Pokemon Unite, it makes them think that the area is clear of enemies. There is a reason it's called 'Bait Mode' as there are other ways to trigger this effect to fool your enemies into thinking that the coast is clear.
The application potential is there, but for the most part, you can only summon Dondozo while you're in Bait Mode. The enemy won't know for sure when Commander is active, so it's likely that they'll steer clear of Bait Mode until you respawn. Even so, it might be worth it to bring Dondozo out anyway, as your HP is slowly refilled from 0 while you're fighting as Dondozo. I would advise against this in the early game though, as Dondozo doesn't have a lot of longevity starting out. You'll see what I mean.
If enemies are around when Commander ends, that puts you in grave danger, as Commander has a whopping 60 seconds of cooldown before you can summon the big guy again. Not only is that a full minute of waiting for Dondozo to come back, your opponents know they have a whole minute to do whatever they want to you. See, a KO'd Tatsugiri can defend a Goal Zone, which is hilarious to think about, but only if Commander is online. If you get gutted like a fish defending a Goal Zone after failing to defend with Dondozo, they'll basically own that zone and score all the points they want.
That's why the basic attack has a basic effect of reducing the cooldown of Commander for you. It takes 20 boosted basic attacks to fully restore the cooldown of Commander, though it'll be a lot less than that considering how much time it'll take to build up those boosted attacks.
Because of how reliant Tatsugiri is on Dondozo, it's no surprise that the rest of its moves are centered around reducing the cooldown of Commander. The more often you play as Dondozo, the better your odds of winning.
-

At the start of the game, you can choose between Water Gun and Taunt as your first move. By Level 3, you'll have learned both.
-
Move 1: Water Gun (Ranged)
The user shoots an explosive shot of water that bursts on hit. The cooldown of Commander is drastically reduced if this move KO's an opposing pokemon. 6s cooldown.
Water Gun creates an explosion in a small area of effect when it hits an enemy or reaches the maximum distance. The cooldown of Commander decreases by 10 seconds if this move KO'd a pokemon on the opposing team.
Tatsugiri may be small and weak, but it has a very high Sp. Attack stat, and it's not afraid to use it. Water Gun is a simple starting move like any other, but it's volatile nature of going for kills when the opportunity presents itself make it risky to be around. If you're vulnerable, Tatsugiri has no problems making a jump for prey if it can do so by itself.
If Water Gun nabs a KO for you, you'll be rewarded with not just EXP and Aeos Orbs, but also a lot of time shaved off of Commander. With 10 whole seconds reduced, Water Gun would only need to score another 5 KO's to completely free up Commander. You'll need even less than that considering the additional wait time of Water Gun's cooldown, which is a ridiculously fast 6 seconds. The blast effect makes it possible to hit multiple enemies at once, so imagine how quickly you can bring out Dondozo with a double or triple KO.
Of course, Water Gun behaves like most projectiles in that it is a solid shot that explodes on contact with an enemy or after reaching the maximum distance. It passes through walls easily enough, thankfully, but it may be frustrating to see that Water Gun gets blocked by a healthy enemy, saving their weakened ally and depriving you of all of that cooldown reduction.
At least the cooldown for Water Gun is pretty low. Your Sp. Attack is also fairly high, meaning you can get the KO with Water Gun at decent HP thresholds without having to weaken the enemy a lot.
It won't be much use to you if the enemy doesn't hold still. Luckily, with a bit of dramatic deception, you can fool them into dropping their guard with a timely Taunt.
-
Move 2: Taunt (Buff)
The user enters Bait Mode and reduces the cooldown of Commander by a little bit. The cooldown of Commander decreases for each hit of damage received by the opposing team. Afterwards, the user's Sp. Attack, basic attack speed, and Movement Speed increase for each hit of damage received. 9s cooldown.
Taunt reduces the cooldown of Commander by 5 seconds. The cooldown of Commander decreases by another 5 seconds for each hit of damage Tatsugiri receives while in Bait Mode.
When Taunt is used, your HP will 'drop to 0' before disappearing and activating Bait Mode. Your HP bar remains hidden until Bait Mode ends.
Bait Mode lasts for 4 seconds, after which your Sp. Attack, Movement Speed, and basic attack speed increase by 10% for each attack you receive, capping at 150%.
Frail pokemon with bluffing moves and effects are some of my favorite designs, as a successful bluff requires a lot of skill on the player's part. That's why I'm never upset when enemy Zoroark get me good with their Illusion ability, as it's not easy to fool perceptive people like me tongue-in-cheek.
Tatsugiri is also a frail pokemon that has to rely on making a smart bluff to get the most out of its effects. Firstly, when you use Taunt, your HP bar will appear to drop to 0 without warning before you shift into Bait Mode. This deceptive ploy is meant to trick the enemy into thinking you've been defeated, as your HP bar goes into hiding until the bluff ends. While you could summon Dondozo at this point, it might be wiser to hold the bluff long enough until the nearby enemy drops their guard and Water Gun comes back off of cooldown. I'd imagine a weakened enemy might go for a manual recall in order to rotate lanes, not realizing that you're still in the fight, playing dead, waiting out the microseconds for Water Gun to be ready to use.
The best time to use Taunt is when you're at low HP or when an enemy with high damage potential is nearby, like a Sobble or an Absol. Pokemon like these guys are no stranger to dealing surprising amounts of damage out of nowhere, so they won't be all that suspicious if you used Taunt and suddenly dropped dead right in front of them. It's all for the best that these two are squishy pokemon, prone to getting easily KO'd themselves. Playing dead gives you just enough time to wait for Water Gun to come back online.
Before we move on, Taunt is classified as a Buff move because of the boons it grants to you for each hit of damage received. Because you're playing dead, you cannot be targeted by basic attacks and Sure-Hits because you are technically respawning. That said, in the middle of a team fight, the enemy might still throw out some moves at your allies, and these effects might hit you while you're in Bait Mode. It's risky, but every little hit adds a 10% boost to your Sp. Attack, Movement Speed, and basic attack speed for a short while afterwards. There is a limit to these boosts, but it's very unlikely to hit the cap before you are KO'd, so take your hits on the cheek in moderation. Oh, and each hit reduces the cooldown of Commander by 5 seconds, meaning you only have to get hit 11 times to fully reset the cooldown of your Ability.
Also, you're banking on the enemy team not paying attention to the KO notification on the top screen, as Taunt is very good at tricking the enemy, but not the game itself. No fake credit for KO's or anything, so don't hold your bluff for too long.
-
At Level 5, Water Gun becomes either Muddy Water or Dragon Pulse.
-
Move 1a: Muddy Water (Area)
The user splashes filthy water directly forward, obscuring the vision of enemies on hit. The cooldown of Commander decreases dramatically if this move KO's an opposing pokemon. 8s cooldown.
At Level 11, Muddy Water becomes Muddy Water+.
Expands the area of effect.
Muddy Water obscures the vision of enemies for 2 seconds on hit. Opposing pokemon will be covered in mud while their vision is obscured as a visual aid for the duration of the hindrance.
Commander has its cooldown decreased by 15 seconds if you KO an opposing pokemon with this move.
Muddy Water splashes in a small area in front of Tatsugiri when used. Muddy Water+ increases the size of this attack by 50%.
In addition to Tatsugiri's bag of dirty tricks, it also likes to put some mud in the eyes of the enemy. Muddy Water splashes this filth everywhere in order to blind the enemy for a short while, giving it enough time to enact its plan.
The cooldown is longer than Water Gun, but the range is considerably larger and easier to use. This range increases further with Muddy Water+, as it becomes much more likely to KO weakened opponents at its current power level. Speaking of KO's, it also decreases the cooldown of Commander by 15 seconds off of a successful KO, compared to Water Gun's 10 seconds.
Now, as to how to use the blinding effect of Muddy Water, it wholly depends on how you use Bait Mode and Dondozo. If the enemy is blinded but still throwing out attacks, you can go for Taunt and pretend to play dead to lull the enemy into a false sense of security. Or you could reposition yourself to a better spot to summon Dondozo, as cutting off their escape route is one way to secure a KO against a tough opponent like Mewtwo.
There are other ways of abusing the blinding effect. A classic example is to ambush an entire platoon of enemies with Muddy Water, obscuring their vision and giving an opening to your teammates to unload their own burst damage. It's also useful to retreat, as 2 seconds is just enough time to hide in a nearby plot of Tall Grass, and if the enemy comes looking for you, you can surprise them with Dondozo appearing out of nowhere.
Compared to Dragon Pulse, Muddy Water is a lot more tactical.
-
Move 1b: Dragon Pulse (Ranged)
The user jumps forward in the direction they're facing, then launches a condensed shot of dragon energy in the designated direction. The dragon energy explodes on hit with an enemy. The cooldown of Commander decreases dramatically if this move KO's an opposing pokemon. Up to 3 uses can be held in reserve. 3s cooldown.
At Level 11, Dragon Pulse becomes Dragon Pulse+.
Up to 4 uses can be held in reserve.
Tatsugiri will jump in the direction it is facing before firing Dragon Pulse where you are aiming at. Dragon Pulse pushes you back a little bit when launched.
Dragon Pulse reduces the cooldown of Commander by 10 seconds when this move KO's an opposing pokemon.
A more aggressive version of Water Gun, Dragon Pulse trades in the utility of Muddy Water for direct damage through explosive energy blasts.
Dragon Pulse can be aimed with both control sticks, as Tatsugiri will jump in the direction it is facing before firing the attack in whatever direction you're going for. It keeps Tatsugiri mobile while attacking, which is good for a frail Attacker, and it also can use this move repeatedly through multiple uses.
The move hits much harder than Water Gun and continues to increase in damage the more Levels you gain, but at this Level, the opposing team will have started fleshing out their moves for the game, so be careful about how you approach fights.
Not much more to say about this move. It hits hard and can be used repeatedly, making it a direct upgrade to Water Gun in every way. The multiple uses make it easier to secure a KO, though you're still only likely to get one or two KO's through persistent attacking. Each shot has a potential to reduce the cooldown of Commander by 10 seconds, so the best case scenario is to score multiple KO's in a team fight. That does put you at risk of getting KO'd yourself, so don't get too crazy with Dragon Pulse.
Playing dead will only get you so far. You have to increase your schemes to nefarious levels. Preferably Level 8.
-
At Level 8, Taunt becomes either Nasty Plot or Mirror Coat.
-
Move 2a: Nasty Plot (Buff)
The user comes up with a nasty scheme, increasing its Sp. Attack, basic attack speed, and Movement Speed greatly for a short while. The cooldown of Commander is decreased a bit. During the buff, the user's HP bar is replaced with a fake one, decreasing the user's HP more than usual when receiving attacks. If the fake HP bar reaches 0, the user enters Bait Mode for a while and the cooldown of Commander decreases again. 10.5s cooldown.
At Level 13, Nasty Plot becomes Nasty Plot+.
Increases the buffs gained.
Nasty Plot increases your Sp. Attack, basic attack speed, and Movement Speed by 100% for 5 seconds. Nasty Plot+ increases these boosts by 125%.
The cooldown of Commander is decreased by 7.5 seconds when Nasty Plot is used. It is decreased by another 7.5 seconds if the user enters Bait Mode during the buff.
Nasty Plot replaces your HP meter with a fake one for 5 seconds. The fake HP bar shows your current HP but will appear to take more damage than usual to opposing pokemon when hit by attacks. If this fake HP bar reaches 0 before the move ends, Tatsugiri will enter Bait Mode for 5 seconds.
Taunt requires precision and perception to utilize correctly, as it requires you to anticipate what you and the enemy think will be lethal damage. With correct timing, you can fool an enemy into thinking you've been KO'd, only to suddenly bring out the big guy after having reduced the cooldown of Commander to 0. It's an intellectually demanding move, and it's hard to utilize the buffs you get afterwards, considering all the damage you'll have taken.
Nasty Plot continues this nasty scheme without having to put yourself at risk, kind of. You still need to get hit for the plan to work, but your power to deceive has greatly increased. First of all, you get a huge boost to your Sp. Attack, Movement Speed, and basic attack speed for a short while, filling you with gusto and chum to take on the entire enemy team. You're not invincible, even with the big boost to your stats, but you don't need to be, especially with a fake HP bar hiding your vitality.
This is a unique effect similar to Zoroark's Illusion ability. Your HP bar is copied and replaced with a fake one, taking more damage than usual from opposing attacks while your real HP is decreasing normally. Now, the enemy won't suspect a thing because of how squishy Attackers like Tatsugiri are, but they'll know something is up if you don't show up in the KO feed. Just like with Taunt, you can fool the enemy but not the game, so take advantage of the confusion of excess notifications during heated bouts.
Now, when the fake HP bar reaches 0, Tatsugiri will play dead and enter Bait Mode. You only have 5 seconds to decide what to do next before Bait Mode ends. Do you summon Dondozo if it's available to you, or do you wait for your moves to come off of cooldown? The cooldown of Commander decreases by a total of 15 seconds when Nasty Plot is used and shifts you into Bait Mode, so there's a good chance you can bring out the big fish to finish the fight for you.
Whatever you're planning, be mindful that most enemies won't fall for the ploy twice, at least not in quick succession. Then again, there's not a whole lot they can do about triggering Nasty Plot, as in addition to the scheming thought bubbles that pop up when Tatsugiri uses the move, the only thing that gives away the moves effects is a suspiciously weaker HP bar and a suspiciously high damage output coming from the little fish. At least Nasty Plot has a very high cooldown to deal with.
A different scheme you can play is to trick the enemy with a mirror.
-
Move 2b: Mirror Coat (Buff)
The user gains a huge shield that shines brightly. The shield casts a mirage that shows you standing in place while you are in Bait Mode. Every time you are damaged, the shield will reflect a portion of the damage dealt back to the attacker, along with some of your own Sp. Attack stat. The mirage will appear to counterattack with basic attacks. The cooldown of Commander will decrease for each shot reflected. When the shield fades away, the mirage ends and the user will remain in Bait Mode for a short while afterwards. 9s cooldown.
At Level 13, Mirror Coat becomes Mirror Coat+.
Increases the amount of cooldown decreased from Commander.
Mirror Coat gives you a 20% shield when used. At the same time, you enter Bait Mode for the duration of the shield plus an extra 1 second.
Mirror Coat casts a reflective illusion to deceive the enemy. Opposing pokemon will not see that you are in Bait Mode. They will instead see you standing still.
Mirror Coat reflects 120% of the damage received from attacks along with some of your Sp. Attack stat. When Mirror Coat reflects damage, you will appear to be using your basic attack to enemies.
Each time you are damaged during Mirror Coat, the cooldown of Commander decreases by 2.5 seconds. Mirror Coat+ increases this to 4 seconds.
There's a scientific test called the Mirror Theory where animals can be tested for their intelligence by reading how they respond to their own reflections. Some recognize their sense of self while others think it's a rival animal and start attacking it. Tatsugiri is the scientist in this scenario, but instead of testing for intelligence, it wants the idiots to fall for its trap.
Mirror Coat is another ploy just like Nasty Plot where you get a pretty big shield but then shift right into Bait Mode. Instead of playing dead, you're playing alive while playing dead all the while your enemies think you aren't playing dead. You following me so far? Good.
The shield casts a mirage that makes enemies think you're just standing in place without a care in the world. Any attack received will be countered by what appears to be your basic attack. In actuality, this is Mirror Coat reflecting the damage back at them, turning the lost shield into counterattack damage. In addition to that, any hit the mirror receives reduces the cooldown of Commander by 2.5 seconds, increasing to 4.5 seconds with Mirror Coat+. This is way less time than Taunt, but since the enemy can't see that you are in Bait Mode, they're more than willing to hit you with all they've got, plus more thanks to the huge shield given to you by Mirror Coat.
Now, because it is a shield, it doesn't last forever. When the shield is broken or fades away, the mirage disappears and you'll stay in Bait Mode for an extra second. You won't be fooling anybody with this cheap trick, since there's no fake HP to play dead with, but you don't need it. You'll be banking on all the cooldown of Commander being reduced through Mirror Coat to bring Dondozo back online and onto the battlefield.
Also, keep in mind that you are in Bait Mode the entire time Mirror Coat is active. The enemy won't know the danger they are in while the shield is up, and you can even activate Commander before Mirror Coat fades away. This is important because Mirror Coat is the only way you can summon Dondozo without appearing to be in Bait Mode to the enemy team. It's also the quickest way to manually summon Dondozo without waiting for Bait Mode to happen at 0 HP.
The downside to Mirror Coat is the reliance on your shield, since a huge percentage of a small HP bar doesn't amount to much. There's also the fact that you can't move or use your other attacks while in Bait Mode and Mirror Coat has you pretend to not be in Bait Mode while it is active. Lame as it is, it's not a good idea to use Mirror Coat in the middle of a team fight and expect to achieve much from the ensuing scuffle.
Although, if the enemy knows you are running Mirror Coat, you can bluff Mirror Coat by standing still all of a sudden. This won't work unless you have a shield to add to your deception, but it'll be worth a shot.
Before we get to the Unite Move, it's time to cover the big guy himself. What makes Dondozo so powerful that Tatsugiri's entire moveset is dedicated to fishing it out?
-

When Commander is used, Dondozo takes Tatsugiri into its mouth. You'll be able to control Dondozo for a short while.
-
Dondozo Ability: Unaware
Dondozo deals damage to opposing pokemon ignoring their shields and buffs. The pokemon's moves gain additional uses based on the Level of Tatsugiri. The duration in which Dondozo remains in control is lengthened slightly when the user deals damage to an opposing pokemon.
While Dondozo is in control, it deals piercing damage to all enemies, ignoring shields and buffs.
Every 3 Levels, Dondozo's Moves gain an additional use. At Level 12, this maxes out to 5 uses. Its moves share this use counter.
As stated before, the duration of control of Dondozo stalls for 1 second when damage is dealt to the enemy team.
Now, remember the stats for Dondozo at the beginning of the post? In addition to an extremely high HP stat, Dondozo also sports average Attack and Defense that help it out in head-to-head combat, something that Tatsugiri struggles with. It has very low Sp. Defense and Speed, which gives it trouble dealing with ranged attacks, but that isn't a problem since Dondozo doesn't have a traditional HP Bar.
Instead of HP, Dondozo operates on a timer. Its HP ticks down by a percentage each second, giving you at most 10 seconds to deal as much damage as possible when Dondozo is summoned. Since the HP bar is also your timer, getting hit by attacks will decrease the duration of control even further, though given Dondozo's high defensive stature, it'll only decrease the time by a microsecond or two. Opposing Sp. Attacks will decrease your timer by a lot, though, so before you bring Dondozo out, prioritize neutralizing Sp. Attackers with Tatsugiri, since it has better range and Sp. Defense to deal with them.
As for Dondozo's actual impact on the battlefield, its Unaware abiltiy kicks in as soon as it is summoned. It makes a huge splash on the field when it shows up, dealing big damage to nearby enemies. Oh, and the Unaware Ability makes all of Dondozo's attacks deal piercing damage, ignoring shields and Defense buffs.
Going on the offensive is your best bet, as dealing damage prolongs your control of Dondozo by a second each time. It won't increase the timer by 1 second for each enemy hit, just one second when an attack connects. That's all well and good, but your basic attack is very slow, and the windup and wind down takes more than a second, so a successful hit won't add much to your control timer.
What about your moves though? Well, Dondozo can use two moves while it's out and they don't use cooldowns, since Dondozo is operating on limited time anyway. But instead of cooldown, it uses a shared use meter, just like Blissey's Egg Bomb and Softboiled moves when used together. You get an extra use every 3 Levels, maxing out to 5 uses at Level 12. It's easy to reach this Level, but you still have to be careful with how you spend your time and resources while playing as Dondozo.
Hitting enemies extends your play time as Dondozo by 1 second each time a move connects. You can only play as Dondozo for 10 seconds uninterrupted, after which you switch back to Tatsugiri and you'll have to wait 60 seconds for Commander to come back online. If you want to make the most of Dondozo's power, you better not miss your attacks.
-
Dondozo Move 1: Wave Crash (Dash)
Dondozo charges forward cloaked in rushing water, Throwing enemies on hit. If this is the last move used, Dondozo launches Tatsugiri from its mouth directly forward.
Enemies are Thrown for 1 second on hit.
Tatsugiri is launched forward at the end of the dash if Wave Crash is the last move used.
The sheer size of Dondozo turns this charging water attack into the naval equivalent of vehicular homicide. Wave Crash hits so hard and is extremely hard to avoid, as even a glancing blow will send enemies flying in the air for a solid second.
I did forget to touch on one extra thing, though. Dondozo can be controlled for 10 seconds, after which you'll switch control back to Tatsugiri. However, if your moves run out of uses before then, Dondozo will tire and spit Tatsugiri out, depending on the last move used. At the beginning of the game, this means that you won't really be able to utilize Dondozo much if Wave Crash or Order Up is your first move, as it'll send Tatsugiri flying immediately. This is what I was talking about earlier, how Dondozo won't have a lot of time to play if you bring him out early in the match.
If you are forced to bring out Dondozo before the 8 minute mark, you're better off using basic attacks until time is up, at which point you have to decide which finishing move to use. At higher Levels, you can be a lot more wanton with what moves you use, as you'll be able to use these attacks repeatedly. Maybe with Wave Crash you can dash 5 times to Stun the enemy into submission for a cheap KO, but then you lose out on the the damage boost Order Up can give you.
When Dondozo comes out, it comes with both moves learned and ready to use. And believe me, Order Up is worth the grind.
-
Dondozo Move 2: Order Up (Ranged)
Dondozo drops a platter of fresh sushi at the designated area. Your Sp. Attack, Defense, Sp. Defense, and Movement Speed increase for each Order Up that damages an enemy. If this is the last move used, Dondozo launches Tatsugiri from its mouth along with the attack.
A platter of nigirizushi is dropped at the designated area. If an enemy is hit by this move, your Sp. Attack, Defense, Sp. Defense, and Movement Speed increase by 25% for the duration you are in control of Dondozo.
Each use of Order Up stockpiles the buffs, maxing out to 125%.
If Order Up is the last move used, Tatsugiri is thrown along with the sushi platter. Any buffs gained from Order Up will linger for 7 seconds afterwards.
The Sp. Attack buff also boosts Dondozo since Tatsugiri's Sp. Attack stat is added to Dondozo's Attack stat for its attacks.
The ironic thing about shrimp sushi is that it is the most cooked version of the food you can order. I mean, not regarding crunchy rolls, but it's a decent choice for those conscious about eating raw fish. Although, if you have a shellfish allergy and hate raw fish, then you simply are unable to enjoy Japanese cuisine like the rest of us.
As for the opposing team, you don't know for sure which ones are allergic to shellfish, but they are allergic to huge platters of wood being dropped on them. Order Up throws a big platter of nigirizushi at the designated area, damaging all enemies within the area of effect. In the games, this move boosts one of your stats depending on which form of Tatsugiri Dondozo has in its mouth, but in Pokemon Unite, it powers up all of your relevant stats.
Tatsugiri adds its Sp. Attack stat to Dondozo's Attack, so any boosts received from items and emblems benefit the both of them equally. That's why Dondozo seems to power up with the Sp. Attack boost from Order Up, since the two are working together. Order Up only boosts your stats by a little bit, but these boosts stack with each use, so you really want to level up enough to get multiple uses out of Dondozo's moves.
Unfortunately, since Wave Crash and Order Up share uses, you cannot use Order Up 5 times without sacrificing Wave Crash. It's a shame too, because the boosts are permanent while controlling Dondozo, and they continue to linger for a while when Tatsugiri is spat out. It might be tempting to stick to the ranged effect of Order Up, but it doesn't hinder enemies the way Wave Crash does, nor does it share the same impact of a giant fish charging and splashing water everywhere.
Just focus on Leveling up. It increases the uses of your moves and also Dondozo's stats, not to mention that your Unite Move unleashes the combined might of both Dondozo and Tatsugiri.
-
Unite Move: Commanding Connoisseur (Buff)
Tatsugiri and Dondozo unite to fight together on the battlefield. While Tatsugiri sits on top of Dondozo's head, Dondozo can be directed and controlled by the player. Wave Crash and Order Up will launch different Tatsugiri when used, and each one will use either Muddy Water or Dragon Pulse at the nearest enemy. Tatsugiri will have its HP fully restored if this Unite Move was used while in Bait Mode.
Commanding Connoisseur has Tatsugiri and Dondozo join up as normal, but with Tatsugiri standing on top of Dondozo's head.
Different Tatsugiri are launched with Wave Crash and Order Up, keeping their effects. These Tatsugiri can be either Curly Form, Droopy Form, or Stretchy Form. This is purely aesthetic and doesn't affect how the moves are used.
The launched Tatsugiri will use either Dragon Pulse or Muddy Water once at the nearest enemy, depending on which move you learned. They will prioritize opposing pokemon on the enemy team.
Commanding Connoisseur lasts for 12 seconds and you are completely invincible during this time. However, the duration of Commanding Connoisseur decreases when the pokemon receives attacks from the opposing team.
Tatsugiri relies on ambush strategies to get its food, and Dondozo is more than willing to wait for lunchtime. However, put these two in a contest of power, and they become capable of unleashing their combined might unrestricted. Now, Tatsugiri leads the charge with its faithful steed Dondozo, forgoing all pretense of strategy and planning, choosing to go all out and attack.
For 12 seconds, Tatsugiri and Dondozo fight together as one, as the little fish stands tall on the head of a big fish like a captain of a mighty vessel. And just like a ship, Dondozo is teeming with more Tatsugiri in its mouth than normal. The power of Commanding Connoisseur allows you to use Wave Crash and Order Up repeatedly while the Unite Move is in effect, and each one will spit out one of these Tatsugiri stowaways when the move is used. These feisty fishes will land with an attack, either Muddy Water or Dragon Pulse, depending on which one you've chosen, and target the nearest enemy on the opposing team. You spread a lot of damage this way, and it's uncontested as you are invincible.
Well, not completely. Getting hit reduces the timer of Commanding Connoisseur, as it is normally when controlling Dondozo with Commander. The upside is that you can use your moves repeatedly without being forcefully spat out by Dondozo, it just spits out different Tatsugiri. But other than that, if the enemy team aren't afraid of a rampaging giant catfish, they'll brave the storm and fight back, reducing your play time by a bit, especially if they're keeping their distance with ranged attacks.
For the most part, though, Commanding Connoisseur gives you quite a defensive buffer when engaging in a team fight. You can directly challenge the entire enemy team fighting for an objective like Regieleki and potentially steal the KO from them. If you used the Unite Move while in Bait Mode, you'll return to the battlefield with full HP, letting you enact your revenge on those who wronged you. Of course, you're still a squishy Attacker, so do your due diligence before tactfully retreating.
Never underestimate the power of teamwork.
-
Achievements
Reduce the cooldown of Commander by a total of 150 seconds in one match.
Dondozo is necessary to Tatsugiri's survival, so an achievement based around bringing it out as often as possible is the key to success when playing as Tatsugiri. 150 seconds is pretty demanding though, as that equates to 15 KO's with Water Gun or Dragon Pulse, or 10 KO's with Muddy Water.
You can bring it down even further if you use Nasty Plot or Mirror Coat to their full effect. Use these moves to trick the enemy, and then bring out the big fish as soon as the cooldown of Commander is reset.
You do need to use Commander whenever it is available in order to make progress with this Achievement. Reducing the cooldown of Commander isn't possible when the ability is online. Of course, you shouldn't bring out Dondozo for no reason. The big fish performs best when fighting 2 or 3 opposing pokemon, using Wave Crash to Stun the enemy and Order Up to boost itself.
It's in your best interest to master reducing the cooldown of Commander, as the more often you play as Dondozo, the more value you add to your team. It's better to be a big fish in a small pond, after all.
-
Holowear
Now, since the license does specify that you can play as both Dondozo & Tatsugiri, you might think that both of them like to dress as a pair. Well, remember when I said that Dondozo is partial to the orders of Tatsugiri? Yeah, that only applies to battles, not standing still to get your measurements taken by the holowear tailor. No big suits for the big fish, just the little sushi dragon.
Not to worry, though, as Tatsugiri gets some top quality holowear to purchase. First off, the fairly obvious Cook Style Holowear gives it a tiny little chef's hat and apron. Then there's Sailor Style Holowear which dresses it up like a naval officer, complete with white hat with the blue stripes, white shirt, and blue ascot. For a bit of humor, Space Explorer Style Holowear gives it what could be a space helmet, but it's just a fish bowl turned upside down and worn as a helmet by Tatsugiri. It's got the fake plants peeking out from the rim and everything. Well, at least it has Captain Style Holowear to make it more dignified, what with the pirate hat, pirate coat, and even an eye patch to complete the look. Finally, Dondozo Style Holowear fits the little fish into a sock refurbished to resemble its big ol' friend, with cute buttons for eyes and pipe cleaners for fins.
Serving up looks while serving up lunch, that's what fashionable Tatsugiri do.
-
Strategy
Playing as Tatsugiri boils down to two distinct modes of battle. Mode one should be playing as Dondozo, whereas Mode two is reducing the cooldown of Commander in order to summon Dondozo. Tatsugiri is small and frail, so it's important to have Dondozo ready to join the battle when you need it.
To that end, you must master Tatsugiri's moves. Muddy Water and Dragon Pulse are useful in their own right, but their main purpose is to KO the enemy. I mean, the same can be said for just about every move in the game, but for Tatsugiri moreso, since a successful KO reduces the cooldown of Commander dramatically. How you use these moves is up to you, but they both have different applications.
Muddy Water has a blinding effect when it hits an enemy, and I've already gone over in-depth at how to use this effect in the move's description. I was a lot more curt with Dragon Pulse, since a mobility based projectile attack is valuable for a frail Attacker to have. It has a bit of recoil to it, so it's useful to attack the enemy while retreating. Both moves are powerful, but you should avoid trading KO's with the other team just because an opportunity for multiple KO's presents itself. It'd be terrible to have Commander come back online while you're 10 seconds away from respawning.
As for Nasty Plot and Mirror Coat, both of these moves are tricky but effective at reducing the cooldown of Commander, though they require a steady hand. Like I've said before, Nasty Plot is pretty good at tricking the enemy into thinking you've been KO'd, but if it doesn't get acknowledged by the game's KO notifications, the jig is up and the ploy will fail. Ironically, this makes Nasty Plot better suited for team fights, where pokemon are getting KO'd left and right, you just have to watch out for the inevitable Burst damage. As for Mirror Coat, the ploy is a lot less obvious, though the move is used more for damage and quicker summoning of Dondozo than it is for actually fishing the big guy out.
Actually playing as Dondozo is where all of your damage for the game will come from, as it is the safest way to spread thousands of points of damage without any risk to the little sushi dragon. By jumping into Dondozo's mouth, Tatsugiri is safe from any and all attacks. Dondozo is also immune to damage, though its HP continues to tick down as a timer. This sheltering effect does mean that it cannot be boosted or healed by allies, so for the brief amount of time you are playing as Dondozo, it'll just be you against the enemy team by yourself.
Luckily Dondozo is ridiculously strong, especially with its Unaware Ability granting it piercing damage with every attack. Defending against Dondozo will be difficult for the enemy team, as the only way to reliably shorten its playtime is to attack it directly without getting hit in return. That said, because its moves gain uses as Tatsugiri levels up, it is extremely limited in what it can accomplish at the beginning of the game. It can never open with a Wave Crash or Order Up when it shows up for the first time since that will immediately end Dondozo's control and spit Tatsugiri out along with the attack. This means that, until the Tatsugiri has leveled up considerably, the opposing Dondozo is safer to play around than it may seem.
It still shouldn't be underestimated, as Dondozo can still uses its massive size and hard hitting basic attack to hinder the opposing team's ability to counterattack during team fights. The tail swipe covers a large area, but it's very slow and it doesn't add much control time to Dondozo when it hits. But if it does hit, hoo boy, you'll be sent flying like a jet ski spinning out. This can severely hamper the opposing team's efforts to control the battlefield around Regieleki or Rayquaza, so if you see an opposing Tatsugiri strutting up to the fight as if they don't have the wet paper defenses of an Attacker, be prepared for a storm of fish. That's fish, singular.
One last thing to cover, and that's the Unite Move, Commanding Connoisseur. It basically removes all of the limitations of Commander and unleashes the full power of both Dondozo and Tatsugiri combined. It allows Dondozo to use its moves freely without having to give up its turn in battle and it lets Tatsugiri's friends join in the fight. The little sushi dragons are excitable and will throw out Muddy Water or Dragon Pulse when they pop out of Dondozo, though these moves aren't as effective as when Tatsugiri itself uses these moves. I mean, you'd hate to be permanently blinded by Muddy Water, or hit by 3 shots of Dragon Pulse by each Tatsugiri, right?
While you can use Commanding Connoisseur at any time, your HP will be fully restored if you activate the Unite Move while in Bait Mode, especially while you have fainted. This makes Tatsugiri unique in that it technically has a self-revive move, which would be even more broken if it wasn't a squishy Attacker. It just means that KO'ing a Tatsugiri is anything but a done deal, as it can choose to summon Dondozo through either Commander or Commanding Connoisseur, and it'll come back at full strength if it does so through the latter option.
The duration of Commanding Connoisseur ticks down normally when Dondozo receives damage, just like normal with Commander, so bold opposing players may choose to reduce your impact by attacking you from afar. If you know the enemy knows this, then you should prioritize taking out these ranged Attackers, for your team's benefit as well as your own. Otherwise, the Unite Move will end and you'll have to endure the volley of attacks aimed right at you without the protection of the big fish, and it's not an endeavor you're likely to endure.
Fishing is made up of 3 parts, the bait, the rod, and the fisherman. Bait the fishes with an easy KO, and then use the rod to take them down. You're the fisherman in this scenario, so hold steady and reel in the next big catch. There's a sushi platter with your name on it at the end of the day.
-
And this has been Tatsugiri & Dondozo for Pokemon Unite! I really love the idea of two pokemon occupying a Unite License together and working really well because of it, and quite frankly, I can't imagine Tatsugiri joining Unite without Dondozo in tow. As such, a two for one special, by one sushi boy, get a big catfish friend for free!
Phew, this has been quite the journey, but I'm not done yet. Stay tuned next week for the home stretch of Season 3! Until then, see ya!
0 notes
Text
Persian for Pokemon Unite!
Season 1
Season 2
Prev: Cradily - Hatterene - Tropius - Cacturne - Ditto - Weavile - Ogerpon - Coalossal - Gogoat - Galarian Slowbro - Luxray - Breloom - Uxie, Mesprit, & Azelf - Wobbuffet - Obstagoon - Lanturn - Castform - Dusknoir
Cats are some of the most charming, endearing, and adorable animals we know of, and they can also be cruel, uncaring, and devious. The same is true of many cat pokemon, especially Persian, who has been around since Generation 1, throwing a hissy fit here and there. It even had a different form in Alola, though that regional form is already in the game, and this post is only about one cat.
They say that Persian and Meowth are cats that bring good fortune, so let’s find out if we’re lucky to get these fickle felines in Pokemon Unite.
-
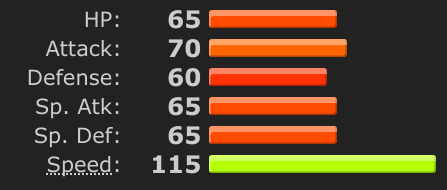
Back in the olden days, these numbers would've been more than acceptable. A high Speed stat of 115 makes Persian faster than most pokemon back in Pokemon Red and Blue. Low stats everywhere else are pitiful, but they were meant to balance its high speed, especially since the critical hit rate was based on the Speed stat. But then the critical hit ratio of the game was changed a Generation later, and now Persian falls behind in every facet aside from its high speed. Maybe it's overdue for a rework, but since it was carried by its niche of dealing critical hits very quickly, we have to work with what we've got. For that reason, Persian is fitted for the role of a...
Speedster
-
Basic Attack - Melee/Attack
Becomes a boosted attack after three hits. When the boosted attack is used, the user lunges towards the enemy, then starts swatting at them furiously with their claws. This attack deals damage multiple times, and the number of hits can be increased by mashing the basic attack button.
When the boosted basic attack is used, the pokemon leaps to the target and begins to hit them repeatedly with one paw. If multiple enemies are nearby, the higher priority target is chosen, depending on your basic attack button settings.
The boosted basic attack deals damage 5 times. More hits can be dealt by mashing the basic attack button, one additional beat per press.
You know how when your cat gets excited and they do this single paw strike repeatedly? Like when they are bothered by another cat and they lash wildly with single claw strikes? That is basically Persian's boosted basic attack, unleashing its restrained fury on the target.
It takes three hits to boost the attack, which is a bit on the slow side, but it's intended to be used carefully. Persian will leap at the target and sit there swatting furiously for a solid second, which is long enough for an enemy to counterattack. A whole second of damage leaves you open for the enemy and their teammates to retaliate, so make sure you pick your targets carefully.
If you do go for the attack, you can make the most of it by mashing the basic attack button. You'll add more hits to the boosted attack in this way, and talented button mashers will benefit the most from unleashing their inner cat.
You know who you are.
-
Ability: Technician
The user’s moves deal more damage the less Aeos Orbs there are in your Score Pocket.
Your moves deal increased damage the less Aeos Orbs you have in your Score Pocket. The formula increases your moves power by 1% for each missing Aeos Orb. This means that an empty Score Pocket of 30 increases your Moves power by 30%. As the Score Pocket expands, so does Technician’s potential power boost, maxing out to 50% at Level 12 and higher.
There's a saying that goes 'More money, more problems' which serves to highlight how excess riches can be problematic when others know you have wealth to share. Well, the opposite is true, in that if you have no money, you'll have no problems dealing with people that want your fortunes, or lack thereof. After all, cats don't need money.
And this one doesn't need Aeos Orbs either. When you have no Aeos Orbs to score a goal with, you're essentially very poor in Pokemon Unte. This poverty turns into power when boosted by Persian's Technician, increasing your damage by 1% for each missing Aeos Orb. 1% for each missing point means that you power maxes out to 30% at the beginning of the game, 40% from Level 8 to 11, and 50% at Level 12 onward.
Now, this does mean that your moves weaken the more wild pokemon you defeat, as KO'ing them for EXP also fills your Score Pocket with points. Fortunately, a simple score will completely deplete all of your Aeos Orbs, and help you win the game too, I guess.
But there's another way to spend your Aeos Orbs. Persian and Meowth are cats that think they're royalty, so they have a habit of throwing money around like confetti.
-

At the beginning of the game, Persian will start out as Meowth. You can choose between Pay Day and Scratch as your first move. By Level 3, you’ll have learned both.
-
Move 1: Pay Day (Ranged)
The user throws coins at the enemy, dealing damage. This move can be used repeatedly while on cooldown, consuming Aeos Orbs instead. If this move hits an opposing Goal Zone while consuming Aeos Orbs, the Aeos Orbs used will be collected in the Goal Zone and will be added to the total points scored by you or an ally. 5s cooldown.
Pay Day can be used repeatedly while the move is on cooldown, but it will cost 3 Aeos Orbs to do so each time. If you have less than 3 Aeos Orbs, you cannot use Pay Day off of cooldown.
If Aeos Orbs are used up during Pay Day, and the projectile lands within an opposing Goal Zone, the Aeos Orbs used will be collected and added to the total number of points scored by you or an ally. Collected Aeos Orbs can be seen underneath the Goal Zone’s HP, shown as ‘+X’ with X being the number of Aeos Orbs collected so far.
Any extra points that contribute to a score will be attributed to you in the Results Screen.
If you are KO’d before the points are scored, the collected Aeos Orbs will disappear from the opposing Goal Zone.
By itself, Pay Day launches a small projectile of golden coins directly forward. It's flashy, but it doesn't have any effect when it hits an enemy, aside from dealing damage.
The main draw is to use the move while it's on cooldown. Pay Day can be used repeatedly, but it costs 3 Aeos Orbs to do so. Having a reliable projectile like this is handy, but contingent on having the Aeos Orbs to spare. On the upside, throwing away your points like this does ensure that Technician powers up after each use, giving you the ability to consistently apply offensive pressure on the enemy team.
It also messes with the points of the opposing Goal Zone. When you throw Pay Day at a Goal Zone using Aeos Orbs, the amount you spend get added to a 'collection' within the zone. It's not exactly scoring, but the Orbs spent don't disappear. Rather, the Orbs you use up will be scored along with whatever you or an ally dunk when making a score. So, if you add 3 points to a Goal Zone and then score 15 points, the total points scored add up to 18 altogether.
You can add lots of Orbs to opposing Goal Zones in this way, especially if it's prone to breaking. Sadly, you can't affect your own Goal Zone in this way, but Meowth is fickle about how it flaunts its wealth. At least it's contributing to the scoreboard in this way, especially since Pay Day will still add points even if it hits an enemy guarding it.
Oh, but the points will all be lost if you get KO'd, which is easy enough since you're a Speedster. Better make your contributions scarce but meaningful.
-
Move 2: Scratch (Dash)
A jumping scratch attack that deals damage two times in quick succession. 2s cooldown.
Scratch deals damage two times, once near the beginning of the attack, and once more near the end of the dash.
A simple scratching attack, what more could you want?
Well, I guess we could talk about how fast the cooldown is. 2 seconds is ridiculously fast for a dashing move, even for a Speedster. However, keep in mind that Meowth doesn't pack a lot of power in its claws and has to rely on Technician to help it deal damage. It's a good thing the move has very low cooldown, as not only can it be used repeatedly to move about on the map, but you can dive in and out of a fight easily.
But like I said before, you're a Speedster, so a stray hit will put you out of commission for a while. Even evolving into Persian won't help your bulk much, but it does come with a stronger variant of Pay Day to help you out.
-
At Level 5, Meowth will evolve into Persian. At the same time, Pay Day becomes either Power Gem or Swift.
-
Move 1a: Power Gem (Ranged)
The user launches a sparkling gemstone from its forehead, dealing damage to the enemy and reducing their Defense for a short time. This move can be charged for additional power and expanded area of effect. This move can be used again while on cooldown, using Aeos Orbs instead, and consumes more Aeos Orbs when charging, dealing more damage in this way. If this move lands in an opposing Goal Zone, the Aeos Orbs used for this attack are collected and added to the total points scored by you or an ally. 5s cooldown.
At Level 11, Power Gem becomes Power Gem+.
Deals increased damage.
Power Gem reduces Defense by 50% for 3 seconds. This debuff can be reapplied with consecutive uses of Power Gem.
The move can be charged for 0.75 seconds, increasing the damage dealt by as much as 100% and expanding the blast radius, making it possible to hit multiple enemies.
While the move is on cooldown, Power Gem can be used again at the cost of 5 Aeos Orbs. Charging the move fully costs an additional 5 Aeos Orbs. When used in this way, Power Gem deals an extra 50% more damage.
Similar to Pay Day, Power Gem will add Aeos Orbs to a Goal Zone when the move lands within the area. All effects are the same in this regard, such as the collected Aeos Orbs contributing to the total points scored when done by you or an ally.
Power Gem+ increases the base damage of the move by 40%.
They say money makes the world go 'round. If that's true, gems must make it ballistic, considering how bright and sparkly they are.
Power Gem is slightly slower than Pay Day, but the power boost is noticeable. It reaches farther and has a small blast radius, making it effective at catching ranged enemies. This sparkly spritz can also be charged, increasing not only the attack power of Power Gem, but also the size of the explosion.
If you manage to hit multiple enemies with Power Gem, you'll be rewarded with a Defense reduction debuff plaguing all affected enemies. A solid hit is the perfect opening for you to follow up with either Scratch or a boosted basic attack, especially since their Defense is reduced by a whopping 50%. It only lasts for 3 seconds, but you can reapply the debuff liberally by using it again and again.
Just like Pay Day, Power Gem can be used while on cooldown, at the cost of some Aeos Orbs. It's a lot more expensive, though, asking for 5 Orbs initially. It costs another 5 Orbs to charge, making the move costly to use when you just evolved, as your Score Pocket maxes out to just 30 by the time you learn Power Gem. Until you Level Up some more and amass a pile of riches to your name, you should be careful with how you spend your Aeos Orbs.
This move also messes with the opposing Goal Zone in the same way as Pay Day, in that any Aeos Orbs spent will be collected and contribute to the next score that gets made. Of course, the odds of this happening are pretty slim, since any enemy on the opposing Goal Zone is gonna be bulkier than you can handle. Power Gem is better off serving you out in the open, hunting for KO's. You can worry about making a meaningful score later on in the game, when there are less enemies guarding their Goal Zones, after you've KO'd them all.
Some cats get by with their agility and reflexes alone. You'll feel like you have 8 extra lives if you learn Swift instead.
-
Move 1b: Swift (Ranged/Sure-Hit)
The user hisses and raises its tail and the fur on its back. It then launches multiple star projectiles forward in a conical shape, dealing damage to any enemy hit. When an opposing pokemon is hit by one of these star projectiles, the user flips and sends out even more star projectiles, honing in on affected enemies. This move can be used repeatedly during the second part of the attack, launching more star projectiles in exchange for Aeos Orbs. If these star projectiles charged with Aeos Orbs damage an enemy within an opposing Goal Zone, the Aeos Orbs used will be collected and added to the total points scored by you or an ally. 8s cooldown.
At Level 11, Swift becomes Swift+.
Increases the number of star projectiles thrown. Reduced cooldown.
The initial ‘charge’ of Swift takes 0.75 seconds. Persian can continue to move while preparing Swift but at 70% reduced Movement Speed.
The star projectiles are thrown out in a conical shape in the designated direction. If an enemy is hit, Persian will perform a flip, just like Espeon when it uses Stored Power. During this flip, more star projectiles are launched, honing in on all enemies damaged by the first part of the attack. Persian can direct itself while doing this.
When Swift hones in on an enemy, an additional two stars are launched. Swift+ increases this number by an additional two.
Before the attack ends, Swift can be used again to repeat the attack at the cost of 5 Aeos Orbs. The star projectiles will continue to hone in on the enemy until they move out of range, in which case the attack will fail. Swift will go on cooldown when the move ends, whether it’s because you’ve run out of Aeos Orbs or you choose to stop attacking.
Just like Pay Day and Power Gem, Swift will add Aeos Orbs to a Goal Zone if they damage an enemy within the opposing Goal Zone. These points will then be added to the total points scored by either you or an ally. The collected Aeos Orbs will disappear if you are KO’d.
Swift+ reduces the cooldown to 6 seconds.
Now, I don't know what a 'Speed Star' is, exactly, but I do know that pokemon that can use the move are capable of mustering up the least bit of energy needed to use this attack. For Persian, while it could use the powerful normality of its Normal Typing, it instead opts to source the power for Swift from its funding. Just like with Power Gem, Swift is backed by Persian's hidden wealth. I mean, shining stars could be a currency somewhere in the world, right? Like a coin with a star minting...
I digress. Persian's Swift is a two part attack that throws out pretty pearly pointed projectiles at potential opponents. The first part scatters the stars all willy-nilly, whereas the second part launches additional projectiles that track down all who got struck by Swift.
Persian likes to move nimbly while using Swift as well. It stalls for a bit to muster up the energy to use the move, but then it flips out quite literally, throwing the attack out in one smooth motion.
This is relevant to the move because, before the second part of the attack finishes, Swift can be used again to launch more projectiles, at the cost of some Aeos Orbs. It's 5 points per use, but if you can afford it, you'll see that Persian quite literally dances about while showering stars on the opposing team like a prejudiced storm of shooting stars.
It hits the opposing Goal Zone in the exact same way as Pay Day and Power Gem, although it's much more likely to contribute to the score total due to the habit of enemies retreating when under attack.
Now, as long as you have points to spare, you can cash in with Swift to secure a KO. The attack doesn't miss and the stars remember the enemy hit by the first part of the attack, so all you have to do is keep the enemy within your line of sight.
There's a couple of problems with Swift, however. Like I mentioned before, it's quite expensive, especially at Level 5 when you learn the move. Your Score Pocket at the moment maxes out to just 30, meaning you can afford, at most, an additional 6 extra shots of Swift. It's not unlikely you can get more if you're moving about enough to pick up stray Aeos Orbs off the ground or when you score a KO on an enemy with Swift, but moments where you empty your bank account completely to KO an opposing pokemon will be common until you Level up considerably.
Also, Swift stops working when the enemy is too far away. If you can't see them on screen any more, Swift won't be able to come out. Also, the projectiles can be body blocked by other opposing pokemon, limiting the total damage you deal to a single target. The stars will hurt though, but this will be a problem if it's an opposing Defender coming between you and the target, and the Defender is rapidly approaching you.
For major team fights, it's a great skill to have as it allows you to move, ahem, swiftly on the sidelines, throwing stars everywhere. Just keep in mind that you can't use your other move until Swift ends.
Speaking of which, Scratch is lame. You better Level Up some more in order to fully realize the potential of this precious purring pal.
-
At Level 7, Scratch becomes either Slash or Fury Swipes.
-
Move 2a: Slash (Dash/Melee)
A leaping slash that has a high chance of dealing critical damage. 3.5s cooldown.
At Level 13, Slash becomes Slash+.
Extends the dash distance and increases the critical hit chance of the move.
Slash has a 35% chance to deal a critical hit with each strike. Slash+ increases these odds to 45% and doubles the attack distance.
After covering the complex mechanics of Power Gem and Swift, Slash and Fury Swipes feel breathtakingly simple to go over. A jumping slash attack reminiscent of a wild cat ambushing its prey, you can bet it would leave some deep scars.
The low cooldown of the move is its strongest factor, as Persian is a no nonsense kind of cat. Being able to unleash a critical hit diving attack at any moment is the greatest ploy of any fickle feline.
The move gains increased power from Technician, just like Power Gem and Swift, but the critical hit rate magnifies this damage bonus when it happens. Of course the bonus will be times zero if your Score Pocket is full, so it's best to use this move after exhausting your Aeos Orbs from using those moves, or even after scoring.
Although, relying on chance for extra damage is a bold task, for a frail Speedster. Maybe some players will prefer stability in the form of Fury Swipes.
-
Move 2b: Fury Swipes (Dash/Melee)
A mighty leaping scratch attack that attacks twice in quick succession. If damage is dealt successfully, resets the cooldown of this move. 9s cooldown.
At Level 13, Fury Swipes becomes Fury Swipes+.
The user becomes Invincible briefly after KO’ing an opposing pokemon.
Both hits of Fury Swipes must land in order to reset the cooldown of the move.
Fury Swipes+ grants you 2 seconds of Invincibility when you KO an opposing pokemon with this move.
Big cats wear down their prey with quick, precise cuts in order to exhaust them. If they can do this multiple times before the prey retaliates, it reduces the danger of engaging a risky opponent. That is the idea behind Fury Swipes, a series of piercing claw strikes meant to bring the opposing pokemon down with surgical precision.
The two claw strikes of Fury Swipes are meant to be spaced just enough to barely hit an enemy at the same time. That's because, if both hits land, Fury Swipes rewards the player by resetting the cooldown of the move. This requires proper spacing and timing, especially against twitchy opponents like other Speedsters, but the extra damage is always worth it, especially with Technician at or near full power.
The move is better used against single opponents by themselves rather than those covered by their teammates, as even though Fury Swipes is more likely to land both hits in a crowd, you are also just as likely to get KO'd almost instantly. If you really want to use this move to dive into a crowd of enemies, you should wait until the move has upgraded, as you get temporary invincibility when you KO an enemy. This lets you tear the enemy team to shreds without any danger to your well-being, as long as you're aiming at frail and weakened opposing pokemon.
Other than that, it's a solid move to use against Wild pokemon, since it's so easy to position this attack to hit twice and get cooldown resets. The damage increases even more with Technician, though you'll see a damage reduction when your Score Pocket starts filling up.
Just use Power Gem or Swift at every opportunity. It's not like money grows on trees or anything.
-
Unite Move: Royal Cat Nap (Recovery/Buff)
The user stops battling and begins to take a quick nap. The more HP it restores, the more Aeos Orbs it receives. Afterwards, the user’s Attack and Movement Speed drastically increase for a short while.
This Unite Move fully restores the user’s HP over a set amount of time. For each percentage of HP restored, Persian will get 1 Aeos Orb added to its Score Pocket. A minimum of 50% of your HP restored will fill up a Score Pocket by 50 Points at Level 12.
The Unite Move ends after 7 seconds or when your HP is fully restored. It will cancel if you receive damage from an opposing pokemon. If used at full HP, the Unite Move ends after 3 seconds.
Your Attack and Movement Speed increases by 80% for 7 seconds afterwards if the Unite Move is allowed to finish.
A recovery move is pretty useless when a frail Speedster has access to it, but when it's an entire Unite Move, it may be the worst in the entire game. Ah, but the point of the move isn't to heal, but to earn Aeos Orbs without having to lift a finger. Persian's high pedigree allows it to make some serious cash, as Royal Cat Nap serves not only to line your pockets, but empower you afterward.
First of all, it is a full refill of your HP, which would be overpowered on anything other than a frail Speedster, but it is still conditional healing. The healing ends when you get hit by an attack, which comes by easy enough with things like Decidueye's Shadow Sneak or Mewtwo's Infinite Psyburn. If you want to take a nap in peace, you'll need to find a nice quiet spot of grass somewhere nearby, not too close to the action, but just close enough that you can rejoin the fray when your HP has been refilled.
If you happen to use Royal Cat Nap with 0 points in your Score Pocket, you'll receive Aeos Orbs for each percentage of HP restored. This may seem counterproductive to the Technician Ability, but you do need points to utilize the bonus effects of Power Gem or Swift. You get to keep the points even if the Unite Move gets cancelled, though it's not a guarantee that you'll survive the followup attacks.
With those extra points, you can make for another score very easily. Supposedly, if you used Power Gem on a weakened Goal Zone, you'll have amassed a load of points to overflow when you or an ally score a goal next. If you follow up with a full Score Pocket after using Royal Cat Nap, the overflow of points on a single Goal Zone will be exponential.
And that's not even covering the boost you get afterwards. If you get a good night's sleep using Royal Cat Nap, you'll be rewarded with a massive boost to your Attack and Movement Speed. If you boost your Attack stat with items, the boon will magnify as a result, but only if you complete the Unite Move in its entirety.
Now that's all well and good, but what if you don't need HP recovery? What if you used Royal Cat Nap while you're already at full HP? Well, the Unite Move duration will be drastically reduced to 3 seconds, but you won't get any Aeos Orbs added to your Score Pocket, since no HP was recovered. So what would happen if you used Royal Cat Nap at full HP, no points in your Score Pocket, and come out of the move with a Unite shield, an 80% Attack and Movement Speed boost, and 50% boost gained from Technician?
Terrible, horrible, things, I wouldn't dare dream of it.
-
Achievement
Start a 4 KO Streak with Technician at full power.
A Speedsters job is simple; secure KO's against the most important members of the opposing team, whether they be high damage dealing ranged Attackers, impenetrable Defenders, or reliable Supporters. Sometimes they KO one opposing pokemon and retreat for a job well done. Sometimes they go overboard and go on a killing spree, it happens.
But for Persian, a lot of how it plays as a Speedster revolves around its moves and how it utilizes Aeos Orbs, and how the resource affects it in turn. For example, it needs to have a nearly empty Score Pocket in order to fully power up Technician and its moves, but it also needs a couple of Aeos Orbs in order to repeatedly use Power Gem and Swift. It's a delicate balance of supply and demand that our noble feline has to master in order to play a Speedster well.
But the end goal is the same. Use your abilities and skills together to contribute to the team as much as you can. One way of doing this is to start a KO streak while at 0 points in your Score Pocket. It doesn't matter what happens before that, as long as the first KO happens when you're penniless. Maybe you've used up all your Aeos Orbs to get the streak going, maybe you went buck wild with Power Gem or Swift. Whatever the case, the opportunity to deal some serious damage will present itself to you afterwards, allowing you to fulfill your duties as a Speedster.
Like a cat let loose on a ship crawling with rats.
-
Holowear
Persian's royal disposition lends itself to a wide variety of regal, and expensive, holowear, but we need most of them to be affordable to the average trainer in order to make a profit.
To that end, Larcenous Style Holowear models Persian after the burglar trainer from Pokémon Red and Blue, with a mouth covering, sunglasses, baseball cap, and a sack full of not pokeballs, but Aeos Energy. Hunter Style Holowear gives it a straw conical hat, a cloak tattered in ends, a toy sword strapped to its side, and a large bag of money on the other side. Leaning on the regal side of things, Captain Style Holowear gives it a big pirate's hat, an eyepatch, a captain's suit and boots, and a toy blade strapped to its hilt. And I guess Persian does need Regal Style Holowear to flaunt its wealth, with a big glittering crown, royal attire, overly fancy cape, and another toy rapier strapped to it. Lastly, Sultan Style Holowear makes it resemble a rich man from the desert, with a fancy head wrapped in bandages and jewels, a vest, baggy pants, and curly boots.
Persian really only wants high effort Holowear, to show that we value it as much as it thinks it's worth.
-
Strategy
A common misconception about Speedsters is that they are only good at getting KO's and that they're basically the melee version of Attackers. It's true that they are capable of dealing enough damage to get a KO streak going, but their fidgety nature lends them to make for some risky gambits when it comes time to score. You could use up a Dash move to give chase to a weakened enemy, or make a desperate run for the enemy Goal Zone to get the point lead, or both. No better time to dunk 100 points than when the entire enemy team is respawning.
All playable pokemon have a rating that shows their scoring potential, and Persian would have an unusually high rating, even for a Speedster. That's because of its choice of attack in either Power Gem or Swift, and how spending Aeos Orbs on these attacks not only makes it stronger, but also weakens opposing Goal Zones by imposing 'credit' on them.
By itself, Persian isn't able to make use of this credit system it instills on opposing Goal Zones, as they are usually guarded by 2 or 3 opponents. But if it played smart, it can incur a 45 point credit, then cash it all in with just a score goal of 5 points. It could do this, or it could let another pokemon make this score for it.
Building up credit for its allies to cash in makes it possible for Persian to contribute plenty of points to the scoreboard without ever making a goal itself. It requires coordination from teammates to achieve this, but any roundabout way to avoid direct confrontation with the opposing team is favorable for a frail Speedster like itself.
Between Power Gem and Swift, the former doesn't need a target to hit in order to add credit to a Goal Zone, but the latter does. The tradeoff is that Power Gem is a bit risky to use against opponents due to the windup, but the Defense debuff makes it worth the effort. Swift is a lot safer due to the evasive nature of the move, but it can become expensive to use as an attack if you were to use the move repeatedly in one sitting.
The choice between Slash and Fury Swipes can be chalked up to style. Slash is a direct attack that relies on chance to get the most damage, whereas Fury Swipes can deal multiple hits reliably with carefully placed cuts. Both moves deal more damage exponentially with the boost from Technician, so the best time to go on the offensive with these attacks would be right after making a score or after exhausting all of your points through Power Gem or Swift.
Speaking of points, your Unite Move, Royal Cat Nap, is one of the more difficult boons to take advantage of due to the function of the move. You get Aeos Orbs for each percentage of HP you restore, but a frail Speedster like Persian doesn't have a lot of HP to spare in the first place. Most stray hits will take you down to half HP or more, so it's not feasible to use this move to clutch your survival.
It won't even save you in that regard, as the Unite Move will cancel if you get hit while sleeping. What makes this move worth using in the first place? Well, considering that Royal Cat Nap has the potential to completely fill your Score Pocket, it has to do so on a risk versus reward system. You need points to use Power Gem or Swift at their full power, and using up points in this way slowly boosts Technician. The Unite Move also boosts your Attack and Movement Speed greatly if it is allowed to finish, giving Power Gem and Swift some extra kick. If the Unite Move is used while at full HP, it'll end after 3 seconds, giving you the boosts but without any Aeos Orbs. Imagine the damage you can deal with a fully powered Technician boost.
Persian is a fickle cat pokemon with some very refined taste, but its battle prowess is not to be underestimated. There's a reason trainers tolerate its fussy fervor, as this ferocious feline fights with flash and force, finishing in first place in contests of strength. It just demands to be pampered afterward.
-
And that's Persian for Pokemon Unite! Considering the fact that Persian and Meowth are themed around luck and good fortune, basing their movesets around 'money', or Aeos Orbs, seemed like a no-brainer. That said, it does feel like I'm missing an opportunity to feature Meowth by itself. Could it be possible to make a moveset for Meowth as a Supporter? Who knows.
Well, enough chit-chat. That'll be it from me. See ya!
1 note
·
View note
Text
Dusknoir for Pokemon Unite!
Season 1
Season 2
Prev: Cradily - Hatterene - Tropius - Cacturne - Ditto - Weavile - Ogerpon - Coalossal - Gogoat - Galarian Slowbro - Luxray - Breloom - Uxie, Mesprit, & Azelf - Wobbuffet - Obstagoon - Lanturn - Castform
The envoy of the dead, the ferryman of the underworld river, what many would call the Grim Reaper himself. Dusknoir has arrived on Aeos Island, but for what purpose? Has he come to reap the souls of the living, or are his motives far more sinister?
Whatever the reason may be, we must be prepared to shake hands with Death itself. It's time to look into what this begrudged boogeyman is capable of.
-
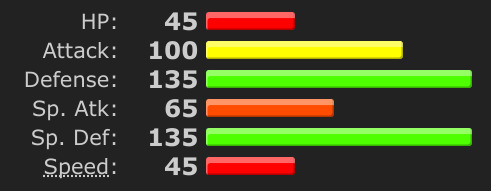
With massive stats in both defenses, Dusknoir seems like it was made for the role of a Defender. That would be true, but due to its Ghost typing, it suffers a bit from 'big boned' syndrome, where it isn't as fat as you would think. A low HP stat of 45 averages out those huge Defender numbers into what's essentially average bulk, but at least it has a decent Attack stat. In actuality, Ghost types like Dusknoir get most of their value from playing trick or treat with their enemies, using moves like Will-o-wisp, Confuse Ray, Curse, Pain Split, all of which can enfeeble opposing pokemon while empowering the user and their allies.
As such, for being well suited to the hybrid role of a Defender and a Supporter, I designate Dusknoir with the role of an...
All-Rounder
-
Basic Attack - Melee/Atttack
Becomes a boosted attack after 4 hits. Each hit marks an enemy with an eye icon. When the boosted attack is used, a shadow explosion deals damage to the enemy regardless of where they are, damaging any nearby enemies as well. The boosted attack ignores shields when damaging an enemy with a wide open eye mark.
Each hit of the basic attack marks the affected enemy with an eye shaped icon. The first hit marks them with a closed eye icon, which progressively opens as more hits land. The boosted basic attack has the pokemon attack all around itself with ghostly energy and affects all marked opposing pokemon.
When the pokemon uses its boosted basic attack, all pokemon marked by the basic attack will be attacked by a ghostly explosion that affects nearby pokemon in a small area.
The more the eye mark progressed, the more damage dealt. The first mark, the closed eye mark, deals 100% of the boosted basic attack damage. The second mark, the tired eye icon, deals 120% damage. The third mark, the open eye icon, deals 140% damage. The fourth mark, the wide open eye icon, deals 160% piercing damage.
With the big hands of Dusknoir and Dusclops, you can bet they know how to throw them. Duskull less so, but it's learning.
Those big hands also have a habit of cursing all who are touched, so when it hits something in Pokémon Unite, it marks them with a weird eye symbol. The more hits this basic attack deals, the wider the eye opens. And when the boosted basic attack comes out, all who are marked are seen by the user and attacked all at once with powerful curse energy.
Now, the basic attack will become boosted after 4 hits, but the eye mark isn't guaranteed to be opened all the way when this happens. In the heat of battle, you'll land one or two hits on an opposing pokemon, marking them with a weak eye icon. That's good enough, as the eye icon is the multiplier for the boosted basic attack. Now, it would be nice to hit an enemy all 4 times, but just once is good enough, as the boosted attack will deal damage regardless of where they are when it comes out.
It's also hard to actually land all 4 hits of the basic attack, as the basic attack doesn't ever reset. You could KO a wild pokemon while at 3 basic attacks, then throw your 4th attack at an opposing pokemon 30 seconds later, marking them one time before the boosted basic attack comes out. It'd be nice if there was a way to increase your basic attack speed outside of X Attack, that way it'd be possible to cycle through your basic attacks at least once.
As it just so happens, there is. It's Dusknoir's powerful aura called Pressure, and it's much more impressive than it seems.
-
Ability: Levitate/Pressure
Levitate (Duskull)
The pokemon’s Movement Speed increases relative to the Unite Move Meter.
Pressure (Dusclops/Dusknoir)
The pokemon’s Movement Speed and basic attack speed increase relative to the Unite Move Meter. Reduces the damage of all opposing Unite Moves.
Both Levitate and Pressure increase the user's Movement Speed relative to the user's Unite Move Charge Meter. For example, 50% Unite Move charge equates to 50% increased Movement Speed.
Both Levitate and Pressure are in effect even when the Unite Move is locked by the Level or by other effects.
In addition, the user's basic attack speed also increases relative to the Unite Move Charge Meter, following the same formula.
Pressure reduces the damage of opposing Unite Moves by 40%.
Did you know that when a round starts, your Unite Move Meter is locked? Obviously, yeah, you aren't at a high enough level to use it, but even so, it continues to charge while locked. This can come into play during certain Quick Battle modes where you level up so quickly, you can unlock your Unite Move before its finished charging. Now, this will never happen in a real match, but for the most part, Duskull's Levitate Ability gives it a slowly increasing Movement Speed boost when the game starts.
It helps that Duskull and Dusclops are bulky enough that they can defend an area, and then use that speed to retreat or rotate lanes when necessary. However, they don't quite have the attack power of a Defender to make use of their defenses just yet. This can make it difficult for Duskull in the beginning, but if you can evolve soon enough, Levitate will become Pressure, giving Dusclops some much needed firepower for the mid game.
Pressure not only increases your Movement Speed, it will also increase your basic attack speed, letting you hit fast enough to mark enemies with the watchful eyes of the underworld. Oh, and it improves your ability to defend by spreading basic attacks around much faster.
Speaking of defense, Pressure also reduces the damage received from opposing Unite Moves if you get hit by them. It may not help much if you're behind in EXP, especially when you're stuck as a Dusclops, but if you've evolved into a Dusknoir, it can give you some much needed bulk. Most opposing pokemon will pop their Unite Move to win a 1-v-1 or to make a power play, but Dusknoir's Pressure takes that option away from the enemy, especially when you're at equal Level.
It's a carnal type of fear when you're backed into a corner, and your Unite Move isn't guaranteed to work against the slowly approaching Ghost Type pokemon that's the personification of death itself. Spooky.
-

At the start of the game, Dusknoir will start out as Duskull. You can choose between Astonish and Leer as your first move. By Level 3, you will have learned both.
-
Move 1: Astonish (Melee)
The pokemon disappears into the shadows, becoming invisible to enemies. When the move is used again, the pokemon reappears and Stuns and damages any enemy nearby. 9s cooldown.
Astonish makes the user invisible for 5 seconds or until the attack is used. You cannot use any other attack or move until then.
Astonish damages all nearby enemies and Stuns them for 0.75 seconds.
Invisibility effects are annoying and difficult to scale to the player's skills, so there are loads of things to consider when giving such an effect to a pokemon. Is it fair when a Duskull uses it to help it launch a sneak attack? Maybe not, but it is in character for a mischievous little skull creature like itself.
The move Astonish is balanced out by two things. Firstly, it has a lengthy cooldown of 9 seconds and only runs for 5 seconds. This makes it difficult not only to lead an attack or an ambush with, but also deprives the user of an escape plan should the frontal attack backfire. Basically, if you open with Astonish, Stun and hit an enemy, what are you to do if this move fails to KO or deal significant damage to the enemy? Probably perish.
The second thing is that Astonish has short range and doesn't augment Duskull in any way beyond granting invisibility. Wherever you go with Astonish, you have to understand that you're committing to it. Remember, your Attack stat isn't all that impressive until you evolve into a Dusknoir, so make sure that this surprise attack counts.
The easiest way to do that? Play as a Supporter with Astonish and your other move.
-
Move 2: Leer (Debuff/Hindrance)
A bright flash of light is emitted from the pokemon’s eye, briefly blinding the enemy and reducing their defense. 7.5s cooldown.
Leer obscures the vision of enemies for 2 seconds and reduces their Defense by 30% for 4 seconds.
There are more pokemon out there with multiple heads than there are pokemon with single eyes, and that's one of the weirder things about pokemon in general. Being a Ghost type, Duskull doesn't have much need for physical senses, so it can afford to lose some depth perception. Of course, there is such a thing as equivalent exchange, so by losing one eye, it gained some special powers for using the remaining eye.
Leer flashes a debilitating light from its eye, blinding affected pokemon briefly and reducing their defenses afterwards. It helps Duskull soften up opposing pokemon to make up for its low attack power, but it also really helps out allies deal even more damage, especially if they can deal ranged physical damage like Raboot or Decidueye.
The blinding effect is also interesting. It only lasts for 2 seconds, but if Astonish is ready to go, you can follow up with that attack and go invisible, completely escaping the opposing team's vision! It's up to you on what happens next, as you can escape to safety or try and go for a KO on a weakened opponent. Remember, you're a hybrid Defender and Supporter, so whatever you do is supposed to benefit you and your teammate.
Coordination is the key here. You get a lot of EXP for KO'ing opposing pokemon, which is helpful for you as Duskull needs quite a bit of EXP to evolve. If you can manage that, you'll be one step closer to unleashing your full power.
-
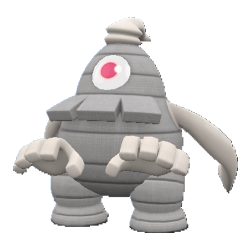
At Level 6, Duskull will evolve into Dusclops. At the same time, Astonish will become either Shadow Punch or Night Shade.
-
Move 1a: Shadow Punch (Ranged)
The pokemon becomes cloaked in shadow, disappearing from the enemy’s sight. When the move is used again, a projectile fist is launched, dealing damage to any enemy struck. The fists can be used repeatedly until the move ends, but the fists will be visible to enemies. Each hit restores the user’s HP. 9s cooldown.
At Level 11, Shadow Punch becomes Shadow Punch+.
Increases damage dealt gradually while invisible.
Shadow Punch makes the user invisible for 7 seconds. During this time, using Shadow Punch again sends a shadowy fist out as a projectile. This move can be used repeatedly in this way with a 0.5 second delay in between punches. Shadow Punch goes on cooldown when the invisibility effect wears off.
The projectile fists are visible to opposing pokemon, revealing to enemies where you are hiding. Each hit of Shadow Punch restores your HP by 50% of the damage dealt.
The user will be forced to become visible if damaged by an opposing move. Shadow Punch+ has the projectile fists deal increasing damage the longer you manage to stay invisible, up to as much as 250%.
Similar to Astonish, Shadow Punch turns you invisible. However, Shadow Punch also turns your ghastly fists into straight slinging knuckle sandwiches made of phantom energy. I guess all you need to box like a pro is a good ol' pair of hands, and not necessarily a set of arms or elbows, or shoulders for that matter. Seriously, why does it just have hands?
Well, with a new evolution comes some improved stats, which makes it more feasible for Dusclops to go on the offensive with Shadow Punch. The invisibility effect hides you very well without any tell that you're nearby. Enemies will only know you're in the area if they see the ghost fists flying out of nowhere, but the invisibility will protect you from Sure-Hit moves like Glaceon's Icicle Spear.
But if something else hits you, Shadow Punch and the invisibility effect ends, forcing you to come out of hiding. This is different from Astonish, which kept you hidden even if you got tagged by a lucky shot. While Shadow Punch gives you range and invisibility, the move must be used carefully for the full effect.
As a reward for playing well with Shadow Punch, each hit restores some of your HP when they deal damage. This is useful for recovering from a fight or when a scuffle with the opposing team has worn you down a little too much. If you manage to safely use Shadow Punch to escape the opposing team, any potshots you take will serve to restore your HP and keep you in the fight for a little longer. The longer you manage to stay hidden, the more HP you can restore, putting you back in the fight.
Shadow Punch+ improves the damage these ranged punches can deal the longer the invisibility effect remains for, which helps you deal plenty of damage, especially as you'll have evolved into Dusknoir by now. It becomes easier to pick off weakened opposing pokemon with Shadow Punch while your own offensive presence is enough to ward off the enemy team.
Speaking of which, if you want to talk about offensive presence, consider Night Shade as an alternative.
-
Move 1b: Night Shade (Area)
The pokemon creates a shadow copy at the designated area while becoming invisible in turn. The shadow copy can be directed but cannot attack. When the move is used again, the copy explodes, dealing damage to all enemies in range and deals extra damage for each hit the copy took. 10s cooldown.
At Level 11, Night Shade becomes Night Shade+.
Resets the cooldown of this move when an opposing pokemon is KO'd.
Night Shade creates a clone of the user in the designated area while also turning you invisible. This effect lasts for 7.5 seconds, until Night Shade is activated.
The created clone shares your name and HP bar at the time of creation, but will not take damage or be affected by hindrances. It can still be targeted and attacked by opposing pokemon and moves.
The clone can be 'directed' by your own movement. You are essentially controlling two characters at the same time, but one is a decoy.
Night Shade can be used again to cause the clone to explode in a wave of ghost energy, dealing damage to all enemies nearby. Each hit of damage the clone received increases the damage dealt by this explosion by an additional 7.5%, maxing out to 150%.
Night Shade+ has its cooldown reset when an opposing pokemon is KO'd by this explosion.
Most, if not all, of the cloning moves in Pokémon Unite puts a computer in charge of the copy. The most you can do when using Double Team with either Greninja or Meowscarada is pick the best direction and hope for the best. But Dusclops has big hands and is surprisingly adept at pulling puppet strings in order to control Night Shade. As such, the ability to confuse and confound opposing pokemon depends on your own misdirection and sleight of hand.
The copy made by Night Shade shares your name and HP, which is good enough to convince nearby enemies that you're the real deal. The jig is up once the copy is attacked, as Night Shade prevents the clone from receiving damage or hindrances. It will also tell enemies that you are nearby, as Night Shade requires you, the puppet master, to be close by to control it.
If you are in danger of being revealed to the opposing team, you can trigger Night Shade to self destruct, dealing damage to all enemies near the copy. It will deal even more damage the more hits it received, returning the enemy's aggression back to them.
Of course, this only works on opponents that aren't paying attention. Smart players will back away from the copy when they see it isn't responding to damage or crowd control, as they know it will eventually explode. They'll start attacking blindly around the area itself, hoping to fish you out. You can do something sneaky and use Night Shade behind you, tricking the opposing team to overextend or waste their own Unite Move.
Keep in mind that this trickery is in service to the team. You're playing as a hybrid Defender slash Supporter, so your crafty Night Shade plays must be used to draw enemy fire safely away from teammates. You can afford to go on the offensive with Night Shade+, as not only can you reset the cooldown of the move with a successful KO, you'll also have evolved into the more powerful Dusknoir by then.
Speaking of which, Dusknoir requires quite a bit of EXP to reach its full potential, and for good reason.
-

At Level 9, Dusclops evolves into Dusknoir. At the same time, Leer becomes either Shadow Ball or Destiny Bond.
-
Move 2a: Shadow Ball (Debuff/Hindrance)
The pokemon launches a ball of darkness, sticking to all enemies in range, obscuring their sight, and increasing the damage they receive for a short while. The affected pokemon have their Unite Move charge rate decreased for a few seconds afterwards. 10s cooldown.
At Level 13, Shadow Ball becomes Shadow Ball+.
Further decreases the opposing pokemon's Unite Move charge rate.
Shadow Ball launches from Dusknoir's mouth and takes 0.75 seconds to come out, giving opposing pokemon a brief moment to escape from the move's range.
If Shadow Ball hits an opposing pokemon, it will 'attach' to them by covering up their heads, obscuring their vision for 3 seconds. When this effect wears off, the Shadow Ball will clear away, though the move's other effects are still active.
Shadow Ball will also increase the damage received from all pokemon by 35% for 6 seconds.
In addition, affected pokemon have their Unite Move Meter fill at a reduced rate for 10 seconds. Unite Move charge will be reduced by 50%, whether it be passively, from KO'ing pokemon, or from scoring goals. Shadow Ball+ reduces this even further by 65%.
Because of Dusknoir's reputation of 'stealing' souls and taking them to the other world, it is a pokemon that many would approach with caution. The truth is, it's not actually taking souls. Rather, it's taking away and inhibiting one's life force in order to weaken them, which seems much worse.
Shadow Ball affects not only the pokemon it hits but also their life force as well. In addition to obscuring their vision, it enfeebles them and makes them more susceptible to damage from you and your allies.
But that's not the worst of it. Shadow Ball will also inhibit the generation of opposing pokemon’s Unite Move Meter, extending the time it takes for opposing pokemon to receive their ace in the hole, so to speak. This gravely affects pokemon with slow Unite Move Meter generation, but it can also inhibit those with fast meter gain, like Blaziken or Dragapult, making their high powered moves less reliable.
Shadow Ball does have a bit of a windup to it, though, so if an enemy sees it coming, they'll either move out of the way or retreat. Their best option is the latter, as the blinding effect and the defense reduction make them vulnerable to follow up attacks from you and your allies. The upgraded version also reduces the charge time even more, though this will be difficult to take advantage of in the late game.
Instead of inhibiting the Unite Move Meter, Dusknoir may instead opt to steal it.
-
Move 2b: Destiny Bond (Debuff)
Casts a curse on all enemies in range. While active, the affected pokemon have their Unite Move charge rate transferred to yours. If an enemy is KOd while cursed, gain more Unite Move Charge. 15s cooldown.
At Level 13, Destiny Bond becomes Destiny Bond+.
Expands the area of effect.
Destiny Bond affects all pokemon within close range to Dusknoir. Affected pokemon have their Unite Move Meter transfer any charge amount to your own Unite Move Meter. This has no effect on wild pokemon.
If an affected opposing pokemon is KO'd while cursed by Destiny Bond, you gain an additional 10% Unite Move charge.
Destiny Bond+ expands the area of effect by 25%.
A fellow traveler is a stranger you'll know for a long time. Maybe they'll tell you their life story, or teach you a really good recipe for dinner. For Dusknoir, its travelling companions are often the dearly departed, so what it hears from these strangers are tales lost forever, known only to the pokemon itself.
Now, because of that, Dusknoir doesn't have a lot of experience handling company with the living, so when it uses Destiny Bond, it ends up taking the energy of their souls forcefully. You and me both, big guy.
Destiny Bond does only one thing, but it is powerful in its effect. By taking the Aeos Energy away from opposing pokemon, it prevents their Unite Move Meter from charging for 5 seconds. Any Meter that would be charged are transferred to Dusknoir instead, which is great, because its Unite Move is also pretty powerful, but more on that later.
By preventing opposing Unite Moves from being charged, you stall their generation for 5 seconds, meaning you have 5 extra seconds before the enemy can use their trump cards. Unfortunately, this doesn't have any effect on opposing pokemon that already have their Unite Mvoe fully charged, so Dusknoir will be in a bit of trouble if it tries to use Destiny Bond on such pokemon. Well, it would be, but its Pressure Ability reduces damage received from these Unite Moves, so it'll be fine for the most part.
The hard part is actually using Destiny Bond. For such a powerful effect, Destiny Bond suffers from a whopping 15 second cooldown, which can be argued to be way too much. If the opposing team knows you are running Destiny Bond, they'll be more wary of being near you, or they'll become a bit more trigger happy with their Unite Moves.
Crazy as it sounds, this is exactly what you want. You're an All-Rounder with the rare hybrid role of a Defender and a Supporter, so it's your job not only to distract the opposing team, but also to draw their fire. That's why its Pressure Ability works the way it does, and how Shadow Punch and Night Shade are designed to confound the opposing team. By influencing their decisions in when and where to use their Unite Moves, you've already done half of your job as an All-Rounder. Every second's worth of hesitation is extremely valuable to you and your team, you just gotta know how to spend it.
Because Destiny Bond transfers the Meter gain from opposing pokemon directly to you, you can expect to get your Unite Move often, especially if you make good use of the move in spite of its high cooldown. But just so you know, Dusknoir's devilish delights do not end with Destiny Bond, dare I say. Its devious diversions devour and distract the dull witted deviants of the day with its dynamic destabilization and dramatic draining.
Dang, I depleted my deck of D words. Dusknoir's Unite Move, everybody.
-
Unite Move: Soul Steal/Soul Banish
Soul Steal (Recovery)
Absorbs the target's life force, stealing some HP and Unite Move Meter and adding it to your own. 20s cooldown.
Soul Banish (Sure Hit)
Grabs an enemy and drags them into your mouth, forcefully returning them to their base. If the target is at a low enough HP percentage, instantly KO them instead.
Dusknoir has two Unite Moves it can use, depending on the amount of Unite Move Meter it has. If the Unite Move Meter is anything less than 100%, it will be able to use Soul Steal. Both Unite Moves are available as soon as Dusknoir evolves.
Soul Steal takes 15% of the opposing pokemon's HP, dealing piercing damage, and restores its own HP equal to the amount. It will also take 15% of the opposing pokemon's Unite Move Meter, or whatever is available, and adds it to your own Meter.
Soul Steal will go on cooldown for 20 seconds after it is used, though this doesn't affect the Unite Move Charge itself or stop you from using Soul Banish when it becomes available.
At 100% Unite Move Meter, Dusknoir's Unite Move becomes Soul Banish. It will grab an opposing pokemon and forcefully returns them to their base. If the opposing pokemon is at 15% HP or less, it will instantly KO them instead. You will see opposing pokemon who are at 15% HP or less highlighted on their HP bar when Soul Banish is available to you.
Soul Steal is unaffected by the use of Soul Banish and is also unaffected by cooldown reducing items and emblems.
Neither Soul Steal nor Soul Banish have any effects on Wild Pokemon.
Because of Dusknoir's ability to influence the Unite Move Meter of itself and opposing pokemon, it has to be balanced out by having a very late evolution, similar to Tyranitar and Metagross. It also gets its Unite Move at this Level, and it can use two different kinds depending on the meter available to you.
Starting off, by the time you manage to fully evolve into Dusknoir, your Unite Move will be fully charged, becoming Soul Banish. It is a Sure-Hit move that summons a large phantom arm from Dusknoir's belly, grabs an enemy, and sends them straight to the afterlife. OK, not really, it actually forces them to return back to base. It's like a reverse Hoopa Hyperspace Hole, where you point at an enemy and send them away for a short while.
The attack CAN instantly KO an enemy if you grab them while they're at 15% HP or less. In that case, yeah, they get dragged into the void, never to be seen again...or for a couple of seconds, depending on their respawn timer. You do have to be within attacking range to grab them, though, and most competent opponents will back off when their HP gets too low. Your best bet would be to coordinate some burst damage from your team to reduce their HP and then grab the victim before they have a chance to get away.
While the Unite Move itself is on cooldown, you'll have access to a separate move called Soul Steal. Where Shadow Ball and Destiny Bond operate by inhibiting Unite Move Meter gain, Soul Steal outright takes it from the enemy, along with some HP for good measure. This not only sets the opposing pokemon back in terms of burst damage potential, it can shut out their Unite Move if it gets taken while at 100%.
This is really debilitating for the hapless victim, as most players rely on their Unite Move to win difficult 1-v-1 fights or to make a big enough splash that they can turn the tables in a team fight or to retreat from an ambush. By taking away that ace from up their sleeves, you drastically reduce an enemy's potential impact on the flow of battle.
The 20 seconds of cooldown is quite frustrating to deal with, though. You can't even affect it with cooldown reducing items and emblems, since it's neither a move nor a Unite Move, more like a 'pseudo-Unite Move'. Also, the amount of Unite Move Meter you stole will most likely be restored, with interest, by the time Soul Steal comes off of cooldown. It depends on what Unite Move the enemy has and how long it lasts for. You also won't get a lot of meter from select targets like Blaziken or Dragapult, and you have no idea how much Unite Move Meter an opposing pokemon has.
The point isn't to hinder the enemy by removing all of their Meter, though. By using Soul Steal whenever you can, you'll quickly gain enough Unite Move Meter to use Soul Banish, which you can then use strategically against troublesome opponents during Objective fights. It also combos well with either Shadow Ball or Destiny Bond, as the longer you can delay the opposing pokemon's Unite Move, the less damage they can deal to you and your team.
You don't just take their souls, you take away their hopes and dreams and spirits and will to fight.
-
Achievements
Use Soul Steal a total of 10 times in one battle.
Sometimes an achievement isn't about difficulty. Sometimes it's about teaching the player how to optimally use the pokemon in the most indirect way possible. I know that that's how I've been constructing these achievements this whole time, but it's important to remember when it's something simple like 'use this effect a couple of times in a fight'.
Of course, there's always a catch to these sorts of achievements, or some nuance that makes them harder than they seem. For Dusknoir, it has to do with the fact that Soul Steal is only available to you when you are fully evolved and have access to your Unite Move. You will eventually gain enough EXP to evolve into Dusknoir, but if it happens late enough, you may not be able to use Soul Steal 10 times before time runs out.
There's also the fact that, when you do evolve, your Unite Move Meter will be full, meaning it will become Soul Banish instead. It's a great move, don't get it twisted, but if for some reason you really need to use Soul Steal, you'll have to use Soul Banish first. You cannot decrease your own Unite Move Meter to use Soul Steal unless you are up against an opposing Dusknoir.
Using Soul Steal many times eventually means you'll take enough Unite Move Meter to fully charge up Soul Banish, so if you want to go back to Soul Steal, you'll need to target a high-priority enemy like an over-leveled opposing All-Rounder if you want Soul Banish to be worth its usage. And then you'll have to do this repeatedly throughout the match.
And that's how they get ya. In optimizing your gameplay to get this achievement, you learn not only how the move works, but also the nuances around it. If you're going to be spamming Soul Steal and Soul Banish as often as possible in a match, you might as well figure out who to target with these moves in order to improve your odds of winning the battle.
When you ask a ghost to put a little soul into it, they do what they have to do to make do.
-
Holowear
Unlike most other pokemon, Dusknoir is perfectly suited for many kinds of holowear, even with that big mouth it has for a stomach. It's human-like shape gives us plenty of creativity in coming up with a fashionable set of expensive digital clothing.
Starting things off, Phantom Thief Style Holowear gives Dusknoir a fancy top hat with stylish brooches and clips and feathers, as well as a big stylish cape that flutters in the wind as it makes a grand escape. Ninja Style Holowear gives Dusknoir a shaggy hood and cowl and a headband on its forehead, as well as a vest loaded with ninja tools like kunai and smoke bombs. Although, with Magical Style Holowear, it becomes rather flashy with an oversized witch hat, a cloak tailored to expose its belly, and a satchel of books containing mysterious spells strapped to its side. Speaking of mystical, Guardian Style Holowear decorates Dusknoir with strangely shaped pieces of armor, giving it the appearance of a warrior from the days of old. And finally, it would behoove me to include the Spooky Style Holowear to Dusknoir's holo-wardrobe, giving it a black and orange scarf wrapped around its head, a top styled after a carved pumpkin, and bat wings and skulls plastered onto its arms and body.
-
Strategy
When Dusknoir has fully evolved and chosen both of its moves, their function can be separated into two different utilities; the first option changes how you become invisible, whereas the second option sabotages the opposing team's Unite Move Meter generation. This is very strange for what's supposed to be a bulky All-Rounder, until you realize that it's meant to be a hybrid Defender and Supporter, in the sense that it defends and supports the team by hindering the enemy and messing with their Unite Moves.
Of course, half of the battle is actually reaching that pinnacle of power, so you have to optimize the first 5 minutes of the game to Level Up as much as possible. You aren't strong or fast enough to reliably clear the Central Area, so leave it for an ally to take. Instead, you should be focused on supporting an ally on their way to the middle of Top or Bottom Lane. To that end, EXP. Share is actually a very solid item choice for squeezing some extra EXP out of wild pokemon while also increasing your passive Movement Speed, especially when combined with Levitate and Pressure.
Wild Pokemon aren't going to give you enough EXP to evolve, though, even with the EXP. Share working for you. Most of the extra EXP you'll be getting in the early game will be from coordinating KO's against the opposing team, and Duskull is perfectly suited to help an ally get that head start. With Astonish turning you invisible, Stunning enemies with the sneak attack, and Leer to blind and debuff the opposing team, you can KO any enemy you manage to ambush.
That's the idea, at least. If anything goes even slightly wrong, you'll find yourself suffering from an EXP deficiency while the opposing team is running away with points. It'll be tough, but if you manage to eke out some Levels, you'll evolve into the much more capable Dusclops, and use Levitate's evolved ability, Pressure, to your advantage. By this point, your Unite Move is fully charged, even while it's locked by the Level count, so your Movement Speed and basic attack speed are very high. Use these passive boosts to your advantage to put pressure, so to speak, on the opposing team.
But just having increased Movement Speed and basic attack speed won't be enough to turn the tables for you. You do need an ally to take advantage of the opening you provide, which is difficult enough for most Defenders and Supporters to deal with when playing alone. If you're by yourself, you'll have to make do with some dirty tricks, so don't be afraid to deceive the enemy with either Shadow Punch or Night Shade.
Between these two options, Shadow Punch is slightly safer, as it offers you a ranged attack that comes with invisibility and HP drain, but one hit will cancel the move, making it a poor choice against anti-stealth opposing pokemon like Shadow Sneak Decidueye or Fire Spin Delphox. Night Shade, on the other hand, requires some clever thinking to fully abuse, as it requires not just crafty plays like deceiving the enemy with obvious ploys, but also unpredictable gambits. By that I mean, you can use Night Shade to make a clone to your left or right, but expert players may know your game and suspect you are somewhere close by. You can trick these foolproof fools by placing Night Shade right next to you, confounding them by thinking 4 steps ahead. I can't guarantee this won't work against less intelligent players, but to each their own.
As long as you are playing well with a teammate, you'll get most of your EXP from securing the KO on the opposing pokemon. Do this enough times, and you'll evolve into Dusknoir. With the extra Attack power, you can play the Defender part of your All-Rounder role much more easily, and you can continue to hinder the enemy by depleting their Unite Move Meter with either Shadow Ball or Destiny Bond.
Shadow Ball is a direct upgrade to Leer in almost every way, with the downside of being able to affect only one pokemon at a time. It also has a windup to it, allowing opposing pokemon to move out of the way if they see the move being charged in Dusknoir's mouth. But if it does manage to hit, not only will it blind the enemy and increase the damage they receive for a short while, it will also hinder Unite Move Meter generation for 10 seconds. This can be debilitating for those with fast Unite Move charge times, as well as those with slow charge times. Quite frankly, it doesn't matter who it hits, unless the Unite Move is already fully charged, no opponent will want to get caught by Shadow Ball.
Destiny Bond is a riskier move compared to Shadow Ball, but it has a much higher reward. By bonding and cursing nearby enemies, it transfers all Unite Move Meter gain to Dusknoir, effectively siphoning it from affected enemies. This works in Dusknoir's favor, as its own Unite Move Meter generation is very slow, so it has to take it from opposing pokemon using Destiny Bond or Soul Steal, but more on that in a bit. It can affect multiple enemies at once, drastically increasing the charge rate of your Unite Move. If it hits an enemy at 99% Unite Move Meter, it basically prevents the meter from increasing any further until the curse wears off after 5 seconds, or if Dusknoir is KO'd first. 5 seconds isn't a lot of time, but it doesn't need a lot of time to shut out one of the most powerful options an enemy can use. If an enemy gets KO'd while cursed by Destiny Bond, Dusknoir will get extra Unite Move Meter, whether it directly KO'd the enemy or not.
At the same time you evolve into Dusknoir and upgrade Leer into either Shadow Ball or Destiny Bond, you'll have access to your Unite Move, Soul Steal and Soul Banish. It's unheard of for a pokemon to have two different Unite Moves, one of which functions independently from the meter, but it plays into your extremely slow Unite Move Meter generation.
Soul Steal takes HP and Unite Move Meter from a targeted enemy, giving Dusknoir not just reliable recovery but also reliable Unite Move Meter gain by taking it from an enemy. If you steal meter from an enemy that had their Unite Move ready to go, you'll effectively have stalled their Unite Move from being used for a little while. Now, the game is optimized enough to the point where most players run items and emblems to shorten the cooldown for their Unite Moves, but even without these effects, Soul Steal takes 20 seconds to come off of cooldown, which is more than enough time for the stolen Unite Move Meter to be regained. It's great if you take meter from an enemy that's nearly fully charged, but they'll get it all back later eventually.
Stealing Unite Move Meter helps out the team by delaying burst damage, but it's mostly for Dusknoir's own benefit that the meter gets taken. Like I said before, Dusknoir's true Unite Move, Soul Banish, requires a lot of time to fill all by itself, so it augments this wait time by taking the meter from the opposing pokemon instead with either Soul Steal or Destiny Bond. For all of its effort, Soul Banish will simply grab an enemy and forcefully return them back to their base. It's like Sableye's Phantom Ambush, but faster and you can only grab one enemy. If you grab a problematic opponent like a Decidueye or Cinderace hoping to snipe the kill off of Rayquaza, Soul Banish sends them back to where they came from and gives you a good 7 or 8 seconds before they can return.
If Soul Banish grabs a weakened enemy instead, it will instantly KO them. You will see nearby enemies susceptible to Soul Banish and the instant KO effect if the Unite Move is ready to go and their HP is low enough by their HP bar highlighted, similar to how other instant KO effects like Lapras's Perish Song show that these enemies will be KO'd by the attack if hit. If one of these susceptible pokemon is a frail Attacker or Speedster, you could use Soul Banish to get the KO, but it's not really worth spending the Unite Move Meter on such an easy target. If it was an opposing Defender or All-Rounder that have a habit of restoring their HP back full when in a pinch, like say Goodra and Buzzwole, then Soul Banish will be worth the attempt.
Ghosts are mysterious as they are fantastical, but the dangerous ones are those that wander between the realms of the living and the dead. When Dusknoir is on the field, you better make sure your soul isn't snatched by its big burly hands.
-
And this has been Dusknoir for Pokemon Unite. I have a habit of turning less popular pokemon into potential players for Pokemon Unite, and I won't apologize for that. But of the popular pokemon that I do like, Dusknoir is one of them, and I would love to see everyone's favorite fat phantom join the fray one day.
That'll be it from me for this week. See ya!
5 notes
·
View notes
Text
Castform for Pokemon Unite!

Season 1
Season 2
Prev: Cradily - Hatterene - Tropius - Cacturne - Ditto - Weavile - Ogerpon - Coalossal - Gogoat - Galarian Slowbro - Luxray - Breloom - Uxie, Mesprit, & Azelf - Wobbuffet - Obstagoon - Lanturn
The weather is a force of nature as fickle as it is powerful. Humans have conquered many aspects of nature, but the forces that guide this world are not one of them. As such, the best we can do is predict its next move with our most advanced computers and data collecting experiments.
But who could've predicted Castform coming to Pokemon Unite? Not me, that's for sure. But if it did, I believe it would look something like this...
-

Did you know that Castform was made in a lab by human researchers? Yes, just like its fellow contemporaries, it owes its existence to people trying to control forces beyond their understanding. But while pokemon like Mewtwo and Genesect were blessed with power and abilities far exceeding the norm, Castform was blessed with...uniformity. Yeah, these numbers feel more like a curse, as Castform lacks any meaningful impact with these stats and has to rely on abusing the weather to get the most damage.
But, it is a bona fide weather machine, which we've already established is extremely powerful. For that reason, I designate Castform with the role of an...
Attacker
-
Basic Attack - Ranged/Sp. Attack
Becomes a boosted attack after two hits, dealing more damage. The boosted attack changes effect depending on the pokemon’s form. In Sunny Form, an explosive fire ball is launched, damaging all nearby enemies. In Rainy Form, a stream of water is launched, pushing enemies away. In Snowy Form, multiple ice shards are launched and the pokemon’s movement speed increases momentarily.
The projectile properties of each boosted basic attack changes depending on which form Castform is in. Sunny Form has the boosted basic attack explode, Rainy Form has the boosted basic attack fire a stream of water similar to Blastoise, and Snowy Form launches 4 shards of ice that can be intercepted by other pokemon and increases Castform's Movement Speed by 50% while the projectiles are flying.
In Normal Form, the boosted basic attack has no special properties other than dealing extra damage.
Now, just like Mewtwo and Aegislash, Castform comes with a form changing gimmick, which is its entire deal. The details of actually changing forms aren't mentioned here, but we'll worry about that later.
For now, you need to understand what's within your power when you're in a particular form. When in Normal form, the basic attack...does nothing special. I mean, it's stronger when boosted, but most basic attacks are. The real power comes from when Castform is in one of its three weather forms.
In Sunny Form, the boosted basic attack explodes when it hits an enemy, making it effective at handling groups of enemies. In Rainy Form, the range is a little limited, but it Shoves enemies away on hit, like Squirtle's Water Gun. It's a good effect to have for such a frail Attacker. The Snowy Form behaves like a weaker version of Glaceon's Icicle Spear, though not as strong or annoying. It just fires multiple ice shards that can be intercepted by the enemy, and because you're made of ice in this form, you can skate around at increased speed while launching these ice shots.
This is all well and good, but how does form changing work? Is it a permanent effect or what? Let's read the weather report now.
-
Ability: Forecast
At the start of battle, and after returning to base, the pokemon will be in its Normal Form. The pokemon changes form after using certain moves. In Sunny Form, the pokemon’s moves deal more damage the longer the form is retained. In Rainy Form, the pokemon’s movement speed is increased slowly. In Snowy Form, the pokemon gains a shield that slowly grows.
Castform starts each round in Normal Form, as well as after respawning and after manually recalling to base. The boosting effect of Forecast is reset each time this happens.
Castform can change into Sunny Form, Rainy Form, or Snowy Form by interacting with its moves Sunny Day, Rain Dance, Hail, Weather Ball, Heat Wave, Hydro Pump, and Blizzard. This form change is similar to evolution where Castform becomes invincible during the transformation.
In Sunny Form, Castform's Moves deals 2% extra damage each second, maxing out to 50% after 25 seconds.
In Rainy Form, Castform's Movement Speed increases by 2% each second, maxing out to 50% after 25 seconds.
In Snowy Form, Castform generates 1% shield every second, maxing out to 25% shield after 25 seconds. If damaged, the shield will refill on its own.
According to the Forecast ability, the day will start out normal, but as time goes on, there will be equal chance of sun, rain, and hail soon after. Huh? What kind of data is this? Is someone messing with the air currents or something?
Why yes, it'd be none other than Castform, most likely. Through using its moves, Castform will change into one of its 3 forms, Sunny Form, Rainy Form, and Snowy Form. The exact details of how still aren't apparent to us, but let's take shelter for now and read the report, as it's very prudent to study up on meteorology for this pokemon.
Castform's ability, Forecast, is not only responsible for changing its form, but also for slowly powering up the little cloud bean. While it is possible to change forms repeatedly, Forecast grants you a special bonus if you manage to stick it out in one of the fickle weather forms.
In Sunny Form, Forecast slowly increases the damage your moves deal, 2% a second, maxing out to 50% after 25 seconds. This is Castform's most powerful form, as it is a ranged attacker with plenty of wide reaching moves that cover the whole area, like a hot summer day.
Forecast has your Movement Speed slowly increase at the same rate while in Rainy Form, which has something to do with everything becoming slippery during a long shower. It may not be as strong as Sunny Form, but a ranged attacker that slowly becomes faster is not to be underestimated.
You get a slowly increasing shield in Snowy Form through Forecast, since it reflects how a gentle snowfall can become dangerous by slowly covering everything in ice, including the pokemon itself. It maxes out to 25%, but the upside is that it will always refill even if it gets damaged a little. But even 25% shield won't turn a frail Attacker into a tank, so you still gotta play it cool, especially if your form has just changed.
Enough of these weather predictions. It's time to get out there and enjoy the day, come wind, rain, or shine!
-

At the start of the game, Castform will be in its Normal Form and will always revert to this form after respawning or manually retreating to base. You can choose between Ember/Water Gun/Powder Snow and Sunny Day/Rain Dance/Hail as your first moves. By Level 3, you'll have learned both.
-
Move 1: Ember/Water Gun/Powder Snow (Ranged)
Ember - Throws burning cinders in a wide arc. The cinders stick to opposing pokemon and explode when the user damages them with a basic attack in Sunny Form.
Water Gun - Launches a stream of water directly forward. Doused enemies are more susceptible to the Shove effect of the user's basic attack in Rainy Form.
Powder Snow - Freezes the designated area with snow, reducing the Movement Speed of opposing pokemon.
When the user changes forms, Ember, Water Gun, and Powder Snow will switch as well to reflect the user's form. The user's basic attack becomes boosted afterwards. 8s cooldown.
When learned, Ember is the first move Castform will know if it learns this move while in Normal Form. Otherwise, it will reflect the current form. Afterwards, the move will only change when Castform changes form as well.
Ember deals damage to all enemies in a fan shape in front of Castform. The embers stick to opposing pokemon afterwards for 3 seconds and explode when Castform damages them with its boosted basic attack while in Sunny Form, dealing 30% extra damage.
Similarly, Water Gun douses enemies for 3 seconds and increases the distance they are Shoved by Castform's boosted basic attack while it's in Rainy Form.
Powder Snow reduces the Movement Speed of opposing pokemon caught in the attack by 30% for 3 seconds.
Because of Castform's mastery over adapting to the weather, it isn't able to use just one form of an attack. No, as soon as the match starts, it is at the mercy of the whimsical waves of the weather.
Ember, Water Gun, and Powder Snow are all moves Castform can use in one slot, but it will only use one of these moves at a time, depending on Castform's current form. If it changes into its Sunny Form, Ember will be switched in. In Rainy Form, it'll be Water Gun, and in Snowy Form, it'll be Powder Snow. These moves all behave a little differently, but not differently enough that it's hard to keep track of their effects.
These changes are automatic, so there's no need to manage anything other than your form changing. It's how you use these moves when they're available to you, that's what matters.
Ember burns all enemies in a fan shape directly in front of you, and sticks cinders on the enemy that explode when Sunny Form Castform uses its boosted basic attack on them. Oh, that's really useful, as using Ember, or Water Gun or Powder Snow for that matter, automatically boosts your basic attack when the moves are used. The cinders don't stick for long though, so this effect is only useful to you if you use this move while in Sunny Form.
Water Gun has a similar bonus where it douses enemies, which causes them to be Shoved further away when hit by Rainy Form's boosted basic attack. Likewise, the dousing effect doesn't stay for long, so you'll only see this boon when Castform is soaked with rain water.
Powder Snow doesn't do anything extra aside from slowing enemies down a little. But when you combine this with the momentary speed boost gained from Snowy Form's boosted basic attack, you'll feel like an ice skater slash gunslinger, outspeeding opposing pokemon.
If for whatever reason you are changed back into your Normal Form, the last move you know will stick. These moves are still powerful, but not as useful to you without your form changed. Let's learn how to change forms now with your other move.
-
Move 2: Sunny Day/Rain Dance/Hail (Area)
Sunny Day - Casts a burning light at the designated area, dealing a little damage to enemies over time. Enemies within the light will receive more damage from Ember, Flamethrower, or Solar Beam.
Rain Dance - Summons a shower of rain at the designated area, dealing a little damage to enemies over time. Enemies within the rain will receive more damage from Water Gun, Water Pulse, or Thunder.
Hail - Brings down hail stones at the designated area, dealing moderate damage to enemies over time. Enemies caught in the hail storm will receive more damage from Powder Snow, Ice Beam, or Hurricane.
This move randomly shuffles each time it is used. If the user enters the area of effect, it will change to its respective form. 8.5s cooldown.
When learned, and each time one of these moves are used, the move will randomly become either Sunny Day, Rain Dance, or Hail. There is a 33% chance that the move won't change as a result of this random shuffling.
Sunny Day deals damage over time to all enemies within the area of effect and also increases the damage of Ember, Flamethrower, and Solar Beam by 30% when damaging enemies within the area of effect. The damage over time effect scales with Castform's Sp. Attack. If Castform enters this area of effect, it will change into its Sunny Form.
Rain Dance deals damage over time to all enemies within the area of effect. It will also increase the damage enemies receive from Water Gun, Water Pulse, and Thunder while within the area of effect. The damage over time effect scales with Castform's Sp. Attack. If Castform enters this area of effect, it will change into its Rainy Form.
Hail deals more damage over time to enemies within the area of effect compared to Sunny Day and Rain Dance and it also scales with Castform's Sp. Attack. The damage enemies receive from Powder Snow, Hurricane, and Blizzard are also increased while they're within the area of effect. Castform will change into its Snowy Form when entering the area of effect.
All 3 moves linger for 4 seconds.
Having been born in the elements, Castform can manipulate the weather as easily as it can breathe. But even so, the power to dictate the mood of the day is not something it likes to hold power over, so it instead randomizes which weather forecast gets read when it uses a weather changing move.
Yep, it has the ability to use either Sunny Day, Rain Dance, or Hail, but it prefers to use these moves randomly, to maintain the whimsical nature of the weather itself. That's all well and good, but it makes it a bit difficult to control, no?
That's the point. You can't really 'control' the weather as much as you can plan around a sick day. It just has to happen naturally.
Even so, these are powerful moves to start the game off with. Each one has the same effect of dealing damage over time within a specific area of effect, but Castform will react to each one depending on the weather type. It'll turn into Sunny Form within Sunny Day, Rainy Form within Rain Dance, and Snowy Form within Hail. Since these moves come out at random, the form you can change into will be chosen at random just as well.
Just like a rainy day or some snowfall, you have to plan around which weather pops up, especially since each one grants some extra power to your moves when they're used. We've already explained what Ember, Water Gun, and Powder Snow do, but they become even more damaging if they hit an enemy within the respective weather effect.
These weather moves cover a wide area too, which is how Castform gets its Attacker power going. Although, Ember, Water Gun, and Powder Snow are a little on the weak side, so you'll need to deal a lot of damage in order to get enough EXP to improve these moves of yours.
-


At Level 5, Ember/Water Gun/Powder Snow will become either Flamethrower/Water Pulse/Ice Beam or Solar Beam/Thunder/Hurricane.
-
Move 1a: Flamethrower/Water Pulse/Ice Beam (Ranged)
Flamethrower - A blazing stream of fire is launched directly forward. Opposing pokemon receive more damage the longer this move is used. The rate of damage of Flamethrower is increased when the user is in Sunny Form.
Water Pulse - Multiple rings of water energy are cast forward in the designated direction. Each ring has an increasing chance to Stun opposing pokemon. The water rings are bigger when the user is in Rainy Form.
Ice Beam - A freezing ray of ice is launched directly forward, reducing the movement speed of enemies caught in the attack. The movement speed reduction increases the longer this move deals damage. If the user is in Snowy Form, opposing pokemon will be Frozen briefly when this movement speed reduction is maxed out.
The move changes between Flamethrower, Water Pulse, and Ice Beam when the user changes forms appropriately. The user's basic attack becomes boosted afterwards. 8.5s cooldown.
At Level 9, Flamethrower/Water Pulse/Ice Beam becomes Flamethrower+/Water Pulse+/Ice Beam+.
Reduced cooldown.
The move will change between Flamethrower, Water Pulse, and Ice Beam when Castform shifts into any of its respective forms with the exception of Normal Form. When learned, the move becomes Flamethrower if Castform is in Normal Form.
When used, Castform will hold the direction it is aiming at while using these moves and can continue to move while attacking. All variations of this move last for 2.5 seconds.
Flamethrower deals increasing damage to enemies it hits consistently, increasing as much as 100% when the attack is maintained. In Sunny Form, the rate of damage increases, reaching max damage sooner and boosting the overall damage output.
Water Pulse launches one ring of water every 0.5 seconds, totaling 5 water rings in one attack. Each water ring has a 20% chance to Stun. In Rainy Form, the rings double in size. Each projectile travels forward independently of one another.
Ice Beam reduces opposing pokemon's Movement Speed by 10% each second when the damage is maintained. It maxes out to 30% after 1.5 seconds, and will Freeze enemies in place if this happens while Castform is in its Snowy Form. The range of Ice Beam is very long.
The cooldown of these moves is reduced to 7 seconds when the moves are upgraded at Level 9.
While Ember, Water Gun, and Powder Snow were simple and easy enough to explain, the evolution of these moves means that they'd have to upgrade to the stronger variants in Flamethrower, Water Pulse, and Ice Beam naturally. Now, I don't regret making this post or the work I'm putting into it, but stuff like this makes it a bit hard to keep the post well maintained and interesting enough to read through, and it's just like that typing it out too. Hopefully you get the gist of this move as it's explained.
Now, Flamethrower, Water Pulse, and Ice Beam are functionally identical to each other in the style of attack, but each one varies slightly in order to be useful in all kinds of situations. It's also meant to reflect how each attack benefits each form Castform can take. To that end, keep in mind the boons of Forecast's form change ability and how it slowly increases Castform's abilities as the battle goes on.
Flamethrower is a beam like projectile that spews hot flames directly forward. This attack deals damage constantly in the chosen direction, and slowly builds up damage while doing so. The rate of damage is higher if you're in Sunny Form, so try not to stay in Normal Form for too long.
Water Pulse fires water rings directly forward, each one with a slight chance of Stunning the enemy on hit. Focusing your attack in one direction gives you good odds at Stunning an enemy once or twice, but you can move about in such a way that you can form an advancing wall of water rings traveling in the designated direction. In Rainy Form, these rings are bigger, making them harder to avoid.
Ice Beam behaves similarly to Flamethrower, except it has much better reach but lacks the gradual damage boosting effect. What it does, however, is that it weakens the opposing pokemon's Movement Speed the longer it damages an enemy, capping out to a generous 30% after 1.5 seconds. If you are in Snowy Form, this Movement Speed debuff turns into a Freeze status effect instead, hindering enemies and stopping them in their tracks.
All of these moves are powerful, but even moreso when combined with the boons of Forecast and your weather move, Sunny Day, Rain Dance, or Hail. By covering a wide area, you can really ruin the opposing team's day by spreading your attacks everywhere. The only thing you have to keep in mind is how each weather event is random, so you make do with what you get.
Like I said, you don't plan for the weather, you take advantage of it.
-
Move 1b: Solar Beam/Thunder/Hurricane (Area)
Solar Beam- A burning beam of sunlight is fired from the sky, targeting the designated area. The beam can be directed, slowly losing power over time. If the beam crosses over Sunny Day, Weather Ball Fire, or Heat Wave, the beam regains its power.
Thunder - Lightning bolts will occasionally strike at the designated area. The lightning bolts can be directed, losing frequency as they go. If the lightning bolts aim at Rain Dance, Weather Ball Water, or Hydro Pump, a lightning bolt will be guaranteed to strike with an increased explosion range, and the frequency of bolts is reset.
Hurricane - A flurry of ice wind is summoned at the designated area. The winds can be directed, losing size and speed as they move about. If the snow storm blows over Hail, Weather Ball Ice, or Blizzard, the winds will increase to beyond their maximum size and their speed is reset.
The move changes between Solar Beam, Thunder, and Hurricane when the user changes forms appropriately. 8.5s cooldown.
At Level 9, Solar Beam/Thunder/Hurricane becomes Solar Beam+/Thunder+/Hurricane.
Increases the area of effect and travel speed of these attacks.
Solar Beam, Thunder, and Hurricane will switch with each other when Castform changes to a respective form, with the exception of Normal Form. If Castform is in Normal Form when it learns this move, the initial move will be Solar Beam.
All three moves must be controlled with the right stick, though the travel speed of these attacks is slower than the average movement speed rate. When the moves are upgraded, the travel speed of these attacks match normal Movement Speed and the area of effect increases by 25%.
When used, Castform can move normally, but must also direct the move with the other control stick. If Castform is KO'd, the move ends.
Each move lasts for 5 seconds and the move will go on cooldown when the effects end.
Solar Beam loses 15% of its power with each second after it is cast, falling by as much as 60% before ending. This power resets when the beam is directed into the area of effect of Sunny Day, Weather Ball Fire, or Heat Wave.
Thunder deals damage over time very quickly in a designated area, though the rate of damage decreases over time. This rate of damage resets when the attack is directed into the area of effect of Rain Dance, Weather Ball Water, or Hydro Pump.
The size and travel speed of Hurricane decrease as the move is used. The size and travel speed of Hurricane is reset when the attack is directed into the area of effect of Hail, Weather Ball Ice, or Blizzard.
Now, while Castform can't fully control the weather, it can take advantage of certain factors to summon these attacks. It's like, you can't stop it from being so windy, but you can at least fly a kite better.
Just like with Ember, Water Gun, and Powder Snow, Castform will summon different attacks depending on its form, and each one is powerful in their own right. They do run off of weather power, though, so it's better to use these moves when the appropriate weather attack is in effect.
Solar Beam has Castform condense the sun's rays into a powerful beam and brings it down, like a giant magnifying glass. The sun doesn't sit still for long, so Solar Beam quickly starts losing power. If Sunny Day or Heat Wave is nearby the attack, you can direct Solar Beam into these area of effects to rekindle the power of Solar Beam.
All of these moves behave like this in the same way with their respective weather phenomena. Oh, Weather Ball also affects these moves too, but it's not entirely reliable. You'll see.
Thunder controls a very angry storm cloud to bring down a hail of lightning bolts as if they were rain drops. It's shocking, but it loses intensity as the attack goes on. Refuel the cloud's rage by directing it into Rain Dance or Hydro Pump, or Weather Ball Water.
Now, I'm cheating a bit by pairing Hurricane with the Ice type phenomena, but since the only other move related to ice and snow is Aurora Veil, a move Castform cannot learn yet, I had to make do. As an attack though, it summons whirling wind blades of ice in a large area, much bigger than Solar Beam or Thunder. The size and speed weaken as the move goes on, so bring it back up to speed by moving it into Hail or Blizzard.
Now, while you're directing these attacks, Castform has the ability to move about as well. It's great for a squishy Attacker to be able to move so fluidly, because if it gets attacked and interrupted, it'll lose control of these moves, though that's the least of your worries. These attacks do have a range limit, though that doesn't matter as much since Castform can push or pull away from the fight while using these attacks.
What's up with Weather Ball, though? Well, remember when I said that Castform enjoys the random nature of weather? ...yeah.
-
At Level 7, Sunny Day/Rain Dance/Hail will become either Weather Ball or Heat Wave/Hydro Pump/Blizzard.
-
Move 2a: Weather Ball (Area)
A condensed ball of cloud energy is gathered and falls down slowly at the designated area. When it touches the ground, it will erupt into a flurry of either Fire, Water, or Ice energy. Weather Ball Fire damages enemies and leaves them Burned for a short while. Weather Ball Water damages and Shoves enemies away from the center of the attack. Weather Ball Ice damages and Freezes enemies in place for a brief moment. If Castform is within this area of effect, it will change into the corresponding form with Forecast activated at half power. 10.5s cooldown.
At Level 11, Weather Ball becomes Weather Ball+
Increases the range of the eruption radius.
When Weather Ball is used, it appears in the sky above the designated area and takes 2 seconds to land onto the ground. When it touches down, it will explode into either Weather Ball Fire, Weather Ball Water, or Weather Ball Ice. This effect lingers for 3 seconds before disappearing.
If Castform enters this area of effect, it will change into its respective Form and will have Forecast start at half power, depending on the form. To recap, Sunny Form activated by Weather Ball will start out with 25% extra Move damage, Rainy Form will start out with 25% Movement Speed, and Snowy Form will start with 12.5% shield. Forecast is unaffected if the form doesn't change.
Weather Ball Fire Burns opposing pokemon caught in the blast for 5 seconds. It will also Burn enemies entering the area of effect.
Weather Ball Water Shoves enemies away from the center of impact and will continue to Shove enemies away until the move ends.
Weather Ball Ice will Freeze enemies in place for 2 seconds and deal damage over time to enemies within the area of effect.
Weather Ball+ expands this range of effect by 25%.
The randomness of Weather Ball is like a box of chocolates, but instead of chocolate, it's the concentrated fury of mother nature packed into a tiny little ball. It even falls with the restrained intensity of a gentle breeze foretelling a powerful storm, touching down with the rage of a thousand pressurized clouds.
Weather Ball as an attack is kind of annoying to deal with, especially if you're the one playing as Castform. It takes two seconds to reach the ground, which is way too slow for any ambushes or sneaky kill steals. But although it does deal damage, you won't know what the weather type will be like until it explodes. You can take the gamble and sit within the area of effect, taking whatever element pops up, or you can wait and see if it explodes into the desired weather element you need for the battle.
To compensate for this randomness, Weather Ball powers up your Forecast ability by half. Normally, you'd have to wait out the whole 25 seconds for Forecast to fully power up your weather form, but since Weather Ball is very useful in a fight, it rewards your gambling spirit by giving you the Forecast Ability at half power, regardless of what type you turn into.
The attack itself is pretty strong, since it covers such a wide area. Maybe it'll be obvious when and where it's gonna land, but its wide reach makes that a nonfactor, especially during fights near or at Objectives like Regieleki or Rayquaza. Also, the enemy won't know what kind of element it'll be either, but it's not something they'll want be caught in, giving you, a squishy Attacker, some breathing room.
Weather Ball Fire threatens to singe all caught enemies and leave them Burned. Weather Ball Water will splash water waves everywhere, forcing caught enemies out and away from the attack. Weather Ball Ice, however, will Freeze enemies on the spot if they get caught. None of these are effects the enemy team will want to deal with, not without hindrance protection at least.
The move does have a lengthy cooldown of 10.5 seconds, so that's something to consider. Although, it takes 2 seconds for the attack to drop and Weather Ball lingers for 3 seconds when it explodes, making the cooldown feel more like 5 seconds in total afterwards. The short time frame of the attack makes it seem like it'll be hard to combo Flamethrower or Solar Beam, but the 2 second delay actually makes it easy to coordinate the combination yourself. You know, if you're lucky enough to land the right element.
If you'd prefer the gentle randomness of the weather, you have three other options to choose from. All one move, of course.
-
Move 2b: Heat Wave/Hydro Pump/Blizzard (Area)
Heat Wave - Superheats the air in the designated area, greatly damaging enemies without shields over time. Increases the damage enemies receive from Flamethrower or Solar Beam while within the area of effect.
Hydro Pump - Shoots a huge volume of water in the designated direction, causing an eruption of water and rain to fall where the attack lands. The rainfall damages enemies over time and deals increased damage to shields. Also increases the damage enemies receive from Water Pulse or Thunder while within the area of effect.
Blizzard - Summons a whirlwind of snow and ice at the designated area, dealing piercing damage to enemies within. Enemies will eventually Freeze while within the area of effect. Also increases the damage enemies receive from Ice Beam or Hurricane while within the area of effect.
When Heat Wave, Hydro Pump, or Blizzard is learned, and every time the move is used, it will randomly change into one of the three attacks afterwards. When the user enters the area of effect, it will change into its respective form. 9s cooldown.
At Level 11, Heat Wave/Hydro Pump/Blizzard becomes Heat Wave+/Hydro Pump+/Blizzard+.
Expands the area of effect.
When Heat Wave, Hydro Pump, and Blizzard is learned, and each time the move is used, the moves will switch randomly. There is a 33% chance the move won't change as a result of this random shuffling.
All three moves linger in effect for 4.5 seconds before ending. Castform will change into its respective form when entering the area of effect.
Heat Wave deals damage over time to enemies within, dealing 30% more damage to enemies without shields. Flamethrower and Solar Beam deal 35% more damage to enemies caught within the area of effect.
Hydro Pump deals damage over time to enemies within, dealing 30% more damage to enemies WITH shields. Water Pulse and Thunder deal 35% more damage to enemies caught within the area of effect.
Blizzard deals damage over time to enemies within and will eventually Freeze them for 2 seconds if they stay within the area of effect for 2 seconds. Ice Beam and Hurricane deal 35% more damage to enemies caught within the area of effect.
The area of effect of these moves increases by 25% when upgraded.
Similar in effect to Sunny Day, Rain Dance, and Hail, the moves Heat Wave, Hydro Pump, and Blizzard all affect a single area, dealing damage over time to all enemies within. These moves will also boost the power of your respective combo attack when hitting an enemy within, so make sure you line up that Ice Beam or Thunder just right.
These moves have a slight bonus effect as well. Heat Wave deals extra damage to enemies caught without shields, since a blistering summer day is rough to handle without any shade or protection. Hydro Pump, on the other hand, will slowly erode away any shields the opposing pokemon have, as the rain will wash everything away. Blizzard doesn't care about shields at all, as it deals piercing damage to enemies caught within. It'll also eventually Freeze these enemies, which reflects how powerful cold weather can be, bringing all of life to a standstill.
Just like Sunny Day and the other two weather moves, these attacks will shuffle around when used. It's just like Weather Ball in this regard, although you'll know what element you're throwing out before you use the attack. You'll also change forms when you interact with these moves, so you can shift elements if you so choose. Changing forms causes you to lose out on the accumulated boosts from Forecast, though, so think carefully about committing to the change of element.
A good day can be ruined by bad weather. A great day prevails in spite of it.
-
Unite Move: Withering Weather (Buff)
The user creates catastrophic weather around it, the effect changing depending on which form the user has taken. If the user is in its Normal Form, it will change into a random form. Upon activation, Forecast will be activated at max power and the user's moves have their cooldown reset. While active, Withering Weather will lock in the local weather phenomena, preventing moves like Weather Ball from changing away from the user's Form type. Nearby opposing pokemon will have their Sp. Defense slowly reduced and the user will be immune to hindrances while Withering Weather is active.
Withering Weather will create a distortion of weather around the user, depending on which form Castform is in. If Castform is in its Normal form, it will randomly change into Sunny Form, Rainy Form, or Snowy Form and summon the appropriate weather phenomena.
This Unite Move casts bright sunlight with mirage waves, foggy black mist, or floating ice crystals in a wide area around the user, depending on what form Castform is in. This visual effect shows the full radius of Castform's influence while Withering Weather is active.
Withering Weather fully powers up Forecast when used, with the exception of Snowy Form as the shield you get starts out at 25% and will refill at a normal rate during the Unite Move.
Withering Weather will also prevent your moves from switching away to a different type. It means that Weather Ball will always be a Fire Type if you are in Sunny Form, or Heat Wave will not switch with Hydro Pump or Blizzard after the move is used.
All opposing pokemon have their Sp. Defense slowly reduced by 5% for each second their linger within Withering Weather's area of effect, maxing out to 50%. This debuff resets if they leave the Unite Move's area of effect. The Unite Move lasts for 15 seconds.
The final trick of Castform's weather forecast tomfoolery is no laughing matter. Bad weather is responsible for all sorts of terrible things in our world, from floods to ruined suburbs and global warming and ice age levels of snowfall. Thankfully, Castform harnesses only a fraction of this almighty force of nature, but the fraction used is devastatingly powerful.
First off, depending on what form Castform is in, Withering Weather will replicate it and reflect it into the air as a powerful weather phenomena. Sunny Form summons blazing sunlight, Rainy Form creates black fog and humid air, and Snowy Form casts ice crystals and permafrost all around itself. If Castform happens to be in Normal Form, a random weather form is chosen, but whatever one you get will serve you well regardless.
Withering Weather causes the changes in the air to lock in and become permanent, at least for the duration of the Unite Move. It locks in the weather forecast, causing Castform's Moves and Ability to react. The Forecast ability will trigger and fully boosts the respective stat all the way to max. This means that Sunny Form will have maxed out 50% extra damage using your moves, Rainy Form will max out to 50% Movement Speed, and Snowy Form will start out with a full 25% shield. In the case of the latter, the shield will continue to refill at a normal rate when it gets destroyed, so don't linger for too long around burst damage aimed against you.
The other effect of Withering Weather is that it causes Weather Ball, Heat Wave, Hydro Pump, and Blizzard to lock in to the local weather report. This means that, in Sunny Form, Weather Ball will always be a Fire Type move and Heat Wave will never change to Hydro Pump or Blizzard when used. This happens to Rainy Form and Snowy Form as well, solidifying your moveset for the next 15 seconds.
Lastly, Withering Weather puts a strain on the environment and opposing pokemon as well, as it causes them to slowly lose Sp. Defense they longer they stay within your range of influence. Withering Weather reaches very far, to account for the wide range of your moves like Hurricane or Ice Beam. While it does make it obvious to the opposing team that you're nearby, it does mean that a solid defense ploy from your teammates will increase your staying power and impact on the battlefield.
While you can choose which form to use pop Withering Weather with, actually managing your forms for the battle will be the hard part, but more on that later, in the Strategy section. For now, understand that Castform's Unite Move serves to illustrate how major the effect weather has on our world, no matter how small it is.
I mean, really small. Castform is only 1 foot tall, or 0.3 meters. Isn't there a saying, something about butterflies?
-
Achievements
Earn a KO Streak of 4 or more while Forecast is at half power or more.
The main job of pokemon in the Attacker role is to deal as much damage as possible to the opposing team. Most of the time, this results in a clean 2 or 3 KO Streak as recognition, but for the most part, the less opponents there are on the field, the better.
For Castform, it is very, very good at spreading damage all around due to the nature of its weather powered moves. With attacks like Weather Ball dealing damage in such a wide radius, Castform has one of the more straightforward achievement requirements of Attacker Pokemon so far.
Remember what its base stats look like, though. Not only is it terribly frail, it's also a bit weak on the offensive front. As it's been stated before, Castform relies on the weather to get the most out of its far reaching moves. Its Forecast ability helps it build up power the longer it's active, but it relies on you not getting KO'd too early to be effective.
This is where the Achievement comes into play as a learning tool. The 4 KO Streak is a tall order, even for some Attackers, but you need to get that 4th KO while Forecast has been running for at least 12.5 seconds. That's quite a bit of time to wait for Forecast to power up, but it is when Castform is at its strongest, feasibly of course.
If you want to get this achievement, you'll have to learn how to be patient. You'll also have to learn how to not get KO'd. You'll also need to learn how to aim your attacks to spread the most damage. You know, just regular Attacker things.
When the rain comes down, bring the thunder!
-
Holowear
While Castform isn't the only pokemon that can change forms in Pokemon Unite, it does impact its gameplay the most. So much so that, unfortunately, most fabulous Holowear will only be visible to Castform while it's in its Normal Form. Unless we downgraded the style to just hats, I'm afraid we've got limited options in playing dress-up with the little weather bean.
Let's try our best anyway. Starting things off, Magical Style Holowear gives Castform a big swirly witch's hat, with cloud pins and lightning stickers decorating it. With Leafy Style Holowear, Castform gets a large leaf that it uses like a parasol, along with a hat made of foliage. Farmer Style Holowear gives it a big straw hat and a sprig of wheat hanging out of its mouth. But for a bit of class, Fashionable Style Holowear gives Castform a big top hat with a brooch tacked onto the side. Lastly, for some extra rare pizzazz, Prepared Style Holowear gives it a warm snow hat, along with some sunglasses and a plastic umbrella that it uses to cover itself, just in case any weather event comes to try and ruin its day.
-
Strategy
With the power of the weather at your disposal, using Castform optimally is a simple as picking which terrible weather event you want to rain over your enemies. It sounds easy enough, especially with such wide reaching moves like Heat Wave and Water Pulse. But given the frailty of Castform, there's a trick to maintaining a presence on the battlefield.
For the most part, it boils down to understanding how each weather effect benefits Castform. Sunny Form, Rainy Form, and Snowy Form slowly power up the pokemon the longer it stays in that form, so you may think it'd be optimal to retain one weather phenomena for the whole game, right?
Well, not quite. I mean, you could, but the point of being able to use 3 different forms is to be adaptable. Think of each time you are KO'd, you are losing a stock. If it happens while you're in a form like Rainy Form, then you would think you'd have better luck in either Sunny Form or Snowy Form. That's usually correct, as the flow of battle can change by the minute, as each Form not only boosts a different stat, but uses a different move, which can improve your odds in fighting the opposing team.
Sunny Form has your moves get stronger the longer the form is retained, which results in either Flamethrower or Solar Beam starting out with increased damage. These moves have the least range, though, and that's by deliberate design. They shred the HP of tanks that lack mobility like Slowbro or Lapras, but they have difficulty reaching more agile characters like Zeraora or Cinderace, even though these attacks hit hard.
Speaking of slipperiness, Rainy Form slowly increases your movement speed as the form is retained, making you harder to catch while you're using Water Pulse or Thunder. Since Water Pulse is very likely to Stun on hit, it makes for a great attack for approaching or retreating. Thunder less so, but you can circle the fight with greater ease while raining lightning bolts everywhere.
Now, you are a frail Attacker, so you'd think the shield grown in Snowy Form wouldn't be that useful, and you'd be right. But it makes Ice Beam and Hurricane much safer to use. It makes it more realistic to slow down enemies with Ice Beam and eventually freeze them in place, as long as you utilize proper spacing. While Hurricane doesn't grant any debuffs, it still hits really hard, even while it's shrinking and losing speed. With a big enough shield, you can get a head start on punching holes in the opposing team's fortifications.
It all depends on what the weather feels like. The random nature of the weather attack in Move 2 makes it difficult to benefit from in the middle of the fight. But the effects are powerful and worth using, even if it means an impromptu shift in the weather patterns for you and the Forecast Ability. At least Weather Ball gives your Forecast Ability a head start, but Heat Wave, Hydro Pump, and Blizzard have a longer lasting and more powerful impact on the opposing team.
As long as you are able to take things in stride, a little bad weather won't get in the way of a feel good day.
-
And this has been Castform for Pokemon Unite! My favorite thing about making these posts is turning bad pokemon into solid playable characters for the game, since each pokemon has plenty of personality to contribute. And that doesn't always mean they should be a Supporter either, like my Luvdisc or Delibird moveset. No, with a bit of imagination, even a little cloud bean like Castform can become a torrential weather nuke if played right, and that's what I'd like to see if it ever came to Aeos Island.
Now, we do have a major fan favorite coming next week. Make sure you stay tuned for that release. Until then, see ya!
0 notes
Text
Lanturn for Pokemon Unite!
Season 1
Season 2
Prev: Cradily - Hatterene - Tropius - Cacturne - Ditto - Weavile - Ogerpon - Coalossal - Gogoat - Galarian Slowbro - Luxray - Breloom - Uxie, Mesprit, & Azelf - Wobbuffet - Obstagoon
When pokemon turns an existing animal into an inspired creation, there are loads of creative liberties that need to be taken in order to blend together realism with fantasy. Like a two headed giraffe or a metal pincher monster bug. Lanturn as a pokemon is very far removed from its real life counterpart, but I don't hear anyone complaining about it, especially knowing what angler fish really look like.
Instead, what we got is an adorable little light fish that can brighten up anyone's day. Let's see if it can bring that positive attitude to Pokemon Unite.
-
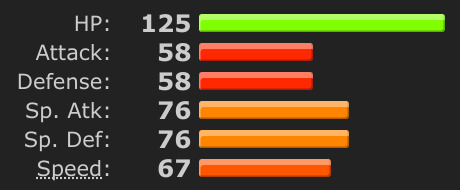
I'll be honest, I always forget that Lanturn has a very high HP stat, as it doesn't look that fat in its sprite. Maybe it has a bit of chub to it, but most fatty fish live in the cold, like the arctic or the deep...dark. Ah, I get it. Well, HP is Lanturn's most impressive stat for sure, but its other numbers are pretty underwhelming. All that Lanturn has going for it is high HP and a helpful night light, so for that reason, I designate Lanturn with the role of a...
Supporter
-
Basic Attack - Ranged/Sp. Attack
The user casts light from its antennae, enveloping all pokemon in its warming glow. While glowing, ally pokemon have their hindrances weakened and hastened. This glow expands when Bubble, Ion Deluge, or Bubble Beam are within range.
The light glow envelops and affects the area all around the user. The range is equal to that of a ranged basic attack.
Allies within the basic attack will receive 50% less effects from hindrances. These hindrances also have their duration halved.
Chinchou and Lanturn are not protected by these effects.
The basic attack button must be held to use this effect. Mashing the button causes the light to turn on and off, making it less effective.
Bubble, Ion Deluge, and Bubble Beam expands the range of this light glow by 25% while the moves are within the area of effect.
Hindrances are everywhere in Pokemon Unite, so it helps to have some sort of protection against these effects. Like a bright candle, Lanturn's basic attack casts away these hindrances as if they were shadows in the night.
Well, it's not exactly hindrance protection, since that would be OP for a basic attack. Instead, Lanturn's basic attack weakens the effect of hindrances and hastens their duration, making them half as effective overall when inflicted. A 1 second Stun is shortened to 0.5 seconds, and a debilitating debuff is weakened substantially while in the glow of your basic attack.
This is great and all, but it does require Lanturn to be within range of its teammates in order to provide this protection. As if that's a bad thing, Supporters are supposed to support, you know?
However, the protection granted by this basic attack does not affect Lanturn itself, since it is used to having the lights on all the time. One stray hindrance can stop Lanturn from casting its light briefly, compromising the safety of the team. If you don't want to get singled out by the enemy, make sure the team you're supporting also supports you.
Support the Supporters.
-
Ability: Illuminate
Reveals any invisible or hiding enemies nearby. Reduces damage received from affected enemies by 75%.
Opposing pokemon hiding in Tall Grass or under the effects of Stealth and Invisibility will be revealed to you and all allies while they're within the area of effect of Illuminate.
It should be noted that Illuminate will not cancel the Stealth or Invisibility effects of opposing pokemon when revealed, such as Sableye's Shadow Sneak or Dragapult's Shadow Force.
If an enemy is exposed to the anti-Stealth effect of Illuminate, the damage they deal to Chinchou/Lanturn is reduced by 75%. If they deliberately reveal themselves, the damage reducing effect of Illuminate will not activate.
Invisibility effects have been as terrifying as they are annoying, ever since the beginning of the game. Greninja's Smokescreen and Gengar's Unite Move, Phantom Ambush, were sneaky but fair, but things got really bad with the introduction of Sableye's Prankster ability.
Now, most of these invisibility effects have markers that pop up when these tricky jokesters are nearby, but that doesn't make it less frustrating when one pops up out of nowhere and ruins your plans. And don't even get me started on the ambush plays from Tall Grass.
If you've cried about these invisibility effects before, it sounds like you need a Lanturn on your team. Lanturn's ability, Illuminate, reveals enemies in hiding when they are nearby. It doesn't matter if they're invisible or camping out in Tall Grass, Lanturn's light will reveal them to the enemy team.
If an invisible enemy is revealed and tries to attack Lanturn, the Illuminate ability will drastically soften the blow. It has something to do with the bright light shining right into their eyes and limiting their power or something like that. The point is, if Lanturn leads the way with its bright light, any enemy revealed by Illuminate will have their opening attack greatly reduced.
This effect only works on enemies exposed by Illuminate, so if the opponent comes out of hiding, the damage reduction effect will not trigger. Lanturn is pretty bulky for a Supporter, but any amount of burst damage will KO you, so wade these dark waters carefully.
Cast away the darkness, our shining glimmer of hope.
-
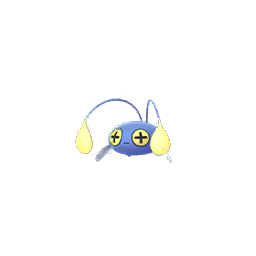
At the beginning of the game, Lanturn will start out as Chinchou. You can choose between Flash and Bubble as your first move. By Level 2, you'll have learned both.
-
Move 1: Flash
The user emits a bright light directly forward, damaging enemies and obscuring their vision if they were directly facing the user. Bubble expands the range of this attack. 8s cooldown.
Similar to Sableye's Unite Move, Phantom Ambush, Flash will only obscure the vision of opposing pokemon if they were directly facing you. The Vision Obscuring effect lasts for 3 seconds.
If Bubble is in range, Flash expands by 50%. Ion Deluge and Bubble Beam do this too, but Flash gets replaced first after evolving so this most likely won't happen.
Camera Flash Emoji. That's basically what the move Flash is, an unexpected blast of light in your general direction.
Now, that bright light does disorient the enemy if you manage to hit them in the face with this attack. Just like how Absol's Pursuit is reliant on the position of the enemy, Flash requires the enemy to look at you when you light up. It's a great way to punish the enemy for trying to go for a push, as a direct hit will obscure their vision for 3 seconds.
The range may be a bit hard to get used to, though. You can increase it with Bubble, since light refracts off of reflective surfaces. Bubble is your other move, by the way.
-
Move 2: Bubble
The user shoots a water bubble directly forward. When an ally crosses paths with Bubble, it envelops them and grants them a small shield. The bubble will pop if an enemy touches it. 6.5s cooldown.
Bubble as a projectile stops moving shortly after it is launched. It lingers in the air for about 5 seconds before it pops, damaging nearby enemies.
An ally can touch the bubble to gain 5% shield. An ally can only take one bubble shield at a time. Chinchou and Lanturn cannot receive this shield.
Bubble covers an ally with a visible veil of water when it grants them a shield. Flash, Confuse Ray, and Signal Beam have their range expanded if an ally with this shield effect is also in range.
Bubbles are fun. They're bouncy, they make a nice little pop when they blow up, and they also double as a protective barrier made of water to ward against the elements. Ok, maybe not like that, but if they were big enough, they could be.
As an attack, Bubble has Chinchou or Lanturn launch a water orb directly forward. It doesn't reach very far nor does it hit hard, but it does two things for you and your allies.
For one, Bubble refracts light, so it will extend the reach of Flash, and Confuse Ray or Signal Beam when you learn it. This makes it easier to hit multiple enemies at once with your moves, possibly disorientating the entire opposing team. That's a bit dramatic for what's supposed to be an early game move, but it's possible.
For your teammates, it grants a weak shield that they can use and wear like a protective barrier. I mean, it's just water, so it's not a very big shield, but any amount is helpful, especially for the weak power level of the early game.
Both effects can be utilized at once, as the bubble shield isn't just a visual effect. It'll still expand the range of Flash and your other moves while it's being worn by an ally, so you have a very good shot of winning the 2-v-2 fight in the Top or Bottom Lane.
Remember to say cheese.
-
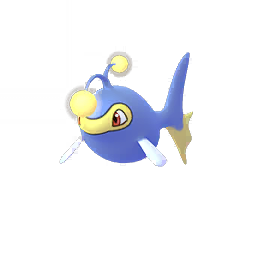
At Level 5, Chinchou evolves into Lanturn. At the same time, Flash becomes either Confuse Ray or Signal Beam.
-
Move 1a: Confuse Ray
The user flashes a sinister light directly forward, damaging nearby enemies. If an opposing pokemon was directly facing the user, they will be forced to approach the user. Bubble, Ion Deluge, and Bubble Beam expands the range of this move. 6s cooldown.
At Level 10, Confuse Ray becomes Confuse Ray+.
The flash comes out faster. Reduced cooldown.
Just like Flash, Confuse Ray affects enemies that directly faced the user when the move comes out. Affected enemies will be forced to move towards the user for 1.25 seconds and cannot attack or use items while controlled.
It takes Confuse Ray 0.75 seconds to come out as a conical flash of light. Confuse Ray+ reduces this startup time to 0.25 seconds and reduces the cooldown of the move to 5 seconds.
If Bubble, Ion Deluge, or Bubble Beam are within range, the area of effect expands by 30%.
Sometimes a teammate overestimates their abilities and they overextend. It happens sometimes. It just sucks that they get KO'd and the EXP they drop powers up the opposing team, turning a handsome Level advantage into a detrimental stalemate. We all have that lapse in judgement now and then, but what if it happens because of an attack?
The hypnotic effects of Confuse Ray forces all who directly observe the beam to be drawn into the light. It's not meant to deal big damage, but rather to disrupt the enemy team's positioning and create an opening for you and your team. It pulls Defenders and All-Rounders closer towards you, away from their backup, and exposes them to the hungry jaws of your vengeful teammates.
Of course, Confuse Ray needs to actually hit the enemy dead on, which is easy enough. Except that the whole hypnotic effect is a little too overpowered, even when it's brief, so Confuse Ray comes with a short 3/4th of a second charge time before the flash comes out. This makes it very slow, but hey, this means that any enemy that gets hit by the flash can't complain about the move being hard to dodge. At least Confuse Ray+ shortens the charge time and cooldown, but even still, don't look at it and you'll be fine.
It also doesn't help Lanturn all that much if they land the Confuse Ray attack but they don't have any allies nearby to capitalize on the effect. Can't really do much damage by yourself, now can you?
If you want another way to confound the enemy, maybe Signal Beam is preferred.
-
Move 1b: Signal Beam
A confounding beam of sound and light is fired directly forward. If this move deals constant damage to an enemy, they will be Stunned for a considerable amount of time. Bubble, Ion Deluge, and Bubble Beam expands the range of this move. 9.5s cooldown.
At Level 10, Signal Beam becomes Signal Beam+.
It takes less damage to confuse the enemy.
Signal Beam deals constant damage over time in the designated direction. It continuously fires in the designated direction and can be directed with the right control stick while Signal Beam is active. Signal Beam lasts for 5 seconds.
If Signal Beam deals 15% total damage to an enemy, that enemy will be Stunned for 2 seconds. Signal Beam+ reduces this requirement to 12.5% damage.
This effect only occurs if Signal Beam deals damage directly to the enemy. It must deal damage directly to the enemy's HP, not their shields or other protective effects. Sp. Defense buffs do not impede this effect.
Signal Beam will have its range extended by 30% if it crosses paths with Bubble, Ion Deluge, or Bubble Beam.
I never quite understood Signal Beam. I mean, I know it's a light type attack, but why is it a Bug Type move? It's one of those things about Pokemon that you roll with, even though you don't quite understand it.
I know Lanturn understands how to use Signal Beam, though, as the move casts not only light, but also sound and energy. By focusing this attack through its antennae, it scrambles the air waves in such a way that prolonged contact can cause confusion and hysteria, mostly confusion.
That's not an exaggeration either. If Signal Beam deals 15% direct damage to the enemy, they'll be hit with a debilitating 2 seconds of Stun. That's longer than most Sleep effects! And it's not like Lanturn's Sp. Attack stat is bad enough that it can't do this consistently, so how is it fair?
Well, the devil is in the details, and it requires that this be dealt to the enemy directly. Signal Beam can only Stun enemies hit directly and unprotected by any shields, of which they are really easy to get a hold of. You won't see Signal Beam accomplishing much attacking opponents on their own Goal Zone, as the shields and healing will counteract the effects of the move.
The move is pretty easy to avoid as well. The range of Signal Beam is pretty small, and requires Bubble, Ion Deluge, or Bubble Beam to extend the range to be a significant threat to the opposing team. But even so, the enemy can simply move out of the way of the beam before they take the full 15% damage. At least Signal Beam+ reduces this requirement to 12.5%, but at this point in the game, shields are very common, especially through Buddy Barrier.
Neither Signal Beam or Confuse Ray are very effective without any teammates around to back you up. You need an ally Attacker or Speedster to nab the KO on an enemy controlled by Confuse Ray and you need a Defender or Attacker to tear away shields so that Signal Beam can Stun something. Geez, playing as a Supporter by yourself must be frustrating.
But if you can get your team to cooperate, you can reward them greatly with the upgrade to Bubble.
-
At Level 8, Bubble becomes either Ion Deluge or Bubble Beam.
-
Move 2a: Ion Deluge
The user scatters electric particles forward, causing them to float in the air or attach to pokemon. When attached to an ally, the particles burst when the ally receives effects from a move, negating the effects and hindrances the move would inflict. When attached to an enemy, the particles burst when an ally damages them with a move, adding a brief Stun. 9s cooldown.
At Level 12, Ion Deluge becomes Ion Deluge+.
Scatters more ion particles in a wider area.
Ion Deluge unleashes three electric orbs that float in the air for 9 seconds. When attached to a pokemon, they will linger for 10 seconds. Ion Deluge+ scatters 5 orbs in a wider area.
When attached to an ally, Ion Deluge negates the effects and hindrances inflicted on them by opposing pokemon once, though it will not reduce damage received. An ally can only have one attached Ion Deluge particle at a time, though they can get more after it bursts.
When attached to an enemy, any damage received from an ally's moves gain 0.25 seconds of Stun. This Stun hindrance will not combine with any Stun hindrances used by other moves. Lanturn cannot activate this effect.
Similar to Bubble, Confuse Ray and Signal Beam have their range extended when an affected pokemon is in range of these moves.
There are some people out there that insist that electricity is good for you, in the sense that a small controlled amount is beneficial. Sort of like how slices of cucumbers in the eyes or boiling hot mud does wonders for one's skin complexion. Well, I suppose it must be good for something, because Lanturn has figured out how to use Ion Deluge to keep its teammates healthy with ailment warding electric particles.
Ion Deluge sticks to allies when it's thrown out, visible by a small field of crackling electricity. If an ally gets hit by a move that would inflict a hindrance or a debuff, the sparks pop and negate these effects. It won't reduce the damage received and only triggers once, but one instance of protection is what most All-Rounders or Defenders need to deal with problematic opponents. You can arm 3 out of your 4 teammates with these particles, or save them all for one reliable partner. You can only stick one particle to an ally at a time, but nothing is stopping them from reapplying the particles repeatedly.
It can also stick to enemies too, though it will do more harm for them. The particles will react to moves used by your team, bursting and Stunning the enemy briefly. And I mean briefly, as in, a quarter of a second brief. Most moves come with their own Stun effect, so it won't serve to exacerbate the hindrance any more than it already does. The point of the extra Stun is to add extra value to moves that can't Stun, like Decidueye's Spirit Shackle or Machamp's Cross Chop. In this way, you're helping allies make up for their shortcomings by augmenting their abilities.
Ion Deluge+ throws out more electric particles in a wider area, making it easier to influence the battlefield by affecting more pokemon. Also, don't forget that the particles expand the range of Confuse Ray and Signal Beam, drastically increasing your reach and ability to support the team. Whether the particles are floating about or they're protecting your allies like armor, your presence will be known, like a beacon in the darkness.
Shine on, little fish.
-
Move 2b: Bubble Beam
The user launches multiple bubbles forward, each one granting an ally a small shield. Multiple bubbles can be taken at once, combining to create a big shield. 7.5s cooldown.
At Level 12, Bubble Beam becomes Bubble Beam+.
Grants bigger shields.
A line of 4 bubbles is launched forward in the designated direction.
Each bubble grants 5% shield to an ally. Each one can also be taken by a single ally and combine to grant a 20% shield.
Bubble Beam+ has each bubble grant 6% shield, which can combine to grant a 24% shield to a single ally.
Bubble Beam bubbles linger in the air for 5 seconds before popping on their own. They will deal damage in a small area in this way but can also pop when an enemy touches one.
Just like Bubble, Bubble Beam grants allies a visible veil of water as a shield, which will expand the range of Confuse Ray and Signal Beam when used within range.
The shield granted by Bubble Beam will not exceed 24% if the cooldown is manipulated in such a way that multiple bubbles from different uses of Bubble Beam attach to an ally.
Now, as crazy as this sounds, maybe your team doesn't need hindrance protection. I know, this sounds really insane, but sometimes your allies are better equipped against hindrances than you'd expect. Or maybe your team is so squishy that any protection against hindrances won't matter. In that case, maybe with a big enough shield they can survive a surprise attack or two. Time to bring on the bubbles.
While Lanturn is perfectly capable of using high power moves like Hydro Pump or Discharge, it is responsible enough to take its role as a Supporter seriously that it is willing to power down to maintain this disposition. That, and Bubble Beam is the natural progression of the shield granting effect of Bubble, times 4.
Four bubbles, four of them. Each one provides a shield to an ally when they're picked up, and each one can combine to create an even bigger shield. Because of the low cooldown of the move, you can expect to reapply the shield to a different ally, improving your team's odds of winning the fight for an objective. I mean, you could have each teammate take one shield each, but the shield will be small as a result.
In the heat of battle, this will probably happen a few times, intentionally or not. Hey, it's better than nothing, and most of the time, it'll be a Defender or All-Rounder that will be caught in the middle. Attackers and Speedsters are responsible enough to not get caught in these full party scuffles, usually.
Bubble Beam also deals respectable damage, since the enemy might get in the way of the attack. You know, just in case they think they can take the shield for themselves. You can hit an enemy four times with each bubble, but then you'd have to wait for the move to come off of cooldown before you can use it again to give an ally a shield. If you're caught by the enemy all by yourself, though, it's a decent attack to rely on, and can pack some mean KO power.
It's like how, if you were to use the correct combination of items, you could turn a Supporter like Eldegoss or Blissey into a strong Sp. Attacker. Lanturn has a bit of edge in that regard.
-
Unite Move: Spotlight Secure
The user casts a bright beacon that shines down on the battlefield. The beacon can be directed, shining down and highlighting opposing pokemon. If an opposing pokemon is exposed to the beacon, they will be Stunned briefly and have their vision obscured, and have their Defense and Sp. Defense reduced greatly for a while afterwards.
When activated, Spotlight Secure shifts the camera to zoom out and expand, and a spotlight with Lanturn's face beams downward onto the ground.
This spotlight beam can be controlled and moved around at a fixed speed to direct and highlight opposing pokemon, whether they are in hiding or invisible. Spotlight Secure lasts for 12 seconds or until Lanturn is damaged.
When the spotlight beam hits an opposing pokemon, they will be Stunned for 1.5 seconds and have their Vision Obscured for 2.5 seconds. Their Defense and Sp. Defense will also be reduced by 50% for 6 seconds. Spotlight Secure cannot affect an enemy twice.
Spotlight Secure can only shine down in a wide area around Lanturn and will not reach past this area of effect.
You ever used a magnifying glass to burn ants on a clear day? If you did, you will be judged, silently, but also you understand how this Unite Move works. I don't quite understand how Lanturn is able to control this massive beam of light from the ground, but we can pretend it's using Solar Beam. Oh wait, Lanturn can't learn Solar Beam. Uhh...
The light beam Lanturn is using for its Unite Move, Spotlight Secure, is filled with powerful electricity, which is why when an opposing pokemon is caught in the beam, it Stuns and blinds them momentarily. Now, the beam of light doesn't move all that fast, it's only normal movement speed that doesn't get affected by any modifiers, but it can be directed over walls and obstacles, which helps chase down enemies.
Really, it's their own fault for getting caught, as the beam is bright and obvious, what with Lanturn's beaming face visible in the light glow. It'll even reveal enemies that are hiding in Tall Grass or under any invisibility effects, though you won't have Illuminate helping you reveal enemies.
As far as Supporter Unite Moves go, Spotlight Secure is pretty powerful in how it hinders enemies and helps allies. I've already mentioned that it Stuns enemies for a little while and obscures their vision, but it also halves the Defense and Sp. Defense of enemies caught in the light. With proper coordination, you can turn what would've been an ambush into a reverse team wipe, as the enemy will be forced out of hiding with Spotlight Secure coming their way.
As powerful as this is, it does have one glaring drawback. Lanturn focuses a lot of energy into casting and maintaining this light show, so if it gets hits, it'll lose concentration and the Unite Move will be cancelled. This is really bad if you get caught, if. The range of Spotlight Secure is large enough that you don't need to be close to the battlefield to expose nearby enemies in hiding, though keep in mind that it doesn't reach everywhere.
Watch out for ambushes too. Just like how aiming Dragonite's Unite Move, Draco Impact, takes the focus of the camera away from the pokemon, Spotlight Secure requires you to visually aim and direct the beam of light while it's active. It's best used a fair distance away from Objectives like Regieleki or the Bottom Regi, as these are hotly contested areas and the opposing team may prefer to ambush your team in order to increase the odds of securing the lead. Just make sure your hiding spot isn't too obvious, as opposing Speedsters or Attackers can rush in to shut down your light show before you can make the enemy team see the light.
With a bright enough light, you can see anything, even one's inner soul.
-
Achievements
Expand the range of either Confuse Ray or Signal Beam to affect multiple opposing pokemon at once.
Lanturn is very good at casting a bright light, so in order to master this pokemon, you must master the light yourself.
Both Confuse Ray and Signal Beam can combine with either Ion Deluge or Bubble Beam to extend their range, though actually affecting opposing pokemon will be the tricky part. Note that the achievement requires you to 'affect' opposing pokemon, not damage them. In order to score points with this achievement, you need to not only successfully hinder enemies with these moves, but you must do so while their range is expanded.
Not much else to it other than to plan carefully and coordinate with your allies. Confuse Ray has a bit of a short startup before flashing and Signal Beam requires constant damage to an enemy without a shield, so make sure you're well positioned to use either move.
And make sure you've got allies backing you up. Can't really extract any benefits from hindering the enemy without an ally nearby.
-
Holowear
As far as looks go, Lanturn is a bit one-note. I mean, a dainty little orb of light on top of a fish doesn't really scream stylish, so let's spool together some fashion for this flashy fish.
Starting things off, Sleepy Style Holowear gives Lanturn a night cap, some comfy PJs, and an eye mask sitting under its antennae, to help those with anxieties about sleeping in the dark while not losing any sleep itself. Starry Style Holowear decorates Lanturn in star pins and ribbons to help make it shine like a star in the night sky, you know, more than it already does. Since that antennae helps with it catching prey, Fishing Style Holowear makes sense for it, giving it a fisherman's cap and a fishing vest. Huh, a fish going fishing. To help catch the bad guys, Enforcer Style Holowear gives Lanturn a police cap, a police suit, and a utility belt stocked with sprays, pellets, snacks, and a short stick baton. And finally, to make Lanturn the center of attention, Holiday Style Holowear dresses it up with red and white ribbons, sparkly wreaths of pine, baubles and ornaments, and fixes a star around Lanturn's gleaming antennae. To light up this starry night, holy night.
-
Strategy
Lights, camera, action! Playing as Lanturn requires you to be very involved in combat with a fellow teammate in order to get the most out of your contributions. Because of how Lanturn's moves combo together, it also requires coordination with an ally and enough wit for them to capitalize on the openings you provide.
First off, let's recap on what the basic attack does for Lanturn. It's a wide ranged light glow that damages all enemies nearby, but the damage multiplier is weak for what your Sp. Attack stat is. The main point of the basic attack is to protect your teammates by limiting their exposure to hindrances. Reducing their effectiveness and duration by half is a very valuable ability, but it requires you to be nearby an ally suffering from a hindrance, and therefore near an enemy on the opposing team.
It's lights out if you get hit, though, as Lanturn cannot protect itself in this way, so a hindrance hitting you dead-on will be fully effective. You're already giving more for your teammates than what you're receiving, so it's on the teammate to protect you in kind.
Most Supporters operate best when fighting from the back row, as they can safely support the team and be as involved as they can in this way. Lanturn is just as effective leading forwards thanks to its Illuminate ability revealing hiding enemies. This would make it vulnerable to ambushes, but Illuminate also drastically reduces the damage of enemies exposed by your light glow, softening the blow from the impending surprise attack. With a fellow Attacker by your side, you can foil a sneak attack in this way, giving your team the edge when it comes to fights surrounding the objective.
As for the actual moves, Confuse Ray and Signal Beam are powerful hindrance moves, but they require proper execution as explained before. You can use the cover of Tall Grass to hide the charge time of Confuse Ray, but it'll be more effective in the confusion of a team fight, provided your bulkiest allies are at the forefront of the scuffle. Signal Beam is also more effective when defending a Goal Zone or around Objectives than opposing Goal Zones, since the enemy is guaranteed to have a shield provided to them. Although, it's better to hold your fire until the enemy team has exhausted their shields from Buddy Barrier and their opening moves that provide shields, like Charizard's Flare Blitz and Metagross's Gyro Ball.
Speaking of shields, the protections you can grant to allies through Ion Deluge or Bubble Beam are not to be underestimated. Ion Deluge can protect 3 teammates at once with ionized electric particles that mutes any debuffs and hindrances received from opposing moves, though it won't soften the damage received. Ion Deluge+ drops 5 ionized particles, which is more than enough for the whole team. Lanturn can't use these particles itself, but an ally can reapply a particle when one is used up, negating as many debuffs and hindrances received as they can take. Oh, and these particles do the opposite effect when stuck to teammates, adding a very brief amount of Stun to moves when they are received by a teammate.
They don't increase the damage taken, but that's fine. Ion Deluge is about neutralizing the effect of moves, not reducing their damage. Bubble Beam, on the other hand, is all about reducing damage, as each bubble provides a small shield, and each bubble can be combined to increase the shield received. It shoots out four bubbles, one for each ally, but the shield will be small in this way. It's better for one or two allies to split these shields up evenly, since shields don't last forever. Bubble Beam deals damage since Ion Deluge can't, but it deals a surprising amount of damage to enemies, considering Lanturn's ability to use high powered attacks like Surf and Thunder. Just because it's holding back doesn't mean it won't hurt.
Finally, we need to talk about the Unite Move, Spotlight Secure, once again. Since it requires all of your focus to aim and direct this move, using the Unite Move can leave you exposed to surprise attacks, especially long range moves like Lucario's Aura Cannon or Decidueye's Nock Nock. It only takes one hit to cancel the Unite Move, so make sure to pick a safe spot to cast this beam of light.
The range of Spotlight Secure is wide and vast, but it cannot reach everywhere. Say for instance, you use Spotlight Secure in the Tall Grass near the jump pads in Theia Sky Ruins in the Central Area. You can direct the light beam to as far as the central pit and some of the Tall Grass nearby, but not to the other side in Top or Bottom Lane. You can cast this paralyzing glow over some of the well known hiding spots around the Central Area, but not all of them.
The speed of the light beam is also static as well, you cannot affect this with an X Speed or anything like that since this is a Unite Move projectile, technically speaking. You can direct it over walls and obstacles, but you won't be able to chase down Speedsters or Attackers that really don't want to get caught. You also won't see invisible pokemon in view, unless they're within Illuminate range of Lanturn itself, though you'll have bigger problems to worry about in that instance.
The main appeal of Spotlight Secure is to use it in tandem with an ally and counter any ambushes the opposing team might try to pull off. If an ally is nearby a potential hiding spot, Spotlight Secure can safely cast down into the Tall Grass to check for enemies. If you guess right, the enemy will be Stunned for 1.5 seconds, blinded for 2.5 seconds, and have their Defense and Sp. Defense halved for 6 seconds. With the right teammate nearby ready to take advantage of the opening you create here, it will most likely be game over for the caught opponents.
You don't have to take a shot in the dark, when you've got a powerful light shining your way. The deep dark is yours to conquer.
-
And that's Lanturn for Pokemon Unite! Just because a new generation of pokemon is over and done with doesn't mean we can't give some special attention to the favorites of old! I certainly appreciate the novelty of a Water and Electric Type, you know, before Rotom took it away. Ah well, time marches on.
That'll be it from me for this week. See ya!
4 notes
·
View notes
Text
Obstagoon for Pokemon Unite!

Season 1
Season 2
Prev: Cradily - Hatterene - Tropius - Cacturne - Ditto - Weavile - Ogerpon - Coalossal - Gogoat - Galarian Slowbro - Luxray - Breloom - Uxie, Mesprit, & Azelf - Wobbuffet
As a fan of the concept of regional forms when they were introduced in Gen 7, I was pleasantly surprised when Obstagoon was revealed. Giving regional forms an exclusive evolution is certainly a bold move, one they've yet to repeat in later games, so Obstagoon is a unique pokemon in that regard, along with Mr. Rime, Sirfetch'd, Perrserker, Cursola, and Runerigus. Oh, and Clodsire, I guess...
Never mind all that, though. Obstagoon boasts a very daring design, sporting a frightening black and white visage reminiscent of a certain rock star from the past century. It's bold, brash, and daunting to face, which makes it very difficult to confront.
You know what comes next. Let's see if Obstagoon can get its foot in the door and muscle its way into Pokémon Unite. And a one, and a two...
-

Obstagoon's defining trait is the culmination of the theme of its evolution line, from the wayward wandering of Zigzagoon to the disciplined direction of Linoone, ending with Obstagoon's stalwart stopgap. Having grown strong in the harsh environment of Galar, it now sticks to one place to defend its territory, and its stats reflect this. Above average Defense, Attack, HP, Speed, these numbers are pretty bland by themselves, but together, combined with Obstagoon's brashness for boundaries, make it out to be a tough contender for the role of a...
Defender
-
Basic Attack - Melee/Attack
Becomes a boosted attack after three hits. The boosted attack delivers a wide swipe that shoves enemies away.
The boosted basic attack Shoves enemies away in the direction of the attack.
Shove effects are very powerful, which is why they're usually reserved for moves that require aiming. Usually. Giving one to a Defender as part of their basic attack would seem like overkill, so for balance purposes, Obstagoon requires three hits to fully boost its basic attack.
This makes it very slow to power up the basic attack for the Shove effect to be useful, but it does allow Obstagoon to have the upper hand in drawn out fights. It's faster than Mr. Mime's basic attack powering up to deal a Throw effect, but it's stronger coming from a Defender. It keeps melee attackers from maintaining a foothold in your side of the arena and it can be used to push ranged attackers out of hiding, so make sure you hit true with this boosted basic attack.
If you can hit more than one enemy, that'd be even better.
-
Ability: Gluttony/Guts
Gluttony (Galarian Zigzagoon/Galarian Linoone)
The less HP the pokemon has, the more HP it restores through recovery effects.
Guts (Obstagoon)
The less HP the pokemon has, the more HP it restores through recovery effects. Its Attack and Defense also increase the less HP it has. If the pokemon’s HP is restored, the increased Attack and Defense boost linger for a while before resetting.
Gluttony and Guts increases recovery effects relative to the amount of missing HP. For example, 50% missing max HP equates to 50% more healing from recovery effects, 75% missing HP equates to 75% more healing, etc.
The Attack and Defense boost of Guts also follows the same formula, in that 50% missing max HP equates to a 50% Attack and Defense boost. This boost is persistent.
When HP is recovered, the Attack and Defense boost lingers for 7 seconds before resetting. If HP is restored from 25% to 50%, the Attack and Defense boost will linger at 75% boost before resetting to 50% boost after 7 seconds.
This lingering boost effect resets if the HP falls below the original HP threshold, i.e. recovering from 30% to 50% and then falling down to 20%. Getting KO'd will also reset this boost.
The drastic change in appearance from evolving from Linoone to Obstagoon is reflected in the ability. It turns you from an okay Defender that is dependent on healing, into a Defender that gets stronger the more you push against it.
Defenders are expected to eat a lot of hits in order to do their job, which makes Obstagoon perfectly situated to deal lots of damage. By playing your part, Guts will greatly increase your Attack and Defense as the battle wears on. You can't fight at low HP forever, nor would it be feasible to, but having your HP restored would cut into your defensive capabilities, no?
Well, Guts has a side effect that mitigates this reduction from healing. More specifically, Guts has an extra effect that let's you keep the Attack and Defense buff from your low HP threshold. If you manage to bounce back from dangerously low HP, not only will you get a high boost, you'll keep the boost for a short while afterwards. It's risky, but rewarding if you've got reliable healing nearby.
Watch out for hindrances though. Can't utilize that Attack and Defense boost if you get Stunned into KO.
-

At the start of the game, Obstagoon will start out as Galarian Zigzagoon. You can choose between Headbutt and Lick as your first move. By Level 2, you'll have learned both.
-
Move 1: Headbutt (Melee)
A short ranged tackle with a chance to Stun the enemy. 2.5s cooldown.
Headbutt is a short ranged head attack with a 20% chance to Stun an enemy for 1 second.
Starting things off, we've got a very annoying move called Headbutt. I say annoying because of how inconsistent it is for the enemy, and the user.
While it has a shockingly low 2.5 second cooldown, it also has a stunning 1 second Stun effect that happens every 1 in 5 uses. This sounds amazing, but Headbutt doesn't have a lot of range to it, and each hit isn't guaranteed to Stun the enemy. It's feast or famine when this move successfully Stuns an enemy, and only if you've got someone backing you up to help you finish the job.
If you're lucky, you can combine the Stun from this move with the Shove from your boosted basic attack to reposition the enemy, either to inhibit their retreat or to keep them away from your Goal Zone. Just keep in mind that 2.5 seconds of cooldown is longer than it feels in the heat of battle, so try not to miss.
-
Move 2: Lick (Melee/Debuff)
A short range tongue lash that reduces the enemy’s defense and boosts your basic attack. Also Stuns enemies briefly if your HP is low. 6s cooldown.
Lick is a short ranged whip-like attack that debuffs enemy's Defense by 40% for 6 seconds and boosts your basic attack.
If your HP is at or below 20%, it is guaranteed to Stun enemies for 1 second.
Keep in mind that Headbutt has a pathetically low dash distance when used, so much so that it technically qualifies as a Melee attack. Your other move, Lick, has even LESS range than Headbutt, but it comes with extra effects that are useful to your defending endeavors.
First off, a successful hit debuffs the enemy with a lengthy Defense reduction effect that lingers for the duration of the move's cooldown. Starting off a fight with Lick is a great way to maintain your offensive presence by threatening constant damage in this way. It also fully boosts your basic attack, which allows you to Shove enemies in whatever direction you see fit afterwards.
Lick comes with a guaranteed Stun if you use the move while at low HP. However, at this stage, your ability is Gluttony, not Guts, so you won't see any extra damage coming from this move unless you're running Weakness Policy. It's a nice effect to have though, when the going gets tough and you've taken a beating from all of that Defending you're doing.
This is all assuming you actually hit the enemy with these attacks. Not to worry, though, as Zigzagoon are fast growers and eventually evolve into the more streamlined Linoone.
-
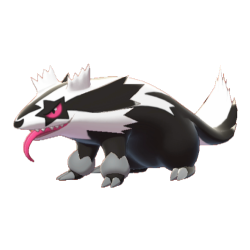
At Level 4, Zigzagoon will evolve into Linoone. At the same time, Headbutt will become either Night Slash or Double-Edge.
-
Move 1a: Night Slash (Dash)
A fast cutting attack with a high critical hit chance. The lower your HP, the higher the critical hit chance. 3.5s cooldown.
At Level 10, Night Slash becomes Night Slash+.
Critical Hits restore your HP relative to the critical hit rate of Night Slash+.
Each hit has a 30% chance to deal a critical hit. This rate increases the lower your HP is, relative to the amount of missing HP, i.e. 50% missing max HP equates to 50%+ critical hit rate.
The critical hit rate effectively becomes 100% at 30% max HP or less.
Night Slash+ restores your HP by 10% each time you land a critical hit. The amount of HP restored increases based on the critical hit rate. The calculations read out to 100% crit chance equaling 20% HP restored on hit.
If Night Slash+ lands a critical hit while at 30% HP or less, the critical hit rate rolls over and further increases the HP restored. At 10% HP, the crit rate becomes 120% and HP is restored by 22% on hit.
As Galarian Linoone, Night Slash is a sharp cutting attack that can help you cover some distance. Even though it's a Dash move, it doesn't reach very far, and is used mainly for threatening major damage up close. This is helped by a very low cooldown of 3.5 seconds and a critical hit rate that only increases the less HP you have, turning a risky roadblock into a revengeful ravaging of rage and regret.
This becomes even more powerful when Linoone evolves into Obstagoon, as the Attack and Defense boost granted by Guts further increases the damage you can deal. Combined with the potentially high critical hit rate, a weakened Obstagoon can quickly prove to be a very dangerous obstacle to overcome for the enemy team.
The upgraded version of Night Slash provides some helpful healing when a critical hit connects. It may not be as much healing as the Potion Battle Item or an ally's healing move, but any amount of healing triggers Guts, which can exponentially increase the less HP you have. It's all percentage based too, so the higher you can increase it, like with Aeos Cookie or Buddy Barrier, the greater your returns.
Keep in mind what you're missing when you pick Night Slash over Double-Edge, though.
-
Move 1b: Double-Edge (Dash)
A wild charge attack that Stuns enemies at the cost of some HP. 2.5s cooldown.
At Level 10, Double-Edge becomes Double-Edge+.
Restores a lot of HP when this move KO's an enemy on the opposing team.
On hit, Double-Edge Stuns enemies for 1.5 seconds and takes away 10% of your max HP.
Double-Edge+ restores your HP by 30% when you KO an opposing pokemon.
If you liked Headbutt enough that your only complaint was the attack distance, then Double-Edge is the move of choice for you. Now it reaches quite a fair distance as an attack and Stuns enemies for slightly longer while also keeping the same cooldown.
Unfortunately, while a random Stun chance on a short distance melee move was cute at the beginning of the game, it's not as cute when that breaches into the late game, especially when the user evolves into Obstagoon. For balancing purposes, Double-Edge comes with some recoil that cuts away your HP each time it hits.
Ah, but it's used by a pokemon that gets stronger when it has less HP, oops.
Learning Double-Edge is a harsh commitment to make, especially as Galarian Linoone doesn't have access to Guts. Each powerful hit takes away from your HP, HP that you need to keep defending the area with and not get KO'd. Maybe if you're packing Potion you can pop it and get an extra hit or two in, but it's gonna be a rough go at it until you finally evolve into Obstagoon.
Speaking of recovery, Double-Edge+ comes with a massive HP restore when you KO an enemy, a flat rate of 30% of your max HP. Guts will not only increase this amount, but it also gives you a stronger Attack and Defense boost that you get to keep for a while. If you're in a team fight and you see some squishy Attackers or Speedsters at low HP, scoring a KO with Double-Edge+ will power you up greatly, and you'll snowball and steam roll the opposing team with your overwhelming power boosts.
Well, that's the idea anyway. Gotta level up enough to actually evolve into Obstagoon in the first place.
-
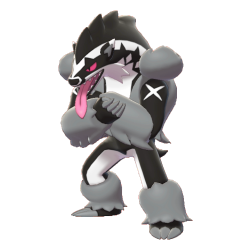
At Level 8, Linoone evolves into Obstagoon. At the same time, Lick becomes either Obstruct or Facade.
-
Move 2a: Obstruct (Debuff/Hindrance)
The user leaps directly ahead and shouts in the designated direction. All nearby pokemon hearing the shout will be Stunned briefly and have their Defense reduced for a short while. The lower your HP, the more Defense is reduced. Any moves opposing pokemon were using will be interrupted. The user's basic attack also becomes boosted. 7.5s cooldown.
At Level 13, Obstruct becomes Obstruct+.
Expands the area of effect.
Obstruct requires both the Left and Right Control Stick to aim this move, similar to Meowscarada's Double Team. Obstagoon will jump in the direction it's facing and will turn to face the designated direction to shout.
The area of Obstruct's effect is circular, with Obstagoon placed in the far side of the circle facing inward. Obstruct+ increases the size of this attack by 33%.
Obstruct Stuns enemies for 1 second and reduces the Defense of all enemies that are shouted at by 40% for 6 seconds. The less HP you have, the greater this Defense reduction.
Any moves and move effects that were active and used by opposing pokemon will be interrupted unless the pokemon is protected by hindrance immunity. Active attacks like Azumarill's Aqua Tail, Decidueye's Razor Leaf, Mewtwo's Psytrike, and Venusaur's Petal Dance will be interrupted and forced to end. This even affects Area Moves like Crustle's Stealth Rock or Slowbro's Surf, as these moves will end up getting cancelled.
Obstruct has no effect on Unite Moves.
You ever have an argument with someone and you're making plenty of good points while their only defense is to interrupt you with loud noises? How juvenile. I mean, just because you're a dog doesn't mean you get to bark incessantly to make yourself heard.
Well, being rude is Obstagoon's specialty, especially with all of that yelling. Obstruct has Obstagoon jump directly ahead and then give off a loud shout, Stunning enemies for a second and reducing their defense. The Defense reduction gets stronger the less HP you have, but a base debuff of 40% is gonna make every followup attack sting, especially since your basic attack becomes boosted afterwards.
But that's not the worst of it. The loud booming sound of Obstruct is shocking enough that it can cancel some Moves as they're being used. Imagine Crustle's X-Scissor getting in two swings before it gets canceled by Obstagoon's Obstruct, or Zoroark's Night Slash/Feint Attack combo ending without a finisher. That's the power of shouting loudly enough that you shock opponents into inaction.
The move does have a surprisingly low cooldown, which makes it easy to abuse, but it does have its limits. The shout hits in a wide range, but the initial jump forces you to confront the enemy up close to ensure that the shout hits. Obstagoon doesn't have any problem getting physical with the enemy team, but if 3 or 4 of them are present, don't expect to last long. Also watch out for ranged attackers, though with Night Slash or Double-Edge, you shouldn't have much trouble closing the distance.
Obstruct doesn't deal any direct damage, but it does soften up the enemy team for you, and can greatly increase the chance of fending off the enemy team from an objective or a Goal Zone. But if you prefer to threaten heavy damage up close, perhaps you'd prefer Facade.
-
Move 2b: Facade (Melee)
A short ranged full frontal attack that deals more damage the less HP you have. Also deals piercing damage. The user is Unstoppable while using this move and deals even more damage if the user receives an attack while using Facade. 5.5s cooldown.
At Level 13, Facade becomes Facade+.
Increases damage dealt.
Facade deals piercing damage to enemies directly in front of you.
During the attack animation, Obstagoon will be Unstoppable. The attack takes 0.5 seconds to come out. If Obstagoon is damaged during the attack animation, Facade deals 3x more damage.
The damage dealt by Facade increases relative to the amount of missing max HP, i.e. 50% missing max HP equates to 50% damage boost.
Facade+ increases the damage of the move by 2.5x.
You know how you say you're fine when you're not actually fine? Like when you're trying to hide a stomach illness or an embarrassingly large pimple. Yeah, that's called a Facade, and when a pokemon uses it, they attack while hiding the painful condition they're in.
When Obstagoon uses Facade, though, it's hiding the pain of absorbing all of that damage and turns it into power for this attack. Not only does the move hit hard, it hits even harder the less HP you have, and not just because of Guts. The move has a boosting effect when you use it at low HP, which does stack with the Attack boost from Guts. Combined together, Facade hits like a truck at very low HP.
It's all piercing damage too. Well, it kinda has to, since the move has pathetically low range for a Melee move. It's got low cooldown, at least, but it doesn't matter much if you can't hit anything with Facade.
That's about where all the negatives for Facade end, as this move is meant to combine with your other move, Night Slash or Double-Edge. Both are dashing moves with relatively low cooldown, which helps Obstagoon cover the distance it needs to quickly reach high priority targets like squishy Attackers. Both moves also improve the less HP you have, so you can deal some heavy damage if you tank a lot of hits dashing your way into the fight. Night Slash can threaten huge damage to even Defenders and All-Rounders, but Double-Edge is more consistent and will even lower your HP for you so that Facade can deal more damage.
Normally you'd have to worry about Stun or other hindrances that inhibit your movement, but Facade makes Obstagoon briefly Unstoppable when the move is thrown out. Again, it's an effect meant to make up for the shortcomings of its low range. Though, if you time it right when you get hit with an attack, Facade will deal triple the damage afterwards. It makes it easier to handle hordes of enemies when you can deal insane damage from the cluster within.
All of that bravado really does amount to actual strength. Can't help but wonder if Obstagoon shouts to taunt the enemy or as a warning...
-
Unite Move: Roadblock Rock (Buff/Hindrance)
The user stamps its foot and holds its ground in the designated area, pushing away pokemon from the opposing team with rhythmic rock music. Enemies that approach the user will be pushed back by the user's shouts. If the user's HP falls to a certain percent, the Unite Move ends and the user gains a massive Attack and Movement Speed boost and will also become Invincible for a short while. The more HP lost during Roadblack Rock, the greater the Attack and Movement Speed boost.
Roadblock Rock has Obstagoon hold its ground and jam out to some rock music being played in the background. This effect is visible with music notes flying about and Obstagoon waving rhythmically.
Upon activation, Obstagoon will stamp the ground and shout at enemies trying to get past it, Shoving enemies away in the designated direction. This effect of pushing enemies away persists for 12 seconds or until Obstagoon's HP falls to 15%.
The Shove effect has a 1.5 second cooldown if Roadblock Rock fails to push enemies out of the area of effect. This means that if an enemy gets pushed into a wall, it won't lock them down into a position where they can't escape.
When the Unite Move runs out or when Obstagoon's HP reaches 15%, Obstagoon will get a 15% Attack and Movement Speed boost. The boost increases depending on how much HP Obstagoon has lost during the Unite Move. The increased boost is relative to the percentage of HP lost.
Music can be faintly heard coming from Obstagoon during Roadblock Rock, more specifically, it's the Gym Leader Battle Theme from Pokemon Sword and Shield.
Ever gone walking down a sidewalk and catch up to some guy who's vibing hard to some sick tunes playing in his headphones? I mean, like he's really into it, swinging and kicking and stuff, and you can't get his attention because of the music playing loudly and you can't get past? Yeah, that's basically Obstagoon's Unite Move, but without the moving.
Roadblock Rock establishes a perimeter for Obstagoon to jam out to some rocking music playing in its head. It doesn't have any headphones or digital media or anything like that, but it does remember one really good song it heard one time. You know how it is when a song plays over and over again in your head, but it's a good song so you don't fuss about it.
Obstagoon loves its personal space and also loves being loud, so Roadblock Rock is the ultimate expression of character for the tall badger man. It's also a great defensive Unite Move, as it keeps enemies from slipping past. By laying claim to a small area, Obstagoon will shout and push back pokemon that try to push through, making it a great guardian for the team, especially during Objective fights.
The shouting and shoving are powerful impediments, but it doesn't make Obstagoon invincible. Sure, melee attackers can't hurt you that easily, but there are plenty of long range options that can wear you down during the Unite Move. You can't move or attack until Roadblock Rock ends either, so you can quickly lose all of your HP if you've blocked the entire enemy team.
Oh wait, forget what I said. If Obstagoon is brought down to 15% of its max HP before Roadblock Rock ends, it actually does become invincible. It stops blocking the way, but it turns its lost HP into an Attack and Movement Speed boost. This means that, if Obstagoon starts the fight with full HP and successfully blocks the entire enemy team, you can expect to be brought down to low HP and come out invincible and fueled by Guts.
The counterplay to this Unite Move is more nuanced than it seems. Agile and crafty enemies can bypass the roadblock with hindrance protection or immunity, like Talonflame's Fly or Snorlax's Block. Fast foes can just take the long way around if they can help it, like Dodrio or Mimikyu. The more direct answer would be to wait out the Roadblock Rock, but a smart Obstagoon player can pick the right time and place where that choice is unfeasible for the enemy team.
There's always the option to attack and bring Obstagoon to low HP. It's crazy, but it does force Obstagoon to stop defending and start attacking. The Obstagoon player may prefer to use this Unite Move offensively and will put themselves in a precarious position just to get that Attack boost. In this case, watch out for the bold players that try to get in between both teams while at full HP, as the more HP lost during Roadblock Rock, the greater the boost gained if they reach low HP.
If. That's the key word here. If the duration of Roadblock Rock runs out before Obstagoon's HP is brought down low enough, it won't get that invincibility status. Smart opponents will bring Obstagoon's HP down just shy of 15% if they can help it, leaving the Defender with a much more manageable 20% HP and decently high Attack and Defense boost from Guts. To counter this counterplay, you need to understand that there is an inherent risk versus reward here with how the move can be used. Using Roadblock Rock at high HP is risky since the enemy may be smart enough to play around it, whereas at half HP, a stray burst damage attack may be enough to bring you down to low HP, but the resulting Attack and Movement Speed boost won't be as great.
Maybe you should get in their heads, you know? Like an annoying song or a petty taunt by spinning in tight circles after a KO. Make them want to hit you.
-
Achievements
Deal 20,000 extra damage through Guts while at 50% max HP or less.
Now, 20k damage may not seem like much, especially for a Defender class, who commonly hit double or triple that amount in a normal match. However, the achievement specifies that all that damage must come from the boost granted to you through Guts. Fighting at full HP contributes nothing to this achievement, so gaining any recognition from the game here will require some risky brawling.
Naturally, the lower your HP, the easier it will be to fill out this achievement. All the best, too, as just about everything in your moveset improves the less HP you have. Not just the Guts ability, but Night Slash's crit chance, Obstruct's Defense reduction, Facade's piercing damage, even your Unite Move, Roadblock Rock, grants you invincibility when you're brought down to low HP. If you can manage the stress of defending the team while at death's door, this achievement should come easily to you.
There's a reason Guts as an ability emphasizes risk versus reward, as the extra Attack and Defense boost are useful as long as you stay alive long enough to use them. Remember that these boosts will linger for you if you restore your HP at the right moment. No need to stay at low HP for every single fight when you can heal it off.
Defenders do their best work when they're healthy and backed up by their allies.
-
Holowear
As a rowdy badger man beast empowered by spite and rock music, there are a few obvious Holowear choices we can come up with for Obstagoon. But I like to think outside the box and fill one's wardrobe with options for many occasions.
First up, Patrol Style Holowear gives Obstagoon the helmet and black armored vest of a patrol officer from the old country. You know, the one Galar is based off of. Then there's Warm Style Holowear that gives it a beret, a checkered ascot, and a brown overcoat for defending against the chilly weather. For a bit of extra flair, Sailor Style Holowear gives it a bandana, a scrappy blue and white striped shirt, and torn shorts with a chain holding it together. Or, you can get fancy instead with Fancy Style Holowear, dressing up Obstagoon in a top hat, monocle, peacoat, and a gilded pocket watch hanging out of its pocket. Lastly, for some sporty flair, Wrestler Style Holowear gives it a stylish eye mask, leather vest, leather shorts, and a mini cape flowing from its backside to make it look like a flashy heel.
Oh, and a Rock Star Holowear, which is obvious enough, and also very expensive, obviously.
-
Strategy
Defenders nowadays are judged by their longevity and not for their stats, which is understandable. The power level of the game has evolved quite a bit, to the point where old Defenders like Snorlax and Crustle can't quite keep up with their defending duties. But Obstagoon doesn't care about the troubles of old blood. Obstagoon don't give a crap.
With one powerful ability, Obstagoon's defending endeavors are amplified by the fight, making it capable of dealing big damage to the entire enemy team if the opportunity arises. It's not uncommon for Defenders to hit a 4 or 5 KO streak in the middle of battle, but that usually happens mostly during team fights around objectives. Or the enemy team got overconfident and made a bad push.
Either way, Obstagoon's value to the team is gauged by how well it can tank these hits for its allies during fights. To defend the team, yeah, but also to boost its Guts Ability. It's like if Flail Snorlax was its own pokemon, that's the kind of beast Obstagoon is, and the kind of Defender it plays to be.
Night Slash and Double-Edge are both powerful moves that get stronger the less HP Obstagoon has, but they really come into their own when upgraded. While Night Slash threatens opposing Defenders and All-Rounders, Double-Edge capitalizes on the presence of fragile Attackers and Speedsters. However, when upgraded, these effects heal Obstagoon, which triggers the extra healing of Guts. Less HP means more healing, which means that Obstagoon can maintain its offensive presence for longer on the battlefield. A Defender that can heal themselves can be annoying to face, but at least it's all conditional, unlike Dragon Pulse Goodra and Horn Leech Trevenant.
Obstruct is Obstagoon's calling card, but you can trade it in for the raw damage of Facade. While Obstruct can affect multiple enemies at once with hindrances and debuffs, Facade is straightforward in its ability to deal damage to enemies up close. Of course, Obstruct has the range advantage and can interrupt opposing pokemon while they're using moves, just like Clefable's Follow Me, but if you've got Supporters that are good at holding the enemy down for you, Facade will be very rewarding to hit. Oh, and the Stun effect of Double-Edge is long enough that you can land Facade for heavy damage. Something to consider.
Now, Roadblock Rock is one of the trickier Unite Moves to use for all the reasons that have already been explained. It prevents enemies without hindrance protection from passing through and it activates invincibility when the user is brought to low HP, granting them an Attack and Speed boost combined with Guts. It's easier to play around than it may seem, so it only has a few uses where its effect can be guaranteed.
Firstly, and most obviously, it can be used at or near objectives like Regieleki or Rayquaza to prevent the opposing team from establishing a foothold in the battlefield, as melee attackers can't get close to you. Ranged attackers can try and snipe the objective, but they can also damage you in the process, which brings you closer to the activation of Roadblock Rock's invincibility effect. If all goes well, your team will secure the objective and come out stronger for it. If not, well, maybe you can retaliate with Guts.
Outside of important team fights, Roadblock Rock can help you stall and distract an enemy from pushing or from retreating, but you'll need an ally to help you out in that regard. Like, if you want to keep the enemy team from rotating to the Bottom Lane, you can pester them with Night Slash or Double-Edge, but Roadblock Rock roots you in place and won't stop the enemy from just manually recalling. But with an ally helping you out, that becomes much more difficult, especially if it's an agile teammate like Blaze Kick Cinderace or Dodrio.
You're a Defender that can establish footholds in choke points, but you can't do everything by yourself. Remember, you're playing in a team, so be the obstacle your team needs.
-
And that's Obstagoon for Pokemon Unite! Man, time flies. This post was drafted pretty late into Generation 8, so I filled this season with plenty of Galarian Pokemon that I could muster a moveset for. Now that Gen 9 has come and gone, I'm gonna have to come up with plenty of movesets for the fresh faces from Paldea.
Well, that's a problem for the next season. Until next time, see ya!
2 notes
·
View notes
Text
No Season 3 Pokemon Unite Post Today...
Sorry everyone, but I'm gonna have to skip a week. The drafts aren't ready yet, and I need more time to finish the next one and a few others so that I can have a backlog. I should have more time this week, but I wouldn't cross my fingers.
There will be a post next week, though. In fact, here, I'll leave you with this hint.

#Pokemon Unite#maybe it's pretty obvious what the next one will be...#imagine if it was something else though#like#a different pokemon on his team than what you're expecting
1 note
·
View note
Text
Wobbuffet for Pokemon Unite!

Season 1
Season 2
Prev: Cradily - Hatterene - Tropius - Cacturne - Ditto - Weavile - Ogerpon - Coalossal - Gogoat - Galarian Slowbro - Luxray - Breloom - Uxie, Mesprit, & Azelf
I have something to confess. I didn’t play Pokemon Gold & Silver when it came out, so I wasn’t as fond of Gen 2 as I was Generation 1 and 3. I grew up around pokemon fans that regarded Gold & Silver as the best games in the series, and I couldn’t fathom it. I will admit, however, that a lot of the designs that came out in those games were some of the slickest, coolest, and wonkiest ones ever, from Scizor to Heracross, and from Girafarig to Miltank, the designs were all over the place, and they gave the games their own sort of charm to them.
The weirdest one, by far, would be Wobbuffet, a beloved and wacky pokemon adored by all. Many would like to see this pokemon join Unite, so let’s see if it has what it takes to take a hit and return the damage on Aeos Island.
-
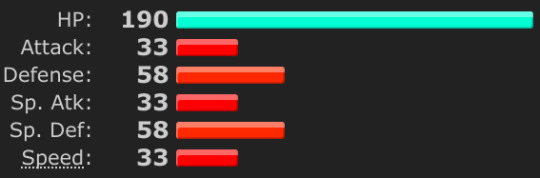
While Wobbuffet has the most impressive HP stat we’ve seen so far, it is ultimately let down by literally everything else. Pitifully low defenses makes that gargantuan HP number weaker than it actually is, nevermind the awfully low offensive stats and Speed. Unfortunately, Wobbuffet is a gimmick pokemon through and through, as its stats and moves are designed to revolve around its defining trait; it’s ability to take a hit and then return it back at the opponent. While this has had mixed results in the mainline games and their competitive formats, this translates to one single niche in Pokemon Unite, and that would be the role of a...
Defender
-
Basic Attack - Melee/Sp. Attack
Each time the pokemon receives damage from a basic attack, the pokemon gains a basic attack counter. The pokemon can only use basic attacks while it has any amount of basic attack counters on it, but each use reduces the counter by 1. Each time the pokemon damages an enemy with a basic attack, the pokemon restores a small amount of HP. The basic attack counter will also increase if the pokemon is in the path of an allies’ basic attack.
The pokemon’s basic attack counter increases by one each time it receives a basic attack from opposing pokemon, Wild or otherwise. This basic attack counter has no limits, but resets when you are KO’d.
The basic attack counter also increases when the pokemon is in range of basic attacks used by teammates.
The basic attack counter is displayed by a boxing glove graphic on the HUD, followed by a number.
The basic attack has the pokemon wobble back and forth repeatedly, damaging all nearby enemies. With mashing, the pokemon can unleash 4 attacks a second. As with most basic attacks, Wynaut and Wobbuffet cannot move while they are stuck using their basic attacks.
When damage is dealt, the user’s HP is restored by 2.5% each time.
Wynaut and Wobbuffet start each round and respawn with 0 basic attack counters.
Did you know that Wobbuffet never throw the first punch in a fight? Because of their gimmick, they spend the battle tanking hits in order to retaliate against the enemy, using their own power against them. As such, while Wobbuffet can hit really fast and hard and can even heal itself with its basic attack, it is limited by its self-imposed pacifism that prevents it from getting violent in the first place.
Now obviously, it is in the enemy team’s best interest to eliminate all opposition, so you are going to get hit. But this can become mortifying when you run out of basic attacks to throw and you can’t defend a Goal Zone from being broken. Luckily, your basic attack can increase when an ally uses their basic attack on you, deliberately or otherwise. It doesn’t hurt you to receive their attacks, but it still counts as a hit, which increases your basic attack counter.
However, you need to keep in mind that your basic attack will only increase when receiving basic attacks, not opposing Moves. Yeah, Attackers and Speedsters rely on their basic attack to get the most damage, but even as a Defender, you will take more damage than you can counter, meaning you can be overwhelmed at the start of a fight.
Luckily, you have a very disruptive ability that turns what would be a liability of a basic attack into one of your greatest strengths.
-
Ability: Shadow Tag
When an opposing pokemon enters the user’s range, that pokemon will be Immobilized and become unable to use their moves for a short time. Afterwards, Shadow Tag cannot affect the enemy for a while, but receiving damage from your basic attack will reduce the duration of this effect.
Shadow Tag activates when enemies come within melee basic attack range of the user. Upon activation, the enemy will become Immobilized, which prevents them from moving or using Dash Moves, and they are prevented from using Moves while Immobilized. This effect lasts for 3 seconds.
After Shadow Tag wears off, the enemy cannot be affected again for 30 seconds. This is shown with a black bar underneath the enemy’s shadow, counting down until they can be affected again. This countdown bar can be reduced by 1 second for each basic attack you deal to the enemy.
Shadow Tag has no effect on Wild Pokemon.
If an opposing pokemon runs into you and sees that you have no basic attacks to use, then the enemy will mistakenly decide that you are EXP fodder. They will throw their moves at you and stay at arms’ length away from you, whittling down your HP as they sit comfortably on their side of the field.
Well, that’s when they make the biggest mistake of their life. With the Shadow Tag ability, all you need is to confirm the presence of an enemy and then approach them with malicious intent. When Wobbuffet gets within striking distance of an enemy, Shadow Tag activates, not only incapacitating the enemy by restricting their movement, but it will also prevent them from using Moves. When that happens, the enemy will, in a panic, mash the basic attack button, hoping and praying that their allies are nearby to stop you from delivering all of those pent up counterattacks you’re storing.
Shadow Tag is Wobbuffet’s most powerful ability and is one of the strongest in the game. Because Wobbuffet relies on receiving basic attacks to use its own basic attack, the simplest way to counter Wobbuffet is to just not use basic attacks at all. Shadow Tag as an ability removes this counterplay, forcing the enemy to sit in place and spend some quality time with you. As a Defender, this is a very powerful ability, as you’ve taken the flow of battle away from the opposing pokemon.
Similar to other abilities like Wigglytuff’s Cute Charm, Shadow Tag cannot affect the same enemy again for 30 seconds, with a visible meter displayed by the affected pokemon’s shadow. Unlike Wigglytuff’s Ability, Wobbuffet can influence this cooldown by simply using its basic attack against the affected pokemon. Each hit of your basic attack reduces the cooldown of Shadow Tag, and since you can launch 4 hits in a second with your basic attack, 1 second cashes out to 5 seconds of cooldown reduced. After 4 or 5 seconds of constant basic attacks, the Shadow Tag resets and can be used on the affected pokemon once again.
I know this seems like another ability meant to ruin Melee attackers, but to be fair, Shadow Tag would absolutely ruin ranged attackers all the same. Wobbuffet has to actually approach the target to affect them, so those who don’t want to get caught simply have to keep their distance. And guess what? That’s exactly what a Defender is supposed to do.
-

At the start of the game Wobbuffet will start out as Wynaut. You can choose between Splash and Amnesia as your first move. By Level 2, you’ll have learned both.
-
Move 1: Splash (Melee)
The pokemon jumps forward, pushing back enemies slightly upon landing. The move can be charged, during which the damage and Shove effect increases the more attacks the user receives while charging. 8s cooldown.
Splash is a short ranged jump that damages enemies slightly and Shoves enemies a very short distance away.
The move can be charged indefinitely, but it cannot be cancelled. While charging, Splash’s damage increases by 10% for each attack received, having no limit. Wynaut cannot move while charging and the attack’s designated direction cannot be changed.
I always feel a little weird giving the move Splash some utility when it specifically isn’t supposed to have any when used in the main games. But you know what? We can gaslight ourselves into thinking Charizard and Duraludon are physical attackers and that Leftovers is a good item or that the MVP rating means something, so let’s just say that Splash, when used by Wynaut, is a baby’s first counter attacking move.
By itself, Splash is a pitifully weak dash move that only sends you forward a very short distance. But because Wynaut is equally capable of learning how to counter moves, it has some shocking resilience when it comes to taking blows. It’s no surprise that it can take it and dish it out when it’s training to become a Wobbuffet, so don’t be shocked when it KO’s you while it’s using Splash to practice throwing its weight around.
You can charge Splash to absorb hits, which increases the damage you can deal when Splash is unleashed. Taking hits doesn’t increase the distance you can jump, but there’s no limit to the damage you can store, so use the move boldly when the enemy goes on the offensive.
But, again, the enemy can choose not to engage, which is acceptable for a Defender, but not when they’re stalling for time and backup. If you want to get in on the offensive quickly, you’ll also need to learn Amnesia.
-
Move 2: Amnesia (Buff)
The pokemon forgets something, boosting its Defense and Sp. Defense for a short while, and gains 8 basic attack counters. 10s cooldown.
Amnesia boosts your Defense and Sp. Defense by 75% for 4 seconds.
Back in my day, Wynaut came out of the egg with 3 moves, maybe 4. Apparently Amnesia is a very recent addition to its movepool, which is whatever to me. At least it makes the early game easier.
For a starting move, Amnesia grants a very powerful defensive boon. 75% Defense and Sp. Defense is insane for a move you can know by Level 2, but it’s held back by the very short 4 second buff duration. It’s very useful when combined with Splash, as the move builds up damage by the number of hits received, not their strength.
It also comes with some free basic attack counters. Apparently Wynaut forgets that it wasn’t hit? And that’s enough for it to get 8 whole basic attack counters. That may seem like a lot, but remember that you can throw out up to 4 hits per second with quick enough button mashing, so it’s not a very bountiful boon. But hey, at least it’s something. At least you’ll be able to muster up some basic attacks for when the enemy team is threatening to score points in your Goal Zone.
Wynaut is a quick learner, though, as after a few Levels, it will very quickly evolve into the much sturdier Wobbuffet.
-

At Level 4, Wynaut evolves into Wobbuffet. At the same time, Splash becomes either Counter or Mirror Coat.
-
Move 1a: Counter (Dash)
The user toughens up its body in preparation for a charge attack. While charging, the pokemon builds up damage and basic attack counters from all Attack based Moves and basic attacks. When Counter is unleashed, the user dashes forward, dealing damage to all enemies along the way. The damage dealt by Counter increases the more damage the user received and the more basic attack counters generated while charging. If the damage dealt by Counter is high enough, enemies will be Stunned. 8s cooldown.
At Level 10, Counter becomes Counter+.
Increases the damage build up. The pokemon becomes Unstoppable while charging.
Counter sends Wobbuffet dashing forward in the designated direction. Wobbuffet charges Counter for 3 seconds, during this time you can move at reduced Movement Speed, though the designated attack direction will not change.
Counter stockpiles 50% of all damage received while charging the move. When unleashed, all stockpiled damage is released when this move hits an enemy. Counter+ increases this build up to 75%.
Extra damage is dealt for each basic attack counter made, piling on an additional 10% for each one.
If the damage dealt by Counter or Counter+ exceeds 30% or more of the enemy’s max HP, they will be Stunned for 1.5 seconds.
Counter will only stockpile damage and generate basic attack counters from Attack based Moves and basic attacks. Unite Moves will not affect Counter, even if it was used by an Attack based pokemon.
High risk, high reward. That is the core philosophy of a move like Counter.
As Wobbuffet is famous for taking hits and returning them twofold, Counter is the natural evolution of a move like Splash...I think. By anticipating the opposing team’s offensive push, a well timed Counter can be disastrous for the enemy, as Wobbuffet will not only absorb all the damage dealt, but also become stronger for it afterwards.
Counter works by absorbing half of the damage Wobbuffet receives from opposing pokemon’s Attack based Moves and basic attacks. It won’t absorb damage from Unite Moves, but more on that later. When the move is fully charged, Wobbuffet rushes forward, unleashing all of that stockpiled damage back onto the opposing team. If the resulting damage deals more than 30% of the target’s HP in one hit, the enemy will be knocked silly and will be Stunned for quite a while. You can expect to have an easy time Stunning opposing Attackers and Speedsters due to their low HP, but opposing Defenders and All-Rounders will feel almost resilient to this effect, especially if you don’t absorb enough damage.
But if you do manage to Stun the enemy, then great news! Counter generates basic attack counters from all Attack based Moves and basic attacks, so you can score in some cheap shots while the enemy is dizzy and restore some of that lost HP back.
Oh, but you do have to take those hits in the first place, huh? Counter may seem like a saving grace for you and your team while you’re behind on EXP, but 3 seconds is longer than it seems when it comes to absorbing damage. The Level difference will do you no favors if you’re depending on Counter for a cheap KO, as it’s entirely possible to get KO’d yourself before the move comes out. You can fortify yourself with Amnesia during the charge, but you can’t change the charging direction of Counter once it’s chosen, so you better hope the opposing Attacker doesn’t move too far away from the fight.
At this level, hindrances and obstacles aren’t all that common yet, but they can seriously impede your counterattacking efforts. Counter does not have any hindrance immunity until it upgrades at Level 10, so watch out for stray projectiles like Cramorant’s Hurricane or Mr. Mime’s Confusion or even Crustle’s Rock Tomb.
If range is the issue, then Mirror Coat is the solution.
-
Move 1b: Mirror Coat (Sure Hit)
The user gathers up light energy, preparing to unleash it at all nearby enemies. While charging, the pokemon builds up damage and basic attack counters from all Sp. Attack based Moves and basic attacks. When Mirror Coat is unleashed, psychic shards are unleashed upon all enemies within range. The damage dealt by Mirror Coat increases the more damage the user received and the more basic attack counters generated while charging. If the damage dealt by Mirror Coat is high enough, enemies will be Stunned. 8s cooldown.
At Level 10, Mirror Coat becomes Mirror Coat+.
Increases the damage build up. The pokemon becomes Unstoppable while charging.
Mirror Coat locks on to all visible pokemon in range and damages them with flying psychic shards after 3 seconds of charging. Wobbuffet can move while charging.
Mirror Coat stockpiles 50% of all damage received while charging the move. When unleashed, all stockpiled damage is released when this move hits an enemy. Mirror Coat+ increases this build up to 75%.
Extra damage is dealt for each basic attacker counter made, piling on an additional 10% for each one.
If the damage dealt by Mirror Coat or Mirror Coat+ exceeds 30% or more of the enemy’s max HP, they will be Stunned for 1.5 seconds.
Mirror Coat will only stockpile damage and generate basic attack counters from Sp. Attack based Moves and basic attacks. Unite Moves will not affect Mirror Coat, even if it was used by a Sp. Attack based pokemon.
High risk, high reward. That is the core philosophy of a move like Mirror Coat.
As Wobbuffet is famous for taking hits and returning them twofold, Mirror Coat is the natural evolution of a move like Splash...hey wait a minute! This is functionally identical to Counter, isn’t it? Well, yes, since Counter returns all physical damage taken, Mirror Coat is the special opposite, and is reflected as such in Pokemon Unite.
While Counter is a Dash Move, Mirror Coat is a Sure-Hit attack that requires visible enemies in range. This may seem like it makes Counter the weaker of the two, but Mirror Coat will not be able to target and damage enemies that are in hiding or invisible. Other than that, the plan of attack is the same. Simply charge Mirror Coat when big damage comes your way, and you’ll retaliate with painful psychic blasts.
The problem here is that, since you can only have one of either Counter or Mirror Coat, certain fights against balanced teams become unwinnable for you. If the entire opposing team is rocking all Attack based pokemon, then Counter is a no brainer, same goes for Mirror Coat against Sp. Attack based teams. But if the opposing team is balanced, then the move will become useless depending on who you run into. Counter and Mirror Coat will only absorb damage from their respective ends of the damage spectrum, so don’t get caught fighting the wrong enemy by yourself. Try to have a teammate nearby that can cover for your weakness.
Wow, a Defender with counterattacking moves that can be easy to counter. What a world you live in, Wobbuffet.
-
At Level 6, Amnesia becomes either Safeguard or Encore.
-
Move 2a: Safeguard (Buff)
The user casts a protective field at its location, greatly reducing damage received and prevents hindrances from affecting you and your allies while within the area of effect. HP restoring effects are also strengthened while Safeguard is active. Your allies restore a bit of HP when you gain basic attack counters from their basic attacks. 11s cooldown.
At Level 12, Safeguard becomes Safeguard+.
Extends the duration of the protective field and also expands its area of effect.
Safeguard creates a veil of light that reduces damage received by 75% and prevents hindrances from affecting you and your allies. Safeguard can only protect allies that are within the area of effect. Safeguard lasts only for 5 seconds.
Your HP restoring effects are also increased by 50%, affecting items like Potions and Drain Crowd and Shell Bell, as well as the HP restoring effects of your basic attack. Allies restore 5% of their HP when they generate basic attack counters for you.
Safeguard+ extends the duration of the move to 6.5 seconds and increases the size of the area of effect by 30%.
Because of how one-note Wobbuffet’s defensive capabilities are, it’s ability to support the team with timely KO’s makes it feel like a Supporter at times. Now, I won’t hesitate to say that this is similar to Umbreon, where a Defender can pretend to be a Supporter with one move, but given Wobbuffet’s pathetically shallow movepool, I think it gets a pass here.
All the best, Safeguard is a very powerful defensive boon for you and your allies. While it isn’t any stronger for you over Amnesia, it does share that defensive buffer with allies. Safeguard does protect you and the team from hindrances, so already this is such a great effect to have when Stuns and Hindrances are everywhere in this meta. It does confine you and the team to a specific space, but it is literally the safest spot on the map, so better make yourself at home.
It also makes for a nice retreat, as Safeguard also amplifies healing effects used within the area of effect. This can be anything from the Goal Zone passive healing, to items like Potion and Drain Crown. Most notably, Wobbuffet’s own basic attack comes with healing, so if the opposing team decides to take the fight inside your humble abode, you’ll have the advantage while the barrier is up.
Speaking of healing, remember when I said that ally basic attacks contribute to your basic attack counter? Well, in order to incentivize teammates into buffing you up, Safeguard will also heal allies when they add basic attack counters to you. This favors ranged attackers the most, as they are able to provide cover fire while within the safety of Safeguard.
The shield only lasts for 5 seconds though, a little longer with Safeguard+. After that you have to wait for the move to come off of cooldown, which can take 11 seconds in total. Safeguard isn’t something you can put down at the start of the fight, as the healing and defensive boon it provides is way too good to squander. Although, if you anticipate burst damage coming your way, Safeguard may be your only recourse when the fight starts.
Burst damage is so annoying. If only you could take the option away from the enemy. Show of hands.
-
Move 2b: Encore (Hindrance)
The user gives an opposing pokemon a round of applause, showering them with praise and cheer. While the opposing pokemon is being praised, that pokemon can only use basic attacks. The damage they deal to all opposing pokemon is reduced, except when they are used against the user. The user’s basic attack counter increases by twice the normal amount when they receive damage from a praised opposing pokemon’s basic attack. 7s cooldown.
At Level 12, Encore becomes Encore+.
Also reduces the praised opposing pokemon’s Movement Speed.
When Encore is used, a special effect of applause, cheers, confetti scattering around the target, and a spotlight all play and highlight the affected opposing pokemon.
While praised, the affected pokemon can only use basic attacks or their Unite Move. Encore lasts for 7 seconds.
The damage the praised pokemon deals to Wild Pokemon and teammates is reduced by 50%, but remains 100% when targeting the user.
Your basic attack counter doubles with each hit received while Encore is in effect.
Encore+ reduces the target’s Movement Speed by 30%.
Give the enemy a big round of applause. Their aptitude in pressing one button is to be recognized, and must be praised! Cheer, cheer! Mash that basic attack button!
At the moment, there are only two moves with the effect of forcing the enemy to use solely their basic attack; Clefable’s Follow Me and Sableye’s Confuse Ray. Neither effect lasts for as long as Wobbuffet’s Encore, nor do they drastically reduce the enemy’s offensive foothold in a fight. It’s no coincidence that these effects come from Supporters, since Wobbuffet’s other Move makes it feel like a Supporter itself. For what it's worth, Encore provides a lot of value to the team, though mostly to Wobbuffet.
The praise effect of Encore affects only one opponent at a time, so it can be difficult to take advantage of in a fight over an objective. However, Encore lasts for as long as the move’s cooldown runs for, so you can immediately use Encore again as soon as the effect ends. Depending on who you spotlight with this move, it can completely sap away the enemy’s momentum, since Encore not only forces the victim to use only basic attacks, but those basic attacks deal half damage to everything but Wobbuffet itself.
Obviously, the counterplay to this would be to target Wobbuffet with basic attacks, but Encore causes Wobbuffet’s basic attack counter to double with each hit received. Since Wobbuffet gets stronger the more hits it takes, the only way to fight Encore is to not fight at all. Just disengage and retreat from the fight, which is exactly what Wobbuffet as a Defender wants you to do. Oh, but if Wobbuffet uses Encore+, this also becomes harder to do as the move gains a Movement Speed debuff. And don't get me started on how effective combining Encore with Shadow Tag can be, it almost feels cheap when you land it just right.
Now keep in mind, Encore does not prevent the enemy from dealing damage, and it especially doesn’t prevent them from using their Unite Move. Before you learn your Unite Move, this is something you’ll have to watch out for, especially if you Encore the opposing Jungler who will most likely have their Unite Move ready.
If you anticipate the opposing Unite Move, you can do something about it. Yep, that’s right. Wobbuffet, as a Defender that can counter anything, can even counter Unite Moves with its own.
-
Unite Move: That’s The Way It Is (Buff/Sure Hit)
The user becomes empowered by Aeos Energy. While empowered, the user receives reduced damage from opposing Unite Moves. At the end of the move, a concentrated ball of Aeos Energy is fired at all opposing pokemon that damaged the user with their Unite Moves. The more damage the user received, the more powerful this attack becomes.
Wobbuffet’s Unite Move, That’s The Way It Is, reduces incoming Unite Move damage by 75% and lasts for 8 seconds.
Wobbuffet is completely Unstoppable while the Unite Move is active.
After 8 seconds, Wobbuffet unleashes a homing attack on all opposing pokemon that damaged it with a Unite Move, regardless of their range. Wobbuffet cannot be interrupted during this attack. Enemies that were buffed by opposing Unite Moves will not be targeted.
That’s The Way It Is deals 100% of the original damage received back to all targeted pokemon.
Did you know that Wobbuffet’s Japanese name, Sonans, can be literally translated to ‘That’s the way it is!’? Supposedly this name and its habit of placing a hand on its forehead is in reference to a famous Japanese comedian, combining to create a niche pokemon with a niche archetype akin to the phrase ‘that’s the way the cookie crumbles’. I suppose it’s only natural to lament losing to bad karma, when all you can do is sigh and accept the result.
After all, when you go up against a Wobbuffet, all you can do is expect to have your power turned against you, especially when it uses its Unite Move, That’s The Way It Is. While others use their Unite Move to deal big damage or to save their teammates, Wobbuffet sticks mainly to its ideology of never hitting first. By harnessing Aeos Energy, it gains the ability to counter even Unite Moves, turning all of that power back against the attackers.
Because of how much of a game changer Unite Moves can be, they're very easy to counter when the fight takes place near important objectives like Regieleki or Rayquaza. You can expect the enemy team to try and desperately secure the objective based on their positioning. And even if they choose not to use their Unite Move, that puts you and your team in the advantage if they aren't willing to risk getting their Unite Moves countered. A good offense is a great defense, as they say.
The one thing to note about That's The Way It Is is that certain Unite Moves won't trigger the counterattack effect. Some Unite Moves will buff the user, like Gengar's Phantom Ambush or Machamp's Barrage Blow, but they can be followed up with the actual Unite Move attack, which can be countered. But then there are straightforward buffs that do not trigger That's The Way It Is and its counterattack, such as Goodra's Right As Rain or Tyranitar's Tyrannical Rampage. As well as other supportive Unite Moves such as Comfey's Flowery Fields Forever, Mimikyu's Play With Me bypasses Unstoppable and forces Wobbuffet's Unite Move to end, proving to be the one and only counter to this counter.
The number of Unite Moves you can't counter with That's The Way It Is is very small, but there are enough of them to make a team. This would be the worst thing to see if Wobbuffet ever got into the game. Good thing Wobbuffet isn't real and this is all a post made for fun, eh?
-
Achievements
KO 10 opposing pokemon in a single game using either Counter or Mirror Coat.
There are talented people out there that can do many things well, and then there are less experienced people that can, at best, do only one thing. For those that can only do one thing, you must learn to do it very well. Fear not the man who has practiced 10,000 kicks. Fear the man who has practiced one kick 10,000 times.
Pokemon fall under this dichotomy all the same, and Wobbuffet falls into the latter scope of the spectrum here. As a pokemon, it can only do one thing, but it is terrifying how well it can do it. In Pokemon Unite, it brings its experience of taking his and retaliating in kind to the battlefield, and as such, its achievement reflects this.
10 KO's in a single match is quite the tall order, even for a Defender. However, both Counter and Mirror Coat can target and damage enemies that weren't even involved in the fight, making the moves easier to use in the heat of battle. If you absorb a big hit, you can get an easy KO by keeping the squishy enemies in range of the impending counterattack.
This becomes even easier when Counter and Mirror Coat upgrade, gaining Unstoppable. Yeah, these counterattack effects can be snubbed by a well placed hindrance, so if you want to have a solid shot at earning this achievement, it's in your best interest to level up as soon as possible.
Defenders can't do their job well if they're behind in experience.
-
Holowear
Now, I do need to point at that, while Wobbuffet can be of either gender, the one I've chosen for this post is female, as shown by its bright pink lips. No particular reason for that decision on my part, I just think it's really funny that, when they started updating pokemon models to have sexual dimorphism in Gen 4, Wobbuffet, of all creatures, got some face paint, ha ha.
Now that we've got that out of the way, Dancer Style Holowear gives Wobbuffet a flashy dress and big dramatic feathers that enhance its back and forth motions. Training Style Holowear puts Wobbuffet in a sturdy piece of headgear, some cushy body armor, and shoulder pads to make it look like your average sparring partner at the gym. But Wobbuffet works really well as a bodyguard, so Stoic Style Holowear gives it big black glasses, a black suit, and a radio piece on where I think its ear is. With Concierge Style Holowear, Wobbuffet wears a fancy tuxedo suit, a musical note headpiece, and wields a conductor's baton in one hand, since it's a profession which requires a lot of swaying. And finally, Knight Style Holowear covers Wobbuffet head to toe in silver armor plating, with a leather cloth covering the breastplate and stylized with the pokeball symbol.
Thanks to the pokemon anime, we know that Wobbuffet can be made to look very fashionable, so just about any wardrobe will work for our wobbly wisecracker.
-
Strategy
As a Defender, one thing stands out with Wobbuffet when you compare it to its other impregnable ilk, and that would be how quickly it reaches its full potential. Yes, it evolves at Level 4 like most other Defenders, but it acquires its full kit by Level 6, and fully upgrades at Level 12, requiring far less EXP than a Defender typically would need.
This is because of Wobbuffet's glaring weakness when it comes to securing EXP through Wild Pokemon. If it respawns after losing a battle, it'll have a miserable time trying to KO Wild Pokemon because of how slow their basic attacks are and how weak their main attacks are. Counter and Mirror Coat both work regardless of what moves Wild Pokemon use, but the rate of damage Wobbuffet can absorb is really low, so it's better to rely on getting EXP through teamfights and helping allies secure objectives by defending them.
To that end, Wobbuffet must master its matchups against the enemy team with either Safeguard or Encore. Choosing between Counter and Mirror Coat is a matter of understanding the attack spectrum of the opposing team, so I won't insult your intelligence when I say you should run Counter when the opposing team is running physical attackers. Instead, you should weigh the pros and cons of running either Safeguard or Encore over the other, as both moves have their advantages and disadvantages.
Because Safeguard creates a safe space for you and your allies, it's a great countermeasure against persistent enemies, physical or ranged. It's best used in tandem with ranged attackers of your own and you want to preserve your Goal Zones, but it's also pretty handy for your Melee attackers when they're right in the middle of a team fight with an objective, like Regieleki. It's not as useful in the offensive push, but it can cover a retreat thanks to the barrier blocking hindrances from affecting you and your team's escape.
As good as you are at taking hits, your job as a Defender is to guard allies who may not be as resilient as you, so Encore is an effective detriment to burst damage from the opposing team. It singles out an enemy and locks them into only using their basic attack, so already it stops savage move combos like Gengar's Sludge Bomb and Hex. However, it also reduces the damage they deal to all other pokemon except against you, which is handy to protect the team and also great for generating basic attack counters. It may not be as useful during a team fight, but if you can hit an enemy who will cause the most problems with their moves, you'll bring a lot of value to your team's offensive momentum, especially if you tag them with Shadow Tag at the same time.
Regarding the merits of teamwork, it's important to you and your team that your basic attack counters are always stocked up really high. You can't actually do anything without any basic attack counters, so you'll be a sitting duck if the enemy team reads into your unarmed disposition. Remember, your teammates can give you basic attack counters by keeping you in range of their hits, so brawls with a melee attacker ally can keep you supplied with hits while fending off the enemy team.
There's also the Shadow Tag ability you need to utilize. Normally, Defenders can get taken by surprise when ambushed by enemies in hiding, but Shadow Tag can snag enemies hiding in Tall Grass, so that can dissuade an assault if you're approaching their position unknowingly. After tagging them, Shadow Tag cannot affect an enemy again for 30 seconds, but this timer can be reduced by your basic attack, of which you can throw 12 hits with your basic attack while the enemy is trapped. You can handle Melee attackers easy, but against ranged attackers, all you need to do is put yourself within melee range to hold them down and pummel them, with or without the assistance of an ally.
One last thing. Because of Wobbuffet's sheer power in its counterattacking abilities, opposing pokemon will not hesitate to use their Unite Moves against you to deal big damage and weaken you before the big team fight happens. Your Unite Move, That's The Way It Is, has a very low charge time, so it gives you ample opportunities to counter these wayward Unite Moves heading your way. However, don't go wasting the Unite Move wantonly, as it'll only deal damage if you actually intercept opposing Unite Moves. If the enemy sees you powered up with That's The Way It Is, they can easily keep their finger off the Unite Move button until yours runs out.
With all of this in mind, does Wobbuffet actually have a shot in Pokemon Unite? I don't see Wynaut.
-
And this has been Wobbuffet for Pokemon Unite! I was originally gonna scrap this post because I couldn't come up with a moveset I was happy with, but when I started getting ideas for a pokemon to abuse an attack absorbing counter effect, Wobbuffet came back to my head space. It was quite literally made for this archetype, so I was happy enough to rework the entire post just to get it in line.
Phew, that'll be it from me for now. See ya later!
1 note
·
View note
Text
Uxie, Mesprit, and Azelf for Pokemon Unite!
Season 1
Season 2
Prev: Cradily - Hatterene - Tropius - Cacturne - Ditto - Weavile - Ogerpon - Coalossal - Gogoat - Galarian Slowbro - Luxray - Breloom
Knowledge, Emotion, Willpower. These are the mental cornerstones of sentience, and proof that to know is to exist. I think, therefore I am. To deny oneself one of these facets is to reject the idea of your own impermanence. Our fleeting lives are guided by these powerful forces, so to embrace them is to truly become human.
So what is the meaning of Uxie, Mesprit, and Azelf coming to Pokemon Unite? We must take an introspective look at this trio.
-

Starting things off, these are the base stats of Uxie, which are quite formidable for a Psychic Type. With very high base defenses and a decent Speed stat, Uxie is fitted for quick defensive maneuvers like Reflect and Stealth Rock. It lacks the offensive power to retaliate, but it's reliable in its fortitude, taking hits when necessary. It feels like it would make for a very powerful Defender by itself.

Meanwhile, Mesprit's stats are a lot more balanced, nearly resembling the mythical 100 stats across the board. They've sacrificed a bit of HP and Speed for slightly higher offense and defense, though to what end, I'm not entirely sure. It does mean that Mesprit can do almost anything that you'd require of it, whether it be to hit hard with Psychic or Zen Headbutt, support the team with Stealth Rock or Knock Off, take hits for an ally and return fire with Pain Split or Encore, or even create openings with U-Turn or Thunder Wave. Mesprit is very varied in what it can accomplish for the team, almost like a Supporter.
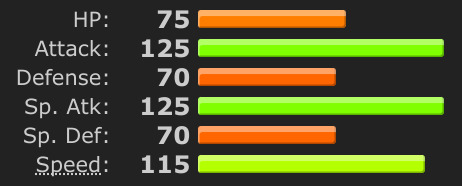
At the far end of the spectrum, Azelf boasts an incredibly high pair of attacking stats along with high Speed. It specializes in hitting fast and hard with such moves like Psychic, Fire Blast, Thunderbolt, Energy Ball, Ice Punch, Shadow Ball, or even Explosion. Azelf would clearly be made for the role of an Attacker, or maybe even a Speedster, but as it shares a license with Uxie and Mesprit, who all play drastically different from Azelf, one singular archetype would not suit all three. As such, Uxie, Mesprit, and Azelf, with their powers combined, all fit into the role of an...
All-Rounder (EX)
-
Basic Attack - Ranged/Sp. Attack
The pokemon launches a psychic blast from the gem on its forehead, dealing damage to enemies and fills them with a strange power. When this strange power is full, affected enemies will be linked to the user with a psychic link, gradually decreasing one of their stats while the link is maintained. When linked to Uxie, the target's Attack and Sp. Attack decrease. When linked to Mesprit, the target's Movement Speed decreases. When linked to Azelf, the target's Defense and Sp. Defense decrease. If these effects reach full power, the Levitate Meter begins to fill up faster. Linked pokemon receive increased damage from your basic attack and receive an additional effect.
After an enemy is hit 3 times, a psychic link is made between the user and the target. This link will persist for as long as both the user and the target are on screen and will only disappear if either pokemon is KO'd or the distance becomes too great.
Each of the three pokemon inflict a different effect on linked enemies. Uxie will decrease the target's Attack and Sp. Attack by 5%, increasing by 2% each second, maxing out to 25%. Mesprit will decrease the target's Movement Speed by the same amount and rate. Azelf will also affect the target in this way, decreasing the target's Defense and Sp. Defense.
If a link is maintained against an enemy for 10 seconds, the effect becomes maxed out and the Levitate Meter begins to fill at an increased rate for each fully powered link.
Linked pokemon receive 150% more damage from your basic attack. In addition, Uxie will heal HP relative to the damage dealt, Mesprit will gain 2% Unite Move Charge, and Azelf has a 30% chance to Stun enemies for 0.5 seconds.
Legendary pokemon are as strange as the myths about them, so trying to understand the full scope of their power can be a bit taxing on the brain. There's also the fact that there's three of them you can control, so it's gonna take a bit of wisdom to understand it all. Maybe even some emotion too, if you're willing to read through.
When the basic attack damages an enemy, they are filled with a 'strange power' which is just a fancy way of saying that it applies a mark to affected pokemon. After 3 hits, the mark clears and a psychic beam is made, linking the user to the affected pokemon. This is where things start to build up, as this beam starts debuffing the affected pokemon. Depending on who's in control, the linked enemy will suffer a gradually decreasing defense power, mobility, or offensive power, and can only break the link by KO'ing the opposing pokemon or by moving as far away from the offender as possible.
It's for the best that they move away, because even after all of this, Uxie, Mesprit, and Azelf still get more out of this simple basic attack. They can deal increased damage to enemies linked by the beam and each basic attack gains an additional effect when specifically damaging linked enemies. Uxie gets some healing and Azelf has a chance to Stun with their basic attack, but Mesprit gains a tiny bit of Unite Move Charge, which is pretty bonkers. I mean, the former two you can expect to apply to a traditional Defender or Attacker, but Mesprit has a way to accelerate the Unite Move Charge with just a basic attack.
It's not mentioned here, but the base damage of the basic attack is pretty high, atypical of other pokemon that rely on conditional boons for extra damage like Cinderance or Dodrio. This means that even the weaker oriented Uxie can expect to deal unexpectedly high damage with its basic attack, so imagine what Azelf would be capable of once the basic attack psychic beam is established.
There's another tidbit here about something called the 'Levitate Meter'. Actually, we haven't even talked about how this trio would be controlled in Pokemon Unite. We're getting to that, we gotta cover the Ability next.
-
Ability: Levitate
The pokemon generates psychic power, filling up the Levitate Meter and increasing its Movement Speed and Sp. Attack the more power it attains. When the pokemon is full of psychic power, its Sp. Attack increases drastically as the psychic power drains. When the pokemon has exhausted its psychic power, the user switches with the next pokemon in waiting.
Levitate fills a meter over time, posted right under its HP Bar on the HUD. The user's Sp. Attack and Movement Speed increase equal to the percentage of the Levitate Meter filled, i.e. 50% filled equals 50% boosted Sp. Attack and Movement Speed.
The Levitate Meter takes 20 seconds to fill.
When full, Levitate boosts your Sp. Attack and Movement Speed by 150%. However, it will also start to deplete, running out after 7.5 seconds. The Sp. Attack and Movement Speed boost will be unaffected until it runs out. When that happens, Uxie will switch with Mesprit, Mesprit will switch to Azelf, and Azelf will switch back with Uxie. The Levitate Meter starts filling up all over again.
The Levitate Meter resets when the user is KO'd. If the Levitate Meter is full when you are KO'd, the meter resets and the user will have switched places with the next pokemon in waiting.
So that's the main gimmick of this trio. Instead of playing as all three entities at once, Uxie, Mesprit, and Azelf share a license and take turns through the Levitate Ability and through what we call the Levitate Meter. It may seem nifty at first, but there isn't anything in the description that defines how to control the power in the first place. It's almost written as if you can't control when the switching occurs, and that you'll only have about 20 seconds to play as either one of the trio before a mandatory switch is forced.
Weird. Anyway, the Levitate Meter is the main Ability of the trio and is an effect that all three share. It slowly fills up over time, increasing the Sp. Attack and Movement Speed of the user the more it fills up. It'd be nice to take advantage of these power boosts in more controlled situations, but you'll have to deal with the whimsical fluctuations of psychic forces beyond your control. Well, you can, but more on that later.
When the meter does fill up, the overall power boost is much greater, but the meter becomes a timer, giving you only 7.5 seconds to run wild with extra boosted Sp. Attack and Movement Speed. When it runs out, the pokemon trades places with the next member of the trio, having to gather that psychic energy all over again. 20 seconds is a while to wait for the Meter to fill up, so if there's an important team fight happening, it's better to wait for the Meter to fill a bit before engaging. Remember, these three have a really high Sp. Attack stat, so stalling to get the power boost will always be worth it.
In case you're wondering, yes, the trio all share the same HP bar, because it wouldn't be fair to the opposing team otherwise. Yes, it does seem kind of weird to jump from the frail Azelf to the bulky Uxie with the same HP stat, but the three are much more intricately connected than we can perceive. They share an Ability, some Moves, even the same Item Loadout and License, so it's easy to believe they share the same stamina. It falls on you, the player, to make sure that your pokemon aren't put in any extreme danger when it's time to make the switch, as the three enjoy battling and want to put in their fair share of the effort.
Well, I say that, but... As we cover the moves, you'll see that they sneakily take more time than they're allowed to with devilishly tricky moves and mind bending attacks.
-


At the start of the game, Uxie will be in control. You can choose between Rest and Confusion as your first move. By Level 3, you will have learned both.
-
Move 1: Rest (Recovery)
The user creates a protective field of psychic energy and takes a quick nap. As the user restores HP, its Levitate meter decreases. 10s cooldown.
Uxie, Mesprit, and Azelf can continue to move while using Rest.
Rest takes 3 seconds to restore HP. It will restore your HP in exchange for 15% of your Levitate Meter.
The amount of Levitate Meter lost is based on a percentage, meaning Rest can still be used even with an extremely low Levitate Meter. However, the amount of HP restored will reflect the paltry conversion.
If Rest is used while the Levitate Meter is full, Rest will prevent the Levitate Meter from decreasing while the move is active. In this instance, Rest will restore 20% HP regardless.
You cannot attack while Rest is active. Rest cannot be cancelled.
It's not only the body that requires adequate rest, but the mind too. To sort out all the information acquired throughout the day and to recover from the energy it took to process it all, sleep is an important part of a healthy mind. That's why Rest is one of the first moves shared by Uxie, Mesprit, and Azelf in Pokemon Unite and one of the many moves you can use to manipulate the Levitate Meter.
First off, while the psychic barrier is a visual effect, it doesn't actually increase your defenses or anything, it just creates a suitable environment for the trio to take a quick nap. The mind is always running, though, which is why the three are able to move while using Rest. It's a handy ability to have when you need to rotate Lanes and it can save your bacon when you need to retreat from a disadvantageous fight.
However, in order to restore HP, Rest requires 15% of your current Levitate Meter. Because of the way percentages work, Rest can be used no matter how full or empty the meter is, but the amount of HP restored reflects what you managed to offer up. As such, Rest can restore up to 15% of your HP, but never the exact amount, because as soon as the Levitate Meter fills up, it'll start going down, as per the effect of the Levitate Ability.
Thankfully, Rest has a bonus effect when it's used while the meter is full. Not only will it heal a flat 20% of your HP, it will also stall the depletion of the Levitate Meter. That sounds good, expect you can't attack while using Rest, so what's the point? Well, the compensation is that, since you're stuck using Rest to recover HP, you shouldn't lose out on the limited time you have to abuse the Sp. Attack and Movement Speed boost.
Also, this is just a starting move. The trio have access to much more powerful effects later on, but we gotta keep the power level manageable for the early game, you know?
-
Move 2: Confusion (Hindrance/Ranged)
The user attacks the designated area with its psychic power. The effect dealt to opposing pokemon changes depending on the active user. When used by Uxie, opposing pokemon cannot use moves. When used by Mesprit, damage dealt to enemies restores the HP of nearby allies. When used by Azelf, opposing pokemon will be Stunned briefly. 6.5s cooldown.
Confusion has a different effect depending on which pokemon is in control.
Uxie will prevent all affected pokemon from using Moves for 1 second. If a Move is on cooldown, the cooldown gains an extra second.
Mesprit will damage enemies and restore the HP of allies near itself and the affected enemies relative to the damage dealt.
Azelf will Stun enemies for 1.25 seconds.
Though all three Lake Guardians have access to the same ability and Moves, the effects of those moves when used changes due to the nature of their powers. It also reflects their personalities and unique characteristics, as well as embodies the potential archetype the three would have taken on if they were fighting solo.
To that end, Confusion has differing uses and applications. Uxie, playing the part of a Defender, uses Confusion to temporarily trick enemies into forgetting how to use their moves. It adds 1 second of cooldown to the moves the enemy knows, giving you and the team a brief moment of respite when the opposing team is on the offensive.
While I can't say for sure that Mesprit would play as a Supporter, I know that it favors healing and supportive moves through its choice of Level-Up Moves. As such, Confusion functions like Clefable's Draining Kiss in that it heals nearby allies relative to the amount of damage it deals. If you're providing backup to a bulky All-Rounder in the middle of a fight, Mespirt's Confusion is a greatly effective attack to throw out against hordes of enemies.
Azelf is straightforward in its ability to deal heavy damage, just like an Attacker. As such, Confusion will simply Stun enemies on hit, allowing you more time to use your basic attack against vulnerable opposing pokemon.
While all of these effects are powerful and useful, keep in mind that this move is being shared by one pokemon, one with a switching gimmick. If you are in control of Mesprit and you want to throw out Azelf's version of Confusion for a different kind of fight, then you're out of luck. You have to wait the 20 seconds out for the Levitate Meter to fill up, plus another 7.5 seconds for it to run out before you can make the switch. You can accelerate the Levitate Meter with your basic attack, but that would require risky positioning and proper backup to get the most out of it without getting KO'd in return.
The Lake Trio are fickle creatures, so it's important to play to their strengths instead of forcing them to play your way. And you'll need to get good at it too, as Uxie, Mesprit, and Azelf require more EXP than normal to reach their full potential. For instance, you're stuck with Rest until Level 6.
-
At Level 6, Rest becomes either Psychic or Future Sight.
-
Move 1a: Psychic (Buff)
The user creates a psychic barrier around itself, changing in effect depending on which pokemon is in control. Uxie's Psychic increases Defense and Sp. Defense and converts the Levitate Meter into HP restoration. Mesprit's Psychic increases Movement Speed and converts the Levitate Meter into a gradual Evasion boost. Azelf's Psychic Stuns enemies briefly on contact with the barrier and converts the Levitate Meter into a gradually increasing Sp. Attack boost. When this move is used while the Levitate Meter is full, the Levitate Meter is reset. 11s cooldown.
At Level 13, Psychic becomes Psychic+.
Extends the duration of the psychic barrier.
Though it is called a 'psychic barrier', Psychic does not grant you a shield. It simply creates a psychic forcefield that each pokemon uses differently.
Uxie's Psychic increases Defense and Sp. Defense by 70% and starts losing Levitate Meter in exchange for HP recovery. The percentage of Levitate Meter lost is converted into HP recovered.
Mesprit's Psychic increases its Movement Speed to 70%. The Levitate Meter lost is converted to an increasing Evasion boost, causing Moves to miss Mesprit more often the higher it gets.
Azelf's Psychic causes direct contact with enemies to deal 0.75 seconds of Stun. The Sp. Attack boost is notably high due to the Levitate Meter already boosting Sp. Attack as a boon of the ability. It's compensation for forfeiting a portion of the meter that's already boosting your Sp. Attack. The ratio is something to the effect of 1:2.5.
The Levitate Meter drains 25% of the maximum meter and converts it into the respective boost. These boosts max out to 25% healing for Uxie and 75% Evasion and Sp. Attack for Mesprit and Azelf respectively. The boosts end as soon as the move does.
If the Levitate Meter is full, the meter resets when Psychic is used. It will resume decreasing afterwards, but the Levitate Meter decreasing will continue to power up the effects of Psychic. This means that Psychic will gradually increase the respective boost very quickly.
Psychic lasts for 5 seconds. Psychic+ extends this duration to 6.5 seconds. Psychic can be cancelled by pressing the move button again. The move will end automatically if the Levitate Meter drops to 0.
Now, some players are better suited to the roles of Defenders or Supporters, so playing as Uxie, Mesprit, and Azelf can be a bit difficult for them because of how they need to manage the Levitate Meter. It can be a bit tough switching from a Supporter role to an Attacker role when the pokemon demands it, so it's understandable that this Unite License won't be for everyone. But for those that are willing to try, they will learn that there are ways to manipulate the Levitate Meter, not to prolong the playtime of their preferred Lake Guardian, but to extend the fight as the role the team needs the most.
Psychic summons a mental barrier that provides a different effect for each guardian, powering up an additional stat at the cost of some of the Levitate Meter. Uxie gets a strong boost to its defenses and converts the Levitate Meter into HP restoration. Mesprit gets a pretty high Movement Speed boost that makes it tricky to pin down, made even worse with a slowly increasing Evasion stat that can force moves to deal 0 damage by chance. Azelf turns the psychic forcefield into a Stunning barrier, like a rogue bowling ball, knocking enemies dizzy as it moves around. Because the Levitate Meter is tied to the increasing Sp. Attack and Movement Speed boost normally, the Sp. Attack boost granted by Psychic is much stronger to compensate. The same goes for Mesprit, though the Movement Speed boost is static throughout the move and will noticeably decline as the Levitate Meter drops.
Actually, all three will lose out on their Movement Speed boost boon from their Levitate Ability, as Psychic does require some of the Levitate Meter in order to boost the respective pokemon. Azelf gets a little more power from the exchange, but Mesprit will not be as fast and Uxie will sacrifice speed and power for some reliable healing.
The best way to use Psychic is to establish a role during a fight. You can't control when a team fight happens, but you can choose to commit to an archetype with Psychic. If you get stuck with Uxie, it's time to become a Defender and cover your teammates, utilizing Psychic's grand defense buffs and passive healing to absorb the blows and blasts from the opposing team. As Mesprit, you can draw their fire easily with your Movement Speed boost and slowly increasing Evasion boost. Unlike Rest, you can still attack while using Psychic, which is great news for Uxie, Mesprit, and Azelf especially, as the Sp. Attack boon is very helpful in dealing powerful basic attacks to the opposing team. A psychic barrier that stuns enemies on hit is pretty nifty too, discouraging Melee attackers from approaching too eagerly.
Remember that your basic attack is your only way to manually increase the Levitate Meter at this point. If you find yourself really good at filling it up, you might have an affinity for using Future Sight instead.
-
Move 1b: Future Sight (Area)
The pokemon focuses its psychic power into its gem, causing it to glow after a while. During this time, Future Sight will deal damage to all nearby enemies at random. The move can be charged, converting the Levitate Meter into additional damage. This move grants an additional effect to the user if it KO's an opposing pokemon, depending on which pokemon is in control. Uxie will restore HP for each KO'd pokemon. Mesprit will gain Unite Move Charge for each KO'd pokemon. Azelf will gain a basic attack speed increase and reduce the cooldown of Future Sight for each KO'd Pokemon. 12s cooldown.
At Level 13, Future Sight will become Future Sight+.
Increases the damage this move deals.
Future Sight takes 1.5 seconds to charge. After 2.5 seconds, the gem on the pokemon's forehead glows brightly, indicating to allies and enemies that Future Sight is active. The gem gleams red for 5 seconds, or until Future Sight activates. Future Sight can activate at any time during those 5 seconds, the timing of which is random.
Future Sight will deal damage in a wide area, typically affecting those within ranged basic attack distance.
Future Sight can be charged for extra power at the cost of Levitate Meter. The amount of Levitate Meter used up drastically increases the damage dealt by Future Sight, equal to 3x the percentage given. The Levitate Meter will resume charging as soon as Future Sight is primed.
If Future Sight is used while the Levitate Meter is full, the attack will occur at the exact moment the Levitate Meter runs out. The attack boost is a fixed 3.5x damage increase.
If the user is KO'd before the Future Sight comes true, the move is cancelled.
When Future Sight KO's pokemon on the opposing team, Uxie, Mesprit, and Azelf will gain a different bonus. Uxie will restore 15% of its HP for each KO. Mesprit will gain 10% Unite Move Charge for each KO. Azelf will have its basic attack speed increased by 20% and reduce the cooldown of Future Sight by 2 seconds for each KO.
Future Sight+ increases the base damage by 75%.
One can argue that there is no such thing as reading the future, but psychics can prove you wrong, and not for the reasons you might think. If you've heard of the story of the Frog and Scorpion, then you'll know that one's nature defines and directs us. By that I mean knowing a person means knowing what they'll do or how they'll react to certain things, simply because you know enough about them. The abstract future is lost to us, but the characteristic future is well defined. This is why Future Sight, when it is used by Uxie, Mesprit, and Azelf, is so much stronger than normal, as they fuel this psychic attack with nature and character and emotion and all that psychological warfare.
When Uxie, Mesprit, or Azelf focus their psychic power into their forehead, the red gem in their head reacts by glowing brightly. This is an indicator to your enemies and allies that Future Sight is ready to go and can explode at any moment. And because the future is so fickle, there's no way for you, or anyone else, to know when Future Sight will deal damage. All you'll know is that it will deal big damage in a wide area around you, so in order to make the most of when Future Sight will make an impact in the fight, you'll have to be in close proximity to opposing pokemon.
This can be problematic depending on the situation, such as how much HP you have remaining and which pokemon you are controlling. Uxie has the best chance at surviving long enough for Future Sight to take effect, but its damage is equal to Mesprit's. Azelf will deal the most damage by a wide margin, but you are exposing yourself to the opposing team with Attacker typical defenses and HP. The payoff will be worth it if Future Sight activates earlier than anyone was expecting, but the opposing team may dash away from your range of influence or even spend resources to muster up some burst damage just to put you down.
You can postpone the explosion of Future Sight by using up some Levitate Meter, causing the move to prime much later than normal. Any amount of Levitate Meter you give up is converted into extra damage that Future Sight will deal and is an alternative and harder hitting method of decreasing the Levitate Meter. The main idea is to score KO's, though, as Future Sight grants additional effects to the pokemon depending on who's in control. Uxie gets HP restored to make up for choosing Future Sight over Psychic, so there's a risk versus reward factor at play here.
Mesprit, in spite of playing similarly to a Supporter, scores some Unite Move Charge for each KO you manage to land with Future Sight. It'll be a bit before we cover the Unite Move, but at later levels, this effect will really come in handy against frail or weakened enemies, especially with how slow the Unite Move Charge is. It won't be all that useful when you learn Future Sight as the Unite Move won't be available to you until you get a few more levels, so it's not necessary to stall the fight as Mesprit when engaging the enemy.
It is absolutely worth it to prolong the battle as an Azelf though, as not only is it the strongest version of Future Sight you can use, the KO boost powers you up even more. You get a slight basic attack speed increase for each KO, which is nice and all, but you'll also reduce the cooldown of Future Sight for each one. That may sound all well and good, but remember that the Levitate Meter is used up to charge Future Sight, so if you used some of it up, you'll lose out on some Movement Speed and Sp. Attack power afterwards. The better way to use Future Sight as Azelf is to use a little bit of your Levitate Meter initially and gain a slight power boost for the move. During the time Future Sight is primed and threatening to blow, the amount of Levitate Meter used up will be restored naturally, bringing your power levels back to the way they were before you started the move. Any KO's you score afterwards will reward you with buffs which can be used to finish off the surviving opposing team, especially with the increased basic attack speed you gain.
Just like with Psychic, Future Sight uses the Levitate Meter as a resource while also allowing the player the freedom to choose which of the Lake Guardian Trio they want to keep fighting as. While Azelf can deal the most damage, Uxie and Mesprit can sacrifice the Levitate Meter in order to keep supporting the team during 5-v-5 engagements. It also threatens big damage in a wide area at random, dissuading opposing pokemon from lingering too close to the user and any objectives they happen to be close to, such as Regieleki or their own Goal Zone.
Confusion continues to be a great move for most of the match, but as the power level of the battlefield grows, you'll need to cover more and more sections of the map, and sticking to one role isn't going to cut it anymore. While Psychic and Future Sight allow you to keep fighting as one of the Lake Guardian Trio, you don't have a way to accelerate the Levitate Meter to speed up the switching process until Level 9, when Confusion upgrades to a better move, or moves.
-
At Level 9, Confusion becomes either Mystical Power or Memento/Healing Wish/Explosion.
-
Move 2a: Mystical Power (Ranged)
The user fires a slow moving psychic blast straight forward, dealing damage and causing the affected pokemon to be locked-on by the user's psychic gem. When locked-on, the user creates a psychic link with the affected pokemon. Each time Mystical Power is used against linked opposing pokemon, it increases the Levitate Meter by a small amount. When the Levitate Meter reaches its full power, Mystical Power stalls the depletion of the Levitate Meter when damaging locked-on enemies. 1.5s cooldown.
At Level 14, Mystical Power becomes Mystical Power+.
Increases the speed of the projectile.
Mystical Power has below average travel speed as a projectile. When an enemy is hit, a psychic link is made just like the one made with their basic attack on the affected targets. Multiple basic attacks can be made against multiple enemies hit by Mystical Power.
The psychic beam made by Mystical Power is functionally identical to your basic attack. Your basic attack will affect these enemies all the same, including granting extra effects on hit.
If Mystical Power deals damage to an enemy affected by your basic attack, whether it be the normal one or the one made by this move, the Levitate Meter gains 10% charge. If the Levitate Meter is full, it prevents the Levitate Meter from depleting for 1 second.
Mystical Power+ increases the projectile speed of the psychic blast, making it comparable to other ranged projectiles like Gardevoir's Moonblast or Gengar's Shadow Ball.
You know, it's kind of nice that Uxie, Mesprit, and Azelf all got a signature move. It was kind of weird that they didn't have one in the generation they were introduced in, where they started giving out signature moves left and right to all the Legendary Pokemon and some regular pokemon, too. Too bad it's basically a Psychic Type Charge Beam.
But as an attack in Pokemon Unite, it's pretty crazy in what it can accomplish. The first thing you'll notice is that there is no unique effect for Mystical Power when it is used by either Uxie, Mesprit, or Azelf. That's because when Mystical Power hits an enemy, it creates a psychic link with the affected pokemon that's just like the one you can make with your basic attack.
Remember what your basic attack can do. Depending on who's in control, it'll slowly decrease the stats of the target over time. While normally it requires three hits, Mystical Power can create the beam link with one hit. Affected enemies also receive more damage from your attacks, which can really soften them up for Future Sight, if you've chosen that move over Psychic.
That's not all. If Mystical Power hits the enemy again, it'll fill the Levitate Meter by a small chunk. Given the extremely low cooldown of Mystical Power, it is the fastest way to fill the Levitate Meter available to you, accelerating the time it takes to max out Levitate or to switch pokemon.
While both Psychic and Future Sight use up the Levitate Meter to augment their abilities, Mystical Power offers a way to boost your overall damage output by filling the Levitate Meter as much as possible. You can combine this move with Psychic or Future Sight to reliably power these moves, but given Mystical Power's extremely low cooldown, you are guaranteed to switch pokemon eventually, causing a paradigm shift in your battle strategy. At the very least, you can accelerate your Ability's meter to reach a high Sp. Attack and Movement Speed boost much faster, making you more reliable in dealing damage and providing backup to your team.
The one downside to Mystical Power is the low projectile speed, making it difficult to actually hit enemies in the first place. Mystical Power+ fixes this by increasing the projectile speed, but this doesn't happen until Level 14. Level 14! That's an obscenely high Level just for an upgrade, but it tracks for how hard it is to train Legendary pokemon like the Lake Guardian Trio.
Also, the bonus Levitate Meter you gain will only apply to enemies hit by the psychic beam, made either by Mystical Power or your regular basic attack. An enemy can choose to disengage and run away, and you won't be able to catch up because of Mystical Power's low projectile speed. It'd be easier to slow the enemy down with the Slow Smoke item, but more often than not, Mesprit has the easiest time in this regard due to how they can manipulate movement speed with their basic attack and Psychic. That's one scenario out of 3, so it's not something you can rely on. Mystical Power is much more effective when engaging in a team fight, when you have backup and are providing support to your team.
Now, what if you are really good at generating Levitate Meter without Mystical Power? What if you're just really good at using your basic attack to build up that Meter? Well, if you were, you'd be insanely effective with the alternative to Mystical Power...
-
Move 2b: Memento/Healing Wish/Explosion (Area)
These moves are exclusive to Uxie, Mesprit, and Azelf respectively and will cause the user's Levitate Meter to deplete and switch places with the next pokemon in waiting. Memento has the user project a wave of darkness in the designated direction, causing all affected pokemon to become unable to use their moves for 1 second, plus additional time relative to the amount of Levitate Meter depleted. Healing Wish restores the user's and all nearby allies' HP, relative to the amount of Levitate Meter depleted. Explosion Stuns and deals major damage to all opposing pokemon within range, dealing additional damage relative to the amount of Levitate Meter depleted. 15.5s cooldown.
At Level 14, Memento/Healing Wish/Explosion becomes Memento+/Healing Wish+/Explosion+.
Expands the range of all effects.
When Memento, Healing Wish, or Explosion are used, the Levitate Meter will be depleted and the user will switch with the next pokemon in waiting.
Uxie's Memento casts a dark shadow as a projectile in the designated direction. Affected enemies will have their moves locked by 1.5 seconds of cooldown. Depending on the percentage of the Levitate Meter used up, this move locking effect will be extended, up to 2.5 seconds. If the Levitate Meter was full, it will lock their moves by 3 seconds. Memento+ increases the size of the projectile.
Mesprit's Healing Wish restores the HP of itself and all allies in a nearby radius by 15%. Depending on the percentage of the Levitate Meter used up, this healing effect increases, by as much as 25%. If the Levitate Meter was full, this increases to 30%. Healing Wish+ expands the area of effect.
Azelf's Explosion damages all enemies in an area and Stuns them for 1 second. Explosion deals more damage the more Levitate Meter was used up, up to 200%. If the Levitate Meter was full, the attack increases to 250%. Explosion+ increases the size of the attack.
By now it should be clear what the purpose of your two moveslots are, but in case it isn't, I'll break it down for you. Because Uxie, Mesprit, and Azelf are linked by their Levitate Ability and the Levitate Meter, their plan of attack revolves around building up psychic power in order to deal high damage and eventually switching out, shifting the archetype as well. While Psychic and Future Sight serve to prolong the fight by taking from the Levitate Meter, Mystical Power accelerates it by filling it up very quickly.
Memento, Healing Wish, and Explosion do the same thing as Mystical Power in a more straightforward sense. Rather than speed up the meter filling process, the pokemon chooses to give up its turn by sacrificing itself, affecting all nearby pokemon depending on the effect of the move.
When Uxie uses Memento, it washes the enemy in an amnestic veil of shadow, causing all affected pokemon to forget what moves they have. Memento completely drains the Levitate Meter and prolongs the amnestic effect relative to the percentage of the Levitate Meter. It's a powerful tool when used at the right time, especially during hotly contested objectives like Regieleki, as you remove an enemy's ability to secure with their moves.
Mesprit's Healing Wish, meanwhile, converts the entire Levitate Meter into a wide ranged heal. It can heal even more HP the more Levitate Meter was used up, so even if this move comes off of cooldown, it'd be better to wait for the Levitate Meter to fill up a bit more before using it. Also, don't forget that the Trio share an HP bar, so your own HP is also restored graciously.
And lastly and certainly least surprisingly, Azelf uses the straightforward Explosion to make an impact in the fight. Because of Azelf's very high Sp. Attack and Explosion's modifier, this move is very likely to KO something, even with less than half of the Levitate Meter used up. Thankfully, Azelf has the defenses of an Attacker, so if your opponents are allowing you to stroll up with Explosion at the ready, then that's on them.
The application of Memento, Healing Wish, and Explosion is going to be tricky when you learn the move for various reasons. On top of being forced to switch pokemon after using one of these moves, the moves also have an insanely high cooldown of 15.5 seconds. This means that you'll be stuck with your basic attack and either Psychic or Future Sight until you can use the move, but at least the Levitate Meter is still filling up. Although, if you're using Psychic or Future Sight, the Levitate Meter will be pretty exhausted when Memento, Healing Wish, or Explosion come back online, so you're gonna have to wait a bit for the Levitate Meter to refill if you want these moves to have any effect when they're used.
But if you enjoy the aspect of switching between different roles throughout a match, these are the moves of choice for the most part. Mystical Power will still make you wait for the meter to fill up and the run out on its own timer, so manually switching with an improvised self-destruct button is not the worst way to manage multiple roles as an All-Rounder.
-
Unite Move: Space Time Containment (Hindrance)
The user and its cohorts come together and create a mysterious red chain, encircling the area between them. The pokemon then begin to float around the battlefield, unaffected by the terrain. When the red chain begins to spark powerful energy, it will bind enemies within shortly afterwards. Depending on the user, the red chain affects opposing pokemon differently. Uxie will prevent Unite Moves from being used by the bound pokemon. Mesprit will prevent Held Items from boosting the bound pokemon. Azelf will prevent the enemy from leaving the red chain circle.
Uxie, Mesprit, and Azelf will appear and create a red chain, similar to the one used to contain Dialga and Palkia. They will float around as directed, with the current pokemon positioned at the top.
Upon activation, Space Time Containment will activate after 6 seconds, affecting all opposing pokemon within the area of effect.
If used by Uxie, affected pokemon will be unable to use their Unite Move for 20 seconds. The Unite Move can continue to charge in the meantime, however.
If used by Mesprit, affected pokemon will lose the stat bonuses and effects granted by their Held Items for 10 seconds.
If used by Azelf, affected pokemon will be unable to leave the circle, similarly to Umbreon's Mean Look, for 5 seconds.
You are completely Invincible until the Unite Move activates.
The Levitate Meter continues to run while the Unite Move is active. If the Levitate Meter is about to run out, the user will not switch places until Space Time Containment activates.
The powers of space and time are mighty and unfathomable, but they are at their weakest when they are directly observed. When the forces of Sinnoh threatened to unravel the very fabric of reality, the Red Chain was made to contain and prevent this atrocity, as that which is known can be defeated.
Uxie, Mesprit, and Azelf muster up a fraction of this power to use this Unite Move, Space Time Containment, to retain and weaken opposing pokemon. The timing is automatic, so there's no way to manually trigger the Unite Move, but the wide area of effect makes it difficult for opposing pokemon to get away. As such, in order to counter this Unite Move, the enemy team must pay attention to which pokemon is leading this attack, as each pokemon uses Space Time Containment differently.
Uxie will lock out the Unite Move of any pokemon caught in Space Time Containment for 20 seconds. This is an extremely powerful effect depending on where it is used, but also the easiest effect to counter. Since Space Time Contaiment takes 6 seconds to activate, any opposing pokemon not wanting to have their Unite Move's locked for 20 whole seconds can simply opt to use it right away, since Space Time Containment doesn't cancel Unite Moves. It also doesn't stop Unite Moves from charging, so those who had just recently used their Unite Moves don't have to worry about losing time to Space Time Containment.
But in this way, Uxie is taking control of Unite Moves away from the opposing team, and not just in the literal sense. During the fight for Rayquaza, the enemy would prefer to use their Unite Move against the entire team or to secure the objective, but that becomes problematic if Uxie comes out with the red chain. The enemy will then either be forced to either use their Unite Move early, run away from the immediate team fight, or risk getting caught and being forced to wait out the 20 seconds before the lock wears off. It throws off the timing of the enemy's offensive push, and you can't even damage Uxie, Mesprit, or Azelf while they're using Space Time Containment. All you can do is take the time to manage the available space carefully.
If you think that's bad, Mesprit's version of Space Time Containment temporarily removes the stats and effects of the opposing pokemon's Held Items. You know, those expensive boosters you had to buy and power up with Item Boosters? Yeah, Mesprit can just lock you out of their boons for 10 seconds if you get hit with this. That means no Buddy Barrier to give you HP or a shield, no emergency healing from Focus Band, and even no stacks from items like Aeos Cookie or Attack Weight. Anyone getting hit by this Unite Move will essentially become naked and exposed, forced to rely on their emblem loadout and raw base stats of the pokemon they're playing as. It can drastically reduce the offensive and defensive power of the enemy, allowing your team to either clear out the field or secure an objective more safely.
Meanwhile, Azelf's version of Space Time Containment is literally just a supersized version of Umbreon's Mean Look, with the same effect of preventing the enemy from leaving the area of effect. Umbreon can only affect one opposing pokemon at a time, though, so Azelf has the upper hand when fighting hordes of enemies. It's the shortest effect, though, wearing off after 5 seconds, so you'll need to coordinate with your team if you're going to make the most of Azelf's Space Time Containment.
Space Time Containment does not affect or is affected by the Levitate Meter in any way, so it's kind of odd that there is a lack of synergy here. But the fact that Space Time Containment makes you totally invincible while it's being used makes it very safe to play while waiting for the meter to fill up. If you time it just right that the Levitate Meter fills up when Space Time Containment activates, you'll be working with a highly boosted Sp. Attack and Movement Speed boost while the enemy is at your mercy, bound by the red chain. This makes it easier for Mesprit or Azelf to finish off the enemies they manage to snag with Space Time Containment, so make sure you get good at gauging meters.
Don't underestimate the powers of the mind.
-
Achievement
Achieve a K.O. Streak of 3 or higher while the Levitate Meter is at full power.
Throughout this post, you may have noticed that there are short blurbs about the Moves when they are used while the Levitate Meter is at full power. Because of the way most of them mess with the Levitate Meter, there had to be an additional effect the player can exploit when these moves are used while Levitate is maxed out.
At full power, Levitate grants the user an extra powerful Sp. Attack and Movement Speed boost, but only 7.5 seconds of time to use it. When it runs out, the pokemon becomes exhausted and switches with the next pokemon in waiting. During that time, however, Uxie, Mesprit, and Azelf are at their strongest, so it's the perfect time to go for a 3 K.O. Streak.
Unfortunately, there are only two moves you can feasibly use while Levitate is maxed out, and that would be Psychic and Mystical Power. These two moves allow you to deal damage while the Levitate Meter is running out, making it easier to earn this achievement.
But with Future Sight, Memento, Healing Wish, and Explosion, this becomes difficult, as the damage dealt happens when the Levitate Meter runs out in Future Sight's case, or is completely exhausted in the case of the latter. It's not impossible, mind you, but if you happen to learn both moves, you'll only have your basic attack to work with while the meter is running out.
The Levitate Meter is way too important to the pokemon's playstyle to change the Moves or to alter the achievement. It's important to convey how powerful Uxie, Mesprit, and Azelf are in the brief period of time before they have to switch places. As such, the Achievement is designed to encourage players to work with the Levitate Meter instead of against it, using your Moves to manipulate the meter to better time when Levitate gains its full power.
There is no better feeling when the Levitate Meter fills up just in time for the team fight. It's the greatest human feeling of all, euphoria.
-
Holowear
Now let's get one thing straight here. Uxie, Mesprit, and Azelf are pokemon on the spectrum of legendary and mythical rarity, so their gender is either unknown or genderless. That said, it can be argued that they have a feminine appearance to their design and are often regarded as 'girlies' affectionately. There's a case to be made for them to be considered masculine as well, but that's not all that important to the pokemon and their playstyle.
What is important is to appeal to the trainers that are looking to buy some spiffy holowear for the trio, so the clothing has to conform or remain impartial to the feminine perception of these three. Starting off, we've got Idol Singer Style Holowear that puts the three in a flashy and frilly dress that pop stars tend to parade on stage in, each one in eye-catching colors respective to the three. Tea Party Style Holowear gives Uxie, Mesprit, and Azelf a frilly maid-styled dress lavished in laces and ribbons, color coordinated, of course. Ribbon Style Holowear decorates the trio in big and wavy ribbons all over their bodies, with varying degrees of red, yellow, and blue colors all around them. For some Halloween flair, Witchy Style Holowear puts all three in a witch's hat and robes, with each one having a slightly different hat that reflects their studious nature. And lastly, Rock Style Holowear gives each member a flashy and rockin' outfit that fits them out to be members of a rock band, complete with face paint and jackets and spiky bracelets.
Designing 3 different holowear will be difficult and the price will reflect the effort as such, but it's easier to come up with concepts when this license features the trio working together as a group.
-
Strategy
The novelty of playing as three different pokemon in one license quickly wears off when it becomes apparent how much extra work goes into actually playing as the trio. Even as an EX license, the privilege of playing as a Legendary Pokemon must not undercut the opposing player's experience. For that reason, those who choose to play as Uxie, Mesprit, and Azelf must deal with the Levitate Meter and all of its quirks.
When the game starts, you will begin the round in control of Uxie. When the Levitate Meter fills and empties, you will switch places with Mesprit, and then Azelf the next time this happens. This order is in place because this is the queue the three are listed in the National PokeDex, if anyone was wondering.
Starting off with just Rest, you need to manage not only the Levitate Meter but also the cooldown of the moves that affect your Levitate Meter. While Rest is useful as Uxie, the odds are high that the Meter fills out right before you engage the enemy in the middle of either Top or Bottom Lane, at which point you'll either fend off the enemy with a full Levitate Meter as Uxie or start the encounter with a drowsy Mesprit.
You should be partnering with a bulky ally like an All-Rounder or a Defender, as either Uxie or Mesprit can support their push or help with gaining EXP. In these cases, Rest should be used to preserve the archetype to better help your teammate, but anything can happen, and an untimely KO can lead to an extension in duration as either Uxie, Mesprit, or Azelf. This can especially be disastrous if your team desperately needs a Supporter or a Defender and you can't stay alive long enough for the switch to happen.
As a Legendary Pokemon, you have a greater need for EXP than other pokemon, as you don't get the upgrade to Rest until Level 6, and the upgrade to Confusion at Level 9. On top of having to manage a fickle Meter, Uxie, Mesprit, and Azelf are one of the more challenging licenses to play as. This is pretty much solely for balance, as we can't have a pokemon start the game overpowered, even if their name is Mewtwo.
If you're good enough to make it to Level 9, then congrats! You can finally start putting some pressure on the opposing team with your moves! Remember, the way each loadout works is that the first move lowers the Levitate Meter while the latter half accelerates the switching process. Because you switch between Defender, Supporter, and Attacker roles with each pokemon, these moves are meant to facilitate role compression when the situation calls for it. Start a fight with burst damage as Azelf, then switch to Uxie to maintain your position against weakened enemies. Provide backup with Mesprit and maintain it with either Psychic or Future Sight, then switch to Azelf to finish off the weakened enemies. Hold the line as Uxie, then trade places with Mesprit when backup arrives.
If you manage to achieve all of this fluidly, then you are truly a one-of-a-kind player. Not only are you good at using your moves and manipulating the Levitate Meter with those moves, but you're well suited to adapt to any situation the opposing team can throw at you.
Uxie, Mesprit, and Azelf are difficult pokemon to tame and master, but you can expect nothing less from so-called 'Legendaries'. To master the forces of the mind, you may fancy yourself as some kind of psychologist, or perhaps a master mental manipulator. Either way, these psychic forces are yours to command.
I know, I feel, I will. Say it with me now.
-
Phew! That was Uxie, Mesprit, and Azelf for Pokemon Unite! Complex posts like these always take a lot out of me, so apologies if my posts haven't been as frequent as they have been. These three spent about 2 weeks in my drafts because of the sudden flash of inspiration I was hit with, so I had to give it my all.
Now, I might end up skipping next week, but I'm still gonna work on drafts in the meantime. If I do find myself with some extra time, then the normal post schedule will resume. If not, you'll know what happened. Anyway, that'll be it from me. See ya!
1 note
·
View note
Text
Breloom for Pokemon Unite!
Season 1
Season 2
Prev: Cradily - Hatterene - Tropius - Cacturne - Ditto - Weavile - Ogerpon - Coalossal - Gogoat - Galarian Slowbro - Luxray
I’ve said it before and I’ll say it again, Generation 3 had some top tier Pokemon designs, with Breloom being one of the shining examples of this. Now sure, it doesn’t make much sense for a grumpy little mushroom to turn into a kickboxing kangaroo, but Breloom is such a charming little character that you can’t help but adore it. In fact, we all love Breloom for these quirky oddities, and it highlights the joy of pokemon designs, that they can be funny and endearing without having to make too much sense.
But will this be enough for Breloom to bounce into Pokemon Unite? Let’s punch it in.
-
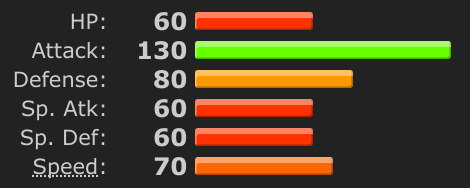
Breloom impresses with an extremely high Attack stat, more than doubling what its previous form, Shroomish, was packing. Unfortunately, Breloom’s other stats pale in comparison, mustering up a meager 80 Defenses and declining everywhere else. It lacks the range or the bulk to take hits and it isn’t very speedy either, and yet it is described in the PokeDex as having fighting skills comparable to pro boxers. Now, talk about a glass jaw, but you don’t remind humans of a professional pugilist if you can’t dodge a simple hook or straight. That gives me the impression that Breloom, in spite of its poor speed, is exceptional at dodging attacks and taking advantage of openings to deliver bone breaking uppercuts . For this reason, I designate Breloom the role of a...
Speedster
-
Basic Attack - Melee/Attack
Becomes a boosted attack after two hits, during which the pokemon deals rapid fire strikes to the enemy. The basic attack button can be mashed during the boosted attack to increase the number of hits.
The boosted attack has Breloom unleash a flurry of punches in the direction of the target. This flurry lasts for 1 second. During this time, an additional attack is dealt for each button press you mash. The more you mash, the more additional damage you can deal.
Shroomish has less range with this attack, but the same effect can be produced. Shroomish attacks by spinning and hitting with its fungus flaps.
The pokemon can move while unleashing this attack, but it will not change direction. Other enemies can be caught by this attack.
Starting things off, we’ve got a veritable fury of fungus power for a basic attack. As a boosted attack, Breloom and Shroomish have the ability to launch a flurry of multiple hits, capable of damaging an enemy, or enemies, multiple times really quickly. And I mean, really quickly, as you can choose to mash the basic attack button during this rush to inflict more damage.
This is a really useful effect for your Ability, but before we move on, we just need to clarify some things. You only have 1 second to mash as much as you can, which sounds meager, but you would underestimate how exhausting this would be on your thumb, or fingers, I don’t judge. It’s rare for a game mechanic to put stress on your physical body, so don’t wear yourself out just to get the MVP. Do the bare minimum, and let your moves do the heavy hitting for you.
Speaking of which, let’s talk about why you’ll want to deal as many hits as you can in the first place.
-
Ability: Poison Heal
The pokemon spreads poisonous spores to the enemies it deals damage to. When that enemy is KO’d, the poisonous spores are absorbed, healing the user relative to the amount of spores left behind.
The Poison Heal spores accumulate onto the enemy for each attack they receive. Each attack adds a random amount of spores, between 1.0% to 2.5% for each hit.
The degree of infection is calculated as a percentage and maxes out to 100%. The amount of spores accumulated is not shown to the player or enemy, but a pokemon infected with any amount of spores will have a cloud of dust around them.
When an enemy infected with Poison Heal spores is KO’d, the pokemon restores HP equal to the percentage of infection.
The Poison Heal spores disappear when the pokemon is KO’d or after 10 seconds without receiving damage from the Poison Heal user.
Healing abilities on squishy Attackers and Speedsters may seem counterintuitive, but believe me, on any other archetype, this would be broken. I mean, look at Trevenant and Goodra and tell me that they don’t heal themselves too much.
Breloom has the ability to infect enemies with Poison Heal spores through damage dealt through its attacks and moves. These spores then end up powering up the effectiveness of your moves, making it easier to KO them. In essence, you’re wearing down the enemy to make them vulnerable to a KO, but as a Speedster, you need to deal that damage very quickly, which is why the basic attack functions the way it does.
If you do score that KO, then congrats! Not only do you do what is to be expected of a Speedster, but you’ll restore HP equal to the percentage of infection the enemy is afflicted with. For a frail Speedster like yourself, it may not be much, and sometimes it isn’t, but it changes the dynamic of your matchups against other pokemon. For example, you won’t expect to heal much from KO’ing an Attacker, because you’ll need less moves to KO them. Against Defenders and bulky All-Rounders, however, they have the ability to tank your attacks and fight back, so the reward for overcoming that challenge should reflect the effort you put in.
Most Speedsters are prone to becoming easy to KO when they’ve exhausted their moves, but Breloom is a little different in that regard. You’ll see.
-
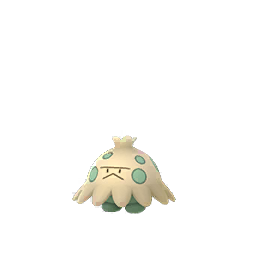
At the start of the game, Breloom will start out as Shroomish. You can choose between Headbutt and Stun Spore as your first move. By Level 3, you’ll have learned both.
-
Move 1: Headbutt (Dash)
The user charges headfirst into the enemy, dealing damage and Stunning them briefly. The more Poison Heal spores the enemy is infected with, the more damage this move deals. 7s cooldown.
Headbutt Stuns enemies for 0.5 seconds.
The damage dealt by Headbutt increases equal to the percentage of Poison Heal infection on the affected enemy or enemies.
Headbutt is a decent attack to start a fight with and to make your point in the middle of a scuffle. While it does Stun enemies, it can deal extra damage the more Poison Heal spores the enemy is afflicted with.
Now granted, the options available to you in the early game are very limited. It can be difficult to spread Poison Heal spores with just your basic attack and this move. That’s why, if you want to stand a chance in a real fight, you should come equipped with Headbutt and the other move you can learn.
-
Move 2: Stun Spore (Area)
The pokemon scatters spores all around itself, Stunning all enemies in range. For a little while afterwards, the user can spread Poison Heal spores much more easily. 8s cooldown.
Stun Spore blasts dust and pollen all around the user quickly, Stunning enemies for 0.5 seconds on hit.
For 5.5 seconds afterwards, the amount of Poison Heal spores you can infect enemies with increases from 1.0%-2.5% to 3.5%-4.25%.
Without access to Stun Spore, you spread a measly amount of Poison Heal spores with your moves and attacks. Stun Spore not only paralyzes nearby enemies, it drastically increases the production of Poison Heal spores in your body, dropping way more spores than normal. Now granted, you and your enemy don’t actually know how bad the infection is, as the game won’t show you the percentage of spores an enemy is afflicted with. But that’s fine, as all you need to know is that you’re producing triple or even quadruple the amount of Poison Heal spores through your attacks.
This ensures that not only will Headbutt deal increased damage, you’ll heal more HP through Poison Heal if you manage to KO an infected enemy. Of course, you need to actually hit the enemy by getting up close to them, so be sure you plan to finish that fight.
When the time to evolve comes, you’ll graduate from reckless head hits to disciplined flying fists.
-

At Level 5, Shroomish will evolve into Breloom. At the same time, Headbutt becomes either Mach Punch or Counter.
-
Move 1a: Mach Punch (Melee)
The user stretches its arms out to deal a swift strike to far away enemies. This move deals more damage the more Poison Heal spores the enemy is afflicted with, and has a chance of Stunning enemies, becoming much more likely to Stun the more Poison Heal spores the target is afflicted with. 2.5s cooldown.
At Level 11, Mach Punch becomes Mach Punch+.
Damage dealt is increased.
Mach Punch deals more damage to opposing pokemon equal to the degree of infection of Poison Heal spores they are afflicted with. The base damage of Mach Punch+ increases by 75%.
The chance to Stun enemies on hit is equal to the Poison Heal spore degree of infection.
The PokeDex has mentioned numerous times that Breloom are equipped with surprisingly stretchy arms that allow them to deal surprise punches from afar, yet they don’t have a unique Move to highlight that. Nowadays, they’d give Breloom some sort of special Grass Type move that punches enemies with its fists covered in spores or something. Guess that’s what happens when you get introduced a game before Gen 4, when they started handing out signature moves like candy.
Well, we can give its stretchy arms some special attention here. In a demonstration of its pugilistic perfection, Breloom uses Mach Punch to strike enemies from afar, hitting farther than Headbutt but without sacrificing its footing. It keeps the same effect too, dealing more damage the more Poison Heal spores the enemy is infected with.
Mach Punch has some notably unique boons, though. On top of its lightning fast cooldown of 2.5 seconds, the move has an additional chance to Stun enemies depending on how much Poison Heal spores the enemy is infected with. At the start of the fight, the odds are basically 0%, but leading with a boosted basic attack covered with Stun Spore increases these odds dramatically. It’s still only a typical chance between 20% to 40% and it requires that you aim the move, but it’s still a solid choice for dealing with opponents near and far. That said, you don’t want to take this move for granted, as lingering in footsies with the enemy invites bad luck and opposing backup to show up and ruin your day. Remember, you’re a Speedster, don’t stay in one place for too long.
If you’d prefer to engage the enemy evasively, the other option is equally efficient.
-
Move 1b: Counter (Melee/Sure Hit)
The pokemon sidesteps in the designated direction, evading damage and attacks. If this move is used to successfully evade damage from an opposing pokemon’s Move, the user counters with a swift strike, resetting the cooldown of this move. The user also restores some HP relative to the amount of Poison Heal spores the attacker is afflicted with. 6s cooldown.
At Level 11, Counter becomes Counter+.
Damage dealt is increased.
Counter can only be used to dash in the pokemon’s left or right direction. During this dash, the pokemon is invincible and cannot receive damage or effects, similar to Cinderace’s Feint.
If Counter is used at the same time an opposing Move would be received, the pokemon retaliates with a stretching punch that doesn’t miss, only failing to deal damage if the enemy is too far away. This will also reset the cooldown of Counter.
Counter will only work against Moves, not basic attacks or Unite Moves.
Counter will also restore your HP relative to the Poison Heal spore infection the attacker has, plus 5%. Even if the attacker has no infection active, Counter will still heal you by 5%.
If multiple attacks are dodged, Breloom will target the enemy with the most Poison Heal spores.
Counter+ increases the damage dealt by 75%.
Float like a Butterfree, sting like a Beedrill, that is the motto of bruiser boxers like Breloom. It basically means to stay light on your feet in order to retaliate against any slow attack with a quick and deadly punch. While most users of Counter are trained to take hits and return the damage, Breloom can't afford to stomach any blow, so it opts to bob and weave before delivering a sneaky straight.
With a quick jump to the left or right, Breloom will dodge all attacks and damage heading its way. If you time it just right that you evade damage with this move, Counter will have Breloom return fire with a quick crack of its stretchy arms, dealing damage and restoring some HP depending on the amount of Poison Heal spores the target is infected with. This won't be as effective at the beginning of a fight, but if it gets drawn out by opposing Defenders or Supporters, you can expect gradual returns on your investment in the fight.
While the cooldown may be higher than Mach Punch, Counter prefers to reward players for their evasive maneuvers when they hit it just right. A successful dodge resets the cooldown of Counter, allowing you to use it again and again if you need to. Just keep in mind that Counter will only work against opposing moves, so you'll only get the hit off properly two or three times, depending on which opponent you're fighting. Plus, it might be a little more difficult to pull off against multiple enemies, but you shouldn't be putting yourself in that situation as a Speedster in the first place.
There is a range limit to Counter, if it isn't apparent that Breloom's arms can't stretch very far. It's still a solid choice against ranged attackers with predictable moves, but be careful not to get taken by surprise. The healing effect is a decent compromise when it comes to engaging an enemy for an extended amount of time, but your primary focus as a Speedster should be to secure KO's when you can.
To that end, you must improve your ability to spread spores much more easily.
-
At Level 8, Stun Spore becomes either Spore or Seed Bomb.
-
Move 2a: Spore (Buff)
The user scatters a cloud of sleep inducing spores all around itself. The user can spread Poison Heal spores much more easily while Spore is in effect. When an enemy is afflicted with a specific amount of Poison Heal spores, the enemy will fall Asleep. Opposing pokemon deal reduced damage to the user relative to the amount of Poison Heal spores they are afflicted with. 11.5s cooldown.
At Level 13, Spore becomes Spore+.
Opposing Pokemon fall Asleep for much longer.
Spore creates a cloud of dust around Breloom and its attacks, but this is only a visual effect to confirm the Move is active. Spore lasts for 7 seconds.
Spore increases the amount of Poison Heal spores you can infect an enemy with, increasing from 1.0%-2.5% to 4.0%-5.75%.
When an enemy receives 30% infection from your Poison Heal spores while Spore is active, the enemy will fall Asleep for 1.25 seconds, waking up after receiving damage from allies or Wild Pokemon. Spore+ extends this status effect to 2 seconds.
Spore cannot cause an enemy to fall Asleep again until the Move is used again after coming off of cooldown.
While Spore is active, opposing pokemon deal reduced damage equal to the infection of Poison Heal spores they are afflicted with.
A classic threat that gets thrown around is something to the effect of 'I'll knock your lights out!' or 'I'll knock you into next week!'. This means to knock someone out cold, or put them to sleep forcefully, but it seems like Breloom is able to do this quite literally, using Spore to sneakily lull the opponent into a quick slumber.
Spore has Breloom increase the production of Poison Heal spores, drastically increasing the infection rate of opposing pokemon. With Spore active during a normal boosted basic attack, the infection jumps to somewhere between 24% to 33%. That's a lot of spores, especially for what you get in return when you KO this infected enemy.
But more importantly, while Spore is active, if you hit the enemy with enough Poison Heal spores, you'll send the enemy to sleep, leaving them helpless for a short while and allowing you free reign with your next attack. It could be Mach Punch or a boosted basic attack, or even a Unite Move, but we'll get to that soon enough. For the opening Spore grants you, you can then either tack on more damage and spores or go for the KO to cash out quickly on your Poison Heal spores, however it happens.
Spore also provides a bit of a defensive buffer while it is active. Depending on how many Poison Heal spores the enemy is infected with, it'll dumb down their offensive power when it's used against you. Even though you're a Speedster, you can become quite tanky with enough Poison Heal spores spread onto the opponent. It will actually take a bit of work to get to that point, as the spores need to accumulate first, but it does drastically improve your matchup against Defenders and Supporters that like to drag out fights.
It might still be hard to deal with ranged attackers that like to keep their distance and use their moves to dodge your attacks. In that case, maybe you'd prefer the reliability granted by Seed Bomb instead.
-
Move 2b: Seed Bomb (Ranged)
The user flings a seed from its tail, unleashing an explosion of spores in the designated area. The amount of Poison Heal spores this move can afflict is drastically increased. Opposing pokemon will be Stunned on hit and can be Stunned for longer if this attack increases the Poison Heal spore infection past a certain threshold. Up to 3 uses can be held in reserve. 7s cooldown
At Level 13, Seed Bomb becomes Seed Bomb+.
The area of effect is increased.
Seed Bomb accelerates Poison Heal spore infection by an extra 12.5%-20.0% when they damage an enemy.
Seed Bomb will also Stun enemies for 0.75 seconds on hit. If this move increases the Poison Heal spore infection up to or beyond 50%, the affected enemy or enemies will be Stunned for 1.25 seconds.
Seed Bomb+ expands the size of the explosion by an extra 25%.
When Spore is used, it ramps up the infection process of Poison Heal, turning all of your attacks into asthma inducing clouds of powder. It's a powerful effect, but it doesn't deal any damage and relies on constant attacks to bring Poison Heal to its full potential.
When Seed Bomb is used, however, you launch a condensed ball of Poison Heal spores in the designated area, Stunning enemies on hit and afflicting them with a random amount of spores. The amount of Poison Heal spores Seed Bomb infects enemies with is a random amount between 12.5% to 20.0%, which is a wide margin but much more than what you can normally infect through your basic attacks.
It doesn't quite compare to Spore, but Seed Bomb has the ability to Stun enemies that are further away, and can even inflict a longer Stun if the attack infects the enemy and goes over a certain percentage of infection, 50% to be exact. Because Seed Bomb can be used through multiple uses, it requires a bit of luck but it is possible to land this extended Stun after launching 3 bombs. Though, for a move with multiple uses, the cooldown is a bit on the high side due to how persistent Poison Heal is, because an enemy hit with all 3 Seed Bombs is guaranteed to receive extended Stun when the move comes back online.
In practice, Seed Bomb is the best way for Breloom to handle ranged attackers, even if you are good at landing hits with either Mach Punch or Counter. You lack the ability to Dash with your moves, so any way to quash long distance fighting is to your benefit. All for the better, as all of your damage comes from accumulating Poison Heal spores through your attacks. As such, accelerating Poison Heal infection is the best way to fight, whether it be speeding up the process with Spore or through direct hits with Seed Bomb.
Because of how integral Poison Heal is to Breloom, you might assume that its Unite Move may be made better by the ability. And you'd be correct.
-
Unite Move: T.K.O. (Dash)
The user dances rhythmically while preparing to deliver a straight, evading damage. Afterwards, the user rushes forward with a powerful punch, dealing great damage and Stunning enemies on hit. The more Poison Heal spores the enemy is afflicted with, the longer the duration of Stun. If T.K.O. KO’s an opposing pokemon, their Respawn Timer is lengthened.
Breloom starts dancing like a boxer and playfully ‘weaves’ its head while preparing to attack. This dance lasts for 3 seconds and Breloom is completely Invincible while dancing.
All enemies hit by this move will be afflicted with 25% Poison Heal spore infection.
T.K.O. Stuns enemies for 1 second, adding more time relative to the degree of Poison Heal spore infection the enemy was afflicted with. For example, 50% infection equates to 1.5 seconds of Stun, 100% infection equates to 2 seconds of Stun.
A bell will ring three times when the attack lands successfully. This is just audio flair.
If T.K.O. KO’s an enemy, an extra 10 seconds is added to their Respawn Timer.
When it comes down to the wire, when your head starts spinning and your fists start feeling sore, you know it's time to make a break for that one final hit. You've been in the ring for less than 10 minutes, but it feels like days. With all your strength and focus, you start to shift your legs rhythmically and with such elegance, you're practically gliding. Step, step, sidestep, weave, and there, an opening! With all the remaining power in your body, you focus all of it into one big breath and exhale, you dive in and deliver a mighty punch. Contact! You hit your opponent so hard, they go down and stay there, down for the count. This is Breloom's T.K.O., otherwise known as the 'Truffle King's Onslaught', and not whatever else you were thinking.
Now, I don't mean to be dramatic, but Breloom's Unite Move, T.K.O., harnesses the power of that desperation and turns it into a skill that it can summon for its Unite Move. With a deadly straight, Breloom hits the enemy so hard they'll be seeing stars for a while, or 1 second at the minimum.
T.K.O. has Breloom perform a funny looking dance, but it is actually a boxer's flighty steps that make them move more fluidly, able to evade even fast hooks and rushes. Because Breloom fights on par with professional pugilists, it harnesses this fleet-footed guile and becomes completely Invincible to all effects while dancing. It's only for 3 seconds, but during this time, Breloom cannot be harmed or hit by any attack. It's definitely a useful effect to evade Sure Hit effects like Azumarill's Unite Move Belly Bash or Zeraora's Unite Move Plasma Gale.
When Breloom is done dancing, it goes in for the haymaker, a powerful straight that deals major damage and Stuns enemies briefly. Now, I mentioned that Poison Heal enhances the effects of this move, and that would be through extending the Stun hindrance this move deals. Any degree of infection will add a little bit extra Stun to this move when it hits, but it is relative to the percentage of infection. Something like 30% infection translates to 1.3 seconds of Stun, which isn't much. You'll be wanting to land this attack against enemies knee deep in Poison Heal spores, as 100% infection turns the Stun into 2 seconds.
For what it's worth, T.K.O. does deliver the most amount of Poison Heal spores you can infect enemies with a single hit, so this move is very good at starting a fight just as much as it is at finishing them. Perhaps you'd prefer to open with this Unite Move, then follow up with Mach Punch for fast, strong damage or Spore for easier sleep inducing attacks. Just be careful when flying into fights with this move, as Breloom respects the ring's boundaries as a boxer, and will not use this move to travel through walls, a dilemma Talonflame experiences difficulties with its own Unite Move.
Too bad that there aren't any referees in Pokemon Unite. And by that I mean, too bad for the opposing team...
-
Achievement
KO enemies afflicted with 60% Poison Heal spore infection 5 times in one battle.
Your moves are stronger the more Poison Heal spores you infect the enemy with, so naturally the Achievement reflects this. However, because you cannot see the degree of infection on opposing pokemon, deciding whether to go for the KO or to keep adding spores can become problematic to teaching players how to play Breloom.
That said, what players will end up not doing is engaging weaker bodied enemies for this achievement. By that I mean, because this achievement requires a high degree of infection, Breloom players seeking to achieve this will avoid extended fights with Attackers and Speedsters. Since such an engagement will result in a quick KO one way or the other, Breloom players will learn how to shorten these fights, to their benefit for the most part. This already conditions them to play Speedsters properly, to root out easy targets so that the ally team can better handle team fights.
To actually gain points for this achievement, Breloom players will have to learn to use all of their moves to their full effects. Opening fights with Spore or Seed Bomb, landing hits with Mach Punch or Counter, directing their boosted basic attack optimally, and using their Unite Move, T.K.O., at the perfect time, these all must be executed perfectly to achieve 60% infection or higher. It's not just to tack on damage, but to reward dedicated fighting by healing the pokemon afterwards, allowing them to engage another opponent right away.
This Achievement teaches Breloom players not only how to fight, but how to fight well. Each fight can be won, as long as it's one-on-one. Fighting hordes will result in disaster, so your moves must be used to disengage. These are the qualities of playing a Speedster very well, not just playing Breloom.
Wear your belt with pride, little slugger.
-
Holowear
You know, it's a good thing Holowear is just articles made of light, because I can't imagine a Breloom wearing any of these clothes willingly for long. It'll probably tear them off in frustration from being restricted in movement.
Speaking of, the first one is Traveler Style Holowear, giving Breloom a big hat, sunglasses, a backpack, and a little camera hanging around its neck. Outback Style Holowear gives Breloom a sharp looking outdoorsy hat, a necklace made of fangs, and some leather pants to protect it from the elements. Musician Style Holowear gives it some musical note hair clips, a necklace adorned with music notes, and a banjo strapped to its side. Party Style Holowear, gives Breloom a big glittery party hat, some streamers flying off of its frills, a party tooter in one hand, and some balloons tied to its tail. Lastly, Champion Style Holowear gives Breloom some patches on its body, a sweat towel draped over its neck, boxer shorts, and multiple champion belts hanging off of its tail, to really drive home how expertly honed its skills in boxing have become.
-
Strategy
All Speedsters are built to deal a lot of damage very quickly, but they do this at the cost of bulk, it's a quirk of the archetype. In order to be effective in dealing damage, Speedsters need to dive in and out of fights, especially when things get crowded, but some are perfectly capable of handling hordes. By analyzing the situation, they wait for the right moment to unleash all of their attacks on one or multiple enemies.
Breloom does this in the reverse order, due to how its ability Poison Heal works. It is just as capable of dealing high amount of damage, but only after it has infected the opposing team with enough Poison Heal spores to power up the damage it can deal with its moves and their bonus effects. It can still functionally dive in and out thanks to the guile its moves grant, so in that regard, Breloom is a unique kind of Speedster.
Firstly, it's basic attack is a deliberate design, allowing the player to deal as many hits as they physically can, not only increasing the damage, but worsening the infection of Poison Heal on the enemy. It relies heavily on position and timing, as the size of the boosted basic attack can easily damage multiple enemies.
But even with the boosted basic attack, it can be a little challenging to spread spores quickly, especially against resilient enemies like Defenders and All-Rounders. To this end, Spore and Seed Bomb are made the way they are to facilitate quicker infection. They won't stop you from getting destroyed in a 3v1, but Speedsters shouldn't be putting themselves in danger like that in the first place.
Breloom is supposed to fight like an Out-Boxer, keeping out of the enemy's range in order to attack and counter when an opening presents itself. Mach Punch and Counter are built to help Breloom maintain its footing against opposing pokemon by goading them into attacking so that it can then retaliate with one of these moves. With enough distance, Breloom can simply exhaust the enemy, going in for the KO when their moves are on cooldown, limiting their options to counterattack.
If done right, Breloom will have infected the enemy with enough Poison Heal spores that it can then forgo defense and safety in order to secure the KO. For this reason, Breloom handles Defenders, Supporters, and bulky All-Rounders much better than other Speedsters. It actually has a bit of trouble dealing with Attackers and Speedsters, as the trade hits between itself and the enemy are not in its favor. While it is vulnerable to losing chunks of its HP to big hits like Cinderace's Pyro Ball or Decidueye's Spirit Shackle, it will not see a lot of Poison Heal spores restoring its HP due to how weak the infection ends up, as these pokemon can go down in three or four hits, which isn't enough for Poison Heal to get a foothold of any kind.
For this reason, you must pick and choose your fights carefully and consider all options when engaging the enemy. If the opposing team favors staying close together when engaging objectives, Seed Bomb is the preferred move, with Mach Punch as a solid follow-up. Against more heavyset opponents, Spore is perfectly optimal to build up Poison Heal much more effectively, with the move's Sleep hindrance being very effective at safely engaging these opponents. Predictable attacks like Delphox's Fire Spin or Gardevoir's Future Sight can easily be countered with Counter, otherwise Mach Punch is the best choice to keep your distance and to fight from afar.
In dire times, your Unite Move, T.K.O., is a solid move to escape from a tight spot or to get the lead in the team fight, since it also delivers the most Poison Heal spores in a single hit. While it would be preferable to hit multiple enemies at once, sometimes it may be better used to shut down dangerous enemies capable of dealing high damage very quickly like opposing Speedsters, especially since Breloom matches up poorly against them. The 3 seconds it takes for the attack to come out may be predictable and easy to counteract, but the Invincibility gained is invaluable in repositioning Breloom to a more favorable arena, preferably away from spread attacks like Venusaur's Solar Beam or Charizard's Fire Blast.
The fight never ends, little slugger.
-
And that's Breloom for Pokemon Unite! One of the many favorites from Pokemon Ruby and Sapphire, I think it'd be really cool if we had a boxer like fighter in Pokemon Unite. I know, I know, why rob Hitmonchan of that honor? Well, it's not like they can't both be in the game. Besides, it might have to have a gimmick as a duo license with Hitmonlee, but for now, I would love to see Breloom enter the ring.
Anyway, that'll be it from me. See ya next week!
3 notes
·
View notes
Text
How Pokemon Unite can add Shiny Pokemon
There have been rumors and speculations and grand ideas about Shiny Pokemon coming to Pokemon Unite. While I would absolutely be on board with Shiny Pokemon in Unite, the application of the mechanic needs to be just as unique and rare as the Shiny Pokemon themselves.

As such, I'm gonna walk you through my idea of how to implement Shiny Pokemon in Pokemon Unite, step by step.
Step 1: Tease the Players about Shiny Pokemon coming to Pokemon Unite
This is the easy part, just have the social media accounts for Pokemon Unite to release screenshots of Shiny Pokemon during a game mode.

(This is the thumbnail for the 'shiny' Hoopa glitch that happened a while ago. You can tell that this is a glitch because the eyes and horns don't match that of the shiny model. Click the image to be linked to the full video.)
Step 2: Update the Pokemon List with something called a 'Sparkly Bottle'
When the Shiny update goes live, two things change. First, in the Pokemon List tab of the main menu, each pokemon has a Sparkly Bottle option underneath their Holowear listing.
(Imagine it riiiiight there under Zirco Trading, or next to the Make Favorite option if you will)
Step 3: Time to Start Shiny Hunting
It's explained to you that, in order to fill the Sparkly Bottle, you need to collect sparkles from off-colored pokemon you encounter in the other game modes. It sounds simple enough, but after a couple of games, you come up with nothing for your efforts.
That because, in order to reflect the rarity and beauty of Shiny Pokemon in general, the odds of finding off-colored Wild Pokemon are very low, reflecting the typical Shiny Odds in the mainline games, 1 in 8192.
Even with these odds, with the sheer number of Wild Pokemon that spawn and get defeated over the course of a Standard or Ranked Match, you will eventually run into one such off-colored Wild Pokemon. You'll know that a Wild Pokemon is shiny by the alternate colors it has as well as sparkles emanating from it. The question is, will you defeat it in time before the enemy or an ally takes it from you?

Step 4: The Hunt Never Ends
Alright, you manage to take out a shiny Wild Pokemon and got some sparkles to fill your Sparkly Bottle. You return to the main menu and find that you've filled up the Sparkly Bottle by a little bit. Specifically, you've filled 2...out of 100.
Yeah, it'll be a bit demoralizing to see that, after all that time spent hunting and finding a shiny pokemon, you've only filled the Sparkly Bottle by a small fraction. What gives? Well, while the rarity for all Wild Pokemon being shiny is the same, different Wild Pokemon provide a different amount of sparkles when defeated. Shiny Bunnelby and Swablu provide only 1 sparkle, whereas shiny Accelgor and Escavalier provide 4. Shiny Objective Pokemon like Regieleki can fill up the bottle by 10 sparkles, making them even more important than before to secure.
The idea here is that, with a long enough playtime, you'll eventually fill the Sparkly Bottle all the way up to full. You go and cash it in, and you are rewarded with an alternate Shiny Skin for your favorite pokemon.
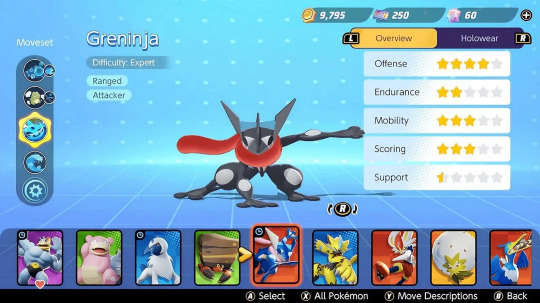
Well, you finally got it. Now what?
Step 5: Do It All Over Again for the Rest of the Roster
Cashing in the Sparkly Bottle empties it out and brings it back down to 0, plus whatever extra you had over full. The Sparkly Bottle is available to all pokemon, but you can only use it on one pokemon you own the license for.
Your efforts and determination will be acknowledged by your peers, as Shiny Hunting is the only way to fill the Sparkly Bottle here, no purchase necessary. It'll take a long while to fill up the Sparkly Bottle one time, but those fanatical enough to change the colors of their favorite pokemon will do so after a week or two of grinding. Those of us with less time on our hands will get there eventually, but not as soon as others.
The point of the Sparkly Bottle is to maintain engagement with the players and keep them in the game for as long as possible. It's also a reward for loyal players who play often and consistently. It certainly wouldn't do anyone any favors if you could just buy the Shiny colors as a skin and slap a stat boost to it, right? Heh, right? ...right?
-
Well anyway, that's my idea. If you have other ideas on how they can implement Shiny Pokemon in Unite, I'd love to hear it. Or you can just like and reblog this post to show your appreciation for the idea.
1 note
·
View note
Text
Too Many All-Rounders in Pokemon Unite?
It's been a little over two years since Pokemon Unite came out, and in that time, over 40 new Pokemon have been added to the game, 13 of which came out as All-Rounders. Now, say what you will about the All-Rounder archetype as a whole, but they do their job well in managing multiple roles in one battle, playing as either a Speedster, Defender, or even as an Attacker through certain choice Moves.
However, nowadays you'll find that there's a bit of discourse surrounding All-Rounders as a whole. More specifically, about how the All-Rounder moniker is thoughtlessly slapped onto any pokemon that lacks a defining role when they get into Pokemon Unite.

Now, I get it. When a pokemon comes along with a broad spread of stats and moves and an ability that can either lean into offense or defense or even support, it can be hard to pin down the specific role it can take in Pokemon Unite. Some of them could've been Speedsters, others could've been Defenders. But to land on 'All-Rounder' when a pokemon could've been something different, it can make fans of the pokemon itself feel cheated.
But let's not forget what the point of an All-Rounder is, and that is to cover different roles in battle when the team needs it. The need for a Defender or high powered Speedster eases when you've got a team packing two All-Rounders to cover both halves of the map. They've got a job to do, and they can do it well.

If you still got something against All-Rounders in general, put your thoughts out there and make them known on this post. Voice your opinions on this poll and lets have a discussion about it.
If any of these options don't fully convey your thoughts on the matter, then you're welcome to express them on this post.
I understand how skewed the roster for Pokemon Unite is at the moment, with nearly as many All-Rounders as there are Attackers, which is why I've been trying to keep things balanced in my own posts. Even so, some pokemon are simply destined to fill the role of an All-Rounder, so Season 3 of my Pokemon Unite movesets will see more All-Rounders than normal. I will make sure that each one is unique and varied in their versatility.
Like my old Falinks post. I think I did a pretty good job with this one. Though I have a funny feeling that this post will become obsolete very soon...
Anyway, that'll be it from me. Check back next week for the results of the poll. In the meantime, I'll be looking forward to your comments and opinions. Until then, later!
3 notes
·
View notes
Text
Luxray for Pokemon Unite!
Season 1
Season 2
Prev: Cradily - Hatterene - Tropius - Cacturne - Ditto - Weavile - Ogerpon - Coalossal - Gogoat - Galarian Slowbro
Do you remember playing Pokemon Diamond and Pearl? Do you remember your first wild pokemon you caught? For some, it was a trusty Bidoof, for others, it was a brave Starly. But some of us were smitten when a little blue cat with bright yellow eyes appeared right before us. With powerful electric blasts and an intimidating disposition, Luxray has served many trainers extremely well throughout their journey through Sinnoh.
And now, let’s put all of that faith and loyalty into putting Luxray into Pokemon Unite. Let’s see what this bolting bobcat brings to the battlefield.
-

Luxray’s most powerful stat is Attack, which is to be expected of a big electric cat. It’s Sp. Attack also isn’t too shabby, which allows Luxray to deal damage from both ends of the spectrum if it needs to. While it is on the weaker side defensively and in agility, Luxray is very good at weakening opponents through paralysis and debilitating effects like Roar or Snarl. So, with the high capacity to deal electric attacks like an Attacker, the ability to deal high damage like a Speedster, and the power to ward off enemies like a Defender, I think it’s safe to say that Luxray is surprisingly flexible. As such, I believe Luxray settles into the role of an...
All-Rounder
-
Basic Attack - Ranged/Attack
The user fires a star shaped bolt of electricity from its tail. An additional bolt is fired as the basic attack builds up power, dealing damage to an additional enemy for each boost. When the basic attack builds up to maximum power, up to 5 boosts, the pokemon starts slashing at enemies nearby while continuing to shoot star bolts at all nearby enemies. This basic attack deals additional damage to enemies marked with an X.
The basic attack boosts up to 5 levels. For each level, an additional basic attack projectile will be launched at a different enemy. Multiple enemies are targeted at random.
When the basic attack boosts up to 5 levels, the basic attack becomes charged for 5 seconds. During this time, the pokemon will deliver a melee basic attack all around itself along with a ranged basic attack projectile. This melee basic attack activates effects like Razor Claw and Garchomp’s Rough Skin.
Enemies marked with an X receive 125% more damage from your basic attack.
At the moment, there is only one All-Rounder that uses ranged projectiles for its basic attack, and that would be Dragonite. It can even forgo range altogether if it uses Outrage, so the novelty wears off depending on how the match goes. Luxray is decidedly an electric slinging cat, so it uses star bolts to deal damage to enemies from far away.
Unlike other basic attacks, Luxray can fire off more than one projectile due to the way its basic attack works. As it builds up power, it can target additional enemies, one for each boost. It’s slow, but if you build up all the way to five boosts, you’ll be able to attack the entire opposing team with just your basic attack alone. And also just like Dragonite, and Greninja too, it can adopt a melee attack when it’s at full power, without sacrificing the ability to deal ranged attacks.
It also combos with the X mark it can inflict on enemies with its moves, but we’ll get to that later. For now, let’s go over the ability.
-
Ability: Intimidate
Opposing pokemon deal reduced damage to the user when they are nearby. Opposing pokemon marked with an X have their attack power reduced even further.
Nearby enemies deal 30% less damage to the user when they are close by.
Opposing Pokemon marked with an X deal 50% less damage.
While Intimidate as an ability has the power to reduce the damage received from nearby enemies, it isn’t going to be enough to save you from burst damage most of the time. Not to say that the weakening effect isn’t useful, but Luxray’s base stats aren’t really high enough to make use of the reduction effect. It’s main draw is that the ability is always in effect, reducing the total amount of damage you receive across the entire game.
That said, the ability works by reducing offensive power by a percentage. Opposing pokemon with average attacking stats won’t notice much of a difference when Intimidate reduces their attack power, but those with higher stats will feel something when their attacks stop hurting as much. Ironically enough, this means that opposing Speedsters and heavy hitting All-Rounders lose out the most on the damage they can deal to you.
Ranged attackers, however, can fight outside of Intimidate’s power reducing range. Even though Luxray is a ranged attacker, it can have a little bit of trouble dealing with opposing ranged attackers due to how long it takes to build up its basic attack boosts. As such, Luxray needs to be more proactive in dealing with fighters from afar before they become a problem for itself. Bobcats are ambush hunters, don’t you know, so prepare to strike from the cover of Tall Grass.
Of course, you’ll need to know how to use its moves in order to pull off a successful surprise attack.
-
At the start of the game, Luxray will start out as Shinx. You can choose between Leer and Spark as your first move. By Level 3, you will have learned both.
-
Move 1: Leer (Debuff)
Flashes a scornful look at enemies directly in front of you, Stunning opposing pokemon momentarily and reducing their Defense for a short while. Opposing Pokemon are also marked with an X for a short while. 9s cooldown.
Leer Stuns enemies for 0.5 seconds and reduces their Defense by 35% for 5 seconds. They are also marked with an X for 9 seconds.
Genuine question, who looks at Shinx and gets scared by it? How is its Leer and Intimidate ability so effective when it resembles an adorable stuffed cub?
Well, I’m not a pokemon professor, so I’ll leave that question to the professionals. What I do know is that Leer is a surprisingly strong debuffing move that you can use at the beginning of the game. Not only does it temporarily stun enemies, it’ll reduce their Defense for as long as the cooldown runs for. This is an incredibly useful move for starting fights or for finishing off enemies.
It also marks enemies with an X, which is Shinx, and Luxray’s, unique mechanic. This X mechanic is integral to how Luxray plays, but for now, you just need to know how it can be utilized. By marking enemies with an X, your basic attack deals increased damage. It also increases the effect of Intimidate, reducing their attack power even further. When you combine all of this together, what Leer does for you is that it reduces the Defense and damage of the opposing pokemon, Stuns them, and increases the power of your basic attack while the X is in effect.
And that’s not even without going into detail in how it interacts with your other Move, Spark.
-
Move 2: Spark (Dash)
The user tackles enemies while charged with electricity. On impact, the residual electricity splits off and damages a nearby enemy. If this move or the split bolts damage enemies marked with an X, the mark is cleared and the attack deals more damage and restores the user’s HP. 8s cooldown.
When an enemy is hit by Spark, a nearby enemy will receive a bolt of lightning and take damage. If any of these enemies are marked with an X, the mark is cleared and the attack deals 175% more damage and restores the user’s HP by 50% of the damage dealt.
If multiple enemies are present, the split bolt chooses one randomly.
If the initial target is marked with an X, the rest of the attack deals increased damage and contributes HP to be restored. If the bolt hits an enemy marked with an X, however, the overall increased damage and healing is reduced. If both enemies are marked with an X, the extra damage and healing effects increase consequently.
By itself, Spark is a plain Dash Move that sends Shinx flying forward a tiny bit. If you hit an enemy, however, the residual electricity splinters off from the impact point, jumping to a nearby enemy and also dealing damage to them. This is useful for when the target has backup nearby, which they’ll usually have in Top or Bottom Lane, but this move gets stronger if you mark an enemy with an X.
Hitting an enemy marked with X clears the mark, but the Move deals increased damage and restores your HP relative to the damage dealt. Either your target or their ally hit can be the one marked with X, but when it goes away, you’ll come out of the exchange with a bit more HP than when you started. Of course, to maximize the damage and healing, the main target of Spark is the one that needs to be marked with an X, but don’t beat yourself up if you miss your mark in the heat of battle.
Clearing the X mark however means that you’ll shut down the boons your basic attack and Intimidate ability had, so think hard about when the right time to use Spark should be. Preferably, it’d be near the end of Leer’s debuff, after you’ve gotten the most out of the Defense drop and right before the X wears off.
Leer is a bit of a short ranged move, though, so it may not be easy to apply the X mark in the first place. When you’ve got a good feel for how to utilize the move, you’ll be ready to evolve and level up your X marking tactics.
-
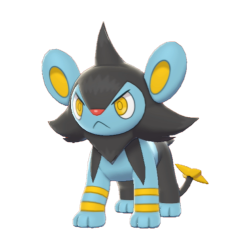
At Level 5, Shinx evolves into Luxio. At the same time, Leer becomes either Scary Face or Thunder Wave.
-
Move 1a: Scary Face (Debuff)
The pokemon gives an intimidating look at all enemies in range, inflicting a drastic Defense and Movement Speed debuff that gradually wears off. All affected enemies will be marked with an X that will not be cleared by the user’s moves until the debuff wears off. 11s cooldown.
At Level 12, Scary Face becomes Scary Face+.
Extends the duration of the debuff.
Reduces the Defense and Movement Speed of affected enemies by 300%. However, this debuff weakens gradually, weakening to 30% before wearing off after 3 seconds. Scary Face+ extends the duration of this debuff to 4.5 seconds, and the debuff weakening effect is lessened to 50% before wearing off.
Scary Face marks enemies with an X for 3 seconds, 4.5 seconds with Scary Face+. This mark will not be cleared by your moves until it wears off, though your moves will trigger bonus effects as if the mark was cleared.
Fear is a normal response to terrifying things, which is why Luxio and Luxray use it to stop prey from escaping. By frightening enemies in range, not only do you hit them with an incredibly powerful Defense and Movement Speed debuff, you also mark them with an X with a unique mechanic to it.
Firstly, the Defense and Movement Speed debuff is extremely powerful, dropping both stats all the way down to 300%. This debuff weakens gradually, though, weakening to 200% after 1 second, 100% after 2 seconds, and then sitting at 50% before it wears off completely. It’s not reliable enough to be used throughout a fight thanks to its high 11 second cooldown, but it opens up victims to a whole ton of damage if you follow up immediately with a powerful attack.
Speaking of which, the X mark is unique in that it won’t be cleared by your moves, but they’ll still get an extra effect as if it were cleared. For example, Spark will deal increased damage and restore your HP if you hit an enemy with this X mark, even though the X wasn’t cleared. This means that you can follow up Spark with your basic attack, which allows you to keep piling on heavy damage, especially if it was boosted.
It is a very short lived mark, though, and the only one you can tag with your chosen moveset, aside from your Unite Move. It may not last long, but combined with Scary Face’s powerful initial debuff, it can help you end the fight as soon as it started. The upgrade remedies this a bit by extending the duration to 4.5 seconds, slightly prolonging the duration of the Defense and Movement Speed debuff as well.
If you like dealing quick damage, Scary Face is the right way to go, but if you want some extra distance, you may prefer Thunder Wave instead.
-
Move 1b: Thunder Wave (Ranged/Hindrance)
The user launches a bolt of electricity in the designated direction, which erupts into a paralyzing field of thunderbolts after reaching the maximum distance or on hit with an opposing pokemon. The attack Stuns enemies briefly and marks them with an X. If the user clears this mark with one of their moves, the move will Stun enemies, deal increased piercing damage, restore the user’s HP, and reduces the cooldown of Thunder Wave. 9.5s cooldown.
At Level 12, Thunder Wave becomes Thunder Wave+.
Increases the size of the electric blast.
Thunder Wave behaves like a physical projectile in that it will explode after hitting an enemy, though not when it hits a wall. This projectile explosion Stuns enemies for 0.75 seconds and marks them with an X for 9 seconds.
If the X is cleared by one of your moves, the marked enemy will be Stunned for 1 second, increase the damage dealt by 225%, turns the damage dealt into piercing damage, and restore’s the user’s HP equal to 50% of the damage dealt. These effects stack with the Move that cleared the mark.
Clearing the mark also reduces the cooldown of Thunder Wave by 1 second.
Thunder Wave+ increases the size of the explosion.
Both Leer and Scary Face are a bit challenged when it comes to the distance they can cover. This is why you have the option to fire a long range bolt as an alternative. Thunder Wave not only marks enemies with an X from afar, it also charges them with electricity, granting Luxio and Luxray some extra powerful effects if they get cleared.
After getting blasted by electricity, Thunder Wave marks all enemies hit by the blast with an X. This X Mark lasts for as long as Thunder Wave’s cooldown runs for, so it’s no big deal if you fail to clear it right away with a move. If you do manage to clear it, the X mark rewards you by adding extra power to the move, as well as stunning the enemy, turning the damage dealt into piercing damage, restoring your HP, and will even reduce the cooldown of the move by a second, making it possible to use Thunder Wave again.
These effects stack with any other effects your other move has. For example, Spark already deals increased damage and heals you for each X mark you clear. If the X mark cleared was made by Thunder Wave, you’ll deal even more damage and heal for even more HP, on top of all the extra effects Thunder Wave grants. It’s a great way to deal with ranged attackers because of all the stun effects this move can deal, from the attack itself and from the mark being cleared.
But even so, Spark can be a bit on the weak side, even with Thunder Wave or Scary Face augmenting the X marks effects for you. The only thing left to do is to level up even more and reach your true power.
-

At Level 8, Luxio evolves into Luxray. At the same time, Spark becomes either Wild Charge or Discharge.
-
Move 2a: Wild Charge (Dash)
The user dashes forward while cloaked in volatile electricity. If an enemy marked with an X is hit by this move, the mark is cleared and the cooldown of this move is reset. The cooldown of Wild Charge is reduced when the user deals damage with its fully powered basic attack. 12.5s cooldown.
At Level 13, Wild Charge becomes Wild Charge+.
Damage dealt is increased.
Wild Charge has its cooldown reset if you damage an enemy marked with an X.
The cooldown of Wild Charge is reduced by 0.5 seconds each time you deal damage with your fully boosted basic attack.
Wild Charge+ increases the damage by 75%.
After achieving its full potential, Luxray unleashes its maximum power onto its enemies with fully powered electrified tackles. Wild Charge is an extremely powerful attack, so much so that it has to be balanced with a very high cooldown of 12.5 seconds. That’s the only thing holding this move back from completely overpowering the enemy team, but Luxray has the ability to power through these limitations.
If Luxray hits an enemy marked with an X with Wild Charge, the residual electricity coming off from the attack refuels the move, resetting the cooldown of the attack and allowing Luxray to use it once more. It functions similarly to Lucario’s Extreme Speed attack, but Luxray has multiple options to mark enemies with an X and multiple ways to clear it. But just like Lucario’s Extreme Speed, Luxray doesn’t get much extra when you hit multiple marked enemies at once with Wild Charge. The optimal way to space the move is to hit at most 1 marked enemy with each dash, while hitting as many unmarked enemies as you can in between.
When you combine this with Scary Face, you’ll have 3 seconds to run wild with Wild Charge, since the X mark made by Scary Face doesn’t clear but will still grant your moves their extra effects. This means you’ll be dashing back and forth for as long as Scary Face is active, which is 3 seconds, or 4.5 seconds when it’s upgraded. Alternatively, Thunder Wave gives some extra oomph to Wild Charge, which may not sound like the better deal, but since Thunder Wave is a ranged electric blast that stuns, it’s very helpful in dealing with frail ranged attackers.
Even with Wild Charge resetting itself when clearing X marks, 12.5 seconds is still a long time to wait for the move to come off of cooldown when all is said and done. Thankfully, Wild Charge has one more extra effect, and that’s with the cooldown being reduced each time you deal damage with a fully boosted basic attack. It doesn’t reduce for each enemy you damage, only when you actually use it to damage an enemy, so it’s forgiving in that regard. That said, building up basic attacks to fully power it up can be a bit of a grind, so make sure you don’t put yourself in danger until you’re fully powered up.
If you prefer to keep your distance, Discharge is a powerful alternative option.
-
Move 2b: Discharge (Ranged)
The user fires a lightning bolt forward, dealing damage to enemies. If an enemy is nearby, the lightning bolt jumps to them and deals damage. If an enemy is marked with an X, the lightning bolt deals increased damage throughout the attack and will clear the mark. The lightning bolt will continue to jump between enemies, dealing damage to each enemy once. However, enemies marked with an X can be damaged again after the mark is cleared. When no more viable enemies are nearby, the lightning bolt returns to the user, restoring HP. 11s cooldown.
At Level 13, Discharge becomes Discharge+.
The range of viable targets is increased.
Similar to Azumarill’s Water Pulse, Discharge deals damage between multiple enemies, jumping to and fro between viable targets.
Discharge will damage each enemy once until no more viable targets are within range, at which point the lightning bolt will jump back towards the pokemon and restore their HP equal to 50% of the damage dealt.
Enemies marked with an X will have the mark cleared, increasing the damage by 25% for each mark cleared. After the mark is cleared, the enemy is viable to be targeted again by Discharge.
In the case of Scary Face and the X mark it inflicts, Discharge will jump repeatedly to the marked enemy or enemies until the Scary Face debuff wears off. Discharge will not go on cooldown until the lightning bolt returns to Luxray.
The lightning bolt can damage enemies in between jumps and on its way back to Luxray. However, the lightning bolt can disappear if Luxray is too far away, such as when it returns to base before the move can finish.
Discharge+ increases the range in which the lightning bolt can jump by a small 25% wider radius.
As an All-Rounder, Luxray is expected to cover multiple roles and do as many things as it can within its power. It can become a pseudo Speedster with Wild Charge or a Defender with Scary Face and its Intimidate ability. However, it has the profile of an Attacker, being able to damage multiple enemies at once with its basic attack when it’s fully charged. So when it chooses to learn Discharge, that comes full circle in making Luxray a long ranged damage dealer that specializes in fighting hordes of enemies.
Discharge behaves a lot like Azumarill’s Water Pulse, in that Discharge is a projectile that can jump between multiple enemies at least once. Whereas the upgraded version of Azumarill’s Water Pulse can damage enemies repeatedly, Luxray doesn’t need to upgrade to be able to damage multiple enemies multiple times, instead utilizing the X mark it can inflict with its moves.
First off, by itself, Discharge will launch as a projectile that will then jump around between enemies, damaging each one at least once. When the attack runs out of enemies to damage, the bolt returns to you, restoring your HP equal to half of the damage you managed to deal. Without any boosts, it’s a decent option at handling hordes of Wild Pokemon.
When used to clear X marks, though, that is when the move truly powers up. It follows the same attack pattern as before, except the lightning bolt gets stronger for each X mark it clears. Also, the attack treats marked and unmarked enemies as different targets, so Discharge can hit an enemy twice before and after the X mark gets cleared. If you mark an entire crowd of opponents, you’ll effectively double the power of Discharge and hit each enemy pretty much twice over.
With Scary Face, Discharge will not clear the X mark but will continue to power up as if it did, and it will also hit the X marked enemy again and again until the Scary Face debuff wears off. This will only be in effect for 3 seconds, or 4.5 seconds with Scary Face+, so you can punch a really big whole in a group filled with Defenders and Supporters. Thunder Wave is the safer way to mark enemies, and the Stun you deal can linger long enough for you to immediately follow up with Discharge. It’ll also add an extra effect to Discharge, Stunning enemies again, turning Discharge into piercing damage, reducing the cooldown of Thunder Wave, increasing the healing you get afterwards, so on and so forth.
For how powerful Discharge is, you shouldn’t overestimate the move’s reach. It won’t jump if the opposing team is spaced far enough apart, and it lacks power when it attacks two or three enemies in a group. Discharge+ fixes this a bit by increasing the range the bolts can jump, but the application falls on you. As in, how effective dealing damage with Discharge depends on how many opposing pokemon you can mark with Scary Face or Thunder Wave.
Any combination of your moves work really well with each other, but when it comes to your Unite Move, your damage potential increases dramatically.
-
Unite Move: Luxray Vision (Sure Hit)
The user’s eyes become supercharged with electricity, allowing you to see enemies that are hiding or invisible. When an enemy is targeted, the user takes a brief moment to power up for a pounce before jumping and landing on the enemy in a bolt of lightning, dealing damage. The lightning jump marks the target and all nearby enemies with an X. Clearing this X Mark with your Moves fills up the Unite Move Charge Rate. If the enemy was hiding or invisible, the damage dealt by this Unite Move is increased. If the enemy is KO’d by this attack, the user’s basic attack becomes fully boosted and deals increased damage for a short while. The lightning strike deals damage in a greater area if the user’s basic attack was already fully boosted.
All enemies that are in hiding or are invisible will be revealed to the player when Luxray Vision activates.
When an enemy is chosen, Luxray powers up for 1.5 seconds before jumping, dealing an electric blast at the enemy’s location. This blast marks the target and all nearby enemies with an X Mark for 15 seconds.
The X Mark fills the Unite Move Charge Rate by 15% when it is cleared by either Wild Charge or Discharge.
The X mark can be applied along with another X mark made by either Scary Face or Thunder Wave. When both are applied and then cleared, the X mark made by Luxray Vision clears first.
Luxray Vision deals 250% more damage to enemies hiding in Tall Grass or under an invisibility effect, like Sableye’s Prankster or Gengar’s Phantom Ambush.
If this move KO’s an enemy, the basic attack boosts all the way to 5 and deals 150% more damage for 15 seconds. If the basic attack was already fully boosted, the electric jump deals damage in a wider area.
You have 5 seconds to target an enemy before the Unite Move ends. During this time, Luxray cannot use basic attacks or Moves.
Pokemon has been asking us to suspend our disbelief for years, and so far we've obliged, but I can't help but feel that maybe x-ray vision is a bit too far out there. I mean, you know that is concentrated radiation being emitted through light, right? Well, if superheroes are allowed to have this specific superpower, I guess it's not too farfetched for a pokemon to do it.
I mean, it's not like Luxray actually uses this see-through effect in the games, so we might as well put it here, in Pokemon Unite. Luxray Vision grants Luxray the ability to see hiding pokemon, in Tall Grass or otherwise invisible through their moves and abilities. It's just like Inteleon's Azure Spy Vision, except since Luxray only uses one attack before the effect wears off, it's drastically shorter in duration and not as useful for rooting out hiding enemies for your team.
When Luxray has a lock on an enemy, though, it will take a moment to prepare for a pounce before jumping onto the target in a blast of electricity. The attack ends at this point, but the Unite Move grants a slew of extra effects when it hits. First off, it marks enemies with an X that, when cleared, refills the Unite Move Charge Rate by 15%. Since it's possible to hit multiple enemies with Luxray Vision, it's likely you'll be able to refill your Unite Move by 30% or maybe even 45%. If you see yourself jumping into an entire enemy horde, be ready to fire off Wild Charge or Discharge. You can even lead with Scary Face or Thunder Wave, since the X marks can double up and affect a pokemon at the same time.
If you land on an enemy that was invisible, you'll even deal extra damage to them. It doesn't matter if they were invisible or all huddled up in the Tall Grass together, they'll never see you coming and suffer a damage penalty as a result. You're gonna want to get that KO, as scoring a KO with this move will fully charge your basic attack and make it stronger for quite a while. It's great for following up the ambush with heavy damage from your basic attack, but if it was already powered up, the electric blast from the jump will increase in size instead. You'll still get the power boost if you land a KO, so make sure you use this move to finish off weakened enemies.
Just one small tidbit, the attack will never miss, which is useful for chasing down fleet-footed enemies. Things can get unpredictable, though, if you hit an enemy that is in the middle of using a shortcut, such as Hoopa's Hyperspace Hole or even just a manual Recall. In the short time it takes for Luxray to make the jump, the enemy can already have relocated to a different area than the one they were in a second ago. You won't appear in the middle of the opposing team's base, but you'll be stuck right outside their front door if it happens that you targeted an enemy on their way back home. Weirder things have happened to other pokemon that chase down enemies with their own Sure Hit attacks.
Make sure that the hunter doesn't become the hunted.
-
Achievements
Deal 5000 damage to enemies marked with an X with your fully powered basic attack in a single battle.
With all the effects of your Moves coming together to deal optimal damage, you shouldn't forget about how your basic attack can damage multiple enemies, especially dealing extra damage to those marked with an X.
The problem is, because of how beneficial it is to clear the X, players may neglect to utilize the basic attack. It's a powerful effect, hitting up to 5 opposing pokemon when fully powered up, dealing more damage to marked enemies, but that power goes away when the X mark is cleared by Discharge or Wild Charge. As such, in order to properly train players on using all of Luxray's tools effectively, this Achievement rewards players for maxing out the damage they deal with their basic attack.
5000 damage using only your basic attack may sound like much (maybe it isn't, I haven't been paying attention to what exactly is 'good' damage) but you gotta remember that you can hit 5 enemies at once when the basic attack is fully powered up. Also, it starts dealing melee damage at the same time, so crowded fights are a great opportunity to start spreading damage. However, this achievement requires that the damage be dealt while the enemy is marked with an X, so it's better to use Scary Face or Thunder Wave when you're fully powered up, clearing the mark afterwards only when it's about to wear off.
If you're consistent enough and good at timing the duration of the debuffs, you'll find yourself hitting or even exceeding the damage requirement for the achievement. And when that happens, you'll know for sure that you've become a Luxray Master.
-
Holowear
When it comes to tailoring holographic clothes, Luxray's big glorious mane might get in the way of some headgear. As such, when any hats or tops are listed, assume they've been sewn in half and are sticking to its fur with hair clips.
To start with, Fancy Style Holowear gives Luxray a top hat, a fancy suit, and some glittering braces on its legs and tail. Secret Style Holowear, gives it some high tech visors, a sneak suit, and a spywatch strapped to its foreleg. Pirate Style Holowear gives Luxray a big tricorn, an eyepatch, scarves and coats over its body, and a toy sword strapped to its side, because X marks the spot for Luxray. Gamer Style Holowear puts Luxray in a gray beret, a posh business vest, and a pocket filled with playing cards, you know, that kind of gamer. Lastly, Starry Style Holowear decorates the pokemon with stars and veils, making Luxray look just as glittery and full of stars as the night sky.
-
Strategy
With Luxray's reliable ranged basic attack and X marking effects, the pokemon is very adaptable to almost any situation, adapting to the flow of battle as it pans out. In fact, much of Luxray's most optimal game plan has been explained thoroughly throughout its Move's descriptions. As such, I'm only going to summarize Luxray's attacks and how they combine with each other, then go over its weaknesses and blind spots, because even an All-Rounder can struggle to cover their bases.
To start off with, since Leer becomes either Scary Face or Thunder Wave, Luxray will always have some ability to apply the X mark on enemies to increase its damage. Even without either move, it can apply a separate X mark with its Unite Move, though the Charge Rate is above average and may see limited application in the heat of battle. Either way, Luxray is at its strongest when it starts any fight with Scary Face or Thunder Wave, as it can then threaten huge damage with a follow up move.
The ability to inhibit enemies in order to maximize damage is one of the fairer ways of allowing a pokemon to deal huge damage. It wouldn't be fun to play as a pokemon that would need to do all of this work for very little payoff. Indeed, while Luxray can deal drastic damage to opposing pokemon under the right conditions, one of its main flaws is the punishing cooldowns of Scary Face and Thunder Wave if those moves miss.
We've been going on and on about how integral these moves are to your plan of attack and why it's best to use these moves at the start of scuffles, and that's because of the extremely high cooldown these moves have. Hit or miss, it'll be a bit before they come back online, during which you'll need to make the most of the opening you've made on any enemy you managed to hit with these moves. While Thunder Wave has a shorter cooldown and can be reduced by clearing the mark it makes, both moves have very different applications, with Thunder Wave handling ranged attackers better whereas Scary Face handles Defenders and bulky All-Rounders solidly. Choosing one over the other in certain circumstances won't ruin your game plan, but against balanced teams, Luxray can run into a bit of trouble.
Ironic, isn't it? In achieving perfectly balanced offense and defense, Luxray finds itself struggling against perfectly balanced opposition. It can enfeeble melee attackers with Scary Face, or close the distance against ranged attackers with Thunder Wave, but it cannot do both, and that is where its weaknesses lie. Should the enemy team understand what Luxray's plan of attack will be, it will be helpless against the counterattack, forcing it to rely on its teammates to cover for its own opportunity cost.
Regardless of which combination of moves you choose, there are three constants always at play that work to your benefit; your far reaching basic attack, your damage reducing Ability, and your Unite Move, Luxray Vision. Your basic attack becomes more capable of dealing with crowds the more it's boosted, allowing you to handle crowds better, especially if you get a lucky hit with either Scary Face or Thunder Wave. It's even better if you chose Wild Charge over Discharge, as each hit reduces the cooldown of that move by a bit each time you hit something with it, allowing you to deal big damage a second or third time. Discharge doesn't get any benefits, but it handles hordes all the same thanks to its jumping damage effect.
Intimidate as an Ability is not to be underestimated, as it reduces damage received by enemies nearby. Marked enemies deal even less damage, and Scary Face and Thunder Wave are both perfectly capable of marking enemies within Melee Basic Attack range. Speaking of which, when your basic is fully boosted, you start dealing Melee Damage due to the overwhelming surge of electricity in your body. This melee attack can freely damage an enemy that is also being targeted by the ranged projectiles of your basic attack, piling on the damage even further. Adding on to that, it deals even more damage to marked enemies, allowing you to fight opposing pokemon at close range much better than other pokemon. The combined effects go away when the X mark fades or is cleared by your moves, but as we've gone over in the Achievements section, the best way to abuse the X mark is to wait until it's about to fade away before clearing it with your Moves.
Lastly, the Unite Move, Luxray Vision, allows you to single out 1 enemy on the opposing team with a deadly pounce. The power of this move increases when you hit an enemy hiding in the bushes or if they are invisible, and considering that all of the current pokemon that can use invisibility are on the squishy side of the spectrum, you'll more often than not secure that KO easily. But if you don't, not to worry, as the survivor or survivors will be marked with a unique X mark. This X mark, when cleared by your moves, refills the Unite Move Charge Rate by a small amount, incentivizing you to start the attack with either Wild Charge or Discharge at the ready so that you can immediately clear it. If you instead prefer to lead with Scary Face or Thunder Wave, the X marks do stack, allowing you to really pile on the damage if you hit a Defender in the bushes.
Luxray has the ability to deal heavy damage with its moves, but not for free. Each set-up requires careful planning to pull off a hunt successfully, requiring patience and a steady hand to hit all the right notes. If it fails to secure a KO, it is at risk of losing its own stock and is at the mercy of the enemy until it can successfully retreat. If it gets it right and corners the enemy, well, it'll be a gruesome scene playing out, that's to be sure.
You ever get the feeling you're being watched? Like some fierce predator is nearby? If Luxray is in the area, it most likely is.
-
And that's Luxray for Pokemon Unite! Fun fact, the original moveset was something completely different and was centered around its basic attack building up some kind of X star effect or something. I already forgot what it was because of how it didn't fit Luxray's character all that well. I like this moveset better, and I'm hoping that fans of Luxray appreciate the creativity and uniqueness expressed in these moves.
That'll be it for me until next week. Until then, see ya!
5 notes
·
View notes
Text
Galarian Slowbro for Pokemon Unite!

Season 1
Season 2
Prev: Cradily - Hatterene - Tropius - Cacturne - Ditto - Weavile - Ogerpon - Coalossal - Gogoat
Slowbro in Pokemon Unite is a pretty solid Defender, being able to use Scald to hinder physical attackers or Surf to juggle crowds of enemies. Being able to stop enemies with its Unite Move, Slow Beam, has been the saving grace for teams, allowing them to deal with difficult enemies.
But I believe that its Galarian cousin has plenty of potential in Pokemon Unite as well. Not to put regular Slowbro down or anything, but I like the twist Galarian Slowbro brings to the table, trading in a bulky shell for an armored hand blaster.
I think Galarian Slowbro deserves a shot in Pokemon Unite. Let’s see how it can hit the mark.
-

Because Galarian Slowbro opted to put the shell on its arm instead of its tail, it lacks many of the defensive qualities regular Slowbro has. In contrast, Galarian Slowbro boasts higher attacking stats than Slowbro, coupled with decently high HP and Defense. It lacks the Sp. Defense and Speed to stay in battle for long, but compared to regular Slowbro, it has many opportunities to hit hard and often. There’s also the fact that its little Shellder buddy has morphed into the shape of a cone perfectly suited for firing poisonous projectiles. All things considered, I think Galarian Slowbro makes an easy case for the role of an...
Attacker
-
Basic Attack - Ranged/Sp. Attack
Becomes a boosted attack after three attacks. The boosted attack deals more damage and adds a psychic round to your PsyPoison Reserve. After using a move, using a basic attack unloads your PsyPoison Reserve on the damaged enemy or enemies. The basic attack gains the effect of the used Move in this way. Up to 6 rounds can be kept in your PsyPoison Reserve.
The PsyPoison Reserve is Galarian Slowbro’s unique mechanic and behaves similarly to the number of bullets in a revolver. You get one psychic round when you deal damage with your boosted basic attack and you can hold up to 6 at a time.
After using any of Galarian Slowbro’s Moves, you can completely unload your PsyPoison Reserve to fire all shots to hone in and damage the enemy hit by your Moves. You cannot use this effect if the move misses or fails to deal damage.
If multiple enemies are damaged, multiple psychic rounds are shot for each round in your PsyPoison Reserve.
After landing a Move, you have 6 frames, or 1/10th of a second, to press the basic attack button to unload your PsyPoison Reserve.
The shots fired from your PsyPoison Reserve gain the effect of the used Move. They can be body blocked by other enemies. Galarian Slowbro can move while unloading its PsyPoison Reserve.
Many Attackers get most of their damage output from a unique basic attack mechanic, and Galarian Slowbro is no different. In addition to a normal basic attack meter, it also has something called a ‘PsyPoison Reserve’ that keeps a load of psychic rounds within its holster. Get used to that word, because Galarian Slowbro’s entire moveset revolves around this loaded mechanic.
As mentioned above, Galarian Slowbro can keep 6 rounds in its PsyPoison Reserve, which it can then unload immediately after using a Move, where the rounds then gain the effects of the used Move. We’ll be going into more detail in that regard later, but for now, Galarian Slowbro is a little, well, slow in accumulating psychic rounds to fill its PsyPoison Reserve. You get a round for using a boosted basic attack, but it takes three hits to boost it up, meaning you’ll need to take a moment to farm if you want to join a fight with a fully loaded PsyPoison Reserve.
Luckily, Galarian Slowbro has other methods of accumulating rounds other than its basic attack.
-
Ability: Gluttony/Quick Draw
Gluttony (Galarian Slowpoke)
Consuming a berry adds a psychic round to your PsyPoison Reserve. Occasionally you will gain 2 psychic rounds instead of 1.
Quick Draw (Galarian Slowbro)
Consuming a berry adds 1 or 2 psychic rounds to your PsyPoison Reserve. When you damage an enemy preparing an attack, you will gain a psychic round. If your PsyPosion Reserve is already full, the damage dealt is increased greatly.
Gluttony and Quick Draw both add a psychic round to your PsyPoison Reserve when you eat a berry, but will occasionally add 2 instead. The odds for Gluttony to double the psychic rounds gained is 30%, whereas Quick Draw increases the odds to 50%.
Quick Draw will also add a psychic round to your PsyPoison Reserve if you deal damage to an enemy preparing an attack. More specifically, this occurs when the enemy is holding the attack button and aiming with it in anticipation of an approaching enemy.
If your PsyPoison Reserve is full when Quick Draw would add a psychic round in this way, the damage is increased by 200% instead.
Quick Draw is effective on Wild Pokemon that telegraph their attacks with red outlines, as this is technically the attack being prepared.
At the start of the game, Gluttony is Galarian Slowpoke’s ability, and it’s a bit useless when you're engaging in fights in the middle of the lane. You may have gotten 1 or 2 rounds from clearing out the Bunnelby on your way to the middle, but with Gluttony, you can stock up on more rounds by eating the berries when they spawn. Just make sure they don’t get nabbed while you’re distracted.
Quick Draw is where things get dangerous. You have an improved version of Gluttony working for you throughout the game, but the real firepower comes from attacking trigger happy enemies. Quick Draw gives you a free psychic round when you damage an enemy that was preparing an attack. To be specific, if a Galarian Slowbro hits you while you’re holding a Move in preparation for an approaching enemy, Galarian Slowbro gets a psychic round for free for their PsyPoison Reserve.
You might be thinking, ‘Huh, that probably isn’t gonna happen all that often’, and normally you’d be right. But there are plenty of Moves that trigger Quick Draw because of the way they work. For example, Decidueye’s Spirit Shackle can be charged until it’s released, during which a hit from Galarian Slowbro activates Quick Draw. Inteleon’s Snipe Shot also activates Quick Draw because of the time the player needs to aim. Other effects like Tyranitar’s Ancient Power, Lucario’s Power-Up Punch, Urshifu’s Wicked Blow, and Blaziken’s Overheat all activate Quick Draw because of their charge times, and these are just the ones you can see.
It should also be noted that any damage dealt activates Quick Draw, including the psychic rounds unloaded from your PsyPoison Reserve. Nimble enemies like Cinderace or Absol might use their moves evasively to try to create some distance from you, so if a stray bullet strikes them as they’re attempting to make a getaway, you’ll get a refund on your PsyPoison Reserve for having such an itchy trigger finger.
Also the damage dealt is doubled if Quick Draw activates while you already have a fully loaded PsyPoison Reserve, but this realistically only happens when you use your Moves. Speaking of which, let’s take a look at what you’re packing.
-

At the start of the match, Galarian Slowbro will start out as Galarian Slowpoke. You can choose between Acid and Curse as your first move. By Level 3, you’ll have learned both.
-
Move 1: Acid (Ranged)
Fires a poison shot at the target, ignoring the enemy’s shield. 8s cooldown.
Acid can damage multiple enemies.
In terms of simplicity, I don’t think you can make things any shorter than this. Acid is a long range shot of poison that deals piercing damage, but that’s about it. We could talk about the cooldown, but given that most Attackers use their Moves to secure KO’s from afar, it’s par for the course.
What we can talk about is how the PsyPoison Reserve interacts with Acid. Since you can unload your reserve immediately after using Acid, the psychic rounds gains the effect of the move used. This means that, after using Acid, each followup shot of psychic rounds will gain the effect of dealing piercing damage to enemies, which is a powerful effect for dealing with Defenders in the early game or for taking over the opposing Goal Zone.
But getting enough psychic rounds for your PsyPoison Reserve is gonna be the tough part, even with your ability and boosted basic attack. We just need one more push to fully stock up on ammunition.
-
Move 2: Curse (Buff)
Increases your attack power and defense for a short while, as well as adding a psychic round to your PsyPoison Reserve. Your next attack that damages the enemy will also restore some HP. 10s cooldown.
Your Sp. Attack, Defense, and Sp. Defense increase by 50% for 5 seconds. A psychic round is added to your PsyPoison Reserve as well.
Your next attack that deals damage, whether it be a basic attack, Acid, Shell Side Arm, or Psyshock, will restore your HP by 50% of the damage you deal. If you unload your PsyPoison Reserve after using Shell Side Arm or Psyshock, each following hit will also restore your HP in this way.
In spite of Galarian Slowbro’s drastic shift in occupation, it’s still a little Slowpoke at heart. Sometimes it just wants to sit back and curse, you know?
Not only does Curse boost your Sp. Attack, Defense, and Sp. Defense for a short while, it’ll also add a psychic round to your PsyPoison Reserve, free of charge. This is useful if you’re one round away from a loaded holster and you think that one extra bullet will secure the KO on the opposing Speedster.
There’s also the fact that your next hit of damage will restore HP equal to 50% of the damage you managed to deal. It can be something small like an unboosted basic attack, or something big like a direct hit with Acid. Oh, and since Curse technically adds an effect to Acid, your PsyPoison Reserve will also gain the effects of Curse, causing each psychic round to heal you relative to half of the damage they manage to deal. It’s a big chance to heal a lot of HP, especially if you’ve fully loaded your PsyPoison Reserve.
But Acid is a bit on the weak side to take advantage of this effect. Better power up even further by evolving.
-

At Level 5, Galarian Slowpoke will evolve into Galarian Slowbro. At the same time, Acid becomes either Shell Side Arm or Psyshock.
-
Move 1a: Shell Side Arm (Melee/Ranged)
This move has two different effects, depending on the proximity of opposing pokemon. When an enemy is close by, Shell Side Arm deals Melee piercing damage that briefly Stuns and deals increased damage to debuffed enemies. When enemies are further away, Shell Side Arm fires 3 shots of poison, reducing the Sp. Defense of enemies and inflicting poison which deals damage-over-time and increases the damage of poison the more hits the enemy receives. The two attacks have separate cooldowns and can be used separately while the other is on cooldown. 12s cooldown.
At Level 11, Shell Side Arm becomes Shell Side Arm+.
Reduces the cooldown of the move.
The two versions of Shell Side Arm are used depending on the proximity of targets within range. The Melee version of Shell Side Arm takes priority over the Ranged Version.
Melee Shell Side Arm deals piercing damage and Stuns the enemy for 0.5 seconds. It also deals 150% more damage to enemies afflicted with a debuff. The rounds in your PsyPoison Reserve gain all of these effects if used.
The Ranged version of Shell Side Arm fires 3 shots of poison, each one inflicting a poison damage-over-time hindrance that lasts for 7 seconds. The damage dealt by the hindrance increases the more hits of Shell Side Arm the affected enemy received, but does not extend the duration of the hindrance. It also reduces the Sp. Defense of enemies by 75% for 7 seconds. The rounds in your PsyPoison Reserve will also exacerbate the poison damage if used, but the Sp. Defense debuff will only have its duration reset.
Both versions of Shell Side Arm have their own cooldowns separate from each other, which is displayed similarly to how moves with multiple uses are displayed. On the HUD, Shell Side Arm has two different icons which denote which version is available, Melee and Ranged.
Shell Side Arm+ reduces the cooldown of the move to 10 seconds.
Shell Side Arm is unique in that this move has two different versions of itself depending on the range of enemies. When enemies are far away, it launches 3 poison shots which poison enemies and reduces their Sp. Defense. When enemies are nearby, it’s a club attack that deals piercing damage, Stuns enemies, and deals extra damage to debuffed enemies.
Not only that, both versions of this move can be used independently of one another, even though they share the same moveslot and cooldown. It’s similar to how Moves with multiple uses operate, in that the Melee Version will go on cooldown for 12 seconds whereas the Ranged Version can still be used.
Breaking it down even further, ranged Shell Side Arm inflicts a poison hindrance which deals damage over time, the power of which increases the more poison shots the enemy was hit with. Your PsyPoison Reserve adds damage to the poison hindrance when used right away, resulting in a lot of passive damage with a fully loaded holster.
Alternatively, you can combine the Sp. Defense debuff with the Melee version of Shell Side Arm, which deals more damage to debuffed enemies. Not only does it Stun and deals piercing damage, these effects carry over to the psychic rounds in your PsyPoison Reserve, potentially incapacitating nearby enemies and dealing heavy damage to even shielded enemies. Also, the extra damage to debuffed enemies carries over, so a good combo is following up the ranged version of Shell Side Arm with the Melee version, then unloading your PsyPoison Reserve at the damaged enemy. It’s a lot of damage, even for a Burst Damage Attacker like Galarian Slowbro, but it does require a lot of setup.
The upgrade to Shell Side Arm reduces the cooldown of the move by a bit, but that’s more than enough as the attack can be used repeatedly thanks to packing two attacks in one Move. As long as you space out both effects, the cooldown of the move feels like a nonissue, though that can be challenging to keep track of in the heat of battle.
If you prefer something simpler, Psyshock is a little more straightforward.
-
Move 1b: Psyshock
The user charges up power before firing a single psychic blast that explodes on contact with an enemy or a wall. The cooldown of this move is reduced for each enemy damaged. When this move KO’s an enemy, gain a psychic round in your PsyPoison Reserve. 10s cooldown.
At Level 11, Psyshock becomes Psyshock+.
The blast size increases.
Psyshock takes 1 second to build up power before Galarian Slowbro launches the attack. Galarian Slowbro can move while charging, though the chosen direction remains constant.
Psyshock has its cooldown reduced by 1 second for each enemy on the opposing team damaged. The psychic rounds in your PsyPoison Reserve gain this effect as well.
You gain a psychic round for your PsyPoison Reserve if Psyshock KO’s an enemy on the opposing team. The psychic rounds in your PsyPoison Reserve gain this effect as well.
Psyshock+ doubles the blast radius.
Compared to Shell Side Arm, Psyshock makes your little handcannon feel more like an RPG Launcher. By concentrating psychic power into the shell chamber, Galarian Slowbro launches a condensed ball of psychic power that creates an explosion at the point of impact.
As with most ranged attacks, Psyshock behaves like a physical projectile in the sense that a direct hit with an enemy or wall will cause the attack to blow up at the point of impact. This makes crowded fights a little tough to get the most out of the explosion, but threading the needle in this way gets you the most benefits.
Psyshock has an additional effect where the cooldown of the move is reduced for each enemy you hit with the resulting blast. Although you’ll only get 5 seconds shaved off at most when you hit the entire team with this attack, your PsyPoison Reserve gains the cooldown reducing effect, making it easier to reload Psyshock for another shot.
Of course, this means you’d have to give up your hard earned psychic rounds when engaging a smaller group to fully abuse Psyshock, but the Move has one more trick to it. Scoring a KO with this move, or with the psychic rounds unloaded from your PsyPoison Reserve immediately after using Psyshock, will grant you another psychic round. This effectively means that unloading your PsyPoison Reserve to secure a KO in this way gets you a small refund to your ammo.
For crowded fights, what this means is that Psyshock can be used repeatedly if you engage with a fully loaded PsyPoison Reserve. Simply use Psyshock, unload your psychic rounds, use Psyshock again, and then unload your PsyPoison Reserve once more if you managed to KO enemies during your second go at Psyshock. Your preferred target will be fragile Attackers and Speedsters, but they tend to keep their distance when engaging the entire enemy team, so make do with the crowd size you have.
The upgraded version of Psyshock solely increases the blast size of the psychic shot, making it easier to catch multiple enemies and tapping them with your PsyPoison Reserve. This also makes it easier to reduce the cooldown of the move, but the plan of attack is still the same. It does mean that it might hit Attackers and Speedsters more easily, even if they’re a bit further away from the team fight, but don’t sacrifice big damage just to secure one KO.
Gee, for a sharpshooter, Galarian Slowbro has a bit of difficulty landng hits on the enemy. There's a way to fix that, but you'll need to level up even more to each your full potential.
-
At Level 7, Curse becomes either Psychic or Psych Up.
-
Move 2a: Psychic (Sure Hit/Debuff)
Mark an enemy with psychic power. When you use the Ranged version of Shell Side Arm or Psyshock, the projectiles fired from those moves will gain a homing effect and hone in on the marked enemy. The marked enemy receives more damage from these attacks and deals reduced damage to you for a short while. Additionally, any shield damage you deal to the marked enemy with your basic attack will be given to you as your own shield. 10s cooldown.
At Level 13, Psychic becomes Psychic+.
Reduces the enemy’s movement speed while the psychic mark is in effect.
Psychic marks enemies with a graphic that resembles an eye and a shoot reticle combined. This mark lasts for 7 seconds and causes the Ranged version of Shell Side Arm or Psyshock to swerve and hone in on the targeted enemy.
Psychic will also cause Ranged Shell Side Arm or Psyshock to linger in the air for longer than they normally would, as they won’t stop flying until they hit the marked enemy. Psyshock will still explode on contact with a wall or a different enemy.
If these moves hit different enemies while moving towards the marked enemy, you can only unload your PsyPoison Reserve to damage enemies nearby and within view.
Psychic increases the damage dealt by Shell Side Arm or Psyshock by 50%. This effect carries over to the psychic rounds in your PsyPoison Reserve.
The marked enemy also deals 50% less damage to you while Psychic is in effect.
Dealing basic attack damage to a marked enemy with a shield will transfer 100% of the shield damage dealt back to you, gaining a shield equal to the damage you deal. This includes the damage dealt by your PsyPoison Reserve.
Psychic+ reduces the Movement Speed of marked enemies by 50%.
A major aspect of target practice is the mental fortitude it takes to land every single shot perfectly. Say what you will about the Slowpoke family, but if there's one thing they've got going for them, it's mental discipline in spades.
So what happens when you give a psychic a gun? Mind powers that can trick bullets to never miss, that's what. Marking an enemy with Psychic causes Galarian Slowbro to think of that enemy when it uses Psyshock or the Ranged version of Shell Side Arm, causing the projectiles of those attacks to swerve and hone in on that enemy, even from afar.
Psychic also adds a whole host of debuffs to the afflicted enemy. Not only does Shell Side Arm and Psyshock deal more damage to the marked enemy, it also reduces the damage they deal to you while marked. This Move can trivialize some 1-on-1 fights for you as it allows you to deal more damage while reducing the damage you receive from the opposing pokemon.
The move has one more bonus effect, and that's how dealing basic attack damage basically steals shields while hitting a marked enemy. By itself, it's not a big deal, especially with a slow basic attack like yours. But remember, the psychic rounds in your PsyPoison Reserve also count as basic attack damage, meaning you can totally rob a Defender of their precious shield at gunpoint (these gun metaphors are getting a bit out of hand...), provided your holster is full.
These combined effects make Psychic a powerful debuffing Move to debilitate a single target. It's handy when the opposing team has sent their bulky All-Rounder to the Central Area and they've got the EXP lead on you. It's also just as good at shutting down Speedsters by ensuring that your projectiles always hit the mark on an evasive enemy.
The upgrade effect adds in a Movement Speed debuff that hinders the enemy while they're marked. On top of the increased damage, decreased attack power, and shield stealing effect, reducing their movement speed further enfeebles single targets. You can really ruin someone's day by hitting them with Psychic, as you've singled out the most problematic enemy on the opposing team.
In practice, you're using this move to focus on a single enemy out of a group, so it may not be the most useful attack in a team fight. It also doesn't buff you like Curse does, especially without any healing effects. If you prefer a reliable buff like that, you'll choose Psych Up instead.
-
Move 2b: Psych Up (Buff)
Target an enemy and copy their positive boosts, as well as gaining a Sp. Attack, Defense, and Sp. Defense boost. While Psyched Up, your moves and basic attacks restore some HP relative to the amount of damage dealt. Gain two psychic rounds to your PsyPoison Reserve. 8.5s cooldown.
At Level 13, Psych Up becomes Psych Up+.
Increases the boosts gained and increases the HP recovery effect.
Psych Up targets an enemy and copies their positive boosts, as well as boosting your Sp. Attack, Defense, and Sp. Defense by 75% for 6 seconds. The copied boosts also last for 6 seconds, regardless of the original duration of the targeted boost.
Psych Up will only copy stat boosts, not boosts to moves or resistance to specific damage. Any copied boost will be displayed in the active buff section of the screen and will show which stat is being boosted by Psych Up.
All the damage you deal while Psych Up is active will restore your HP equal to 50% of the damage dealt.
Psych Up+ increases Sp. Attack, Defense, Sp. Defense by 100% and also increases your HP recovery by 75% of the damage you deal to opposing pokemon.
Envy is a powerful emotion, as it causes you to desire that which others have, even abstract things like emotions and status. The Slowpoke family have very little to desire or envy, so when they want something, that means they understand what is valued. With their psychic powers, they can feasibly attain anything they want, even feelings and boosts through placebo. Maybe that's why they're so lax all the time...
Psych Up has Galarian Slowbro read an enemy for all of their positive boosts and tricks itself into granting itself that power. The residual psychic power boosts its Sp. Attack, Defense, and Sp. Defense for a short while, allowing a brief moment of power regardless of who you target with this move. The boosts you do manage to copy will run for the same duration as your Psych Up boosts, no matter how short or how close to running out the copied buffs were. This is handy for when you are fighting an opposing team composition that isn't running any boosting moves or items, but that is extremely rare.
For the most part, Psych Up is great for copying the boosts from opposing X Attack or X Speed users, but it also copies boosts from moves as well, like Crustle's Shell Smash or Sylveon's Calm Mind. Psych Up will not, however, copy esoteric boosts that power up things that aren't stats, like Dragonite's Dragon Dance. I mean, yes, the attack and speed boost are copied, but not the boost to Dragonite's Hyper Beam, since Galarian Slowbro can't use that move. For a more literal example, Blissey's Helping Hand will not be copied with Psych Up, since the basic attack speed is not a stat that the Move can copy.
At the very least, Psych Up retains the HP recovery effect of Curse, but carries it across all of the damage you can deal while the buff is active. It goes without saying, but unloading your PsyPoison Reserve is the strongest and best way to recover HP with this effect, especially with a full holster. The upgraded version of the move not only makes the boosts stronger, but also restores more HP through this effect.
Of course, choosing this move over Psychic means you give up the ability to focus damage on a single enemy, trading in that security for a more reliable buff. But if you enjoy being able to fire shots that can never miss, you'll love Galarian Slowbro's Unite Move.
-
Unite Move: Toxic Bullets (Sure Hit)
Upon activation, the pokemon will be aware of all enemies in the vicinity. The pokemon will then fire a poison shot at each enemy, firing an additional shot for each psychic round in your PsyPoison Reserve. Each shot deals increasing damage.
All nearby enemies on screen will be revealed to Galarian Slowbro, whether they are invisible or hiding in Tall Grass.
Each revealed enemy will be struck by a toxic bullet, plus an extra bullet for each psychic round in your PsyPoison Reserve. This does not exhaust your psychic rounds.
Each bullet shot deals an increasing 15% damage as they are fired, maxing out to 90% after 7 shots.
In practice, with a fully loaded PsyPoison Reserve, the first shot deals normal damage, with the second shot dealing 15% more, then 30% with the next one, and so on and so forth. In this way, the total damage output equals 320% on a single enemy.
Toxic Bullets will target all enemies on screen and will fire shots at them, even if they leave the area. The shots will fly until they reach the targeted enemy. New enemies that appear will not be targeted.
Toxic Bullets can be intercepted by Wild or opposing pokemon, though the increasing damage will not reset. In this way, however, the damage cap is reduced for each shot blocked.
Enemies will know they’ve been targeted by Toxic Bullets as a purple reticle appears over their character and will linger until all shots have been fired.
The terrifying firepower of a gunman that never misses is increased exponentially when those shots are poisonous and can hunt you down like a vindictive wasp. You can't hide from this attack either, as this Unite Move reveals all hiding enemies on screen, even the invisible ones. Once Galarian Slowbro has a lock on you, it's lights out, especially if you're a frail Attacker or Speedster.
Now, by itself, Toxic Bullets will only fire one shot, which deals pitiful damage. But if you have any psychic rounds in your PsyPoison Reserve, you'll automatically unload your entire clip at all targeted enemies. These rounds are amplified by the Unite Move, dealing increasing damage the more shots the enemy gets hit with, causing the overall damage output to skyrocket. Frail enemies like Attackers and Speedsters can easily be KO'd if you manage to fire 7 bullets with this move.
But that's gonna be the hard part. As you've read thus far, Galarian Slowbro uses its PsyPoison Reserve for a lot of extra effects, such as combining it with Shell Side Arm or Psyshock for increased damage and boons. As such, in order to stay on top of the 'high damage' game, it needs to constantly fill and expend its PsyPoison Reserve throughout the fight. Realistically speaking, when are you gonna have a fully loaded holster at the same time your Unite Move is available?
This is where the 'skill' comes into play when it comes to using Toxic Bullets. The most optimal way to get the most damage with this Unite Move is to start a team fight with a full PsyPoison Reserve, preferably while boosted with Psych Up or an X Attack. But good players can manage with half or even none of their psychic rounds in their back pocket, as they can generate rounds midfight with Quick Draw, Psyshock, Psych Up, or even with aggressive mashing of the basic attack button. You also maintain an offensive presence by constantly threatening high damage and hindrances with smart and timely uses of your moves, which is how an Attacker is supposed to work.
However you handle it, stand your ground. Don't start pointless fights, but be prepared to finish them.
-
Achievements
Max out your PsyPoison Reserve and unload it 8 times in one battle.
Because of how integral the PsyPoison Reserve is to your damage output, the Achievement reflects that by challenging the player to load it fully and unloading it multiple times in one game.
And for good reason, as you get so much out of timely shooting with your moves. From extra damage to extra stuns, to abusing your buffs and keeping your HP full with your recovery effects, being able to master the PsyPoison Reserve means mastering Galarian Slowbro as a pokemon.
I've already gone on long enough about this unique mechanic, so let's wrap up this post.
-
Holowear
Normal Slowbro has been in the game since launch, as such, its wardrobe of Holowear is a very impressive collection of style and application. However, Galarian Slowbro has a different style when it comes to clothing, due to its higher power level. Thus, we'll need to tailor the Holowear to not only highlight Galarian Slowbro's uniqueness, but also for how different it is from its Kantonian cousin.
To start, Western Style Holowear is an easy enough suit to put on, with a cowboy hat, leather vest, scruffy cowl, and rugged belt to make Galarian Slowbro look like a true gunslinger. Next, Summer Style Holowear gives it some diving goggles, water wings, an inner tube, and a plastic water gun to inspire some splash and fun in the sun. Wizard Style Holowear gives Galarian Slowbro a big conical hat and a starry cloak and maybe some extra flair effects for moving and attacking. With Punk Style Holowear, Galarian Slowbro gets a spiky black leather jacket, spiky bracelets, and a super spiky wig on its head to look more intimidating. Lastly, Painter Style Holowear gives it a beret, a long white dress shirt, and paint cans dangling from its tail, all the while Galarian Slowbro is covered in paint splatters on its body and clothing, all holographic, of course.
You'd think having a gun stuck to your hand would limit the career choices of Galarian Slowbro, but there are plenty of ways to utilize the ability to shoot poison from your hand, as it turns out.
-
Strategy
Because of its unique mechanic, the PsyPoison Reserve, Galarian Slowbro's most important button would be the basic attack button. Much like Cinderace and Alolan Ninetales, optimizing your damage output means learning how to get the most out of the A or B Button (or just the basic attack button if you're playing on Mobile...).
The easy answer might be to just stack up basic attack boosters like Rapid Fire Scarf or the Muscle Band, but keep in mind that Galarian Slowbro is a Special Attacker, so the Attack boosts would be wasted. Not only that, depending solely on the basic attack button is a very slow way to fill the PsyPoison Reserve. You'll need to utilize Quick Draw and its Moves to not only build up psychic rounds, but also to recycle them.
First off, Psyshock grants you a psychic round when you use the move to KO an enemy, and this effect carries over to the PsyPoison Reserve when you unload it on an enemy. Up against frail Attackers and Speedsters, you'll be loading and unloading like the white painted curb of an airport. There are diminishing returns with this effect, though, as you can never fully reload your PsyPoison Reserve off of just KO's. I'm not saying you can't get a 5 KO streak with this move, but 6 is greater than 5, you know?
Psych Up is the easiest and quickest way to load multiple rounds of your PsyPoison Reserve, but it requires a visible target to lock and load with. It's a fair trade, though, as loading up with Psych Up means there are enemies immediately within range to engage with. It also means you have a great opportunity to generate psychic rounds through Quick Draw or your basic attack, though it requires you to avoid getting KO'd yourself.
Speaking of Quick Draw, since any lucky attack will grant you a psychic round, you can quickly power up if you can hit enemies while they're aiming their moves. Some Moves are more telegraphed than others, like Decidueye's Spirit Shackle or Blaziken's Overheat, but others will require intuition and battle experience and maybe an itchy trigger finger to activate. Quite frankly, if you know what move the enemy can use and when they'll use it, you'll master Quick Draw and can end any encounter with a fully loaded PsyPoison Reserve.
So, what is the opposing team supposed to do? Well, not get hit for one. I'm not being facetious, that is a genuine way of dealing with Galarian Slowbro. Look, the most dangerous attack in its toolkit is a fully loaded PsyPoison Reserve, but it can only use that if it lands a hit with either Shell Side Arm or Psyshock. It can fix this by using Psychic, but the move along with Psych Up require targets to be within range and visible for the attacks to connect. Taking Galarian Slowbro by surprise is a lot easier to do than handling Regular Slowbro, as Galarian Slowbro has the stats of a mildly bulky Attacker. It's also a lot easier to take on with an exhausted PsyPoison Reserve, so if a Defender or bulky All-Rounder can draw its initial fire, the rest of the team can have an easier time taking care of it.
Galarian Slowbro gets stronger as the fight drags on, but it can also be overwhelmed with debuffs and hindrances, just like any other Attacker. A gunman is at their weakest when they need to reload, so when the opportunity presents itself, rush in.
-
And that's Galarian Slowbro for Pokemon Unite! I would love it if they added more alternative forms of pokemon that are already in the roster, especially cool ones like the ones from Hisui.
You might be thinking, why isn't Galarian Slowbro a part of a duo evolution with Galarian Slowking? Well, ideally I'd like for a possible team of Slowbro, Slowking, and the Galarian Duo to come to Pokemon Unite, maybe even throw in a Cloyster. To that end, I think Galarian Slowbro and Galarian Slowking should be separate licenses. If you disagree, I'd love to hear your ideas (because I don't know how that split license would work...).
That'll be it from me. We've got a fan favorite coming next week, hailing all the way from Sinnoh. You don't wanna miss it!
1 note
·
View note
Text
Gogoat for Pokemon Unite!
Season 1
Season 2
Prev: Cradily - Hatterene - Tropius - Cacturne - Ditto - Weavile - Ogerpon - Coalossal
Pokemon is a series based entirely on tradition. You have aspects of the game that have been in place since Pokemon Red and Blue, such as six pokemon slots, eight Gyms you need to beat, an Elite 4, and an opposing terrorist organization that you, a child, must dismantle.
But as the games ride on, old traditions are challenged and broken, and these are most apparent in Gen 6, with the introduction of the Fairy Type and rideable pokemon, like Gogoat. These rideable pokemon paved the way for what would eventually be the fazing out of the HM system and other features like our main ‘mons Koraidon and Miraidon in Gen 9, and we owe it all to the innovations Gogoat and friends has shown us.
So can this green goat goad us into giving it a chance in Pokemon Unite? Let’s give it a gander.
-

Based on first impressions, Gogoat has a bit of beef to its defensive profile, but don’t let that high HP fool you. Yes, it’s very high, but its offset by its very low Defense and Sp. Defense. Its Defense does increase with its Grass Pelt ability, but there’s little it can do about that Speed stat. Respectable offensive stats show that it can roll with either Attack or Sp. Attack, but it has standard attacks for a Grass Type, nothing that really stands out, y’know. It’s real claim to fame has and always will be the fact that it is practically built to give rides to people and pokemon, proving to be really dependable in that regard. As such, to really prove itself, I designate Gogoat with the role of a...
Supporter
-
Basic Attack - Melee/Attack
The pokemon delivers a harsh swing with its horns. This basic attack can be charged to deal increased damage to enemies and to also Throw them on hit. This attack can also be charged while the pokemon is running and carrying an ally.
The attack is a short ranged swing of the pokemon’s horns. It can be charged to deal more damage and Throw enemies a short distance. It takes 1.5 seconds to fully charge and deal 2.5x more damage.
It takes 0.75 seconds to fully charge the basic attack. The resulting attack Thrown enemies a short distance and renders them unable to act until they land.
While carrying an ally, this basic attack can be charged while moving. Otherwise, it can only be done standing still.
For a Supporter, Gogoat has some heft to its horns, which allows it to deal heavy damage when it needs to. Being able to charge your basic attack to unleash a short ranged Throw attack can be annoying to deal with in the middle of a fight, but that’s just how most goats roll. You turn your back on them for a second, and they’ll decide to just headbutt your butt with their head.
There’s also a short bit about charging the attack while giving an ally a ride. Yes, Gogoat is able to pick up allies with its moves like how Lapras could, or at least the version of Lapras I wrote before it officially came to the game, but as you can do this with regular moves instead of a Unite Move, it’s got some quirks to it. For the most part, you’re the armored carrier that brings reinforcements to battle, which is how you play as an offensive Supporter like Gogoat.
And when I say armored, I mean armored with thick heavy foliage.
-
Ability: Grass Pelt
When the pokemon is in Tall Grass, it slowly gains a shield. The longer you stay, the greater the shield becomes. If you are carrying an ally, the ally also gains a shield.
After 1.5 seconds of standing in Tall Grass, Skiddo and Gogoat generate 5% shield every second. The shield gained by Grass Pelt caps to 25%.
The shield gained by Grass Pelt will not fade away while within Tall Grass. The shield can be regained if it was lost in battle by standing in Tall Grass.
Any ally pokemon you are carrying will also gain a Shield through Grass Pelt at the same rate. The shield they get scales with your HP.
Likewise, the ally’s Grass Pelt shield can be regenerated if they are being carried by you and you are standing within Tall Grass, though this is typically unfeasible in the middle of a fight.
The shield gained by Grass Pelt lasts twice as long as a regular shield.
Gogoat has the ability to get a big shield by grazing in Tall Grass, which is handy for a Supporter that needs some protection to ride into battle. It may take a while, but it’s the freest big shield you can get at any time. Because Tall Grass is everywhere, all it takes is about 6 seconds of break time to get a fully powered Grass Pelt shield, you just need to take a rain check if a big fight is going on.
Also, the shield can be repaired by just going back into the cover of Tall Grass. Yeah, it may not be cool to disengage from a battle just to refresh your shield, but Goodra does it too when they’re even a little bit hurt, so no one will hold it against you if you retreat with a small chunk of your shield gone.
If you have an ally riding your back, you’ll even share the shield with them while waiting to engage a fight. They just have to wait for the ability to fill out their shield and they’ll be good to go. But you should know that they cannot regain or repair the shield by themselves as you’re the one with the Grass Pelt ability, so it’s up to you to make sure your friends are well guarded and Supported.
Because, you know, you’re a Supporter, despite how hard your attacks can hit.
-

At the start of the game, Gogoat will start out as Skiddo. You can choose between Tackle and Growth as your first move. By Level 2, you’ll have learned both.
-
Move 1: Tackle (Buff)
The pokemon charges straight forward and starts running, damaging and crashing into the first enemy you hit. You can put an ally on your back by running into them, dealing increased damage to enemies and also Stunning them. 9s cooldown.
The pokemon’s Movement Speed increases by 20% during Tackle. The move ends when you hit an enemy or after 6 seconds, after which the move goes on cooldown.
If you run past an ally, you will pick them up and carry them on your back. If you collide with an enemy, you’ll deal 2.5x more damage and Stun them for 1 second.
The ally can dismount by using any Move, but they can use their basic attack freely without dismounting.
The ally pokemon cannot be targeted by enemies while riding.
Goats are known for two things, eating anything and fighting anything. While Gogoat’s diet won’t come into scrutiny for this post, we have to utilize its brazen headstrong attitude for most of its attacks. Starting off, Tackle is a straightforward move that sends Skiddo running forward at increased speed, letting it damage an enemy and allows it to keep running afterwards.
Tackle is how Skiddo and Gogoat operate as emergency transport, as they will pick up allies that need a lift when they pass by. Unlike Lapras’ Unite Move, Lapras Express, allies will dismount easily when they try to use a move, but the upside is that you don’t stop running when you hit an enemy. Just know that, because Tackle ends when you hit someone, you won’t be able to pick up allies afterwards, so using it to dive into a fight to save an ally will not work out the way you think it will.
On the plus side, Tackle hits harder and Stuns if you run into an enemy while carrying someone, which can give your teammate the opening they need to unleash some burst damage, or the equivalent of such attacks available to them in the early game. If only there was a way to power them up for that inevitable confrontation.
Oh wait, there is!
-
Move 2: Growth (Buff)
The pokemon’s Attack and Sp. Attack is boosted for a short while. Any ally you are carrying also receives this boost. 6s cooldown.
Your Attack and Sp. Attack increase by 50% for 5 seconds. The ally you are carrying will also receive this boost if you use this move while they are on your back.
Similar to Crustle’s Shell Smash, Skiddo and Gogoat have an option to amplify their offensive capabilities with an easy to refresh buff available to them. Growth boosts your Attack and Sp. Attack by 50% for 5 seconds, and you can even share that buff with your teammate when they’re riding on you. And because the buff runs out 1 second before the Move comes off of cooldown, you can quickly reset the buff to keep up the fight, sooner if you have any cooldown manipulating items and emblems.
Now, while your ally does get a free X Attack through Growth, they cannot use any Moves while riding you without dismounting. They can only spam the basic attack button and activate their ability if they are able to, meaning the best teammates to take advantage of this arrangement is an ally with a very effective basic attack like Mewtwo Y or Dreepy. Not to say that Melee attackers can’t make it work, but some of them may be forced to dismount if their basic attack forces them to dash like Leafeon or Zacian. Just focus on getting your allies to where they need to go and drop them off with a helpful power boost.
I mean, you can also join in the fight too, but maybe you should take a backseat to scuffles until you’re high leveled enough to evolve.
-
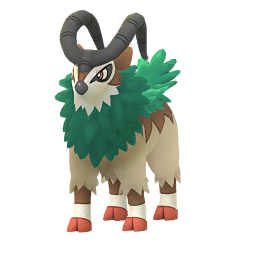
At Level 5, Skiddo will evolve into Gogoat. At the same time, Tackle will become either Horn Leech or Aerial Ace.
-
Move 1a: Horn Leech (Recovery)
The pokemon charges with its horns outward, damaging enemies and restoring HP. You can pick up an ally pokemon during the charge, dealing increased damage to enemies and restoring more HP. The ally will also restore HP when Horn Leech damages enemies. 9s cooldown.
At Level 10, Horn Leech becomes Horn Leech+.
Increases movement speed and HP restored.
For 6 seconds, Gogoat will move with its horns displayed outward. When Gogoat deals damage during Horn Leech, your HP is restored relative to the damage dealt.
If you pass by an ally pokemon, you will pick them up and carry them on your back. Like with Tackle, the ally can dismount with any Move but they can use their basic attacks freely.
Horn Leech deals 50% more damage and restores 20% more HP to you when carrying an ally. The carried ally also restores HP.
Your movement speed during Horn Leech is increased by 35%. Horn Leech+ increases this to 50% and you restore an additional 15% more HP through Horn Leech.
Horn Leech does the same thing for you as Tackle, in that you rush forward at increased movement speed and can damage enemies, but improves upon the move in all the important ways. Firstly, Horn Leech will not end when you run into someone, but instead after a set amount of time has passed. Secondly, as it is implied by the name, you do restore some HP relative to the amount of damage you deal to enemies gored by your horns.
And thirdly, you can pick up an ally while running headfirst with Horn Leech. They will still be stuck on your back until they dismount by using a Move, but it may be in their best interest to stay seated if they’ve taken a bit of a beating. Horn Leech will restore the HP of the ally riding on your back, whether you run into Wild Pokemon or the opposing team. You get to do some extra damage and heal some more out of the exchange, which is a nice compromise as you take all of the damage for your allies while giving them a ride.
Horn Leech is useful for rushing into a big fight and for making a big escape, as the attack doesn’t end when you hit someone. You are still vulnerable to damage and hindrances, so watch out for those in either situation.
If your need for speed is greater than your need to feed, Aerial Ace will be your preferred Move overall.
-
Move 1b: Aerial Ace (Dash/Buff)
The pokemon dashes forward and quickly dashes back, Stunning enemies hit by both attacks. Your movement speed increases afterwards for a short while. If a teammate is within range, the teammate is picked up and gains a movement speed boost when they dismount. If this move is used while a teammate is riding you, the user zigzags while dashing forward, increasing movement speed and Stunning enemies on hit and becoming Invincible during the attack. 5s cooldown.
At Level 10, Aerial Ace becomes Aerial Ace+.
Expands the range of the attack and increases Movement Speed gained.
Your Movement Speed increases by 35% for 3 seconds after using Aerial Ace. Hitting an enemy with both cuts of Aerial Ace Stuns them for 1 second.
If you use this attack on a teammate, you will pick them up and put them on your back in one quick motion. When they dismount, by using any Move, they will gain a 35% Movement Speed boost for 5 seconds.
When Gogoat is carrying an ally, it will move in a zigzag pattern quickly when it uses Aerial Ace. This briefly makes Gogoat and the ally it is carrying Invincible during the attack and your Movement Speed also increases by 35% for 3 seconds.
Aerial Ace+ doubles the range of the move and increases all Movement Speed boosts to 50%.
You ever see an ally getting their muffins mixed by multiple enemies? Don’t you ever think, ‘man, if only I could save them’? Well, that becomes possible with Aerial Ace, as not only does the move allow you to quickly dash in and out of a fight, picking up your teammate along the way, you’ll even Stun any enemies you managed to hit with both slashes of the move!
Not only that, you get a pretty nifty speed boost right afterwards, allowing you and your teammate to escape easily. Your teammate also gets this speed boost when they dismount as well if they need a quick pick-me-up to clear out the Central Area as soon as possible. Aerial Ace is designed for bold rescue operations such as this, and you are able to do this multiple times thanks to the low cooldown of the Move. It’s great for saving an ally that lacks the mobility to get away from a problematic opponent, but it’s also useful for Stunning enemies as needed, controlling the fight and keeping the power struggle in your favor.
Because of the move’s low cooldown, you can expect to have access to Aerial Ace again after a short ride. Since you’re already carrying an ally, Aerial Ace turns into an evasive dash that has you completely Invincible during the attack, allowing you to evade long range attacks like Inteleon’s Snipe Shot. It’s also a compelling opener to a team fight while carrying a bulky All-Rounder like Aegislash or Buzzwole, allowing you to dive into the middle of a fight and unleashing the most powerful attack from the center of the scuffle.
Of course, at this point, all you have to augment the power of your and your allies’ attack is just Growth, which is serviceable, but can be improved upon.
-
At Level 7, Growth becomes either Bulk Up or Seed Bomb.
-
Move 2a: Bulk Up (Buff)
The pokemon’s Attack, Sp. Attack, Defense, and Sp. Defense increase, and its HP recovery effects are also strengthened. If you are carrying an Ally Pokemon on your back, the ally receives these boosts as well. In addition, you and your ally gain Unstoppable for a short while. 10.5s cooldown.
At Level 12, Bulk Up becomes Bulk Up+.
Further increases boosts gained.
When Bulk Up is used, Gogoat’s Attack, Sp. Attack, Defense, and Sp. Defense increase by 60% for 6 seconds. Any HP you recover is restored by an additional 30% as well during the boost. If you are carrying an Ally Pokemon, the ally gains these boosts as well.
If you are carrying an Ally when you use Bulk Up, you and your Ally gain Unstoppable for 2.5 seconds.
Bulk Up+ increases the boosts gained to 75%. HP recovery effects are strengthened by 50% as well.
The extra HP your allies recover through Bulk Up will show on the results screen as attributed to you.
Goats are known to have some of the greatest moxie in the animal kingdom, which explains their questionable need to headbutt everything they see. I don’t know where it comes from, but in Gogoat’s case, it probably has something to do with its Bulk Up Move.
With one move, Gogoat’s Attack, Sp. Attack, Defense, Sp. Defense, and HP Recovery increase greatly for a short while. This allows Gogoat the muscle power it needs to join in team fights, whether to help finish off the enemy or to make a desperate retreat. While the Sp. Attack boost is useless to you, Bulk Up shares the boost with Ally pokemon riding you, which makes Bulk Up a helpful boon to any of your possible teammates.
Speaking of which, popping Bulk Up with an ally on your back grants you and your teammate the Unstoppable Status Effect, making you nearly impossible to hold down with hindrances. It won’t be of much help to an ally if you’re using this move to escape, but if you were to rush into a fight, Bulk Up would make for a powerful opener for you and a friend to crash the party with.
The powered up HP recovery effect means that you’ll restore a bit more HP from recovery effects like Horn Leech or Potion. If your allies understand what the Bulk Up boost grants you, they can also pop their own recovery for some extra juice, like the Potion Item or through moves like Venusaur’s Giga Drain or Goodra’s Dragon Pulse. It also means extra healing if you chose Horn Leech over Aerial Ace, though Horn Leech won’t be missed as much if your teammates have reliable sustain like Umbreon’s Wish or Buzzwole’s Leech Life. Though keep in mind that any move they use will cause them to dismount off of Gogoat, so you better come up with a plan of attack while riding to battle.
Though perhaps you can engineer an attack on your own terms to catch the enemy by surprise.
-
Move 2b: Seed Bomb (Area)
Launches a parade of hard shelled seeds on the designated area, damaging enemies and greatly reducing their Attack and Defense. If a teammate is riding you, they are thrown along with the seeds, dealing more damage and stunning enemies on hit. 7s cooldown.
At Level 12, Seed Bomb becomes Seed Bomb+.
Expands the range of the attack and further decreases Attack and Defense.
Seed Bomb decreases the enemies Attack and Defense by 75% for 7 seconds. If an ally was on your back when you use this move, the attacks deals 2.5x more damage and Stuns enemies that are hit by the shock wave caused by your allies’ landing for 0.5 seconds.
Seed Bomb+ further decreases the Attack and Defense of damaged enemies to 100%. The range is also effectively doubled.
Using this move forces you to stop moving, even while riding with Horn Leech.
While Bulk Up offers a variety of boosts to benefit any possible ally, Seed Bomb works in contrast by debuffing enemies with a concentrated effect. It can only debuff Attack and Defense, but the severity of the debuff is much stronger than Bulk Up’s boons and lasts for as long as the move’s cooldown. This means that, if you are up against physical enemies like Crustle or Tyranitar, Seed Bomb enfeebles them greatly compared to the Attack and Defense boost Bulk Up grants.
A 75% Attack and Defense debuff is no joke, as it can greatly bog down Defenders and Bulky All-Rounders that rely on those stats to take hits and return them back in kind. The debuff lasts for 7 seconds, which is just as long as the move’s cooldown, allowing you to reapply the debuff almost immediately when it wears off, putting the pressure on the opposition. Of course, you’ll need an Attack focused ally to take advantage of this debuff, though Melee Attackers will have the time of their life thanks to Seed Bomb’s secondary effect.
Since Gogoat launches Seed Bomb from its back, any ally it’s giving a ride to will be ejected just as well, turning them into a projectile. They’ll hit the ground with a solid thud, dealing extra damage to enemies and also stunning them briefly, in addition to hitting them with debuffs. That brief moment of Stun is all the time you need to start laying the smack down on the enemy, especially if they’re an Attack based All-Rounder or Defender like Aegislash or Trevenant. Ranged Attackers like Decidueye and Cinderace can also start putting holes in the enemy team, but they’ll have to dismount shortly before Gogoat uses Seed Bomb so that they don’t get caught in the middle of the enemy team when they wake up.
Seed Bomb+ expands the area of effect and even debuffs enemies even further when they get hit, allowing you to greatly debilitate a larger group of enemies, especially during the Rayquaza fight. You just have to hope that the ally you’re throwing will also be sufficiently leveled enough to clean up afterwards, as you can expect the entire enemy team to be there.
As strong as Gogoat is, it’s only a distraction that empowers its teammates with free rides and boons. Yes, it hits hard, but only so that it can either finish off weakened enemies or to soften them up for its allies. As such, it’s Unite Move perfectly encapsulates Gogoat’s ability to occupy an enemy for the team.
-
Unite Move: Clashing Crowns (Dash)
The pokemon charges at an enemy and locks heads with it, forcing the enemy into a contest of strength. You and the target must mash the attack button repeatedly to overpower the other. If you win, the enemy will lose a portion of their HP and have their defenses reduced for a short while. The enemy will lose more HP if they do not mash enough. If you lose, you will lose half of your HP. If you have an ally pokemon riding you, they can also join in, adding their strength to yours.
Similar to Slowbro’s Slow Beam and Mimikyu’s Play With Me..., this Unite Move forces an enemy into an immovable state. The clash lasts only for 3 seconds, though.
Assuming the enemy mashes to the maximum degree but loses the clash regardless, the least HP an enemy can lose to this Unite Move is 20%. However, if the enemy barely mashes, they can lose up to 50% of their HP.
If you lose the mashing contest, you will lose 50% of your HP regardless of how well you mashed. An ally pokemon riding you can mash as well during the clash, contributing their strength to yours.
In extremely rare circumstances where both players are evenly matched, neither player will lose HP.
HP lost is based on the percentage of remaining HP and is classified as piercing damage. This Unite Move can never KO.
The enemy will have their Defense and Sp. Defense reduced by 75% for 8 seconds after losing.
Both you and the enemy can still be targeted and damaged by other players. The Unite Move will be cancelled if you are KO’d.
When a pokemon is targeted, they will adopt the same idle animation as charging a score in a Goal Zone. Pokemon like Lucario, Machamp, Pikachu, and Charizard have cool poses, but others have strange and goofy ones, like Mr. Mime juggling balls or Chandelure waving its arms around. These aren’t intentional, these are just the scoring animations each pokemon has.
Only opposing Gogoats will use a unique animation when targeted by Clashing Crowns.
When a goat charges at you, you have to turn away instead of charging them head on. The reason for that is because goats are built for literal head-to-head combat, and you are risking major damage to yourself by stooping to their level. But when you’re a Gogoat in a world of competition, everyone else might as well look like goats.
Clashing Crowns is a powerful Unite Move that challenges the first enemy you run into to a test of strength. Upon a successful hit, you and the enemy will be locked in mortal mashing, pounding the attack button as much as you can to claim victory. Because of how easy it is to catch an enemy off-guard, you’ll have a head start on the button bashing power. Though you shouldn’t be surprised to run into an enemy well versed at mashing mini-games, as it is possible to lose this encounter.
Firstly, the fight lasts only for 3 seconds, during which either you or the enemy can get damaged by opposing team members. Even without anyone to interfere in the contest, the loser of the clash can lose a percentage of their HP if they don’t mash enough. For the opponent, they can lose half of their HP if they don’t really try all that hard, or up to 20% if they barely lose. But in your case, since you’re the one who initiated the duel, you’ll lose 50% of your HP for losing, regardless of how well you mashed.
You can guarantee victory by starting Clashing Crown with an ally riding on your back, as they can join in on the mashing as well. It’s a bit cheap to gang up on one enemy, but it’s not without cost. Remember, the Unite Move lasts for 3 seconds, during which you and an ally are occupied with an enemy, leaving the rest of your team in a 3v4 situation, which isn’t ideal in normal circumstances. During that time frame, the entire team can be wiped out because of the power difference, especially if you used Clashing Crowns with someone bulky on your back. Perhaps it would be best to ride with someone underleveled or when multiple enemies are respawning, to make up for the time lost.
As annoying as Clashing Crowns is, this Unite Move can never KO an enemy due to the damage dealt being based on remaining HP. It wouldn’t be worth using the move on a weakened enemy, especially since Gogoat is very strong for a Supporter and can go for the KO themselves. Maybe you can impede an opposing Defender or All-Rounder, but without backup, they’ll come out of the clash annoyed at you, and some can even restore their own HP if they can easily sustain themselves. You’ll need allies with you to make the most of this Unite Move, and I’m not just talking about the free ride mechanic. Gogoat can support a team well if there’s teammates nearby to support.
A rampaging goat can easily draw all the attention in the room. Take advantage of this opening and seize victory head on!
-
Achievements
Make 12 Assists in a single round.
Gogoat’s main function on teams is to provide free rides with some extra benefits through its moves. With Horn Leech and Aerial Ace scooping up allies, it’s easy to charge straight into a fight, but this achievement is about accumulating Assists, not KO’s.
For the most part, you and your allies benefit greatly from timely uses of either Bulk Up or Seed Bomb, but you have to know when it is optimal to dive into fights without getting yourself KO’d in turn. To that end, you should prepare with a shield gained by Grass Pelt, which you can share with an ally while standing in Tall Grass. It may take about 6 seconds to accrue a large shield, but it’ll be worth it to not get immediately destroyed by burst damage thrown at you by the opposing team.
After that, the fight can go however you want, especially if your ally is a ranged attacker. Though keep in mind that your ally will dismount if they use a Move, so you gotta open with either Bulk Up or Seed Bomb, then whittle the enemy down so that your teammate can clean up afterwards.
Your Unite Move, Clashing Crowns, makes this a lot easier as you cannot KO an enemy with the move, but you will take a large chunk of their HP in the exchange, which can be enough for a teammate to finish them off. I know you’d probably prefer to get the KO for yourself, but remember, you were a sitting duck for those 3 seconds. You gotta pull back and let your teammates fight too, especially if you were walloped while waging war with the enemy.
Don’t butt heads with your friends, butt heads with your enemies instead.
-
Holowear
Because Gogoat has an entire gimmick based on giving rides to its allies, we can’t really put anything big and flashy on its back. But that’s completely fine, as less is more, as they say.
Starting off, we have Explorer Style Holowear that gives Gogoat a brown explorer’s hat and loads of satchels and sacks hanging off of its sides. Warm Style Holowear gives it a beanie, a big scarf, and some comfy looking pants on its backside. Western Style Holowear gives it a big cowboy hat, a sheriff’s badge, and a poncho draped over its body. Gardener Style Holowear gives Gogoat a big sun hat, some overalls with shears and trowels peeking out of the pockets, and a sprig of wheat hanging out of its mouth. And lastly, Punk Style Holowear gives the goat some cool shades, bracelets on its horns and ankles, and a black leather suit that covers its body. Gotta ride in style, you know?
-
Strategy
Much of what you need to accomplish as Gogoat can be learned from playing Lapras, and vice versa. If you want to make for a good Supporter, you gotta bring yourself and an ally to where the important fight is. If you want to make for a great Supporter, you do that and more by dealing a lot of damage and making Assists.
Supporters are split into two camps; you have healers and buffers like Blissey and Eldegoss, and then you have those that specialize in distractions like Sableye and Mr. Mime. Some of them dabble in alternative proficiency, but for the most part, they’re the shoulders to lean on during a fight. Gogoat breaks this mold by not only doing both, but also dealing just as much damage to opposing teams in fights as its fellow Attackers and All-Rounders. This is what happens when you make friends with a stubborn goat.
First off, while its ride mechanic is somewhat weaker than Lapras’ Unite Move, Lapras Express, Gogoat compensates for that with the ability to empower the ally riding on it with healing and shields. With Horn Leech, you can drain HP from all enemies you run into, refilling the HP bar of yourself and an ally, which can be useful to save them from certain KO or to top them off before joining a fight. With Aerial Ace however, you trade in any possibility of healing with deft movement and quick strikes, allowing you to save a friend from getting ganged up on. It also turns into an invincible cutting attack while an ally is on your back, which can be useful in escaping long range shots and Unite Moves.
Regardless of which move you choose, these attacks form the crux of your ability to support the team as a Supporter. These moves, and Tackle, are the only way you can pick up allies to ride with, which is also the only way you can share a shield with them through your Grass Pelt ability. It takes 6 seconds to gain a massive 25% shield, which scales to your HP, but any amount will be greatly appreciated by your ally Defender or All-Rounder. If they are impatient, an ally can choose to dismount with any move, so don’t fault them for opting to jump back into the fight instead of waiting for Grass Pelt to fill out the shield.
Speaking of which, it’s also on your allies to understand how riding works, since the move is different from how Lapras does it. Only basic attacks can be used repeatedly while riding on Gogoat, and maybe some abilities that can be activated, and even then, a basic attack can force the ally to dismount if it makes them dash forward, like Gengar or Aegislash. Any Move will also cause a dismount, even if it’s only a buff like Crustle’s Shell Smash or Dodrio’s Agility, and this also include Unite Moves. It can be frustrating to manage allies if they keep accidentally hopping off, but thankfully it’s easy enough to pick a friend back up, as Horn Leech and Aerial Ace have much shorter cooldowns than Lapras Express.
While you have them on your back, you can power up yourself and your allies with either Bulk Up or Seed Bomb. Bulk Up grants a universal boost to all stats and your HP recovery, sharing it with a riding ally. If you use it while giving a ride to someone, you’ll both get Unstoppable for a short while. If you prefer to take the enemy by surprise, Seed Bomb is a great option, as it has a stronger debuff effect. It’ll also toss your ally at enemies, along with the Seed Bomb attack, stunning enemies hit directly by your launched ally. If you throw a teammate that thrives in close quarters combat like Snorlax or Scizor, your team will have a very powerful opening advantage in a team fight. Just make sure that your ally is in on the plan of attack as well, maybe make a pit stop in a nearby plot of Tall Grass before starting the fight.
Your Unite Move, Clashing Crowns, is what will really turn the tides of battle in your favor. Being able to occupy an enemy for a short amount of time is a powerful effect, as we’ve learned from Slowbro’s Slow Beam and Mimikyu’s Play With Me. While you’re guaranteed to have an enemy’s attention for 3 seconds, you can also take away a big chunk of their HP bar by mashing the attack button furiously. No matter how good the enemy mashes, they’re guaranteed to lose at least 20% of their HP if they lose the mashing contest, though you’re also guaranteed to lose 50% of your own HP if you pick a fight and end up losing. You can use an ally riding on your back as backup, but it’s advised not to do this during team fights as your allies will be down 3-to-4 for those 3 seconds, which is all the time it takes for something to go completely wrong. Clashing Crowns is at its strongest during other Objective fights like Regieleki or one of the Regi Trio in Bottom Lane, as it’s very rare to engage the entire enemy team in one lane over the other (of which there’s a lot to be said about that situation...).
But most importantly, Gogoat is also packing some serious muscle. You’re at your strongest leading an ally into battle and then buffing them up with Grass Pelt or Bulk Up, or hindering the enemy with Aerial Ace and or Seed Bomb, but those are your opening gambits. The rest of the fight sees a wild and furious goat kicking and screaming and biting at all perceived danger, and Gogoat can do some serious damage thanks to its above average Attack stat. It can either stun the enemy repeatedly with Aerial Ace, or run around healing itself with Horn Leech, and it can use these moves at any time to either beat the enemy into submission or to make a break for freedom with an ally in tow.
Goats are as dependable as they are useful, as humans have known for thousands of years. We took care of them, so make sure that this one takes care of you, friend or foe.
-
And this has been Gogoat for Pokemon Unite! Since I was very spot on with how Lapras was integrated into Pokemon Unite, I figured, ‘well, what if ANOTHER pokemon had a ride mechanic?’ and whaddya know, there are other ride pokemon like Lapras! Maybe I could’ve chosen Mantine or something for a Supporter ride pokemon, but I kinda like Gogoat as a concept. Y’know, gruff green grass goat with an ability that people think is useless, so I can use Pokemon Unite to transform it into something endearing and useful. That’s about half the reason I come up with these posts.
Anyway, that’ll be it from me. See ya next week!
0 notes