
Last Seen Blogs

lh-photographys-blog
LHPhotography Blog

thecaleblandryjonessociety
CLJsociety

bewertungenl
Anwalt für Reputationsschutz - Dein-Ruf.de

jarmes
Contrarian Anarchist Dipshit

idrewacircle-moving
Untitled
Text
Historic Home Remodeling and Renovation: How to Find the Right Contractor and Avoid Common Pitfalls
Remodeling and renovating a historic home can be a rewarding yet daunting task. These architectural treasures hold rich stories within their walls, but updating them requires careful planning and execution. One of the most critical decisions you'll make is choosing the right contractor. In this article, we'll explore how to find the perfect contractor for your historic home project and steer clear of common pitfalls along the way.
Researching Contractors:
Before initiating any renovations on your historic home, it's paramount to conduct thorough research on potential contractors. Here's a detailed breakdown of how to approach this crucial step:
Identify Potential Contractors: Begin by compiling a list of contractors who specialize in historic home remodeling. Utilize online resources, local business directories, and recommendations from trusted sources such as friends, family, and local preservation societies.
Review Portfolios: Take the time to carefully examine the portfolios of each contractor on your list. Look for examples of past projects that align with the style and scope of your own renovation. Pay close attention to the quality of workmanship, attention to detail, and adherence to historical authenticity.
Verify Experience and Expertise: Ensure that the contractors you're considering possess relevant experience and expertise in historic home remodeling. Look for evidence of specialized training, certifications, or affiliations with organizations such as the National Association of the Remodeling Industry (NARI) or other professional bodies dedicated to historic preservation.
Interview Potential Contractors: Schedule consultations or interviews with the contractors who have made it onto your shortlist. Use this opportunity to discuss your project in detail, including your goals, timeline, budget, and any specific requirements or concerns you may have. Pay close attention to how each contractor communicates and interacts with you during these meetings.
2. Qualifications and Credentials:
When selecting a contractor for your historic home renovation, it's essential to ensure that they possess the necessary qualifications and credentials. Here's what to consider:
Licensing, Insurance, and Bonding: Verify that any contractor you're considering is properly licensed, insured, and bonded. Licensing demonstrates that the contractor has met the necessary requirements to perform construction work in your area, while insurance and bonding provide financial protection in the event of accidents, injuries, or property damage during the renovation process.
Specialized Training: Inquire about any specialized training or coursework that the contractor has completed specifically related to historic preservation and renovation. Contractors with specialized expertise in this area are better equipped to navigate the unique challenges and considerations associated with working on historic properties.

3. Understanding of Preservation Guidelines:
Historic homes are often subject to strict preservation guidelines designed to protect their historical integrity and character. When selecting a contractor for your renovation project, it's crucial to choose someone who has a solid understanding of these guidelines and is committed to working within them. Here's why it matters:
Compliance with Regulations: Your contractor should be well-versed in local historic preservation regulations and zoning ordinances governing renovations to historic properties. This includes requirements related to building codes, permits, and approvals necessary for undertaking renovation work on a historic home.
Appropriate Materials and Techniques: A contractor with a thorough understanding of preservation guidelines will know which materials and construction techniques are appropriate for use in historic home renovations. They will prioritize the use of historically accurate materials and methods while minimizing interventions that could compromise the home's historical integrity.
Collaboration with Preservation Authorities: In some cases, your contractor may need to collaborate with local preservation authorities or historic preservation boards to obtain approvals or guidance for your renovation project. A contractor who understands preservation guidelines will be prepared to navigate these processes effectively and advocate for the preservation of your home's historical significance.
4. Communication Skills:
Effective communication is essential for a successful renovation project, especially when working on a historic home with its own unique challenges and considerations. Here's why communication skills matter when selecting a contractor:
Understanding Your Vision: A contractor who communicates effectively will take the time to understand your vision for the renovation project, including your goals, preferences, and priorities. They will listen attentively to your input and incorporate it into the planning and execution of the project.
Providing Updates and Feedback: Throughout the renovation process, your contractor should keep you informed of progress, challenges, and any decisions that need to be made. They should provide regular updates and be responsive to your questions, concerns, and feedback.
Addressing Issues Promptly: Inevitably, issues may arise during the renovation process that require attention or resolution. A contractor with strong communication skills will address these issues promptly and transparently, keeping you informed of any developments and working collaboratively to find solutions.
5. Detailed Contract:
Once you've selected a contractor for your historic home renovation project, it's essential to formalize the agreement with a detailed contract. Here's what to include:
Project Scope: Clearly outline the scope of work to be performed, including specific tasks, timelines, and milestones. Define the responsibilities of both parties to avoid any misunderstandings or disputes later on.
Budget and Payment Terms: Specify the total project cost, payment schedule, and any payment milestones or deadlines. Include provisions for handling changes or additions to the scope of work that may impact the overall cost.
Materials and Specifications: Detail the materials, finishes, and fixtures to be used in the renovation, including any requirements for historical accuracy or preservation. Specify any allowances or options for selection by the homeowner.
Permits and Approvals: Clearly define the responsibility for obtaining necessary permits and approvals for the renovation project. Ensure that the contractor agrees to comply with all relevant building codes and historic preservation regulations.
Insurance and Liability: Require proof of insurance coverage, including general liability insurance and workers' compensation insurance, to protect both parties in the event of accidents, injuries, or property damage during the renovation process.
6. Avoiding Common Pitfalls
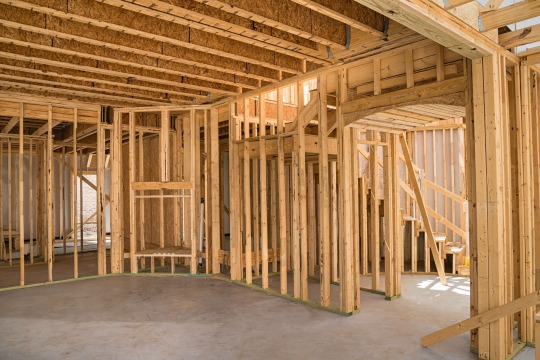
Ignoring Structural Issues:
Description: Historic homes often have unique structural challenges due to their age and construction methods. These issues may include foundation problems, deteriorating support beams, or outdated electrical and plumbing systems.
Impact: Ignoring structural issues can lead to safety hazards, increased renovation costs, and even structural failure in extreme cases.
Solution: Prioritize a thorough inspection by a qualified structural engineer before beginning any renovation work. Addressing structural issues early ensures a solid foundation for the rest of the project.
Cutting Corners on Materials:
Description: Some homeowners may be tempted to opt for cheaper, low-quality materials to cut costs during the renovation process.
Impact: Choosing inferior materials can compromise the historical integrity of the home, detract from its aesthetic appeal, and result in frequent repairs or replacements.
Solution: Invest in high-quality materials that match the historical character of the home. Research authentic or period-appropriate materials that maintain the authenticity of the original design.
Underestimating Costs:
Description: Historic renovations often entail unforeseen expenses due to the unique challenges associated with preserving and restoring older structures.
Impact: Underestimating costs can strain your budget, causing delays or incomplete renovations if funds run out before the project is complete.
Solution: Develop a detailed budget that includes a contingency fund to cover unexpected expenses. Work closely with your contractor to identify potential cost overruns and adjust the budget accordingly.
Skipping Permits and Approvals:
Description: Some homeowners may attempt to bypass the necessary permits and approvals required for historic renovation projects, either due to ignorance or a desire to expedite the process.
Impact: Skipping permits and approvals can result in fines, legal repercussions, and forced removal of any unauthorized work. Additionally, it may jeopardize eligibility for historic preservation incentives or tax credits.
Solution: Familiarize yourself with local building codes and historic preservation regulations. Obtain all required permits and approvals before commencing any renovation work, and consult with preservation authorities to ensure compliance with guidelines.
Conclusion: By avoiding these common pitfalls requires thorough planning, attention to detail, and adherence to professional standards and regulations. By addressing structural issues, investing in quality materials, accurately estimating costs, and obtaining necessary permits, you can ensure a successful historic home renovation project that preserves the integrity and beauty of your property for years to come.
0 notes
Text
Can termite travel and spread from place to place?
Yes, termites can travel and spread from place to place, and they are known for their ability to cause extensive damage to wooden structures and vegetation. There are several ways in which termites can move and establish new colonies:
Flying Termites (Swarmers): Mature termite colonies produce winged, reproductive termites called swarmers or alates. These flying termites leave their original colony in a swarm to find a mate and establish new colonies. After mating, they shed their wings and start new colonies in suitable locations.
Subterranean Termites: Subterranean termites build their nests underground, and they create tunnels or mud tubes to access food sources, such as wood. They can travel from their nest to a structure or food source and back. As they forage for food, they can unintentionally establish satellite colonies in new areas.
Drywood Termites: Unlike subterranean termites, drywood termites do not require contact with soil. They infest and feed on dry wood, including furniture and structural wood in homes. These termites can infest wood in one location and, if not detected and treated, spread to other wooden structures or pieces of furniture.
Hitchhiking: Termites can be unintentionally transported from one place to another when infested wood, such as lumber or furniture, is moved or transported. If wood with termite colonies or eggs is moved to a new location, it can introduce termites to that area.
Natural Dispersal: In some cases, termites can naturally disperse through ground movement or flooding events. Flooding can carry termite colonies to new areas, where they may establish new nests.
Human Activity: Human activity, such as landscaping, construction, or home renovation, can disturb termite colonies, causing them to relocate and potentially spread to new areas.
To prevent the spread of termites and protect your property, it's essential to take preventive measures like regular inspections, maintaining a termite barrier around your home, and promptly addressing any signs of termite infestation. If you suspect you have a termite problem or need assistance in termite control, it's advisable to consult with a professional termite damage repair service, as they have the expertise and tools to effectively manage termite infestations and prevent their spread.
#termite damage repair#termite damage#termite control#termite inspection#termite treatment#termite protection#termite infestation
0 notes
Text
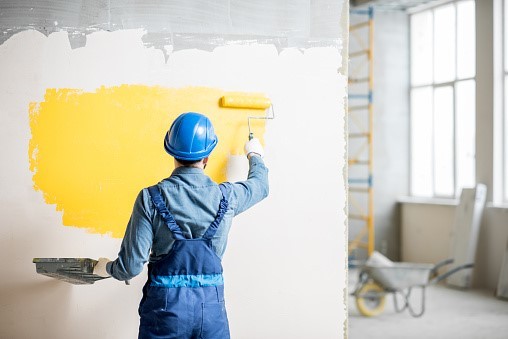
Pro Tips: Commercial Painting for Interior Doors
We have started another year, and with that will in general be new tasks. An incredible method for giving your interior an uncommon revives is by painting your doors. This can appear to be overpowering, yet with these ace tips you will be well headed to partaking in your tidied up space.
An effective commercial painting project generally begins with readiness. In the first place, you will need to figure out what kind of paint is as of now on your doors. Hose a cloth with scouring liquor and rub it against the entryway. In the event that any paint has moved to the cloth, your doors have a plastic based paint and you won't have to prime first. Assuming nothing falls off on the cloth, the entryway has oil based paint and you should prime first.
Then, at that point, you should settle on the style and plan you would like in your home. You might need to go with white or add a pop of variety relying upon what supplements the remainder of your home. Picking paint with a shine or semi-sparkle finish will make a surface that is a lot simpler to clean.
Then, you'll have to buy quality devices and materials to guarantee proficient outcomes. Put resources into a 2-2.5 inch band brush for the entryway and trim. On the off chance that you like to utilize a roller, consider microfiber sleeves which give a smoother finish. Remember your drop fabrics, paint plate, and sandpaper!
Presently it is the ideal time to get to work! We suggest eliminating the entryway from the edge for best outcomes. Make certain to save the equipment in a protected spot for remounting after the entryway is painted and completely dry. On the off chance that there are any defects in the entryway, fill them with wood filler and sand down to a smooth completion. Then, now is the right time to paint! In the event that you have a framed entryway, paint the edges first, the interior boards, vertical strips, flat strips, lastly the upward strips on the sides of the entryway. Make certain to adhere to the drying guidelines in view of the item you select - don't rush the cycle. Whenever you are finished painting and the entryway has completely dried, reattach and partake in your revived space!
1 note
·
View note
Text
What factors go into determining the quality of exterior home painting?
Several factors contribute to determining the quality of exterior home painting. Here are some key factors to consider:
1. Surface Preparation: The quality of the painting job heavily relies on thorough surface preparation. This includes cleaning the surface, removing dirt, grime, and loose paint, repairing any damaged areas, sanding rough surfaces, and priming as necessary. Proper surface preparation ensures good paint adhesion and a smooth finish.
2. Paint Quality: The type and quality of paint used significantly impact the durability and appearance of the exterior paint job. High-quality paints with good adhesion, UV resistance, and weatherproofing properties tend to last longer and provide better protection against the elements.
3. Color Selection: The choice of paint color can affect the overall aesthetic appeal of the house. Opting for appropriate colors that complement the architectural style, surroundings, and personal preferences is crucial. Additionally, using color-fast pigments can help prevent fading over time.
4. Paint Application Technique: The application technique employed by the painter plays a vital role in achieving a high-quality finish. Experienced painters utilize proper brushing, rolling, or spraying techniques to ensure even coverage, smoothness, and minimize visible brush marks or roller streaks.
5. Number of Coats: Applying an adequate number of paint coats is essential for durability and a consistent appearance. Typically, two coats of paint are recommended to achieve optimal coverage and color depth. However, certain situations might require additional coats, such as when transitioning between significantly different colors or covering a highly porous surface.
6. Weather Conditions: Exterior painting should ideally be done under favorable weather conditions. Avoiding extreme temperatures, high humidity, direct sunlight, or rain is crucial. Working in suitable weather allows the paint to dry properly and prevents issues like premature drying, bubbling, or uneven finish.
7. Proper Tools and Equipment: The use of appropriate tools and equipment, such as high-quality brushes, rollers, sprayers, and ladders, contributes to a professional-looking paint job. Good tools facilitate better paint application, smoother finishes, and reduce the chances of accidents or damage during the process.
8. Skill and Experience of the Painter: The expertise and experience of the painter or commercial painting contractor can greatly influence the quality of the exterior painting job. Skilled professionals know how to handle various surfaces, navigate obstacles, address potential issues, and deliver a high-quality, long-lasting result.
Remember, a well-executed exterior paint job not only enhances the curb appeal of your home but also protects it from the elements, which can help maintain its value and integrity over time.
#painting#commercial painting#commercial painting contractor#exterior painting#Exterior home painting
0 notes
Text
How to Deal with a Roofing Insurance Claim?
Dealing with a roofing insurance claim can be a bit complex, but following a systematic approach can help you navigate the process smoothly. Here's a step-by-step guide:

Assessment and Documentation:
Inspect the Damage: Assess the extent of the damage to your roof caused by incidents like storms, hail, or leaks.
Document the Damage: Take clear photos and videos of the damage from various angles. This documentation will be crucial for your insurance claim.
Review Your Policy:
Understand Coverage: Review your insurance policy to understand the extent of coverage for roof damage. Note any deductibles, limitations, or exclusions that may apply.
Contact Your Insurance Company:
Prompt Notification: Notify your insurance company about the roof damage as soon as possible. Some policies have specific time limits for reporting claims.
Provide Information: Be ready to provide details about the damage, when it occurred, and any initial repairs you may have done to prevent further damage.
Schedule an Adjuster Inspection:
Insurance Adjuster: Your insurance company will likely assign an adjuster to assess the damage. Schedule a time for them to inspect your roof.
Present Documentation: During the inspection, provide the photos, videos, and any other documentation you've collected. Walk the adjuster through the damage.
Obtain Repair Estimates:
Get Multiple Estimates: Obtain estimates from reputable roofing contractors for the repair or replacement work required.
Share Estimates: Share these estimates with your insurance adjuster to ensure they align with their assessment.
Claim Approval and Pay-out:
Approval Process: Your insurance company will review the adjuster's report and the repair estimates. They'll determine the amount they'll cover based on your policy terms.
Pay-out: Once the claim is approved, your insurance company will issue a pay-out. This pay-out may be in one or multiple instalments.
Choose a Contractor:
Contractor Selection: Select a licensed and experienced roofing contractor to carry out the repair or replacement work. Check if your insurance has any requirements for contractor choice.
Start Repairs:
Coordinate with Contractor: Work closely with the chosen contractor to schedule the repairs. Ensure they follow local building codes and regulations.
Document the Process:
Record Progress: Keep a record of the repair process with photos and notes. This documentation can be useful if there are any disputes.
Final Inspection and Payment:
Completion Inspection: Once the repairs are complete, conduct a thorough inspection with your contractor to ensure the work meets your satisfaction.
Final Payment: If your insurance pay-out was issued in instalments, the final payment is typically released after you provide proof that the repairs were completed.
Remember that the specifics of the process might vary based on your insurance company, policy, and local regulations. It's also recommended to consult with professionals, such as roofing contractors and legal advisors, if you encounter any challenges during the claims process.
2 notes
·
View notes
Text
youtube
#construction#painting#commercial painting#home repair#home improvement#commercial general contractors#exterior painting#office painting#interior painting#home decor#Youtube
1 note
·
View note
Text
When Do I Need to Paint the Exterior of My Commercial Building?
The need to paint the exterior of your commercial building can vary depending on several factors, including the type of building materials, local climate conditions, regular maintenance practices, and the overall condition of the existing paint. Here are some signs that indicate it may be time to consider repainting the exterior:

1. Fading and Discoloration: Over time, exposure to sunlight and weather elements can cause the paint to fade or become discolored. If your building's exterior paint appears dull, uneven, or has significant color changes, it may be time for a fresh coat of paint to restore its aesthetic appeal.
2. Peeling, Cracking, or Blistering: When the paint starts to peel, crack, or form blisters, it indicates that the protective barrier has been compromised. This can expose the underlying surfaces to moisture and other damaging elements. Repainting is necessary to maintain the structural integrity and protect against further damage.
3. Chalking: Chalking occurs when the painted surface develops a powdery residue that can be easily rubbed off. It is a natural aging process of certain types of paint and can result in a faded appearance. If your building exhibits excessive chalking, it may be time to consider repainting to restore its vibrancy.
4. Damaged or Weathered Surfaces: If the exterior surfaces of your commercial building have become significantly weathered, with signs of erosion, rust, or decay, repainting can provide a protective layer to prevent further deterioration and extend the lifespan of the building materials.
5. Branding or Image Updates: If you're rebranding your business or updating the overall image of your commercial property, a fresh coat of paint can play a vital role in achieving the desired look and creating a positive impression on clients, customers, and visitors.
It's important to note that regular maintenance and inspections are crucial for identifying signs of paint deterioration early on. Additionally, consulting with professional painters or contractors experienced in commercial exterior painting can provide valuable insights and recommendations based on the specific needs of your building.
#commercial exterior painting#painting#commercial painting#painting office#office painting#painter#exterior painting#Interior Painting
2 notes
·
View notes
Text
Is exterior painting and interior painting is different for commercial and residential?
The main differences between exterior painting and interior painting for commercial and residential projects lie in the scale, scope, and specific requirements of each type of painting job. While the basic principles of painting remain the same, there are a few factors that may vary between commercial and residential projects.

1. Surface Area: Commercial buildings often have larger surface areas compared to residential homes. This means that commercial exterior painting projects may require more extensive preparation, equipment, and manpower to cover a larger area efficiently.
2. Building Materials: Commercial buildings and residential homes may be constructed with different materials. Commercial buildings often use materials such as concrete, metal, or stucco, which may require specific types of paint or coatings designed for those surfaces. Residential homes may have a wider variety of materials, including wood, siding, or brick, which may have their own specific painting considerations.
3. Regulations and Codes: Commercial buildings are subject to specific regulations and codes set by local authorities. These regulations may dictate the type of paint to be used, color restrictions, and other considerations. Residential painting projects may also have certain restrictions, but they tend to be more flexible compared to commercial projects.
4. Usage and Traffic: Commercial buildings often experience higher levels of foot traffic and wear compared to residential homes. This means that commercial interior painting projects may require more durable paints and coatings that can withstand frequent cleaning and potential damage from everyday use.
5. Aesthetics and Branding: Commercial buildings may have specific branding or design requirements that need to be considered during the painting process. This could include specific color schemes, logos, or other visual elements that reflect the company's identity or brand. Residential painting projects are typically more focused on personal preferences and individual aesthetics.
While there are some differences between commercial and residential exterior and interior painting, the core principles of surface preparation, paint application techniques, and attention to detail remain important in both cases. It is crucial to consult with professional painters who have experience in the specific type of project you have to ensure the best results.
#painting#commercial painting#residential painting#interior painting#exterior painting#home painting#home & lifestyle#home decor#home
2 notes
·
View notes
Text
Key questions to consider when hiring commercial general contractors
Choosing the right commercial general contractor is crucial for the success of your construction project. Before making a hiring decision, it's important to ask pertinent questions that can help you evaluate their expertise, reliability, and suitability for your specific needs. Consider the following key questions before hiring a commercial general contractors:
1. What is your experience in commercial construction?
Understanding the contractor's experience in commercial projects is essential. Inquire about the number of years they have been in the industry, their portfolio of completed projects, and any relevant certifications or licenses they hold.
2. Can you provide references from previous clients?
Requesting references allows you to gauge the contractor's reputation and track record. Contact their previous clients to inquire about the quality of work, adherence to timelines, communication skills, and overall satisfaction with the contractor's services.
3. Do you have the necessary insurance coverage?
It is vital to confirm that the contractor carries adequate insurance coverage, including general liability insurance and workers' compensation insurance. This ensures that you are protected from potential liabilities and accidents that may occur during the project.
4. How do you handle subcontractors and vendor selection?
Many commercial projects require subcontractors or specialized vendors. Inquire about the contractor's process for selecting and managing subcontractors. Ensure they have a robust network of reliable professionals and a thorough vetting process to maintain quality standards.
5. How do you approach project scheduling and timeline management?
Time is often a critical factor in commercial construction. Ask the contractor about their approach to project scheduling, their ability to meet deadlines, and how they handle potential delays or unexpected circumstances.
6. What is your communication strategy during the project?
Clear and efficient communication plays a pivotal role in ensuring the success of any construction project. Inquire about the contractor's preferred communication methods, how often they provide progress updates, and how they handle change orders or project modifications.
7. Can you provide a detailed cost estimate and payment schedule?
Obtain a comprehensive cost estimate that includes all aspects of the project, such as materials, labour, permits, and any potential additional costs. Additionally, discuss the payment schedule and terms to ensure they align with your financial plans.
8. How do you address quality control and inspections?
Ask about the contractor's quality control processes and how they ensure that the work meets industry standards and regulations. Inquire about their inspection procedures, both during and after the project, to guarantee that the final result is of the highest quality.
9. What is your approach to safety on the construction site?
Safety is paramount in construction projects. Inquire about the contractor's safety protocols, training programs, and their commitment to adhering to local building codes and regulations. A safe work environment protects both workers and your investment.
10. What warranty or post-construction support do you offer?
Discuss the contractor's warranty policy and post-construction support. Understand what types of issues are covered, the duration of the warranty, and how they handle any necessary repairs or corrections after project completion.
By asking these essential questions, you can gather valuable information and make an informed decision when selecting a commercial general contractor. Remember, thorough due diligence and open communication are vital for a successful partnership and the timely completion of your construction project.
#commercial general contractors#commercial contractors#general contractor#construction#construction contractors
2 notes
·
View notes
Text
7 Compelling Reasons to Consider Home Renovation
Renovating your home can bring about numerous benefits and improvements to your living space. Here are seven compelling reasons to embark on a home renovation project:
1. Enhanced Comfort and Functionality: Renovations allow you to tailor your home to your specific needs and lifestyle. You can reconfigure rooms, update outdated features, and improve functionality. By optimizing the layout and design, you can create a more comfortable and convenient living environment.
2. Increased Property Value: Home renovations often lead to an increase in the value of your property. By modernizing and improving key areas such as the kitchen, bathrooms, or outdoor spaces, you can make your home more appealing to potential buyers or appraisers. This can be especially beneficial if you plan to sell your home in the future.
3. Energy Efficiency and Cost Savings: Renovating your home presents an opportunity to incorporate energy-efficient features and upgrades. Installing insulation, upgrading windows, or replacing outdated appliances can significantly reduce energy consumption and lower utility bills. Over time, the cost savings can offset the initial investment of the renovation.
4. Personalization and Style: Renovating allows you to personalize your home and reflect your unique style preferences. You can choose finishes, colors, and materials that align with your aesthetic vision. Whether you prefer a contemporary, traditional, or eclectic look, renovating enables you to create a space that truly feels like home.
5. Improved Safety and Security: Older homes may have safety issues or outdated security systems. Renovations can address these concerns by updating electrical wiring, roof repair, adding smoke detectors, installing security cameras, or reinforcing doors and windows. Prioritizing safety and security during a renovation ensures a secure and protected living environment for you and your family.
6. Adaptation to Changing Needs: Over time, your housing needs may evolve. Renovations can help you adapt your home to accommodate lifestyle changes. Whether you need additional space for a growing family, a home office for remote work, or a more accessible layout for aging in place, renovations offer the flexibility to meet your changing requirements.
7. Emotional Well-being: A well-designed and renovated home can have a positive impact on your emotional well-being. Living in a space that reflects your personality, offers comfort, and meets your functional needs can contribute to a sense of contentment and happiness. Renovations provide an opportunity to create a home environment that promotes relaxation, productivity, and overall well-being.
Remember, the decision to renovate your home should be based on your specific circumstances, goals, and budget. It's essential to carefully plan and consider the potential benefits and costs before undertaking a renovation project.
M&T's team of experts is ready to assist you with every aspect of your renovation requirements. Visit us today.
1 note
·
View note
Text
Guidelines for Repairing Termite Damage
Termites are tiny insects that have a strong appetite for chewing, digesting, and tunneling through the wood in your home. They can cause extensive damage to the wooden structures of your property, silently wreaking havoc for years before you even notice the structural damage. Because of their small size and hidden nature, termites can be difficult to detect until it's too late. Therefore, it's crucial to take preventative measures and regularly inspect your home for signs of termite activity to avoid potential damage.
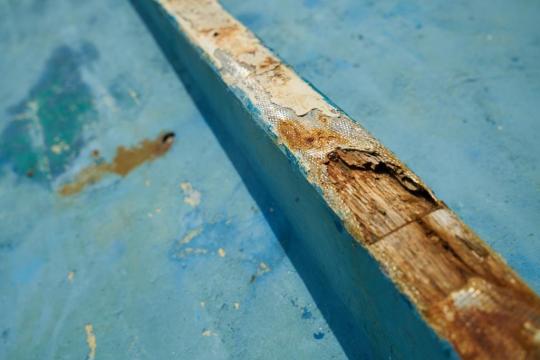
Termites can cause significant damage to the wood in your home, but there are several signs of termite damage that you can look out for. Some common signs include:
· Blistering or buckling wood flooring
· Narrow tunnels in wood or wood furniture
· "Mud tubes" under your porch, around your windows, or wherever wood is exposed
· Walls that look like they've experienced water damage
· Termite wings or bodies
· A mildew or mold-like smell
By keeping an eye out for these signs, you can identify termite damage early on and take steps to address the problem before it becomes more serious. Regular inspections and preventative measures can also help reduce the risk of termite infestations in your home.
How to Repair Termite Damage
1. If you've identified some termite damage in your home, you may be able to repair some of it on your own. Here are two ways to address termite damage in wood:
· Use Wood Hardeners or Fillers to Fill in Gaps: If the damage is relatively minor, you can try using a wood hardener or filler to fill in gaps and restore the wood's structural integrity. These products are designed to penetrate the damaged wood and harden it, making it stronger and more resistant to further damage.
· Add Additional Support to Weakened Areas: In some cases, you may need to add additional support to weakened areas of the wood. This could involve adding braces or sister boards to reinforce the damaged sections of the wood. Be sure to use the appropriate hardware and techniques to ensure a secure and long-lasting repair.
2. Leave Extensive Damage to a Professional: If the termite damage is extensive or if you're not comfortable making the repairs yourself, it's best to leave the job to a professional. They can assess the extent of the damage, identify any underlying issues that may have contributed to the infestation, and recommend the best course of action to restore your home's structural integrity.
3. Keep Records of Your Termite Damage Repairs: It's important to keep records of any termite damage repair that you've made. This documentation can be useful in several ways, including:
· Obtaining insurance compensation: If you have a homeowner's insurance policy that covers termite damage, you'll need to provide documentation to support your claim.
· Evidence in a legal case: If you're involved in a dispute over termite damage, such as a lawsuit against a previous homeowner or a contractor who failed to disclose the infestation, your records can serve as evidence to support your case.
· Proof of remediation: If you plan to sell your home in the future, having documentation of termite damage and repairs can provide potential buyers with peace of mind that the issue has been addressed.
To reduce the likelihood of experiencing another termite infestation and the subsequent repairs, it is important to take preventative termite control measures. Here are some routine pest mitigation steps that you can implement:
· Seal settlement gaps: Termites can use even small gaps in the foundation of your home to gain access. Seal these gaps to make it more difficult for them to get in.
· Implement proper grading and drainage: Make sure that water is directed away from your home's foundation to prevent moisture buildup, which can attract termites.
· Repair pipe leaks promptly: Termites are attracted to moist environments, so it is important to address any leaks quickly to prevent the accumulation of water.
· Remove vent blockages: Proper ventilation helps to reduce moisture buildup, which is attractive to termites. Remove any blockages from vents to promote airflow.
· Replace rotten or damaged wood: Termites are attracted to decaying or damaged wood. Replace any damaged wood promptly to avoid providing a food source for termites.
· Prevent plants, shrubs, and trees from growing up against your home: These plants can create a bridge for termites to gain access to your home. Keep them trimmed and away from the foundation.
· Clear gutters and downspouts: Clogged gutters and downspouts can lead to water buildup, which can attract termites. Keep them clear to promote proper drainage.
· Keep wooden building parts at least six inches above the ground: Termites are attracted to wood that is in contact with the soil. Keep wooden building parts elevated to reduce the likelihood of an infestation.
· Avoid storing wood against your home's walls: This creates an attractive food source for termites and makes it easier for them to gain access to your home. Store wood away from your home's walls.
2 notes
·
View notes
Video
youtube
Services offered by M&T Construction and Painting LLC- To know more visit us
2 notes
·
View notes
Video
Hire a Licensed roofer for roof installation. follow this 9 tips to choose the correct roofing contractor
2 notes
·
View notes
Text
Is Your Roof Ready For Winter?
Introduction
If you live in a part of the country that has extreme weather conditions, your quality roofing and construction is probably one of the most important things on your property. In addition to playing a key role in keeping you warm, dry, and comfortable during winter months, a well-designed roof can provide years of service. However, no matter how strong or durable your roof may be, it can still be destroyed by Mother Nature's fury.

Conduct roof inspections and maintenance.
Roof inspections and maintenance are important to ensure your roof is in good condition.
To conduct a roof inspection, first, check the weather forecast before going out on a cold day. If it's snowing or raining, wait until the weather improves so that you don't get wet or lost in your own house!
Use a flashlight to look up through windows and skylights to see if there are any leaks from water pouring down onto the ground below (this may be caused by trees next door dripping sap into your yard). If this applies to you, have someone come over with some tar paper—a thick layer of paper with adhesive on each side—to patch up any holes in order not only prevent future leaks but also keep them from getting bigger over time."
Test your roof drainage system.
Check for clogged gutters.
Inspect downspouts to make sure they're draining properly and aren't frozen in place due to ice dams or flashing problems (the part of the gutter that connects with the shingles).
Test your roof drainage system by pouring water on top of it and seeing how much drains away without getting into your home or basement area—this is called "flooding," which can lead to mold growth inside your home if left untreated for long periods of time!
Check for damaged or loose shingles and flashing.
Check for loose shingles.
Check for damaged or missing flashing.
Look for gaps between the roof and the roof decking where water can get in, causing leaks and damage to your home.
Trim tree branches close to the roof.
Trim tree branches close to the roof.
Use a ladder.
Make sure you're safe when trimming trees, and use a rope to tie off branches that are too far away from the roof. If you don't have one, get one! It's worth it. You can buy them at any hardware store or garden center for about $20-$30 dollars (depending on how many feet long). A pruning saw works well too, but not everyone has one handy—and if they do, they probably don't know how to use it properly because most people don't need one in their backyard anyway!
Maintain the attic, fireplace, and chimney system.
Maintain the attic, fireplace, and chimney system.
Make sure there is adequate ventilation in your attic to prevent moisture buildup that can cause damage to your home. You should also be checking for insulation that needs to be replaced or if any water damage is present from leaks or condensation on the roof of your house.
Examine areas where rodents may reside such as around windows and doors where they can enter through gaps left by missing screens (especially on wooden windows). Check around pipes that run through walls made with mortar joints; rodents may chew on them causing structural damage over time. Also, look at ceiling joists where signs of rodent activity are likely found; this includes holes chewed into them, droppings left behind after feeding time has passed and evidence of gnawing marks around nails used for holding up floorboards or rafters overhead."
Pay attention to ice dams.
Ice dams are caused by heat escaping from your home. When ice melts, it creates a "trough" of water where the melting happens. This trough collects on top of the roof and is then exposed to further melting as more water pools up there.
The result: water damage inside your house that may require expensive repairs. And remember: if you have an attic fan or heat recovery ventilator installed, these sources of warm air can make it easier for ice to form on your roof instead of just sitting in one place (like when there's no snow).
Weather conditions can impact all types of roofs; maintain yours so that it lasts longer and functions better.
Don't neglect your roof during winter months, as this is when problems often occur. Check for damage, whether it's a small hole in the shingles or sloping at an angle. Also, look for loose shingles or flashing (the metal strip that covers the joint between two layers) that could cause water intrusion into your home if not sealed properly.
Trim tree branches near chimneys and vents to help prevent icicles from forming on them over time -- these can create structural damage if they fall during winter storms onto other parts of your home's exterior surfaces like siding or gutters! If you do find ice dams on top of snowfall accumulation, remove them with a manual scraper designed specifically for this purpose."
Conclusion
This is an important step to take, and one that you should not delay. Roofs are typically only covered by insurance companies for 30 years, so if you wait too long, it could cost more money than it is worth. If your roof has been damaged by weather or other factors, do not hesitate to contact a professional commercial general contractors who can help!
#commercial general contractors#quality roofing and construction#roof installation#roofing#winter#winterroofing#roofers
2 notes
·
View notes
Photo
M and T Contractor offers Commercial Painter in Florida, Mississipi, Alabama. We offer Commercial Painting Services in reasonable prices. Get a free quote today.
2 notes
·
View notes