
Last Seen Blogs

catnatch
true beauty is a true sadness

livben34
Livben Kozmetik

min4urbana
Min4 Urbana

kancil77
KANCILBOLA

drquackers101-blog
Ask Dipper Pines
Text
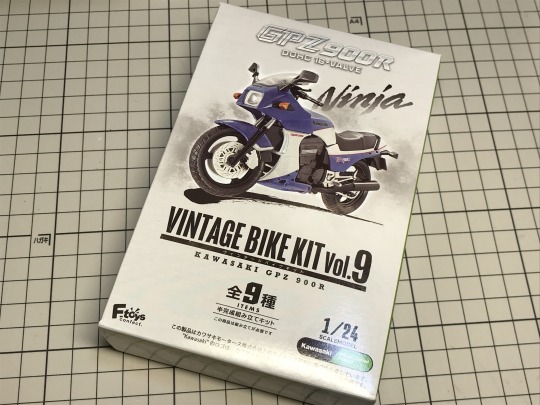
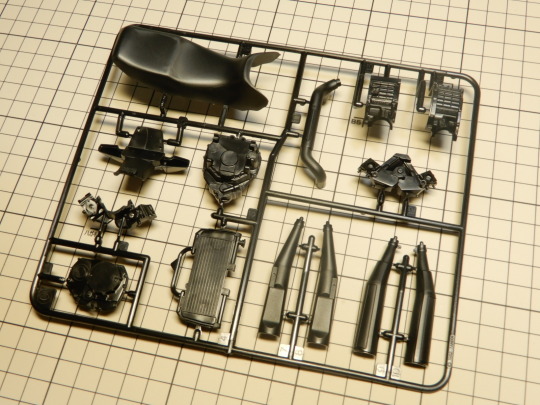
1:24 Kawasaki GPz900R TOP GUN #3
The PC I use for this blog etc. has stopped starting.
To be exact, it started up, but it seemed like the screen wasn't showing, so I replaced the graphics board today and it's back on track.
1:24 scale TOPGUN GPZ900R.
This PC was out of order, but I was able to create the decals I had made on another PC.
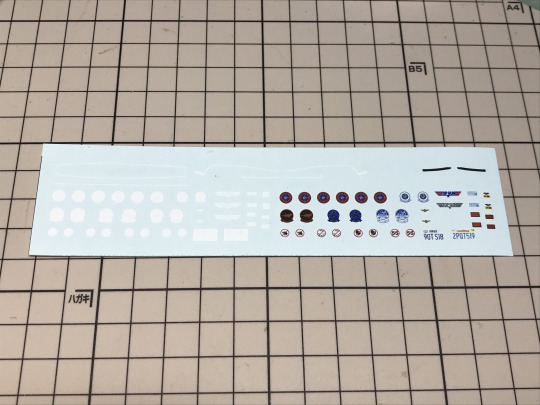
This is a laser printer decal that a friend printed for me.
When I had it made before, it had a detailed design, but nearly half of it was defective and I couldn't use it.
This is because if you print white first and then color, the original mount may stretch slightly due to the effects of the printer's rollers and heat, causing the position of the white print to shift.
As a countermeasure, the white part is now separated as shown in the image.
I made it 1/24 based on the decals that come out on the 1/12 scale.
The side markers are also reproductions of decals in the base kit, so I added side markers so that they don't hit anything that doesn't have a decal.
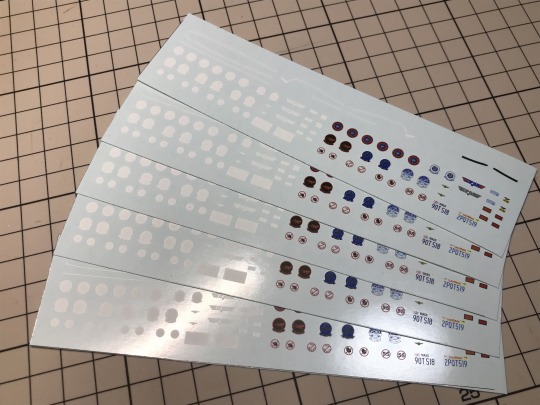
This time I also printed other decals, so I ended up with 5 decals.
I will use one for myself, so there are only four left.
I've decided to start studying something new soon, so I've been busy for a while, so the next update is undecided.
However, we will continue to proceed properly.
Please support me in producing the kit.
・Patreon
patreon.com/SMC9999
・Buy Me A Coffee
https://www.buymeacoffee.com/smc9999
・Ko-fi
https://ko-fi.com/smc9999
0 notes
Text
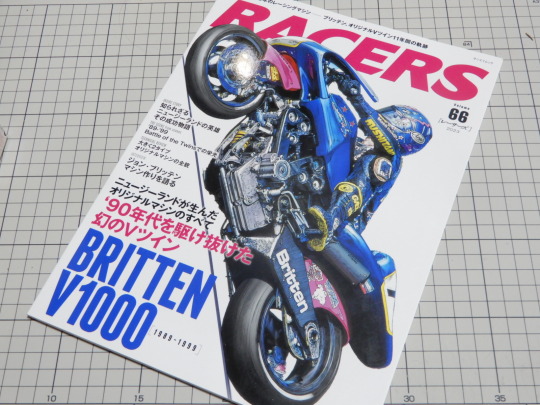
1/12 BRITTEN V1000 #1
Hello everyone.
As for the BRITTEN V1000, when I was collecting images before making it, I found on Facebook that the original company BRITTEN itself was developing a new 1/12 scale kit.
The new kit was announced in 2020, and the latest update was in 2022.
Well, now that I know that the original company is making it, it doesn't seem necessary for me to make it, so I guess I'll just wait for it to be made into a kit.
So, I was thinking about what to do, but I decided to stop making 1/12 scale and start making 1/9 scale little by little over the weekend.
BRITTEN V1000 will be updated every Sunday.
See you next week.
Please support us in producing the kit.
・Patreon
patreon.com/SMC9999
・Buy Me A Coffee
https://www.buymeacoffee.com/smc9999
・Ko-fi
https://ko-fi.com/smc9999
1 note
·
View note
Text
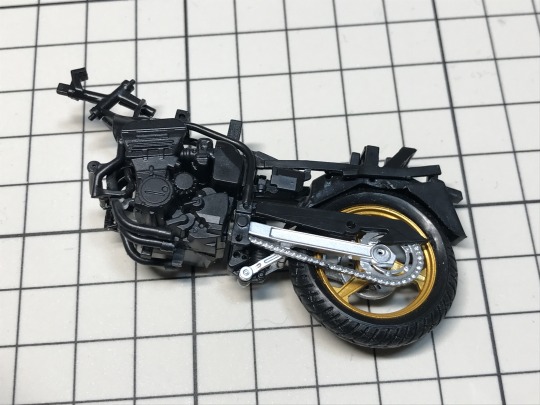
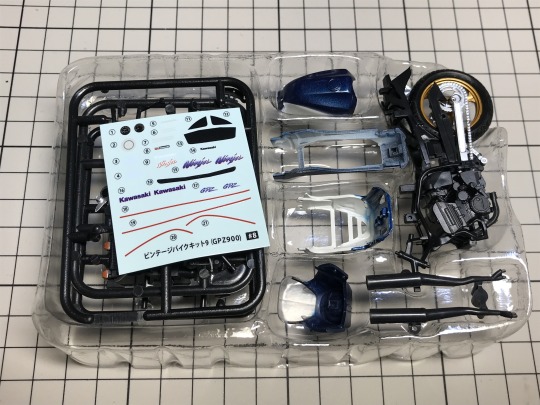
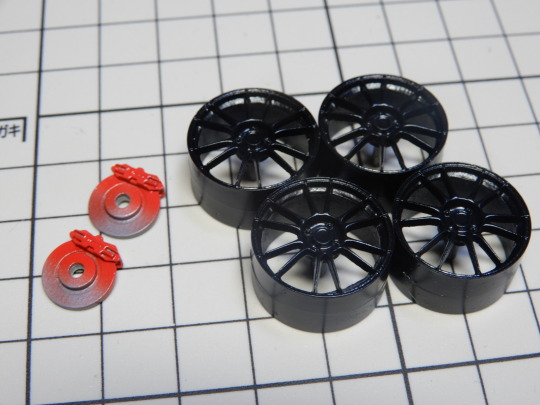
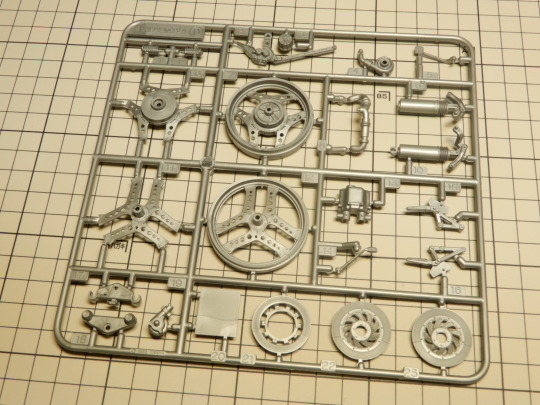
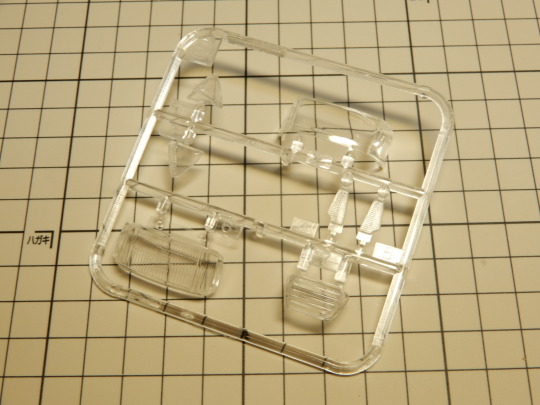
1:24 Kawasaki GPz900R TOP GUN #2
I was planning to update this on Saturday, but I'm posting it today a little late.
1:24 scale TOPGUN GPZ900R.
I tried assembling it without glue. It can be assembled, but some parts are easy to remove, so it would be better to glue them together.
I'll be repainting it this time, so I'll take it apart again later.
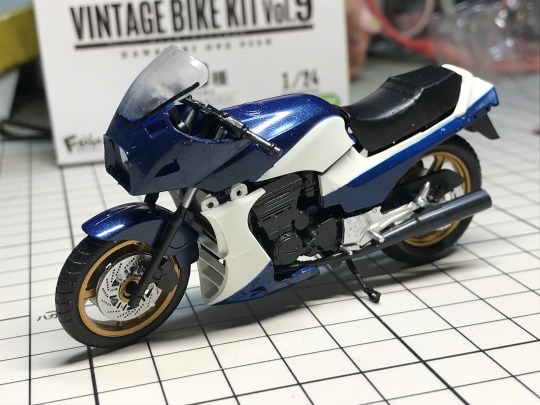
It is in the condition I bought it and has been assembled as shown in the image.
The rear fender will easily come off if left as is, but it is designed to hold up fairly well once the exterior parts are attached.
These will also be repainted, so I'll take them apart.
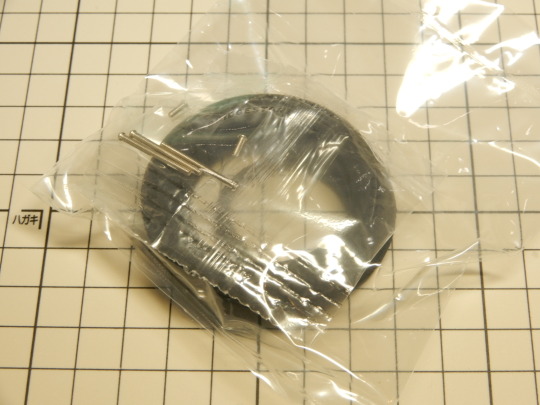
The kit is randomly packed so you don't know what's in it until you open the box, and mine was number 8.
This time I was going to repaint it, so any one would have been fine, but I was curious about numbers 2, 3, and 4 because they seemed to have side markers on the cowl just like Top Gun Ninja. It seems that it is now possible to reproduce it with decals.
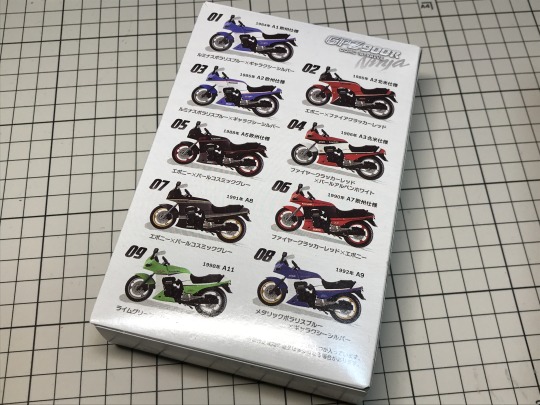
This is the included decal.
It's amazing that it even comes with decals at this price.
You can tell which number yours is by looking at the number at the bottom right.
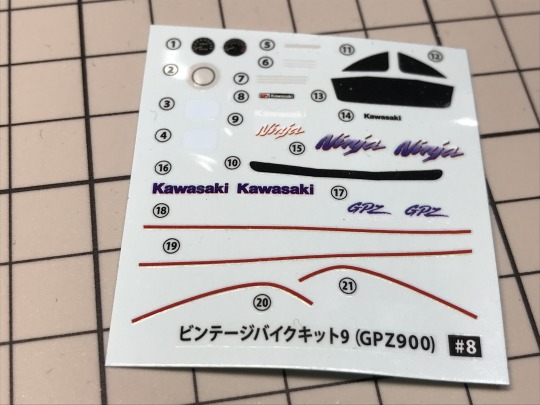
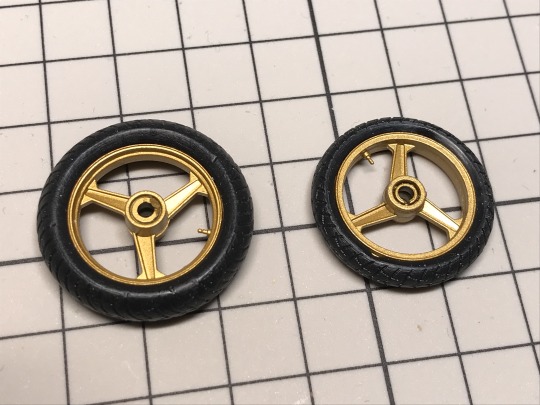
First of all, the shape of the wheels in this kit and those in Top Gun seem to be different, so I'll make them.
A friend of mine seems to have made decals for 1/24, so I asked him to show me a picture, but there was no picture of the part to be pasted on the front fork, so I wonder if it's a 1986 spec? I'll look into it a little more.
・Base kit + decal + 3D wheel
In addition to the easy specifications of
・Base kit + decal + 3D wheel + etching
・Base kit + decal + 3D wheel + etching + 3D additional parts
・Base kit + decal + 3D wheel + etching + 3D additional parts + resin parts
I will proceed with the settings in 3 to 4 steps.
See you next Saturday.
Please support us in producing the kit.
・Patreon
patreon.com/SMC9999
・Buy Me A Coffee
https://www.buymeacoffee.com/smc9999
・Ko-fi
https://ko-fi.com/smc9999
1 note
·
View note
Text
1/12 BRITTEN V1000 #0
As I previously wrote about 1/24 Kawasaki GPz900R Top Gun Navy Captain, in a Facebook post at the beginning of the year, I asked him to tell me about motorcycles that would be interesting to make as a motorcycle kit, and he received 3 comments. Thank you.
It was my first time seeing the BRITTEN V1000, so I searched to see how many images I could collect and found a book by RACERS, so I bought it.
It's a very unusual motorcycle and looks interesting.
It seems that BRITTEN itself released a 1/12 scale metal kit, but it seems that it is now product is discontinued.
I'll try making a little bit of this over the weekend.

BRITTEN V1000 will be updated every Sunday.
Please support me in producing the kit.
・Patreon
patreon.com/SMC9999
・Buy Me A Coffee
https://www.buymeacoffee.com/smc9999
・Ko-fi
https://ko-fi.com/smc9999
0 notes
Text
1:24 Kawasaki GPz900R Navy Captain #1
In my post at the beginning of the year, I asked if anyone could tell me about any motorcycles that would be interesting to make as a motorcycle kit, and I received three comments. Thank you.
I think I can do something with the 1:24 scale TOPGUN GPz and Britten V1000, so I'll try to make them little by little over the weekend.
The Morbidelli V8 is also an interesting motorcycle, but I'm sorry to say that I can't get a picture of it from the angle I want, but making it into a kit is on hold.
There is an affordable kit for the 1:24 scale GPz900R, so I would like to use this as a base and add decals etc. to make it.
see you next week.
to be continued.
Please support me in producing the kit.
・Patreon
patreon.com/SMC9999
・Buy Me A Coffee
https://www.buymeacoffee.com/smc9999
・Ko-fi
https://ko-fi.com/smc9999
1 note
·
View note
Text
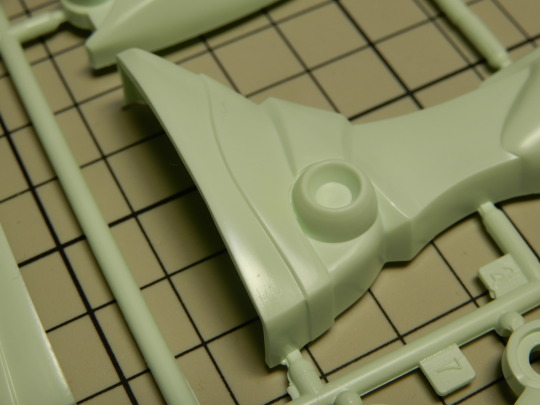
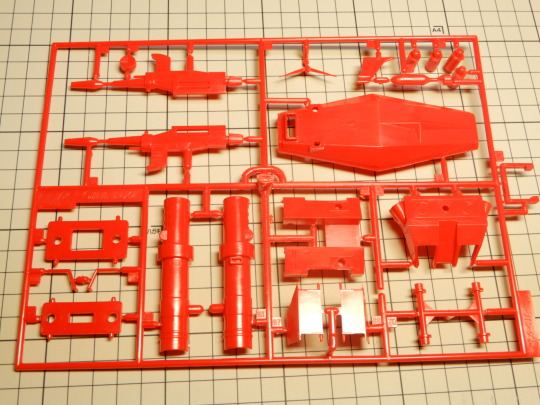
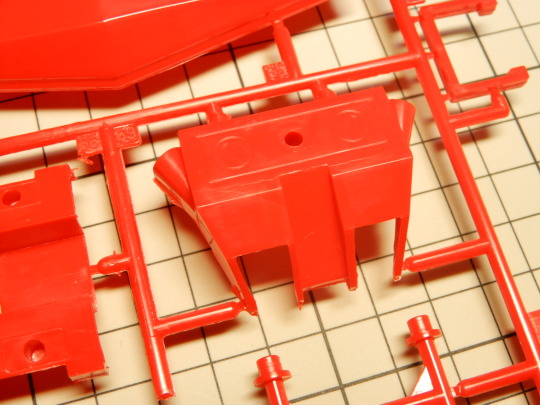
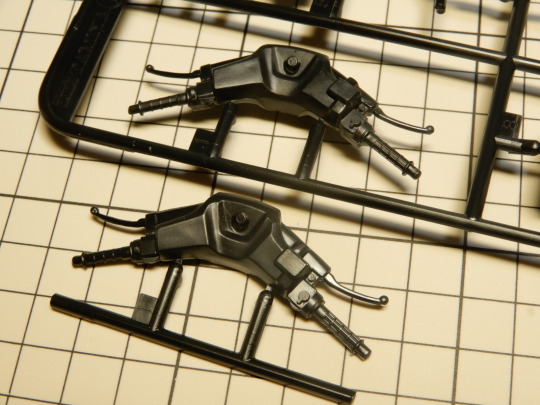
SMC TKP-001 1/24 Diablo SE30 jota Conversion Kit
Today I will be introducing the SMC "TKP-001 1/24 Diablo SE30 jota Conversion Kit" scheduled to be released in early February.
The actual vehicle is based on the limited edition "Diablo SE30" made to commemorate Lamborghini's 30th anniversary, and the last 15 or so vehicles will be the "SE30 Jota" with a part called the Jota kit installed in the engine.
The only external differences are the shape of the engine hood and the word "jota" below the rear SE30 emblem.
This kit is a conversion kit that reproduces the "SE30 Jota" based on Fujimi's Diablo.
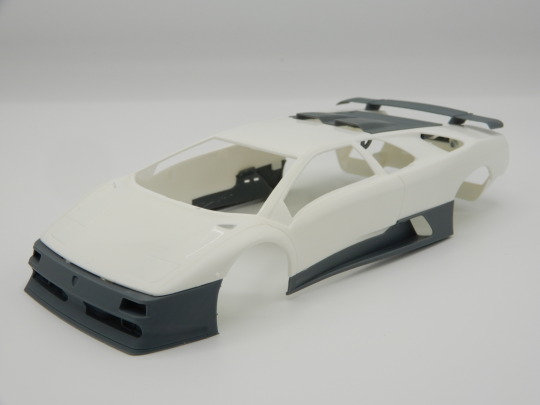
It was originally made for the Diablo SV MY96, also made by Fujimi, but many people complained that the kit was not available, so I changed it to fit the regular Diablo as well.
Normal Diablos are molded in one piece, including the side skirts, so processing such as cutting them is required.
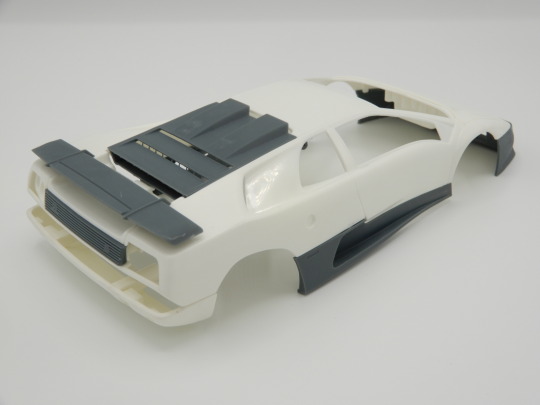
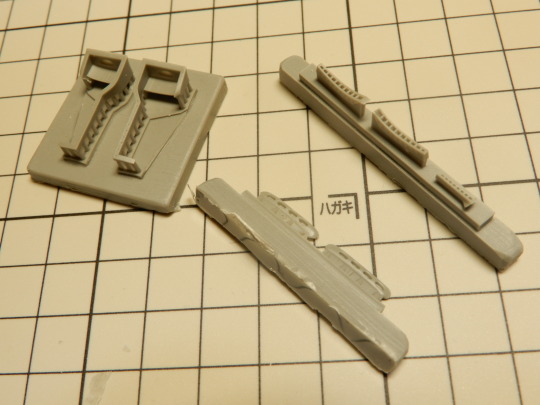
From now on, 3D printer parts will be our main made-to-order products for the time being.
In addition to the parts in the image, photo-etched parts and metal stickers are included.
I created a reservation page, but SMC/YATAGARASU has been contacted by overseas customers saying they are unable to make payments, so I am looking into it.
SMC/YATAGARASU (for customers outside of Japan.)
https://ygsmc.official.ec/items/81971887
SMC-zero(Yahoo shop)
in preparation
There are still some things to do, such as the manual, before the product is released, so I will add more information from time to time.
I will be posting production articles in a separate section soon, so please take a look at them for reference.
See you soon.
to be continued.
Please support me in producing the kit.
・Patreon
patreon.com/SMC9999
・Buy Me A Coffee
https://www.buymeacoffee.com/smc9999
・Ko-fi
https://ko-fi.com/smc9999
0 notes
Text
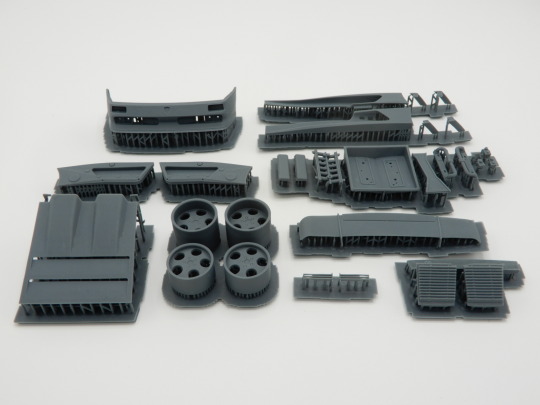
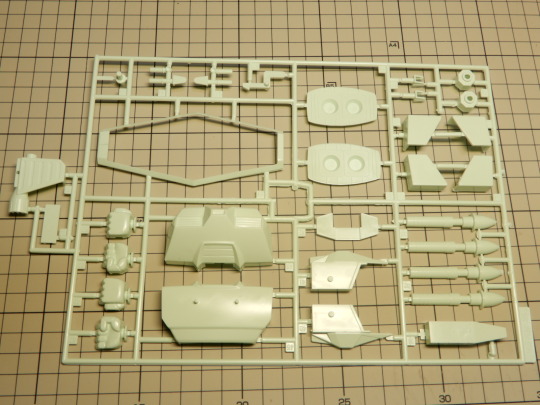
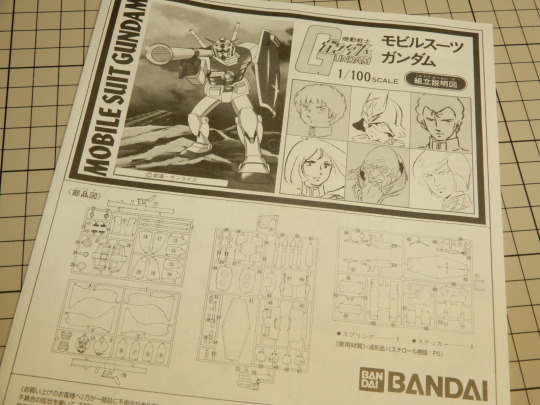
BANDAI 1/100 MOBILE SUIT RX-78 GUNDAM #0
I'm going to try making a Gundam model that I remember making when I was little.
This time, I'm going to take a look at the contents of the kit that I bought when it went on sale last year and kept it for a year.
When I opened the box, my impression was that it was bigger than I expected.
Speaking of 1/100, it's the current MG size, so of course it's large, but the old kits we've been making in recent years were 1/144 scale, so it seems like that's what it looked like.
I would like to say A runner…but in old plastic models, there was no division into A runner and B runner, and all runners were serially numbered.
Judging from its size, I already felt that it was different from what I remembered at the time, but since it was a plastic model of the Core Fighter's transforming Gundam, I thought it was this kit.
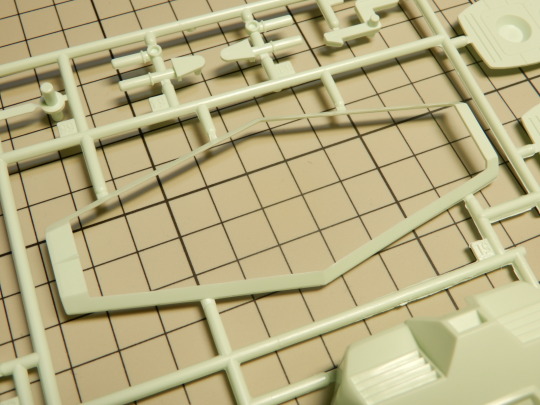
The legs are one piece from below the knees to the toes.
The red part and the white part of the foot are made so that the red part is one level lower.
This is the second runner.
These include the waist, thighs, forearms, and weapons.
This is the third runner.
The white part of the shield was a separate part, which I thought was an unusual construction at the time, and at the same time, I started to feel that it was different from the kits I made when I was little.
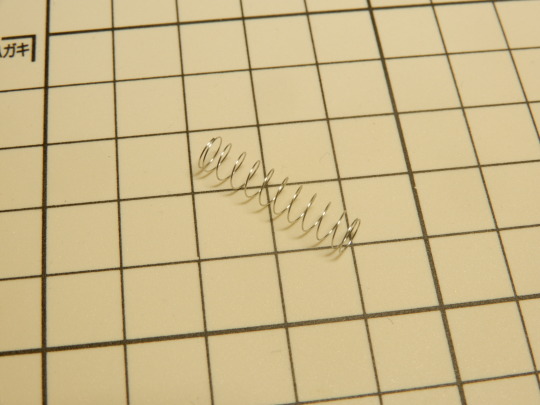
As someone who grew up watching BB Senshi, I can tell by the shape of this part that it's a spring-powered thing. Maybe I'll put it into a bazooka.
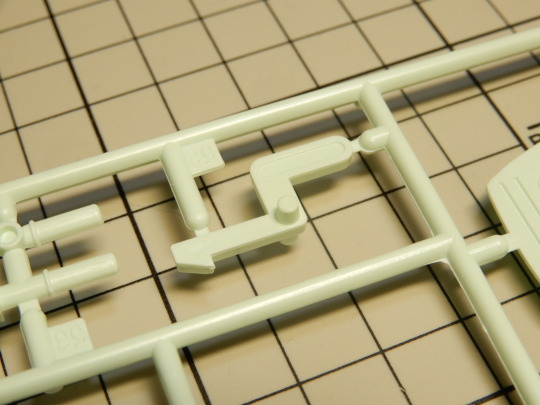
There is a groove molded on the back of the shoulder armor, and the angle of this groove makes it seem like the arm can be held in place.

The fourth runner is red.
The backpack was in a red runner.
Also, something that looked like a weapon that I had never seen before.

After all, it had a spring attached.
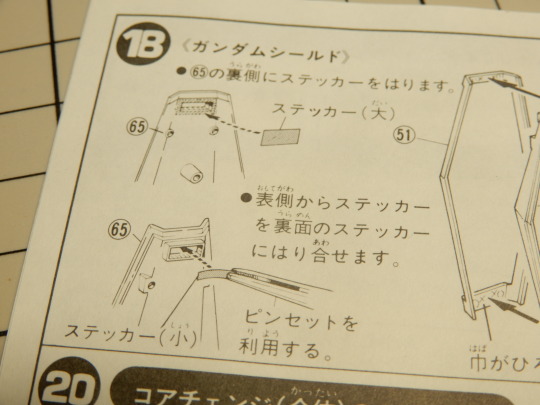
It comes with a sticker, but I'm not sure where to use it.
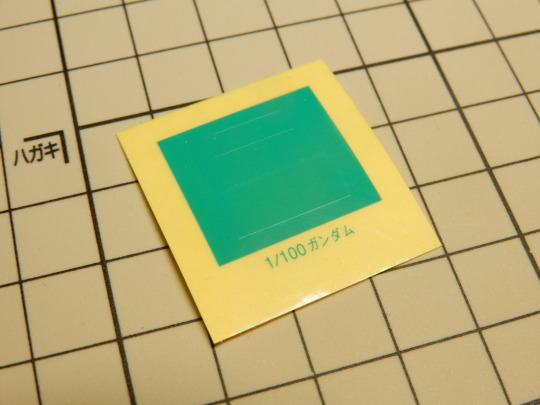
The manual includes illustrations of characters, giving you a sense of the atmosphere of the time.
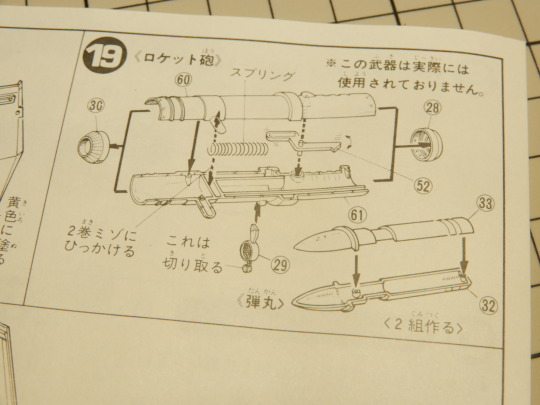
The weapon-like thing I had never seen before was a "rocket cannon" that was never actually used.
It seems that springs are also used for this weapon.
The mysterious sticker from earlier was supposed to be pasted on the shield.
I'll try to find some time and make it little by little.
Well then.
to be continued.
Please support me in producing the kit.
・Patreon
patreon.com/SMC9999
・Buy Me A Coffee
https://www.buymeacoffee.com/smc9999
・Ko-fi
https://ko-fi.com/smc9999
0 notes
Text
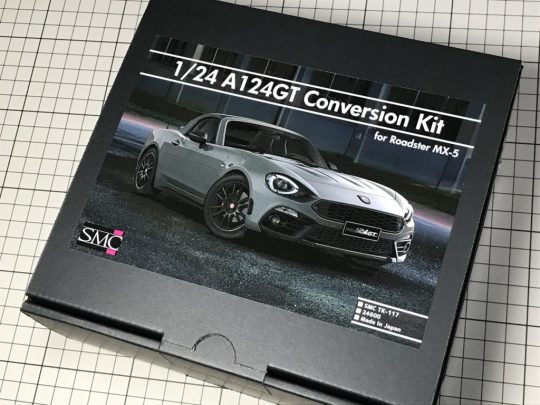
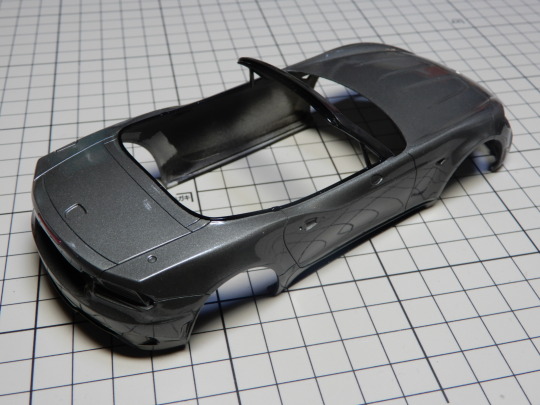
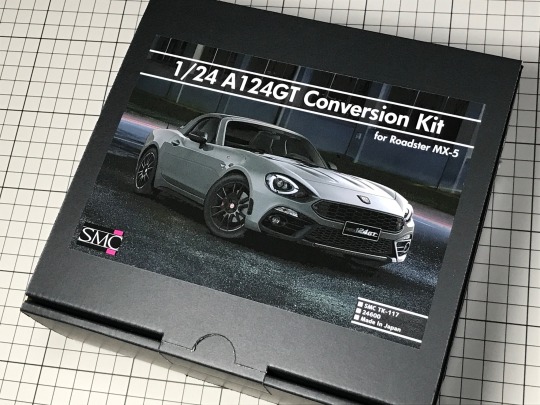
TAMIYA+SMC 1/24 ABARTH 124 GT #1
I am making SMC's "TK-117 1/24 A124 GT Conversion Kit for Roadster MX-5" by myself.
For the body, the front and rear bumpers were glued on first, and then painted after doing the groundwork.
I made a white body before, so this time I made it in gunmetal.
The A-pillar seemed to have a different color feel than the body, so I painted it with Creos' graphite black.
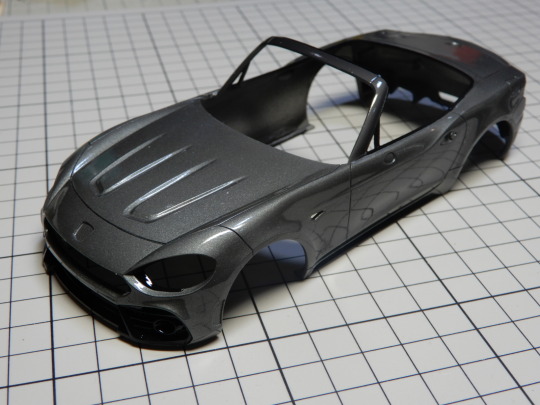
I finished painting the rear center stop lamp, front and rear bumpers, the black parts on the sides, and the black parts around the windows, all the way to the clear coat.
The chassis was painted as the base kit Roadster, roughly according to the instructions in the manual.

As someone who doesn't like masking, I thought it would be okay to paint it all black. While struggling with this feeling every time, I color each piece little by little over several days.
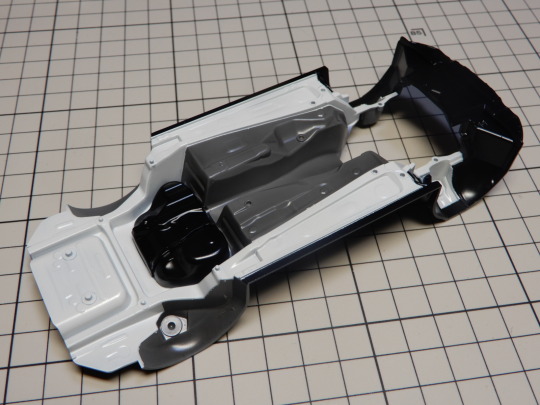
The wheels are painted semi-gloss black and the brake calipers are painted red.
I'll try to find some time and make more.
See you soon.
to be continued.
Please support me in producing the kit.
・Patreon
patreon.com/SMC9999
・Buy Me A Coffee
https://www.buymeacoffee.com/smc9999
・Ko-fi
https://ko-fi.com/smc9999
0 notes
Text
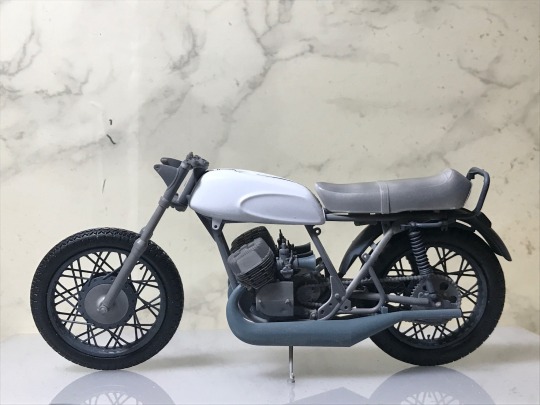
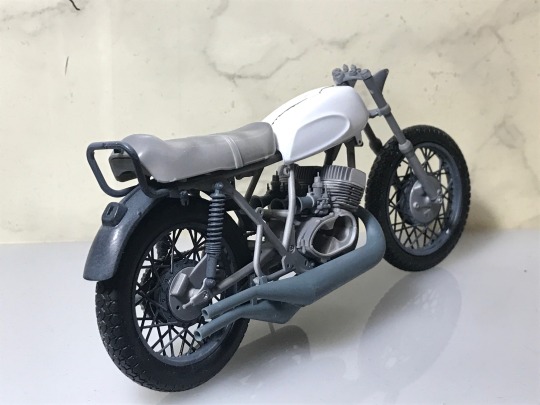
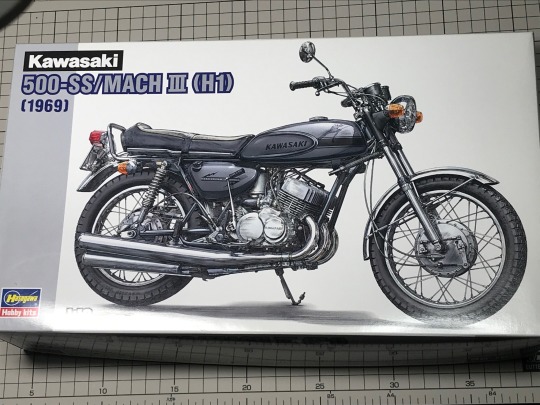
HASEGAWA 1/12 Kawasaki 500SS MachⅢ / Kurusu Naomi #1
This is "Kurusu Mach", which is currently the main project.

I will be making Hasegawa's 1/12 Kawasaki Mach III as the favorite car of Naomi Kurusu, who appears in ``Tokkou no Taku'', just like SR.
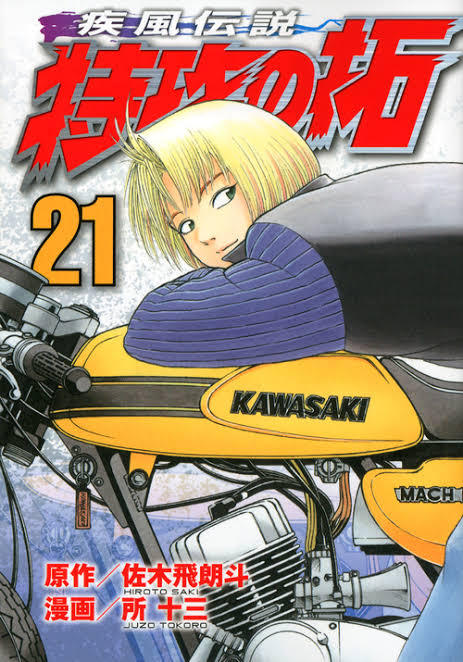
I thought it was cool back then, but there was no Mach III kit in the first place.
This is a bike I've been meaning to make someday since it was announced by Hasegawa.
As far as I can tell, the main changes are:
・Chamber
・Sheet
・Front fork
・Funnel
・Magura separate handle/Top Bridge
・backstep
・Tandem bar/turn signalless
Ragnyan teacher's parts
・Spoke wheels
・chain
That's about it.
I'll continue to assemble it until I get it into the shape I want.
Hasegawa's kit has a lot of parts, so it is reproduced in quite a lot of detail.
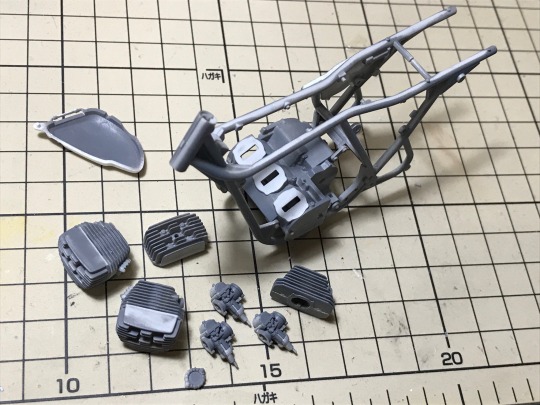
I tried assembling it until it became a motorcycle shape.
Kurusu Mach seems to have removed the front fender, so I haven't installed it.
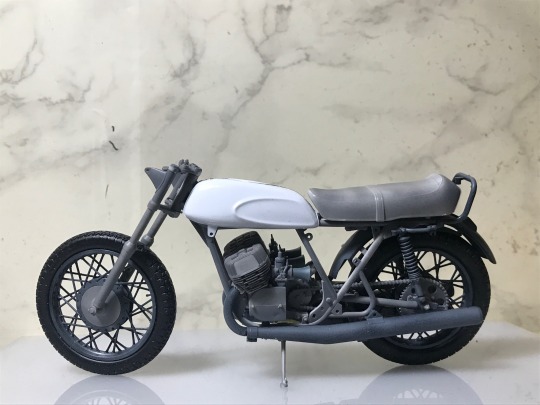
I made a funnel that looked like it could be done right away.
The three-part carburetor is also well made.
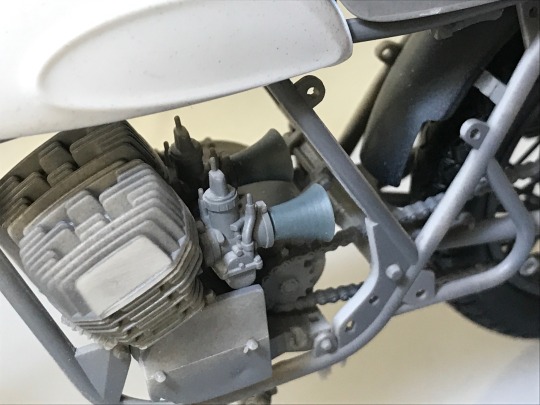
I also made a chamber.
I was able to install it with the second prototype, but the center one requires a little more adjustment.
As of now, only volumes 21 and 22 have been reprinted, so I'm making as much as I can.
One of the interesting parts of Tokkou no Taku'' is that it uses real bike parts. I'm watching the manga wondering what's going on with Kurusu Mach this time, but the conversation stops when Taku-chan says,Is separate handle a Tomazeri?'' or ``Chamber is…'', so I only understand the part where separate handle is Tomazeri. It was.

Since this is a special reprint, I also bought the novel version to see if it contained any descriptions that weren't in the manga.
For now, Kurusu-kun appears in two of the four books I bought, so I'll continue reading to see if there's any mention of Kurusu Mach.
to be continued.
Please support me in producing the kit.
・Patreon
patreon.com/SMC9999
・Buy Me A Coffee
https://www.buymeacoffee.com/smc9999
・Ko-fi
https://ko-fi.com/smc9999
1 note
·
View note
Text
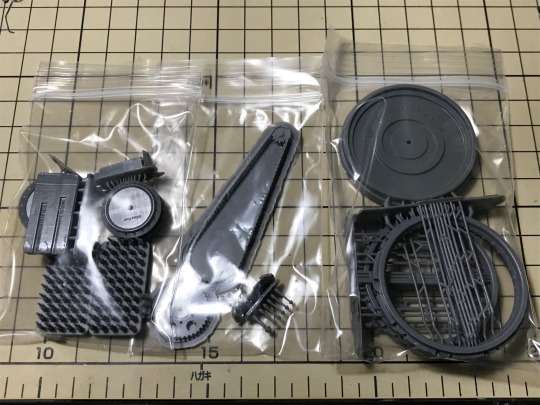
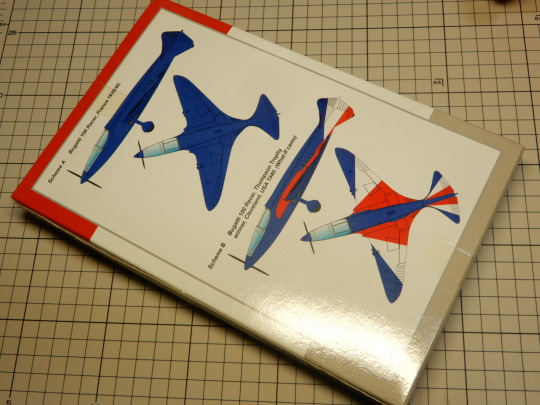
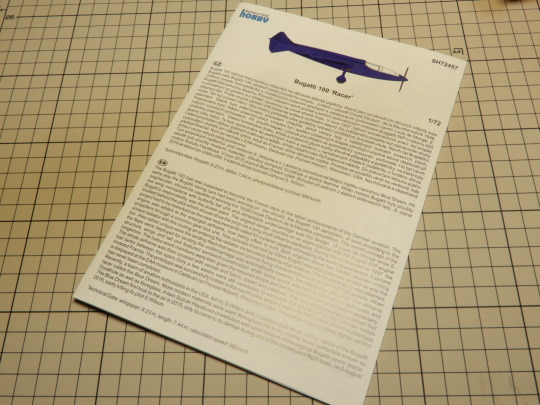
SPECIAL HOBBY 1/72 BUGATTI 100 Racer #0
One of the exhibitions sponsored by a friend this month had an air racer category, so I pulled out the Special Hobby 1/72 scale Bugatti 100 racer that I bought last year.
Yeah, I bought it just because it was a Bugatti airplane.

In reality, I don't think it was ever flown in a race due to wartime, but I'll look into it more closely when I make it .
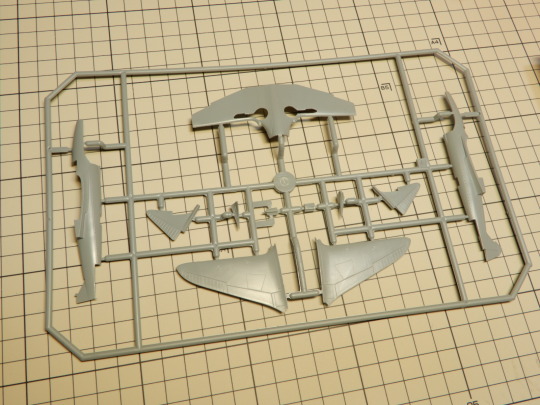
A runner is the main body.
I once saw the finished product at a exhibitions, and my impression was that it was really small.
I opened it for the first time today and when I saw the contents, I realized how small it was.
The B-2 is the only 1/72 scale kit I have, so it's an extreme comparison.
B runners are small parts other than the main body.
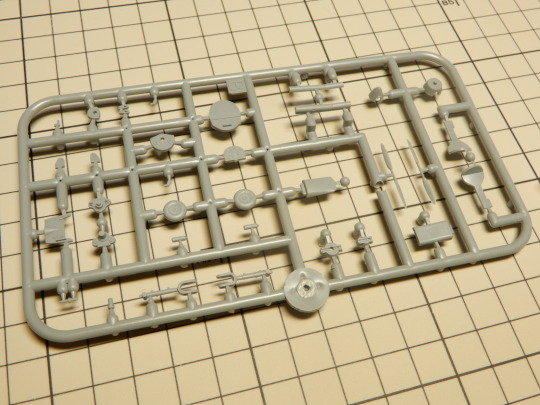
The canopy is a clear part.
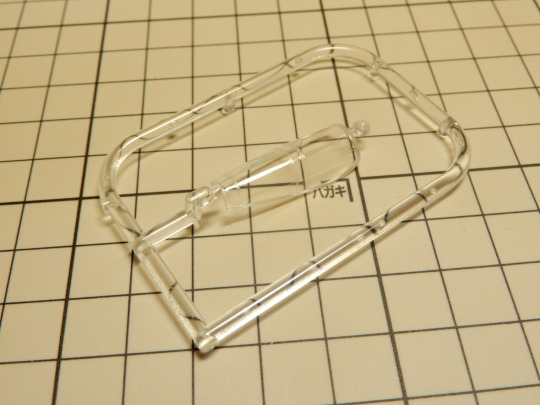
In addition to the plastic parts, there are also resin parts, although I don't know if it's because the details are so fine or if they didn't fit in the runner.
The instructions are in full color, but the decals were not included.
It's not that big, and there aren't that many parts, so it's a kit that can be completed quickly if you make it without thinking.
I recently found out that 1/48 scale was also available, so I completely missed buying it.
I'd like to do some research while temporarily assembling it, and if I have time, I'll try making it.
Well then.
to be continued.
Please support me in producing the kit.
・Patreon
patreon.com/SMC9999
・Buy Me A Coffee
https://www.buymeacoffee.com/smc9999
・Ko-fi
https://ko-fi.com/smc9999
0 notes
Text
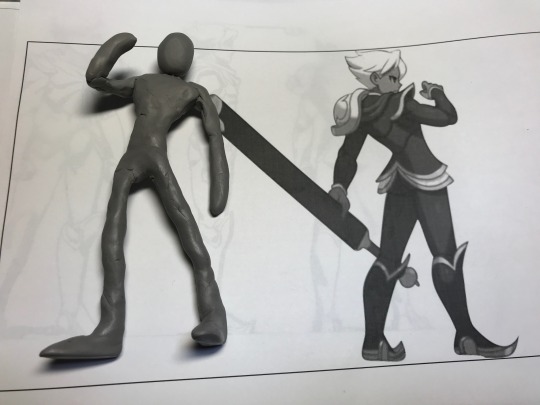
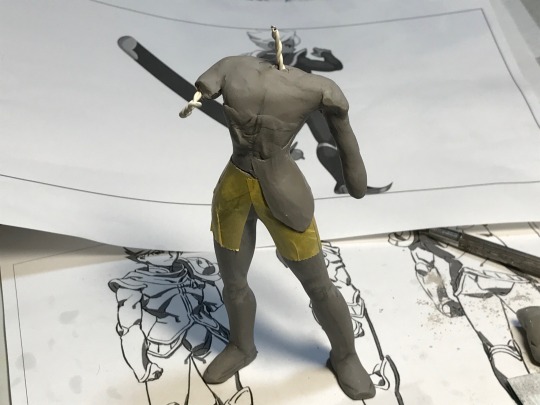
DHAR/indivisible #1
When I asked if there was anything my family wanted for their birthdays, they requested figurines of characters that they don't sell and don't think will ever come out.
So, I'm going to make a figure of the character "DHAR" from the game Indivisible.
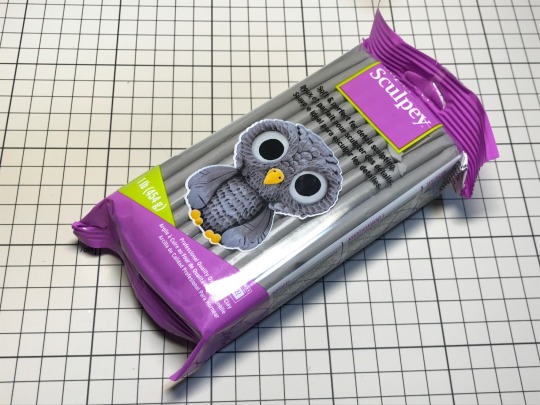
When I first made my own figures about 10 years ago, I tried using fund and putty, but this time I decided to try using something called Sculpey, which I had been interested in for a while. Simply put, it is clay that can be baked in an oven.
I'm a complete beginner when it comes to figure making, so I'll just follow what I see on the internet.
It looks like the core is made of wire, so I prepared the wire I had at home.

Since there are no detailed settings for the character, I decided to make him about 180cm tall, so if he was made into a 1/12 scale, he would be about 15cm, so I decided to make him around 15cm.
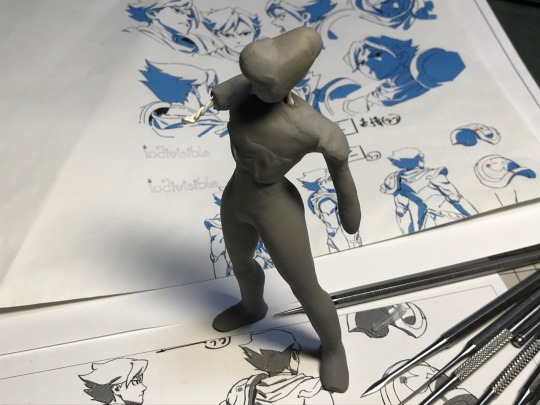
Sculpey seems to bite better if the wire is twisted.

Add Sculpey to the wire that will become the core by posing it in a similar pose.
Once it had taken some shape, I baked it in the oven.
Because Sculpey was surprisingly soft, when I was making the shape of the legs, the shape of the body part I was holding would be distorted, and my nails would hit it and make a dent, so I had to adjust the shape to a certain extent for each part I was working on. It seems better to bake it frequently when it becomes hard.

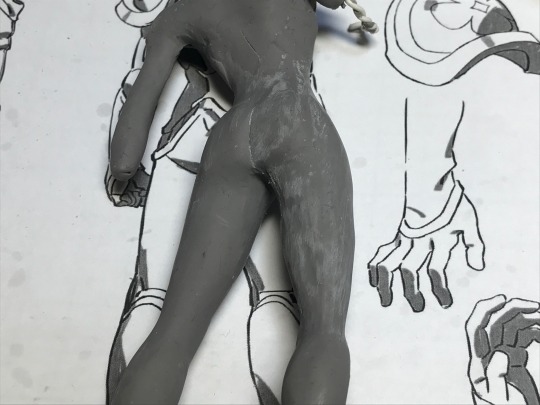
First, I finished the area from my waist to my knees.
I tried baking it in this state, applying sandpaper, and seeing if I could carve the streaks.
It seemed like I could carve the sujibori with the chisel I always use without any problems.
When you put sandpaper on it, it feels like epoxy putty, and even though it's hardened, it's a little sticky, and the sandpaper gets clogged quickly.
No matter how smooth you intend to smooth it, you will notice that the surface is undulating when you sand it.
I split it around the waist and hit a 3mm shaft.
From here, we will continue with surface processing and modeling for the lower body.
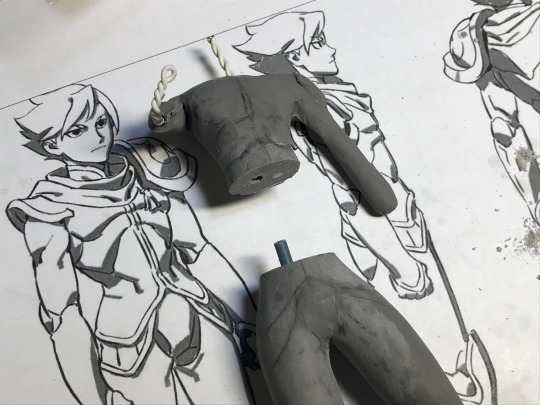
Once the lower body is adjusted to a certain extent, protect the lower body with masking tape and add additional parts to the upper body.
I will make time and progress little by little.
Well then.
to be continued.
Please support us in producing the kit.
・Patreon
patreon.com/SMC9999
・Buy Me A Coffee
https://www.buymeacoffee.com/smc9999
・Ko-fi
https://ko-fi.com/smc9999
3 notes
·
View notes
Text
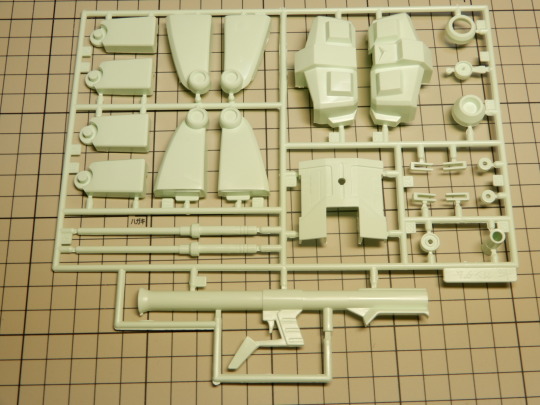
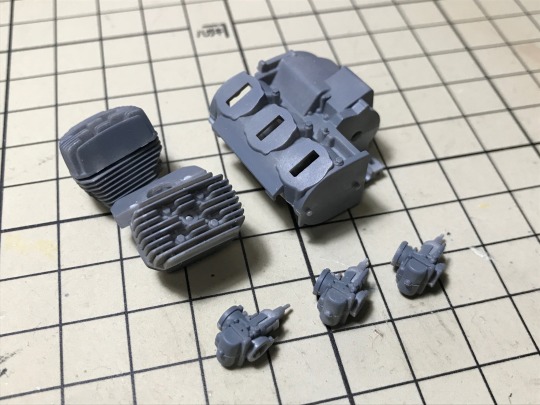
TAMIYA 1/12 HONDA CX500 TURBO #0
Today I bought a Honda CX500 Turbo from Tamiya as it's being resold for the first time in a while, so I'm going to take a quick look at what's inside.
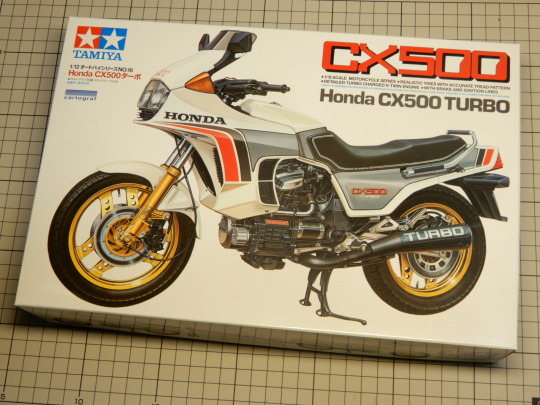
I bought it without knowing anything about the actual bike, so I thought it would be interesting to see a bike with a turbo, but when I looked at it, I realized that it was powered by a drive shaft (?) instead of a chain.
The actual car debuted in 1980, and the kit seems to have been released in 1982. The original kit was made 42 years ago.
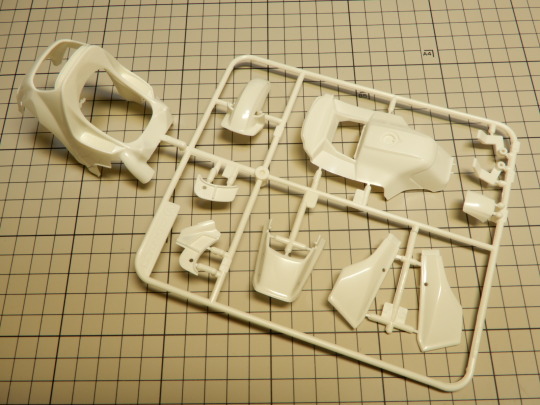
The A runner is cowl related and the molding color is white.
The actual car appears to be pearl white, and the painting instructions are similar.
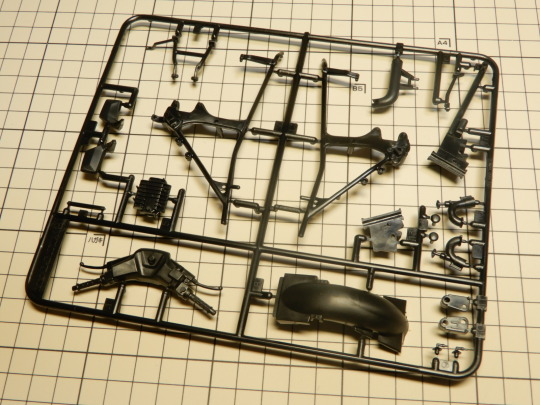
B runners are mainframes, etc.
Since I returned to bike modeling, I've only been working on old bikes, so it's refreshing to see that there's no frame underneath the engine.
C runner is mainly engine related.
D runners are wheels, turbochargers, etc.
The plate-like part numbered 20 is a name plate attached to the license plate part.
E-runners are plated parts, such as the front fork.
The lower right part is the drive shaft, and it seems to also serve as the swing arm.

The clear parts are the lights and cowl screen.
I was looking at the manufacturer's completed photo and wondered if the turn signals were painted in a solid color, but apparently clear red and clear orange paint didn't exist at the time.

The rest are tires, screws, and a tube for wiring.
The decals are made by Cartograf, as stated on the package.
The gray parts of the exterior are metallic gray.

The parts for the handle were in a small bag, and I was told to use this one.
At first glance, I can't tell what's different.
I bought two kits this time, so I'm thinking of building one as is and customizing the other as a cafe racer.
Last year, I made Tamiya and Hasegawa's RZ250, and the latest Hasegawa's parts were detailed and well-reproduced, and the build quality was good, but Tamiya's one may be older, so there are fewer parts, but it has the necessary and sufficient parts configuration. , it was easy to make.
For now, I'm going to temporarily assemble it and use etching and metal stickers, and then I'm going to explore parts that can be replaced with 3D.
Well then.
to be continued.
Please support us in producing the kit.
・Patreon
patreon.com/SMC9999
・Buy Me A Coffee
https://www.buymeacoffee.com/smc9999
・Ko-fi
https://ko-fi.com/smc9999
2 notes
·
View notes
Text
2024 Start!
A happy new year.
Thank you for your continued support this year.
Over the past two or three years, things haven't been progressing as planned, so I'm trying to figure out the cause and gradually changing the way things are done through trial and error, but there are still issues to be solved.
This year, I'm thinking of going back to basics and moving forward.
This blog is also a process of trial and error, and I'm thinking of taking a little more time to write various articles this year.
This time I'll be posting things that I've carried over from last year, but that I plan to write about in the future.
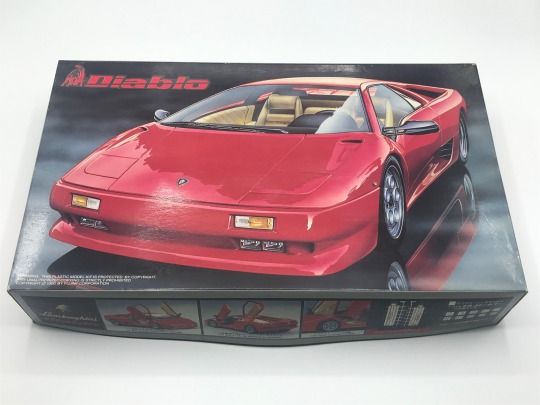
First up is Fujimi's Diablo SV MY96.
This will be made using the SE30jota conversion kit, which was scheduled to be released last year but is now scheduled to be released this month a little later.
Next is Fujimi's Diablo, but this is a normal version that is still available.
Since SV MY96 is not available, I will combine it with this kit and make it as SE30.
This is Abarth 124GT released last year.
I will also make this in conjunction with Tamiya's Roadster.
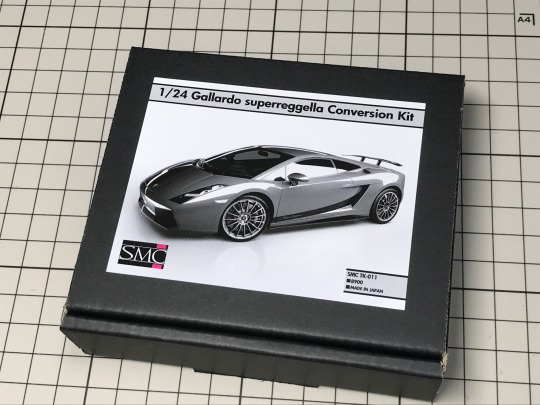
This is the Gallardo Superleggera, which was also released last year.
I will make it together with Fujimi's Gallardo.
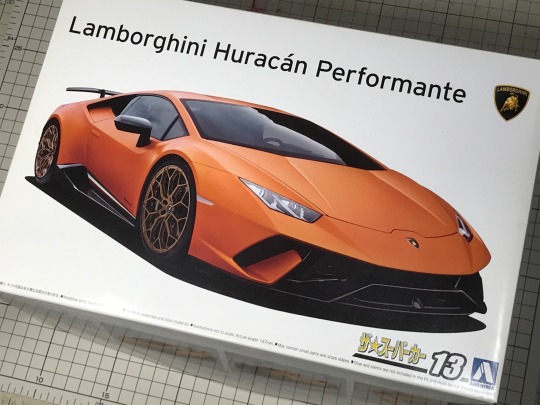
Aoshima's Huracan is his Performante.
This is planned to be a Huracan/Technica, and I'm currently making parts, but it's quite different from the Performante, so it's likely to be a conversion kit that requires some cutting and pasting.
This is a bike I'm building as a hobby.
It's one of the kits I bought when I was in high school but couldn't make properly, and it's a 1/8 Heller Kawasaki 1000 Godier Genoud that I bought last year for revenge.
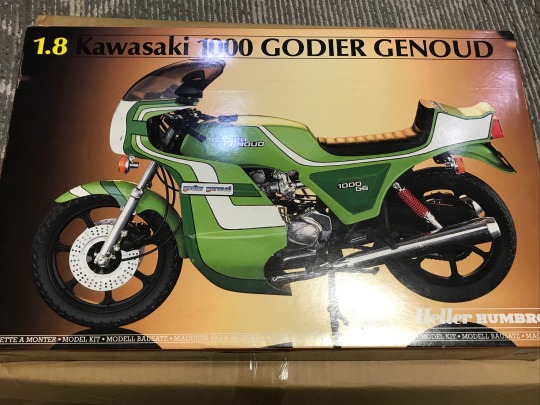
I received a wheel from Mr. O, who was the reason I returned to bike modeling last year, so I'm going to make it.
This is Hasegawa's Mach III, which I am currently making mainly.
Like SR, I will be making this bike for Kurusu, who appears in Tokkou no Taku.
There are many other things I want to make and things I want, but these are the ones I'd like to start with.
``Tokkou no Taku'', which has been republished two volumes a month since last year, will reach its final volume this year, so I'm going to try making a bike that I wanted to make at the time but couldn't due to my technical skills.
I hope this year will be a better year for everyone.
Please support us in producing the kit.
・Patreon
patreon.com/SMC9999
・Buy Me A Coffee
https://www.buymeacoffee.com/smc9999
・Ko-fi
https://ko-fi.com/smc9999
1 note
·
View note
Text
BANDAI BEST MECHA COLLECTION No.52 1/144 MAZINGER Z

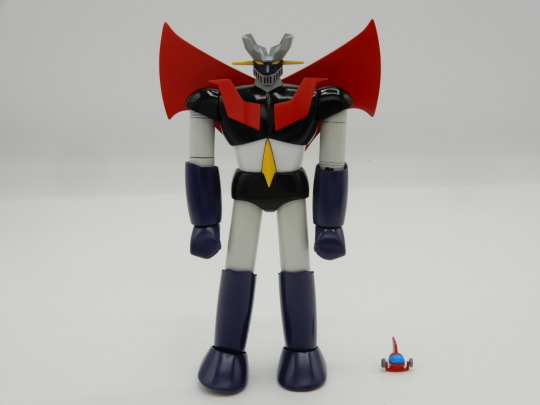
5 notes
·
View notes
Text
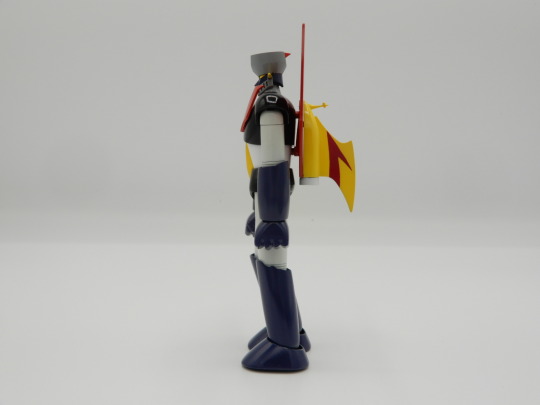
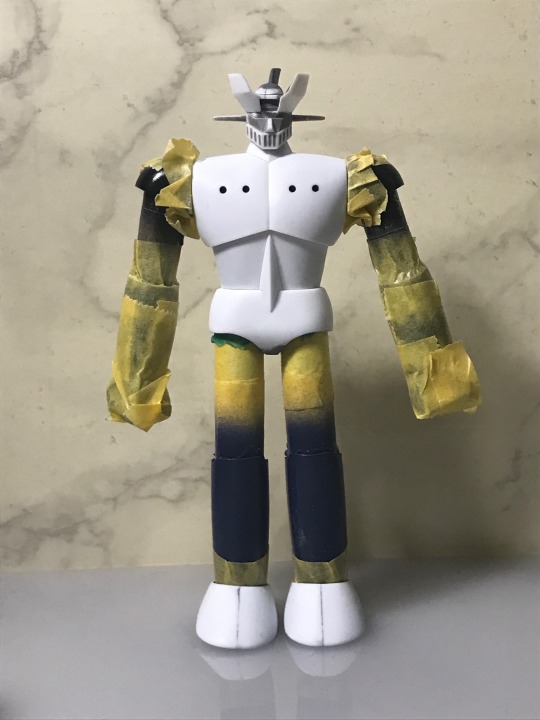
BANDAI BEST MECHA COLLECTION No.52 1/144 MAZINGER Z #2
Hello everyone.
This time it's also the old kit Mazinger Z.
Just like last time, the process basically involves repeating gluing, seam processing, painting, and masking, so I will only describe the parts that have been slightly modified.
I decided to make the old kit with the original atmosphere, so I haven't changed the proportions.
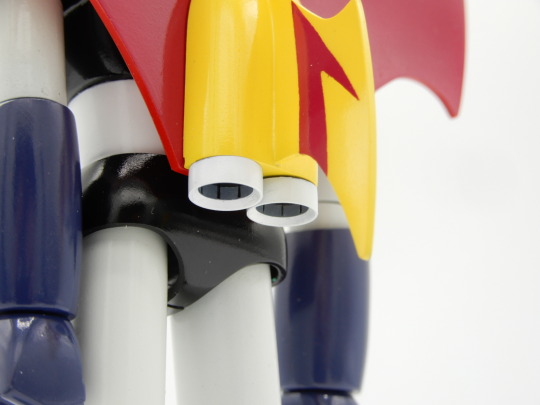
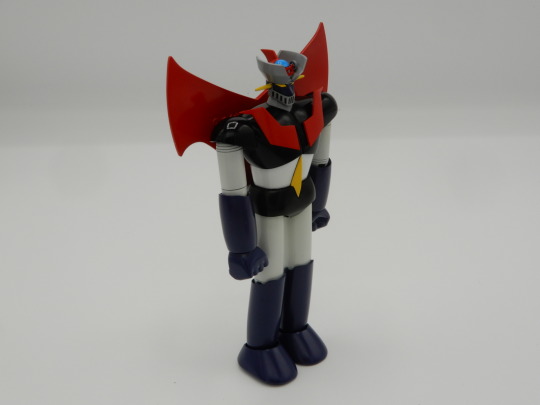
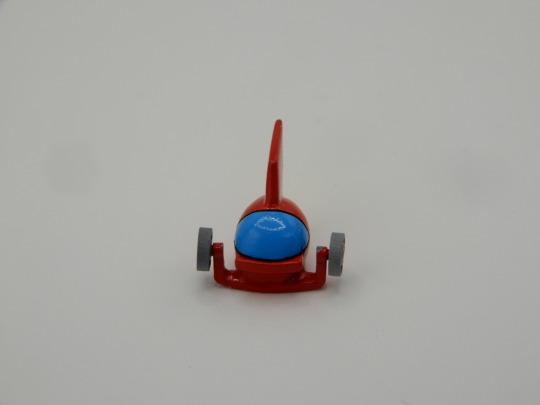
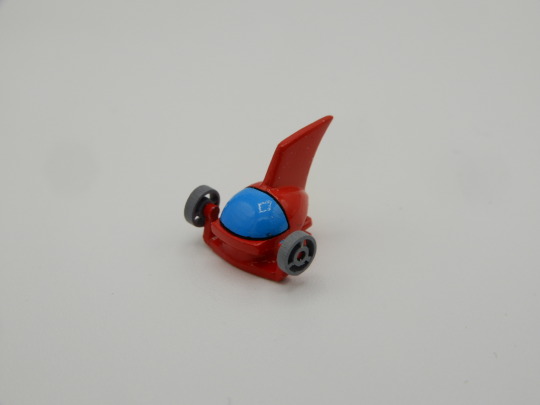
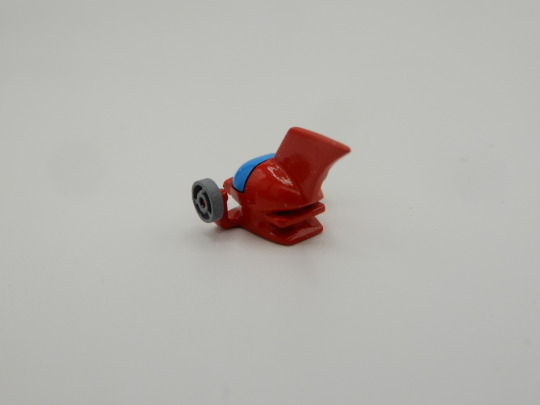
Hover Pilder's wing, which is a separate part from the main body, has been remade.
The original purpose was to make it into separate parts to make it easier to paint them separately, but I also made the hover part look like that.
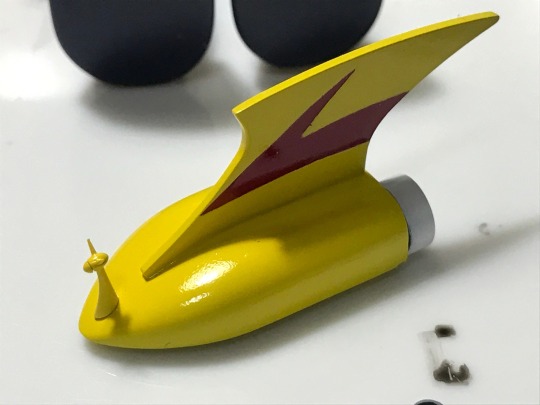
This is the completed hover pilder.
Other than the wings, the dividing line of the window was changed to the same line as the anime.
After making it, I found out that the width was a little too big and I couldn't get it to pile on my head properly.
The part I made myself has the same dimensions as the original part, so I might have been able to make it fit better by reducing the thickness of the wing of the other part. There's not enough confirmation.
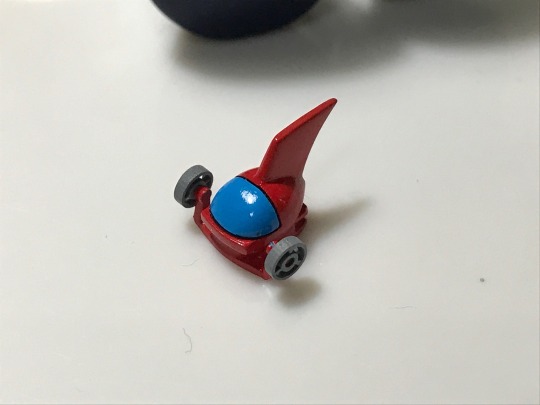
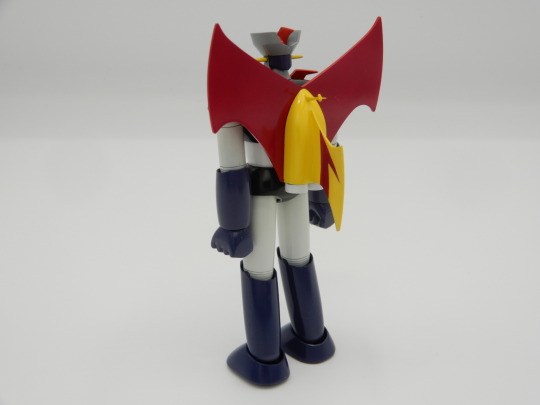
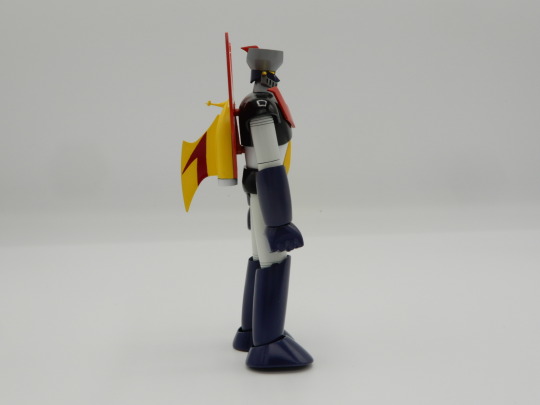
It's a Jet Scrander.
Mazinger Z cannot fly in the sky without this, but since Dr. Hell's army started sending in mechs that can fly first, Mazinger Z will have a hard time until the Jet Scrander is completed.

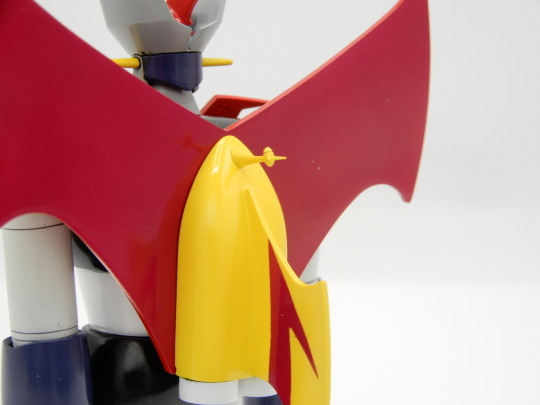
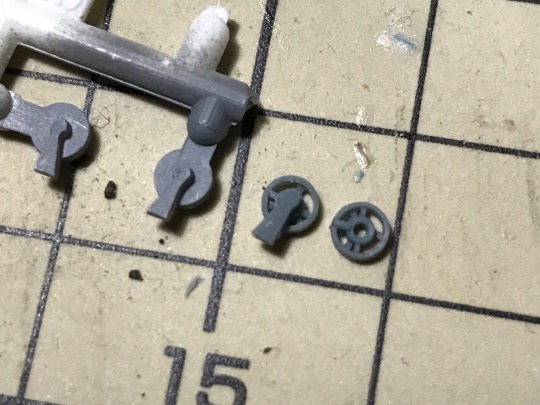
Jet Scrander has a redesigned jet nozzle.
In the kit, the striped part was a convex mold that was sometimes seen in older kits. (The white one on the left of the image)
It was tedious to re-carve 20 places on the left and right sides, so I first made a 3D concave mold. (image center)
After that, when I was looking back at the anime to make the next antenna, I realized that the slit-shaped mold was on the inside, so I made it again. (Image right)
This is the Jet Scrander that appears in the anime.
It has something like an antenna on the tip.
When the wing opens, the upper part looks magenta-ish and the lower part red, but it seems to be a setting because it looks the same in other stories.
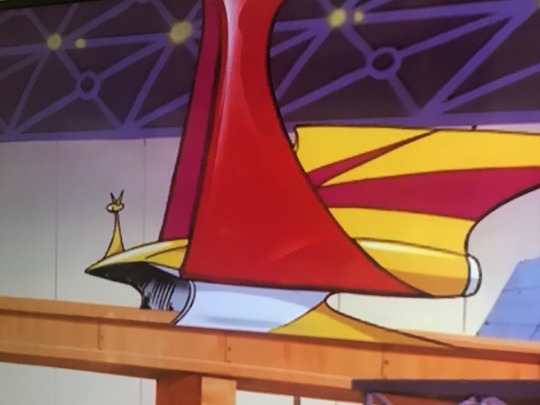
This antenna was also made in 3D.
I made a pattern for masking the arrow-like pattern on the vertical tail and painted it separately.
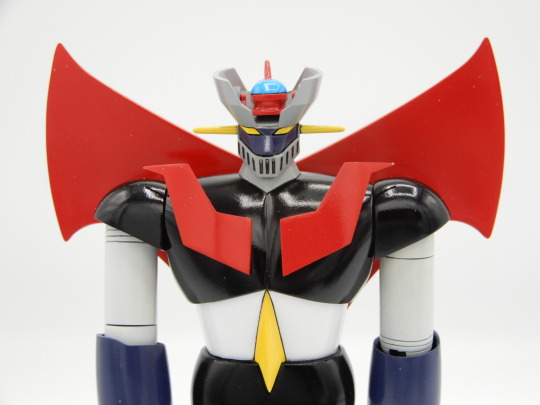
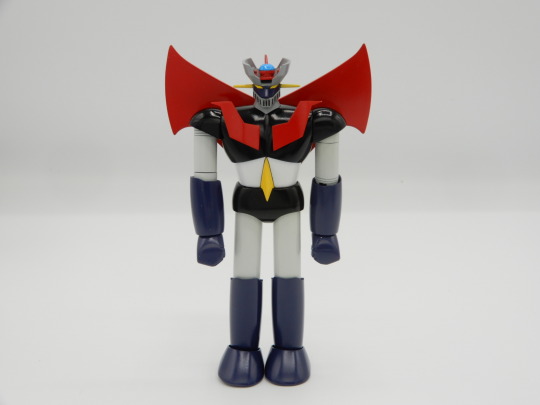
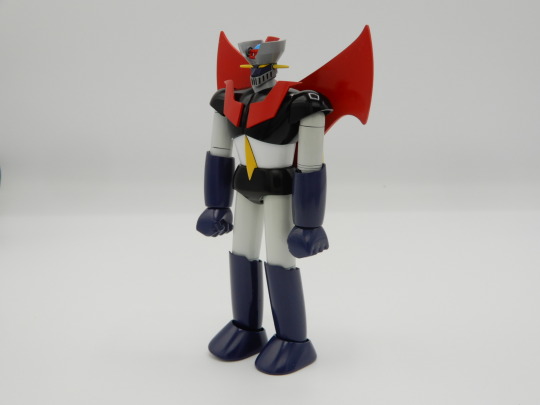
That's how it was completed.
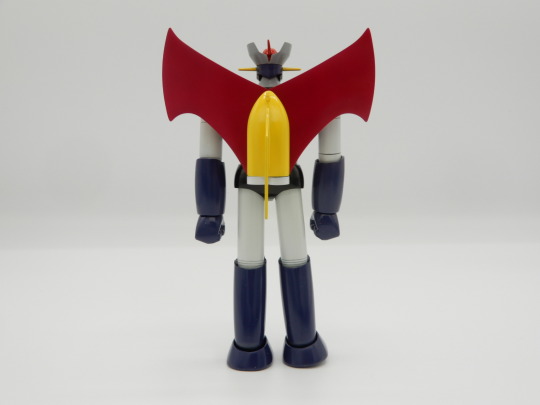
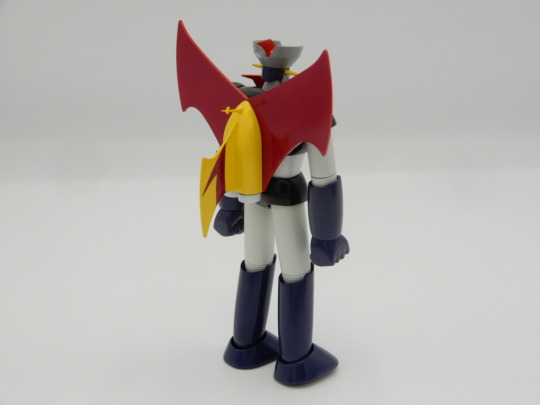
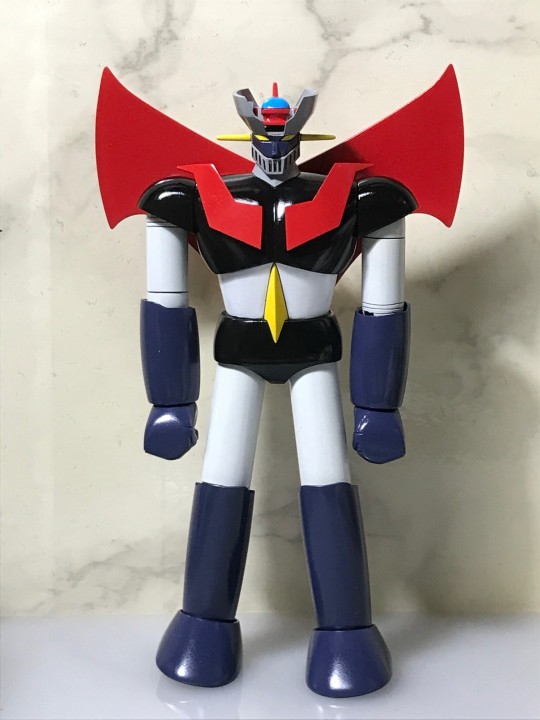
From the front, it looks like Mazinger's ending at the time.
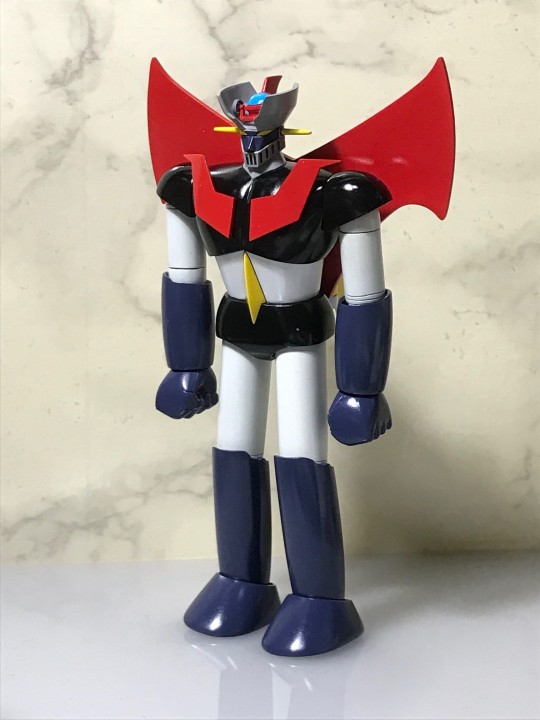
From the back.
The wings of the Jet Scrander are magenta when viewed from here.

Even when the knees are fully extended, they are still slightly bent like this in the kit.
The knees of this kit are not straight and the Jet Scrander is a bit heavy, so I had to lean forward a bit.
Since the joints are plastic, I think it would have been a good idea to keep the proportions the same but at least reinforced the joints.
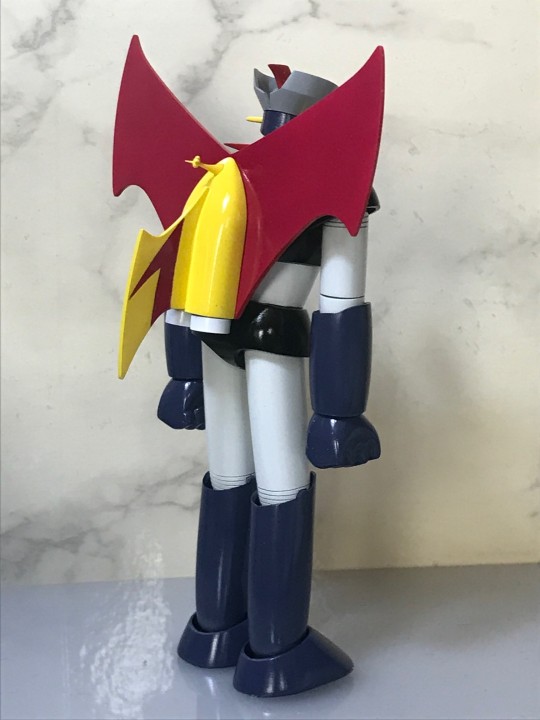
With that, Mazinger Z is complete.
Next time, I will proceed with one of the four cars and two bikes I am currently making.
Well then.
Please support us in producing the kit.
・Patreon
patreon.com/SMC9999
・Buy Me A Coffee
https://www.buymeacoffee.com/smc9999
・Ko-fi
https://ko-fi.com/smc9999
0 notes
Text
BANDAI BEST MECHA COLLECTION No.52 1/144 MAZINGER Z #1
Hello everyone.
When I was planning to do something, but for some reason I had some free time, I used to make the old Mazinger Z kit for a change of pace, and now I've completed it.
It was one of the things I bought at a time when I was buying a lot of old kits, and I just kept it in stock after I bought it, but I started watching anime from that time, so I started working on it.
It's an anime from the 1970s, so it's almost 50 years old. This was before anyone in my family was born.
The kit also has "1983" written on the box, so it is a kit from 40 years ago.
Although the anime itself predates Gundam, the kit seems to have been released after 300 Yen Gundam.

The kit contains three white runners, and is what is called a Monaka kit.
This is a standard configuration for plastic models at the time.
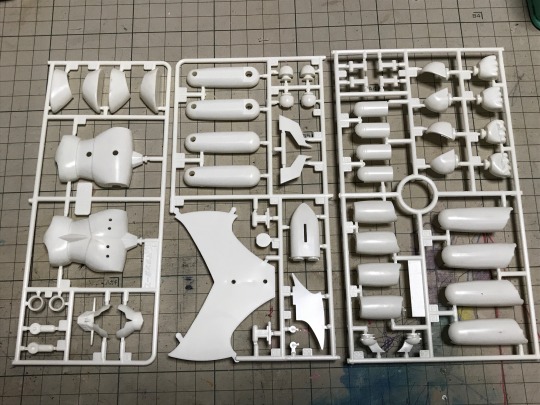
Since it is a MonaKa kit, I glued the inner parts first, processed the seams, painted, and then masked. Then, the next part is glued, the seams are processed, and the process is repeated.
I painted it with Gaia's Neutral Gray 1 and then painted it with clear for protection.
If you do this, you may be able to scrape off the area where the mask leaked a little without leaving the clear coat.
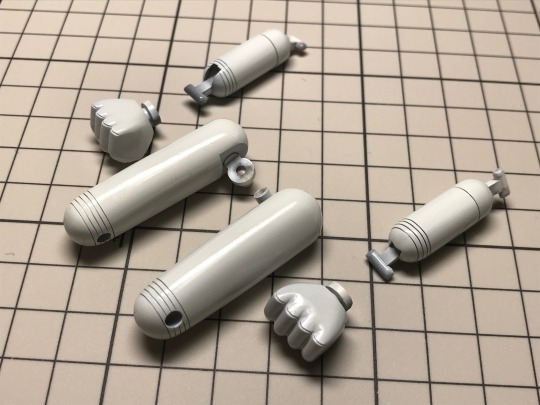
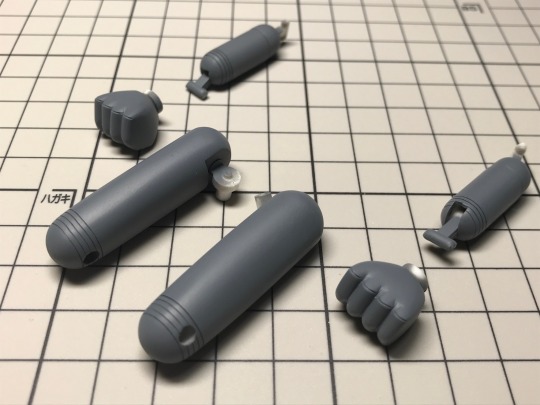
Due to the assembly procedure, I completed the seams of the thigh, upper arm, and hand parts first, but it seems like I misunderstood somewhere that the colors were the same, so I went to the trouble of masking them and ended up getting the colors wrong.
The correct answer is that the hands should be the same color as the forearms, not white.
So, I just repainted the hand the same color as the forearm.
continue next time.
Please support me in producing the kit.
・Patreon
patreon.com/SMC9999
・Buy Me A Coffee
https://www.buymeacoffee.com/smc9999
・Ko-fi
https://ko-fi.com/smc9999
1 note
·
View note
Text
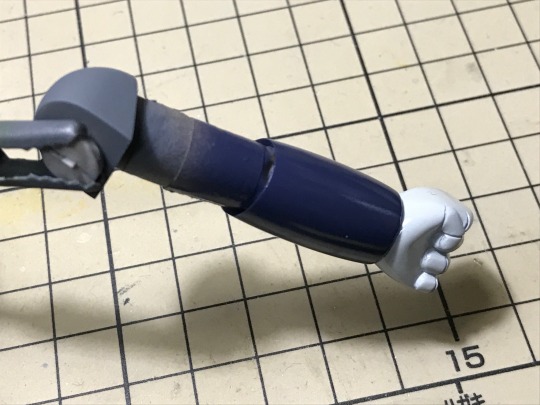
Meme Chimera #2
Hello everyone.
I attended GWC held on November 19th.
My child was drawing something pop, so I put it on display.
My acquaintances think of me as someone who only makes car models, so the people I meet at GWC are surprised and ask, ``Huh? What do you make?!''
GWC is basically an original-only event, so I'm trying to create something different from what I usually do, which also serves as practice for creating data.
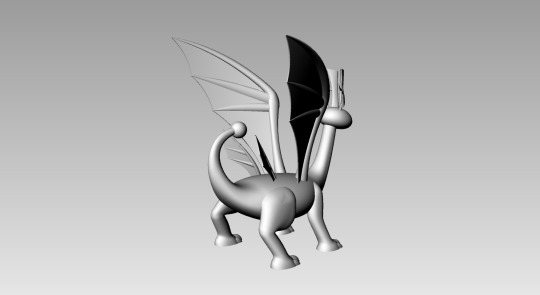
The data for the new work “Meme Chimera” was completed, but
An error occurred around the 8th hour of the 12-hour output time, so I was unable to take it to GWC.
When I looked at the monitor of the output machine, it seemed like the entire surface was being irradiated at times, so maybe the slicer data is strange.
I also wanted to change the film, so I also cleaned the area around the resin tank.
The data looks like this.
A child told me, ``It really looks like a 3D version of a child's doodle,'' and he was right.
It's a three-dimensional version based on your drawing.
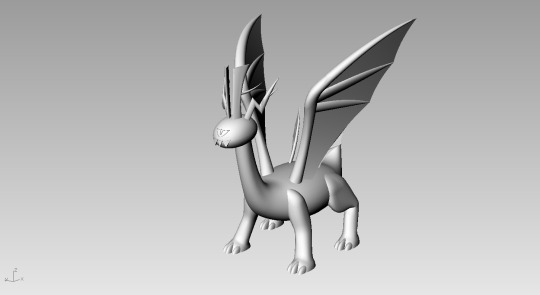
While thinking about the parts allocation, I will leisurely build it for next spring's GWC.
GWC is held twice a year, so I make two things like this a year.
That guy suddenly started making something I don't really understand…If you think that, then GWC is almost here.
I will update next time when I can output it.
to be continued.
Please support me in producing the kit.
・Patreon
patreon.com/SMC9999
・Buy Me A Coffee
https://www.buymeacoffee.com/smc9999
・Ko-fi
https://ko-fi.com/smc9999
0 notes