
echoesofenlightenment
Echoes Of Enlightenment
A blog dedicated to Zen Koi, a new App game for collecting, breeding, and ascending koi fish into dragons!
19 posts
Don't wanna be here? Send us removal request.
Last Seen Blogs

hunybey
Mariana Bey Fotografia

genuinely-bad-posts
Bad Posts

duskanddawn27
Dusk and Dawn

l33t-hax0r-tournament
L33T HAX0R TOURNAMENT

alenavlgposts-blog
Alena.
Note
Oh, I don’t think I was clear about the “adding dragons” thing, i actually meant a third party app like the dragon vale guide app, where you can mark off the koi you ascended because ZK1 doesn’t show that in the collection tap, I wasn’t exactly talking about transferring dragons from one game to another, sorry for giving that expression 😅
oh xD In that case I still have no idea L O L. I don’t usually add apps, so I haven’t got a clue if there are special third party ones for an addon xD
1 note
·
View note
Note
Do you think they’ll create an app where you can add your dragons from Zen Koi 1? Unlike ZK2, ZK1 doesn’t show the dragon symbol behind the fish
Honestly I’m not sure, ZK2 does have a lot of nice things unique to it that I’d wished it had the whole time, but I do miss some of the old koi and dragons from the first one. I don’t play nearly as often anymore but when I find myself bored or in need of calming, at least ZK2 is there xD I’m really doubtful they’ll let us transfer fish from one game to another since it’s possible that those koi don’t exist in the new games data at all.
3 notes
·
View notes
Note
So I'm having trouble understanding the rarity stat. As far as I can tell there are three options for what it does but I can't for the life of me tell which one it is. 1. Increase the chance of a rare mate appearing. 2. Increase the chance the egg you are fathering (mothering?) will be rare. 3. Increase the chance the egg you are hatching is rare. Do you know the one it is? Right now I've been leaving a high rarity level koi in a slot to hatch eggs but I have no idea if that's the right tactic.
The rarity stat, I believe, both increases the likelihood of you hatching a rare fish as well as encountering them in the wild! One tactic I use, (Which admittedly can bore other people) is to level a fish from 1 - 10 in the very first pond, and in there level up its speed and agility first, then after this focus on rarity, while also ignoring any and all other fish who come in unless they’re rare!
2 notes
·
View notes
Photo


Between dragon-fying koi, watching ads, and finding pearls in flowers, huzzuh on the big 500!
I had no idea there were slots after 500P. This is gonna take so long holy shit.
Why can’t we buy more breeding / egg slots though??? This is what I really want to know.
11 notes
·
View notes
Photo
Zen Koi made it on a list! Hooray!


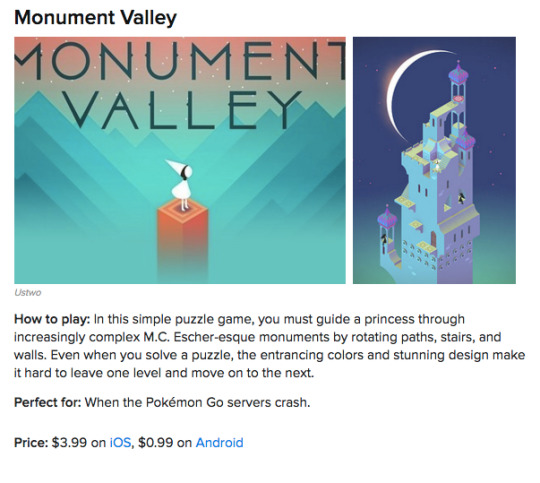
Monument Valley honestly kept me from having a panic attack a few weeks ago.
I was on hold with my bank for roughly a half hour because someone had stolen my debit card number and had charged a couple hundred dollars worth of stuff to it. All I could think about while I was on hold was what if my rent check bounces, I can’t afford the late fee I’ll be slapped with and I’m already on bad terms with my super - and I felt that horrible grip around my chest squeezing down and my breathing getting faster.
Normally I can just drink a cold glass of water and sit in front of my ac (to remind myself that no, my throat is not actually closing up, and that yes, I can still successfully get air into my lungs with the help of a fan) but this time neither of those tricks did anything. Well actually that’s not true, they reminded me that I was alone in my apartment, and if couldn’t find a way to calm down, I wouldn’t necessarily be able to get help - which only scared the shit out of me even more.
So I sat in front of my AC and pulled up the brightest, happiest looking app I have on phone, which is Monument Valley, and within ten minutes of building pathways to guide the princess through the castle I was breathing normally. I found myself thinking, look at this bitch, you’re already solving this, this will be cleared up with your bank in the next half hour, and in case your check bounces, you’ll have documentation as to why to show your landlord. On good days, it’s sometimes honestly as simple as helping a tiny me walk through a beautiful castle while solving simple puzzles to remind myself:
I got this.
66K notes
·
View notes
Text
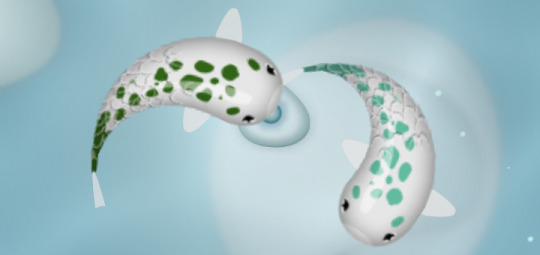
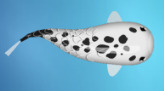
42 Kinds of Koi in the game- That’s a lot!


*Okunoha, *Daiya, *Kimono - These three Koi types are not confirmed. they could be future fish but we don’t know yet*
8 notes
·
View notes
Note
Is there a fan page/forum for everyone who is addicted to this game?
Yes there is a forum! I was going to make a post about it but I might as well announce it here.
The Ponds of Reflection
-has just about all the info you could want, a place to help write down for quick glances at what you own in collections, places to chat about whatever, and in general is I think the only Zen Koi forum at all thusfar. We have more info and pictures of koi types than any one place on the net- and we looked!
We encourage anyone who plays the game to make an account on our forum! It’s kind of new but we just need some more people on it. We update the species list as regularly as we can (Once in a while the surprise limited edition fish slips by but we usually get it listed pretty fast)
EDIT: I’ve just added in the latest three usd shop fish and added their templates to the Collection board :3
Fun Fact: There are 42* (3 unconfirmed breeds included) different kinds of Koi in the game. With 16 common colors and 16 rare colors, there are a total of
1344 total fish in the game.
11 notes
·
View notes
Photo

Current dragon points: 71

26 notes
·
View notes
Photo
This is a starter’s guide to Zen Koi, for those looking to play and those who have just begun playing! This game is very simple but can also lure you into making poor decisions very early on, things that senior players sometimes regret later.
I originally introduced the game on my other blog because it helps reduce stress and anxiety with focusing your mind on simple tasks, and gentle music tones. (You can find that post here, it has details about how to get this free game there!)
Firstly, when you first start the game, you are not really made aware right away how few koi slots you have (IE, how many koi you can have at a time!) and does not tell you right away that you will only have 8 egg slots/nests. This can lead a new player to allow their first koi to breed with every koi that visits your pond!
When you just start out, I would say breed your fish about 3 times- More likely than not your first fish is a common color Sutato, unless you have a rare color from the start. This way, you can have your starter and a couple other fish. Use your pearls ONLY to unlock koi slots at this stage of the game, it is vital to have as many open slots as possible!
--Here is the color/marking guide, I still need to update it since I accidentally deleted the original, but all the colors and names of markings are listed, as well as noting what rare and common colors are.
---Here is a Koi Breed/Marking guide which will update frequently, it is currently the only work in progress chart for all the fish in the game. We have completed several marking collections and are working on the rest.
Raising Your Koi: From Fish to Dragon
(Under the cut-an in-depth look at the whole game!)
EDIT: Updated some info and added a few more pictures!
When you first begin the game, two random fish will appear, they are most always Sutato (’start’) marking, and most likely common colors. An egg will hatch, and this is your first fish! You will be very slow and not very agile but that’s okay.
The first thing you’ll want to do is tap your stylus or finger on ‘greenies’ (or green tadpoles, it’s not really made clear what they are) to have your fish eat a few. It should take one or two to raise your level up. right now your agility is more important than speed. Do NOT put any stat points in rarity! Agility first, then speed (1 then 1, alternate between levels (pictured below), do not fill in rarity til the first two are filled!)

Stats:
Fish have randomized stat totals, aside from cloned fish. The lowest possible stats on a fish is:
Agility: 7 | Speed: 7 | Rarity: 7
While the best possible base stats is:
Agility: 10 | Speed: 10 | Rarity: 10

Some fish are born with not only base stats, but also some stat points already filled in! (See above)
Stat points are not really important, any and every fish can win the game no matter how high or low its stats are. It just means some fish are a little more agile and faster than others. The agility stat increases your fish’s ability to turn and rotate around, but also gives the fish a little burst of speed to lunge at a prey item. Speed dictates how fast your fish is, naturally.
After leveling identical stat fish with the same exact base stats filled in, I have noticed some fish are faster and more agile than others, even at the same level. I cannot prove if the fish have ‘secret stats’ (I guess like pokemon do?) but I’m beginning to think there are hidden stats per fish.
I’ve had perfect stat fish seem slow compared to some mid stat fish, and some lowest stat fish being decent enough, while another exact same stat, lowest possible point fish is extremely slow, even after level 10. With this in mind I cannot help but assume that there are hidden stats making each fish unique.
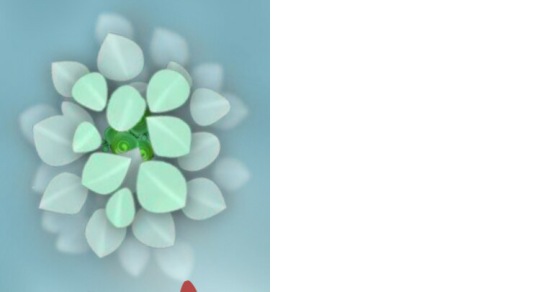
In the game you will sometimes uncover blooming flowers, inside these flowers can be anywhere from nothing, to stat boosters, to gems. Stat boosters are either green (Agility) or blue (Speed) (no rarity one). These boosters make your fish extremely fast for several seconds, which can be a little difficult to work with if you’re leveling a slower fish, as the speed and turning ability is more than maximized and then some!

* An un-bloomed flower will open when you draw near it!

(This one didn’t have a stat boost inside, but this is what a blooming flower looks like)
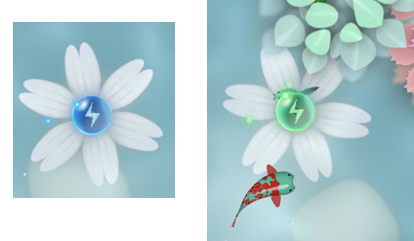
*Sometimes flowers bloom in the thorns. It’s annoying. | Agility boost makes glowing fins and green trail, Speed boost makes a glowing tail and blue trail.
*The colored gems you encounter have to do with the prey/crafting, I’ll get to that in a moment.*
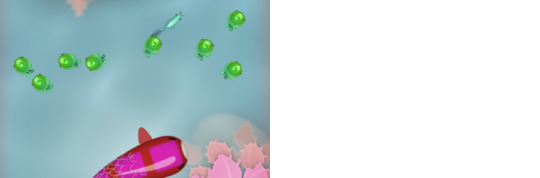
Finding Prey:
When you just begin the game with your newborn fish, (And each time you level a new fish afterward) you will find your fish is slow, and it is difficult to catch the ‘minnows’ (They’re..Idek what they are but I’m calling them minnows. They’re silvery blue). You’ll want to usually start up by eating the greenies as mentioned before, gain a few levels, and raise your agility and speed a little. Once you’ve done that, you want to aim for minnows that are swimming near your fish’s face. If you attempt to chase a minnow, more often than not you’ll be led on a merry chase around your pond and may never catch it, but it’ll lead you through all sorts of stuff, whether you want to go or not. With that in mind, aim for minnows that are nearby or will soon be nearby. It takes a little bit of skill to get used to it, but the more you try, the sooner you’ll get the hang of judging when to have a go at those guys.
Prey items often hang out in water plants, they might spawn there as well. Sometimes they even show up in large swarms!
Prey:
Oh boy. Some of these guys are easy to hunt and some are a pain in the ass!
Greenies:

Greenies are extremely slow and are not difficult to find or catch. They can be found on every level, either free swimming or grouped together in clumps hiding in the blue-green water plants. They offer very little XP later in the game, but if you see a clump of them, go for it! there can be ten or more stuck together sometimes. There’s not really any tips to catch these, they literally cannot escape the koi, it’s no contest!

‘Minnows’ (plankton things?) :

Minnows are much faster than you are, right at the beginning of the game. They only appear for the first couple levels so they aren’t always going to be around to annoy you. Remember to level up your agility and speed in zone 0 and they’ll soon become easy to catch. Swim close behind them without targeting them til they’re super close to the fish’s mouth, then tap! You will most likely be able to catch them. Also, the minnows come back if they swim outside the edges of the pond, so if you target one and it swims to the edge, wait a moment and snap it up when it comes back. Minnows are tricky but be patient, and try not to get frustrated! They are the second most difficult prey item to catch, at least early on.
Stickies:

Stickies are a minor annoyance. Like greenies, they are not really all that hard to find, but offer minor difficulty in catching. Sometimes they’ll be free floating or stuck to other prey, slowing those things down, so you can eat them and the other prey item! It’s also one way to catch minnows in zone 2+, as the minnows are hindered massively. Stickies get their name because they stick to prey- And to your koi too! They will make your koi marginally slower. You can swim in circles trying to get them to no avail if they’re too close, too. What you need to do is stop moving. 100% stop.
The stickie(s) will slide off on their own. Once it starts to move away, turn around quickly if you have highish agility and snap it up, or go away then around and eat it! Sometimes stickies will chase you. You can actually get a large group of them after you, only for you to stop, they lose interest immediately, then you can eat the lot in one go. They even stick to one another sometimes! Stickies may be one reason so many prey items get stuck in green plants, which may also be a spawning point for prey. At times you may enter a plant only to see a TON of prey items scatter in all directions, often with stickies hitching a ride! Or else, they wont scatter and will be helpless as your koi devours them all!

Jellyfish:

Jellies are not difficult to catch, they are slow but sometimes can be hard to find (Or not! It’s kind of random. At times they’re everywhere, and sometimes, nowhere to be found!) They move in a slow, undulating way, sometimes scooting along suddenly, making you miss, but return to moving slowly right after. They are not much of a challenge.
Waterbugs:

Like jellies, the waterbugs aren’t difficult to catch but can turn quickly. As long as your agility is decent (and by the time you encounter them, it should be fairly good) you shouldn’t have trouble!
Leaf-Fish:

Leafies are a little annoying. They’re very fast, and scuttle along rapidly towards the closest green-blue water plant they can find! Once they’ve shot into a plant, you will not be able to get them. I assume this is meant to be camouflage. Sometimes they get confused and spin around senselessly if they can’t figure out where to go. Can sometimes be hard to find, but not too difficult to catch once found. A minor irritance. With enough speed and agility (Which should be decent by the time you get to them) you should be fine.
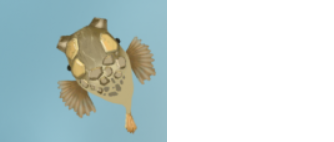
Puffer Fish:
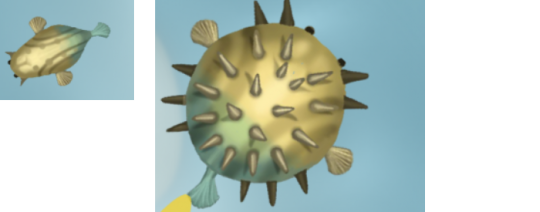
PUFFERS. These things annoy the holy living shit out of most players, at least, new players. They are annoying and seemingly impossible to catch!-- Unless you know the trick, of course. You MUST swim stealthily directly behind them, sometimes not even targeting them and then tapping on them to catch them. If you come in at even slightly the wrong angle, they will inflate! If they do, jsut wait a moment and wait for it to deflate then tap it again. They are terribly slow. I find it easiest to catch them when they are going straight upwards or downwards. Sometimes right or left swimmers are good. If its at an angle it can get a little harder to catch. HERE is a video of how to catch them with more tips. These are the hardest fish in the game and the only ones I would consider labeling as ‘difficult/hard’
Angel Fish:

Angel fish are quasi difficult, and only show up in the later levels of the game. They vary between semi fast, and SUPER fast when they swoop away. With agility and speed they can be caught relatively easily. They may dodge you a couple times but stick to it and you’ll catch them.
Stonefish:
Some might call the stonefish difficult. I rather find them slow and easy- Once you understand that it takes 3-4 strikes to eat them! Each time you strike them, they lose a piece of armor- Which you will see on their backs as yellow/gold in color. When they have no more armor, they can be eaten in one go. They like to hide in plants or swim around. You can flush a whole ton of them at once and eat away at their armor bit by bit then swoop in and eat the lot!
Double-Fish:

This ‘fish’ exists only on the eighth level, on the nirvana gate zone. They can be found everywhere, and are more than easy to catch. They practically beg you to eat them! Double-fish have massive XP stashes, at level 17, eating two-to-four can level you up. They exist entirely to level your fish up and gain all the remaining rarity stat points and to breed your fish before it moves on to being a dragon on the celestial plane atop the atsral waterfall.
Leveling:
Now if you’re paying attention to the game you’ll notice that after a few prey items in zone 0 that it’ll encourage you to unlock the seal and expand the pond. Some of you might have done this already, and its not going to kill you if you have, but lets pretend you didn’t. You really don’t have to but I level my fish to 10 before I advance them to the first pond expansion, because in zone 0, you only have two prey items in a small pond to chase, they respawn fast and often in clumps (Greenies sometimes mass respawn in clumps of ten or more you can eat in one move if you’re lucky!)
Leveling to 10 in the starting zone may take a little while for new players but it does help with getting used to how your fish moves, and also gives you lots of stats (at least 5 in agility and 5 in speed, not counting any stats the fish might have already had filled in at the start) which will make the upcoming levels much easier. You, like me, will probably hate the minnows when you begin. They get easier the more you eat them, and learn how to hunt them down the faster your fish is.
At level 10, without having used any prey to craft the gems, this is how many minnows and greenies one particular fish ate to get exactly to 10:
It looks like a lot but it really goes fast! Lots of practice indeed.
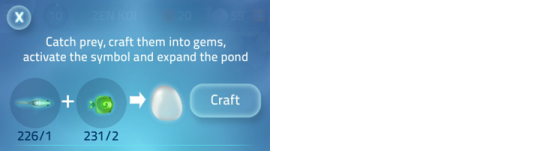
Crafting:
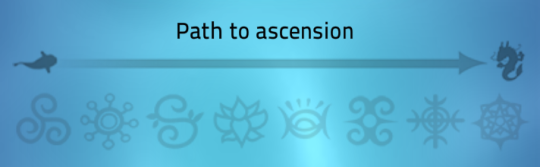
Once you advance to the next zone, you will be introduced to new prey items. The crafting is always simple to understand, just like the above. x prey + x prey = 1 gem. These gems unlock seals/gates. There are eight gates total:

The first and last gates are the easiest in my opinion. The very last gate is like a nirvana, it has black-blue and pink double sided ‘fish’ things that give so much xp, it’s literally not possible to never completely fill in your stats. This last zone is also important because the xp being dished out means potential mates show up in your pond, like they have every half level so far in the whole game, except in the last zone, you run into them more often!
The ingredients/Prey items needed per level sometimes changes, but the number needed for each level doesn’t. Here is an example of the Lotus Seal’s crafting:

As you can probably tell, I was spacing out a little playing while watching a show and ended up with more than enough prey to move on!
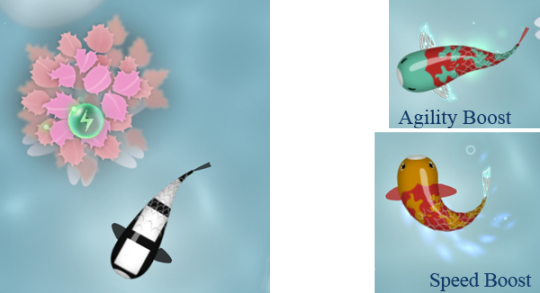
Once you craft all the gems you need to move on, click ACTIVATE and /don’t touch the screen!/. Your fish will automatically swim to the seal on its own and unlock it with the gems! If you did accidentally touch the screen, just tap the ? in the lower left corner and click ‘expand pond’ to make your fish autoswim again.


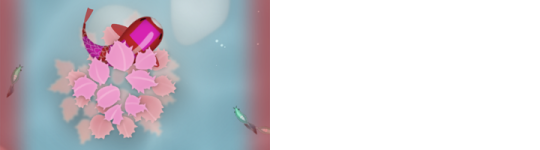
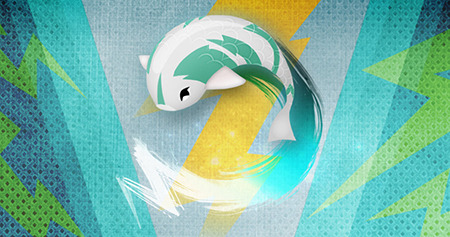
*My Kukuro Bux Koi with swirling gems, en-route to open the seal.
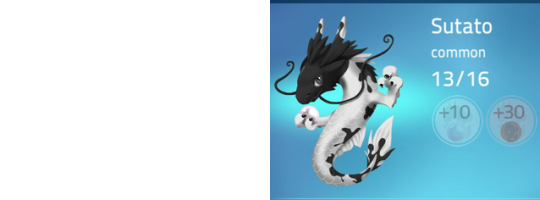
Once you open the last gate, your fish will become a dragon! Ascending all koi colors in a particular marking set into dragons rewards a lot of pearls (currency) and dragon points (Leaderboard/ total game points earned), on top of those earned by collecting all the fish in the set!


Plus, each fish you ascend rewards you with an additional +1 /per/ koi, too! So while you don’t /have/ to level each koi you get to collect, it is encouraged!
Sometimes your fish will swim into red thorns on the way to the gate. These cannot hurt your fish. Your fish is immortal and cannot die. All it does is make a low tone sound and slows the fish down, with red around the edges of the screen to insinuate that the fish is uncomfortable! The red thorns should normally be avoided but I sometimes use them to slow down while turning to attack a puffer fish and give it time to deflate if it puffed up.
Breeding:
Fish that visit your pond come around /roughly/ every half level. It isn’t always exact, and sometimes if you level too fast, you’ll miss it on the half levels.
A fish of some kind of marking and color will arrive in your pond, sometimes they are hard to follow and sometimes they follow you! If you decide to breed with the other fish, follow it. You will see a ring appear on the screen around your fish, with a light blue ‘loading bar’ sort of thing. The closer you are to matching the other fish as it swims, the faster the bar will go. The further you are, the slower it will go, and may even reverse! Some fish are very hard to catch, and it is always random, though I’ve noticed rare fish colors (see chart in section 1 for the colors) tend to be a little trickier as a general rule to catch. Sometimes a fish gets away but stays in your pond to give you another chance to dance, but some seem to vanish as soon as they are out of sight!

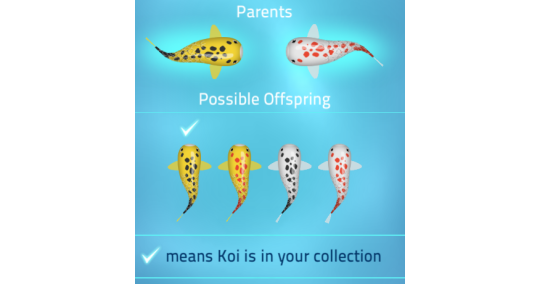
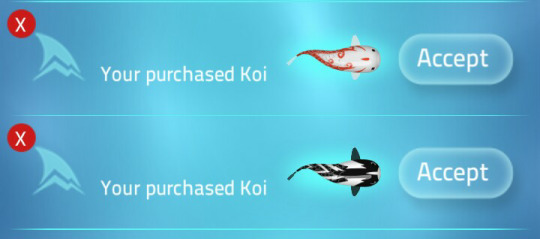
If you’ve managed to stay with the other fish as it swims all over the place (and sometimes through thorns, which annoyingly, does not slow the other fish down but you /will/ get slowed down.) the loading bar will come full circle, and the fish will circle one another, an egg will appear, you will be taken to a screen that shows the parent fish and all possible offspring. Here, you have the option to release the egg (IE trash/toss it) or, if keeping it, you will be asked if you would like to add the egg to your list.
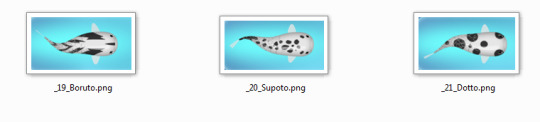
The time it takes eggs to mature seems to vary drastically between the different patterns and types of Koi. Sutato, for instance, the starter koi, takes between 2-5 minutes, while Supoto, the spotted limited edition, took 9-10 hours. The newest limited edition, Dotto, takes 11 hours or so. I have heard that some of the later breeds of koi can take upwards of 3 days! This is why it is extremely important to always keep an eye on how many egg slots you have open vs how many koi slots. If you find you enjoy the game, I highly recommend buying the limited edition koi (Which you have 14 or so days to get when you join) for 4.99$ usd, as it comes with 40 pearls. On top of the pearls you have when you start the game, the additional 40 will give you enough pearls to open another slot. If memory serves, slots go in 10-20-50-100-200-500 (Pearls, the game currency, for which there are no advertisements in the game to get you to buy, outside of the limited time offers which happens about once a month or so.)
Managing your koi and egg slots is one of the hardest parts of the game. I have heard that you don’t /have/ to level and ascend each fish into a dragon, that you can release a fish and have it still in your collection (Where you can clone it for 1-5 pearls (Maybe higher for rarer markings, 1 pearl is typical for common colors while 5 pearls is typical for rare colors) and level it at leisure whenever. The catch is, it’ll have 7-7-7 stats! Cloning can also be useful for trading fish with other people (To trade fish, you must connect your game to a facebook account! You can even make a game-only FB just for the game!) Once you friend another zen koi player, you can go to a friend list and add the person (I think you can also add a new friend in game when using the gift fish option.)
In addition, you can unlock achievements by hatching out koi, which gives you pearls and dragon points. (List below from sister’s game, screenshots taken from I think google play, so it doesn’t show the pearl/dragonpoint rewards)

Unlocking New Markings
You start the game off with Sutato Koi, apparently as you collect more fish, there is an increased chance to encounter new fish. Someone posted in a tip guide that this can happen after collecting 4 new fish. I’ll quote that:
July 31, 2015 zenkoidude:
The Koi patterns that you encounter in the pond are connected to the pattern of Koi that you’re swimming around.
So for the first pattern (Sutato), you will only encounter other Sutato Koi for the first 4 Sutato patterns you have in your collection. For every encounter after that, there’s a chance that you’ll encounter the next pattern up.
As you continue to collect more and more Sutato, the chance of encountering the next highest level increases (which can make collecting those last few in a set difficult).
So if you’re stuck, wondering why you can’t see any of the next level of Koi patterns, then you need to collect a few more of your current pattern before a new pattern will be unlocked. This also means that you can’t really skip collecting a pattern (say if you didn’t like the pattern) since you’ll need to get at least 4 before the next pattern will become available.
I myself have unlocked two new markings via collecting, and my sister has a few more so what I know so far is this chain:
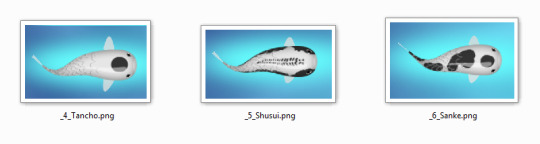
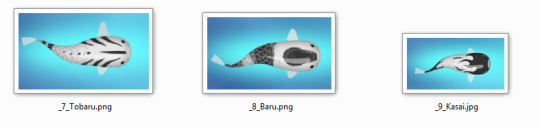
Sutato->Bux->Linea-> Tancho -> Shusui -> Sanke -> ? -> ?
*Collectors edition Koi do not count in this lineup*
Just last night a surprise Linea showed up!

Dragon Points & Leader Boards
You may at some point, if you have leveled a koi into a dragon already, have noticed the red dragon point up at the top next to the pearls you have. These dragon points cannot be spent, and are your total score in the game so far.
You get dragon points for ascending a koi into a dragon, for completing above mentioned achievements, and completing collections as well. You can view the worldwide leaderboard, which is everyone playing, or rank yourselves among your friends!
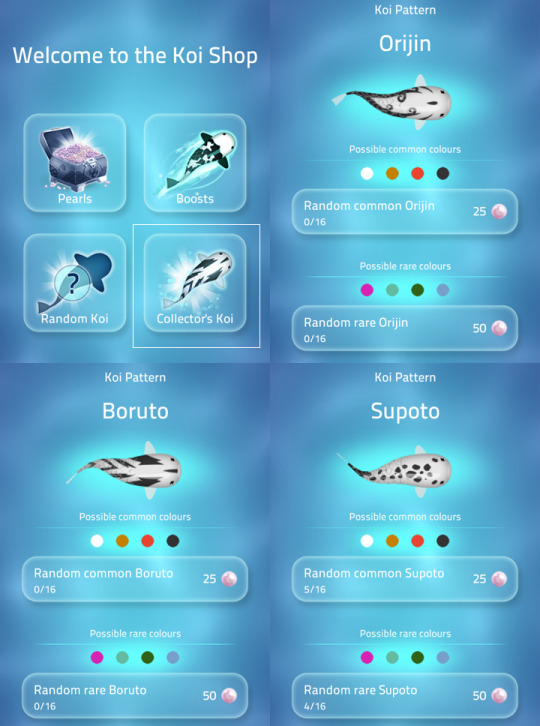
Shop:
The shop can be found on the main page of the game. There, you can buy randomized common or rare koi (Price is different for common/rare) of certain markings, collectors edition koi (Also randomized color, and also different price for common or rare. See HERE for details on collectors edition koi!
I think this is just about everything you need to know about the game! This blog also posts other details such as the contents of the Collector’s koi from time to time so follow me if you want to be kept up to date on stuff happening in the game! I also do give-aways too!
203 notes
·
View notes
Photo

(8-5-15)
This is pretty cute :3
1 note
·
View note
Photo
If you level and ascend fish you can get pearls without buying them! Also you get pearls for completing collections, as well as completing achievements!
(And the all important dragon points which, the more you have, the higher your rank is on the leaderboards!)
From the main page of Zen Koi, you’ll see a tab that says ‘shop’. Click shop->collectors koi -> Orijin, Boruto, Supoto.
Eventually I think Dotto will be on here too!
EDIT: Here’s the random koi I got! (Both common, 25 pearls EA)
15 notes
·
View notes
Photo
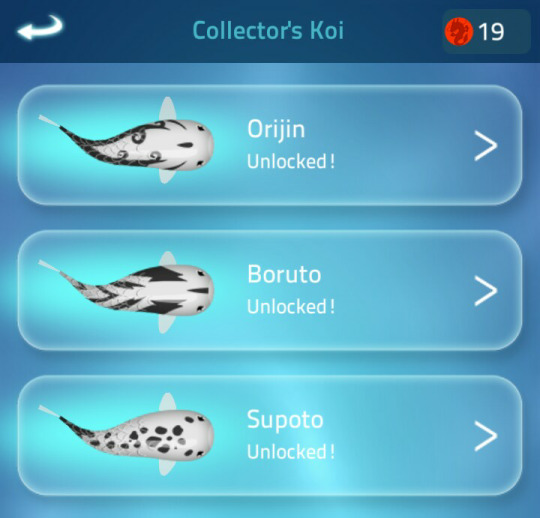
So my friend voidsingularity discovered (After I told her about the shop tab where you can buy a random koi color) that there was apparently a collectors koi tab. I’ve never noticed it before but apparently its a thing, and apparently both of us have two previous retired fish listed as ‘unlocked’ ? Neither of us has those, but we do have supoto. This is pretty cool either way!
14 notes
·
View notes
Text
List of Complete Color charts:
Marking & Color Guide
(With full color grid detailing common and rare colors and all known markings shown!)
Common: Koi Colors
Sutato | Bux | Linea | Supoto |
*Working on completing the others, some may be nigh impossible to do*
8 notes
·
View notes
Photo

Common Supoto, complete chart (Courtesy of my sister’s game!)
1 note
·
View note
Photo

Common Linea, complete chart (Courtesy of my sister’s game!)
1 note
·
View note
Photo

Common Bux, complete chart (Courtesy of my sister’s game!)
1 note
·
View note
Photo
voicesofthedistantsea:
voicesofthedistantsea:
Just an overly simple guide with exact color values for all the Koi in the game! All koi fall into these colors, one body color and one marking color, no matter what pattern the fish has.
There are 16 common color combinations, All have one of four base body colors:
*Note that the slightly different shades, such as the clearly different red bases and ‘red-orange’ markings for example, are still listed as red/red, even if the shades technically have different japanese names!
White = Shiro (しろ)
White/White = Shishiro
White/Yellow = Shiniro
White/Red = Shidai
White/Black = Shikuro
Yellow = Kiiro (きいろ)
Yellow/White = Kishiro
Yellow/Yellow = Kiniro
Yellow/Red = Kidai
Yellow/Black = Kikuro
Red = Aka (あか)
Red/White = Akashiro
Red/Yellow = Akaniro
Red/Red = Akadai
Red/Black = Akakuro
Black = Kuro (くろ)
Black/White = Kushiro
Black/Yellow = Kuniro
Black/Red = Kudai
Black/Black = Kukuro
…And there are 16 Rare color combinations:
The four rare colors are:
Hot Pink*(Purple)/Murasaki (パープル)
Jade/Hisui (ヒスイ)
Green/Midori (緑色)
‘Blue’/Ao-iro (ブリュ)
*technically light blue/green*
White/Pink = Shimura
White/Jade = Shihisui
White/Green = Shimido
White/Blue = Shiao
-
Yellow/Pink = Kimura
Yellow/Jade = Kihisui
Yellow/Green = Kimido
Yellow/Blue = Kiao
-
Red/Pink = Akamura
Red/Jade = Akahisui
Red/Green = Akamido
Red/Blue = Akaao
-
Black/Pink = Kumura
Black/Jade = Kuhisui
Black/Green = Kumido
Black/Blue = Kuao
~*~*~*~*~*~*~MARKINGS~*~*~*~*~*~*~
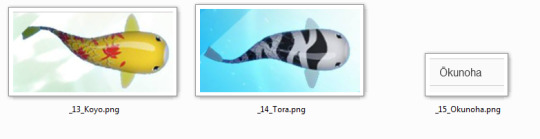
Sutāto (’start’; スタート)

Bux *Bokkusu* (’box’; ボックス)

Linea (’line’; ライン)

Tanchō (*monotone?; 丹頂 )

Shūsui (*’Scaleless?’, 秋水)

Supoto (’spot’; スポット)-Limited Edition?
Sanke/ 大正三色 (*no direct meaning found, has a splotchey pattern)

Tobaru *Toraibaru* (’tribal?; トライバル)

Baru (’bar’; バール)

Kasai (’fire’; 火災) - Special Edition ( ? )

Kitesho (Kaitō?), (Dichotomous *branching*; 怪盗 - Special Edition ( ? )

Boruto (Bolt) Apparently given to 50 people in a ‘Share your favorite koi’ contest
*May possibly be Shihisui Boruto only? *White/Jade*
Orijin (Origin) Limited or Special Edition, may be Singapore only?
*List will expand as I figure out more markings, some screenshots taken by my sister hauntedmyth (When I actually fill out pictures here)
The marking names of the last two fish have been figured out! Hooray!

59 notes
·
View notes