
Last Seen Blogs
wehavetofind
𝕴 𝖑𝖔𝖛𝖊 𝖞𝖔𝖚.

mrdonaldwilliams
Donald L. Williams Tumblr

caehlynt
Caehlynt

kaywan
Very Titled

omarn94
Another Photo Blog
Text
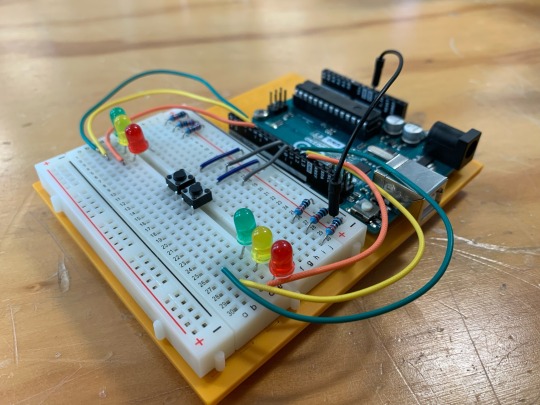
Physical Computing Assignment 2 - Magic Graph!

Fantastical
0 notes
Text
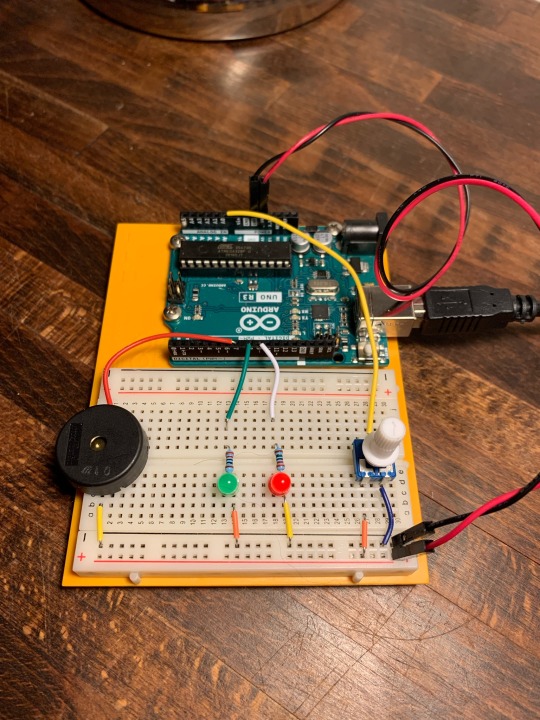
Physical Computing Assignment 1 Traffic Light.
Beautiful.

0 notes
Text
Been a while since updating this but I came across this video by Russell Brand and he makes a lot of interesting points. And of course it focuses on Elon Musk so, even tho ICT is done, Ricardo may still get a kick out of this.
youtube
“Consider that we may be more than our most selfish impulses, our misguided greed and selfishness, survival instincts redirected by systems that require us to remain on low bandwidth engagement, so that we may not throw off the shackles of a system that requires our compliance.”
Brand asks us to consider what the effect of micro chipping the brain could do to our already limited and challenged autonomy.
Brand also touches on the idea that someone being a genius in one field doesn’t make them a genius in another. There’s no automatic “cross pollination”. Just because someone is a genius in tech doesn’t mean they should they be responsible for the reorganization of society.
And even if they are proposing cures and aid to severe brain injuries, it’s still wise to query their true economic motives, especially when dealing with something as invaluable as the human mind. The companies associated with this, Amazon and Facebook, have already proven that their true motives are financially driven, so it’s safe to assume that while these benefits are legitimate, they’re likely secondary to their main priority which is the pursuit of further profit.
Ahh there I go again being technophobic.
Anyways I could write more on this but I’m on holiday damnit. But this is definitely an interesting topic worth potentially coming back to down the road.
0 notes
Text
Studio Final Project Week 6 - 3D Prints!
Changing it up a little bit this week!
Time's pressing on me to get my programming assignment done so I'm going to go through what we did today in steps. Trust me it's goin to be a tonne of fun so hold on to your hats an get ready for a journey into creating the first phase of a 3D printed modular fidget cube. Well, modular cube. Today it's still just a modular cube. Woo?
Okay so, STEP 1

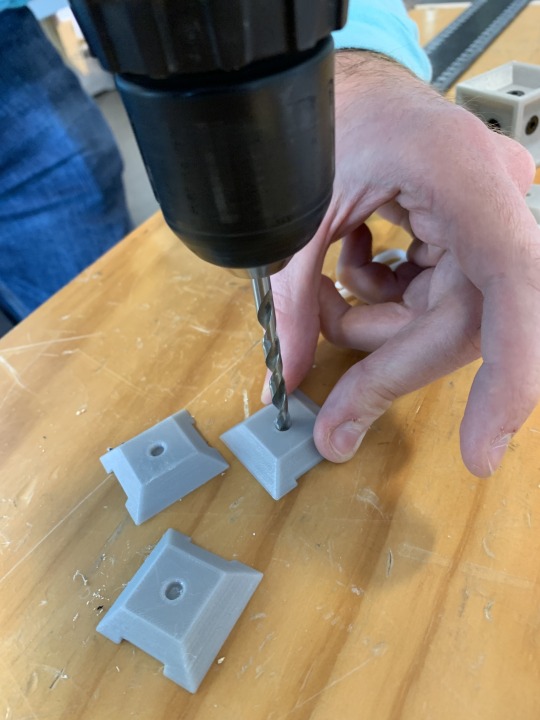
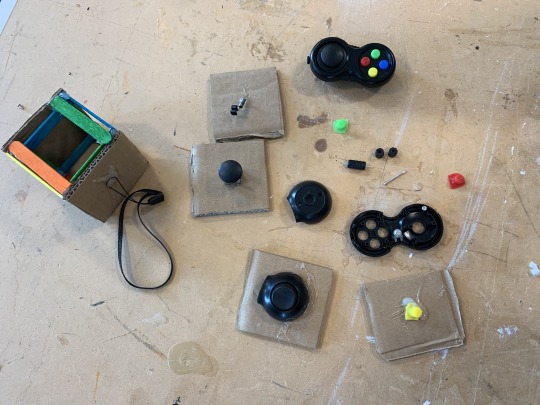
Krishna very kindly 3D printed out the cube base and modules for us. Look how pretty they look. So official looking. Very impressive.
STEP 2

We then used the drill to increase the size of the hole that the screws need to go in. Once we had widened it enough, I was introduced to "taps" which is used to drill the grooves needed by the screw.
333

We screwed in the screws! Using an Allan key! It was wild!
FOUR

So satisfying seeing that final cube base with the screws in. my goodnesses
CINCO
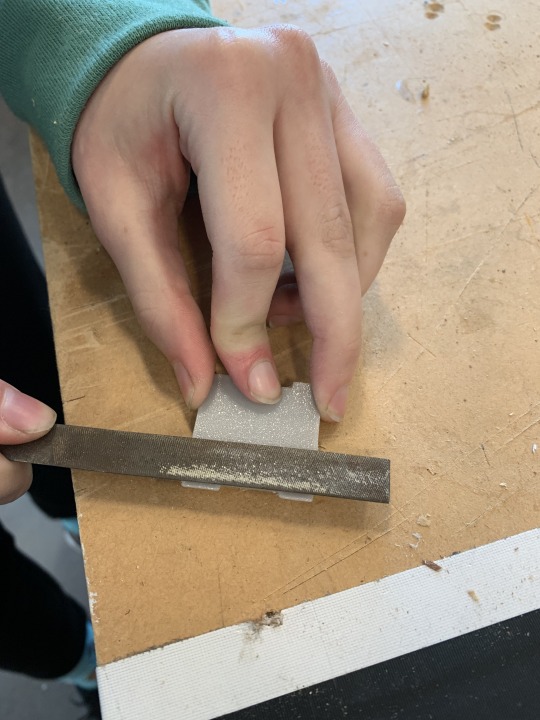
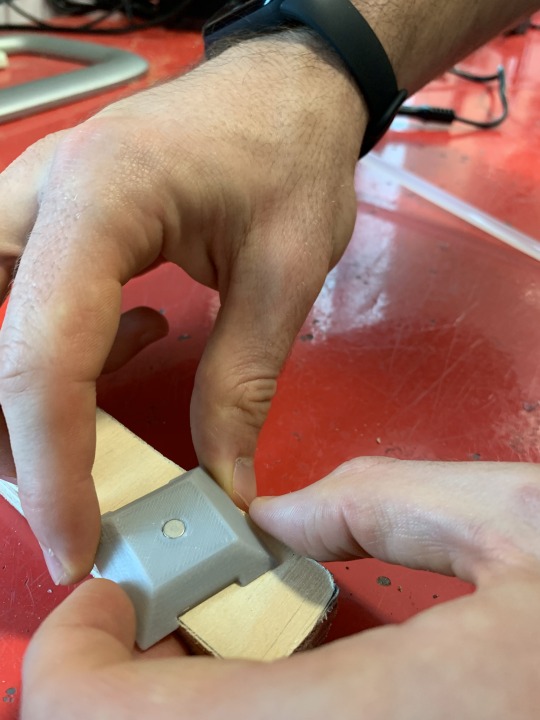
We noticed that the modules were ever so slightly too bulky so we used the files to shave a couple millimeters of the edges. The things you learn while 3D printing.
SIX
We then used the drill to slightly widen the the holes for the magnets. It was actually a pretty scary experience cause I was so afraid of accidentally drilling all the way through. Luckily, no such thing occurred, but we did get scarily close with one. We were sure to print out an extra module just incas something actually did happen though.
SIETE

We used a hot glue gun to fill the hole with glue then proceeded to put the magnet inside. This was actually a very time consuming experience as it was challenging to find the right amount of glue that wasn't too much so the magnet wouldn't fit, but still wasn't too little so the magnet would fall out.
EIGHT! GR8 8
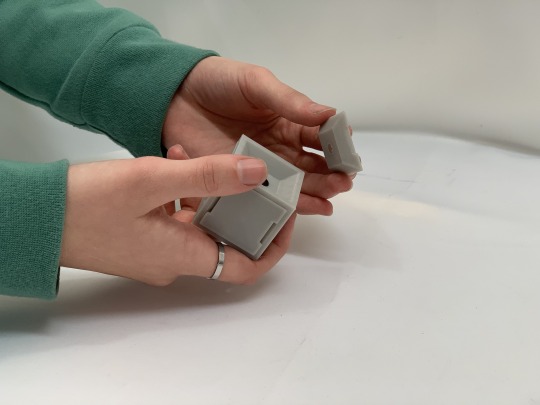

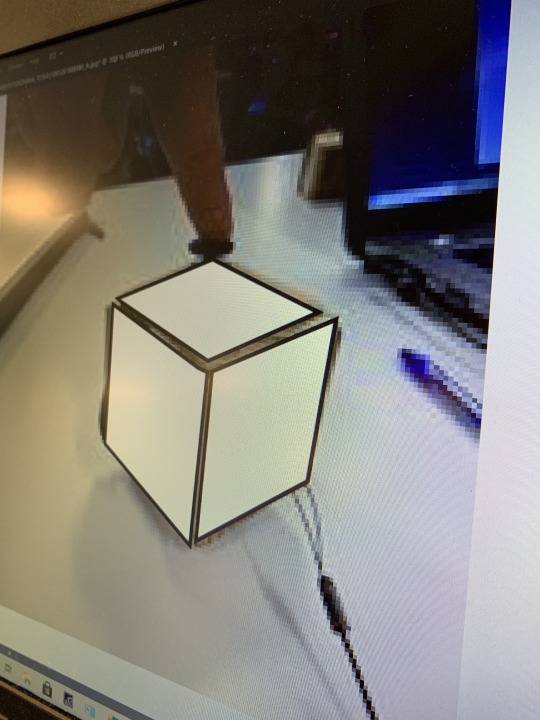
We did it! look at this beauty. The magnets worked like a charm. The modules slid in and out of the cube base like a pair of AirPods. Towards the end of the session we used the camera set up not he studio to snap some pics that we can use for our final submission.
One thing we did realize from creating this high fidelity prototype is that we didn't account for the sharpness of the cube when making our 3D model and the end result was consequently not the most comfortable in the hand. We attempted to resolve the issue by using a file to smoothen the corners. Ideally, we'd make another 3D print with smoother corners. These are the things you pick up when prototyping, so it's just a part of the process. Whether we make that next 3D print is still to be determined ad the amount of tasks needed for the final submission fo this project are piling up big time.
Next up- adding the fidget elements on to the module pieces.
And also the video, write ups, etc. A lot!
Thank you to whoever's reading this for getting this far and bearing with my somewhat frantic state of mind as I push this blog out among all the other deadlines.
I was also going to add in a video of us using the fidget cube but Tumblr won't let me. big sad
2 notes
·
View notes
Text
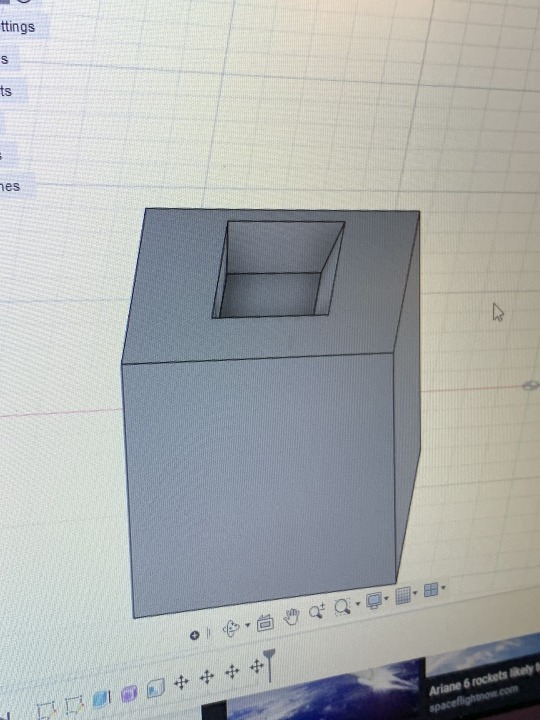
Studio Final Project Week 5 - 3D modeling
This week we primarily worked on finalizing our 3D model using the Fusion 360 software.
As can be seen and is explained in the video, we got to a good point with out cube base and modules.
Learning the new software to create the 3D models was definitely a daunting task but fortunately Connor had a good grasp on it already.
Here’s a video of Connor explaining the model.
After finalizing the models we spoke with Krishna and planned to have it 3D printed by following week.


(Yes, this is a very brief post compared to usual as I’ve been swamped with deadlines as we come to the end of the term).
1 note
·
View note
Text
Techno Determinism and Technophilia intro paragraph
Here's the rough intro to my ICT essay. In all honesty, I'm not sure if I'm barking up the right tree here, so any sort of feedback is welcome. Think of this as the "describe" part of the Kolb cycle.
...
The Creative Technologies experience that happened to me for this topic wasn’t a physical experience of a single event. It was an eye opening realization. I’ve been enthralled with technology since my teenage years and have, in the background of my mind, somewhat noticed how it is negatively (and of course, positively) impacting my life. It was a thought, but I didn’t have a name for it. Then, in week 5 of our Intro to Creative Technologies class, we were introduced to the concept of Technophilia, along with Technological Determinism. Not to get too textbook-y or parrot anything back, but Technophilia refers to the mindset that uncritically accepts all technology as an answer to just about any social issue, without consideration of the root cause of said issue. I found myself relating to this somewhat as I too can get carried away in the flashiness of technology. This is, of course, the opposite of technophobia, which is the fear or general dislike of new technologies. While I am still critical of technology, I certainly find myself to be more on the technophilia side of the spectrum. This then leads into the concept of technological determinism – whereby technology is seen as an agent of social change. Its introduction changes the way we function as a society, and this is something that, according to technological determinists, cannot be predicted nor resisted. Again, this is one side of a spectrum, with the other side being social constructivism, whereby society shapes technology. It sounds rather reminiscent of the chicken and the egg paradox, with one side affecting the other, almost in a loop. Obviously, we as humans created technology, but the degree to which it is shaping and changing our social dynamic is something worth considering. And that’s when it hit me. I started to think about my use of technology, the most prevalent one being the one that practically lives in my phone for the good majority of the day – my smart phone. It’s almost such a common idea that it’s questionable whether or not to bring it up, but the argument that phones are changing the way we live, perceive our friends, family and the world is a common one to say the least. But it got me thinking, how much has my life changed as a result of owning a smartphone? And, more specifically, how much of that is due to social media? The ability to gain instant gratification by flicking open Instagram and scrolling mindlessly or using a smartphone to check one thing and winding up wasting time looking at something completely unrelated are common occurrences for me, and I don’t think I’m alone. It’s reducing our attention span, warping our world views. And how much of it is our fault? That’s where technological determinism comes in. To what extent are we being controlled by this technology, and how much can we control it?
3 notes
·
View notes
Text
youtube
Personal favorite of mine would be the edible cutlery - would be perfect for the studio space.
Other great ideas include the Form box and the Coelux sun panel.
Just a wee bit of creative tech procrastination to get me thinking about potential ideas for next semester.
What was your favorite idea?
2 notes
·
View notes
Text
Studio Final Project Week 4 - branding, market research, and design
In our studio class today we were promoted to create a timeline from now until the submission date, and it quickly became apparent that there is still a lot of work to be done.
Carrying on with our first bad research from yesterday, throughout the studio session we asked other students and lecturers to try the different sizes of cubes and pyramids we had created yesterday and for their feedback on their preferred size for each along with their preferred size and shape overall.
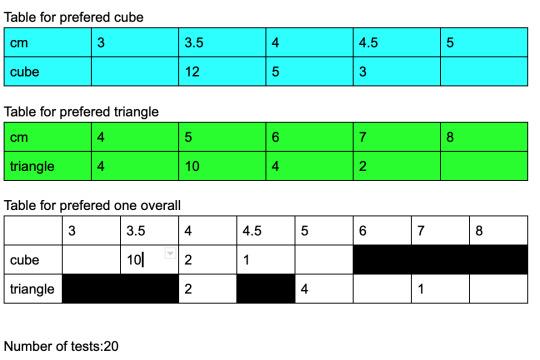
By the end of the day, we had gotten 20 opinions, with the most popular choice being the 3.5cm cube shape. Thus, we’ll likely use those dimensions for our 3D modeling, but still plan to get more opinions with time.
During our user testing for the dimensions, someone *get their name* brought up the idea that it may be beneficial to user test people’s preference for fidget modules as well. This is worth considering, and we’ll try to do something in that vein. The reason we hadn’t fully considered it is that the whole point of having a modular device is that the user gets to choose the elements that go on to it. They customize the final product to their liking. But, for all these modules to be compatible with all cubes, they need to fit all the side slots, hence the cube/pyramid base has to be a fixed size, which is why we created the different size prototypes to gauge which one is most preferable to the most people.
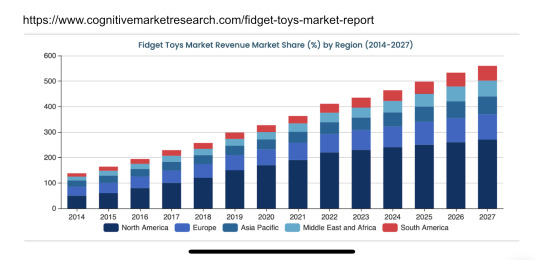
We also had a look at some second-hand research to gauge the market to see if there even was an interest in fidget toys and what that trajectory was. It would be wasteful to conceptualize an idea that doesn’t have any signs of demand. (This is a generalization of course as people can be turned around, but it does help to know people have some sort of a preexisting interest in the area of what you’re making.) From our brief search, we came across this graph, which does indicate a significant year-on-year increase in fidget toys. More research still needs to be done, but this looks to be a promising start.
We also thought about our name and logo. For now, we’re still sticking with the name EcoFidget, but may change it in the future should something slicker come up.
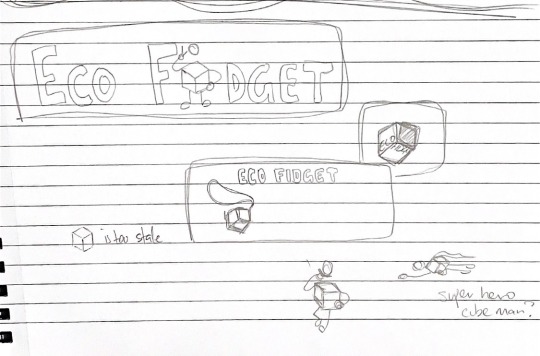
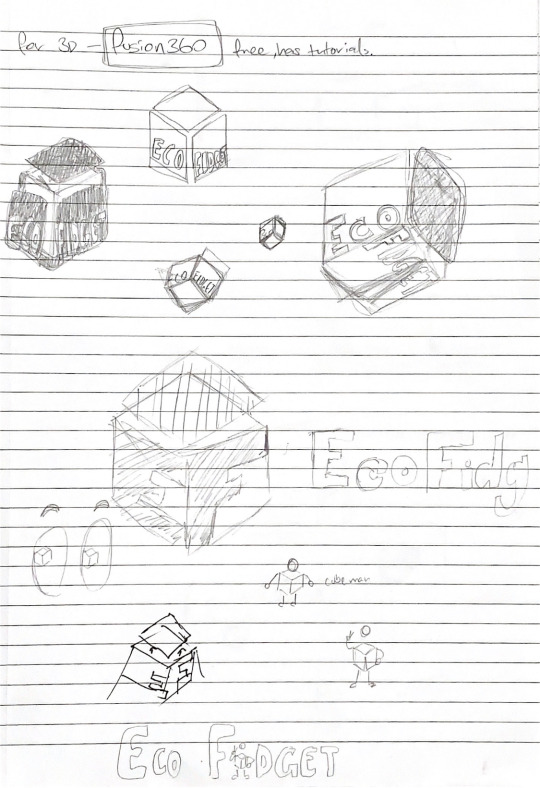
As seen from these scans, we drew out a couple of logo ideas and even considered a little fidget mascot. We wanted the logo to incorporate the modular element, but having the sides rise off, as this is effectively the product's main differentiating feature and selling point. The cube mascot was another interesting addition, and something that could be taken a lot further should this product ever eventuate. It would be great to have the mascot animate in an advert to introduce it, as this is a product that could very possibly appeal to younger people. But, the design isn’t childish to the point where it’s off-putting for older customers.
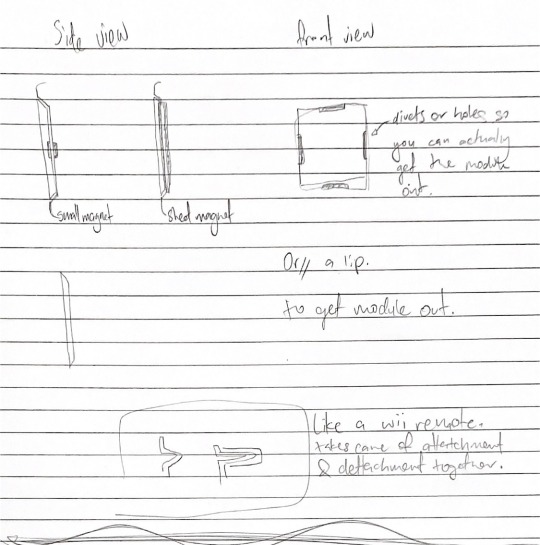
We also considered the connectivity of our modules some more as seen in the sketch above. Our two main ways of connection are magnets and a clip. Magnets are more seamless, but this is still under consideration.
We then thought about when we will eventually have to 3D print our hi-fi prototype and subsequent final product. We spoke with someone in the maker space and found out that we would have to install a software called Fusion 360. We did so and got to work on designing our starting cube, and then tried adding in an indent on a side that would house the module. The software was somewhat challenging to learn, and none of us have any experience with 3D modeling so this was just a start that will require more worn down the line.

We also received a tutorial on vector tracing through the use of Adobe Illustrate. The software wouldn’t install on my laptop so I worked with Connor. We took a photo of our modular cube prototype and then used vector tracing to trace around it to get a silhouette that we could use in a logo or an infographic that would be used for our final submission.


Up until this point, I had only considered regular photos for our final submission, but today the idea of adding in an infographic as one of those photos was introduced. This is an appealing idea as it would allow us to incorporate so much more information about how our product could be used than a simple image. Especially for a product like this, making sure the viewer understands the modular aspect of it is essential. So, we’ll definitely try to create an infographic using vector tracing that outlines how the product works as one of our photos.
Our group also discussed the video part of the submission. It had been in the back of our minds until now, and we thought it was to be more focused on explaining the final product. But, it turns out that the video’s purpose is to show the creation process of this project. Fortunately, these blogs can act as a skeleton for that video. I’m not overly experienced with video editing, but I did quite enjoy making the vlog so I’m happy to head this part of the project up. I’m thinking of keeping it relatively straightforward, focusing on the linear progression of this project. In hindsight, it would’ve been beneficial to consider the video a “making” from the beginning, as I would’ve filmed and narrated over more of our making phase as opposed to just taking photos. Alas, it looks like a large chunk of the video may have to be still moving images accompanied by music. We spoke to Rachel to clear this up and she says that that should be okay.
I’ve got to say though, that the realization of all the things that need to be done for this project submission, alongside our commitments to programming and ICT is quite daunting. So, going forward, I plan to try to come into university more often to get as much work done as early as possible to avoid a last-minute panic and break down before the submission
1 note
·
View note
Text
Studio Final Project Week 4 - Mass prototyping
Studio 1 Final Project Week 4 - rapid Low-Fi prototyping and the start of user testing
Today we used cardboard to create a variety of different potential fidget cube sizes. Our modular prototype from last week had a size of 6cm by 6cm, and that was far too big so we created our first prototype at half of that.


We then decided to try creating a 3 sided triangle fidget shape in a variety of different sizes too.
Since we didn’t have a protractor to measure angles, we used a box and saw to create a 60-degree angle out of a block of wood, which we then used to draw the triangle cutouts on the cardboard.


We used ourselves as a miniature test group to figure out the range of prototype sizes we’d create with the cardboard. For the cube, it became clear that anything larger than 5cm would be generally too large, and anything smaller than 3cm too small. We then did the same for the triangle shape, with our prototypes ranging from 4cm to 8cm.
We were surprised by how much larger the sides of the triangle were than its square counterpart that felt the same in the hand.
But this makes sense when we considered the reduced surface area of a triangle compared with a square with the same length sides.
We also tried out a four-sided triangle with a square base but decided that this was less comfortable in the hand. It also would reduce the custom aid ability of the final product, as the whole point is that all the different fidget parts are meant to fit on any side of the shape, but with this one, the square bottom wouldn’t be able to house any of the other triangular fidget modules, not have its module fit on the other triangular sides.

So, in the end, we had our range of different size prototypes. 5 differently sized cubes and 5 differently sized pyramids.

We then started the process of user testing by creating a table that we’d use to sacrament people’s preferences.
The studio was pretty empty by this point but we managed to find two fellow students to test out the different shapes and sizes and give us their feedback.
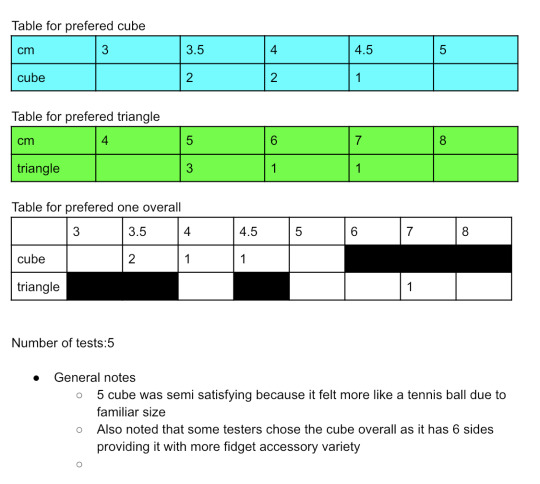
The three of us group members also tested them out and gave our feedback, giving us a starting number of 5 tests for the day, as seen in the image
Collecting much more user testing data is the logical next step from here.
Once we have a clear idea of which size and shape people prefer, we can come to an informed decision of how to construct our hi-fi prototype with the 3D printer.
We would also like to create a wireframe of the hypothetical website that would be used to advertise and sell the product should it ever go to market. This would be a beneficial additional document for our final submission as it could provide a visual representation of our final vision, even if it isn't a fully functioning website.
1 note
·
View note
Text
Studio 1 Final Project Week 3 - Peer Review
As a group, we presented our idea and prototype to the class and received some constructive feedback.
Here is a list of things that were brought up and how we'll address them:.
Use of things that would otherwise be thrown away such as bottle caps to create the fidget elements, instead of 3d printing our own or repurposing existing ones
A way of achieving this would be to put up bins around the uni where we ask for peoples reusable items that we could then repurpose into fidget modules.
Our only concern is that may take away from the may tale away from the subtlety, intricacy and custom shape of the modules we had envisioned. Our initial prototypes were made from random objects so we can definitely make more with different objects to experiment.
The mechanism used to stick the modules together was brought into question. Our initial best case scenario idea of using magnets may not be as environmentally friendly, as magnets turned out to not be easy to recycle. We had an idea to combat this whereby the user is prompted to send back their broken fidget modules so that the magnet can be reused and not contribute to waste.
Another alternative to connect the modules could be to use a plastic clip as is used in the back o remotes, as this this eliminates the need for magnets.
Don’t have to go “big scale” as in we dont have to worry about a facturoy mass producing the device, and it’s okay for us to focus ont he conceptualizing and production phase.
Someone also gave us the idea of incorporating different textures for the fidget modules. This could be achieved through the use of discarded materials and fabrics, as this is a common occurrence and significant issue in the fabrics industry.
We were also prompted to look in to the principles of design and research which models of fidget products in the past were most popular to better understand what the market would want from our version.
User testing. This is an idea we’ve been thinking of for a while but iti was brought up and elaborated on today. We were prompted toc reate even more prototypes of varying sizes and shapes to give to as many people as possible to get a better guage on what’s most effective.
We also considered packaging, and thought about using fabric scraps to create it. Provides a rustic, flea market look and is environmentally friendly.
Going forward, our plan is still similar but from now we'll have an even bigger focus on user testing a variety of different sizes, and also try to include textures which we hadn't considered before.
*Reminder for myself to come back to this and answer the questions from the slide when they're uploaded*
1 note
·
View note
Text
Studio 1 Final project Week 3- Modules save the planet!
In preparation for our student showcase tomorrow, we got together refine our ide and considered that an effective way of improving the reusability of our fidget toys would be to create a modular design. As demonstrated last week, fidget toy parts tend to break rather easily, so a modular design would allow the user to replace the individual broken part, as opposed to having to replace the entire device, resulting in less overall waste. This also has the benefit of allowing the user to change the orientation of the different fidget modules to their custom preferences, which should prove popular to potential consumers.
But what’s the point of chatting away about ideas without some good ol' prototyping?
So, we hot glued some popsicle sticks together to create the “skeleton” of our fidget toy upon which the modules would be attached.

We then disassembled the store-bought fidget toy to make use of its parts. We got glued the separated parts onto squares of cardboard that would be stuck onto the skeleton, effectively emulating the modular nature of the final product.


We quickly realized that the size of our skeleton (and consequently the modular pieces attached to it) was far larger than what we would use for the final product. But for now, it served as a useful proof of concept for the showcase. While we want the final model to be smaller, just how much smaller I will be determined through user testing. In the future, we plan to make multiple low-do prototypes and give them out to as many people as possible and ask them what they prefer to gauge what an appropriate size would be. After all, our aim is for the skeleton to be a “one size fits all” base that the custom modules are added to. So, it's vital that the base be as user-friendly as possible.
After creating the prototype, we considered different ideas on how we want the final product to look and function. We quickly established that for the final base, we didn’t want the skeleton to just be hollow, as this would make the product feel incomplete if not all 6 sides have modules attached. We thought about providing blank modules to use if that side of the base hadn’t been used for a fidget module, but in the end, decided against this idea as it just seemed like an extra step that could be avoided with a better design. We didn't want to have more parts than necessary, for waste purposes but also intuitiveness. The idea of someone attaching a blank module just to be replaced with a fidget module, later on, didn't sit well.
So, on the flip side, we considered having a base that's basically just a complete cube, and the individual fidgets are attached directly onto it, without the need for a base. This is a great concept in theory, as it solves our prior issue of the fidget cube feeling incomplete when not filled up, but given our current resources, we're still unsure how viable that would be.
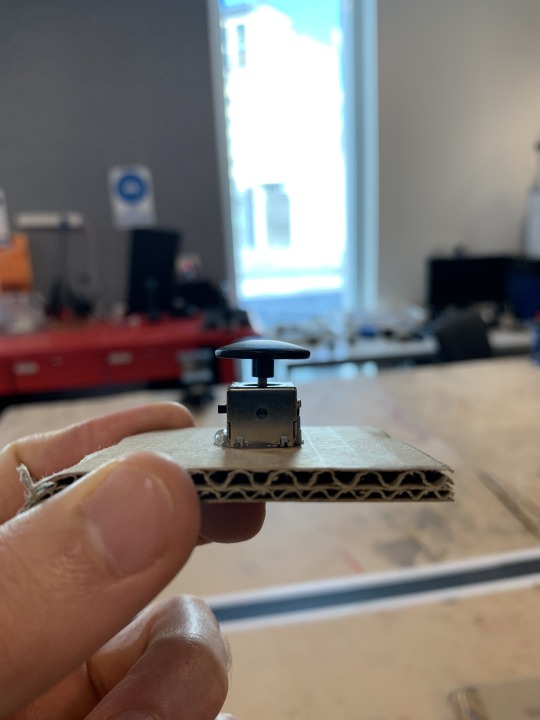
Pictured above is an example of one of the fidget parts we used, and as can be seen, it has a sizable base that ideally would have to fit in the cube, so having it attack straight on to the side (like it is to the cardboard in this demo) wouldn't achieve the desired result.
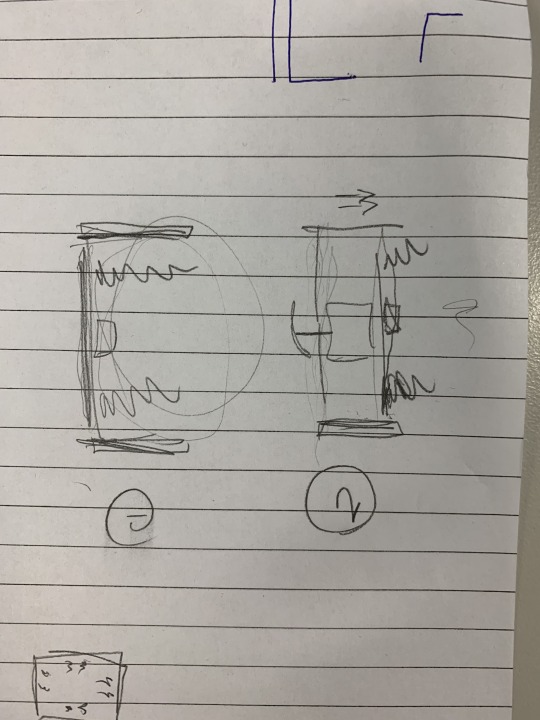
We thought of a way that may be able to do this, where the solid side of the cube would open up when the fidget accessory is inserted, and then close back up when removed. As seen in the rough sketch above, it relied on springs to open and close, but it does sound rather finicky and a potential future "marshmallow" so, while we haven't written off the idea entirely, it's a less likely solution
So, putting our effectual thinking caps on, we considered a version that may be more achievable given what's available to us. It's still a solid cube, but the sides are indented, allowing space for the module to fit in. This is more of a compromised approach, so it still feels like a solid cube but allows room for the module's base in a more straightforward manner.
In terms of attaching the module, we decided that a magnetic connection would likely be the most seamless method, but more testing down the road will dictate how achievable that is.
We also considered how a product like this would be marketed, and drew up some website sketches to sell the item. We decided the fidget cube would be sold in a variety of presets, so it would already come with 6 fidget modules, that the user could then rearrange or replace at their leisure.

We then t sketched how the marketing images would highlight the modular aspect of the cube, by showing them slightly raised from the cube's base.

Lastly, we reconsidered exactly how to implement the recycled materials to create the final product. As it currently stands, we may have to use regular 3D printing to create our final demonstration, but research the method in which the actual product could be made from recycled materials should it go to market.
Overall today was another productive session, and adding the modular aspect to our project is further pushing us in the right direction of considering less waste and promoting a more circular economy.
2 notes
·
View notes
Text
Studio 1 Final Project - Week 2
Today we were formally introduced to the concept of lo-fi (low fidelity) prototyping in our studio class. We were taught about the importance of rapidly creating multiple, quick and simple prototypes of what we eventually want to create to check that we are on the right path and inform our decision-making process.
We were also introduced to the idea of effectual reasoning in our ICT class, which essentially boils down to using what's available to create your solution. Thus, we focused on creating our low-fi prototypes with what was available to us in the studio.
Fortunately, this is a method we already touched upon last week when we created our first fidget toy prototypes, so we used today's session to build on that and make some more prototypes using different low-fi materials.
We had also ordered two identical fidget toys online which we had on hand to draw inspiration from and see which elements we could improve upon.

The first thing that became evident from playing with the purchased fidget toys was their lack of durability. It didn't take long for them to start falling apart from basic fidgeting. This is something we touched on in theory last week - how toys like these can break easily and contribute to waste. So, our goal still appears worthwhile - to reverse that cycle by creating more durable versions from waste, instead of contributing to it.
We then cut out some cardboard to construct a low-fi prototype of a possible alternative fidget size and shape.


We wanted to test a slightly larger size than our previous prototypes and the store-bought fidget toy, but it became apparent that for something that angular, the size was too big for most hands.

We used a ruler to compare the new size with the store-bought fidgets and our previous prototypes, and discovered that we coincidently created all our initial prototypes to be a similar size as the store-bought product.
This was just a coincidence, but it's telling that we enjoyed using our first prototypes more, and the industry also created a fidget toy that size for the market, so it's a good indicator that our final fidget toys should be roughly a similar size to those.

Next, we thought about possible ways to help differentiate our product from the rest.
We went through a variety of ideas such as;
Making it produce sounds like a musical instrument. We decided against this in the end as we were deviating too far from the initial goal of fidgeting
Getting the user to move their whole body in an exercise manner while otherwise sitting down for long periods. Again, this felt a bit far-fetched and we couldn't think of an intuitive way to implement it.
Making our fidget toys into characters that people could choose from for added variety and uniqueness. For example, one may be called "Metal Man" and the other "Glass Guy" or "Paper Boy" and that fidget toy would come with a pamphlet (or another interactive medium) that educates the user about the fidget toys specific recycling material. This idea does narrow the age demographic down to younger children, but the educational part about spreading recycling awareness is something that we do want to incorporate in the final product, so we plan to hopefully implement this in the end.
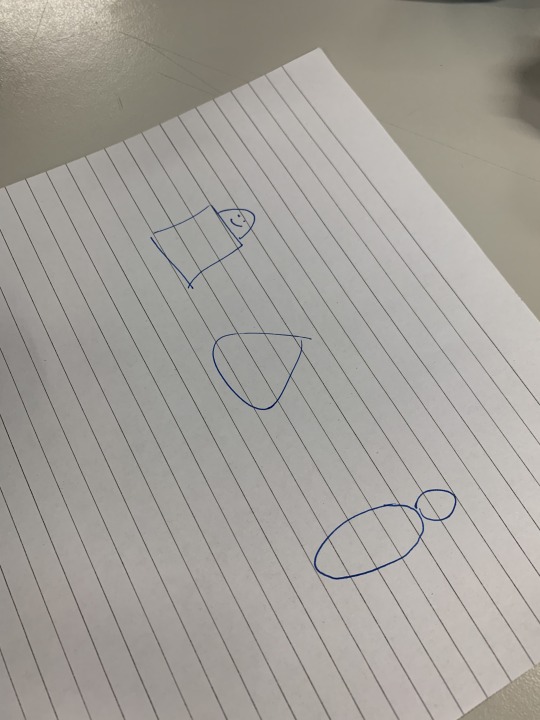
I drew some rough, simplistic sketches of potential "characters" or fidget toy models that we could use for the final lineup. We decided on having three final fidget toys, each with its own functionality and recycling material focus.
We then used some playdough and tinfoil to make some more lo-fi prototypes of potential designs. We decided that, after experimenting with the angular cardboard prototype, that the rounded corners help make for a much more ergonomic fidgeting experience, so we made all of our next prototypes rounded and oval.
We also didn't like the convex shape of the store-bought fidget toy, so made an indent in the blue one as that felt better for the thumb to slide over.

We also used some leftover orange thread that we found to construct a lo-fi handle that we could use. Last week we tried knitting one from old plastic but this felt a lot sturdier so could be a reasonable alternative.
Overall, today was a useful extension of what we started last week. It was nice to see that we were already doing some of the creative strategies, and now we know the name for it - low-fi.
We had some doubts about whether or not what we were doing is enough, but after talking to some teachers we were reassured that we don't necessarily have to recreate the "wheel", but we can change how the wheel is made. So, in our case, we don't have to think of a completely new fidget method, but we can do a good job coming up with a better type of fidget spinner that's eco-friendly and helps educate people on the importance of recycling. It's all about promoting that circular economy model discussed last week.
Another key takeaway from today was incorporating the mental process of "effectual reasoning" which was introduced in our into to creative technologies class. Using this mindset, we were able to think of prototype solutions that made use of the items we had available to us, as opposed to thinking up unattainable ideas.
Going forward, we have planned to meet up next week before the studio class to use the 3D printing labs and create some hi-fi (high fidelity) prototypes to take this to the next level.
1 note
·
View note
Text
Day 1 of Studio 1 Main Project - Making Prototypes and Answering the Prompt Questions
Today my group and I got together to finalize our idea for our presentation tomorrow.
We started by looking at the prompt questions for the assignment.
This asked us to consider why the project is important, what the idea is, who it’s for, and where/when it would be implemented.
To save repeating myself, below is a copy of our answers to these questions.
Why is the project important?
Helps people relieve stress
People who fidget tend to wreck things over time
Fidget toys can also become fads (like fidget spinners) and get discarded
Contributes to a circular economy. Using what can be considered as waste as a resource.
People who are neurodivergent actually focus better when fidgeting, thus the creation of fidget toys. Helps both in class and workplaces where lots of being still is required (such as offices)
FIdgeting can also be an anxiety and stress response.
Fidgeting lowers cortisol which causes stress interferes with learning → fidgeting helps with learning and memory
What is the idea?
Using recycled materials to create fidget toys that, if broken, could be recycled again. Contributes to a circular economy.
Who is the idea meant to help?
People who are neurodivergent
People who are prone to fidgeting
Students
Where/When is the idea going to be implemented/take place?
Schools
Offices
Universities
Places where concentration is required for long periods of time, and people may be prone to fidgeting.
Planes, due to limited ability to move, and a consequential urge to fidget.
This was a useful exercise as it got us to critically think about our idea and its wider impact, allowing us to accurately assess its viability.
Once we had answered the questions to a decent extent and prepared some presentation slides, we got to work creating some prototypes to show off as a proof of concept.
The idea is to make use of either recycled materials or materials that would otherwise be thrown away, in keeping with the circular economy theory the project is based around
Thus, our first prototype consisted of a nut enclosed in some green off-cut material, as a very primitive fidget toy prototype.

We liked the idea of concealing an object in some material, but found the shape of the nut to be somewhat restrictive when moving it about in the fabric, and decided that a sphere would more easily slide around.
Thus, we went for a walk into town to purchase a few marbles to use in our second line of prototypes.
We also experimented with different types of fabric to sew the marble into, as well as varying the number of marbles in each prototype.


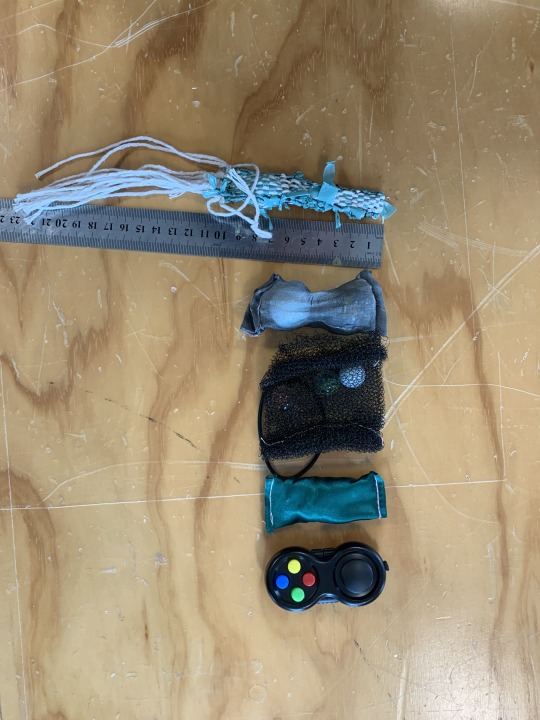
This resulted in two more prototypes pictured below
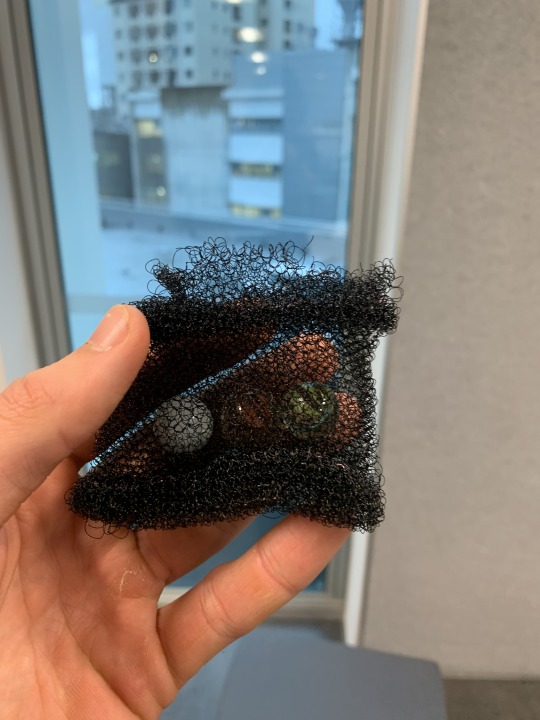
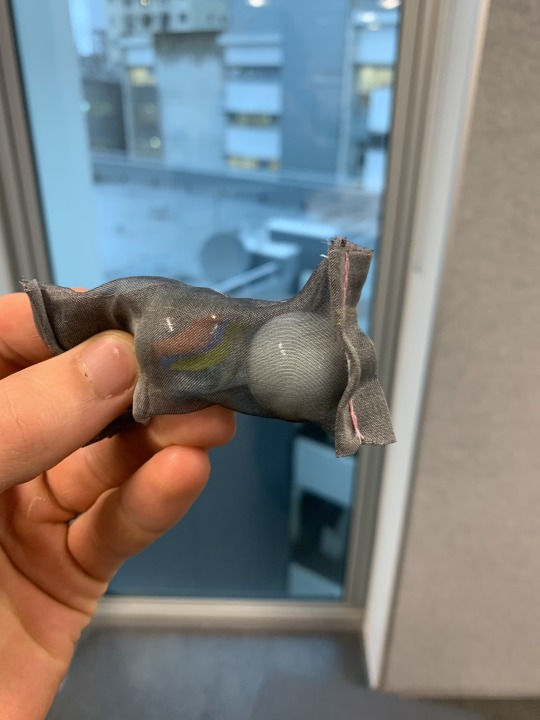
We liked the idea of having a range of different fidget toy models, with differing materials and number of marbles. This allows the user to choose what's best for them. The significance of this became apparent to us when different members of the group preferred different prototypes models. For example, I really liked the squishy texture of the dark netting prototype on the left, while Connor preferred the smooth texture of the prototype on the right. So, using our four person team as a miniscule focus group, we realized this is likely to be the case with eventual users. One size fidget toy does not fit all.
Fortunately, two of the group members are already proficient in sewing, making this stage possible. I tried to observe and learn from them throughout this creation process, and plan to do so more going forward as this will prove to be a valuable skill.
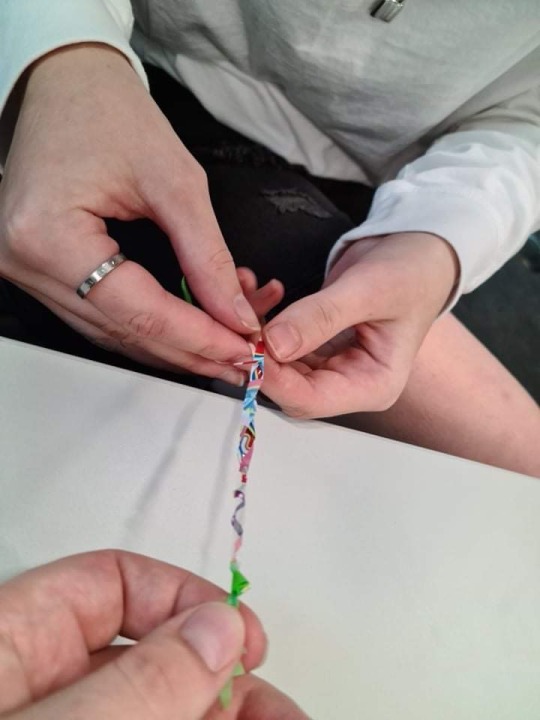
In keeping with the theme of reusing materials, we played around with weaving strips of old plastic to create strings that could be used as a strap for the fidget toy which connects to the user's wrist, preventing accidental drops, breakages, and consequential unnecessary waste.


Overall today was a pretty productive first day working on this project. We thought critically about our end goals and created some decent prototypes. One of the key lessons I’ve learned throughout the four prior studio projects and our Intro to Creative Tech class is the importance of prototyping at every stage, so I’m glad we’ve already made some models at the very beginning.
It’s still early days and I’m sure that certain things will change over time, especially after our pitch tomorrow. But for what it’s worth, today was a good start.
3 notes
·
View notes
Text
https://youtu.be/wQofKTBl0SM
A really insightful, humorous take on algorithms and the potential drawbacks they may pose on society. Nicely addresses the topic of technophilia discussed in class today.
He also refers to AI as “more of a sales pitch than actual reality”, so Ricardo should like this.
youtube
4 notes
·
View notes
Text
BCT Studio 1 Project 4: E-Textiles – “The Old Mates” Group Flag!
Our fourth studio project introduced us to the world of e-textiles.
We were tasked with creating our very own flag that would represent our group. But, we also had to incorporate small LEDs through the use of electrical thread connecting to a battery that’s also sewn into the flag.
This was much more of an express project, as we were to complete the flag within around two hours, unlike our previous projects which we’d work in throughout the week.
First, since the flag was to represent our group, we started thinking of some possible group names. This was definitely one of the more fun aspects of the process, as we got to really be creative with what we wanted to be called. After several iterations of names, such as The Fantastic Friends, A Group of Guys, or Connor’s Minions, we settled on a fun little inside joke that had developed over the month - The Old Mates.
It sounded snappy, illustrated the group's friendly dynamic, while also harkening back to traditional principles, but still leaving room for enhancement. At least, that’s what we got out of it.
Next, we sketched some potential logo ideas to go on the flag and represent our group name.

We also played around with more generic flag ideas inspired by current flags like trance or Italy, for the sake of simplicity.

Eventually, we settled on having a large “O” at the center of our flag, to represent the “old” from our group name. It was simple enough to be carried out in the allotted time but still contained meaning from our group name.
We then used a word processing software to create some digital designs of what we wanted the final flag to look like.
By this stage, we had already seen the fabrics we had access to, and had selected pink, black, white, and green. Thus, these were the colors used when creating the digital designs.

As seen, we went through a range of potential designs, but in the end, settled for this final design.
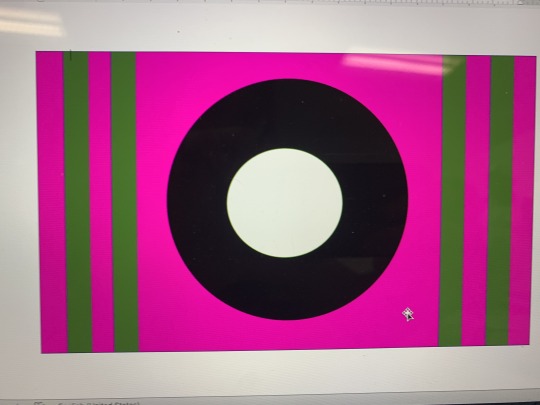
We liked how the “O” resembled a record, which is in keeping with the “Old” element of the group name. Further, like a record, we also
- adhere to old principles but operate in the modern world
-keep on spinning, both by creating ideas and working hard.
-Are super trendy and hipsters keep us in their bedrooms.
Okay that last one may have been a stretch but bottom line we relate to the record symbol, so it was nice for it to be the main feature of our flag.
The pink background was also a nice way of adding a modern flair to the more olden looking record in the center. It’s bright and stands out, which is how we want our work to be.
We also included 4 green stripes on the sides of the flag to represent the four group members. The green color acted as both a representation of our environmental awareness as well as a throwback to our best group project – the nature-themed Zen Keys.
For the e-textiles part, we planned to have 4 LEDs light up in the center white circle, which would also be representative of the four group members.
It then came time to make the flag.
First, we cut out the fabric we needed:
- A large pink flag background
- A large black circle to go on top
- A smaller white circle to go in the center
- 4 green stripes to go on either side of the flag.
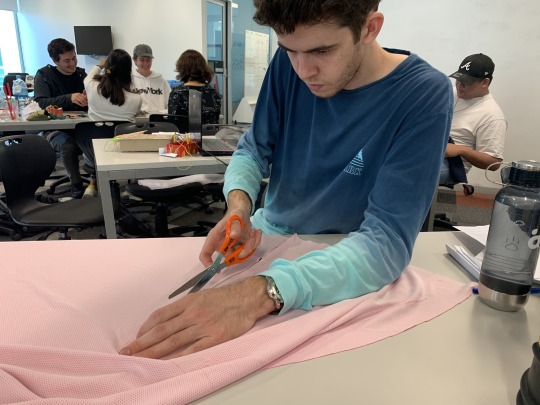
Due to time constraints, we used Velcro to stick the flag elements together instead of sewing.
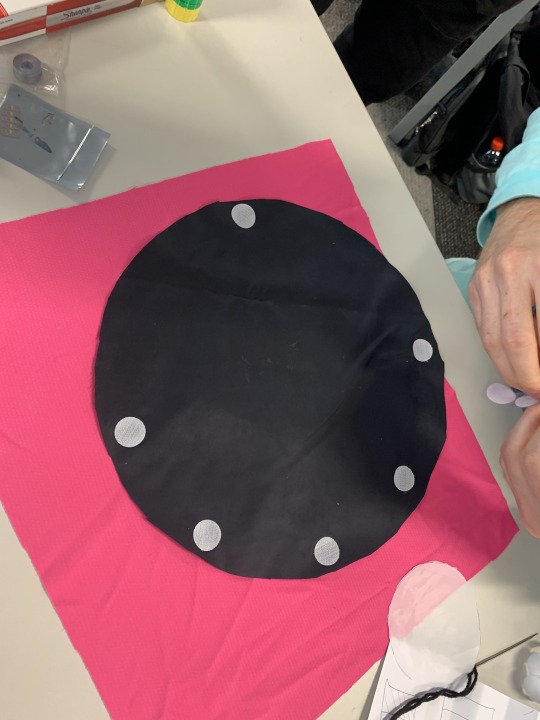
When adding the 4 green stripes on the ends of the flag, they turned out to look too messy, so we unfortunately were unable to include them in the final product. We figured at least we’d still have the 4 LEDs at the center, which would represent the four group members.

Finally- the e-textiles part of the project.
We sewed on the four LEDs to the front of the flag, beneath the white center circle, and sewed the power unit to the back of the flag.
Unfortunately, we accidentally sewed the electrical thread to the wrong positive and negative sides of the battery, so our LEDs didn’t light up in the end. Given another hour we could’ve redone the wiring but our time was up, so we submitted the flag as is.

Overall, while this was a relatively rushed project, and our LEDs weren’t operational in the end it was still an enjoyable learning experience. Plus, we still created a good-looking flag that accurately represented our group’s logo.
In particular, I really enjoyed coming up with the group name, and even more so creating the different flag designs on my computer.
I’ve noticed a trend throughout this month whereby I have a strong preference for the design elements in our group projects, whether that be a board game design, soundscape designs, iconography, or a flag. I always enjoy creating the overall aesthetic the most.
On the other hand, the sewing part of this project was probably my weakest point. I have never sewn before, so this was completely new territory for me, and – If I’m honest – I’m not that good at it nor do I like it that much. However, I’m sure that’s a causal relationship and as I start to improve my skills, I’ll probably start liking it more.
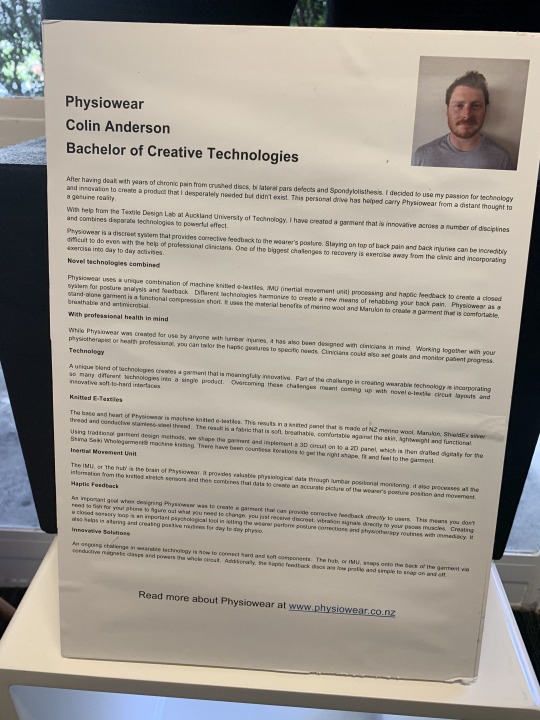
While e-textiles may not be my forte, I was exposed to some interesting and innovative uses of it during our textiles lab tour - such as the PhysioWare tights that help with posture correction made by a previous is BCT student - so I won’t write it off just yet as it could come in very handy down the road.
An obvious point of improvement for this project would be to just get the LEDs to work. Clearly, this is easier said than done, but under less rushed conditions I’m sure we could’ve gotten them working.
It also would’ve been fun to play around with more intricate flag designs, perhaps incorporating images into the flag too. Again, given more time this would’ve been possible and is something we can improve on in future e-textiles propjets.
2 notes
·
View notes
Text
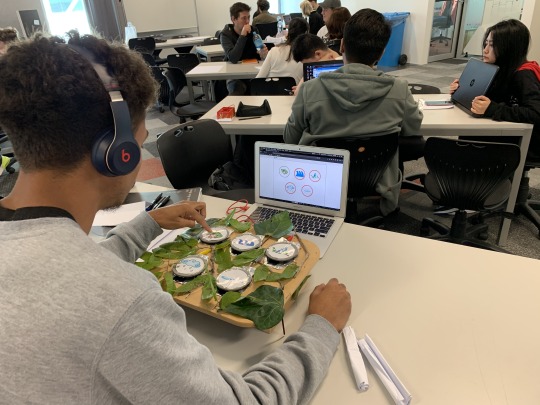
BCT Studio 1 Project 3: Makey Makey Instrument – the Zen Keys!
Our third studio project tasked us with using the Makey Makey and the Scratch software to create our very own “instrument”.
After some time thinking of possible instrument ideas, we decided to go with something relatively simple in concept. Our group had been somewhat burned from the previous project, where we built our board game around a spinner which was something that – while simple in appearance – was an unknown element that effectively cost us having a final working model to show at the end of the project.
To avoid facing such a fate a second time, we settled on the general design of our instrument to consist of a board with 5 buttons that would toggle the desired sound elements. Simple, but we’d rather have something simple that works than something overly complex that doesn’t.
We then thought about what kind of sound the instrument would make. An initial idea was to have it work as a hip hop beats maker, with each button controlling a part of an instrumental track, allowing the user to physically interact with the music by adding and taking away loops with their hands.
We concluded that, while this was an interesting concept, since no one in the group was particularly musically inclined, we didn’t want to go down that road and find out that creating individual parts of a hip hop instrumental required more knowledge than we had. In other words, we wanted to avoid that “marshmallow” altogether.
However, we kept the overall concept of a user toggling parts of an audio experience and planned to focus the instrument on something that requires less musical knowledge - nature. Plus, there have even been studies to suggest that nature sounds can increase relaxation (see reference at the end), so we decided to create something to do just that.
Thus, our final idea concluded in the creation of a nature soundscape, where the user can interact and toggle different parts of the soundscape using the buttons of our instrument. Effectively, the user would be able to control their level of immersion by adding layers of nature sounds.
First, we used Scratch to write some code that would play the desired nature sound when one of the five designated Makey Makey keys was activated by the button press. Fortunately, Scratch already had a selection of nature sounds for us to choose from, so we didn’t have to make our own or dig through other sound websites. We picked the following 5 sounds to be in our nature soundscape - birds in trees, water droplets, frogs, rain, and waves. We wrote some code that would play the desired sound when a designated key was pressed. For example, when the down arrow key is pressed, Scratch would play the sound of birds chirping, and turn it off when the down arrow was pressed again. This “down” arrow key would later be mapped to a button on our instrument through the Makey Makey.

We also planned to use Scratch to display a visual representation of what sounds were playing at any given moment. This would allow the user to have a better understanding of what’s going on, especially since some of the nature tracks could sound relatively similar in parts. When playtesting the instrument prototype, it became clear that sound alone wasn’t enough, and it could get quite confusing trying to figure out if a sound had been toggled or not, so a visual aid was clearly necessary. The end result was to be a grid of icons that would illuminate the corresponding icon for whatever sound was playing. But, for this early stage of the process, we just wrote a program that displayed the icon of whatever button had been pressed on the screen, as we still hadn’t figured out how to use Scratch to make a grid of icons with each icon operating independently yet.
Next, we used the Makey Makey and some tinfoil to construct a rough prototype of what the final instrument would be like.
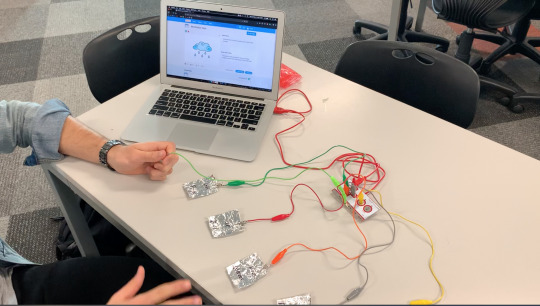
When I pressed a tinfoil button, the assigned sound would play, and the corresponding icon would appear on the screen.
It was still far from a final product, but it gave us an idea of what the user experience would be like, and an indication that the concept we were building towards could work.
We then started developing the buttons for our soundscape board.
One of the key lessons we’ve learned for the creative process, from exercises such as the marshmallow challenge, is to test and prototype thoroughly throughout as well as try differing ideas and approaches.
Thus, Matt, Connor, and I split up to create our own prototype versions of the type of button we’d use and then reconvened to compare and pick the best option.

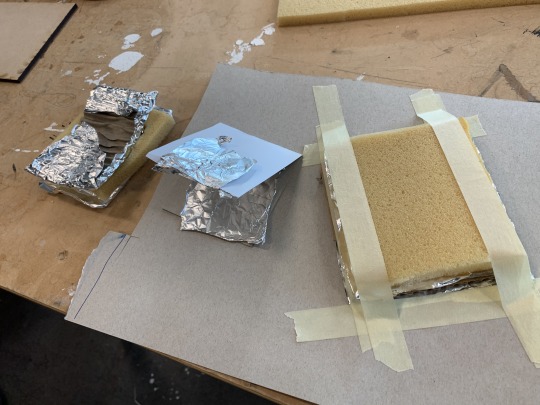
In the end, we chose Connor’s button design, (pictured right) which used the sponge material to provide an effective “bounce” after being pressed, returning to its usual state. This design consisted of a piece of tinfoil at the bottom, separated from another piece of tinfoil by some cardboard. The top piece of tinfoil was attached to the sponge and would be pushed to touch the bottom piece, completing, and then breaking the circuit when springing back – acting as an effective switch that would toggle the nature sounds.
We then started the process of making the real buttons that would be used in the final soundscape. In terms of sizing, we had already found a large piece of wood that we would use for the base, so we wanted our buttons to also be large to make the experience as immersive as possible. In keeping with the natural aesthetic, it was important that the buttons remained circular, as we wanted to avoid any sharp corners as these aren’t found in nature. Even the board we used as the base had rounded corners to maintain the natural aesthetic.

We decided that this would be a great opportunity to use the laser cutting facilities for the first time, as it would provide a clean finish to the buttons as well as give us a valuable learning experience, as this is something that will undoubtedly be used in future projects as well.
First, we used Adobe Illustrate to create the very simple design for the material that would effectively replace the cardboard element of the prototype. This consisted of us using two circles one larger and one slightly smaller, to create 5 duplicate rings that we would cut out in the printer. We found some dark acrylic in the maker space that we could use as the material.
Upon further consideration, we decided to use two rings per button for added height, to make the buttons require more of a “press” when being activated. We also had some excess acrylic to allow for this, so we duplicated the rings we had to print out a total of 10, with 2 rings per button.
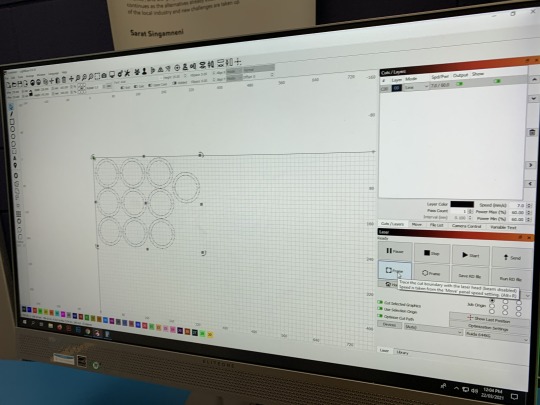
It then came time to use the laser cutter. Chris – the head of the maker space – guided us through the process and we came away with some pretty clean results. The laser cutting facility does appear rather complex at first, so I’ll likely need some more assistance when doing this again in the future, but it was a useful way of familiarizing myself with the facility in advance.

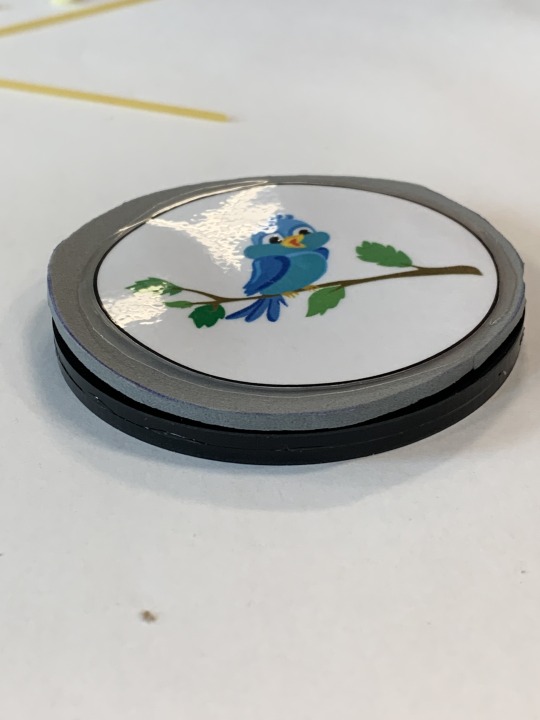
I then used a word processing software to create some simple icons that we then printed out, laminated, and put on top of the buttons. It was important to use the same icon images that were to be used in the software to ensure the experience was as easy to understand and intuitive as possible. As we learned in the Intro to Creative Technologies classes, iconography plays a large role in the quality of user experience.

After using the hot glue gun to stick the pairs of acrylic rings together, we used a different spongey material and the laminated icons to recreate the prototype in a much cleaner final design.
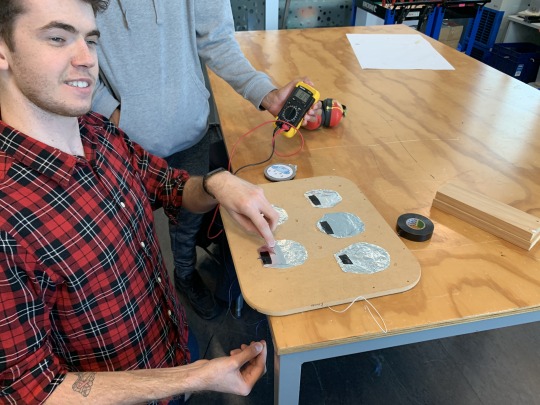
To help make the user experience as seamless as possible it was important that the user wouldn't be required to hold the Makey Makey ground wire for the instrument to work, as is often the case with Makey Makey projects. To avoid this, we had to create a common link between all the buttons that would be connected to the Makey Macey’s ground wire instead. This involved connecting copper wires to the tinfoil base beneath all the buttons. Initially, we tried soldering the copper wires to the tinfoil for a clean look, but this proved to be too brittle, so we used some tape instead, which was still discrete enough to not hinder the natural aesthetic. We drilled a small hole beneath each circle of tinfoil to feed the copper wires through so we could stick them to the back of the board, where they would be connected to the Makey Makey’s ground wire. This allowed us to keep that part of the wiring hidden from the user.

To further enhance the clean, natural aesthetic of the Zen Keys, we stuck two pieces of wood to either side of the board, to provide elevation so that the Makey Makey and its wiring could go underneath and be hidden from the user.

We then used the hot glue gun to stick the buttons down onto the soundscape board.
We also added on some leaves and sticks that we’d collected outside, to provide a nice natural finishing touch to the final design.

On the software side, we had finally managed to create our initial vision of having a grid of icons, with the active sounds highlighting their respective icons.
We did this by splitting up the code into 6 separate parts; 5 for each of the sprites representing the different nature icons, and one default background that had all the icons visible in the grid formation. The individual sprite code consisted of the icon and a red circle around it, and this would be shown over the backdrop of the default icon grid whenever activated. The end product resulted in exactly what we had initially envisioned - when a sound was activated, its icon on the grip would have a red ring appear over it, and these icons could be activated and deactivated independently of each other, providing a clear visual guide to the user regarding their input.

Finally, we hooked the Makey Makey up to the laptop and the soundscape worked pretty much exactly as intended.

Overall, I am really proud of this project. We achieved our goals both aesthetically and interactively.
The general design of the product was the highlight for me. The large, expansive size of the board provided plenty of space for the large buttons and natural decorations. The icons were clean and matched the software. Speaking of, getting the software to work exactly as intended from the start, especially when we had no idea how to do it in the beginning, was another triumph.
Another design process element that we carried out well was continually testing and prototyping our ideas as we went along so that when it came time to laser cut and laminate icons, we already knew that the concept would work.
The only issue we faced was that one of the buttons didn’t work as consistently as the rest, so it wasn’t very reliable for toggling the nature sound it was responsible for at the showcase. It appeared as though the tinfoil under its spongey surface wasn't springing up as well, thus not breaking the circuit when intended to and making the switch faulty. Given more time, it would've been beneficial to take it apart and fix it so that the whole soundscape worked flawlessly. Regardless, this was still a minor issue that had a minimal impact on the overall user experience.
While the button-making process taught us a lot about prototyping and using the laser cutter, when considering how much time it took to get right, it’s fair to say that next time it may be worth it to just purchase a button. Especially when considering more complex projects in the future, we may not have the time to spend constructing our own ones. That being said though, it was nice being able to make our own, large custom buttons with our own icons. Plus, doing this a second time would likely not take as longs since we’d have a better idea of what we’re doing, so there’s still an argument in favor of making our own buttons in the future. It will have to be something judged on a case-by-case basis.
An idea that could be developed with this soundscape is incorporating it into an educational game of sorts for children, where they are played a sound and have to identify it by pressing the correct button. This is an idea that became apparent to us while showing it to our peers and thinking of other use cases for such a design.
Another way to enhance the general nature simulation element of the soundscape would be to incorporate virtual reality to properly transport the user into nature, not only by sound but visually as well. This is a bit more complex, but it would be great for maximizing the immersion if we could use a VR headset for the user to wear that displays a 360-degree image of a forest while they activate the different nature sounds.
This was definitely the best project we’ve done so far. Granted, that isn’t saying much given that our last project didn’t technically work, but this soundscape genuinely seemed to impress a lot of peers when we showed it off in class. We also connected a pair of wireless headphones to the laptop, to provide a more immersive experience.
All in all, the combination of an aesthetically pleasing nature-themed design language with an easy-to-understand software and user experience provided an impressive and immersive instrument experience.
Reference: https://www.health.com/condition/stress/why-nature-sounds-are-relaxing
2 notes
·
View notes
Text
My Very First Vlog (assessment)!
For our first Intro to Creative Tech assessment we were tasked with creating a 4-minute vlog explaining why we chose the Bachelor of Creative Technologies, what we expect from it and what we plan to do with it in the future. After weeks of consistently adding ideas to a rolling list of points to include, I spent ages trying to tidy up all those ideas into a coherent script that I used for my final video.
For the video itself, I decided to go with a simple vlog style format consisting of me talking to the camera. Initially, I did this to try and avoid having to do too much editing and use my presenting skills to my advantage. In the end, I did a bit of a mix as I still incorporated a bunch of additional clips and photos for added visual content to help illustrate the points being made.
In the end, I created a video that I’m proud of, but wish it could’ve been longer.
I definitely had a range of mixed feelings throughout this project. During the initial creative process of just putting down ideas of things to include, I was really enjoying it. I only felt a sense of stress when it came time to put all those ideas together and realized that it was way too long for four minutes. It was challenging having to pick things to remove as I had become so attached to all the different points over time. It took me way longer than expected to get a script together that was short enough- this was the most stressful part of the process by far. Especially since 40% of the grade depends on this video- I was so scared of cutting points that would potentially cost me marks. I often just wound up reading and re-reading the script a dozen times to only take out a couple of words each time. It was only when it came crunch time as the deadline approached that I really started slashing away at the word count to get it to a more reasonable length. Again, this was kind of disappointing to me, and I feel as though the result may feel a bit shallow as a result, but that’s the nature of adhering to a time constraint.
The filming part I actually loved though, as this mixes well with my background in performance and acting so that was probably the most fun.
The second most fun part - that I wasn’t expecting- was the editing process. I actually quite enjoyed lining up all the additional clips to align with the dialogue and cutting down the footage whenever I paused to make it sound smoother. The tinkering and playing around part of the process engaged me more than expected.
Thus, even though the content may have been a bit shallow compared to what it used to be, I was really happy with the final product as the filming and editing went well. It actually inspired me to potentially make more of this kind of content for my own personal projects as there were a lot of things that I would’ve love to have included but couldn’t due to the time constraints.
Some areas that I could’ve improved on are as follows;
The initial script should’ve been shorter from the start. As mentioned earlier, I constantly added ideas to it since the assignment was announced, so when it came time to finally sit down and finalize the script it was way too long, and I consequently spent most of my time cutting it down. This resulted in more breadth than depth than I would’ve liked, and next time I’d focus on fewer points and unpack them more. The issue is that I had become attached to all the ideas I’d written, so I couldn’t remove enough. And I’m still somewhat annoyed by the points ideas that I did have to remove. Going forward I’ll try and start with a select few points and expand on them, rather than having kids and shortening them all.
Another area that could’ve been improved on for the script is the style of writing used. I found that when I wrote the initial script, I just wound up writing an essay, which sounded very robotic and unauthentic when being read out to the camera. I found that writing the script while saying each line out loud did wonders in creating something that sounded more natural. Next time I’ll use this approach from the start, as this is something I found out towards the end and would’ve saved me a bunch of time had I implemented it from the very beginning.
Editing- I’m quite happy with the editing I did but would’ve loved to add a backing track for the dialogue -as it can sound quite eerie talking against pure silence - and maybe a cool song at the beginning and end. I also would’ve played around with text in the videos for headers to add more structure. In the end, I decided to leave these elements as we aren’t being graded on the editing, but I’d still like to learn those skills for my own personal gain.
Even with the limited editing I did on this video, I spent ages tweaking all the additional clips to align exactly with the points being made through the audio. And I honestly loved it, even if it was time-consuming. I have to say that this project probably stressed me out the most but it was also the most enjoyable
So it’s something I can look into for future video-based projects, whether for this course or just personal enjoyment.
The equipment used was also very basic and I would love to have been able to use a proper microphone and a decent camera. For this, the only equipment used was a phone stand, with my phone’s selfie camera being the main camera. Again, we’re not being graded on this, but as a personal improvement for future video based projects, I’d love to have proper crisp audio and video. Of the two of these I’d say audio is the most important, so I might invest in a reasonably priced microphone down the road. The lighting also could've been improved, and I’ve seen decently priced ring lights that would enhance the lighting dramatically, so maybe one of those too. The iPhone camera quality is good enough that it doesn’t justify spending large sums of money on a high quality videocamera, so this would definitely be last on the priority list.
All in all, this project was an interesting introduction to the world of vlogging that - while stressing me out a tad - has inspired me to potentially do something more like this further on in the degree or in my personal life. Without the same level of restriction, or having a better understanding of what to do script-wise, it would be a lot less stressful and time-consuming so I’d be able to spend more time having fun with the filming and editing, which were easily the best parts of this project.
TLDR; I had fun with this one but wish it could’ve been longer. Irony
Here’s the final product! - https://youtu.be/5YruZeokUGI
2 notes
·
View notes