changelingfiberarts
Changeling Fiber Arts
Embroidery, Spinning, Weaving, Knitting. ChangelingFiberArts on etsy.
70 posts
Don't wanna be here? Send us removal request.
Last Seen Blogs


sas-viewer
THE DOGES

lehighvalleypa
Lehigh Valley, PA

ikkkyokume
комок в горле

wild-wombytch
Finally blocklist famous🏅
Text
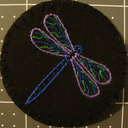
It’s been ages, but I’ve finally got my Etsy updated again! Yarn, fiber, and handwoven scarves are listed now; embroidered patches and bookmarks still need to be inventoried and relisted but will hopefully be up soon.
https://www.etsy.com/shop/ChangelingFiberArts
5 notes
·
View notes
Photo


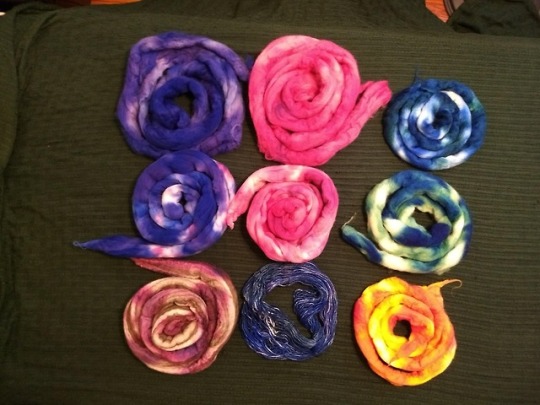


So way back in July, when it was still hot and sunny out, I wanted to do some dyeing but the idea of turning on the stove was... unappealing. So I decided to try out solar dyeing. It... kind of worked?
It was late enough by the time I got everything set up that I'd missed almost all of the sunlight that day, so they sat overnight and then I put them outside in the morning. I live in the city with a tiny yard and nowhere that gets direct sunlight all day, so I had to check on them fairly frequently to move them to wherever the sun was(sometimes I didn't catch this quickly enough and they ended up back in the shade for a while). When I checked the temperature in the jars a few times throughout the day, it was never above around 100F. Around 3:30 in the afternoon of that first day I placed them into a plastic bin to try to trap a bit more heat. That got the temperature up to around 115F, but they only had about 2 hours in the bin before my property was totally in the shade. The dye baths were starting to clear at this point, but definitely not exhausted.
I set them out again the next day, this time in the bin from the start. The temperature still never got up past 115F, but they did clear up a bit more over the course of the day. After I ran out of sun, I rinsed out two to test whether the dye was set. There was still a decent amount of color in the dye baths- what I'd normally associate with having too much dye to start, which these definitely didn't. They continued bleeding into the rinse water even after 3-5 rinses, when normally I'm fine with 1 or maybe 2. I wound up throwing the rest of them on the stove to steam after all to be sure they'd set.
The colors weren't really what I was hoping for; I ended up with a lot of blending where I'd been going for distinct colors and distinct colors where I'd been going for blending. I think the fact that they sat for so long and were moved around so much messed with any plans I had for how the dyes would act. I also got a lot more felting that I usually do, likely for the same reasons of spending so long soaking and moving around so much.
Also, if you do end up trying this and reaching the same conclusion as I did that they need to be reset on the stove, take the lids off the jars first. I don't care if that's where you labeled them, steaming mason jars with the lids on is in fact exactly what you're supposed to do to seal them for canning, and you will be very sad afterwards when you try to get the fiber out...
My conclusion from this experiment is that solar dyeing can work, probably, but for it to be actually effective you'd need at least one of
- a hotter/more equatorial climate
- a yard with areas that get direct sunlight all day
- a more sophisticated solar oven set up
This was one of the hottest parts of the summer for us (Boston area), around 95F and miserably sunny, and it still didn't seem sufficient to set the dye. My guess is that someone farther south would have a lot more luck; here it would definitely need a much better solar oven than just a clear plastic bin.
One of the arguments in favor of solar dyeing is that it's low effort since you can just set the jars outside and forget about them for a while until they set. Lacking a proper yard I lost that part too since I had to keep moving them around to stay in the sun, and it wound up being a lot more effort than if I'd just set them on the stove in the first place.
12 notes
·
View notes
Text
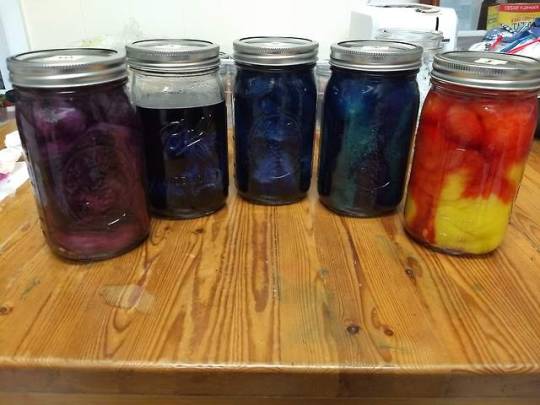
Sock blockers!
Next up in the “hmmm what can I make with a laser cutter” series. I may have made them a tiny bit too small, but I’ve never used sock blockers before(or, uh, blocked anything, whoops), so I don’t really know how to judge that. I figure I’ll use these for a while and if I decide bigger ones would be better I can always make a version two.
The star cutouts were mostly because the star tool was one of the easiest to use in inkscape and meant I didn’t have to worry about centering anything, but I actually really like how that came out, especially against the blue.
17 notes
·
View notes
Text
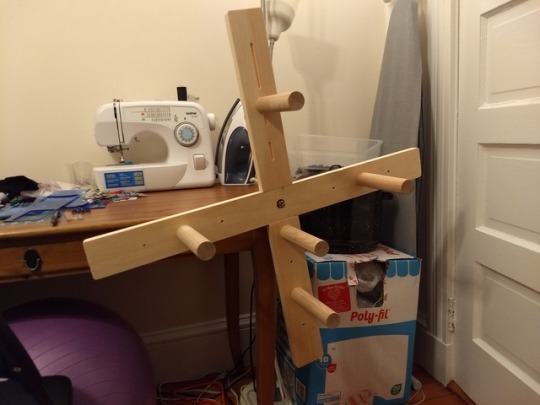

Next up in the “I made myself a new tool” series: skein winder!
There are a few changes I would make if I were to do it again(longer axle for a start; it’s a bit awkward finding places to clamp it as is), but it definitely works, and I’m pretty happy with the overall design. In theory it comes apart for storage, but in practice I’ll probably leave it together unless I need to transport it anywhere. The pegs can move for 1, 1.5, and 2 yard skeins, and one arm has slots instead of holes for finer adjustment. They bolt on, which means it takes a little more effort to move them around, but also that they’re not going anywhere once you do.
I’ve had it for about a week now, and it’s already proven invaluable. As great as niddy noddys are, I would have been real unhappy trying to use one to skein up 1350 yards of laceweight yarn...
7 notes
·
View notes
Text

I made control cards!
They’d always fallen into the category of “cool and probably useful, but not essential enough to justify spending money I don’t really have on”. But then I learned that my city runs a free fablab, and signed up for a laser cutting class on a whim... and then suddenly realised what I ought to make for my first project.
There are still a few kinks to work out, but I encountered enough failure modes in my first few iterations that this set (try number three) turned out perfectly serviceable, even if it did require a few extra passes to go back over places that didn’t do what they were supposed to and there’s a bit of a slice in one corner from where I wasn’t able to hit the stop button fast enough. I’ll probably recut that one at some point, but for now, I’m happy to have some new toys to play with.
And now to go dream up what else I can make with this newfound laser cutting ability...
9 notes
·
View notes
Text

I made a dress form!
This is something I've been wanting to do for ages and finally managed to make the scheduling work out to get a friend over to encase me in duct tape. Time to make all the clothes!
I'm not going to give a full tutorial, since there are plenty of those online, but I will mention a couple things that I learned in the process.
I wasn't able to find anything that gave me a straight answer as to how much of various materials I would need("2-3 rolls" isn't very helpful when they don't tell you how big the rolls are...), so I ended up just getting more than I could possibly need and figuring I could always find a use for the extra. In case you don't like that plan, I used:
- a bit over 1 3/4 (60yd) rolls of duct tape, or around 105 yards
- probably halfish of a 10lb box of fiber fill.
Your requirements will obviously vary based on size(for reference, I’m 5'5"/~150lbs), whether you stick to the torso or include arms/legs, how densely you stuff it, etc. I'm pretty sure I overstuffed mine some, so you might be able to get away with less stuffing, but I'd probably recommend having at least a few pounds on hand to be safe.
Speaking of duct tape, I used Nashua 398 and was really happy with it. It tore well, was thin enough to be flexible without being unmanageable, and was plenty sticky enough to layer but not so sticky that we couldn't remove it when needed. We never needed scissors to get it off the roll, and I think there was only a foot or two of tape through the whole project that was wasted due to folding over on itself and sticking(and most of that was when I tried to move things and stopped paying attention to where loose tape was).
If you want to add legs like I did, don't use nylons as your sacrificial underlayer. It seems like a great idea in theory, especially if you've got those pairs that have been sitting around in your drawer for most of a decade since the last time you had reason to wear them, but in practice it was less great. The tape didn't stick to the nylons very well, so when I took everything off, they tried to resume their unstretched state and started pulling off the tape in spots, which pulled the tape in to stick to itself in giant wrinkles. I was able to pull them back apart and cover the now exposed sticky side with another layer of tape, so it was mostly just annoying and maybe resulted in the leg shape not being quite as perfect as it might otherwise have been, but with different tape it could have been a disaster.
All the tutorials I looked at cautioned to not suck your stomach in artificially, but I learned that it is entirely possible to overcorrect. If you're going to use your form for fitting pants, I would probably start with a strip of tape around where you like your waistband to sit to make sure that it's the correct circumference. Possibly do another at your natural waist if that's a place you anticipate wanting to fit to. Duct tape and stuffing are not nearly as easy to reposition as skin and fat, so if(like me) you like to wear your pants so that they settle under your stomach fat and push it up rather than resting directly over it, you might find(like me) that taping over where it rests naturally will result in a dress form that can't actually fit into your pants. I was able to get it back to my actual measurements with some surgery after the fact that probably didn't throw off the proportions too too badly, but if I were to do it again I would check my measurements during the taping process to make sure everything matched when we were still in a position to fix any discrepancies we caught. And when in doubt, err on the side of too small rather than too big, since it's easier to pad it out later if needed than to take the duct tape in.
8 notes
·
View notes
Photo

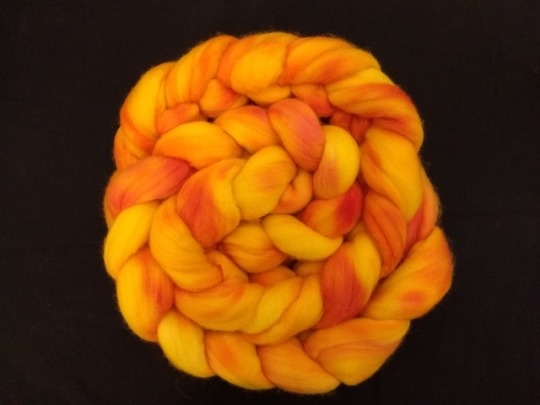
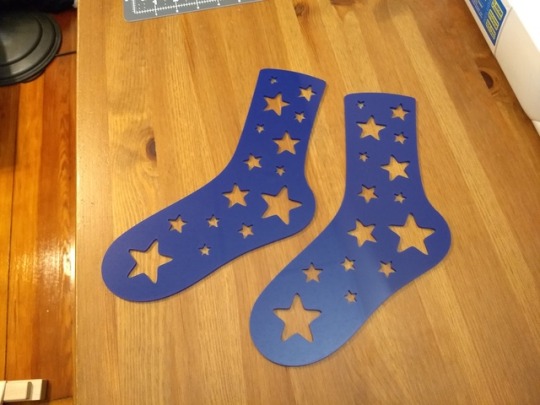
I’m selling hand dyed fiber for spinning now! I’ve just listed my first two colorways, “Rivers in the Rainforest” and “Goldfish”. You can find them in my etsy shop; each of them comes on either Merino or Jacob, and there are two braids of each.
I haven’t been able to spin any samples yet, as I’m taking my crafting very slowly at the moment as I recover from tendinitis in my wrist, so if you act fast you could be the very first to see how these spin up :)
8 notes
·
View notes
Photo
A wild sale appeared!
From now through friday(6/22/18), all handspun, hand dyed yarn is 15% off, and all ready to ship embroidered patches and bookmarks are 10% off. If you’ve been thinking that you might like to pick something up, now is an excellent time to do so!
#sale#on sale#etsy#etsy sale#handspun yarn#hand dyed yarn#embroidery#hand embroidery#embroidered patch#embroidered bookmark#queer embroidery#autistic embroidery#queer artist#actuallyautistic#autistic artist
15 notes
·
View notes
Text
Like I'm sure everyone with an Etsy shop is doing, the announcement of the fee hikes made me think that maybe it's a good time to look into other online store options again. I'm going to share my impressions from what I've found so far with you, partly so you don't have to do that work yourself, and partly so you can share your opinions if you have actual experience(as either a seller or a buyer) with these platforms.
My use case is "very small volume of sales, but ideally that will increase", so my impressions are through that lens, though I've tried to note places where something looks like it could be good for someone who's not me.
Promising contenders:
- IndieMade
This looks like a decent balance of customization and theming for that mid range of “want more control than an etsy shop gives but don't want to build my whole own website”. No transaction fees(aside from card processing). Plan prices are on the low to mid range. They don't have a totally free option, though; their limited basic plan is still $5/month.
- Squareup
Not to be confused with squarespace. This one looks like it's actually totally free, aside from the payment processing fees you'll get everywhere. That said, it's very bare bones. Very. A few big issues I see right away are that it doesn't allow international orders, you can't do calculated shipping, and you only get one image per listing. But it's free, and looks reasonably professional for something so simple. Could be a decent stepping stone while establishing yourself enough for the more featureful plans elsewhere to be worth it.
Maybes:
- Zibbet
On paper, this one looks great. Reasonable pricing, including a limited free option, and a decent if not amazing looking default shopfront theme. But the reviews I see are very polarized. A bunch of 5 star reviews saying the site is awesome to sell on and a bunch of 1 star reviews saying it's terrible and a waste of time and money. So I would want to hear more experiences from people who've tried it to say for sure.
- Tictail
Fee structure is hard to follow. There are no fees for “your shoppers”, who first order through your storefront, but 10% fees for “marketplace shoppers”, who first order through the marketplace. It's hard to tell from the information available and glancing at the website how this is likely to break down. If it skews towards 0% fee sales it could be a reasonable option, but if it skews towards 10% fee sales or if things are designed such that shoppers accidentally end up at the marketplace or something, probably not. The general look of things is very minimalist; aesthetically, I'm not a huge fan, but it looks reasonably professional as far as cookie cutter shopfronts go.
- Big Cartel, Shopify, Weebly, Wix, Volusion, Big Commerce
These ones are more a "your own website" rather than "your storefront in an online marketplace". Probably a better option for larger/more established shops that want more customizability, and less good if you're just starting out and want something plug and play. Prices tend to be on the higher end, though Big Cartel has smaller cheaper plans(including a very limited free plan) and Weebly has some cheaper plans that are smaller and also charge a transaction fee.
Unlikely:
- Craft is Art, iCraft, Bonanza, ArtYah, eBid, eCrater
Prices range from fairly decent to pretty not great, but the sites all have a kind of knock off vibe that would make me-as-a-buyer hesitant to trust sellers there regardless of their actual content.
- Amazon, Storenvy, DaWanda, eBay, ArtFire, Aftcra
High transaction fees without anything obvious to make them worth it.
I’ve spent way longer than I meant to looking all this up, so hopefully it can be helpful to someone! If you've got experience with any of these(especially IndieMade, Squareup, Zibbet, or Big Cartel), I'd love to hear your opinions.
12 notes
·
View notes
Photo
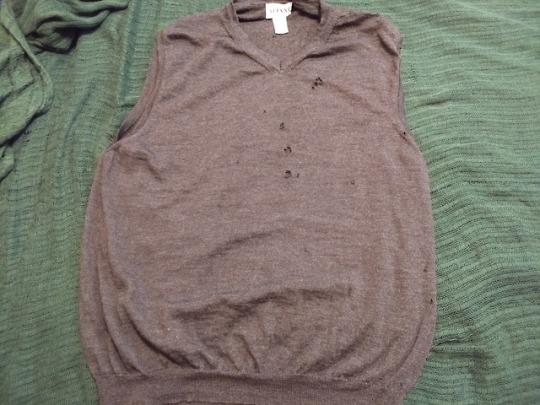


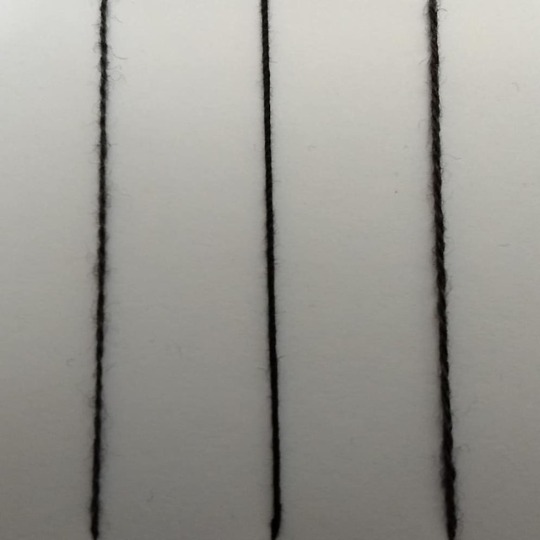
New project, and looking for advice from lace knitters.
I grabbed a bunch of sweaters from the by the pound section of the thrift store - stuff with nice fiber content, but ugly designs or that were full of holes. I’m planning on taking them apart to repurpose the yarn into something for hand knitting. Here’s the one I started with, which I picked first mostly because it was the first to dry. I didn’t really think about why that might be.
It’s very thin. I’m basically spinning thread. It’s kind of cool, since there’s no way I’d be able to draft this thin on my own. It’s also taking /forever/. I’m not sure quite how long it is, but a back of the envelope calculation puts it at probably somewhere around 3000yd of singles. Since I want to ply it back on itself to make it a bit thicker, I’m respinning the entire thing to add a lot more twist. Even with a 17:1 whorl that takes a while.
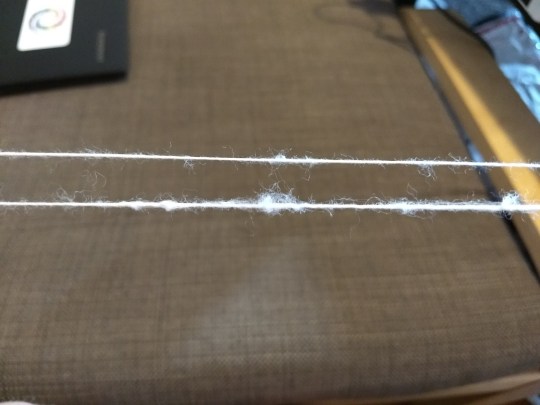
I’ve finally finished the first third. My original plan was a 3-ply, since it’s so thin, but now I’m second guessing myself. I never really done any lace knitting, so I don’t have a good sense of how thin a yarn it’s reasonable to knit with. Maybe the 2-ply would be fine? Maybe the 3-ply is still too thin?
I would love to hear opinions from people with more experience in this area than I have. That’s a sample of 2-ply on the left, 3-ply on the right, and a strand of size 10 crochet cotton in the middle for reference. Which would you prefer to work with?
#lace knitting#lace weight#lace weight yarn#reclaimed yarn#yarn#knitting#spinning#hand spinning#merino#wool
2 notes
·
View notes
Photo


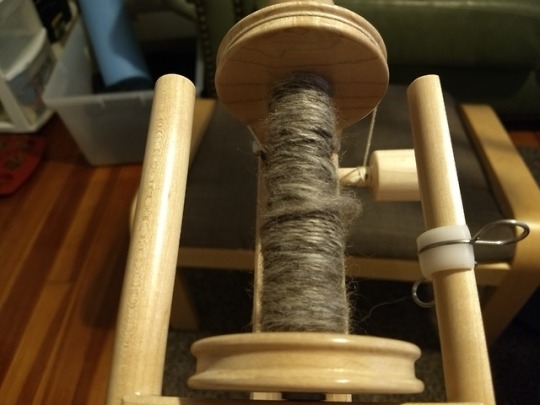

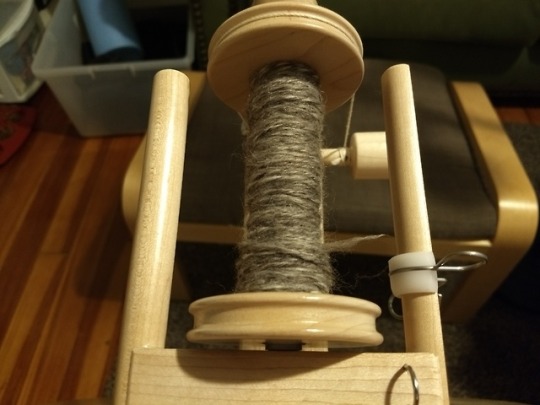


I bought a wheel today! It’s a Lendrum DT, and I’m exactly as pleased with it as I hoped I’d be.
I spun up a 20g skein to try it out and I’m already in love. It’s so relaxing! I actually kept treadling it for a while even after I didn’t have any fiber on just because I like how it feels. And once I got used to the take up, it’s so much easier to manage than a drop spindle. And so fast! That 20g only took me about an hour to spin and ply, and that with a lot of stopping and going slow as I figured things out. The thing where I don’t have to stop every yard or so to wind it on is just as wonderful as I expected. Though I do keep forgetting I still have to stop every once in a while to move the slider. Plying from bobbins was also pretty great, especially after the debacle that was my last plying ball. I even mooostly got the lengths to match.
And since I’m pretty sure there’s a rule that you’re not allowed to walk away from a yarn sale without making at least one semi-impulse buy, I decided that now is also a good time to finally try processing a fleece myself. I came across some alpaca fleece- seconds, so I’m not sure how it’ll spin up, but for $10 for a pound and a half I figured I had to. And then also hand carders, which I was going to end up getting eventually anyway, so getting them now on sale was probably a good thing. And then rounded it out with two and a half pounds of a romney x fine wool fleece. I haven’t started playing with those yet, but I’m pretty excited to finally have options other than just getting prepared fiber and spinning it straight.
Also a pound of BFL top that came with the wheel. Which I was not expecting, but I am totally okay with surprise fiber. That’s what I spun up for this first skein. I’ve got some BFL waiting in my bin but hadn’t gotten to it yet, so this was my first experience with it. I can see why people speak so favorably of it.
#spinning wheel#hand spinning#handspun#handspun yarn#lendrum#lendrum dt#alpaca#wool#fleece#bfl#bluefacedleicester#hand carders#schacht hand carders#fiber#yarn
10 notes
·
View notes
Text
Friends, gather round, and let me tell you a story.
It begins, as many stories do, with a spindle.
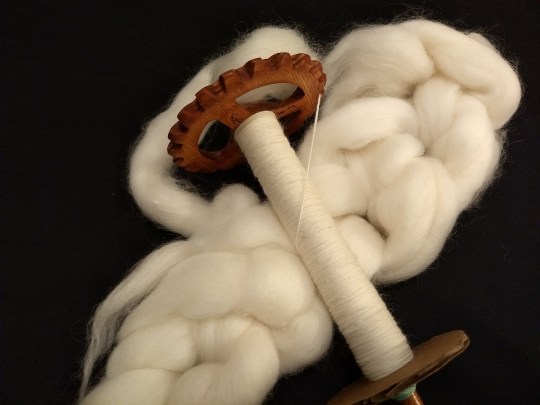
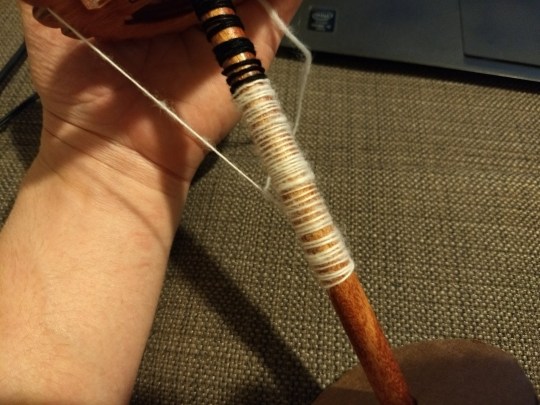
This spindle was full of an exquisite cop of lovingly spun singles, all ready to be plied. And thus, we come to the plying ball.
A first ball was wound, from the spindle onto the ball winder. There are no pictures of this stage of the story, as I naively believed at the time that all was well. Spoilers: all was not well.
As this singles was to become a two ply, the next step was to wind a second ball from both ends. Doing this step on the ball winder rather than on the spindle as I was plying was one of the few good decisions I made in this endeavor. See, I had had some issues with tangling before, and found that they were easier to sort out if I was not also juggling a spindle at the time. I was confident that I had determined the source of the tangles, though. Clearly, the end of the center pull was somehow slipping under some of the other wraps before I pulled it out. So I very carefully extracted it, making sure there was no way it could have gotten caught anywhere, and merrily began winding the second ball.
For a brief period, all was well with the world. And then- disaster. A loop had caught around the center pull end and was beginning to tangle. Now, I had seen this problem before. I had learned this lesson. Left alone, it would only make itself worse. Immediate action must be taken.
I didn't want to break the singles, so I unwound all the way back to the beginning so I could pass the end through. Pleased with myself for having averted disaster, I continued on.
Disaster, however, was not on board with being averted. There was not one loop intent on catching, but many, and in short order they had made themselves known. In a moment of hubris, I told myself that it would be okay; surely, if I were careful, I could just work through it and eventually the loops themselves would be wound on.
The tangle grew.
I interject, my friends, to provide you with an important detail not yet mentioned. You see, the ball winder being used for this endeavor, being not the highest of quality, had a tendency to, on occasion, misplace a loop. Rather than resting in its proper place around the outside of the growing ball, a loop would slip off the top or bottom to start a new layer close to the center shaft. I thought nothing of this at the time- a minor cosmetic anomaly, surely, that would have no bearing on the function of the center pull ball. The singles was still following more or less the same path, and a small slip here or there would not cause anything to cross over such that a knot could be formed. I believed the occurences safe to ignore, and not worth the time to unwind and correct. Ah, how wrong I was.
Now, let us return to our tale.
Too much was wound at this point for going back to the beginning to be a reasonable option. The sensible approach, at this point, would have been to break a singles, carefully remove it from the snarl, and reattach it once everything was in order. However, I could not bear to do so. The join would be so inelegant! Think of all the twist I could lose! I resolved, thus, to deal with the small tangle the natural way; I am, of course, quite practiced at recovering yarn barf. Surely I could manage.
This was my next mistake.

As I toiled, various strands began to work themselves together. Eventually, of course, two strands managed to become so entwined that in trying to separate them I broke the singles anyway. And again, and again, such that I ended up with more breaks than I would have had I chosen that path from the start. But at long last, both ends of the plying ball were free and moving smoothly.

Those pieces that were totally detached, I put back on the spindle to try to restore some of the twist that must have escaped in all this breaking and threading and finagling. This also gave me ample time to lament the state of my now horribly nappy and inconsistent singles, a sad fate after their previous incarnation as beautifully smooth and even.
Those pieces were then reattached in their place in the plying ball. Once I could no longer use the spindle to facilitate the joins, I accomplished them by finger twisting each piece about six inches back from the end to build up as much excess twist as I could. I then laid the ends over one another, spit felted them a bit for extra security, then pulled the area taught to allow the extra twist to travel into the join. The areas I joined like this, despite my worries, were fairly inconspicuous.

The areas that got pulled to and fro by my attempts at untangling, however, were not.
Once everything was reattached, the winding could continue. That is not, however, the end of the story. You see, with all the poking and prodding and pulling that happened while I was still in denial about the necessary course of action, several internal loops pulled themselves free to create their own tangle, technically separate from the working ends but still eager to get in the way.

There had, of course, also been loops that slipped off the bottom during the first winding, and those had just as much potential for snags and tangles as the ones at the top. With nothing near them to catch, on, though, they managed to keep themselves mostly behaved with no intervention on my part.

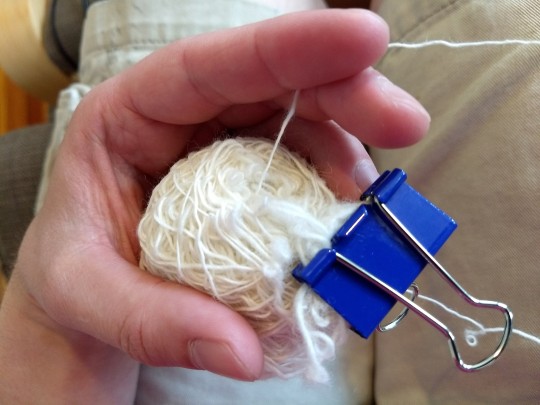
Hoping that if I could keep the clump on top somewhat contained I might be able to proceed with the winding only mildly inconvenienced, I went in search of something to use as a tangle management system. I settled on squeezing all of the errant threads into a binder clip.

This was largely successful. It was also at this time that I discovered that if I unwound the outside end of the plying ball off the bottom rather than the top, it would have fewer opportunities to catch on the unruly protrusion at that end. This kept things manageable enough for the center end to slip through unimpeded despite the loops around it. I continued in this manner - slowly, but at long last making actual progress - until the trail of the outside singles led me straight into the binder clip.

Thus began the next of many rounds of untangling interspersed with sections of winding, thankfully with slightly less to worry about each time through. The first time the tangle was still severe enough that I was once again obligated to break the singles; though this time, having learned my lesson, I did so without hesitation.

On subsequent trips through the tangled mass, I was able to separate out the individual loops sufficiently to free the end without needing to resort to breaking it.
This is not to say that the journey was now easy. I had to be very careful not to let the ball itself rotate, or the bundle of tangles hanging off the top, while nicely contained in their binder clip, would wrap itself around the center pull and trap it. I also had to be sure that every coil of the outside end came off the bottom, and none snuck up over the top to cinch around center pull and tangle bundle together.
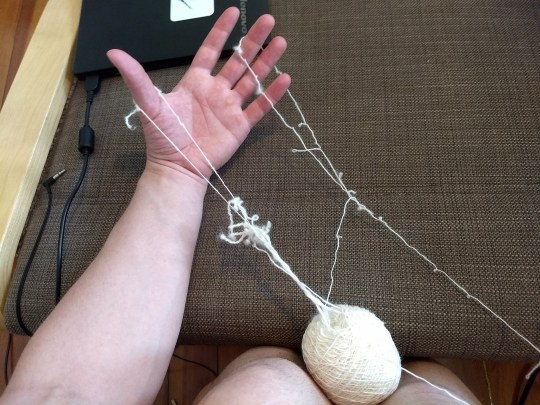
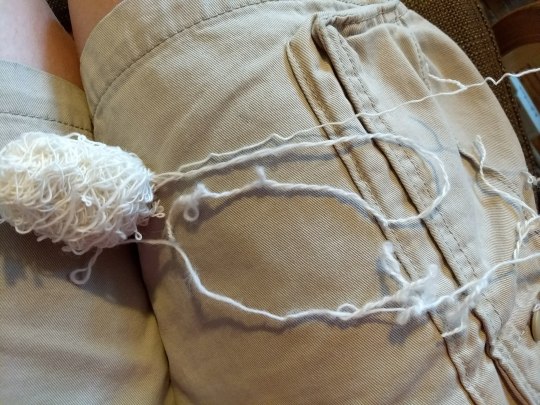
This is bad.

Much better.
This is also bad.

It made for slow going, working carefully to avoid these problems, and stopping to correct them when they inevitably happened anyway, but at least I was finally going. The bundle of loose loops grew smaller and smaller until at last, there was only one left.
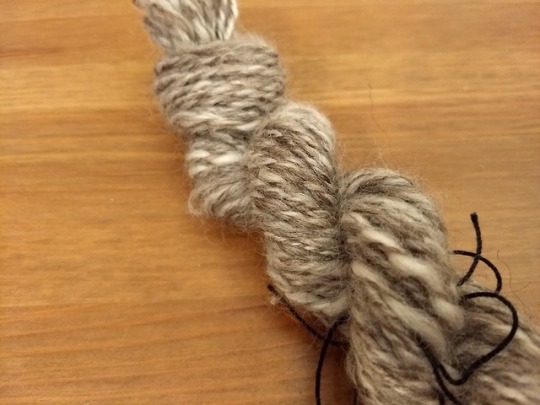
This one of course was so happy with the way it had plied on itself that when I tried to straighten it out it snapped on me one last time. But eventually, all was once again (mostly) well. A plying ball was at last obtained. A plying ball with sections of singles that were not quite as nice as they had once been, but a plying ball none the less.

This plying ball performed its job admirably. There were no more issues with tangling as it moved from ball back to spindle to add the final twist, and the end result, after far more hours than I'd wanted to spend, was a beautiful(if you ignore the parts that got abraded in the untangling) skein of yarn.
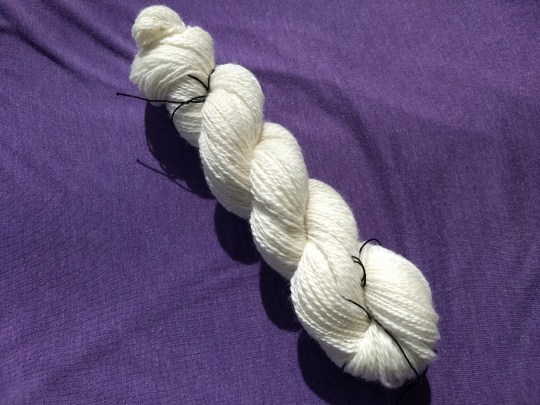
And so, at last, our story comes to a (mostly) happy ending, with many lessons learned.
Lessons learned:
- Be careful when winding the first ball. If any loops slip up off the top, go back and fix them. I don't care how far back they were, go back and fix them.
- If a tangle does start, unless it's close enough to the beginning that it's worth it to unwind the whole thing to pull it through, just break the single. I know that hurts, but one small join will be less apparent in the final yarn than a giant section that's gone super nappy, and the quicker you catch and deal with it the less yarn will get a chance to get caught in the tangle.
- It's slower, but if there's any hint of a tangle up top, pull the outside end off the bottom of the plying ball. The center end can make it through a small bit of trouble, but the outside end will catch on any irregularity and quickly make a tangle significantly worse.
- Some amount of tangle and looping at the top can be dealt with if it's held enough out of the way. I sincerely hope I never have the opportunity to test this, but should I end up in a similar situation again, I'd like to try something like bobby pins to hold nascent free loops out of the way until the winding end reaches them. It's possible that if done quickly and neatly enough that could eliminate the need to break the singles.
- Be careful when winding the first ball.
- No really, be careful when winding the first ball.
#hand spinning#plying ball#yarn barf#untangling#tangle#spinning#plying#two ply#plying from both ends#handspun#handspun yarn#drop spindle
201 notes
·
View notes
Photo
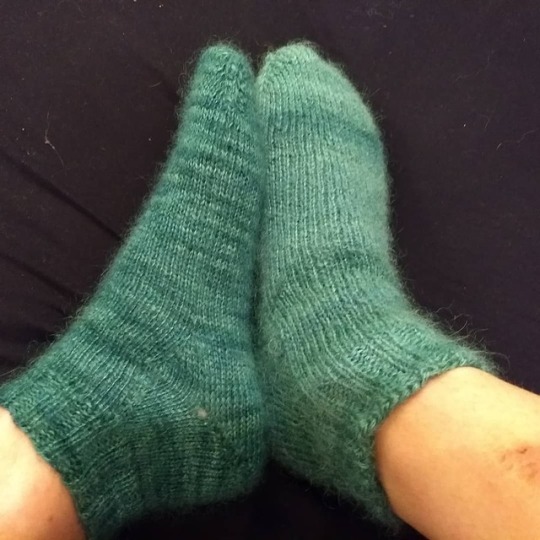
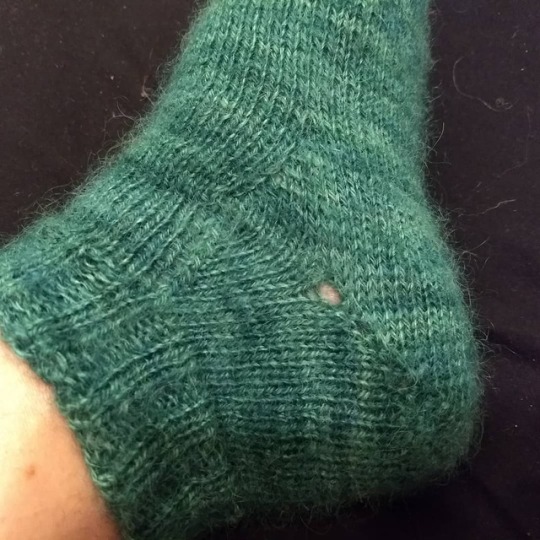
Third pair of socks is complete!
There were definitely some issues with these, which I'll get into in a moment, but overall they were a resounding success. My experimental heel design worked beautifully. I got the sizing slightly off, and I definitely should have leaned the gusset increases the other way, but it hugs the contours of my foot extremely well and has a delightfully snug fit. I can tell that once I get the sizing right this design will get me a perfect fit.
I may try to write this up as a pattern once I've ironed out the last few issues; I can't be the first person to have thought of a gussetted short row heel, but it's not something I've come across in any of the patterns I've looked at.
Most of my problems with this knit came from the yarn- partly the fiber, but mostly my spinning of it. I drastically underplied both skeins, which combined with the naturally frizziness of the fiber meant I split the yarn constantly. I also didn't match the gauge very well on the second skein, so I was trying to knit a matched pair out of two significantly different yarns. The size turned out mostly the same, but one sock is considerably thicker than the other. I had 17g left of one skein (out of 50g), and less than 3 yards of the other.
I'm still not a huge fan of the fiber (masham), but it did grow on me a bit. When I first started, I thought it was going to be miserable to knit the whole way through; it was rough and scratchy and felt like it was cutting into my fingers. But either it softened up as I worked or I got used to it, because by the end, while I didn't exactly love it, I didn't mind it so much. Though it did continue to shed all over me the whole time. The finished socks actually feel quite soft and rather comfortable. I can't see myself seeking out this fiber again, but it's a fair shot nicer than I thought it'd be when I first spun it.
#knitting#socks#sock knitting#knit socks#fiber exploration#masham#wool#hand knitting#handspun yarn#hand dyed yarn#short row heels#toe up socks#two at a time#knitting with handspun#experimental knitting
3 notes
·
View notes
Text
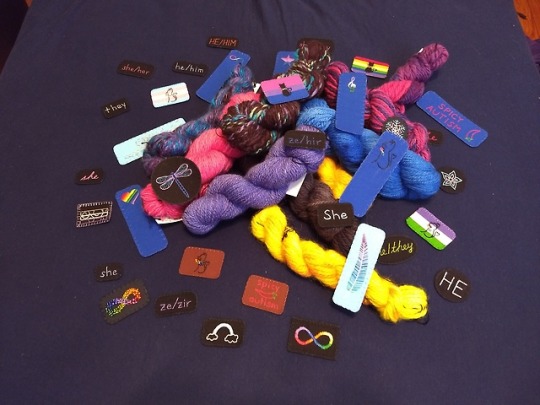
Yarn is now for sale!
I've finally come up with a pricing system I think I'm happy with, have figured out how shipping works, and managed to take some photos with reasonably accurate colors, so it's time to see how this goes.
I've got 10 skeins of my hand spun, hand dyed yarn up for sale in my etsy shop. Head on over and check them out!
1 note
·
View note
Photo

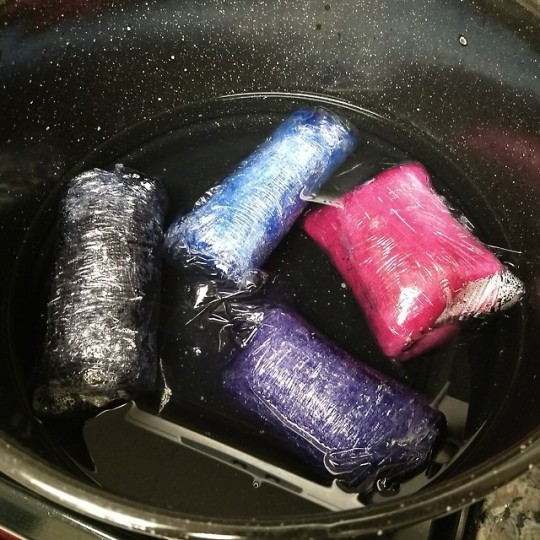
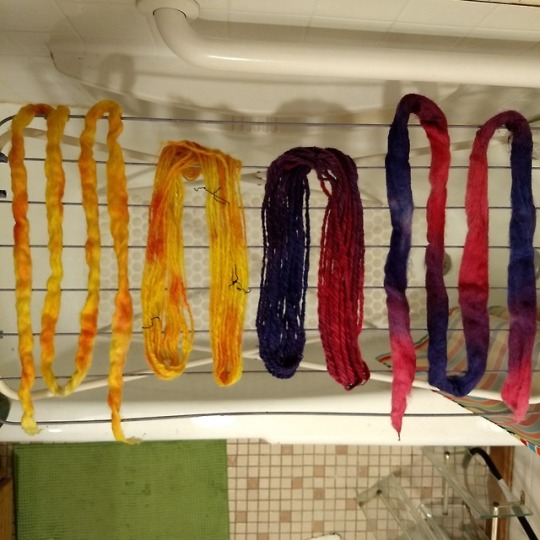
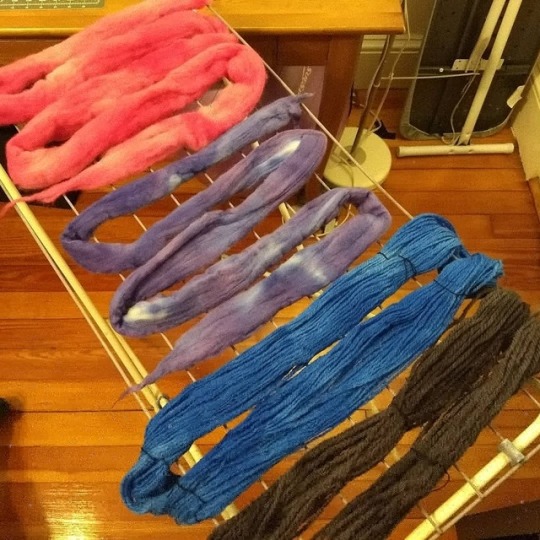
More dyeing! I tried a bit of a new technique for these, by which I mean "I wanted to try hand painting yarn but didn't have a steaming setup". I followed the steps for hand painting up through "wrap it in cling film", and then instead of steaming it I just threw those back in the pot of water and heated that. It worked pretty well. There was some minor dye bleed into the pot on the first batch(when I hadn't worked out how much water to use for the dye stock yet), but nothing melted, the dye set, and I didn't have as much trouble with felting as I had had previously(though whether that's more to do with wrapping them while in the pot or being more gentle while rinsing them out I can't say for sure).
The wool breeds here are masham for the yellow/orange, eider for the pink/purple, merino for the blue and purple, and whitefaced woodland for the pink and grey. The second batch I was going for solid colors, but used the same technique so I could get four different colors in the same pot.
A few observations:
- About 6-8oz of water seems to be a good amount to mix the dye in(for 50g fiber); less than that and it doesn't reach all the fiber evenly, more than that and it leaks out of the wrapping.
- I was hoping for polka dots on the masham; while they were more distinct than when I tried a similar thing kettle dyeing, they still ran significantly(I actually used pink dye for them, and there was enough bleeding between them and the yellow that they turned completely orange). To get actual distinct dots I'd probably have to dye them in two separate steps.
- The colors on batch two all turned out deeper than I was expecting. I used 1/8 tsp of dye powder for each, so I figured they'd be pretty pale. Takeaways from this are that I don't actually need to use as much dye as I thought, which might help with the rinsing completely without felting problem, and also that if I want to dye pale colors(at least in a consistently measurable way) I need to do more than 50g of fiber at a time.
- The colors aren't consistent across the skeins/lengths of top. It seems that the hand painting method, while good at keeping the fiber from felting, isn't great for consistent solid colors. I think the next technique I want to try for dyeing small batch solids is dyeing in mason jars; I almost tried it this time, but I've seen conflicting opinions on how important it is to have a rack in the bottom of your pot so I decided I'd just play it safe and wait until I get one.
- The solid purple ended up with splotches of blue. I was expecting it to come out on the blue side, given that when I used this dye in the first batch the yarn ended up with a blueish section, but I wasn't expecting how it was blue in some places and purple in others. The two theories I can see for this are that either it appears blue in smaller concentrations, or the blue particles bleed farther and thus the parts that the dye ran into rather than being directly applied to were blue instead of purple. I'm leaning toward the latter, given that the few areas where I missed getting any dye at all are ringed by blue, and also because I still ended up with blue on my previous dyeing with a more concentrated dye stock, but I'd like to do more experimenting to determine for sure. It's a neat effect, but I'd like to be able to get it on purpose instead of by accident.
- I was very surprised by how the grey turned out. This is the same black dye that on my previous attempt turned a definite brown. Given that, and that everything I've read about black dye says you need several times as much as other colors, I was expecting 1/8tsp of black dye to result in either a light brown or a very light grey. This is strictly grey, not brown, and while it's definitely grey rather than a true black, I wouldn't exactly call it light. I'm going to have to play around more with the black dye and see if I can get to something actually approaching black.
1 note
·
View note
Photo

Second pair of socks is done!
I actually finished them yesterday... and then went to put them on and discovered I'd bound off way too tightly, and they wouldn't fit over my heel >_<. And of course I'd been good and woven in my ends and trimmed the yarn already, too. I ended up ripping back the bind off and one more row to give myself some yarn to work with, then did it up again with the same bind off, but being careful not to pull anything tight. Which was difficult, because it goes against all of my instincts, but worked out anyway, and now I can actually get the socks on my feet.
They're not quite perfect(a dropped stitch in one of the heels that I caught too late to want to try to fix it, some tension issues at the break in the magic loop) and I'd like to fiddle with the pattern a bit for my next go, but they seem like perfectly serviceable socks.
I'm really happy with how the colors ended up, especially for the one on the right (dyed after spinning). I was worried the repeats would be too short, but I seem to have lucked out on the pooling and wound up with some nice diagonal stripes. The one on the left was fractal spun after dyeing. I was a bit worried at the beginning because it started off with a large chunk of the same dark purple, but it moved into some more defined stripes after that. I think I'd like it a bit more with some more contrast between the colors, but it works well as a subtle striping.
5 notes
·
View notes
Text
Oh noooooo I went to start the ribbing on this sock and realised I managed to drop a stitch in the heel somehow, and now I have to decide if I just leave it as is or frog all the way back to fix it.
2 notes
·
View notes