windkissfr
Feel the wind kiss you!
Gif by chill-crafting wind kiss---enjoy your flight! https://www1.flightrising.com/clan-profile/500739
3912 posts
Don't wanna be here? Send us removal request.
Last Seen Blogs
onlyiconss
𝐢𝐜𝐨𝐧𝐬

lovefreakswhoeatdick
NO JUDGEMENT LADIES JUST BE YOU RELEASE THE FREAK

ask-navigator-bepo-blog
Ask-Navigator-Bepo

narra144
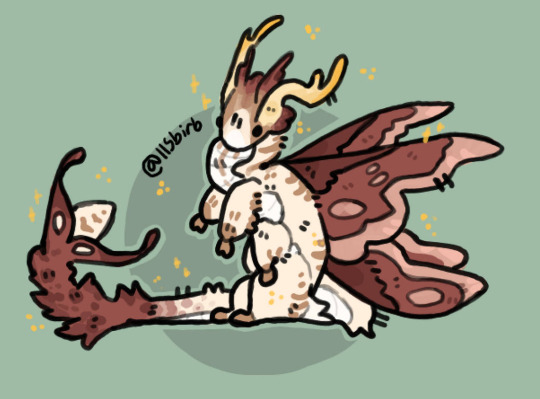
nemophilist (n.)


Photo
A drawing I did of my cutie Willow over on Flight Rising. She’s a gardener with mild social anxiety.
382 notes
·
View notes
Text
🌊 gilf-baldwin Follow
actually tidelord disappearing didn't affect me at all because my actual dad already left years before tidelord decided to go ahead and copy him. this ain't my first rodeo #absentfathergang

🐎 centaur-kicks Follow
username checks out
🌊 gilf-baldwin Follow
hey now.
2k notes

💡 wrecking-wiretangle-walk Follow
Day 32 of cutting a random wire in Wiretangle Walk until someone notices
still nothing lol do half of these even do anything
💡 wrecking-wiretangle-walk Follow

uh-oh.
15k notes
👊 dickpuncher2848 Follow
plaguebringer's kind of a milf tbh.
🌟 guide-to-exaltation-deactivated2
The shamelessness on this website astounds me. What would the Gods say if they saw this vile text? Seek enlightenment or you shall face their divine wrath.
👊 dickpuncher2848 Follow
ok first of all the gods are too busy waging their gay little wars to look at my tumblr blog second of all i'll have you know i'm an ordained priest in 5 different regions so i actually know more than u. btw.
🌵 marzalfanclubpresident Follow
FIVE?? you can only become a priest of your own element how the fuck did they let you do that
👊 dickpuncher2848 Follow
colored contacts.
50k notes
2K notes
·
View notes
Note
may i ask how you get your linework and colors to be so smooth and crisp on your skins? they're so amazing!
I have a little process (along w processes from other skin artists) here in this thread but my trick for skins honestly is:
6-8px default round brush on 1250px canvas
COLOUR the INNER LINES after flats
use the lines/shadows to your advantage; my skins are always very colorful. by tinting the lines and shadows a very saturated colour you can either blend it into your skin OR use it as 'shading'


148 notes
·
View notes

Text
Flight rising by popular demand has given us the ability to skin children
470 notes
·
View notes
Text
Baby Stats
With permababy skins confirmed to be on the horizon and templates already available, I wanted to quickly gather the stats on the popularity of each breed under the eternally youthful effect. You'd have a hard time selling a skin for a permababy when there's only a few hundred of that breed's babies in the game, after all. The stats are interesting! I've bolded top 5 most popular, and italicized the top 5 least.
All: 73,089
Abberation: 4384
Aether: 2347
Auraboa: 540
Banescale: 2139
Bogsneak: 1452
Coatl: 9366
Dusthide: 124
Fae: 1696
Gaoler: 7459
Guardian: 1811
Imperial: 4492
Mirror: 2740
Nocturne: 6131
Obelisk: 3616
Pearlcatcher 2038
Ridgeback: 865
Sandsurge: 496
Skydancer: 2868
Snapper: 5000
Spiral: 6185
Tundra: 1776
Undertide: 1787
Veilspun: 2510
Wildclaw: 1268
Coatls are winning by a LANDSLIDE here. Not surprisingly, they're widely accepted as Very Cute. Not surprising to see dusthide and auraboas so low considering they're both still very new, particularly dusthides. Little surprising to see surges are that low, but most of all I was shocked to see wildclaws make bottom 5!
115 notes
·
View notes
Text
:3c I'm overly excited for hatchling skins so I'm already prepping one. Hatchling deserve plush toy buddies!
272 notes
·
View notes

Text
Simple skin & accent tutorial!
I'm only familiar with making accents in CSP so some of the things you see here might be program specific, but for the most part it should be generally applicable.
Okay with that being said, here's a very basic tutorial, under a readmore because it got long (image heavy)
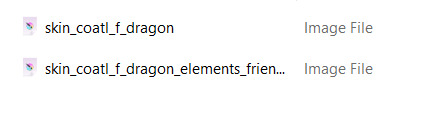
Assuming you already know roughly what you want to make and what breed pose you want to make it on, go to the custom skins page on the sidebar then download PSDs. For this step I'm choosing coatl F!

It should download automatically, the file will be compressed (zipped). I normally just open the folder and move the top file (without elements_friendly) to my accents folder to access it from my art program:
Open your preferred art program and open the file! It is a PSD file so it should be compatible with most art programs. When you open it, everything should look like this:
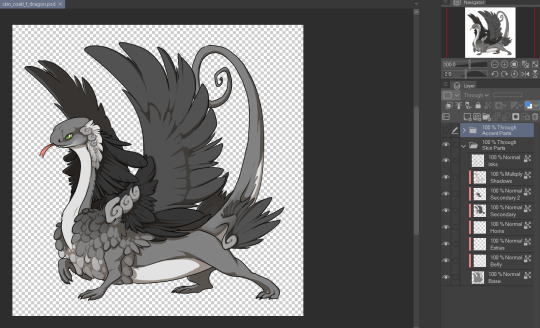
The layers probably look complicated, and it isn't super clear where you can and can't draw- but I promise it will get easier to understand! Before I even start drawing I do two things: I resize the image (changing the image resolution) to 700px by 700px. This means the image the resize better later on when I need to downscale it to 350px by 350px. Next, I make a new folder under both the existing folders with a single, full white layer in it. And set everything in "Through Skin Parts" to 50% opacity.

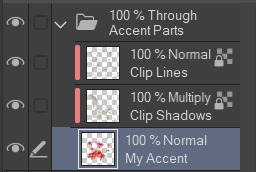
Lastly, put the bottom two folders completely out of your mind, we won't be touching them at all. The only folder that matters is "Through Accent Parts". As I'm drawing the accent itself, I make the lines and shadows layer invisible because they can just be distracting, like this:

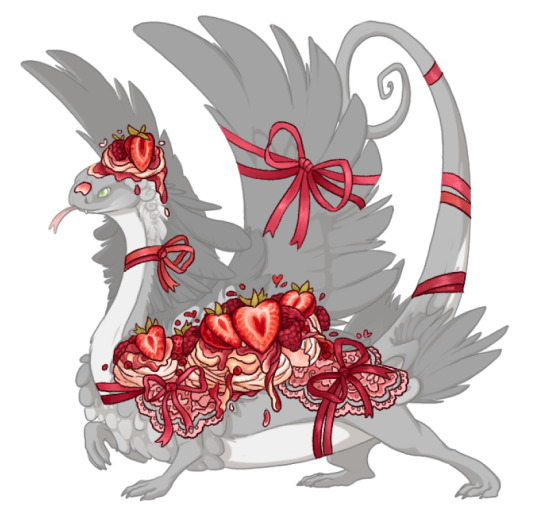
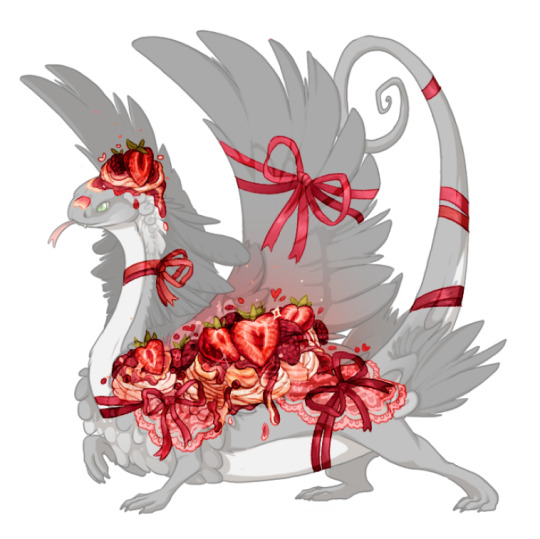
That layer beneath both lines and shadows layers? The one labelled "Accent Goes Here"? That's where you draw, and you can make more layers to draw more on later. For now you can sketch your design on that layer. Here's my sketch for my skin Strawberry Pavlova:

It's pretty rough at the moment so I want to add another layer to draw my clean line art on, in CSP this means just adding another layer and turning off clipping which automatically applies as the layers above it have clipping turned on. When that's done it should look like this:


(You can absolutely use more layers for lining if that's what you prefer!)
Next is adding colour. An important thing to note for this step is to avoid using colours that are very close to black, and to avoid using black altogether. This is against skin and accent rules as you need lines and shadows to remain visible over your design, and very dark colours make this a lot harder!
When I typically colour my skins and accents I will separate out design elements (so for example all plants on one layer, all blue cloth into another layer, all jewellery on another, etc etc.) into different layers- this is purely to make recolouring easier and isn't necessary. In this case I didn't have my colours separated out as I had no intention of recolouring this skin! This is what this skin looked like when I was finished colouring:
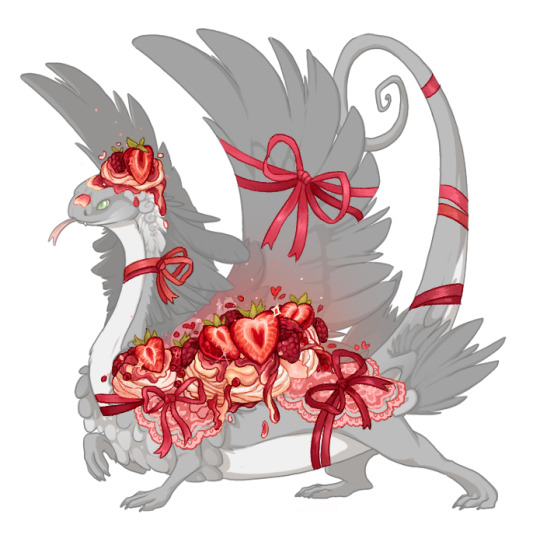
Now I just need to do some final finishing polish on the design! For this one it involves adding a bit of pink transparent colour behind the strawberries, adding pale transparent colour under my lace and of course- adding sparkles! One of the final things I do is recolour my own line art to a red-pink colour (in this case I had it set to multiply as well- but this isn't needed!) this takes some of the harsh edges out of the accent and make the design feel more cohesive imo!

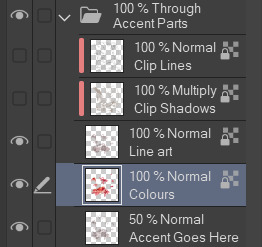
And the design is finished! The final step before we can submit this is a big one! We have to change the lines and shadows that we've been ignoring this whole time. For this I flatten all the art work into one layer, like this:
Why do we have to change the lines and shadows? Well...

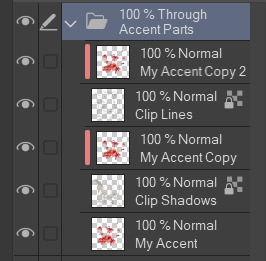
The default shadows are pretty high opacity and very grey, they cover up my accent and make the details harder to see. And the default line art is black. You can edit these layers to make them much nicer. You can edit them manually- making sure to lock transparent pixels so you don't edit the coverage of the lines and shadows. Or you can do this: (You can ignore this next part if you're finding it overwhelming) Duplicate your accent design twice (so you have three layers with it on total), set both your lines and shadows layers to normal and unclip them. Your layers will look like this:

Ignore what the accent looks like for now. Next move the copied layers so one is above the lines and one is above the shadows, keeping only one in the original position. And then clip these duplicated accent layers to the layers directly beneath them, it will look like this:
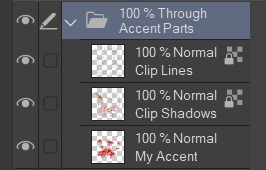
Merge the accent copy layers with its corresponding lines or shadows layer, you should still have 3 separate layers when you're done: The lines, the shadows and your original accent design. Like this:
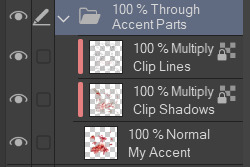
Then clip both of the lines and shadows onto your accent design layer and set both lines and shadows layers to multiply. Like this:
If you've done it all correctly your accent should now look like this:
This is a lot better than the default lines and shadows already! It's pretty dark in spots and my lines are definitely too light in other places though. So next I usually start by setting my shadows layer to 50% opacity and then going over both lines and shadows layers manually recolouring the lighter parts to a darker colour so they are visible on top of my final design. When you downscale your art to submit it, lines and shadows that were super obvious suddenly vanish- so don't be afraid to downscale it and keep editing the lines and shadows.
Here's what the final product, downscaled to 350 pixels, looks like:

This got accepted first try by skin mods (just in time for valentines!) Important things to note: places where my design is less opaque the lines and shadows are also less visible, this is completely fine! You don't have to fix this. Lines should always be visibly darker than the shadows they're on top of, this means sometimes they will have to be black to get them to show up or you may even have to make your accent underneath lighter to get everything to conform to the rules! Lastly, lines and shadows are subjective and you may end up getting rejected a few times before they're to skin mods liking. Its one of the harder parts of skin making and you won't always get it right.
Community feedback is your best friend, don't create in a vacuum! Go join discord servers where other people are making accents too, ask for help! Now go forth and make!
191 notes
·
View notes


Text
i think i liked the last chibi better TwT

still cute tho
177 notes
·
View notes
Text

ok so this started because, the thing about dusthides is that they have a very cool thing going on with their wing, where the secondary is only visible on the underside of the wing and not the top. unfortunately, only one pose (F) shows this off at all, so I wondered if the M pose could be altered to show the back wing to emphasize that trait. and also i thought it would be cool if the secondary was also on the underside of the plating, which i then had to add more of, and then also i had to draw the F pose to see if i could reposition the tail to show off THAT attribute. and then since i was drawing them ANYWAY i just redesigned some other things. for fun. i dont think i did it super great but it was a fun exercise!!
881 notes
·
View notes