waterlilyunit5
Unit 5 - 'Operation:Heart'
Barnsley Hospice Denim Upcycle Project
&
The Heart
52 posts
Don't wanna be here? Send us removal request.
Last Seen Blogs


adorpheus
adorpheus

mightandmagicx
Might & Magic X Legacy (Меч и магия 10), Герои VII

birdisanidiot
Bird's Slime
Text
1 note
·
View note
Text
Presentation Script/Prompt
Notes for hand-in day's presentation to the class and Barnsley Hospice. Colour coded notes so it's more helpful to remember, and better to keep track of where I'm at.
1 note
·
View note

Text
Experimentation of Design Boards


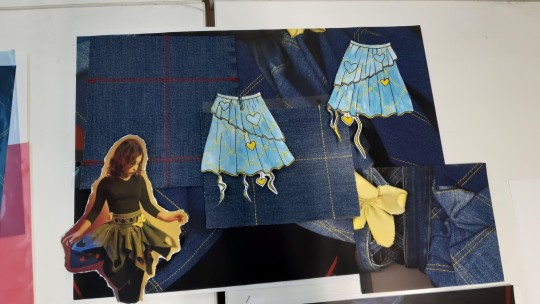


I experimented with the layout of the my design boards, firstly figuring out whether I want them portrait or landscape. I used some close-ups of my garment from my photoshoot, as well as putting my garment on a photocopier to create some artistic close-ups to zoom in on detail. I used these close-ups to see if I wanted a full background image, or to tear around each image and place it in the background of my boards. I also used coloured acetate/film to match the colour scheme of my collection. Some small samples were creates (similar to my patchwork style stitching) as I wanted to see if adding texture and another element would make the board look more appealing and highlight the stitching detail on my garment.
My figure illustrations I had drawn in a continuous line style were also experimented with. I placed the illustrations onto my boards and experimented with the layout, however, due to the vibrant colour of the backgrounds and the plainness of the figure illustrations, they didn't really fit. Instead, I copied the illustrations onto acetate to see if that would make the illustrations fit better. However, they still didn't work, and decided not to include them, and instead, used some poses from
1 note
·
View note
Text
Designs Boards and Finale Designs


My Final Design Boards! The boards include five designs with a front and back specification drawing, and each design has its own board. One of the five designs is a specification drawing of my garment. The designs have been sketched out by hand and media, including watercolour, Pro-Marker and pencil, has been applied afterwards. Each design is fine-lined, as well as using a paint pen for the stitching. For the yellow stitches, I have used a white paint pen and then gone over each stitch with yellow acrylic. This made the stitching more noticeable, and brought out the contrasting colour. I have made sure to add shading a highlights in to make the illustrations more detailed and realistic looking.
The design boards are backed with coloured film/acetate, images of poses from my photoshoot, and close-ups of my garment. I've also added denim samples of the patchwork stitching to add texture and variety.
1 note
·
View note
Text
Full Garment Construction
Pattern piece was created by pleating and pinning different lengths and sizes of a pentagon shape - the point of the pentagon creates the handkerchief skirt look, and the horizontal line opposite the point is pleated at the waist.
Once the pattern was decided, it was folded in half and cut so it's symmetrical.
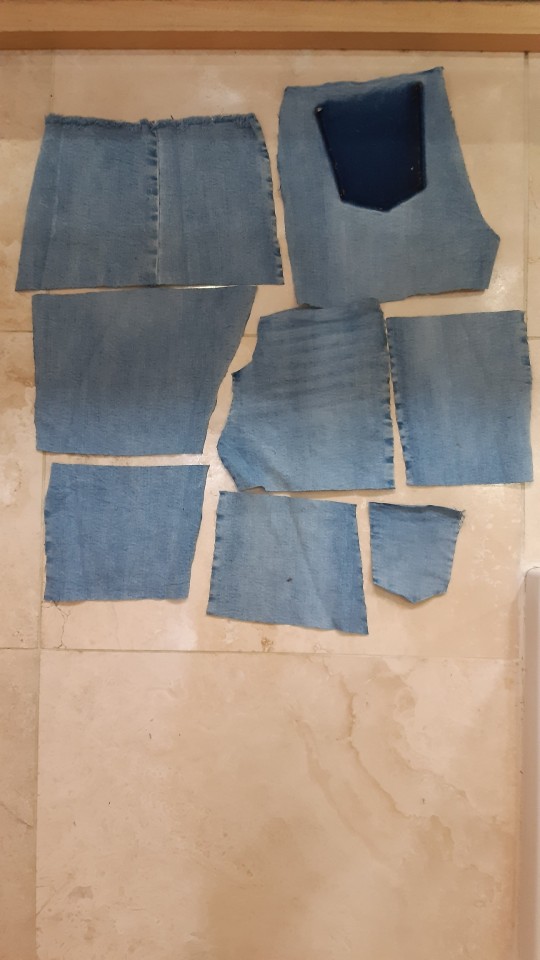
The seams of two pairs of black jeans were unpicked (along the seam on the inside, front, and back), along with all seams from my additional garment.
The pattern piece was aligned on the back piece from my additional garment, and two pieces were cut out.
The remaining fabric from the sleeves and front pieces were overlocked at the edges and sewn together (with a 1cm seam allowance), and three pattern pieces were then cut out after aligned correctly so as little fabric was wasted.
Four more pattern pieces were needed to be made from the black denim so there were eight pieces in total.
The first two black denim patter pieces were cut out of the top half of the jeans (below the waist band over). The pockets on the jeans had to be unpicked so the denim could be used.
I then overlocked and sewed the remaining denim from the bottom half of the jeans and cut out a third pattern piece.
I then swapped half of a pair of one of my blue jeans for half of a peer's black pair of jeans so I could cut out a fourth black denim pattern piece.
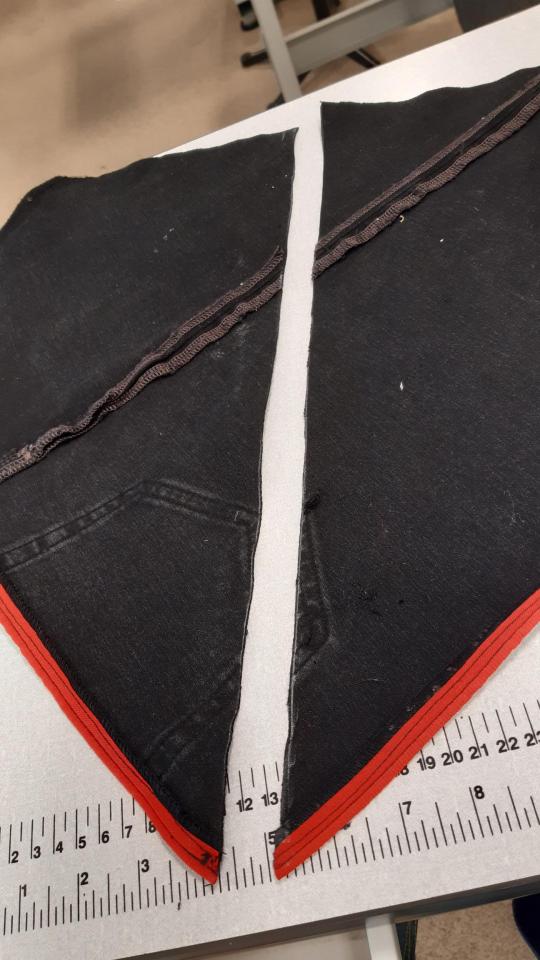
Once all pattern pieces were cut out, all edges of the pattern pieces were overlocked before the piping was sewn on.
The piping was sewn onto all eight pieces individually and 1cm from the edge.
When the ping reaches the outer corner, a little slit was cut in the piping so it could bend at a right angle before continuing along the hem.
The hem was then turned over, pressed and topstitched.
The side of all eight pattern pieces were sewn together in an alternating pattern.
I then swapped half of a pair of one of my blue jeans for half of a peer's black pair of jeans so I could cut out a fourth black denim pattern piece.
Once all pattern pieces were cut out, all edges of the pattern pieces were overlocked before the piping was sewn on.
To create the skirt's top layer, I used the second pattern piece (which is the same shape as the underlayer pattern piece, but smaller and shorter.
Just like the bottom layer, eight pieces were needed to be made from this pattern piece to be able to be plated and sewn in line with the bottom layer.
I had three and a half pairs of (blue) denim jeans left, two pairs being a lighter/paler blue than the other one and a half. Four of the pattern pieces were cut out of the paler denim, and four out of the darker denim.
To be able to have enough denim, I cut out four pattern pieces from underneath the waistband of the demonic, sewed the streams of the remaining denim together, and cut out four more pattern pieces.
Vertical and horizontal lines were marked on at right angles, to create square. For the darker blue, the patchwork squares were marked on 15cm by 15cm, and the square on the lighter blue denim were marked on 10cm by 10cm.
The sewing machine was then threaded up with two upper spools of yellow thread (the same shade), and the bobbin was filled with one spool of black thread.
Having two spools of yellow thread thickens and highlights the stitches, making it have a better patchwork effect. Black thread blends in with the denim, and using one spool for the bobbin makes the yellow thread look handstitched.
Then, following the lines going with the warp, against the weft, I sewed two lines (about half a centimetre apart) in the yellow thread
Since the weft is stretchier than the warp, and the fabric stretches out when sewing along the weft. strips of interfacing were cut out and ironed underneath the pattern piece, along where the marked-out lines would be. This stopped the fabric from stretching out. Having interfacing on the full pattern piece would stiffen the fabric up too much that it would be more difficult to pleat.
The lines going in the opposite direction (along the weft) were then sewn along, continuing with the double lines around half a centimetre apart.
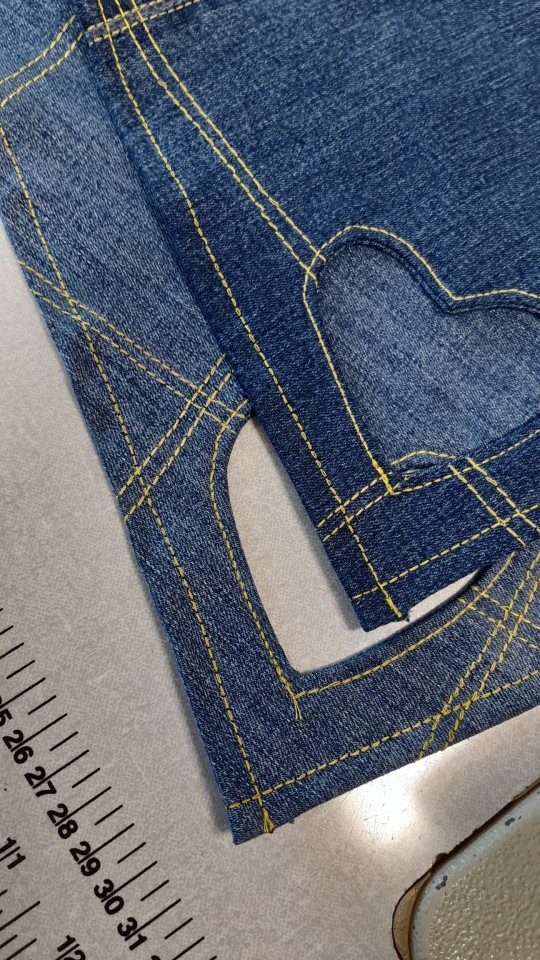
A heart shaped template was then created to mark out where to sew for the cutouts. The size of the template was experimented with first; too small and it wouldn't be as noticeable, too big and it might look out of place and overcrowd the garment.
With chalk, I then marked out where the centre of the pattern piece was (vertically), before marking 6cm upwards from the bottom of the piece.
The heart shape template was placed on top of the 6cm mark in the centre, and lined up correctly, before tracing around the shape. This distance from the bottom meant the cut out wasn't too close to the hem but still sat nearer the bottom.
This was repeated seven more times on the other pattern pieces.
I then sewed along the marked-out heart shape in black thread, sewing slowly and steadily so the shape was neat and symmetrical.
I then cut out the inside of the heart shape, leaving just over half a centimetre around the edge on the inside. And cut notches all the way around the seam allowance to allow the fabric to bend when turned inside out.
I then threaded a needle with a long piece of thread in-between my fabric and back, so it could loop around a stitch that was placed at the inner point of the heart shape. I then turned the heart the correct way, pulling the thread as I did so, so I was able to pull out the point of the heart.
The hearts where then topstitched in the same double yellow thread.
All eight pattern pieces were then overlocked with pale blue thread (to match the underside of the denim) on four sides of the piece (two hems and two side seams)
The hems of each pattern piece were then folded over at one centimetre and pressed.
The hems were then sewed with the same thread used for the patchwork decoration (two spools of orange/yellow thread and one spool of black thread for the bobbin). And pressed again
Side seams were sewn together at one centimetre.
After the heart shaped apertures were completed, the hems of each pattern piece were overlocked with light blue thread to blend in with the denim. The waist seam did not need overlocking as it would be sewn into a waistband.
Each hem was pressed over at 1cm, and sewn with double yellow thread.
Each side seam was sewn together.
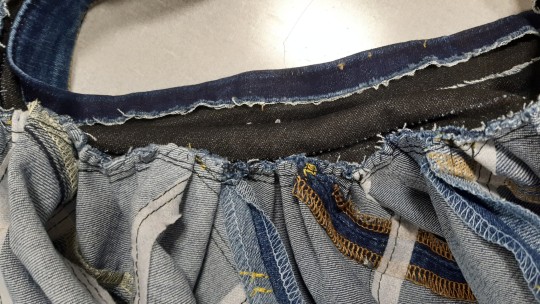
A waistband from a pair of jeans was unpicked apart, and cut to the right length (so would fit around my waist and overlap around 2cm)
On one half of the waistband, I used chalk to market out eight equal sections, and then used red/orange chalk to mark out the centre/middle of each section.
When pleating in the skirt by hand, right sides together, the different coloured markings will give me a guide for where each seam should be placed, as well as the centre of each pattern piece.
Pleats were pinned and then tacked in with black thread, making sure to tack in each pleat at least once, and twice for security.
The pleated skirt was then sewn into the waistband at 1cm, along where the original seam allowance on the waistband was
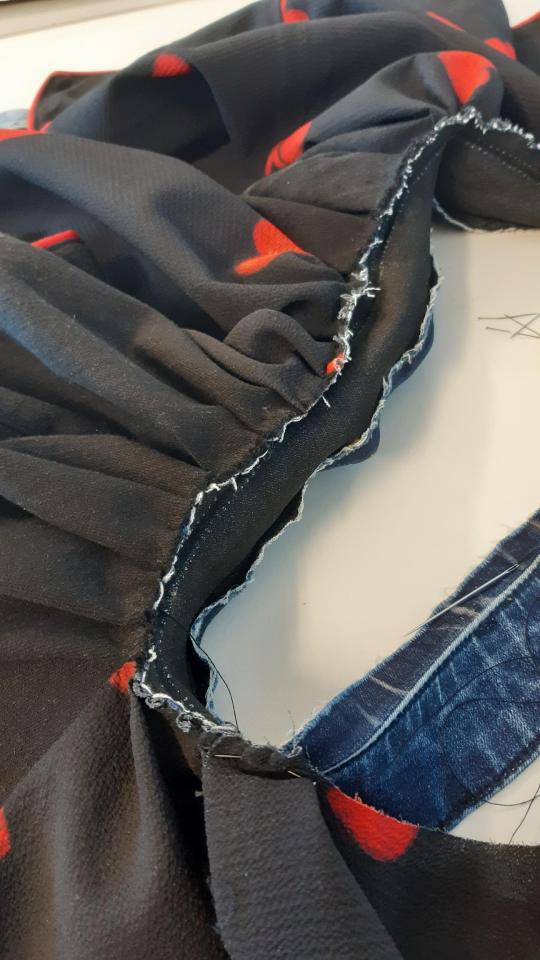
The other half of the waistband was also marked out eight equal times in white chalk, and then red chalk to mark out the centre of each section. This was for the second layer (bottom layer).
So the points of the bottom layer’s pattern pieces could centre in-between the top layer’s points, one of the pattern pieces were cut down the centre, and the loose half of the pattern piece was sewn to the other side of the pattern piece. (for example, each pattern piece has a number, 1-8 One and eight aren’t joined together but the other pattern pieces are. Half of ‘1’ was cut off and sewn onto ‘8’)
The remaining raw edges of the skirt were overlocked with black thread
This time the skirt was pleated wrong side to right side, so when both waistbands or joined and sewn together, both layers of the skirt face the correct way.
The pleats were pinned and then tacked in, before being sewn at 1cm
Both waistbands were sewn together at 1cm, right sides together.
A second denim waistband as unpicked, this time leaving one edge still topstitched together.
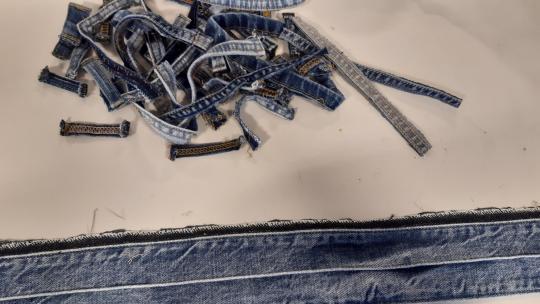
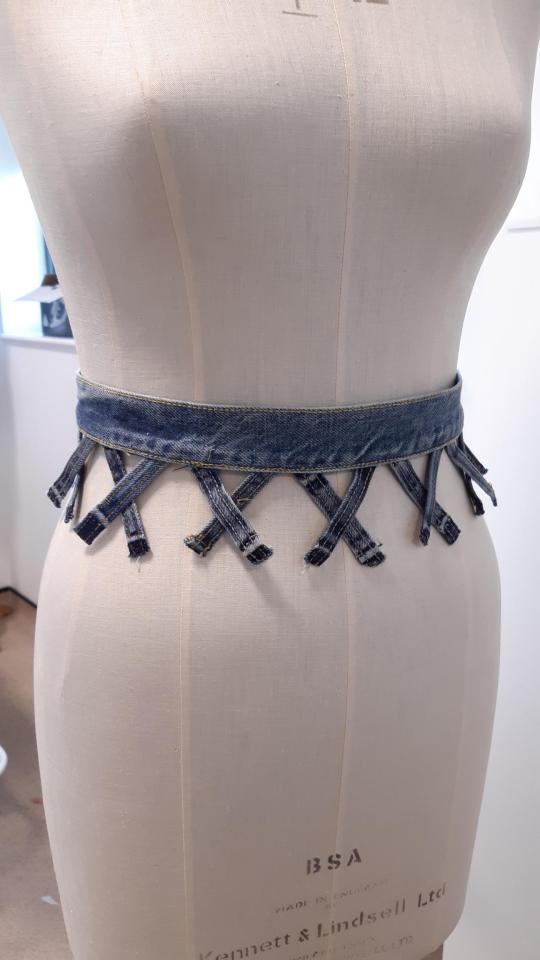
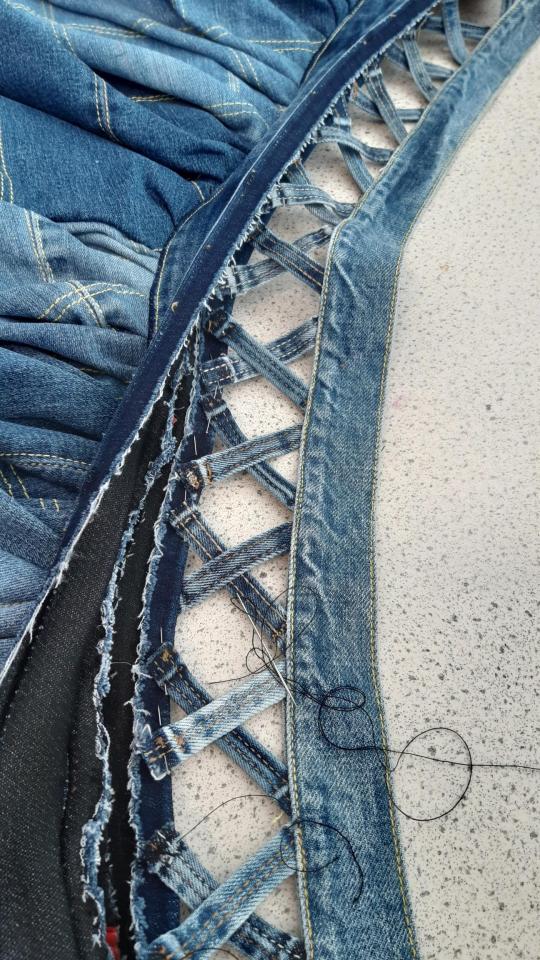
20-30 beltloops were unpicked from all my denim, ready for the crosshatch pattern
Two belt loop was placed onto the second waistband at a time, right sides together, one crossed over the other to make an ‘X’.
Each ‘X’ was pinned into the seam allowance of the waistband
The step was repeated with remaining beltloops, placing each ‘X’ side by side, and arranging it to make sure it was neat/even.
Once the full waistband was covered, still leaving 1cm on each side for seam allowance, each beltloop was tacked in place, before sewing them to the waistband.
The beltloops and waistband were lined up with the other waistband (the one with the skirt sewn in), and pinned in place, before being sewn right sides together.
All four waistband seams were topstitched together with double yellow thread
The side seams of the skirt (side seams of black bottom layer) were sewn together up to the hip point, and the raw end s of the piping were folded inwards and handstitched down, so it wasn't visible.
A zip was then pinned right sides together, making sure each section lined up with the other side, before being sewn together with a zipper foot.
The zip was then pressed and topstitched to keep the seam down.
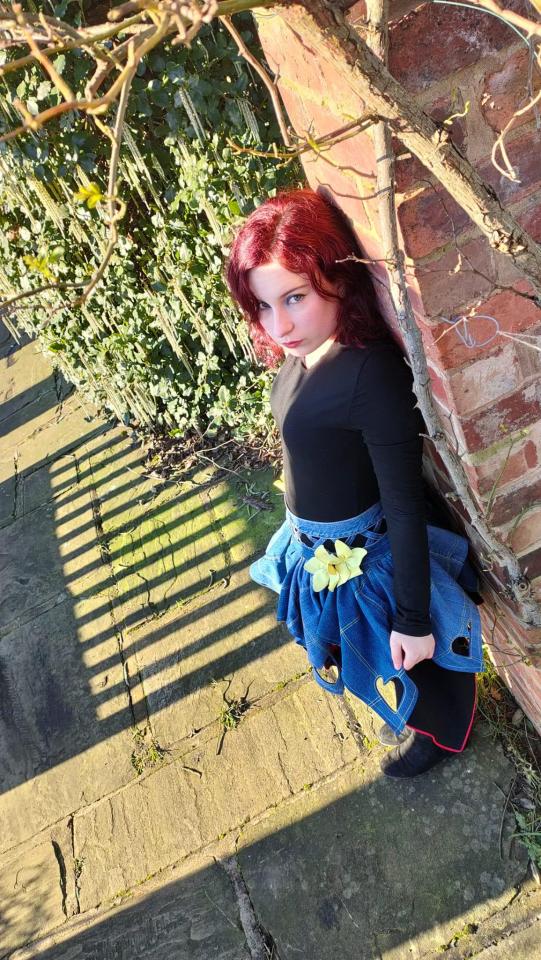
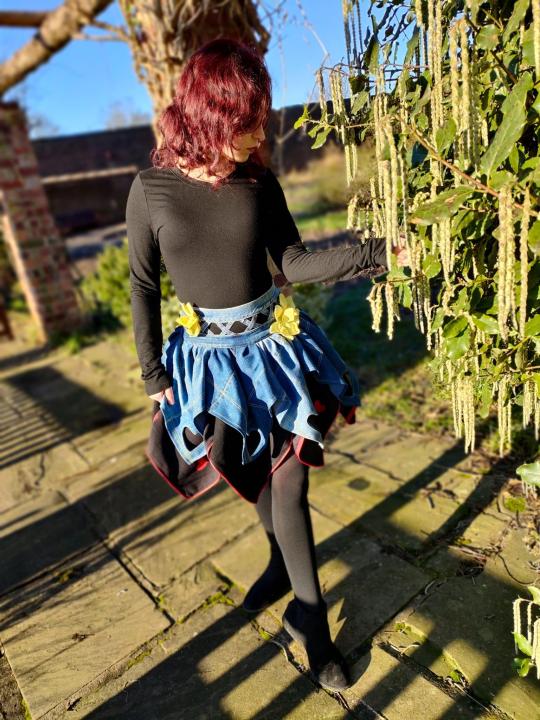
(denim flower construction on blog, another post) denim flowers were then arranged and pinned onto garment until I was satisfied with the placement, and were handstitched onto the waistband, making sure to carefully sew down each petal so they wouldn't continue to curl up.
0 notes


Text
Media Experimentation
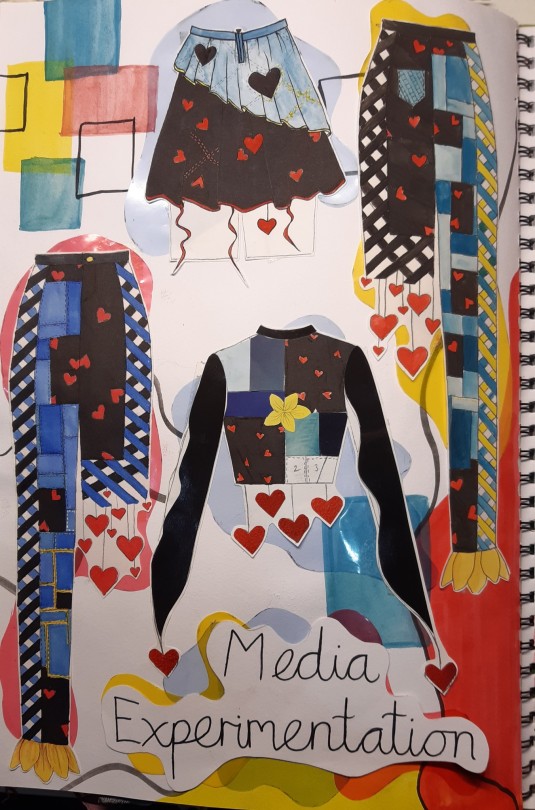

I experimented with my media application as I needed to figure out what mediums were best to use, and what colours and shades were best for each element of the designs.
For the blue denim, I tried using Pro Markers, watercolour, collage and pencil, as well as collaging with denim. The Pro-Markers didn't give the effect of denim, there wasn't the correct shades of blue to be right for denim as some were also too vibrant, and there also wasn't enough shades of blue to portray how many types of denim colours there are. The collaging was to plain, and couldn't get the correct shading with it, and with the denim collage, the pieces were too difficult to cut up small, and was quite messy, which was something I didn't enjoy. I realised that watercolour was best to use for the blue denim as it gave the right effect for denim, as well as having many shades of blue that weren't too vibrant, or too dull. To help with shading, I will use pencils I have more control over them than watercolour.
For the black denim and other black fabric, I experimented with using watercolour, pencil, collage, Pro-Markers. Using collage for this colour was better than using it for the blue, as black does show as much shading and shadow as lighter colours, but it still didn't bring enough texture, and looked plain and flat. Pencil ended up too patchy, and though it's best to add pencil on afterwards for better shading. Watercolour was also too patchy, and a lot of the white kept showing through. I even tried a lighter black watercolour I had, and it made a slight difference, but was still too patchy. I then used pro markers, experimenting with two shades, one black, one dark grey. This was to see if a lighter shade of black would show the stitching better than the black, but, surprisingly, the black was still able to show the stitches, so I decided to continue using the black Pro-Marker.
For the little details, such as the heart print, floral decoration, heavy decoration, and the piping, I experimented with Pro-Markers, pencil, and watercolour, and a small bit of collage. Pro-Markers were too messy for the small details, as the ink bled over the lines, and the point of the marker was too big to apply shading with. Collage did work for some of the bigger details, but was unable to add collage to piping. Watercolour and pencil worked perfectly, as the brush/point was small enough, as well as the colour being vibrant enough. Also, for the stitching lines, for previous units, I have used black fine-liner to add it the stitching details, and am continuing to do this. However, when applying on the yellow stitching (as seen on my garment), it was difficult to recreate the stitches without making it look like the denim was yellow, rather than the stitching, or the yellow didn't show up at all. I had the idea of applying the stitches with a white acrylic paint pen I had, and then added yellow marker over the top once it had dried. I found this to be very successful and effective.
Each design will be fine-lined. I have made a note of what mediums to use for what colour and which designs, and will apply it to my final illustrations.
0 notes


Text
Final Garment and Garment Description
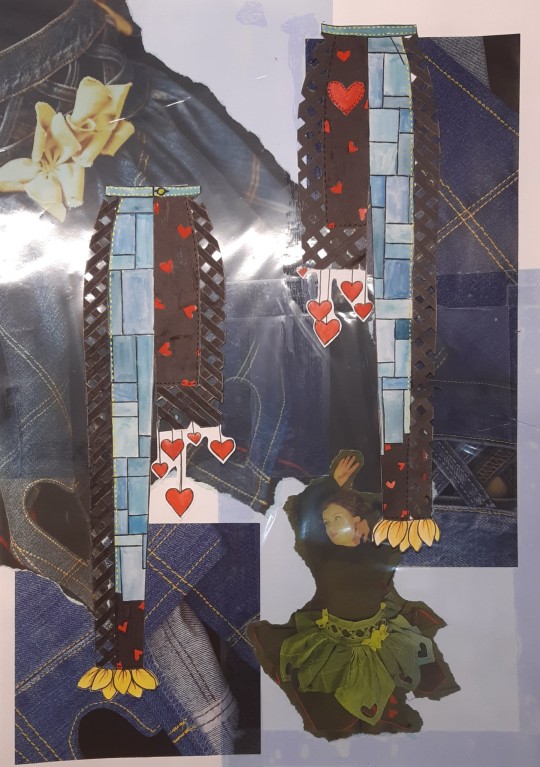
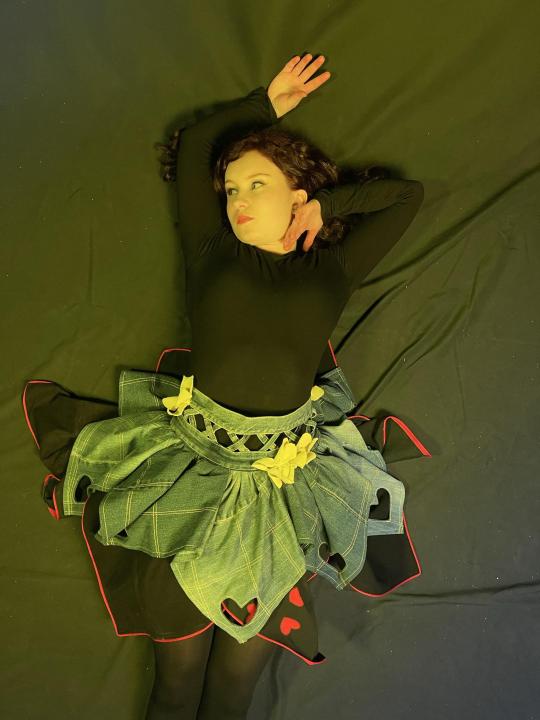
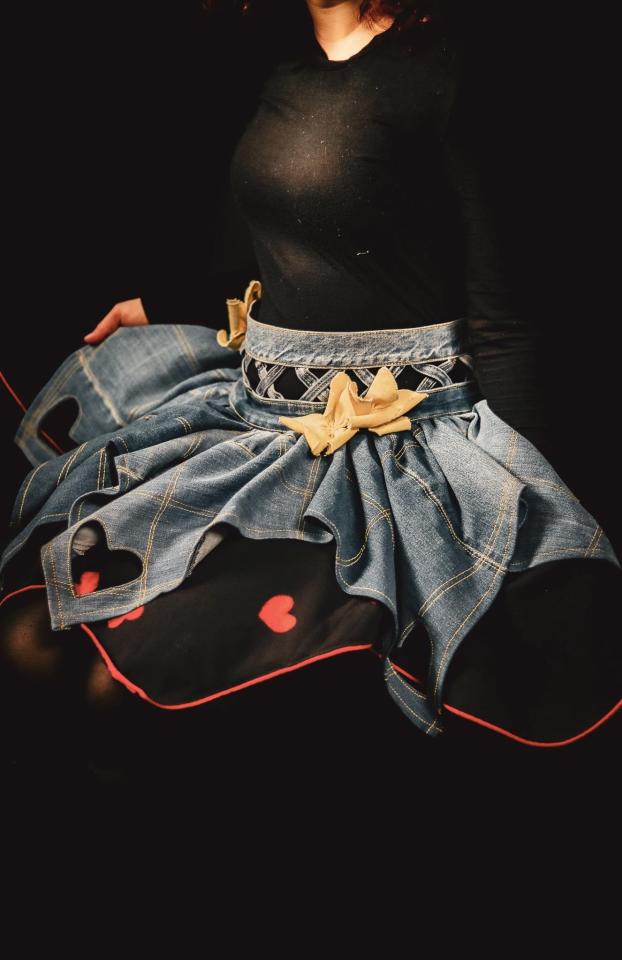
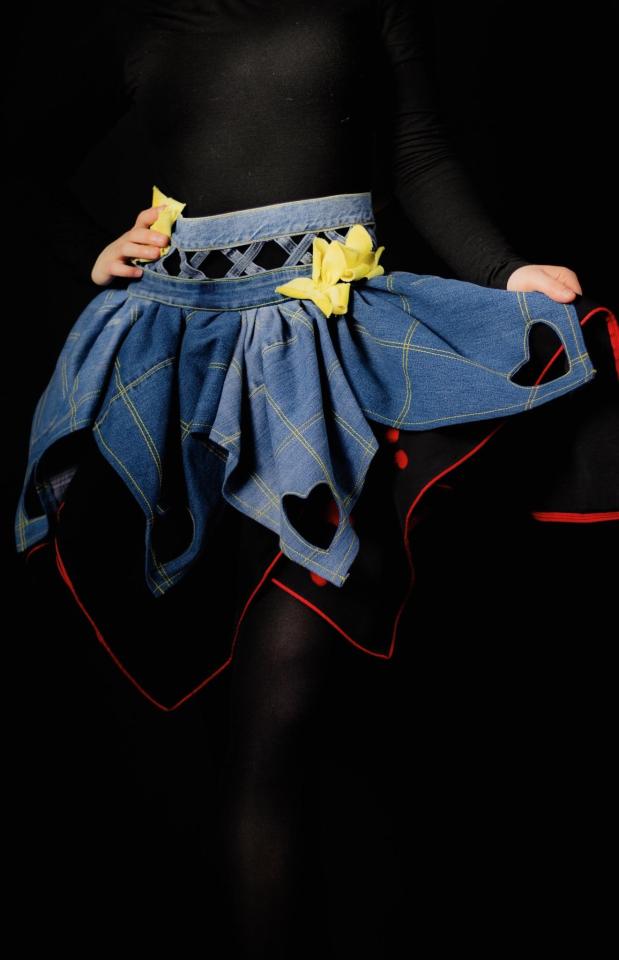
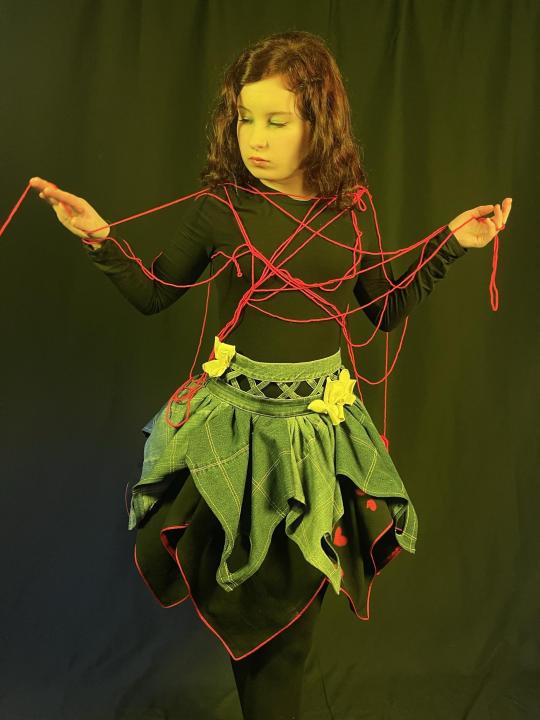
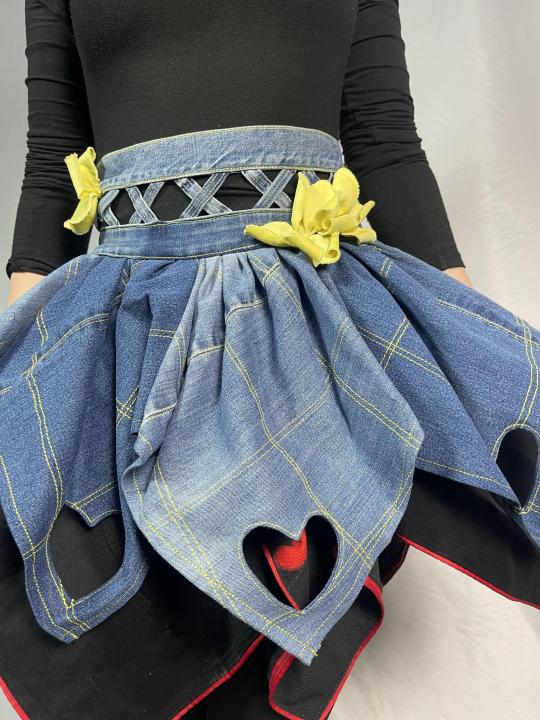
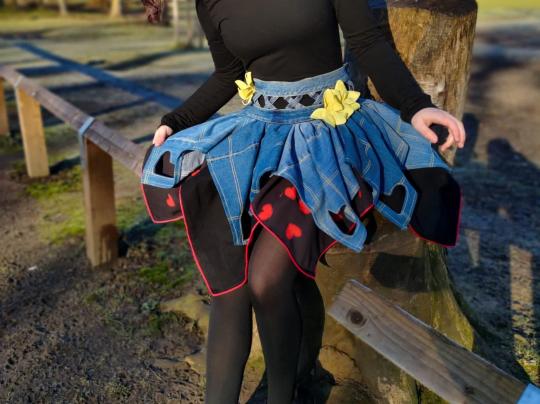
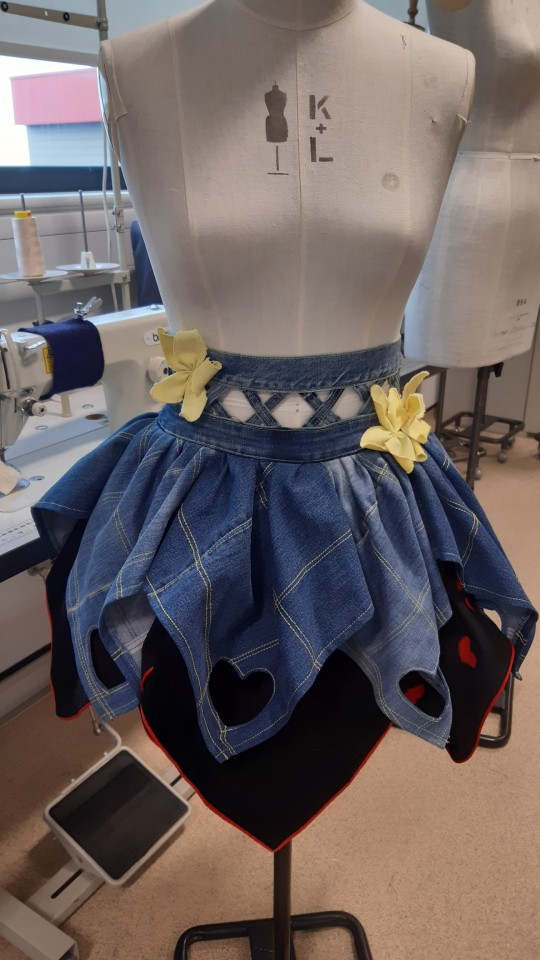
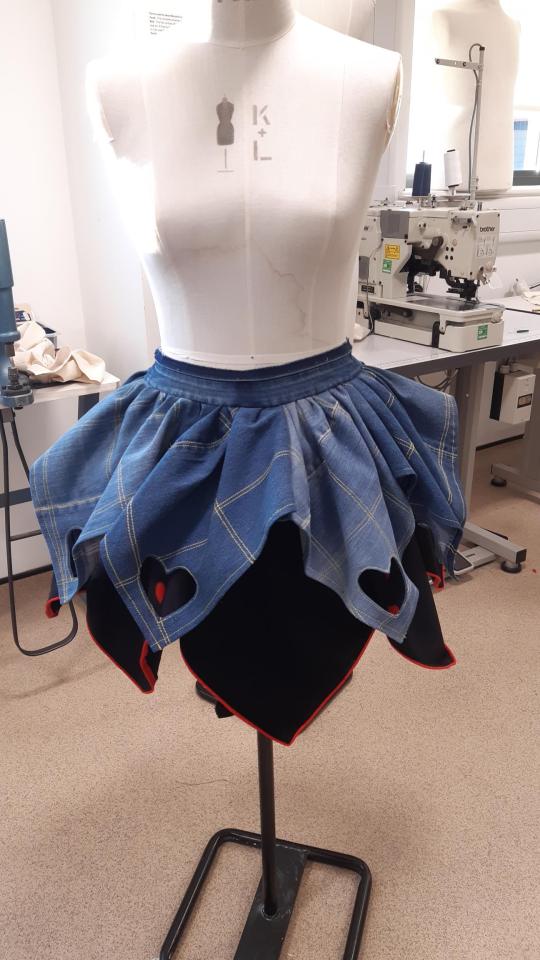
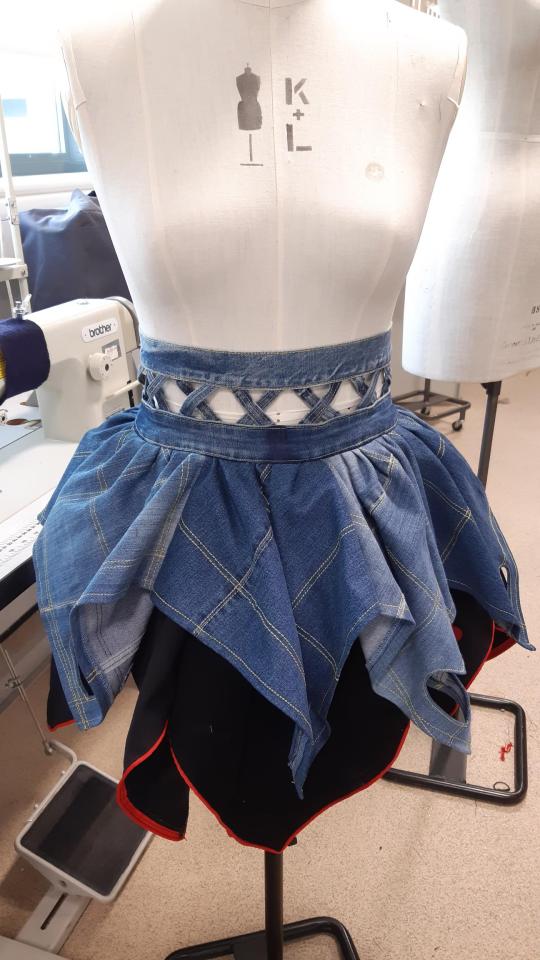
The garment I have made for Unit 5 - Barnsley Hospice Upcycle Project - has been inspired by the Heart, and have focused on elements from my open-heart surgery (2012). The garment is a handkerchief style skirt which consists of two layers made of recycled denim and heart-printed woven polyester, and has a red, yellow, blue, and black colour theme inspired by electrocardiogram colours. The garment’s volumed silhouette has been inspired by the silhouette of the heart as well as inspired by the stereotypical shape of a flower, taking the curves, fullness, volume, and shape from both elements of inspiration.
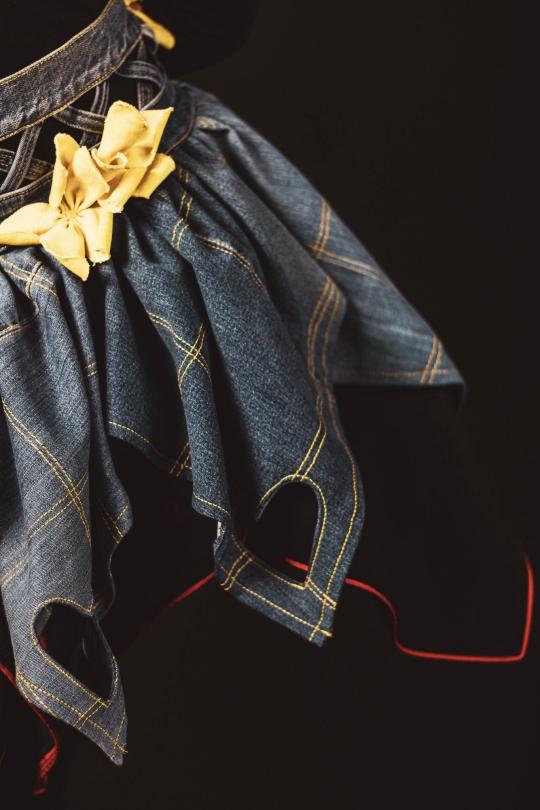
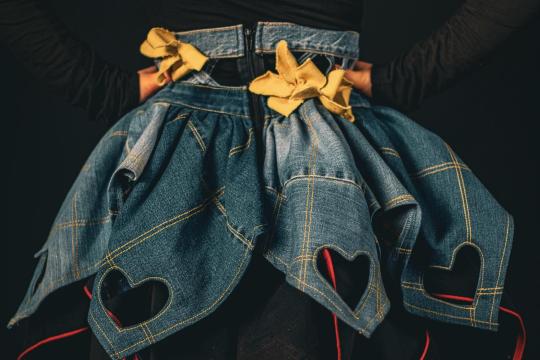
For the skirts bottom layer, four black denim and four heart-printed fabric pattern pieces have been used in an alternating pattern, and each piece hemmed with matching red piping to portray the inspiration of veins. The skirt’s top layer also has alternating pattern pieces of lighter and darker blue denim pieces, four light blue, four darker blue. Each pattern pieces has a yellow patchwork-like decoration, with the darker denim pieces having larger patchwork squares. A heart shape aperture has been added near the point of each pattern piece and top-stitched with yellow thread to match the patchwork, also matching with topstitching on the hems.
The waistband of the skirt has been constructed out of waistbands from denim jeans, and a crosshatching pattern, inspired by the crosshatch pattern of medical gauze, created out of upcycled belt-loops. The skirt is fastened with a zip, and bleached and dyed, yellow denim flowers have been hand stitched along the waistband of the garment to continue the representation of flowers.


0 notes

Text
Denim flowers for garment embellishment


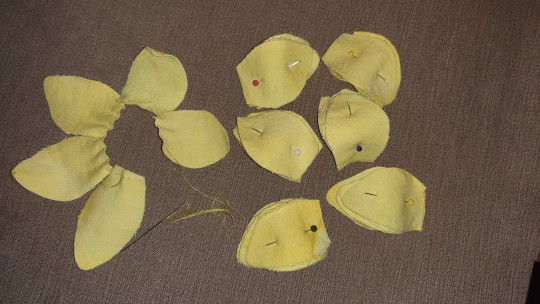

On my garment, I'm wanting to add some small denim flowers like the ones I made as sample. However this time, I will know which is the best way to bleach the denim, what shade of yellow to dye them, and what size and shape petal is best to use. I also had a thought about adding on some padded heart to match the heart print fabric, bug this is something I'm still unsure about, so decided to bleach and dye some denim anyways, just incase.
I started of by cutting up one half of a pair of light denim jeans, unpicking the seams and pockets off. I had saved the lightest pair of jeans to be used for bleaching and dying, as it would be much easier to bleach, and tje bleach would turn brown and make the denim turn yellow. This happens usually with darker denim, denim with a browner/yellow tint, or has been dyed with chemicasl that make it harder to bleach. I placed the denim into a tub that had a layer of bleach, and began adding a piece of denim at a time, adding a layer of bleach in-between each one. I use gloves for the bleaching, so I was able to spread the bleach around without getting it on my hands.
After an hour, the denim was taken out of the tub and rinses thoroughly before leaving to dry. I then added a small amount of yellow dye to a small tub of water, and submerged the bleached denim. I also did this with some red dye to the remaining denim pieces (for the padded hearts.
I left the denim to soak in the dye for almost an hour so the denim had chance to become more vibrant. The denim was taken out of the dye, and any excess dye was gently squeezed out, but not to much otherwise it would loose the vibrancy. A made a stencil for the oetalsnusing tracing paper, making sure to get the right size and shape first, before tracing down the petals 30 times to be able to make six flowers. When tracing, I made sure to place the petals as close together so less denim was wasted. The petals were cut out and I began constructing.
Each petals was folded at the edge so there were three small pleats for me to thread the thread through. I'd di this to four Korean petal before bunching them together, making making sure to pull the thread tighter this time. I continued the process to the other flowers, and also made another flower that was slightly bigger than the rest.
These flowers were then be added to my garment along the waistband.
0 notes
Text
Figure Illustration Experimentation


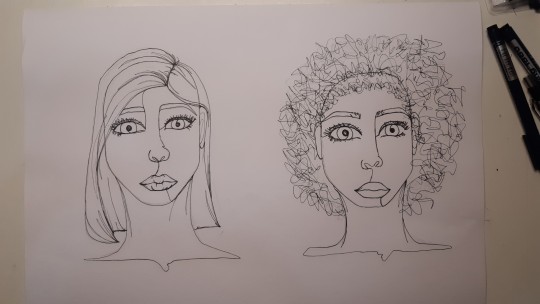


For my figure illustrations, I wanted a use a simple style, different to what I would usually illustrate in, and something that would link to my theme. I ended up finding the idea of continuous line drawing, and thought that that would be a great style as it reminds me of endless, winding veins.
I started off with some face illustrations first, sketching out a basic outline of the features (eyes, nose, mouth, ears, hair) in pencil, before going over in pen, but not taking the pen off the page, as best as I could. Since it was my first time doing continuous line style, I used pencil for the first one just to be sure I could do it. Then used pen for the rest of the illustrations. I then sketched out an outline for full figure illustrations, and repeated the steps, using pen to go over the outline without taking the pen of the page.
I found this difficult at first, especially for the illustration with more detail, so I had to take my pen of the paper to figure out where I would cary on, but made sure to return to the same spot I had left from. However, j was really pleased with the outcome, and think they would be a good illustration for my final designs.
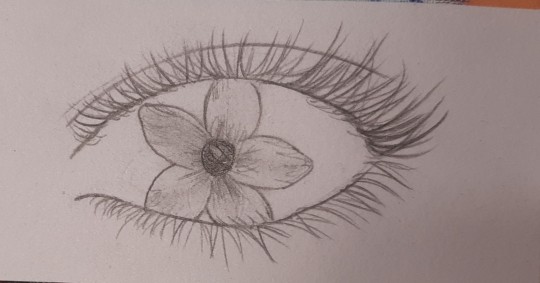
I also did some additional illustrations linked and inspired by the florals in my sketchbook I thought this was a fun quick activity to give myself a variety of illustration ideas. The illustrations included differently shaped eyes with pupils and iris', in the shape of florals and a heart shape too. I also illustrated some flower patterns onto a face, as well as a face onto a flower, but I thought it was too similar to my illustrations from FMP, and wanted something different.
0 notes
Text
Garment Construction Continued


After the heart shaped apertures were completed, the hems of each pattern piece were overlocked with light blue thread to blend in with the denim. The waist seam did not need overlocking as it would be sewn into a waistband.
Each hem was pressed over at 1cm, and sewn with the double yellow thread.
Each side seam was sewn together.
A waistband from a pair of jeans was unpicked apart, and cut to the right length (so would fit around my waist and overlap around 2cm)
On one half of the waistband, I used chalk to market out eight equal sections, and then used red/orange chalk to mark out the centre/middle of each section.
When pleating in the skirt by hand, right sides together, the different coloured markings will give me a guide for where each seam should be placed, as well as the centre of each pattern piece.
Pleats were pinned and then tacked in with black thread, making sure to tack in each pleat at least once, and twice for security.
The pleated skirt was then sewn into the waistband at 1cm, along where the original seam allowance on the waistband was
The other half of the waistband was also marked out eight equal times in white chalk, and then red chalk to mark out the centre of each section. This was for the second layer (bottom layer).
So the points of the bottom layer’s pattern pieces could centre in-between the top layer’s points, one of the pattern pieces were cut down the centre, and the loose half of the pattern piece was sewn to the other side of the pattern piece. (for example, each pattern piece has a number, 1-8 One and eight aren’t joined together but the other pattern pieces are. Half of ‘1’ was cut off and sewn onto ‘8’)
The remaining raw edges of the skirt were overlocked with black thread
This time the skirt was pleated wrong side to right side, so when both waistbands or joined and sewn together, both layers of the skirt face the correct way.
The pleats were pinned and then tacked in, before being sewn at 1cm
Both waistbands were sewn together at 1cm, right sides together.
A second denim waistband as unpicked, this time leaving one edge still topstitched together.
20-30 beltloops were unpicked from all my denim, ready for the crosshatch pattern
Two belt loop was placed onto the second waistband at a time, right sides together, one crossed over the other to make an ‘X’.
Each ‘X’ was pinned into the seam allowance of the waistband
The step was repeated with remaining beltloops, placing each ‘X’ side by side, and arranging it to make sure it was neat/even.
Once the full waistband was covered, still leaving 1cm on each side for seam allowance, each beltloop was tacked in place, before sewing them to the waistband.
The beltloops and waistband were lined up with the other waistband (the one with the skirt sewn in), and pinned in place, before being sewn right sides together.
All four waistband seams were topstitched together with double yellow thread
The side seams of the skirt (side seams of black bottom layer) were sewn together up to the hip point, and the raw end s of the piping were folded inwards and handstitched down, so it wasn't visible.
A zip was then pinned right sides together, making sure each section lined up with the other side, before being sewn together with a zipper foot.
The zip was then pressed and topstitched to keep the seam down.
(denim flower construction on blog, another post) denim flowers were then arranged and pinned onto garment until I was satisfied with the placement, and were handstitched onto the waistband, making sure to carefully sew down each petal so they wouldn't continue to curl up.
0 notes
Text
Decorative stitching sample
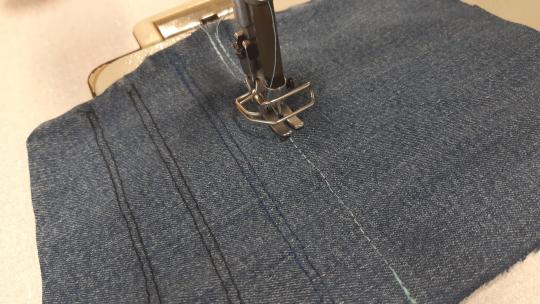


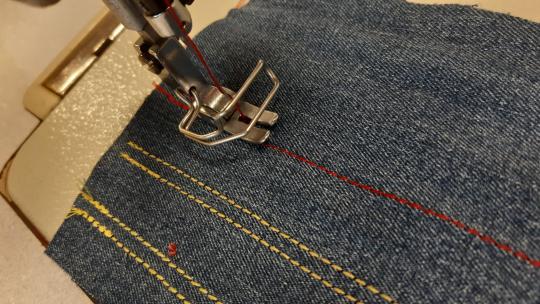

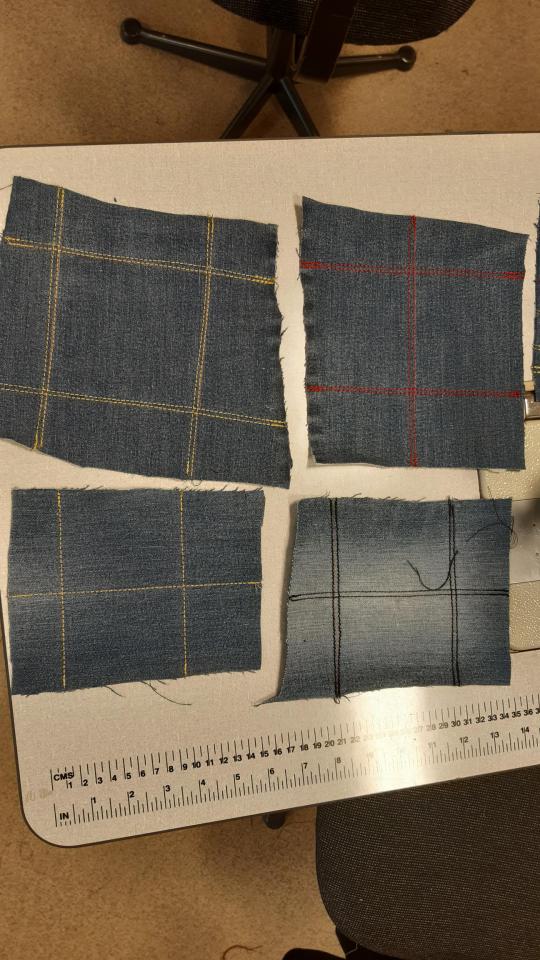
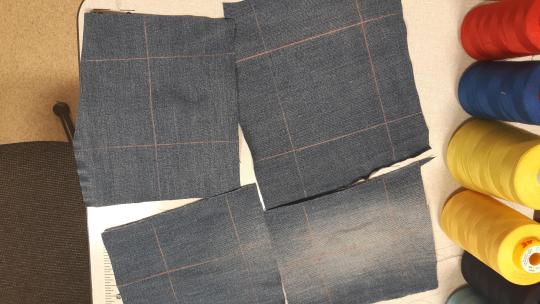
On my garment, I wanted to make the top layer look like patchwork. To create this effect, instead of creating real patchwork, I had the idea of sewing vertical and horizontal lines on each pattern piece, to create the illusion of patchwork. Before sewing onto my garment, I needed to know which colours to use, as I couldn't decided. The colours I sampled were, black, navy, dark blue, light blue, red, yellow, and light yellow. These are all colours that fit in with my garment's colour palett/theme, and the different shades help me know if a lighter or darker version of my chosen colour looks better.
I started by sewing on each colour onto a piece of denim, and sewed them in double lines, as when on my garment, double lines will help create the effect if patchwork (with patchwork, you usually top stitch each piece, giving the double line look). Once I had sewn each colour, I wanted to thicken up the thread, so I added a second thread (in the same colour) to the upper thread, threaded it through the machine with the current thread, and began sewing each colour again, leaving only one thread on the bobbin. Having a double thread on the upper spool highlights the lines, and each stitch, creating a better and stereotypical patchwork effect, as it looks hand stitched and more noticeabl.
I then narrowed down the colour to continue sampling with. Navy, blue and light blue blend in too much with the denim, and the darker/orangey yellow contrasts better than the lighter yellow. I marked on some patchwork like lines onto some denim pieces using tailor's chalk, and sewed on double lines with double thread in black, red, and yellow. I decided that the orangey yellow was a better colour to use as it contrasted with the blue denim, the red didn't stand out enough, and the black blended in too much. I also thought that using yellow was better, as yellow is part of my colour theme (red, yellow, blue and black), and I hadn't included it within my garment yet. Just so I was sure I was going to sew double lines instead of a single line, I used my chosen thread colour to sew a single line vertically and horizontally, but notices straight away that sewing double lines is much nicer, and has a better patchwork effect.
My next steps now is to add the decorative technique onto each pattern piece of my skirt pattern piece before sewing on the hems and side seams.
0 notes