
v8crafts
v8crafts
sometimes i make things!
etsy.com/shop/v8crafts
1 posts
Don't wanna be here? Send us removal request.
Last Seen Blogs

1-800-choke-me
🎀 bimbo 🎀

2baabbies
hiii baddies

nothing-particularly-exciting
maybe some memories become songs
septic-punk
Punk-Eye

ghostwriter-mcwalker
Untitled
Photo
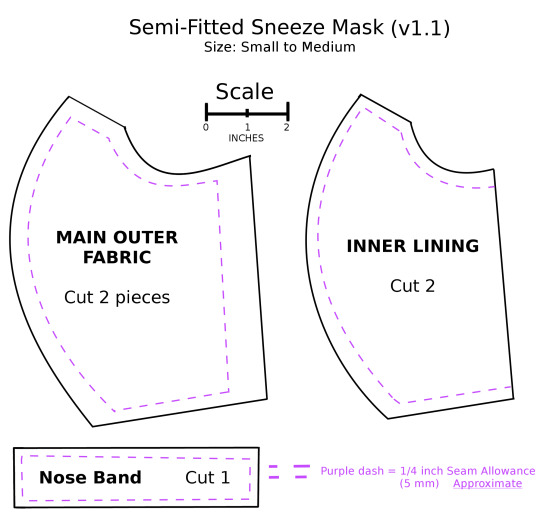


(updated to v1.1 on 4/14!! please use updated links~)
diy fabric mask pattern!!!! i said i was going to and i did 😷
this is not really a “beginner” pattern, it assumes you have some experience sewing. for easier options check out what the cdc has, or consider buying a pre-made mask from an indie maker~ (psst, i’m selling them myself)
unfortunately i can’t figure out how to make a two-page pdf so the inner & outer pieces are in separate files. sorry. also this is my first time sending out a pattern i have made/adjusted and then having other people try to make it, so while i tested it... things may not go well for you. extra sorry, and good luck?
main/outer pattern (pdf): https://drive.google.com/file/d/1x2qNW-SRjP9nj4U34PY4D8omvLAVKtrR/view?usp=sharing
inner lining pattern (pdf): https://drive.google.com/file/d/1rpGyyvIiMExhiO9H6vU3rruwPx3Xa2D-/view?usp=sharing
the pdf should be scaled correctly for regular 8.5x11″ printer paper, make sure to click “print original size” and check the scale after it’s printed. if you can only print one page, print the main piece
*you do have permission to use this pattern to make masks to sell if you want, just please link to this post to credit me!
this pattern is based off of: https://www.craftpassion.com/face-mask-sewing-pattern/ which is also free, has a fantastic tutorial, and multiple size & file format options!!
where mine differs is a roomier nose piece, b/c my nose was too big for the original shape, and extra length/altered curve to create an accordion pleat to get full chin-coverage even when coughing
to make: follow the original craftpassion tutorial until the end where you are supposed to sew the side seams for the elastic channels. instead, you are going to add a pleat and then sew the seam for the elastic channel
mini-tutorial with pics for that step under the cut!
1. fold & iron the channel for elastic/ribbon/string, as in original tutorial
2. put elastic/ribbon inside the channel & pin at top, so elastic can’t slip away. trust me on this, it’s possible to put it in later but it takes so much more effort & misery. also, flat elastic about 1/4″ (6mm) or smaller will be easier to work with than round elastic

3. turn mask face-up (outside of mask up), then fold the bottom edge up towards you
4. make this fold about 1 inch deep but no need to be exact. ironing it helps for the next step
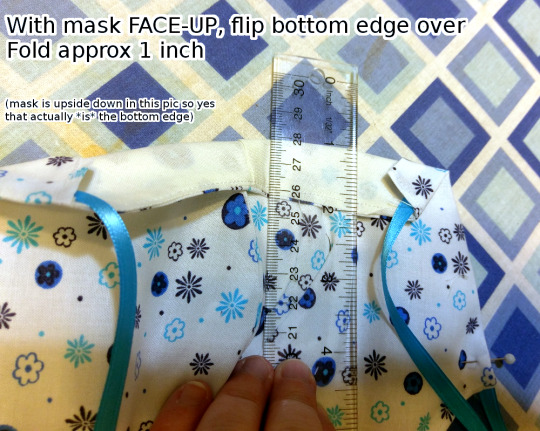
5. keeping a hold of fold, flip mask upside-down again (lining facing up)
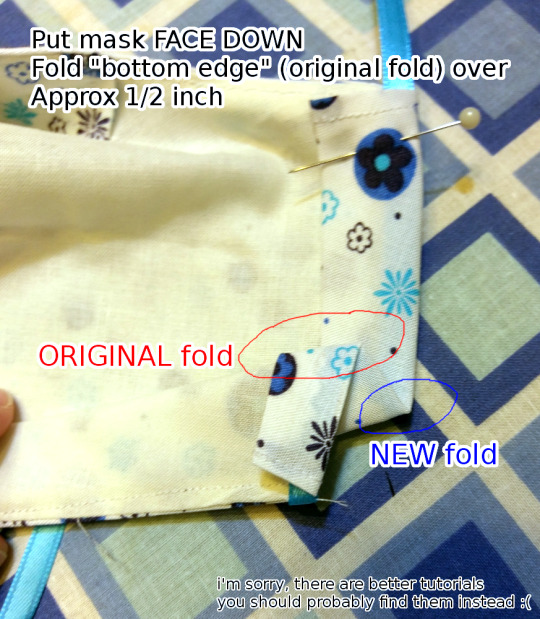
6. focus on one side at a time!!!
7. about 1/2 inch above the new “bottom edge”, which is really the fold you made in the last step, fold the fabric up towards you
8. iron, and/or pin the hell out of it, to stop the fold from undoing itself
9. the fold should now look kinda like a “N”
10. repeat on the other side
11. you will have to adjust the mask slightly, the edges of the elastic channel will need to line up straight while the middle of the mask itself curves

12. i didn’t get a picture but you can check that both sides are equal by folding mask in half & comparing the pleats. measurements aren’t important but you don’t want the mask to be lopsided, so make sure both sides line up evenly
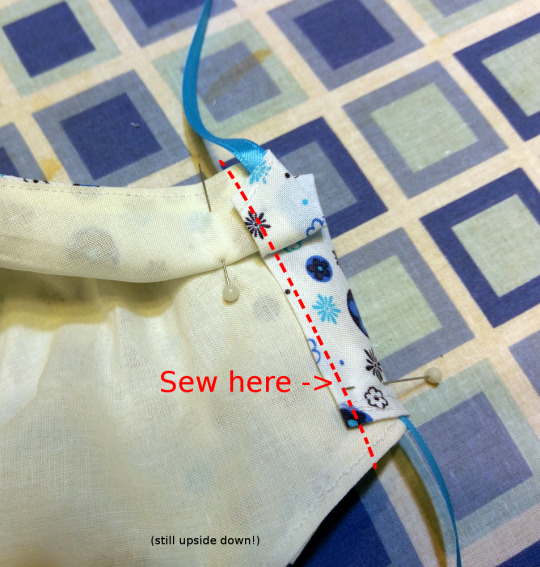
13. once both sides are pinned, sew straight down the side of the elastic channel. go slowly- the fabric is thick where it folds, your machine may have trouble
14. MAKE SURE YOU DON’T SEW ON THE ELASTIC (or ribbon). try to sew pretty close to the edge to avoid this. if you do sew over it, you’ll have to undo the seam & try again :(
15. done!!!!

make sure you wash your mask before wearing, and keep it clean! 😷
0 notes