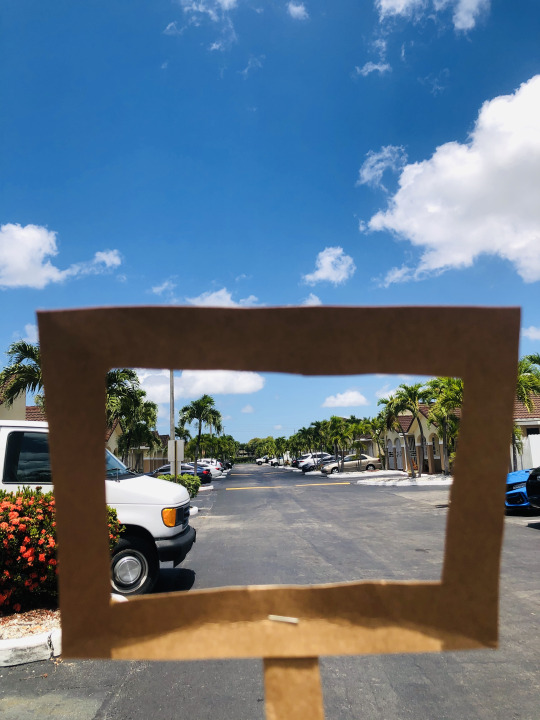
#vertical and horizontal art print Size Comparison
Text
#Excited to share the latest addition to my#etsy shop: wall Art Size Guide boho style 2 sets#vertical and horizontal art print Size Comparison#picture frame size guide#Frame Size Guide https://etsy.me/3zzh4UV#framesizeguide#wallartratioguide#artsizeguide#wallartsize#framesizes#wallartratio#artsizecomparison#postersizechart#walldisplayguide
0 notes
Text
Creativity is key to designing

Want to improve your design abilities? For scrap paper, diaries, and more, these simple doodle design ideas are ideal! Drawing is one of my favorite pastimes. If you’re anything like me, if your thoughts wander when you’re holding a pen, you’ve found yourself in the middle of a doodle. The Ultimate Graphic Bundle Pack is specially designed for graphic designers by our expert graphic designers that will save you 1000s of hours & make you money on a recurring basis.
All doodle patterns that don’t fall into a particular “form or style” is referred to as “doodle art,” which is a catch-all term. It may be in black and white or in color, represent “something” or be abstract, be a component of a bigger work of art or stand alone as the entire work, or simply be scrawled sketches done while you are on hold.
Doodling is frequently referred to as “mindless art.” That term bothers me because it doesn’t capture the care and consideration that goes into making some of the truly beautiful doodles that people have produced. So, instead of calling it “doodling,” I’ll call it “doodle art” or “artful doodling,” as I feel that that seems a little bit more appropriate and, to be really honest, a little less insulting. In either case, doodle art is a playful form with no restrictions that are easy to start and hard to quit once you get going. Its doodle leaves whether you doodle a page full of spirals or add doodled flowers to a canvas painting.
Why Create Doodle Art?
Doodling actually improves your ability to pay attention to what is going on around you, according to studies. So even though other people may think you are not paying attention when you are doodling during a class or meeting, it is actually assisting your ability to concentrate. While there may be a scientific justification for doodling, many people do doodle art because they enjoy drawing but don’t want to devote a lot of time to it. Doodle art has the advantage of being enjoyable and calming, as well as being flexible in terms of size, complexity, and timing for completion. It can be a quick type of art with repetitive parts that harmonize with your choice of the amount of work.
The art of floral patterns involves employing plants and flowers to produce a striking and well-balanced composition or display. Even in ancient Egypt, there is evidence of sophisticated floristry. The principles of floral design — balance, proportion, rhythm, contrast, harmony, and unity — as well as the elements of floral design — line, form, space, texture, and color — are all incorporated into expertly crafted floral designs, arrangements, or artwork.
Botanical Style, Garden Style (Hand Tied, Compote or Armature), Crescent Corsage, Nosegay Corsage, Pot au Fleur, Inverted “T”, Parallel Systems, Western Line, Hedgerow Design, Mille de Fleur, and Formal Linear are just a few of the various fabric pattern designs that exist.
The pattern with the leaves industry as it exists now has been influenced by Eastern, Western, and European styles. The three primary line placements of heaven, humanity, and earth are included in the Japanese floral arrangement technique known as Ikebana. The European style, in comparison, places more emphasis on the color and variety of botanical materials — rather than only blooming flowers — in large groups of various blooms. Symmetrical, asymmetrical, horizontal, and vertical manner of layouts historically defines Western design.
Floral Print encompasses creating wreaths, nosegays, garlands, festoons, boutonnieres, corsages, and bows in addition to flower arrangements.
#doodle pattern#Doodle leaves#Floral Pattern#Pattern with leaves#Fabric pattern designs#Floral Print#Graphic bundle pack
1 note
·
View note
Video
youtube

paper help
About me
The Art Of The Personal Letter
The Art Of The Personal Letter We've also included some version with and without a spot for kids to write down their name. Printable PDF writing paper templates in multiple completely different line sizes. For most college students and teachers graph paper, lined paper and even music paper is a day by day necessity. Even some educational and technical professions are attempting to look the net for templates in order to print them. Whether you're utilizing them as worksheets, for assignments or as a hobby, the selection of printable templates we put together will assist together with your project by dashing it up. In our record you can see lined paper, graph paper, sheet music, multiplication sheets and even measurement instruments, all in principally PDF format able to print. This major lined writing paper has summer themed images line the aspect of this printable. Using a readymade template such as this one can prevent plenty of time and effort. This means that you would have the time to help your youngster out in completing his tasks. They have horizontal traces with even spacing, and a few of them have vertical lines which indicate sections or margins. Although these come in different codecs and sizes, they've an identical structure. You should purchase lined paper, make your individual template or obtain printable lined paper from here. The totally different line styles work for a variety of writing initiatives including student publishing, letter writing and handwriting follow. Use to distinguish for writing skills at school. While many people could prefer dot grid paper for drawing, the ruled paper is unquestionably #1 in relation to writing. Each sheet of printable lined paper templates has a layout that can make each word of your textual content readable and easily digestible by a reader. To make a clean pocket book right into a lined paper was truly kind of a hassle for some folks. No matter what kind of writing you plan to do, printable lined paper is one of the finest selections to use. You can download a template from here and print a notebook paper template, a writing paper template, and more. Whether you want the template for a college project, a poem or more, this straightforward template will prove extraordinarily helpful. A lined paper template word is straightforward to make and is extremely versatile too. Lined paper, also called dominated paper is a sort of paper for writing which has horizontal strains printed on it. Because you can find many notebooks in the store with lined writing paper templates on it. However there is nothing impossible if you want to be as inventive as you possibly can! You placed a lined writing paper template in the back entrance of a clean pocket book. This will be much easier because the information sheets allow you to with spacing and making a steadyline. Then by utilizing a information lined paper may allow you to to make a wonderful and neat handwriting on a clean paper. I first learned about this idea when as a single trainer my co-employee for his for to spell her last name this fashion. My three-yr-old loves dictating letters to his grandparents. The author printable comply with the rules you input in the box below. In that sequence, we explored tips on how to mannequin, support and and rejoice printable writing and spelling. You could make your own lined paper template for different purposes. Use it for essay writing, document maintaining, and even for the use of your kids in order that they will complete their assignments. There are plenty of lined paper templates word available which is able to be sure that students of different ages can accomplish their college assignments and homework. These lines separate the hand-written textual content and make it simpler for you to write in comparison with a clean piece of paper. You can make a lined paper template with or without margins. Such a template would be ideal for calligraphy, drawing, noting music, and writing. If you just must print out some basic lined paper, these are the printable PDF templates in varied ruled sizes you should get some writing accomplished. Primary writing paper is broad-dominated paper that youngsters use when they are starting writers in elementary faculty. With extensive rows, the paper allows for bigger letters and phrases. You can purchase wide ruled paper and composition books from workplace provide stores. However, if you simply need a few sheets (or you've run out of paper), you can create your personal custom-made ruled paper utilizing Microsoft Word 2007. You'll find dozens and dozens of Christmas stationery printables here, each another festive than the last.
0 notes
Text
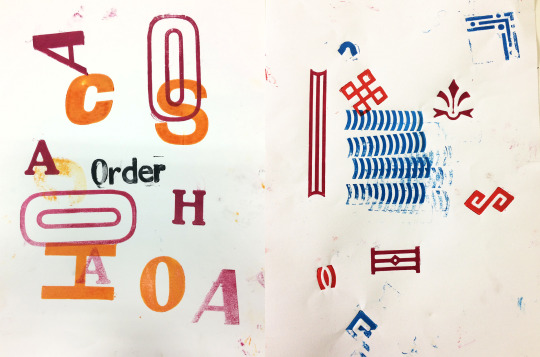
'Lost and Found’ Part 3—Type Beast
For the last ‘Lost and Found’ workshop, we used block relief printing to combine parts 1 and 2 together. I have looked at how to make a custom typeface out of strange materials and how to use screen printing to combine unrelated images, so for this workshop, I looked at combining type and print together.
We were given a set of examples of 2 juxtaposing words to respond to in our outcomes. These were:
Trial & Error
Strength & Weakness
Names & Faces
Bits & Pieces
Quiet & Loud
Beauty & Beast
Forwards & Backwards
Order & Chaos
Lost & Found
Winners & Losers
Strong & Weak
Positive & Negative
Time & Place
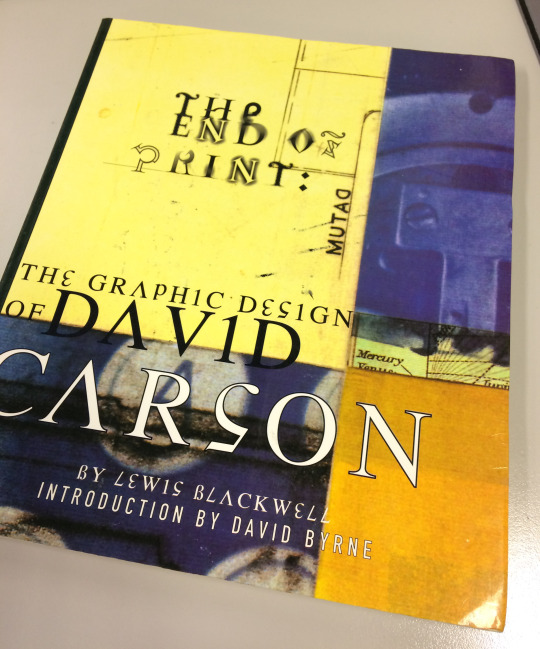
The aim of this workshop was to produce a series of prints, using the words we selected, perhaps capturing the essence of the words or even using letters from them to create something with a completely new meaning. Using the artist David Carson as the influence, we were encouraged to be rough with our prints and to put any typographic rules we have learnt to the side.
David Carson

David Carson, who many claim to be the ‘godfather’ of grunge typography, was born on September 8, 1954 in Corpus Christi, Texas. He accumulated his bachelor of arts degree from San Diego State University, although initially planning to study sociology. It was only in his later life when Carson started to pursue graphic design as a career. In fact, surfing was a large part of his life, with him being ranked the 9th best surfer in the world 1989. David Carson’s background is clearly very different from the conventional artist. This clearly shows through his rough, disorganised style of work which goes against many of the principals of design and typography.
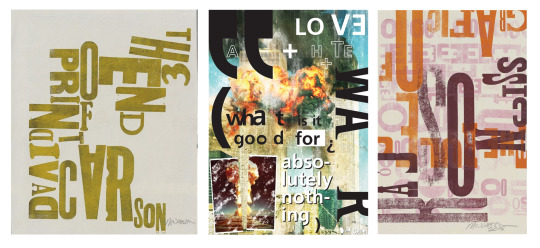
Here are three examples of some of his work. I chose the first and third examples as they relate to the process we explored in this workshop: block relief printing. The centre uses some different techniques to do with photographic collaging which slightly resembles Robert Rauschenberg’s work with the various layers roughly overlapped. So I thought it would be good to compare how the two artists use similar techniques in different scenarios.
In terms of the block relief examples, the left is a quotation reading “The end of print David Carson”. “The End Of Print” is a collection of his works which he published as a book. What interests me about this left print is how different typefaces, sizes and orientations have been united by their similar colour. What is especially interesting about Carson’s work, is although at first the perception of it may seem to be almost ‘messy’, there is always an underlying consistency to the letters. Whether this be through colour like the example to the left, or to the right where there is a more obvious control of their orientation. The right image is still limited to just 3 print colours. However, this one features a lot of overlap and weaker prints to give an eroded effect. With all this going on, every single print is still carefully placed with its orientation considered. It’s either horizontal or vertical, which is what gives the chaotic nature of the layering and random letters such a strong contrast. Altogether, there is a balance to ensure Carson’s message is still perceived, yet it may not be the obvious message being portrayed by the type itself.
“Don’t mistake legibility for communication”
When David Carson says “Don’t mistake legibility for communication”, I relate it back to these three examples I have chosen. The original message of the letterpresses is overshadowed by their arrangement and manipulation, causing them to have a new meaning. Just because the letters may not be legible, this doesn’t mean that they are not communicating anything. On the contrary, they give a completely new meaning to the piece once they are collaged together.
The middle example showcases Carson taking advantage of imagery to compliment the typography. Because the type has meaning and supports the message, he hasn’t manipulated it to the point where it is unrecognisable. Rather, the viewer can still read the type but is slightly held back from doing so by how inconsistent it is. Along with the imagery of destroyed buildings in the background and a bomb in the bottom left, the piece has a powerful sense of destruction.
‘The End of Print’ showcases a lot more examples of instances where David Carson has used typography along with imagery. He worked as an art director, designing various magazines which often focused around skateboarding and surfing. Magazines use type and image as the core components of each page; this is why I have chosen some examples of his work on magazines to show how he implements the two. Below are examples of spreads he produced for “Surfer”, to redesign their outdated design.
Carson’s work on “Beach Culture” was arguably the first chance he got to make an impact on typography and design as a whole. ‘Beach Culture’ was owned by the parent company ‘Surfer Publications’, who also owned the magazine ‘Surfer’. Throughout 1991 and 1992, Carson was hired to give ‘Surfer’ a new look essentially. Their designs were still working to 1970s conventions, so this gave David Carson the chance to redesign their magazines using a completely new approach. Being a previous professional surfer himself, it is interesting to see how he visually interprets his passion into magazine spreads. As well as this, some of the pages used Photoshop to manipulate the type, which makes these examples some of the earliest uses of Photoshop.
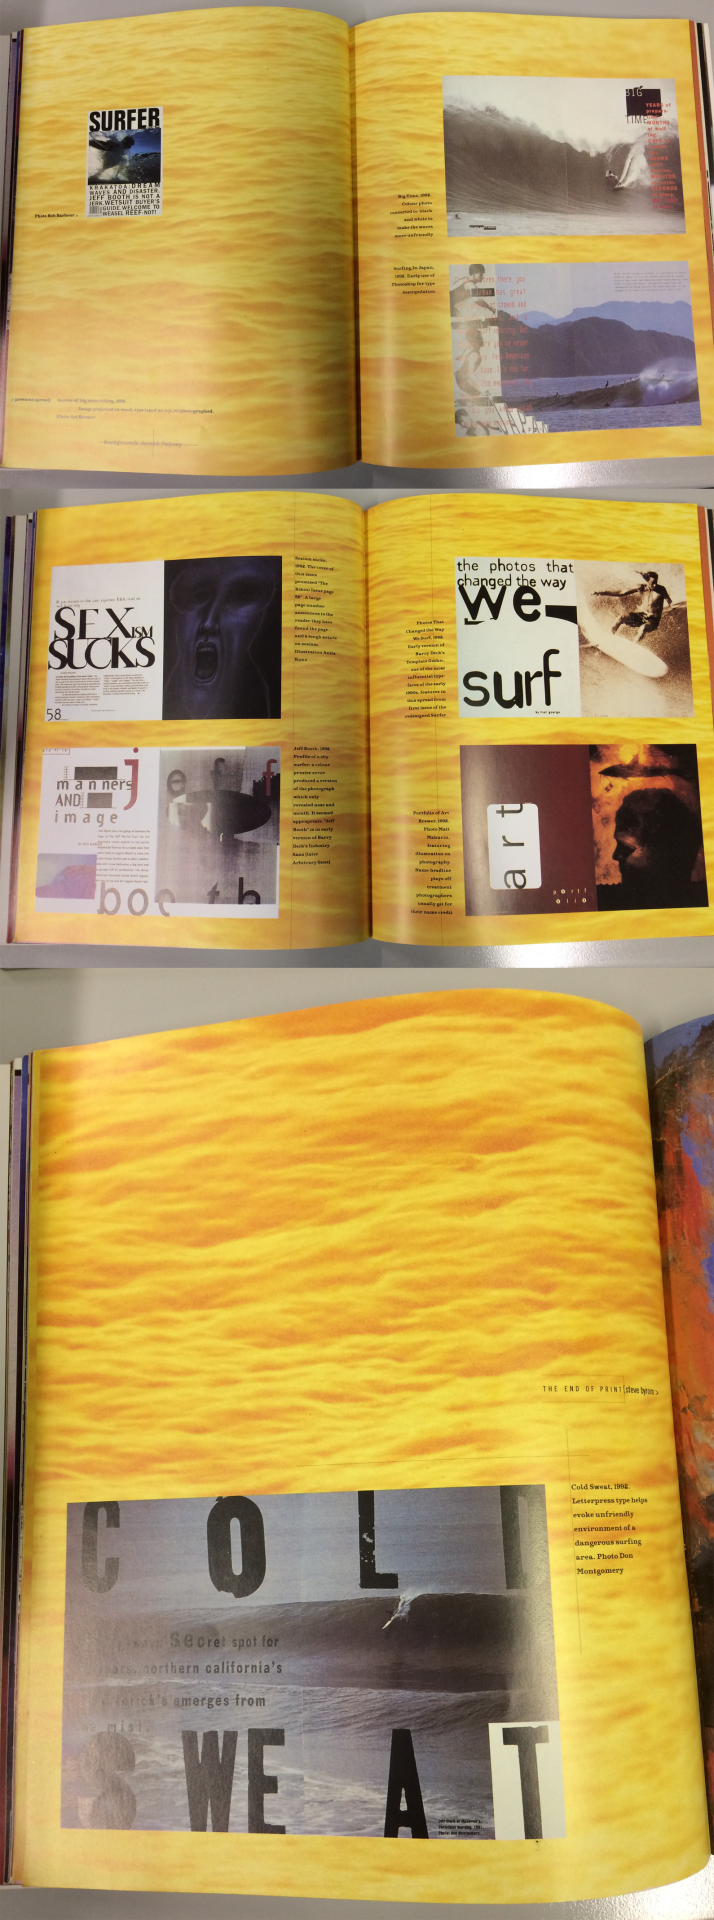
The main thing that stood out to me instantaneously was the extreme contrast between the display and read type. Carson’s style is wild, but if this rough edginess was translated into the read type of a magazine, it’s functionality would suffer. Because of this, he controls when and where he uses the spontaneous scale and position and restricts it to the display type, causing a large contrast. For a specific example of this, the page which reads “the photos that changed the way we surf”, the “we surf” type is so much more impactful due to its extreme size in comparison to the other type. Read type is typically at a 10-12 point size, but “the photos that changed the way” is a lot larger than this. However, in comparison to the rest of the type on the canvas, it serves as read type as it serves for no interpretation.
Process
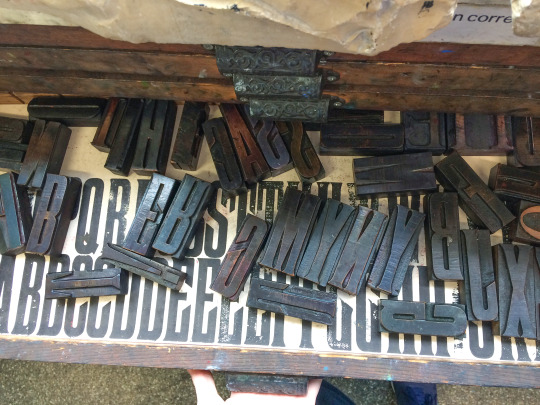
As a class, we first prepared some typeface trays to choose our letters from. These consist of 26 characters in assorted styles and sizes, so multiple people choosing which trays they like meant as a class there was a range of type to work with. David Carson very rarely stuck with one typeface. He would use various different ones to compliment the chaotic composition. Once we selected a few typefaces, the next step was to start preparing the blocks by inking them. I started off using a palette knife to spread some of the oil-based ink onto the workspace, before using an ink roller to spread the ink further onto the desk. I did this until the ink reached the right consistency, which was indicated by the sound resembling a smooth hissing noise. Next, I used the same ink roller to roll some of the ink onto the letter blocks. I didn’t ink all of my letters at once, however, because I was going to use different colours later on so I had to keep some of the letters dry at this stage. Saying this, there was always the opportunity to clean the blocks and re-ink them with another colour.
Cleaning the blocks was done with ‘white spirit’ and a cloth. We used white spirit because the ink, being oil based, doesn’t wash away with water. The white spirit is needed to dilute the ink enough so that it becomes easier to wipe off the blocks. Once wiped, the little amount of white spirit that may be left on the blocks quickly dries, meaning the blocks are ready to be re-inked.
Now the blocks were inked, the next stage was to go to a printing press and start making the actual reliefs. The blocks were the first thing that went onto the presses, followed by the paper we were printing on. But because it is a relief print, I had to take into account how they will be flipped when I turn the paper over. What I liked especially about this disorganised way of looking at type, was that even if I did make a mistake, for instance with the orientation of one of my letters, it doesn’t take away from the meaning of the overall piece. This pushed me to be more loose with my work, and not to care so much about making small mistakes.
Once the letters and the paper were laid onto the bed, I then pushed it into the press and pulled the lever to force the press downwards. If the lever could be pulled effortlessly, then I needed to add more packing (newspaper). If it was impossible to pull all the way across, then I needed to take some of the packing out. At the right point, the blocks make a sharp imprint into the paper, but not too much pressure is added to damage the paper or even the blocks themselves.
Although this process takes longer than screen printing, I prefer it because of how free I am to alter the prints. Whereas with screen printing I am limited to what is exposed onto the screen, with block relief printing I can very easily change how I lay out each block and changing colours is a lot easier. Therefore, I think the extra time it takes is worth it due to how much happier I am of the outcome.
Review
In conclusion, I think I captured the essence of David Carson well through the limitation of colour and orientation. I also think I responded well to the words and using a mixture of legibility and distortion to portray their meanings. “Chaos” is printed in various colours, typefaces and positions to convey the meaning of the work. There is no balance or organisation to the way “chaos” is printed which makes the word seem in a frenzy of some sort. To contrast this, to word “order” follows opposing rules. I thought about its composition, placing it in the middle and the word as a whole is readable. One thing I wanted to do better and is something I will work on if I revisit block relief printing, is the quality of the print. I wanted to produce a print with a clinical line which complimented the word “order” but struggled with achieving this accuracy. Saying this, I was aware that making mistakes doesn’t always take away from the outcome; I think this is the case for me this time as I think the subtle texture around “order” could represent a slight corruption (which also links with the rough ink marks occurring all around the page).
In terms of the volume of work produced from this workshop, I didn't achieve my aim to produce roughly 5 prints. However, I focused on being happy with one outcome as opposed to rushing 5. Because block prints take more time, especially in large groups, I feel like it was unrealistic to produce 5 prints, all of which I am satisfied with.
Looking Back
Looking back at David Carson’s quotation “don’t mistake legibility for communication”, my outcome is a good example of this in practice. The legibility of the word “chaos” is skewed so much to the point of it being unreadable in the conventional sense. Each letter being roughly placed onto the page and in some cases overlapped with other letters still communicate the feeling of chaos, so the legibility of the word changes whilst the communication doesn't. On the other hand, the legibility of “order” is controlled so that the word still reads like usual which is an example of the message being understood at face value.
Being the last workshop of the ‘Lost and Found’ workshop, the main thing I have learnt is the mindset of different artists and how this applies to my own work. Thinking about possible routes I could take my project, the printing processes have rarely been regarded as a strength of mine. Along with this, I don’t feel like I am more likely to use them for my final outcomes; this doesn’t mean the workshops were a waste of time at all. On the contrary, instead of the primary focus being on the processes themselves, I focused on the artists we used as inspiration and their outlook on their work. With this information, I have learnt a lot about how I should approach my own work by being constantly motivated to challenge myself with new ideas.
Moving Forward
With what I have taken away from the ‘Lost and found’ workshop series (especially this last workshop), my main aim is to be challenging myself and my ideas with new unfamiliar practices. I found the rough way of working to be especially helpful for gathering ideas, but I think my next step isn’t to gain more ideas, but to start refining them into what I think will be the most effective in fulfilling the brief. My aim isn’t to choose a final idea yet as I feel like this will limit the practical work I produce, but I do feel like with these workshops I am starting to get to the point of too many ideas which could lead to me losing track of my initial passions.
Because I have primarily worked with type recently, the first step of me challenging my ideas is to visit other areas of design. I plan to visit what I see myself using for my outcomes (branding and animation). After this is when I can start combining what I have learnt together.
0 notes
Text
Developing An Artists Gaze
Symmetry:
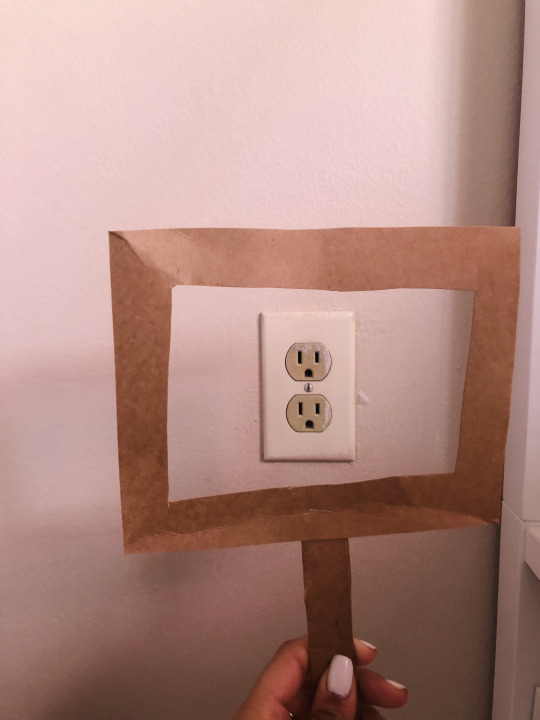
This wall plug is an example of symmetry because when divided vertically of horizontally it is equal on both sides. I chose this for symmetry because it was the first thing that stood out to me and made the most sense.
Asymmetrical:

This plant is an example of asymmetrical. The reason being because if you were to divide it in half either side would not be the exact same as the other. They would be completely different and unequal. The reason I chose this plant is because of its diversity and colors.
Repetition:
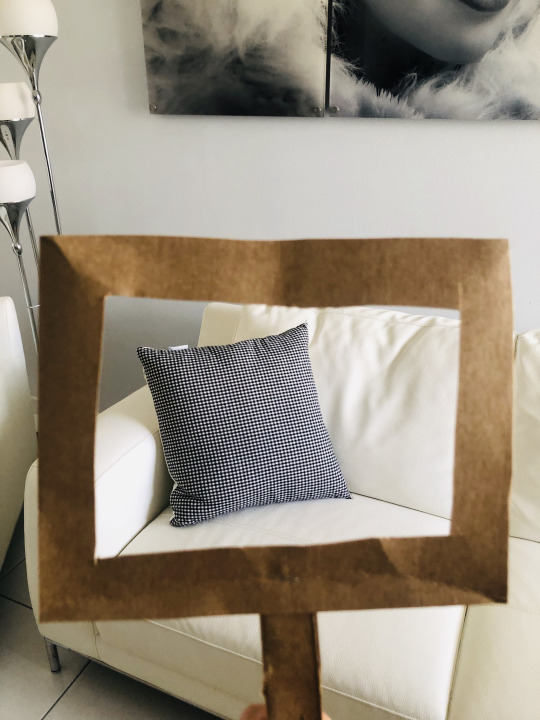
The checkered pillow is an example of repetition because of the checkered print. In order to create this print, the use of black and white squares are heavily used.
Variety:
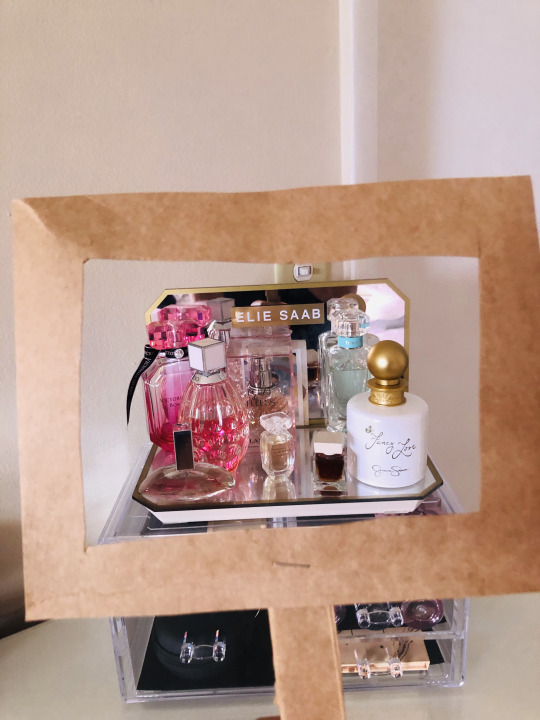
This is an example of variety due to the different types of shapes, sizes and colors of these perfumes. For instance, there is one perfume in the far left that is pink, but then there's one that is small in the middle.
Rhythm:
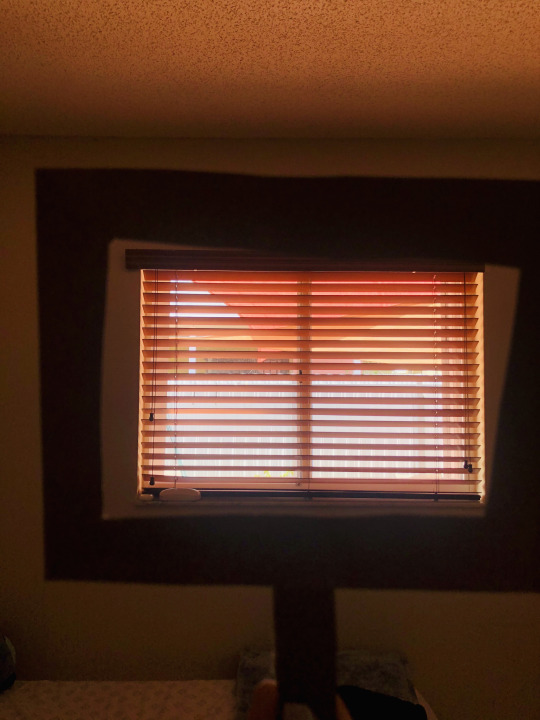
This window is an example of rhythm because it creates a sense of movement and flow. The movement created is downward because the blinds are faced downward and because of this the light shines down.
Harmony:
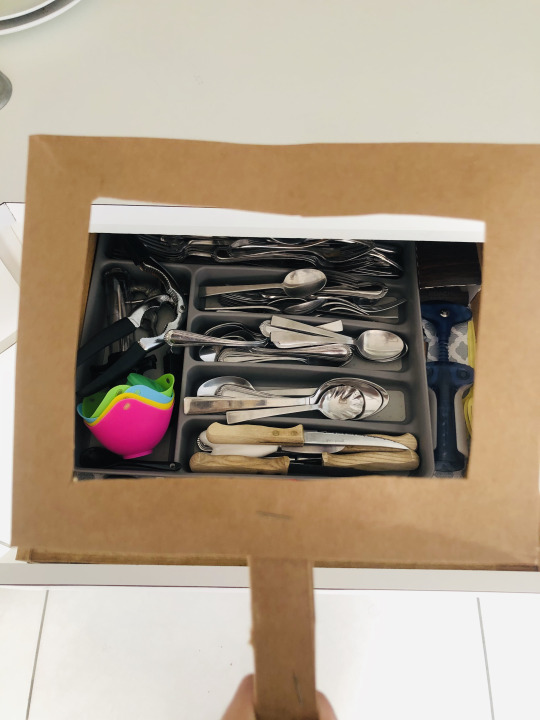
This drawer of utensils is an example of harmony. The reason being because although there are different types of utensils such as, forks, spoons, and knifes but in the end they all come together to make a utensil drawer. I chose this because if the diversity in sizes and shapes there is.
Scale:

This is an example of scale because you can see the difference in sizes between the picture frame and the stapler. The stapler is smaller in size compared to the picture frame. The reason why I chose this is because I see this set up everyday while i’m doing homework or assignments.
Proportion:
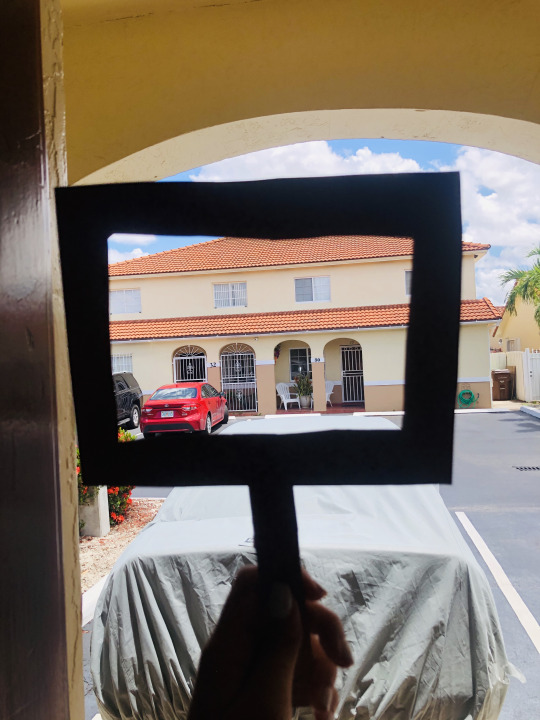
This is an example of proportion since you can clearly see how enormous the house is in comparison to the red car. I chose this because it was the first thing I saw when I opened my front door.
Emphasis:
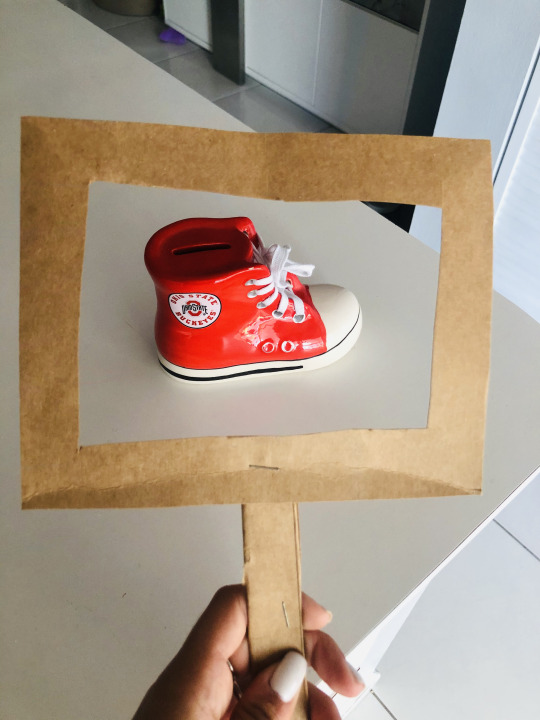
This is an example of Emphasis because of the color red that the mini shoe has. The placement of the red shoe being on top of a white table places emphasis on the show because of how vibrant the color is. The reason I chose this is because I see this everyday since it is located in my kitchen.
Compositional Unity:
This is an example of Compositional Unity. The reason as to why its an example of compositional unity is because there is a combination of, cars, trees, houses, and plants, in order to create a neighborhood as a whole.
Artists are extremely passionate about their work. They look at the world in different ways in order to tell a story and see the world itself for what it can be. While I was working on this project I felt that creativeness and that vision that artists see. I saw the world in a different perspective and created a story for each picture I chose. My observations were also at the top of the line. I had to be very observant while going through my neighborhood or looking for items/ objects in my houses to use for each example. I feel that I did a good job or representing the principles of art, and I also felt that this project was very interactive and I was able to enjoy what I was doing. I also really enjoyed that I was able to learn more about the principles of art.
0 notes
Text
Vocabulary
Additive Color- the mixing of two colored light sources
Analogous Color- three colors next to each other on the color wheel
CMYK Color- a subtractive color model used in printing
Color Depth- the number of bits used to indicate the color of a pixel
Color Wheel- a diagram that organizes and shows the relationships between colors
Complimentary Colors- colors opposite of each other on the color wheel
1-Dimensional- only one dimension, length
2-Dimensional- composition with only length and width
3-Dimensional- has length, width, and depth
4-Dimensional- artwork that uses reality as part of its composition
Asymmetry- if split down the middle both sides are not the same
Balance- all the elements of art coming together in a piece
Chiaroscuro- light and shadow that have a heavy contrast
DPI- dots per inch, measurement for printing
Image Resolution- the number of pixels in an image
Cool Colors- blue, green, and purple
Grayscale- only white, black, and gray values
Hue- color
Monochromatic- variations of one color
RGB Color- additive color model, primary is red, green, and blue
Saturation- intensity of color(s)
Contrast- opposite elements being put together
Focal Point- where your eye is naturally drawn to in a piece
Juxtaposition- comparison of two elements next to each other
Leading Lines- what leads the eye to the focal point
Modernism- art movement that broke classical form
Motif- a distinct feature or pattern
Negative Space- empty space in a composition
Pixel- the small illuminated spaces that make up a screen to display images
PPI- pixels per inch, image measurement
Shade- add shadow
Subtractive Color- begin as white and form black when all primary colors are mixed together, absorb light to reflect different colors, primary is cyan, yellow, and magenta
Tint- adding a specific color to shift the tone/underlying color
Tone- light and dark values
Triadic- color scheme using colors that are evenly spaced around the color wheel
Warm Colors- red, orange, and yellow
Opacity- level of transparency
Postmodernism- art after the modernism era that questioned the values of modernism and authority and focused on innovation
Unity- a harmonious composition where everything comes together in a way thats balanced and cohesive
Rhythm / Pattern- visual repetition
Rule of Thirds- a grid dividing an image into thirds thats used to create compositions that are not centered but retain balance
Transparency- the ability to see through some layer of the composition- the way a piece is arranged
Value- using the lightness and darkness of colors to create an illusion of depth
Raster Images- representation of the grid of pixels that make up an image
Vector Images- image format using a math based composition that can be resized without losing quality
Style Guide- documentation that lays out the design assets for a project
Trapped White Space- white space surrounded by elements of the design
White Space- purposely empty space in a piece that balances out the composition
Above the Fold- the upper section of a newspaper, magazine, or website that’s reserved for the most important information
Branding / Brand Identity- recognizable design elements that establish a business
Gutter- inside margin of a book close to where it will be bind
Logo- icon that represents a brand
Lorem ipsum- placeholder text when the original text is not available
Manicule- pointing symbol used to draw attention
Logotypes (give examples if you can): a graphic that represents a company name such as the NASA logo
Abstract Mark—- an abstract shape that represents a brand
Lettermark- type based logo usually based off of an abbreviation
Emblem- a font inside a symbol or icon used as a badge or seal
Pictorial Mark or Symbol- icon designs that require no explanation, ex: Apples logo which just an apple
Mascot Wordmark- logos that include a character that represents the brand
Soft Proof- step in the printing process that checks for double accuracy
Substrate Trim- manufacturing trimming process
Web Press- a press that continuously prints a roll of paper
Points- mark positions of a space
Serif / Sans Serif- type with or without extending features
Slab Serif- type with thick block letters
Small Caps- uppercase type that is smaller than the beginning height of the first type letter
Tracking- letter spacing
Widows- a very short line usually consisting of just one word
Serif- type is extending parts of the design
Spine- the main curved stroke of an S
Stem- main vertical stroke in a letter type
Terminal- spurs, ears, and swatches in type
x-height- height of a letter
4-Color Printing- printing that uses 4 different layers of ink
Bleed- extra margin area that takes in account where a print. will be trimmed
Direct to Digital Printing- printing process where the image goes directly from a printer and onto a film
Hard Proof- printed prototype produced with a less expensive printing process
Inkjet printing- type formed by jets of ink
Letterpress- oldest form of printing using a surface with raised letters
Offset Printing- printing process where the ink goes from a plate to a rubber blanket to the printing surface
Pantone Colors- color codes for specific shades
Recto / Verso- front and back or right and left sides of a paper
Screen Printing- printing process where the ink is forced through a screen
Display Font- type that is used for large headings, sometimes with a more eccentric design
Drop Cap- Large capital letter used as a design element
Em Dash- long dash
En Dash- short dash
Font family vs. Typeface- typeface is a specific font while a font family is a group of similar fonts
Glyph- symbol used as a readable character
Hierarchy- font size used to establish importance
Parts of Type:
Apex- point at the top of a character
Arm- horizontal or upward sloping stroke that doesnt connect to a stroke or stem on both ends
Ascender- part of a letter that extends above the mean line for a font
Baseline- line where the letters sit
Bowl- closed rounded part of a letter
Cap height- height of a capital above the baseline
Justified Text- adjusted text that aligned equally between margins
Kerning- space between characters
Leading- distance between lines of text
Legibility- readability and the ability to distinguish type
Monospace- type where each letter occupies the same amount of horizontal space- the amount of space type occupies horizontally
Orphans- lines at the beginning and end of a paragraph that are separated from the rest of the text block
Picas- typographic measuring unit
Counter- I closed space in a letter
Crossbar- connecting stroke between two strokes
Descender- part of a letter that extends below the baseline
Ear- upper right design flourish on a letter, typically on a g
Finial- tapered curve at the end of a letter
Ligature- when multiple letters are joined in a single type
1 note
·
View note
Text
Build & Destroy
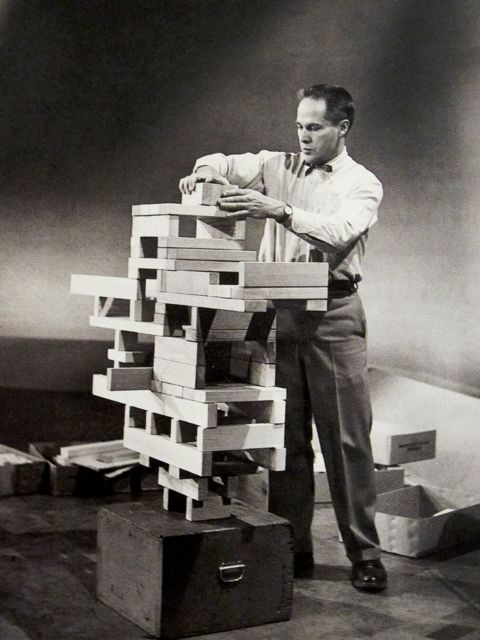
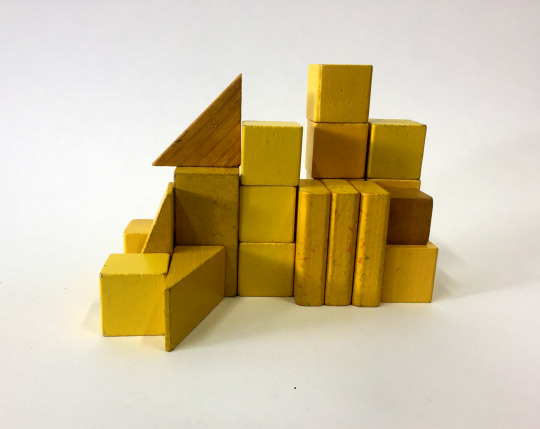
This workshop was to develop an understanding of balance in structure within modernism architecture. This task will get me to strip back to the basics and remember the autonomous mind within design, by not over thinking each task and worrying about what the outcome is but start to understand the shape and from, to then make connections to structures and how they could help in the designing process. The workshop has been based in the work by Eliot Noyes with his project Neutralises balance this task was to use building blocks to make 3d abstract sculptures that have similar characteristics to structures, I was asked to use the same colour to limit my design however this also gave the potentiality to explore the tonal value with one colour, possibly identifying another design within the tone.
Using my sketchbook I was given different observational drawing techniques by using a range of medias and different viewpoints of the sculpture to record. The first task was to use either crayon or charcoal to observe the vertical lines within the piece; for myself I decided to use crayon to follow in the theory of Noyes’s the autonomous mind linking to how children just build to play around, so by using crayon I found that I was drawing without thinking, also it made me to start to not see my sculpture as a structure I found this to be important as it allowed me to over complicate the drawings.
From these drawings there is that child like appearance just through the texture and the consistency given off by the crayon. Although it is very rough there is similar characteristics and qualities to the sculpture, however from speaking with my tutor the purpose of this task was to be loose and free with the drawings by looking for a second then drawing either extending the lines bigger than they are or thicker, and smaller this would then change the subject with different inter crossing lines; following these drawing exercises it would allow there to be the element of development as these new lines could allow me to produce a different project through a 3D method or in a detailed technical drawing.
The next task was to do the same as the first but instead of drawing in the vertical lines I had to draw the horizontal lines using a different colour. There was two options for this next stage we could have draw the horizontal lines over the top using a different colour or on a separate sheet of that could be layered over the top. I went with drawing over the top on the same page as at the time I thought this would be the best option however now upon reflection I can see there being more potential in having them on separate pages as I found myself drawing to the vertical lines trying to have more consider lines connecting to each other, trying to have order in the observations and not having freedom. By also having the drawings on a separate page it would allow me to combine the different lined drawings of this sculpture with another to see if I could then identify something new within that mix and match.
With the continuous drawing task I decided to change my viewpoint and draw from above to see if there was another outcome in a different position, from doing this I found that there is the possibility of finding another structure in a structure, this got me thinking in how this could relate to actual existing buildings can we identify another building in the Empire state building, Buckingham palace, The Effie tower etc, they could be found in the smallest areas within a window for example it doesn't have to be another building as a whole it could be separate individual pieces that need to be put together.
The effect this task had was more bold and prominent as for the choice of media I went with by using a permanent marker I wanted to have the opposites in consistency by having a solid unified line to the broken rough crayon line. I feel this showed more diversity in my drawings and enabled me to pick out different aspects within both that could possibly be collaged together, to see if they could form one united image with the juxtaposed features. One designer/ architect that I found this task could be linked to was Frank Gehry as his sketches for building designs were loose, for example the continuous line drawings he produced when designing the Walt Disney concert hall are really basic but have a vast amount of detail when observing the sketches to the actual building showing these organic curved shapes that don’t follow the usual order a building has when being designed and produced.
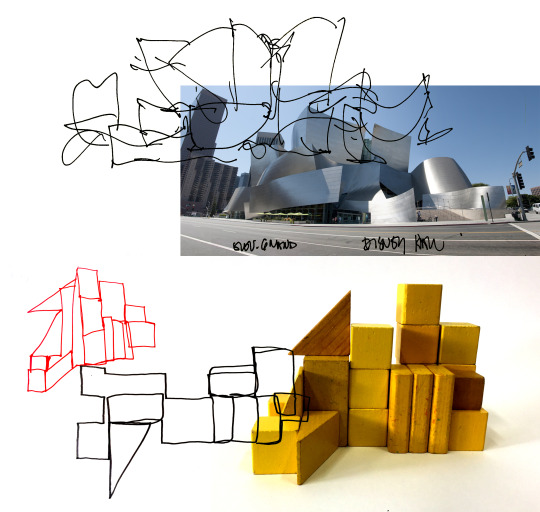
This image shows a comparison of continuous line drawings done by Frank Gehry and myself.
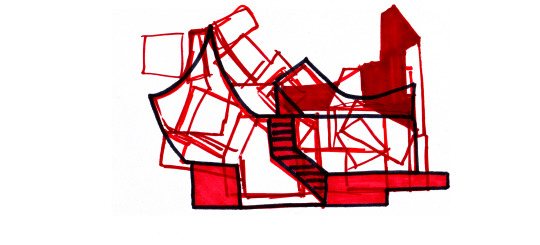
The final drawing task was to use ink to record a smaller section within the sculpture to capture the tonal value, also by taking smaller sections of this sculpture it allowed me to identify imagery in the structure that could be made by a combination of the shadows and blocks to form something new. I started by doing this task in my sketch book but I found there to be to much control which wasn't the purpose of the task, so I decided to work on a larger scale as this would mean there would be times I would have to reach over and stretch to complete my observations this was what I was intending for as it meant there was more possibilities for mistakes which could then lead onto creating something new and different with the similar features to the block work.
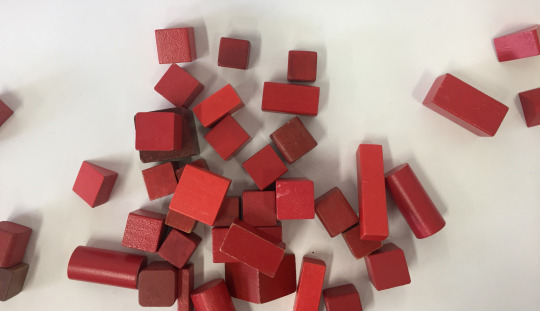
In this follow up task we were asked to knock down our structure we produced to try and identify if there was anything formed in the rubble; possibly another building or simple forms.
With the scattered blocks I was able to use my recent research on Zaha Hadid and used a rather geometric task by turning it into a curved/angular design; this was successful as I was able to this gradually starting with one drawing layered over top and sketching out around the design I could see within. The next step was to repeat this again until I found something that was obscure and completely different from the original image, this was to show the progression that occurs in the design process.

Looking at mine and Freya’s work there will instantly be connections as the processes are the same, however there are some differences in how we approached the drawing tasks. With the first task I opted to draw the vertical line and horizontal together whereas Freya decided against this, the reason behind why I did it together was because I felt there was more potential in finding a structure within this lines, but I also see the positives of doing it the other way as you can still layer the lines on top of each other but with this way it gives the designer more freedom in how these lines could be allied together or in different positions.
Whats interesting about having these two outcomes lined up against each other shows the similarities in shapes within the both drawings even though the models built are different. Where I see this connection the most is in the continuous line drawings this is because they have the most detail but also they are the easiest to understand what the subject is that is being drawn, when comparing the contentious line with the inks there is more tonal value in them possibly giving the opportunity to identify a ‘structure with in a structure’ however in the inks they both give the subject back the childish element that there was in the building phase.
Whats the potential of repetition of this task? What would different or the same every time this workshop was repeated. I feel if I was to repeat this task there would be a cutoff point because I believe the designing process would become very limited as my model making will end up being to similar almost identical outcomes each time.
Following this workshop I developed this further by using the work of Theo Van Doesburg on his life drawings of a ‘Cow’. When observing my scattered building blocks they had similar characteristics to the break down work of living objects into simple geometric forms.

When observing both of these images I can see the shape and form are very similar having a range of different sized square and rectangles; something that I notice about Doesburg’s work that is similar to the work of Vladimir Malevich’s is that they both looked at the simple forms of art and graphic design by breaking each idea to the bare minimum. For example this drawing Doesburg done of a cow can be identified throughout all four images as the positioning of each shape and colour also relate to the original form it started at.
what is modernism and what drawing techniques/styles epitomise’s this
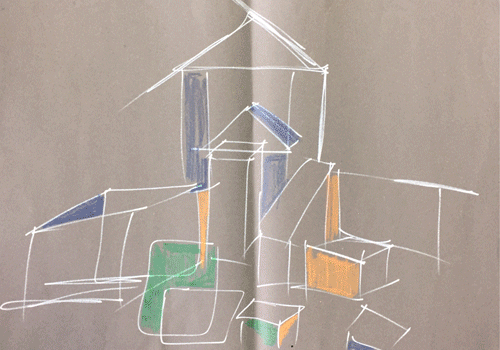
After completing this workshop I wanted to develop this further by printing out all of my different drawing techniques to cut them out and layer all together. I wanted to see if there was any other imagery that was being produce when having all the drawings together.
I was starting to see different structures in this task; this made me to think about this idea again of identifying ‘structures in structures’, this allowed me to rotate each piece and record the different positions, In the first image the two triangles together looked similar to a roof of a building that I spotted on a trip up to London. So I believe this task was a success as I am able now identify these small features in my work that can be identified in existing buildings or designs.

After using this mash up of all the line work I created a series of imagery from the blocks stage by stage, which then formed a building in the end. In the picture below it shows the series layered on top of each other having a chaotic appearance but you can still following the shapes that outline the from first block work to the finished image.

0 notes
Text
Meural Canvas Gesture-Controlled Digital Art Frame Goes Version 2.0
The Meural Canvas earned a place as one of our past Tech Gift Guide picks, an early prognosticator of the digital art canvas category explosion that introduced an entire world of both static and animated artwork intended to replace or supplement traditional wall art. The first Meural stood out for its unique gesture-based controls, and it’s now heading into its second iteration with several refinements and options.
Meural is offered in two versions: the 20 by 50.2 by 1.6 inches Winslow Canvas surrounded by a tasteful 1.5-inch natural walnut frame, or the slightly smaller framed Leonora Canvas available in either black or white. Both models use the same 27-inch 1080p LCD partnered with 8GB of memory (4GB for storing art, and 4GB for storing firmware and software updates). The only difference is the size and material of the exterior frame, with each capable of displaying a wide assortment of image and video files: JPG, GIF, PNG, BMP, and SVG. Looking beyond stills, users can even upload or manually install MP4 or MOV movie files. Note, the Canvas does set a 200MB limit per file and the display doesn’t include speakers, but it does open a world of possibilities for displaying silent videos.
Like the first Meural Canvas, the newest model comes equipped with motion sensors giving users the ability to swipe up, down, left, or right to navigate settings and selections. This updated model’s gesture efficiency has been notably improved in comparison to the sometimes sluggish first edition, especially while hung on the wall, but it’s still preferable to access the Canvas using an iOS or Android connected device, which is still quicker for reviewing artwork collections or changing settings. However, we discovered guests demoing our loaner unit nearly always preferred using gesture controls versus the app, revealing sometimes faster isn’t always as wondrous.
Gesture control is standard with both version of the Meural Canvas, but the optimized iOS app is still our preferred method of reviewing and selecting artwork to display.
Forgoing a 4K resolution upgrade, the Meural team instead focused on improving the Canvas’s viewing angle and color accuracy, which in combination with the display’s effective matte screen and an environmentally aware adaptive brightness system, gives artwork and photography a natural and pleasantly clear appearance from normal viewing distances. The result is a digital art frame emphasizing “art” rather than the “digital”, and thankfully so when considering gracing the walls with artwork benefitting from a subtle and nuanced approach.
Wall space and the room itself may dictate a preference for either a vertical or horizontal orientation, and the Canvas serves this need automatically by reorienting its display and switch to artwork intended for vertical or horizontal modes. Wall mounting hardware is included and is extremely easy to install even for a single person; we do wish in the future Meural team would develop a simpler option for adjusting the display to rotate between orientation modes, which would undoubtedly please indecisive types.
A sample of horizontal and vertical art made available to Meural users culled from a curated library of tens of thousands of licensed artworks made available via my.meural (available with subscription).
Although the Meural Canvas works as a solitary option, it’s best as a supplement mixed in with traditional wall art; integrated side by side with paintings, photography, or prints, the digital display offers a novel option to showcase curated collections of artwork of both a personal or professional nature, any which can be magically called up with a swipe of the hand – something no framed piece of traditional static art can yet do.
via http://design-milk.com/
from WordPress https://connorrenwickblog.wordpress.com/2018/02/09/meural-canvas-gesture-controlled-digital-art-frame-goes-version-2-0/
0 notes
Text
#Excited to share the latest addition to my#etsy shop: wall Art Size Guide 2 sets vintage style#vertical and horizontal art print Size Comparison#picture frame size guide#Frame Size Guide https://etsy.me/3zAZkbN#framesizeguide#wallartratioguide#artsizeguide#wallartsize#framesizes#wallartratio#artsizecomparison#postersizechart#walldisplayguide
0 notes
Last Seen Blogs

whumpetywhump
Whump Blog

ronenamit1988
Untitled
icekingofhope
Ice
sleptting
narcoleptic moot™
silverlining317
Silver Lining