#this on top of the possibility of my sims messing up or my TOOL edits disappearing lol
Text
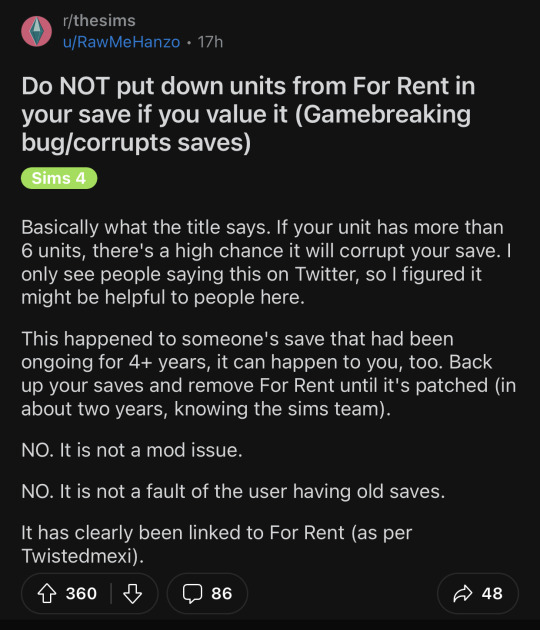

I was planning to update my game today, but idek whether I should anymore.
#this on top of the possibility of my sims messing up or my TOOL edits disappearing lol#🫤#the sims 4#ts4#reddit#twitter#psa ???
976 notes
·
View notes
Text
Making Normal Channels in GIMP (with njob)
Hello everyone! I was explaining how to do this in the Sims of History discord server and realized how much of this process I learned through trial and error. There isn’t really a good step-by-step tutorial about how to do this in GIMP, only in Photoshop (at least no text-based tutorials). While I use both Photoshop and GIMP for various things, I prefer to make my normal channels in GIMP. This tutorial will walk you through the process and hopefully demystify normal channels in GIMP.
Normal channels (bump maps) add additional depth beyond your mesh, which is useful for things like folds, painted on pockets, and buttons.
This tutorial is particularly for how to make Create-a-Sim items, not objects, but a lot of steps should be transferable.
You will need (all free programs):
GIMP
njob
Sims4Studio and/or CAS Tools

First, open your diffuse texture in GIMP. I often try to use the light/base texture rather than one I have colored already, but if you have already colored it and didn’t save a base, don’t worry, it doesn’t make much of a difference. Don’t use an image which has a pattern applied to it, as that will create a bump on the pattern and appear like applique or something along those lines (unless that is your goal).
I recommend doing this step after you have tested your diffuse texture image and mesh (if applicable) in the game. If you have any last minute changes to either of these, you will probably need to re-do your normal from scratch.
If your image is in layers for recoloring, or not, choose to flatten the image. Transparency isn’t helpful in making normal channels, so get rid of it so you won’t have to worry about it later.
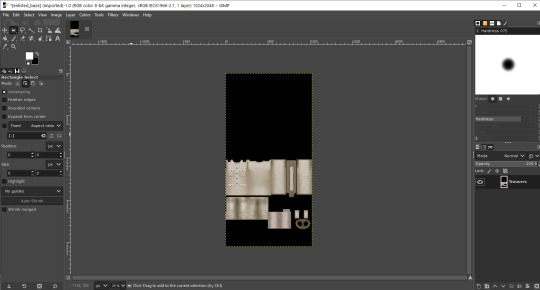
Once you have flattened it, the background usually turns either black or white. It doesn’t really matter which one, it won’t make much of a difference in njob.
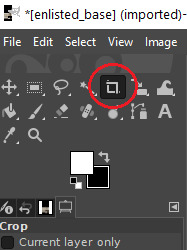
Now, select the crop tool. You can see the current dimensions of the image in the “aspect ratio” box. For a CAS items, the original will be 1024:2048, which is 1 x 2. We will need to crop the image into a 1 x 1, or perfect square.
To have your normal channel as high quality as possible, you should use 1024:1024. This will work for clothing items like full body outfits, tops, bottoms, gloves, socks, and tights (basically anything mapped in this bottom portion of the UV map). For all of these items, you must use a square and cannot crop it to be smaller. For shoes, this means a very large blank area.
For accessory items like jewelry and hats, the cropping is different. For instance, a hat would be 512:256. If you are unsure of the dimensions to use, export the normal channel on the maxis item and copy its dimensions. The following instructions will assume you are making a clothing item and not an accessory item.
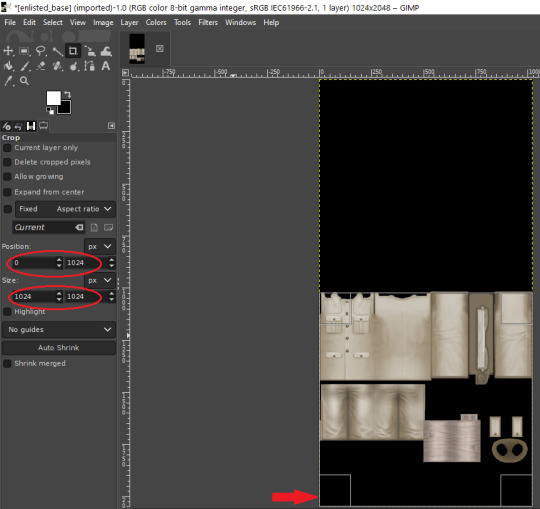
Click anywhere on the image while you have the crop tool active, then adjust your dimensions in the box to the left. You can manually type it in or drag the box and follow the size in the box as you drag.
The box should be perfectly aligned with the bottom and have no space below. If you have space below, just drag it as far to the bottom as you can. GIMP will stop you from dragging it outside of your current dimensions. If a little is sticking out at the top, that is okay. Nothing can be mapped outside of the 1024:1024 dimensions, so it is probably just bleed over or space filler that you are cropping off.
Press “Enter” on your keyboard to complete the crop.

Optional Step: If you desire, you may want to decrease the brightness and increase the contrast on your image so there will be more for njob to pick up. If you already have a lot of contrast, you may not need to do this.
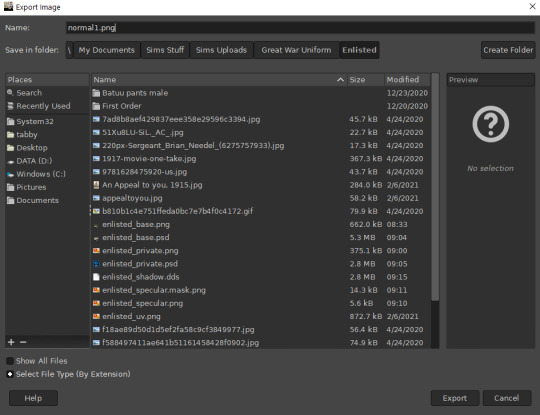
Next, export your image as a PNG or BMP. Be sure to not overwrite your original diffuse texture.
You can now close GIMP, though you will need to open it again later.
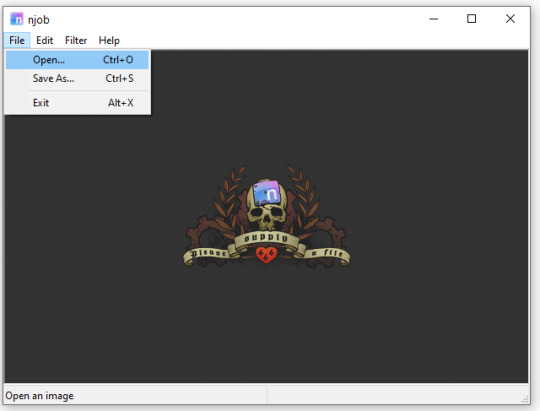
Open njob, then your saved, cropped image.
Maximize your screen so you can see what you’re doing.

Go to Filter > Diffusemap > Heightmap and select that option.
The screen will pause to load for a bit before opening up a new box.

Your image will convert to black and white and may look a bit strange. The first step is to change your “Course Detail” setting to the lowest (or close to the lowest) setting and your “Fine Detail” to the highest setting. I generally play around with the “Mid Detail” and “Scale” until I get what I want. Try to have what you want to be visible stand out, while folds should be soft and fuzzy but still somewhat distinguishable.
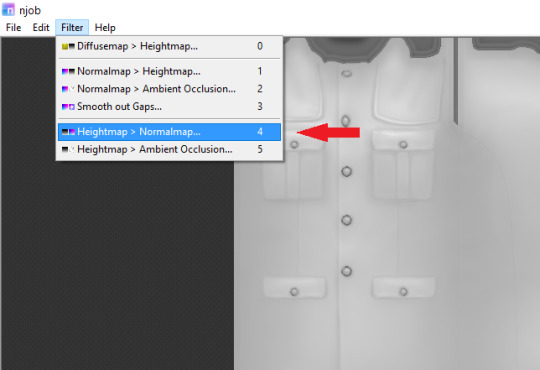
Once you have what you need, click OK and go to Filter > Heightmap > Normalmap

There are two settings, “Scale” and “Blur Radius.” Neither of them have “ideal” settings, so you will need to adjust as you need. “Scale” controls the depth of the contrast and “Blur Radius” impacts the softness of the image. If your edges are too harsh, your normal map may look odd in game.
You will probably also have lines in areas in no texture. This is normal, and I will go over how to remove those later.
Once you are satisfied with how things look, save the image as a bitmap.
Now, open your bitmap image in GIMP. It is time to clean up the image and get rid of the artifacts. Unfortunately, unlike a specular, a normal map doesn’t have a mask to prevent bleed over onto skin or other textures. The unused areas need to be a midrange, solid grey. It is easier to edit at this step before you create your transparency.
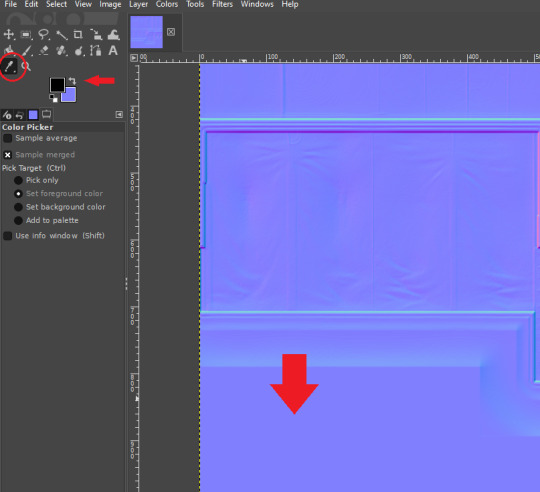
Select a midrange blue color from one of the blank areas with your color selector and make it your background color by using the arrow button between the foreground and background colors.
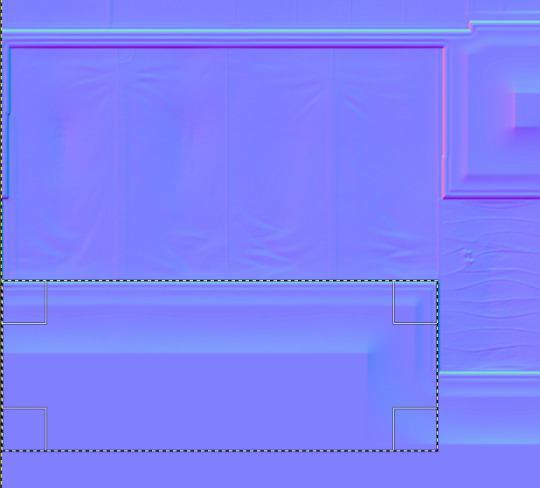
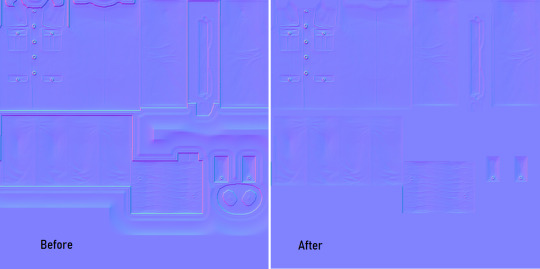
Select the areas that should be blank and delete them, which will replace the lines with a solid blue color. This would be areas around the neck, wrists and ankles, and also places like the filler beneath skirts and tops that doesn’t need texturing. Be sure to select the odd lines around the image, which are usually a bright teal or hot pink color. Those can be very visible.
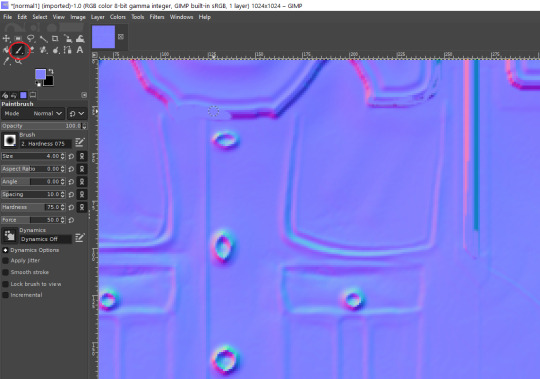
Sometimes, you may need to take your paintbrush and clean up the artifacts if they are in curved or very small areas. If anything looks too sharp, you can also use the smudge brush to smooth it out (very lightly). But don’t move anything around too much.
Once you have cleaned up your image, export it again as a bitmap. This is just so you can go back to it if you make a mistake later or need to modify it. Usually I save it as a new image, but you can overwrite the old one if you are feeling confident.
I have to point out that sometimes you can get away with not cleaning the artifacts from your image. But I have had too many issues with it in the past to skip this step.
Now it is time to make the normal map. Finally!

In the layers area, right click on your single layer and add an alpha channel to it. There is also a small button at the bottom you can use to add an alpha channel. You will need this transparency for the next step.
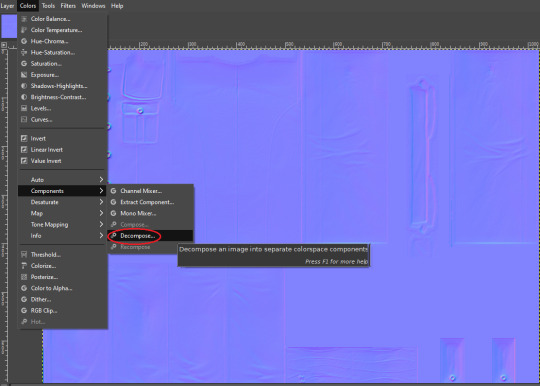
Next, go to Colors > Components > Decompose.

A small box will open up. Change your color model from RGB to RGBA to enable the alpha channel as a separate channel (layer).

Now, a new image will open that is your bitmap but greyscale. You will see four layers on the side called red, green, blue and alpha.
Select the red layer and click CTRL + A on your keyboard to select the entire layer. Then, click CTRL + C to copy the layer. (If you don’t have a keyboard, you can do “Select all” and “Copy” but this takes longer).
Now, go to your layer named alpha and press CTRL + V (paste) and CTRL + H (to anchor the layer). Now, you have replaced the alpha channel with the red channel.
Next, go to the green layer and select and copy it. Paste and anchor it into the red and blue layers, just as you did before with the red layer and alpha layer.

Your image won’t look too much different right now, it will just look like the green alpha channel rather than the visible red alpha channel when you opened it. Go back to the top bar and choose Colors > Components > Recompose. This will alter your original image, so the one you have open in layers will stay open. Go back up to the top and select the original image to go back to it, or close your layered image.

Now, your image should have changed from mostly blue to a transparent, mid-range gray with only a few elements visible. This is how it is supposed to look. If you don’t have transparency or it looks very different, then you probably messed up somewhere. Generally, I find it easier to go back to the original cleaned up bitmap (that you saved for future use) and start from scratch rather than trying to figure out where I messed up. That is usually faster.
Next, export your single-layer image as a PNG or DDS file (your preference). You will need a DDS plugin to save DDS files.
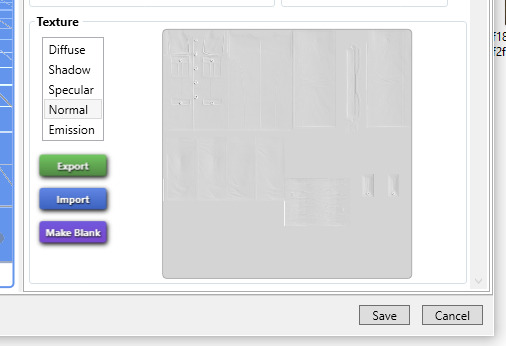
Open your item in Sims4Studio and import your new image file in the normal texture category. You will see a small preview in the box, which will probably show more details than you were able to see in GIMP. If it looks correct, save it and go to check it in game or in CASTools (which has a feature for previewing bumpmaps that can help you check for alignment problems). CASTools can be particularly useful if your computer doesn’t open the Sims quickly and you want to preview multiple bumpmaps. The only issue with CASTools is that it doesn’t really look much like it will look in game.
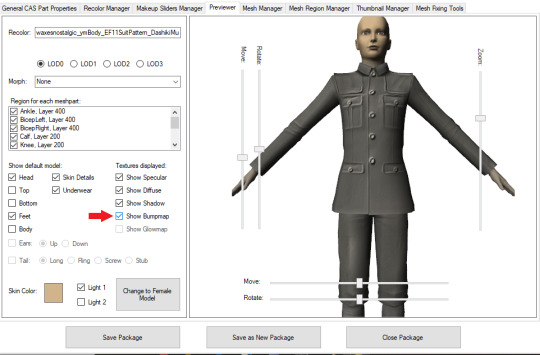
In CASTools. You have to select to see the bumpmap in the Previewer tab.
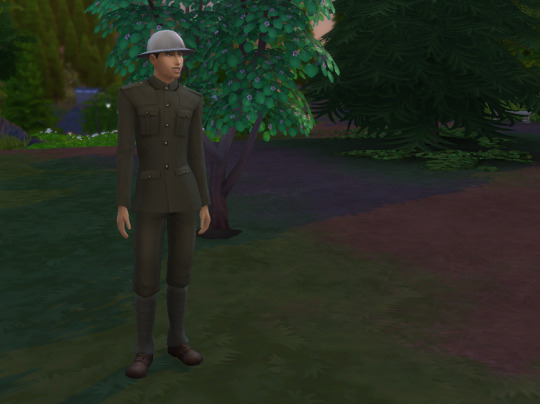
In game.
As I have only been making normal channels for a few months now, it’s possible I have missed some things, so if you know an easier or better way let me know and I can update the tutorial. I hope this is useful to you!
93 notes
·
View notes
Text
Story Process Challenge
Tagged by @nocturnalazure in the text, but I hope this counts :)
1. Your writing process - show us a part of your script or explain how you write your scenes. Do you write in screenplay format or novel format? Etc, etc.
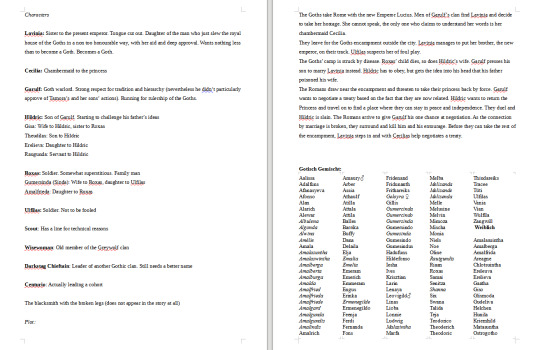
Sims-stories I write in digital format almost exclusively and usually in dialogue form. Here’s the first page of “Wild Hunt”. It all started out with Lavinia’s character description and stayed there a very long time. Then it also has a stock of Gothic names, which is copied from another document, hence the German headline. Being me, I sometimes leave some silliness, like the extra-characters.
(The thing about the blacksmith was that when these ‘barbarians’ caught an artisan, they sometimes crippled them so they couldn’t run away, but had to work for them. Unfortunately I couldn’t fit such a character into the story. He’s still there from brainstorming days)
This is the market scene from Chevalry, along with a lot of cut scenes. I always quote this as an example why some of the best scenes aren’t even there in my writing. The text is green because I used this to mark it as the story-in-the-story. (The expression ‘shock-blanket’ is a reference to an episode of Sherlock. Some expressions (”slain” “daughter to”) are also borrowed from Shakespeare-plays)

2. Scene building - show us you in the middle of scene building through pictures, gifs, or a video. Explain what is the best thing about scene building and what is the worst!
I rarely take pictures of half-built sets. Wherever possible, I prefer using places built by experienced builders. I have zero sense of architecture. A square small place is the most I can be trusted to do myself. Generally I prefer to work with decor and plants.
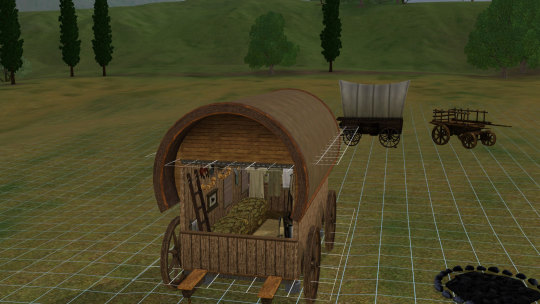
This travelling cart was a different kind of challenge. I built it on a 10x10 lot and it had to be placed first, before I constructed a new set around it. On the second picture you also see the cleverly camouflaged mailbox :)

3. CC/Pose Making - do you make your own cc/poses for your scene? If so, what is your process like to create? Do you just go off the top of your head? Do you use reference photos?
I think it’s safe to say that I’m a pose-maker. Although I make a lot less poses than I used to. Partly because of time, partly because I don’t like the washed-out Blender under Windows 10 :/ In the heyday of Chevalry, I would quit the game and pose the scene myself, if I wasn’t 100% satisfied. Though the only scene I ever posed start-to finish was the haircutting-kiss. Nowadays, I rather try to work with existing poses. Back when I took requests, I sometimes worked with reference pictures, and they do give the scene some extra depth. The scene modelled after a still from “Anastasia” really taught me how much detail the artists had put into their characters’ expressions, and this translated back to the resulting poses.
4. Getting in the zone - What do you do to get in the zone to work on a scene? Examples include: show us your playlist you use when working on a scene, what’s your go-to scene snack/drink, etc.
I kinda miss living on my own, when I could dedicate a whole day to shooting a battle-scene for Chevalry. But in fact I decided to tell this story then and there because I knew it was the perfect time of my life for doing so.
I’m super shy with music, and I have a limited music-library (by modern standards), which I listen to over and over again. Many of these songs have influenced characters, but can’t even bring myself to hunt them up on the internet.
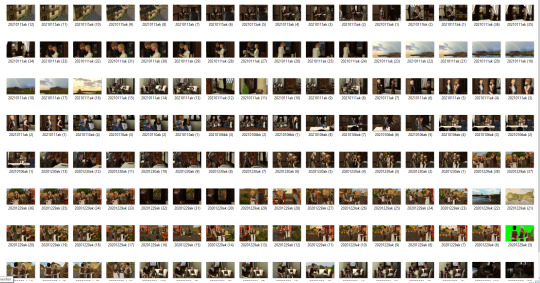
5. Screenshot folder - give us a look into your screenshot folder to show us just how much goes into ONE scene for your story. (Scrapped pictures encouraged!!!)
Here is Of Chevalry, end of Chapter 6. The green ones are reference shots for depth of field blur (I don’t use Reshade). The ones with Sarmanna in a bath-suit are for editing her hands back into the picture, when they clipped through the dress.

MCarric Scenes, most recent: You’ll notice there’s a lot less greenscreen blur nowadays. I usually draw it with the blur-tool now. I still need to find a good occasion for this lovely rainbow I captured...
6. Captions - are you a caption on the picture kind of storyteller or captions in text box type of storyteller? Why? Do you do both?
Although I am more of a visual storyteller, I very much prefer the text in the post. I’m very given to typos and spelling errors and I’d hate having them baked into my pictures. Also I find the text easier to read in the post.
7. Editing!!!!! - explain and show us your process editing a scene through a video, gif, or picture. A Before and after will suffice if you aren’t in the middle of editing a scene as you answer this.
I like editing my pictures in a way that makes them look like they had been like this in game all along. Here’s Sarmanna in a bath-suit again. In cases like this one, you can even bring out the feeling a bit more. I could have dug her left arm out of the skirt. But as she’s feeling very shy and vulnerable in the scene, I made it look like her arm was close to her body. I also have a photoshop action which gives this slightly desaturated old-painting look to the images.


8. Throwback- show us an ANCIENT story scene you did in the past and explain how you would do the scene differently today!
In 2014 I tried to tell the backstory of Anja Tilney, a Maplethorpe Island inhabitant. It was the first time I tried messing around with poses, and I remember I included this shot because Simmagmeg had just released these poses which meant much to her. This scene I still think turned out cute, but on the whole I wasn’t feeling the story any more, after a while. It was rather simply constructed, but still I felt I couldn’t do it justice with my skills back then.
I just reread it for the first time since (here...), and it isn’t quite as bad as I remembered, but back then I scrapped the project and decided to stay well away from Sims storytelling in the future...

tagging @arielovessims, @thethingshesaidthesims3, @windermeresimblr, @unsimspirational
16 notes
·
View notes
Text
Extensive lists of unproblematic youtubers, The Re-do
So when I published my first list, less than 2 weeks later the list got invalidated by someone on said list doing some very messed up stuff, and ive discovered some new channels. SO here is the Revised list of unproblematic youtubers
(I know noone is totally unproblematic, we all have flaws. But these channels I have found are the *least* problematic that I can find.)
First Off, Here is everyone from the first list who is still on it,
Bailey Sarian Does Murder Mystery and Makeup Mondays where she talks about true crime stories and does her makeup
IAMTRAEH Does Natural hair horror stories and tutorials for Natural hair
Snitchery Does Tutorials on how to change up your look
SusieJTodd does Fashion videos on a plus sized body
Bernadette Banner a Vintage fashion youtuber with a voice of liquid gold
TT Bret mainly a cosplayer who is more active on Tumblr and Tik Tok but does occasionally post youtube videos
Safiya Nygaard Does bad makeup science and travel videos. She’s absolutely adorable and down to earth
Dollightful a Korean Based artist who repaints dolls into her own characters, She did all of Eevies evolutions
Sideways Delves into music theory and motifs in modern culture.
Imbrandonfarris just absolutely hilarious with the most adorable little girl. He eats bugs sometimes
Emmymadeinjapan Makes vintage recipes, tests vintage cooking tools, and Viral internet foods in a respectful and educated manner
NikkieTutorials one of the few Big beauty youtubers who isn’t stupid Shady I love her so much
Royalty Soaps She makes and sells handmade soaps and she’s adorable
TheEpicNate315 shockingly a video game youtuber, He makes informative videos about Skyrim and Fallout 4 Lore
Overly Sarcastic Productions Covers History, Literary tropes, and Mythology In a fun animated medium
You Suck At Cooking is what would happen if How to basic had a voiceover
Enchanterium another doll repaint artist
Jennelle Eliana A travel Vlogger who lives out of her van with her snake. Very informative
ThreadBanger cusses a lot but Rob and Corinne have one of the healthiest relationships on the platform. Rob also almost died a year ago and he’s back and better than ever (For some reason in the first list I had him listed as Todd? Ive been watching them for years so I dont know what thats about Whoops)
MyFroggyStuff More doll art tutorials but this time they focus more on the dollhouse and smaller parts of a house awesome if you have kids who like dolls and crafting
Kristen Ryan Broadway fans rejoice! Kristen makes karaoke versions of popular songs but will sing every other part except the one you want to sing! She normally uploads multiple versions of the same songs so you have choices!
Rachel and Jun a Japan based married couple who talk about their life in japan and how they make their interracial relationship work
RRcherrypie I guess they would fall under ASMR youtuber but I just find the little toys they mess with really interesting
ellie Nicole a Beauty Vlogger who occasionally covers natural hair and her skincare routines
Mo Mo O'Brien a cosplayer and Larper who attends renaissance festivals among other things. Is possibly the cutest person on this planet?
호주사라 HojuSara Australian youtuber based In South Korea, She does Korean based vlogs.
Maven of the Eventide Covers Vampire lore in modern fiction and reviews vampire movies
Spill, the only tea channel you will find on this list. Lays out the facts and lets you come to your own conclusion in a respectful manner,
Mikaela Long, Does Beauty? Among other things
Philip DeFranco does daily news stories and is honestly one of the only ways I can consume the news without it feeling like its piling on top of me
And now here are all the new Additions:
Wayward Seon is an art and gaming channel very near and dear to my heart. She’s up and coming and has the smooothest voice EVER
hannahleeduggan Is a diy channel who bought a cabin and has been building and renovating it
Food Then Games is a gaming channel who does alot of Bioware and Dragon age videos, Her Dragon Age Modding tutorials have literally saved my games.
Ghil Dirthalen This one is Kindve Niche, but I love Dragon Age lore since its one of my favorite games and she presents it in a really well thought out a prepared way. So if your a dragon age fan, I highly recommend her
l0user Does song edits that I have a really hard time decribing, stuff like
“ WAP but you're in the church and someone has broken headphones “
Nerdforge does Nerdy, popculture crafts. Im a big fan of her bookbinding videos.
Voicesofjake The purest bean, He does voices and hair videosthat leave me rolling honestly
Plumbella is a Sims youtuber who is just so funny and makes me laugh
Jasmine Chiswell Is a vintage youtuber and Marilyn Monroe lookalike who lives in one of Marilyn Monroe’s old houses. She did NOT deserve that ridiculous trend of mocking her voice. She is one of the sweetest people on the platform.
Here it is, the updated version! I hope you all enjoy!
#youtube#makeup#beauty#music#art#The Sims#True crime#vintage#gaming#problematic#unproblematic#fave#tea#doll art#doll repaint#broadway#fashion#kpop#cosplay#ASMR#travel#diy#beauty community#News#update#Part 2#finally updated
12 notes
·
View notes
Text
Lazy Man’s Tips for Better Pics Part 2: Editing with FireAlpaca
Photoshop has some amazing tools but can be expensive or lag your computer. There are a number of free alternative photo editing softwares and multiple tutorials on how to use them.
Below I will go into some useful tools from FireAlpaca to use on Sims Screenshots.
Check out the other tutorial:
Part 1: In-Game Tips
So my first suggestion is to check out and download FireAlpaca. It’s free and has a very helpful FAQ section of the site if you ever have more questions. I’m going to cover a few helpful tools inside FireAlpaca to create edits inside Sims 4 screenshots.

So first thing to do is open the screenshot you want to edit. “Open” can be found under the “File” tab.
The things to note here are your layers in the upper right corner:
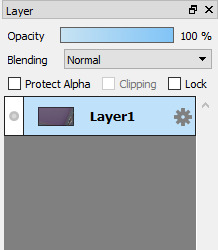
Adding layers and using filters under the “Blending” drop down is a great way to add effects.
Some quick keyboard shortcuts:
CTRL + L

Opens your levels and lets you make things lighter or darker.
CTRL + U

Opens your hue saturation and brightness bars. You can add more color with Saturation and brighten or darken your screen. I wouldn’t mess with Hue too much unless you are trying to get an odd color effect.
I use these two shortcuts the most. They can do the most work for you.
The other helpful tools I use are under the “Filter” bar on the top:

Unsharp Mask will sharpen up your picture. You only need a very little to add a little edge to your sims.
Gaussian Blur will blur anything. A little goes a long way on that as well. It’s a great way to smear lights or soften anything.
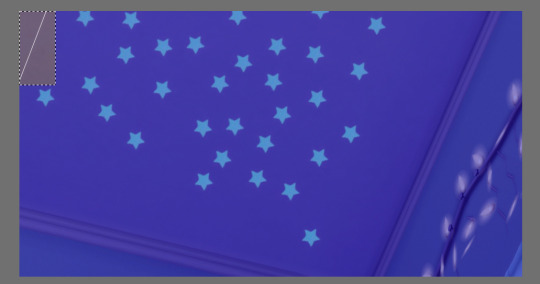
So, if you wanted to add something to your sims screenshots, like say...some glow in the dark stars to your ceiling. First you need a screenshot of the ceiling and a picture of glow in the dark stars.
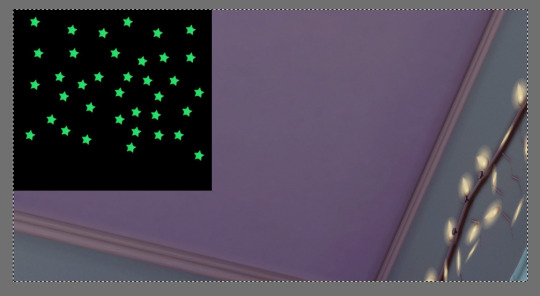
I got the screenshot from in game and opened it. I found the glow in the dark stars online and copy and pasted it over. So it looks like above.
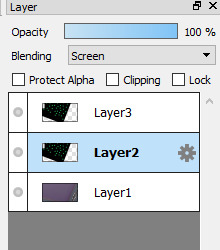
Over at the layer bar you should see this:

Make sure your layer with the stars is highlighted in blue and change the blending mode to “Screen”
Tip: Under the screen blending option, all black in the photo will disappear. This is useful to turn any photo with an all black background transparent.
Your shot will look like this:

Make sure you are still highlighted on that layer and press:
CTRL + T
This lets you move just that layer. Move the stars where you want them like so:

Now you may notice the white line. It is from the star photo. To get rid of that you can cut it out of the layer using the select tool on the side seen here:

It’s the square with the dotted lines. Select the part you want to get rid of:
Make sure you are still on the stars layer. Then hit delete on your keyboard. And it will go away.
If the space you want to delete is not a perfect rectangle you can use the drop down at the top:
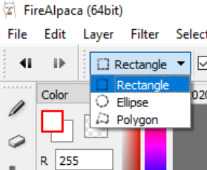
To change the shape of your select tool. The Polygon lets you make your own shape and once you get pretty good with that, you can do a lot of fancy tricks.
Another useful trick is circling a part of the layer you want to move and using:
CTRL + T
This will allow you to move just the selected part of your layer around. It’s how you can move one or two of the stars if you don’t like where they are.
YOU COULD STOP HERE WITH THIS EDIT
And it would be a cute little edit of stars on the ceiling. However, if you want to give your stars a little shine, then I recommend doubling the stars layer.
CTRL + A (selects the whole layer)
CTRL + C (copies it)
CTRL + V (pastes it)
So on your layer bar you should see this:

Now it’s going to be all black again. Make sure you make this third layer match and “Screen” it under the Blending options.
Click on the layer under your copied layer:
Then head over to Gaussian Blur under the Filter tab on the top bar.

Adjust to wherever you like to add a little glow.
And ta-da:

I would post that as my screenshot.
Now that’s a lot of steps but it gets easier the more you do it and natural once you get used to the keys. Honestly the best way to get better at editing is to just keep doing it and trying new things. See what this filter does. Play with color. Play with blurs and blending and just keep trying new things!
I am not at all an expert and I do the least amount of work possible in most cases because I am much more of a “play then post” kind of person. I am sure there are others out there like me so I hope this can help someone out there.
Editing is an ongoing and forever changing thing. Trends will always be changing so my best advice is find your style. Find what you like. And google methods or ask others advice if there’s something you like.
This is by no means an all extensive tutorial but hopefully it helps out someone and gives them the courage to try out some new editing techniques!
If you liked these and they were any sort of help I might do more in the future. Thank you for reading these if you got this far and best of luck! I’d love to see what you do!
17 notes
·
View notes
Text
Weight Painting
Note: Please don’t reblog this, I only posted it here because someone requested it and the private link wasn’t working - it’s a WIP and I have like zero time to actually fix it. Thank you. <3
I’ve noticed a lot of people struggle with weight painting, which I empathize with – not understanding weights kept me from making the kind of CC I wanted to make for years! Most CC tutorials don’t really explain much beyond «do a weight transfer», which isn’t always sufficient, so I decided to write up what I do when I weight paint. I’m sure there are ways of doing this that work just as well (and better!), but through copious trial and error, this is what I’ve found works for me.
I’m mostly going to focus on long dresses and gowns (aka 90% of my CC), but a lot of this should be useful for other types of CC as well.
This isn’t going to be a full, detailed guide to weight painting because, honestly, I don’t actually understand Blender that well. I’m also not going to cover meshing, UV maps, basic weight transfers and stuff like that – if you need advice on those things, check out the Sims4Studio forums. :)
I use Blender 2.76 – things might work/look different in other versions!
1. Vertex groups and mesh explosions
Okay, so this was without a doubt my biggest hurdle back in the day. My meshes kept getting all spiky and deformed in game and I couldn’t for the life of me understand why.
Turns out vertex groups are, like, really important. This is probably obvious to a lot of people, but it took me about two years to figure out, so I’m gonna talk about it.
Your mesh needs to have the same vertex groups as the base mesh you’re cloning, and not all EA meshes use the same ones. If you’re doing a weight transfer from the mesh you originally cloned, this shouldn’t be a problem. Most tutorials will tell you to clone an EA package that’s as similar to yours as possible, and this is a huge part of the reason for that.
However, I don’t do that! This is because I don’t want to use too many mesh cuts (for a guide to mesh cuts, look at this Sims4Studio guide) because they confuse me. In fact, I clone 99% of my dresses from the base game chemise so that they’ll be both base game compatible and only use one mesh cut.
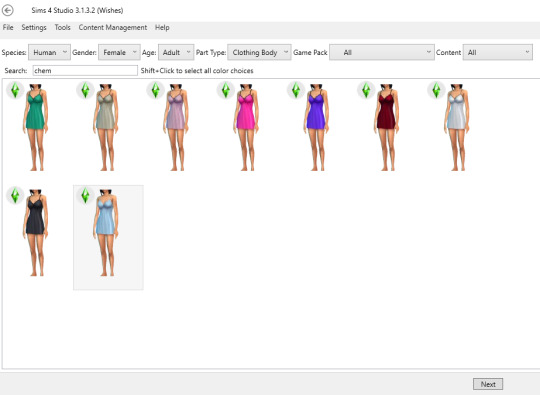
Now, the chemise looks nothing like a gown, so if I was going to do a weight transfer from that for a long dress, it... wouldn’t work. That means I have to use something else, and that means paying attention to vertex groups. Let me explain why.
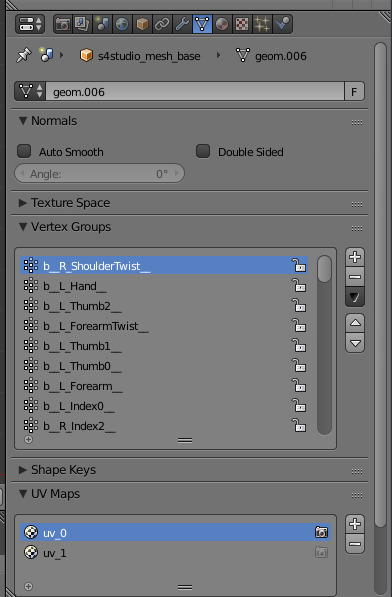
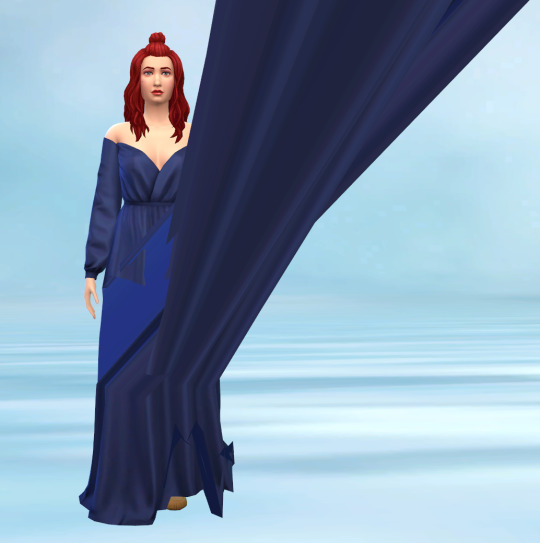
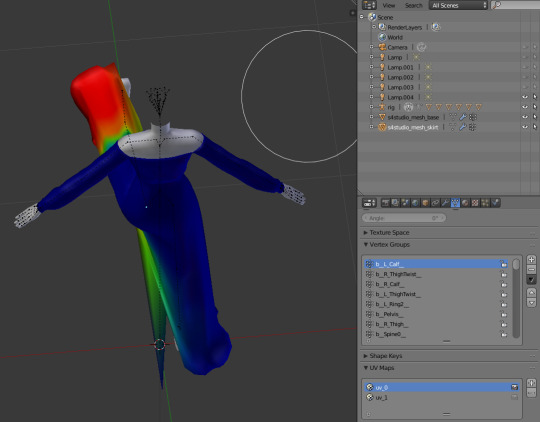
If you export the chemise and open it in Blender, you can see the list of vertex groups on the right. If you try to import a mesh that has additional vertex groups into your package, you’ll get distortions and weird spikes in-game. Most notably when it comes to making long dresses, the chemise does not have Skirt, Foot or Toe bones, but most of EA’s long dresses use one or more of these. So, for instance, if you do a weight transfer from this Holiday Celebration gown:
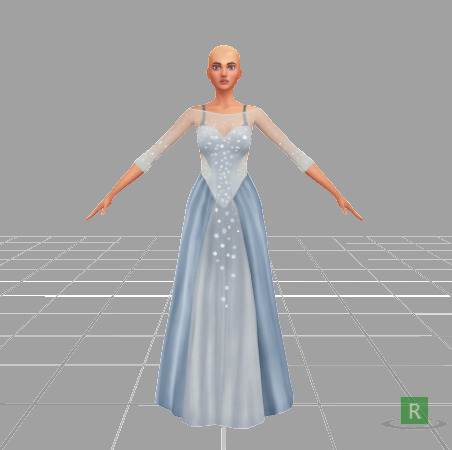
And import the mesh into a package cloned from the chemise...
Your result will be something like this:
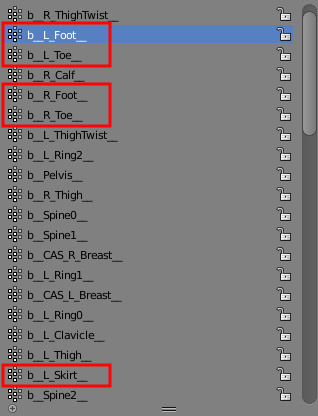
This is because these vertex groups don’t exist in the original cloned mesh:
The easiest way to avoid this is, as I already mentioned, cloning and doing you weight transfer from the same mesh. A lot of the time, that’s going to work just fine. As I also said, though, I don’t do that. So what do I do instead?
2. How to manually fix weights
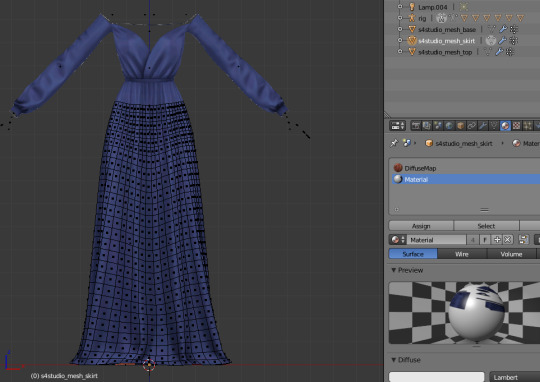
This is the dress I want to weight paint. My .package file is cloned from EA’s chemise. As you can see, they look nothing alike.

Now, I’ve been doing this for a while, so I already have an old piece of CC that I can do a weight transfer from that’s not going to have any vertex group issues (full disclosure: all my skirt weights these days are transferred from my Hannah dress and then adjusted slightly). For the purposes of this guide, however, that’s not how I’m doing it.
The first thing I’ll do is separate the dress from the body so I don’t mess up any weights unnecessarily. Then I’m going to split the mesh one more time so that I can do individual weight transfers for the top and the skirt.
I do this because it’s usually really hard to find a mesh to do a transfer from that’s similar enough to both parts to give a good result, and since I’m aware of what vertex groups I can use, this isn’t going to be a problem. Sidenote: I also recommend splitting meshes like this for UV1 transfers.
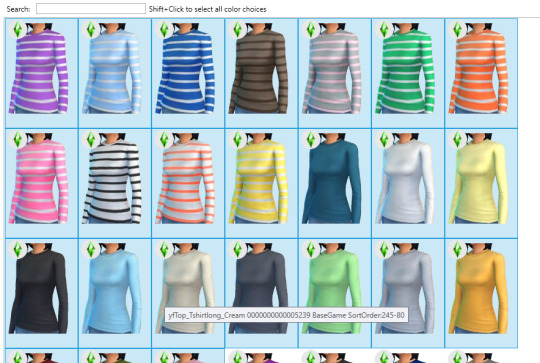
Next, I need to find base meshes to do weight transfers from. For the top, I almost always use this base game sweater because, in my experience, it works for almost anything:
Finding a long dress or skirt is harder, though. I don’t want to use the Skirt, Foot or Toe bones, but just about all EA meshes use them. So what I’m going to do is find a mesh that uses them anyway and then manually remove them.
Note: If you’re completely new to weight painting, you’re going to be much better off finding meshes that use the same bones/vertex groups! I’m doing it this way to demonstrate manual weight painting and editing in general, not the most efficient way of weight painting this particular dress.
I’m going to use the long gown from the Holiday Celebration pack because the skirt has a similar-ish shape.
Let’s take a look at the vertex groups in Blender. This has a lot of bones that I don’t want, but okay!
The next step is to do weight transfers as usual, which I’m assuming I don’t need to cover. Merge the mesh back together (if you split it), and let’s talk about the most important, magical, amazing button in all of weight painting. That’s this one:
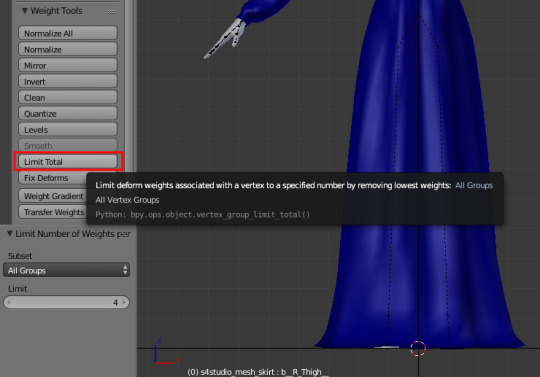
See, The Sims 4 only allows vertices to be attached to 4 bones and automatically limits them if there are too many. This can result in weird deformations and spikyness in-game. However, Blender’s «Limit Total» button will, well, limit the number of bones per vertex for you. You can do this manually as well, of course, but I very, very rarely feel the need to. Generally, using this tool regularly during weight painting will fix SO MANY problems. Click it immediately, and keep clicking it every so often.
Next, I’ll pose the rig so I can see what the mesh is going to look like when it moves. This looks pretty good right now, but of course, it’s not going to look like this in-game because it has too many bones. It also looks pretty jagged and doesn’t move very smoothly.

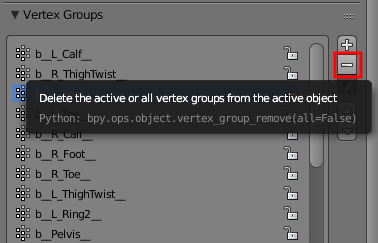
Let’s start with the vertex groups. What I’m going to do next is straight up delete the groups I don’t want. In this case, that would be the Skirt, Foot and Toe bones – compare it to the vertex groups in your cloned mesh if you’re not sure.
Then hit «Normalize All». We just removed a bunch of weights without replacing them with anything, which will result in a whole bunch of weirdness and deformations. Normalizing the weights will automatically make sure all the vertices have the right values to work properly.

Once I’ve got that sorted out, it’s time to do the actual painting. In this case, what I want to do is smooth out some of the jaggedness and fix some spikes that have appeared.
In this case, there appears to be a problem with the left calf. The bone related to this is named, appropriately, enough, b_L_Calf. By clicking this vertex group in Weight Paint mode, we get an view of how the weights are painted on the bone.
Note: All the vertex groups are quite reasonably named. If there’s a problem with the shoulders, for instance, the b_L/R_ShoulderTwist bones are most likely the ones that needs fixing.
Dark blue means the vertexes aren’t weighted to the bone, red means they’re heavily weighted to it. In the image above, it looks like the weird spike should be moving with the rest of the calf, but it’s hasn’t been painted to do so.
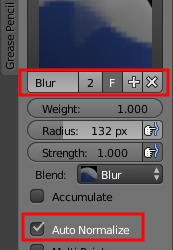
There are a couple of ways to fix this, the easiest of which is probably using the «Add» Weight Painting Tool. The exact settings aren’t super important and fairly intuitive, so go ahead and play around with them. Make sure Auto-Normalize is active, though. Then use the tool on the offending vertex, and the weird spike disappears.

The Blur tool is by far the one I use most, though, and it works great for things like this as well. It gives you less precise control than the Add/Subtract tools, though, so it’s mostly a matter of preference.
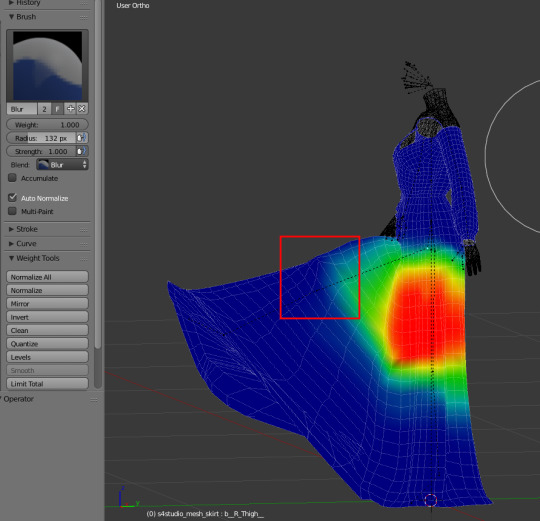
My next step is going to be smoothing out some jagged edges with the Blur tool, starting with the upper thigh area, which has some spikyness going on.
Note: The mesh I weight transferred from doesn’t use the Thigh bones at all, so with the Skirt bone gone, the skirt is purely weighted to the ThighTwist and Calf bones. This is how I weight paint long, flowy dresses as well. These types of meshes don’t really require a precise distinction between the Thigh and ThighTwist bones, and it’s easier to weight paint two vertex groups than three. Tighter and shorter dresses generally require using all three, though.
To make sure you don’t accidentally start weight painting the arms or unrelated parts of the mesh, you can select the part of the mesh you want to focus on in Edit mode and activate Face selection masking for painting by clicking the tiny red/white cube at the bottom of the screen in Weight Paint mode.
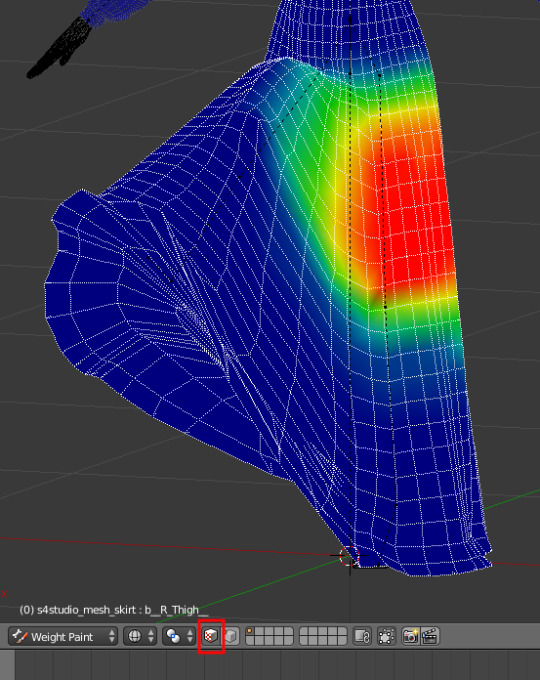
So, back to the actual weight painting – once you understand the basics, it’s really not that hard. Here, I’ve selected the different bones on the leg (b_R_ThighTwist, b_R_Calf b_Pelvis near the top) and gone over them with the Blur tool, and it looks much smoother already.
The next step is to do this, well, everywhere! This involves moving the rig into different positions to see how the mesh moves and rigorous use of the «Limit Total» button to make sure what I see in Blender is what I’m going to see in-game.
I’m not going to give a step-by-step guide here because it’s basically just the same steps over and over until I get a result I’m happy with – using the Add, Subtract and Blur tools on the appropriate vertex groups where I want to fix something, and hitting Limit Total a. lot.
Once I’m happy with how it looks in Blender, I’m going to import my mesh into Sims4Studio and test it in-game...

Aaaand we have a working dress. :)
6 notes
·
View notes
Photo

WHO is Santi and WHERE is his face?
i am LIVING for your warm & colorful posts right now!! your editing is so amazing and it brightens my day everytime i see a new post of yours *.*
THANK YOU!!!! <3 i am so happy/relieved to be using warm colors once more, i feel like myself again. don’t get me wrong, i do like evoking different moods, but sometimes (a lot of the time, especially with santi) too much is too much. today’s posts were HOPEfully my last emo edits..............for now
LOL I actually made a comment about Fiona naming a cat/dog (once Pets comes out) Rodrigo. I'll go back underground now haha (still a great story, cant wait to read more) -Runaway NONY
OH I DIDN’T EVEN SEE THAT wtf. either tumblr ate it or i accidentally scrolled past it i’m sorry. i always enjoy seeing messages from anons who return to my inbox! but lmAO that’s a good idea. i actually met the most perfect dog today and now i know the breed and name of dog santi needs immediately
Hii! If you dont mind me askin, how do you edit your darker screenshots? I always end up making them too light or too dark to see a thing :( Thank you!
hmmm idk what to tell you about making them too light or too dark, because that’s a very specific thing that really depends on the picture. BUT i know that the dodge tool is my bff for brightening up dark pictures while still retaining some of the darker elements you want in them (aversely, the burn tool will help darken parts), messing with the exposure can also really help, coloring can also help too, selective color is my bff especially with blue shadows and orangey skin...this is kind of a broad answer, i’m sorry, but if you needed help with something specific, let me know!
I remember you answered an ask and said you drew tears when you edit right? Is there a reason you don't use CC tears?
i answered this like two weeks ago but i can’t find it so whateveR
i’ve used cc tears a few times but there’s only like three of those in existence and my characters have cried a LOT. i feel like it would be kinda weird if they had the same tears every time. also there are just some variations that i like to customize myself by drawing, like sometimes they’ll be full on sobbing, sometimes just one single tear...it just depends on the situation, that’s why i draw ‘em.
Santi is my favorite Harvest Moon character.
idk shit about harvest moon so idk how to respond to this :[ here’s a small picture of michael cera with a cactus

Would you recommend buying a macbook for playing sims?
if a macbook is what you already have, then yeah, i’d say it suffices without many problems. if you’re specifically going out and buying a computer with the knowledge that you’ll be playing sims on it, then mmmmmm i’d probably say no...but it also depends on if you’re like gonna get REALLY into storytelling and cc n shit or if it’s just casual gameplay with a mods folder that’s like 5 gb or less...if it’s the latter i think it should also be fine. but yeah it just depends on what kind of gaming you’re planning on doing.
How can I read your story from the beginning? Is there a link or something? I keep seeing it on my feet and it looks so great!
thank you! there’s a button at the top of my page that says “story directory” but if you’re on mobile you can just go here or copy this link: http://femmesim.tumblr.com/tagged/story/chrono
I've talked to u like once before and I'm to shy to talk to u again... Why am I like fish?
This**
we are all like fish if you really think about it
lmao but really just reach out my dude! if we talked once then y’know you already broke the ice so just go for it!! i am here and ready to talk about all the things under the sun
Do you use Topaz Clean?
yep
hi hello so maybe I am just a blind bean but may I ask how in god's name do you get your images to be so crisp? I have everything set up, but it seems as if when I do my thing in Photoshop, everything turns out lookin like a blobfish. I'm not sure if you use another person's topaz settings or if you have your own. Thank you so much if you do respond bc I was too much of a wuss to message you *cries in Spanish*
OMG well it’s mostly just resizing, smart sharpening, and most importantly topaz clean (see above) that makes them so crisp. i also use the sharpen tool on sims’ faces, and the smudge tool when something is particularly pixelated or whatever. everything i do is listed in here! UR NOT A WUSS *hugs you in spanish*
youre my inspiration to be a better writer. I know i'm good and giving characters depth and backgrounds and coming up with a rough story idea. but i rush things and i'm not great at putting it into a good story so ya. My story on simblr started out as casual gameplay but i wanted it to be more and i'm trying to get better @ everything
OMG ;_________; it sounds like you are a good writer already, and it’s awesome that you recognize your strengths while also acknowledging that you need to work on some things as well. i try to do the same and i think that’s what keeps me level headed. it sounds like you just need to dedicate some time to planning, that way you start to realize all the nuances of your story that come together to flesh out that initial rough idea. you seem to have a positive attitude, so that’s great!! you’re already getting better and better, i know it <3
now Santi's song is Post Malone - Congratulations
OMF LMAO u sent this when santi finally got to mexico and it’s fitting

sos i was listening to the song fight song by rachel platten when i saw the photoset of santi making it to mexico and now i can't stop ugly crying please make it stop
omG i see it
TAKE BACK UR LIFE SANTI U GOT THIS
This is so random but like, can I just say that you're so amazing like?? Why?? You're so sweet and funny and I love you very much ok
AKJSKJDFKJS THANK YOU THIS IS SO NICEEEE ;-; i try but a lot of the time i feel like a sarcastic asshole lmao thank u for thinking otherwise <3
Am I the only one who's like... really mad about pets being NPCs? I just feel like being able to control them was the best part. I don't really feel like the EP is worth it without them. Like, don't get me wrong, I understand that the team worked really hard on it, but I feel like they didn't do it as well as they could have.
hmm i’m kind of meh on that front because like on one hand i did like controlling pets and the novelty of the fact that you could just see their different interactions firsthand, but ultimately i think i’m okay with not controlling them because it makes it more realistic for me and honestly they’re probably more likely to take care of themselves a little bit more if they’re automated, because i’m just thinking about ts3 pets and how i literally had to make them go pee outside otherwise they’d pee in the house...even if they were well trained and stuff lmao. plus there might be a cheat or mod that lets you control them, like there was in ts2? so don’t lose hope yet.
hey your blog is AWESOME, i read through your stories in a day and am obsessed (kind of in love with gianni) ❤ what are some of your favorite ts4 blogs? i'm trying to find more awesome blogs to read through during my miserable journey of trying to get the game to work on my computer lol
heyo here’s some! thank you btw, and i hope your miserable journey ends soon :{
(I really need to get this off my chest) ok so my aunt is currently in a critical condition after having a kidney failure and she's in desperate need for a new one and I'm the only one in my family that's a match (so far) but I'm not allowed to donate bc I myself have severe health issues affecting my day to day life that would make it extremely dangerous for me to remove a kidney. I'm so fucking frustrated you don't understand like I just want to cry most of the time
first off i’m so sorry that this is even happening to you ;__; and you’re an amazing person for being willing to help out your aunt like that, so just know it isn’t your fault that you’re unable to. don’t guilt yourself for it okay?
is there any other possible donor at all? i wanna know how this situation ends up. i really hope your aunt will be okay. just stay close to your family for support and don’t blame yourself.
how did you get photoshop for free? I'm trying to find a link that won't give me a virus, but I had no luck yet
the pirate bay is ur friend
Ok I gotta rant. GoT does NOT deserve the hype/amazing ratings. Like, sure the cinematography is pretty great and they have ok actors but the freaking script is so mediocre I actually think I could write a better one. Me. A 16 y/o tiny child. There are so much better shows out there! Hell, even Supernatural has a better script than GoT
whenever ppl agree with me about how much GoT sucks i grow stronger and stronger
even the actors are iffy at this point. watching daenerys act is painful, jon snow is wooden as hell, it’s just bad. ur 16 yr old self has more potential than these writers tbh. it’s just completely mediocre; it started out as something great because it followed the same layered storytelling pattern as the books, but it’s diverged from that completely because the writers got too caught up in the hype. and you’re right, it doesn’t deserve that hype!
omfdkjsgkj i’ve never watched supernatural but i haven’t heard good things. that’s a low bar
29 notes
·
View notes
Last Seen Blogs

jeanomalkin
unbelievable jean jacket
detectiveseaslug
A Galactic Mystery....
germenis
"What an excellent day for an exorcism."
thebieberera
BIEBER
nataliachernikova
My Biz