#then a sharp salty cheese if you can do dairy (parmesan or feta)
Text
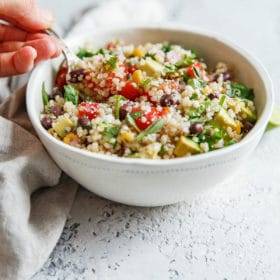
Southwest Quinoa Salad
An easy southwest quinoa salad with black beans, grape tomatoes, jalapeño, red onion, cotija, fire roasted corn, avocado, and lime vinaigrette. This flavorful salad can be made up to a day in advance, and is ideal for summer potlucks and barbecues.
This post is sponsored by Bob’s Red Mill.
Since developing today’s recipe, this southwest quinoa salad has made an appearance in my kitchen more times than I count. Every time that I prepare it, I’m just as thrilled to reach into the refrigerator and pull out the leftovers.
On its own, this quinoa salad makes for a delicious, balanced, and nutritious meal. It can also be served as a side dish with dinner (another reason to whip up a batch immediately!) or prepared up to a day in advance and taken to summer potlucks or barbecues!
Not only does it hold up extremely well (it actually tastes best after the flavors have had time to macerate together!), but it’s zesty and bursting with summer flavor. Juicy grape tomatoes, black beans, jalapeño, fire roasted corn, cilantro, red onion, ground cumin, avocado, salty cotija cheese, and a simple fresh lime juice vinaigrette.
So simple, yet so delicious.
As you can probably tell, the base of the salad is cooked quinoa. This recipe is part of a year-long partnership (and one of my favorite long-term partners) with Bob’s Red Mill, my favorite source for whole grains, flours, and cereals.
This spring, we prepared a decadent lemon coconut cake with fresh berries. This time, we’re going zesty and savory with their organic white quinoa. I’ve even included a new cooking video below too!
What is Quinoa?
Quinoa (pronounced KEEN-wah) has been a staple in my pantry for years. Although it’s technically a seed and pseudocereal, quinoa is my favorite “grain” of choice for cold salad preparations for a few reasons.
Firstly, it cooks extremely quickly. Secondly, once cooked it transforms into a soft, fluffy grain that absorbs other flavors incredibly well.
Since quinoa is not part of the wheat family (it is part of the amaranth family, and is closely related to spinach!), it’s also naturally gluten free.
Quinoa is a nutritional powerhouse! It knocks almost every other traditional whole grain out of the park. It is a complete protein (which means it offers all nine essential amino acids) and is high in dietary fiber, protein, iron, and potassium.
I also happen to love it! We often cook up a batch of it on the weekends and add the leftovers to various dishes throughout the week. It’s texture and mild flavor is universally appealing to even the pickiest of eaters.
How to Properly Cook Quinoa:
There are a few important steps and tricks for cooking quinoa properly. Once harvested, quinoa grains have a natural coating called saponin, which if not rinsed off properly, can impart a soapy, bitter flavor to cooked quinoa.
One reason why I love Bob’s Red Mill organic quinoa even more is that they pre-rinse the quinoa for you, which means that you can technically skip this step and just start cooking!
Unlike rice (where you combine the grains with cold water, bring it to a boil, simmer, and cover), you’ll want to cook quinoa a bit differently. The best method for producing fluffy, properly cooked quinoa is to use a 2:1 ratio (water to quinoa) and bring a pot of water to boil first, then add the quinoa, reduce it to a simmer, cover, and continue cooking until the liquid is absorbed.
I’ve outlined the details of this method in the recipe below, but this ensures that each quinoa grain cooks evenly (without undercooking or worse, becoming mushy!). If quinoa is cooked properly, the individual grains should be fluffy and pop open to reveal a little white tail.
How to Cool Quinoa Quickly for Salads or Cold Preparations:
When meal-prepping or using it for cold applications, such as this southwest quinoa salad, the best way to cool quinoa quickly is to immediately transfer it to a large sheet pan.
Distributing the grains into an even thin layer (without compressing them) not only allows the quinoa to cool quickly (it will only take about 15 minutes if done this way!), but it also ensures that the quinoa at the bottom of the pot won’t overcook as it’s sitting off the heat.
This is my favorite trick for cooling all grains – keep it in your back pocket, you’ll end up turning to it often!
Why You’ll Love this Southwest Quinoa Salad:
Once the quinoa has cooked and cooled, the rest of this salad comes together in minutes! You’ll simply whisk up the dressing, combine the quinoa and other ingredients into a large bowl, pour on the vinaigrette, and gently mix.
The tomatoes, red onion, fire roasted corn (I use frozen, as an easy shortcut!), and cilantro add freshness to each bite. The black beans add heft and heartiness. The jalapeño provides a touch of heat. The Mexican cotija cheese adds just the right amount of funky saltiness, and the smoky cumin lime vinaigrette gives it a bright, acidic flavor.
Since avocado will oxidize quickly, I add it just before serving, along with another squeeze of fresh lime juice and a sprinkling of chopped cilantro. Hope you love this salad as much as I do!
Southwest Quinoa Salad
Yield: 5-7 Servings
Prep Time: 1 hour
Cook Time: 20 minutes
Total Time: 1 hour 20 minutes
An easy, flavorful southwestern quinoa salad with black beans, grape tomatoes, jalapeño, red onion, cotija, fire roasted corn, avocado, and lime vinaigrette. This grain salad is naturally gluten free and vegetarian, and can be prepared up to 24 hours in advance. Serve as a summer side dish or main course.
Ingredients:
For the Quinoa:
For the Vinaigrette:
zest of 1 lime
1/4 cup freshly squeezed lime juice (roughly 2 juicy limes), plus more for serving
3/4 teaspoon ground cumin
1 garlic clove, grated on a microplane or pressed
3 tablespoons (45 mL) avocado oil (or other oil)
1/2 teaspoon kosher salt, plus more if needed
1/4 teaspoon freshly ground black pepper
1/2 small red onion, finely diced (1/2 cup)
For the Salad:
1 heaping cup (6 ounces) grape tomatoes, quartered
1 can (15 ounces) black beans, rinsed and drained well
1/2 cup frozen fire-roasted corn, thawed and drained
1/2 jalapeño pepper, seeds and ribs removed, and finely diced
1/3 cup crumbled cotija cheese
1/2 cup fresh cilantro leaves, roughly chopped
1 ripe avocado, pitted, peeled and diced
kosher salt, as needed
Directions:
Prepare and Cook the Quinoa: Combine the water and salt in a medium saucepan with a tight-fitting lid. Bring to a boil. Add the quinoa, cover, and simmer over low heat until the liquid is absorbed and the quinoa is tender, about 17 to 20 minutes. Remove from the heat, fluff with a fork, cover, and allow to sit for an additional 10 minutes. Spread the cooked quinoa in a thin layer on a baking sheet (set on a cooling rack) and allow to cool completely. If prepping ahead of time, transfer the cooled quinoa to a large container and refrigerate for 2 to 3 days until ready to use.
Prepare the Vinaigrette: Combine the lime zest, lime juice, cumin, and grated garlic in a small mixing bowl. Slowly pour in the avocado oil, whisking continuously until emulsified. Add the salt, black pepper, and diced red onion to the dressing. Stir to combine. Allow the mixture to sit for 5 to 10 minutes (allowing the mixture to sit helps cut the sharpness of raw garlic and onion).
Assemble: In a large mixing bowl, combine the cooked (and cooled) quinoa, grape tomatoes, black beans, fire-roasted corn, jalapeño, and onion-vinaigrette mixture. Stir until well combined. Gently fold in the crumbled cotija cheese and cilantro. Season to taste with salt and pepper, adding more lime juice as desired. Cover and refrigerate the salad for at least 30 minutes or up to 24 hours in advance. *Note: While you can serve this salad immediately, it tastes best when it is allowed to sit and marinate for at least 30 minutes or longer).
Just before serving, fold in the diced avocado and a generous squeeze of fresh lime juice, as desired. Serve chilled or at room temperature.
Leftovers can be stored in an airtight container in the fridge and kept for up to 3 to 5 days.
All images and text ©A Beautiful Plate.
Tips For Success:
Make This Vegan: Omit the cheese.
Authentic cotija is a Mexican hard cow cheese with a dry texture similar to aged parmesan. Cotija produced in the United States can sometimes have a softer texture.
You can find crumbled cotija (or blocks of cotija) in the dairy section of most grocery stores. Although different in flavor profile, a good and more readily available substitute would be crumbled feta cheese. You can also omit the cheese altogether.
This post is sponsored by Bob’s Red Mill. Thank you for supporting brands I love and use in my kitchen. Check out more delicious healthy recipes, snag coupons, and find stores near you at BobsRedMill.com!
All Recipes, Beans, Lentils, and Legumes, Cinco De Mayo, Cuisine, Diet, Dinners, Fourth of July, Gluten Free, Grains, Healthier Dinners, Healthy and Light, Holiday Dishes, Main Course Salads, Mexican and Tex-Mex, Pastas, Risottos, and Grains, Quick Weeknight Dinners, Salads, Season, Sides, Summer, Vegetarian, Whole Grains

Source: https://www.abeautifulplate.com/southwest-quinoa-salad/
0 notes
Text
Cheesy Bread Is Absurdly Good, No Matter What You ...
New Post has been published on https://simpleeasycooking.com/cheesy-bread-is-absurdly-good-no-matter-what-you/
Cheesy Bread Is Absurdly Good, No Matter What You ...
[Photographs and GIF: Vicky Wasik]
I’m always in search of new and exciting ways to incorporate more cheese into my diet. In our wedding vows, my husband promised to have and to hold and to always keep the fridge stocked with three varieties of cheddar. When the opportunity to develop a recipe for this South American cheesy bread arose, I skipped all the way to the dairy section, gleefully throwing blocks of Grana Padano into my basket.
In Bolivia, these rolls are called cuñapes; in Ecuador, they are known as pan de yuca; in Brazil, it’s pão de queijo; and in Paraguay and Argentina, they go by chipa. You also can’t forget the Colombian version, pan de bono, which incorporates masarepa into the dough. Aside from minor variations in technique and cheese type, they all rely on both cheese and tapioca starch for a bold flavor and incredibly chewy texture that’s instantly addictive. To avoid showing favoritism to one nation over another, I’m just going to call it cheesy bread. I scarf them down by the dozen, plucked right off the hot sheet tray, but they are traditionally served with coffee as an afternoon snack.
When made perfectly, the cheesy bread should have a crisp crust with a chewy and light interior. At its worst, the bread can be soggy, dense, and heavy. They are the simplest bread you can make—they require no kneading or proofing, just a quick mix with you hands to bring all the ingredients together—but the details make all the difference. I wanted to test all the variables to come up with a recipe that’ll bake up just right every time, no matter what you call them.
Tapioca Starch
The key ingredient in cheesy bread is tapioca starch. It’s a finely milled starch, derived from the cassava root, with a squeaky texture similar to corn or potato starch. Cassava root, also known as manioc or yuca, originated in northern Brazil, before it spread across all of South America. This explains the prevalence of this many-named cheesy bread throughout the region.
Once tapioca starch is hydrated and cooked, it has both the chew of mochi and the stretch of Hawaiian poi. These unique qualities of tapioca starch endow it with the texture of melted cheese even before any cheese is added. The combination of this texture along with the flavor of the salty and savory cheese is what makes biting into this bread feel like you’re eating warm cheese by the doughy fistful. Who could resist?
There are several brands of tapioca starch available and, although it is originally a South American ingredient, most of the brands available in the States are imported from Thailand. I wanted to see if there’s a noticeable difference between brands of different origins. I tested batches made with a Thai brand of tapioca starch versus Brazilian polvilho azedo and polvilho doce. The azedo starch is fermented before processing, resulting in a pleasantly sour taste; it is called for in most cheesy bread recipes throughout South America. The doce starch is unfermented and is also used in some cheesy bread recipes, but most often it finds its way into desserts.
I was surprised to find that there are significant differences in both taste and texture between the three tapioca starches. The bread made with polvilho azedo was lighter in texture and had a heartier crunch than the bread made with the Thai starch. The Thai starch has a very fine texture, unlike the Brazilian starches, which have a more uneven grind. The imperfectly milled starch became a flawless final baked bread, while the fine Thai starch made bread that was dense and heavy. The sourness of the polvilho azedo also emphasized the sharp tang of the cheeses in a way that the polvilho doce didn’t. It’s definitely worth the effort of ordering polvilho azedo if you want to make the most flavorful cheesy bread.
The Queso Question
The type of cheese used in pão de queijo, cuñapes, or pan de bono depends on whether you’re making them in Brazil, Bolivia, or Colombia, etc. Most recipes call for queso fresco, but it’s not exactly like the Mexican queso fresco most commonly found around where I live. The particularities of each queso can vary greatly from region to region. The queso most commonly used has the crumbly texture of Mexican queso fresco, combined with the stretch of mozzarella, and the salty bite of Parmesan. I have yet to find this magical unicorn cheese in my corner of Manhattan, but a blend of Cheddar and Grana Padano does the trick.
Once you’ve gotten a handle on how the dough should look and feel, the cheese possibilities are endless. You may need to adjust the amount of liquid or butter in the dough depending on the water and fat content of each cheese, but after some simple tweaks the bread will bake up just fine with anything from a pungent blue to a briny feta.
Regardless of what cheese you choose, one of the biggest factors is whether you use chopped or shredded cheese. The bread made with chopped cheese was lighter and had melty pockets throughout, while the bread made with shredded cheese was dense and heavy. This makes perfect sense if you look at the differences in volume between chopped and shredded cheese of equal weight.
Shredding cheese significantly increases its surface area and volume, which allows it to be more evenly incorporated into the dough. Once baked, the shredded cheese melts faster than chopped, weighing down the dough and yielding an overly gummy and dense bread. On the other hand, the chopped cheese melts at a slower rate and creates little pockets of steam within the bread that puff up and lighten the rolls.
Making the Dough
Once you’re armed with the right tapioca starch and have retired your grater for the evening, it’s smooth sailing to cheesy bread land. There’s no need for a mixer, or even a spoon for that matter.
I mix together the tapioca starch with salt, baking powder, milk, butter, and eggs. After everything is evenly incorporated, I knead in the cheese, taking care not to overmix it. You want some uneven, large chunks of cheese to remain so they can melt into surprise pockets of delight.
Some recipes call for scalding the milk and others use cold milk instead. Dough made with scalded milk more evenly incorporates the cheese and bakes up into a uniform, round roll. On the other hand, dough made with cold milk leaves little clumps of cheese, which will burst through the bread’s crust during baking to form a crisp and crackly edge. It’s just a matter of personal preference, as well as regional habits—feel free to choose to scald or not scald.
Although you can bake the dough right away, letting the dough rest overnight fully hydrates the starches for a fluffier texture. Gluten-free starches take much more time and a higher ratio of liquid to hydrate than wheat flour. During the overnight rest, it’s imperative to cover the dough with plastic wrap pressed right onto the surface, similar to covering a pudding if you’re on the no-skin team. The dough quickly dries out to the point of no return and all that cheese will be lost forever beneath a hard crust.
If it’s your first time making cheesy bread, I strongly recommends using a scale until you get accustomed to the texture of the dough. This dough feels very different from dough made with wheat flour. Immediately after mixing it appears both runny and thick, while after the overnight rest it’s brittle and dry. After you get an understanding of how the dough should feel, run wild: eyeball quantities, try different cheeses, add seasonings. As long as the texture of the dough is right, you’ll end up with great results every time.
I like to form the dough into two-inch balls by rolling it between my palms. They can be formed into larger or smaller rolls, logs for dipping into coffee, or even donut shapes. Next, I make an indentation in the bottom of each with the back of a wooden spoon, which helps the dough bake evenly throughout.
You can bake them right away and eat them while steamy and warm or the dough balls can be frozen on a tray and bagged up for later. They bake up perfectly right from the freezer, just like cookie dough, so you can instantly get your cheese fix anytime.
Although perfect on their own, a dollop of jam in the center of each baked roll can transform it into a hand-held cheese plate. Sometimes I get crazy and make a grilled cheese out of a split bun. And instead of using English muffins, I might make an epic eggs Benedict on top of a pair of cheesy breads right out of the oven. I believe in doing whatever it takes to get more cheese in my life.
Your purchase on Amazon helps support Serious Eats.
amzn_assoc_placement = "adunit0"; amzn_assoc_tracking_id = "thesoggychef-20"; amzn_assoc_ad_mode = "search"; amzn_assoc_ad_type = "smart"; amzn_assoc_marketplace = "amazon"; amzn_assoc_region = "US"; amzn_assoc_default_search_phrase = "Cook book"; amzn_assoc_default_category = "All"; amzn_assoc_linkid = "7687f0a409a2a1d4bc785464e4a8293f"; amzn_assoc_design = "in_content";
Source link
0 notes
Text
Cheesy Bread Is Absurdly Good, No Matter What You ...
New Post has been published on https://simpleeasycooking.com/cheesy-bread-is-absurdly-good-no-matter-what-you/
Cheesy Bread Is Absurdly Good, No Matter What You ...
amzn_assoc_placement = "adunit0"; amzn_assoc_tracking_id = " thesoggychef-20 "; amzn_assoc_ad_mode = "search"; amzn_assoc_ad_type = "smart"; amzn_assoc_marketplace = "amazon"; amzn_assoc_region = "US"; amzn_assoc_title = "Shop Related Products"; amzn_assoc_default_search_phrase = "cooking"; amzn_assoc_default_category = "Kitchen"; amzn_assoc_linkid = "51fe4d035c7af8dc5928e6f5e5b79c4e"; amzn_assoc_default_browse_node = "284507"; amzn_assoc_rows = "4"; amzn_assoc_design = "text_links";
[Photographs and GIF: Vicky Wasik]
I’m always in search of new and exciting ways to incorporate more cheese into my diet. In our wedding vows, my husband promised to have and to hold and to always keep the fridge stocked with three varieties of cheddar. When the opportunity to develop a recipe for this South American cheesy bread arose, I skipped all the way to the dairy section, gleefully throwing blocks of Grana Padano into my basket.
In Bolivia, these rolls are called cuñapes; in Ecuador, they are known as pan de yuca; in Brazil, it’s pão de queijo; and in Paraguay and Argentina, they go by chipa. You also can’t forget the Colombian version, pan de bono, which incorporates masarepa into the dough. Aside from minor variations in technique and cheese type, they all rely on both cheese and tapioca starch for a bold flavor and incredibly chewy texture that’s instantly addictive. To avoid showing favoritism to one nation over another, I’m just going to call it cheesy bread. I scarf them down by the dozen, plucked right off the hot sheet tray, but they are traditionally served with coffee as an afternoon snack.
When made perfectly, the cheesy bread should have a crisp crust with a chewy and light interior. At its worst, the bread can be soggy, dense, and heavy. They are the simplest bread you can make—they require no kneading or proofing, just a quick mix with you hands to bring all the ingredients together—but the details make all the difference. I wanted to test all the variables to come up with a recipe that’ll bake up just right every time, no matter what you call them.
Tapioca Starch
The key ingredient in cheesy bread is tapioca starch. It’s a finely milled starch, derived from the cassava root, with a squeaky texture similar to corn or potato starch. Cassava root, also known as manioc or yuca, originated in northern Brazil, before it spread across all of South America. This explains the prevalence of this many-named cheesy bread throughout the region.
Once tapioca starch is hydrated and cooked, it has both the chew of mochi and the stretch of Hawaiian poi. These unique qualities of tapioca starch endow it with the texture of melted cheese even before any cheese is added. The combination of this texture along with the flavor of the salty and savory cheese is what makes biting into this bread feel like you’re eating warm cheese by the doughy fistful. Who could resist?
There are several brands of tapioca starch available and, although it is originally a South American ingredient, most of the brands available in the States are imported from Thailand. I wanted to see if there’s a noticeable difference between brands of different origins. I tested batches made with a Thai brand of tapioca starch versus Brazilian polvilho azedo and polvilho doce. The azedo starch is fermented before processing, resulting in a pleasantly sour taste; it is called for in most cheesy bread recipes throughout South America. The doce starch is unfermented and is also used in some cheesy bread recipes, but most often it finds its way into desserts.
I was surprised to find that there are significant differences in both taste and texture between the three tapioca starches. The bread made with polvilho azedo was lighter in texture and had a heartier crunch than the bread made with the Thai starch. The Thai starch has a very fine texture, unlike the Brazilian starches, which have a more uneven grind. The imperfectly milled starch became a flawless final baked bread, while the fine Thai starch made bread that was dense and heavy. The sourness of the polvilho azedo also emphasized the sharp tang of the cheeses in a way that the polvilho doce didn’t. It’s definitely worth the effort of ordering polvilho azedo if you want to make the most flavorful cheesy bread.
The Queso Question
The type of cheese used in pão de queijo, cuñapes, or pan de bono depends on whether you’re making them in Brazil, Bolivia, or Colombia, etc. Most recipes call for queso fresco, but it’s not exactly like the Mexican queso fresco most commonly found around where I live. The particularities of each queso can vary greatly from region to region. The queso most commonly used has the crumbly texture of Mexican queso fresco, combined with the stretch of mozzarella, and the salty bite of Parmesan. I have yet to find this magical unicorn cheese in my corner of Manhattan, but a blend of Cheddar and Grana Padano does the trick.
Once you’ve gotten a handle on how the dough should look and feel, the cheese possibilities are endless. You may need to adjust the amount of liquid or butter in the dough depending on the water and fat content of each cheese, but after some simple tweaks the bread will bake up just fine with anything from a pungent blue to a briny feta.
Regardless of what cheese you choose, one of the biggest factors is whether you use chopped or shredded cheese. The bread made with chopped cheese was lighter and had melty pockets throughout, while the bread made with shredded cheese was dense and heavy. This makes perfect sense if you look at the differences in volume between chopped and shredded cheese of equal weight.
Shredding cheese significantly increases its surface area and volume, which allows it to be more evenly incorporated into the dough. Once baked, the shredded cheese melts faster than chopped, weighing down the dough and yielding an overly gummy and dense bread. On the other hand, the chopped cheese melts at a slower rate and creates little pockets of steam within the bread that puff up and lighten the rolls.
Making the Dough
Once you’re armed with the right tapioca starch and have retired your grater for the evening, it’s smooth sailing to cheesy bread land. There’s no need for a mixer, or even a spoon for that matter.
I mix together the tapioca starch with salt, baking powder, milk, butter, and eggs. After everything is evenly incorporated, I knead in the cheese, taking care not to overmix it. You want some uneven, large chunks of cheese to remain so they can melt into surprise pockets of delight.
Some recipes call for scalding the milk and others use cold milk instead. Dough made with scalded milk more evenly incorporates the cheese and bakes up into a uniform, round roll. On the other hand, dough made with cold milk leaves little clumps of cheese, which will burst through the bread’s crust during baking to form a crisp and crackly edge. It’s just a matter of personal preference, as well as regional habits—feel free to choose to scald or not scald.
Although you can bake the dough right away, letting the dough rest overnight fully hydrates the starches for a fluffier texture. Gluten-free starches take much more time and a higher ratio of liquid to hydrate than wheat flour. During the overnight rest, it’s imperative to cover the dough with plastic wrap pressed right onto the surface, similar to covering a pudding if you’re on the no-skin team. The dough quickly dries out to the point of no return and all that cheese will be lost forever beneath a hard crust.
If it’s your first time making cheesy bread, I strongly recommends using a scale until you get accustomed to the texture of the dough. This dough feels very different from dough made with wheat flour. Immediately after mixing it appears both runny and thick, while after the overnight rest it’s brittle and dry. After you get an understanding of how the dough should feel, run wild: eyeball quantities, try different cheeses, add seasonings. As long as the texture of the dough is right, you’ll end up with great results every time.
I like to form the dough into two-inch balls by rolling it between my palms. They can be formed into larger or smaller rolls, logs for dipping into coffee, or even donut shapes. Next, I make an indentation in the bottom of each with the back of a wooden spoon, which helps the dough bake evenly throughout.
You can bake them right away and eat them while steamy and warm or the dough balls can be frozen on a tray and bagged up for later. They bake up perfectly right from the freezer, just like cookie dough, so you can instantly get your cheese fix anytime.
Although perfect on their own, a dollop of jam in the center of each baked roll can transform it into a hand-held cheese plate. Sometimes I get crazy and make a grilled cheese out of a split bun. And instead of using English muffins, I might make an epic eggs Benedict on top of a pair of cheesy breads right out of the oven. I believe in doing whatever it takes to get more cheese in my life.
Your purchase on Amazon helps support Serious Eats.
amzn_assoc_placement = "adunit0"; amzn_assoc_search_bar = "true"; amzn_assoc_search_bar_position = "bottom"; amzn_assoc_tracking_id = " thesoggychef-20 "; amzn_assoc_ad_mode = "search"; amzn_assoc_ad_type = "smart"; amzn_assoc_marketplace = "amazon"; amzn_assoc_region = "US"; amzn_assoc_title = "Shop Related Products"; amzn_assoc_default_search_phrase = "cookware"; amzn_assoc_default_category = "All"; amzn_assoc_linkid = "b45319dac495d29e17b5eff312392025";
Source link
0 notes
Last Seen Blogs

nothingbutpurehappiness
W i l d c h i l d ♦

kristiliqua
hyperfixations going crazy

theforcevevo
So this is how liberty dies

kemifatoba
Kẹ́mi Fátọba

lilthingsz
Little Things