#the bottom slots are pretty much interchangable
Note
Who are YOUR top 10 favorite TWEWY + Neo TWEWY characters?
Coco Atarashi
Nagi Usui
Sho Minamimoto
Rindo Kanade
Fret Furesawa
Kaie Ono
Rhyme Bito
Beat Bito
Neku Sakuraba
Uzuki Yashiro
Thanks so much for asking and sorry for the late reply!
#hyouibanasks#muslimfish#the bottom slots are pretty much interchangable#also Coco may be my favourite but sho is an objectively funnier character#he lost to a fish in a poll
3 notes
·
View notes
Text
Put Your Hands On Me

As you slipped into bed, beside the Scotsman, you rethought how you ended up sharing a hotel room with him.
You saw Drew at the front desk for the hotel and then you heard the woman announce news that would’ve been the last room as all the others had been booked due to another event in the area. And when you asked, he turned and offer you to share the room with him. And you, happily, agreed. It would be no big deal to share the rom with him.
You guys have fooled around plenty of times. Being on the road 360 days out of a year made it super impossible for you to find yourself a partner. Or...at least one that could be understanding of you not being home all the time. You just needed someone to take the edge off...and Drew....he needed the same. You two had an arrangement, one that worked well for the both of you. Drew offered you space in his hotel room and you went with him to it.
You both....weren’t thinking of having fun, letting off steam. At least, you weren’t until you saw Drew undress. You allowed your eyes to roam his body, wishing you could be in his arms. Drew wasn’t aware of your roaming eyes as he put on a pair of shorts to sleep in. You followed suit, slipping on a sleep shirt and a pair of shorts to sleep in as well. Drew went to his side of the bed and you went to yours. And he pretty much kept to his side of the bed while you kept to yours, even though it wasn’t what you wanted.
You couldn’t help the thoughts of wanting Drew to touch you, kiss you, and just fuck you. But he, he was just working his way into bed, getting under the covers to get comfortable. Your want only grew as the man in question did nothing to initiate anything with you. And you didn’t know how you wanted to initiate anything fun with him.
So, it really wasn’t anything special as the lights were turned off and the Scotsman went to try and sleep with you on the other side of the bed, wondering how you could get what you wanted from Drew. You turned away from the man so your back was to him, to think about how you wanted to get his hands on you. He had to still be up....there was no way he ever fell asleep quickly. You rubbed your thighs together in thought, trying your best to ignore the small throb of your clit.
“Drew?” you called to the man trying to sleep just behind you. The man in question hummed quietly. “Drew?”
“What?” he asked, sounding a little tired.
“Are you awake?” you asked him.
“Obviously,” he sighed. “What do you want?” His question had you biting your lip. You knew what you wanted. Those thoughts had your heart racing, mind going places because....you’ve done it so many time with him before. What’s one more time?
Your silence made Drew curious and you heard him roll over behind you.
“What is it?” he asked curiously.
“I want something?” you murmured.
“You want something?” Drew clarified, and you felt and heard him scoot in closer. “And what might that be?”
“I want you....to put your hands on me,” you murmured. Drew moved in closer, so close you could feel his body heat drawing near. He pressed along your back and it made you shiver. One of his large hands fell onto your hip as he used it to draw you back into him, ensuring you were as close as you could get.
“You want me to put my hands on you?” he teased, lowly. His deep voice in your ear made you want to whimper. His lips started to kiss the back of your neck. It made you gasp, your breath starting to shake to feel his hot breath against your sensitive flesh. His hand moved from your hip to under your shirt. It smoothed up your skin before he was able to grope one of your breasts. You tried to lick your drying lips to no avail to them. Even your throat felt dry. “I think my hands are on you now, Princess.”
“N-no,” you whimpered. Quickly, you gripped his large wrist to the hand that was up your shirt, pulling it down and away from your breasts. Drew allowed you to lead his hand downwards....and down to the waistband of your shorts. You were able to slip his large hand inside, leading him under the waistband of your panties as well, until his large fingers were cupping your sex. It was then you noticed how wet you were for his large fingers easily slipped around your folds. Drew groaned.
“You’re so wet for me,” he whispered in awe. You whimpered, head falling back to allow Drew better access to your neck. The Scotsman started to nip and suck a light bruise into your skin.
“Fuck,” you whimpered, more to yourself than to Drew as his large fingers found your clit. He applied the perfect amount of pressure to the little nub that had your hips twitching to chase his fingers as he rubbed large circles against your sex. Little whines and moans left your lips, especially as the man started to rut against your ass. His cock was already hard, and you could feel it through the shorts the both of you were wearing. “Fuck Drew.”
“You like that Princess?” he growled out. You could only nod and whimper as his large fingers rubbed large, hard circles on your clit. “I wonder how fast I could get you to come for me.” In your head, you knew it wouldn’t take much. And you couldn’t tell whether Drew wanted to keep you on edge or get you off as fast as possible. Because the Scotsman would interchange between large, slow circles to fast, smaller ones that aimed for your clit.
“Drew,” you were able to whimper out. He hummed while his hips moved against your ass, providing him enough friction while his hand was getting you off. Just like what you wanted.
“Tell me when you’re close,” he grunted in your ear. You nodded with a whimper caught in your throat. His teeth and lips were real sweet with your neck, something that was a stark contrast to his fingers that were nothing but rough and fast as he continued to rub against your little nub. The thrum of pleasure he was providing that radiated from where his fingers were and ran through every limb like electricity zapping you made your head dizzy. It made it so hard to think of anything but his fingers providing you the best bits of pleasure as he kept going. You almost didn’t realize that between nips and kisses, the Scotsman was giving you little praises here and there. He was calling you a ‘good girl’ and saying how good you were doing for him....his Princess.
Your teeth sunk into your bottom lip at that, at him laying claim to you as if he could. It felt so nice and it went to your head. The euphoria roaring in your ears like white noise. It blocked out every sound but Drew’s little pants and praises in your ear, your own little whimpers, and....the slick noises of your hot, wet sex being toyed with by the man behind you. You could feel your pussy clench around nothing, feel your tummy tighten in a way to signal how close you really were.
“Shit,” you whimpered out. Your hand moved down to grip Drew’s forearm, holding onto it as everything in your being started to tighten and tense up.
“You’re close, huh?” Drew asked. You nodded.
“Y-yes,” you were able to whimper out. Drew gave a small groan as his fingers sped up on your clit. A cry left you to feel the intense pleasure that was pushing you closer and closer to the edge. “I’m right there.” Drew chuckled a little. His hot breath against the back of your neck made you shudder in delight.
“Come for me,” Drew growled into your ear. “Come for me right now, princess.” His words had your eyes clenching shut, taking in everything he was giving to you in order to be pushed over the edge into a blissful climax.
You came with a cry on his fingers. Your body tensed up and curled and Drew followed your body. He kept you close to him, ensuring your body was pressed to his and you couldn’t go anywhere as he rubbed you through your orgasm. The slick noises of it being almost too much as he did so.
Drew’s fingers rubbed you until you whimpered, your body shaking and your hand flying down to grab at his wrist, stopping him.
With a chuckle, Drew kissed the back of your neck. His hand withdrew from your shorts. Peeking down to his digits, you noted how they glistened in the lights that streamed through the blinds of the hotel room.
They were so wet.
You took several moments to catch your breath, feeling Drew’s lips on your neck as you calmed yourself. But....you wanted to take care of Drew as much as he took care of you.
You were quick to turn over on your other side to face Drew. Even though you were still near breathless, panting slightly, you couldn’t help but smile.
“Your turn,” you murmured. Drew licked his lips at your words. His chest was moving with rapid, excited breaths as he moved to lie on his back and you were quick to stay in his arm, throwing a leg over one of his thick thighs. It allowed your body to get close to his, his thigh slotting between yours in a pleasant way Drew held you to his side as you pushed down his shorts enough to release his cock. His harden length fell against his stomach, the head shiny already with precum. “Oh shit,” you whispered as you reached for his cock, your hand wrapping around the length of it.
Drew let out a noise, a small groan as your hand moved up and down his cock., starting out slow but then increasing in speed. His stomach clenched with his pleasure and he pulled you ever so closer to him while you worked over his length. His large hips were twitching, trying to rut up into your hand and chase the feeling of your soft palm on his sensitive skin.
“Fuck,” the Scotsman cursed. Hearing him do so made you smile to yourself. You loved it when he cursed.
“How close are you?” you asked while your thumb ran over his leaking slit. It made the large man gasp, his stuttering. You couldn’t help but peer up at him. Drew’s eyes were clenched shut. Little pants and gasps were leaving his lips. One word for what he looked like crossed your mind as you witness him slowly come undone for you; beautiful.
“Close,” he was able to grunt out before his tongue peeked out to lick his lips. You couldn’t look away from his face, even as his eyes fluttered open. He looked to you before he cupped your head, pulling you towards him so he could kiss you deeply. You sighed into the kiss, reveling in the feeling of his hot tongue licking into your mouth in a sloppy, wet kiss that left you as breathless as he was. You couldn’t help but rut against Drew’s thigh as it was pressing against your sex through your shorts. It felt good to get Drew off and you as well, especially as your hand pumped the thick length faster, and the Scotsman’s hips rutted slightly into your palm, causing there to be enough pleasurable friction to your core.
Drew’s grunts and groans started to increase in volume, so you started to speed up your hand. You wanted to help him get off as fast as he did for you because you knew it’s what he needed. Drew pulled away from your lips with a deep groan. You watched his face screw up as you felt his cock twitch in your hand.
“Come for me, Drew,” you encouraged. With a small moan, he pressed his forehead to yours, breathing in your air as you continued to pump him to the fast rhythm you built up to. “Come for me.” The Scotsman let out a series of small ‘fuck’s’ as his hips started to rut a little faster, chasing the orgasm that was right there.
And then it hit him. With a loud groan, you felt his cock twitch again. His cum spurting from the tip to land on his firm belly. Some of it spilled onto your hand as you pumped him through it, his arm tightened around you as you continued to stroke him off. You looked down to the mess he made. Your teeth sunk into your bottom lip to see it.
Drew reached a hand to your cheek, using it to turn your face back from where you were looking so he could kiss you while you finished him off. A happy noise left you as you kissed him back, pleased that you could provide him euphoria. When his length started to soften, you allowed it to slip from your grasp. Your lips pulled away from his and you smiled when your eyes open to take in Drew’s face. The blissed-out look on his features mixed with a faint amount of sweat that collected on his forehead from exertion.
Drew’s eyes opened to take you in. His own smile formed on his face.
“That was nice,” he sighed. A giggle left you as you gave the man a quick kiss.
“I’m glad you liked that,” you murmured.
“We should clean up,” he said. You looked to your hand and his belly, both covered in his cum. “I’m not getting up.” You sighed, looking back to him.
“Lazy,” you teased. He smirked at you.
“You started this,” he said to you. “And you can clean up.” You playfully gave a huff as you rose from the bed and went over to the adjoined bathroom to the hotel room. You washed your hand first before grabbing a clean washcloth for Drew. You wetted it under warm water, relishing actually getting the chance to have Drew’s hands on you. You rung the rag out with those thoughts in min, turning off the tap before heading back into the room.
The man gave a small groan as he scrubbed a hand over his face, his cock already tucked back into his pants
“You’re gonna kill me, Princess,” Drew said. A giggle left you as you wiped down Drew’s stomach.
“Death by orgasm,” you teased, “what a way to go.” Drew chuckled. You dropped the rag on the floor before curling up into his side. The Scotsman’s arm wrapped around you, his large hand stroking down your side.
“I needed that,” he murmured. You hummed in agreement. “Maybe next time I won’t go try to sleep first thing when I end up in a hotel room with you.” You giggled once more, hiding yourself in his neck.
“Maybe not,” you whispered to him. “Or else you wouldn’t have half the fun like this.” Drew chuckled.
“Now....” he started, eyes peering down at you. In turn, you turned your head to meet his gaze. “Now that I’ve put my hands on you, can we sleep?”
“We can...if you put your lips on me too.” Drew gave a groan but it wasn’t in anger or frustration but playfulness. His eyes met yours once more. With a smile, he obliged in your request once more. His lips meeting yours in a soft kiss that had you reaching up to meet him. His forehead pressed against yours after. “Now get some sleep.” The man relaxed back and you followed suit.
“Goodnight, Drew,” you murmured quietly after several moments of silence.
“Goodnight, Princess,” Drew murmured as if it was a secret, a small whisper. With a faint smile, you allowed your eyes to slip closed and drift off to sleep.
Because, just as much as Drew may have needed this, you did as well.

Tag: @acon1120 @adriennegabriella @amandalynngraves @amariemoore @andie01 @annoyingasian @ar3le @artemisapalla316 @ashkrystal @astolenheartnkiss @axelwolf8109 @baemcintyre @balorstrowmanblackmurphy @beckyann6879 @bigbabyscottishpsychopath @brownskinafro @calicina @calwitch @claymoreme @commando-claymore @crossfitjesusinblackskinnyjeans @curlyafrogirl @daddyslittlevillain @dalia-corven @darlingambrose @dcnmarvelgamergeek @demonqueen29 @drew-is-boo @bakugosteddybear93 @fabulousrockstar @fireyegale @fivefootxo @flawlessglamazon @fullofmelaninsarcasmandepression @gold--gucciempress @hardcoresweet45 @heel-rollins @homeorbust @ihavenowilltolivelol @i-have-saracasm @itsicantbelievethis666 @jazzy-tzw @jeffhardyenigmawwefan @junglecassidy @kalliravenne @ladytea19 @lilred91 @littlesuperstar @madebypointlesswerewolves @malethirsty @meishaabae @melblacc @meremaidqueen @midnight--luna @monocromaticstaircase @morenokatt @moxleysbaby @moxley-unhinged @mox-made-me-do-it @moxnmurphy @moxtiel @neversatisfiedgirl @nevertoofarfromivar @new-zealand-chic @nicolewoo @nothinginlifebutgreif @number1120 @ofbeornandbjorn @pandaluver96 @queenofthearchitect @saiyandude @sassymox @savemeroman @scuzmunkie @sebstanismylife @shieldgirl18 @shortyiceheart @slytherinyourrpants @softmoxymuffin @superrezzy00 @taryn-dibiase @thatnerdwriter @thatpanpal @the-beastslayers-queen @thehoundsofjustice @thepalaceofmelanie @theworldofotps @thewrestlingwarehouse @trashofambrolleigns @twistedbeautifully @unabashedwrestlefics @undiscovereddisneyroyalty @undisputedmorgs @unprettypeony @voidstrugh @waywardwrestlewritingwaif @welcome-to-lovecraft-country @xbreezymeadowsx @yaint-me @youcantreignonmyparade @drewmcintyrekoccsrocbwdgfan @nerdpeterparker
206 notes
·
View notes
Text
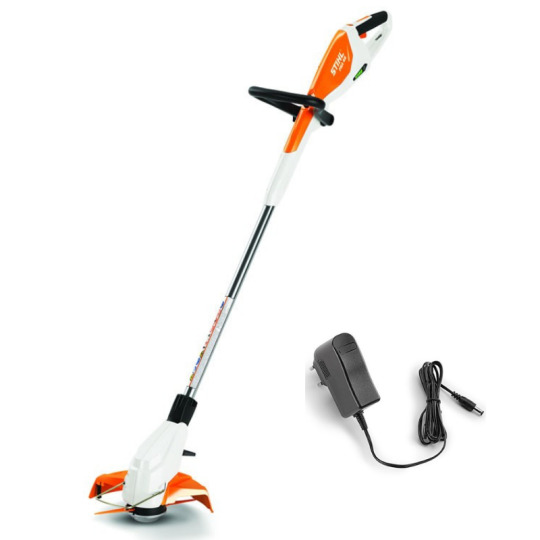
Cordless Grass Strimmer

Cordless Grass Trimmer Reviews
Bosch Cordless Grass Strimmer
Cordless Grass Trimmer/edger
Swift Garden cordless battery electric powered garden tools. Including a full range of interchangeable 40v tools which include mowers, chainsaw, grass & weed trimmer, leaf & debris blower, hedge trimmer, polesaw & log reach hedge trimmer. Additional to this are a.

Cordless Strimmers Cut the Cord with Our Range of Cordless Strimmers. Here at The Green Reaper, we’ve got a great range of eco-friendly cordless battery-powered grass trimmers for you to choose from, which give the user the freedom to trim overgrown areas in the garden without being restricted by a power cord.
Cordless Grass trimmers Cordless grass trimmers are perfect for trimming areas not close to a power outlet. They can be powered in several ways, but do not rely on a power cord to work, so are a versatile choice for your garden.
© Provided by gardening etc. Bosch UniversalGrassCut 18–26 cordless close up of spool
The Bosch UniversalGrassCut 18–26 cordless grass trimmer features telescopic height adjustment and an ergonomic V-shaped handle. Lightweight and with an automatic feed for the spool line, it’s been designed to make trimming lawns, borders and edges, effortless.
Having pretty much left our split-level garden to its own devices since October, the top two lawns were becoming rather unruly. With no clear edges they were certainly in need of trimming before we could attempt to attack them with the lawn mower. Our bottom lawn (the largest of the three), is maintained by a robotic lawn mower, which is great, but doesn’t mow closely around the borders, bottom fence line or steps. Therefore, this provided another challenge for the UniversalGrassCut.
See how it did prepping my garden for summer, and find out whether it deserves a place on the list of the best strimmers.
Bosch UniversalGrassCut 18–26 cordless grass trimmer specifications:
Power type: 18V 2.5Ah Li-ion battery
Battery life: 40 mins
Charging time: 1 hour
Best for: trimming and edging
Cutting width: 26cm
Weight: 2.7kg
Noise Level: A-rated
Getting started
We moved into our house a year ago, and it’s the first house we’ve owned that has had a lawn. Therefore, apart from watching my dad get angry, every time his old corded strimmer hit a rock, I have had no experience with strimmers and the Bosch UniversalGrassCut was the first one I’ve ever used.
Firstly, I breathed a huge sigh of relief when I unpacked the box and found only one instruction manual. Almost all the recent appliances I have purchased come with at least four or five manuals, so it was nice to see everything condensed into one A5 booklet.
After reading through the safety instructions and noting that eye and ear protection should be worn, plus kids and pets should be kept at a good distance, I moved on to setting up the machine. As well as written instructions, there are labelled diagrams relating to each stage of setup in the back of booklet, which proved to be useful.
I quickly skimmed over the assembly instructions and read that the battery needed to be charged, which I did so promptly. I’d have listed this as the first step (rather than after assembling the strimmer), so anyone following the instructions step by step could save a bit of time. All I had to do to assemble the strimmer was mount the protection guard, secure it with a screwdriver, fold out the handle, adjust the telescopic working position, mount the wheel and fit the spool of cutting cable.
This was fairly straightforward until it came to fitting the spool, as this is not listed as an initial step in the assembly instructions. It talks about operation, before it mentions mounting the spool and even then, it’s written as if there is already a spool in place.
This was the only step I struggled with and had to double check with my partner that I was doing everything right. He agreed that this was confusing, and we couldn’t work out whether we needed to pull any line out of the spool or assemble anything. After looking through the pictures again, we found that the spool was all ready to go as it came and all we needed to do was click it into place. Setup took 20 minutes, but it would have been a lot quicker without the spool issues.
What is the Bosch UniversalGrassCut strimmer like to use?
Once the battery is charged, it’s easy to slot it in and you’re ready to go. It has a safety lock button which requires pressing, before then pressing the on/off switch, which is a trigger on the bike-like handles. You keep the trigger pressed to operate the strimmer.
Lawn trimming
The UniversalGrassCut has three different cutting positions and there is a foot pedal to switch between each. This is slightly flimsy and it’s not completely clear which position the strimmer is in without moving it through all three positions, to be sure.
For lawn trimming, the strimmer must be set at the highest position (a 48-degree angle) and once set, it’s as easy as moving the strimmer from left to right. The wheel ensures that you do not get too close to any walls, trees or anything that protrudes out of your lawn (bird tables, washing lines etc). The wheel was useful in our garden as we have walls splitting the three levels, so I could use the wheel to guide the strimmer along the wall-edge and the strimmer did a great job of trimming the grass, right up to the wall.
The grass trimmer has been designed to be ergonomically comfortable and to be used with a natural, upright posture. I found this to be true and trimmed the lawns with comfort and ease. However, my partner is 6ft 4in and he found that the telescopic handle did not come up high enough and felt he stooped over when using it. This is something taller gardeners might want to bear in mind.
The strimmer did a good job of trimming the lawn and easily cut through large clumps of grass, weeds and dead plants.
Edging
To create nice, clean edges for the lawn, the foot pedal needs to be pressed so the strimmer sits at a 36-degree angle. This is the hardest position to achieve and you need to ensure it clicks into place right in the middle.
The instructions are a tad confusing here and it took a bit of trial and error to get the desired effect. It says to 'guide the trimmer along the edge of the lawn' and 'by using the wheel you avoid contact with solid surfaces'. You also have to flip the handle 180 degrees and turn the strimmer clockwise to get the correct working position, so the wheel has contact with the ground as you roll it along the edge. I found that you needed to work out how far away from the edge the wheel needed to be to cut a straight line where you wanted it. In our lawn, the grass has made its way into the paving in some areas, so I could cut a line through the clumps of grass to show where the edge of the lawn should be. We will have to remove the grass outside that perimeter by hand.
Once you have the hang of it, it did quite an effective job and worked well around the top of the walls, edges of the steps and where the lawn meets the patio.
Check out our selection of lawn edging ideas for those awkward lawn-meets-patio areas
Cutting in awkward places
The final cutting position is for trimming around trees, plants and hard-to-reach places, such as under benches. For us, this feature came in useful for cutting around the fence posts at the bottom of our garden and a silver birch. The foot pedal sets the strimmer at 24 degrees and the wheel acts as a plant protector, shielding plants, whilst still achieving a close trim.
Noise

As noted in the instructions, ear protection is advised. With a large, open garden, I found that the Bosch UniversalGrassCut was no noisier than a lawn mower. I would be mindful of using it when I know my neighbours are relaxing, or for long periods of time.
Ease of use
Overall, for me, once I had set the strimmer up and worked out what to do with the spool, the strimmer was very easy to use and I was impressed that I managed to trim almost the whole garden in one go, which took about 40 minutes. I recharged the battery fully and then completed the edging which took a further 10 minutes and there was plenty of battery left. Bosch claims that the battery is powerful enough to allow the strimmer to trim the edges of eight tennis courts in one charge. I think you would have to be well practiced at using the machine for this to be true!
A bonus for anyone who owns any other cordless Bosch appliances, is the 18V battery is part of their 'power for all alliance', which means the battery is interchangeable between tools, whether this be drills, mowers or vacuums. We unfortunately do not own any of these, but I would consider purchasing other Bosch appliances with this battery system, especially as I am impressed with how well the UniversalGrassCut works.
Additional features
The plant protector wheel is a great feature that not all strimmers have. Although this was my first time trimming the lawn and borders, no plants were harmed unintentionally. It makes edging easier too and I imagine using a strimmer without a wheel guide would cause more wear on the spool line.
The IntelliFeed system for the line is also hugely beneficial, as it automatically rolls off the line as necessary, retaining the cutting diameter. This means that you don’t have to keep stopping to manually adjust the spool, which is both safer and more efficient.
How does it rate online?
The majority of reviews for the UniversalGrassCut are positive, with many praising how lightweight and easy to use the appliance is. Many also commend the battery length and how well it copes with trimming a variety of plants, from long grass to nettles.
Some reviewers also own other Bosch products with the battery share option and were pleased with how well the strimmer works alongside their other Bosch tools.
The only negative remarks echo those of my partner in that the telescopic handle simply does not go long enough and some say the model feels a bit cheap and ‘plasticky’, to which I would disagree. If the model was made of other materials, it would be a lot heavier and more difficult to use.
The average ratings are between four and five stars, making it rate well against similar models which are a similar price. I would highly recommend the Bosch UniversalGrassCut 18–26 cordless grass trimmer.
About this review and our reviewer
This cordless grass trimmer was tested by reluctant gardener Bethan Davis, a PR and events officer who lives in the Midlands. She has just had her second child and with two kids under the age of five, a pristine garden isn't always easy to maintain.
She put the strimmer through its paces in a medium-large garden with lots of borders to contend with and an awkward fence adjoining a field. The garden also has several levels and lots of walls, so a strimmer is needed for lots of areas a mower can't reach.
Which? has reviewed ten new grass trimmers, including eight cordless models from top brands including Bosch, Black & Decker, Gtech and Stihl. Some were excellent and won us over with their mix of power and precision, while others left us underwhelmed.
Cordless grass trimmers have some fundamental advantages over corded electric and petrol models. There’s no danger of cutting through an electrical cord and you won’t have to drag the cord behind you or find an extension cord to get to the end of the garden. Compared to petrol models they are a breeze to start, lighter, less noisy and vibrate less.
Find out which we thought were the best of the bunch by looking at our grass trimmer Best Buys.
Cordless Grass Trimmer Reviews
Value for money cordless strimmers
You will have to pay a bit more for a cordless grass trimmer. Our cheapest general-purpose cordless grass trimmerfor use around the garden is £77, compared to around £50 for our cheapest Best Buy corded electric grass trimmer. The most expensive heavy-duty cordless grass trimmer, designed to make short work of long grass and weeds, costs £345 compared to around £150 for a similar petrol model. To find out how much you should spend on a grass trimmerthat’s right for you, read our guide to buying the best grass trimmer.

The real expense comes in buying a new battery. All the cordless grass trimmers we tested lasted just 15 minutes before the battery ran down in our demanding tests. So you might find you need a second battery to finish all your trimming jobs in one go, as some of the batteries take over four hours to recharge. The most expensive battery from the models were tested is £110, while even cheap models have batteries that cost in excess of £40.
Be careful when looking for a bargain as some cordless garden tools are sold without a battery and charger. If you already own a DIY or garden tool from your chosen grass trimmer brand, you may be able to use the battery and charger that came with that tool. Otherwise, you will have to add the cost of both the battery and the charger, making that ‘bargain’ a lot more expensive. Find out more in our guide to cordless grass trimmers.
Bosch Cordless Grass Strimmer
Cordless grass trimmers tested
We tested these grass trimmers:
Cordless Grass Trimmer/edger
We also tested these corded electric models:
0 notes
Text
Leica's CL gives an iconic design the modern tech it deserves
Up until recently, Leica built lovely, expensive cameras that no-one ever called "state-of-the-art." The TL2, however, recently marked a change in direction. Not only was it relatively cheap for a Leica at $1,950, but it was endowed with modern features like 4K video. It's pushing that idea further with the CL, its new $2,795 flagship 24.2-megapixel APS-C mirrorless that looks and feels more like an old-school Leica, thanks to a new body and manual dials. At the same time, it's got the tech you'd expect in a modern camera, including an all-new electronic viewfinder.
Leica's aim with the TL2 was to bring modern performance and specs to the T, its first APS-C camera. It replaced the sensor and electronics wholesale, endowing it with a new 24-megapixel sensor, 4K video, a touchscreen interface and relatively fast autofocus performance. "Everything the customers asked for, we gave it to them in July with the TL2," Leica Product Manager Maike Harberts told Engadget.
What it was missing, though, was a Leica-like tactile feel, which is where the CL comes in. The new model has the same electronics as the TL2, but looks much like the German company's more traditional M or Q full-frame models with a smooth, low-profile metal body and manual dials.
More importantly, it has a new 2.36 million dot electronic viewfinder (EVF) built expressly for it. "It's for people who love to take the camera to their eye, adjust the most important values and just be in the zone and take pictures," explained Harberts. In exchange for that manual functionality, the CL has a smaller 3.0-inch touchscreen with menu functions driven by the D-pad. Touch options are reserved for reviewing and zooming in on photos.
Looking at the numbers, the Leica CL has the same 24.2-megapixel sensor, 49-point contrast autofocus and Maestro II series processor that's on the TL2. That gives the CL 10 fps burst shooting speeds in both mechanical and electronic shutter modes, letting you capture around 33 RAW images before the buffer fills.
ISOs range from 100 to 50,000, while the shutter speed goes up to 1/8000th of a second in mechanical mode and 1/25,000th electronically. The electronic shutter makes nary a peep, which is good news for street or golf photographers. Unfortunately, there's no optical image stabilization on either the body or TL lenses. The only way to get it is by using a full-frame, stabilized SL lens, which can be mounted without an adapter, but will cost you a hell of a lot more than a TL lens.
AOL/Steve Dent
For video, you get (yay!) 4K at 30 fps, or 60 fps 1080p, but no microphone input (boo!), so you're limited to the onboard mic or an external recorder. It's fair to say, however, that not many folks in Leica's intended market will be using the CL for anything other than casual video.
You also get WiFi -- the only way to transfer pictures directly from the camera, since there's no USB port -- and a single UHS-II-supported SD card slot. The TL2 didn't have great battery life, and the CL is even worse, letting you shoot about 220 photos on a charge. In other words, order at least a spare battery or two.
I've had a few days to play with Leica's CL, equipped with a brand new 18mm f/2.8 pancake lens. Together, they make a combination that's ideal for street photos, something Leica is famous for, so that's what I tested in my Paris neighborhood.
Built in Germany, the body is magnesium with anodized aluminum top and bottom covers. If you're into that classic Leica style, it's hard to call this camera anything but "gorgeous," especially if you add the optional leather half case. It's pretty light at 403 grams with a battery, less than Sony's A6500 (453 grams) and the Fuji X-T2 (503 grams). With the pancake lens, it's about as light an APS-C interchangeable-lens camera can be, and I could (just) fit it in my jacket pocket.
The top left button/dial combo is reserved for aperture or shutter, depending on the mode, but the right-hand dial can be programmed for shutter, exposure compensation, ISO and five other settings. The two dials and their buttons let you change most settings, but it's not quite as nice as having, say, five dedicated dials like you get on the X-T2. There are also three rear buttons ("play," a programmable "function" and "menu") and a D-pad. There's a small, backlit screen on top that shows essential settings like shutter speed, aperture and exposure compensation.
The camera was fairly easy to learn, and I could indeed shoot without taking it away from my eye. The EVF is as bright and fast as promised and delivers accurate colors. The rear display is visible in sunlight, but it's not tiltable like on most of the CL's rivals. That's unfortunate, especially for low- or high-angle street photos, but then again it would add weight and take away from the camera's solid-slab-of-metal feel.
Thanks to the silent electronic shutter, it was easy to be discreet while shooting. That said, the mechanical shutter makes a very satisfying sound, so I was sort of torn between the two. Given the lack of stabilization, you may want to go with the electronic mode in low light to reduce vibration.
That lack of stabilization isn't a huge issue on a wide lens like the 18mm; I could shoot sharp photos at a shutter speed as low as 1/25th of a second. On a longer, heavier lens it would be, though, and shooting hand-held video is pretty much impossible unless you have steadier hands than I do.
With the color set for "natural" (there's also "vivid," "standard" and two black and white settings), the Leica CL produced accurate colors that were just on the side of "warm" that I prefer, with fairly punchy contrast. I took most of the photos at ISO levels of between 1,600 and 6,400, and found noise levels to be very acceptable. When you push it up to 12,800 and beyond, however, images start to get a bit crunchy. The CL's DNG images carry a decent amount of image data (14 bits), so it's easy to pull details out of sections that are too dark or too bright.
In sum, the CL isn't terribly different from the TL2, but Leica is clearly pitching it at Leica-philes who prefer the classic form and dials. The biggest addition is the built-in electronic viewfinder that goes a long way to transforming it into a rangefinder-like model beloved by fans of the brand. What's missing compared to rivals is image stabilization and USB transfers, items that probably aren't deal-breakers for most wannabe Leica buyers.
The $2,795 price tag for the CL (in anodized black only) isn't cheap, but it is still less than most Leicas, making it feasible for well-off amateurs and professionals. Leica glass is also notoriously expensive: The 18mm f/2.8 pancake lens (in black or silver) is now Leica's cheapest TL lens at $1,295, while the 18-56mm f/3.5-5.6mm model is around $1,695, and you can get the CL in a kit with those lenses for $3,795 and $3,995, respectively. The Leica CL mirrorless arrives at the end of November.
- Repost from: engadget Post
0 notes
Photo

New Post Honor 7X Review: King of Mid-Ranger Smartphones? has been published on http://www.reviewcenter.in/6817/honor-7x-review-king-mid-ranger-smartphones/
Honor 7X Review: King of Mid-Ranger Smartphones?
Earlier we had updated our readers, about the upcoming Honor 7X, which is set to launch in Indi on 7th December. The Honor 7X is an upgrade to the Honor 6X for sure, with improvements visible everywhere, and Honor is expected to price it aggressively just like the Honor 6X and recently launched Honor 9i. As it has been quite some time, since I have been using the phone, so I guess it’s the time when I share my thoughts about the phone in this Honor 7X Review, so that in case you’re planning to buy it, it’s a must-read, to know whether it meets all your needs or not.
Honor 7X Review
Design and Display
The Honor 7X has a full-metal uni-body design, that is as per the latest trends and due to the all-metal body, the phone feels really premium in hand. The edges are curved, and these make the Honor 7X very comfortable to hold. The aluminum chassis provides protection and adds rigidity.
(adsbygoogle = window.adsbygoogle || []).push();
On the bottom edge, there is the micro USB port along with a 3.5mm jack- A mix of old and new. Honor has not opted for USB-C yet, but it’s good that they provided a headphone jack on the Honor 7X. The speaker is also at the bottom edge, and the sound output seems to be loud enough.
The dual camera module, along with the LED flash is on the top left corner on the rear of the Honor 7X and the fingerprint sensor is placed below the sensor, at the center to maintain the symmetrical design.
The display of the Honor 7X is the first upgrade when compared to the Honor 6X, the display is bigger and better, with a size of massive 5.93-inch. And by minimizing the bezels, Honor put this kind of huge, almost 6-inch display into the phone while maintaining the footprint of a 5.5-inch phone.
The bezel-less display provides a great experience while watching videos or playing games. And, the 18:9 aspect ratio display with full HD+ resolution (2160 x 1080) is vibrant, the colors are well saturated and the display is probably the best we have seen mid-ranger at such a price, considering the fact that the Honor 7X is priced for only Rs 12,999 in India. The viewing angles of the display are good, and it is well lit, even in outdoor conditions under direct sunlight everything on the screen is crystal clear and not a pain in the eyes.
Performance
The Honor 7X is powered by a Kirin 659 processor Octa-core processor (4×2.36 GHz Cortex-A53 & 4×1.7 GHz Cortex-A53), coupled with 4GB of RAM. The Honor 7X is absolutely smooth and doesn’t lag at all. As a multitasker, I was enjoying YouTube videos, while switching between email, replying to texts, browsing the web and between multitasking, there were no lags at all.
I never expected that it will be so responsive and fluid, but well it is kinda comparable to flagships out there with 30K range, if we consider the multitasking and doing daily tasks. Now, many of you are probably addicted to some mobile games and would ask about gaming performance, well the Mali-T830 MP2 inside the Honor 7X handles casual games perfectly, there are no lags or frame drops.
I mostly play Clash Royale, 8 Ball Pool, Daddy was a thief and Asphalt 8, and among them, gaming experience was totally fluid. There were no lags at all and we hardly got to see any frame drops as well in the gameplay. Huawei has done a lot of work to make sure applications and game take full advantage of the 18:9 display. Huawei tested Honor 7X with over 200 top games and 1500 applications for compatibility and the apps which don’t support the display ratio yet, will automatically expand to take up the full screen without ruining the user experience.
There’s 32GB/64GB of storage onboard, which is enough for most users I guess and well, you can also pop in a microSD card having a capacity up to 256GB, given that you will be able to use only one SIM card as it comes with a hybrid SIM slot on the Honor 7X.
There is a 3340 mAh non-removable battery inside the Honor 7X which is good for regular usage. During the phase of amount two weeks while using the phone, the daily routine was checking emails, using social media and messaging apps, watching some YouTube videos and playing some casual games mostly, but with the 3340mAh battery, it needs to be plugged in sometimes in the evening if you panic about low battery.
Camera
When Honor 6X was launched, it impressed many, including us with the camera. The camera was the killer factor on the Honor 6X, it’s ancestor and it was one of the first mid-range phones to have dual camera setup which could provide great bokeh effect, and now the Honor 7X has an even better camera setup.
There is a 16 MP rear camera, along with a 2 MP depth sensing sensor to provide shallow depth of field and add bokeh to macro shots and portraits. The rear camera of the Honor 7X takes impressive shots, with a good amount of detail, perfect saturation levels, and natural bokeh effect. The good thing about Honor 7X is that the phone doesn’t make your portraits look artificial at all, with the bokeh.
#td_uid_1_5a303b8eef5af .td-doubleSlider-2 .td-item1 background: url(http://www.reviewcenter.in/wp-content/uploads/2017/12/IMG_20171205_134549-80x60.jpg) 0 0 no-repeat; #td_uid_1_5a303b8eef5af .td-doubleSlider-2 .td-item2 background: url(http://www.reviewcenter.in/wp-content/uploads/2017/12/IMG_20171205_134304-80x60.jpg) 0 0 no-repeat; #td_uid_1_5a303b8eef5af .td-doubleSlider-2 .td-item3 background: url(http://www.reviewcenter.in/wp-content/uploads/2017/12/IMG_20171205_133915-80x60.jpg) 0 0 no-repeat; #td_uid_1_5a303b8eef5af .td-doubleSlider-2 .td-item4 background: url(http://www.reviewcenter.in/wp-content/uploads/2017/12/IMG_20171205_133702-80x60.jpg) 0 0 no-repeat; #td_uid_1_5a303b8eef5af .td-doubleSlider-2 .td-item5 background: url(http://www.reviewcenter.in/wp-content/uploads/2017/12/IMG_20171205_133541-80x60.jpg) 0 0 no-repeat; #td_uid_1_5a303b8eef5af .td-doubleSlider-2 .td-item6 background: url(http://www.reviewcenter.in/wp-content/uploads/2017/12/IMG_20171205_133502-80x60.jpg) 0 0 no-repeat; #td_uid_1_5a303b8eef5af .td-doubleSlider-2 .td-item7 background: url(http://www.reviewcenter.in/wp-content/uploads/2017/12/IMG_20171205_133449-80x60.jpg) 0 0 no-repeat; #td_uid_1_5a303b8eef5af .td-doubleSlider-2 .td-item8 background: url(http://www.reviewcenter.in/wp-content/uploads/2017/12/IMG_20171205_133333-80x60.jpg) 0 0 no-repeat; #td_uid_1_5a303b8eef5af .td-doubleSlider-2 .td-item9 background: url(http://www.reviewcenter.in/wp-content/uploads/2017/12/IMG_20171119_120214-80x60.jpg) 0 0 no-repeat;
Honor 7X Rear Camera Samples
1 of 9
The rear camera includes modes like night-shot, panorama, HDR, portrait mode, pro-photo, capture smiles, light painting, time-lapse, slow-mo and watermark. In low lighting conditions as well, the Honor 7X performs quite good.
#td_uid_2_5a303b8ef0fd0 .td-doubleSlider-2 .td-item1 background: url(http://www.reviewcenter.in/wp-content/uploads/2017/12/Screenshot_20171211-181934-80x60.jpg) 0 0 no-repeat; #td_uid_2_5a303b8ef0fd0 .td-doubleSlider-2 .td-item2 background: url(http://www.reviewcenter.in/wp-content/uploads/2017/12/MVIMG_20171211_180244-80x60.jpg) 0 0 no-repeat;
1 of 2
The 8 MP front camera on the Honor 7X captures selfies with a good amount of detail, in good lighting conditions and the best thing is that Honor didn’t just concentrate on the rear camera, and the front camera is particularly good for video calling as it is capable of shooting at 1080p at 30fps.
#td_uid_3_5a303b8ef154e .td-doubleSlider-2 .td-item1 background: url(http://www.reviewcenter.in/wp-content/uploads/2017/12/IMG_20171205_133554-80x60.jpg) 0 0 no-repeat; #td_uid_3_5a303b8ef154e .td-doubleSlider-2 .td-item2 background: url(http://www.reviewcenter.in/wp-content/uploads/2017/12/IMG_20171211_181014-80x60.jpg) 0 0 no-repeat;
Honor 7X front camera samples
1 of 2
Outdoor Selfie
Portrait Selfie
Like rear, the front camera is also capable to shoot bokeh selfies/portrait images which uses software to blur the background of the person. It works in a good lit area and indoors which is more than enough for a device at this price range. Although that reminds me of Honor 9i, which has dual camera setup at the front and the portraits clicked using that are more refined.
Software: Nice Custom UI with fluid interface
The Honor 7X runs Android 7.0 Nougat out of the box with company’s EMUI 5.1. Though Honor uses a custom skin, the EMUI 5.1 is pretty lightweight and doesn’t gulp all the free memory. EMUI 5.1 lets you choose between standard layout with all apps on the home screen or an App Drawer, there is the option to interchange positions of navigation keys, a floating dock with some controls can be added and there are features like motion control, one-handed UI, voice control and more.
#td_uid_4_5a303b8ef1ae7 .td-doubleSlider-2 .td-item1 background: url(http://www.reviewcenter.in/wp-content/uploads/2017/12/Screenshot_20171211-181641-80x60.jpg) 0 0 no-repeat; #td_uid_4_5a303b8ef1ae7 .td-doubleSlider-2 .td-item2 background: url(http://www.reviewcenter.in/wp-content/uploads/2017/12/Screenshot_20171211-182043-80x60.jpg) 0 0 no-repeat; #td_uid_4_5a303b8ef1ae7 .td-doubleSlider-2 .td-item3 background: url(http://www.reviewcenter.in/wp-content/uploads/2017/12/Screenshot_20171211-182212-80x60.jpg) 0 0 no-repeat;
1 of 3
There are a bunch of other useful features like App Cloner and second space, but EMUI 5.1 is pretty much bug-free and as Honor is consistent in case of software updates, I guess new features, bug fixes will be provided regularly, so overall the software experience is fluid and smooth.
#td_uid_5_5a303b8ef2308 .td-doubleSlider-2 .td-item1 background: url(http://www.reviewcenter.in/wp-content/uploads/2017/12/Screenshot_20171211-182132-80x60.jpg) 0 0 no-repeat; #td_uid_5_5a303b8ef2308 .td-doubleSlider-2 .td-item2 background: url(http://www.reviewcenter.in/wp-content/uploads/2017/12/Screenshot_20171211-191628-80x60.jpg) 0 0 no-repeat; #td_uid_5_5a303b8ef2308 .td-doubleSlider-2 .td-item3 background: url(http://www.reviewcenter.in/wp-content/uploads/2017/12/Screenshot_20171211-181817-80x60.jpg) 0 0 no-repeat;
1 of 3
Camera add-ons
Split screen experience is better on 7X as if automatically resizes the window you’re working on when you need to type in it and it automatically accumulates the space required for it. First introduced in Honor 8, you can use gestures on the fingerprint scanner to perform various tasks like pulling down notifications, taking pictures, answering calls and many more.
Final Verdict
The Honor 7X keeps the promises of Honor’s great camera performance, along with providing raw power to do multitask seamlessly and have a great user experience. Priced at Rs 12,999 for 32 GB storage and 64 GB storage variant for Rs 15,999, Honor 7X is a perfectly priced smartphone and is available in 3 colors i.e. Aurora Blue, Gold and Black. Honor 7X was the best selling smartphone in world’s biggest 11.11 Alibaba sale and is a global best-seller budget smartphone.
0 notes
Text
Rebuilding an FE Engine, Part 1
When our buddy Danny Valenzuela’s 360ci Ford motor started leaking oil and then shortly thereafter developed a slight rod knock, we knew it has high time for him to start thinking about his options. He wanted to stick with a Blue Oval mill to power his ’69 F-100, so I thought a 302ci crate engine might be a good choice. Much to my chagrin, he decided to stay true to the original blueprint and rebuild the 360 FE. My experience with Ford engines is just vast enough to know that nothing fits, nothing interchanges, and the distributor is in the wrong spot; or the right one depending on who you ask!
As it turns out, rebuilding the FE was pretty painless once we got all the odds and ends sorted; we were missing a few things by the time we got around to gather the components to actually rebuild the motor following its initial teardown some two years prior, but that’s another story.
First things first, I bought a couple “How-To” books online and perused them cover to cover before we even began. Then, armed with a bit of background knowledge, we went shopping. Turns out the 360 that came in the F-100 trucks of the time are very similar to the FE engines that were powering Ford’s passenger cars since the time of Ike. Features such as its long cylinder block made for a stout bottom end that found its way into numerous forms of racing in the ‘60s, including a checkered flag at Daytona in 1967 for Mario Andretti in an FE-powered Fairlane. So much for the old boat anchor moniker.
Determined to build an FE capable of holding its own amongst Coyotes, LS engines, and the variety of small block options regularly seen, we set out to fasten together ourselves a formidable FE.
The backbone of our build is a forged Scat crankshaft featuring a 4.125-inch stroke and a set of 6.700-inch Scat rods that, when mated to the 4.090-inch Mahle pistons, will result in a 434ci motor. An Edelbrock Performer camshaft and lifter kit with an advertised duration of 296-degrees, will ensure the cylinders maximize their volumetric efficiency.
For now, that’s about as far as we’ll get with this engine build, but stay tuned for the full fastenin’ of our fire-breathing FE as we cover the ins and outs of top end assembly next month, followed by a dyno session test and tune at Westech Performance Group.
Here’s our FE block fresh from the machine shop. The mains have been align bored and honed, and the cylinders have been machined to accept a 4.090-inch piston. We’ve also chased all the threads with an ARP thread chasing kit. The block and components check out, so it’s just a matter of slapping everything together now! But first, the block needs to be masked and sprayed in Ford Blue High Temp engine paint from Summit Racing.
With the paint dry and the block thoroughly cleaned, it’s time to install a set of cam bearings into the fresh block using a COMP Cams cam bearing installation tool from Summit Racing (#CCA-5312).
The cam bearing installation tool utilizes five changeable mandrels to drive in each cam bearing. The diameter of the bearings dictates which mandrel is used, in this case, number three.
The centering cone is installed on the extension rod followed by the mandrel and we’re ready to drive in our new King cam bearings.
The FE cam bearings feature a common inside diameter but a different outside diameter, with the smallest at the rear and progressively growing in size towards the front of the block. This allows the cam bearings to slide through to their respective location with unimpeded.
Each cam bearing is placed on the mandrel of the installation tool and the mandrel adjusted until the bearing is nice and snug. The tool is then slid through the block until the corresponding cam bore is reached.
The installation tool utilizes a tapered centering cone that maintains the bearings alignment as it’s installed. A few solid blows is all it takes to drive each bearing in place.
The rear four cam bearings can be installed in any orientation as the block features an oil groove that runs the entire diameter of the cam bearing. The front bearing however does not feature an annular groove so care needs to be exercised so that the oil holes in the bearing line up with those in the block. We installed the front bearing from the inside out so that the installation tool can use the rear of the block to align the cone and assembly, ensuring that the bearing is installed nice and straight.
Next, it’s time to install the freeze plugs. We used a Milodon kit from Summit Racing (#MIL-34036). A thin coat of Black RTV on the mating surface of each plug helps ensure a leak free installation.
In the valley, there are five galley plugs that need to be installed; two at the rear of the oil feed crossover, one at the front of the crossover, and one horizontally in the distributor bore.
Lastly, the cam and galley plugs at the rear of the block are installed. Note the use of ARP thread sealant on the screw-in plugs as well as the oreintation of the cam plug, opposite that of the other freeze plugs.
To actuate the valves on our FE with a little attitude, we’ll be using an Edelbrock Performer Series cam and lifter kit (#7106). This cam features 108-degree lobe separation with 296-degrees of advertised duration and 0.572-inch lift.
A liberal amount of camshaft installation lube is used to prevent lifter failure at startup and initial break-in.
We opted to go big rather than go home when it came to the displacement on our original 360ci engine and for that end, we chose a Scat crank with a 4.125-inch stroke mated to a set of 6.700-inch rods. For comparison sake, stock 360 specs call for a 4.050-inch stroke and a 6.540-inch rod. Coupled with a 4.090-inch bore our FE should yield around 434 cubic inches.
King bearings will be used for the crank and rods as well, available from Summit Racing.
With the upper half of the main bearings in place and coated in assembly lube as well as the block side rear main seal, Danny drops the stroker Scat crank in the FE block for the first time.
Another light coat of assembly lube is applied to the crank before the four front lower main bearings and caps are installed. The rear cap will be installed shortly…
But first, we need to check the crankshaft’s thrust or endplay. The main cap fasteners on the first four caps are installed finger tight and then caps number one, two, and four are torqued to spec (95ft lbs.). On Ford FE engines, the thrust bearing is located in the number three main. Next, a dial indicator is installed on the end of the block so as to measure the crankshaft’s thrust. A screwdriver is used to move the crank fore and aft in the block, noting the dial indicator’s reading. Proper crank thrust should be between 0.008-0.0012-inch.
Our setup came in one the low side, with 0.008-inch thrust.
With acceptable crankshaft thrust, the rear main cap can be installed and torqued to sped along with the rear main seal and side-seals. First the bearing is installed and lubricated…
…followed by the Fel-Pro rear main seal and side-seals. Note the rear main seal is rotated slightly in its slot. This is so that the upper and lower seal’s seams don’t line up with the cap and blocks, a helpful trick for a more effective rear main seal.
To further aid the rear main seal, Black RTV is use between the rear main seal and the side-seals.
With the rear main installed and torqued to spec, a nail is driven into each side seals, effectively pinning them in place and forcing them against the block, improving their sealing capabilities.
Our FE has apparently bore witness to a previous overbore, necessitating the use of 4.090-inch pistons. We’ll be using Mahle Power Pak forged inverted dome pistons to fill the holes in our block.
Our Mahle pistons ship complete from Summit Racing with a performance ring set that must be filed to spec depending on the application. I’ve done this by hand in the past, so needless to say that for this project, I went out and bought a Summit Racing Ring Filer (#SME-906000) to get our rings to size with ease.
As each ring is filed, it’s placed squarely in the bore approximately one-inch from the top. A piston works well to get the ring nice and square in the bore.
Then, each ring is measured with a feeler gauge until it’s within manufacturer’s specification. For our setup, that’s 0.014-inch for the second compression ring and 0.018-inch for the top compression ring. Once the rings check out, they’re left in their respective bore until it’s time to assemble them onto each piston. This ensures that the rings are measured and fit to the proper cylinder.
With the rings filed and in their respective bores, it’s time to assembly the pistons, pins, and rods. Wire clips are used to hold the wrist pin in place. These can be a bit cantankerous at first but are actually fairly easy to install once the proper technique is utilized. Insert one end in the annual groove and then use the machined hole to twist the rest of the clip into place using a small screwdriver or pick. Ensure each clip is fully installed, you don’t want these coming loose later!
With one clip installed, the piston pin and Scat rod can be mated to the piston. A liberal amount of assembly lube on the pin ensures the rotating assembly isn’t damaged during the break-in period.
Another wire clip is installed on the opposite side of the piston and this assembly is ready for rings.
The rings are assembled to each piston using a Summit Racing piston ring installation tool (#OTC-4839).
Each ring has a specific orientation. For the driver’s side pistons, the bottom oil ring rail gap should be at the 8 o’clock position, the oil ring expander gap between 11 and 1 o’clock and the top oil ring rail gap at 4 o’clock. The lower compression ring’s gap should be a 6 o’clock, while the top compression ring’s gap at 12 o’clock. For the passenger side, the orientation is flipped.
An ARP piston ring compressor, sized to the exact bore spec, makes installing the piston assembly a breeze and prevents the ring assembly from catching on the deck of the block. A light coat of oil on the piston, installation tool, and the cylinder ensures easy assembly. Half the rod bearing is installed on the connecting rod before installation of the piston assembly. Heed need be paid to ensure that the con rod bearing goes on in the proper arrangement, the chamfer should face the large fillet on the crankshaft.
As each connecting rod and piston assembly is installed, the rod cap, bearing, and bolts are installed and torqued to 35lb ft, then the crankshaft is rotated to ensure everything rotates smoothly. If all’s well, the ARP rod bolts are then torqued to their recommendation of 70lb ft.
Since our Scat connecting rods came equipped with ARP rod bolts, we thought it a good idea to upgrade the rest of our fasteners to suit, including the main cap bolts.
Like all ARP fasteners, these were installed using ARP Ultra-Torque Assembly Lubricant to warrant accurate preload and torque settings. The main cap fasteners were torqued in three equal steps to 100ft lbs. following ARP’s recommended sequence.
With the bottom end all snugged up, we took a minute to measure the rod side clearance, between 0.016-0.020-inch should be acceptable.
The post Rebuilding an FE Engine, Part 1 appeared first on Hot Rod Network.
from Hot Rod Network http://www.hotrod.com/articles/rebuilding-fe-engine-part-1/
via IFTTT
0 notes
Last Seen Blogs

pdfcehennemi
PDF Kitaplar

mauimaui25
Having Fun
Follow Me @ Buttercupprincess On Ig

stellarscript
Take the Journey

briefsublimeenthusiast
BriefSublimeEnthusiast

nathanpr3sc0tt
Nathan Prescott