#switch into a different mode to be able to adjust to a new process
Text
i mean this totally neutrally (as opposed to other posts on the subject where i’m def poking fun at ppl) but it’s so interesting to me how extremely wrapped up in their emotions ppl get over tech issues. previously i thought it was the fact that when i was doing this for my whole job i was getting paid min wage to assist professors who are a pretty weirdo subsection of humanity already but no it seems to track across the population. and you might think that it’s ppl having that attitude to any complex problem and it just so happens that most of the problems at a white-collar job occur in the digital world—but i also don’t buy that bc my coworkers reacted better to the time i came into the office and it was raining from the ceiling than the time we changed how dropbox handles links. i just don’t get where the feelings are coming from when it is an impersonal thing that presents issues that are either solvable or not
#text tag#this has been human safari at aldieb.tumblr.com#my mom is actually scared of computers like i don’t judge her too much bc we all have our thing but the emotions brought up by trying to#improve things on her laptop or phone are shockingly intense#and it seems that way for a lot of older folks#and finally idc what feelings ppl have abt stuff but ime those big feelings cut off problem solving skills at the knees like you need to#switch into a different mode to be able to adjust to a new process
4 notes
·
View notes
Video
youtube
iJoy TaijiZen Judo - Packs A Punch!
iJoy TaijiZen Judo Disposable Vape | 24k Puffs Review
Hey vapers, are you looking for cross of sorts between a disposable vape and a pod mod? Well, if there’s one company who knows a thing or two about both types of devices, it’s iJoy. For over a decade, they’ve been creating some of the most impressive vape hardware that we have ever witnessed. Now, iJoy has taken some basic concepts from each hardware type, and combined them into one amazing system with the collaboration of Taijizen. Presenting the iJoy TaijiZen Judo Disposable Vape | 24k Puffs. With an unmatched trio of things such as performance, convenience, and flavorful cloud production, this iJoy Disposable Vape is taking vaping technology to a new level of awesomeness that can’t be stopped.
Has a Magnificent Eye-Catching Appeal and Sturdy Build to It
Of course, the first thing you will notice is how the iJoy TaijiZen Judo Disposable Vape has a very neat, sorta futuristic-like design to accompany its internal aspects. The outer colorful pattern blends well with the single or dual color on the device’s front and back, and it’s size is just perfect. Speaking of stature, since this disposable system is crafted using lightweight, quality materials, it can withstand frequent usage and an occasional drop or fall. This draw-activated disposable vape is also quite portable, so you can carry it around with you in your pocket, purse, or bag wherever you’re off to. Plus, its wide tampered mouthpiece lets you take those sensational hits without burning your lips in the process. Even comes equipped with a child lock for safety.
Powerful Battery to Handle Two Puff Counts
With a built-in 850mAh rechargeable battery to already accompany a massive 25mL 5% (50mg) Salt-Based Nicotine E-Liquid volume, vapers are able to get two different puff counts depending upon the Mode they choose when using the iJoy TaijiZen Judo Disposable Vape. In Normal Mode: up to 24,000 puffs and Boost Mode: up to 12,000 puffs (see instruction manual as well to toggle between modes). Let’s not forget the Type-C charging port that permits for a quick charge, thus minimizing downtime in order to get back to your vape session.
The 2.7″ HD Mega Full Touch Screen
Do you want the most easiest but still engaging navigational vaping experience possible? Great, because the iJoy TaijiZen Judo’s nice-sized HD (High-Definition) mega full touch screen provides this and more! You see, adding a touch of exclusivity, this intuitive touch screen does more than simply enhance the device’s usability. It ushers the world of vaping into the digital age with sleek animations and a navigating interface that’s quite simplistic. On this screen you will find the Wattage that can be adjusted, where your Battery level is at for when it might be time for a recharge, and how much E-Juice you have remaining (so you can prepare to get a new device and avoid a potential dry hit, too). Simply put, it’s customization at its absolute finest.
Rapid Ignition Speed, Dual Mesh Coil, Adjustable Power, and Adjustable Airflow = Finely-Tuned Flavor and Fog
iJoy’s TaijiZen Judo boasts a rapid ignition speed of 0.001s, providing some intense flavor and massive vapor from the initial draw. The pre-installed 0.5Ω dual mesh coil (has a large heating surface area) increases both those things even further. In fact, it’s this dual mesh coil which’s able to help handle the wattage Mode selected: N(15W) & B(25W). With adjustable power and adjustable airflow (for the airflow, a side-to-side switch can be found at the device’s bottom), vapers are able to tailor their hits at more proficient rate.
iJoy TaijiZen Judo Disposable Vape Flavors to Choose From:
Apple Kiwi: Tangy, fruity combination of green apples & kiwis.
Berry Bubble Gum: Assorted berries infused into little bubblegum squares.
Blackberry Cherry: The unique duo of blackberries and red cherries.
Blue Raspberry Ice: Black raspberries chilled to icy perfection.
Blue Strawberry Coconut: An exotic blend of blueberries, strawberries, and coconuts.
Chilled Watermelon: Frozen summertime watermelons.
Cool Mint: Freshly crisp n’ chilly mintiness.
Cranberry Soda: Tangy cranberries are infused with sparkling zesty soda water.
Lemon Peach Passion Fruit: Citrusy lemons are mixed with Georgia peaches and blissful passionfruits.
Mango Lime Pineapple: Inspired island fruitiness: mangoes, limes, and pineapples.
Pineapple Lime: Tropic pineapples with a spritz of lime.
Sour Strawberry Grape: Sweet Strawberries and purple grapes are given a blast of sourness.
Triple Mango: Red, yellow, and green mangos.
Watermelon Chew: Takes this juicy melon and infused it into pink sugary chews.
White Strawberry Ice: White strawberries that’re treated to a refreshingly brisk, menthol twist.
Package Contents Include:
1 x iJoy TaijiZen Judo Disposable Vape | 24k Puffs
Features & Specs:
Weight: 120g
Dimensions: 52mm x 29mm x 101.2mm
Adjustable Wattage Range: 15W-25W
Puff Counts: 25W Boost Mode – 12K Puffs / 15W Normal Mode – 24K Puffs
Integrated Battery Capacity: 850mAh
Operation: Draw-Activation Firing Mechanism (touch the button on the screen first to select your wattage and then take a draw)
Preloaded Capacity: 25ML
Nicotine Salt: 5% (50mg) Nic Salt
Material: PC
2.7-Inch HD Mega Full Touch Screen with Animation
0.0001s Ignition Speed Button
0.5Ω Dual Mesh Coil
Adjustable Power
Adjustable Airflow
Battery Life Indicator
E-Liquid Level Indicator
Type-C Charging Port (charger not included)
Limited Edition Interface
Child Lock
NO Maintenance and NO Refilling
Pre-Filled & Pre-Charged
Good Throat Hits
MTL Vapes
Wide Tampered Mouthpiece
Compact, Portable, and Lightweight
Sturdy Design
15 Wonderful Flavors
Advanced User Item. Use at Your Own Risk!
https://vapesocietysupplies.com/products/ijoy-taijizen-judo-disposable-vape/

0 notes
Text
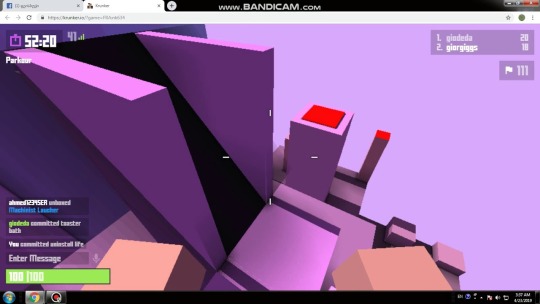
Krunker.io
Io games are expanding, the new multiplayer battle regal game will be upon us soon. You must not skip todays game, due to the fact it is an excellent 3D shooter with minecraft-like graphics : pixel graphics. Become a member of the game in addition to fight against people from all over the world, enjoy the particular game from 1st person (FPS game). You have a couple of weapons you switch between. The game has several road directions that are produced at the finish of the circular random. Each one particular is unique and sophisticated. Your process is to get rid of as many opponents as possible and endure so long as possible. Find the most points and become the particular winner of the round. Krunker.io is a video game full of enjoyment that you simply enjoy if you like challenges and battle suprême games like ewriti9ng. io. Have fun.
Krunker customizations
Krunker io game sails over a popular trend of in-game and character customizations while all is made to be as simple as possible. See a list of our suggestions what you can modify with a few minutes time investment:
Krunker maps
Maps are basic expoliar of every game. In Krunker, there is possible to pick from a big selection of random-generated maps or perhaps maps created either by the programmer or a community. And when you perform not find any map to become according to your would like, by use involving a simple on-line editor you can create and publish your own map.
Tool sights and sport icons, texts in addition to images
Modification involving sights for weapons and game icons is possible simply by replacing default photos with own or downloaded images from the web. This option will be available under configurations button and moving at proper plugs.
Krunker Mods
Krunker mods are mod packs modifiying arrears view, gameplay or perhaps game features. https://wargamememories.com/map-updates-in-season-3-fortnite-guide.html can either choose one of pre-created mods, create own modes or insert an external mode by way of url address from the internet. Players using krunker mods still play with common players although having the sport a bit different according to used mod which in turn bring nontraditional plus interesting options to help make the game interesting even for regular players.
Krunker Shop
Some things are available for free of charge, many are paid. Krunker shop available regarding logged players allows buying and area code new game items.
Krunker Accounts
Krunker game allows design of user accounts for unlocking rates high, purchases, skins and other game adjustments plus features.
Developer
Krunker io game continues to be developed by Sidney de Vries.
Krunker.io unblocked
In the event that you have discovered Krunker. io blacklisted on your electric device, more than likely this kind of is due in order to blocking by community or device officer. To play the sport in this case you need to change the network or even device you are connecting from, or find yet certainly not blocked proxy server in your community - try googling for "Krunker. io proxy" or check for more information to be able to avoid blocking.
1 note
·
View note
Text
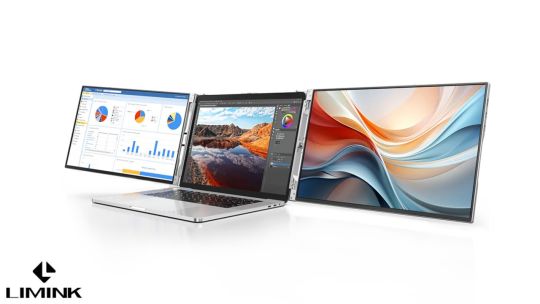
Enhance Your Productivity with Llimink's Laptop Screen Extender
youtube
In an age where remote work and digital multitasking have become the norm, having a laptop screen extender can be a game-changer. Llimink, a leading innovator in technology solutions, has developed a revolutionary laptop screen extender to transform how you work and boost your productivity.
The Power of a Laptop Screen Extender
Imagine being able to seamlessly extend your laptop's screen, creating additional real estate for all your tasks, projects, and entertainment. Llimink's laptop screen extender provides a convenient solution for professionals, students, and anyone seeking an efficient way to manage multiple applications and improve workflow.
Key Features of Llimink's Laptop Screen Extender:
Easy Plug-and-Play Setup: Llimink's laptop screen extender is designed for simplicity. It's a plug-and-play device, so that you can set it up within minutes without technical expertise. Connect it to your laptop's USB-C or HDMI port, and you're ready to go.
Stunning Display Quality: With Full HD (1920x1080) resolution and vibrant colours, Llimink's laptop screen extender provides an exceptional visual experience. Whether working on spreadsheets, editing photos, or watching movies, you'll enjoy sharp and clear images.
Adjustable Stand: The laptop screen extender has an adjustable stand, allowing you to customize the angle and height for maximum comfort and productivity. It can be used in portrait or landscape mode, depending on your preference.
Compatibility: Llimink's laptop screen extender is compatible with many laptops, including MacBooks, Windows, and Chromebooks. It works seamlessly with various operating systems and doesn't require additional drivers or software.
Extend or Duplicate: You can extend your laptop's screen to create more workspace or duplicate your screen for presentations and collaborations. It's a versatile tool that adapts to your specific needs.
Boosting Productivity with Llimink's Laptop Screen Extender
Efficient Multitasking: Multiple tasks on a single laptop screen can be challenging. With Llimink's laptop screen extender, you can open your email on one screen while working on a report on the other. This seamless multitasking capability can significantly enhance your productivity.
Streamline Workflows: Professionals who rely on data analysis, graphic design, or coding will appreciate the extra screen space. It allows for a more organized and streamlined workflow, reducing the need to switch between tabs constantly.
Enhanced Presentations: For students, educators, and business professionals, Llimink's laptop screen extender is a valuable presentation tool. You can keep your notes on one screen while displaying your presentation on the other, ensuring a smooth and professional delivery.
Comfortable Ergonomics: The adjustable stand included with Llimink's laptop screen extender promotes a more ergonomic setup. It helps reduce strain on your neck and shoulders, allowing for longer, more comfortable work sessions.
Entertainment and Creativity: Whether you're streaming your favourite TV show, playing video games, or editing photos and videos, the extended screen offers a more immersive experience. You can enjoy leisure activities or get creative without compromising on display quality.
Conclusion:
Llimink's laptop screen extender is the perfect solution for anyone looking to enhance productivity and streamline their work processes. With its easy setup, high-quality display, and versatile features, this device is a must-have for students, professionals, and creatives.
Experience the difference in your work and leisure activities with Llimink's laptop screen extender. Upgrade your laptop setup today and unlock new levels of productivity and creativity. Say goodbye to the limitations of a single laptop screen and hello to a world of possibilities. Transform your work, study, and play with Llimink's innovative technology.
0 notes
Text
You just got a new Xfinity remote, and you're trying to figure out how to pair it to your TV. We're here to help.
First, ensure that your TV and Xfinity remote are turned off. Then, locate the pairing button on the back of your Xfinity remote. It's a small, circular button located near the battery compartment.
Now, turn on your TV and press and hold the pairing button on your Xfinity remote until the LED flashes. Once your TV turns on, release the button. The LED should stay lit. If it doesn't, repeat these steps.
Your Xfinity remote is now paired to your TV.
How to pair Xfinity remote to tv
What Is the Xfinity Remote?
The Xfinity remote is the remote you use to control your Xfinity TV. It allows you to change the channel, adjust the volume, and more.
You'll need both devices near each other to pair your Xfinity remote to your TV. Turn on your TV and wait for it to load the channels. Once it does, press and hold the Setup button on the Xfinity remote until the red light begins flashing. Then, use the arrows on the remote to enter the code for your TV. You can find this code in your TV manual.
How to Pair Xfinity Remote With TV
First, locate the three silver buttons on the Xfinity remote.
The top two buttons are the power and volume controls, while the bottom button is the mode selector. Now find your TV's power button and hold down the mode selector button on the Xfinity remote until the TV is turned off.
Once your TV is off, release the mode selector button and press it again. This will put your TV into pairing mode. Finally, locate the Xfinity remote's pairing button, a small square near the bottom of the remote, and press it until the light flashes green.
Your Xfinity remote is now paired with your TV.
Step-by-Step Instructions to Pair Xfinity Remote to Tv
You've just received your new Xfinity remote, and you're eager to get it set up and start using it. But before you can do that, you need to pair it with your TV. Here are the step-by-step instructions to do just that:
Turn on your TV and ensure it's on the correct input.
Hold the Xfinity button on the remote until the light blinks.
Type in your TV's four-digit code. You can find this code in your TV's user manual.
Hit the enter button on the remote.
The light on the remote will stop blinking, and you'll be good to go!
The Benefits of Pairing Your Xfinity Remote
Pairing your Xfinity remote with your TV has benefits, especially if you want to enjoy your favorite programming with the least effort.
For one, you can use one remote to control your TV and Xfinity set-top box. This can help save time and energy when navigating through the various channels and features available with the Xfinity service.
You will also be able to navigate through the menus and settings of your TV without having to switch between remotes, making it easier than ever before.
Other benefits include using voice commands such as watching ESPN or turning off the TV from within the same remote and using different remotes for different TVs in your home.
How to Troubleshoot if Pairing Fails
If the pairing fails, there may be several reasons for this. First, make sure you are following the steps correctly.
If that doesn't help, try removing any obstacles between your remote and TV, such as walls or furniture. If that still doesn't work, you can try resetting the remote and going through the pairing process again.
To reset your remote, press the Setup button until all four mode buttons light up.
Once all four mode buttons flash three times quickly, release the setup button, and your remote will begin searching for your TV. Then go back to step two and follow the instructions above to pair your Xfinity remote with your TV.
FAQs on Pairing Xfinity Remote
You've learned how to pair your Xfinity remote with your TV, but you may still have some questions. Here are some of the most common FAQs when it comes to this process:
Q: What if my Xfinity remote won't connect?
First, ensure your TV is set to the right inputs and your batteries are fresh. If that doesn't work, you can use the Automatic Code Search option again to find the code that works for your TV. You can also try resetting your remote if all else fails.
Q: What if my Xfinity remote won't control my TV?
This usually happens when you accidentally hit the wrong button on your remote, so try manually syncing it again by following the same steps we went over earlier. If that doesn't work, try resetting your remote or getting help from customer support.
Q: Can I use my Xfinity Remote for other devices?
Yes, once you've paired it with your TV and configured it properly, you can use it to control all sorts of other devices like soundbars, streaming devices, and more!
Conclusion
Follow these simple steps if you need help pairing your remote to your pairing. First, find the code for your TV brand. Next, hold down the TV power button and the code until your TV turns off. Finally, release the buttons and press the power button on your remote. If your TV doesn't turn on, try the sequence again.
0 notes
Text
How to use Split-Screen With Minecraft
Do you remember the good old times when you played console games with your friends on a split-screen? Now you can relive those memories and create some amazing new ones with Minecraft split-screen. This option is only available for consoles (Nintendo Switch and PlayStation) However, it is possible to create new memories with Minecraft split-screen.
Your TV screen or console should have a minimum resolution of 720p. PlayStation Vita doesn't support split-screen because it is qHD (1/4 of 1080p). WiiU doesn't support split screen either because it only has 480p resolution. For devices that are eligible, you'll have to connect them to a TV screen with an HDMI or RGB component cable.
Find out more information here and detailed steps on splitting the screen in Minecraft.
Minecraft Splitscreen Requirements
As we've mentioned previously that you'll require an Xbox console and a TV with 720p resolution or higher. Also, you need to set the video resolution of your console to match the TV. This process is relatively easy to complete. Go to the console's settings and then move on to the display options. PS3, PS4, Xbox 360, Xbox One and Xbox Series S/X usually set the resolution when using HDMI. However, previous adjustments made by hand could cause problems that require manual reconfiguration.
You can split the screen in Minecraft locally or online. tecelana The local split-screen can accommodate up to four players at once. If you have a large TV screen, playing with friends or family is loads of fun. Let's begin with some tips for local split-screens, and later the online split-screen will get explained too.
How to Split-screen Minecraft Locally
Local split-screen is a way to play on a single console. It should not be confused with the LAN (local network) game, which requires multiple devices being utilized. Up to four players can join any given device. The instructions for playing Minecraft in split-screen mode vary slightly for each game console however, the steps below will cover them all.
Here's how to set up a "local split-screen in Minecraft:
1. Connect the console to the TV with an
HDMI
or component cable, then launch
Minecraft
.
2. Select
Create a New
If you wish to start from scratch or build,
previous world
from the game list.
3. In the
Multiplayer
Slide settings
Multiplayer Game
to the off to the off.
4. You can adjust the difficulty and other game options to meet your needs.
5. Choose
Create
Or
Play
To start the game.
6. Use a different controller to activate the second player on the console, and then select the correct button(s) to join them into Minecraft. For instance the PS4 makes use of the
PS
button to enable a user button to activate a user
Options
button (pressed twice) to add a second button (pressing twice) to add the second player in Minecraft.
7. Select the account for the other player (if you haven't done it yet). XBOX 360 and PS3 use the Minecraft Legacy Console Edition, which means you must first need to press
Start
To get into the game, press the second controller. The console will prompt the user to login.
How to Split-Screen Minecraft Online
You can play Minecraft in a split-screen mode with your local friends, while also playing with others online. In other words online play cannot be played on a split-screen, however two or more local players are given the split-screen while playing with those who are online. Here's how to set up split-screen play online.
1. Log into your console with your Xbox Live Gold or PlayStation Plus account. For XBOX 360 and XBOX One local accounts and players on XBOX Live Silver (the free Live subscription) are not able to join. PlayStation Plus is not required for the PS3, but it is required for the PS4.
2. For Minecraft Legacy editions, open on your console and select Play Game, then load or Create. For Bedrock editions, click Create New or choose a game on your list.
3. You can alter the game's options to your preference before launching your game. Before you start the game, go to Bedrock's Multiplayer menu. Make sure that Multiplayer is turned on.
4. Other "remote players" can accept your invitation (required) to join your gaming. Split-screen technology can only be used with up to four players on a console, but they can also play online with other players.
Minecraft's an interesting, fun and creative game. Like all games it's more enjoyable when you play with your friends. You can now split the screen to play Minecraft similar to playing older console games with other players.
PC users might be feeling left out however, which is perfectly normal. If you have a big screen, it's a shame you can't split it and perform the same task on a console. There are third-party screen-splitting tools available online that you can look into however, they're not officially licensed and might not be reliable.
1 note
·
View note
Text
Ac3d texturing

#AC3D TEXTURING HOW TO#
#AC3D TEXTURING SOFTWARE#
#AC3D TEXTURING PLUS#
#AC3D TEXTURING DOWNLOAD#
Import now also supports Material-Data.More and more people are discovering that AC3D works well both creating and managing models for 3D printing and is a great alternative to large, complicated and expensive 3D CAD programs. STL is the most common file format used in 3D printing and AC3D 7.2 supports both ASCII and Binary STL files.
#AC3D TEXTURING DOWNLOAD#
Models from STL files are automatically optimized at import (duplicate vertices at the same position are replaced by a single vertex).ĪC3D's new STL support means that you can directly preview and edit the STL files from 3D printing download sites such as Thingiverse. AC3D 7.2 also includes Ron Jensen's plugin for checking the integrity of an object prior to 3D printing. The plugin checks for holes and open edges, selecting surfaces that are at the edge of the 'leaks'. This new function is available from the Tools menu as "Select Leaky Surfaces". (Windows/Linux) You can now take a model from your desktop, or a Windows-Explorer/file-browser window and drop it straight into AC3D. Other plugins are available in the Community Plugins section. can be dropped directly onto an object so you can instantly see the texture in place. The OpenSceneGraph database plugin library osgDB automatically loads plugins on demand, using the extension of the file being loaded/saved to determine which plugin to load. This is great when you have a folder/library of objects/textures and you quickly want to load them in AC3D. Some improvements have been made to the Tool->Hierarchy. Inivis AC3D 7.2 includes: 3D File support Groups can now be drag/dropped to adjust the ordering and newly grouped objects retain the ordering - especially useful if you are editing large structures. Images formats used for texturing and view-background images Supports a huge range of output/input formats (additional formats e.g.
Fast real-time OpenGL graphics views (2DĪnd 3D) with whiteboard controls for easy navigation.
Multipoint polygon and line editing down.
Edit at different granularity - groups.
Simple and easy manipulation of selected components.
Powerful mouse selection with add/remove, select through and select closest components Then restart SketchUp and the script should be visible through the via Plugins Export to AC3D, or Extensions Export to AC3D in SketchUp 2015 or later.
Note In Sketchup 8, users are able to export as a.
Fast subdivision-surfaces with instant switch to view/hide subdivisions.ĭae files, meaning no conversions are necessary if texturing in AC3D.
Extrusion and surface revolution of lines and surfacesįield-of-view - instantly see results of your actions in 3D.
Its hard to find what you are looking.Model or switch into 'walk mode' for Quake-style control. This review process is for those that want to find out what 3d art is all about. If you are wondering why I did this, I know there is a plentiful palette of 3d programs that drive the 3d modeling and design world, those that create games those that create art. Model created with AC3D, Rendered in POVRAY, Texture mapping is done with Gimp2.2 (the desktop theme interface shell is Litestep) = Wallpaper : : Will do all kinds of exports and imports of dxf, 3ds, povray. It is shareware it is a very minimal cost. More information is discussed on the forum they provide. Learning curves are cut in half and are about a 7 on the scale to learn. With the demos and tutorials you can create things in about 12 mins or less right out of the box. As always 3d programs come with a learning curve. It does require a render engine, I used povray to render it. The Demo (shareware) comes with a tutorial and a few demos on how to.
#AC3D TEXTURING HOW TO#
This is not a how to create review it is a REVIEW. Took me a while to create because I wanted it to look cool. One hand on the key board another on the mouse you can create this ship that I've done in less than 6minutes.
#AC3D TEXTURING PLUS#
Unlike the programs costing 300 plus dollars and up. Just because it has a strong appeal to me.
#AC3D TEXTURING SOFTWARE#
Review #2 - My model design software of choice.
0 notes
Text
Photomatix pro 6 crack

#Photomatix pro 6 crack serial key#
#Photomatix pro 6 crack license key#
#Photomatix pro 6 crack Patch#
#Photomatix pro 6 crack full#
#Photomatix pro 6 crack pro#
Distortion and perspective correction: straighten the image and fix perspective problems quickly.
Incorporating exposure: Combining HDR photos with original exposure for more realistic images.
Advanced color control: adjust each color, saturation, and brightness.
Tone Balancer, a new method for rendering HDR for realistic results.
Bug fixed: Canon 5D Mark IV Raw files recorded at ISO above 400 are not supported.
Bug fixed: Lens correction didn’t work when processing single images.
Olympus E-PL8 and E-M1Mark II, Pentax K-70 and KP and Panasonic G8, GF9, and GH5, among others.
Added Raw support for several other camera models, such as Canon 77D and 800D, Nikon D3400 and D5600,.
Automatic Ghost Removal and Selective tool.
Automatic Alignment of hand-held photos.
Merge to HDR, Tone Mapping, and Exposure Fusion.
Automatic ghost removal and selective thawing devices.
Combine with HDR, tone mapping, and exposure fusion.
When I tried this software, I had issues with the inactivation tool which was able to make each stroke was not reversible.
#Photomatix pro 6 crack pro#
HDRsoft Photomatix Pro Keygen lets you modify a specific area of the image, without altering the whole image. The tool can recognize edges, and change the size of the brush or make it smaller. HDRsoft Photomatix Pro may also be aware that both you can see that the Color, as well as the Merge panels, come with a small brush icon.īrush tools let you modify a specific part of the photo ( blending or correction of color) without impacting the entire image. If you’re not sure of the meaning of an adjustment, you can circle the adjustment and lookup an explanation in the lower left part of the display. The image you imported was a single one and it wasn’t a bracket and you merged images that were previously merged with the initial.
#Photomatix pro 6 crack license key#
With Photomatix Pro License Key you can mix the edited image with some of the expressions that were created. The Mixed Panel lets you make custom image combinations. You can alter the entire image or the color channel in one go by selecting the appropriate selection from the drop-down menu. The next step is color settings that have default settings like saturation and brightness. The setting you select will affect the way your final HDR image is displayed. Be aware switching the modes erases all previously set settings on the sliders. The drop-down menu lets you choose between five different options. If you are working using a single photo or a collection of images that are enclosed in parentheses in them, your workflow will be easier to use which makes it simpler to upload images and choose the best ones and edit them. These characteristics are especially beneficial for photographers, architects, and landscapes.
#Photomatix pro 6 crack serial key#
Photomatix Pro 6.3 Serial Key freeload It is also possible to remove color projections, boost sky performance, and modify other features of your image by changing the brightness and saturation for each color. With the brand new Interactive Brush tool, you can change the color of specific areas in the picture by drawing over these areas. Ideal for natural and residential-style landscapes.
#Photomatix pro 6 crack Patch#
HDRsoft Photomatix Pro Patch with the brand new HDR rendering technique called the Tone Balancer provides more options for creating a realistic appearance. Turn on the automatic exposure sequence and allow Photomatix to integrate your photos to create an enhanced dynamic range photograph. There is no need to purchase or purchase expensive lighting equipment to shoot scenes with high contrast. You may also Download With Crack File Adobe Premiere Pro CS6 Crack Photomatix Pro Crack also provides an exposure blend (also called exposure blend) along with HDR Tone mapping. By capturing and manipulating several exposure shots with Photomatix Pro, you can create a panoramic view that displays specifics in the dark and bright areas that make up the view. Photomatix Pro 6.3 Crack freeload:Ī panoramic view is one with high contrast, as you are not able to limit your view to areas of the same brightness when taking the 360-degree panorama. Straighten your images and correct issues with perspective with lines appearing to be parallel even though they are not supposed to be. HDRsoft Photomatix Pro Crack can also make use of brushes to blend a region with the original image or other images from the brackets set if the horizon isn’t right or the thing that vertical, like buildings, and is not vertical. Photomatix Pro 6.5 Crack: If you’re looking for a more realistic appearance it is possible to mix images from the original with an HDR rendering.
#Photomatix pro 6 crack full#
Download Now Photomatix Pro Crack Plus Serial Key Full Latest Version
0 notes
Last Seen Blogs

postnolife-blog
Blog

glove23
attack and dethrone god, babes

virtualbully
a weak viking

heracliteanfire
A London Salmagundi

nicolenails-blog1
Sin título