#step 2: dark eyeshadow from the eyelids up to the eyebrows and a little under the eye
Text
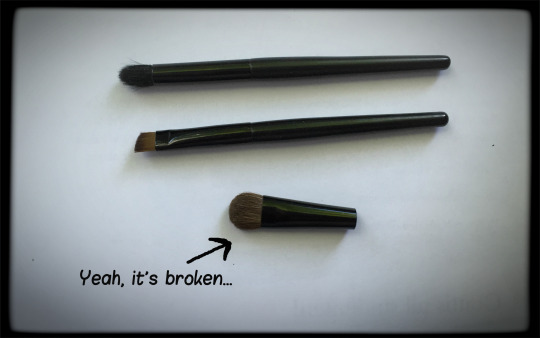
my Typical Makeup Look which ive been gradually getting better at is pretty simple despite looking like its more high effort than it is
#step 1: pale foundation#step 2: dark eyeshadow from the eyelids up to the eyebrows and a little under the eye#step 3: eyeliner (pencil type) in a ring around the eye and an extended 'lash' shape on the sides#step 4. mascara (its mascara)#step 5: lipstick (its lipstick)#step 6: i use this like. crayon eyeliner thing and i draw a little on my eyebrows and then smudge it to make my brows look more 'solid'#step 7: after having smudged my brows i then smudge it again down the sides of my nose bridge#hard to explain this but it adds an Effect#step 8: setting spray or whatever its called (so it stays)#so yeah not that complex#OH YEAH AND sometimes for lipstick ill put on this metallic red one my mom gave me and then use my finger to smudge some of my#black lipstick with/over it and it creates the illusion of a metallic black its neat
4 notes
·
View notes
Text
How to Apply Simple Everyday Makeup
Start out with a completely clean face. The very first part of your routine is to clean your face. Use a washcloth, soap, and warm (but not hot) water to gently wash your face. If you shower in the morning and already scrubbed your face, you can of course skip this step.
It's even more important to make sure your face is clean at the end of the day. Always be sure to remove your makeup before you go to bed. Leaving it on overnight can clog your pores and cause acne. Many dermatologists recommend using disposable exfoliating wipes to remove makeup.[1]
2
Apply sunscreen and moisturizer. If you plan on spending time in the sun, be sure to start with some sunblock. Use a product made especially for faces, as these are less likely to leave goopy residue that makes applying makeup difficult. If your skin is prone to dryness and flaking, be sure to massage in a dollop of moisturizer. Makeup can temporarily disguise flakey skin, but will be obvious and look even worse by the end of the day. If you need both, apply your sunscreen first.[2]
3
Apply makeup primer to your face. Primer helps makeup go on easier and last longer. Simply dab some onto your fingertips to apply it. Work the primer into your skin wherever you plan on wearing makeup. If you'll be wearing foundation, this means your forehead, nose, chin, and cheeks.
If you'll be wearing eyeliner or eyeshadow, add some primer to your eyelids and the space underneath your eyebrows. General makeup primer usually works fine in these areas. However, more gentle primers designed especially for eyelids are also available.[3]
Part
2
Putting Down the Foundation
Download Article
Image titled Apply Everyday Makeup Step 41
Choose the right foundation. Foundations come in many varieties, each offering different benefits and drawbacks. While some use solid foundation sticks, liquid foundations tend to be the more popular option.
Finding the right foundation can be a challenge. You want one that best matches your natural skin tone.
If your skin is prone to irritation, you'll need to look for foundations that are advertised as "gentle" and "for sensitive skin."
Additionally, quality foundation is expensive, so you may not be able to afford trial and error. When choosing a new foundation, try talking to beauticians at a makeup counter in a department store or cosmetics shop. They will most likely offer to do your makeup for free. They'll pick out the perfect shade to match your skin tone, and you can get an idea of how different products feel on your skin. Don't feel obligated to buy anything that day.
2
Apply foundation. A thin, even layer of foundation will work to smooth out your skin and give it a uniform appearance. How you apply your foundation will be determined by the type you've chosen.
For liquid or cream foundations, start by adding a very small dollop close to the center of your face (such as the side of your nose) and apply it outward. You may use your fingertips, a foundation brush, or a makeup sponge. Add more as needed. Don't massage the foundation into your skin. Instead, use light, stroking movements as if you were painting on a canvas.[4]
Most solid foundations come as a tube or stick. For these, you can either use your fingers to pick up some product and apply as you would a liquid, or you can use the stick directly on your skin. Applying directly from the stick to your skin will give you better coverage but will result in a thicker layer.
No matter which type of foundation you use, it's important to blend your makeup well to make it look natural. Use small circular motions with your applicator of choice until it looks seamless on your skin.[5]
3
Add some concealer to problem areas. If you have any uneven areas that show through your foundation, such as pimples or dark circles under your eyes, you can cover them up with a little concealer. Dab a tiny amount to these areas and blend the concealer using the same technique you used for your foundation.[6]
Choose a concealer the same way you would a foundation. Unlike foundation, however, it's good to pick a concealer that is one or two shades lighter than your natural skin tone. Because it doesn't have to be exact, testing concealer on your hand can help you narrow down your choices.
4
Brush on some translucent powder. When using foundation, you should always finish with a powder. This will help your makeup to set, making it last longer and keeping it from rubbing off. Use a brush to lightly dust on some translucent powder to your forehead, cheeks, nose, and chin.[7]
Part
3
1 note
·
View note
Text
How To Choose Concealer For Dark Skin
New Post has been published on https://skin-care-routine.com/skin-care-routine/how-to-choose-concealer-for-dark-skin/
How To Choose Concealer For Dark Skin
A. How To Choose The Right Concealer – Tips On Shades And Formulas
Have you always wanted to master professional concealer tricks to get perfect coverage? Here’s the concealer – it’s the most essential item in your makeup routine. It can be a total turnaround if you know how to use it correctly, but one wrong move can make your makeup look disastrous. With color correction corrections in the photo, this can confuse many of us.
I have some important beauty tricks to share with you – from using concealer before or after foundation to choosing a formula that works for you. These are useful tips to help you improve your makeup game and clear up your confusion. Concealer of things.
1. How to choose a concealer formula
Let’s start with the basics. The choice of concealer will depend a lot on what is right for your skin type and your concerns. Before going out to buy a concealer, make sure you know exactly what you are looking for.
a. Liquid concealer
A liquid concealer is the most versatile of the lot. It is perfect for normal, oily or combination skin. It is easy to apply and the cover is buildable, varying from light to full. Liquid concealers come in a variety of styles, such as: B. matt, moist and satin. This type of concealer is the least likely to clog your pores. So, if you have sensitive skin and are prone to acne, I recommend that you try one.
b. Cream concealer
If you have a dry or mixed skin type, the cream concealer will work well for you. The cover is buildable and varies from medium to full. You can choose one with a creamy or satin finish. Its formula and consistency are great for hiding discoloration. Sometimes cream concealers tend to wrinkle with prolonged use. You can prevent this from happening by setting your concealer with a little bit of compressed powder.
c. Adhesive concealer
Stick concealers are a boon for dry and sensitive skin. Depending on the product selected, they may have a satin or matte finish. I found that this type of concealer has coverage that can be expanded from medium to total.
2. Color theory and choosing the right concealer shade for every skin problem
What nobody talks about concealer is that different skin problems require different colors and textures. To suit your skin tone, choose a concealer shade half shade lighter than the base shade. Pay close attention to words like “neutral”, “cool”, “warm” and “beige”.
You can make the most of color theory with concealers. In the color wheel, the colors opposite each other in the spectrum are opposite. Therefore, when used for color correction, they cancel out.
Green is the opposite of red
Orange is the opposite of blue
Yellow is the opposite of purple
Let me simplify it further with a little more explanation.
a. Eliminate your dark circles with concealer
When it comes to dark circles, prefer “warmer” shades to avoid obvious white circles around the eyes. Purple and bluish dark circles are best hidden with an orange to yellow concealer, which is a lighter shade than your skin tone. This will help to mask the discoloration and brighten the skin under your eyes. If, on the other hand, you have brownish circles, use a peach, salmon or orange concealer.
b. Disguises and redness with your concealer
Green concealers neutralize redness on the face – like blemishes and red spots. You can also use it to cover up acne, rashes and red acne spots.
c. Hide dark spots with concealer
Orange and peach color graders can be used along with your regular concealer to effectively cover dark spots caused by acne, aging, sun damage and even freckles.
d. Cover pimples with concealer
To hide the pimples, it is important that the concealer has a thick, dry consistency. You can also use a cream concealer. They usually come in a pot or tube. To remove redness from the Zit, use a green gradation concealer before starting the foundation and cream concealer.
If you’re curious to try the color grading palettes that work wonderfully, check out the Bobbi Brown BBU palette, the Stila Correct & Perfect All-In-One color grading palette and the NYX color grading palette. Make Up For Ever also has these color correction pots that you can buy in different colors to help camouflage dark spots, redness and other problems.
3. How can you hide in the right way?
However, if you want complete perfection, you need to take a step before applying the primer, and then color correction concealers come into play.
After adjusting the color and applying the product, gently press the base with a makeup sponge and then press the concealer. Pressing will ensure that the color concealer remains in place. It is also important to remember that less is more. Therefore, you should only use small amounts of concealer where necessary. You can adjust your makeup with a compact powder to make it last longer.
4. Corrective Hacks That Will Instantly Change Your Makeup Game
These simple tricks go a long way in creating a perfect foundation and will completely transform your beauty routine. You only need one thing – concealer!
a. Apply concealer in natural light
Poor lighting is responsible for the days when you thought your concealer would match your skin and it really wasn’t. The best place to apply concealer is near a sunny window, so that natural light can reveal the performance of your concealer.
b. Triangular concealer trick
Draw a triangle with the concealer and blend it with a small brush or makeup sponge instead of spreading the concealer over the eye area. This helps to completely cover the area and instantly creates the illusion that your face is rising.
c. Concealer on your eyelids
If you don’t want to invest in eye shadow primers, apply a concealer on your eyelids to prevent the shadow from falling off your eyelid or wrinkling. A concealer works just as well as a eyeshadow primer.
d. Concealer for problem areas on your body
A pimple on the back or chest can be easily covered with a small concealer that exactly matches your skin tone. Refill with a little translucent powder to prevent wear.
e. Pop your lipstick
I love using lipstick and I learned that you can prevent the color from draining by covering the outside of your lips with a fine brush and concealer. This will also help to improve the shape of your lips and make them more plump than ever.
f. Contour and highlight with concealer
With a concealer two shades darker than your skin and two shades lighter than your skin, you can contour and highlight your face to further improve your makeup game. A pencil concealer has more control over placement – use the darkest to shade areas that are naturally shaded and the lightest concealer to highlight areas that capture light naturally.
g. Wipe with a tissue
Did you notice your concealer hardening in the lines around your eyes? Take a handkerchief, divide it into two layers and remove excess makeup. You will be surprised at how well this simple step works!
h. Highlight your eyebrows
A concealer that is a shade lighter than your skin tone can be used to enhance the eyebrows. This instantly raises the eyebrow and enhances the eyes even more!
i. Perfect your winged eyeliner
We all make mistakes when we get the perfect winged eyeliner. During periods of crisis, dip an angled brush into the concealer and use it gently to cover any imperfections. It’s easier and faster than starting over!
Now that you know how a concealer is a wonderful and versatile makeup tool, it’s time to try some of these tricks. You may not get it right the first time, but remember – patience and practice are essential!
B. Best concealer for darker skin tones 2021
Looking for the best concealer for darker skin? As a black woman, I can tell you how difficult it is to reach a makeup counter to find the perfect concealer shade, and you wonder what to choose. You are faced with a range of colors, some with warm tones, some with cold tones and some just neutral. It is no surprise that the beauty industry is still catching up on diversity / inclusion and how to keep women (and men) with richly pigmented skin.
Choosing the shade of the concealer will often not tell consumers how the concealer will oxidize. This means that it darkens on contact with air. Therefore, it is important to be aware of this. To mitigate this, test the concealer on your skin and wait for about 20-25 minutes (you can browse other products while you wait) to see how it changes and whether you are happy with the result.
Best base
Best Makeup Brushes
Best perfumes
However, for deeper skin tones, the first thing you need to get your skin tone right is. You can determine this using this policy:
Warm tone: means that the underlying colors of your skin are gold, peach and / or yellow
Cool tone: it means you have blue and red spots under your skin
Neutral: This means that you have a combination of the above, hot and cold
Generally, when looking for corrective or even foundations, the packaging indicates a skin undertone in the form of undertone letters; H. W, C and N followed by the color number. You have probably seen this before, but you may not know what it means. You can also try the old school trick of trying on jewelry. If silver looks better to you, it means you have a cool tone, and if gold looks better to you, it means you have a warm skin tone. If you can’t really see the difference, it just means that you have a neutral tone.
I have been looking for concealers for my skin color for a long time and I was looking for concealers and, although I found my tones perfect (a concealer that matches my skin tone that I can use to highlight it in a more glamorous effect) I found that problems are mainly in the formations, that is, being very dry, breaking easily or incompatible with translucent powders. I also talked to other women with deeper skin tones and made a list of the top five concealers that serve and complement women with deeper skin tones.
1. Fenty beauty pro filts immediate retouch concealer
Fenty Beauty changed the makeup industry after Rhianna launched a baseline of 50 inclusive colors. The concealers in this line are light and can be built depending on the desired coverage. Most people in the reviews mention that they never found a concealer shade for their skin tone until this line was launched, and mention how many concealers they bought since launch. Personally, I bought some from Fenty Beauty and have been using them for a year. I have to admit, I never saw a concealer that had the perfect shades for darker skin tones.
2.Pat mcgrath: skin fetish: sublime perfection concealer
This product is a high coverage formula that contains a Vita Serum Complex that repels expression lines. It is also available in 36 shades, which means you can find the shade of your skin’s real complexion concealer and make it stand out. Others who have done evaluations said that this product applies smoothly under the eyes, without wrinkles or fine lines, while others said that it looks buttery and is easy to use with a concealer brush or a mix of beauty blender. There are so many colors to choose from if you are looking for more than just concealer and something to contour your face as well. You can really choose how you want to use this product.
3. Beauty bakarie instabake 3-in-1 hydrating concealer
The advantage of this concealer is the moisturizing element, since most people do not like concealer, as it can easily dry the skin under the eyes. Contains the active ingredient of cassava in the product, which comes from the botanical’s water-binding powers. Ideal for those who suffer from dry skin, are always on the move and just want to work with a product that combines skin care and makeup in one. Reviews on the website show that most people love this product because it is light and very easy to mix with a sponge and not easy to wrinkle. It is loved because it is stain-proof and long-lasting.
4. Blackup: without transfer of transfer
Known for neutralizing dark circles, covering imperfections, this product has a natural matte finish that prevents the product from being transferred to clothing. I personally used this product after someone recommended me to withstand the heat and provide a moisture / sweat-proof appearance in hot climates. It is an ideal product to store in your makeup bag on vacation and want to have a glamorous look at night. The only negative aspect of this product, like many concealers with a magic wand, is that it is not hygienic to put the product on your face and then put it back in the tube and repeat.
5. Longwear mac pro broker
Who hasn’t used this concealer? In fact, it was the first concealer I bought when I was a teenager, and I was attracted to MAC by its color palette. It is old, but one of the favorites of all time for many. In addition to providing great coverage, you can always find your tone, regardless of the depth of your skin tone. Most makeup artists and influencers always have this in their kit, and it’s a great staple. The only negative point about this product is that it looks very heavy, but you can control it by choosing the coverage you want, that is, H. From light to medium or total coverage.
#Are How To Choose Concealer For Dark Skin Tones#Are How To Choosing Concealer For Dark Skin#Can How To Choose Concealer For Dark Skin On Face#Can How To Choose Concealer For Dark Skin Tone#Can How To Choosing Concealer For Dark Skin#For How To Choose Concealer For Dark Skin Tone#How Many How To Choose Concealer For Dark Skin On Face#How Many How To Choose Concealer For Dark Skin Tone#How Much How To Choose Concealer For Dark Skin Tone#How Often How To Choose Concealer For Dark Skin On Face#How Often How To Choose Concealer For Dark Skin Tone#How To Choose A Concealer For Dark Skin#How To Choose A Concealer Shade#How To Choose A Concealer Shade For Dark Skin#How To Choose A Concealer Shade Online#How To Choose Concealer For Black Skin#How To Choose Concealer For Dark Skin#How To Choose Concealer For Dark Skin 04#How To Choose Concealer For Dark Skin 07#How To Choose Concealer For Dark Skin 1 Year Old#How To Choose Concealer For Dark Skin 10 Year Old#How To Choose Concealer For Dark Skin 18#How To Choose Concealer For Dark Skin 2 Year Old#How To Choose Concealer For Dark Skin 2017#How To Choose Concealer For Dark Skin 2021#How To Choose Concealer For Dark Skin 3 Year Old#How To Choose Concealer For Dark Skin 3d#How To Choose Concealer For Dark Skin 4 Year Old#How To Choose Concealer For Dark Skin 4c Hair#How To Choose Concealer For Dark Skin 5 Year Old
0 notes
Text
She Boss | Part 2
Summery: She's her own boss and theres nothing that can't stop her from ruling the world. Except for the soft heart she sprouts from the young, handsome Korean Leader.
Pairing: Kwon Jiyong x Reader
Rating: Drama, Angst, Smut, Fluff
WARNINGS: Language, light|heavy Violence, light|heavy Smut

Part 1 | 2 | 3 | 4 | 5 | 6 |
You were sat around the long table that was catty cornered to the kitchen Dino stood cooking in. The rest of the boys sat around you trying to convince you to live in Seoul for a month, just to try it out. You were just about to break and agree when Ule walked into the room holding a cream envelope in one hand and a large box in the other.
"Delivery for the beautiful Valentina Cappucio." He mocked holding the things up for you to see better.
"The hell is that?" You said standing to take the box out of his hands and turn to place it on the table. You looked up to see both Vince and Carlo smirking at you.
"What did you do?" You snapped, snatching the card out of Ules hand. You gave him a stern look before pulling the knife Martin, another one of your guards, was using to clean under his nails out of his hands and slicing the envelope open
You are formally invited to the 42 annual Dragon Ball.
Attire: Formal Gold and black
When: Friday, January 13th
Time: 6o'Clock to 3 am
A smile tugged at the corner of your mouth as you remembered the spoken invitation Jiyong had given you. You could tell he had handled this particular invitation as 'Gold and Black' was crossed out and 'red' was scribbled on the side. On the bottom of the letter in the same loose handwriting there was a note.
P. S. I can't wait to see you, I will send a car your way at 5:30 so we can make our grand entrance.
P. S. S. Please accept these gifts, I saw them and thought of you
-G.D
You looked over to the cream box and placed the letter down to slowly undo the red ribbon that held it close. After dropping the material, carefully removing the top, and folding back the same blood red color tissue and you're eyes went wide.
In the box was a sleek, dark red dress. You pulled it out and held it up so you could see better and let your eyes wonder. It hit the ground in a soft circle and the off the shoulder top made you bite your lip. It was elegant with just the right amount of sexy as you turned it around to see how the back dip into a V. You were so infatuated with the dress you didn't even notice there was more. It wasn't until you saw Ule pull three other boxes out did you hand the dress to Vince to go hang. In the first box, the largest, was a pair of dark red heels that snaked up your leg as a dragon. The next box showed a cream clutch that had the same dark red embroidered into dragons along it, and the last box was a much smaller velvet box that made your eyes widen when the lid was lifted. It was an antique, there was no doubting that since the gold of it was darker and more worn looking. You lifted the necklace out and held it carefully between your fingers to examine it better. The thin gold chain connected in the front as the chain turned from dainty to thick, transforming into the head of a dragon with blood red eyes. The other end hooked through the dragons mouth and the bit that hung out was looped into a matching dark red stone.
There was a note in the bottom of the velvet case and you picked it up before the boys could notice it and read it carefully.
My father sent this to my mother for her first ball with him, I feel it's only appropriate.
xoxo, Ji
You discreetly held the note to your heart before you slipped it in the pocket of your shirt and placed the necklace back in its box.
"Damn, this guy is smooth." Vince said looking at you, deciding not to bring up the hit of pink beneath your cheeks.
"It's strictly business." You said coughing and collecting the boxes to take into your room where the red dress was now hanging well above the floor.
Carlo had followed you in and closed the door. He didn't say anything for a minute as he just watched you watch the dress.
"Jiyong is a dangerous man." He started moving to sit on your bed.
"And I'm a dangerous woman." You said not looking away from the dress.
"Exactly. I don't know if it's a good thing or bad thing you two have this unspoken attraction towards each other."
"Well, were both two very attractive people." You smiled winking towards your older brother who just rolled his eyes.
"It was love at first sight, you mark my words. You two are going to destroy the world together." He said chuckling.
"I think it's time you call Jooyoung and Mina." You say changing the subject.
"Hello girls" you cooed from the couch you laid on, only in a large dress shirt you stole from Ule.
The two walked into your room a lot more comfortable this time and took no time in prepping themselves before calling you to the chair.
"Is that the dress?" Jooyoung said admiring the draping red material.
"Gorgeous right?" You said eyeing her.
"You're hair needs to be up." She said in response while collecting your thick locks and pulling them up. "Show off those collar bones."
"And I'm putting eyeshadow on you. There'll be none of this simple look going on tonight." Mina sung from beside you.
The two got to work silently, taking turns tilting your head this way and that as Jooyoung curled and and Mina contorted.
"I was surprised when we got a call from you again." Mina said as she blended the bronze into your skin.
"I liked you two, why change that?" You said stiffly, trying not to move too much.
"Surprisingly we like you too. A lot more than we thought we were going to." Jooyoung smiled
"Understandable." You chuckled as Mina moved onto your eyes.
"So, tell us where you're going tonight." She said taking the brush off your eyelid. You lent forward to take the invitation off the vanity and handed it to her for her to read.
"You're going to the Dragon ball.... and G Dragon signed this himself? Val do you know who he is?" She said in a worried whisper.
"I'm very well aware." You say.
"He has you wearing red..." Jooyoung said looking back up to the dress.
"Yes?" You said opening both of your eyes and turning to look at her.
"Well, it's just... the Kwon family, that's how they claim their women. Everyone shows up in the designated colors and those who wear red are automatically placed into their... well their world." She said wringing her hands.
"Girls, there's nothing to worry about. I know." You said smiling at the two of them as they both now round to sit against the vanity.
"It's just... if you know then you know their a very powerful family... a dangerously powerful family... only other dangerous family's are pulled into their circle." Joonyoung said.
You smiled and placed and on each of their knees.
"I know." You said smiling as nicely as you can.
"I'm.. please can I ask something?" Joonyoung said biting her lip. You nodded and she looked to Mina before turning back to you. "Are you in... the same business?" She said, obviously scared she asked something she shouldn't have. You smiled, admiring her braveness and feeling sad that she was so nervous.
"Yes." You began. "But that stays in this room. I really like you two and I'm starting to consider you a friend. Please don't make me regret that." They both nod and force a smile, now obviously timid with being around you.
"Wait so last time you waltzed in your meeting in that dress and just told other mafia men what to do?" Mina said shaking her head. You laughed and rose an eyebrow.
"They were shaking in their boots." You said causing a light giggle to come from the both of them.
"Girl power." Mina said shaking her head before instructing you to close your eyes again.
"Thank you for not completely freaking out. You obviously know a little more about the business than you should." You said, smiling as Jooyoung rubbed your shoulders.
"You know, if someone as powerful as you befriends you, you roll with it. As long as I'm not brought into anything I could careless what you do." She said, more confident now.
You placed your hand on hers before letting the two of them finish. You had to call Ule in to get the dress down but soon after he left you stripped and turned silently asking Mina to zip your dress before bending to slip your feet into the shoes that were provided.
"He's just stamped his name all over you, hasn't he." Joon said reading the note you handed her as Mina secured the necklace around your throat.
"Pretty much. But don't worry, I'm claiming him too." You said with a wicked grin as you pulled a black and red pocket square out of a bag that had your families snake and rose design all over it.
"Smart girl." Jooyoung said handing the note to Mina to read.
"You look perfect." She said looking over to you as you stood.
You smiled just as there was a knock on the door and you smiled at each girl before leading them out of the room where all six boys stood in their own versions of black and gold tuxedos. The last thing you saw before hugging the girls bye was the blush that crept to Mina's cheeks as Carlo winked at her softly.
It was a sleek black limo that picked you up and drove you to the party. Flutes of champagne were passed around for the drive and you eventually gave up on trying to hide your excitement, it was better to get it out now than while there since you did have a reputation to uphold. You couldn't help but silently gawk out the solo window as you pulled up to the large house, waiting as the limo stopped. You heard the driver talking to someone saying you had arrived and then opened the door slightly to politely ask you to wait for the boss to meet you.
It didn't take long for Jiyong to open the door and step aside as all six men climbed over you to exit the car. When his hand finally reached in for yours you took a deep breath putting your game face on and placed your hand in his. He had his serious face on too, but the moment you stepped out and made sure all of your skirt had followed it faulted into the grin he had the night of the meeting. He coughed and bowed slightly before once again kissing your ring.
"You look stunning." He said quietly into your ear as he offered his arm up to you. Before you started walking though his eyes caught the necklace and he took the head between his thumb and forefinger letting a smile reach his cheeks again before looking into your eyes.
"I was worried it would be too much." He said clearing his throat again before returning to his business face.
"I thought it was sweet." You said causing him to chuckle again.
"You might be the death of me." He said with glittering eyes.
He led you across the pavement and up the grand stairs that lead to the entrance. You could see into the room- it had been accented with gold everywhere. People were already drinking and laughing having a care free time, you did think it was weird no one was on the laid out dance floor though since music was already being played. You then remembered what Jooyoung had said and looked over to Jiyong who wore a deep red tuxedo jacket that was accented with a black collar, black dress shirt and the same deep red slacks that had the signature black tuxedo stripe down the leg. He looked over to you and smiled again, only to drop it when you turned towards him and pulled out his pocket square.
"Here." You said smiling and pulling the material you had put in your clutch out and flipping and folding it to tuck it back into his jacket. "Now you have a little bit of me." You said nonchalantly before resting your hand on the crook of his arm and setting your business face back on. You could see him grinning from beside you.
"The death of me." He said just as a loud voice called attention to the crowd.
#bigbang#bigbang mafia#bigbang mafia au#Kwon Jiyong#jiyong#Jiyong mafia#jiyong mafia au#gdragon#gdragon mafia#gdragon mafia au
158 notes
·
View notes
Text
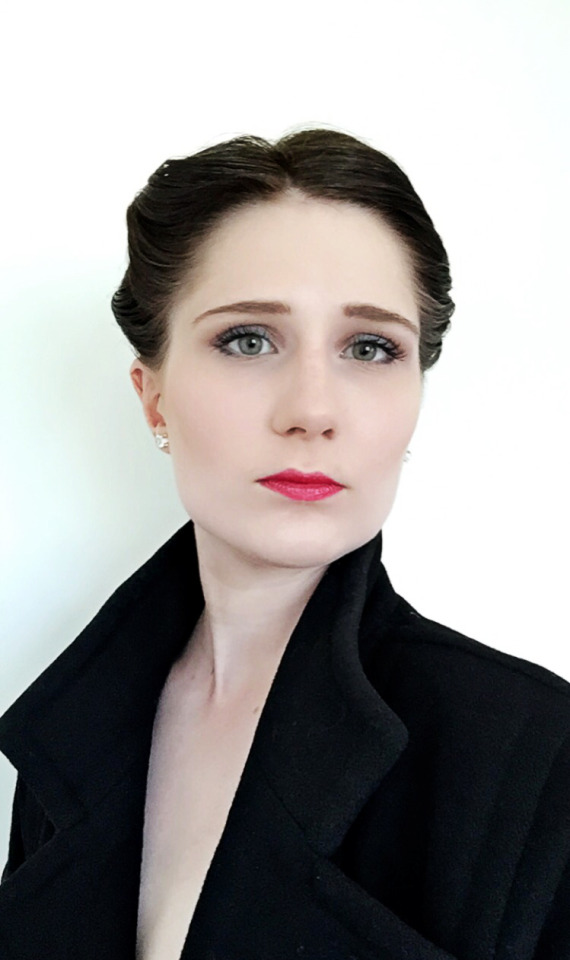
How to make Irene Adler's beauty look from "A Scandal in Belgravia" - Easy/poor student edition

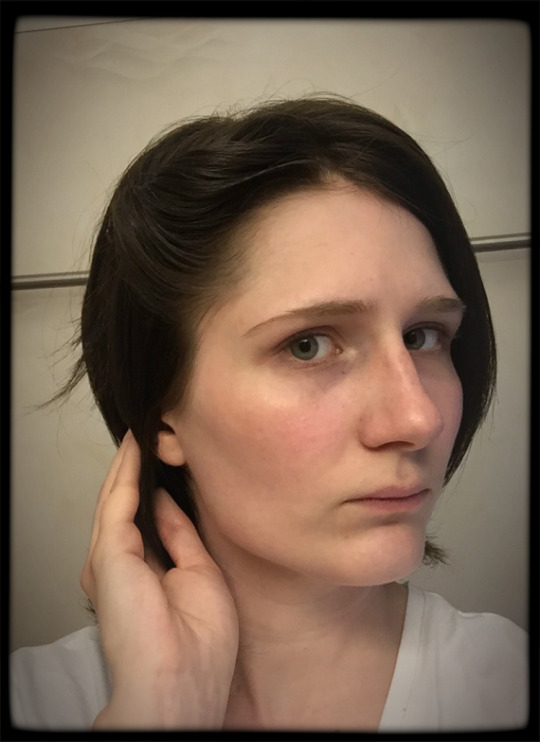
If it's something I realised when I started doing cosplay about one year ago, it's how expensive it can be. As a "poor student", it can be difficult to find both the time and the money to do the look you want in the quality that you want. Many tutorials today also use many different tools and expensive makeup. Of course the result will most times be better with high quality makeup but I think that you can create quite a good look without professional skills and without super-expensive makeup. Some days ago, I decided to do Irene Adler's characteristic hairstyle and makeup for the first time and I realised during the process that you can do quite much with quite little resources. So here is my easy and "poor student" friendly tutorial about how to turn yourself into The Woman.
Part (1) - The “Before” picture

So let's start with the obligatory "before" picture. This is me in all my natural beauty. Or well, not quite. My hair is dyed in a darker colour since 1,5 weeks ago. The colour might be called "Dark Chocolate" but I call it "Sherlock/Evie" dark after the hair colour of my two favourites right now. I should probably add Irene Adler to that description too.
Part (2) - Irene Adler’s characteristic hairstyle
When Sherlock first meets The Woman, she has perfected her beauty look into the smallest detail. That includes her hairstyle which will be the first step in the process of recreating her look.
Step (1) - Tools
What I need to create my Irene Adler-inspired hairstyle is basically a lot of hairpins and a great amount of hairspray. I use a basic spray with strong hold and recommend you to use something like that. It depends on the quality of your hair but my hair is, though not so long, very... VERY thick so I need all the hold I can get.

Step (2) - Hairstyle in the front
Start by parting your hair slightly to the side and grab the front/upper piece of your hair on the short side. Spray! (You can never get too much hairspray).

Form this piece of hair into a slight curl, make a bun out of it and then secure it with hairpins. The loose hair is no problem (it will be included in the French twist later) so don't try to thug it into the pun or anything. One good advice is to secure the pins with the entry of the pin pointing towards your face. The hold will become stronger and it's easier to hide the pin in your hair.
Next, take the front/bottom piece of your hair and twist it loosely. Spray and then secure with the pins necessary. Irene has her front/upper piece of hair ending up in a large curl but as I don't own a curler and that is an exceedingly more difficult move to do by yourself, I do it in this way instead. Of course you can try out that curl yourself!
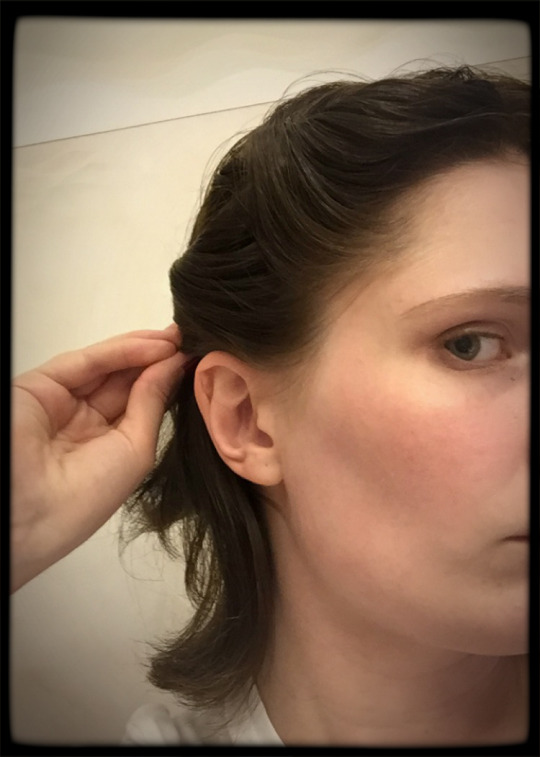
Irene's hair is slightly asymmetrical and the other side is not split into the same two parts as the first side. I do a simple version here again and twist the whole side up and end it slightly above my ear. Be careful with twisting it too hard. The aim is to make the hair look more effortless than it really is. Spray again and secure with the pins necessary.
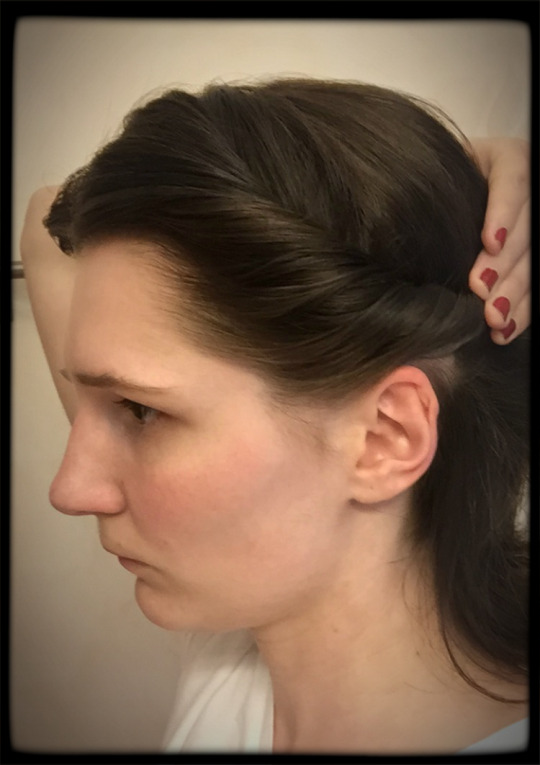
Step (3) - Hairstyle in the back

So, now the front parts are done. It's now the magic happens when it's time to secure the back of the hair. I first use plenty of spray in the rest of the hair to make it easy to work with. I then backcomb the hair slightly to give it even better structure. Then take all of the hair from the start of the neck and twist your hair into a French twist. In this particular picture below, I did the twist slightly lower than I would have wanted it to be so keep that in mind. Secure it with all the pins necessary and don't be afraid to use even more hairspray. If someone else is doing the hairstyle on you, you might need lesser spray but as I do it myself, I need all the help I can get from the spray.
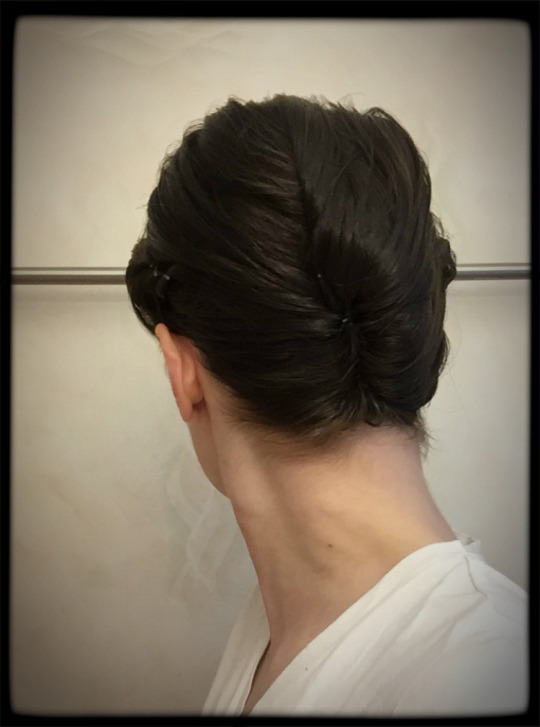
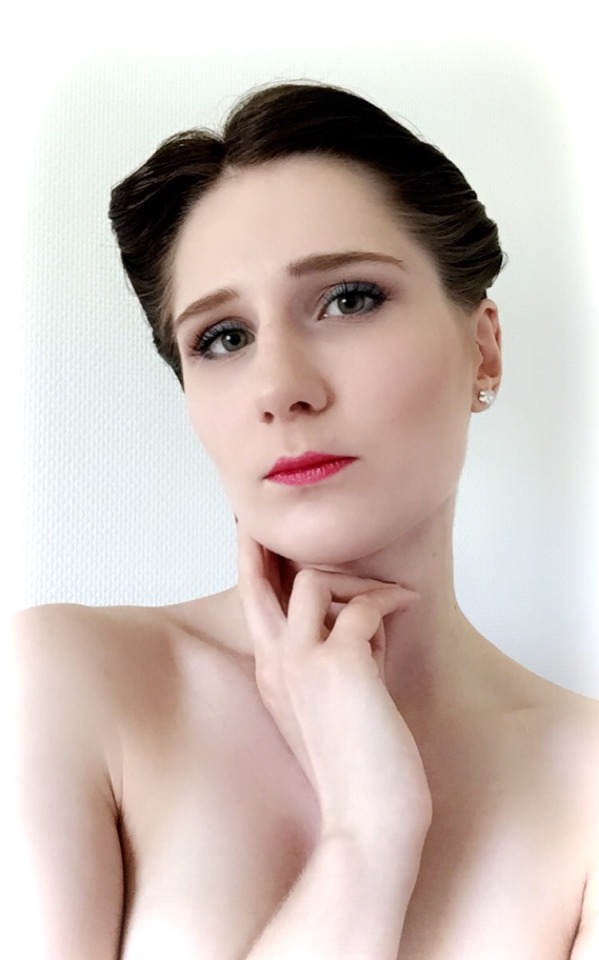
Step (4) - Admire your hairstyle
And voilà! I have now turned my hair into an easy version of Irene Adler’s. When you’re done with the hairstyle, make sure one more time that it’s properly secured with hairpins and spray. Time to move on to the next part!

Part (3) - Irene Adler’s characteristic makeup
One thing that the audience got a good look on in “A Scandal in Belgravia” was Irene’s makeup as she is getting ready for her first meeting with Sherlock (while Sherlock is getting ready for meeting her by provoking John into hitting him to the ground). Without the makeup, it’s not really Irene Adler. The first time I did this look on myself, I realised that my features looked a lot more like hers than I first thought. This makeup is therefore adapted to my face and you might need to use different methods. I use the makeup I have at home and if you have better tools and brands, just use them! This is, as I have said, an easy tutorial for those of you who are “poor geeks” like me. Anyway, let's take it away!
Step (1) - Tools
I have bought all my makeup in grocery stores. Some of the brands are slightly more expensive but never above 13,00 £. I recommend you to foremost use what you have at home. The only thing I have bought especially for this look is the blue eyeshadow.
Step (2) - Foundation, cover and highlight
Irene has pretty flawless skin so let’s start with a covering foundation. I use my regular one which is liquid and very light with the colour Ivory Rose to cover my whole face. The methods of applying it can differ but I use my fingers. Be sure to apply some more on the upper part of your cheekbones to make them slightly lighter.

Next, I use a bronzing powder to finish the foundation. Apply with a brush and start by the chin. Then apply on your forehead, the sides, under your eyes and the nose. Apply very sparsely on the cheekbones as you want them light for the next step.

Now, Irene has prominent cheekbones and if you don't have them yourselves, you need to highlight them. I do this in a very simple way, by using the same browsing powder again and with a smaller brush, applies a thicker layer just below my cheekbone. If you are good at highlighting in general, this step won't be a problem for you. If you are not, like me, just be sure to keep the upper part of the cheekbone light and the bottom part darker. I recommend you to watch a tutorial on highlighting in that case because of my own limited skills.

Step (3) - Eyebrows, eyes and lips
Now we are done with the foundation and it's time to do the details. First, the brows. I actually just do them the way I always do them and just fill them in. Start a little bit wider and then make them thinner. If you have thicker or thinner eyebrows than me, paint them in the way you see fit. As my eyebrow pen is out, I use a thin eyeshadow brush and fill them with a black eyeshadow. Maybe not the best solution but it works if you have dark hair and nothing else at home. Sometimes, we must use our imagination to save money. Be careful with the black shadow though as it can become very thick looking if you apply too much.
The next step is Irene's gorgeous eyes. I first use a brown eyeshadow to highlight the eyelid. Take a small brush and apply lightly across the lid. It's no problem if it's slightly outside at the end of the eye that points to your ear. Blend with another brush in the way you find fit. This step is just for making the look a little bit more well-rounded.

Now it's time for the eyeliner. I first apply some black eyeshadow to the bottom of the lid to give it a smoother transition to the mascara later. Apply slightly below the bottom lashes at the corner of your eye too. Be careful though. This black shadow eyeliner shall be just that: a shadow. OBS! In the picture below, I haven’t applied the bottom lashes eyeliner yet.
Now for a characteristic step: the blue eyeliner. I use again an eyeshadow for this step and a thin brush. Paint the lower part of the lid with the eyeshadow until you have a firm, but thin, eyeliner. Apply just slightly to the corner of your eye below the bottom lashes too. This one shall not in any way be as thick as on the eyelids. Just a little splash of colour.

The final step on the eyes is the mascara. I use one with a rubber brush, which I love. If your lashes don't curl naturally like mine do, use an eyelash bender to achieve that. Next, apply the mascara to your upper lashes and make it cover all the lashes as much as you can. Also apply mascara to the bottom lashes at the corner of the eye but not further in.

The final part of Irene's makeup is also the truly transforming part of it: her characteristic red lipstick. If you are in a mood, you can try to reshape your lips but I don't have the tools for that so I just put it on. I'm using the lipstick I had at home which has the colour Cherry Sparkle. Cover your lips with an even layer and of course you can do it way better than I can.

Step (4) - Find the right Irene Adler attitude in the mirror
And with that we're done with the makeup and now the transformation is almost complete. Time for the final touches!

Part (4) - Irene Adler’s nails and jewelry
Irene has many different accesoaries in her closet, from the Louboutin high heels to the diamond ring on her finger. I have chosen to highlight some of them.
Step (1) - Nails
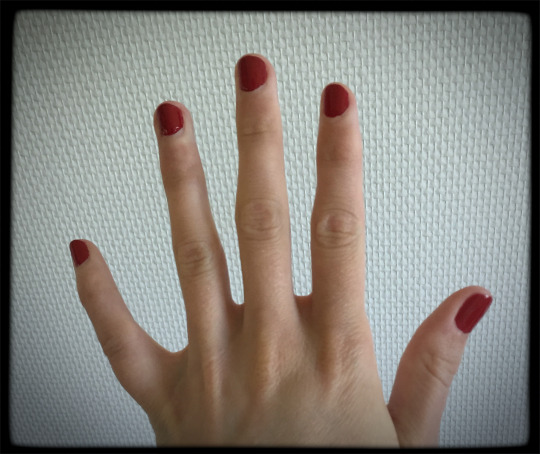
There are some pieces in The Woman’s beauty look which are more characteristic than others. Important are her red finger nails. I paint mine with a regular red nail polish. These can of course also be done in a much more advanced way. Do it the way you like them! The most important thing is that they are the dark red that we want them to be. I bought my nail polish at the grocery store for about 1,00 £.
Step (2) - Earrings
Other accessories are her earrings and like I said earlier, the ring on her finger. I don't have such a ring that looks like the one she has but the earrings are easily managed, even on a small budget. I use a pair of stones that I had at home which are something that I bought for about 1,00 £. Take what you like but if you want it in Irene Adler’s style, I recommend no colour but just a regular white/silver stone.

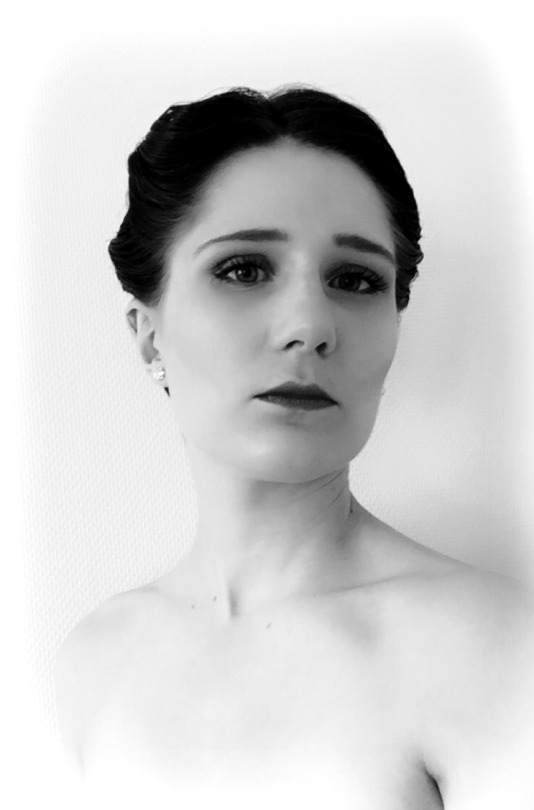
Part (5) - THE FINAL PRODUCT
And by that, we are done and you have your cheap and easy Irene Adler look! As I have said during this whole process, this is my way of doing it and if you have better suggestions yourself on how to mimic Irene's beauty tricks: use them! It's just the imagination that sets the limit! Now follows some finished pictures of the look with four different outfits! The pictures and the editing are also perfect for a small budget. I took the pictures myself with my phone and the editing is done with pixlr.com.
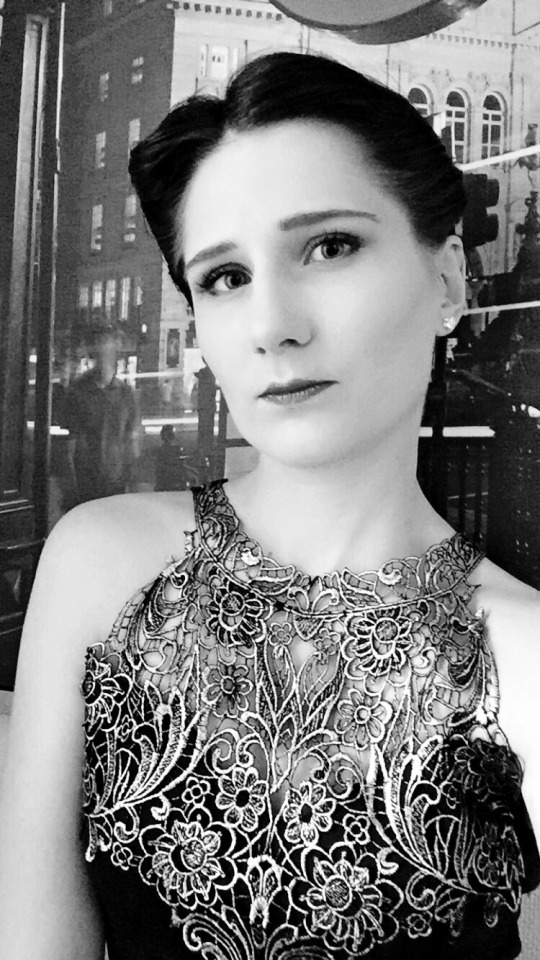
Outfit (1) - Sherlock’s coat


So as I don’t own a riding crop but I do own a violin, this is the story: The Woman got a hold of Sherlock’s violin and now... Well, I don’t know where it goes from there.
Outfit (2) - Battle dress

Grey characters are always the most interesting ones, I think.
Outfit (3) - Classy dress

This dress is clearly not looking like the one Irene Adler had but I love it and thought it was in the right style. And the attitude does it!
Outfit (4) - Battersea Power Station outfit


I know Irene had black leather gloves to this outfit but mine was just too thick.
#sherlock BBC#irene adler#cosplay#Sherlock Holmes#Lara Pulver#benedict cumberbatch#steven moffat#martin freeman#makeup#outfit#Sherlock#battledress#brainy is the new sexy#A SCANDAL IN BELGRAVIA#season two#lipstick#the woman#the woman who beat you#THE REICHENBACH FALL#The Great Game#The Final Problem#the blind banker#the hounds of baskerville#beauty look#cheap#poor student#tutorial
162 notes
·
View notes
Text
Wayhaught Pride pt 1
Just gonna be 2 or 3 small parts, just some rambling thoughts in my head. @jaybear1701 would demand like 50k of this but really I’ll be surprised if it gets 5k total.
Summary: Nicole takes Waverly home to Chicago for her very first pride.
ps the following gif has nothing to do for the story but exists so...

“Is this okay?”
Nicole looked up from the bag she was in the middle of unpacking, unable to stop the grin that spread across her face. Her eyes raked over the short frame that was wearing rainbow leggings under a pair of cutoff shorts and a raglan shirt with a rainbow unicorn on the front, tied tight just at her rib-cage to reveal her midriff. Nicole felt her heart skip a beat for what had to be the most exquisite vision she’d ever seen in her entire life.
“Is it too much?” Waverly looked down at Nicole’s own attire, a simple black tee with a rainbow heart on the front and a pair of shorts, her hair tied up in a ponytail. “It’s too much isn’t it? Damn it!”
“No no!” Nicole reached out, stopping Waverly in mid step and stepping up to her. She couldn’t let her change out of her outfit. With a smile, she curled a fingertip under Waverly’s chin, tilting her head up towards the light. “You are absolutely perfect.” Rainbow eyeshadow adorned each eyelid and she couldn’t resist dipping her head to capture soft lips.
When she’d invited Waverly back to Chicago for pride, she'd honestly thought the youngest Earp would decline. After all, Waverly had been spending most of her time with Wynonna and the others investigating the latest revenant attack. She’d actually been a little hesitant to extend the invitation. Not that she didn’t want to spend the time with Waverly. She did.
No… she was… for lack of a better word… completely terrified of introducing Waverly to her college friends. They were just… a little different from their life in Purgatory where Waverly had never left. Small Canadian town versus American big city. She was really just hoping her friends wouldn’t be… too horrible.
“Are you ok?”
“Yeah. Of course. Why wouldn’t I be?” Nicole pulled Waverly closer, breathing in the perfume that smelt of sweet apples.
“I don’t know. You seem… super worried.” Pulling back, she saw a strange look in Nicole’s eyes before it quickly vanished. Her eyes narrowed as she took in the expression. “You’re nervous about something.” It wasn’t a question. It was a statement. She had spent a lot of time watching the officer, taking in her body language and she could see it in the way Nicole’s brows furrowed, the small wrinkle that appeared between her eyebrows. “It’s me isn’t it.” She pulled away, arms crossing over her chest. “You’re nervous about how your friends will take you dating some… country bumpkin… Some… Canadian country bumpkin.”
“Wav…” She didn’t want to smile but there was something about an angry Waverly that forced the corners of her mouth up. “You are so far from a country bumpkin…” She reached out, unfolding arms that came apart easily. “Come here.” Her own arms wrapped around Waverly, pulling her in close. “You’re right that I am nervous about you meeting my friends, but it’s the other way around. I hope you don’t judge me too horribly by my friends. They’re not the most… sophisticated.”
“You think I’m going to judge you?” Waverly looked up into dark eyes, seeing nothing but honesty there. “Are you kidding me? Have you not met my sister? I mean… your friends can’t really be worse than my sister the Heir, Doc Holiday the immortal gunslinger, Dolls the government agent… can they?” When Nicole took a moment to think, her eyes narrowed. “Can they?”
Nicole pursed her lips. “Well…,” she thought about the best answer she could supply. “They can sometimes be a little egocentric... brazen... I’ll just let you meet them,” she decided with a nod.
“Ok that’s a little scary.” Waverly’s brows scrunched in worry. “Am I going to regret leaving my shotgun at home because we can always just stop somewhere along the way. I mean this is America, isn’t it. I hear Walmart sells shotguns right?”
“We are not stopping for a shotgun.” Nicole laughed. “Don’t worry, Baby. Even though you are more than capable of defending yourself, I can protect you from the rambunctious lesbians.” Claiming soft lips in a kiss, she’d meant it to be a tease, but Waverly didn’t get the memo. Instead, Nicole took a step back as Waverly seemed to press closer. Another step back and she easily guessed where it was leading as her legs hit the bed and she felt a small push on her shoulder and she was falling onto the soft surface. “Hey now…”
Straddling her newly formed lap, Waverly smirked. “So… I’m not going to have to fight off any exes or anything am I? Cause I can put on my buttkicking shoes.”
“I don’t think so.” Nicole ran her hands up the rainbow covered thighs, brushing her lips along the length of her neck. “You don’t have to worry. None of them could ever compare to you”
“Why?”
“Because you’re the most amazing woman I’ve ever seen... and because I love you.” Nicole bit the soft skin where neck met shoulder, hearing the sudden sharp inhale. “And you are one fine slice of humanity, Miss Earp.” She felt a hand wrap in her ponytail, pulling her head back before lips claimed her own in a kiss. She allowed herself to be lost in the gentle exploration until hands began to tug her shirt up. She wasn’t exactly sure if she was approaching the point of no return, or if she’d already passed it. “We’re… going… to be… late.” She mumbled against the persistent lips.
Waverly pulled back slightly, giving herself enough room to strip off her own shirt. “Your point?”
Nicole licked her lips, taking in the sudden appearance of warm flesh. “Completely irrelevant.” She commented before lifting Waverly up and turning to press her into the bed.
124 notes
·
View notes
Text
6 simple makeup looks for beginners
Makeup is a vast universe filled with all sorts of glamorous tools like foundation, mascara, etc. This divine universe is glittery but also very confusing as to how to apply and what to apply, because a single wrong step would make it a disaster, but when done with precision can make you glow like the goddess you are. And as much as we want to love it and excel in it, we know that it is tough. And for beginners like us, it is like a pool of glittering water in which we desperately want to dive, but unfortunately don’t know to swim. But no need to be scared of it, your love for makeup is never going to disappoint you and we here are going to be your guiding beacon by listing down a few simple makeup looks for beginners.
1. Natural diva:

Probably the best way to start diving into the makeup universe. Natural makeup is as simple as it sounds because it highlights your natural beauty in a much more radiant, but simple way. For a natural makeup look, all you have to do is firstly to make sure that you retain the makeup that you are going to apply by applying a suitable ace primer, followed by application of concealer which hides your dark spots, then its time to bring in the foundation. Make sure to touch up your eyelids with a primer as well. The purpose of natural makeup is to make you look as natural as possible, therefore we suggest applying a nude shade of lipstick as well as eyeshadow. Complete the look by applying mascara to your eyelashes and your eyebrows.
2. Bring out your cat:
You got it right, we are talking about that bold cat-eye which has been loved by us all since the black and white times. For this look all you have to do is follow the steps written in the natural makeup section. Cat-eye can be very difficult to ace but with the right smudge-free and waterproof eyeliner and a makeup tutorial and you are good to go.
3. Try that blush:

We all want our skin to look healthy with a pretty blush and this only requires the right makeup. This makeup look will make your skin glow and look healthy with just a few strokes of blush and foundation. To perfect this look, begin with priming you skin followed by a suitable concealer. Blend your foundation all over your skin by means of a blender to get that glow you seek. Hide the dullness under your eyes by applying a concealer in the shape of an inverted triangle. Now its time to add a little color on your cheeks by applying a peachy blush. Prime your lids, followed by adding a touch of nude and pink over your eyelids. Perfect your lips by applying a simple shade such as pink and complete the look by applying mascara on your lashes as well as eyebrows. And Voila! You got the perfect radiance.
4. Go metallic:

Get hold of the latest trend in makeup by replacing your usual palette with one with metallic shades. Make your eyes bold and chic by this dusting a metallic color on your lids. Let your eyes shimmer with the metallic pop and get ready to slay!
5. Color it all:
Sure, black eyeliner looks bold and chic, but nothing can beat the fancy colored eyeliner. It is time you add some color in place of the usual black eyeliner which surrounds your eyes. Add a bold stroke of color and bring out your inner diva.
6. Gloss it up:

Shine is what we all seek in our life and where best to start from, then our face itself. To add this desired and breath-taking shine, all we need is gloss. Gloss is the new trend and to get this look, a lip-gloss plays a major role. After your usual makeup, apply the lustrous gloss on your lips to make it shimmer as well as dab it on your eyelids on top of your desired shade of eyeshadow.
Hope these looks made you fall in love with makeup.
0 notes
Text
Make Small Eyes Look Bigger - 11 Makeup Techniques
New Post has been published on https://vanmiumakeup.com/make-small-eyes-look-bigger/
Make Small Eyes Look Bigger - 11 Makeup Techniques
Eyes that are bigger usually appear to make you look younger and awake.
All eye shapes are beautiful, don’t get me wrong! I have small almond shaped eyes myself and I don’t want to toot my own horn, but quite a few people have complimented me for them! Not all of us have big eyes. However, we can always create an illusion by using clever make-up techniques.
Here we will take you through some simple tips and tricks that helps make your eyes look bigger.
How To Make Small Eyes Look Bigger?
1. Praise Those Eyebrows
The brows make all the difference. Take a trip to the salon at frequent intervals, and keep the brows in good shape. Follow the natural shape of your eyes.
For those who want to keep their brows bold, bear in mind that you have to maximize the space you have so that it creates an illusion of bigger looking eyes. Bold, thick, and beautiful brows bring attention to the eyes. The difference between natural brows and over-tweezed arches is that the natural makes one look more innocent, while the latter makes you appear older.
Pro Tip: To get those full and expressive brows, brush them up with clear brow mascara.
2. Say Goodbye To Puffiness
The key to gorgeous eyes is by pampering them right, every day. The swollen skin around the eyes can make them look tiny. Here is how you can reduce puffiness around the eyes.
Get enough sleep
Wash your face with cold water often
Place used cold teabags over the eyes as the tannins present in tea tighten the skin
Reduce salt intake Exercise
3. Say No To Under Eye Dark Circles
Using a concealer to cover up the dark circles will not make your eyes look bigger, but at least, the dark circles will not draw attention to them when someone is looking at your eyes. So, this step is really important.
Color correct your blemishes and dark circles with an illuminating concealer. Ensure you use a shade slightly lighter than your foundation to lift and enhance your look. We recommend the light and creamy YSL Touche Eclat and smooth MAC Pro Longwear Concealer, which is also a great cover-up for spots.
4. Light Neutral Colored Eye Shadow
Use neutral and light eyeshadows. Follow the rule of contouring. Light colors for the areas that you want the light to reflect and darker shades for the areas you want to push back. Using light colors at the center of the eyelids brings them forward. Pick up some product on a brush, tap the excess off and gently apply at the center of the eyelids.
Pro Tip: The shadow can be shimmery or of matte finish; it doesn’t matter as long as it is light in color.
5. Tightline The Upper Water Line
This is the step that makes a lot of difference. Use a black liner to tightline the upper water line. This gives the appearance of fuller lashes and helps to open up the eyes. I like to use the 24/7 Glide-On Eye Pencil by Urban Decay. The formula is amazing and it gives your eyelashes volume without doing much!
6. Lay Low With The Eyeliner
When using liner on the lower lashline, make sure to only apply it to the outer third. Use a smudger or a brush to soften it out. As for the eyelid, draw a line as close as you can to the lashes. You can create a tiny flick and gradually make it thicker at the end if you want to.
7. Curly, Fluttery Eyelashes
An eyelash curler is to women what a sports car is to men. For those big eyes, ensure that you fully cup the lashes in the curler closer to the roots. Our favorites are E.L.F. Studio Eyelash Curler and Sally Hansen La Cross Double Curl Eyelash Curler.
8. The Nude Effect
Most people think that the way to achieving big eyes is by loading up on black kohls or kajals. However, this is entirely the opposite. The dark black kajal actually makes the eyes appear smaller and boxed in. Considering the Indian skin-tone, a white eye pencil may not be the most flattering one to use. The trick here is to go nude on your lower lash line. Try Bourjois Khol and Contour Eyeliner Pencil- 08 Rose Fantaisiste, or MAC Chromagraphic Pencil.
9. O’ Holy Mascara
The magic wand for makeup, a good mascara can make your eyes look bigger and thicker in no time. We suggest Clinique’s High Impact Mascara, and Maybelline Great Lash Mascara for that oomph factor. For those battable lashes and added glam, try applying three to four coats on the outer corners of the eye to create doe shaped eyes.
10. Contour The Crease
Contouring the crease helps in creating the illusion of deeper set eyes, which in turn, make them appear larger. Use a matte brown shade from the outer corner to the crease and blend well. When you’re going for an intense makeup look, you can contour slightly above your actual crease. Cover from the Naked Basics 2 palette by Urban Decay is a good shade for contouring.
11. Shimmer In The Inner Corner
Use a highlighter or a shimmery light eyeshadow in the inner corner. This adds a little something extra to your makeup look, and also helps you look awake. You can choose two ways of applying this.
You can blend it out and give it a very sheen look. This makes you look fresh in a very natural way.
Perhaps you’re looking for something more. Then, in that case, don’t blend it out. Doing this makes your eyes sparkle and is an easy way to compensate when you haven’t done much eye makeup.
Some More Tips To Make Your Eyes Look Bigger
Try and avoid dark colors like blacks and grays.
However, you can use soft browns for the crease.
Don’t overload on the eyeliner. This only makes the eyes look smaller.
Full lashes help to open up the eyes more so use the mascara.
You can also choose to apply false lashes.
Use eye masks and gently massage the areas around the eyes to get rid of the puffiness and water retention.
If you have red eyes or if they are irritated, use eye drops. The redness can actually make them look smaller, and it isn’t healthy to leave them looking so red!
Well, there you have it. 11 ways to make your eyes look brighter and bigger. I certainly know for a fact that this works. If I feel like I look exhausted (which I do on most days now of late), I follow these steps. Try it out and let us know how it turned out for you.
Readmore: How to Fake Big Eyes with Makeup
Youtube Channel about Makeup: Vanmiu Makeup
0 notes
Text
Makeup For Hooded Eyes
If you have hooded eyes, I bet you’re familiar with the struggle of smudged eye makeup. If you are not sure about your eye shape, take a closer look at your eyelids – if the lid area is not very visible, you have hooded eyes. Your crease is hidden underneath the upper part of your lid, and your brow bone is less defined. From Blake Lively to Jennifer Lawrence, plenty of celebs have hooded eyes. Here’s the good news – you can still sport any eye makeup look you fancy!
We’ve put together an eye makeup tutorial for all you gals with hooded eyes to give your peepers a serious lift. Read on to find out some great eye makeup tricks and techniques that will come in handy for you.
Hooded Eyes Makeup Tutorial
This stunning smokey-gold eye makeup look is perfect for evening wear. If you want an eye makeup look that is suitable for daytime, ditch the gold or anything that is too shimmery.
What You Need
Neutral eyeshadows
Gold eyeshadow
Eyeshadow brushes
Eye primer
Face makeup
False eyelashes or mascara
Step-By-Step Tutorial With Pictures
Step 1: Prep Your Eyes
Youtube
Start with a clean canvas. Wash your face with a mild cleanser and follow up with a moisturizer. If you want your makeup to last longer, it is essential to use a primer – both on your eyelids and your face.
Step 2: Lift Your Crease
Youtube
Use an eyeshadow brush to apply a soft caramel shade right under the brow bone and slightly above your crease line. Move from the outer corner of your eye to the inner corner in a windscreen wiping motion. This step really helps open up hooded eyes and adds a ton of definition to the hidden crease.
Pro Tip: Make sure you keep your eyes open and look straight into the mirror while you’re doing this step. This ensures you achieve the right color placement.
Step 3: Highlight Under The Brow Bone
Youtube
Highlight your brow bone with a matte or shimmery eyeshadow that is a little bit lighter than your natural skin tone. Adding a highlight to your brow bone gives your eyes a lifted appearance and draws attention upwards.
Step 4: Add Some Color
Youtube
Use a stiff, rounded brush to apply a dark brown eyeshadow under your brow bone and into the crease. Make sure you blend it in to create a smokey look. Leave the base of your eyelid untouched.
Step 5: Time For The Gold
Youtube
Apply a dusty gold eyeshadow or pencil to the base of your eyelid. Blend it in with a damp eyeshadow brush if you want the color to pop. You can also use this eyeshadow to highlight the inner corners of your eyes and your lower lash line.
Step 6: Amplify Those Lashes
Youtube
The right pair of fluttery falsies can help hooded eyes look more open and awake. However, if you don’t want to go in with false lashes, you can rely on your eyelash curler and a volumizing mascara to do the trick.
Now, finish up the rest of your face makeup – foundation, highlighter, blush… your usual drill.
Here’s the final look!
Youtube
Now that you have a basic idea of how to do makeup for hooded eyes, here are a bunch of makeup tips that will amp up your look even further.
The Ultimate Guide: Makeup Tips And Tricks For Hooded Eyes
It’s best to avoid harsh eyeliners as they make your eyes appear smaller. Always opt for a pencil liner that you can smudge out for a subtle smokey effect.
Go over your lower waterline with a nude pencil if you want your eyes to look more open.
Prepping your eyelid with an eye primer is vital. Don’t skip this step. It will prevent your eyeshadow from smudging and smearing all over your eyelid.
Defining your brows will enhance the beauty of any eye makeup look. Make sure you fill in any sparse areas with an eyebrow product. Keep it simple and natural-looking.
To avoid your eyeshadow color from disappearing when your eyes are open, always apply the shadow till a little above your crease and under your brow bone.
To get the benefit of fuller-looking lashes, tightline your upper lash waterline with a brown eyeliner pencil.
Apply a dark shadow to the area underneath your bottom lashes – a third of the way in works best. Line the rest of the area with a bright, luminous color.
Highlighting your brow bone is a must for hooded eyes.
Ladies, it’s undoubtedly true that having hooded eyelids can create a few makeup challenges – but they aren’t unconquerable. With the right application techniques and tricks, you can master any makeup look. Don’t be afraid to experiment with different looks to find what works for you. It’s always fun to try out something new!
That was our take on makeup for hooded eyes. We hope this article comes in handy for you the next time you struggle with your makeup. Are you excited to try out this look? Let us know in the comments below!
The post Makeup For Hooded Eyes appeared first on STYLECRAZE.
The article source is here:Style Craze
0 notes
Text
Makeup For Hooded Eyes
New Post has been published on http://healingawerness.com/getting-healthy/getting-healthy-women/makeup-for-hooded-eyes/
Makeup For Hooded Eyes
Esha Saxena September 20, 2018
If you have hooded eyes, I bet you’re familiar with the struggle of smudged eye makeup. If you are not sure about your eye shape, take a closer look at your eyelids – if the lid area is not very visible, you have hooded eyes. Your crease is hidden underneath the upper part of your lid, and your brow bone is less defined. From Blake Lively to Jennifer Lawrence, plenty of celebs have hooded eyes. Here’s the good news – you can still sport any eye makeup look you fancy!
We’ve put together an eye makeup tutorial for all you gals with hooded eyes to give your peepers a serious lift. Read on to find out some great eye makeup tricks and techniques that will come in handy for you.
Hooded Eyes Makeup Tutorial
This stunning smokey-gold eye makeup look is perfect for evening wear. If you want an eye makeup look that is suitable for daytime, ditch the gold or anything that is too shimmery.
What You Need
Neutral eyeshadows
Gold eyeshadow
Eyeshadow brushes
Eye primer
Face makeup
False eyelashes or mascara
Step-By-Step Tutorial With Pictures
Step 1: Prep Your Eyes
Youtube
Start with a clean canvas. Wash your face with a mild cleanser and follow up with a moisturizer. If you want your makeup to last longer, it is essential to use a primer – both on your eyelids and your face.
Step 2: Lift Your Crease
Youtube
Use an eyeshadow brush to apply a soft caramel shade right under the brow bone and slightly above your crease line. Move from the outer corner of your eye to the inner corner in a windscreen wiping motion. This step really helps open up hooded eyes and adds a ton of definition to the hidden crease.
Pro Tip: Make sure you keep your eyes open and look straight into the mirror while you’re doing this step. This ensures you achieve the right color placement.
Step 3: Highlight Under The Brow Bone
Youtube
Highlight your brow bone with a matte or shimmery eyeshadow that is a little bit lighter than your natural skin tone. Adding a highlight to your brow bone gives your eyes a lifted appearance and draws attention upwards.
Step 4: Add Some Color
Youtube
Use a stiff, rounded brush to apply a dark brown eyeshadow under your brow bone and into the crease. Make sure you blend it in to create a smokey look. Leave the base of your eyelid untouched.
Step 5: Time For The Gold
Youtube
Apply a dusty gold eyeshadow or pencil to the base of your eyelid. Blend it in with a damp eyeshadow brush if you want the color to pop. You can also use this eyeshadow to highlight the inner corners of your eyes and your lower lash line.
Step 6: Amplify Those Lashes
Youtube
The right pair of fluttery falsies can help hooded eyes look more open and awake. However, if you don’t want to go in with false lashes, you can rely on your eyelash curler and a volumizing mascara to do the trick.
Now, finish up the rest of your face makeup – foundation, highlighter, blush… your usual drill.
Here’s the final look!
Youtube
Now that you have a basic idea of how to do makeup for hooded eyes, here are a bunch of makeup tips that will amp up your look even further.
The Ultimate Guide: Makeup Tips And Tricks For Hooded Eyes
It’s best to avoid harsh eyeliners as they make your eyes appear smaller. Always opt for a pencil liner that you can smudge out for a subtle smokey effect.
Go over your lower waterline with a nude pencil if you want your eyes to look more open.
Prepping your eyelid with an eye primer is vital. Don’t skip this step. It will prevent your eyeshadow from smudging and smearing all over your eyelid.
Defining your brows will enhance the beauty of any eye makeup look. Make sure you fill in any sparse areas with an eyebrow product. Keep it simple and natural-looking.
To avoid your eyeshadow color from disappearing when your eyes are open, always apply the shadow till a little above your crease and under your brow bone.
To get the benefit of fuller-looking lashes, tightline your upper lash waterline with a brown eyeliner pencil.
Apply a dark shadow to the area underneath your bottom lashes – a third of the way in works best. Line the rest of the area with a bright, luminous color.
Highlighting your brow bone is a must for hooded eyes.
Ladies, it’s undoubtedly true that having hooded eyelids can create a few makeup challenges – but they aren’t unconquerable. With the right application techniques and tricks, you can master any makeup look. Don’t be afraid to experiment with different looks to find what works for you. It’s always fun to try out something new!
That was our take on makeup for hooded eyes. We hope this article comes in handy for you the next time you struggle with your makeup. Are you excited to try out this look? Let us know in the comments below!
Feedback
×
How can we improve it?
This article contains incorrect information.
This article doesn’t have the information I’m looking for.
×
How helpful was it?
This article changed my life!
This article was informative.
The following two tabs change content below.
Latest posts by Esha Saxena (see all)
Esha Saxena
RELATED ARTICLES
Source: https://www.stylecraze.com/articles/makeup-for-hooded-eyes/
0 notes
Text
How to Apply Wedding Makeup
http://www.viralleakszone.com/how-to-apply-wedding-makeup/
How to Apply Wedding Makeup
DIY bridal makeup, wedding makeup tutorial
Doing your own makeup on your wedding day can be intimidating, especially if you are not used to wearing makeup every day. However, the proper preparation and testing can help you confidently achieve a great result that will have you looking great both down the aisle and in photos.
Makeup You Need:
Things You’ll Need
Face primer
Foundation
Liquid under-eye concealer
Creamy face concealer
Setting powder
Blush
Bronzer (Optional)
Eyeshadow primer
Eyeshadows
Waterproof eyeliner
Waterproof mascara
Highlighter or luminizer
Eyebrow powder/pencil
Brow gel
Lip liner
Lipstick
Lip gloss (Optional)
Makeup Tools You Need:
Things You’ll Need
Foundation brush (Optional)
Powder brush
Blush brush
Eyeshadow blending brush
Flat eyeshadow brush
Pencil brush
Brow brush
Highlighter brush (Optional)
Cotton buds
Blotting sheets
Step 1: Primer
Apply primer to the center of your face: Nose, chin, and forehead. It will help your T-Zone stay matte and your makeup will look better for longer.
Step 2: Foundation
Make sure to choose a foundation that suits your skin type (the product label usually specifies which skin type is best for). Unless the event will be held outdoors (for example, at the beach), choose a foundation with no SFP. SPF tends to show up white cast with flash photography.
Apply the foundation all over your face and blend it on your neck as well. Apply as little foundation as needed just to even out your skin tone: The goal is your skin, but better. If you have any blemishes, you will cover them with concealer.
Step 3: Face Concealing
Choose a creamy face concealer that matches your skin tone and your foundation perfectly. If you have any blemishes or scars, dab the pointed eyeliner brush in the creamy face concealer and apply a tiny amount only on the blemish to cover it. With your finger, tap over it until it blends with the rest of the skin.
Step 4: Under-Eye Concealing
Use a liquid concealer one or two shades lighter than your skin tone to conceal darkness under your eyes. Dab the product with your ring finger and make sure to blend it well.
Step 5: Powder
Set your foundation and concealer with a finely milled setting powder. Choose a powder with no silica as it may show up white cast in photos taken with flash.
Step 6: Blush
Choose a blush color that complements your skin tone and gives you a healthy flushed color:
Baby pink or peachy pink for very fair skin tones
Peachy pink or rose for light to medium skin tones
Deep rose color for deeper skin tones
Step 7: Bronzer
Bronzer may not be necessary, but if you think that warming up your skin would suit you, apply a very small amount of bronzer to the sides of your forehead, on the sides of your face and below your cheekbones. Have a very light hand.
The bronzer should be completely matte, and the color should look like your skin color when you get a little tan. Shimmery face products, if not expertly applied, can make the pores of your skin look larger and your face shiny, which does not look flattering in photos.
Step 8: Eyes
Dab a small amount of primer on both the entire upper eyelids up until under the eyebrows. This will make the eyeshadow stay on longer and look better.
Apply a flesh-toned eyeshadow on the entire lid
Apply a medium brown eyeshadow along the socket line
Apply a dark brown eyeshadow to the outer corner of the eye
Apply a highlight color (champagne, ivory, pale golden all work as long as they are not shimmery/glittery) under the brow bone and in the inner corner of your eyes
Blend the eyeshadows with gentle circular motion to soften up the edges.
Line your upper lid with a water-resistant eye pencil. The line should follow the eye shape and be as close as possible to the upper lashes. Make sure to fill in the space in between the lash roots, as that gives the appearance of fuller lashes.
With the pencil brush, apply the darkest eyeshadow over the line you just created and smudge it softly. Then, curl your lashes with an eyeshadow curler. Apply one or two coats of mascara.
Step 9: Brows
With a brow powder or a brow pencil, fill in the empty spots in your eyebrows to create fuller-looking brows. Choose a brow product that is one shade lighter than your brow hairs if you are a brunette; choose one shade darker than your hair color if you are blonde. Apply eyebrow gel to set the brows in place.
Step 10: Highlighter or Luminizer
Adding a subtle sheen to the skin in strategic areas of the face, can add a youthful glow. If you like, add a touch of highlighting powder or luminizer to the top of your cheekbones.
Step 11: Lips
Use a lip liner that matches your natural lip color to define the contour of your lips and fill them in. Apply the lipstick all over your lips, and then blot with a paper towel. Blotting your lips and then reapplying the lipstick will make the lipstick stay on longer.
If you like the look of glossy lips, add a touch of gloss to the center of your lips.
Step 12: Touch-Ups
Carry your makeup bag to the event location for touch-ups. While having all of the makeup products would be ideal, you could also carry just the essentials: Setting powder with a brush or puff, and lipstick or lipgloss.
A Few Additional Tips:
Choosing a Style
Your wedding makeup look should be as close as possible to the look you normally wear. Aim for a more polished, only slightly “heavier” version of it. If you don’t typically wear any makeup, opt for a very natural, fresh-faced look (as in this tutorial).
Testing, Testing, Testing
Get together all the products you need for your wedding makeup and rehearse the look as many times as you need to achieve the result you want. The more you practice, the less nervous you will feel on the big day.
Making the Look Photoproof
Take photos of your face every time you do a makeup trial, and do it in natural light, preferably in front of a well lit window. Natural light is very unforgiving and will allow you to see mistakes and correct them, such as a foundation color mismatch. If your wedding is happening in the evening or indoors, take photos with flash as you will be photographed with flash.
Achieving Flawless Skin
Do not try any new skincare or makeup products during the two weeks before the wedding to prevent unexpected breakouts. Same goes with facials, as they may cause an unexpected skin reaction that your skin would not have enough time to heal from.
0 notes
Text
How to Apply 1950s Makeup
http://www.viralleakszone.com/how-to-apply-1950s-makeup/
How to Apply 1950s Makeup
1950s makeup tutorial, Marilyn Monroe makeup, pin-up girl makeup
Blame it on our never-ending love affair with classic style icons like Marilyn Monroe and Sophia Loren, but ’50s-era beauty looks are making a major comeback. From the red lips and perfect complexion to the flawless and sexy cat eye, here’s exactly how to get that super-sultry pin-up look that simply never goes out of style.
Things You’ll Need
Makeup primer
Foundation brush
Tinted moisturizer, BB cream, or other lightweight foundation of choice
Concealer
Powder brush
Loose translucent powder
Bronzer
Blush
Brow brush
Brow powder
Eyeshadow brush
Beige cream eyeshadow
White powder eyeshadow
Taupe powder eyeshadow
Liquid eyeliner
Mascara
Red lip liner
Red lipstick, to match
Clear lip gloss (optional)
Step 1: Prep Face
Starting with clean, moisturized skin, apply a pea-sized amount of makeup primer over your entire face. The primer helps fill fine lines and wrinkles, creating a smooth surface for your makeup.
Step 2: Create a Cat Eye
Gently pull your eyelid taught, then use liquid eyeliner to draw a thin line across the lid, staying as close to the lashline as possible. When you come to the outer end of your lashes, create a winged effect by sweeping eyeliner up toward your temple in a diagonal direction. Repeat on the other side, then finish with two coats of mascara on your top lashes, focusing on the outer lashes.
Step 3: Apply Foundation
Apply a pea-sized amount of foundation onto the back of one hand. Dip a foundation brush into the product, then buff it onto your face in a circular motion until it’s applied in a light, evenly distributed layer. Apply concealer to the under-eye area and other dark spots. Finish the base by dipping a powder brush in loose translucent powder and applying it evenly all over your face.
Step 4: Contour Face and Brows
Using a powder brush, gently sweep bronzer over your cheekbones, across your forehead and down your nose. Next, apply a pink blush to your cheeks, giving yourself a natural flush. For bold pin-up-girl eyebrows, use an eyebrow brush to fill in and contour brows, giving them a slightly arched shape.
Step 5: Apply Eyeshadow
Dip your eyeshadow brush into the beige cream eyeshadow, then apply it over your entire eyelid, repeating on the other lid. Next, apply the white eyeshadow (one with a little shimmer is best) along the eyelid, eyebrow bone, and inner corners of your eyes. Finally, buff the taupe eyeshadow into the outer crease of each lid, working in a half-C motion from the top of the lid to the base of your eyelashes.
Step 6: Apply Lipstick
Trace along the edges of your lips with a red lip liner, then lightly fill in the outline to evenly cover your lips. Next, use a matching classic-red lipstick (a velvety formula gives you the most luxurious look), and apply it to both the top and bottom lip. For a shinier look, apply one coat of clear lip gloss on top.
All images were shot by Shawna Henrie of Bluedog Fotography in Orange County, California. Hair and makeup done by Dee of Swell Beauty.
0 notes
Text
New Year's Eve Makeup Tutorial
http://www.viralleakszone.com/new-years-eve-makeup-tutorial/
New Year's Eve Makeup Tutorial
fashion and style, makeup tutorial
New Year’s Eve is the perfect occasion to wear a more glamorous makeup look. A bold lip, false lashes, and even a little glitter are all great ways to add a festive touch to your look. Follow these tips to create a glittery, sophisticated makeup look perfect for ringing in the New Year.
Things You’ll Need
Face primer
Foundation
Under eye concealer
Setting powder
Eyebrow powder or pencil
Eyeshadow primer
Eyeshadows: Matte ivory, medium brown, and dark brown, gray, or black
Black eyeliner (pencil, liquid, or gel)
Cosmetic glitter glue
Cosmetic glitter
Mascara (preferably waterproof)
Bronzer
Nude lip liner
Nude lipstick
Makeup setting spray
Step 1: Start with the Eyes
Since this makeup look features bold eyeshadow colors and glitter, it is best to start with the eye makeup, and then move to the face makeup. That way, if you experience any fallout with eyeshadow powder or glitter, you can simply use makeup remover to clean up the fallout without ruining your face makeup.
Apply an eyeshadow primer to the eyelid. You may apply it with your ring finger (which is the weakest finger, and therefore the most gentle for taping products around your eyes) or you may use a brush. An eyeshadow primer helps the eye makeup stay on for many hours without budging.
Begin by applying the matte ivory eyeshadow all over the lid up to the brow bone, which creates an even base for the eye look. Then apply the medium brown in the crease to add definition.
Apply dark eyeshadow shade to the lid, elongating the other corner slightly. Then, with a black eyeliner pencil, line the upper lid. Make sure to get in between the lash roots, which gives the appearance of fuller lashes.
With a clean blending brush, soften the edges where you applied the eyeshadows.
Step 2: Apply the Glitter
Pour a small amount of glue onto a clean surface. Dip a clean eyeshadow brush or a silicone glitter applicator into the glue and then into the glitter, and pat it on the eye lid. You may pat it only on the center lightly for a softer effect, or all over the lid where you applied the dark eyeshadow for a dramatic effect.
Curl your eyelashes and apply a few coats of mascara until your lashes are voluminous and dark.
Step 3: Apply Face Makeup
Clean any eyeshadow/glitter fallouts from your face using a makeup-removing wipe.
Apply a thin layer of face primer, then proceed with applying your foundation to even out your skin tone. If extra coverage is needed, (if you still have redness after the first layer of foundation) apply extra foundation only where extra coverage is needed. Apply under eye concealer to brighten the under eye area, and then set your face makeup with powder.
Step 4: Define Your Brows
Fill in any gaps in your eyebrows to make them look fuller, keeping a light hand.
Step 5: Enhance Your Cheeks
Apply bronzer under the cheekbones, on the sides of the face, and on the temples to warm up your complexion and enhance your face structure.
Step 6: Define Your Lips
Define your lips with a nude lip liner and fill them in. If your lips are uneven, follow the tutorial on how to make your lips appear fuller. Then apply a nude lipstick.
Step 7: Set the Look
Mist your face with makeup setting spray to set your makeup and give it a dewy but non-greasy finish.
0 notes
Last Seen Blogs

bennidraws
benni (18+)

alexandrapotora
Alexandra Potora

the3rdmusicroom
My favorite part...
tootditoot
Unpolished Art Boogaloo

thatmysticalbiscuitarts
ThatMysticalBiscuitArts