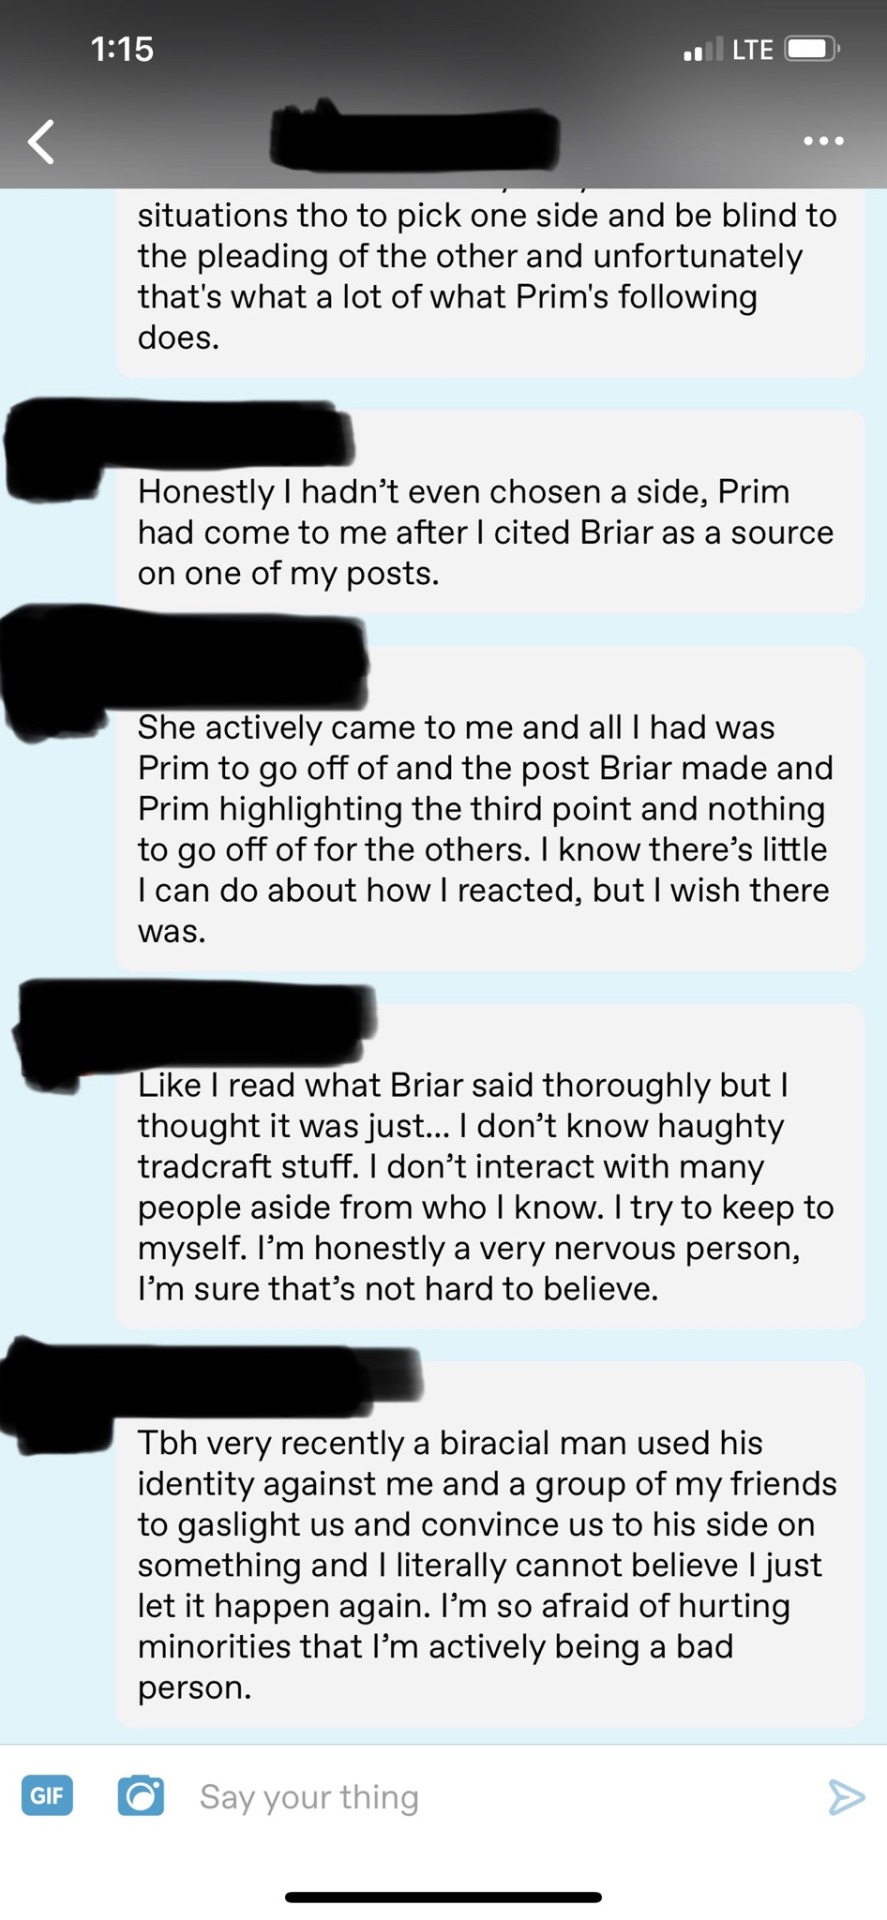
#so if you're a little known blogger it can just be harder because. your posts just aren't making it as far you have a few followers
Text
actually now that the clique thing is a few days old, i didn't really get involved for a reason and I don't feel super strongly in either direction
but I will say that like. while there's certainly a problem of less interaction on the fanworks/posts from less popular blogs, this isn't really a byler exclusive issue? this happens in most fandoms these days, interaction is just on a decline in general which IS. a problem but not really a "byler tumblr is cliquey" problem. in regards to any actual cliques I wouldn't say they don't exist but I don't think it's "the popular kids" themselves doing this. I don't know if the rest of you have some other bloggers in mind that I don't know about, but as someone who is mutuals with a fair amount of who I thought were the popular blogs, they are always very nice and welcoming to me, and actually easy to talk to once you just. see them and talk to them as a normal human and not an omnipotent fandom god. so this is all to say that if there's a clique issue I think it's from the outside. I think maybe people are perceiving these bigger blogs who all happen to be friends as these untouchable idols in fandom and it's. making it cliquey from the outside. like are they a clique or have you just convinced yourself they wouldn't want anything to do with you and isolated this group from everyone else. this isn't to say that people can't be assholes of course just that I don't think any of this is intentional
#I think a lot of post interaction problems are also just probably coming from the fact that I don't think anyone checks the tag anymore#I certainly don't. I just keep up with what my mutuals are posting#and my mutuals are posting their work and they're sharing their friend's work or the work their friend shared from someone else#so if you're a little known blogger it can just be harder because. your posts just aren't making it as far you have a few followers#and they have even fewer. and so unless you get an anomaly popularity boost it'll be harder for a post to get traction#also “it's a clique bc all the popular blogs are friends and only associate with each other” well they have been friends for months#or a year now. and also probably were not as popular when that friendship started#so it's more like. a friend group forms and then when one of you gets a popularity boost so do the others bc you're friends#and then next thing you know it's a friend group of popular bloggers#anyway. all this to say get out and make some friends! either I'm right and this will actually fix the problem#or there really is a clique in which case why tf would you want to associate with them anyway#but genuinely this is rich coming from me actually known to most as godawful at talking to people irl#but it's really so simple to make tumblr friends it just requires you to be a little brave and genuine#if you see someone posting a lot of cool stuff follow them!! and then get in their askbox and talk to them about something#if they have an au you really like talk to them about that if they have some music they've been posting about check it out#and tell them what you thought!#just like. be friendly and open they'll probably respond in kind and next thing you know you have a really cool friend#anyway if you're one of my mutuals and you saw me like a post the other day or whatever that might feel contrary to this#well the other day I was just watching things go down lmao#I didn't care what any posts said I was busy with my own discourse lol#(and also if you're ANOTHER mutual wondering wtf this post is about don't worry about that)#idk I think I just. haven't really witnessed cliquey behavior but I see posts about this with enough notes#that sometimes I think. well you guys gotta be experiencing SOMETHING so idk. idk#I guess this is another “some people just have friends” post#anyway I think a good thing to remember here also is that we're arguing about popularity on Tumblr Dot Com. brother we are bloggers#and we're calling it cliques. like a highschool movie
7 notes
·
View notes
Text
Further Insight on Briar's Recent Discourse & Prim's Apparent Grooming of Younger, Newer Witches
It was suggested to me that instead of making one long post (which I was genuinely sorry for creating in the moment as well), that I should offer the second half in a separate one so that it is easier to share and harder to simply ignore as a wall of text.
Here is the link to the first half of the current JBird and Briar discourse floating around. I highly encourage everyone involved in the Witchblr community to review both posts and not just this final addition.
Regarding Prim stirring the pot, I actually do have proof of that on my page somewhere if you wouldn't mind my sending it to you? The person I reblogged it from, Mahi, also received death threats from Prim when they were only 16 and Prim was 20 (I can't ask him to share that though because Prim has since used her following to drive him off of Tumblr and he's still fairly [and justifiably] sensitive about it.)
Regarding Briar's statements more specifically though, I can see where the confusion is coming from. After the "in France" part, she's just defining a relevant term (hence the use of "irrelevant details) and then giving an explanation of how she came to be so knowledgeable about that term/concept. I wouldn't say she's calling Prim's activism an "irrelevant detail," but pointing out how Prim uses it as a shield against backlash whenever another blog (not just tradcrafters) calls out her platform. I don't expect you to fully understand or see what I mean when I say that, of course. Because you are still new, and these are habits I've observed of hers from nearly a year of following their interactions. I would, however, like to point out that Briar doesn't say anything racist about Prim and does not once bring up her race. In fact, I think if you read her entire post and not just point 3 as Prim has it cropped out in all of her mentions of it, you would see more fully the depth and amount of frustration Briar is trying to express. Similarly, Briar never threatened to dox Prim. She has, in fact, repeatedly tried to point out that Prim should be protecting her online information and be more aware of how to stop others from finding out about her private life/situation. These statements, however, have since been warped by Prim and her followers to come off as a threat on her life. Briar's statements above aren't a threat of doxxing. She's never once posted Prim's personal information or told others to find it or use it in any way. She has, however, searched for Taglocks on Prim, something witches especially are known to look for. In that search she found more than she was even looking for, despite trying to tell Prim repeatedly to stop being so open online with the information she posts about herself. Doxxing though is not racist. It is something used by them, sure, but it is not inherently racist.
Additionally, Prim has raised money, sure, but I still have not seen any actual receipts as to her *actually* donating it to any public or private organizations. This, for me, is highly suspect. In reality, we still have no idea where that money is. Whereas with Briar, she took no money in for a couple days on her readings and instead merely asked that those requesting a reading first submit proof of donation to an organization linked in the post. She raised substantial money for the BLM movement, but no one seems to want to bring that up in all of their "she's a racist" discourse. Also, the observation that someone is misleading or gaslighting their following is not racist. Just because she said Prim was recently using her BLM reblogs & promotions to do it *this time* still does not make it racist. Questionable wording is just something the reader disagrees with, in my opinion, and should be addressed as such.
I'm not going to lie, I do feel a little frustrated at this point. I was really hoping to come to you and see that you had concrete proof to offer that Briar is a racist. I do understand that you have your own reasons for feeding into the assumptions and twisted outlooks already taken on Briar's words, but I don't have enough energy in me to fully swallow my tongue on this one. I really do hope that you at least consider what I've said here. I'm not sure what I can say at this point because all of the information I've read from you thus far has been purely conjecture or assumptions or just "not feeling right" about the wordings on a single post. A racist, from my perspective, is not something I would ever feel comfortable calling someone off of this lack of evidence.
I understand it is hard to separate preconceived notions from your mind when reading through the words of others, but I really do miss when you were more open to the words of others. If I could ask one thing of you, it'd be to please try to read Briar's post again but from the perspective of seeing it how it was meant to be: a witch who has been on the butt end of Prim's harassment for going on three years now. She is tired of the wild accusations and constantly having to defend herself, and even when she supplied her proof a couple years ago, no one wanted to hear her. She has, largely, given up on being heard, and now screams into what feels like a void when attacked.
Proof of Prim stirring the pot that I offered: An example of Prim actively seeking out the community and trying to stir the pot with an already dealt with situation that had passed over a year ago.
A direct source that I offered as further proof of what has occurred already: This is one from the account mentioned before who was directly involved with the previous discord server where the Trio incident took place a couple years back.
[A Reply.] I think, to be fair, I saw your comments on her previous posts through your main, and with how much aggression you packed into those messages, I don't necessarily blame her for deciding not to engage with your private messages. As I've said, she's very used to people attacking her like that, and in her mind, unfortunately, you've probably been added to the list of aggressive people ready to fling the blame at her rather than look at the situation as a whole. I do apologize for the way her post may have made you feel, but I think it's also important to remember the potentially aggressive things you left on her page (I'm not saying you meant to come off that way, but even I couldn't help but read that way). Also, regarding the ask, it's no small secret that the occultists of the tradcraft group are skilled and well-versed in hexes and curses. When reading her posts about how she may respond to further antagonism on Prim's part, I see a fully realized occultist wielding their most well kept and trained weapon: baneful magic. I'm sure Prim herself also understands that the "threat on her life" she's saying she's so afraid of, isn't a physical threat, but a metaphysical one. She has repeatedly and continually tried to drag these people through the mud, and now that they're refusing to just sit back and be canceled, she's afraid. She knows how strong their magic is, and they aren't shy about it 🤷♀️
[A Reply.] No, I completely understand where you're coming from. I, personally, have seen your willingness to talk things through, despite how aggressive you can come off at times in the things you say, so I think that's why I was genuinely so surprised to see your comments on some of her posts. But I do think her response and refusal to further directly engage with you is warranted and her right. Unfortunately, it is hard to tell who is genuinely open to talking and who is just trying to bait and add to the problem. And with how aggressive your comments were, 8 honestly think she most likely was responding from a place of "oh look another young Prim follower here to bait and berate me." I don't think she looks down on you for your age, but her views are likely a reflection of the fact that a lot of 18yos follow Prim and have openly harassed her without even asking for her input on the matter.
At this point, I would like to talk about the second half of the title of this particular post. Grooming. This is a very serious allegation against Prim that I have not spoken on previously because I had no proof that it was happening. With this person's permission, I would like to share how exactly they wound up fighting Prim's battles for her.
I will note: I am highly disgusted by what follows.
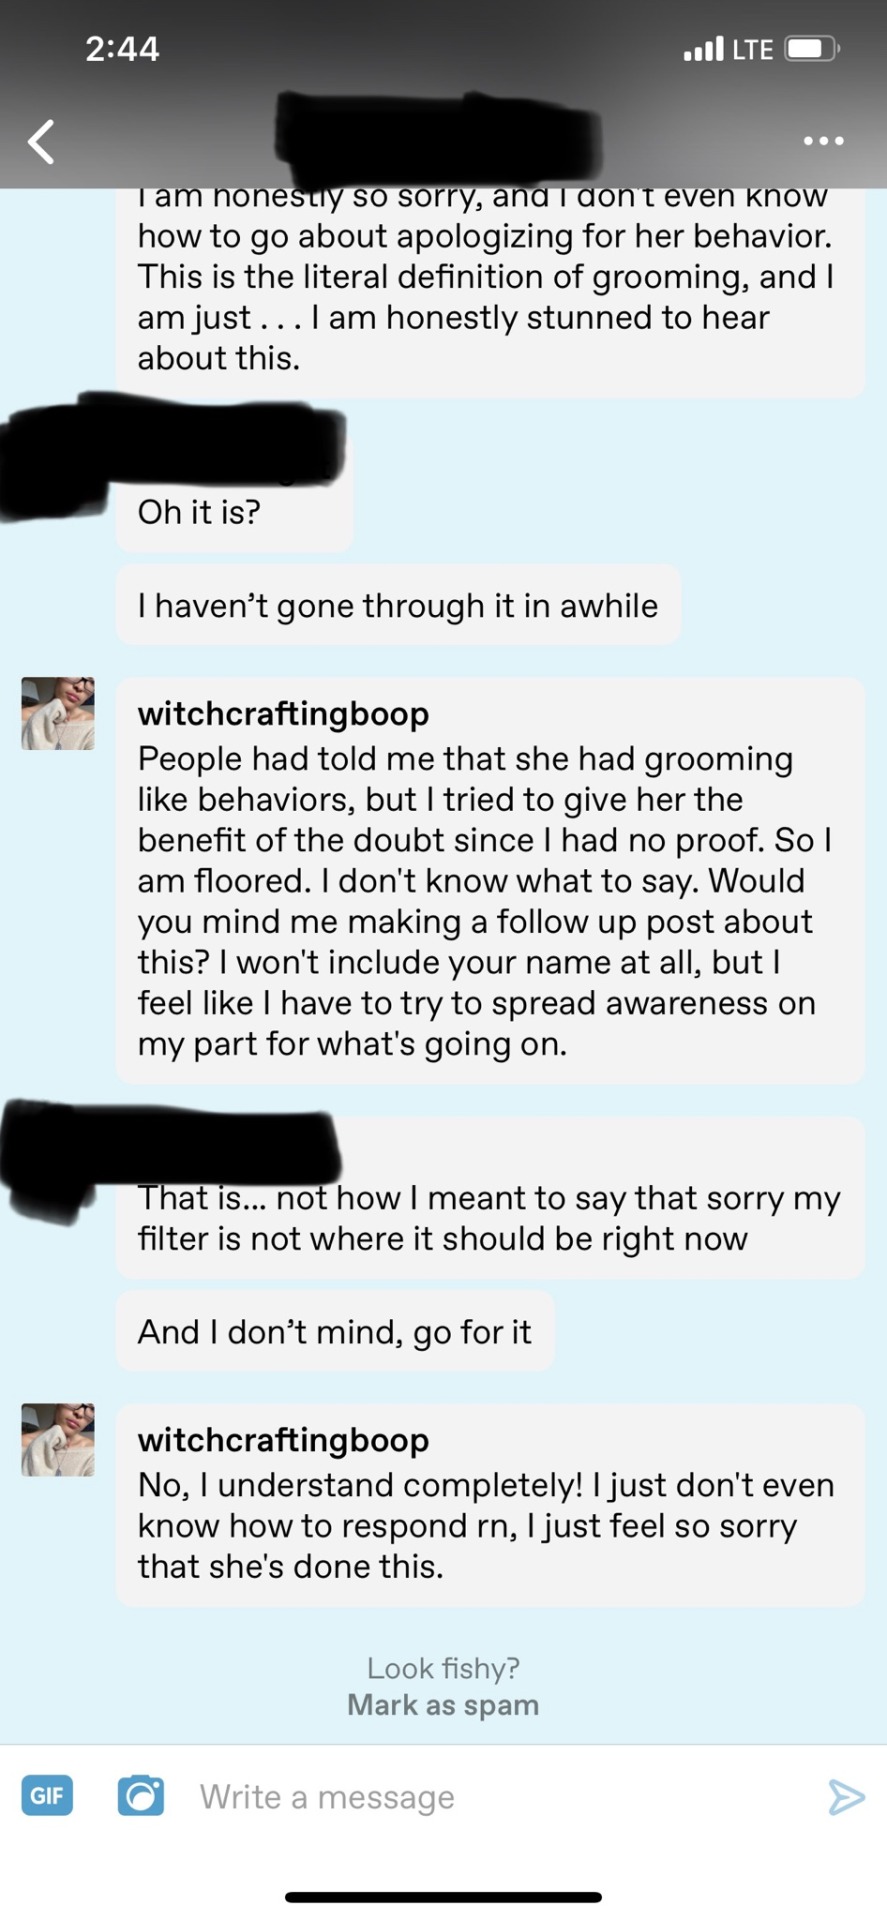
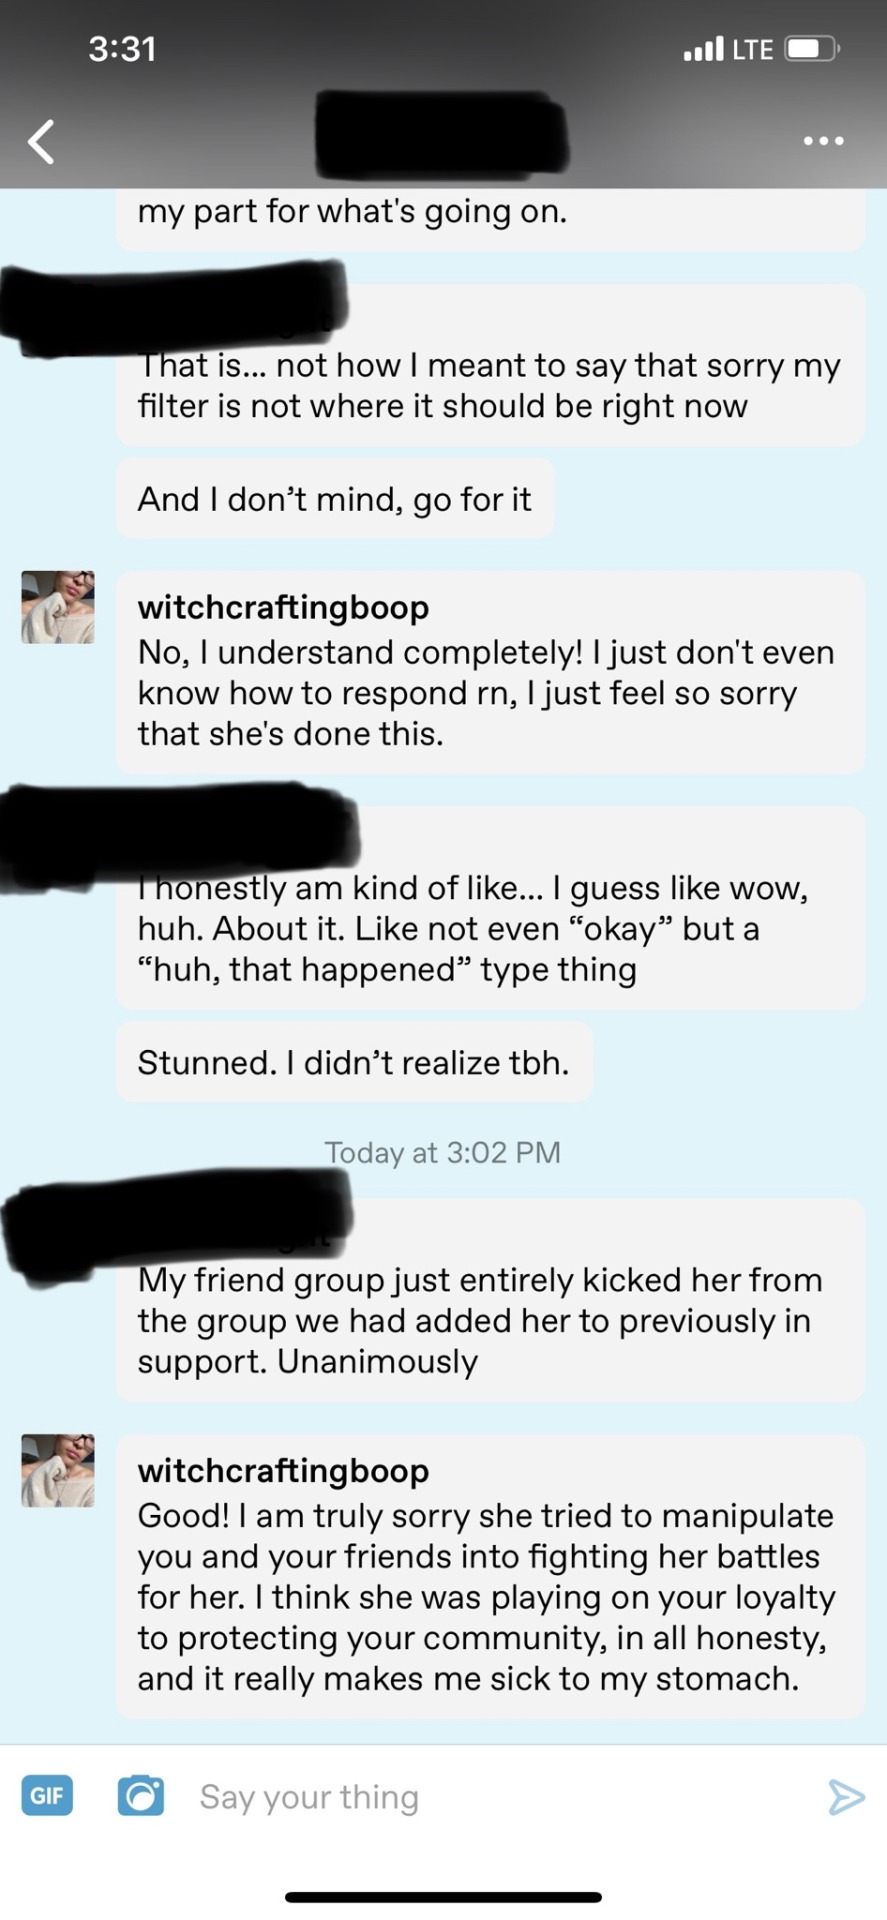
[A Reply.] Oh no! You cannot fault yourself for this! Prim is a known manipulator, and the fact that she was able to make you somehow think this is part of your being "gullible and naive" is just testament to the fact that she's gotten wayyy too good at what she does. This is in no way your fault or because of some fault within you. Practiced manipulators are cunning and dangerous even to the best of us. It was unfortunate that she chose you, but her twisting you around is in no way a bad reflection on you as a person!
I've chosen to include my reply to this person rather than our continued discussion because of how personal and involved our conversation turned. I've included it to show, as well, that grooming others to fight your battles is (though this should go without saying) NEVER OKAY. Prim has shown her true colors, in my opinion, and while I tried to give her the benefit of the doubt time and time again, I simply cannot permit myself to ignore the harm and damage she's inflicted on not only the tradcraft community, but also this innocent group of friends. A group who that has hitherto dedicated their time to sussing out predators, terfs, nazis, and racists. A group that should never have had to deal with being gaslit and manipulated by a well-known and respected blogger on this platform.
I cannot reiterate enough how sorry and deeply shocked I am at the information this person has brought to my attention. I am still stunned by Prim's activities and unable to fathom how many other potential individuals are out there being groomed to support and fight for her cause. I am sorry to the Witchblr community as a whole. I feel as if I have sat by and watched as Witchblr has been manipulated and am therefore complacent in the damage and needless hurt that has been allowed to spread throughout our community. I am just so very, very sorry.
I will be taking a couple days off of Tumblr because of this, as I feel as if I need space and time to think, but my inbox is always open and I am always available to speak with others on my return.
#witchblr#witch community#witchblr discourse#discourse#nightshadeandroses#grooming tw#grooming in the witch community#tradcraft#traditional witchcraft#beginner witch#novice witch#baby witch#witch predator#long post#gabrielle#chthoniaa
27 notes
·
View notes
Text
DIY Plywood Flooring Pros and Cons + Tips
Our Plywood Pretty week is coming to a close and there's one topic we haven't covered yet… plywood flooring. While we love our hardwood floors, we know that not every DIYer has the budget, and, if we're keeping it real, not every project is worth the splurge for higher end flooring. We've talked about and heard from our readers over on Facebook about plywood plank flooring, too — see the posts here (1, 2, 3, 4, 5,) — including some awesome pictures of their floors. From natural sealed plywood, to stained, to painted, to even TORCHED plywood floors to bring out the grain, and mixed plywood types for an interesting flooring pattern — we really do have amazingly talented readers! (Click on each picture to go to the photo/thread on Facebook for more info.)
Everyday DIY: Readers' DIY Plywood Flooring
Since this is a popular idea that we haven't personally tried, we reached out to some fellow DIYers about their experiences with their DIY plywood flooring installation and durability, and we're compiling their answers into an informative post today.
DIY Plywood Flooring FAQs
We asked each blogger these 4 questions:
1) Why did you choose plywood plank flooring over other more traditional flooring types?
2) How has your plywood flooring held up to regular use and cleaning?
3) Would you install plywood plank floors again, or recommend them to a friend? Why or why not?
4) What is one think that surprised you about the plywood plank floors, or that you wished you had known before you started?
Their answers are below. Be sure to pay them each a visit to see the specific tutorial details of how they installed their plank plywood floor and if you have any specific questions for them — plus, check out their other projects while you're there — beautiful homes and amazing projects!
Have you ever considered installing a plywood plank floor? If you have DIYed it, we'd love to hear your experience and add it to our post, too — leave us a comment below and send us a pic here.
DIY Plywood Plank Floors | Quarry Orchard featured here
Shannon installed her plank-look plywood flooring in her bonus room above the garage over 6 years ago (at the end of 2010) using 6 inch planks of 15/32″ plywood. She originally shared the tutorial with us here on Remodelaholic, and we get a lot of questions about her floors, so here is her update:
1) We chose plywood floors because of cost. We needed to redo this room which meant pulling up the carpet. When we did that, it was only subfloor below. We didn't want to spend a lot on this floor and it is a large room. This was more of an experiment, to be honest!! We weren't sure how it would go.
2) The floors have held up really well! Since installing them, we have had 2 children and now have 3 indoor/outdoor cats. We also had an indoor beagle for the first few years after doing the floors. We chose a cheaper plywood so it is a bit softer. However, they have held up very well. There are a few “dents” in high traffic areas due to the kids riding cars on them. However, I don't know that anyone other than us would even really notice. People are still shocked to learn it is plywood!
3) Yes, I would recommend plywood flooring to others and I have. I would be hesitant to install them in areas that may get wet though. It is still only plywood. I would worry about this in a kitchen or bathroom. I'm a messy cook and spill and drop things. I would worry about liquid getting under the boards. In our room, we used Liquid Nail to adhere them to the floor AND did cut nails, only for appearance. So, we have had a few small spills on ours but nothing like a kitchen would see.
4) We wish we would have known how beautiful they would be! Our plan was to install and then paint them. We left an intentional gap between the boards so that the paint wouldn't just fill it in and make it look solid. However, once we cut them and had the entire room laid, we were shocked! Everyone who came to see them also commented on how beautiful the grain was. Since they were cut into strips and laid in planks, it didn't looks like plywood. So, we stained it instead. Had we knows that, we wouldn't have left that gap. It isn't a huge gap or problem, but you feel it when walking barefoot. I also have to use a vacuum attachment in some places to vacuum between them.
Painted Wide Plank Plywood Floors | Little Green Notebook
Jenny was one of the first DIY bloggers I saw do plywood flooring, way back in 2013, and her painted wide plank floors (using 8 inch planks of 15/32″ sheathing plywood) in her beautiful studio are still holding up well today!
1) We went with plywood floors in my studio because I wanted something easy to install ourselves and, most of all, super affordable. I really wanted to paint the floors white and I just couldn't wrap my head around the idea of painting new, expensive flooring. The plywood ended up costing about $1 per square foot, which is pretty unheard of for wideplank wood flooring especially!
I needed about 800 sq ft of flooring for the studio and with all the materials (plywood, saw blades, glue, new nail gun, etc) we came in at about $1000. Installation could not have been easier, too! We had one person cutting and gluing and two people laying and nailing the planks and we finished installing everything in one day! It was incredibly satisfying.
2) I think the plywood flooring has held up well! It's hard to tell if it's the oil-based enamel paint helping out, but I would give the floors an 8/10 score for durability. We chose a pine plywood for cost and convenience, and the softer material definitely shows more of the typical wear and tear from my projects and our dog, but I honestly don't really notice it. I think if someone was worried about living with a more worn-in look, they could always opt for a harder plywood, like birch.
3) I would definitely recommend plywood flooring to a friend under the right circumstances. Because the planks have flat edges, with no tongue and groove notches, there will be a little bit of movement with the planks over time. Some of the planks will sit up a tiny bit higher than surrounding planks. The overall look ends up leaning a little more country and less polished (think an Anthropologie store), but it's completely charming in the right house!
4) I've been surprised at how well these floors have held up! We installed my studio flooring more than four years ago and it looks practically the same today as it did a few months after installing them and breaking them in a little. I think at the five year mark I'll probably want to do a fresh coat of white paint, but overall I'm so happy with these floors!
Jenny's top plywood floor tips:
Order your plywood from the contractor desk at your hardware store a week in advance. I ordered mine from Home Depot and there was a nominal fee to rip down all the planks to size. If you have the planks cut to be a little under 8″ each (since the plywood sheets are just under 48″) , you'll have six planks of equal width and no waste.
This is true with any wood flooring install, but be sure to really stagger those planks so there is not an obvious pattern that emerges with the seams!
Newbie's Guide to Plywood Plank Flooring | Shark Tails
You'll recognize Allison as one of our awesome contributors (and if you don't, check out her latest projects here and here!). She installed her 3/8″ plywood flooring in 8-inch planks in her master bedroom a year ago, in April 2016, and her tutorial is so comprehensive and detailed! She also has three dogs, so her floors have seen some real life use. Read her full 1-year update here.
1) Plywood was certainly not our first choice but it honestly ended up being a very happy surprise. We were desperate to get rid of the carpet in our bedroom (we have three dogs) and originally wanted hardwood. A little math later put that dream to bed real quick — it was way outside of our budget! Laminate wasn't really an option because aesthetically it wasn't our favorite, and the ones we did end up liking were not exactly cheap. So I started researching “alternative” flooring — and I stumbled on some examples of people using plywood planks that didn't look too bad. As a matter of fact, they looked pretty fantastic! Plus, the price tag was just right at $1/sqft. It ticked two of my major boxes (look, price) and the third (durability) we decided to take a chance on.
2) Honestly, our plywood floors have held up amazingly well. As mentioned, we have three very active dogs and these floors take a beating on the regular. There is an area of the floor where they jump on and off the bed that has some scratches but you honestly cannot notice them either by feel or sight (unless you are getting right down on all fours). I should note that we stained our floors with a really light shade, which I think helps camouflage any dings/scratches. I can't speak to how these would look if you used a darker stain. If you don't have pets, scratches will not be an issue for you, unless of course you're in the habit of tap dancing in spike heels, dragging grand pianos across the floor, etc.
3) Yes yes, and yes. If budget were no option (one can dream) I obviously would opt for hardwood floors every time, but for the cost, feel, and look you cannot go wrong with these and I am so happy we decided to take the plunge and give them a try. I am actually thinking about installing these plywood floors in my foyer/kitchen area, except painting them instead of staining.
4 ) I wish instead of cutting the sheets down into planks myself, I'd had Home Depot make the cuts for me. It would have been worth the extra $25 or whatever it was to have them do it and they be perfectly straight/square. My cuts were as straight as i could possibly get them, but they aren't perfect and because of that the gaps in my floors are inconsistent.
Allison's last word on plywood floors: If you hate the floors you have now, but are still on the fence about this project, DO IT! You won't regret it!
Painted and Stenciled Plywood Floor | Life in the Big House
Brooke installed her plank plywood floor in a back room that functions as a sort of mudroom for her 3 large dogs. She laid the floor last August (of 2016) and made it amazing by not just painting it but by stenciling it for a cement tile look that has me swooning! Brooke used 1/2″ plywood in both 6- and 8-inch planks for variety.
1) I chose plywood flooring for several reasons. First – it was cheap and I was looking for a cheap fix. Second, I love the look of painted wood floors, but I would never be able to bring myself to paint real wood floors. I love old houses (mine was built in 1908) and I can't even paint the wood trim. So painting regular old (or new in this case) plywood appealed to me. I really wanted to do cement tiles, but that was a bit too pricey for me.
The actual installation of the plywood was super easy. I had the store cut it into 6″ and 8″ widths to vary the look in the room. A penny for spacers and my crown stapler made it go super quick. The room I used was rather small and also the original floor was sloping pretty bad in the back corner. I used a few shims to do my best to make it level….result, eh, not so level. But since I was using plywood, I wasn't too worried about movement (even thougth I had a foundation guy look at it and he said it probably wouldn't move much more since it was sooo old.). That's one reason I decided not to tile, I was affraid the tile or grout would crack if it did end up settling more. Since this floor was for a doggie room, I was concerned about durability, but I figured with enough layers of primer, paint and finish coating, it ‘should' be good.
COST
Plywood – $71
Primer – $23 (Oil Based Floor Primer in White)
Base Paint – $30 (Valspar Porch and Floor Latex Paint
Stencil Paint – $30 (Same as above)
Sealer – $50 (Verathane Heavy Use Formula and true to name – super low odor!)
Total $204 – of course my project would have been cheaper is I hadn't wanted to stencil a pattern.
2) Considering all things, and all things mostly being it is a room for the dogs, and we have 3 big dogs – doberman pinscher, boxer/pit bull mix and a black labrador, it's done very well. Since there was a high possibility that the dogs would get the floor wet, I made every attempt to protect the plywood as much as I could. I used an oil based floor primer in white that was supposed to protect the wood from water. The base coat and stencil colors I used Valspar Porch and Floor Latex Paint, another type of paint that should be super protective. And then for the protective coat (sealer) I used Verathane Heavy Use Formula Poly, and I did a couple of coats of that just to be on the safe side. With all the ‘extra' measures I took, I hoped it would be enough to keep the plywood looking good. It has now been about 8 months since I finished the project and I have to say the floors still look great. There are 3 scratches in the floors where you can see the raw plywood, I am not sure who's fault that is (ours or the dogs? we also use that room for storage sometimes and our dobie is a bit on the hyper side….)But as soon as I saw the scratches, I put another coat of poly on them to prevent any further damage.
For cleaning, I've used a Bissell Steam mop and a swifter wet jet mop. The dogs track in a lot of dirt and mud and the floors always look great after a vacuum and mopping. I have not noticed any other issues, no swelling, no chipping besides the scratches mentioned above.
these floors do get used and dirty…
…but they clean up really well!
3) I would absolutely recommend plywood floors!! Super easy to install and even if someone didn't have saw to cut them or a nailer to install, they could easily rent the tools or even use a hammer and nail. I'm not sure I would attempt the same stencil again, that took a lot longer than I had anticipated and was a lot more involved. I love the look and might try to a find an easier way to get the pattern or do a larger stencil. But the actual plywood installation was super easy and I am still very happy about it, plus it's less $$ commitment and an easy fix for a tight budget. We do plan on finishing some attic space in the future and we want to use plywood plank floors again, I think I'll just have one solid color or a larger pattern. I did really like the all white of the floor primer I used before the base coat of blue.
4) I am surprised about how it has held up to the dogs. We have heart pine floors throughout our house and you can easily see the scratches from their claws (and we just had them refinished a year ago), and with the plywood floors, it's harder to see the small scratches (minus the larger ones I mentioned earlier). After I was finished, I really thought I had wasted a bunch of time making the floor so pretty only to have the dogs destroy it in a few months, but it still looks great (IMO *:) happy ) I ended up needing more plywood and had to make a store run near the end, I'm not sure how I messed that one up.
I do live in Georgia and I was afraid the temperature changes might cause the wood to pop up from the floor or pull away from the walls. The room where the floor is installed, is not insulated very well and is always a few degrees warmer in the summer and a few degrees colder in the winter.
Brooke's plywood floor tips:
Buy high grade plywood (sanded)
Have the store cut it for your (easy to transport! and saves time)
Prime, Prime, Paint, Seal, Seal
Enjoy!
Rustic Multicolor Plank Plywood Flooring | Sand Dollar Lane
Leen recently (early 2017) installed plywood floor in the bonus room above her garage, which serves are her art studio. She used 1/4″ plywood cut into 8 inch planks and finished with a variety of stains for a more rustic multi-color style.
1) I chose plywood floors because of cost definitely! Also, I wanted flooring that looked rustic and custom, not the same as everyone else has.
2) So far so great. It's not in a high traffic area so I can't attest to how it would hold up in an entry way or somewhere like that. I use a barely damp mop when cleaning it only because that is what I use for our hardwood floors in the house.
3) I would [install plywood floors again]! It was much easier than I expected it to be and I love the way it looks.
4) I wish I had known about the no sanding floor finish sooner, I wouldn't have dragged my feet so long. I was worried that it was going to be more work than it actually was. I am surprised at how good it looks. I was expecting it to look nice but kinda felt like I was settling because of my budget. It's much nicer looking than I expected it to be!
Leen's final tip: Make sure your sub floor is level and clean, and hammer down any raised nails in the sub floor before starting to lay the planks down.
Rustic Barnwood Style Plywood Plank Flooring | House Seven
Anissa has a gorgeous farmhouse vibe in her home, where she installed her 8″ plank barnwood style plywood floors in her home's bedrooms and hall over 2 years ago (June 2015) using 15/32″ plywood. Anissa says, “We sold that home last summer and have moved into a new home. But I will say that the plywood floors were a huge selling point for the house. People just loved them!”
1. We went with the planked plywood because we wanted large (8″ wide) floors that felt like barn wood but the cost of buying traditional engineered or hardwoods was way out of our budget. The plywood floors achieved the look we wanted for far less.
2. The durability is incredible. I like to move furniture and we have 3 kids and a dog, all of that combined can kill the floors and these held up to all of it!
3. We initially installed the floors in our master and we loved the look and durability so much that we went ahead and installed them in our daughters room and the upstairs landing and hallway.
4. The one thing that we realized was we needed to use far less polyurethane than we did in our first try. It made the floors far too yellow, even with using the clear floor type. Do not roll on the poly but instead brush light strokes until you have the achieved amount.
Anissa's #1 tip: Sanding is key here! The more you sand the better the floor will look and we also sanded a beveled edge to each plank to give them more of a custom look.
Stained Plywood Plank Floors | Red Cottage Chronicles
Maureen laid her plywood floors in her living room in April 2014. The 6-inch planks look wonderful!
1) Our main reason for choosing the plywood plank floors was definitely cost. We had received an estimate from a local flooring company to provide engineered wood floors for $4000.00. Choosing the plywood planks was roughly 10% of that estimate!
2) We are very happy with how the floors have held up. Going into this project we knew that pine is a relatively soft wood, and with two dogs and lots of foot traffic it would definitely not remain pristine. While there are some scratches, really just add to the patina we were going for and actually add to the overall appeal of this flooring choice. I clean them weekly with a damp mop and Method wood floor cleaner, and they have not dulled or lost their finish at all.
3) I wouldn't hesitate to install the plywood planks again or to recommend them to anyone who is looking for an inexpensive wood flooring option.
4) We did a lot of research before taking on this project, so not a lot surprised me. What did surprise me though was that it was a bit longer process than I was expecting given the drying time and required number of coats of poly. The actual planks went down in no time at all, but finishing it took a couple of day.
Maureen's tips:
Ask your local lumber store if they would be willing to cut the plywood to size for you. Some big box stores will do 3 free cuts and then 1 a cut after that, but some will do it for free on a day that isn't too bus! It is well worth it to ensure straight, even cuts.
Before applying the stain and again before the poly ENSURE THE SURFACE IS DUST FREE!
Allow for about a week from start to finish depending on the size of the space.
Keep in mind that the furniture has to be completely removed from the room. Since we live in a small home and through our living room is the only route to our bedroom and bathroom we did arrange to stay away for 2 nights when we applied the poly.
Painted Plywood Plank Floor | Little House on the Corner
We featured Christine's home here a few years back, and we still love it and love her painted plank floors! She laid her floors in a guest room nearly two years ago, back in May 2015, using thin 4-5 mm plywood so that the floor level wouldn't be dramatically different than the existing flooring in the rest of her beautiful Edwardian home.
1) We love wooden floors and have original floorboards throughout the rest of the house. The guest bedroom floorboards were however in a really bad condition with large gaps between them which is why we decided to install a plywood floor.
Because we were installing the new floorcovering over the existing floorboards we wanted to use a material that was as thin as possible. The plywood we used is only 4mm thick which means there’s almost no visible threshold and height difference as you step into the room.
We also wanted flooring that was quick and easy to install and laying the plywood floor ticked all the boxes.
2) The floor has held up really well. We primed and painted it with white floor paint and up till now haven’t had an chips, dents or marks. We only occasionally use the bedroom so it doesn't get a huge amount of wear.
3) We’d definitely install plywood floors again. It was easy to do and you can achieve a totally bespoke finish to perfectly fit your space.
4) I thought the floor would have to be painted to look good but i was really surprised at how beautiful the plywood looked in its raw state before we applied the paint finish. The pattern in the timber was beautiful and we we're really tempted to leave it natural and just seal it with varnish.
Christine's tips for a great plank floor:
Plan, measure and then plan & measure some more. We planned our floor so that the room was perfectly devices into equal planks. This not only makes everything look high quality as there are no thinner or cut pieces at the edges it also makes installing it quicker as you have almost no cutting to do.
If you’re installing planks have them cut and don’t bother doing it yourself. Having long strips of plywood ready to lay saves so much time and costs almost nothing.
If you paint the floor wait as long as you can before putting any furniture back in the room. We marked the paint when we put back the bed. We'd recommend waiting at least a week if you can!
Dark Stained Plank Plywood Flooring | Remodelando la Casa
Cristina installed her beautiful 8-inch plank dark plywood flooring in a bedroom in her home almost 2 years ago (2015) and plans to install it in more locations in her home soon.
1) The main reason for using wide plank plywood flooring in my home was cost and design. You can’t find 8” wide plank, 3/4in. floors that are easy on your wallet.
2) The plywood flooring has held up wonderfully. Now, I installed this kind of flooring in a bedroom, more specifically my son’s bedroom, which has very little traffic, there’s no consumption of food in there, and there’s a rug covering more than 50% of the planks.
There are some grooves in between the planks that people are always asking me if they get filled with dirt. Well, a simple vacuum cleans whatever gets in there, but I’m happy to report that after almost two years of having the floors, there’s no accumulation of dirt.
3) Yes, I want to continue installing the same kind of planks on the entire second level of my home – the bedrooms and hallways.
I recommend this type of flooring for spaces with light traffic. However, if you don't mind dents and scratches at all, you can have them all around your home.
4) I was greatly surprised at how beautiful and smooth the planks look and feel once they're installed, having in mind the ugly product at the beginning of the process. Also, the room I covered was small, but the amount of planks seemed huge while doing all the sanding, staining and polyurethane protecting.
Cristina's tips for a beautiful floor:
I wouldn't go with the lowest grade of plywood. I did so the first time, but the amount of sanding was something that was I really didn't enjoy.
The whole process is quite a lot of work, but it's something that's very DIY friendly. You get the savings and the beautiful floors by doing it yourself!
Plywood Wood Plank Floors | Layers of Learning
Michelle laid plywood plank floors in her living room way back in 2012, and they're still looking great, even in a home with six children and plenty of projects. She used 6″ planks of 11/32″ plywood.
1. I chose plywood flooring mostly because of the savings over commercial wood floors. But we also picked this option because we knew we wanted to redo several of the floors in our house over a few years. We couldn't be sure that the commercial floor we chose would still be available years ahead. We wanted our floors to match so we did it ourselves.
2. We have six boys who are not easy on the house, but our plywood floors still look excellent. The wood itself and the finish have both held up really well. They are scratched and dinged on some places, but since we expect a rustic look to the floors this didn't bother us.
The difference in color is mostly due to lighting, not an actual difference in color, though they do not look as shiny as they did at first.
3. I would definitely install these floors again. In fact we did finish the bedrooms with plywood floors several years after the original living room install. I would recommend these floors to others provided they were fine with a rustic, lived-in look.
4. I was surprised at how easy they are to clean and how they never look filthy like the old press board floors we had originally in the house. I just sweep or vacuum on a regular basis and then mop with a well-wrung out wet mop about once a month.
Distressed Wide Plank Plywood Flooring | Addicted2Projects
Andrew and his family first installed their plywood flooring about 4 years ago (2013) in their foyer and since then have also laid plywood flooring in their living room and dining room — and have inspired many other DIYers with their tutorial! They used 5/8″ sheathing cut into 8″ planks.
1) The price was the main factor [in choosing our flooring] and after research I found out the plywood flooring (like we did) and engineered wood floor are the same but our floors were done for a fraction of the price. Install was super easy and they have lasted for years and only look better with time.
2) The floors have held up GREAT. With 3 kids, 18 year old cat and 85 pound greyhound rescue…they are strong. Cleaning and care are the same as another hardwood flooring.
3) Yes and we actually have already done it again. We tested it in our foyer several years back and now have done the living room, dinning room, and study is going to be done in the next few weeks. I would recommend these to anyone wanting a strong, good looking, very inexpensive alternative to other flooring options.
4) [It surprised us] that we love them SO MUCH and wished we had done it sooner and in previous houses we have owned.
Andrew's encouragement: Don't be scared! Try it in a small room and see what you think. Remember that these ARE hardwood floors and can be treated and installed in the very same way. Just do it!
So. there you have it — all your burning questions answered about if plywood floors are actually as durable and dreamy affordable as they seem!
If you still have questions, leave them in the comments and we'll do our best to answer, or click over to one of the featured blogger's tutorials where you can ask them more specific questions about their flooring, too.
And don't forget to check out all the other plywood projects and inspiration we've shared for our Plywood Pretty week:
The post DIY Plywood Flooring Pros and Cons + Tips appeared first on Remodelaholic.
from car2 http://ift.tt/2oSYJwl via as shown a lot
0 notes
Text
DIY Plywood Flooring Pros and Cons + Tips
Our Plywood Pretty week is coming to a close and there's one topic we haven't covered yet… plywood flooring. While we love our hardwood floors, we know that not every DIYer has the budget, and, if we're keeping it real, not every project is worth the splurge for higher end flooring. We've talked about and heard from our readers over on Facebook about plywood plank flooring, too — see the posts here (1, 2, 3, 4, 5,) — including some awesome pictures of their floors. From natural sealed plywood, to stained, to painted, to even TORCHED plywood floors to bring out the grain, and mixed plywood types for an interesting flooring pattern — we really do have amazingly talented readers! (Click on each picture to go to the photo/thread on Facebook for more info.)
Everyday DIY: Readers' DIY Plywood Flooring
Since this is a popular idea that we haven't personally tried, we reached out to some fellow DIYers about their experiences with their DIY plywood flooring installation and durability, and we're compiling their answers into an informative post today.
DIY Plywood Flooring FAQs
We asked each blogger these 4 questions:
1) Why did you choose plywood plank flooring over other more traditional flooring types?
2) How has your plywood flooring held up to regular use and cleaning?
3) Would you install plywood plank floors again, or recommend them to a friend? Why or why not?
4) What is one think that surprised you about the plywood plank floors, or that you wished you had known before you started?
Their answers are below. Be sure to pay them each a visit to see the specific tutorial details of how they installed their plank plywood floor and if you have any specific questions for them — plus, check out their other projects while you're there — beautiful homes and amazing projects!
Have you ever considered installing a plywood plank floor? If you have DIYed it, we'd love to hear your experience and add it to our post, too — leave us a comment below and send us a pic here.
DIY Plywood Plank Floors | Quarry Orchard featured here
Shannon installed her plank-look plywood flooring in her bonus room above the garage over 6 years ago (at the end of 2010) using 6 inch planks of 15/32″ plywood. She originally shared the tutorial with us here on Remodelaholic, and we get a lot of questions about her floors, so here is her update:
1) We chose plywood floors because of cost. We needed to redo this room which meant pulling up the carpet. When we did that, it was only subfloor below. We didn't want to spend a lot on this floor and it is a large room. This was more of an experiment, to be honest!! We weren't sure how it would go.
2) The floors have held up really well! Since installing them, we have had 2 children and now have 3 indoor/outdoor cats. We also had an indoor beagle for the first few years after doing the floors. We chose a cheaper plywood so it is a bit softer. However, they have held up very well. There are a few “dents” in high traffic areas due to the kids riding cars on them. However, I don't know that anyone other than us would even really notice. People are still shocked to learn it is plywood!
3) Yes, I would recommend plywood flooring to others and I have. I would be hesitant to install them in areas that may get wet though. It is still only plywood. I would worry about this in a kitchen or bathroom. I'm a messy cook and spill and drop things. I would worry about liquid getting under the boards. In our room, we used Liquid Nail to adhere them to the floor AND did cut nails, only for appearance. So, we have had a few small spills on ours but nothing like a kitchen would see.
4) We wish we would have known how beautiful they would be! Our plan was to install and then paint them. We left an intentional gap between the boards so that the paint wouldn't just fill it in and make it look solid. However, once we cut them and had the entire room laid, we were shocked! Everyone who came to see them also commented on how beautiful the grain was. Since they were cut into strips and laid in planks, it didn't looks like plywood. So, we stained it instead. Had we knows that, we wouldn't have left that gap. It isn't a huge gap or problem, but you feel it when walking barefoot. I also have to use a vacuum attachment in some places to vacuum between them.
Painted Wide Plank Plywood Floors | Little Green Notebook
Jenny was one of the first DIY bloggers I saw do plywood flooring, way back in 2013, and her painted wide plank floors (using 8 inch planks of 15/32″ sheathing plywood) in her beautiful studio are still holding up well today!
1) We went with plywood floors in my studio because I wanted something easy to install ourselves and, most of all, super affordable. I really wanted to paint the floors white and I just couldn't wrap my head around the idea of painting new, expensive flooring. The plywood ended up costing about $1 per square foot, which is pretty unheard of for wideplank wood flooring especially!
I needed about 800 sq ft of flooring for the studio and with all the materials (plywood, saw blades, glue, new nail gun, etc) we came in at about $1000. Installation could not have been easier, too! We had one person cutting and gluing and two people laying and nailing the planks and we finished installing everything in one day! It was incredibly satisfying.
2) I think the plywood flooring has held up well! It's hard to tell if it's the oil-based enamel paint helping out, but I would give the floors an 8/10 score for durability. We chose a pine plywood for cost and convenience, and the softer material definitely shows more of the typical wear and tear from my projects and our dog, but I honestly don't really notice it. I think if someone was worried about living with a more worn-in look, they could always opt for a harder plywood, like birch.
3) I would definitely recommend plywood flooring to a friend under the right circumstances. Because the planks have flat edges, with no tongue and groove notches, there will be a little bit of movement with the planks over time. Some of the planks will sit up a tiny bit higher than surrounding planks. The overall look ends up leaning a little more country and less polished (think an Anthropologie store), but it's completely charming in the right house!
4) I've been surprised at how well these floors have held up! We installed my studio flooring more than four years ago and it looks practically the same today as it did a few months after installing them and breaking them in a little. I think at the five year mark I'll probably want to do a fresh coat of white paint, but overall I'm so happy with these floors!
Jenny's top plywood floor tips:
Order your plywood from the contractor desk at your hardware store a week in advance. I ordered mine from Home Depot and there was a nominal fee to rip down all the planks to size. If you have the planks cut to be a little under 8″ each (since the plywood sheets are just under 48″) , you'll have six planks of equal width and no waste.
This is true with any wood flooring install, but be sure to really stagger those planks so there is not an obvious pattern that emerges with the seams!
Newbie's Guide to Plywood Plank Flooring | Shark Tails
You'll recognize Allison as one of our awesome contributors (and if you don't, check out her latest projects here and here!). She installed her 3/8″ plywood flooring in 8-inch planks in her master bedroom a year ago, in April 2016, and her tutorial is so comprehensive and detailed! She also has three dogs, so her floors have seen some real life use. Read her full 1-year update here.
1) Plywood was certainly not our first choice but it honestly ended up being a very happy surprise. We were desperate to get rid of the carpet in our bedroom (we have three dogs) and originally wanted hardwood. A little math later put that dream to bed real quick — it was way outside of our budget! Laminate wasn't really an option because aesthetically it wasn't our favorite, and the ones we did end up liking were not exactly cheap. So I started researching “alternative” flooring — and I stumbled on some examples of people using plywood planks that didn't look too bad. As a matter of fact, they looked pretty fantastic! Plus, the price tag was just right at $1/sqft. It ticked two of my major boxes (look, price) and the third (durability) we decided to take a chance on.
2) Honestly, our plywood floors have held up amazingly well. As mentioned, we have three very active dogs and these floors take a beating on the regular. There is an area of the floor where they jump on and off the bed that has some scratches but you honestly cannot notice them either by feel or sight (unless you are getting right down on all fours). I should note that we stained our floors with a really light shade, which I think helps camouflage any dings/scratches. I can't speak to how these would look if you used a darker stain. If you don't have pets, scratches will not be an issue for you, unless of course you're in the habit of tap dancing in spike heels, dragging grand pianos across the floor, etc.
3) Yes yes, and yes. If budget were no option (one can dream) I obviously would opt for hardwood floors every time, but for the cost, feel, and look you cannot go wrong with these and I am so happy we decided to take the plunge and give them a try. I am actually thinking about installing these plywood floors in my foyer/kitchen area, except painting them instead of staining.
4 ) I wish instead of cutting the sheets down into planks myself, I'd had Home Depot make the cuts for me. It would have been worth the extra $25 or whatever it was to have them do it and they be perfectly straight/square. My cuts were as straight as i could possibly get them, but they aren't perfect and because of that the gaps in my floors are inconsistent.
Allison's last word on plywood floors: If you hate the floors you have now, but are still on the fence about this project, DO IT! You won't regret it!
Painted and Stenciled Plywood Floor | Life in the Big House
Brooke installed her plank plywood floor in a back room that functions as a sort of mudroom for her 3 large dogs. She laid the floor last August (of 2016) and made it amazing by not just painting it but by stenciling it for a cement tile look that has me swooning! Brooke used 1/2″ plywood in both 6- and 8-inch planks for variety.
1) I chose plywood flooring for several reasons. First – it was cheap and I was looking for a cheap fix. Second, I love the look of painted wood floors, but I would never be able to bring myself to paint real wood floors. I love old houses (mine was built in 1908) and I can't even paint the wood trim. So painting regular old (or new in this case) plywood appealed to me. I really wanted to do cement tiles, but that was a bit too pricey for me.
The actual installation of the plywood was super easy. I had the store cut it into 6″ and 8″ widths to vary the look in the room. A penny for spacers and my crown stapler made it go super quick. The room I used was rather small and also the original floor was sloping pretty bad in the back corner. I used a few shims to do my best to make it level….result, eh, not so level. But since I was using plywood, I wasn't too worried about movement (even thougth I had a foundation guy look at it and he said it probably wouldn't move much more since it was sooo old.). That's one reason I decided not to tile, I was affraid the tile or grout would crack if it did end up settling more. Since this floor was for a doggie room, I was concerned about durability, but I figured with enough layers of primer, paint and finish coating, it ‘should' be good.
COST
Plywood – $71
Primer – $23 (Oil Based Floor Primer in White)
Base Paint – $30 (Valspar Porch and Floor Latex Paint
Stencil Paint – $30 (Same as above)
Sealer – $50 (Verathane Heavy Use Formula and true to name – super low odor!)
Total $204 – of course my project would have been cheaper is I hadn't wanted to stencil a pattern.
2) Considering all things, and all things mostly being it is a room for the dogs, and we have 3 big dogs – doberman pinscher, boxer/pit bull mix and a black labrador, it's done very well. Since there was a high possibility that the dogs would get the floor wet, I made every attempt to protect the plywood as much as I could. I used an oil based floor primer in white that was supposed to protect the wood from water. The base coat and stencil colors I used Valspar Porch and Floor Latex Paint, another type of paint that should be super protective. And then for the protective coat (sealer) I used Verathane Heavy Use Formula Poly, and I did a couple of coats of that just to be on the safe side. With all the ‘extra' measures I took, I hoped it would be enough to keep the plywood looking good. It has now been about 8 months since I finished the project and I have to say the floors still look great. There are 3 scratches in the floors where you can see the raw plywood, I am not sure who's fault that is (ours or the dogs? we also use that room for storage sometimes and our dobie is a bit on the hyper side….)But as soon as I saw the scratches, I put another coat of poly on them to prevent any further damage.
For cleaning, I've used a Bissell Steam mop and a swifter wet jet mop. The dogs track in a lot of dirt and mud and the floors always look great after a vacuum and mopping. I have not noticed any other issues, no swelling, no chipping besides the scratches mentioned above.
these floors do get used and dirty…
…but they clean up really well!
3) I would absolutely recommend plywood floors!! Super easy to install and even if someone didn't have saw to cut them or a nailer to install, they could easily rent the tools or even use a hammer and nail. I'm not sure I would attempt the same stencil again, that took a lot longer than I had anticipated and was a lot more involved. I love the look and might try to a find an easier way to get the pattern or do a larger stencil. But the actual plywood installation was super easy and I am still very happy about it, plus it's less $$ commitment and an easy fix for a tight budget. We do plan on finishing some attic space in the future and we want to use plywood plank floors again, I think I'll just have one solid color or a larger pattern. I did really like the all white of the floor primer I used before the base coat of blue.
4) I am surprised about how it has held up to the dogs. We have heart pine floors throughout our house and you can easily see the scratches from their claws (and we just had them refinished a year ago), and with the plywood floors, it's harder to see the small scratches (minus the larger ones I mentioned earlier). After I was finished, I really thought I had wasted a bunch of time making the floor so pretty only to have the dogs destroy it in a few months, but it still looks great (IMO *:) happy ) I ended up needing more plywood and had to make a store run near the end, I'm not sure how I messed that one up.
I do live in Georgia and I was afraid the temperature changes might cause the wood to pop up from the floor or pull away from the walls. The room where the floor is installed, is not insulated very well and is always a few degrees warmer in the summer and a few degrees colder in the winter.
Brooke's plywood floor tips:
Buy high grade plywood (sanded)
Have the store cut it for your (easy to transport! and saves time)
Prime, Prime, Paint, Seal, Seal
Enjoy!
Rustic Multicolor Plank Plywood Flooring | Sand Dollar Lane
Leen recently (early 2017) installed plywood floor in the bonus room above her garage, which serves are her art studio. She used 1/4″ plywood cut into 8 inch planks and finished with a variety of stains for a more rustic multi-color style.
1) I chose plywood floors because of cost definitely! Also, I wanted flooring that looked rustic and custom, not the same as everyone else has.
2) So far so great. It's not in a high traffic area so I can't attest to how it would hold up in an entry way or somewhere like that. I use a barely damp mop when cleaning it only because that is what I use for our hardwood floors in the house.
3) I would [install plywood floors again]! It was much easier than I expected it to be and I love the way it looks.
4) I wish I had known about the no sanding floor finish sooner, I wouldn't have dragged my feet so long. I was worried that it was going to be more work than it actually was. I am surprised at how good it looks. I was expecting it to look nice but kinda felt like I was settling because of my budget. It's much nicer looking than I expected it to be!
Leen's final tip: Make sure your sub floor is level and clean, and hammer down any raised nails in the sub floor before starting to lay the planks down.
Rustic Barnwood Style Plywood Plank Flooring | House Seven
Anissa has a gorgeous farmhouse vibe in her home, where she installed her 8″ plank barnwood style plywood floors in her home's bedrooms and hall over 2 years ago (June 2015) using 15/32″ plywood. Anissa says, “We sold that home last summer and have moved into a new home. But I will say that the plywood floors were a huge selling point for the house. People just loved them!”
1. We went with the planked plywood because we wanted large (8″ wide) floors that felt like barn wood but the cost of buying traditional engineered or hardwoods was way out of our budget. The plywood floors achieved the look we wanted for far less.
2. The durability is incredible. I like to move furniture and we have 3 kids and a dog, all of that combined can kill the floors and these held up to all of it!
3. We initially installed the floors in our master and we loved the look and durability so much that we went ahead and installed them in our daughters room and the upstairs landing and hallway.
4. The one thing that we realized was we needed to use far less polyurethane than we did in our first try. It made the floors far too yellow, even with using the clear floor type. Do not roll on the poly but instead brush light strokes until you have the achieved amount.
Anissa's #1 tip: Sanding is key here! The more you sand the better the floor will look and we also sanded a beveled edge to each plank to give them more of a custom look.
Stained Plywood Plank Floors | Red Cottage Chronicles
Maureen laid her plywood floors in her living room in April 2014. The 6-inch planks look wonderful!
1) Our main reason for choosing the plywood plank floors was definitely cost. We had received an estimate from a local flooring company to provide engineered wood floors for $4000.00. Choosing the plywood planks was roughly 10% of that estimate!
2) We are very happy with how the floors have held up. Going into this project we knew that pine is a relatively soft wood, and with two dogs and lots of foot traffic it would definitely not remain pristine. While there are some scratches, really just add to the patina we were going for and actually add to the overall appeal of this flooring choice. I clean them weekly with a damp mop and Method wood floor cleaner, and they have not dulled or lost their finish at all.
3) I wouldn't hesitate to install the plywood planks again or to recommend them to anyone who is looking for an inexpensive wood flooring option.
4) We did a lot of research before taking on this project, so not a lot surprised me. What did surprise me though was that it was a bit longer process than I was expecting given the drying time and required number of coats of poly. The actual planks went down in no time at all, but finishing it took a couple of day.
Maureen's tips:
Ask your local lumber store if they would be willing to cut the plywood to size for you. Some big box stores will do 3 free cuts and then 1 a cut after that, but some will do it for free on a day that isn't too bus! It is well worth it to ensure straight, even cuts.
Before applying the stain and again before the poly ENSURE THE SURFACE IS DUST FREE!
Allow for about a week from start to finish depending on the size of the space.
Keep in mind that the furniture has to be completely removed from the room. Since we live in a small home and through our living room is the only route to our bedroom and bathroom we did arrange to stay away for 2 nights when we applied the poly.
Painted Plywood Plank Floor | Little House on the Corner
We featured Christine's home here a few years back, and we still love it and love her painted plank floors! She laid her floors in a guest room nearly two years ago, back in May 2015, using thin 4-5 mm plywood so that the floor level wouldn't be dramatically different than the existing flooring in the rest of her beautiful Edwardian home.
1) We love wooden floors and have original floorboards throughout the rest of the house. The guest bedroom floorboards were however in a really bad condition with large gaps between them which is why we decided to install a plywood floor.
Because we were installing the new floorcovering over the existing floorboards we wanted to use a material that was as thin as possible. The plywood we used is only 4mm thick which means there’s almost no visible threshold and height difference as you step into the room.
We also wanted flooring that was quick and easy to install and laying the plywood floor ticked all the boxes.
2) The floor has held up really well. We primed and painted it with white floor paint and up till now haven’t had an chips, dents or marks. We only occasionally use the bedroom so it doesn't get a huge amount of wear.
3) We’d definitely install plywood floors again. It was easy to do and you can achieve a totally bespoke finish to perfectly fit your space.
4) I thought the floor would have to be painted to look good but i was really surprised at how beautiful the plywood looked in its raw state before we applied the paint finish. The pattern in the timber was beautiful and we we're really tempted to leave it natural and just seal it with varnish.
Christine's tips for a great plank floor:
Plan, measure and then plan & measure some more. We planned our floor so that the room was perfectly devices into equal planks. This not only makes everything look high quality as there are no thinner or cut pieces at the edges it also makes installing it quicker as you have almost no cutting to do.
If you’re installing planks have them cut and don’t bother doing it yourself. Having long strips of plywood ready to lay saves so much time and costs almost nothing.
If you paint the floor wait as long as you can before putting any furniture back in the room. We marked the paint when we put back the bed. We'd recommend waiting at least a week if you can!
Dark Stained Plank Plywood Flooring | Remodelando la Casa
Cristina installed her beautiful 8-inch plank dark plywood flooring in a bedroom in her home almost 2 years ago (2015) and plans to install it in more locations in her home soon.
1) The main reason for using wide plank plywood flooring in my home was cost and design. You can’t find 8” wide plank, 3/4in. floors that are easy on your wallet.
2) The plywood flooring has held up wonderfully. Now, I installed this kind of flooring in a bedroom, more specifically my son’s bedroom, which has very little traffic, there’s no consumption of food in there, and there’s a rug covering more than 50% of the planks.
There are some grooves in between the planks that people are always asking me if they get filled with dirt. Well, a simple vacuum cleans whatever gets in there, but I’m happy to report that after almost two years of having the floors, there’s no accumulation of dirt.
3) Yes, I want to continue installing the same kind of planks on the entire second level of my home – the bedrooms and hallways.
I recommend this type of flooring for spaces with light traffic. However, if you don't mind dents and scratches at all, you can have them all around your home.
4) I was greatly surprised at how beautiful and smooth the planks look and feel once they're installed, having in mind the ugly product at the beginning of the process. Also, the room I covered was small, but the amount of planks seemed huge while doing all the sanding, staining and polyurethane protecting.
Cristina's tips for a beautiful floor:
I wouldn't go with the lowest grade of plywood. I did so the first time, but the amount of sanding was something that was I really didn't enjoy.
The whole process is quite a lot of work, but it's something that's very DIY friendly. You get the savings and the beautiful floors by doing it yourself!
Plywood Wood Plank Floors | Layers of Learning
Michelle laid plywood plank floors in her living room way back in 2012, and they're still looking great, even in a home with six children and plenty of projects. She used 6″ planks of 11/32″ plywood.
1. I chose plywood flooring mostly because of the savings over commercial wood floors. But we also picked this option because we knew we wanted to redo several of the floors in our house over a few years. We couldn't be sure that the commercial floor we chose would still be available years ahead. We wanted our floors to match so we did it ourselves.
2. We have six boys who are not easy on the house, but our plywood floors still look excellent. The wood itself and the finish have both held up really well. They are scratched and dinged on some places, but since we expect a rustic look to the floors this didn't bother us.
The difference in color is mostly due to lighting, not an actual difference in color, though they do not look as shiny as they did at first.
3. I would definitely install these floors again. In fact we did finish the bedrooms with plywood floors several years after the original living room install. I would recommend these floors to others provided they were fine with a rustic, lived-in look.
4. I was surprised at how easy they are to clean and how they never look filthy like the old press board floors we had originally in the house. I just sweep or vacuum on a regular basis and then mop with a well-wrung out wet mop about once a month.
Distressed Wide Plank Plywood Flooring | Addicted2Projects
Andrew and his family first installed their plywood flooring about 4 years ago (2013) in their foyer and since then have also laid plywood flooring in their living room and dining room — and have inspired many other DIYers with their tutorial! They used 5/8″ sheathing cut into 8″ planks.
1) The price was the main factor [in choosing our flooring] and after research I found out the plywood flooring (like we did) and engineered wood floor are the same but our floors were done for a fraction of the price. Install was super easy and they have lasted for years and only look better with time.
2) The floors have held up GREAT. With 3 kids, 18 year old cat and 85 pound greyhound rescue…they are strong. Cleaning and care are the same as another hardwood flooring.
3) Yes and we actually have already done it again. We tested it in our foyer several years back and now have done the living room, dinning room, and study is going to be done in the next few weeks. I would recommend these to anyone wanting a strong, good looking, very inexpensive alternative to other flooring options.
4) [It surprised us] that we love them SO MUCH and wished we had done it sooner and in previous houses we have owned.
Andrew's encouragement: Don't be scared! Try it in a small room and see what you think. Remember that these ARE hardwood floors and can be treated and installed in the very same way. Just do it!
So. there you have it — all your burning questions answered about if plywood floors are actually as durable and dreamy affordable as they seem!
If you still have questions, leave them in the comments and we'll do our best to answer, or click over to one of the featured blogger's tutorials where you can ask them more specific questions about their flooring, too.
And don't forget to check out all the other plywood projects and inspiration we've shared for our Plywood Pretty week:
The post DIY Plywood Flooring Pros and Cons + Tips appeared first on Remodelaholic.
from mix1 http://ift.tt/2oSYJwl via with this info
0 notes
Last Seen Blogs

radarofficial
The Radar™

amberepark-blog
Untitled


book-books-blog
book

candycandydelicioso-blog
Candy So Sweet