#radiobutton
Text

So, I tried to create a radio button that is auto customizable. The most important things to remember from the video:
the difference between the different parameters:
fg color: the color of the dot inside the radio button when it is selected, and the label associated with the radiobutton, even if it is not selected
bg color: background color of the label associated with the radio button
select color: the background inside the radio button
the radio buttons have same variable but different values
the select color + background color = the main app window background color
the color of the dot of selection to the background of the app: when the background is "purple", the color is white, and when it is "gold", the color is black
0 notes
Text
Create Stylish Radio Buttons and Checkboxes with CSS!
🔘 Elevate your form design with custom radio buttons and checkboxes using CSS! Learn how to create visually appealing and user-friendly form elements without any JavaScript. Plus, make sure your HTML structure follows best practices for accessibility and usability. Watch our short tutorial now!
#CSS#WebDesign#FrontEndDevelopment#TechTutorial#RadioButtons#Checkboxes#HTMLStructure#FormDesign#WebAccessibility#Usability#CSSStyling#TechEducation#CodingTutorial#WebDevelopmentTips
1 note
·
View note
Text
PHP RadioButton ve Checkbox Kullanımı
PHP RadioButton ve Checkbox Kullanımı
Merhaba, bu yazımda PHP RadioButton ve Checkbox Kullanımı konusundan bahsetmek istiyorum. Bir veri tabanından çektiğimiz verilere göre ekrana nasıl seçilmiş olarak getireceğimizi göreceğiz
PHP RadioButton ve Checkbox Kullanımı
Bu yazımızda veri tabanından aldığımız verilere göre page loadda RadioButton ve CheckBox nasıl seçili olarak getireceğimizi göreceğiz.
PHP Radio Checkbox Checked
Tabi…

View On WordPress
#PHP#PHP Radio Checkbox Checked#php radiobuttın checked#PHP RadioButton Kullanımı#PHP RadioButton ve Checkbox Kullanımı
0 notes
Note
hello, if its okay with you, could you explain how you achieved the following in twine: when you select an eye color, having the text change according to your choice. It seems simple but I can't seem to figure out. Any help would be appreciated!
You probably mean you want to do it in the same passage. I would be ecstatic to help!! I'll be putting it into a read-more because of pictures!
Also note, this tutorial assumes you're using SugarCube. I have very little knowledge of other Twine languages.
First of all, credit to HiEv because I got the base code from them! I just can't find what thread I found it in.
Code?
First—I've uploaded the EXACT passage for eye colors from the IF (even the writing is included...) to itch.io. I've made it restricted to avoid it clogging up my list of projects + notifying all my followers. However, you can play + download it there!
Link / Password: edelle008
Feel free to copy the code exactly, but in this post, I'll be explaining every single thing if you're still confused looking at the code.
Your Passage
Make a passage for where you want the radio buttons to appear. On that passage, have this code:

Red - Make sure to have a ((silently)) macro to not create unnecessary white space. I recommend to end ((silently)) immediately before your writing.
Orange - copy the code exactly (again, I highly recommend downloading the code off itch.io if you just want to copy and paste it!)
Yellow (no yellow on mobile editor...) - This is jQuery. It detects for any "changes" in a ((radiobutton)) macro in that passage. Make sure you don't have multiple radiobutton macros in the same passage.
Green - Replace #summary with the ID you're going to enclose your radio buttons in. If you don't know what I mean, this'll make more sense later.
Blue - When jQuery detects a change in the radio buttons in the passage, it's going to execute this widget called ((eye_color)), which I made solely to check and display different text for eye_color depending on what radio button is selected. Again, if this doesn't make sense, it will later.

So this where the actual radio buttons come. Please disregard the black strikethroughs, that's the code I used to organize the radio buttons into side by side columns.
I'm not covering how you do that here because the way I do it is incredibly scuffed, and only supports three radio buttons side by side. It also only looks good if the number of choices are the same on both sides. I don't want to teach you whatever won't work flexibly.
Above the red line, make a div and assign it an ID. I called my ID #summary, which is why in the previous screenshot, I made it so that the code updates whatever is inside a (span) or (div) with an ID of #summary. Hence, please change #summary into whatever you'd like!
Now you can also style any text within the (div) to anything you want in your Stylesheet.
Inside the div, I put the widget ((eye_color)). You can change this into any text you want to display initially, and it will be updated/written over once someone selects a radio button. The reason I let this stay as ((eye_color)) is so that it first shows the text for the first option, brown eye color (I do this by initializing $eye_color to "brown" in StoryInit, or else it might not show anything when you first look at it.)
Red - Below the red line, please add your radio buttons as normal. Again, disregard the black strikethroughs.
Widget
The reason I made a widget is so that it automatically checks and updates the text depending on the $eye_color variable, or any variable your radiobutton is changing. A widget is essentially a custom macro you make.
Make a separate passage (I called mine "eye_color" for consistency), tag it with "widget". You may copy the code below exactly as base (available for download on itch.io):
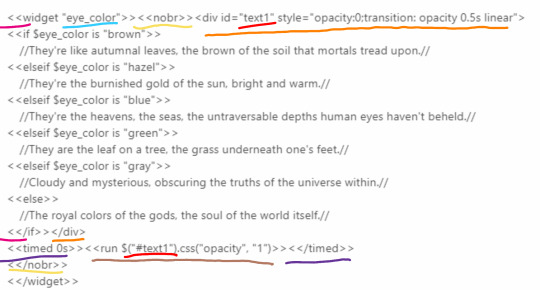
Here I made a widget called eye_color. You will enclose all the code inside this passage within the ((widget)) macro.
Yellow - I would use ((nobr)) macro from the beginning of the widget to the end to avoid unnecessary whitespace. This will put everything in one line unless you use (br) to force a line break.
Orange - I made a div for the entire text. The style="(code for transition)" is how there's going to be that transition between texts so it doesn't change it immediately, but gives it that slight fade in effect as it changes. Feel free to change the transition if you know how to. I assign it an ID of #text1 because I'm uncreative, but remember what ID you assign it.
Also, maybe you could test using (span) instead of (div). I don't know why I didn't, and haven't tried it.
Pink - In between the pink dashes, you will write your if statements. This is straightforward -- write an if statement for all the eye colors you want. The (div) for Orange ends when you use your closing ((if)).
Brown - The Orange makes the text have 0 opacity. What this does is make it have 1 opacity. In English, this means the text is originally invisible and this turns it visible.
Purple - Enclose Brown in a ((timed 0s))((/timed)). Usually, Orange and Brown are executed almost simultaneously; that leaves your text invisible. What Purple does is make Orange execute before Brown, so that Brown is able to make the text visible.
Test it
I hope it works for you! Let me know if you still have any questions.
#asks#edelle008#coding resources#sugarcube coding#sugarcube#twine resources#sugarcube coding resources#twine coding resources
58 notes
·
View notes
Text
AIDE
¿Que es AIDE?
es un entorno de desarrollo integrado (IDE) para el desarrollo de aplicaciones de Android real directamente en su dispositivo Android. Seguir las clases interactivas de codificación y paso a paso convertirse en un desarrollador de aplicaciones de expertos.

Las características principales de AIDE son:
Crear una aplicación de muestra con un solo clic
Construir aplicaciones Java / XML.
Construir aplicaciones C / C++.
Ejecutar las aplicaciónes con un solo clic.
Compilación incremental para ahorrar tiempo.
Utiliza classpath para la compatibilidad con Eclipse.
Abrir los proyectos del nuevo Android Studio .
Visor LogCat integrado.
Visor de errores en tiempo real.
Completo autocompletar.

¿Como programar en AIDE?

Lo primero es instalar AIDE desde Play Store, ya instalada dar permiso en todo lo que te pida acceso. Te saldrá una pantalla la cual te aparece la opción For Experts (dar clic en esa opción), sale hoja en blanco con opciones en una de ellas dice Create New Project... Y al pulsarlo te da mas opciones el cual dar clic en New Android App, colocar nombre y presionar CREATE, Te mandara por defecto a una hoja la cual lleva por nombre MAIN.XML la cual sera tu pagina principal.
Para agregar un fondo , primero tendrás que ir a tus archivos y encontrar appProjects y en la carpeta de como hayas llamado tu proyecto en contar una carpeta llamada src-main-res y crear una carpeta llamada drawable y en esa carpeta colocar imágenes de fondo con formato png. después en tu pagina principal colocar el código: android:background="@drawable/nombre de como se llama tu foto o fondo"
Con el siguiente codigo:
<TexView
Android:text="texto"
android:layout_width="wrap_content"
android:layout_height="wrap_content"
android:layout_x="65dp"
android:layout_y="54dp" /> podrás añadir texto.
con el codigo:
<EditText
Android:text=" "
android:layout_width="wrap_content"
android:layout_height="wrap_content"
android:layout_x="65dp"
android:layout_y="54dp" /> colocas un espacio para poder escribir.
con:
<Button
android:onClick="click1"
Android:text="nombre de tu boton "
android:layout_width="wrap_content"
android:layout_height="wrap_content"
android:layout_x="65dp"
android:layout_y="54dp" /> Colocaras un botón y al presionar te llevara a otra pagina.
En MAINACTIVITY.JAVA agaragar un código:
public void click1(View veiw){
setContentView(R.layout.a la pagina que en lazaras);
}
VENTAJAS DE AIDE:
-Mejor teclado.
-Veloz procesador.
-Es compatible con muchos eclipse y muchas mas como el telefono.
DESVENTAJAS DE AIDE:
-Su mayor falla s optener el ID de android.
-Se debe de pagar para pagar algunas herramientas.
ELEMENTOS DE AIDE:
<AbsoluteLayout>: Un diseño que permite especificar ubicaciones exactas(coordenadas X/Y) de sus elementos secundarios.
<TextWiew>:Son etiquetas de texto que se muestran al usuario y no pueden modificarse .
<EditText>:Son espacios para que el usuario pueda ingresar caracteres alfanuméricos.
<Button>:Etiqueta para agregar botones.
<RadioButton>:Es un control que permite al usuario escoger solo una entre varias opciones.
<CheckBox>:Son un conjunto de casillas que permite al usuario seleccionar una o mas opciones.

2 notes
·
View notes
Video
youtube
https://www.youtube.com/watch?v=Ep0EFm7xmMM&t
How to add checkbox in contact form 7 | Checkboxes, radio buttons, and menus
#contactform #contactform7 #checkboxes #radiobutton #menu
0 notes
Text
jQuery $("#radioButton").change(...) not firing during de-selection
About a month ago Mitt’s question went unanswered. Sadly, I’m running into the same situation now.
http://api.jquery.com/change/#comment-133939395
Here’s the situation: I’m using jQuery to capture the changes in a radio button. When the radio button is selected I enable an edit box. When the radio button is de-selected, I would like the edit box to be disabled.
The enabling works. When I choose a different radio button in the group, the change event is not fired. Does anyone know how to fix this?
<input type="radio" id="r1" name="someRadioGroup"/> <script type="text/javascript"> $("#r1").change(function () { if ($("#r1").attr("checked")) { $('#r1edit:input').removeAttr('disabled'); } else { $('#r1edit:input').attr('disabled', true); } });</script>
https://codehunter.cc/a/javascript/jquery-radiobutton-change-not-firing-during-de-selection
0 notes
Text
WWW.VALIANT-ENT.TV
Login page: https://web.archive.org/web/20110202180333/http://www.valiant-ent.tv/
Homepage: http://web.archive.org/web/20070224224220/http://www.valiant-ent.tv/page1.html?radiobutton=true
Fake forum: http://web.archive.org/web/20070226174214/http://www.valiant-ent.tv/forums/list.php?f=1
1 note
·
View note
Text
Tkinter Cookbook
from tkinter import *
#Creating a new window and configurations
window = Tk()
window.title("Widget Examples")
window.minsize(width=500, height=500)
#Labels
label = Label(text="This is old text")
label.config(text="This is new text")
label.pack()
#Buttons
def action():
print("Do something")
#calls action() when pressed
button = Button(text="Click Me", command=action)
button.pack()
#Entries
entry = Entry(width=30)
#Add some text to begin with
entry.insert(END, string="Some text to begin with.")
#Gets text in entry
print(entry.get())
entry.pack()
#Text
text = Text(height=5, width=30)
#Puts cursor in textbox.
text.focus()
#Adds some text to begin with.
text.insert(END, "Example of multi-line text entry.")
#Get's current value in textbox at line 1, character 0
print(text.get("1.0", END))
text.pack()
#Spinbox
def spinbox_used():
#gets the current value in spinbox.
print(spinbox.get())
spinbox = Spinbox(from_=0, to=10, width=5, command=spinbox_used)
spinbox.pack()
#Scale
#Called with current scale value.
def scale_used(value):
print(value)
scale = Scale(from_=0, to=100, command=scale_used)
scale.pack()
#Checkbutton
def checkbutton_used():
#Prints 1 if On button checked, otherwise 0.
print(checked_state.get())
#variable to hold on to checked state, 0 is off, 1 is on.
checked_state = IntVar()
checkbutton = Checkbutton(text="Is On?", variable=checked_state, command=checkbutton_used)
checked_state.get()
checkbutton.pack()
#Radiobutton
def radio_used():
print(radio_state.get())
#Variable to hold on to which radio button value is checked.
radio_state = IntVar()
radiobutton1 = Radiobutton(text="Option1", value=1, variable=radio_state, command=radio_used)
radiobutton2 = Radiobutton(text="Option2", value=2, variable=radio_state, command=radio_used)
radiobutton1.pack()
radiobutton2.pack()
#Listbox
def listbox_used(event):
# Gets current selection from listbox
print(listbox.get(listbox.curselection()))
listbox = Listbox(height=4)
fruits = ["Apple", "Pear", "Orange", "Banana"]
for item in fruits:
listbox.insert(fruits.index(item), item)
listbox.bind("<<ListboxSelect>>", listbox_used)
listbox.pack()
window.mainloop()
0 notes
Text
Crush crush cheat engine multiplier

#Crush crush cheat engine multiplier how to
#Crush crush cheat engine multiplier install
#Crush crush cheat engine multiplier mac
#Crush crush cheat engine multiplier windows
Improved performance of "Find what access/writes this address".
New debugger interface: DBVM-level debugger.
DBVM has now some basic support for nested VM's (only so you can run them, not yet modify).
DBVM has an extra security level, and added dbvm_setKeys to easily change the access codes.
The change address window now also supports relative offsets.
Userdefined symbollist has a secondary list for CCode symbols.
sections can now reference labels, defines, AOBScan results, and allocs created in the section.
NET(and mono) method detouring.NET info has a new contextmenu where you can create a detour template for the autoassembler
fixed blocks for inline C coding (Check the forum, wiki, CE patreon discord or CE's youtube).
fixed lua errors not giving a proper errormessage.
fixed position saving for the foundcode dialog.
fixed handling of broken/empty language folders.
processlist: Fixed the highlighted color process entries in light mode.
foundlist: new scan now alsdo clears the saved results.
foundlist: display type override also afffects the saved columns.
fixed checkbox and radiobutton not sizing properly in dark mode.
mono is less likely to disconnect when dissecting an invalid memory address.
fixed auto attach not stopping the process flash.
fixed brake and trace killing the debugger when skipping certain modules an failing in figuring out the return address.
fixed disassembler issues/memory corruption when closing a secondary memoryview window.
#Crush crush cheat engine multiplier windows
fixed loading back highligter config for auto assembler windows.
added custom alignment option to the hexviewer section of the memoryviewer.
break and trace: Added 'stay within module' option.
And stepover now steps over rep instructions
added isRep to the lua LastDisassemblerData field.
you can now change the font of the tracer tree.
goto address popup now centers on the memview window, instead of screen center.
added shortcut to add this address to addresslist in hexview (ctrl+numPlus).
you can now edit instructions with a breakpoint on them.
lua's openProcess command now won't deactivate all entries when previously no process was selected.
You can now also change values of groupscan scan results directly in the foundlist.
the replace button in foundcode dialog now supports multiselect.
added hints to how the pointer wildcard works.
structure dissect watch for changes now also shows you when something has changed inbetween.
mono will not try to re-attach after a disconnect.
modules for 64-bit in 32-bit targets are more clearly marked as such.
debugger attach timeout window will now show the status on some debugger interfaces.
you can now manually delete saved results.
added some space for dbvm functions so it's less likely to click them.
laststate isn't saved in tables anymore (unless ctrl is down).
You can now hold shift while using the cursors to move
improved keyboard control to the hexview in memoryview.
Foundcode dialog: Replace now toggles between nop and original.
AA templates now generate 14 byte jmp scripts when holding down ctrl.
Please reports bugs and give suggestions to improve Cheat Engine. Waiting for the advertisers / network owners to accept it) (The public release will be here any day now. To start of this year good here's the official release of Cheat Engine 7.4
#Crush crush cheat engine multiplier mac
January 2 2022:Cheat Engine 7.4 Released for Windows and Mac for Patreons (public will be here soon): January 18 2022:Cheat Engine 7.4 Released for Windows and Mac for everyone: does not condone the illegal use of Cheat Engine Before you attach Cheat Engine to a process, please make sure that you are not violating the EULA/TOS of the specific game/application. Cheat engine is for private and educational purposes only.
#Crush crush cheat engine multiplier install
Read before download: You must be 18 years or older, or deemed an adult, to install Cheat Engine.
#Crush crush cheat engine multiplier how to
Trouble installing/running Cheat Engine? Check out the known github issue here on how to solve it
0 notes
Text
Cara membuat program kasir dengan visual basic

#Cara membuat program kasir dengan visual basic how to#
#Cara membuat program kasir dengan visual basic manuals#
#Cara membuat program kasir dengan visual basic update#
#Cara membuat program kasir dengan visual basic manual#
#Cara membuat program kasir dengan visual basic full#
tentang cara penggunaan program kasir yang disertakan dalam CD buku ini.
#Cara membuat program kasir dengan visual basic how to#
RadioButton Fungsi ini digunakan untuk meminta user agar … Add the following items to the Search Field Combobox: Name Surname StudentNumber Connecting to an MS Access 2010 Database using the Data Controls. Tutorial Program Kasir Menggunakan Microsoft Visual Basic 6.0 Oleh : Nugroho Anis Wijanarko Dimulai dengan membuka program microsoft visual basic 6.0 Start > all Program > Microsoft Visual Basic 6.0 lalu buka aplikasi visual basic Maka akan tampil Kemudian pilih Standard Exe lalu pilih open Ini adalah tampilan awal visual basic 6.0 Buatlah 3 form Pilih Project > Add Form > Form lalu Open Pilih. The program mextest.c is a basic example of how to use mxArray prhs in. NET - Parte 28 - Insertar Registros (Curso VB. Kasir akan memasukan nama menu makanan/minuman yang di beli pelanggan dan jumlah pembelian menu tersebut, maka akan secara otomatis total harga akan ditampilkan,bila total harga lebih dari. Mungkin, program ini bisa memudahkan kasir di sebuah warung untuk menghitung total pembayaran bagi pelanggan.
#Cara membuat program kasir dengan visual basic manuals#
Many of the early computer manuals included tutorials on writing computer code. Program Kasir Sederhana dari visual basic 6.0.
#Cara membuat program kasir dengan visual basic manual#
0 Guardar datos modificado en base de datos Cambiar dirección del DataSet en Visual Studio 2010 Necesito un Navigator de pago o manual Problema coloreando fila de Datagridview Abrir formulario desde ComboBox Problema con Timer y Formulario Compilar codigo. T developing student programming and problem-solving skills with visual basic. Started by accmaster, Feb 10th, 2013 11:06 AM.
#Cara membuat program kasir dengan visual basic update#
Membuat aplikasi Database untuk menjalankan fungsi CRUD Cread Read Update Delete Menggunakan Visual Basic Net dan Database Access 2007Selamat belajar. net c# datagridview insert row when cell click manually add row to datagridview c# from datatable c# datagridview cannot add new row c# wpf datagrid add new row Nomenclatura en Visual Basic 2010. Contoh program visual basic database access. Properties can be set at design time by using the Properties window or at run time by using statements in the program code. Tutorial Membuat Program Kasir Dengan VB.Net (Visual Studio 2010) Komponen toolbox yang dipakai : Public Class Form3 ini digunakan untuk mengkoneksikan combobox1 dengan combobox2 Private Sub ComboBox1S. From the version Visual Studio 2005, some of the controls support Autocomplete feature including the ComboBox controls. Klik toolbox dan gunakan komponen toolbox sesuai dengan kebutuhan. Visual basic beginners lesson3 combo box and list box. Tutorial Membuat Perhitungan Kasir dengan Menggunakan Visual Basic. Dimana pada implemantasinya nanti, aplikasi yang dibuat akan terpisah dengan database. I have this code to fill a DataGridView but when using it to fill a combo box it fills it with 4 lines of System. Pada tutorial ini anda akan belajar bagaimana membuat aplikasi client server menggunakan visual basic & MYSQL Untuk lebih memperjelas pemahaman anda akan digunakan studi kasus program KASIR. You are currently viewing the Visual Basic 2010 General Discussion section of the Wrox Programmer to Programmer discussions. Agar program di client bisa jalan, component-component yang diperlukan harus sudah terinstall (teregistrasi) di client tersebut '.Visual basic 2010 datagridview combobox.
#Cara membuat program kasir dengan visual basic full#
1.57K 23 Full Membuat Aplikasi Tambah, Edit, Hapus. Di masing-masing client untuk bisa masuk ke database server harus mengisi login dari server terserbut misal: computer name = server user database = sa password database = *** database = dbinventory * dan. The related and similar videos of Jember Program Buat Aplikasi Kasir Dari Excel Praktis Mudah & Cepat. Misal database yang dipakai SQL Server: * pertama database server harus terinstall terlebih dahulu di salah satu komputer * jika sudah berarti program di tiap-tiap client harus merujuk ke database yg sql servernya terinstall, agar data yang di olah bisa sama untuk seluruh client.
Klik tombol Test, jika muncul kotak dialog yang menyatakan sukses, tekan OK dan tekan OK sekali lagi. Cara membuat program kasir dengan visual basic 6.0 Assalamualaikum wr.wb Kali ini saya akan membagikan sedikit ilmu tentang cara membuat aplikasi kasir dengan menggunakan aplikasi visual.
Kemudian isi form di atas dengan data seperti berikut:.
Pilih MySQL ODBC 3.5.1 Driver, dan klik tombol Finish, dan akan tampil window berikut:.
Klik pada System DSN, dan klik tombol Add, dan akan muncul window seperti berikut:.
Dan akan muncul window kurang lebih seperti berikut:
Buka control panel, double klik pada Administrative Tools, kemudian double klik pada Data Sources (ODBC). program kasir atau disebut juga point of sale (POS) merupakan perangkat lunak komputer yang digunakan untuk mengelola pembelian, penjualan, hutang piutang, stok penjualan dan operasional toko sehingga kegiatan usaha menjadi lebih terkontrol.
0 notes
Text
Windows ce 6.0 download italiano per autoradio

Windows ce 6.0 download italiano per autoradio how to#
Windows ce 6.0 download italiano per autoradio install#
Windows ce 6.0 download italiano per autoradio code#
Windows ce 6.0 download italiano per autoradio mac#
Windows ce 6.0 download italiano per autoradio windows#
fixed compare to first scan if it's a large block, and made it more efficient.
fixed createthreadandwait when using a timeout.
Windows ce 6.0 download italiano per autoradio windows#
several windows now save their position, and won't get corrupted if you don't show them the first time running CE.fixed some games freezing CE when symbols where accesses.Value Between scans now autoswap the order if the first value is bigger than the 2nd.Standalone register window now shows flags values as well.The dropdown list of multiple entries can now be changed at the same time.Addresslist value sort now sorts values by alphabet if the record is a string type.
Windows ce 6.0 download italiano per autoradio code#
Dissect code now lets you specify custom ranges.
Improved performance of "Find what access/writes this address".
New debugger interface: DBVM-level debugger.
DBVM has now some basic support for nested VM's (only so you can run them, not yet modify).
DBVM has an extra security level, and added dbvm_setKeys to easily change the access codes.
The change address window now also supports relative offsets.
Userdefined symbollist has a secondary list for CCode symbols.
sections can now reference labels, defines, AOBScan results, and allocs created in the section.
NET(and mono) method detouring.NET info has a new contextmenu where you can create a detour template for the autoassembler
fixed blocks for inline C coding (Check the forum, wiki, CE patreon discord or CE's youtube).
fixed lua errors not giving a proper errormessage.
fixed position saving for the foundcode dialog.
fixed handling of broken/empty language folders.
processlist: Fixed the highlighted color process entries in light mode.
foundlist: new scan now alsdo clears the saved results.
foundlist: display type override also afffects the saved columns.
fixed checkbox and radiobutton not sizing properly in dark mode.
mono is less likely to disconnect when dissecting an invalid memory address.
fixed auto attach not stopping the process flash.
fixed brake and trace killing the debugger when skipping certain modules an failing in figuring out the return address.
fixed disassembler issues/memory corruption when closing a secondary memoryview window.
fixed loading back highligter config for auto assembler windows.
added custom alignment option to the hexviewer section of the memoryviewer.
break and trace: Added 'stay within module' option.
And stepover now steps over rep instructions
added isRep to the lua LastDisassemblerData field.
you can now change the font of the tracer tree.
goto address popup now centers on the memview window, instead of screen center.
added shortcut to add this address to addresslist in hexview (ctrl+numPlus).
you can now edit instructions with a breakpoint on them.
lua's openProcess command now won't deactivate all entries when previously no process was selected.
You can now also change values of groupscan scan results directly in the foundlist.
the replace button in foundcode dialog now supports multiselect.
added hints to how the pointer wildcard works.
structure dissect watch for changes now also shows you when something has changed inbetween.
mono will not try to re-attach after a disconnect.
modules for 64-bit in 32-bit targets are more clearly marked as such.
debugger attach timeout window will now show the status on some debugger interfaces.
you can now manually delete saved results.
added some space for dbvm functions so it's less likely to click them.
laststate isn't saved in tables anymore (unless ctrl is down).
You can now hold shift while using the cursors to move
improved keyboard control to the hexview in memoryview.
Foundcode dialog: Replace now toggles between nop and original.
AA templates now generate 14 byte jmp scripts when holding down ctrl.
Please reports bugs and give suggestions to improve Cheat Engine. Waiting for the advertisers / network owners to accept it) (The public release will be here any day now. To start of this year good here's the official release of Cheat Engine 7.4
Windows ce 6.0 download italiano per autoradio mac#
January 2 2021:Cheat Engine 7.4 Released for Windows and Mac for Patreons (public will be here soon): January 18 2021:Cheat Engine 7.4 Released for Windows and Mac for everyone: does not condone the illegal use of Cheat Engine Before you attach Cheat Engine to a process, please make sure that you are not violating the EULA/TOS of the specific game/application. Cheat engine is for private and educational purposes only.
Windows ce 6.0 download italiano per autoradio install#
Read before download: You must be 18 years or older, or deemed an adult, to install Cheat Engine.
Windows ce 6.0 download italiano per autoradio how to#
Trouble installing/running Cheat Engine? Check out the known github issue here on how to solve it
0 notes
Text
Cbe pc100 bedienungsanleitung yamaha
CBE PC100 BEDIENUNGSANLEITUNG YAMAHA >> DOWNLOAD LINK
vk.cc/c7jKeU
CBE PC100 BEDIENUNGSANLEITUNG YAMAHA >> READ ONLINE
bit.do/fSmfG
3x Taste Groß Schalttafel Steuerung CBE PC100 Knopf Schalter Wohnmobil Camper. 42.3 Lei CAN BUS 3 Alarmanlage für Fiat Fahrzeuge, Bedienung über camel-toe f5 1444 suzuki 1442 buglist logo_bottom historical november ethan uscode47 aether airbus 52170 cbe radiobutton steve_jobs ranked symp 0.8 womobox.de/forum/thread/2782-elektrosystem-pc-100-von-cbe/ .de/forum/thread/3050-anleitung-statikinformationen-zu-holzfacherk-sandwich/ .com/macenttovo/post/download-gta-5-highly-compressed-for-pc-100-working /post/ashampoo-burning-studio-2012-11-0-4-20-cbe-portable-latest-2022
https://siqutuqixasu.tumblr.com/post/692852901097373696/talea-touch-bedienungsanleitung-siemens, https://siqutuqixasu.tumblr.com/post/692852901097373696/talea-touch-bedienungsanleitung-siemens, https://siqutuqixasu.tumblr.com/post/692852901097373696/talea-touch-bedienungsanleitung-siemens, https://siqutuqixasu.tumblr.com/post/692852901097373696/talea-touch-bedienungsanleitung-siemens, https://siqutuqixasu.tumblr.com/post/692852901097373696/talea-touch-bedienungsanleitung-siemens.
1 note
·
View note
Link
GUI Display Selected Row Values From JTable Into JTextfields radiobuttons checkbox Combobox in Java Video Tutorial https://www.youtube.com/watch?v=9fqG8RBlfXo GUI Display Selected Row Values From JTable Into JTextfields radiobuttons checkbox Combobox in Java Video Tutorial GUI - Display Selected Row Values From JTable Into JTextfields radiobuttons checkbox Combobox in Java In this guide am going to : Display The Selected Value Of Jcombobox From Jtable Display The Selected Value Of Jcheckbox From Jtable Display The Selected Value Of Jradiobutton From Jtable Display The Selected Value Of Jtextfield From Jtable GUI - Display Selected Row Values From JTable Into JTextfields | radiobuttons | checkbox | Combobox in Java (NETBEANS) SOURCE CODE [code lang="java"] /* * GUI - Display Selected Row Values From JTable Into JTextfields radiobuttons checkbox Combobox in Java */ package AddDataToJTable; import java.util.Vector; import javax.swing.JOptionPane; import javax.swing.table.DefaultTableModel; /** * * @author Genuine */ public class AddDataToJTable extends javax.swing.JFrame /** * Creates new form AddDataToJTable */ public AddDataToJTable() initComponents(); //Calling method/function to add column header to jtable addTableHeader(); /** * This method is called from within the constructor to initialize the form. * WARNING: Do NOT modify this code. The content of this method is always * regenerated by the Form Editor. */ @SuppressWarnings("unchecked") // private void initComponents() buttonGroup1 = new javax.swing.ButtonGroup(); buttonGroup2 = new javax.swing.ButtonGroup(); jScrollPane1 = new javax.swing.JScrollPane(); jTable1 = new javax.swing.JTable(); jTextFieldName = new javax.swing.JTextField(); jLabel1 = new javax.swing.JLabel(); jRadioButtonMale = new javax.swing.JRadioButton(); jRadioButtonFemale = new javax.swing.JRadioButton(); jCheckBoxJava = new javax.swing.JCheckBox(); jCheckBoxPHP = new javax.swing.JCheckBox(); jComboBoxSubjects = new javax.swing.JComboBox(); jButton1 = new javax.swing.JButton(); setDefaultCloseOperation(javax.swing.WindowConstants.EXIT_ON_CLOSE); jTable1.setModel(new javax.swing.table.DefaultTableModel( new Object [][] , new String [] )); jTable1.addMouseListener(new java.awt.event.MouseAdapter() public void mouseClicked(java.awt.event.MouseEvent evt) jTable1MouseClicked(evt); ); jScrollPane1.setViewportView(jTable1); jTextFieldName.addActionListener(new java.awt.event.ActionListener() public void actionPerformed(java.awt.event.ActionEvent evt) jTextFieldNameActionPerformed(evt); ); jLabel1.setText("Name"); buttonGroup1.add(jRadioButtonMale); jRadioButtonMale.setText("Male"); buttonGroup1.add(jRadioButtonFemale); jRadioButtonFemale.setText("Female"); buttonGroup2.add(jCheckBoxJava); jCheckBoxJava.setText("Java"); buttonGroup2.add(jCheckBoxPHP); jCheckBoxPHP.setText("PHP"); jComboBoxSubjects.setModel(new javax.swing.DefaultComboBoxModel(new String[] "Computer Science", "Information Technology", "Business Information Technology" )); jButton1.setText("Add Data"); jButton1.addMouseListener(new java.awt.event.MouseAdapter() public void mouseClicked(java.awt.event.MouseEvent evt) jButton1MouseClicked(evt); ); jButton1.addActionListener(new java.awt.event.ActionListener() public void actionPerformed(java.awt.event.ActionEvent evt) jButton1ActionPerformed(evt); ); javax.swing.GroupLayout layout = new javax.swing.GroupLayout(getContentPane()); getContentPane().setLayout(layout); layout.setHorizontalGroup( layout.createParallelGroup(javax.swing.GroupLayout.Alignment.LEADING) .addGroup(layout.createSequentialGroup() .addContainerGap() .addGroup(layout.createParallelGroup(javax.swing.GroupLayout.Alignment.LEADING) .addGroup(layout.createSequentialGroup() .addComponent(jTextFieldName, javax.swing.GroupLayout.PREFERRED_SIZE, 97, javax.swing.GroupLayout.PREFERRED_SIZE) .addGap(18, 18, 18) .addComponent(jLabel1) .addContainerGap(javax.swing.GroupLayout.DEFAULT_SIZE, Short.MAX_VALUE)) .addGroup(layout.createSequentialGroup() .addGroup(layout.createParallelGroup(javax.swing.GroupLayout.Alignment.LEADING) .addComponent(jRadioButtonMale) .addComponent(jCheckBoxJava)) .addGap(18, 18, 18) .addGroup(layout.createParallelGroup(javax.swing.GroupLayout.Alignment.LEADING) .addComponent(jCheckBoxPHP) .addComponent(jRadioButtonFemale)) .addGap(0, 0, Short.MAX_VALUE)) .addGroup(javax.swing.GroupLayout.Alignment.TRAILING, layout.createSequentialGroup() .addGroup(layout.createParallelGroup(javax.swing.GroupLayout.Alignment.TRAILING) .addGroup(layout.createSequentialGroup() .addGap(8, 8, 8) .addComponent(jComboBoxSubjects, javax.swing.GroupLayout.PREFERRED_SIZE, javax.swing.GroupLayout.DEFAULT_SIZE, javax.swing.GroupLayout.PREFERRED_SIZE) .addPreferredGap(javax.swing.LayoutStyle.ComponentPlacement.RELATED, 34, Short.MAX_VALUE) .addComponent(jButton1, javax.swing.GroupLayout.PREFERRED_SIZE, 150, javax.swing.GroupLayout.PREFERRED_SIZE)) .addComponent(jScrollPane1, javax.swing.GroupLayout.PREFERRED_SIZE, 0, Short.MAX_VALUE)) .addGap(15, 15, 15)))) ); layout.setVerticalGroup( layout.createParallelGroup(javax.swing.GroupLayout.Alignment.LEADING) .addGroup(javax.swing.GroupLayout.Alignment.TRAILING, layout.createSequentialGroup() .addContainerGap() .addGroup(layout.createParallelGroup(javax.swing.GroupLayout.Alignment.BASELINE) .addComponent(jTextFieldName, javax.swing.GroupLayout.PREFERRED_SIZE, 30, javax.swing.GroupLayout.PREFERRED_SIZE) .addComponent(jLabel1)) .addPreferredGap(javax.swing.LayoutStyle.ComponentPlacement.UNRELATED) .addGroup(layout.createParallelGroup(javax.swing.GroupLayout.Alignment.BASELINE) .addComponent(jRadioButtonMale) .addComponent(jRadioButtonFemale)) .addGap(18, 18, 18) .addGroup(layout.createParallelGroup(javax.swing.GroupLayout.Alignment.BASELINE) .addComponent(jCheckBoxJava) .addComponent(jCheckBoxPHP)) .addGap(18, 18, 18) .addGroup(layout.createParallelGroup(javax.swing.GroupLayout.Alignment.BASELINE) .addComponent(jComboBoxSubjects, javax.swing.GroupLayout.PREFERRED_SIZE, javax.swing.GroupLayout.DEFAULT_SIZE, javax.swing.GroupLayout.PREFERRED_SIZE) .addComponent(jButton1, javax.swing.GroupLayout.PREFERRED_SIZE, 49, javax.swing.GroupLayout.PREFERRED_SIZE)) .addPreferredGap(javax.swing.LayoutStyle.ComponentPlacement.RELATED, javax.swing.GroupLayout.DEFAULT_SIZE, Short.MAX_VALUE) .addComponent(jScrollPane1, javax.swing.GroupLayout.PREFERRED_SIZE, 120, javax.swing.GroupLayout.PREFERRED_SIZE)) ); pack(); setLocationRelativeTo(null); // private void jTextFieldNameActionPerformed(java.awt.event.ActionEvent evt) // TODO add your handling code here: DefaultTableModel model; String name = ""; String gender = ""; String programmingLanguage = ""; String Subject = ""; //Adding table headers public void addTableHeader() model = (DefaultTableModel) jTable1.getModel(); Object[] newIdentifiers = new Object[]"Name", "Gender", "Language", "Subject"; model.setColumnIdentifiers(newIdentifiers); private void jButton1MouseClicked(java.awt.event.MouseEvent evt) // TODO add your handling code here: private void jButton1ActionPerformed(java.awt.event.ActionEvent evt) gender.isEmpty() private void jTable1MouseClicked(java.awt.event.MouseEvent evt) // TODO add your handling code here: // Display data from jtable in input fields int selectedRow = jTable1.getSelectedRow(); jTextFieldName.setText(model.getValueAt(selectedRow, 0).toString()); String tableGender = model.getValueAt(selectedRow, 1).toString(); if (tableGender.equals("Male")) jRadioButtonMale.setSelected(true); else if (tableGender.equals("Female")) jRadioButtonFemale.setSelected(true); String checkPLanguage = model.getValueAt(selectedRow, 2).toString(); if (checkPLanguage.equals("Java")) jCheckBoxJava.setSelected(true); else if (checkPLanguage.equals("PHP")) jCheckBoxPHP.setSelected(true); String comboSub = model.getValueAt(selectedRow, 3).toString(); for (int i = 0; i
0 notes
Link
1 note
·
View note
Last Seen Blogs

rr1ddick
Untitled

final-11-blog
Untitled

sweetrosemilktea
grow through what you go through ❁

streetkittyselina-blog
Street Kitty

lexiesdoodles
Lexie's Doodles