#my teacher is like 80 something and worried it'll become a lost artform
Note
Dear pasta
Do you have any wood carving tips for beginners?
I bought a bunch of wood and a couple of knives and idk what to do
BOY DO I. And I'm in a good spot for it because I have FOUR carvings of the same design in various stages of completion to assist.
I'm going to also put this behind a cut so that anyone who's like br br pasta it's just wood wood is boring NO IT'S NOT IT'S AMAZING isn't forced scroll by. Although I'm keeping the first tip in the open because IT IS VERY IMPORTANT.
TIPS FROM SIX YEARS OF CARVING/INJURIES/VISITS WITH MY CARVING TEACHER.
First, get yourself a pair of no cut gloves if you haven't already. I use these! They're cheap and they WILL save you a trip to the ER. Take it from someone who carved without them once and slipped with their knife and basically cut themselves down to the bone in their hand. 7 stitches and one bitchin scar later, I now never carve without gloves.
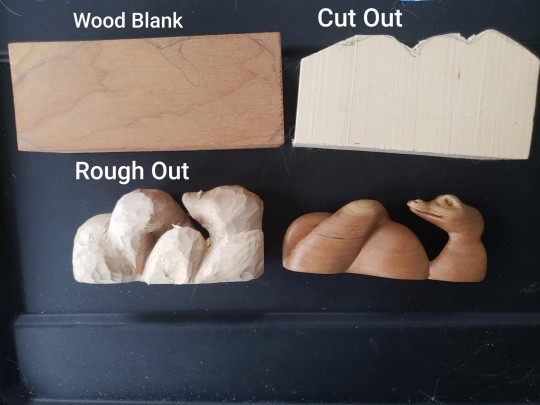
OK. So when starting, you're going to have your wood in of three forms: a blank (a small block of wood), a cut out (a blank that's been cut by a bandsaw into a basic shape), or a rough out (a cutout that's had most excess cut away and just needs details and final shaping). I don't know obviously which you have, but a LOT of people starting out aren't aware that when you're learning you can often purchase cutouts that make things easier (Hummul for example has a lot!). You can still carve from a blank, though! It'll just take a bit longer. Here's a picture with the 3 stages of my sea serpent design, and the first sea serpent I ever made that I carved from a blank, so you can see what I meam (coils are different on 3 just cause I felt like it, so ignore that).
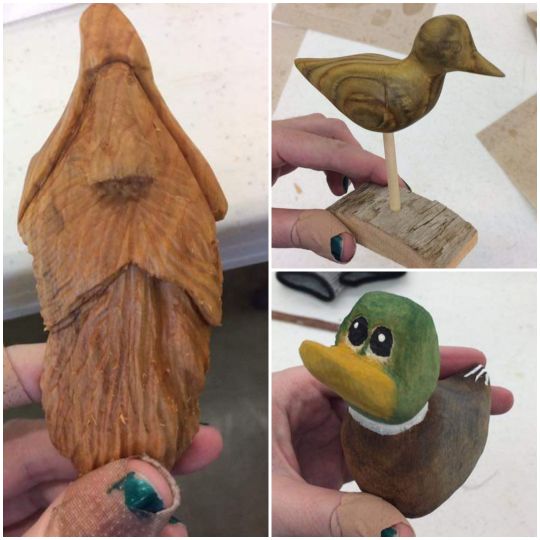
When starting, try to stick to more simple designs so you don't get overwhelmed. Think smaller, basic shapes, usually made of something like basswood which is a nice soft wood (easy to cut). My teacher for example starts everyone on basswood rubber ducky shapes! So there's no complex details, and more abstract shapes. These are three of the carvings I made that first week of my class as an example (the little face is called a wood spirit and you can find a lot of guides for them on youtube, they're very popular!)
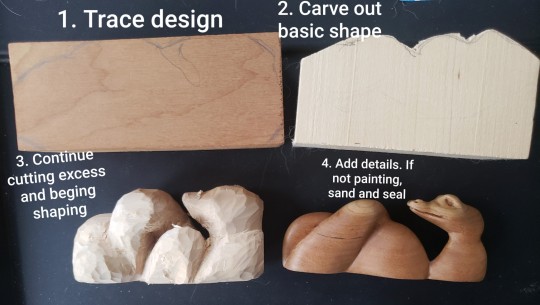
There is a basic process here that we can see with the sea serpents again! Step 1 you trace your design. Step 2, you're removing the large or small chunks of excess (this is where some use a bandsaw if accessible). Step 3 is rounding and shaping. And step 4 is adding details and finishing. If you're not sure about shapes, consider using some basic outlines from online! I've even used toys to give me a basic shape!
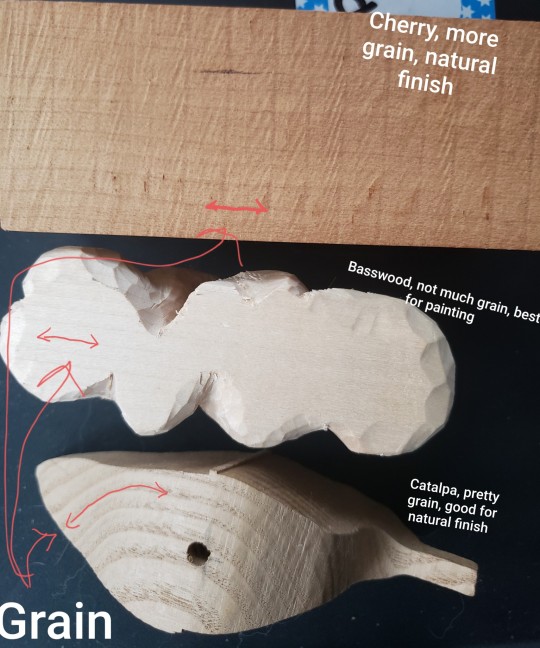
GRAINS: when you first begin to cut, you're going to want to cut with the grain as much as possible. Wood carves far more easily when your knife moves with the grain than against it. There will be points where you have no choice (this is why basswood is a popular wood for beginners and experts alike - little grain, very soft), but try as best you can to go with it. You'll feel it when you cut with it - it'll be a lot easier, but depending on the wood, you can also see it! The bottom wood has an easy to see grain, the top one a bit harder (also note the difference between the band saw lines - perfectly straight and up and down - and the actual grain - left to right, more wavy, nature hates straight lines), and the middle you'll have to look closely to see. If you've got pretty natural grains, most carvers stain or seal them without paint. Basswood's got borderline no visible grain so is almost always painted (see duck above). You'll likely develop a preference as time goes on, too!
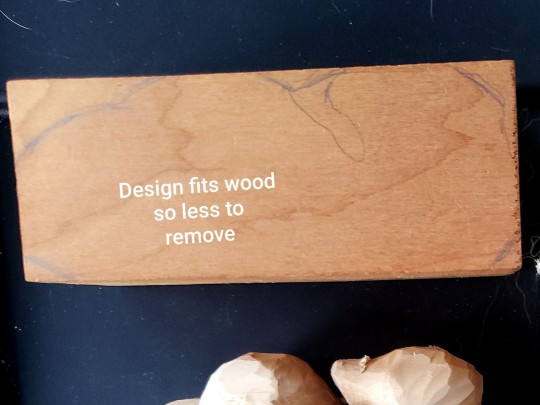
If you're carving from a straight up wood blank, try to make your design fit the shape as closely as possible. This will minimize the amount of excess wood you have to cut off! Especially since your first step is removing what doesn't belong before you start curving and rounding (there's also pencil marks on the top, so I know what I'm carving on all sides).
SHARPEN SHARPEN SHARPEN. If you've got a good knife, it likely came pre sharpened, which is great and can serve you for quite a while, especially if you're cutting softer woods! But you're also going to need to sharpen your knife regularly - I'm working on a very hard walnut dolphin atm and I'm sharpening every 20 minutes or so cause it wears the blade down. To sharpen, you use a strop. There are additional guides for that and places to buy one, but if you're handy you can make one. My teacher's (and mine) is literally strips of cork board covered in compound, and glued to two sides of a wood paddle. Very cheap. 😂 If you need tips on sharpening, let me know!
If you're going to use a natural finish on your wood (i.e. anything but basswood), you'll want to sand after carving and before sealing! Start with 80 grit, then move to 120 grit, and finish with 240. Note: as you start to sand, you'll see lots of little spots appear! You want to sand those away!
MOST SEALANTS ARE TOXIC TO BREATHE, DO IT OUTSIDE OR WEAR A MASK! If you want to avoid that, seal with something like Tried and True Original Finish or try carving wood you paint instead, since you basically carve, skip sanding, and paint with watered down acrylics!
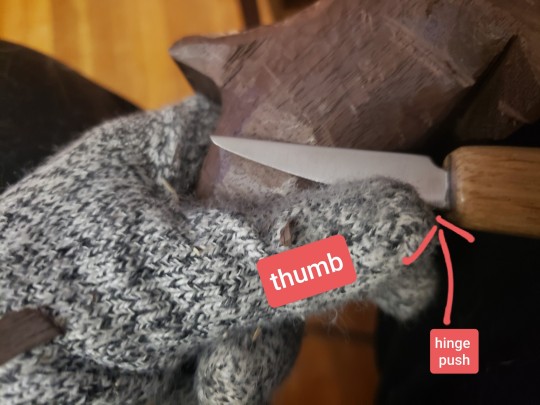
Lastly, the way I hold my knife when carving: I use my thumb against the non-cutting edge to 'push' the knife in a hingeing motion (I'll see if I can make a gif for it at some point). It takes some strain off your hands and lends more strength to the knife for harder or quick cuts. You can also cut VERY fast once you get this down, and my teacher's approved it as a valid technique.
I hope these help! I love love LOVE carving and wish there were more classes around for people to take! Fortunately there are a lot of youtube vids and guides but SO much of it is really just practice. It's also an incredibly soothing hobby. I love sitting in front of a movie or series or listening to a podcast/audio book while I just sit and cut away. And remember, if you have a blank and get into it and start to feel overwhelmed, there are plenty of cutouts and roughouts you can try instead that mean all you need to work on is shaping and detailing! Let me know if you have any other questions!
#woodcarving#i love woodcarving so much and love to talk about it 😂#it is so gd calming and not a lot of people are doing it anymore sadly#my teacher is like 80 something and worried it'll become a lost artform#so i love to spread the word of how SERIOUSLY FUCKING COOL THIS IS#my mantle is covered in pieces for a reason and my friends love getting them as gifts 😂#plus eventually you can make FANDOM THINGS#(not me making a Bucky Barnes bear carving and having plans for a Beardevil 👀)#also seriously wear your gloves though#the er doctor was like WOW this is such a smooth cut almost like a scalpel! what were you doing???#but at least my scar on my hand is a cool story now#gloves mean no scar for you 😂
17 notes
·
View notes
Last Seen Blogs

incorrectly-hazbin
Incorrect Hazbin Hotel Quotes

kemarinaku
Cerita, Cinta, dan Estetika

rainbowlifexox
#youneverfindmehere
helgatishaccreblog
helgatishaCCreblog

yaliseute-meseubuta
야리스테 메스부타 (야리몬) 다운 세이브 한글판