#minimal effects because i wanted to do my best to make a mostly static edit visually interesting with just images and lyrics.
Text
i know ive been deep in uty recently, but dont let that fool you. silly timeloop game still has full residence in my brain.
the song is The Right Wrong by The Dear Hunter!
#in stars and time#isat#isat spoilers#in stars and time spoilers#siffrin isat#isat edit#in stars and time edit#video edit#flashing lights#the bit in the song right before this is very sif and i would have included it if it wouldntve made the edit like a minute long#minimal effects because i wanted to do my best to make a mostly static edit visually interesting with just images and lyrics.#which is also why you get me doing what i call a 'polaroid pile' so often with it. stacking images and leading text to guide your eyes!#welcome back to basil posts at like 2 am for no good reason.#basil edits
89 notes
·
View notes
Text
Blender VR Rendering Tutorial
I originally planned to make VR content using SFM with the SFMVR Stitch tool. Mostly, I’m still planning to, but life happened and I haven’t had as much time as I’d like to spend animating. I’m also crap at it. It would help if I could restrain myself to doing short loops - but it seems the smallest thing morphs into a multi-minute project. More on that later.
(My WIP project, wherein Miranda becomes Mordin’s test subject. For the sake of science, of course)
It is fortunate for me that other animators more skilled than I are willing to share their scenes for me to render. Thank you Likkezg! He had the great idea to share his blender scenes with his patrons, and not only did that let me learn a lot about Blender, this also let me render some pretty amazing scenes. (See my previous post).
There are a lot more skilled blender creators out there, so I’m making this tutorial in the hope it will inspire them to create VR content. If you have any artist you like and would like to see his works in VR, and you have a good graphics card, you can also offer them your help rendering!
EDIT: 13/06/07 - Fixed a pretty big omission in part 1 about camera settings. Be sure to read the update and enable Spherical Stereo.
0. Why VR?
Isn’t it just a fad? Who the hell can afford a VR headset anyway? Turns out, practically anyone with a smartphone. Although the best viewing experiences will be with Vive and Oculus, with Playstation VR close behing, smarphone platforms offer a very respectable viewing experience for VR videos, from the high end GearVR, to the humble cardboard. Newer phones actually have higher pixel counts than the big commercial headsests!
Scroll down to chapter 6 for some advice on viewing VR content on the different platforms. Once you’ve watched any form of VR porn, it’s not hard to figure out the attraction. The presence, the feeling of being there!
For many users, what stands out particularly is eye contact in VR. Even with vary basic experiences, or with CGI characters, there’s a part of your brain than can’t help but chirp in and tell you: “Hey look, there’s another human being, right there in front of us, and she’s doing what?”
Having experienced that, it’s no wonder that porn viewers are the biggest early adopters of VR, with Pornhub reporting 500 000 daily views on their VR sections, and VR studios hiring some of the biggest names in the industry for their productions. The CGI VR niche is left relatively untapped however, and that’s a shame because it has so much potential, and it’s so easy to convert all the great work the community does into VR-friendly content.
You think your favorite video game characters look almost lifelike, wait until you’ve seen them through VR glasses and looked into their eyes - or other parts for that matter.
(Credit: Zalivstok and SFMPOV)
Not only VR lets us give life to these characters like never before, they can also be put in situations that would be exceedingly tricky with real actors, or mate with creatures that don’t even exist! The latter will be a particular focus of this blog.
1. Setting up Blender for VR
I’ll assume you’re already familiar with the basics of Blender. At least as familiar as I am, which is not a whole lot. The great thing about Blender however, is that it’s got the native capacity (as of 2.76) to render content for VR without the need for any additional tools, so this is going to be pretty simple. This tutorial is made with 2.78
The first thing you’ll need to do is activate VR rendering:

Go to render layers, then tick Views and choose Stereo 3D.
Now select the camera you want to work with and let’s set it up for VR.
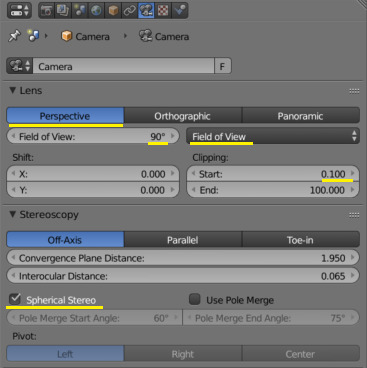
First, go to Perspective and set the field of view first to Field of View (by default it’s in millimeters) then something between 90 to 110 degrees. This is the field of view of your target device. They all have different fields of view, with the high-end devices being generally higher.
But in reality, 90 is fine and works for me both on my Vive and smartphone headsets.
Next, clipping. We’ll talk about that later as part of setting cameras, but you generally don’t want to get closer than 20cm to any objects - it’ll get harder for your eyes to focus. However, there will be occasions when it’s nice to do so anyway, so you want to set the clipping distance to be very short, or even 0.
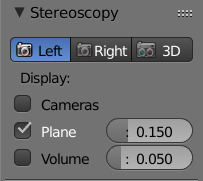
Stereoscopy settings don’t seem to have a huge effect on the video I rendered, but the theory is that the convergence plane should be set near the center of action - it will make it easier to focus the eyes on what’s going on. Interocular distance should be that of the viewer. Unfortunately that’s impossible to anticipate, but leaving it at the default 65mm is fine.
EDIT: Important - enable “Spherical Stereo”. This is a new feature in Blender 2.78 to correctly render panoramic video for VR goggles. For 180 video it’s not too big a deal but will make the image cross-eyed as you turn your head around towards the edges.
Now switch the lens to Panoramic. There are some more settings for us there.
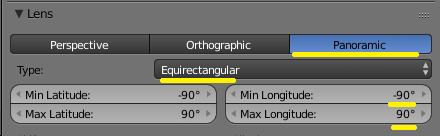
Set the type to Equirectangular, that displays best on most players. Fisheye will work too (It’s what SFMVR Stitch uses), but most smartphone players don’t support it well.
The next bit depends on what exactly you’re trying to render, but I like to do 180 degrees video rather than full 360. Unless there’s some stuff happening in the back of the camera, that should be fine.
For 180, change the longitude min to -90 and max to 90 as above. If you want to go for full 360 VR, leave it at the default: +-180.
Now go to your render settings.

The most important parameter here is the resolution. The resolution is now per eye, so the above is a good setting for 180 video: roughly 2K per eye, so your full video will be equivalent to 4K. For 360 video the X resolution should be 2 times higher than Y.
Frame rate is also important, and for best VR experience you want 60fps, no matter how painful it is to render. Here my original scene was keyframed at 24fps so I used time remapping to change that to 60. It causes weird behaviors if you try to work on your keyframes with this setting so leave it to default til just before you render.
4K, 60FPS seem like a lot and certainly it will take ages to render. But VR rewards you generosly for going overkill on theses things.
Scroll down some, to Output settings.
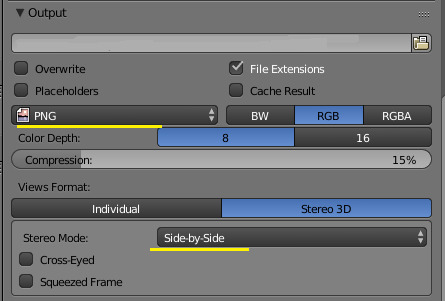
You want to render as IMAGES absolutely. Rendering an animation will take forever, so you really want to be able to stop and resume from the last frame if you need to, or if your computer crashes. For best quality, choose PNG with little to no compression. We’ll see later how to use the sequence to make a movie out of the images.
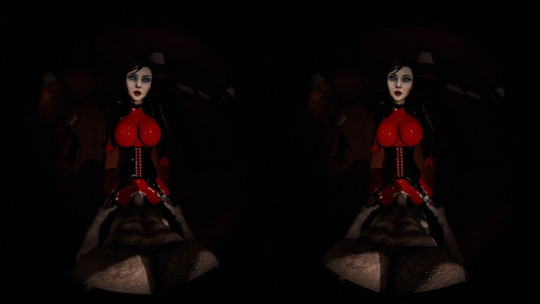
Below that is the views format. You want to choose Stereo 3D with either side-by-side or Top-bottom layout. If you’re doing 360 video, you should go for top-bottom, for 180 degrees, side-by-side is most common.
Now you could in theory hit Ctrl-F12 and start rendering, but I’ll advise you don’t waste your time doing that. You shot will be boring at best or unusable at worst. VR content isn’t shot like normal content, and you need to adjust your scene for that.
2. Setting the scene
I’ll flesh out this part of the tutorial soon, but for the basics.
After switching to stereoscopic rendering, your camera viewport may show a red and blue anaglyph picture. That’s not the most comfortable way to work, so press N to bring up the side menu, and under Stereoscopy, choose either Left or Right. You might want to change from time to time to make sure the field of view is unobstructed for both eyes.
You need to move the camera a lot closer to the subject matter. In the last step you’ve probably doubled your camera’s field of view. Without further adjustment, your subject will appear tiny and distant. Instead, you want to make the best use of your 180 degrees vision and make sure there’s something happening in most parts of the field.


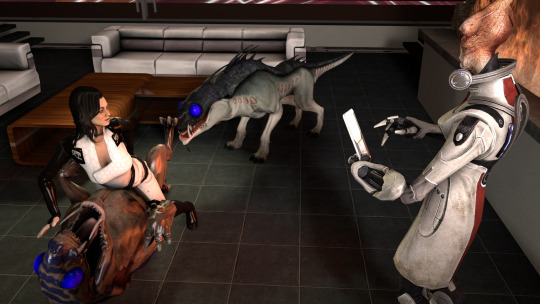
Our varren buddy was at the right distance from a normal camera, but after we change to a panoramic one, he looks tiny! He will look bigger with the goggles on, but we still need to move the camera closer. We can also see things that we didn’t expect or want to be in the field of view - here my light planes are in, so I’m switching back to more conventional lights.

That’s better. I’ve moved the camera to about 1 meter from the varren. I could get even closer for more details, but he’s just snacked on a pyjack, so this is close enough. He’ll appear pretty close with the goggles on.
Don’t get closer than 20-30 cm from any object, or the eyes will have trouble focusing. Still worth doing sometimes however, see below.
It’s safer to just use a static camera to avoid causing VR sickness, especially if you’re doing an interior scene with lots of things in the background.
But with a uniform background you can move your camera around a bit without too much trouble, just do it slow and steady and minimize rotations. Remember the viewer can turn his head around if he wants to see a particular detail.
Try and get, maintain eye contact with your subject if possible, it’s one of your best tricks. You can even close in for a kissing scene for example, but do it slowly. If you’re into that you can also move objects just below the camera - it will look like they’re going in the viewer’s mouth - it’s surprisingly effective.
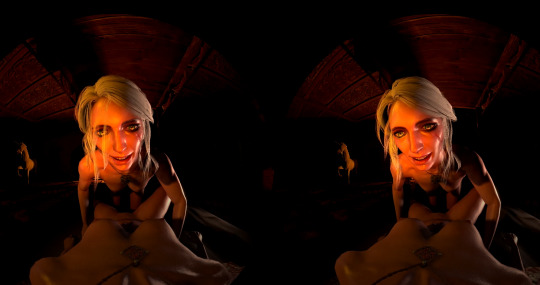
Some cozy time with Ciri (credit: dudefree) . Great use of lighting and eye contact there.
Be careful with glossy or transparency shaders. They look great but they can introduce an unpleasant sensation or make it hard for the eyes to focus in VR, especially when applied to close objects. Some times though they can look pretty good, so try and test for yourself what works or not.
Unfortunately, VR will make little details stand out so you may find problems with your scene that you never did before. Do plenty of test renders before you commit to rendering the whole animation.
Really, do some more test renders to check everything is good. Rendering at 4K takes a long time in Cycles, I’ve lost weeks of rendering because I didn’t check my scene well enough. You can render at half resolution (lower will make it uncomfortable to watch with 3d goggles), and with a frame step value. Still renders are useful but if you have a lot of motion you really want to do a preview of the full scene to be sure.
3. Optimizing
Now this is the painful part. If you thought rendering in Cycles was long, this is going to be many times worse, because we’re basically rendering at 4K with 60fps. The 9-second Jack scene I rendered for Likkezg took me about 80 hours to render, and I consider that to be extremely fast. Other scenes render much slower. This is where it really pays to know what causes long render times in Blender and to work on it.
This video does a great job of covering the basics, but I’m going to try and go a little bit further and show you what worked for me.
Turn on GPU rendering: If you can and haven’t already, this is a must for rendering moderately fast in Cycyles. This is found under User Preferences / System: Choose CUDA and your GPU as your Cycles compute device if available.
Sampling: These settings alone will have the most influence on your render time and quality.

Clamping will greatly reduce noise and “fireflies” at the expense of some highlights. I usually work with 5 direct and 2 indirect. It’s usually the first setting I adjust.
Note the clock icon next to Seed - it will ensure that your noise patterns are randomized for each individual frame. So even if each frame is a bit noisy, your 60fps video will look great!
The number of samples you need for a noise-free image can vary greatly depending on your scene. Some scenes will look good with a value of just 10 (Squared = 100 AA samples), whereas for others you’ll need much more. Try and experiment until you find a good value.
Light Paths: For me these settings have a fairly small impact on performance but you can try and adjust them anyway. Be warned that too low a setting can cause very visible issues with your scene.

You generally want to go with as low values as possible without altering your scene too visibly. If you’ve got a very noisy scene with many glossy shaders, you can try and set Filter Glossy at 1 or 2 to reduce noise. Some tutorials advise disabling caustics, reflective or refractive but I don’t like to: It makes the scene a lot duller for little performance gain.
Lighting: so, those 20 lights you added in to make sure every piece of your scene was subtly enhanced... great artistic work, but it’s going to kill your render times. Keep your lights to a minimum, a classic 3-point setup is good enough, with large and bright lights to minimize noise.
Lighting is often used to bring forward the geometry of a scene, and give the illusion of 3D. But here, you’ve got the real thing, or almost! You don’t necessarily need all the subtle shadows.
On the other hand, setting the atmosphere is just as important in VR, and clever use of lighting can do just that.

An intimate moment with Cassandra (Zalivstok / KDE)
Shaders: Cycles lets you easily build fantastic shader systems with a lot of complex effects, but more than anything else shaders can make the difference between rendering a frame in 4 minutes, or in an hour. You may need to rework your whole shader system both for performance, and for avoiding issues in VR.
Reflective, glossy and and transparent shaders can add a lot to a scene, but they can also confuse the eye in VR, and add a lot of noise. Use them sparingly, and do some hi-res test renders to check that they are performing as they should and don’t cause issues in VR.
Cutting: It goes without saying, but rendering just a couple seconds is easier than rendering a minute. If your animation has some relatively short loops, render just one and copy/paste it in the video editor. One cheap trick to manufacture a loop is to render an animation, then copy paste it in reverse in the video editor. This looks OK for some animations, terrible for others.
Previewing, and more previewing. Really, a scene looks different in the goggles than it does on screen. Check out your test renders in your VR system as much as possible, it’s the only way to be sure you’re not going to waste weeks rendering unusable crap.
4. Rendering
Well with all that setup done, it’s time to hit that big tempting render button, right?

SAVE your scene first. Not kidding. Then you can go and hit Ctrl-F12. See you in several days.
As I mentioned earlier it’s much better to render as separate images. You can stop rendering anytime and resume from the last frame. You can then use the blender movie editor to stitch them together and do some post-processing. More on that here.
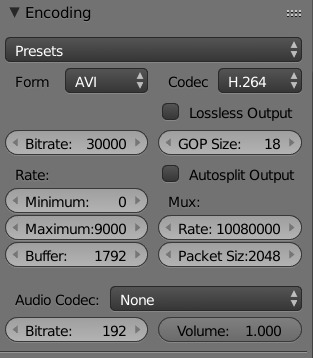
Personally I like to encode my videos in H264, with a bitrate of 25000 to 30000, that should be readable by most systems whilst keeping the best possible quality.
Note that once you’re in Video Editor mode, if you’ve used the same settings as I’ve outlined above, you actually need to disable stereoscopy (The first step we did in part 1 - uncheck the Views box), and set your video resolution to 3840 x 1920. Otherwise it’ll take each frame you’ve rendered (Already with both eyes), and put these on each eye! There’s probably a better way to do it, but this works for me.
Encoding the video should be mercifully short compared to the render.
5. Viewing
First of all, the most important consideration: You’re going to put on a VR headset to watch porn, likely with headphones. Lock the fucking door!
With this said, how do you actually watch this? Virtualrealporn has a pretty comprehensive guide on how to watch VR movies on every existing platform. That’s a good starting place and I’ve got just a couple things to add from experience.
Personally I use a Vive with Simple VR Player, and I think it’s quite possibly the best way to consume VR available right now - although the latest Gear VR might be even better.
Simple VR Player is a paid app on Steam, but well worth the money. It uses the Vive controllers with a simple interface and lots of options under the hood. You should use 180 degrees SBS mode to view our videos from Blender. For videos from SFM, you will need to activate the fisheye option on top of that.
For Oculus or those who don’t want to shell out for a player, the free version of Whirligig will play almost every VR format - but again the pay version is much better. I find the interface a bit confusing in the free version.
On my Android smartphone, I use a no-brand VR mount that I got for free from a phone shop, and it’s pretty decent. Of all the VR players available, the three that seem to do the job best for me are AAA VR Cinema, VaR’s VR Player, and VR Player Free. Neither is perfect but they get the job done and play smoothly.
That’s it! I’m still pretty noob with Blender so if I missed something or got it horribly wrong, please tell me!
93 notes
·
View notes
Text
Migrating to Unified Logging, Swift Edition
Thinking of migrating your iOS or macOS app from a bunch of NSLog or print statements to the new(ish) Unified Logging system? Keep reading for some facts and tidbits that might surprise you, along with a few suggestions for how to make the most of your transition.
If you’re not sure why you’d want to use Unified Logging, here’s a quick run-down of some key benefits:
It’s the new standard. The Unified Logging system is the biggest change to logging on Apple Platforms in years. It has all the telltale signs of something that Apple intends as the way to do logging going forward.
Improve your app’s performance without sacrificing log coverage. The new logging system is designed from the ground up to limit the observer effect that logging has traditionally had on production code. You can now have it both ways: thorough log coverage and great performance.
Upgrade your debugging workflow. Messages logged with the new APIs can be “tagged” with customized subsystems and categories which empowers Console.app to show or hide messages with expressive search filters. This can save you oodles of time when debugging complex issues that span more than one module or process.
I could go on with other benefits, but those will become apparent as we explore the differences between Unified Logging and what it replaces.
Four Ways Unified Logging is Different Than Legacy Logging Techniques
The following is not an exhaustive list of everything that’s new or different with Unified Logging, but rather a few key differences that may have a tremendous impact on how you go about migrating away from legacy logging functions.
1: OSLog isn’t a function. It’s a data type.
You will sometimes hear folks refer colloquially to Unified Logging as “oh-ess-log”, which might send you on a goose chase through the Foundation docs for an OSLog function. There isn’t one. The true analog to NSLog is any of the various functions like os_log that are defined in <os/log.h>, most of which take an os_log_t (a.k.a. OSLog via the Swift overlay) as an argument. The OSLog type is used to associate related messages so they can participate in Console.app’s search and filter features.
2: Console.app is mandatory.1
Unified Logging doesn’t serialize log messages in plain text, nor to a human-readable file format. Instead all messages are written to disk in an opaque data format that can only be read by opening a log archive (see below for how to obtain one) in Console.app. Console.app can unpack the archived messages, displaying them in a manner that is easy to search and filter. The opaqueness of the data format is a major departure from logging systems you may be familiar with. It was undertaken by Apple in an effort to limit the deleterious effects that logging traditionally has on performance and disk space.
3: From Swift, you can only pass a StaticString as a log message.
The following Swift code will not compile:
let foo = "Something happened." os_log(foo) // Error: Cannot convert value of type 'String' to expected argument type 'StaticString'
That’s because the Swift compiler resolves the implicit type of an otherwise unconstrained string literal to String, but the os_log function requires a StaticString. You can fix it either by giving the variable an explicit type:
let foo: StaticString = "Something happened." os_log(foo)
or by eliminating the variable:
os_log("Something happened.")
The static string string can also be a C-style format string:
os_log("We bolster %ld husk nuts to each girdle jerry.", 12)
Please note that you cannot use Swift’s pleasant string interpolation when logging a message:
let count = 12 os_log("We bolster \(count) husk nuts to each girdle jerry.") // Error: Cannot convert value of type 'String' to expected argument type 'StaticString'
This is probably the most significant departure you will encounter when migrating your Swift code from NSLog to Unified Logging. Be prepared for much dirt in your git working directory as you slog your way through substituting os_log calls for each NSLog or print call.
It is possible to log a String, but only as an argument to a static format string:
let count = 12 let string = "We bolster \(count) husk nuts to each girdle jerry." os_log("%@", string)
This workaround comes with a big gotcha, as we will see next.
4: Barring exceptions, your format arguments will be <redacted>.
By default when you log a String as a format argument:
os_log("What is %@?", "threeve")
the message will be rendered like this in Console.app:
Process Message MyApp What is <redacted>?
To reveal the full log message in production logs, you have to explicitly mark that format argument as {public}:
os_log("What is %{public}@?", "threeve")
Then the log message will appear unredacted in your production logs:
Process Message MyApp What is threeve?
Alternatively, you can achieve the same effect on a temporary basis without the {public} scope modifier by doing either of the following before running the app:
Connecting the device to the Xcode debugger.
Installing a special logging profile.
Some argument types do not require these workarounds. Scalar values — bools, integers, etc. — will default to an implied public scope when used as format arguments. You can also mark a scalar argument as {private} if you need to ensure that the value will be redacted in production, overriding the default public scope:
os_log("My secret ID is %{private}ld.", user.secretId)
Dos & Don’ts
Here are some things I consider best practices, in no particular order:
Do: Pay attention to log levels (types).
There are five standard log types, which mostly correspond to what used to be called “levels”, that are defined by the Unified Logging system. Here they are along with brief summaries cribbed directly from the official documentation:
default: Use this level to capture information about things that might result in a failure.
info: Use this level to capture information that may be helpful, but isn’t essential, for troubleshooting errors.
debug: Use this level to capture information that may be useful during development or while troubleshooting a specific problem.
error: Use this log level to capture process-level information to report errors in the process.
fault: Use this level to capture system-level or multi-process information to report system errors.
Choose the most appropriate type on a case-by-case basis, as any two given types are not treated equally by the logging system. This WWDC video has a helpful deep-dive into these differences.
Don’t: Use OSLog.default in shipping code.
You are not obligated to initialize your own OSLog instances. The OSLog.default value is available as a bare-bones alternative and is the default value for functions like os_log which require an OSLog argument. However, when you use OSLog.default, your ability to filter your log messages is limited because no values are provided for subsystem or category:
When you initialize your own OSLog, you provide it with a subsystem and a category. This makes it a snap to filter the visible output in Console.app:
Do: Name your subsystems and categories consistently.
Adhere to a consistent naming convention across your application. It’s worth spending some time looking at how Apple chooses their values for these for logs emanating from their own processes as this should inform your own conventions. Here are my recommendations, which are drawn from Apple’s established patterns:
Always name your subsystems using a reverse domain name style. All of Apple’s own logs have subsystems prefixed with com.apple, such as com.apple.Siri or com.apple.coredata.
If your code is organized into frameworks, use the bundle ID of the calling module as the subsystem for all logs in that module, e.g. com.company.MyApp for application-level logs and com.company.MyApp.SomeFramework for framework-level logs.
Do not use a reverse domain name style for a category name. Instead use a short, human-readable name like “Web Service”.
Choose category names that help narrow the scope of the calling code within its module or that can associate related logs that span multiple files or subsystems. For example, if you have logs that are specific to only one Authenticator class within a custom framework, you might give its logs the category name Authenticator to be used exclusively by that class. Alternatively, if you have lots of authentication-related work spanning more than one class or more than one framework, you could have them all use a category name like Authentication, which would help you see authentication activity across your entire application.
Don’t: Hide your logs behind conditionals.
Because the rendering of the logs is done after the fact by Console.app, there’s no need to filter your log messages programmatically through #if directives or other conditionals. Log everything simply and directly, using an appropriate type, and let the system take care of the rest.
Do: Practice gathering a sysdiagnose.
Get really good at obtaining a sysdiagnose from hardware out in the wild. Full instructions are available here, but the gist of the process is:
Press and hold a bunch of buttons.
Wait ten minutes.
Navigate to a screen deep inside Settings.app
Tap the zipped sysdiagnose and AirDrop it to your Mac (it’ll be ~300MB in size).
Once you have the sysdiagnose on your Mac, you can open the .logarchive file it contains in Console.app and see a dump of all the logs on that device. If you’ve heeded my advice on categories and subsystems, you should be able to filter down to the information you need in short order.
[record needle scratch] Hold on. Did you say I have to wait ten minutes?
Yes, it can take up to ten minutes for sysdiagnose to appear after one has been requested. Because of that delay, you don’t want to make sysdiagnoses part of a daily debugging routine. Instead, sysdiagnoses are useful in situations like this:
A minimally tech-savvy customer reports a bug in production within a few minutes of the event. Walk them through the sysdiagnose steps and find a way for them to send it to you.
You or someone on your team encounters a bug while away-from-keyboard. Trigger a sysdiagnose immediately, and then grab it from the device once it’s back in the office.
Don’t: Force all format arguments to a public scope.
If you are used to reading all your log output in plain text, it can be a real jolt to have to deal with the Unified Logging system’s private-by-default policy. Resist the temptation to force all your format arguments to a {public} scope. Not only does that risk disclosing your customers’ private information (say, if they send a sysdiagnose to another company), but it also risks exposing your company’s secrets. It’s not difficult to imagine a scenario where an error log accidentally reveals your OAuth credentials in plain text in production logs.
Do: Watch these WWDC videos.
Both of these are required material for anyone interested in Unified Logging:
Unified Logging and Activity Tracing
Measuring Performance Using Logging
Departing Note
Okay, technically you can also use Xcode’s console pane to view the output, but only if your app is connected to the debugger at the time. Xcode’s console pane has far fewer features than Console.app, so it’s not particularly useful for a deep examination of your logs. ↩
Migrating to Unified Logging, Swift Edition published first on https://johnellrod.weebly.com/
0 notes
Last Seen Blogs

padzandfriends
Padz And Friends

gennahoward
Genna Howard

harpermiller
No Mourners, No Funerals

dolly0cto
Teeny ᶻ 𝗓 𐰁

margo-rita24
Margo_Rita24