#kingroot
Text
How to Download Kingroot on Android
This article addresses the question of how to download Kingroot on an Android device. The process is straightforward and should not be any more complicated than installing any other app.
What is Kingroot?
Kingroot is a superuser manager for Android that gives users root access on their devices. It's available as a free download from the Google Play Store. After installation, Kingroot will prompt you to enable its SuperSU app. This app provides the necessary permissions to use Kingroot and can be found in the App Store under "SuperSU". Once SuperSU is enabled, users can install Kingroot by opening the app and tapping on the Install button. After installation is complete, Kingroot will prompt you to launch it. To do so, open the Settings menu on your device and select Kingroot from the list of apps. From here, you can configure settings for the app, including its security settings and location. You can also add a new device to your account, which will allow you to use Kingroot on that device too. Overall, Kingroot is an easy-to-use app that provides users with root access on their Android devices. It's free to download from the Google Play Store and can be used to install various root apps and utilities.
What Android devices does the Kingroot app work with?
Kingroot is an AndroidRoot app that can be downloaded from the Google Play Store. Kingroot has been designed to work with a variety of Android devices, including phones and tablets running Android 4.4 or earlier, as well as newer devices running Android 5.0 or later. Kingroot is available in English, French, and German languages.
How to download Kingroot on your device
Kingroot is a powerful rooting tool that can be used on Android devices. It can be downloaded from the Google Play Store or the App Store. Here are instructions on how to download Kingroot on your device: 1. Open the Google Play Store or the App Store and search for "Kingroot." 2. Click on the Kingroot app icon and click on the "Install" button. 3. Tap on the "Accept" button when prompted to allow Kingroot to install on your device. 4. After Kingroot has installed, open it and click on the "Root" button. 5. Tap on the "Enable SuperSU" button and then tap on the "Start Scan" button to root your device. 6. When Kingroot finishes rooting your device, you will be presented with a message saying that SuperSU has been installed successfully.
How to install and use Kingroot?
Kingroot is an Android rooting application which can be used to access system files and apps that are not normally accessible. It is a reliable tool for users who want to modify their device or keep it secure. The app can be downloaded from the Google Play Store and installed on Android devices.
Common questions about installing and using Kingroot
When you're ready to install Kingroot, here are some common questions: -How do I download Kingroot? -How do I use Kingroot? -What are the risks of using Kingroot? -What are the benefits of using Kingroot?
Conclusion
If you're looking to take advantage of Android's security features, Kingroot is an app you should definitely consider downloading. It allows you to gain full control over your device's permissions and provides a number of other benefits including the ability to unblock applications, change your device's name, and much more. If you're interested in learning more about Kingroot or taking advantage of its features on your Android device, be sure to check out the official website!
1 note
·
View note
Video
Why did the once popular "ROOT" culture end in decline?红极一时的“ROOT”文化,为何最后走向没落?
0 notes
Text
Kingroot for pc english 2016

#KINGROOT FOR PC ENGLISH 2016 HOW TO#
#KINGROOT FOR PC ENGLISH 2016 APK#
#KINGROOT FOR PC ENGLISH 2016 INSTALL#
#KINGROOT FOR PC ENGLISH 2016 UPDATE#
#KINGROOT FOR PC ENGLISH 2016 PATCH#
#KINGROOT FOR PC ENGLISH 2016 APK#
Lollipop (king apk root support also android 5.0 - 5.0.2). KitKat (king apk root support also android 4.4 - 4.4.4).Ħ. Jelly Bean (king apk root support also android 4.1 - 4.3.1).ĥ. Ice Cream Sandwich (king apk root support also android 4.0 - 4.0.4).Ĥ. Rooting is the process of allowing users of the Android mobile operating system to attain privileged control (known as root access) over various Android. Honeycomb (king apk root support also android 3.0 - 3.2.6).ģ. Gingerbread (king apk root support also android 2.3 - 2.3.7)Ģ. Download KingRoot for Windows - Free - 3.5.0 KingRoot for Windows 3.5.0 Download Less trash, more efficiency Use Kingroot to rid your phone of pesky and useless apps. KingoRoot, both PC and APK version, offers the easiest Android rooting methods for all android devices of any android version and has the highest success rate. Kingroot was developed in the Chinese language. It is the best rooting process program which will let you root your Android device properly through the connecting your Android mobile phone to your PC via USB cable. So King Root also allows you to use a maximum of your Android mobile/tab without any restrictions.ġ. Best One Click Root To Root Any Android Device. Kingroot for PC English freeload full latest version v3.6 Android root software 2019. KingRoot application has become the best rooting-apps that helps you root a android/smartphone, You will rooting the android system without your pc/laptop. KingRoot Apps Specification and Features Root Without PC Multiple Link for King Root V5.0.1 Apk Download Direct Download Android rooter download for pc - THE BEST FREE SOFTWARE powered by. ROOT GUIDEALL ROOT TOOLS IN ONE PLACEWith and W/O PC. Download latest Kingroot v5.1.2 apk - Root My Galaxy. SuperSU for Android - Download the APK from Uptodown. So, you can rooting your any mobile/tablet without pc/laptop then Download it ( kingroot ) on your phone/tab. Root Android with One Click Root APK- Dr.Fone - Wondershare. It also supports almost all android mobile/tablet ( rooting for android 5.0.2) and this apps can be useful for your oneclick root apk. In that case, if you have any question and problem in updated process here.
#KINGROOT FOR PC ENGLISH 2016 UPDATE#
You can update it from the provided latest version apps, then initially download king apk root V5.0.1. KingRoot 4.1 (Package Name: com.wKingRoot41) is developed by SoftAppPro King Root and the latest version of KingRoot 4.1 0.1 was updated on May 1, 2016.
#KINGROOT FOR PC ENGLISH 2016 INSTALL#
so, If you already using its old version on your any smartphone or tablet, Then you are required to new update your setup ( V5.0.1 ) install now. With more power comes more responsibility, so be careful out there and only download from trusted sources.King root apk ( KingRoot apps ) is released and available to download without waiting. Calculate formulas and present financial data with easy when you use this great program. For guidance on new apps to try out, take a look at this article on rooted apps. Some rooted apps allow you to improve battery life and performance. KingoRoot both root apk and pc root will root your Android devices saferly and quickly. Just a few simple steps can get you a rooted device within minutes. Make sure don’t disconnect your Device until. The easiest and fastest one click apk and root software to root your Android. Then Click the Big Blue Button on the Kingroot Software. Connect your Android device to the PC using supported USB cable. Kingroot app will appear in your Device Menu. Finally you will get the message Root Successful. .latest version of KingRoot, you are able to download and use the older version of it. Make sure don’t disconnect your Device until Rooting process done. Once you are rooted, you will have access to new features and many restricted apps. After installing it, Run Kingroot PC as Administrator. Connect your Android device to the PC using supported USB cable. This is understandable, given the damage a third-party app with malicious coding can wreak on your phone with root access. Remember that the manufacturer is more interested in security than the freedom that rooting affords.
#KINGROOT FOR PC ENGLISH 2016 PATCH#
Phone manufacturers constantly patch these exploits. Rooted devices are more vulnerable to security threats and data theft., especially if you’ve given untrustworthy websites access to your device.
#KINGROOT FOR PC ENGLISH 2016 HOW TO#
root galaxy j7 2016 without pc how to root galaxy tab 4 7 0 t235 king root. Rooting your devices can be beneficial, depending on what you intend to do with it. You can also plug your device to your pc to auto detect and install needed. We can safely root practically any Android device with our remote rooting service, including those that aren’t officially supported by One Click Root software.
0 notes
Text
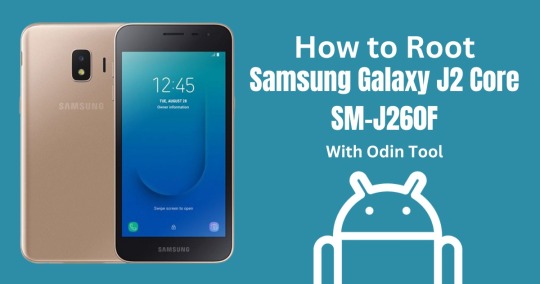
How to Root Samsung Galaxy J2 Core SM-J260F With Odin Tool
Learning how to root SM J260F, particularly the Samsung Galaxy J2 Core model, can significantly enhance your device's functionality and user experience. The root process allows you to access and modify the operating system's code, enabling you to install custom ROMs, remove pre-installed apps, and even boost your device's speed and battery life.
In this guide, we'll walk you through the step-by-step process of how to root Samsung SM-J260F. We'll also delve into using the Odin Tool, a popular firmware flashing tool developed by Samsung. This tool is particularly useful when you want to root Samsung SM-J260F, unlocking a world of customizability and improved performance. So, let's get started with the process of rooting your Samsung Galaxy J2 Core model SM-J260F. Read more - Why we want to root - Full Details with a guide
Table of Contents
The Pros and Cons of Rooting Your Samsung Galaxy J2 Core SM-J260FThe Advantages of Rooting SM-J260F
The Drawbacks of Rooting Samsung SM-J260F
8 Steps To Root SM J260F
Verifying Successful Rooting of Your SM-J260F
Reversing the Root Process on Samsung Galaxy J2 Core SM-J260F
Conclusion
Frequently Asked QuestionsWhat should I do if I can't find my Samsung SM-J260F model listed on the Chainfire website to root SM-J260F?
Why did my attempts to root SM-J260F with applications like KingoRoot, Kinguser, FramaRoot, Kingroot, Vroot, Root Master, z4root, and Root Genius fail?
I have rooted my Samsung SM-J260F, but the system indicates "su binary needs to be updated/The Superuser binary (su) must be updated". How can I resolve this issue?
I've rooted my Samsung Galaxy J2 Core SM-J260F and now the Kinguser binary (su) needs updates?
How to Fix the "Unfortunately, kinguser has Stopped" Error in Samsung Galaxy J2 Core SM-J260F After Rooting?
What should I do if I encounter the "Unfortunately, kingroot has Stopped" error while trying to root SM-J260F?
Why am I seeing "Root Failed! , No Strategy Found, ConnectionUnstabitil , need root" error when trying to root my Samsung SM-J260F?
How to fix Google Play Store errors on my rooted SM-J260F?
What should I do if I encounter the "could not do normal boot odin mode" error while trying to root SM-J260F?
What should I do if my Samsung Galaxy J2 Core SM-J260F gets stuck on the logo screen after trying to root?
Fix Bootloop on device (continuously restart)
The Pros and Cons of Rooting Your Samsung Galaxy J2 Core SM-J260F

When deciding whether to root your SM J260F, it's essential to weigh the pros and cons. Rooting, though potentially beneficial, comes with its own set of risks and challenges. Here's a balanced look at the advantages and drawbacks of rooting your Samsung SM-J260F.
The Advantages of Rooting SM-J260F
1. Custom Software (ROMs): One of the main reasons people choose to root Samsung SM-J260F is the ability to install custom ROMs. These ROMs can enhance performance, provide additional features, and even update your device to a newer version of Android.
2. Apps Permission Control: Rooting provides you with complete control over what your apps can and cannot do. This means you can block ads, remove bloatware, and enhance battery life.
3. Full Device Control: Rooting your Samsung SM-J260F allows for total control over your device. You can change the CPU speed, modify system files, use themes, and even change boot images.
The Drawbacks of Rooting Samsung SM-J260F
1. Bricking Your Device: The most significant risk when you root Samsung SM-J260F is bricking your device, rendering it unusable. This usually happens when the rooting process is not followed correctly.
2. Voiding Your Warranty: Most manufacturers, including Samsung, will void your warranty if they find out you've rooted your device.
3. Security Risks: Rooting can make your device more vulnerable to viruses and malware because you bypass certain protections put in place by Google.
4. System Updates: Sometimes, rooting can cause issues with system updates. This means you may not be able to install updates or may face instability after an update.
In conclusion, deciding how to root SM-J260F isn't a decision to be taken lightly. While the benefits can be significant, the risks are equally substantial. Always ensure you understand the process and the potential implications before proceeding.
8 Steps To Root SM J260F
Note - First Back up your data
Step 1
- Charge your phone up to 50%.
- Download the Samsung Galaxy J2 Core SM-J260F USB Driver and install it on your computer.
- Turn ON USB Debugging and Developer mode on the phone.
Step 2
Download the Odin program to your PC
- Now download the Odin program to your laptop or your Computer.
- After downloading, install and launch it.
Step 3
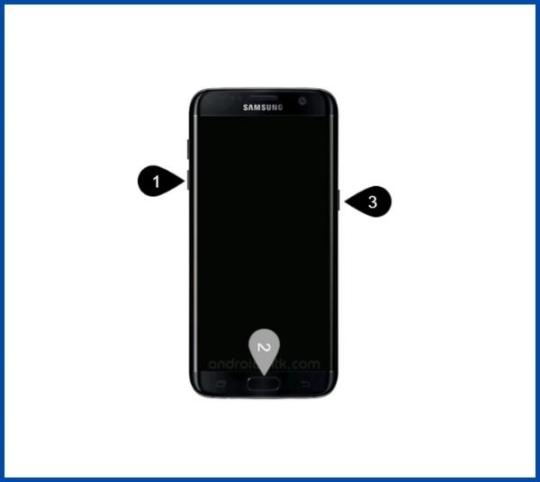
- Take your phone and Turn it OFF by pressing the power key.
- Now press and hold the Power key + Home key + Volume down key until boot to download mode.
Step 4
- Connect your phone to your PC or laptop by using a USB data cable. It's better to use original Data cables.
Step 5
Download the CF-Root file for Samsung Galaxy J2 Core SM-J260F
- Download the CF-Root file for Samsung Galaxy J2 Core SM-J260F. (Yes this zip may include Odin tool again. Use one of the Odin.)
- CF root file is ZIP so, you have to unzip it.

Step 6
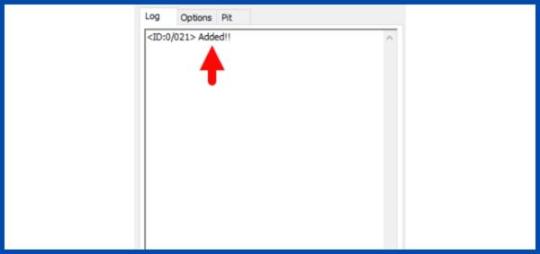
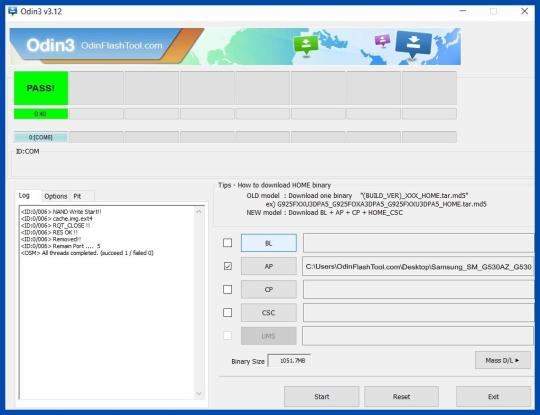
- Now press the Volume up key to continue to Download Mode.
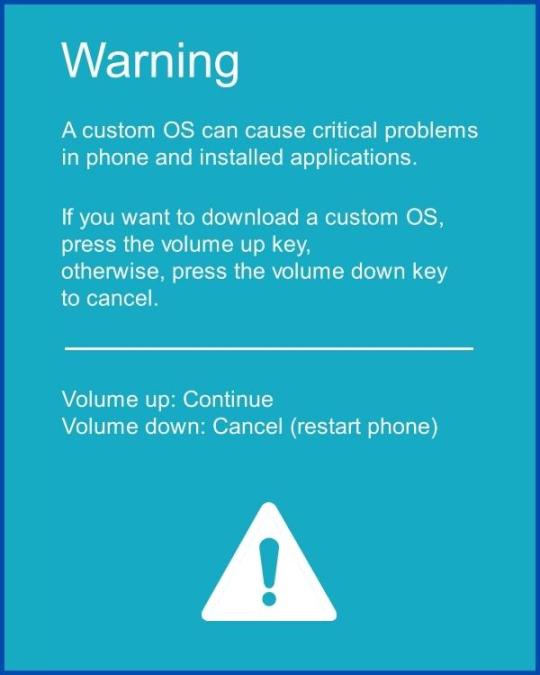
- After tapping the Volume up key, you will able to see the "Added" message in the Odin tool's notification box.
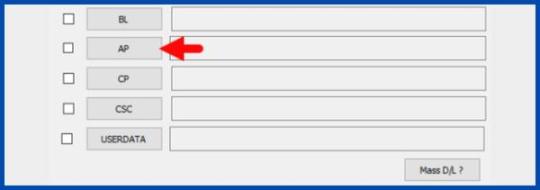
Step 7
- Click PDA / AP and browse to the downloaded CF-Root file.
- Select "Auto Reboot".
- Start Rooting by Clicking Start.
- Read More - Increase RAM SIZE after root
Step 8
- Please wait until the phone restarts automatically and it will display a green Pass.
Root Samsung Galaxy J2 Core SM-J260F
- The last step is to Factory Reset your phone after turning it on.
- Now, Congratulations you have Successfully Rooted :)
- Read more, OK I rooted. Now what next?
Verifying Successful Rooting of Your SM-J260F

To confirm if you've managed to properly root your Samsung SM-J260F, there are a couple of straightforward methods you can utilize. If an application titled "SuperSu" is present on your device after the rooting process, it typically indicates successful root status. But if you're still harboring doubts about how to root SM-J260F and whether it's been done correctly, there's an additional step you can take. Simply make use of a trusted third-party application, specifically designed to assess root access on devices like the root Samsung sm-j260f. This will conclusively inform you if your phone has been rooted effectively. Top 10 Rooted apps for android devices
Reversing the Root Process on Samsung Galaxy J2 Core SM-J260F
After successfully executing the 'root sm j260f' process on your Samsung Galaxy J2 Core, you may decide that root permissions are no longer necessary for your needs. In this case, unrooting your Samsung SM-J260F becomes your next step. Rest assured, the process to revert back from the root Samsung sm-j260f is straightforward and involves a few simple steps. Click here for more detailed instructions on how to unroot sm-j260f and bring your device back to its original settings.
Conclusion
In conclusion, learning to root sm j260f using the Odin Tool unlocks the full potential of your Samsung Galaxy J2 Core. Despite being a technical process, it offers control and customization options. However, it's crucial to back up your data before rooting any device, including the Samsung sm-j260f variant. Remember, rooting may void your warranty, but the benefits can outweigh the risks if done correctly.
Frequently Asked Questions
What should I do if I can't find my Samsung SM-J260F model listed on the Chainfire website to root SM-J260F?
If your specific model, such as the Samsung SM-J260F, isn't listed on the Chainfire website, don't worry - there are other options available to root your Samsung SM-J260F. The absence of your phone model could indicate that the developers are currently making or updating your phone's CF file.
In the meantime, you can consider using a different method to root Samsung SM-J260F. Numerous rooting apps are available that can help you root your Samsung SM-J260F effectively. It's recommended to wait for the official update, but if immediate rooting is necessary, these apps can be a viable alternative. For more details on how to root SM-J260F using these alternative methods, refer this guide.
Why did my attempts to root SM-J260F with applications like KingoRoot, Kinguser, FramaRoot, Kingroot, Vroot, Root Master, z4root, and Root Genius fail?
Rooting applications such as KingoRoot, Kinguser, FramaRoot, Kingroot, Vroot, Root Master, z4root, and Root Genius can potentially root your Samsung SM-J260F. However, these applications may fail to root Samsung SM-J260F if your phone model isn't supported by the app. It's important to note that not all rooting applications are universal and can work with every phone model. If you're struggling with how to root SM-J260F using these applications, it's advisable to try the CF-Root method instead. This is considered the standard way to root mobile phones, including the SM-J260F, and is likely to be successful where other methods have failed.
I have rooted my Samsung SM-J260F, but the system indicates "su binary needs to be updated/The Superuser binary (su) must be updated". How can I resolve this issue?
If you encounter the "su binary needs to be updated" issue after rooting your SM-J260F, you can resolve it by following these steps: first, unroot your device and remove all rooting apps. Then, restart your phone to clear any remaining data from the apps. Update the Superuser binary (su) and proceed to root your Samsung SM-J260F again by following the provided guide. Always exercise caution when rooting your device or seek professional assistance if needed.
I've rooted my Samsung Galaxy J2 Core SM-J260F and now the Kinguser binary (su) needs updates?
If you're facing issues after you root sm j260f, you can follow these steps to unroot your phone:
- Update Kinguser binary (su): Open the Kinguser app and follow the prompts to update.
- Remove rooting apps: Go to Settings > Apps > Select the app > Uninstall.
- Unroot your phone: Use a root access file manager to delete the "su" and "busybox" files from the /system/bin and /system/xbin directories.
- Restart your phone: Restart your phone to ensure all changes take effect.
If you want to root your phone again, follow a guide on how to root sm-j260f. Always take a full backup of your data before making any changes to your phone's software.
How to Fix the "Unfortunately, kinguser has Stopped" Error in Samsung Galaxy J2 Core SM-J260F After Rooting?
If you've recently attempted to root SM j260f and are experiencing the "Unfortunately, kinguser has stopped" error on your Samsung Galaxy J2 Core SM-J260F, here are some solutions you can try.
Firstly, try restarting your device to see if the issue resolves itself.
If the problem persists, follow these steps:
- Open the Settings page on your device.
- Navigate to the App or Application Manager.
- Scroll down the list of applications to find 'kinguser'.
- Once found, click on it and select 'Delete cache and data'.
This process should ideally fix the error you're encountering after trying to root Samsung sm-j260f. If the problem still persists, you may need to consult with a professional or explore other forums that offer solutions on how to root sm-j260f without encountering such issues.
What should I do if I encounter the "Unfortunately, kingroot has Stopped" error while trying to root SM-J260F?
This is a common issue faced by many users attempting to root the Samsung SM-J260F. If you see the "Unfortunately, kingroot has Stopped" error message on your device, don't worry. Here's a simple solution to tackle this problem:
Firstly, restart your device and check if the issue persists. If that doesn't work, follow these steps:
- Navigate to the Settings page on your device.
- Look for the app or application manager.
- Find kingroot in the list of applications.
- Select kingroot and delete both cache and data.
This should ideally resolve the "Unfortunately, kingroot has Stopped" error you're facing while trying to root Samsung SM-J260F. If the issue continues, you might need to consider other methods on how to root SM-J260F.
Why am I seeing "Root Failed! , No Strategy Found, ConnectionUnstabitil , need root" error when trying to root my Samsung SM-J260F?
If you're encountering the "Root Failed!, No Strategy Found, ConnectionUnstabitil, need root" error while trying to root your SM-J260F, it's likely due to the use of an incompatible rooting app. For your Samsung device, we highly recommend you to root Samsung SM-J260F using the CF root method. This method is known to be quite effective and eliminates common issues that are often associated with other rooting methods. Just follow our step-by-step guide on how to root SM-J260F using the Odin tool to avoid such errors in the future.
How to fix Google Play Store errors on my rooted SM-J260F?
If you're facing Google Play Store errors after rooting your Samsung SM-J260F, follow these steps:
- Switch to a new Google account.
- In device settings, navigate to App Manager > Google Play Store. Clear both cache and data.
- If errors persist, delete unnecessary media files to free up storage space.
These steps should help resolve most Google Play Store errors after rooting your device.
What should I do if I encounter the "could not do normal boot odin mode" error while trying to root SM-J260F?
The "could not do normal boot odin mode" error often occurs when you use an incorrect CF root file while trying to root Samsung SM-J260F. However, there's no need to worry as you can still switch on your phone. For a comprehensive solution on how to resolve this issue and successfully root SM-J260F, please follow this link . Remember, using the correct files and procedure is crucial when you attempt to root Samsung SM-J260F to avoid such issues.
What should I do if my Samsung Galaxy J2 Core SM-J260F gets stuck on the logo screen after trying to root?
If your Samsung Galaxy J2 Core SM-J260F gets stuck on the logo screen after attempting to root Samsung sm j260f, there are a few steps you can take to resolve the issue.
- Firstly, navigate to the Odin tool and switch to DL mode. Then, repeat the above steps for rooting your device.
- If the problem persists, it's possible that the CF Root file you downloaded is damaged or incorrect.
Read the full article
2 notes
·
View notes
Text
KingRoot
Kingroot is an application that will help you in establishing Android gadget. kingroot is a pulling device for "sluggish individuals" who simply need to get root access however don't have any desire to streak any outsider Recovery. You don't should be a high level client to utilize this application.
What is Root?
Root is the most noteworthy access of Android framework through which you go top to bottom into your mobiles working framework explicitly android. Regularly an individual requires root admittance to execute exhaustive administration and advancement of telephone, e.g., erase the bloatware of cell phone, disallow programming auto-start, and filter the cell phone framework to save more energy and speed up the versatile phone.Some center and pre-introduced programming's must have the root admittance to open their capacities or to add and eliminate them.
How does KingRoot App work?
KingRoot most recent form covers android 5.0 frameworks and 6.0 frameworks, it supports the appropriateness of the product just as improves viable with android adaptation 5.0. Establishing limit can advance better and ensure the root security, assisting clients with getting root consents adequately and better oversee application authorizations. In the running system, King Root can keep the cycle from being commandeered and restricting programming auto boot in mass. This permits clients to oversee programming startup conduct effectively; clean versatile run-time climate, and guarantee that the telephone is pursuing smooth establishing.
Strategy:
The system of establishing is extremely basic with this application. Download the kingroot apk record and introduce on your gadget. Dispatch the application and tap on the root button and hang tight for quite a long time; you will get your established gadget quickly. Establishing measure is an extremely unsafe errand and care ought to be worked out. However, Kingroot dispense with that danger and give you your established gadget through a basic technique. You can check if your gadget is established utilizing Root Checker.KingRoot can adjust to a full scope of models like OPPO, Samsung, Huawei, Vivo, Lenovo and different brands. After a single tick establishing, it can likewise give security and rights to oversee more provisions. Nonetheless, kingroot download doesn't uphold every one of the gadgets when establishing, for example, the Moto G telephones. In any case, on the splendid side is that it functions as an appeal for establishing assortment of android gadgets. It ought to be remembered prior to establishing that establishing is an extremely delicate interaction and ought to be maneuvered carefully and KingRoot application can be your ideal ally for this cycle.
2 notes
·
View notes
Text
The Advanced Guide to Downloading and Installing Magisk
Are you ready to take your Android device to the next level? Look no further than this advanced guide to downloading and installing Magisk.
With Magisk, you can enjoy the benefits of root access while maintaining the safety and integrity of your device.
In this article, you'll learn how to:
Check device compatibility
Download the Magisk Manager app
Install Magisk via custom recovery
Troubleshoot common installation issues
Get ready to unlock the full potential of your Android device with Magisk!
Why Use Magisk
To enhance the functionality of your Android device, you should consider using Magisk.
Magisk is an advanced tool that offers numerous advantages and benefits.
One of the main advantages of using Magisk is its ability to root your device without altering the system partition. This means you can enjoy the benefits of rooting, such as installing custom ROMs and tweaking system settings, without compromising the integrity of your device's operating system.
Magisk also allows you to bypass SafetyNet checks, which is particularly useful if you want to use apps that require a rooted device or if you want to use banking or payment apps that usually don't work on rooted devices.
Additionally, Magisk offers a module system, which allows you to easily install and manage additional features and modifications.
With Magisk, you can take full control of your Android device and customize it to suit your needs.
Checking Device Compatibility
Before you proceed with downloading and installing Magisk, it's important to determine if your device is compatible with this advanced tool. To verify root access, you need to understand the rooting process.
Rooting allows you to gain privileged access to your Android device's operating system, enabling you to make modifications and install custom ROMs and modules. However, not all devices can be rooted, and attempting to root an incompatible device can result in bricking or damaging it.
Therefore, it's crucial to check if your device is compatible with Magisk before proceeding. One way to do this is by searching online forums and communities dedicated to your specific device model. These platforms often provide information and guides on how to root different devices and may have specific instructions for your device model.
Additionally, you can visit the official Magisk website, which provides a list of compatible devices. Taking these steps will help ensure a successful rooting process without any potential risks.
Downloading the Magisk Manager App
Now that you have checked the compatibility of your device, it's time to download the Magisk Manager app.
The app is designed to guide you through the installation process with easy-to-follow steps.
If you encounter any issues during the installation, the Magisk Manager app also provides troubleshooting options to help you resolve common problems.
Compatibility With Devices
First, ensure that your device is compatible by downloading the Magisk Manager app. Magisk is designed to work with a wide range of Android devices, but there are some device limitations to be aware of.
While Magisk is compatible with most Android devices running Android 5.0 and above, certain devices may have specific limitations due to their hardware or software configurations. It's recommended to check the official Magisk documentation or community forums to see if your device is listed as compatible before proceeding with the installation.
If your device isn't compatible with Magisk, there are alternative rooting methods available, such as SuperSU or KingRoot, although these may have their own limitations and considerations. It's important to research and understand the specific requirements and limitations of your device before attempting to install Magisk or any other root access solution.
Installation Process Steps
To begin downloading the Magisk Manager app, start by navigating to the official website. Once you're on the website, locate the download link for the latest version of the Magisk Manager app. Click on the link to initiate the download process.
It's important to note that before downloading, you should ensure that your device is compatible with Magisk. https://magisksu.com/ can sometimes arise, so it's recommended to check the official Magisk documentation or community forums for any known compatibility issues with your device model and Android version.
If you encounter any installation troubleshooting during the process, it's advisable to refer to the troubleshooting guide provided by Magisk or seek assistance from the community forums.
Troubleshooting Common Issues
If you encounter any issues while downloading the Magisk Manager app, there are common troubleshooting steps you can follow to resolve them.
One common problem that users may face is a boot loop issue after installing Magisk. To resolve this, you can try booting into recovery mode and clearing the cache partition. This can be done by turning off your device and then pressing a specific combination of buttons (varies depending on the device) to enter recovery mode. Once in recovery mode, navigate to the option to clear the cache partition and confirm the action.
Another issue that may arise is difficulties with module installation. If you're experiencing this problem, make sure that you have the latest version of Magisk Manager installed and try reinstalling the module. Additionally, check if the module is compatible with your device and Android version.
Troubleshooting these common issues can help ensure a smooth and successful installation of Magisk Manager.
Installing Magisk via Custom Recovery
Now that you have downloaded the Magisk Manager app, it's time to explore the next step: installing Magisk via custom recovery.
Before proceeding, make sure your device meets the custom recovery requirements.
In this section, we'll also address any troubleshooting issues that may arise during the installation process.
Custom Recovery Requirements
You frequently need a custom recovery to install Magisk. A custom recovery is a modified version of the stock recovery that comes with your Android device. It allows you to perform advanced tasks such as flashing custom ROMs, taking backups, and installing Magisk.
Before you can install Magisk via custom recovery, there are a few requirements you need to meet. Firstly, you need to have an unlocked bootloader on your device. This is necessary because a locked bootloader prevents you from flashing custom recovery.
Secondly, you need to find a compatible custom recovery for your specific device model. Different devices have different custom recoveries available, so make sure you choose the right one.
Lastly, you need to have the custom recovery image file downloaded and ready to be flashed onto your device.
With these requirements met, you can proceed to the next step of the Magisk installation process.
Troubleshooting Installation Issues
To troubleshoot installation issues when installing Magisk via custom recovery, it's important to ensure that all the necessary requirements have been met. If you encounter any errors or conflicts during the installation process, there are a few steps you can take to resolve them.
First, make sure that you have downloaded the correct version of Magisk for your device and custom recovery. Check for any compatibility issues between the custom recovery and the Magisk version you're using.
If you're still experiencing issues, try wiping the cache partition in your custom recovery before installing Magisk.
Additionally, you can try flashing the Magisk uninstaller to remove any conflicting modules or modifications.
Verifying Root Access and SafetyNet Status
After downloading and installing Magisk, it's important to verify your root access and SafetyNet status.
Root access allows you to have complete control over your Android device, enabling you to customize it to your liking and use advanced apps that require root permissions. By verifying your root access, you can ensure that the installation of Magisk was successful and that you have the necessary privileges.
Additionally, checking your SafetyNet status is crucial as it determines if your device passes Google's security tests. Passing SafetyNet tests is beneficial because it allows you to access apps that rely on SafetyNet, such as banking and payment apps, and ensures that your device is secure and protected.
Verifying root access and SafetyNet status ensures that your device is functioning correctly and that you can make the most of the features Magisk provides.
Troubleshooting Common Installation Issues
If you encounter any issues during the installation process, troubleshoot common installation problems to ensure a successful Magisk installation.
Fixing errors and resolving conflicts is crucial to getting Magisk up and running smoothly on your device.
One common issue is encountering an error message stating 'Installation Failed' or 'Error 1.' This can be resolved by ensuring that you have the latest version of Magisk Manager and that you have enabled 'Unknown Sources' in your device's settings.
Another common problem is encountering a bootloop after installing Magisk. To fix this, you can try clearing the cache partition or performing a factory reset.
Additionally, if you experience any conflicts with other root-related apps, make sure to uninstall them before installing Magisk.
Frequently Asked Questions
Can I Use Magisk on Any Android Device?
Yes, you can use Magisk on any Android device. It provides custom ROM compatibility and helps troubleshoot common issues. Follow the guide to download and install Magisk for a seamless experience.
Is It Safe to Install Magisk on My Device?
Yes, it is safe to install Magisk on your device. Magisk is compatible with custom ROMs and can be used to bypass SafetyNet, providing you with advanced customization options and root access.
Can I Still Receive OTA Updates After Installing Magisk?
Yes, you can still receive OTA updates after installing Magisk. One of the benefits of using Magisk for rooting Android devices is that it allows you to keep your system up to date.
How Can I Hide Root Access From Certain Apps?
To hide root access from certain apps, you can use Magisk's "MagiskHide" feature. This protects sensitive data and allows you to enjoy the advantages of rooting without compromising app functionality.
Can I Uninstall Magisk if I No Longer Want to Use It?
Yes, you can uninstall Magisk if you no longer want to use it. By removing Magisk, you will also be removing root access from your device.
Conclusion
In conclusion, Magisk is an advanced tool that offers a safe and effective way to root your device.
By following the step-by-step guide, you can easily download and install Magisk, ensuring root access and checking the safety of your device through the SafetyNet feature.
Troubleshooting common installation issues is also covered, providing a comprehensive solution for users.
With Magisk, you can enjoy the benefits of customization and advanced features while maintaining the security of your device.

1 note
·
View note
Text
عمل روت للاندرويد 12 king Root ، هنام الكثير من مستخدمي هواتف الاندرويد 12 ، يرغبون في عمل روت للاندرويد والحصول على صلاحيات الروت في هواتفهم وذلك لأنها تخول لهم تشغيل تطبيقات التي تحتاج روت لتشغيل مصل تطبيقات زيادة المال في الالعاب وتطبيقات الواي فاي وغيرها الكثير .
عمل روت للاندرويد 12 king Root ، هنام الكثير من مستخدمي هواتف الاندرويد 12 ، يرغبون في عمل روت للاندرويد والحصول على صلاحيات الروت في هواتفهم وذلك لأنها تخول لهم تشغيل تطبيقات التي تحتاج روت لتشغيل مصل تطبيقات زيادة المال في الالعاب وتطبيقات الواي فاي وغيرها الكثير .https://www.apk-go.com/2023/01/tahmil-KingRoot-lilandruyid-12.html
0 notes
Text
تحميل كينج روت 2023 kingroot APK برابط مباشر لـ Android
https://appstoandroid.com/kingroot/
نبذة مختصرة عن كينج روت 2023 kingroot كينج روت الاصلي برنامج كينج روت 2023 ستتعرف عليه بعد التطور الذي حدث في الهواتف وبدأ الأشخاص يبحثون عن عمل روت لهواتف الأندرويد
0 notes
Text
تحميل كينج روت 2023 kingroot APK Download أحدث إصدار مجاناً
تحميل كينج روت 2023 كينج روت الاصلي king root king root 4.4.2
تحميل برنامج كينج روت 2023 لجميع الأجهزة وخاصة بعد تحويل نظام الهاتف إلى روت فبتالي تستطيع تحميل كينج روت
0 notes
Link
0 notes
Text
Bagaimana cara mengembalikan IMEI null? Bagi seseorang yang pernah kehilangan IMEI, kondisi ini biasanya disebabkan saat kamu sudah melakukan Hard Reset, Flash maupun Root pada HP Android. Masalah utamanya adalah ponsel tidak akan menangkap sinyal atau koneksi jaringan. Jika dibiarkan, kamu akan sulit berkomunikasi bahkan mengakses internet setiap hari. Kondisi ini sangat mengganggu, bukan? Oleh karena itu, Lihat selengkapnya tentang cara mengembalikan IMEI null …
0 notes
Last Seen Blogs

our-flag-means-death
Our Flag Means Death

selesera
meet me at midnight

ultravioletlightwaves
Ultraviolet Lightwaves


utilidades4
repost🍄