#i was originally planning on doing more panels but i got tired and shortened it
Text
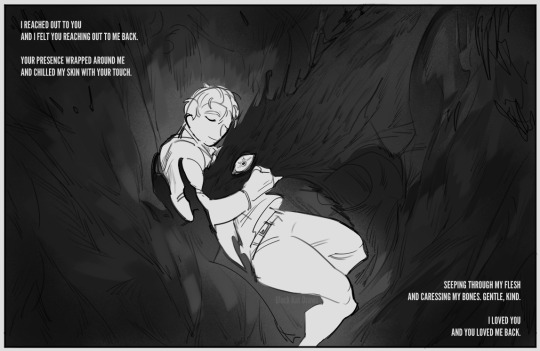

Whenever Stanley closes his eyes, he can feel the older man's aura surrounding him. [Blank Scripts AU]
#im literally about to pass out#i made this while im about to fall asleep#im not very coherent#my apologies if the description or the meaning of the image doesnt translate very well#i was originally planning on doing more panels but i got tired and shortened it#damn it#but basically this is just The Narrator (Black) emitting his energy out (aura)#it feels really cold#like an ocean of ice#that black mass is NOT the narrator's (Black's) true form#that black mass is like a physical manifestation of what the Narrator's (Black's) aura looks like#(in Stanley's imagination at least)#but Stanley is too much of a simp to care about all that#hug wife... wife very cold but thats okay. hug wife#maybe hug will warm wife up#tsp blank scripts au#tsp au#the stanley parable#the stanley parable ultra deluxe#tsp#tspud#tsp narrator#narrator tsp#stanley tsp#tsp stanley#stanley x narrator#narrator x stanley#stanarator#stannarator#stanarrator
408 notes
·
View notes
Text
How To Build a Custom Split Bumper
My latest project is a 1936 Ford Phaeton, and in the Nov. ’18 issue of STREET RODDER the car received a 1939 Buick front bumper. The bumper itself required no modifications, just a new mounting system. The V-shaped front bumper fit the profile of the 1936 Ford perfectly and tucked in nice and tight. I feel certain this bumper would also work on many other brands of mid to late ’30s cars (particularly 1939 Buicks).
Pleased with the look of the front bumper, we located a rear 1939 Buick bumper to adapt to the rear of our 1936 Ford. This process proved to be a bit more involved. First, we removed the spare tire and carrier from the rear of the car because in our humble opinion, the spare tire gets in the way of that gorgeous sweeping flatback panel. The spare also makes the car look very long. With the spare tire removed we set about adapting the 1939 Buick bumper.
The first order of business was taking some basic measurements. As it turns out the original bumper on the car was out of alignment by over 1-1/2 inches. This could have been caused by many things. First, 1936 automobiles were not exactly precision built, tolerances were “generous.” Second, undoubtedly over the past 82 years this old car may have been push-started or used a chain to pull another car home. Either way we set about heating and bending the bumper irons until they were both identical. This ensured we would be mounting the new bumper to equally spaced brackets. There would be more modifications to the brackets during the process, and we were able to tuck the Buick bumper nice and tight to the body, resulting in a much shorter-appearing car. In the end the bumpers were just beyond the face of the taillight lens.
While we could have mounted the Buick bumper as a one-piece bumper, we decided to build a license plate recess into the bumper. Borrowing a concept from the late ’30s and early ’40s Lincoln Zephyr we decided to use two bars in the middle of the bumper as a license plate recess. If you prefer to leave the license plate light mounted to the driver-side taillight this modification is a good way to change the length of a bumper and use the tubing as a simply styling que.
Like most things on old cars, this got a bit more involved than anticipated but in the end we were very pleased with bumper. It is now about 1-inch shorter than the original 1939 Buick bumper, and much like the front bumper this rear piece conforms nicely to the shape of the car.
Of course the same principles involved here apply to virtually any car and most early bumpers; it certainly does not have to be a 1939 Buick bumper on a 1936 Ford. So follow along as we slice and dice an old bumper to give our Ford a more modern appearance, and a little extra style. It may inspire you to take a similar approach on your next project.
The original 1936 Ford Phaeton is pretty busy looking from the rear. The spare tire and dropped-center rear bumper and bumper guards are hiding a beautiful sweeping, “flatback” panel. (Above) Removing the spare tire and adding a modified 1939 Buick rear bumper gives our 1936 tub a whole new look.
Removing the spare tire and moving the license plate from the driver-side taillight to the bumpers makes a dramatic difference, but we have bigger plans.
With the 1939 Buick bumper clamped to the inboard portion of the Ford bumper irons the bumper is too far from the fenders, so it’s time for some bumper tucking.
Before we can begin any modifications we must be sure both bumper irons are the same shape. Our preliminary measurements indicated they were quite different. First we leveled the two bumper irons with a long level.
After we had the driver side properly shaped, we removed both bumper brackets and bent them with heat from the torch and lots of C-clamps. Heat the area, clamp it, heat and clamp until both brackets match. Allow to cool slowly.
And here we have it, two perfectly matched bumper irons. Now we can install them on the car and proceed with the new bumper mounting process.
With the brackets mounted and leveled we measured from the center hole of the spare tire carrier to the end of the brackets to ensure the brackets were equidistant from the center of the car.
Certain that the brackets were properly located, we placed the Buick bumper atop the brackets and carefully centered it. While the bumper would work OK at stock length we decided to shorten it about 1-1/2 inches.
After finding the exact center of the bumper we measured out to our desired opening and marked it with a square. Then our mighty powerband hacksaw made quick work of cutting through the bumper.
We were able to use the outboard hole in the bumper to temporarily attach the bumper piece in place. The inboard portion of the bumper iron is too long and must be shortened.
Using the bumper as a guide we marked the bumper iron for the proper preliminary cut. This first cut should be inboard a bit as we will be adding the mounting portion back onto the bumper iron later.
With both bumper irons cut the bumper halves are held in place by the outboard bolts and inboard clamps. With the bumpers leveled and centered we spent some time “eyeballing” the bumpers to be sure we had the desired look.
Part of that locating process was using masking tape across both wheelwells and measuring to the fenders. Once again, 82-year-old cars are less than precise and we discovered the driver-side fender was quite different from the passenger side. We removed the fender brace and pulled the fender out to the proper location and then straightened the fender bracket. Now everything looked balanced.
A magnet holds our filler plate in place for test-fit. Satisfied with the shape of this piece, we set about making an exact duplicate.
These are the basic pieces we used to form the centersection of the bumper. The steel tubing is actually just good old black pipe from the hardware store. No, it’s not seamless tubing but hey, we’re building a bumper here, not an AA/FD chassis. We fabricated the plates while the gussets are from Summit Racing.
We decided to make our tubing centerpieces bolt-in pieces. We used 3/8-16 nuts tapped into the end of the tubing. We had to open the hole in the tubing just a bit using a step drill. Be sure the nut is square in the hole.
A quick but careful pass with our Miller TIG welder ensures the nut is now one with the tube.
We carefully ground a flat face on the tubing so it will seat perfectly with our new filler plates.
Here is the end product, ready to be bolted in place. We ran a tap through the threads to clean the threads after the welding and grinding process.
Of course before we could bolt the piece in place we had to drill holes in the filler plates. First we did the top hole, then slipped the filler pieces back in place to mark the lower holes to be certain we had a perfect, parallel fit.
After locating the tubing perfectly, the rear of the bracket was trimmed to present a straight line between the tubes. A simple straightedge and Sharpie made the mark.
With both bars fabricated and both filler plates drilled we bolted the pieces together and gave it one last test-fit prior to welding the filler plates into the bumpers.
Putting a gusset behind the filler plate is no doubt overkill, but then again, anything worth doing is worth overdoing. We keep a couple packs of these gussets on the shelf; they are from Summit Racing. Welding the gusset in place first made positioning the filler plate easier.
After carefully positioning the filler plate in the bumper end we TIG-welded the gusset and filler plate with our trusty Miller Synchrowave 200. We preheated the bumper with a torch prior to welding and allowed it to cool slowly.
After the inside was welded we laid down a bead on the outside of the filler plate. We added a bit of extra filler rod to the weld to give us ample material to form a tight radius over the end of the bumper. Once again, slow cooling is best.
After a little work with our small air grinder and Roloc discs we had a nicely finished piece. The team at Advanced Plating will make it even better. Also note the original boltholes in the bumper have been filled.
The outboard mounting pad was formed from 1/8-inch flat stock with a 7/16-14 nut welded behind the plate. This type of mount distributes the stress on the bumper and makes for a cleaner mount than simply welding a stud in place.
The inboard bumper mounts are a slight variation from the outboard mounts. Once again 7/16-14 nuts are welded inside the mount while the flat face of the mount provides a mating surface for the bumper iron.
Before we could locate the exact location for the inboard bumper mounts we had to make the final cuts on the inboard bumper irons. We clamped the two pieces together and made the required cut marks.
With both pieces cut, we V’d the gap slightly before welding them together. Since the stock bumper irons are spring steel we tack welded the pieces, then preheat the pieces with a torch prior to welding. After welding we slow-cooled the pieces in a bucket of sand.
After the piece cooled we have a nicely shortened bumper iron that will tuck the 1939 Buick bumper nice and tight to our 1936 Phaeton body.
And this is what the back side of the bumper looks like after all the new brackets are welded in place. All original holes have been filled so we will have smooth bumpers for a custom look. Should any minor tweaking be required the brackets could be shimmed to perfection.
The bumper irons were reinstalled and we assembled all four parts of our bumper on the car. We were quite pleased with the fit on all pieces.
If you wanted to leave the license plate mounted on the driver side taillight you could run the bumper like this. The early Lincoln influence is very evident (a nice way of saying we copied the Lincoln look).
However, we planned on running the license place in the center of the bumper using the tubing insert as a recess for said license plate. This is the 1936 Ford front bumper iron bracket we had removed from the car. We will drill out the two rivets that hold the mounting bracket to the license plate bracket.
We had to flatten the lip on the bracket where it passes over the lower tube but then it fit fine. We drilled and tapped two 1/4-20 holes in the lower tube to attach the bracket to the tube.
In 1936 there was no official standard size and bolt pattern for license plates—that wouldn’t happen until 1957. The long slots in the 1936 license plate bracket will accommodate both vintage plates and a modern plate, as seen here.
We plan on running a 1936 license plate on the car, so we cut this blank out to simulate the size of a 1936 Georgia license plate, which is 12-3/8×5-3/8. It fits the new opening well. Now it’s time to ship it all off to Advanced Plating.
The post How To Build a Custom Split Bumper appeared first on Hot Rod Network.
from Hot Rod Network https://www.hotrod.com/articles/build-custom-split-bumper/
via IFTTT
0 notes
Text
Frankenstein Diesel! Cummins 1966 Caprice Burnout Machine!
In 1966, Cliff and Elaine Friel walked into Harrington Motors in Harrington, Delaware to purchase their first new car. As a recently married couple in the booming 1960s, it’s what young couples did: they purchased a home in the suburbs, a new car, and started a family. At that point in time, society had a different relationship with the car and it was easily viewed as a measure of prosperity and social status. So much so that in 1966, Chevrolet spun the Caprice away from the Impala model to create its own distinct line, which came with a higher level of exterior trim, and a more luxurious interior. That fact didn’t go unnoticed in the Friel household, and when it came time to make that new car purchase, Cliff (being a die-hard Chevy guy) was well aware of the different luxury levels being offered across the Chevrolet line.
The Friel’s left the dealership that day the proud owners of a new two-door Caprice Coupe decked out in Marina Blue with a blue cloth interior. Between the fenders was Chevy’s mighty 327 cubic-inch small-block with a four-barrel carburetor, backed by a Powerglide transmission and a 3.08:1 posi rear. It was purchased as daily transportation and it faithfully fulfilled that task well into the mid ’70s, when it was eventually replaced by an Olds Delta 88. Cliff’s mother-in-law was in need of a newer car, so the Caprice was sold to her, and she used it until 1983 when it was then passed on to Cliff’s son, Mike Friel.
Mike was 15 at the time and had grandiose plans for the Caprice, but he was still months away from getting his driver’s license. In terms of its overall condition at the time, Mike recalls, “It had a bunch of scratches in it, and it had a dent in the fender which is still there from when my grandmother ran into the garage with it, and it had rust behind the rear wheels, which is still there to this day as well.” The original 327 was still in the car, but he did what most teens with a penchant for grease did in the mid ’80s, which was to slap on a set of headers, jack up the rear with air shocks, swap the wheels, and add a cassette player. “I also started sanding it down and doing dumb teenager bodywork on it to get it ready for paint,” he notes. The dents received a generous layer of Bondo and the entire body was blasted with gray primer right out of a rattle can, but when you’re 15 with 30 years’ worth of experience and you run out of money, those small details just don’t seem to matter.
The Caprice entered service when he turned 16. With his license under his belt, the car once again became daily transportation. While Mike was thrilled with the fruits of his efforts, a watchful eye had been soaking in all the changes made to the car. Let’s just say that Cliff was not amused. That growing displeasure lasted for about six months, until he couldn’t take it anymore. Mike recalls Cliff telling him point blank, “You’re destroying my car. I want it back.” And take it back he did. To his credit, Cliff didn’t leave him carless. The Caprice was replaced with a ’77 El Camino.
With the car back in his possession, Cliff backed it into a small steel barn until he could get to it to undo Mike’s changes and fix it back up. As you can probably guess, that never happened. It took until 2006 for Mike to convince his father that he was never going to do anything with the car, and he should just cut loose with it and give it back to him. Unfortunately, after two decades parked on a dirt floor in a building with no door, and aided by that layer of porous rattle can primer, Mother Nature had inflicted its vengeance on every part of the car.
Now older, Mike had other ideas on what he wanted to do to the Caprice. “I got the 327 running again,” he explains. “I did the brake lines and the bushings, and took care of everything underneath. The Powerglide that was in it was toast, so instead of fixing it, I converted it to a four-speed. I changed the ignition out to an HEI system and replaced the carburetor. After many years, I was back in business with that original engine.” That lasted for about a year, and after the addition of a set of Corvette C5 wheels, the decision was made to take it to the next level. He had his sights set on a big-block, which he started to build for the Caprice. That sidelined the car for a number of years, and in 2012, a warmed up ’93 Cummins diesel drivetrain from a Dodge Ram pickup came into the picture.
Perhaps the most notable aspect of diesel propulsion beyond better fuel mileage is the insane amount of torque it produces. Lighting up the tires on the Caprice is quick and easy without insane amounts of horsepower.
Initially the 5.9L oil burner was destined for a ’66 Cadillac that he was in the process of buying. Mike recalls: “I was trying to get this Cadillac, and the idea was to take the diesel drivetrain, drop it in, and build a big ol’ cruiser. The deal for the Caddy fell through, but I wanted to go to the Ocean City car show that year with something.” Since that didn’t work out, and the Caprice was just sitting without an engine, three weeks was all it took to drop the Cummins into the engine bay. He notes, “When we first did it, we cut out the driveshaft tunnel, the transmission hump, and a big square chunk of the firewall. We modified the factory Dodge pickup mounts a little bit, and made a new transmission crossmember for the back end. We fabricated new piping for the intercooler, installed a Griffin dual-pass radiator, and had a custom driveshaft made. We also ran new fuel lines and wiring on it. This was quick and dirty, but we got it to the show in a matter of weeks.” At that time, Mike was working at R&M Performance in Cambridge, Maryland and it became an after-hours project at the shop for a number of the guys working there.
As you can probably guess, the novelty of that rusty diesel combination was well received, so after the show, he parked the car back at R&M and started gathering parts to redo the suspension. Up front he mounted Afco coil springs and VariShock adjustable shocks and a set of CPP 2-inch drop spindles. At the rear, he thinned the frame rails to allow for the installation of wider rubber. As a result, smaller springs were needed, so a set of front springs was used in conjunction with shortened Koni shocks. The braking was also upgraded with the installation of Wilwood binders at all four corners. The front setup consists of 14-inch rotors with 6-piston calipers, at the rear the rotors measure 13 inches with 4-piston calipers.
After two decades of neglect, the Caprice has gotten a new lease on life with the installation of the 5.9-liter Cummins diesel. While it looks rather rough, the fun factor is substantially higher than when it rolled off the dealer’s salesroom floor with a 327.
There is no bling between the fenders of the Caprice. The heart of this car has its roots deeply planted in the pickup world where functional practicality is king.
After the suspension work, the car saw limited use and at the start of 2016 Mike pulled the drivetrain back out. Since the 5.9L is a torque monster and its installation was rushed, a more permanent solution was needed. With the Caprice parked in his home garage, he cut out the floor and built a 2×3-inch mild-steel subframe in the center of the car to stiffen the chassis. A roll cage was also incorporated to add additional stiffness, and a new floor, transmission tunnel, and a recessed firewall were fashioned from bare steel sheets. Like the rest of the interior, the stock vinyl seats had also seen better days, so they were tossed in favor of a set of NRG Innovations RSC-208 racing seats up front, and a pair of Kirkey racing seats in the rear. Mike also installed an ididit steering column, a Tanida Motor Sports steering wheel, and an Auto Rod Controls flat touch panel. The C5 rolling stock was also upgraded to C7 Z06 specs. The front wheels measure 19×10 and are wrapped in Bridgestone Potenza RE050A 305/30ZR19 tires. The rear set measure 20×12 and wear Michelin Pilot Sport Cup 2 335/25ZR20 tires.
The bulk of the tired interior was tossed out and replaced with racing seats and full harnesses. A rollcage was also fabricated for additional safety and structural rigidity.
The original floor on the Caprice was rusty from sitting for two decades. Mike cut it out along with the transmission tunnel, and reinforced the center section with a 2×3-inch mild steel subframe.
With the stiffened chassis, his confidence level at keeping the body in one piece from the twist meant that he could go looking for additional power from the 5.9. While it didn’t get a full rebuild, he did swap out the fuel pin and the governor spring to bump up the rpm. He also advanced the timing on the injection pump and changed the fueling rate. The end result was an increase to 353 horses at 3,000 rpm, and a stout 798 lb-ft of torque. As an insurance policy, the 46RH transmission was also given a full rebuild.
Future upgrades for the Caprice are usually destined as winter projects. On the horizon is the addition of a Vintage Air system, digital dash, and stereo system. The Cummins will also be moved back to improve weight distribution and some of the interior sheet metal work will be finalized. Some of the rust around the glass also needs repair and the roof will probably get a fresh coat of rattle can primer to match the rest of the body. In its tattered old age, Cliff has accepted his car’s fate and often comments on how it gets better mileage now than it ever did. And it clearly does better burnouts!
The post Frankenstein Diesel! Cummins 1966 Caprice Burnout Machine! appeared first on Hot Rod Network.
from Hot Rod Network http://www.hotrod.com/articles/frankenstein-diesel-cummins-1966-caprice-burnout-machine/
via IFTTT
0 notes
Text
A 1955 Dodge Bought For Work and Rebuilt as a Brother’s Tribute
Dwayne Waters got his classic truck from his brother. Richard Waters was a Texas State Trooper and was always buying and selling—his wife Judy never knew what he was going to come home with. In mid January 1987, Richard came home with a 1955 Dodge Job Rated pickup truck that he bought from a guy in Amarillo. Judy was honest—the truck was ugly.
The truck may have been ugly, but it ran well and it was the perfect workhorse for Richard’s side job, a disc rolling business. He and Dwayne traveled all over the Panhandle with a machine used to sharpen the disc blades on plows. A lift welded onto the rear bumper raised the heavy disc blade roller into the bed of the Dodge. In October 1988, a few days after driving the truck on a job with Dwayne, Richard died after a long fight with cancer.
For the next 15 years, the Dodge stayed stored in a family barn. Eventually, Dwayne started thinking about rebuilding it, and in 2003 he and his mother Carolyn bought the truck from Richard and Judy’s son Luke. “We had to cut down a tree that had grown in front of the door of Dad’s old barn,” he told us.
Dwayne hauled the Dodge from the Amarillo area to his home in Denton where he started planning the restoration. “As I analyzed the truck, I realized that the motor was not the original and that the frame had been modified to accept the motor. I knew then that the Dodge could not be restored as original, and decided to do a ‘subtle’ restoration.”
Things got rolling in 2006 when Dwayne got in touch with Bob Hollingsworth at Bob’s Nas T Chaseez & Exhaust in Burkburnett, Texas. He disassembled the truck in his own shop and hauled the frame to Burkburnett, where Bob used the dimensions to build a new chassis. Mandrel-bent 2×4-inch 0.120 steel tubing forms the custom frame, equipped with all-new mounts for the engine, transmission, and cab. An independent front suspension from Art Morrison Enterprises features a pair of Aldan adjustable coilover shocks plus a 1-inch antisway bar to firm up the ride and handle any wrinkles in the road. A power rack from AGR Performance was added to move the Dodge in the right direction. At the other end, a 9-inch Ford rear was built with 3.73:1 gears and a locker, suspended by a four-bar setup and another pair of Aldan coilovers. Wilwood disc brakes were mounted all around; 12-inch rotors are paired with four-piston calipers.
Bob sent Dwayne sketches of various tire and wheel sizes to help him choose the best size. Dwayne decided on 20s and 18s and ordered the Billet Specialties Chicayne five-spoke style through Briscoe Tire & Alignment in Denton. “I bought a low end set of tires at first, knowing that they would be out of date and would need to be replaced by the time I actually drove the truck,” Dwayne explains. Today the Dodge rolls on 275/60R20 and 255/55R18 Michelins.
As work progressed on the chassis, Dwayne ordered an engine. He wanted to keep everything Mopar oriented, and in 2006 contacted Street & Performance for one of their 345hp 5.7L Hemis with polished aluminum heads. S&P also provided the Mopar five-speed automatic transmission.
Dwayne brought the finished chassis, engine, and transmission back to his home garage in Denton where everything was dismantled to have the frame powdercoated. For several years, the project stayed there while Dwayne decided how to proceed. “I did clean it and polished it several times before parties,” he explains. He also managed to take the unfinished pickup to a local show. “I vise gripped, clamped, and zip-tied it together to look like a truck. It got lots of attention that day, even in its rustic condition.”
After visiting Hatfield Restoration in Canton, Texas, and meeting owner Gary Hatfield and general manager Dale Barnes, he was convinced that this was the right place for finishing the “subtle restoration” on the Dodge. “They were impressed with my truck as they noticed that it had very little rust for its age, and were eager to work on the Dodge because it was different. I trusted their expertise and let then recommend how to restore it. I just asked that they keep it looking like the original truck.”
It still does look like an original 1955 Dodge, with some minor modifications. Before those could be made, Hatfield Restorations had to repair all the dents added loading and unloading the disc roller. “If I had known that someday I was going to pay to have all those dents taken out of the back of my truck, I would have been more careful,” Dwayne says. The few custom body mods were subtle, as he requested. The filled cowl vent, shortened stepboards, smoothed hood with hidden latches, custom mirrors, and customized 1967 Camaro bumpers, improve the looks of a truck that was not originally built for beauty. Other custom mods include tinted glass and 1932 Ford taillights with custom brackets. The bed floor was replaced with oak panels and stainless steel runners.
The paint was sprayed at Hatfield Restorations. Dwayne’s original plan was to paint the truck red, but he ultimately decided to stay with the original color. Banner Green was offered on 1954-1956 Dodge trucks. It was Chrysler code DT7121 back then, now available as PPG code 41480. North Texas Quality Chrome plated all the brightwork.
Like the exterior, the cab interior has stock style with a contemporary makeover. Hatfield Restorations is set up for upholstery work and covered the bench seat, door panels, and dash inserts in light brown leather. Matching leather covers the Billet Specialties Vintec steering wheel mounted on an ididit tilt shifter column, and Mercedes square-weave carpet covers the floor. The instrument panel holds blackface gauges from New Vintage USA’s Woodward series. The rest of the dash has been filled and smoothed and houses controls and vents for the Vintage Air A/C system. The invisible Out Of Sight Audio system provides the soundtrack via Bluetooth technology. Wiring was simplified by the use of a Painless Performance harness.
Dwayne took delivery of the truck in October 2015 at the Goodguys Lone Star Nationals in Fort Worth. It had been 27 years since his last ride with his brother. His first ride in the just-finished restoration was a three-lap trip around the oval track of the Texas Motor Speedway, accompanied by his wife, Lisa. Since then he’s continued to show the Dodge, picking up a few trophies along the way. The trophies are an honor, but Dwayne reminded us that the 1955 Dodge Job Rated was built to be the real honor—to Richard, who would no doubt be proud.
1955 Dodge Job Rated | Dwayne Waters | Denton, Texas
CHASSIS
Frame: custom, mandrel-bent 2×4-inch 0.120 steel tubing, powdercoated
Rearend / Ratio: Ford 9-inch with a locker / 3.73:1
Rear suspension: four-bar, Aldan coilover shocks
Rear brakes: Wilwood 12-inch disc brakes and four-piston calipers
Front suspension: Art Morrison Enterprises IFS, Aldan adjustable coilover shocks, 1-inch antisway bar
Steering: AGR Performance power rack
Front brakes: Wilwood 12-inch disc brakes and four-piston calipers
Front wheels: Billet Specialties Chicayne 20×9.5
Rear wheels: Billet Specialties Chicayne 18×8
Front tires: Michelin 255/55R18
Rear tires: Michelin 275/60R20
DRIVETRAIN
Engine: 2006 Street & Performance 5.7L Chrysler Hemi
Heads: polished aluminum
Intake: Street & Performance cast
Air filter: K&N
Alternator: Mopar 140-amp from Street & Performance
Headers: Street & Performance Hemi Street Rod–style headers, thermal coated
Exhaust / Mufflers: custom exhaust by Hatfield Restorations / Flowmaster Hushpower
Estimated horsepower: 345
Transmission: 2006 Mopar five-speed automatic with overdrive
Shifter: column mounted
BODY
Style: 1955 Dodge Job Rated
Modifications: smoothed hood with hidden latches, shortened stepboards, filled cowl vent
Fenders: stock
Hood: original
Grille: original
Bodywork and Paint: Hatfield Restorations
Paint: 1954-1956 Dodge truck Banner Green, PPG
Plating: North Texas Quality Chrome
Headlights / Taillights: original / 1932 Ford with custom brackets
Bumpers: 1967 Camaro
Glass: tinted
Bed: oak and stainless steel
INTERIOR
Dashboard: stock, filled, and smoothed
Gauges: New Vintage USA Woodward series
Steering wheel: Billet Specialties Vintec
Steering column: ididit tilt shifter
Seats: stock
Upholstery: Hatfield Restorations
Material / color: leather / light brown
Carpet / color: Mercedes square-weave / brown
Sound system: Out Of Sight Audio Bluetooth system
Air conditioning: Vintage Air
Wiring: Painless Performance Products
The post A 1955 Dodge Bought For Work and Rebuilt as a Brother’s Tribute appeared first on Hot Rod Network.
from Hot Rod Network http://www.hotrod.com/articles/1955-dodge-bought-work-rebuilt-brothers-tribute/
via IFTTT
0 notes
Last Seen Blogs
kimrosswrites
A Line A Day

ponysprouts
ponysprout

nigkromgidamakine
NİĞKROM MAKİNE

theseoulstory
The Seoul Story

admitis
Admitis