#i have a migraine so i sincerely apologize if this is incomprehensible
Text

Gradient Maps For Dummies <3
— as written by a dummy
it’s been a while! hello gracious reader and welcome back to the series where yours truly fails at explaining things: photopea for dummies. if you’re unfamiliar, this is a series where the admin of this blog tries to explain how photopea works. whether or not the series is successful is yet to be determined.
today, we’re attempting to tackle yet another one of photopea’s adjustment layers: gradient maps. gradient maps have become more popular in the editing community lately, so i’ve been meaning to make this one for a while. apologies for the delay!

what is a gradient map? a gradient map is a form of layer that adheres a gradient to a photo’s dark and light values. a gradient fill is something different altogether, wherein a gradient is made atop the image without regard for the image’s original form.
think of it as a bedsheet. when held upright, a shield is just a rectangle, but if you lay it on something three dimensional, you can see the object beneath, because gravity causes the sheet to adhere to whatever is beneath. in our case, your image is two dimensional, but a gradient map applies different colors to the dark, light, and middle values.
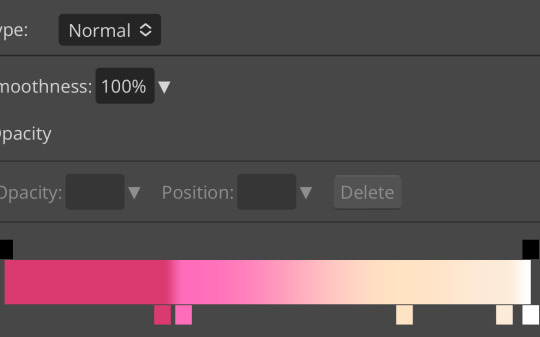
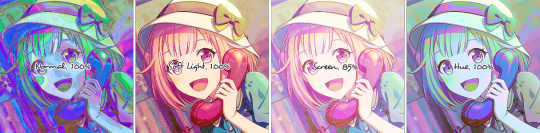
this is the gradient map used on all of the icons above. i made this one by experimenting with different colors. to add colors to a gradient map, double tap below the line, and you’ll see a small square appear. click the square to choose the colors you desire, and feel free to adjust it as you wish.
in photopea’s gradient maps, the colors closest to the left will adhere to the darkest parts of your image, while the colors closest to the right will adhere to the lighter parts of your image. the saturation and lightness values of your color itself don’t affect this at all—for example, here’s the same gradient map applied in reverse.
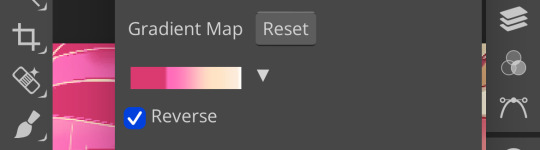
(to reverse a gradient map, toggle the reverse button as seen above. to undo it, just click the button again.)

pretty different, right? especially with no blending modes or adjustments in opacity, this gives your images a spooky negative look. if that’s what you’re going for, go crazy. if you want something a little more plain, set your darker colors on the left, and your lighter colors on the right.
exactly how the editor utilizes a gradient map is up to personal preference. some editors use gradient maps in lieu of complicated psds, while others like myself use gradient maps as one of the pieces of our complicated psds. gradient maps often go hand in hand with blending modes—for more on that, see here.
personally, i use a gradient map as a base for most of my psds.


the exact settings are up to you, but i typically use either blending mode soft light with 50-75% opacity, or blending mode overlay with 10-25% opacity. the gradient map i use is one of the default ones available in photopea, a simple black and white set to reverse.
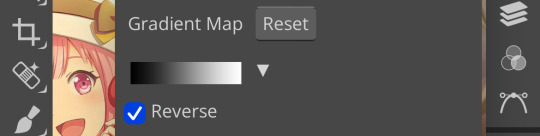
i like to use this gradient map to soften the colors and as a simple, easy to do base for all of my psds. if you look in some of the psds i have posted, you usually see this at the bottom or close to it.
how else can i use a gradient map? anyway you want, really! as you can see in my example image, gradient maps can be used to completely change the colors of your project, or to add a little bit of spice. something else you can use is a noise gradient map for texture.
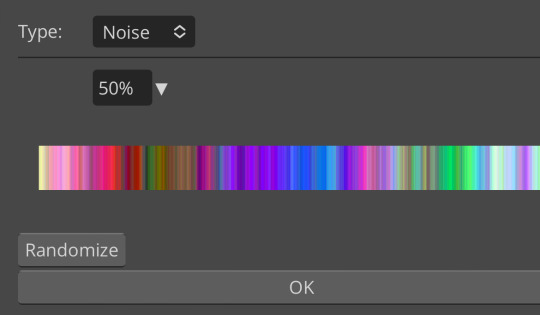
go to the gradient map itself as if you’re going to adjust your colors, and switch the type from normal to noise. then click randomize until you land on something you like!
it looks something like this. set to normal is pretty chaotic and janky looking, but set to soft light or to a lower opacity hue setting, this can be a great way to add some flare to your psds!
like with a lot of things in photopea, it’s best to experiment on your own and figure out what works best for you. i recommend playing around with opacity and blending modes, as well as what color combinations you personally like. every editor’s style is different, and the sky’s the limit with what you can do!
yours truly, canarysage
#i have a migraine so i sincerely apologize if this is incomprehensible#photopea for dummies#ʚɞ — tips.
32 notes
·
View notes
Last Seen Blogs
mecchimon
🔞🎨🐌
mia-frogs
Mia

cardcaptoralsodraws
The Cardcaptor also Draws

bluepandaistiredbuthappy
Bluepandaistired