#for any other android users go to the play store and then manage apps and device
Text
Idk if they'll sneak the scummy changing layout shit on me bc I turned auto update off on my apps
#for any other android users go to the play store and then manage apps and device#idk about apple srry
6 notes
·
View notes
Text
guide to ad-free youtube for mobile via. youtube revanced
since youtube vance is no longer maintained and youtube is cracking down on adblockers here is how to download youtube revanced which has the best options for customising youtube features; including removing youtube shorts popups, sponsorship segments in videos, hiding unused buttons, bringing back dislikes, and more! [official revanced github]
this guide is for android only. sorry apple users idk how to help you. your device doesn't have to be rooted. even if it is, you should still be able to follow this guide. if you have youtube vanced installed, revanced shouldn't clash, so you don't have to uninstall it if you don't want to.
installation guide:
1. download all 3:
i. microg (this will let you log into your youtube account) [apk mirror] (scroll past description, download the latest one)
ii. revanced manager apk [github] (select the latest release, scroll to the bottom in assets, install the .apk file)
iii. latest youtube apk [apk mirror]
2. open revanced manager
3. select in this order: "patcher" -> "select an application" -> "storage" (note: if your phone asks you to let the app have storage access, say yes)
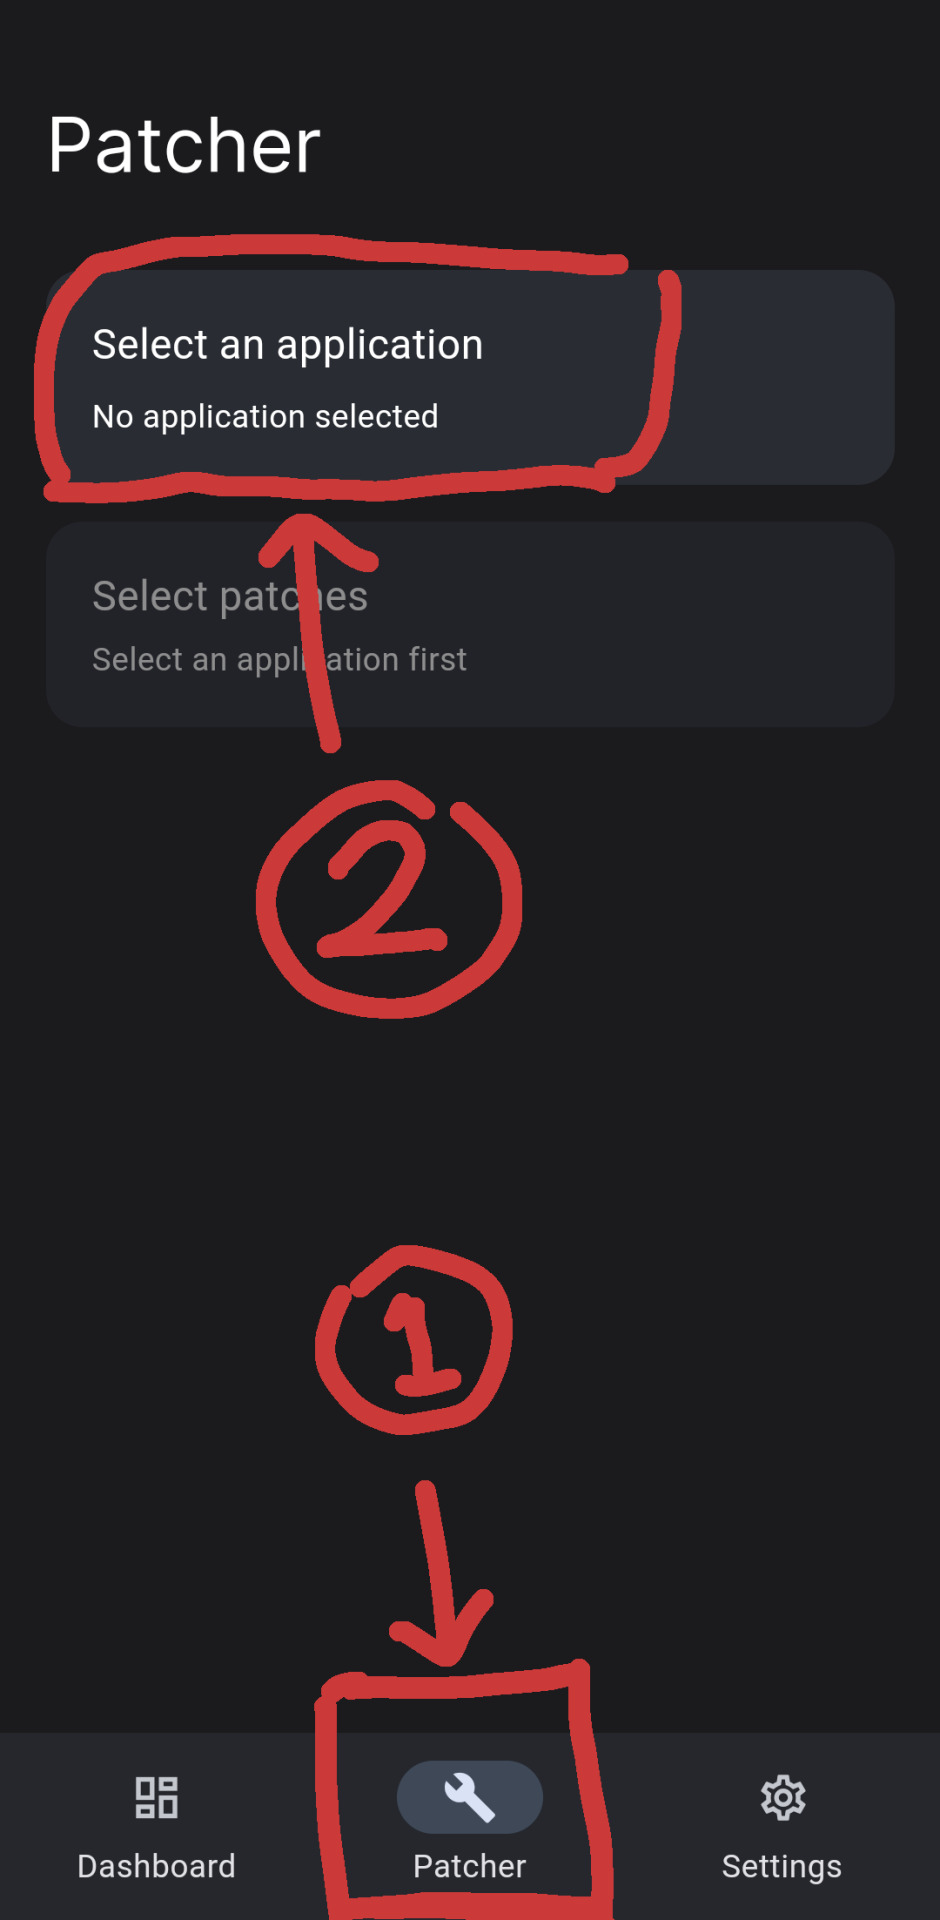
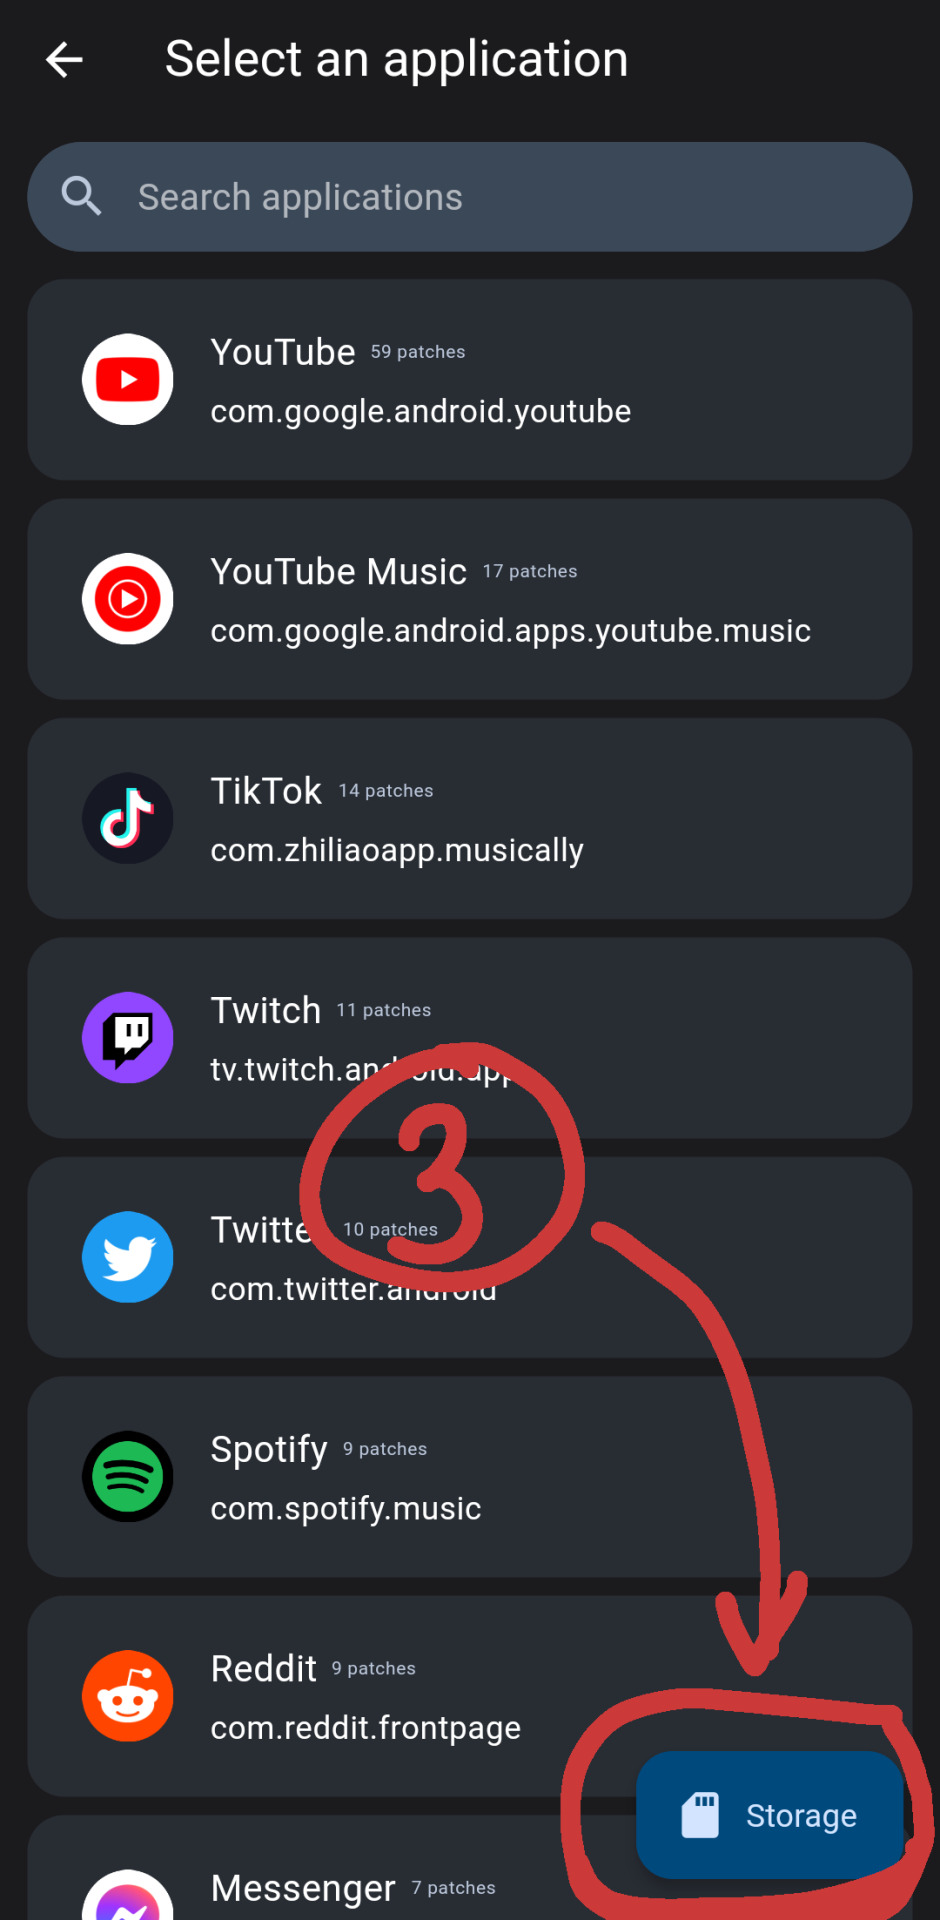
[id. two screenshots of the revanced manager app. there are red markings drawn overtop, indicating areas to select mentioned in step 3. the three spots are circled by a red square, an arrow pointing towards it, and a circle with a marked number to indicate the order at the end of each arrow. id end.]
4. select the youtube apk you downloaded
5. select patches. you can tap "recommended" or "default" or turn on/off patches you want
6. once you have selected, select: "done" -> "patch"
7. wait as it intialises youtube revanced. when it's done select "install" (note: if your phone gives you a warning that the app is blocked, select: "more details" -> "install anyway")
8. if this worked, you should have youtube revanced installed, and you can log in like normal. if this didn't work, read the next part.
(under the read more are troubleshooting solutions + other alternative apps)
issue a) if the botom right now says "open"
1. select: 3 dots on the top right -> "export apk"
2. save it
3. open whatever file browsing app you use (most phones should have a default one that comes pre-installed called something like "files" or "my files". if you don't have one, you can go to the play store and search "files" and pick one. if you aren't sure, i use "files by google")
4. find the exported file and install it (it will be called something like "youtube-revanced-versionnumber.apk")
5. if this worked, you should have youtube revanced installed, and you can log in like normal. if this didn't work, you can read the next part.
issue b) can't build or install youtube revanced with no option to export
1. something may have gone wrong with the file installation at some point, so try a clean start. to do this, uninstall:
i. revanced manager
ii. youtube revanced
iii. microg
iv. (optional) disable/uninstall the default youtube app
2. follow guide from step 1 again, hopefully it works. if it's still not working, you can try other alternatives. i've listed some in the next part of this post
alternatives:
libretube, newpipe, songtube, vuetube, astron, puretuber
i haven't used any of these personally, but i haven't seen any problems with them. let me know if there are and i'll remove it from the list.
you can also use youtube through your web browser with adblock add-ons. i'm not sure whether youtube has affected their mobile site though. with the firefox app you can use ublock origins (for ads) + youtube high definition (for general quality fixes)
#txt#❤️🩹#yay ^_^ feel free to rb this i hope it helps#let me know if something doesn't make sense and i can try to reword it or add screenshots#i tried to keep it concise
859 notes
·
View notes
Text
Pre-Installation Function Now Available!

Dear Travelers,
The pre-installation function is now available on both PC and mobile platforms.
Due to file restructuring, it is recommended to complete this pre-installation over a Wi-Fi connection owing to the large file size.
Before the pre-installation, you may uninstall voice-over files that you don't need by going to Settings > Language > Manage Voice-Over Files to minimize the pre-installation file size.
Pre-installation on mobile devices will download some of the new resources in advance, which will speed up download progress at login after the update and save time.
When the version update is released, Travelers on iOS devices must enter the App Store and tap "Update." Android users may open the game and follow the directions on-screen (or open Google Play and tap "Update").
Travelers on mobile platforms will be unable to play the game while pre-installing game resources. It's recommended that Travelers complete any Domains or other challenges they wish to finish first before beginning the pre-installation process.
Travelers on PC can still play the game while pre-installing game resources. Pre-installation will take up a certain amount of your network's bandwidth, so it's best to make sure you have a good network connection before beginning pre-installation.
After pre-installation is complete, Travelers can update the game and experience new version content faster.
〓How to Update〓
Mobile (iOS & Android)
Method 1: Travelers may begin pre-installing update resources by going to the Paimon Menu > Settings > Other > Pre-Install Resource Package.
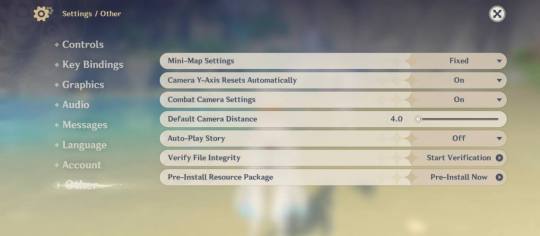
Method 2: Travelers may also begin pre-installing update resources by tapping the "Pre-Install Resource Package" icon in the bottom-left corner of the login screen.

When the version update is released, Travelers on iOS devices must enter the App Store and tap "Update." Android users may open the game and follow the directions on-screen (or open Google Play and tap "Update").
Using the pre-installation function will reduce the time that the game spends updating resources on the first time you enter a new version, even if you did not fully complete pre-installation.
PC:

After the pre-installation function is available, you must first update the Genshin Impact Launcher. After updating the launcher, a "Game Pre-Installation" button will appear to the left of the "Launch" button. Click "Game Pre-Installation" to download the latest game resources.
Using the pre-installation function can speed up the update progress of the launcher during version updates.
88 notes
·
View notes
Text
Seal APK - All in One Video downloader app for Android and iOS
Are you tired of being unable to download your favourite videos or audio files from various platforms? Well, we have just the solution for you! In this blog post, we'll introduce you to Seal APK (sealapk.pro), an incredible third-party app that empowers you to download media content from YouTube and other platforms with ease.
Say goodbye to the frustration of not being able to save your favourite videos for offline viewing or enjoying your preferred audio tracks on the go. Let's dive into the world of Seal APK and unlock a new level of media downloading convenience!
What is Seal APK?
Seal APK is an amazing third-party application that revolutionizes the way you download media files from various platforms. It offers a convenient and user-friendly interface, making it incredibly easy for you to save videos and audio files from sources like YouTube, ensuring you can enjoy them even when you're offline.
Why Choose Seal APK for Video Downloads?
Versatile Platform Support:
Seal App supports a wide range of platforms, including popular ones like YouTube. It enables you to download media content from different sources, expanding your options and giving you the freedom to choose where you find your favourite videos and audio files.
Seamless Media Downloading Experience:
With Seal APK, the process of downloading media is effortless. It provides a straightforward and intuitive interface, making it accessible to users of all skill levels. Say goodbye to complex procedures and welcome a smooth and enjoyable media downloading experience.
High-Quality Downloads:
The app ensures that your downloaded media files maintain their original quality. Whether it's a high-definition video or a crystal-clear audio track, you can trust Seal APK to preserve the integrity of the content, allowing you to enjoy your downloads in the best possible way.
Offline Access to Media Content:
One of the standout features of Seal video downloader is its ability to enable offline access to your downloaded media. You can enjoy your favourite videos or music even without an internet connection, making it perfect for long commutes, flights, or any situation where connectivity may be limited.
How to Download Seal APK:
Official Sources for Seal APK Download: To download Seal APK, visit the official site- sealapk.pro recommended by the developers. The above website ensures that you get the most up-to-date and secure version of the app.
Be cautious of third-party websites, as they may provide modified or compromised versions of Seal APK. Installing apps from third-party sources can expose your device to security risks. It's always recommended to download Seal APK from trusted and official sources to ensure the authenticity and safety of the application.
Ensuring App Safety and Security: Before installing Seal APK, it's important to enable the "Unknown Sources" option in your device settings. This allows you to install apps from sources other than the Google Play Store. However, exercise caution and only enable this option if you trust the source of the APK file.
Installing Seal APK on Your Android Device:
Once you've downloaded the Seal APK file, locate it in your device's file manager.
Tap on the file to initiate the installation process.
Follow the on-screen instructions and grant any necessary permissions to complete the installation.
Once installed, you're ready to embark on your media downloading journey!
Exploring Seal APK Features:
Effortless Media Downloads: The app simplifies the media downloading process. With just a few taps, you can download videos or audio files from your favourite platforms. Whether it's a YouTube video, a podcast, or a music track, SealAPK.pro has got you covered.
Video and Audio File Conversion: Seal offers the convenience of converting video files to audio formats. If you want to extract the audio from a video, Seal APK makes it easy to do so. Simply select the video and choose the desired audio format for the conversion.
Batch Downloads and Playlist Support: Seal app enhances your efficiency by allowing batch downloads. You can queue multiple videos or audio files for download, saving time and effort. Additionally, Seal APK supports playlist downloads, enabling you to save entire playlists with just a few clicks.
Customizable Download Settings: It gives you control over your downloading experience. You can customize settings such as download quality, file format, and destination folder. Tailor your downloads to match your preferences and device capabilities.
Comparison with Other Media Downloading Apps:
User-Friendly Interface and Intuitive Design: Seal pro apk prioritizes user experience with its intuitive interface. The app is designed to be user-friendly, ensuring that even beginners can navigate it effortlessly. Enjoy a smooth and pleasant media downloading journey from start to finish.
Enhanced Download Speed and Stability: Seal latest version apk optimizes the download process to ensure faster and more stable downloads. Say goodbye to long waiting times and interruptions during your downloads. Seal APK strives to provide a seamless and efficient experience.
Additional Features and Functionality: This application goes beyond basic media downloading. It offers additional features such as the ability to share downloaded content directly from the app and the option to manage and organize your downloaded media files conveniently.
Frequently Asked Questions (FAQs):
Is Seal APK legal to use?
Seal APK is a tool that allows you to download media files from various platforms. However, it's essential to respect copyright laws and use the app responsibly. Ensure that you have the necessary rights or permissions to download and use the media content.
Can I download copyrighted content using Seal APK?
Downloading copyrighted content without the necessary rights or permissions is illegal. Seal APK should be used responsibly, adhering to copyright laws and respecting the intellectual property of content creators.
Are there any alternatives to Seal APK?
While Seal APK is a fantastic option for media downloading, there are other alternatives available as well. Some popular alternatives include TubeMate, Snaptube, and VidMate.
Is Seal APK available for iOS devices?
Seal APK is currently available for Android devices only. For iOS users, there are alternative apps available that provide similar functionality.
Where to download Seal APK?
You can download the app by visiting the official website - Sealapk.pro. There you can see a button at the very begging of the page. Just click the button and it's done. The app will start downloading.

Wrapping Up:
Seal APK is a game-changing tool that empowers you to download media content from various platforms with ease. From its versatile platform support to its user-friendly interface and customizable settings, Seal APK offers an exceptional media downloading experience.
Remember to download Seal APK from official and trusted sources [https://sealapk.pro] to ensure your device's security. Enjoy the convenience of offline access to your favourite videos and audio files wherever you go. So, what are you waiting for? Dive into the world of Seal APK and unlock a whole new level of media downloading convenience today!
2 notes
·
View notes
Text
Best IPTV Android Apps / Media Players

IPTV is the best and easy way to watch all world TV channels on any device like Smart TVs, smartphones, mag boxes, computers, and other android devices. To watch IPTV you need to use an app or media player.
- GSE Smart IPTV
- IPTV Smarters pro
- Smart IPTV
- Perfect Player IPTV
- XC IPTV
- VLC Media player
Watching TV in your bedroom, patio, couch, the subway, or anywhere! Now it's possible with smart devices. Where best IPTV Android Apps and Media Players are shining.
You don't need to subscribe to expensive IPTV service plans. You can use our IPTV source on any free IPTV app.
Here we write down some top-rated IPTV apps that will make your online IPTV streaming great and stable.
For stable and fast IPTV you should download any app out of these today.
GSE Smart IPTV
GSE Smart IPTV is the Best IPTV application in the Google Play Store. GSE Smart IPTV is available for more platforms than other apps. It's available for Android, iOS, Android TV, & Apple TV. You can install the Android app on Amazon Fire TV devices.
The GSE Smart IPTV app supports API logins, M3U8, HSL, HTTP, RTMP, RTSP, and MMS sources. The GSE Smart IPTV app is also Chromecast-compatible.
Its best-designed IPTV apps for Android. GSE Smart IPTV is a very friendly layout for users. Its have an EPG setup, a live streaming option, other advanced features.
It's suitable for all Android devices, mobile, Android TV.
Anyone can use and set up on the device easily it's a very simple layout and freely available. Just you need an IPTV source to buy.
Download : GSE Smart IPTV (premium, free version)
IPTV Smarters pro
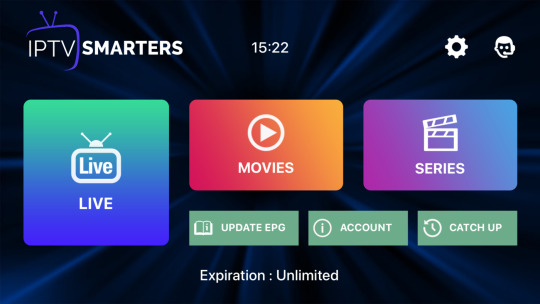
IPTV Smarters pro is also one of the best IPTV apps for android and IOS. You can easily manage your IPTV subscriptions with IPTV Smarters pro.
Its have fully loaded options. The app support TV shows and on-demand movies. You can install EPG and Catch-up as well.
It's open to iOS, Android smartphone, firestick, fire TV users. It's similar to other IPTV apps where you’re able to sign in to multiple IPTV users whether they’re from a different or the same provider.
Watch all channel by category (login with xtream code API). It has its own video player making it easy to view right away.
It's a great app for mobile devices and also really shines on a TV. To get run IPTV Smarters, simply sign in through the M3U link or log in with Xtream Codes API.
Download : IPTV Smarters (premium, free version)
Smart IPTV
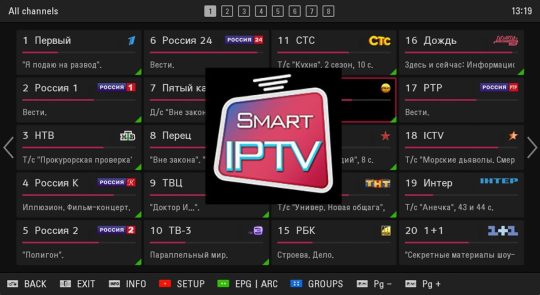
Smart IPTV app is known as SIPTV. Best IPTV app for LG and Samsung smart tv. It gives access to watch IPTV channels with EPG. It is not an android app but available for some android devices on their website.
Smart IPTV app does not have its own channels. You need an M3U link (M3U URL) to watch channels and movies.
IPTV subscription providers provide the M3U link. Smart IPTV app is not fully free app after installing the SIPTV it's free for 07 days. After 07 days go on their website https://siptv.app/activation/ and buy this app for €5.49 for a lifetime.
Perfect Player IPTV

Perfect Player IPTV is the best IPTV player. It's popular for windows, android, and Linux operating systems. It supports M3U, XSPF, EPG, and XMLTV files.
It is the most popular IPTV player because its setup is very easy & user-friendly. Its display shows everything you need to see. You can connect Perfect Player with a traditional TV remote and the mobile app even control by a keyboard and PC mouse.
Perfect iptv available free version available. just you buy the best iptv subscription and get the M3U link from your IPTV service provider and watch all world channels on your device.
Download : Perfect Player IPTV (premium, free version)
XC IPTV
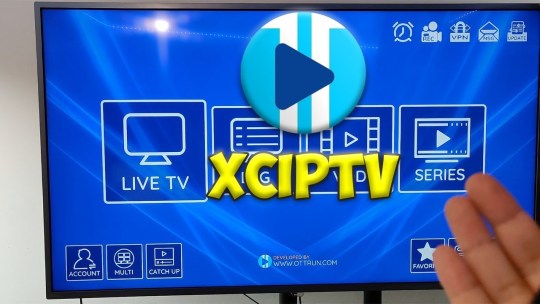
The XCIPTV app or the Xtream Codes Player is compatible with Android TV, Android mobiles, Android Tabs & even fire TV.
This is a very advanced and best IPTV Android app with a favorites function, auto-update channels, multi portal support, simple and fast. Its EPG preview very nice.
It looks very professional app and it will give you the best IPTV experience without buffering and freezing. Same like other apps it does not have its own channels.
Buy iptv subscription from 3rd party and put logins and enjoy your favorite tv channels, sports game, or movie in your bedroom, patio, couch, the subway, or anywhere!
Download : XCIPTV Player (premium, free version)
VLC Media player

VLC is a free & open-source cross platform multimedia player & framework. It's compatible with Windows, Android, iOS, Linux, Unix, and Mac OS X. VLC mostly use for windows.
It offers the easiest and simplest solution to start watching your favorite tv channel.
With VLC Media player you can watch IPTV channels and VOD without adds. VLC Media player have the ability to watch your favorite TV channels in 4K resolution.

Best iptv service 2020-2022
Do you want your own iptv app or brand app?
if you want to create your own iptv app or you want to make your own iptv brand.
For iptv application Click Here
Download any listed IPTV Android App / Media Player on your device and for access to channels and movies buy the best IPTV subscription from us.
Get access to:
- Over 13k tv channels.
- Over 5K VOD.
- EPG Guide.
- Catch-up.
- 24/7 customer support.
- 99.99% uptime service.
- High-quality video streaming.
- Get a free trial for 24 hours. After it, you'll love our IPTV quality service.
Buy Smart IPTV Subscriptions. Click Here
Where To Buy IPTV Subscription With All World TV Channels?
Read the full article
#Bestiptvapps#bestiptvservice#Bestiptvsubscriptions#Cheapiptvsubscriptions#GSESmartiptv#IPTVSmarters#prefectplayer#Smartiptv#VlcIPTV#XCIPTV
3 notes
·
View notes
Text
How to set up firestick troypoint kodi

HOW TO SET UP FIRESTICK TROYPOINT KODI INSTALL
HOW TO SET UP FIRESTICK TROYPOINT KODI UPDATE
HOW TO SET UP FIRESTICK TROYPOINT KODI UPGRADE
HOW TO SET UP FIRESTICK TROYPOINT KODI FOR ANDROID
HOW TO SET UP FIRESTICK TROYPOINT KODI DOWNLOAD
IPTV Player Other head-turning inclusions are scheduled recording, EPG support, data backup, reminders, favorites management, catch-up, parental controls, and more. Users can add as many playlists to the TiviMate IPTV and it supports all the relevant methods such as web portal login, M3U, Xtreme Codes to let the user sign in with his/her favorite IPTV service.And Go Here The IPTV player comes with a long list of features as well as a simplified pricing structure. IPTV On Firestick IPTV comfortably tops our list of best IPTV players for obvious reasons.
HOW TO SET UP FIRESTICK TROYPOINT KODI FOR ANDROID
While IPTV Smarters must be sideloaded onto FireStick and Fire TV devices, it’s available officially for Android Mobiles and iOS via Google Play Store and App Store.And Go Here Troypoint IPTV very similar to the opposite IPTV Players on this list, you’ll check in with multiple IPTV subscriptions (from an equivalent provider or different providers). With the best IPTV Smarters IPTV player, you’ll check in together with your existing subscription either via the Playlist file/M3U URL or via Xtream Codes API.īest IPTV Player For Firestick 2021 albeit Xtream Codes has been taken down, you’ll use the same API if your IPTV provider supports one. It also has its video player, which is typically better than the default players built into the apps of the IPTV providers.And Go Here IPTV Smarters allows you to integrate your existing IPTV subscription and lays out the channels on a user-friendly interface. With this app, you don’t need to be hooked to your IPTV provider for the interface also because of the video player option. IPTV On Firestick IPTV Smarters is indeed a sensible thanks to manage your IPTV subscriptions. TiviMate player is accessible on all the favored OS out there.
HOW TO SET UP FIRESTICK TROYPOINT KODI UPGRADE
These features are worth enough to upgrade to the premium version which costs $10 per annum. Other head-turning inclusions are scheduled recording, EPG support, data backup, reminders, favorites management, catch-up, parental controls, and more. Users can add as many playlists to the TiviMate IPTV and it supports all the relevant methods like web portal login, M3U, Xtreme Codes to let the user check-in with his/her favorite IPTV service. The best IPTV player comes with an extended list of features also like a simplified pricing structure. TiviMate IPTV comfortably tops our list of best IPTV players for obvious reasons. this suggests that your existing IPTV provider must support M3U or EPG URL or API login (if the IPTV player supports it). you’ll sign into all of them via one IPTV player.And Go Hereīest IPTV Player For Firestick 2021 Most IPTV players require you to check-in either with the M3U playlist URL or EPG URL.
HOW TO SET UP FIRESTICK TROYPOINT KODI INSTALL
You are doing not need to install multiple apps from different subscriptions. However, if you employ multiple IPTV subscriptions, management becomes easier with an IPTV player. you’ll install the app separately on the supported devices. Most IPTV providers have their private applications. So, you purchase an IPTV subscription from your provider and play the channels using an IPTV player.And Go Here You, Will, Get The Updates And Go Hereīest IPTV Player For Firestick 2021 It is an app or service which will play IPTV channels from your current IPTV subscription.
HOW TO SET UP FIRESTICK TROYPOINT KODI DOWNLOAD
By The Way, am Going To Share the old & new Smart Playlist M3u freeload To 2022. The Released company has Developed This Software. In This, We Will Give You Will Kind Of Information.
HOW TO SET UP FIRESTICK TROYPOINT KODI UPDATE
There You Will Get New & Old Software Update Every Week. If You Any Problem With This Software Then We Can Solve Your Problem. Smart Playlist M3u freeload To 2022.Here is The Secret Information To Get This Software. IPTV On Firestick Smart Playlist M3u freeload To 2022 Some Time We Want To Update IPTV On Firestick Smart Playlist M3u freeload To 2022. IPTV Server Free IPTV M3u Download IPTV Link Gives us Best Performance To Watch Our FAV TV Channels. Mise a Jour IPTV Server Free IPTV M3u Download IPTV By Models We Will Share Every Week. In This Article, we will share the Famous M3u Files Free IPTV Download Best Collection Mesa Para Computador All Links Mise A Jour. IPTV On FirestickSmart Playlist M3u freeload To 2022.
3 notes
·
View notes
Text
5 Things Every Windows User Should Know About Their Microsoft Account
Your Microsoft account is a single sign-on user account for Microsoft. It lets you to use a single set of credentials to log in to all of Microsoft's services, apps, and devices that run on its operating systems. Whether you're new to Microsoft accounts or just need some guidance, we've put together this FAQ to assist you many business listings.
We'll go over some of the basics and lesser-known features that Microsoft customers should be aware of. This FAQ is for you if you need help creating a new account, reopening an old one, altering your account's email, or adding a device to it.
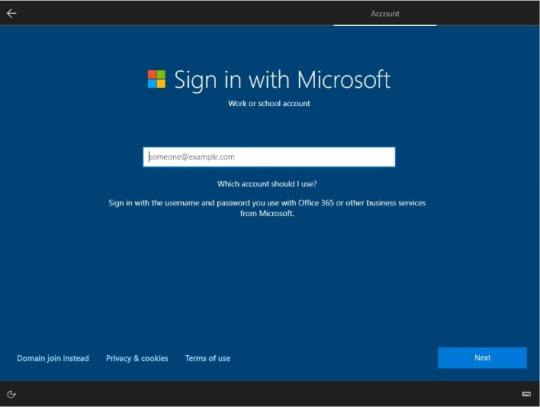
1 - How to Make a Microsoft Account for the First Time
There are two straightforward methods for establishing a new Microsoft Account:
Step 1 - To create a Microsoft account using an existing email address, go to the Microsoft Accounts home page and select the Create a Microsoft account button. After that, all you have to do is submit a valid email address to begin the process of creating your own Microsoft Account.
Step 2 - Getting a Microsoft email address entails the following steps: You may also get an email address from any of Microsoft's recognized domains (@hotmail.com, @outlook.com, @live.com, and so on). Then you may login in to other Microsoft services using that email address as a Microsoft Account.
2 - How to Change, Add, or Remove Your Microsoft Account's Email Address or Phone Number
Your Microsoft Account allows you to add up to 10 email addresses and three phone numbers. These are known as aliases, and they all share the same contact information, internet storage, subscriptions, and password. Then, using any of your registered email addresses and phone numbers, you may log into your Microsoft Account.
Simply sign in to your Microsoft account and select the info button on the upper left side of the screen to update, remove, or create an alias to your account. Your profile will be shown on these page business listings.
At the right side of where your user information is shown, click Manage how you sign in to Microsoft.
Because the information you're about to modify is sensitive, Microsoft will ask you to confirm your password and identity using a code. You will be allowed access if you provide the code.
Under the Account alias heading, you'll see the options to add email, add phone number, and Remove once you've entered the Manage how you sign in to Microsoft page. Select the appropriate option.
3 - How to Add a Microsoft Account to a Device
There are various methods for adding a device to your Microsoft account, but which one is ideal for you depend on the device. You may also link your Microsoft account to your iOS and Android devices.
Surface, Xbox or Other Related Devices
Sign in to your Microsoft account and click the devices button in the upper right side of the screen to add your Surface, Xbox, or associated accessories. Then choose don’t see your device from the drop-down menu and adhere to the following guidelines:
Devices for Xbox One and Windows 10: Log in with your Microsoft account on the device you want to add.
Sign in to the Microsoft Store on your Windows 10 PC.
On an iOS device, go to the Apple App Store and download Microsoft Edge, then sign in using your Microsoft account.
Android Device: Sign in with your Microsoft account and download Microsoft Edge, Microsoft Launcher, or Your Phone Companion from the Google Play Store free business listings.
4 - What to Do If You Can't Find Your Microsoft Account
There are a handful of ways to locate your Microsoft Account e-mail address if you forget it or get an error message reading "That Microsoft account does not exist" when trying to sign in.
Using your security information, locate your Microsoft account.
By navigating to Microsoft's Recover your username page and inputting an alternate email address or phone number connected with your account, you can locate your Microsoft account. Then you'll need to contact Microsoft for a security code.
You must input the security code you received in the email or phone number you used and then choose next. Finally, select Sign in when you find the account you're searching for.
Your Microsoft Account can be found in the Microsoft Product or Service that you are using
If you've never set up your security contact information or don't have access to it, you may look for your Microsoft Account username in other Microsoft products or services you've linked to your account:
Windows 10: Log in to a Windows 10 device that you already own. Select Start > Settings > Accounts from the Start menu. Under Email & Accounts, you'll see the usernames linked with your account.
Open an Office app on Microsoft 365 or Office 2016 or newer. After that, go to File > Account.
Check your email accounts to see if any receipts for Microsoft purchases have been sent to you.
Xbox: Within Xbox, users are identifiable by their Gamertag. They frequently forget that when they joined up for Xbox, they had to create an email address. Your email address is shown in the top right or left corner of the Xbox Home screen, depending on your Xbox device.
Visit the Find your Microsoft account email address page on Xbox's support site for further information on how to locate your Microsoft account on your Xbox.
After two years of inactivity, Microsoft accounts expire. If you can't locate your Microsoft account using any of these methods, it's possible that it's been closed.
5 - How to Reopen a Microsoft Account That Has Been Closed
You have a 60-day window to reopen a Microsoft account once it has been closed. Your Microsoft account will be permanently terminated when the 60-day period has expired.
If you want to reactivate a Microsoft account that has been closed, take these steps:
Steps 1 - Sign in to your Microsoft account by going to the account's home page.
Step 2 - A security code will be sent to you, which you must input.
Your Microsoft account will be reopened when you input the code. You will be able to access your subscriptions, profiles, and material from before the account was terminated.
You don't need to be concerned if you couldn't discover a solution to your problem after reading this Microsoft account basic FAQ. Visit Microsoft's official support site to address a Microsoft account issue. Account & billing is a specialised area on Microsoft's help site that offers troubleshooting for Microsoft account difficulties.
1 note
·
View note
Text
does vpn work on android phone
🔒🌍✨ Get 3 Months FREE VPN - Secure & Private Internet Access Worldwide! Click Here ✨🌍🔒
does vpn work on android phone
VPN compatibility with Android devices
Title: Ensuring VPN Compatibility with Android Devices: A User's Guide
In the era of digital privacy concerns and the omnipresence of cyber threats, utilizing a Virtual Private Network (VPN) has become indispensable for safeguarding one's online activities. With the widespread use of Android devices, ensuring VPN compatibility is paramount for users seeking to maintain their privacy and security on the go.
Thankfully, the majority of reputable VPN providers offer dedicated applications specifically designed for Android devices. These applications are readily available for download from the Google Play Store, ensuring seamless integration with Android smartphones and tablets.
When selecting a VPN for your Android device, it's essential to consider compatibility beyond mere availability. Look for VPN providers that offer robust encryption protocols such as OpenVPN, IKEv2, or WireGuard, ensuring that your data remains secure from prying eyes.
Additionally, check for features like automatic kill switches and split tunneling, which enhance both security and usability on Android devices. A kill switch automatically disconnects your device from the internet if the VPN connection drops, preventing any data leaks. Split tunneling, on the other hand, allows you to route specific app traffic through the VPN while directing other apps to use your regular internet connection, providing flexibility in managing your online activities.
Moreover, ensure that the VPN provider offers reliable customer support channels, including assistance for Android-specific issues. Whether you encounter connectivity issues or require guidance on optimizing your VPN settings for Android, responsive customer support can make all the difference in ensuring a seamless experience.
In conclusion, selecting a VPN compatible with Android devices involves considering factors such as encryption protocols, essential features, and customer support. By prioritizing compatibility and security, users can enjoy peace of mind knowing that their online activities are shielded from prying eyes while using their Android devices.
VPN functionality on Android smartphones
A VPN, or Virtual Private Network, is a powerful tool that enhances the security and privacy of your online activities. When it comes to Android smartphones, utilizing a VPN offers several key functionalities that can benefit users in multiple ways.
First and foremost, using a VPN on your Android device encrypts your internet connection, making it significantly more secure. This is crucial, especially when connecting to public Wi-Fi networks, as it protects your personal information from potential cyber threats and hackers.
Moreover, a VPN allows users to bypass geographical restrictions and access region-locked content on streaming platforms or websites. By masking your IP address and routing your connection through servers in different locations, you can unlock a world of entertainment and information that may otherwise be unavailable to you.
Additionally, VPNs on Android smartphones enable users to maintain anonymity online. By hiding your real IP address, internet service providers, advertisers, and even government agencies are unable to track your online behavior, ensuring your privacy remains intact.
Furthermore, some VPN services offer features such as ad-blocking, malware protection, and data compression, which can improve your browsing experience and even save on your data usage.
In conclusion, leveraging a VPN on your Android smartphone provides a multitude of functionalities that not only safeguard your online presence but also enhance your internet accessibility and browsing efficiency. By investing in a reliable VPN service, you can enjoy a safer, more versatile, and more private online experience on your Android device.
VPN effectiveness on Android mobile devices
A Virtual Private Network (VPN) is a critical tool for enhancing online security and privacy, especially when it comes to using Android mobile devices. VPNs work by creating a secure, encrypted connection between your device and a remote server operated by the VPN service. This connection routes your internet traffic through the secure server, hiding your IP address and encrypting your data.
On Android devices, VPNs are particularly effective in protecting sensitive information such as passwords, financial transactions, and personal data from cyber threats like hackers, data snoopers, and malicious websites. When connected to a VPN on your Android device, you can browse the internet anonymously, ensuring that your online activities remain private and secure.
Moreover, VPNs can help bypass geo-restrictions and censorship by masking your IP address and making it appear as though you are accessing the internet from a different location. This feature is beneficial for accessing region-locked content, streaming services, and websites that may be blocked in your country.
It is essential to choose a reliable VPN service provider that offers strong encryption protocols, a no-logs policy, fast connection speeds, and a user-friendly Android app. By enabling a VPN on your Android mobile device, you can enjoy enhanced security, privacy, and freedom while browsing the internet. So, consider integrating a VPN into your online routine to safeguard your digital presence effectively.
Android phone VPN operation
Title: Understanding the Operation of VPNs on Android Phones
In the digital age, where privacy and security are paramount concerns, Virtual Private Networks (VPNs) have become indispensable tools for safeguarding online activities, especially on Android phones. Understanding how VPNs operate on these devices is essential for maximizing their benefits.
Firstly, VPNs function by creating a secure, encrypted connection between the user's device and a remote server operated by the VPN service provider. When activated on an Android phone, the VPN app encrypts all outgoing internet traffic, including browsing data, app usage, and communication, effectively shielding it from prying eyes.
One of the primary purposes of using a VPN on an Android device is to enhance privacy and security. By masking the user's IP address and encrypting data, VPNs prevent ISPs, hackers, and other third parties from monitoring or intercepting online activities. This is particularly crucial when connecting to public Wi-Fi networks, where the risk of data interception is higher.
Moreover, VPNs enable users to bypass geographical restrictions and censorship by spoofing their location. This means that individuals can access region-locked content or services, such as streaming platforms or websites, that may be restricted in their location.
The operation of VPNs on Android phones is relatively straightforward. Once the user installs a VPN app from the Google Play Store and subscribes to a service, they can easily toggle the VPN on or off from the device's settings or the app itself. Additionally, most VPN apps offer various customizable settings, including server selection and protocol options, allowing users to tailor their VPN experience according to their needs.
In conclusion, VPNs play a crucial role in ensuring privacy, security, and unrestricted access to online content on Android phones. By understanding how VPNs operate and utilizing them effectively, users can enjoy a safer and more versatile online experience on their mobile devices.
VPN performance on Android platforms
When it comes to using a VPN on Android platforms, understanding how performance can be impacted is crucial. VPNs, or Virtual Private Networks, are commonly used on Android devices to enhance online security and privacy while also allowing users to bypass geographical restrictions. However, the performance of a VPN on Android platforms can vary based on multiple factors.
One of the primary factors influencing VPN performance on Android is the encryption protocol being used. Strong encryption protocols such as OpenVPN or IKEv2 can provide better security but might result in slower connection speeds compared to less secure options. Users may need to strike a balance between security and performance based on their specific needs.
Additionally, the physical location of the VPN server can impact performance. Connecting to a server located far away can increase latency and reduce connection speeds. Users should choose a server location that is geographically closer to them for better performance.
Furthermore, the VPN provider's network infrastructure plays a significant role in determining performance. Reputable VPN providers with a large server network and high-speed connections are likely to offer better performance on Android platforms.
In conclusion, VPN performance on Android platforms can be influenced by factors such as encryption protocols, server locations, and the quality of the VPN provider's network. By considering these factors and choosing a VPN service that aligns with their needs, Android users can maximize performance without compromising security and privacy.
0 notes
Text
can t click ok on vpn android
🔒🌍✨ Get 3 Months FREE VPN - Secure & Private Internet Access Worldwide! Click Here ✨🌍🔒
can t click ok on vpn android
VPN Android unable to click OK
Encountering the issue of being unable to click "OK" while using a VPN on an Android device can be frustrating, but there are several troubleshooting steps you can take to resolve the issue.
Firstly, ensure that your VPN app is up to date. Developers often release updates to address bugs and improve compatibility with different devices. Check the Google Play Store for any available updates and install them if necessary.
If updating the app doesn't resolve the issue, try restarting your device. Sometimes, a simple reboot can fix minor software glitches that may be causing the problem.
Another potential solution is to clear the cache and data of your VPN app. This can help reset the app to its default settings and resolve any underlying issues. To do this, go to your device's Settings, then Apps or Application Manager. Find your VPN app in the list, tap on it, and then select "Clear Cache" and "Clear Data."
Additionally, make sure that any overlay apps or screen dimming apps are disabled while using the VPN. These apps can sometimes interfere with the functionality of other apps, including VPNs.
If the problem persists, try using a different VPN app to see if the issue is specific to the app you're currently using. There are many VPN apps available on the Google Play Store, so experiment with different ones to find the one that works best for your device.
If none of these solutions work, you may need to contact the support team of your VPN provider for further assistance. They may be able to provide additional troubleshooting steps or offer insight into what could be causing the issue specific to your device.
By following these steps, you should be able to resolve the issue of being unable to click "OK" while using a VPN on your Android device and enjoy a secure and private internet browsing experience.
Android VPN OK button not working
If you are encountering issues with the OK button not working on your Android VPN app, there are several troubleshooting steps you can try to resolve this issue.
Firstly, ensure that your Android device's software is up to date. Sometimes, an outdated operating system can cause compatibility issues with certain apps, including VPNs. Go to your device's settings, check for system updates, and install any available updates.
If updating your device doesn't solve the problem, try force stopping the VPN app and clearing its cache. This can help resolve any temporary glitches that may be causing the OK button to malfunction. To do this, go to your device's settings, find the list of installed apps, locate the VPN app, and select the options to force stop and clear cache.
Another potential solution is to uninstall and then reinstall the VPN app. This can help reset any misconfigurations or corrupted files that may be causing the issue with the OK button.
If the problem persists even after trying the above steps, consider reaching out to the VPN app's customer support for further assistance. They may have additional troubleshooting tips or be able to provide a solution specific to their app's functionality on Android devices.
By following these steps, you can troubleshoot and potentially resolve the issue of the OK button not working on your Android VPN app, ensuring a smooth and secure browsing experience.
Issue clicking OK on VPN Android
Title: Troubleshooting Guide: Fixing the Issue of Unable to Click "OK" on VPN Android
If you've encountered the frustrating issue of being unable to click "OK" on your VPN Android app, you're not alone. Many users face this problem, which can hinder their ability to connect to a secure network and protect their online privacy. Fortunately, there are several troubleshooting steps you can take to resolve this issue and get your VPN up and running smoothly again.
Firstly, start by ensuring that your VPN app is up to date. Developers often release updates to fix bugs and improve compatibility with different devices and operating systems. Check the Google Play Store or the app store you downloaded the VPN from and install any available updates.
Next, try clearing the cache and data of your VPN app. This can help resolve any temporary glitches or conflicts that may be causing the issue. Go to your device's settings, navigate to the Apps or Applications Manager section, find your VPN app, and select the option to clear cache and data.
If clearing the cache and data doesn't work, try restarting your device. Sometimes, a simple reboot can resolve software-related issues and restore normal functionality to your apps.
If the problem persists, consider uninstalling and reinstalling the VPN app. This can help reset the app to its default settings and resolve any underlying issues that may be preventing you from clicking "OK."
Additionally, double-check your device's settings to ensure that the VPN app has the necessary permissions to function properly. Make sure that the app has permission to access your network connections and that any battery optimization settings are disabled for the VPN app.
By following these troubleshooting steps, you should be able to resolve the issue of being unable to click "OK" on your VPN Android app and enjoy secure and private internet access once again.
Unable to confirm VPN connection on Android
When attempting to connect to a Virtual Private Network (VPN) on an Android device, it can be frustrating to encounter issues with confirming the connection. Several factors may contribute to this problem, but there are steps you can take to troubleshoot and resolve the issue.
Firstly, ensure that you have entered the correct VPN server details, including the server address, VPN type (such as PPTP, L2TP, or IPSec), and your login credentials. Any inaccuracies in this information can prevent a successful connection, so double-check your settings before attempting to connect again.
If you are still unable to confirm the VPN connection, try switching between different VPN protocols. Some VPN services offer multiple options for protocols, and selecting a different one may help establish a connection.
Additionally, check if any other apps running on your Android device could be causing interference with the VPN connection. Background apps consuming high amounts of data or battery power may disrupt the VPN connection process, so closing unnecessary apps can potentially resolve the issue.
Restarting your Android device and the VPN application can also help refresh the connection and address any temporary glitches or bugs. If the problem persists, consider updating your device's operating system and the VPN app to the latest versions, as software updates often contain bug fixes and security enhancements.
By following these troubleshooting steps and ensuring that your VPN settings are accurate, you can increase the likelihood of successfully confirming a VPN connection on your Android device.
Android VPN connection problem clicking OK
If you are experiencing issues with your Android VPN connection and find yourself repeatedly clicking the "OK" button without success, there could be a number of factors influencing this problem.
One common reason for difficulty in establishing a VPN connection on an Android device is related to network settings. Make sure that your internet connection is stable and strong before attempting to connect to a VPN. Additionally, check if the VPN server you are attempting to connect to is online and operational.
Another potential cause for the problem could be related to the VPN app itself. Try closing the app completely and reopening it to see if this resolves the issue. If the problem persists, consider uninstalling and reinstalling the VPN app to reset any potential misconfigurations.
It is also possible that the issue lies with the Android device's operating system. Ensure that your device's software is up to date with the latest updates and patches installed. Sometimes, outdated software can lead to compatibility issues with VPN services.
If you continue to experience difficulties with your Android VPN connection despite attempting these troubleshooting steps, it may be beneficial to reach out to the VPN provider's customer support for further assistance. They may be able to provide specific guidance tailored to their service and help resolve the issue you are facing.
0 notes
Text
Seamlessly Manage Your Investments with the Fidelity App Login: A Comprehensive Overview
In today's fast-paced world, managing your investments on the go has never been more convenient. With the Fidelity App Login, you can access your investment accounts anytime, anywhere, and stay informed about market trends, portfolio performance, and more. In this comprehensive overview, we'll explore the features and benefits of the Fidelity App Login and how it can streamline your investment experience.
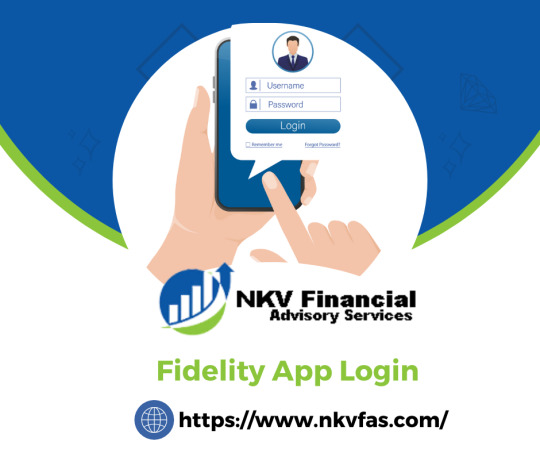
Introducing the Fidelity App Login
The Fidelity App Login provides users with secure access to their Fidelity Investments accounts directly from their mobile devices. Whether you're checking your portfolio balance, placing trades, or researching investment opportunities, the app offers a seamless and intuitive interface for managing your investments on the move.
Key Features of the Fidelity App Login
Account Overview: Fidelity Account Login Upon logging in, users are presented with a comprehensive overview of their investment accounts, including portfolio balances, asset allocation, and recent transactions.
Mobile Trading: The app allows users to trade stocks, options, ETFs, and mutual funds directly from their mobile devices. With real-time quotes and advanced trading tools, investors can execute trades with ease and confidence.
Market News and Research: Stay informed about market trends, news, and analysis with access to Fidelity's extensive research library and market commentary.
Watchlists and Alerts: Create custom watchlists to track your favorite stocks, funds, or indices. Set up alerts to receive notifications about price movements, news events, or other market updates.
Bill Pay and Transfer Funds: Easily manage your finances by paying bills, transferring funds between accounts, and setting up recurring transactions directly from the app.
Security Features: Fidelity Secure Login prioritizes the security of your accounts. The app employs industry-leading encryption technology and authentication methods to ensure that your personal and financial information remains safe and secure.
How to Get Started with the Fidelity App Login
Download the App: The Fidelity App is available for download on both iOS and Android devices. Simply visit the App Store or Google Play Store, search for "Fidelity Investments," and download the app to your device.
Log In or Sign Up: If you're an existing Fidelity Login Investments customer, log in using your username and password. New users can sign up for an account directly within the app.
Explore and Customize: Once logged in, take some time to explore the app's features and customize your dashboard to suit your investment preferences and goals.
Stay Connected: Enable push notifications to receive important account updates, market alerts, and news alerts directly to your mobile device.
Conclusion
The Fidelity App Login offers investors a convenient and secure way to manage their investment accounts from anywhere at any time. With a wide range of features including mobile trading, market research, and account management tools, the app empowers users to stay informed and in control of their finances while on the go. Download the Fidelity App today and experience the freedom and flexibility of mobile investing.
0 notes
Text
How to Backup Data Before Samsung Battery Replacement

Are you experiencing battery issues with your Samsung device? It might be time for a battery replacement. However, before you embark on this journey, it’s crucial to back up your data to prevent any loss during the repair process. In this guide, we’ll walk you through the steps to securely back up your data before Samsung battery replacement, ensuring a smooth transition without losing any precious information.
Why Backup Before Samsung Battery Replacement?
Samsung battery repair or replacement involves opening up your device, which can pose a risk to the data stored on it. While professionals take precautions, accidents can happen. To avoid the nightmare of losing photos, contacts, documents, and other important files, it’s essential to create a backup beforehand.
Steps to Backup Data:
1. Use Samsung Cloud:
Samsung provides its users with a convenient backup solution called Samsung Cloud. Follow these steps to back up your data:
Go to Settings on your Samsung device.
Scroll down and select Accounts and backup.
Tap Backup and restore.
Choose Backup data.
Select the data types you want to back up (e.g., contacts, photos, messages).
Tap Backup.
Wait for the process to complete.
2. Google Account Backup:
Google offers seamless backup options for Android devices. Ensure your Google account is synced and follow these steps:
Go to Settings on your Samsung device.
Scroll down and select Accounts and backup.
Tap Backup and restore.
Ensure Back up my data is toggled on.
Tap Backup account and select your Google account.
Go back to the main Settings screen.
Scroll down and tap Google.
Select the data you want to back up under Account Services.
3. Manual Backup:
For extra peace of mind, manually back up your important files to an external storage device or cloud service like Google Drive, Dropbox, or OneDrive. Connect your device to a computer and transfer files manually or use a file manager app available on the Google Play Store.
Samsung Battery Replacement Cost:
The cost of replacing a Samsung battery varies depending on the model of your device and where you get the replacement done. On average, you can expect to pay between $50 to $100 for a professional battery replacement service. However, prices may vary, so it’s best to inquire at authorized Samsung service centers or reputable repair shops.
Conclusion:
Backing up your data before Samsung battery replacement is a simple yet crucial step to safeguard your valuable information. Whether you opt for Samsung Cloud, Google Account backup, or manual backup, ensure all your important files are securely stored before handing over your device for Samsung phone repair. Additionally, knowing the approximate Samsung battery replacement cost can help you budget for the service. By following these steps, you can undergo the battery replacement process with confidence, knowing your data is safe and secure.
FAQs
Q: Is it necessary to backup data before Samsung battery replacement?
A: Yes, it’s highly recommended to backup your data before any phone repair or replacement procedure on your Samsung device. While professionals take precautions, there’s always a slight risk of data loss during the repair process.
Q: What data should I backup before Samsung battery replacement?
A: You should back up all important data stored on your device, including contacts, photos, videos, messages, app data, documents, and any other files you don’t want to lose.
Q: How can I backup my data before Samsung battery replacement?
A: You can use built-in backup solutions such as Samsung Cloud or Google Account backup. Additionally, you can manually backup your data to an external storage device or a cloud service like Google Drive, Dropbox, or OneDrive.
#samsung battery repair#samsung tablet screen repair#samsung battery replacement#samsung battery replacement near me#samsung screen repair#samsung phone repairs near me#samsung battery service pack
0 notes
Text
Step-by-Step Guide: Webroot Installation on Your Smartphone

In an era dominated by digital advancements, securing our smartphones has become more critical than ever. With the increasing number of cyber threats, it's imperative to equip our devices with robust antivirus solutions. Webroot, a leading cybersecurity provider, offers a reliable and efficient solution to safeguard your smartphones. In this comprehensive guide, we will walk you through the step-by-step process of downloading and installing Webroot for smartphones, ensuring your digital security is in top-notch condition.
Understanding Webroot.com/safe:
Before we delve into the installation process, it's essential to grasp the significance of Webrootcom/safe. This URL is your gateway to the Webroot Safe platform, where you can manage your Webroot subscriptions, download the latest updates, and access other essential features. By visiting Webroot.com/safe, users can ensure that they are installing the correct version of the antivirus software and keeping their devices protected against evolving cyber threats.
Step 1: Preparation - Check Device Compatibility
Before embarking on the installation journey, make sure your smartphone is compatible with Webroot. Visit the official Webroot website or Webroot.com/safe to check the system requirements. Ensure your device has sufficient storage space, meets the minimum operating system requirements, and has a stable internet connection.
Step 2: Purchasing a Webroot Subscription:
To access the premium features of Webroot, you'll need to purchase a subscription. Visit Webrootcom/safe and explore the available subscription plans. Choose the one that best fits your needs and budget. Follow the prompts to complete the purchase process, providing the necessary information.
Step 3: Creating a Webroot Account:
Once you've purchased a subscription, it's time to create a Webroot account. Navigate to Webrootcom/safe and click on the "Sign In" or "Create Account" option. Fill in the required details, including your email address and a strong password. This account will be your central hub for managing your Webroot subscription and accessing support.
Step 4: Downloading Webroot for Smartphones:
With your Webroot account in place, go to Webrootcom/safe and sign in. Locate the download section and select the option for smartphones or mobile devices. Webroot is compatible with both Android and iOS platforms, ensuring a wide range of users can benefit from its security features. Click on the respective download link for your smartphone's operating system.
For Android users, visit the Google Play Store, search for "Webroot SecureAnywhere," and tap "Install." For iOS users, find the app on the App Store and follow the prompts to download and install it on your device.
Step 5: Installing Webroot:
Once the download is complete, open the Webroot app on your smartphone. You may be prompted to log in with the account credentials you created earlier. Follow the on-screen instructions to grant necessary permissions and configure the settings according to your preferences.
Webroot will initiate a quick scan of your device to identify any existing threats. If any malicious elements are detected, Webroot will guide you through the process of removing or quarantining them. This initial scan sets the foundation for continuous protection against potential cyber threats.
Step 6: Configuring Webroot Settings:
Explore the settings within the Webroot app to customize the level of security based on your preferences. Adjust features such as real-time scanning, automatic updates, and scheduled scans to ensure your smartphone remains protected without causing disruptions to your daily activities.
Step 7: Activating Your Webroot Subscription:
To unlock the full potential of Webroot and access premium features, activate your subscription. This can usually be done through the Webroot app on your smartphone. Enter the activation key provided during the purchase process or available in your Webroot account. Once activated, your smartphone will have full access to Webroot's advanced security features.
Advanced Features and Tips for Webroot Security on Smartphones:
Now that you've successfully installed Webroot on your smartphone, it's time to delve into the advanced features and some handy tips to maximize your digital security.
1. Secure Web Browsing:
Webroot offers a secure web browsing feature that protects you from malicious websites and phishing attempts. Ensure this feature is enabled in the settings to receive real-time protection while surfing the internet on your smartphone.
2. Anti-Theft Measures:
Webroot provides anti-theft features, allowing you to remotely locate, lock, or wipe your device in case it's lost or stolen. Activate this functionality through the Webroot app and set up your account preferences on Webroot.com/safe.
3. App Scanning:
Regularly scan your installed applications for potential threats. Webroot's app scanning feature identifies any suspicious behavior or vulnerabilities in the apps you have on your smartphone. This ensures that even seemingly harmless apps are not compromised by cyber threats.
4. Scheduled Scans:
Schedule periodic scans to run automatically at convenient times. This ensures continuous monitoring of your smartphone for potential threats without causing disruptions during critical activities. Adjust the frequency of scans based on your usage patterns.
5. Secure Wi-Fi Connection:
Webroot helps protect your device when connected to Wi-Fi networks. Ensure that the secure Wi-Fi connection feature is activated to prevent unauthorized access and protect your data while using public or unsecured networks.
6. Password Manager Integration:
Integrate Webroot with a password manager for an extra layer of security. This feature not only enhances the security of your passwords but also streamlines the process of managing and accessing your credentials securely.
7. Real-Time Updates:
Regularly check for updates within the Webroot app. Keeping your antivirus software up-to-date is crucial for staying protected against the latest threats. Webroot.com/safe is the go-to destination for the latest updates and enhancements.
8. Optimize Performance:
Webroot is designed to provide robust security without compromising the performance of your smartphone. Explore the optimization settings to fine-tune the balance between security and performance, ensuring a smooth user experience.
9. Multi-Device Protection:
If you have multiple devices, take advantage of Webroot's multi-device protection. You can manage and monitor the security of all your devices, including smartphones, through a centralized Webroot account.
10. Customer Support and Community Forums:
Should you encounter any issues or have questions about Webroot, leverage the customer support resources available on Webroot.com/safe. Additionally, participate in community forums to connect with other users, share experiences, and gain insights into optimizing your Webroot experience.
Conclusion:
In a world where our smartphones contain a wealth of personal and sensitive information, prioritizing digital security is non-negotiable. Webroot stands as a reliable ally in the fight against cyber threats, offering a user-friendly interface and robust protection. By following the steps outlined in this guide, you can effortlessly download and install Webroot for your smartphone, ensuring a secure digital environment. Don't forget to regularly visit Webroot.com/safe to stay updated on the latest security enhancements and manage your subscription effectively. Embrace the power of Webroot and empower your smartphone with top-tier cybersecurity.
0 notes
Text
Snapseed APK Download
What is Snapseed and how to use it? We all have smartphones for pictures because the cost of the cameras is too much & not affordable. Besides this, it is easy to carry the phone in your pocket & multiple uses. So, we always carry it in our pocket & whenever there is a moment to be captured, you always run to your phone, not to the camera. Because it will take time to set up & can miss the moment, if we talk about the quality of the picture clicked by the phone & camera always have disaster changes. You can use those images as DP images in your social profiles.
So, for better quality images, the camera only conducts all the professional photoshoots. But it is impossible to carry the camera on your friend’s birthday at midnight to celebrate. In that case, we use mobile to click the moments. Another issue will arise while the pictures click through mobile: quality. You can use the APK on your phone called Snapseed to get a quality solution.
What is Snapseed?
Snapseed is a photo editing application that can also be used on Android & iPhones. Alongside, you can use the app to create a QR code for your picture. This will protect your image from being copied or stolen by others. Snapseed has 20+ editing tools, which will turn your image into HD quality, but you must be an expert in editing. By means the quality of the image will depend on the person using the app tools.
It is a very powerful application that brings all the features of a photo editing application in English. Snapseed has a very simple interface that makes the application much easier. If you are an editing expert, then this application enhances your images. The best part of the application is it is free to use & safe to use. You can use the Apple Store and Google Play Store to download applications. If any application is allowed by Google & Apple, you can imagine how safe it is. Snapseed also has the MOD version to download with an extra feature, which is free to access. The smoothness of the application is very good & real-time update also matters when you are in editing mode.
Whatever tools you will use on this application, a real-time effect will be there & it will help you know the right editing path. Now, let us talk about the tools & filters of the Snapseed Application.
Features of Snapseed APK –
RAW Develop – In mobile phones, mostly 2-3 file formats will use .png and .jpeg by 99% of phones. But through Snapseed MOD APK, you can open the files in RAW & DNG. You can convert & save the image files into .jpeg & .png.
Snapseed QR Codes – These are very useful features only provided by Snapseed to keep the discreetness of your images. You can share your image with a QR code & the receiver will scan the QR code & can see the image.
The features mentioned above are only available in Snapseed, so if you must take the benefits, you should go with Snapseed. Besides, all these 30+ tools are listed on the application & they can entirely change your picture, such as cropping, Color management, rotating, healing, enhancing the image, or Snapseed Background removal.
How to Download –
You can download the application from our website for free. The original version will be available for download on the Google Play Store & Apple Store. But the mod version of the application is only available on our website & can be used by Android users because Apple will not allow downloading applications from other sources except the Apple Store. So, you can download the version available on the Apple Store for free & enjoy the features of editing.
After downloading from our website, you can only install the application on your Android phone. It is simple to install the application from an unknown source. Click on the install button & follow the instructions provided for successful installations.
How to use Snapseed –
After the download & installation process, open the application, where you will get multiple options. First, click the open button on the top left corner of the app to add the image you want to edit in Snapseed. After that, you can select the Style, where you will get multiple presets. If you are unsatisfied with the presets, select the tools options. Around 30+ editing tools are available to us in this button for free.
The free tools are available if you want to edit the pictures independently. So, you can select your tool & edit your work on your own. You can change the frame, color, Brightness, Text, & other customizations on your desired images. Once the editing is done, you can export the file in JPG or JPEG. You can also open rare file formats such as RAW, heic& others.
HERE
#snapseedbackgroundpng#snapseedqrpresets#snapseeddownload#snapseedapk#snapseedapkdownload#snapseedapp#snapseedediting#snapseedphotoediting
0 notes
Text
How to Use Flutter Clear Cache?
In the quick-paced world of developing mobile app performance optimization plays an important role. The ability to construct high-performance, cross-platform apps has helped Flutter, Google’s UI toolkit, become extremely popular. Flutter, like other software, may accumulate cached data over time, which might influence the app’s performance and lead to slow load times and greater resource utilization.
For your app to perform at its best and provide users with a fluid experience, it is essential to clear the Flutter cache constantly. Your Flutter app’s responsiveness, efficiency, and leanness depend on it.
But how can you clear the flutter cache? Explore every aspect of Flutter cache management, discover why it’s essential, and understand the step-by-step procedure to keep your Flutter app running smoothly.
Knowledge about Flutter Cache
Before we begin eliminating it, let’s first understand what Flutter cache is and why it matters. The Flutter framework includes the flutter clean command. The main objective of this command is to delete the build directory from your Flutter project. Cleaning this directory will help ensure your project has a fresh start because it contains numerous intermediate files produced throughout the app’s development stage. Flutter clean is the first step in this process, even if it doesn’t eliminate the cache.
Hire Flutter developer to help you understand and manage the Flutter cache, and to ensure that your Flutter apps are performing at their best.
Cleaning the Flutter Cache
There are various processes involved in clearing the Flutter cache, and it’s crucial to follow them to prevent any problems appropriately. Here is a detailed instruction:
Start by running the ‘flutter clean’ command in your project directory to use Flutter Clean. This will prepare your project for cache clearing while removing the build directory.
Cache directories should be deleted:
Navigate to the system’s Flutter cache directory. Depending on your operating system, this location may be different:
In Windows, go to C: \Users\ AppData\Local\ Pub\Cache\macOS/Linux : ~/.pub-cache
The cache directory comprises several subdirectories that correspond to the Flutter packages. To clean the package cache, delete these directories.
Clear the Gradle Cache (for Android Studio):
This step is crucial if you’re using Android Studio for Flutter development. Choose “Invalidate and Restart” under “File” > “Invalidate Caches / Restart.”
Restart Your IDE Again:
Restarting your integrated development environment (IDE) after the cache-clearing procedure will ensure that all changes are applied.
Clear Cache on Flutter Web
The importance of clearing the cache for developers working on Flutter web apps cannot be emphasized. As Flutter web clean cache uses the same caching technologies used by traditional Flutter apps, follow the directions above for clearing the Flutter cache.
Flutter App Develops with Flutter Clear Cache Integration
Consider adding cache cleaning to your build process to improve cache management and speed up the development of your Flutter app. Packages like flutter_cache_manager can help with such. If necessary, you can use these packages’ useful caching and cache management techniques to develop your cache-clearing logic.
Exploring the Flutter Caching Packages
The importance of maintaining caches grows as your Flutter project expands. Specialized Flutter cache packages can make the task more simpler.
Flutter Cache Manager
Among Flutter developers, the “flutter_cache_manager” package stands out as a top choice because it provides capabilities like:
1. File caching:
Store and retrieve files quickly while reducing unnecessary network requests.
2. Cache Eviction:
Automatically remove outdated files from caches to save up space and enhance speed.
3. Integration with HTTP and Dio:
Seamlessly integrate with popular HTTP packages for network requests.
You can control your app’s cache more by integrating “flutter_cache_manager” into your project, ensuring it is kept structured and efficient.
Why Is It Important to Clear the Flutter Cache?
1. Faster Load Times: Cached data can build up over time and slow down the loading of your app. Flutter’s clear cache feature ensures that your app starts fresh and provides swift performance.
2. Resource Efficiency: A clean cache helps to improve user experience by preventing your application from wasting resources on outdated data.
3. Free Up Storage: Storage space is used by caching data on the user’s device. The cache can be regularly cleared to assist users in retrieving valuable storage.

Conclusion
If you want to maintain your Flutter app performing at its best, clearing the Flutter cache is more than just a chore. Understanding why and how to use Flutter cache clear can help you maintain your app while also improving the app’s performance, reliability, and efficiency.
In this comprehensive article, we’ve looked at the importance of cleaning the Flutter cache and explained how the cache works inside the Flutter ecosystem. With this knowledge, you can make your Flutter app as user-friendly as possible. You can connect us if you want more app maintenance services beyond simply cleaning the cache.
Frequently Asked Questions (FAQs)
1. How do I use Flutter’s cache manager?
The cache manager can be used in some ways to obtain a file. Calling is the simplest way to get a single file. Use getSingleFile. The getFileStream(url) results are returned as a stream, with the cached file appearing first and then, if desired, the downloaded file.
2. Describe the flutter cache.
Memory Cache: Flutter provides the MemoryCache class for short-term memory storage of data. Data that has to be accessible fast can be cached using this technique. For instance, you can quickly obtain the same data without performing another network request by caching the results of API calls in memory.
3. What does the Flutter cache manager do?
The cache managers keep the local cache. The cache manager is a wrapper for storing different data types (JSON, String, Int, etc.) as the local cache in your Flutter app.
#Clear cache in flutter#Clear the Gradle Cache#Flutter Agency#flutter clear cache#Flutter Development#Flutter Development USA#Flutter packages#hire flutter developer#Use Flutter Clear Cache
0 notes
Text
Optimizing Performance: Unlocking the Full Potential of Your Used Google Pixel 4a
Your Google Pixel 4a is a powerful device, capable of delivering a smooth and responsive user experience. Whether you've just acquired a used one or have been using it for a while, there are ways to optimize its system settings for peak performance. This comprehensive guide'll explore strategies and tweaks to help you get the most out of your Pixel 4a. By the end of this article, you'll have the knowledge and tools to ensure that your device operates at its best.
Understanding Pixel 4a's Hardware and Software
Before delving into optimization techniques, it's essential to have a basic understanding of the Google Pixel 4a's hardware and software components that influence its performance.
Hardware Highlights:
The Pixel 4a is powered by the Qualcomm Snapdragon 730G, a capable mid-range chipset that strikes a balance between performance and power efficiency. It boasts 6GB of RAM, allowing for smooth multitasking and app performance, even when switching between multiple applications. With 128GB of internal storage, you have ample space for apps, photos, and videos.
Software Features:
Google Pixel devices run a clean, near-stock version of Android, providing a bloatware-free experience with fast updates and optimizations. Google Assistant is at your disposal, ready to assist with tasks and provide voice-activated support. Adaptive Battery and Adaptive Brightness are two intelligent features that use machine learning to adjust battery usage and screen brightness based on your habits and preferences.
Performance Optimization Tips
Now, let's explore various tips and strategies to optimize your Pixel 4a's performance:
Regular Updates:
Ensure your device is running the latest Android version by regularly checking for system updates in the device's settings. Updates often include performance improvements and security enhancements.
App Management:
Review your installed apps and uninstall any that you no longer use. Unused apps can consume storage and potentially impact performance. Limit background processes by restricting apps from running in the background unnecessarily.
Storage Optimization:
Periodically clear cache and unnecessary files from your device to free up storage space. You can use the built-in "Files" app for this purpose. If you use Google Photos for backup, ensure that you have optimized your settings to store photos and videos at a lower resolution if storage space is a concern.
Adaptive Features:
Keep Adaptive Battery enabled to allow the device to learn your usage patterns and optimize battery life. Use Adaptive Brightness to adjust your screen brightness automatically based on your preferences and environment.
Battery Optimization:
When your battery is running low, activate Battery Saver Mode to limit background processes and extend battery life.
Display Settings:
The Pixel 4a features a 60Hz screen refresh rate. Consider keeping it at this standard setting, as higher refresh rates can consume more battery.
Animations:
Reducing or turning off system animations in the developer options can make your device feel more responsive. Go to Settings > About phone > tap "Build number" seven times to unlock developer options.
App Updates:
Keep your apps up to date through the Google Play Store. Developers often release updates that include performance enhancements and bug fixes.
Security and Privacy:
Regularly update your device's security patches to protect against potential vulnerabilities.
Factory Reset (As a Last Resort):
If you encounter significant performance issues that cannot be resolved through other methods, consider performing a factory reset to start fresh. Be sure to back up your important data before doing this.
Advanced Optimization Techniques
For users who want to take performance optimization a step further, here are some advanced techniques:
Developer Options:
Access the Developer Options mentioned earlier and explore additional settings for performance tweaks. However, be cautious, as some settings can impact device stability if misconfigured.
Custom ROMs and Rooting:
Enthusiast users may explore custom ROMs and rooting for advanced control over their device's performance. Keep in mind that these actions can void warranties and carry risks, so proceed with caution.
External Storage:
If you have a lot of media files, consider using external storage, such as a microSD card or external hard drive, to offload large files and free up internal storage.
Game Mode and Performance Mode:
Some devices offer game or performance modes that allocate more resources to gaming or demanding tasks. Check if your Pixel 4a has such modes and use them as needed.
In conclusion, optimizing the performance of your used Google Pixel 4a involves a combination of system settings adjustments, app management, and regular maintenance. By following these tips and strategies, you can ensure that your device operates at its best, providing a smooth and responsive user experience.
Performance optimization is not a one-time task; it's an ongoing process. Regularly monitor your device, stay up to date with software updates, and adapt your settings as needed to suit your usage patterns. With proper care and attention, your Pixel 4a can continue to deliver excellent performance throughout its lifespan.
0 notes
Text
"Expand Your App Universe with the Top 10 Google Play Store Alternatives"
The Google Play Store has been the go-to source for Android users to download apps, games, and other digital content for years. However, it's not the only player in town. There are several alternative app stores that offer unique features, a wider selection of apps, and even exclusive content. In this article, we'll explore the top 10 Google Play Store alternatives, giving you the opportunity to expand your app universe and discover new and exciting options for your Android device.
Amazon Appstore
Amazon's Appstore is a robust alternative to the Google Play Store. It offers a wide selection of apps and games, and what sets it apart is the daily "Free App of the Day" promotion, allowing you to snag premium apps for free. Additionally, Amazon frequently runs promotions and discounts, making it an attractive option for those looking to save some money while expanding their app collection. To access the Amazon Appstore, you'll need to install it separately, as it's not available on the Google Play Store.
Samsung Galaxy Store
If you own a Samsung device, the Samsung Galaxy Store is your go-to alternative to the Google Play Store. It comes pre-installed on most Samsung smartphones and tablets. This store offers a curated selection of apps, games, and themes optimized for Samsung devices, ensuring compatibility and top-notch performance. You can also find exclusive content and deals tailored to Samsung users.
Aptoide
Aptoide is an independent Android app store known for its vast selection of apps and games, including some that aren't available on the Google Play Store due to stricter content guidelines. One of Aptoide's unique features is its decentralized nature, allowing users and developers to create and manage their app stores within the platform. However, it's essential to exercise caution when using Aptoide, as the decentralized nature means less oversight, potentially leading to security risks. Stick to well-known and trusted sources within the platform.
GetJar
GetJar is one of the oldest app stores in the Android ecosystem, with a library of both free and paid apps. What sets GetJar apart is its cross-platform availability; you can use it on Android, iOS, BlackBerry, and even feature phones. The store offers a variety of app categories, including productivity, entertainment, and gaming. GetJar also occasionally offers premium apps for free as part of its promotions.
SlideME
SlideME is an alternative app store that focuses on delivering a curated selection of apps and games to users around the world. It's known for its rigorous quality control, ensuring that the apps available are safe and reliable. SlideME also supports multiple payment options, making it accessible to users in various regions. Additionally, it offers a program called "SAM," which allows developers to publish their apps in specific markets, expanding their reach.
F-Droid
F-Droid is a unique alternative app store that caters to open-source enthusiasts. It exclusively hosts open-source apps, meaning all the software on the platform is free and transparent. This makes it an excellent choice for privacy-conscious users who want to avoid proprietary software. F-Droid's interface is simple and easy to navigate, and it allows you to explore and install open-source apps that aren't available on mainstream app stores.
APKMirror
APKMirror is a trusted source for downloading Android application packages (APKs). While it's not a traditional app store, it serves as a repository for APK files of both popular and obscure apps. What's valuable about APKMirror is that it offers historical versions of apps, which can be useful if you need to roll back to a previous version or avoid app updates that you find problematic. However, you should exercise caution when downloading APKs from any source other than the official app store, as there can be security risks.
1Mobile Market
1Mobile Market is a comprehensive alternative app store that offers a broad range of apps and games. It features various categories, including games, tools, and entertainment. One of its standout features is the ability to easily switch between multiple app stores within the platform, giving you access to a more extensive app library. 1Mobile Market also provides app recommendations based on your preferences, making it easier to discover new and exciting apps.
ACMarket
ACMarket is primarily focused on providing a vast selection of modified and cracked Android apps and games. While this may not be the right choice for users who prefer official and unmodified apps, it's popular among those who want to access premium content for free or customize their apps with additional features. Keep in mind that using modified apps can violate the terms of service of the original developers and may pose security risks, so exercise caution when using ACMarket.
BlackMart Alpha
BlackMart Alpha is another alternative app store that primarily offers cracked and modified apps and games. Like ACMarket, it's not recommended for users who want to stay within the bounds of official app distribution channels. While it provides access to premium content without payment, it's crucial to remember that using such apps may have legal and security implications.
Conclusion
While the Google Play Store is the default choice for most Android users, these alternative app stores offer exciting opportunities to discover new apps, access exclusive content, and sometimes even save money. Whether you're interested in the daily free app promotions on the Amazon Appstore, the curated selection of Samsung Galaxy Store, or the world of open-source apps on F-Droid, there's an alternative app store to suit your preferences. However, it's essential to exercise caution, particularly when using app stores that offer modified or cracked apps, to ensure the security and legality of your digital activities. So, why not expand your app universe and explore these Google Play Store alternatives to enhance your Android experience?
0 notes
Last Seen Blogs


lilliangst
i do not know what i am doing

sebastianxl
Untitled

tjatjiemusic
Tjatjie
tjatjiemusic
Tjatjie