#every time i make a tutorial i curse myself for it afterwards because damn its HARD
Photo

okay so i've gotten a request for a tutorial for this edit of nico di angelo, and i'll try to do my best to explain this in an easy way.
first off, you'll need photoshop installed, it probably doesnt matter which you have, but i have the cs6. also it is preferrable that you know the basics of photoshop as well (cropping, how to use the brush tool, how to apply a layer mask and an adjustment layer etc). tutorial under the cut!
here are the links to the extra stuff you’ll need: stuff to use
disclaimer: the psds are NOT mine. they are from @/allscallie and @/agallerrie
i also wanna say that i probably spend hours searching for images on pinterest before settling on anything or before i get inspiration. so this tutorial may seem quick and easy but it really is a *process* sfkdsfk, and i spend several hours on every edit i make.
okay so, to the actual editing:
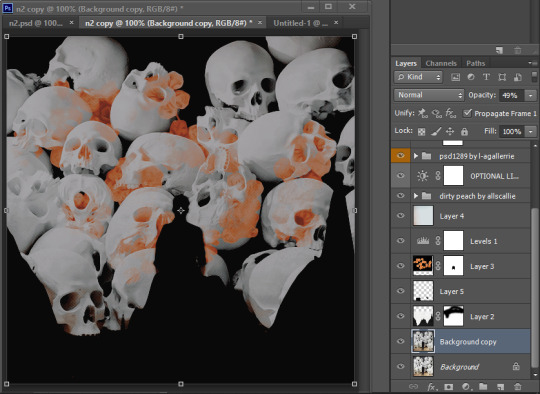
first i crop it to 540 x 540. i probably could have had other dimensions as well, but these were the ones i ended up with.
i probably tried out a lot of different textures before settling on the ones i did, but again, these were the ones i ended up with and thought fit the edit and nico's character.
i put on the psds i've chosen, dirty peach on the bottom and caramelo on top of that.

below the psds i add texture 1, put it on multiply and add a layer mask.

select the layer mask, choose black coloring and brush over the top of the texture, so that the sharp edge dissappears.
i didn’t like that the floor in the picture showed, so i added a new layer and painted black over it. it’s not necessary too detailed with the black, we will add a level adjustment layer next!
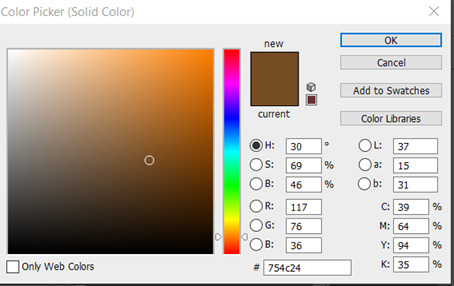
to add a level adjustment layer you go to this:

and use these settings for it:

i felt that i wanted some more color in the edit, and tried to find a texture i felt fit. i ended up with texture 2. add this to the edit, and put it below the levels layer. where we put the previous texture on multiply, we’re gonna put this texture on lighten and place it in this area:

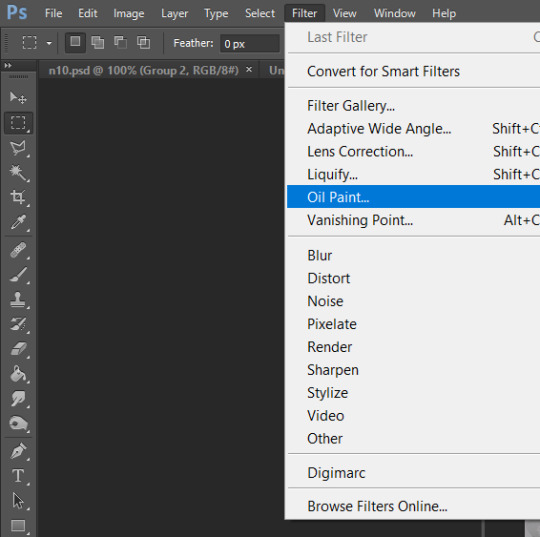
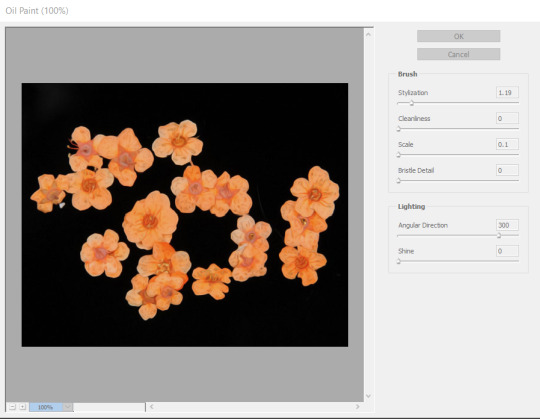
ive also added a filter to it as you can see. this is the oil paint filter that you find here:
the exact settings for it i dont remember but it probably was something like this:
i dont want the flowers to go above the guy in the picture, so i put a layer mask on the layer, and use the brush tool to paint black over the shape of him.
so now the edit looks like this:
im a BIG fan of the next texture we’re gonna use, texture 3. i use this very often in my edits. this we’re gonna put above the levels layer, and put it to color burn. make sure its the ‘light’ part of the texture thats in the edit, and not the ‘red-ish’ part.
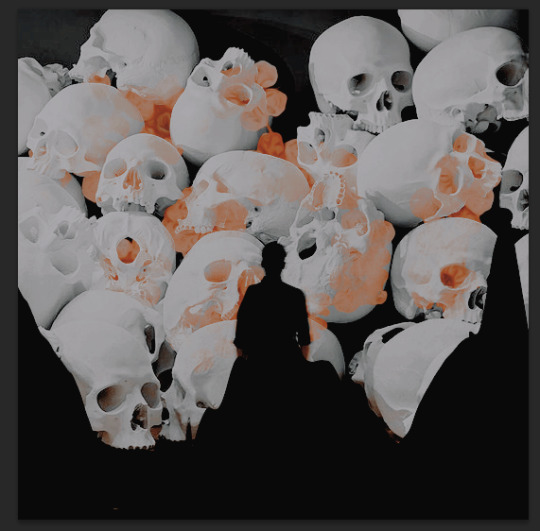
i also wanted to see how it would look if the edit looked more smooth, so i wanted to test the oil paint-filter on our ‘main’-picture, the bottom one with the skulls. so i duplicate that layer, and use the same settings as the flower layer on this duplicated layer. then set the duplicated layer’s opacity to 49%.
it’s not a huge difference from how it was, but the road to success is in the details, isn’t that what they say?
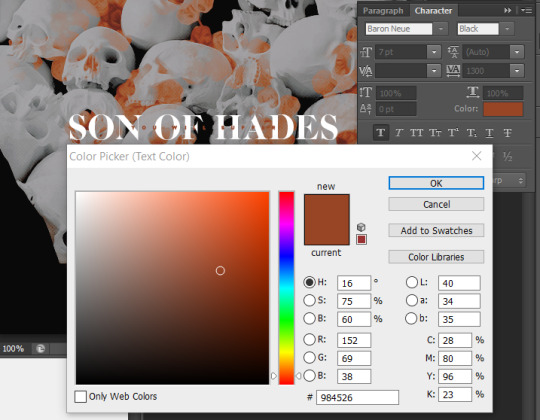
now to the fun part or the difficult part, the texttttt. i scoured goodreads for quotes to use, but knew i wanted to have ‘son of hades’ in the edit, and tried to find a fitting quote. i ended up with “you will suffer, son of hades” “what else is new”.
these are the settings i used for the “son of hades” text:

to get it in the middle of the picture, press ctrl + a, go to layer > align layers to selection > vertical centers and layer > align layers to selection > horizontal centers.
now i want to have the “you will suffer” text above “son of hades”. these are the settings i used for that:
i place this one in the middle of the picture as well, in the same way as the previous.
now i want the text to be more visible, so i put a black rectangle behind the text:
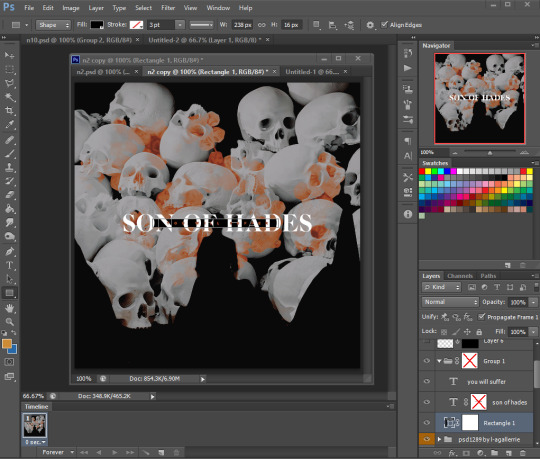
place this in the middle as well.
i want it to look like the rectangle moves through the big letters, so i put a layer mask on the ‘son of hades’ layer, and use the brush tool to paint over the parts of the letters i want to be behind the rectangle. i also move the ‘you will suffer’ text layer below the ‘son of hades’ layer.
then i select these three layers (hold ctrl and click on each), and place them in a group (ctrl + g). put a layer mask on the group and paint over the part of the ‘F’ that is on top of the head to make it look like it goes behind it. and then the text is done!
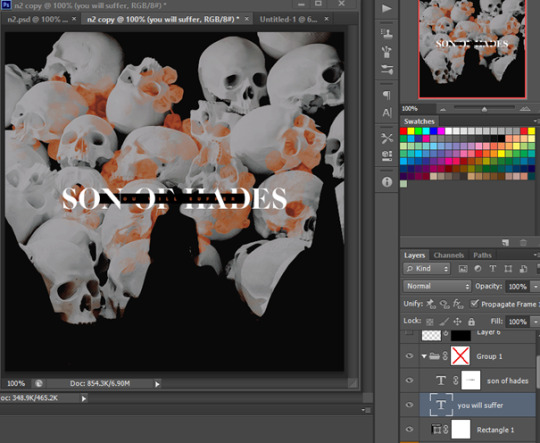
i wanted to do something extra for the edit, so decided to paint some dots as well. add a new layer, select the brush tool, color to white (#ffffff) and set the size to 1px.
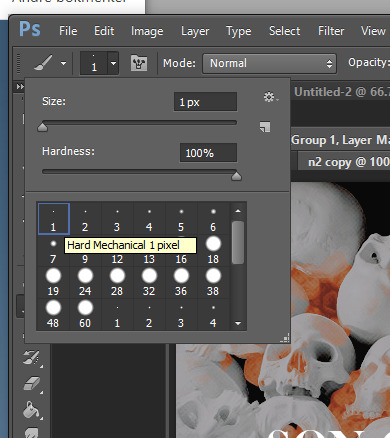
i decided to make nico a crown and also added three dots at each ‘S’

the last thing we’re gonna do for this edit is add three rectangles on the bottom of the edit.

rotate it 45 degrees, and place one in each corner and one in the middle bottom. and now the first pic is done!! woho!!!
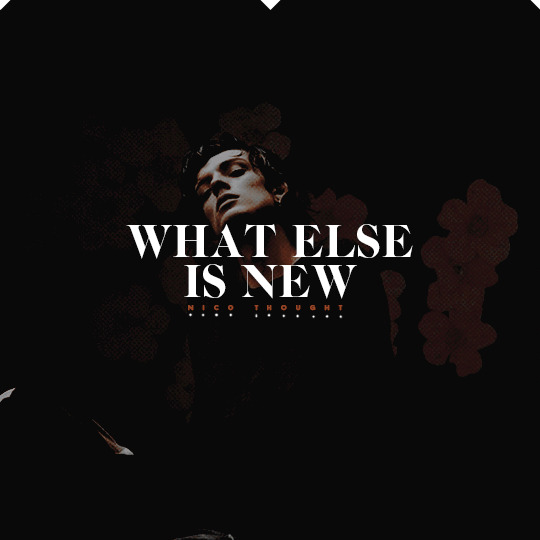
now we’re gonna move on to the next part of the edit. open the second picture.
crop it to 540x540 as the first picture.
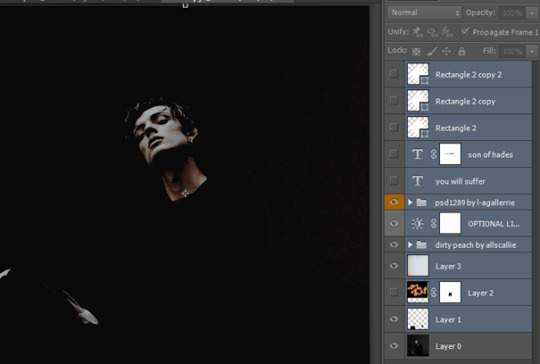
this part takes a little less work, because we already have a lot of what we’re gonna use. Select these layers from the previous picture.
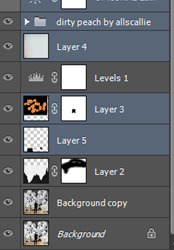

and drag them over in the picture you just opened. click the eye on each layer to make them invisible for now, but keep the psd layers, ‘layer 1’ and ‘layer 3’ visible.
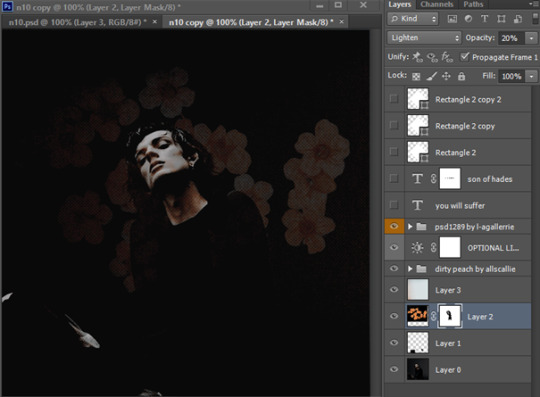
First we will work on the flower layer. Make this visible as well and put it on opacity 20%. On the layer mask paint over the face with a black brush as well.
I want a little different color in the edit, to match the first one better, so i add a color fill adjustment layer:
Put the layer to soft light, and above ‘layer 3’. Now it’s almost only the text left and the extra details!
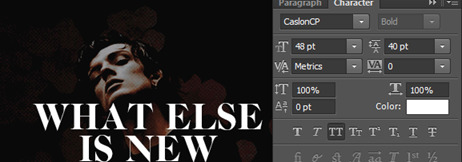
make the ‘son of hades’ layer visible and delete the layer mask. Change the text to “what else is new”, with a break after “else”. Make sure it has these settings.
Then make the “you will suffer” layer visible and write nico thought. Place it right below “is new” and with these settings:

Make the three white rectangles visible again and place them at the top this time, instead of at the bottom.
Only one thing left!! Add a new layer, choose the brush tool, white color and size 1px and paint a dot under each letter of “nico thought” and tadaaaaaa!!!! We. Are. Finished.
IMPORTANT: this tutorial is meant as a help to understand how you can make creations, not as a means to copy others’ style. so please dont copy this edit, but take inspiration from it and i also hope you learned something new!!
#editing tips#tutorial#photoshop tutorial#edit tutorial#my tutorials#god this took time#every time i make a tutorial i curse myself for it afterwards because damn its HARD#also i hope this post works???? its been glitching rip
119 notes
·
View notes
Text
I ’m making a tutorial for @victuuri-moonandsun on how I downloaded the YOI episodes and how to make a basic gif. I decided just to make a tutorial for everyone else who wants to learn? I’m like hella basic at making gifs so ill be providing resources in hopes it will help!
The tutorial includes:
How to download
Capturing Method: VLC vs KMPlayer
Importing + Making the gif (Timing, Cropping, Sharpening, Saving)
Ill teach u how to go from:

to this:

+ A shit ton of screencaps to make up for the fact i’m bad at explanation.
++ what is grammar n spelling?
+++ cursing a lot of it
its like legit 3 am and this tutorial is so bad good luck
You will need:
Vuze
Photoshop (I use CS6)
VLC Player or KMPlayer (I will later discuss the difference usage of these programs)
I. Downloading
Sup yo! Okay let’s start with downloading the actual episodes! I usually use torrents when i’m downloading the episodes. This is what Vuze is for. Like most things u wanna be careful when you download shit off the internet but idgaf i’ve been downloading shit off the interwebs for a while.
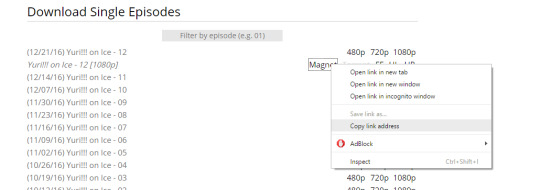
So you wanna either google “yuri on ice 1080p torrent”, but im gonna use HorribleSubs for my example. You wanna make sure you download the 1080p version of the episodes so you can have the clearest/more HQ gifs.
If you’re using the horriblesubs site then you wanna click on “1080p” for whatever episode you want and right click the magnet link.
Yay! Now we gonna wanna open Vuze. First you gonna want to click the “add” folder > Add Magnet > Paste URL > Then hit okay.
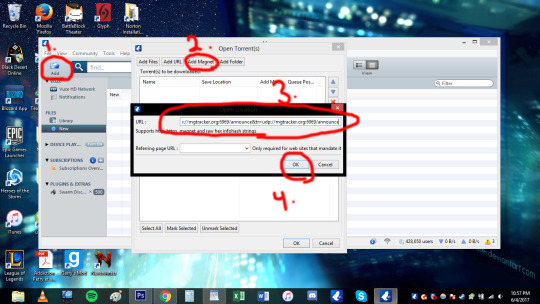
Okay. So once you hit ok this should pop up:
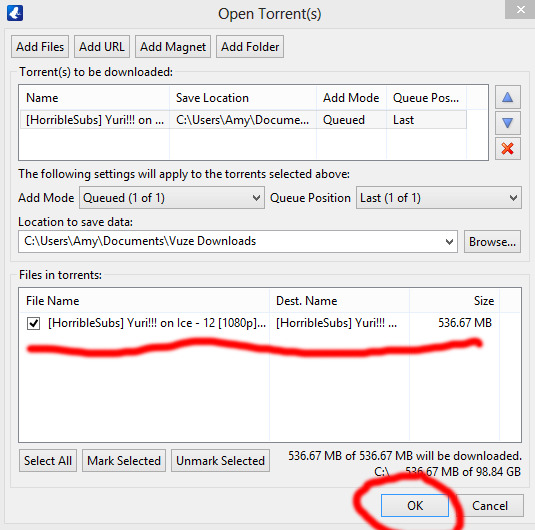
Then hit ok again! You can also change where you wanna save it at this stage too. Okay now your file is downloading and now we wait! The more seeds the faster the download.

Once the file is done downloading we can move on to actually capturing for gif making.
II. Capturing:
OKay. SO I personally use the VLC capturing way because it’s easier for me. With VLC you;re basically recording the scene you want so you can import it into Photoshop. With the KMPlayer you’re taking a shit ton of sceencaps and you’re importing each image into Photoshop. I used both methods and they both get the job done. The only time i use KMPlayer is when VLC is acting wonky. Ill show the VLC method first then the KMPlayer (cringes).
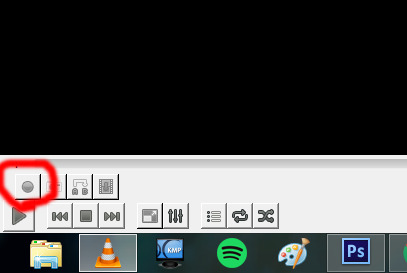
Yay VLC. My fav bby right here. OKay So you’re gonna wanna open that shit up. Okay, so the first thing you wanna do when you open the program is go to view > advance controls. This gives you the option to record!

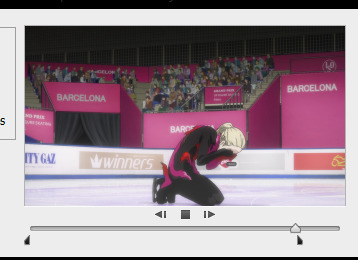
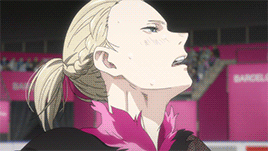
Hell yeah bro now we in business. Okay you’re gonna wanna open the episode you wanna be gif-ing. Since I showed how to download episode 12 i’m just gonna use episode 12 for this too cause fuck it man. You’re gonna wanna decide what scene you’re gonna want to make a gif of. I think for the purpose of the tutorial i’m just gonna do the scene where yurio finishes his program and creys cause hella yeha bro.
okay so for myself, i tend to start recording couple seconds (like 5-10 *my computer is really wonky ) before the actual scene because I want to make sure I record the whole scene without cutting anything out.
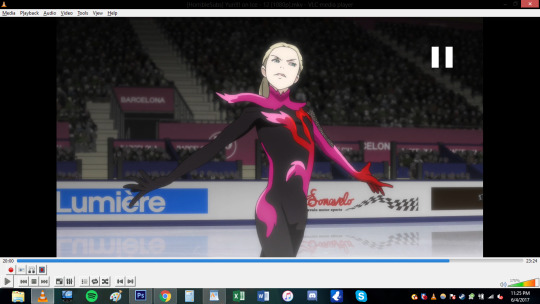
You also notice that the record button is red now. So you’re basically just gonna click it once and let it record until you want it to stop!
Where i began to record (actual a couple secs before becuz i forgot to screencap):
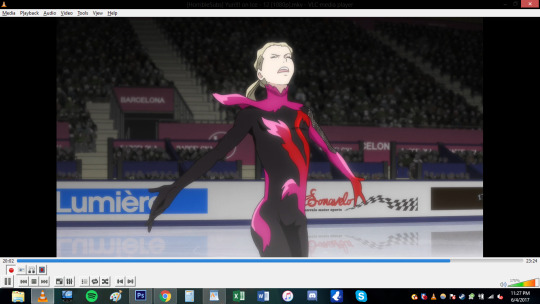
Where I ended:
***note: Notice how the record button changes while you’re recording vs not recording! (i’ve done the dumb thing where i forgot to stop recording and watched the rest of the episode .-. )
Now that short clip will be saved. my video was saved in my video file im sure you can change where you want it saved but idk how. This is where it is saved on my computer. Probably can search “vlc” on your computer if it is absolutely lost (sorry I can’t help much in finding the file).

Basically after this step you’re done deezy. You can skip the KMPlayer and go directly to the gif making portion of this shit tutorial.
OKAY FOLKS HERE’S THE KMPLAYER TUTORIAL ON HOW TO DO GIFS HAHAHAhahaha *sobbing*
I need to explain this program a bit more. So unlike VLC you’re not recording or anything like that. This captures screencaps into jpg or png files. When you do the VLC method, photoshop will make the screencaps for u. This method you’re gonna have to load the each photo (This usually takes photoshop longer to load for me, but than again my computer is old as shit so it may not matter to you).
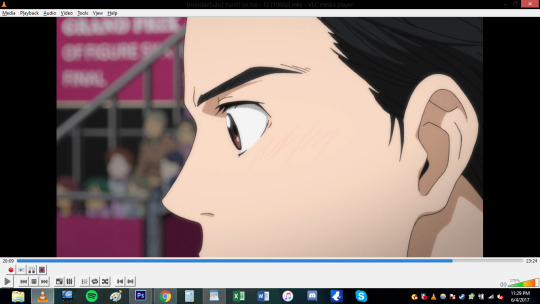
OKay u gonna wanna open that satan spawn and open the episode u wanna do. Again here im gonna do the same scene cause yeah. Basically just go to the scene you want.

Okay here the annoying shit happens. SO unlike VLC for me, I don’t have to a big gap of recording time. I can get closer to the actual scene and want and start capturing (ctrl+G).

When you hit ctrl+G, this window pops up and this where all the settings happen. 1. You decided where you all the pictures will be saved! 2. You can pic the image quality. I go for JPG because my computer just cant handle doing png. If you’re computer can do the png go for it. 3.) Seconds refers to how long you want the program to capture for. I just put 5 seconds to make sure i get the whole scene. You also want the images to be in the original size. 4.) I WILL DISCUSS THE TIMING THING MORE INDEPTH LATER, but for the time being i’ll do every 1 frame.
When you click start on the small window your video has to be playing to actually capture. I just hit start and hhit play cuz fuck it.
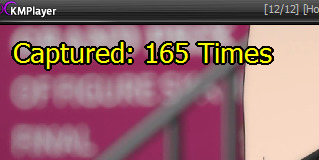
When the program finish capturing this will pop up in the corner. *note: I ended up doing 10 seconds because my computer hates me. So there’s a lot more caps than i needed. this is what you end up with!

A shit ton of fucking photos! YOU READy TO GO TO PHOTOSHOP.
III. IMPORTING-VLC
*if you need help downloading photoshop send me an ask and ill try my best to help you. I downloaded ps cs6 a long time ago and the link i used to download it doesn't exist anymore.
THis step is gonna be different depending on what method you used for the capturing. I’m going to begin with the VLC method. So you’re gonna wanna go to file > importing > video frame to layers.

Find the clip file and hit open. a window will open and now you can select what part of the video you want to actually gif! the two point thingies on the bottom are adjustable. FOr example maybe you recorded too much in the beginning? drag the 1st arrow thing to where you want the gif to start. Same with if you recorded to much at the tale end of the video. You can adjust the right one.
Make sure to have frame animation box is check.
And now we’re at the frames part.This is where I feel conflicted and you will see why when I get to the timing part of the video. (I use to make a lot of gifs for real action tv shows and this is the first anime I ever edited and I just feel like i haven’t found the best timing yet?). For this screencape i left the limit box and just do every frame.

So my video was too long at the end and decided to cut that unwanted shit out. (you can hit the play button just to make sure you’re happy with what you got. Hit ok when u done deezy
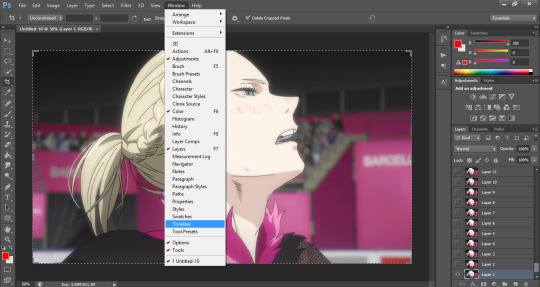
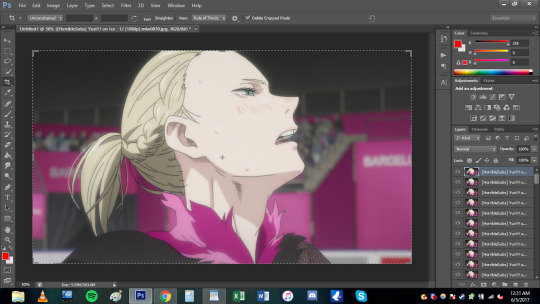
THEN BOOM THIS IS WHAT IT LOOKS LIKE. THAT BOOTIFUL ASS YURIO’S FACE HELL yeAH. Okay. So on the right hand side you have all your layers. but we missing the timeline bro. SO you go to window> timeline
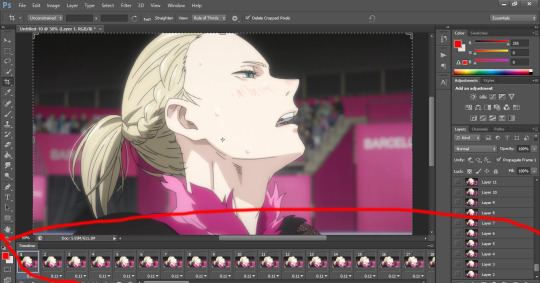
DAMN LOOK AT YOU YOU’RE READY TO MAKE A GIF. You can skip ahead and learn about timing. Keep reading for the KMPLAYER way.
III. IMPORTING- KMPLAYER
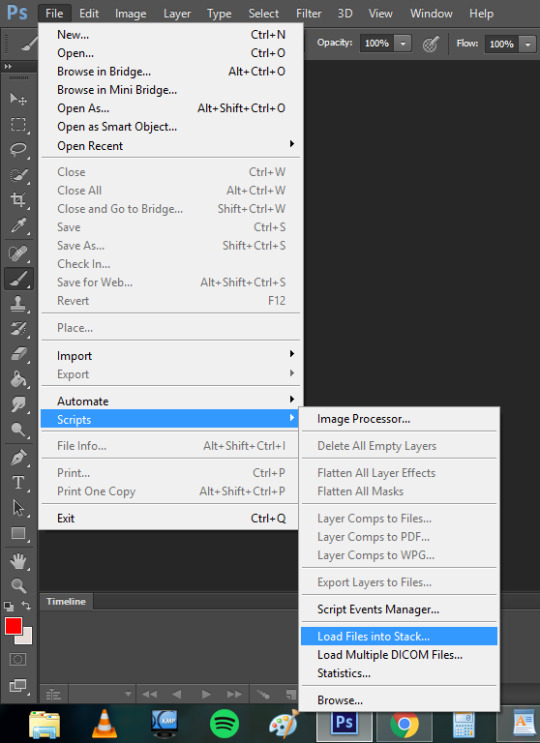
oKAY. You’re gonna wanna go to file> scripts > load files to stacks
A window will pop up and basically you’re gonna select all the screencaps you want for the gif and hit okay.
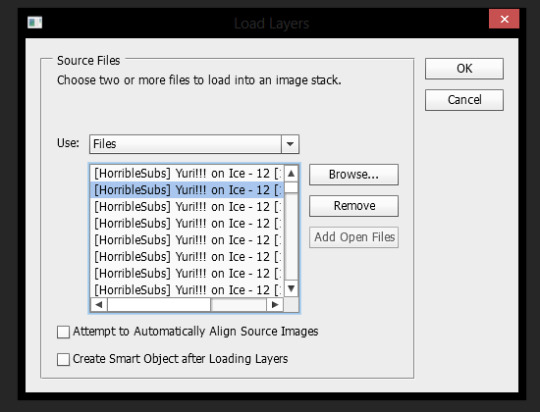
This shit takes my compouter f o r e v e r (compared to the VLC method.) to load and even longer afterwards when it’s being uploaded as layers. This method took my computer to load the files 3 minutes compared to the 5 seconds the VLC method took me. Like i’ve mentioned before it might just be my ancient ass computer’s fault. But this it what it looks like when it’s done loading
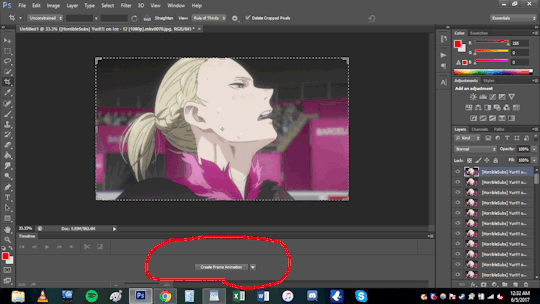
Okay you;re gonna wanna do the same step as VLC to create the timeline (Window>timeline).

But because this was loaded in differently the the stacks will not automatically have frames. You’re gonna want to click create timeline and you will notice you have one frame only.
So on the top right corner of the timeline you will have the option to make the layers into frames.
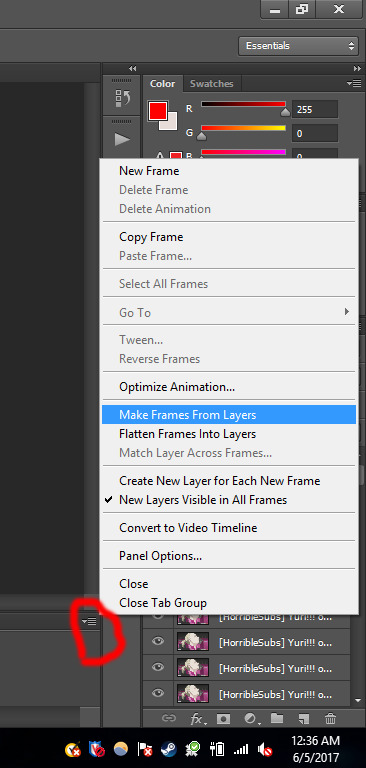
Now you maybe noticed that the frames are fucking backwards son like wtf man. a simple fix to that! in the list of options where you made the frames from layers, you can reverse the frames.
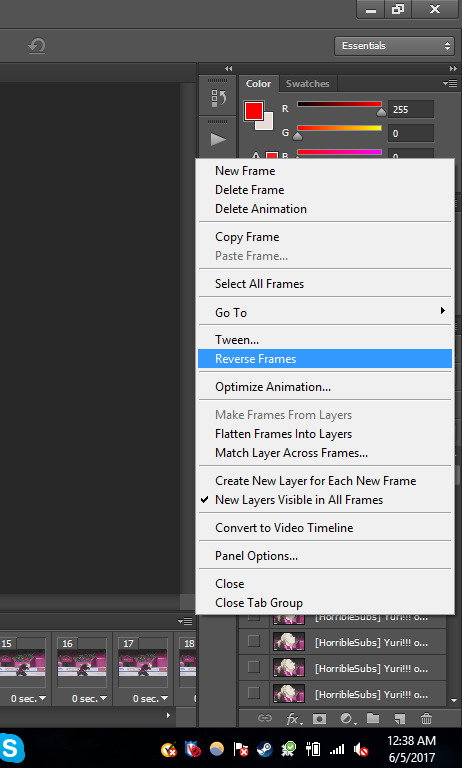
NOW YOU’RE DONE DEEZY. WE CAN MOVE ONE.
IV. TIMING
OKay this gets really iffy for me. I’ll just basically show you the times I use and what it may look if you capture every frame of you choose to do every 2 times (anything else isn’t recommended). In this section it’s what I use and probably not the best, but you can play around with photoshop and you can do whatever the fuck you want yo!
Anyways as you can imagine if you decide to do every frame youre gonna get a shit ton of layers(i’m gonna be working with the vlc method from this point on. any kmplayer question can be sent my way!). But it may look smoother! *will make a note on this*. Downside, the file is prob gonna be WAY bigger.
For ex: Every frame. 103 FRAMES FUCK MAN.
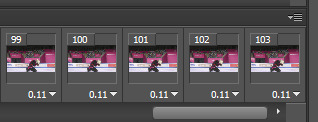
Every 2 frames: 53 frames
So it’s basically about half cuz u know math
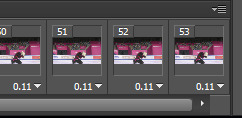
OKay. so when i do gifs I usually set the time to “0.06″ but I put “0.07
for every 2 frames. To change the timing make sure you have all the frames selected (click the first frame then go to the last frame and Shift+click it). Now that all the frames are highlighted you want to hit the down arrow and click other. This is where you set the time and hit okay.
every frame @ 0.06 (No cropping/no coloring/no sharpening)

every 2 frames @ 0.07

So it’s really personal preference. I just have it so ingrained to do every frame at 0.06 since i started making gifs years ago, but i feel like the every 2 frames at 0.07 looks smoother for anime? Really guys experiment and see what you like better!
V. CROPPING
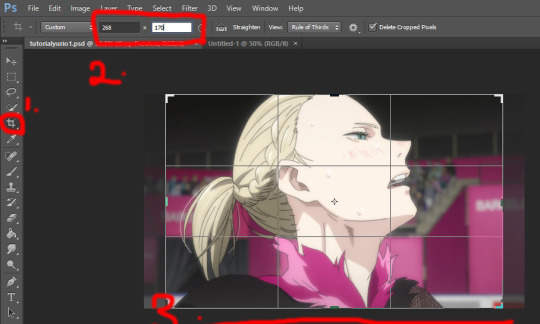
Yay lets get to cropping! These are the current dimensions for tumblr
one picture/gif: 540px width
two pictures/gifs: 268px
three pictures/gifs: 177px, 178px (middle), 177px
spaces: 4px
-itsphotoshop
I always crop my gifs. I just think they look nicer when they’re crop.To start cropping you either wanna hit “C” on your keyboard or clip the crop tool. Afterwards you can put a value of the dimensions (i tend to do 268x165 or 268x170 when I to he gifset with 8 different gifs). Now you can drag the box over the gif to position it where exactly you want the focus to be. You either double click the box or hit enter when you wanna crop.
You might not want to have it dead center. so yeah this what it looks like if you just dragged it:
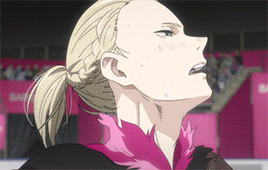
Damn yurio is looking good dead in center, but you noticed the 2nd half yurio isn’t in the middle no more. When you’re cropping you wanna keep this in mind. (you can always make two separate gif to have it all centered but i can make a dif tutorial for that).
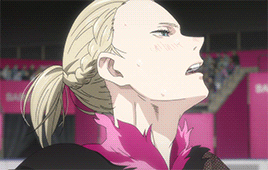
This what it looks like if i decided to keep the cropping in the center:

Overall both scenes are more centered.
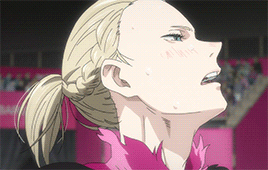
BUT WHAT IFF YOU JUST WANNA ZOOM IN ONTO YURIO’S FACE?? i got chu bro. I’m goning to delete the 2nd half of the gif for the purpose of this example. So what you’re gonan want to do is drag a side of the square until you’re happy with what you want.

Here i just dragged the bottom. Since I have my measure inplace from before, no matter what side i drag it it’s always gonna be the same ratio of 268x170 so no need to worry !
Regular crop:
Crop to zoom in on the face:
THE MORE YOU KNOW ABOUT CROPPING :D!!!
OKay. Once you’re done cropping you’re gonna want to resize that!
I’m going back to the original gif with both scenes.
To resize an image you either can hol the CTRL+ALT+i or go to image>image size
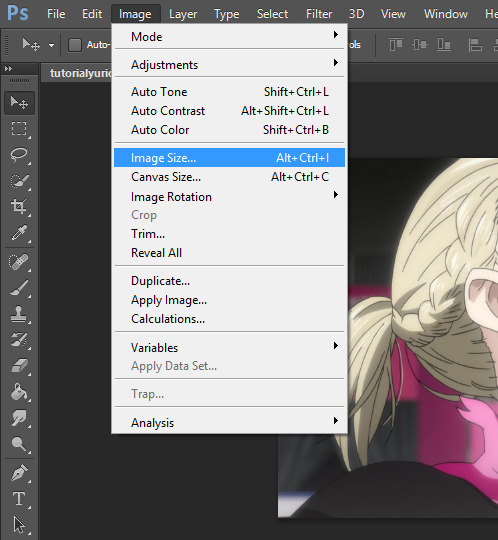
a window will pop up and youll type in what size you wanted. Because i had the dimensions typed in while i was cropping it will basically do the ratio for u

the original size was 1702x1080. Once i typed 268, the program kept the ratio and changed the height. SORRY IM NOT EXPLAINING THIS WELL I REALLY DONT KNOW HOW.
We went from this:
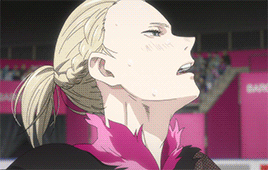
to this:

it’s not a HUGE change but there is a change!
VI. Coloring *bonus
I have no authority on color tbh It takes me to forever to color shit and i’m h o r r i b l e at it. so i aint gonna discuss this much but here what coloring can do for u!
original:
to this garbage:
I don’t really like it but i just did it quickly for the sake of this tutorial.
If you wanted an idea of what I did

The best way I learned to color was from PSDs others made or just fucking around in PS. Here are some resources:
PSDs: x x x
Tutorials: x x
VII: Sharpening:
Oh man okay so i use an action for my gifs but the thing is i downloaded a long ass time ago. It may be this, but im not entirely sure. This hella easy yo!
so you wanna select all the layers:

then you wanna convert the frame animation to a timeline (make sure you changed the time you want the frames to be before you convert!)

You will notice the frames changed on the bottom. Now you wanna go to filter>convert to smart layer

Now you only have one layer!
With this one magic layer you can sharpen all your goddamn layers all at once.
If you don’t have the action you can do the basic sharpening. Okay now go back to the filter tab>Sharpen>smart sharpen. I have use this option in YEARS but i believe the kinda go too was this:
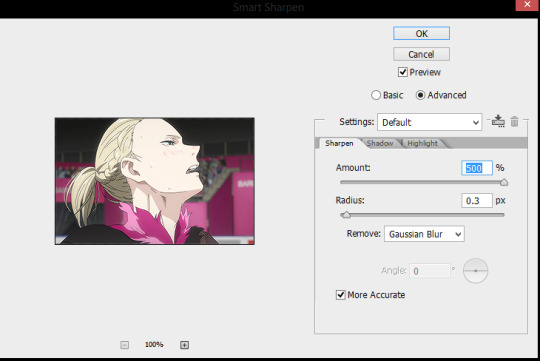
and hit okay!
Before sharpening:

After sharpening:

the lines are more defined in the 2nd gif, If you were able to download the action this is how you use it.
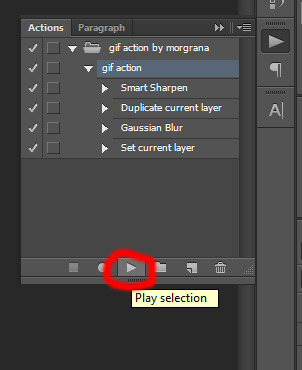
GO to Windows> actions.

WHere the red circle you click, and find the option for load actions. Once you load it you wanna make sure you selected the smart layer and hit th eplay button and the action should sharpen it for u
BOOM. your gif is sharpen. So lts compare all three now.
No sharpening:

Smart sharpening only:

Action (Smart sharpening + blur)

I like the action th most because it’s not as intense as the smart sharpening only. WOW U FINISH A GIF CONGRATULATIONS NOW YOU WANNA SHOW THIS BABY TO THE WHOLE WORLD RIGHT? WELL IMMA SHOW U HOW,
VIII. SAVING THAT SON OF A BTICH
So basically you either hold alt+ctrl+shift+S or file>save as for web
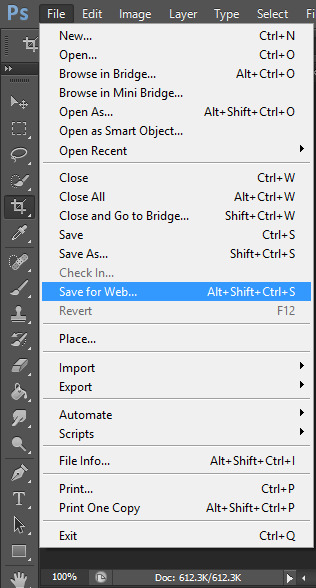
and a window aPPEARS. These are the settings i use to save:
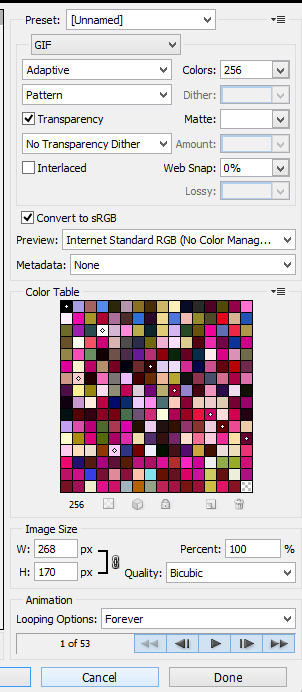
BE CAUTIOUS OF THE SIZE OF THE GIFS: I BELIEVE THE MAX SIZE IS 2MB
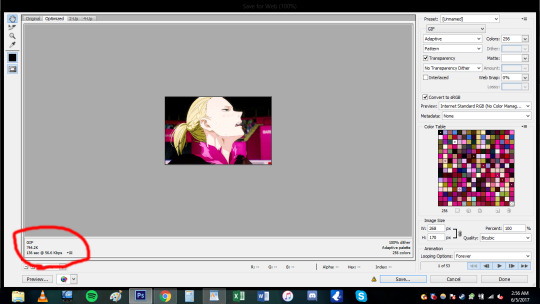

this gif is under 1mb so im safe yo! Some tips if gif is too large is to add a selective layer>black> then +5-10
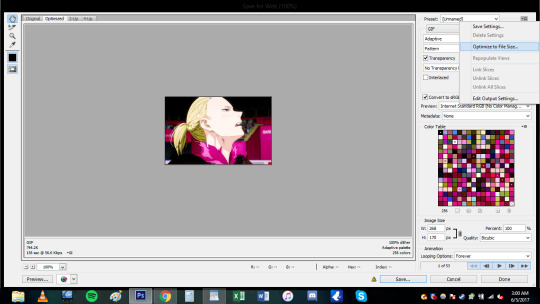
another tip is to use optimize tool if yOU HAVE TO: go to the top right corner

now u done deezy
u save that shit
and cry
send me an ask if you need shit cleared up.
125 notes
·
View notes
Last Seen Blogs

lektury659-blog
sprawdzian bohaterowie

thyunholy-blog
𝙨𝙚𝙚 : 𝙝𝙚𝙖𝙩𝙝𝙚𝙣
vilainous
For Ever .

vincythomas
Instantanés

rayhantow
Rayhantooow