#every so often i just get the urge to sprite redraw
Text

some little angels :3
#apri art#kid icarus#kid icarus uprising#every so often i just get the urge to sprite redraw#mainly bc i'm so much better at art than the last time i drrew them all#also i just think it's fun to change em up
665 notes
·
View notes
Text
From Blender to pixel art
Hey guys !
Last time, i mentioned that the first game is a 2D pixel art platformer, but it was really important to me that the animations were smooth and fluid. The usual (and to be honest, best looking) way to achieve this is by having a 2D artist working on tons of frames (the more you want fluid animations at 60 fps, the more frames you need).
Examples from PixelOutput
The way that i chose, i thought i came up with the ideas myself but it's actually something that has been used many times before in the industry, the most recent example i have in mind being Dead Cells. The idea is to use all the 3D workflow sugar (keyframing, animating, iterating on the mesh without necessarily having to rework the animations, blending between poses or between animations using Mecanim,...), and making it render as pixel art on screen.
This article will detail the workflow (actually the main steps of it) i've used to create, animate and render my main character, and i'll be providing very helpful links i've been referring to for most of the steps. Thanks to all of these guys for their great insights.
Step 1 - Create a character
MakeHuman is free and very easy to use. I won't elaborate on this, check this tutorial if you need any help.
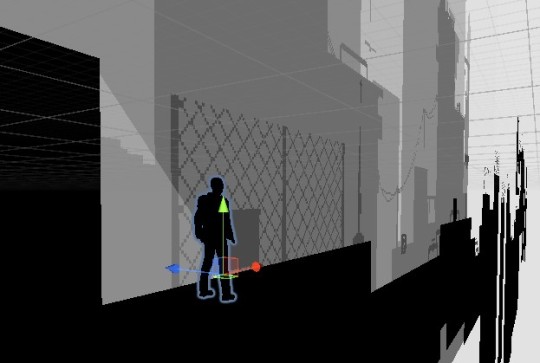
Step 2 - Customizing the character
Once your character is in Blender, you have the opportuniy to customize it as you see fit. Depending on what you want to do, it will require more or less modeling skills. For my game i knew i'd go with the black solid color for characters, so i only needed a silhouette which simplifies a lot this process. I just sculpted a really barebone backpack because i wanted my main character to have one. Remember it will be rendered as pixel art in the end, so no need to be too finicky about the details.
You may have noticed that the mesh from MakeHuman has quite a lot of vertices. If you think you may run into performance issues because of that (for instance, if you want to display a large number of characters on screen), you may want to simplify the mesh topology using modifiers or manual retopology. I didn't, my main character appears only once in the game.
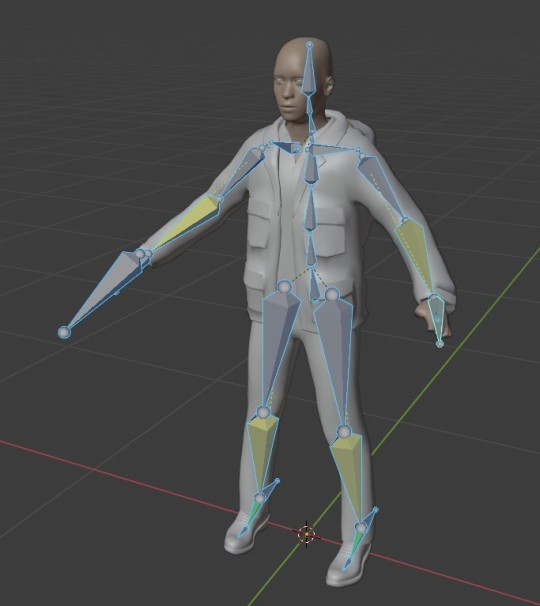
Step 3 - Rigging
Once you're happy with the mesh, you can rig it. Again this is very standard and straightforward (but not necessarily easy), check this tutorial. For an easier setup, you can also use Rigify (which i did). Get familiar with the rig, but because it's a human character and we will be doing a lot of animations, you absolutely need IK on your rig for arms and legs, or you will quickly feel the urge to kill yourself. Check this out to understand IK and how to set it up in Blender. Feel free to make your rig more personal, it's all about how you will use it to animate. This part is important because you create the tools you'll be using while iterating, so these tools must be as efficient as possible to have you win as much time as possible.
For example, i removed a lot of bones that i didn't require because of my art style that will hide details (fingers, toes,..). Make it easy on yourself!
Step 4 - Animation
Now that your model is rigged, you can animate it. There is little to know from the technical standpoint (check this tutorial to get you started), but be warned that you will spend A LOT of time on animations. First try to think of the framerate of animations that you'll be using in-game (configured in Unity) so you use the same in Blender. Then for each animation, i usually follow these steps :
- If possible, study the movement you want to make by watching videos in slow motion on youtube or whatever.
- Think about how you'll use the animation in game. For a 2D platformer, you only need the animation to look good from one side. So put your animation view to the side and work from there. It doesn't matter if the limbs are all wrong when looking the animation from the face: The player will never see that.
- Time the animation by doing a rough keyframing of the "big movements" of your animation (ie left foot/right foot for a walk cycle)
- If i'm doing a cycle animation, i'll duplicate the first frame to the frame "last+1" (if your animation is 50 frames long, duplicate frame 1 in frame 51). This is so interpolation will make your cycle loop perfectly.
- Iterate to improve on these keyframes until you're happy with the overall movement.
- Begin to add smaller details (think, sub-animations) and iterate on them.
- Remember to focus your efforts on what really matters: Spend more time on the animations you'll be seeing most often. Walk and run cycles are very important for instance, you'll be doing that the whole time in-game.
My animations honestly don't look very good, even from the side, but once they are displayed as pixel art and blended with Mecanim, i think the result is good enough, and fits my expectations of fluidity and smmoothness. That's one way of getting around a weakness (ie. my inability to animate properly a human character) to not let it hurt the game idea you have in mind.
Step 5 - From Blender to Unity
To export from Blender to Unity is a simple process, but it raise a few issues regarding scaling, rotation, export and import settings,... I've solved all of them using the settings described in this link, but please keep in mind it might change depending on versions of both Blender and Unity.
Step 6 - Setting up the in-game character
Having your model show and animate in Unity is usually as simple as a drag and drop. In my case, since i'm doing a 2D game with 3D models, i had to make a prefab that would just add a 2d collider, and set the Z position so the model is displayed above all the sprites (which have Z == 0). Since the camera is orthographic, the bigger scale of the character because of its proximity with the camera won't be an issue.
Step 7 - Render as pixel art
Unity now provides some tools to render your game with a pixel-perfect camera. This article from Unity explains it very well.
You can also set a custom resolution for your game view that matches your render resolution, so you have a good preview even when the game is not running which is very helpful for designing UI or using Unity animation sequence tool.
Step 8 - Mecanim
I'll skip this step as it's very dependant on the game. For a very simple Mecanim example of a 2D character playing a run animation when moving, check this tutorial.
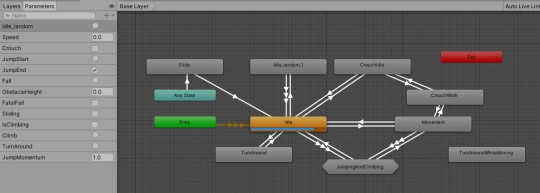
The advantage of using 3d models and animations is that Mecanim will be able to blend bone positions between animations, allowing for smoother transitions. Be careful to keep the Animator clean (These are good tips), as things can quickly go out of control in Mecanim.
This is my complete Animator for Skyline Rider :
Step 9+ - Iterating
Now that everything is setup, you can start iterating. Try out your game, see how your animation feels, go to Blender to make a few tweaks, then export to fbx again and continue testing. Most of the time you can even remain in play mode and the animation will be updated without the need to restart the game. I think of it as "gameplay driven" design which is only possible with great workflows. If you had to redraw every frame when you want to tweak an animation or the looks of a character, you waste a lot of time and either the budget explodes and the release date is pushed away, or you end up with "animation driven" design where programmers will need to make gameplay fit animation, and my personal opinion is that it can hurt the feeling of the game, which must always remain the top priority (at least, in the kind of game i like).
This will probably be less and less of an issue with the continuous progress of procedural animation and animation rigging. Looking forward to working on things like that !
Obviously this whole 2D/3D is kind of a workaround, so in the next article i'll mention something that was actually made less convenient because of this.
Thanks for reading!
If you have questions or want to know more about this workflow, feel free to contact me (check the first post for contact information).
0 notes
Last Seen Blogs

desordemglobal-blog
Desordem Global

evielmostdefinitely
evil evie

livejagranprogram-blog
Untitled

epickendall
Epickendall1

hello-paralyzed-world
Football destroying my life