#developertools
Text


Ready to level up your back-end & web development skills?
Check out these emerging trends you need to know.
𝗙𝗼𝗿 𝗠𝗼𝗿𝗲 𝗜𝗻𝗳𝗼𝗿𝗺𝗮𝘁𝗶𝗼𝗻: Custom Software Development Company
#sstechsystem#webdevelopment#backenddeveloper#backend#developer#softwareengineering#innovation#futureoftech#coding#trends#webdev#backenddev#techupdates#programming#softwaredevelopment#teamwork#skillup#webtechnologies#developertools#webdesign#backenddevelopment#webdevtrends#futureoftechnology
3 notes
·
View notes
Text
DEVIO Review: World’s First Digital Product Selling Platform 2024.
Welcome to my DEVIO Review blog post. In this review, I will share the features, demo, prices, bonuses, and upgrades. This platform boasts the most extensive assortment of stock images, videos, vectors, GIFs, animations, and audio, along with a built-in image and video editor all accessible on a fully searchable interface.
In the dynamic landscape of digital commerce, DEVIO emerges as a game-changing platform that not only simplifies the creation and management of software sales but also democratizes the process, making it accessible for entrepreneurs of all levels. Whether you are a seasoned developer or a newcomer to the tech industry, DEVIO provides a toolbox packed with features to launch your venture into the lucrative software market. Here’s an in-depth look at what DEVIO offers and how it can transform your business.
Are you eager to learn more? Let’s dive straight into the world of DEVIO!
Read the full review here>>>

#DevioReview#DevelopmentTools#SoftwareReview#TechInsights#DeveloperCommunity#ProductAnalysis#SoftwareDevelopment#TechReview#DevelopmentWorkflow#CodingTools#DeveloperTools
0 notes
Text

Post: Anon is building an automated authentication layer for the gen AI age | TechCrunch https://www.blaqsbi.com/5Qeo
0 notes
Text
#WebDevelopers#CodingCommunity#DeveloperLife#CodeNewbie#WebDevelopment#Programming#FrontEndDevelopment#BackEndDevelopment#FullStackDeveloper#WebDesigners#CodeIsArt#TechCommunity#SoftwareDevelopment#HTML#CSS#JavaScript#DeveloperTools#CodeLovers#TechInnovation#CodeCrafters#Mississauga#canada
0 notes
Text


🚀 Step into the future of coding with these 5 groundbreaking AI Coding Assistant Tools! 💻✨ From GitHub Copilot's intelligent suggestions to TabNine's deep learning-powered autocomplete, these tools are here to revolutionize your coding experience. Say goodbye to mundane tasks and hello to seamless development. Dive into the world of AI-powered coding and unleash your creativity! 🛠️🔥
#AICoding#DeveloperTools#ProductivityBoost#webdesign#developer#codeigniter#custom software development
0 notes
Text
One Trading API - Empower Your Trading Experience
Introducing the F.A.S.T. API from One Trading
One Trading unveils the F.A.S.T. API, designed to enhance trading efficiency for traders at all levels. This API provides key features for an improved trading experience:
Authentication: Offers secure access through API keys with customizable scopes, from read-only to full trading functionalities.
Efficient Trading: Facilitates swift order execution and cancellation with high precision in timekeeping, ensuring accurate transaction processing.
Comprehensive Data: Access to real-time market data, including candlestick patterns, order books, and market tickers, aids in making informed trading decisions.
Flexible Integration: The API can be integrated seamlessly into existing systems, supporting both RESTful HTTP requests and WebSockets for real-time data exchange.
Secure Transactions: Ensures data confidentiality and integrity with TLS encryption for all transactions.
#OneTradingAPI#TradingTech#APIIntegration#SecureTransactions#RealTimeData#EfficientTrading#CryptoExchange#TradingAutomation#MarketInsights#TradeSmart#DeveloperTools#FinancialTechnology#CryptoTrading#SecureAccess#StreamlinedOperations
0 notes
Text
What is the most effective tool for managing a team of developers?
Determining the "most effective" tool for managing a team of developers can vary based on the specific needs and preferences of the team. However, one widely used and highly regarded tool for managing developer teams is Jira.
Jira is a project management tool developed by Atlassian that offers a wide range of features tailored for software development teams. Some of its key features include:
Issue Tracking: Jira allows teams to create, prioritize, assign, and track issues or tasks throughout the development process.
Agile Framework Support: It supports popular agile methodologies such as Scrum and Kanban, providing tools like boards, backlogs, and sprints to facilitate agile development.
Customization: Jira offers extensive customization options, allowing teams to tailor workflows, issue types, fields, and notifications to suit their specific needs.
Integration: It integrates seamlessly with other development tools and services commonly used by software teams, such as version control systems (e.g., Git), continuous integration platforms, and collaboration tools like Confluence.
Reporting and Analytics: Jira provides built-in reporting and analytics capabilities to track team performance, project progress, and identify bottlenecks or areas for improvement.
Scalability: Jira is scalable and can accommodate teams of various sizes, from small startups to large enterprises, making it suitable for diverse development environments.
Overall, Jira is widely recognized for its versatility, flexibility, and robust feature set, making it a popular choice for managing developer teams across different industries and domains.
#magistersign#support#cannada#onlinetraining#Jira#ProjectManagement#SoftwareDevelopment#Agile#Scrum#Kanban#IssueTracking#TeamCollaboration#WorkflowManagement#DeveloperTools#Productivity
0 notes
Text
Steps to Install NPM and Node.js on Windows and MAC

JavaScript is an essential component of full-stack development, making it excellent for creating comprehensive commercial apps. It works well with a variety of devices on both the front end (what customers see) and back end (server side) of websites and applications. Node.js is one of these tools, and it’s ideal for developing parts of a website or application that must deal with large numbers of clients or data.
Before we get into the nitty gritty of Node.js, we’d like to address two important questions: how to install npm (Hub Bundle Chief) on a Macintosh and how to do it on Windows.
If you’re having trouble installing Node.js and npm on your Windows or Mac PC, this guide can assist. We’ll make it simple to introduce Node.js and npm to help your project succeed gradually.
To start, you should understand what npm is and why it is significant while utilizing Node.js. Before you start, you want additionally to guarantee that your PC is fit for running Node.js and NPM.
How about we go over the steps for introducing Node.js and npm, making sure you have everything you need to use them in your tasks?
Definition of NPM
NPM (Node Package Manager) is like a big online store for JavaScript programmers. It’s a tool that helps them find and use various code pieces (called packages) that other programmers have created. These packages can do all sorts of useful things, like add new features to a project or help the code run smoothly.
NPM makes it easy for programmers to pick and choose which packages they want to use in their projects. They can also make sure they’re using the right version of a package so everything works well together. In short, NPM helps JavaScript programmers share, find, and use code easily and efficiently.
Key Components of NPM
Website: Think of the NPM website as a big online store, but instead of buying clothes or gadgets, you can find and get small blocks of code, which are called packages. These packages help you build and improve your JavaScript projects. The website is very user-friendly. You can search for different packages, read instructions on how to use them, and see how popular or well-rated they are. Also, if you create your own packages, you can manage them through the website, just like managing your profile on a social media platform.
Command Line Interface (CLI): The NPM Command Line Interface is like a magic wand for developers. It’s a tool you use on your computer’s command line or terminal. With it, you can do a bunch of important tasks just by typing commands. For example, you can add (install) new packages to your project, update them, and remove them if you no longer need them. It’s also used for starting new projects and sharing your bundles with others by uploading (publishing) them to the NPM Vault. This tool is very powerful and helps you manage all the building blocks (packages) of your JavaScript project.
Registry: The NPM Registry is a massive database of the packages and bundles that developers have created. Like a database, keep track of these enormous packages, their formats (like different editions of a book), and the core facts about them, comparable to what different packages they may require to function. When developers create new packages, they save them in this library so that other designers can use them in their projects. This vault ensures that you always get the correct variant of a package you truly want, making it a valuable asset for dealing with these packages in your operations.
What is Node.js?
Node.js is an open-source, cross-platform runtime environment JavaScript code beyond a web browser. Previously, JavaScript was primarily a client-side prearranging language for web browsers. In any case, Node.js has evolved into a useful tool for server-side programming. This move has been crucial, allowing designers to use a single programming language throughout the web development stack, resulting in more proficient and cohesive codebases.
Key Features of Node.js
Asynchronous and Event-Driven
Node.js operates on a non-blocking, event-driven architecture, making it extremely effective and convertible. This is very useful for applications requiring continuous information handling, such as visit applications and internet gaming.
V8 Engine
It runs on Google Chrome’s V8 JavaScript engine, which converts JavaScript directly to native machine code, improving execution.
Extensive Libraries
Node.js boasts an extensive library of JavaScript modules, which further develops the improvement process by lessening the need to compose a lot of code.
NPM: The Backbone of Node.js
NPM stands as the largest software registry in the world. It acts as the default package manager for Node.js, allowing developers to install, share, and manage library dependencies in their projects.
Core Aspects of NPM
Package Management: NPM simplifies the process of managing project dependencies. It simplifies the process of installing, upgrading, and using libraries and tools required for modern web development.
Repository Access
Through NPM, developers gain access to thousands of packages, contributing to a vast repository of solutions and tools. This greatly accelerates development workflows and encourages code reuse.
Project Management
NPM also assists in version control and dependency management of projects. It allows developers to specify which versions of a package their project can use, preventing potential conflicts and ensuring compatibility.
The Synergy of Node.js and NPM
The blend of Node.js and NPM has turned into an establishment in the field of JavaScript improvement. Node.js gives the climate to running JavaScript on a server, though NPM gives the tools and modules expected to construct and oversee applications inside that climate. This synergy has had a significant impact on JavaScript’s ascent to noticeable quality as a full-stack improvement language fit for dealing with both client-side and server-side preparation in a durable way.
Prerequisites
Prior to continuing with the installation of Node.js and NPM on your Windows or Mac machine, it’s vital to guarantee that your system meets specific requirements. These essentials are central to ensuring a smooth establishment process and ideal working of Node.js and NPM.
for Windows Users
Operating System
Windows 7 or later renditions are suggested for better similarity.
Hardware Requirements
RAM: Somewhere near 4GB of RAM, nonetheless, more is great for better execution, especially for greater undertakings.
Processor: An Intel Core i3 processor at 2.5 GHz or higher. Node.js is a lightweight runtime however having a quicker processor helps with speedier execution of errands.
Storage Space: At least 256 GB of free extra storage to guarantee sufficient space for Node.js, NPM, and various task documents.
Administrator Access: Installation might require head honors. Guarantee you have the vital authorizations to put in new programming on your system.
Internet Connection: A steady web association is expected to download Node.js, NPM, and extra packages.
System Update: Guarantee your Windows is fully informed regarding the most recent fixes and updates for a smoother installation.
for Mac Users
Operating System
macOS 10.10 (Yosemite) or later versions are best for ideal similarity with Node.js and NPM.
Hardware Requirements
RAM: At least 4GB RAM, with more suggested for greater improvement work.
Processor: An Intel Core i3 processor or better. Node.js doesn’t request broad computer processor assets, however a quicker central processor works on generally speaking effectiveness.
Storage Space: Something like 256 GB of free stockpiling to oblige Node.js, NPM, and your improvement projects.
Administrator Rights: Like Windows, you might require executive freedoms to introduce Node.js and NPM on macOS.
Internet Connectivity: A dependable web association for downloading vital establishment records and bundles.
Latest macOS Updates: Guarantee your Macintosh is running the most recent variant of macOS for a difficulty-free installation experience.
Installation Guide for Mac
Downloading the NPM Bundle for macOS:
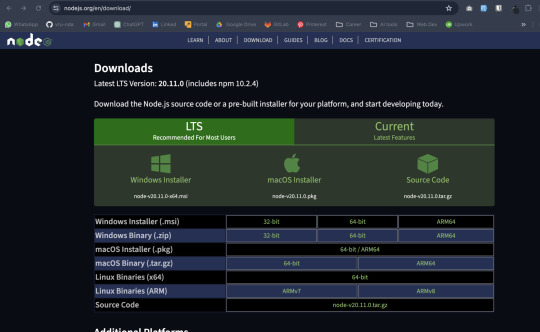

Visit the Official Node.js Site: Open your favored web browser and explore the Node.js official download page.
Select the macOS Installer: You’ll track down choices for different working systems. Pick the macOS Installer, which ordinarily arrives in a .pkg document design, reasonable for Mac.
Download the Installer: Snap on the macOS Installer connect to begin the download. It ought to naturally download the document to your default download area.


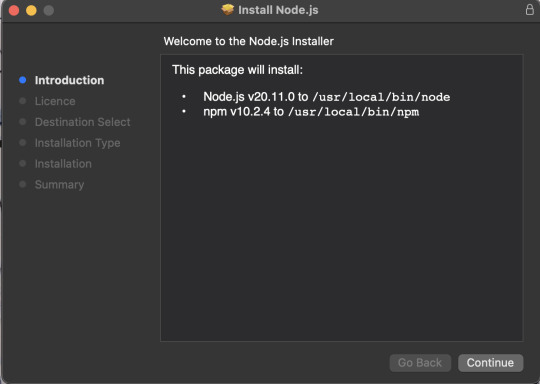
Running the Package Manager as per Guidelines:
Locate the Downloaded File: Navigate to where the installer was downloaded, generally the ‘Downloads’ organizer.
Run the Installer: Double-tap the .pkg document to open the establishment wizard. Another window will direct you through the setup process.
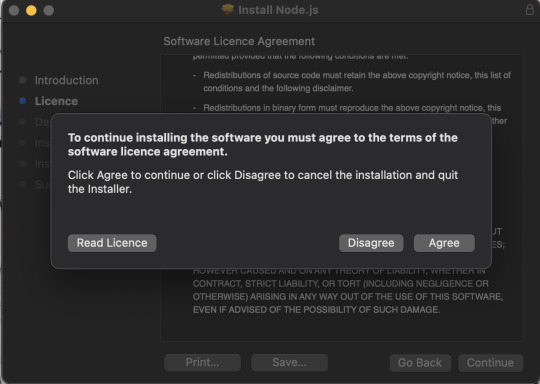
Agreeing to License Terms and Conditions:
Read the License: During the installation process, you’ll be given Node.js’ permit agreements. Going through these terms is significant.
Agree to the Terms: If you agree with the terms, then click the ‘Agree’ button. The following step is required to proceed with the installation.
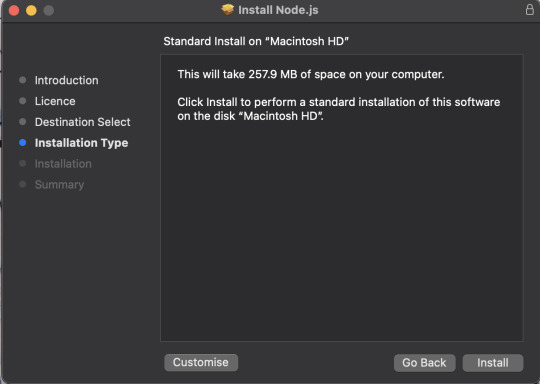
Moving to Final Installation:
Choose the Installation Location: The installer will recommend a default area for Node.js and NPM. You can change this if essential, however for most clients, the default location is adequate.
Start the Installation: After setting the location, click the ‘Install’ button. You might be incited to enter your administrator password to authorize the installation.
Installation Completed:
Wait for the Installation to Finish: The installer will show a progress bar. Hold on for it to wrap up.
Confirmation Message: When the installation is finished, you will get a confirmation message exhibiting that Node.js has been successfully presented on your Mac.
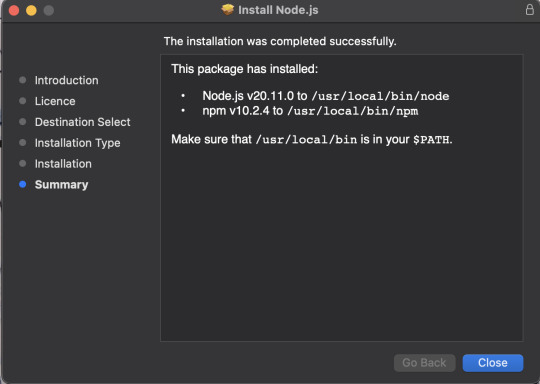
Close the Installer: Click the ‘Close’ button to exit the installer.
Subsequent to completing these means, Node.js and NPM will be installed on your Mac. To check the establishment, you can open the Terminal application and type hub – v and npm – v. This will show the introduced renditions of Node.js and NPM, confirming that they are ready to use. With Node.js and NPM installed, you can now keep on including them in your headway projects on your Mac.
Originally published by: Steps to Install NPM and Node.js on Windows and MAC
#NodeJSInstallation#NpmSetup#DeveloperTools#NPMandNodejssetup#NPMsetuptutorial#InstallingNodejsonWindows#InstallingNodejsonMac
0 notes
Text
#AndroidStudio#AppDevelopmentSoftware#CodeEditor#Collaboration#Cordova#CrossPlatformDevelopment#DeveloperTools#DevOps#Electron#Firebase#FLutter#Github#Gitlab#Ionic#MobileAppDevelopment#OpenSourceDevelopment#OpenSourceTools#productivity#ReactNative#Xcode#gauravgo#gauravgo posts
0 notes
Text

#ProgrammingLaptops#TechInnovation#CodingGear#FutureTech#LaptopTech#ProgrammersChoice#Innovation2024#TechUpgrade#DeveloperTools#LaptopReviews#2024TechTrends#GadgetsForCoders#DigitalWorkspace#PowerfulLaptops#TechDiscoveries
1 note
·
View note
Text


The basics of search engine optimization
#googleadvancedsearchoperators#developertools#googlesearchengineoptimization#careerdevelopment#googlehelpfulcontentupdate#helpfulcontentupdategoogle#googlehelpfulcontentupdatetutorial#rapidappdevelopment#googlesearch#softwaredevelopment#webdevelopment#ventajasdelseo#howtorecoverfromagooglecoreupdate#searchengineoptimization#seo
0 notes
Text
What are the latest features and enhancements in Node.js for 2024?
As of 2024, Node.js continues to advance with several key features and enhancements that significantly impact node.js app development services. Some notable developments include:
Performance Boosts: Ongoing efforts to optimize the V8 JavaScript engine contribute to improved runtime performance, ensuring faster execution and responsiveness in Node.js applications.
ECMAScript Standards Compliance: Node.js remains committed to staying current with ECMAScript standards, providing developers with access to the latest JavaScript language features and ensuring compatibility with modern web development practices.
Enhanced Security Measures: Security remains a top priority, and new features and updates are expected to bolster Node.js security, addressing potential vulnerabilities and offering developers tools to build more secure applications.
Developer Experience Improvements: Node.js continues to focus on enhancing the overall developer experience. Look for updates in developer tools, debugging capabilities, and frameworks that simplify and streamline the development process.
Containerization and Deployment Optimizations: With the growing prevalence of containerization, Node.js is likely to introduce features that enhance compatibility with Docker, Kubernetes, and other container orchestration tools, facilitating smoother deployment workflows for app services.
Native ESM Modules Support: Native support for ECMAScript modules in Node.js improves code organization and simplifies module management, providing developers with more flexibility and modularity in their applications.
npm Enhancements: The Node Package Manager (npm) is integral to Node.js development, and updates may include new features, optimizations, and improved dependency management tools to facilitate seamless integration of third-party libraries and packages.
WebAssembly Integration: Node.js may introduce features or optimizations to better support the integration of WebAssembly modules within applications, opening up new possibilities for performance-critical tasks.
GraphQL Support: Given the increasing adoption of GraphQL, Node.js might offer improved support and integrations to streamline the development of APIs using this query language, enhancing flexibility and efficiency in building data-driven applications.
Extended Support for Serverless Architectures: Node.js is likely to adapt to the trend of serverless computing, providing features that make it easier for developers to build and deploy serverless applications.
To stay updated on these features and enhancements, it's essential for Node.js app development services to regularly check the official Node.js website, release notes, and participate in relevant community discussions. Embracing these advancements ensures that your Node.js applications leverage the latest tools and capabilities for optimal performance and maintainability.
#NodeJS#JavaScript#WebDevelopment#TechUpdates#Programming#ECMAScript#DeveloperTools#AppDevelopment#CodeOptimization#SecurityInTech#PerformanceImprovements#Containerization#DevOps#OpenSource#WebAssembly#GraphQL#Serverless#npmUpdates#TechInnovation#DeveloperCommunity
0 notes
Text
Are you a developer looking for a game-changer that can supercharge your workflow? Look no further! 🚀 In this video, we're diving deep into "LUNO Admin Dashboard" by Thememakker, a revolutionary tool that's making waves in the development community.
LUNO Admin Dashboard is not just developer-friendly; it's packed with feature-rich design and endless theming possibilities, allowing you to align your theme with your brand effortlessly. This means you can create a custom dashboard that perfectly fits your needs.
🔔 Subscribe, like, and share for more exciting content on development tools and tips. Stay tuned for the latest updates!
LUNO Website URL: https://www.wrraptheme.com/templates/luno/marketing/
For more details visit https://www.thememakker.com/ or contact us at [email protected]
Thememakker Infotech LLP
B-906/907, Titanium Heights,
Corporate Rd, Prahlad Nagar,
Ahmedabad (India) – 380015
Call: 7573830505
Email: [email protected]
Follow Us,
https://www.linkedin.com/company/thememakker/
#LUNOAdminDashboard#DeveloperTools#ProductivityBoost#Thememakker#CodingSolutions#WebDevelopment#DevelopmentEfficiency#Customization#SoftwareDevelopment#GameChanger#WebDesign#AppDevelopment#AdminDashboard#AdminThemes#AwardwinningDesigns#ThememakkerSolution#APIIntegration#LaravelAdminDashboard#uidesign#uxdesign
0 notes
Text
Introducing; Laravel Dev (GPT)
The GPT Laravel Dev offers tailored Laravel query assistance, emphasising official documentation, helper functions, adaptable code style, comprehensive debugging, version-specific support, and user feedback integration.

Laravel Expertise at Your Service: The core of this tool lies in its specialisation in Laravel-related queries. It leverages official documentation and widely recognised Laravel packages to provide informed and practical solutions.
Commitment to Official Resources: Prioritising official Laravel resources, the GPT Laravel Dev ensures that the solutions and suggestions provided are reliable and align with standard Laravel practices. When an official solution isn't available, it seeks out other credible sources to maintain accuracy.
Advocacy for Laravel Helper Functions: Emphasising the use of Laravel helper functions, the tool promotes best practices and efficient coding within the Laravel framework. This approach is aimed at enhancing the overall quality and efficiency of your code.
Adapting to Your Coding Style: Understanding the importance of consistency, the tool aligns its responses and solutions with your specific coding style, ensuring a seamless integration into your existing codebase.
Comprehensive Debugging Assistance: The GPT Laravel Dev provides thorough debugging support, covering everything from application layer issues to server and operating system problems. This comprehensive approach is crucial for effective problem-solving.
Version-Specific Support: Recognising the importance of version-specific nuances in Laravel, the tool provides tailored support based on the specific Laravel version you're using, ensuring more accurate and relevant assistance.
Open to Feedback: As this is an experimental venture into new GPT technologies, your feedback is invaluable. I encourage you to use the GPT Laravel Dev and share your experiences. Your insights will play a crucial role in refining and enhancing the tool's capabilities.
Link: Laravel Dev (GPT)
#Laravel#OpenAI#ArtificialIntelligence#GPT#CodingAssistance#PHPFrathe mework#TechInnovation#DeveloperTools#CodeDebugging#AIProgramming
0 notes
Text
Finding CSS Selectors in Chrome: Developer's Guide
Introduction
Welcome to the world of web development, where CSS selectors play a crucial role in shaping the visual presentation of a website. As a developer, understanding how to find and utilize CSS selectors efficiently can significantly enhance your ability to style and design web pages.
In this guide, we'll delve into the intricacies of locating CSS selectors, with a particular focus on using the powerful tools provided by the Chrome Developer Tools. Whether you're a seasoned developer looking to brush up on your skills or a beginner eager to grasp the fundamentals, this exploration will equip you with valuable insights and techniques to navigate the world of CSS selectors with confidence.
Understanding CSS Selectors
Before we dive into the specifics of finding CSS selectors, it's essential to grasp the fundamental concepts that underlie these powerful tools. CSS selectors are patterns used to select and style HTML elements on a web page. They allow developers to target specific elements based on their attributes, relationships, and positions within the HTML document.
Here's a breakdown of key concepts to enhance your understanding:
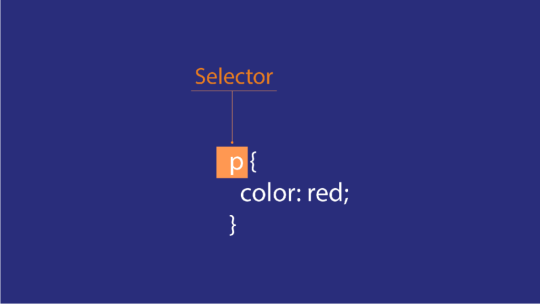
- Simple Selectors: These are the basic building blocks of CSS selectors. They target elements based on their tag name, class, or ID. For example, p selects all paragraphs, .class selects elements with a specific class, and #id selects an element with a particular ID.
- Combinators: Combinators are used to define relationships between different elements. The most common ones include the descendant combinator (space), the child combinator (>), and the adjacent sibling combinator (+).
- Attribute Selectors: These selectors target elements based on their attributes, such as . This provides a flexible way to style elements with specific characteristics.
- Pseudo-Classes and Pseudo-Elements: Pseudo-classes allow you to style elements based on their state, such as :hover for mouse hover. Pseudo-elements target specific parts of an element, like ::before and ::after.
Understanding these foundational concepts lays the groundwork for effectively using CSS selectors in your projects. As you explore the world of web development, keep in mind that CSS selectors offer a versatile and powerful means to apply styles selectively, providing the fine-grained control needed to create visually appealing and responsive web designs.
Inspecting Elements in Chrome

Chrome Developer Tools is an invaluable resource for web developers, offering a suite of features to analyze and manipulate web pages. Inspecting elements is a fundamental aspect of this toolkit, allowing developers to explore the HTML and CSS structure of a webpage in real-time.
Here's a comprehensive guide on inspecting elements in Chrome:
- Opening Chrome Developer Tools: To begin inspecting elements, right-click on the webpage element you want to examine and select "Inspect" from the context menu. Alternatively, you can press Ctrl+Shift+I (Windows/Linux) or Cmd+Opt+I (Mac).
- Elements Panel: The "Elements" panel is where you can view and manipulate the HTML and CSS of the selected element. It provides a hierarchical representation of the document's structure.
- Styles Panel: Within the "Elements" panel, the "Styles" panel displays the applied styles for the selected element. You can experiment with styles in real-time, making it a valuable tool for debugging and refining your design.
- Console: The "Console" tab is where you can interact with the page using JavaScript. It's a powerful tool for debugging and testing snippets of code.
- Network Panel: For analyzing network activity, the "Network" panel is crucial. It provides insights into resource loading times, helping you optimize page performance.
Additionally, Chrome Developer Tools offers advanced features such as breakpoints, network throttling, and emulation of various devices for responsive design testing.
PanelPurposeElementsInspect and manipulate HTML and CSSStylesView and modify applied stylesConsoleInteract with the page using JavaScriptNetworkAnalyze network activity
By mastering the art of inspecting elements in Chrome, developers can streamline their workflow, diagnose issues, and gain a deeper understanding of the structure and styling of web pages.
Finding CSS Selectors
Locating the right CSS selectors is a pivotal skill for developers, influencing the precision and efficiency of styling in web development. In this section, we'll explore various techniques and tools available in Chrome Developer Tools to assist in finding CSS selectors effectively.
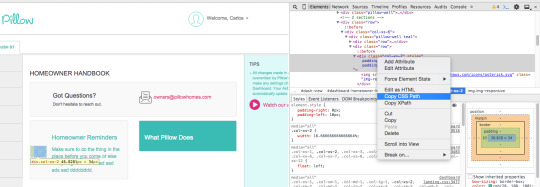
- Inspector Tool: The Inspector tool in Chrome Developer Tools allows you to hover over elements on a webpage and reveals the corresponding HTML and CSS. This visual aid is invaluable for identifying the structure of a page and determining the appropriate selectors.
- Element Selection: By right-clicking on an element in the "Elements" panel and choosing "Copy" > "Copy selector," you can copy the unique CSS selector for that specific element. This method ensures accuracy and eliminates the guesswork associated with writing selectors.
- Console Commands: The Console tab in Chrome Developer Tools enables you to experiment with JavaScript and provides dynamic ways to find CSS selectors. For instance, you can use document.querySelector() to test and retrieve a selector for a particular element.
- Search Functionality: The "Find" tool in the "Elements" panel allows you to search for specific elements or text within the HTML. This can be particularly useful when dealing with larger codebases or intricate document structures.
- Computed Styles: The "Computed" tab in the "Styles" panel displays the computed styles for an element, including the applied CSS rules. This aids in understanding how styles are inherited and computed, assisting in the refinement of selectors.
Developers often encounter challenges in selecting elements with complex structures or dynamic content. In such cases, combining CSS selectors intelligently or using more advanced selectors becomes essential.
SelectorPurpose:nth-child()Selects elements based on their position within a parent.:not()Excludes elements that match a specified selector.Selects elements with an attribute that starts with a specific value.
By mastering these techniques and leveraging the power of Chrome Developer Tools, developers can navigate the intricacies of web development with precision and ease, ensuring their CSS selectors target the right elements every time.
Common Challenges
While working with CSS selectors in web development, developers often encounter various challenges that can impact the styling and layout of a webpage. Understanding and overcoming these challenges is essential for creating robust and visually appealing designs. Here are some common challenges and strategies to address them:
- Specificity Issues: One challenge arises when multiple CSS rules compete for styling the same element. Understanding specificity—how browsers prioritize styles based on selector types—helps in resolving conflicts and ensuring the intended styles are applied.
- Dynamic Content: Websites with dynamic content, especially those relying on JavaScript frameworks, pose a challenge in terms of selecting elements that may not exist in the initial HTML. Using event delegation and understanding the Document Object Model (DOM) is crucial to addressing this challenge.
- Cross-browser Compatibility: Different browsers may interpret CSS rules differently, leading to inconsistencies in styling. Testing and utilizing vendor prefixes where necessary can help achieve a consistent look across various browsers.
- Performance Impact: Inefficient or overly complex CSS selectors can impact page loading times. Optimizing selectors and minimizing the use of universal selectors contribute to a more performant website.
- Responsive Design: Crafting selectors that adapt to different screen sizes and devices is vital for responsive design. Media queries and relative units, such as percentages and ems, play a key role in creating designs that scale seamlessly.
Addressing these challenges requires a combination of best practices, a deep understanding of the document structure, and proficiency in using advanced CSS features. Furthermore, staying informed about updates and changes in web standards ensures developers are equipped to handle evolving challenges in the dynamic landscape of web development.
ChallengeStrategySpecificity IssuesUse more specific selectors or refactor styles to avoid conflicts.Dynamic ContentEmploy event delegation and understand the DOM for dynamically generated elements.Cross-browser CompatibilityTest across multiple browsers and use vendor prefixes when needed.Performance ImpactOptimize selectors and minimize the use of universal selectors for improved performance.Responsive DesignImplement media queries and use relative units for adaptable designs.
By proactively addressing these challenges, developers can enhance the resilience and effectiveness of their CSS selectors, contributing to a smoother and more reliable web development experience.
Best Practices
Mastering CSS selectors involves not only understanding the syntax and techniques but also adopting best practices that contribute to maintainable, efficient, and scalable code. Incorporating these best practices into your workflow ensures a smoother development process and promotes a consistent and polished user experience. Here are some key best practices for working with CSS selectors:
- Keep Selectors Simple: Whenever possible, favor simple and concise selectors over complex ones. This enhances readability and makes it easier to understand and maintain your stylesheets.
- Use IDs and Classes Wisely: Strike a balance between using IDs and classes. While IDs should be reserved for unique elements, classes are suitable for styling groups of elements. Avoid excessive reliance on IDs for styling, as it can lead to specificity issues.
- Avoid !important: While it may seem like a quick fix, the use of !important in CSS can lead to specificity conflicts and make it challenging to debug styles. It's generally better to refactor your styles for better specificity.
- Organize Stylesheets: Maintain a clear and organized structure in your stylesheets. Group related styles together and consider using modular approaches, such as BEM (Block, Element, Modifier) methodology, to create more maintainable and scalable code.
- Comment Strategically: Add comments to your CSS code to explain complex or non-intuitive parts. However, avoid excessive commenting, as it can clutter the code and make it harder to read.
Furthermore, incorporating a naming convention for classes and IDs, such as lowercase with hyphens or camelCase, promotes consistency across your codebase.
ConventionExampleLowercase with Hyphensmy-class-nameCamelCasemyClassName
Finally, stay informed about the latest CSS features and best practices to ensure your skills remain current in the ever-evolving landscape of web development. Adopting these best practices not only improves the quality of your code but also enhances collaboration and maintainability in larger development teams.
FAQ
Explore answers to frequently asked questions about finding CSS selectors in Chrome and enhancing your web development skills:
Q: Why is it important to master CSS selectors?
A: CSS selectors are fundamental to styling web pages. Mastering them provides precise control over the appearance of elements, leading to more polished and visually appealing designs.
Q: How can I find CSS selectors using Chrome Developer Tools?
A: Utilize the "Inspector" tool in Chrome Developer Tools to hover over elements and inspect their HTML and CSS. Additionally, use the "Copy selector" feature to obtain the unique CSS selector for a specific element.
Q: What are some common challenges when working with CSS selectors?
A: Common challenges include specificity issues, dealing with dynamic content, ensuring cross-browser compatibility, addressing performance impacts, and creating responsive designs. Understanding these challenges is crucial for effective problem-solving in web development.
Q: Are there advanced CSS selectors I should be aware of?
A: Yes, advanced selectors like :nth-child(), :not(), and attribute selectors () provide powerful ways to target specific elements based on their position or attributes.
Q: What are some best practices for working with CSS selectors?
A: Best practices include keeping selectors simple, using IDs and classes judiciously, avoiding the use of !important, organizing stylesheets, and commenting strategically. Adhering to naming conventions for classes and IDs also contributes to code consistency.
Feel free to refer to these FAQs as you navigate the intricacies of CSS selectors in Chrome and elevate your web development expertise.
Conclusion
Congratulations on completing this comprehensive guide on finding CSS selectors in Chrome – a vital skill for any web developer. Throughout this journey, we've explored the intricacies of CSS selectors, delved into the powerful features of Chrome Developer Tools, and tackled common challenges faced in the world of web development.
By understanding the fundamentals of CSS selectors, inspecting elements in Chrome, and employing best practices, you've equipped yourself with the tools to create well-styled and responsive web designs. The ability to navigate the Document Object Model (DOM), overcome specificity conflicts, and optimize selectors for performance is now at your fingertips.
Remember to continuously hone your skills, stay informed about evolving web standards, and explore advanced CSS features. The dynamic nature of web development requires a proactive approach to learning and adapting to emerging technologies.
Whether you're a seasoned developer refining your skills or a newcomer eager to explore the world of web development, finding CSS selectors in Chrome is a foundational step toward creating visually compelling and user-friendly websites. Use the knowledge gained from this guide to enhance your projects, troubleshoot issues with confidence, and contribute to the ever-evolving landscape of web development.
Thank you for joining us on this journey, and best of luck in your continued exploration and mastery of CSS selectors!
Read the full article
0 notes
Text

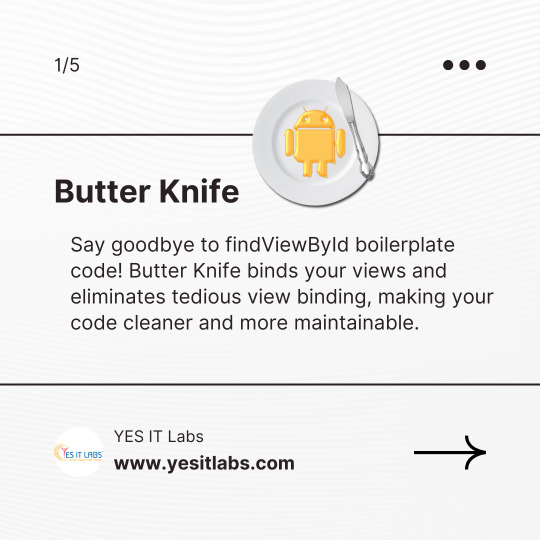
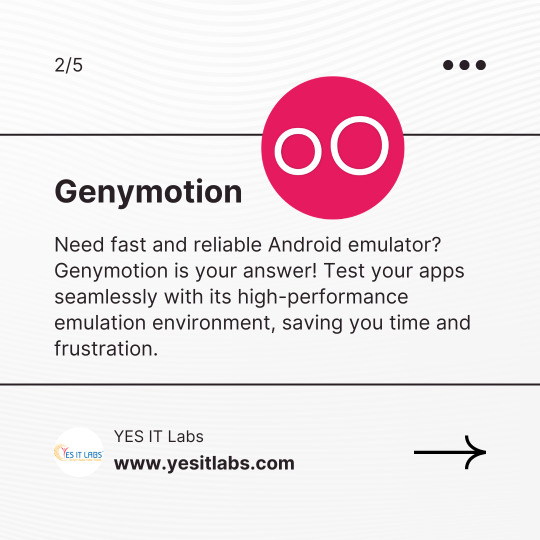


🌟 Discover the ultimate toolkit for Android developers with our top 5 Android Studio plugins! 💡 Unleash your creativity and streamline your workflow with these essential tools:
Butter Knife: Effortlessly bind views for cleaner, more efficient code.
Genymotion: Revolutionize app testing with lightning-fast emulation on virtual devices.
Android Drawable Importer: Simplify importing drawable assets for consistent visual experiences.
LeakCanary: Detect and eliminate memory leaks to ensure peak app performance.
SonarLint: Elevate code quality with real-time issue detection and actionable insights.
Transform your development process and build exceptional Android apps effortlessly! 🚀📱
#AndroidDev#DeveloperTools#ProductivityBoosters#TechMagic#codeigniter developer#android developer#technology
0 notes
Last Seen Blogs

bearanium
Bears are just big dogs.

anekplirwtoi-erwtes
Alma Libre


decepticonerk
Evil.

darisu-chan
Fandom Dumpster of most anything. Also literary references