#basically i was cropping it into individual images and i accidentally backed out into the procreate gallery
Text


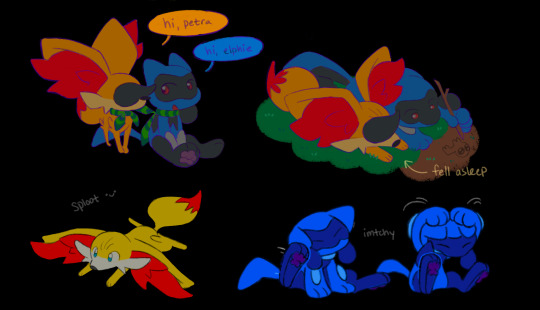
i cleaned up and colored some doodles from a few months ago! these two genuinely helped me get through my finals
+ a bonus, they are simply Children

#pokemon#pokémon#super mystery dungeon#pmd#psmd#riolu#fennekin#myart#petra (psmd)#elphie (psmd)#eye strain#y'all.#i had an Experience with this art doc last night#basically i was cropping it into individual images and i accidentally backed out into the procreate gallery#and i couldn't undo the crop and lost. so much work#friend suggested to go off the low res timelapse and that was basically my only option. had to trace and recolor most of it#but it pissed me off so bad that i speedran it within a day basically#i'm normally a slow artist |D#hope y'all enjoy my daughters whom i have suffered over and would do anything for#OH also i added character tags for my pmd characters!#you can see how some of them have evolved over the years :]#i don't have a huge backlog of art posts but uhh yeah. that's it ^^
561 notes
·
View notes
Text
I’ve apparently consumed enough X-Men Evo and Kodd content recently that it has infiltrated my dreams. Highlights from last night include:
- ghosts but not really
- soft Todd being a little stupid and man do I love him
- why is Todd on the moon
- Kurt in a crop top
- mutant named Careless Whisper
I wrote out more details under the cut. This was a wild enough dream that I wasn’t even mad I overslept.
Inside of what may or may not have been meant to be the X Mansion, but was certainly smaller and shabbier, there was a large room with glass walls that would occasionally show flickering figures. Some nights, the figures solidified, although their image was still ghostly. It was determined that this was a procession of the potential dead, mimicking their way through one last facsimile of life before passing on.
There were multiple phases to this final ghostly display, most notable of which was a dancing procession that looped around the ring of the room. Each person danced in their individual groups of 3 or 4, with people determined to be their soulmates—not romantic, per say, but people who had important places in their heart and life. Some of these people appeared to be filler images, concocted either because the person’s loved ones were not dead, or because they had no such people.
I watched from the dream-bestowed form of an unknown mutant who would later solidify into a character dubbed Careless Whisper. She had perfect mimicry abilities that resulted in a constantly fluctuating accent and could disconnect her consciousness at will to travel relatively freely, leaving her unconscious body behind for a time, so long as the consciousness remained grounded to something else. I do not know her name. We will call her Cera.
Cera watched with a deep, aching sadness as the procession of the dead progressed around the ring. Perhaps she knew Todd, as she watched him closer than any other, but it is more likely she recognized in him a scared young man who life had wronged, and her heart ached with the knowledge that few would mourn his passing.
Also present among the potential ghosts was Kurt. The two danced in separate groups, but the groups were next to each other. As Cera watched, Todd’s ghost seemed to gain awareness of his situation, to understand that this was a final lilting waltz before death, and he removed himself from his group to approach Kurt. Kurt danced hand-in-hand with the faded image of a girl who might not have even been real. Rather than come between the dance, Todd wrapped his arms around Kurt’s middle from behind and leaned his head against Kurt’s back, a final embrace before inevitability claimed them. Kurt faltered, his hands coming to rest on Todd’s arms. The smiling girl did not react, and her hands remained outstretched as though Kurt were still holding them.
The dancing came to a close, and the souls gathered before what I believe was Mystique, rallying the dead for some unknown cause. But before anything else could be revealed, the images flickered out as the door to the house banged open to reveal an alive but also very sick Todd. By the time Cera made her way over, Todd was already being lambasted with questions from a handful of other mutants. Cera forced her way through the crowd and insisted that they could interrogate Todd after checking to make sure he was okay. Todd seemed genuinely surprised that someone was showing him actual concern, but he didn’t protest.
Anyway turns out the idiot had accidentally eaten, like, poisoned sausages or something and that’s why he was gonna die. He threw up in a glass cup Cera grabbed for him (I think an old kitchen had been turned into a makeshift infirmary) and slept it off and then he was fine. Literally that was it that’s all it took, he stopped showing up in the glass after that.
Cera basically adopted a begrudging Todd as her younger brother, because I’m apparently obsessed with the idea of Todd having siblings that care about him, and then they went on a bunch of hijinks and whatever together. This is where the dream got hazier but they DID end up vandalizing the moon at one point. Todd somehow found a portal that led there and Cera just linked her consciousness to his presence and so badda-bing badda-boom, moon time.
Eventually Cera did confirm that Todd had a HUGE crush on Kurt, and she apparently had taken a video of the ghostly dance, and so they embarked on a quest to save Kurt from some unknown peril. I woke up just as they were about to figure out what was up with that, but I do recall that Kurt was just casually wearing a crop top, one of those kinds that looks like it was once a sporty shirt with drawstrings, and lemme tell you, Todd.exe stopped responding for a little bit.
If you read this far… why, but also thank you? Feel free to use this as fic inspiration, just tag me so I can read it because I crave Kodd content.
16 notes
·
View notes
Text
After Effects: revisiting feature requests from 2008
June 2008 seems like a long time ago now. Adobe had only just released After Effects CS3 and I was mostly working on a G5 PowerMac. Four gigabytes of RAM seemed like an awful lot. George W Bush was the US President and the Apple iPhone was only 1 year old – a month later in July Apple would release the iPhone 3G, but that was still a secret.
Just a quick reminder about June 2008… After Effects came in a box, the iPhone was at version 1, and the US President was George W Bush.
What Apple did announce in June 2008 was the name of their next operating system – “Snow Leopard”. At the Apple Worldwide Developer Conference a few details trickled out – most significantly, the announcement that Snow Leopard wouldn’t introduce any major new features, but rather focus on performance and “under the hood” improvements.
When I read the various Apple news reports I started to wonder – what if Adobe took the same approach with After Effects? What if the next release skipped any major new features and instead focused on performance and small improvements? I thought it was worth daydreaming about.
Just for fun, I posted the idea on the After Effects email list, and asked for suggestions for minor feature requests that would make everyday work faster and easier. I remember finding the responses interesting, as there were several things I had never thought of. It was a good reminder that After Effects is used by lots of different people in lots of different situations. After a week or two, I compiled the suggestions together and emailed the list to Adobe, and received a thank-you email from Michael Coleran, the After Effects product manager at the time.
It’s not quite 10 years later, but last week Adobe announced the latest releases of their major CC apps, including After Effects. As usual with such a major update, it takes time to go through all the new features and work out what’s new and what’s changed. There are videos to watch, blogs to read, twitter posts to examine and so on. Right now, I’m not even sure what it’s called. Is it After Effects CC 2018? The update appeared on my Windows machine as just After Effects CC…
Whatever the name, how does the latest version of After Effects stack up against the list of feature requests I sent to Adobe almost 10 years ago? Let’s go through the list and see. Bear in mind that this is a list of suggestions from a range of different people, so there’s some overlap and a little ambiguity. I’ve loosely grouped them together according to the part of After Effects they apply to.
Interface:
Moving/dragging interface tabs around can be “undone”
I used to think this looked better than the current After Effects interface. I was wrong. So very, very wrong.
It’s hard to remember, but After Effects didn’t always look the way it did. Adobe gave AE a major interface revamp with version 7, but many users – myself included – initially hated the radical change and resisted the upgrade.
Eventually After Effects CS3 was released which prompted us to upgrade and grapple with the new look and feel, and it really was a big leap from the old floating-windows of After Effects 6.5. But while it now seems 2nd nature, dragging those tabs and palettes around took a bit of getting used to. It was easy to accidentally drag something to a new place, or close a panel you didn’t mean to, or basically just click in the wrong spot and find your workspace layout had become all messed up. Unlike changes to the timeline, these changes to the interface layout couldn’t be fixed with an “undo”.
Nearly ten years later it’s still easy to accidentally mess up your favourite workspace with an errant click, but can you “undo” workspace layout changes in the latest version of After Effects? Still no.
Verdict: Still waiting…
a colour swatch palette
It’s fair to say that we got more than we asked for! The Photoshop swatches palette is on the left, the Kuler panel in After Effects on the right also includes tools to create colour schemes.
In 2008, the majority of the work I was doing involved motion graphics for large corporate clients with strict brand guidelines. Clients generally had a small, rigidly defined colour palette to work from, but After Effects had no way of saving colours for easy and repeated selection, in the way that Photoshop and Illustrator did. With CC 2014, Adobe introduced the Kuler panel, which finally gave users a color swatch panel but also much, much more. While the Kuler panel is above and beyond the expectations of any AE user who just wanted the same swatch panel that Photoshop had, it’s unfortunate that Adobe hid this awesome new feature away in the “Extensions” sub-menu, so many users are probably unaware it’s there.
Verdict: We got it, but they’ve done their best to hide it from us…
colour labels for composition tabs…
After Effects used to be monochrome, but colour – and colour labels – slowly crept in over time. The lower image is from a time where layers could be given a colour label, but not the actual composition.
Using colour labels has become an essential part of my workflow, but if you go back far enough there was a time when the entire AE interface was monochrome. At some point, After Effects included colour labels for layers in a composition, but presumably there was a period where you couldn’t assign a colour label to the composition itself. But AFAIK, compositions have been able to have colour labels for some time now…
Verdict: Yes thanks!
colour labels for effects
…but there’s no way to assign a colour label to an effect. If you don’t use colour labels to organize your projects then this is probably pretty meaningless to you – but to those of us who do, they are an essential organizational tool. The “Select label group” function is one of those powerful workflow features that isn’t immediately obvious but can save an enormous amount of time and frustration. Perhaps a future version of AE will allow individual effects to have colour labels – but so far it’s a no go.
Verdict: No, not yet.
Plugins & Effects:
a list of favourite effects
While After Effects has allowed you to save your own presets for many years, the plugins themselves are always listed in same groups in the “Effects” menu. In the same way that many applications keep a track of recent documents opened, and After Effects keeps a track of recently imported footage, it would be nice to have a list of recently used effects. So far, however, that’s yet to appear.
Verdict: Still waiting…
Make obsolete plugins (eg Basic 3D) an optional install. Weed out older, redundant and inferior plugins. For example- why is there a CC Toner AND a Tritone? Do we still need a fast blur AND a Gaussian blur? The CC Power Pin is much better than the older Corner Pin, the “Hue/Saturation” effect is miles better than the “Colour Balance (HLS)” effect etc
Over the years, Adobe has bought software from other companies (or just bought the company) and also licensed existing plugins from 3rd parties so they come included with the basic install. Along the way, some older plugins have been superseded and others have duplicate functionality. In recent years, Adobe HAVE started to address this issue, by introducing the “Obsolete” menu. And while there is the potential to do more with the way duplicate functions are handled – and they confused a lot of people by changing the Gaussian Blur and Fast Blur effects recently – they seem to at least be aware of the problem.
Verdict: Well I guess they’ve made a start.
a button to move a layer to the centre of the composition
While After Effects has had an “align” panel for a long time, it was overhauled with CS 5 and gained the ability to align layers relative to the composition. Technically, to centre a layer you have to click twice – once for the horizontal and once for the vertical axis – but we’ll give Adobe a tick for this one.
Verdict: Yes thanks Adobe!
a button to reset the anchor point of a layer to the centre
a button to add a keyframe from within the effects palette
These requests are perfect examples of the types of workflow enhancements I was looking for, when I made the analogy between Apple’s approach to Snow Leopard and what I thought Adobe could do with After Effects. They sound so simple yet so useful – but so far neither of these features has been added.
Verdict: No, not yet. But check AEscripts…
a histogram in the “curves” effect
A lot of After Effects users – myself included – complained about the “old” curves effect. It wasn’t that great, and when benchmarked against the “levels” effect it was incredibly slow. In a rare move, Adobe publically announced they were going to completely overhaul the Curves effect and even asked for suggestions as to how it could be better. The “new” curves effect is fast, has a great scalable interface, and is generally much easier to use. While it doesn’t have all of the features everyone may have asked for, it’s vastly improved over the old one. I use it every day. But does it have a histogram? No, no it doesn’t…
Verdict: Still waiting… if they haven’t done it now, they’ll probably never do it. I’ll just keep on using the levels effect after the curves effect just for the histogram…
give all plugins a consistent edge crop and blend-with-original option (like the way all Tinderbox plugins do)
Tinderbox was one of the first 3rd party plugins I owned, but they were sadly bought by GenArts and then discontinued (I assume some of the technology made its way into Sapphire, GenArts existing plugin range). One feature that helped make the Tinderbox plugins feel professional was the way every plugin had identical controls to crop edges, resize the layer if needed, and to blend with the original image. While some After Effects plugins have some of these features, it was the consistency across all Tinderbox plugins which helped them feel like a high-end tool.
Compositing options – I love them!
Adobe addressed this with the CC 2014 release – which gave all effects a “compositing option” to fade the strength of the effect, and also the ability to use masks to isolate where an effect was applied to an image.
In CC 2017, Adobe went one step further and now every plugin that references another layer can now be controlled to see the layer either before or after effects have been applied.
Verdict: Yes thank you! The “compositing options” are very powerful and the improvements to compound effects in CC 2017 were an unexpected bonus.
a depth shadow effect (not sure what this means, maybe an extruded shadow, not a drop shadow?)
Remembering that this list is a bunch of suggestions from several people, I’m not actually sure what the person who suggested “depth shadow” really meant. But since After Effects introduced Layer Styles from Photoshop, which offer more options for shadows (as well as bevels and all the other layer style goodness) I’m going to assume that’s what they meant.
Verdict: Well we got layer styles, which are pretty cool. I guess that’s what you meant?
Fonts & Type:
a reset button on the character palette (but please don’t reset the font, it’s annoying)
If you’re jumping between different motion graphics projects, it’s common to be working with many different fonts, and many different character settings. Font size, leading, tracking and so on can be radically different between projects and when changing to another project it can be easy to miss settings in the character palette that should have been adjusted. Maybe (just hypothetically… it happened to a friend of mine) you’ve spent hours working on an awesome typography layout only to realize that all the text is superscript… or faux bold… or set to 110% wide. A quick button to reset the character palette would help avoid these sorts of issues.
While there isn’t a clickable button to reset all of the parameters in the character panel, you can choose reset from the character palette’s contextual menu. I’m not sure if this has always been there, but it’s good to know. The fact that the person who requested this specifically asked for the reset button not to reset the font suggests they knew about the menu option but really, really wanted a button to press.
Verdict: There’s a reset option in the contextual menu, but whoever suggested this really wanted a button.
keyframable text palette parameters
Animating text is one of the core uses for After Effects, and so it stands to reason that the text animation tools are incredibly powerful. The problem is that they are SO powerful that even basic text animation can be complicated, or just plain overwhelming. Common text treatments such as animated tracking require the user to manually add a text animator and potentially deal with selecting ranges and so on. Wouldn’t it be nice to be able to animate simple parameters like font size, leading and tracking without having to dive into the world of text animators? To date, Adobe hasn’t agreed.
Verdict: Still waiting…
make the default kerning optical (PLEASE! At least an option in preferences…)
In my experience, optical kerning nearly always looks better.
Verdict: Still waiting…
include fonts with the “collect files” function
Such a common and obvious request, and I can only assume that the reason it hasn’t been done is to do with legal issues surrounding the distribution of fonts. It’s also possible that Adobe’s push to the Creative Cloud TypeKit means they see that as a solution for font problems.
Verdict: Still waiting…
put all fonts used in a project at the top of the font list (as well as in alphabetical order)
Seriously Adobe, frickin’ accountants using frickin’ spreadsheets had it better than us for years!
This is something that Microsoft Office products have done for years, and it’s great. Especially for those of us who spend weeks at a time working with the same font, or sets of fonts, it’s amazing that an application that is used so heavily for text animation has lacked an easy way to identify which fonts are being used in the current project.
Verdict: Hooray! Thanks Adobe, they’ve overhauled fonts and the font menu with the latest release.
Masks
keyframable/ trackable mask axis
While Adobe have continued to add features to masks since it was released, it’s been up to 3rd party scripts to fill various voids and enable new ways to manipulate or work with masks. While there was a time when you could only have one mask per layer, the most recent release of After Effects now provides access to individual path points on a mask through expressions.
Verdict: Yes thanks Adobe! Christmas came early this year.
per-vertex mask feather
This powerful feature was added in CS 6. My own personal observation, however, is that lots of people asked for it but when it finally arrived not so many people actually used it. When you need it, though, it’s invaluable.
Verdict: Yes thanks Adobe! It’s there for when we need it.
Animation
separate X,Y & Z position keyframes
Verdict: Yes thanks Adobe!
adjust and save your own “ease” settings as keyframe assistants
The velocity of keyframes is what gives animation its personality. You could say that the “design” in motion graphics design comes down to velocity curves. While the default “easy ease” helps make animations smoother with the press of a button (I press F9 many time a day…) the default values can make your animations feel a bit generic. Being able to set and save presets for your own favourite “ease” settings would be a huge bonus, and if you have a project where the overall “feel” comes from using specific velocity curve values, it would save lots of tedious clicking and typing.
Verdict: Still waiting…
solids have their colour keyframable without using the fill effect
At first glance this might seem like a flippant request, but remember that this list was made in 2008 and After Effects CS3 was a lot more restrictive than it is now in terms of rendering order and the way compound effects worked (and see above for the compositing options now available). But in 2008 there would have been cases where changing the colour of a solid without having to use an effect would have been very useful. So while it’s clear that this feature hasn’t been implemented, other more significant features to the After Effects rendering pipeline have possibly made this request redundant.
Verdict: Still waiting, but we’ll give Adobe a pass on this one
Preferences
user-defined keyboard shortcuts
With so many apps offering this feature there’s little to add except to note how long it’s taken to arrive. The very latest release, CC 2018, finally brings keyboard mapping to After Effects.
Verdict: Yes thanks Adobe! Christmas came early this year.
adding a preference for the level of detail used by pixelmotion, so you can adjust the quality of time-remapped footage without resorting to using Timewarp.
This is an interesting suggestion, but it will need some explanation. When Adobe licensed the technology behind The Foundry’s “Kronos” plugin and introduced it to After Effects, they also introduced a level of ambiguity and misunderstanding with their terminology. Firstly, there’s the “timewarp” effect, applied to a layer from the effects menu. But there’s also the term “pixelmotion”, which is enabled by cycling through the frame-blending options in the timeline window. Behind the scenes, they’re doing the same thing – you can think of “pixelmotion” as the timewarp effect, but instead of being applied as an effect and being controlled by the parameters in the effects palette, it’s automatically and invisibly enabled by setting the frame-blending button to the appropriate setting.
But as anyone who has ever used pixelmotion/timewarp can tell you – the results aren’t always perfect. But if a layer isn’t rendering quite right with pixelmotion, the next step is to jump into the full-blown timewarp effect and play around with all the parameters. Wouldn’t it be nice and easy if there was a simple way of adjusting some of the pixelmotion settings globally, in the preferences panel, so that the user has a basic level of control over pixel motion. That way, minor artefacts can be fixed without having to change to the timewarp effect.
Verdict: Still waiting…
re-ordering queued items in the render queue when the current render is paused
Once you hit that “render” button, After Effects effectively locks you out of doing anything else until it’s finished. If you have lots of long, intensive compositions queued up then this can mean leaving your machine running for hours, or even overnight. Unfortunately, if your priorities change after you’ve started rendering and you want to change the order that compositions are rendered, you have to stop the whole process in order to be able to move items in the queue. It would save a lot of frustration if you could change the order of queued up renders without having to stop the current one.
Verdict: Still waiting…
saving or locking old render queue information
The render queue isn’t just a blue bar that shows how long you’ve got to watch cats on YouTube before you can get back to work. It’s also a record of what you’ve rendered, where you’ve rendered it to, and when you did it. Looking through the render queue panel can solve the mystery of how to fill in your timesheets, where to find that file you’ve lost, or whether “final final” came before or after “final master fixed”. Being able to save the render queue information or even lock it (locking in file paths for compositions would be very useful) allows this valuable data to be saved for future reference.
Verdict: Still waiting…
overhaul the “Pre-compose” function, at the very least to include options for the behaviors which are currently only available through scripts
If it wasn’t for AEscripts, I would be insane by now…
Pre-composing can be a necessary evil in After Effects, but for such a fundamental workflow tool the options were always limited. With many 3rd party scripts available to add more power and functionality to After Effects’ basic functionality, Adobe added a trim feature to CC 2014, but nothing more. Luckily, there are all sorts of 3rd party scripts out there to help you pre-compose exactly as you want to.
Verdict: Still waiting… best to head over to AEscripts.
an integrated scripting/ expressions environment
Expressions – love them or hate them, they’re essential to many people. But despite their power, you’re still stuck with a simple text box that’s not even easy to resize. If you move up to scripting, at least you have the Adobe ExtendScript toolkit app to help things feel more professional – but it’s hardly integrated with After Effects itself. Many users find expressions and scripting hard enough without being restricted to a tiny text box that has basic problems with copying & pasting text. It could be better…
Verdict: Still waiting for it to be easier to write expressions. The ExtendScript Toolkit is OK for scripters, but not exactly integrated.
3D reflections
Difficult to comment on this one. On one hand, obviously Adobe hasn’t given us 3D reflections inside the After Effects timeline. As After Effects is basically a 2D transformation engine, it’s unlikely they ever will. But they have given us increasingly powerful Cinema 4D integration, and bundled the lite version with the basic AE install. So if you think of Cinema 4D as the solution to this feature request, then Adobe have delivered it with bells on.
Verdict: I’ll just say a big thank you for the Cinema 4D integration.
real time scopes in Synthetic Aperture
Color Finesse is awesome but its integration with After Effects has never felt completely seamless. But the real problem with this request is that it depends on what you mean by “real time”. After Effects isn’t a real-time app, although there’s RAM previews. I do use Colour Finesse a bit and from what I can see, the scopes do update when you play clips within the colour finesse interface – but the playback itself is hardly what you would call real-time. But maybe that in itself is an improvement from 2008. I just don’t know.
However when Adobe released CC 2017 they included Lumetri, a new colour correction tool ported over from Premiere that brings scopes to the regular AE interface. Hooray! I’m going to guess that Lumetri is the future…
Verdict: I don’t know about Colour Finesse, but we got Lumetri. Close enough?
dynamic project structure system, with project folders linked to the file system
This is one of those power-features that makes perfect sense to one group of users, but probably has others scratching their head. Basically, this request means that instead of each user manually organizing their After Effects project by creating and naming folders, importing assets etc etc, After Effects would do this all automatically by copying the folder structure and files from somewhere on your computer. If you’re working on a network drive and someone adds a new folder or a new render on the network, everyone’s After Effects project would automatically (dynamically) update and maintain sync with the master folder. If this sounds useful then let Adobe know, because they haven’t implemented this yet.
Verdict: Still waiting…
And finally…
LAYER GROUPS
Yeah. Ha. Well somehow I’ve written 3,000 words on all these feature requests to date, and I could easily write another 3,000 just on layer groups alone. But let’s just say – they’re still not here. Let’s hope it’s not another 8 years before we finally get them.
The more things change, the more things stay the same.
So it’s approaching ten years since that list was emailed to Adobe and much has changed since then. The integration with Premiere has created entire new workflows for some users, and the integration with Cinema 4D has had – and will continue to have – a major impact on the motion graphics industry. And in 2008 who thought VR would become a thing?
But there’s still plenty of room for improvement. Sometimes, those of us who rely on After Effects every working day don’t need or even want the next big headline feature. We just want a few little tweaks to the sorts of inefficient things that we continue to do every day, to help make our lives easier. And layer groups. We really want them.
I’ll dive into CC 2018 over the next few weeks and no doubt I’ll notice many improvements and new features. But there’s always room to go back to the very basics of how After Effects works and make those little tweaks. Are you listening, Adobe?
The post After Effects: revisiting feature requests from 2008 appeared first on ProVideo Coalition.
First Found At: After Effects: revisiting feature requests from 2008
2 notes
·
View notes
Link
Amazon will sell full-size Christmas trees for the first time this year, following a successful test run with mini trees last year, the Associated Press reported.
Obviously, Amazon is continually making headlines for the many ways it is now involved in our daily lives. A selection from the past two weeks: It’s steadily and rapidly expanding its Whole Foods delivery service in an effort to disrupt your grocery store, partnering with J.Crew for the first time as part of its year-end goal to crush Walmart, and fueling its feud with Sen. Bernie Sanders, which is tied to the extreme wage gap between its workers and its executives as well as reportedly heinous working conditions in its fulfillment centers.
And now, it’s getting involved in Christmas. The trees will be delivered via Prime to any user’s door within 10 days of the tree being chopped. Shipping will be free, but the trees themselves come at a premium — $115 for a 7-foot Fraser fir, for example. (The average Christmas tree in the US cost $51 as of 2016.) This is not even close to being the first Christmas tree delivery service, but it is the first arranged as part of Jeff Bezos’s ever-expanding empire, and therefore, something about it feels a little different.
So would you order an Amazon Christmas tree? While Christmas tree delivery is clearly useful for the elderly and others for whom Christmas tree farms may not be physically accessible, does it not also smack of a corporate monolith trying to grasp at yet another precious facet of the human experience? Is it not sad that the tree is just kind of dropped in front of your house and there’s not even a nice man to put it in a tree stand for you, as there is with established, comparable services?
Maybe I don’t actually need dominion over Christmas tree rituals — I just don’t want Amazon to have it
Wanting to avoid snowy roads and hordes of screaming children is a desire that is quite reasonable to me, but at the same time, I would like to point out something that we might accidentally miss here — Christmas tree farms often give out free hot chocolate to their customers. Sometimes cute boys work at them! Traditions are not about convenience; they are about joy and sweaty group photos.
Amazon has already irrevocably changed the way we shop at Christmas, but will this new service change the way we perform Christmas too? Before we work ourselves into a tizzy, it would behoove us to consult some people who really know Christmas trees inside and out and know exactly how much “disruption” the industry (or an individual uprooted tree) can take.
To that end, I asked five Christmas tree experts for their thoughts on Amazon’s new service.
Beth Walterscheidt, owner of Evergreen Farms (Elgin, Texas)
I speak [for] a choose-and-cut Christmas tree farm where people come out for the experience of choosing and cutting their own tree to take home. These people enjoy the experience and often bring extended family members to enjoy the experience. I do not see [Amazon’s Christmas tree delivery service] as having an impact on our sales. As far as the industry is concerned, I think it has a niche for people who are unable to get out to a tree lot or a farm to get their real tree. It might increase the sales of real Christmas trees, but as I mentioned earlier, it will not deter people from getting out with their families to choose a real tree.
Joe Raedle/Getty Images
Brian Eshenaur, plant pathologist specializing in ornamental crops (Rochester, New York)
Fresh-cut Christmas trees are resilient. They should be able to handle a few days in a box without a problem as long as the box stays at room temperature or below. You see, when it’s compacted in the box, the surface area of the tree is reduced and the humidity builds up inside, so very little evaporation will take place. When it arrives, it is best then to get the trunk of the tree into water right away.
What the buyer would be missing is the experience! The tradition of selecting your own fresh tree would be missed. It’s often a family event; whether at a tree lot or a field where you choose and cut your own, that’s where a lot of memories are made and traditions are built.
Some species of Christmas trees are tougher than others. As far as a tree that will stay fresh and holds on to its needles, Fraser firs are at the top of the list.
Leo Collins, owner of Bluebird Christmas Tree Farm (Heiskell, Tennessee)
I think there are different types of customers, and that’s a great thing. If you’re wanting to get a tree without the hassle of hunting one down, that’d be a good way to go, I would think. For our customers, it’s more about the experience, and the trees are fresh when they cut them down. But we’re at too low of an elevation to grow Fraser firs — we drive up to a different farm in Tennessee where they have them, buy ’em, bring ’em down, once or twice a week. They stay fresh for several months, so [Amazon] won’t have a problem.
Our customers have learned that [Fraser firs] stay fresh, they smell best and stay green and hold ornaments the best, so they usually end up taking those. You’re not going to get the same experience from opening a box, but if it’s a good tree and it’s at your door and you want that ease, that’s the way to go.
Andreas Rentz/Getty Images
James Cooper, professional Christmas blogger (Minehead, Somerset, UK)
I think this story might be getting a lot of press because it’s Amazon, but I don’t think it’s anything really new. I’ve run my main Christmas site since 2000, and people were offering mail-order Christmas tree services back then — and I know that many big tree suppliers have also been offering real and artificial trees via their sites for several years (even though it’s still a tiny percentage of overall tree sales).
I live in the UK, so it will be interesting to see if Amazon will sell real trees online over here as well!
There’s nothing like going and picking your own tree, either pre-chopped or still in the ground. But I can also see how it could be really convenient for many people. I’m actually basically house-bound with ME/CFS (I’ve had ME for over 25 years — longer than I’ve been in the Christmas business), and so I pretty much rely on online shopping. Being able to order online and get a tree delivered could actually be useful for a whole range of people, not just those two who are “too busy” or don’t want to go out shopping for a tree.
Kurt Emmerich, owner of Emmerich Tree Farm (Warwick, New York)
Boxed and delivered Christmas trees have been available for years. Typically, growers have teamed with FedEx or UPS to offer boxed trees and wreaths delivered to customers’ homes. Growers who market their products this way have been reporting strong sales. The announcement from Amazon should help the real Christmas tree industry recover market share from fake trees, so that’s a good thing. The convenience should rival that of a fake tree.
Of course, delivery eliminates the experience of selecting a fresh cut tree or a choose-and-cut tree from the farm, which is often an annual highlight and tradition for families.
As for freshness, the 10-days-from-cutting promise should help with needle retention, but species selection is probably more important. While you can select most any species on the farm and keep it fresh through watering, trees delivered 10 days after cutting must be a species with excellent needle retention qualities such as a Fraser fir.
“The announcement from Amazon should help the real Christmas tree industry recover market share from fake trees, so that’s a good thing”
Regarding price, $115 for a 7- to 8-foot tree is significantly higher than at most retail outlets or farms where you can cut your own. While the convenience factor is high, the overall value does not seem to be there when considering the limited species selection, inability to choose your specific tree, and the risk of shipping damage and/or trees sitting uncollected in depots, driveways, or building lobbies.
As a Christmas tree grower, the decision by Amazon to sell real Christmas trees is exciting and demonstrates the buying public’s growing preference for real Christmas trees. As a substitute for the “Real Christmas Tree Experience (TM),” Amazon has a long way to go to deliver the goods.
Iconic Christmas lover Martha Stewart was not available for comment for this piece, but for the record: She didn’t make a must-watch mini documentary about herself and Michael Jordan and Miss Piggy opening a box, okay? She loves cutting down a tree. She loves effort. On the other hand, Martha Stewart regularly acknowledges the value of our time and recommends convenience. It appears that in 2007, she did receive at least five of her Christmas trees via some kind of delivery service. We are without a final ruling here from her.
Again, is a Christmas tree about the experience of getting a Christmas tree, or is a Christmas tree simply about the smell? Is it about sweeping up pine needles 40 times a day so your cat doesn’t eat them and then barf, or is it about going outside and getting a kissing-by-a-barn picture for Instagram? I couldn’t say. And am I trying to get into the artificial tree versus real tree debate right now? Absolutely not!
However, none of the Christmas experts I consulted brought up whether they had an ethical issue with Amazon’s business model or corporate practices or impingement on storied cultural rituals; basically all any of them mentioned caring about was seeing real trees get out from under the horrible tyranny of fake trees.
They could not care less what Amazon does, so long as fake trees are the ones losing. This, above all, is the real Christmas spirit.
Original Source -> Amazon will deliver live Christmas trees this year. 5 Christmas tree experts weigh in.
via The Conservative Brief
0 notes
Text
Twitch Creative 101
A guide to creative streaming on Twitch.tv
by: Bilvy Jane
First: Why
Software set up for a digital art stream
Stream scenes and Overlays
Understanding the Twitch platform
Third party apps
Bots and extensions
Making a living from streaming
First: Why
There are plenty of “How to start streaming” tutorials on Youtube, Reddit, Twitch, and forums all over the internet, but most if not all of them are aimed at video gamers and vloggers. I wanted to make this guide to help artists who want to start streaming, or make the move over to Twitch but don’t know how, and of course to encourage it! The Creative section of Twitch is still a fairly new area, and could do with plenty more artists to share their skill and communities, and help remove the stigma that Twitch is just a site for gamers.
I’ve been streaming here and there on various platforms for at least five years. I’ve been streaming steadily on Twitch for nearly 2 years, and have been able to call Twitch my full time job since October 2017. I hope my advice and insight helps some of you enjoy this platform!
If you would like to give feedback regarding this tutorial, or have any further questions, feel free to jump into my public Discord or reply on the Tapas forums.
Software set up for a digital art stream
I’ll be writing this section as if you’ve never streamed before, and have never used a program like OBS. I’ve not used any other streaming app before, so I can’t recommend or explain any of them. Fortunately, OBS is excellent and has everything you need!
OBS, or Open Broadcast Studio, is the program that you run your screen through, and control things like frame rate and resolution.
Download: Get “OBS Studio” from https://obsproject.com/download
Settings: Go to your preferences from the File menu or clicking the “Settings” button in the OBS window.
The Stream category is where you connect OBS to your Twitch account, so when you hit the “Start Streaming” button, OBS knows where you’re going live. Match your drop down menus like shown to connect to Twitch’s servers. The “Stream key” is where we tell OBS which Twitch channel we’re going live to; this is your unique code that connects you to your Twitch page. Don’t ever show it to anyone, or they’ll be able to stream to your account!
To find your stream key, log into Twitch and visit https://www.twitch.tv/USERNAME/dashboard/settings/streamkey , and replace “USERNAME” with your Twitch handle. Copy the code and paste it into the “Stream key” field in OBS, and your account will be linked! Now, if you hit that live button, you’ll start broadcasting on Twitch.tv/USERNAME
If you ever want to test your stream quality and watch for lag spikes, buffers etc within OBS, you can tack “?bandwidthtest=true” to the end of your stream key in OBS. This will push you live as if it were any other stream, except the video will not appear on your Twitch page and your followers will not be notified. Don’t forget to remove it once you’re ready to stream for real!
Output is a little trickier, because these settings are incredibly important but will vary from user to user. This is where we control our stream quality and make adjustments to reduce lag and buffering, by deciding on our Bitrate. To find out your Bitrate, you’ll need to know your upload speed. Your upload speed is basically your maximum allowance, and you’re going to allocate some of that to your stream.
Run an internet speed test on Speedtest.net to find this. Speedtest by default measures in mbps, but your OBS bitrate is in kbps. To convert these easily, 1000kbps = 1mbps. Easy! The following conditions are a basic rule of thumb, and you should test your stream and adjust your bitrate to make sure everything runs smoothly for your particular set up.
If you have an upload speed of less than 500kbps / 0.5mbps:
I’m afraid it’s going to be hard to stream much of anything. While it’s possible to stream on a bitrate this low, you would need a higher upload speed for extra cushioning to ensure your stream runs smoothly. I don’t recommend you try to stream, unless you’ve tested everything and can guarantee a smooth connection
If your upload speed is around 1000kbps / 1mbps:
Use between 400–700 for your bitrate, and you should be able to stream comfortably in 720p.
If your upload speed is 2000–3000kbps / 2–3mbps:
Try 1500 bitrate if you want to stream in 720p. You can try using 2000 for a 1080p stream, but you may want to test and make sure this works fine with your computer and connection.
If your upload speed is over 4000kbps / 4mbps:
You can stream comfortably in 1080p with a bitrate anywhere between 2000–3500. Using a higher bitrate will be harder on your CPU, so consider streaming at a lower bitrate & quality if your computer is older or cheaper.
No matter which category you fall into, be sure to test your stream, watch the quality and adjust if you find you’re dropping any frames. You can monitor this at the bottom of the OBS window when you’re live.
An important note to remember when testing bitrates: Gaming streamers recommend no higher than a 3500 bitrate for 1080p gaming, including first person shooters with high intensity movement and graphics. Higher than that will be lost to most viewers anyway. This should give us a general guide, that if high intensity gaming streams don’t need more than 4000, we definitely don’t need that much for drawing and painting.
It’s widely recommended you use 112 or 128 for your audio bitrate, no matter what you’re streaming.
In the Audio tab you can connect microphones, headsets etc. If you’re using a microphone and playing music, you’ll have one audio channel for the mic and another one for your desktop audio. If you’re running your stream on a Mac like me, you’ll need to run your computer audio through another app if you want anyone to hear what music you’re playing etc. Check the tutorial for that here: https://obsproject.com/forum/threads/using-soundflower-on-mac.50257/
The Video section is where we decide our resolution/quality. Keeping your bitrate in mind, select a resolution from the drop down list. The standard FPS for streaming is 29.97 or 30.
The most important thing in this section is to keep the Base (Canvas) Resolution and the Output (Scaled) Resolution the same. This is a hugely common issue when people experience slow computer processing while streaming.
The Base is the size of your canvas, which has the screen, cameras, images/overlays and text on it. When you record video through OBS, it records it using this resolution. The Output is what OBS sends to Twitch, and what appears on your stream page. If you have a Base resolution of 1080 but your output has to scale it down to 720, your computer is going to be doing loads of extra thinking to be constantly converting the video while sending it to Twitch. The only reason you should have these as two separate values if you’re recording content to upload on Youtube etc later on, or want a higher resolution copy of your stream. You’ll need a decent computer to do this, so make sure your hardware holds up to the challenge.
You’ve finished with your settings! Time to do the fun stuff!
Show your drawing: Hit that plus to create a new source. Select Display capture if you’re using a cintiq/yiynova/huion etc to capture the whole drawing screen. If you’re using a regular graphics tablet, it’s recommended you choose Window capture and select your drawing software. If you’re a traditional artist, choose the Video Capture Device and select your webcam.
For a facecam, choose Video Capture, and your mic will already be running through OBS from your Audio settings.
Customise: Position these on your screen by clicking the source within the scene, or clicking its name from your list of sources. The order they appear in the source list is the order they will appear on screen, just like drawing with layers. If you have any overlapping sources and you don’t want to accidentally click or move one of them, you can lock it by clicking the padlock in your source list.
You can right click on a source (from the scene, or from the list) to transform it, including rotations, flips, stretches etc. Select “Edit Transform” for precise and detailed options like cropping. Cropping is especially useful for fitting webcams neatly on the page.
That’s it for the OBS set up! When you hit “Start streaming”, your viewers will see exactly what’s in your selected scene. You can also switch between scenes and edit sources while live, so have fun customising your own screens!
Stream scenes and overlays
Scene Collection: The folder that contains all of your scenes, sources and settings together. Your default “Untitled” scene collection is automatically selected whenever you open OBS. Find this in the File Edit etc menu, under “Scene Collection”. It’s from this menu that you can switch between scenes and even make back ups, so if you ever switch computers, you don’t have to re-enter all of your settings again. Back up with the Export option, and restore from a file with the Import option.
Sources: The individual items within your scene. A webcam is a camera source, a border is an image source, and widgets like chat windows and alert notifications are browser sources. Every item that you see on screen is a source, basically!
Scenes: The “canvas” of your stream, where you show your drawing screen, cameras etc. This is what your viewers see.
Source Types: In the source section, add a new source with the plus button. You’ll have a variety of options, but you’ll only need to worry about a few of them.
Browsersource: Used for third party add ons mentioned in a later chapter. This covers your alert notifications, donation counters, chat boxes, and anything you’ll linking to OBS from the internet instead of uploading from your computer.
Display Capture: Ideal for Cintiq users, captures an entire monitor to show your screen without any lag or delay.
Image: This lets you link an image from your computer to appear on screen, like a border around your video, characters in the corners, background images etc.
Text: A basic text display. You can type out anything and it will appear on screen, and format fonts and sizes etc.
Video Capture Device: For displaying a webcam or other camera
Window Capture: Similar to Display Capture, but only captures a single application window of your choice. There is a slight visual delay when using this option.
Now, what to do with them
All you really need to stream is your drawing screen, or a webcam if you’re a traditional artist. I’m going to assume you want to use a webcam and microphone for the sake of this tutorial, but they’re not at all necessary.
Tiny is a custom bot I run off my computer, using a service called
Phantombot
. It’s completely free and limitless to use, but it’s just a little confusing to get set up for beginners. To get started with basic commands and bot functions, Nightbot is the bot you’ll find in everyone’s channel, and the easiest & most versatile one you can use without touching a line of code.
Log into Nightbot here https://www.nightbot.tv/ And check out some of its features. You can write custom commands, have the bot intermittently announce things in chat for you, take and play song requests from viewers, and even let the bot handle spam. Aside from all the information and silly chat games they supply, bots are like an auto mod. They can purge messages with blacklisted words, hide links, time users out for spam and all kinds of customisable actions. It’s a good way to take some of the weight off yourself and your mods
Making a Living from Streaming
So that’s the basics. That’s the very detailed intermediates as well as the basics, actually. You have everything you need to start a stream and have fun with your set up, but it takes a lot more than just widgets and overlays to succeed on Twitch. Your content and personality will be the forefront of the community you craft, but there are always things you can do to help move things along and encourage more growth.
1. Schedule: The most important step to growing your stream and audience. Even if you stream once a month, to have that day and time set in stone will mean people can always find you, and that will make them more likely to actually catch a stream. Streaming more often is always going to be better, but if you stick to the same days and advertise that schedule clearly, it’s going to be the best thing for your channel
2. The Benefits of Using a Mic: Some people just aren’t comfortable using a microphone, and it’s definitely understandable. Whether it’s anxiety or just disliking the sound of your own voice, it can be hard to want to turn it on if you aren’t used to doing so. The biggest difference a microphone can make for an art stream comes down to productivity, and being able to talk to people while you work, instead of having to constantly stop and type out responses and lose your place and flow. It also means you’ll always be heard and no one can miss one of your messages in the chat. Aside from productivity, talking directly to your viewers simply helps bridge that connection between you better, and a similar thing goes for webcams — Although not having a webcam doesn’t hinder a stream in the way not having a mic can.
3. Tell Everyone: Going live and hoping someone will find your stream isn’t going to get you anywhere! Be sure to cross promote yourself where you know your existing community will be able to find you. Every time you go live make a tweet with a link to the stream, post on Tumblr, notify on Tapas, join a discord for communal promotion and share your stream there as well! Places like Twitter and Tumblr are even more ideal because others can retweet and reblog your live notification to extend your outreach.
4. Crossing Communities: Networking is just as important for growing a stream as it is for growing a comic. Much like you can’t expect anyone to find you if you don’t tell them where you are, no one is going to know you if you stay inside a little bubble. Watch more streams, host and raid others, get involved with other communities and encourage others to make content as well. The best kind of community is a community of peers, and you’ll all play your own part in encouraging and helping each others streams grow. Furthermore, networking with the intent to make friends is always going to be more beneficial than networking for the sole purpose of getting yourself ahead. You’ll form meaningful friendships and your content will be all the more worthwhile when you’re being genuine about it and the way you share it.
5. Embrace ‘Sellout’ Culture: This one sounds kind of tacky, but listen. If you want to make a genuine living off streaming, money is going to come into it sooner or later. By ‘sellout’, I don’t mean endless, constant, and harassing self promotion within your streams. It means that if you have a tip jar, people might tip. But if you don’t have a tip jar, people can’t tip. Make custom alerts through Streamlabs for different donation amounts, keep the alert list visible on your page so people can find it and play with their options! Celebrate anniversaries with special streams and make your own merchandise. There’s no loss if nobody buys anything, but if you have it available, you might just make something of it. You need to give people the chance to support you, and you’ll probably end up pleasantly surprised by the level of generosity on Twitch.
0 notes
Text
torby foliowe z nadrukiem - zobacz ofertę
Promotional Message Example
torby foliowe z nadrukiem - zobacz ofertę
Many of us use adhesive cassette for one matter; wrapping presents. Teflon tape can be not really extremely sticky, but it adheres closely to grooves and areas. Plumbers and mechanics utilize it to seal leaks in pipe joints by wrapping it around screws or valves and reinserting them. Teflon video tape also works for screws or nut products that won't quite match for a quick repair. Suggest to them by buying custom made printed balloons with photos. Provide a suitable touch by including images in the celebrator jointly with your nearest and dearest people. Your celebrator will surely keep in mind your thoughtfulness. Over 35,000 brands across 150 countries trust AdRoll. We have great technology and great people. Provide us a shot. Aged tiled areas offer a smooth company surface and can become tiled over with few complications. Make sure that the older surface area is completely free from oil and dirt and substitute any tiles that are loose or have got fallen out. Although the two terms are often used interchangeably, market insiders usually make a distinction between taglines and slogans: taglines possess longer shelf lives. While slogans can alter with seasonal marketing promotions, taglines are found at the heart of a brands identity and seldom possess expiry schedules inside of a few of years. Slogans, therefore, can end up being were made to more particular advertising campaign designs, customer sections, or intervals of time. Sizzling hot Foil Stamping services will generate unique special effects and reflective radiant foil colours to your design. You can also combine the yellow metal foil stamping assistance with embossing on the same area for even more striking three-dimensional image, resembling sculpted-gold, best on your business cards , invites , or any additional credit cards. If you desire to add a contact of extravagance to your styles, you're going to want to know a little about foiling. Frequently used on superior print press, like invites, business credit cards, reports and letterheads, this is certainly a process whereby metal foil is usually applied to the surface of the paper using either a manually-operated or pneumatic (air-powered) machine. The result? A really spectacular impact that extracts out details of the style in a metallic or coloured gloss. Multi-level marketing can be a business model where salespersons like product sales consultants, vendors, and actually franchise owners and independent owners function in harmony to boost sales of the product. Everyone works on a payment basis (except the producer of the item). This is certainly more like a business set up where the product sales of the item depend on the mixed work of each franchise and local supervisor. There are multiple amounts of individuals receiving commission. Usually there are seven or even more amounts. In a perfect plan there are only two levels: you and the new correlate you are training. Multilevel marketing is certainly basically a mixture of franchise and direct marketing. Voted 2016 Provider of the 12 months by the United kingdom Association for Print and Conversation, Vivid can be Europe's leading designer and producer of digital foiling & laminating systems, including the award-winning Matrix and Easymount range. They've been providing the print sector for 30 years and export to over 50 countries worldwide. Picture Edges: These are the pioneer adhesives of scrap booking, and they still stay a well-known choice for many scrapbookers. When scrapbooking first started, picture edges were used because they would enable you to connect photographs to a web page and still remove them. Because photo sides are not long term adhesives, they are ideal for traditions photographs and anything you have a tendency wish to permanently install to a page. They now arrive in a range of colours and components. http://protape.pl/
reklamówki z własnym nadrukiem firmowym kliknij
Many kids are affected by the manners and attitudes of their parents and caretakers. So it's up to you to arranged the pub for what's acceptable. If you need your children, nieces, or more youthful sisters to adopt healthful behaviors then be sure you are doing the same. Consider a appearance at your inventory of makeup products and personal care items and get rid of those that contain ingredients that are known to be dangerous. If you're not really sure where to begin, verify the Environmental Working Group's Epidermis Deep Makeup products Security Database obtainable online. I believe the best issue you can perform is to try, try and try once again until you know just how to position the paper in your two computer printers. Contact adhesive is widely used in homes as it dries off quickly when spread on the surface by evaporation and has a very good get in touch with. Adhesive tapes have foliopaki z nadrukiem firmy many uses around the home from fixing home windows, masking off painting areas, restoring a broom and actually when performing your daily beauty routine. How use the Crop Equipment! Essential lesson... One of the essential instructions in the images. We observe our suggestions about how to use it better. Great guide. Will the foil just react with solid black toner? I'm asking because I might possess other shaded text message on the web page that I avoid want to react with the foil. Play with the last results and add your creative touch to total it. Look at various other logos in the business specific niche market and get motivated. Make sure your basic logo design is usually an motivation for the future. Follow these measures and rules to produce logo styles for any type of business. Banner Marketing is definitely one of the common means of promoting a brand through digital media. Showing the brand message on a particular internet site, a banner marketing screen can be intended to attract visitors to the website or getting web page of the brand by linking it to the site of the advertiser. We discover hundreds of several products around us every time. No matter what the product can be, there is definitely often some information which requires to become attached with it and has to be shipped to the clients. While selecting out which region of expertise to enter for your personal personal label privileges e-books you must deal with it as you'd virtually any a few other web business style, the extremely same suggestions apply to plr electronic books akin to google adsense, clickbank and / or what ever various other money steam you're involved with. Disadvantages: Because it's difficult to know in progress how each t shirt will react to release printer ink, colour matching can't end up being assured and there may end up being some colour alternative between designs throughout a run. In the opened web page in the Name insight field type the name of the brand-new banner, in the Type select box go for Graphic banner and upload the picture for the banner. I accidentally occurred upon the Heidi Swapp Minc Toner Note down at Hobby Reception a few weeks back. It was the last one and it's genius since you can foil images without a Laser Printer!
0 notes
Text
How to Create Templates in Photoshop CS3
How to Create Templates in Photoshop CS3
Here’s a little tutorial on how to create card or collage templates using clipping masks in Photoshop CS3. Clipping masks are wonderful tools. Basically what they do is make a layer take on the shape of the one below it. So if you create a shape on one layer and then place an image on the layer above it and put a clipping mask on the image layer, the image will suddenly only show within the constraints of the shape! Then you can use the Transform tool (CTRL-T or Edit>Transform>Scale) to resize the image, effectively cropping it to fit the way you want it within that shape you created. It’s very cool
————————————————————————————–
So here’s how you do it:
Create a new document, preferably using one of my actions that include ¼” bleed guides. If not, manually add a ¼” guide on all 4 sides (View>New Guides) You need to keep that bleed area in mind when designing so that your elements don’t accidentally get cropped out when the card goes to the lab or the printers. A 1/4″ bleed is usually plenty of room. Just make sure your elements don’t fall outside of those guides. If you use my actions, you may need to rotate your image if you want it horizontal.
Fill your background with the desired color.
Add any textures or whatever you’d like to the background or on a new layer above the background. Here, I’m just leaving it plain for simplicity.
Create a new layer to add the shape you want your image’s frame to be.
Use the shape tool or pen tool to create your shape. Here, I’m going to use the custom shape tool, being sure to have the “fill pixels” box selected in the custom shape tool dialog. It doesn’t really matter what color I use to fill it since it will be covered by my inserted image.
If you’d like to make a frame around your image, use the magic wand to select the shape, then create a new layer, and make a stroke (Edit>Stroke) around your shape. The reason you need to put this on a separate layer is so that the image will go underneath it. If you were to place it on the same layer as the shape, the image would cover the frame.
To keep the outside edges crisp, choose the stroke to be done inside. For rounded edges, choose outside. For the middle of the road with slightly rounded edges inside and out, choose center.
Next, create a new layer to do whatever text and effects you want on there. At this point, once you get your layout adjusted the way you want it, you can add layer styles like drop shadows and strokes to your text layers and the shape layer too.
Let’s do a quick “clean up” of our layers palette and group our layers according to what they do. Click the Shape layer, hold the CTRL key down and then click on the Stroke layer. This will select both. Now go to Layers>Create Group. This places those 2 layers in a new grouped folder. Rename this folder with what it contains like “Shape 1 & Stroke”. Do the same thing with the remaining layers, grouping them together logically and then renaming the group folders accordingly. Click on the little arrows next to the group folders to open or close them as you need to see the layers inside.
Now we’re going to create the layer to insert your image. Click on the shape layer then create a new layer. This will place your new empty layer directly above the shape. Be sure it’s located there.
With the new empty layer selected (I’ve already renamed it here), create a clipping mask by going to Layers>Create Clipping Mask. You will notice now there is a little bent arrow next to your empty layer pointing to the shape layer. In that empty layer, you can use the text tool to place instructional text. The user should place their image layer between the instructional text layer and the shape layer. Their image layer will take on that clipping command and will then conform to the shape below. Once it’s placed, they can either delete or turn off the text layer.
If you make a mistake and accidentally put the clipping mask on the wrong layer, highlight that layer then go to Layers>Release Clipping Mask
That’s it…you can add more shapes with images or text or decoration as you like. Here I added more shapes with images. I also went back and renamed the group folders to make it more intuitive for the users.
Now, if you want to make your templates just that much better, here are some tips that might be worth trying out.
Use quarter inch bleed guides to keep your important elements from possibly being chopped off during printing. Not all printers have this issue but it makes sense to do it anyway. The last thing you want is to order 200-holiday cards and the family’s name is chopped off because it was too close to the edge! Plus, a little visual room on the edges makes the viewer more comfortable anyway.
I really suggest learning to use a clipping mask so it’s easy to insert the photos AND it gives a nice ability to be able to resize the inserted photo there in the template rather than having to copy and paste an already resized one. This allows you to adjust it to taste both in size and rotation.
Name your layers with what they do! This is an important one and it makes it much easier if you want to change an element, turn off its visibility or move it around.
GROUP your layers by what they do. For instance, put all the elements in the border in one group, textures in another, etc. Make sure you collapse the groups before you save the file. It helps keep your layers palette more organized and helps you know where things are. The tutorial linked above covers how to do this.
Make an instructional text layer (visible or not ) in one of the photo areas with directions on how to insert the photo and/or with what fonts you’re using. This helps people search for the fonts they may need to download and install if they don’t already own them.
Design tip – Color adjustability – – if you want to make your templates REALLY versatile, put all your colorful elements, especially the background, stripes, dots, whatever, in their own grouping so that a Hue/Saturation adjustment layer can be added. This allows the user to change colors simply by moving the sliders. You can either leave each element separate so people can come up with their own color schemes or you can flatten it and then the whole look is changed with the adjustment instead of each individual element. Guess it just depends on how big the file can be since leaving each element in its own layer does make the file size bigger. But it can be really neat to be able to change a color for a client in order to make the sale!
Keep photographic layers separate and above graphic elements. At least above the elements that may need adjustment layers. That way any Hue/Sat color adjustments are only applied to the graphic elements and not your photos.
Use descriptive file names! Put your studio name or username in the front of the file name. This makes it so people remember who created it and they can thank you and maybe even come back with something for you in return. Descriptive file names are also a huge help. If I were to make one, I’d do something like “TwilaDavisReed-5x7GreenStripeYellowDotsTwinsAnnouncement.psd” Yes, it’s long but 99% of computers can handle the long filenames. Just don’t put spaces because online hosting can’t handle that. If you need a “space” use an_underscore.
I could go on, but this is enough to digest for now. So now go forth, have fun creating and sharing these wonderful templates
echo $variable;
The post How to Create Templates in Photoshop CS3 appeared first on Photoshop Online.
0 notes
Last Seen Blogs

jimbo021289
Fat Chicks and Spooky Shit

forthecriminallyinsane
In the pantry.

rogue2u
Untitled

iamnicoledroberts
iamnicoledroberts

gemineral
Mineralogy