#also the results from my matriculation exams came today
Text
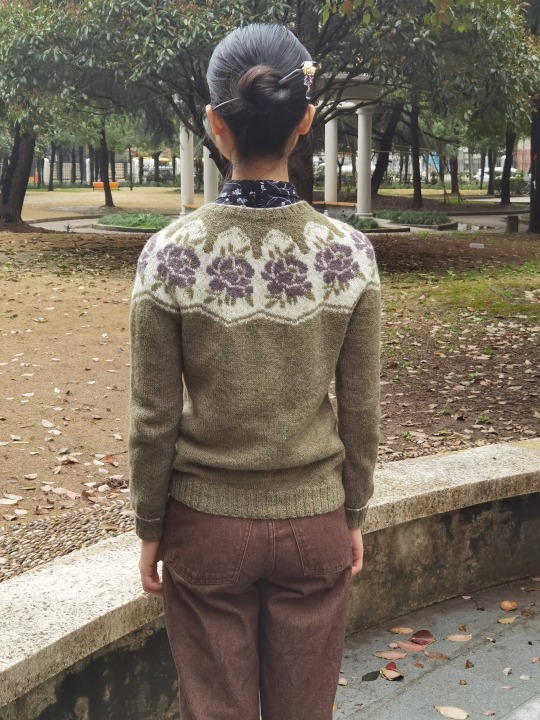
Annie Cardigan | February - March, 2021
Happy International Women’s Day!
The pattern and colours of this cardigan are chosen specifically with Women’s Day in mind, and is named after the first woman to gain honours at Oxford, Annie Mary Anne Henley Rogers. She gained her first class honours in Latin and Greek in 1877, followed by first class honours in Ancient History in 1879, and finally matriculated and graduated in 1920.
A lot has happened in the recent few months which made me re-consider my degree at Oxford, but I have never regretted going there or doubted the value of the experience. I have been taught by so many lovely women teachers and professors and met so many fellow female students—which made me sometimes forget the gender inequality in academia and in schools of all ages—and it almost feels like nothing can make me give up the opportunity to be welcomed in this place where I am expected to actually achieve something.
Aren’t I lucky?
This cardigan is probably my last big project until July, because after a long struggle, I’ve decided to finish what I started—I will need to pass the exams in order to continue my study. Today is one of those good days where I feel connected to the world, and I must cherish my opportunity at Oxford because it hasn’t been an easy fight.
There might be a life waiting for me somewhere. Maybe it’s not going to be too bad. Maybe I just need to push myself a little harder. To eat a bit more, to exercise a bit more (not to. lose weight but to be ready for the long hikes in the summer vacation), and to talk a bit more when I feel like it.
Pattern
Once and Floral by Maxim Cyr.
It was a very simple top-down yoke sweater and the instruction was clear. I set myself a difficult task by deciding to make a cardigan instead and doing the body in flat rather than in the round, which meant doing stranded colourwork from the purl side.
The only problem with the pattern was that the required gauge seemed very odd to me. It was 26sts*30 rows in a 10cm square and the author used a standard fingering weight yarn (400m/100g) and 3.5mm needles. I used a light fingering weight yarn and 3.25 needles, which theoretically should make a tighter gauge, but got around 25sts*34 rows per 10cm. Maybe if I pulled my swatch vertically when blocking, I could have achieved what the pattern asked for, which was very tight in stitch gauge but very loose in row gauge. Thankfully it didn’t create too much trouble for me and I had only a few small mods. (Please refer to the Modification section.)
I am becoming more aware of the accessibility issues of Ravelry, and will try to discover more patterns that are available outside of Ravelry. I have access to books by Japanese designers, but if you know any good source for large, complicated, heirloom lace shawls, please let me know!
Yarn
Isager Alpaca 2, 50% alpaca, 50% wool. 250m per 50g skein.
White: (from the Eco range of Alpaca 2) #E0. I used about 30g (11g left from a used ball), or 150m.
Green: #thyme. I used about 168g (52g left from the four skeins I used), or 840m.
Purple: #52. I used about 10g (44g left), or 50m.
(I find that most skeins are a little more than 50g, so the figures are not exact. The usage of the #thyme also includes two small swatches. The whole cardigan weighs 205g without buttons.)
I’ve worked with this yarn before in my Scandinavian Spring cardigan, and this time I’m very pleased with it as well. It is made of natural fibres and has a nice wooly smell. It creates a thin, soft, and warm fabric that grows and puffs up after blocking. In fact, the Isager website specifically recommends it for cardigans.
The down side of such a soft yarn is obviously that it’s not as hard-wearing as some of the more rustic woolen yarns (such as Tukuwool Fingering). The website does state that it’s not able to handle too much wear and tear, but that is okay for me since both this cardigan and my Scandinavian Cardigan are very special and I do not expect to wear them as everyday garments.
These skeins did have travelled a long way to reach me, so I need to keep the carbon emission in mind. I purchased them from a local yarn store which bulk-ordered from the Isager website, though, so at least that’s better than buying small amounts directly from the Isager store. For this specific project, I only had to buy two more skeins of #thyme and one skein of #52, and the rest came from my stash.
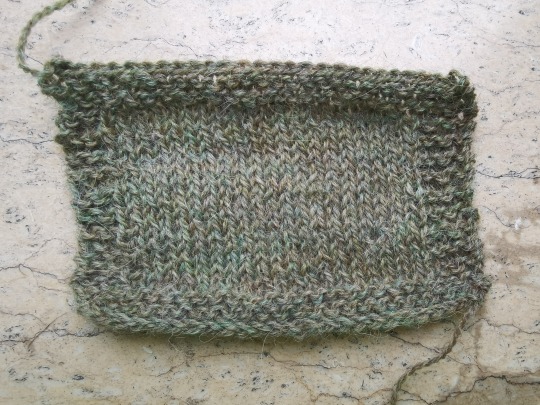
(Can you see the heathered effect on this swatch? I'm swooning 😍)
Other materials
I used freshwater mother of pearl buttons. I’m not sure about the source of these buttons, but I understand that freshwater mussels are very important to the ecological systems in which they live (as are all other species), and I do hope that they come from responsible farming.
As for the thread to sew on the buttons, I opted for Fujix Patchwork Coton #50, which is 100% cotton with a coating that makes it a bit glossier, stiffer, and presumably stronger than the average cotton thread.
Needle sizes
3.25mm for the main body
2.5mm for the ribbing, because I like the ribbing to hug my body snugly and was worried about it being stretched out.
Finished size
I no longer think it’s relevant to take excessive measurements of my finished project, so I will only note the essential figures that might help me (or you) if trying to figure out how many stitches to cast on, how to adjust the yoke, etc.
Underarm circumference: 82cm
Total length of the yoke chart: 16cm

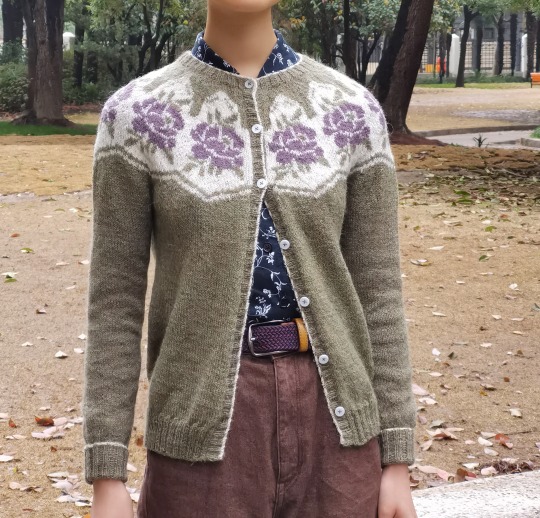
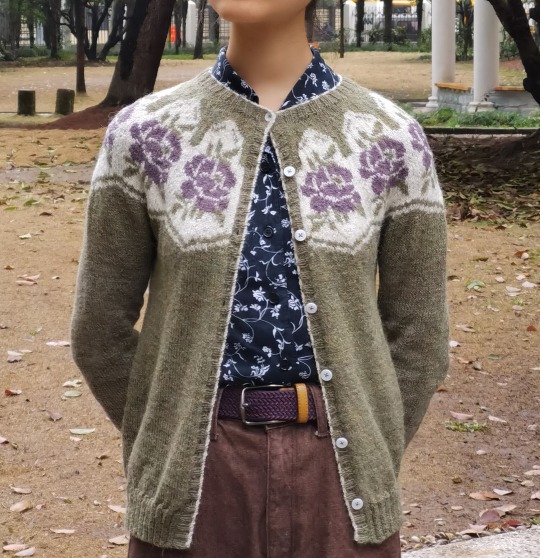
(Three ways to wear the cardigan, and the white bordering with which I'm so pleased - see Mod.)
Modifications
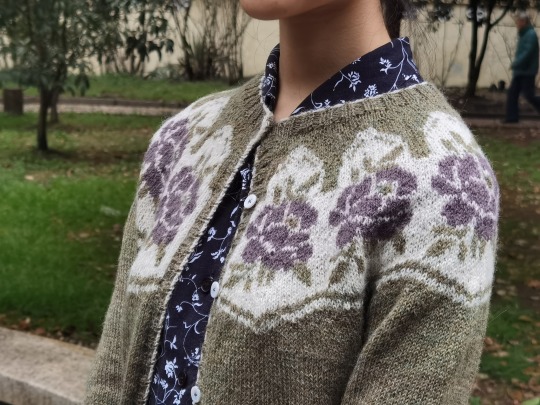
The most obvious mod is of course that I changed it from a pullover to a cardigan. Normally you would still knit in the round and steek the front later, but in order to preserve the yarn, I knitted the body back and forth.
I casted on 110sts instead of 120 because I was hoping for a tight collar. Then in the first row I increased to 120sts.
For the colourwork yoke, there were a few rows where I had only three or four sts of one colour in a repeat and the remaining sts are all in other colours (such as the rows showing the stamen), and for me it wasn’t worth it to carry the yarn of that colour all the way along the row. Hence I used a separate length of yarn to knit those few stitches in each repeat. For the stamen, I cut a length of green yarn for each repeat and knitted it in intarsia.
I did the body first. And then I was hesitant about the design of the hemming, button bands, and the collar, so I did them (in the order I mentioned them) before knitting the sleeves to save some brain power. I had seven button holes, one on the collar band and the rest on the button band, similar to the front of a shirt. The third button was specifically placed to echo the design of the yoke.
The pattern called for 1*1 ribbing, but I did 2*2 as it was stretchier. I did invisible 2*2 bind off with a decorative lining, and the technique is similar to what I did with my Toscana Shrug: after several rows of 2*2 ribbing in green, I switched to white and did one more row of ribbing. Then in white I bound off using the invisible method. You need to knit one row in the contrasting colour before binding off; otherwise it would look somewhat messy.)
You may know that when you change colours, there will be a dotted line on the purl side, and the same thing happens for the ‘purl’ part of the ribbing. I was really worried, but the invisible bound off seemed to have covered up that dotted line, so the result was quite neat—a nice surprise!
For each of the sleeve, I have 74sts on the set up row. I knitted 10 rows, then from next row: (dec 2 for the row, knit nine more rows) repeat five times. So at about elbow length I had five dec rows and 64sts on the needles. I knitted 51 rows to create a straight (instead of tapered) forearm. Then I dec 4 each row for five rows, and ended up with 44sts. I then switched to 2.5mm needles and did 2*2 ribbing. I knitted the ribbing extra long so that I could fold it back, which was the way I preferred.
(Here is a tutorial by Anushka about sewing buttons onto knitted garments, which is very helpful.)
Further Considerations
This was my first time doing colourwork from the purl side and it definitely was not a pleasant job. With more practice I will hopefully become better at it, though! I did reserve knitting (knitting from left to right) instead of purling for a few rows, but gave up as I couldn’t find a way to hold yarn comfortably with my left hand. I might need more practice there, too.
The ribbing is a little bit on the tight side, but at the moment I don’t have a problem with it. If I find it still too tight after some wear, next time I will remember to use 2.75mm needles. The 44sts cuffs are quite snug on my wrists, so next time I’ll do 48sts or more instead.
I still have a fair bit of Isager Alpaca 2 left, and I really need some long gloves to warm my wrists as well as forearms, so I might be knitting a pair of fingerless gloves later.
6 notes
·
View notes
Last Seen Blogs

slicedcheesegremlin
I am in your bottom fridge drawer

whiskered
the literal other half


aikatsu-motivational-posts
Aikatsu! Motivational Posts

sickwidit
CHILLmatic