#also i want to learn animstack in more depth and i want to. learn gimp filters too (one in the same rlly)
Text
my new bit apparently is i make gifs under the emotional duress of this one anon who will check in with me when i havent been making gifs finster style except im not girlmoding and theyre not paying me
#but other than that its basically exactly the same situation#btw love that anon literally no hate. i just have adhd#its not even hard its just that theres a bunch of steps and my brain always goes. TOO MANY. and we sit here making posts about it instead.#but in my defense it is almost midnight and i am just gonna go to bed. tomorrow though. who knows#also i want to learn animstack in more depth and i want to. learn gimp filters too (one in the same rlly)#but i need to forget that for now and just make the sets i have in my todo list lol#if its any consolation im also hardcore procrastinating on all my fics and shit. im kind of just doing a fat load of nothing most days
2 notes
·
View notes
Photo


Let’s learn how to make this pretty snowfall effect as requested by an anon. :D
Things you need:
GIMP
Animstack
Some background knowledge on how to remove backgrounds (optional)
How to install the plugin and make gifs
1. Open a new canvas. Make sure the height of the canvas can be divided by 20 nicely without any decimal places. I would suggest using a height of 400px for this.
You can make a new one or just open your image that you want to use. For me, I am using a black fill layer and added my person layer. I have extracted the background of the person layer too.

You can merge these two layers down now.
2. Make a new transparent layer and call it “Snow1″. Then, use a soft circular brush to draw your snow particles. You can turn on the jitter for your brush to make the circles ‘splatter’ around.

3. Make a new layer called “Snow2″. Increase the brush size and turn off jitter. Now, you’re only going to plop some here and there like this:
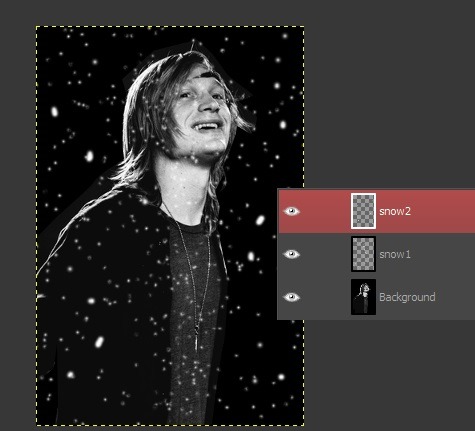
Then, go to Filters > Blur > Gaussian Blur it to about 7-10px.

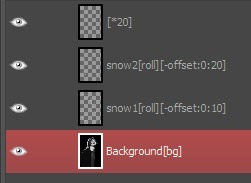
4. Make a new layer. Now, remember at the beginning, I said something about the number 20? This is because we’re going to make a 20-frame gif. If your canvas height isn’t dividable by 20, pick another number that works.
For example, if you have a height of 350px, you can pick something like 25. And 350/25 is 14. The 14 in this case is going to be the distance the snow is going to move down per frame. Makes sense?
Alright, back to my gif! So, I’ve made a new layer called [*20] for the number of frames and then I renamed the snow layers with these tags: [roll][-offset:0:20] and [roll][-offset:0:10] and [bg] for my background.
So, your layers should look something like this:
[*A], where A is the number of frames you want in your gif
snow2[roll][-offset:0:Y], where Y is the distance moved in the Y direction, and of course X is zero in this case. The [roll] tag basically means this effect is going to applied to all the frames.
snow1[roll][-offset:0:Y], you can vary this Y so that the speed of the two snow layers differ to give more depth. Just make sure that both values of Y are dividable by your height of the canvas!
Background[bg], to add as the bottom layers for all the frames (layer groups).
5. Run Animstack by going to Filters > Animation > Process Animstack Tags. Once they are in layer groups, use your playback (Filters > Animation > Playback) to check the animation.
6. If everything looks good, flatten the layer groups by going to Image > Flatten Layer Groups. You can now index the gif. Also, don’t forget to optimize your gif to lower the file size if needed (Filters > Animation > Optimize [for gif]).

It’s so pretty and calming!! :D
I hope yo have found this tutorial useful. Do request for more if you like!
22 notes
·
View notes
Last Seen Blogs

chriswoodnetwork
Chris Wood Network
chriswoodnetwork
Chris Wood Network

caughtmyeyesblog
Women Are Art

emceemom
scarecrow boat

nifeakingbe
Skinny Hipster