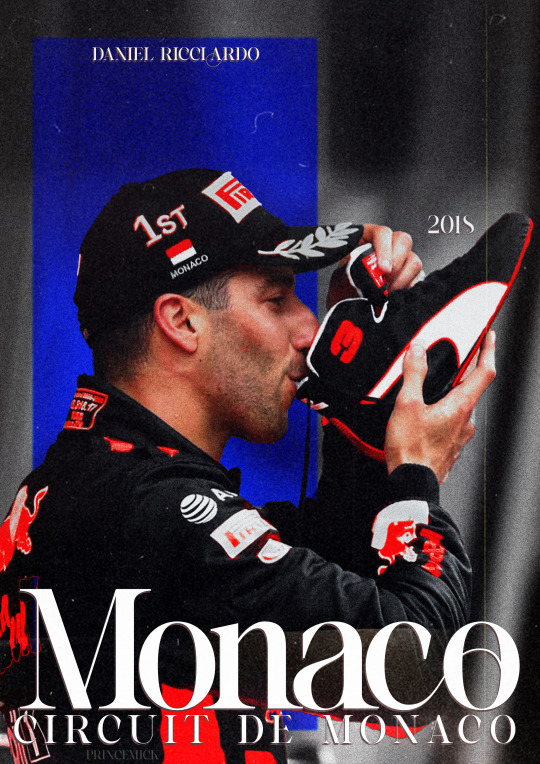
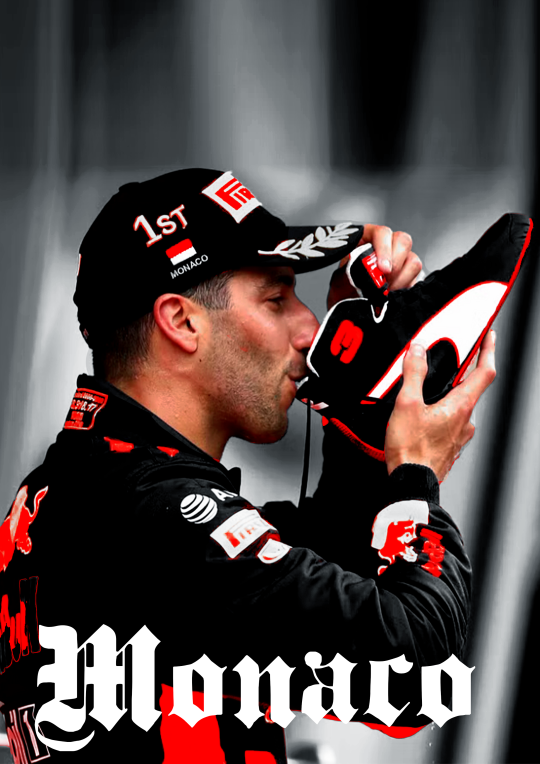
#added a new orange background and photoshop filters to remove blur
Note
hi kyle, please explain your process of making graphics! <3
hi anon! I definetely will, I'll walk you though how I get to a graphic like this:
(warning, half of my process is just 'throw it at the wall, see what happens' so like, idk how easily explainable it is.)
first off, I get all my inspiration from pintrest, instagram graphics artist and random stuff I find. inspiration is everywhere and I always keep a notebook with me where I draw/write what I come up with.
all my photo's are from pinterest and google, I dont sell these, if you're going to please make sure the photo's you're using are free use.
all my fonts come from dafont.
the program I use is photoshop.
now, I'm going to break up my editing process into 7 parts.
inspo
images
editing
colouring
font
colour blocking
textures
hopefully it's clear enough
gather inspiration.
so I really like this and this edit I made before and they're pretty easy so I wanted to make a new one.
but normally if I wanna make an edit I scroll through my poster/edit inspo pintrest board which you can find here.
normally if I dont have such a clear way I want to go I'd make some sketches to see what works and how to get the idea out of my brain.
2. gather images.
I wanted to make a Danny one so its not to hard to find stuff as I have a specific search for this edit but I also have a growing archive of folders of drivers full of pictures ive found over time that I'd normally go through to find good stuff.
when you use google please remember to click on 'tools' and select 'size' and big otherwise you'll cry because of the bad quality
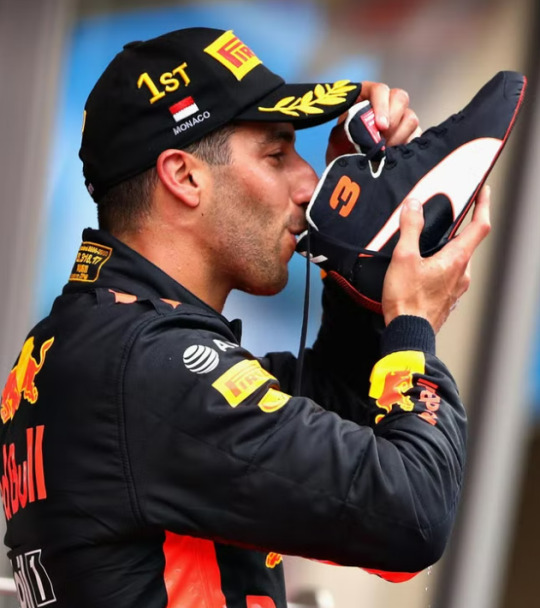
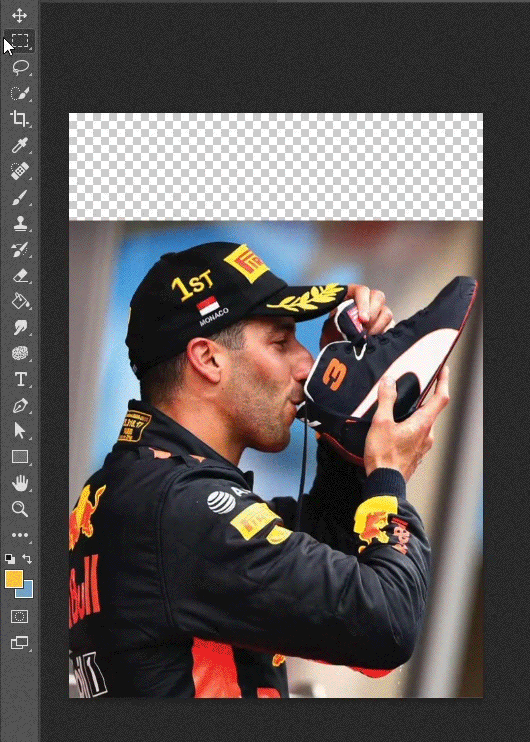
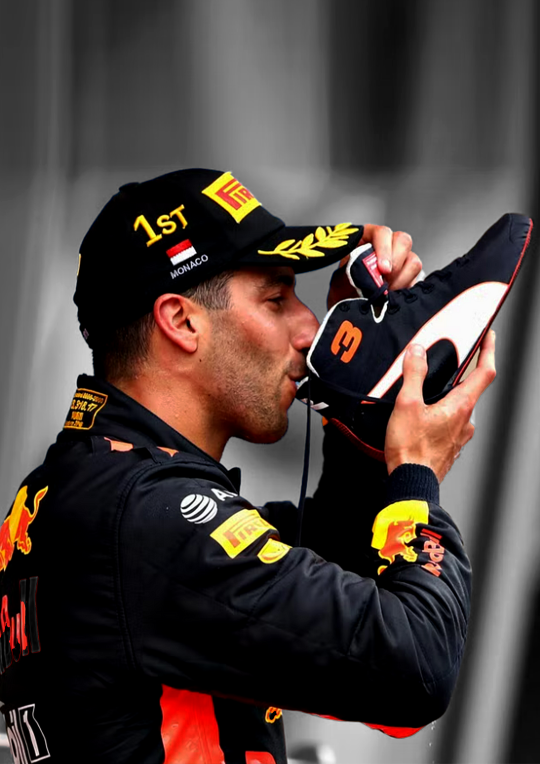
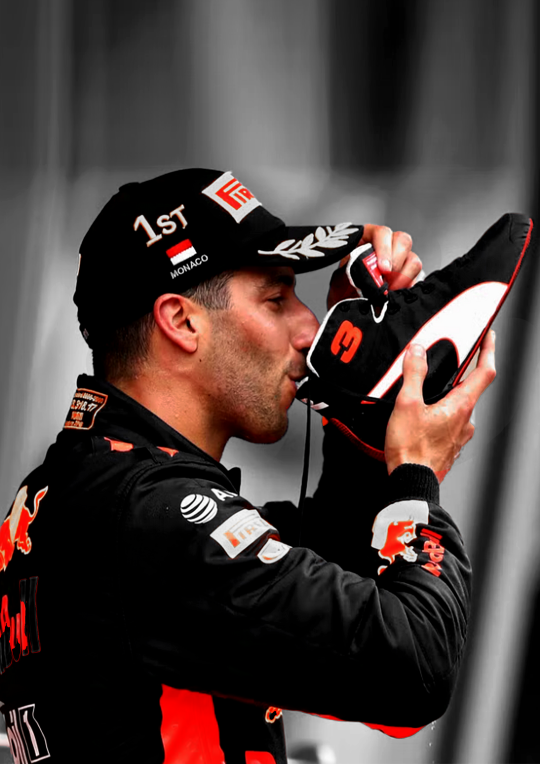
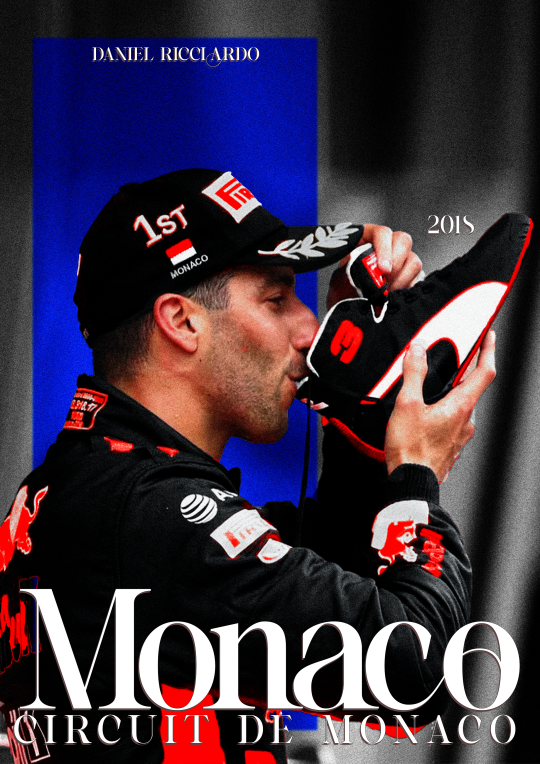
this is the picture I wanted to use for the danny edit.
I thought this would work well because it has depth and so will show the colour blocking well, it also has the flag and the shoe which is clearly recognizable.
3. trow it into photoshop baybee.
this is going to be hard to explain but I basically jsut fuck around. most of the time I kind of know what I want to do and the way I want to go but one of the first steps is always to raserize the layer.
I also make sure to copy the original picture for later so you have the same picture twice
I do this so i can be lazy and go to quick actions and remove the background because then, I get this.
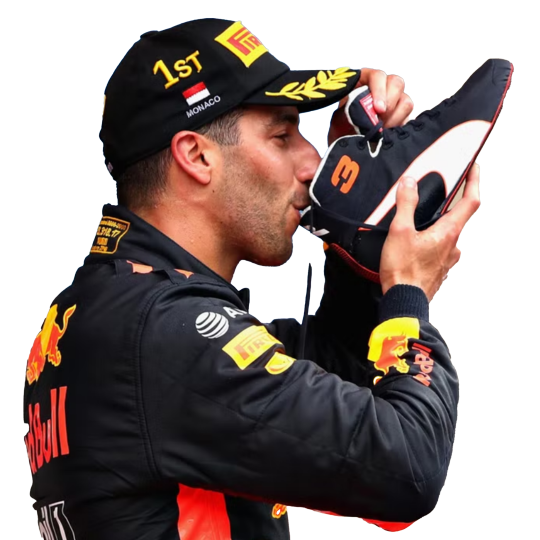
without basically any work. (it's almost never perfect so after I let photoshop do it's work I fix up the parts that need it.)
this is what your layers should look like fter.
that lil black and white thingy is really useful and if you select that and go over it w the erase tool it doesnt permenantly change anything.
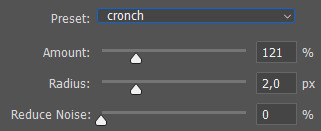
next thing I do is smart sharpen to spice it up, here is the sharpening settings I use.
a small problem with this picture is that it's to small for an A4 size (which is what I'm making it on) so I need to extend the background a little. which I do in the laziest way.
I select the most of the top of the picture I can and copy paste + extend it out. like this:
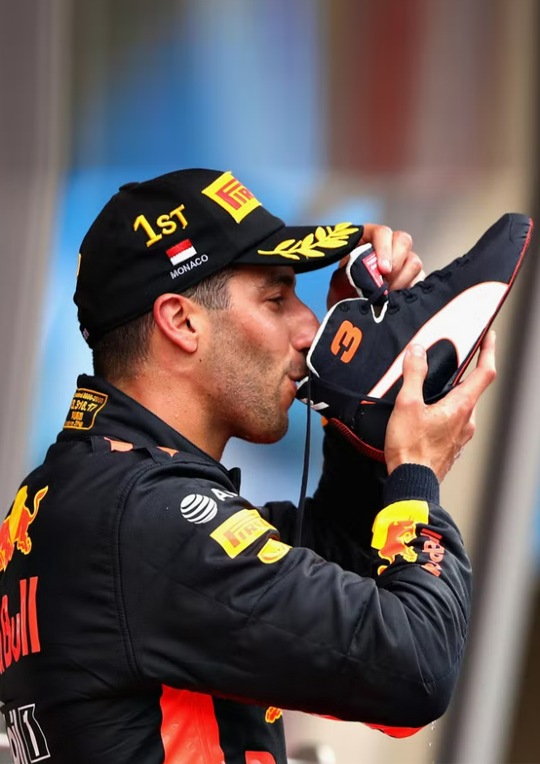
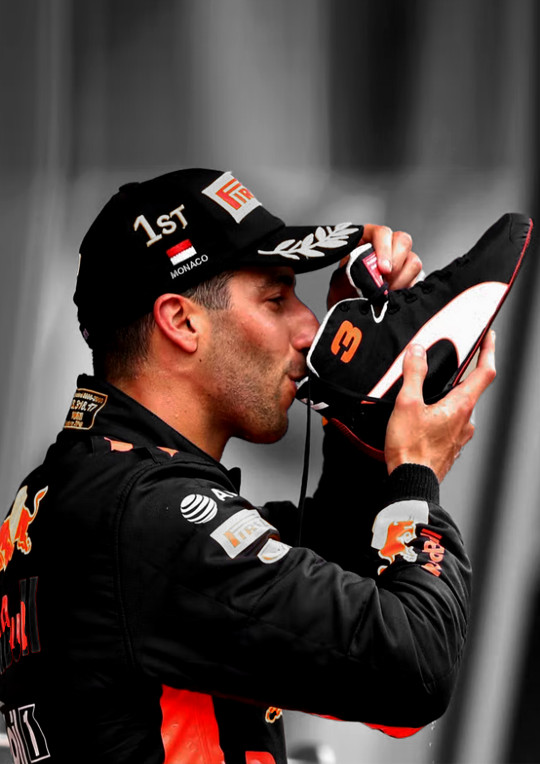
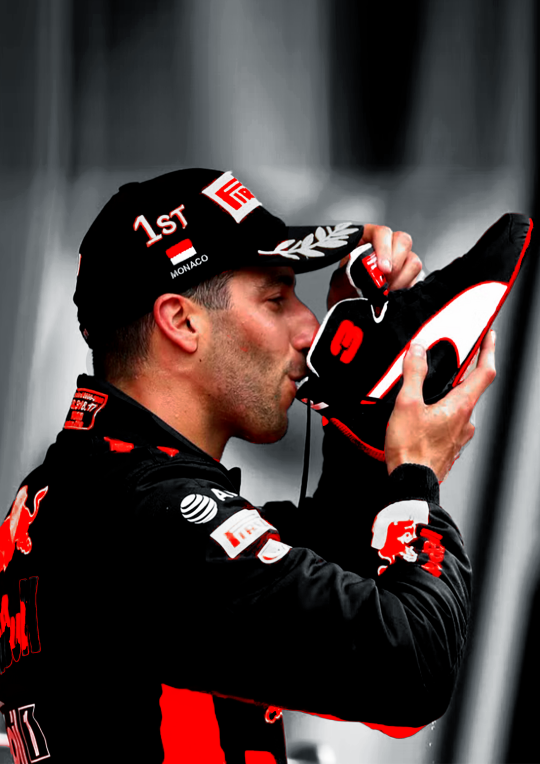
then, for this edit, I'm gonna add a black and white filter to the background so everything behind daniel is in black and white with an adjustment layer. I do this to keep the focus on our subject and remove any and all focus from the bg.
I also add a guassian blur to the bg to once again, keep the focus on daniel.
this is the before and after of that.
now, kinda boring right? yeaaah so now onto
4. colouring
first off CLIPPING MASK IS YOUR BESTIE!!!. if you right click on the adjustment layer and click on clipping mask it will ONLY grab the picture right below it, this way it wont affect everything else you've added to your edit.
anwyay. this is the fun part, and the only way I can explain it, is fuck around, see what you wanna do and what works.
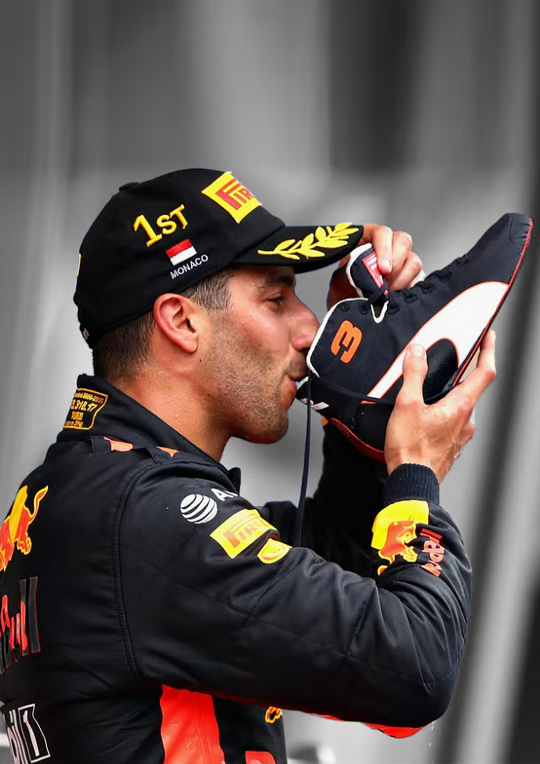
I always add, levels, curves etc to just deepen the blacks and add some contrast. heres the before and after of that.
for this edit I kind of wanna focus on the contrast of blue and orange, kinda like the seb one but a lil different so what I'm gonna do is add hue/saturation and remove the yellow and blue from the picture.
you use this adjustment layer by grabbing the little hand and selecting the colour you want to change.
so I'm gonna play around and remove the blue and yellow from this picture. here's the before and after of that.
now I'm going to add selective colour, i wanna up to an extreme the reds in the suit. this is kinda hard as you'll obviously grab his skin with that too so I'm gonna use that black little mask on this too, it already exists when you add an adjustment layer
it's that little white box, if you select that and ue the erase tool you can basically remove that adjustment layer in places you want to, this is what it looks like on my layers and on the picture.
I want to upp the red even more then this so I'm gonna copy paste that layer two more times and THEN add a non erased selective colour and play around with the depth of the skintone until I'm happy with it.
now I'm almost happy with the colour, I want it to be a bit more blue so I'm gonna go to 'colour balance' and play around with that a little more.
this is the before and after of all that
then I'm done with the colouring on the picture itself. I'm also gonna put all my adjustment layers into a folder to make my layers less busy
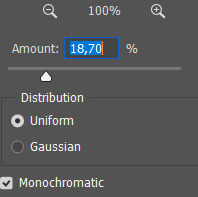
I'm also going to add noise to both the BG and front picture. it just gives a bit more texture and grain that I like
5. typography!
now the stressful part lol.
I know what I'm gonna add so that makes it easy. the name of the race, place and year. this is hard to explain, I know where I'm gonna put everything because off the other edits so it's just about finding a good font.
for this I'm not gonna fuck around with shapes and text layers and adjustments etc. if you want me to explain that please ask away that's just a whole other 5k worded essay.
I know what kinda font I wanna use at first already these choices have to do with a few things which is basically one questions I ask myself:
is there a vibe that already exists around the race and/or win and how do I translate that into the font? (is it fancy, cool, magical, incredible, bold etc etc)
here's an example of how a font can change the vibe
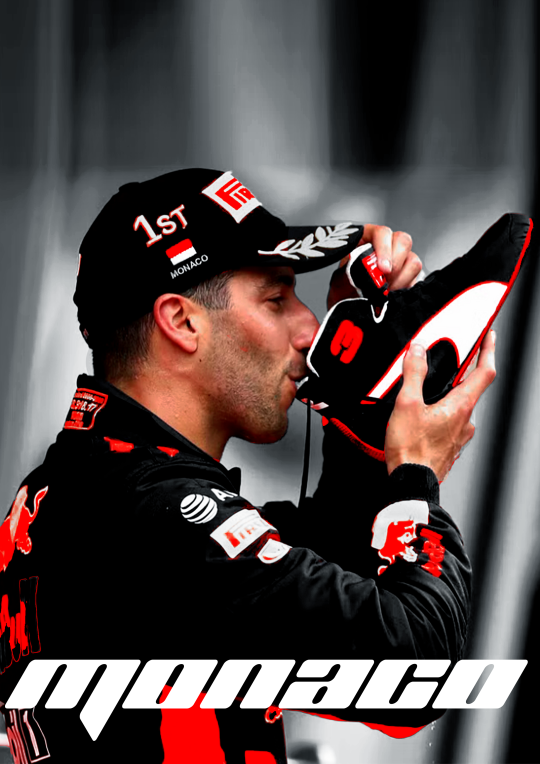
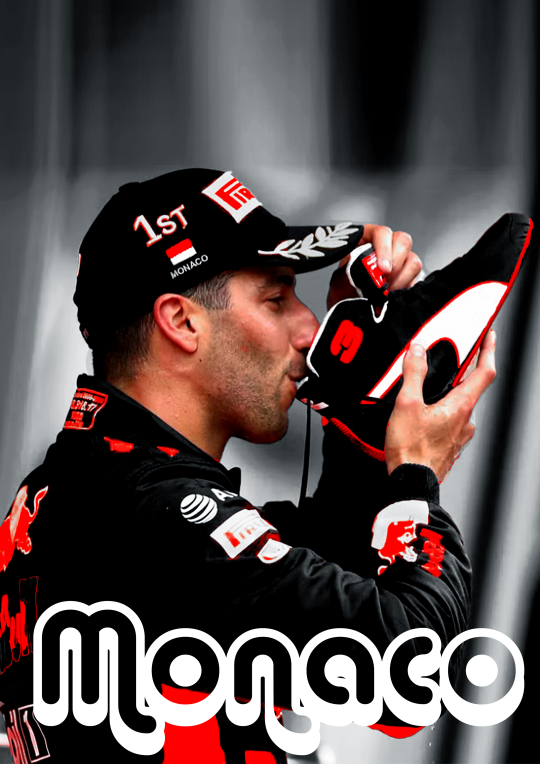
so the vibe I want to go with for this edit is fancy smansy n stuff so I'm thinking of flowly maybe 1930s vibes this is the font I ended up with
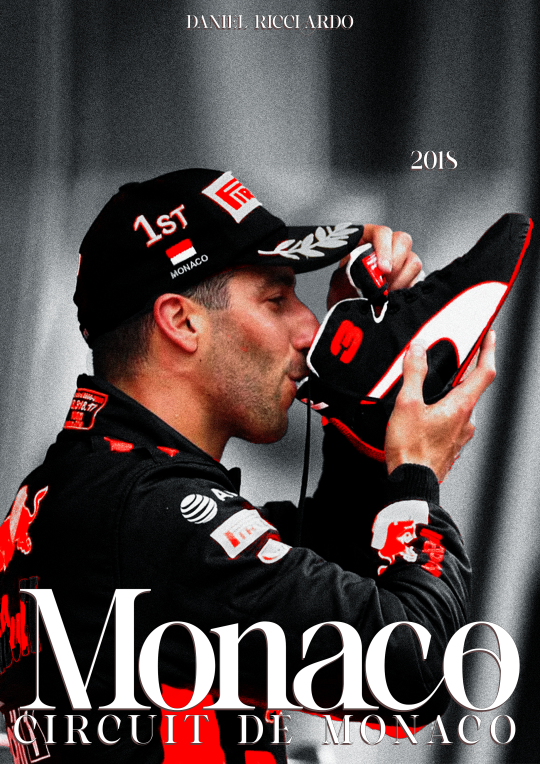
I'm still gonna move the place around but the idea if there.
(I change and play around with my text a lot so, again, ask if you want me to go deeper into this)
6. colour blocking
now for this edit I'm going to add a box of colour, I do this if I want to add a bit of an oomph and contrast to it, I like what I have now but I want to add some contrast to make the colour and him pop even more.
this is petty easy I'm basically just going to add a colour box behind him, I'm gonna do blue as well, thats the opposite of red on the colour wheel AND its the other colour red bull is associated with, also colour theory and all that etc.
I'm also going to add gaussian blur and noise to add some texture and use and overlay. heres the diff in with and without that to show the use of it.
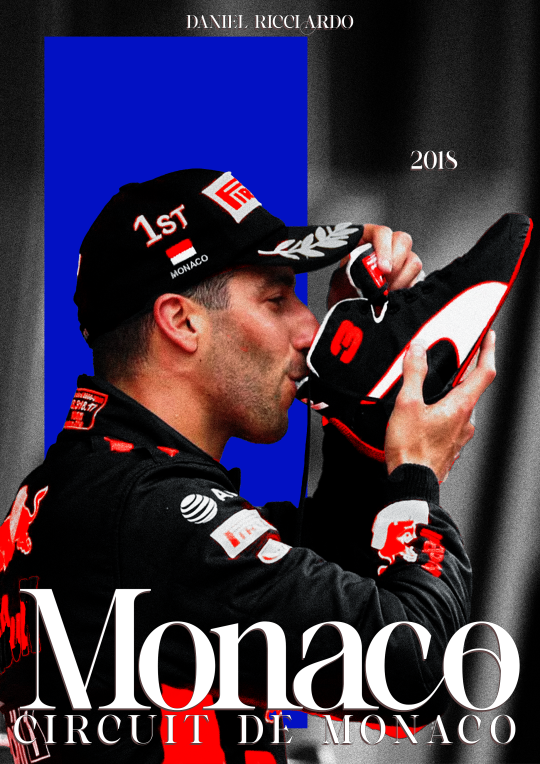
at this point I'm also going to move the text around (as you can see) to make it fit better with the added box
7. texture
the moment where it starts feeling like its finished.
for this edit I kinda want to add some photo texture and more grain. here are the textures I used:
I added these and put it on a screen overlay layer and added some adjustement layers to tweek the last few things.
you can find different textures on google, pinstrest and some awesome artists have texture packs you can pay for w just a few bucks. for these, again, if you're going to sell your work MAKE SURE ITS FREE FOR USE!!!
THATS it!
I add my watermark and maybe fix a few little things but thats all and then I'm done, I reccommend playing around and seeing what works for you.
enjoy and have fun <33
31 notes
·
View notes
Text
Illusion | Task 3 | Workflow
After shooting, I downloaded all of the images from my SD card onto my laptop then opened them in Bridge. I created a folder named 'Illusion Shoot 1' to store all of the shots in one place then batch renamed them illusion_shoot1_001.
I sifted through the images, star rating the possible finals then I cycled through the images with 4-5 star ratings. From there I selected the two images which I wanted to use in the final composite. I separated the RAW files from the JPEGs before taking the chosen images into camera raw.
I performed some basic editing on the two selected images - adjusting exposure, highlights and shadows, and slight colour corrections. After editing in camera raw I saved the images before opening them both into Photoshop.
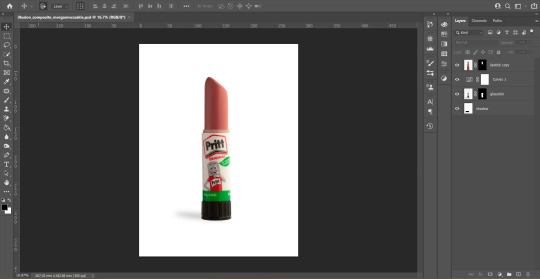
Firstly, I opened the image that I was going to use as the background, which was the glue stick. I then opened the lipstick image and dragged the layer across into the gluestick file. Once both images were layers in the same file I went to the 'Select' menu and selected 'Select and Mask' to make a selection of the lipstick.
I began by using the default quick selection tool to cover most of the lipstick area then used the refine edge tool before outputting the selection to a new layer with a layer mask. I then repeated the same selection steps to the gluestick image to remove the background and the top section of the gluestick. Once each of the layers had been masked and only the usable areas were visible I began positioning the lipstick and gluestick to create one seamless object.
Once I had the lipstick tip and the body of the gluestick lined up I went back around the selections to tidy up any uneven edges. At this point, I also removed some uneven texture from the lipstick using the patch tool and spot healing brush.
After some feedback, I added a curves adjustment layer to make the white of the gluestick a little bit brighter and to remove a slightly orange colour cast from the body of the gluestick.
I then used the ruler guides to straighten the gluestick and lipstick. Finally, I used the elliptical marquee tool and the gaussian blur filter to create a shadow.
0 notes
Text
How to Create a Dramatic Mermaid Photo Manipulation in Photoshop
What You'll Be Creating
Today, we will be putting together a vibrant and dynamic underwater dance scene between two mermaids! With this photo effect, we will take a close look at lighting and shadows, creating simple underwater backdrops and learning how to create a mermaid tail from scratch—no stock images needed.
While we will be using digital painting techniques, I have specially formulated this process with the non-digital painter in mind!
Why not try a similar photo manipulation project over on our Envato Tuts+ YouTube channel, if you wish to try out more mermaid Photoshop content!
What You'll Need
To complete this project, we are using the following resources:
Underwater Coral
Ballet Dancers
Water Reflection
Photoshop Brushes for Painting Fish Scales
Betta Siamese Aquarium Fighting Fish 1
Betta Siamese Aquarium Fighting Fish 2
Vintage Polygon Light Backgrounds
Suns and Rays
Colorful soap bubbles
Find more resources on Envato Elements!
1. How to Create an Underwater Background
We'll start by creating a simple underwater backdrop. Leaving the background clean and straightforward will help keep all of the focus on our two subjects.
Step 1
Create a 3076 x 4359 px canvas.
Change it to a 300 Resolution if you intend to use this for prints.
Step 2
Create a Color Fill layer filled with a dark blue #0f1219.
Step 3
Create a New Layer set to Overlay.
Using a large, soft round Brush, paint blobs of white light towards the top of the canvas.
Set the brush to a low Flow Rate, 1-15%, to slowly build up the light to avoid any harsh edges.
Use multiple layers, set to Overlay or Soft Light, to layer orbs of light over each other. Doing this will give you more control over the light's opacity as well.
Group all of the light layers together, naming the group "Light."
Step 4
Repeat step three, adding even more light to the canvas.
Focus on creating light all over the canvas, not just the upper portion.
Group the layers, naming the group "Light Enhance."
Step 5
You might notice a lot of color banding; there's a quick way to fix this using the Noise Filter! Even if you don't have any notable banding, I suggest adding this as it adds to the foggy underwater feel of our background.
Create a New Layer and fill it with Black.
Bring the layer below the two "Light" groups.
Go to Filter > Noise > Add Noise.
Noise Settings
Amount: 5
Distribution: Gaussian
Monochromatic: Checked
Bring the Noise layer's Opacity to 53%.
Add a light 0.5px Filter > Blur > Gaussian Blur to the noise if it feels too harsh.
Step 6
Create a New Layer setting it to Overlay.
Using the same techniques as in Step 3, paint more blobs of light.
Focus on creating smaller, more stringy light paths towards the upper portion of the canvas.
Step 7
Create a New Layer setting it to Soft Light.
Create shadows using the color Black and the same techniques as in Step 3.
Step 8
Create a Color Lookup layer.
Color Lookup Settings
3DLUT File: TealOrangeContrast
Opacity: 62%
Step 9
Create a New Layer.
With a medium, soft, round Brush, paint light beams coming from the top of the water's surface.
Paint with a low Flow Rate to build up the light slowly.
If you're having a hard time getting the light rays to look smooth and slanted, try adding a Filter > Blur > Motion Blur.
Step 10
Create a New Layer set to Screen.
Paint a pop of pale Orange #d8966e in the middle of the light ray. Bring down the opacity of the layer if needed.
Step 11
Bring in an image of Underwater Coral.
Place it towards the bottom of the canvas, flipping it horizontally.
Using the Patch Tool, remove the fish located towards the bottom of the coral.
Step 12
Add a Layer Mask to the coral.
Mask out the top portion of the coral image with a large, soft, round Brush.
Step 13
Go to Image > Adjustments > Hue/Saturation and set the settings as follows.
Settings:
Colorize: Checked
Hue: 193
Saturation: 29
Create a New Layer with a 4% Opacity.
With a large, soft, round Brush, paint a very light fog towards the top of the reef.
Step 14
Create Color Balance, Vibrance and Color Lookup adjustment layers, ordered from bottom to top.
Color Balance Settings
Red: -17
Green: -35
Blue: -46
Vibrance Settings
Vibrance: +40
Saturation: +21
Color Lookup Settings
3DLUT File: Crisp_Warm
Opacity: 17%
Group the three adjustment layers, naming the group "CC."
Group all of the background layers together, naming the group "Water."
2. How to Remove Clothing From a Subject
Next, we will be extracting and placing our subjects into their new environment. Our primary focus will be removing the unwanted clothes from our soon-to-be mermaids!
Step 1
Extract the subjects using your preferred method. Find my favorite way in this tutorial!
Don't worry about either of the subject's legs—as you can see below, I didn't even bother doing the male's!
Step 2
Next, we are going to use the Clone Stamp Tool to remove the seam going down the side of our female mermaid.
I like using a semi-hard brush when using the Clone Stamp Tool to keep as much of the original texture as possible!
Step 3
Next, I am going to use the Mixer Brush Tool to remove some of the cloth and unwanted texture on the bodysuit and the armpit area. Do this by dragging the soft Mixer brush over the areas with the most amount of texture. You can also use this to smooth out shadows and highlights.
The more you use the Mixer Brush, the better you'll understand how it works!
Mixer Brush Settings
Step 4
Create and clip a New Layer into the subject layer. On this layer, we are going to cover the seam of fabric located on the woman's thigh.
We will be covering the seam by painting skin over the area; the process is much easier to do than it is to explain, so bear with me!
First, let's set up our Brush settings.
Brush Settings
Size: Medium (Change as you go)
Hardness: 0%
Flow: 10%
Using the Eyedropper Tool, sample colors from the same area you are painting—in this case, the thigh area.
Slowly paint over the area of the seam, building up color gradually. Sample colors as you go, making sure everything is smooth and there is a natural transition.
If you are having trouble hiding the seam completely, duplicate the layer you are painting on. Do this will increase the overall opacity of the colors.
Use a soft Eraser brush to get rid of any harsh edges and additional color/paint.
Step 5
Repeat Step 4 on the arm and chest seam.
Step 6
Create a New Layer set to Overlay.
Using a soft, round Brush, paint White over the subject's natural highlights to enhance them.
Step 7
Create and clip a Brightness/Contrast layer into the subject layer.
Brightness/Contrast Settings
Brightness: -12
Blend If:
Step 8
Create and clip a Curves layer into the subject layer.
Curve Settings
Step 9
Create and clip a second Curves layer into the subject layer.
Curve Settings
Step 10
Duplicate the above Curves layer to enhance the effect.
Bring the layer down to 50% Opacity.
Step 11
Clip a Water Reflection image into our subjects.
Set the layer mode to Screen with the Blend If settings seen below.
Blend If Settings
Step 12
Add an Image > Adjustments > Brightness/Contrast and Hue/Saturation to the "Water Surface" layer.
Brightness/Contrast Settings
Brightness: -6
Contrast: 21
Hue/Saturation Settings
Hue: +180
Saturation: -67
Step 13
Add a Layer Mask to the "Water Surface" layer.
Use a large, soft, round Brush to mask out the edges of the image.
Step 14
Duplicate the water surface so that it's placed over the male subject as well.
Group all of the current subject layers, naming the group "Subjects."
3. How to Create a Dark and Vivid Color Grade
When creating mermaids, I like to set up my colors and contrast levels early on! I set my "Color Grade" folder above all the other layers, where I can quickly turn it on or off and adjust it as I continue to paint.
These layers are ordered from bottom to top so that each layer will go above the previous one!
Step 1
Create a Color Lookup layer.
Color Lookup Settings
3DLUT File: FoggyNight
Opacity: 25%
Blend If:
Step 2
Create a Curves layer.
Curves Settings
Step 3
Create a Color Lookup layer.
Mask out the top half of the layer using a large, soft, round Brush.
Color Lookup Settings
3DLUT File: FoggyNight
Opacity: 24%
Blend If:
Step 4
Create a Color Lookup layer.
Copy the previous layer mask onto this layer.
Color Lookup Settings
3DLUT File: EdgeyAmber
Opacity: 14%
Step 5
Create a Curves layer.
Curves Settings
Step 6
Create a Curves layer.
Curves Settings
Step 7
Create a Curves layer.
Curves Settings
Step 8
Create a Color Lookup layer.
Color Lookup Settings
3DLUT File: DropBlues
Opacity: 51%
Group all of the adjustment layers together, naming the group "Color Grade."
4. How to Create a Mermaid Tail in Photoshop
Now to the star of the tutorial: the mermaid tail! As mentioned above, I specifically created this technique for non-digital painters, and as with everything, the more tails you create, the better you will get at them.
If it's your first time, it's best to start slow with simple shapes, colors, and textures. Then from there, you can continue to grow to more complex, photo-realistic shapes and textures, adding much more movement and detail!
Step 1
Create a New Layer.
With a hard, round Brush set to a bright color like white, sketch out your tail. Just worry about the general shape—no need to make it perfect!
The sketch is just a general guide for our tail; you will likely change it as you'll see below.
Step 2
Create a New Layer under your sketch.
Now, using the Pen Tool set to Shape, trace your sketch.
Once you are generally happy with your path (don't worry, you can adjust it later), create a Light Brown #685550 Color Fill layer.
The color fill layer will take the shape of your path, making it so you can change the base color of your tail at any time.
Note!
While you won't always need to do this, for this particular mermaid, I suggest splitting the tail in two. So you will have two shapes, the thigh portion and the bottom portion. Each piece will follow the same process!
Step 3 (Optional)
If you need to edit the shape of your tail, select the Pen Tool set to Path.
On the upper Pen Tool Toolbar, to the left of the Shape button, you will find the Path Operations options.
To Add to Your Tail
If you need to add to your tail, to make it longer for instance, then you will want to set the Path Operations to Combine Shapes.
When set to Combine Shapes, paths will add to the shape of your tail.
To Subtract From Your Tail
If you'd like to subtract from your tail, to adjust the width or shape, for instance, set the Path Operations to Subtract From Shape.
This option will make it so that the path will subtract from the shape, without creating new shapes.
Use these options to adjust and shape your tail until you're happy!
Step 4
Using the layer mask on the thigh portion of the tail, mask out the top inner area of the tail, blending it into the thigh of the subject.
Step 5
Next, we are going to shade and light the upper portion of our tail.
Create two New Layers and clip them into the thigh layer. Name one "Light" and the other "Shadow."
With a soft, round Brush set to a very low 1-10% Flow Rate, paint some highlights onto the "Light" layer and then shadows onto the "Shadow" layer.
Use the Eyedropper Tool to select colors, using the subject as the Eyedropper's reference.
Tips
If you don't have a graphics tablet, use the Smudge and Mixer Brush Tool to smooth and taper out the edges.
Sample the colors from the subject's high, mid, and lowlights; however, feel free to adjust the colors as needed.
Build up both the shadows and light slowly. Setting the brush to a low Flow Rate is essential for this.
Keeping the lights and darks helps you have more control and a higher room for error.
Use the subject as a reference!
Use as many layers as you'd like so you can adjust opacities and play with layer modes!
For light and highlights, use Screen, Color Dodge, Overlay, and Softlight.
When painting shadows, set the layer modes to Multiply and Soft Light.
Step 6
Download and install these free Photoshop Brushes for Painting Fish Scales.
Create a New Group.
Hold Control and Click your thigh shape to create a selection of it. With the thigh-shaped selection, add a layer mask to the new group.
Rename the group "Scales" as this is the group we will be creating our thigh scales on.
Step 7
Create a New Layer inside the "Scales" group, setting it to Overlay.
Using a mixture of a small, soft, round Brush and the "Pixelstains Fish Scale Brush 03" from the downloaded brush pack, paint a Soft Peach #fdc79b color all over the thigh.
Focus the scale texture towards the top of the thigh, keeping the texture small.
Step 8
Create a New Layer set to Darken.
Using the same "Pixelstains Fish Scale Brush 03" brush, paint Dark Brown #4a2618 scales onto your mermaid's thigh.
Tips
Focus on adding scales to areas where the light hits the most. Darker areas should have fewer scales.
Be aware of the direction of the scales.
Create multiple different layers to paint on, and make good use of Control-Z!
Find some fish or other mermaid illustrations for reference.
Add a Filter > Shaper > Smart Sharp to the scales to increase details.
Step 9
Create a New Layer set to Color Dodge, placing setting it above the "Scale" layers.
Add color to the scales using the "Pixelstains Fish Scale Brush 03" Brush. I used a mixture of a Tan #9b8058 and Green #819058 color.
Bring the Opacity of the layer down if needed.
Step 10
Create a New Layer set to Overlay.
Continue to enhance the light and color of the tail by building up more of the Tan #9b8058 color on the thigh.
Use a soft, round Brush set to a 1-15% Flow rate.
Step 11
Repeat step 10 until you are happy!
Looking at references is my biggest tip for this step, along with focusing on building and enhancing the highlights that already exist.
Use a mixture of Overlay and Color layer modes to keep layering on the light.
Step 12
Finish off the scales by creating a New Layer set to Overlay.
Bring this layer below any "Scale" layers.
Using a small, hard, round Brush, paint white highlights on the edges of the most prominent scales, going down the middle portion of the side of the thigh.
Group the "Scales" group in with our "Thigh" layer, naming the new group "Thigh Tail."
Step 13
Remember how we split the tail into two shapes? Well, we are going to repeat the process above on the bottom portion of the tail!
The steps are the same, only you will be working in a looping motion this time.
Once you are happy with the bottom portion of the tail, Group everything together, naming the group "Bottom Tail."
Then Group both the bottom and thigh portion of the tail together, naming the group "Tail - Woman."
Step 14
Create and clip a Selective Color adjustment layer into the "Tail - Woman" group.
Selective Color Settings
Yellows
Cyan: -56
Magenta: +64
Yellow: -22
Step 15
Create and clip a New Layer set to Overlay into the "Tail - Woman" group.
Using a soft, round Brush, further enhance the highlights of both the top and bottom portion of the tail.
As always, it's a good idea to layer lighting using multiple layers!
Step 16
Create and clip a Color Balance adjustment layer into the "Tail - Woman" group.
Color Balance Settings
Red: +70
Green: +53
Blue: +90
Step 17
Repeat the steps above with the male subject!
5. How to Create Fish Fins
To finish up our tails, we will be adding our fins. Soft, flowy fins are the easiest to work with, so that is what we will be adding, but incorporating hard fins like dorsal fins is a great way to create more visually appealing/edgy mermaids!
Step 1
Drop the Betta Siamese Aquarium Fighting Fish 1 image onto the canvas.
I suggest keeping all of the fish stock images as Smart Objects so that you can copy and resize them as needed, without having to worry about distortion or pixelation!
Set the fish stock to Lighten, placing it over the female subject's tail.
Step 2
Using a soft, round brush, mask out the fish's head and body.
Step 3
Add an Image > Adjustments > Brightness/Contrast and Hue/Saturation to the fish stock.
Feel free to adjust these settings for all of the different fins we will create from this fin later on!
Brightness/Contrast Settings
Brightness: -80
Hue/Saturation Settings
Hue: -11
Saturation: -10
Step 4
Repeat Step 3 until you are satisfied with the number of fins!
Use both the Transform and Warp mode to differentiate the fins, along with Layer Masks. We don't want the fins to look too repetitive!
You can also experiment with using the Screen layer mode along with the Lighten layer mode.
It's also best to use at least two different stock images like Betta Siamese Aquarium Fighting Fish 2.
Step 5
Create a New Layer set to Multiply, placing it below all of the fin layers but above the subject layers. So if you placed fins below your mermaid layers, you would have to create a second layer for those fins.
Let's finish up the fins by painting a dark blue base underneath them; this will make the fins feel more substantial.
Use a semi-hard round Brush to achieve this effect.
Step 6
Repeat the above steps for the male subject as well!
6. How to Create a Lens Flare Photo Effect
Next, we will be adding a bright light coming from the surface of the water. Using lighting and lens flares is a great way to add contrasting yet complementing colors to your work!
Step 1
Create a New Layer set to Screen.
With a very large, soft, round Brush, paint a Light Orange #ff9259 blob of light towards the upper-middle portion of the canvas.
Step 2
Drop in image "8" from the Vintage Polygon Light Backgrounds texture pack. Set the layer to Screen.
Add a Filter > Blur > Shape Blur.
Shape Blur Settings
Radius: 70 px
Shape: Hexagon
Use a very large, soft, round Brush to mask out the bottom edge of the light texture.
Step 3
Repeat Step 2 with the Suns and Rays lens flare pack.
Step 4
Create a New Layer set to Screen.
Using a soft, round Brush set to a very low 1-5% Flow, paint a glow coming from the bodies and tails of our two subjects.
Sample colors from the areas you are painting over. For instance, paint light blue over the female mermaid's tailfins, and a light peach or orange color over her body.
Feel free to bring in other colors as well, like greens or golds! Bring the Opacity of the layer down if needed.
7. How to Paint Dark Shadows
Next up, we will be painting some dramatic shadows to match our rich light source.
Step 1
Create a New Layer right above the "Water" group, setting the layer to Multiply.
Using a medium, soft, round Brush, paint a Dark Green #0e1509 color behind your female subject.
The shadows should be slanted, not too soft, and located logically. Creating defined shadows will often produce more dynamic lighting!
Create a New Layer above the previous layer, setting it to Overlay.
Paint a very subtle, soft, faint glow around the woman's face and chest.
Step 2
Repeat Step 1 above, only this time place the layers above your subject's.
Whether you place them above or below the fins is up to you—you will likely have a mix.
Paint shadows on multiple different Multiply layers, building the shadows as you go, and adjust the layer's Opacity as needed.
Use Filter > Blur > Motion Blur to add more slant to your shadows if needed as well!
Also, use the Blend If function to keep shadows out of highlights.
Step 3
Is there an area you want to catch more light? You can use a Brightness/Contrast layer.
Use a layer mask to keep it confined to the tail fin.
Brightness/Contrast Settings
Brightness: 41
Contrast: 79
8. How to Create Underwater Bubbles and Hair
To finish everything off, we will be adding some underwater bubbles and adding some movement to our subject's hair.
While you can paint your own bubbles, you can also use these premade Colorful soap bubbles!
Step 1
Open up the Colorful soap bubbles PSD, and drag and drop the whole "Wiggling Bubbles" group full of bubbles onto the canvas.
Making sure the "Wiggling Bubbles" group is below the "Lens Flare" group, shrink the bubbles substantially!
Set the group to Screen.
Step 2
Use the Move Tool to position each bubble around the canvas individually.
You can copy, paste, flip, enlarge, and shrink the bubbles as needed. Variation is key, so try not to make any single bubble look the same!
Step 3
Create and clip a Brightness/Contrast layer into the "Wiggling Bubbles" group.
Brightness/Contrast Settings
Brightness: -150
Contrast: 100
Next, to get rid of 100% of the color of the bubbles, create and clip a Gradient Map layer above the "Brightness/Contrast" layer.
Gradient Map Settings
Color: Black to White
To add even more bubbles, without having to copy and paste each bubble individually, try the trick below!
Step 4
Duplicate the "Wiggling Bubbles" group, along with its clipped adjustment layers. Bring the new group above the original group. We want to keep our two types of bubbles separate!
Merge the duplicate group and its adjustment layers together, making sure to reset the layer mode to Screen.
Flip the merged bubbles both horizontally and vertically, as well as shrinking them down. Place the bubbles where desired—I placed them in the upper right-hand corner.
If you find that your bubbles aren't bright enough, duplicate their layers!
Step 5
Repeat step 4 until you're satisfied! I added two new sets of bubbles, for a total of three. Again, try to avoid making the bubbles look repetitive!
Use the Eraser Tool on any of the bubbles that look out of place.
Step 6
Finally, add some depth by creating foreground bubbles.
Start by repeating step 4. Significantly enlarge the new bubbles, positioning them on the right side and bottom portion of the canvas.
Add a Filter > Blur > Shape Blur to the bubbles to remove any pixelation caused by enlarging the bubbles.
Shape Blur Settings
Shape: Circle
Radius: 25 px
Group all of the merged bubble layers together, naming the group "Merged Bubbles". You should have a "Merged Bubbles" group and a "Wiggling Bubbles" group!
Step 7
Next, we will want to add some flow to the hair. I personally like to work with the existing hair of the subject, simply adding to it and giving it more motion.
Create a New Layer.
Using a hair-strand brush, like the one I teach you how to create in this fashion portrait tutorial, paint strands of wavy hair extending out of the subject's current hair.
Use the Eyedropper Tool to pick the colors as you go.
Step 8
Create a New Layer, setting it to Overlay.
Using a soft, round Brush with a 1-10% Flow Rate, paint white highlights in and on the hair strands.
Lower the layer's Opacity if needed.
We've Done It!
These mermaids are just a jumping-off point, here to help you cover the basics; there are so many different directions you can go and so many more details you could add compared to what we did here today! And the best part is that the more you create, the better you'll get, going from simple shapes to full-blown complex masterpieces.
Take this opportunity to think of all the different kinds of underwater creatures you could create using these techniques as a starting point. Never be afraid to think outside of the tutorial!
So, as always, keep experimenting with different techniques and practicing, and don't forget to post your version below, along with any questions, comments, or critiques!
Looking to learn more? Why not check out the following photo manipulation tutorials:
Adobe Photoshop
How to Create an Abstract Diamond Lens Effect in Photoshop
Abbey Esparza
Photo Manipulation
How to Create a Honey Bee Themed Photo Manipulation in Photoshop
Abbey Esparza
Neon
How to Create an 80s Neon Horns Photo Manipulation in Adobe Photoshop
Abbey Esparza
Photo Manipulation
How to Create a Ghostly Horror-Themed Photo Manipulation in Adobe Photoshop
Abbey Esparza
Photo Manipulation
How to Create a Surreal Stitched Portrait in Adobe Photoshop
Abbey Esparza
Photo Manipulation
How to Create a Neon Rainbow Photoshop Portrait Effect
Abbey Esparza
from Envato Tuts+ Design & Illustration https://ift.tt/2GCNKmJ via http://www.webmasterforum.ws/rankwyz-discount-code-2015-coupons/
0 notes
Text

Do you own a DSLR but still take average, boring photos?
“Now You Can Master Any DSLR Camera And
Take Gorgeous, Attention-Grabbing Photos By
Following Step-By-Step Video Tutorials!”
“Use your computer, laptop or smart phone to get expert advice with easy-to-follow instructions whenever you need it!”
Hi there,

Evan Sharboneau here…
As you probably know, I’ve helped over 9.2 million photographers create stunning images using digital cameras.

Above is an example of a recent personal work - these are the types of images you'll be learning to create inside my photography training course!
Now, I’ve got something NEW for you – and it’s very cool.
After helping beginners for 5 years, I see exactly what’s stopping you from taking photos that really impress your friends and family… and will sell online, at shows, and even galleries.
So if you’re struggling to get the most out of your camera and finally be recognized for your own amazing photographs, then what I’m about to share will make you extremely happy…
I Used To Be Like You
Look, I understand how it feels to compare your own photographs with what we see in magazines, books, and online forums.
As a beginner, it’s not only frustrating but can get depressing, wondering “how was that shot taken?”… thinking “it’s probably because they have a better camera than me”… or “I’ll take photos that good, eventually”.
Like you, I didn’t know the secrets. I couldn’t afford expensive cameras or classes. But I wanted to take good photos TODAY, not “someday”…
Are These Questions And Concerns Stopping You From Becoming A Better Photographer?
Do you own a DSLR camera but take mediocre photographs – a sign that you lack the skill and confidence to get the best results?
Have you thought about upgrading your equipment, believing that will improve your photos?
Are you lost when it comes to exposure, aperture, ISO/ASA, depth of field, lighting, lenses, filters, post-production and other difficult concepts?
Do you still have questions or feel overwhelmed after reading blogs, forums, books, and tutorials?
Have you thought about taking photography classes – but want to save time and money?
Do you think you’re not ready to be a professional – a mindset that you must overcome to succeed, get recognized, and sell your own photos?
Bad Photos Are Not Your Fault

More old photos of mine shot back when I was the typical average photographer, completely unaware of how my images could be improved. Do your photos look like these?
So many new photographers and hobbyists get stuck on buying equipment. And they spend months hunting for ways to improve their skills.
Yet, after all that, your photos are average. Or worse.
Here’s the truth: it’s really NOT your fault!
I’m telling you, I’ve spent hundreds of hours digging through blogs and forums, reading books and manuals, watching YouTube and DVDs.
Guess what. After going through ALL of the training material out there, I’ve found NONE that will turn you into a pro, step-by-step.
They always have missing pieces. Questions without answers. Nobody says exactly how the best images are made.
You’re just expected to “spend a lot of time practicing”!
People believe that’s a good thing, but it can actually be wasted time and energy. Doing something over and over again is exhausting. It takes years to figure stuff out and become a professional that way… if you get there at all!
There’s a better strategy…
It Takes Years To Become A Professional… If You Don’t Know The Shortcut

These shots were taken by me after I learned the secrets of professionals…
How did I go from beginner to having photographs showcased and featured on DeviantART, Flickr, print ads, billboards, posters, magazines, and book covers?
Well, I never took classes. Anywhere. Ever.
Instead, I went around my town and shot photos with an entry-level DSLR, a Nikon D50.
My first attempts were “ordinary”, nothing special. Online I saw photos better than mine and literally thought they were mysterious. I couldn’t figure out how they did it!
But then… I discovered a few BASIC PRINCIPLES that make it possible to take good photos, every time, no matter what camera’s in my hands.
With these principles, I can take a couple shots and feel comfortable knowing at least one will be a “keeper”.
It’s WAY BETTER than digging through 100 shots hoping that one is just “okay”.
Now I’m aware of WHAT to look for… WHEN to photograph… HOW to get the shot I want. And I can be sure that a photo will be good – even before it’s taken.
It’s like I found a reflex that just “knows” when to click the shutter!
Seriously, this changed my life…
How To Quickly Learn Everything You Need To Create Amazing Photographs

Your shots CAN look like these! Here's how…
Let’s be real: after getting a DSLR you found it takes more than reading the manual to get professional results from it.
Then your hunt for more information and answers began.
But there’s a TON of information about photography, and it’s so unorganized!
I learned by doing meticulous research, putting it all together on my own. After spending years of applying what I discovered, I began sharing with friends online.
Nobody prepared me for the flood of questions about landscapes, portraits, sports, studio photography... and my weird ability to just grab a camera and start taking great photos without any effort whatsoever.
Now I've got the answers you're looking for, and they're here on this website.
Just Imagine Being Able To…
Choose the right DSLR on a budget and still get all the desired features
Properly hold a DSLR and stop looking like a complete idiot out in the field
Stop taking boring photos that nobody cares about and start taking creative, memorable photos worth sharing and selling

GET CRISP, CLEAR SHOTS when photographing anything, including people, objects, and landscapes

Avoid the 6 common beginner mistakes of COMPOSITION and easily create brilliant images instead

Finally grasp a complete understanding of Shutter Speed, Aperture, and ISO for total control over MOTION and DEPTH OF FIELD

Learn the “secret” time of day when most professional photos are shot

Understand Exposure and Metering so pictures won’t be too bright or too dark, but “just right”

Properly select the right WHITE-BALANCE setting on your camera and stop worrying about photos coming out too orange or having washed out colors

Select the BEST LENSES to create appropriate, proportional, non-distorted, aesthetically pleasing images… no matter the situation

Take JAW-DROPPING panoramic shots

Use FOCUS correctly and know what focus points to avoid in a scene

Choose the BEST EQUIPMENT, including flash, filters, camera bag, tripod, tripod head, batteries, battery recharger, strap, camera mount, and memory cards
Use external FLASH to control motion, remove red-eye, add drama, and give your images an edgy, high-class, professional look…

Use FILTERS to control light coming through the lens, remove glare, and even make the colors in a scene appear more saturated
Get NATURAL HDR shots that don’t look fake or “over-done”

Correctly decide when to use a TRIPOD – and know when it’s dumb to use one
Capture sharp, correctly exposed photos in LOW-LIGHT SITUATIONS… with no motion blur or noise

Take stunning photographs at NIGHT with or without using a flash or tripod

Know where to put LIGHTS in relation to your subject/model and how to control the mood of portrait photos

Choose effective LIGHT MODIFIERS, including umbrellas, soft boxes, beauty dishes and grids to establish the mood of the image (do you want the image to be dark, dramatic and shadowy? Soft and pleasing? Bright and happy? Do you want soft pools of background light? When would you want light to create texture across surfaces, and when wouldn't you?)

Know how to select a SOFTWARE package that fits your needs and budget
Correctly EDIT IMAGES in post-production using Adobe® Photoshop® Lightroom and Adobe® Photoshop® software

And much, much more…
Others started applying my advice and the results were pretty amazing…

Photo by someone who took my advice
It felt great when they started getting the same results as me…
But Don’t Just Take My Word For It
“People thought my photos were from a travel magazine!”

Why Does This Work So Much Better?
The principles I discovered can turn nearly anyone into an “expert photographer”. When it comes to getting better shots, you’ll be AMAZED at how well they work.
And these principles are essential if you want photography to be a secondary or even full-time income.
Yet this information is hard to get. It’s either hidden from the general public or scattered all over the place, unavailable in one location for easy access.
NOW HERE’S THE SOLUTION: Everything you must learn to take professional quality images is on this website.
You can finally start using your camera with confidence. Start taking your own amazing photographs that people will rave about and even pay money for, if that’s your goal.
Listen, I’m willing to tell you everything because I’m not afraid of competition.
After being published all over the world, I’ve learned that it’s actually more fun and rewarding to share what I discovered… the very same information that launched my career.
My favorite part is when people send photos after using what I taught them.
Bottom-line: it doesn’t matter if you’re brand new or have been struggling with photography for a long time… I want to help you.
To make it easy, I took a video camera and recorded answers to all the top questions, and more.
I carefully demonstrate how to use exposure and aperture, lenses, lighting, composition, software, and many other topics that people find difficult or confusing.
What’s better, I’ll show you how to succeed…
Without piles of books or college courses
Without years of experimentation taking “average” photos
0 notes
Text
Task 2
Introduction
In task 2, I am asked to begin prototyping my user interfaces and post any idea generations or concepts I create. pre production is essential as I can better visualise what I want to create and draft it and then fully implement it into unreal engine. This is especially important for the industry as when you have other people working on the same project, The pre production is how you can share the vision and general idea of what you’re trying to create.
I’ll also take into consideration human factors during this process.
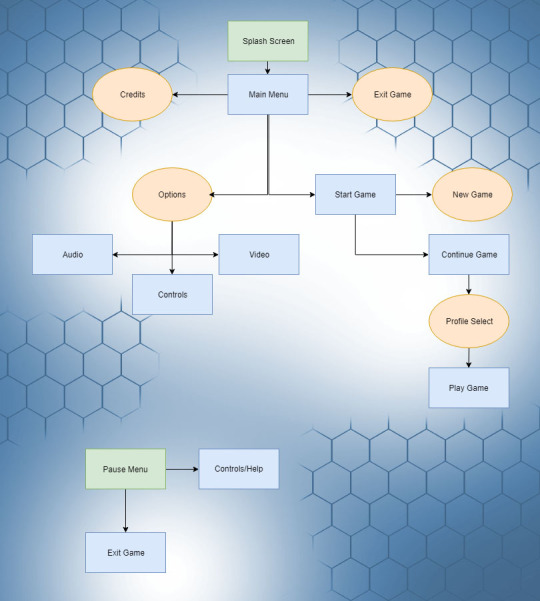
Here’s a simple flowchart detailing the way the menu system will direct the player into the game. It begins with a splash screen during the loading process. This gives the player a visual queue that the game is starting up. Then the main menu is opened with the following options:
Start Game > Takes the player to additional options
Options > Lets the player change game options
Exit Game > Exits the game application
Credits > Plays Credits for the game
If the player selects ‘Start Game’ they are then asked to either choose between starting a new play through or continuing from a previous save. Upon selecting start game the main menu will unload, the level will load and the player character will spawn.
Whilst playing the game the player character can pause and find an additional window detailing the player controls. The game can also be exited from this menu. I’m planning on having the player controls in the pause menu as it can be accessed at any time. Fighting games in particular like Mortal Kombat are notorious for having long combos that you have to remember and navigating the menu to find them is annoying. I want to avoid that in my game and have the pause menu be direct access to the control list.
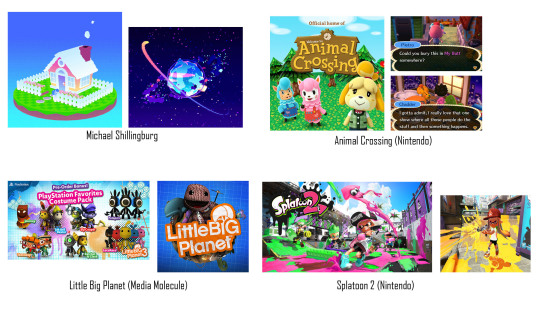
Whilst looking into some potential colour themes for my game I came across an artist and game dev called Michael Shillingburg who has a really unique and colourful style that I love. His great visuals would be perfect for a game aimed towards children and so I’ll definitely be looking at his work for inspiration when developing visuals for my project.
I also found an interesting detailing the differences between photo-realistic and stylised game worlds. I’ve decided to go towards a minimalist stylised approach and this needs to be seen in my menu/hud too.
‘The significant difference between realism and stylized is that with realism you are restricted to making things look ‘real’ while enhancing their visual language. With stylized you are free to play with the shapes and colors, exaggerate or remove details to enhance the look and feel in any direction. Doing so with realism would break the illusion of reality as it wouldn’t be viewed as what we perceive to be as ‘realistic’, it would not belong in our world.’ (Aava, 2017)
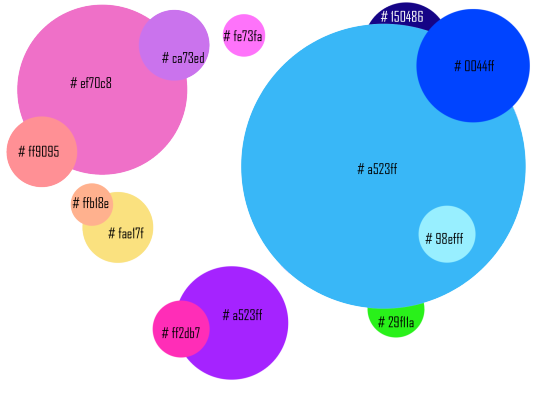
I created a colour pallete in photoshop by using the eyedrop tool and taking colours that I liked from art in my moodboard. There are a lot of colours however this is spread across the game environment, particle effects and UI/UX so not all of these colours will be seen all at once. Instead they’re spread across different environments to not overwhelm the player.
Game Title


Here’s my concept title graphic for my project. I also created an animated GIF to visualise how I’d have the title animate in game. A good use of this animation would be during a splash screen/loading screen. The pulsing animation gives the player visual feedback that the game has not frozen and it’s just taking a moment to load the next area. I chose the name BabyBot as most games popular with younger audiences have short names because they’re easier to search for online like ‘Fortnite’ or ‘Splatoon!’. The alliteration also makes the name easier to remember.
To create this graphic I simply typed up the title ‘Baby Bot’ changed the leading of the font to reduce the space between the words then I went into the effect and gave it a thicker stroke. I chose pink and blue as they’re both colours that are common on my colour palette.I like how the gradient creates purple in the middle too.

I then used the timeline tool to create 5 frames of the stroke reducing and enlarging. This gives it the movement.

I’ll use what I learnt in the future when creating animated features of my menu system. As I concept more of the projects assets I’ll also stick to a general aesthetic so it all blends together well.
My main inspiration for the title was LittleBigPlanet and it’s similar use of bold colourful fonts. I chose the name Baby Bot as it’s short, uses alliteration and refers to the robot characters which use baby like proportions which are common in cute characters. (Large Head, short limbs)
HUD Draft
I’ve created a draft for my HUD for my project.
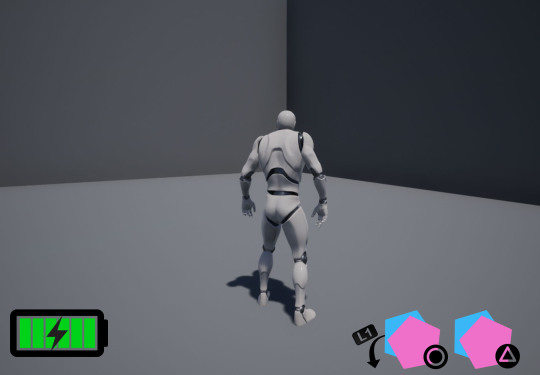
I’ve drafted a health bar and ability interface so far.

Here is a gif showing my concept for the ability interface. The player character will have four abilities that they’re able to activate with circle or triangle. They can hold L1 to activate the alternative ones. The symbol representing each ability will move forward to make it clear to the player what button activates what ability.
When the abilities are on cooldown the symbol will become transparent and then pop back into full opacity when it’s ready to be used again.

Here’s a gif showcasing my idea for the players health bar. As it’s a robot I thought it’d be fun displaying the health as a battery. As the player loses health it decreases and changes from green to orange to flashing red. This uses colours to represent the players health without relying on numbers. I have chosen this because younger demographics such as children will be able to see at a glance the characters health without having to stop and read text or percentages.
Splash Screen
Here is my wireframe. I took inspiration from games in my moodboard such as animal crossing. The splash screen in animal crossing is the game title with a simple (press start) button underneath. I will follow a similar format for my splashscreen.
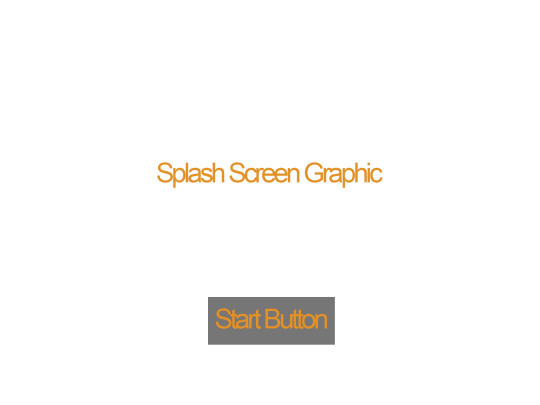
I then went into photoshop and created my finished concept from my wireframe.
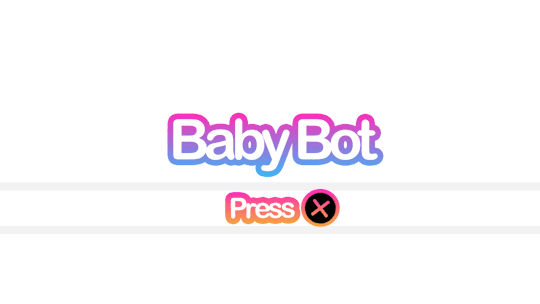
Here’s the splash screen which will prompt the player to press X to continue. I might add additional information like a company name or a project build. The reason why I changed ‘Press Start’ to ‘Press X’ is because I’m building this project with the playstation controller in mind and children will have an easier time finding the X button rather than the start button.
Main Menu
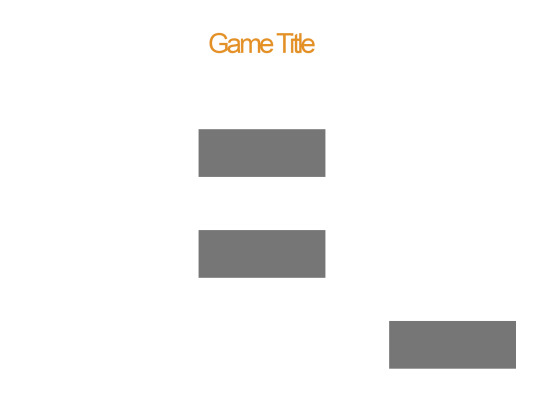
I’ve drafted up my main menu with another wireframe. I plan to have three buttons which I planned before in my flowchart. Start, Exit and Credits. After creating my wireframe I then went into photoshop and used the 1920x1080 resolution as that’s what’s most common at the moment with monitors. I tried to keep withing the blue guidelines provided by Photoshop.
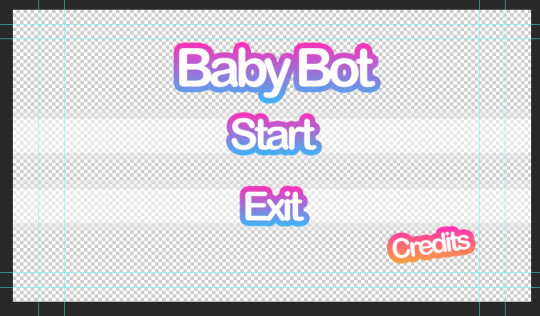
It’s a transparent background so it will showcase the game environment behind it. I’ve chosen a transparent background to give this menu a clear difference from the splash screen.
Here’s a GIF showing how the player will scroll through the options.

I like showing the exact button itself as it leaves no room for confusion on what the player needs to press. I’ll add a sound such as a click whenever the player scrolls through different options to give an additional indicator that they’ve moved their selection. When adding sounds to a game however it’s important to think about how often the player is going to be hearing that and if it’s going to annoy them. That’s why you don’t want anything set too loud or shrill.
Credits Screen
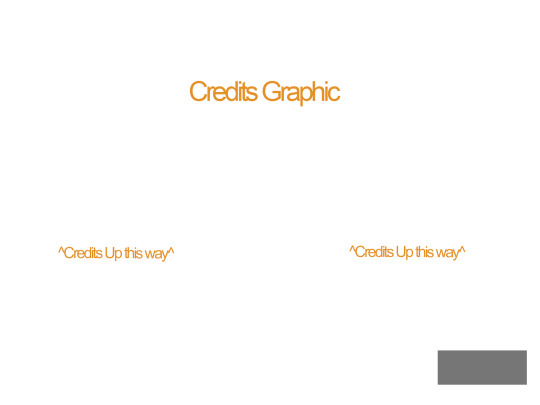
Here’s a draft for the credits screen. I kept to the same structure in my wire frame except that I moved the title slightly lower and larger so it overlays over the moving credits. I did this because the slow pulsing animation on the title is pleasing to look at.

Pause Menu
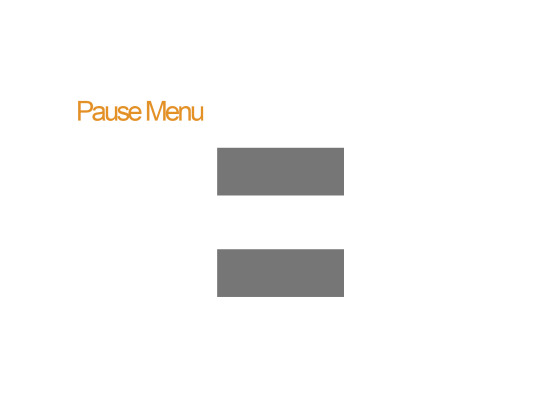
Here’s the pause menu when the player presses ESC or Option/Start. It has a transparent background and two large buttons. When creating my concept in photoshop however I put a slight angle on pause to make it appear more playful.
The widget will come to the viewport and blur the gameplay behind it. This is so the character can still see what’s happening onscreen even when the game is paused. They’re also able to open up the help menu which will display the character controls.
Controls Menu
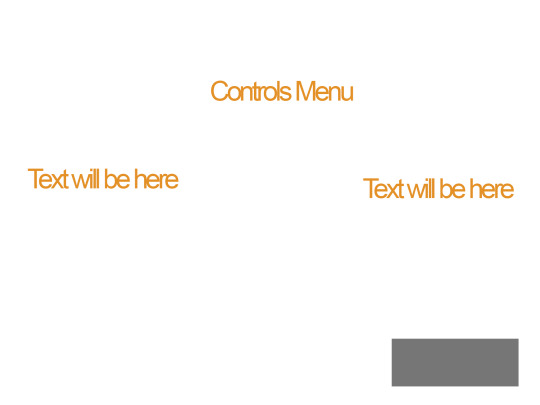
When the player selects help the player is taken to this menu. When creating the wire frame I went back and looked at the credits menu and kept to the same format. This is to simply keep the menu system to a similar structure as I don’t want every page being wildly different. Games in the industry usually have a set style and stick to it throughout which I what I’m aiming to do.
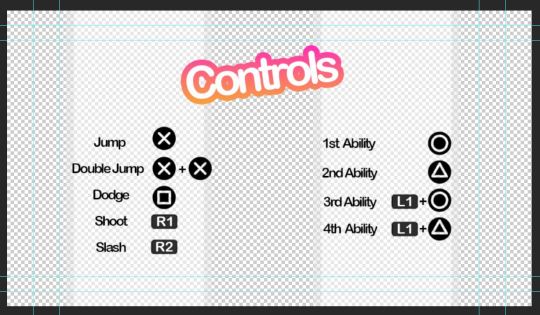
Here’s the controls menu to remind the player how to use their abilities. I added the transparent white walls so the black text stands out more. The rest of the screen will show the game environment behind it. The title “Controls” is also animated as you can see from this GIF.

In-Game Dialogue
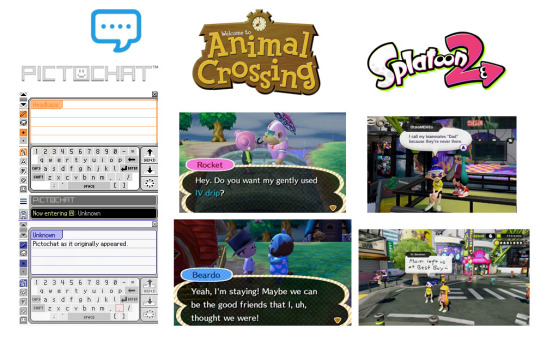
Here’s a moodboard of some ways of displaying text which I think will work well with the style I’m going for. I like the vaporwave aesthetic which often appropriates styles from 1990s-2000s. I’ll keep these three in mind when designing my dialogue display.
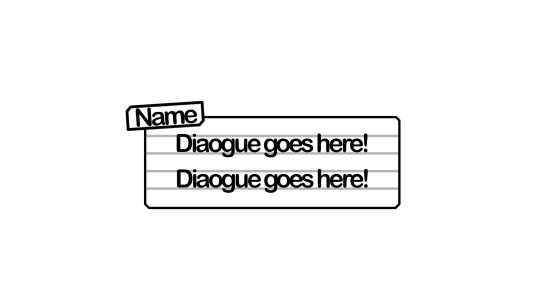
Here’s my draft dialogue box that’s heavily inspired from pictochat but I made the name box larger and off centre similar to animal crossing. I’ll also have different colours for the different character so it’s clear who’s speaking. I’m tempted to have the white background on the box slightly transparent so it doesn’t obstruct the players view of the game.
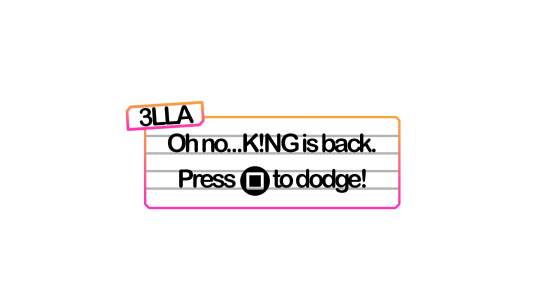
Here’s a draft dialogue box for sidekick character ‘3LLA’ (pronounced Ella) as she warns the player of the antagonist’s return and reminds them how to dodge attacks/dangers areas.
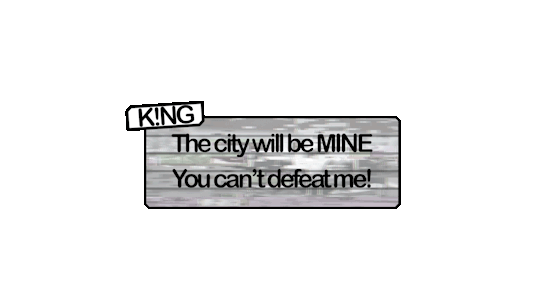
Here’s a draft one for K!NG who’s a malfunction buggy robot who acts as the main antagonist. I wasn’t too happy with this as I felt it was a little bland. I decided to go back and use filters such as offset and wave to mess up the text. I also made duplicates and switched off parts of the RGBs to get the shadows behind the first line. I like how the white text stands out against the background. I’ll use this method to create the distorted glitch affect for K!NG’s dialogue.
I’ll be having recorded voice lines playing alongside so I’m not too concerned with it being hard to read as it’s kind of the point with K!NG. None of his dialogue is informative to the player anyway rather it’s just ramblings of a mad robot.
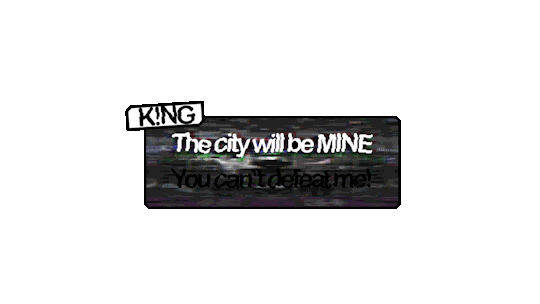
Evaluation of Task 2
I enjoy pre production as it helps me organise my thoughts and ideas on the current task. It allows me time to look at games in the industry and select what I like and don’t like. I looked at games suited towards the same demographic and what I found was bright colours and simple layouts were favoured over more complex menu systems such as something you’d see in a game such as Fallout or Skyrim.
My biggest inspirations were LittleBigPlanet, Hello Kitty Roller Rescue and Splatoon. Animal crossing was also great when coming up for ideas for my in game dialogue.
Feedback I received from peers was that my idea generation was clear but to think more clearly on interactive elements I could add to my menu. I agree that an interactive element would make my menu system much more interesting. Interaction is also great for keeping the attention of younger audience which my game is aimed towards. In task 3, I’ll build my scene which will act as the backdrop for the menu and see what appropriate interactions I could add. I’m thinking of creating an urban scene to set the scene of the game from the get go. Appropriate interactive elements would be flickering lights or birds sitting on buildings which can be clicked on.
References
Aava, K. (2017). Realistic vs. Stylized: Technique Overview. [online] 80.lv. Available at: https://80.lv/articles/realistic-vs-stylized-technique-overview/ [Accessed 5 Oct. 2018].
0 notes
Text
Task 2: Production
After completing the research, creating the mood board and all of the sketches are in place. It is time for the final production. Although I have created the 10 sketches that are already in places, what I usually do is develop more ideas as I go along during the final production. To some people, this may seem like a waste of time and that I should have all of the ideas sketched in the sketchbook before the final production. However, in my case, if I came up with better ideas or designs that I really like, I will change it regardless of the sketches that I’ve already created.
This is a more of an organic approach to doing things, and I preferred it this way rather than being faithful to the original design since I am only focusing on what’s the best thing to do to create an excellent final product.
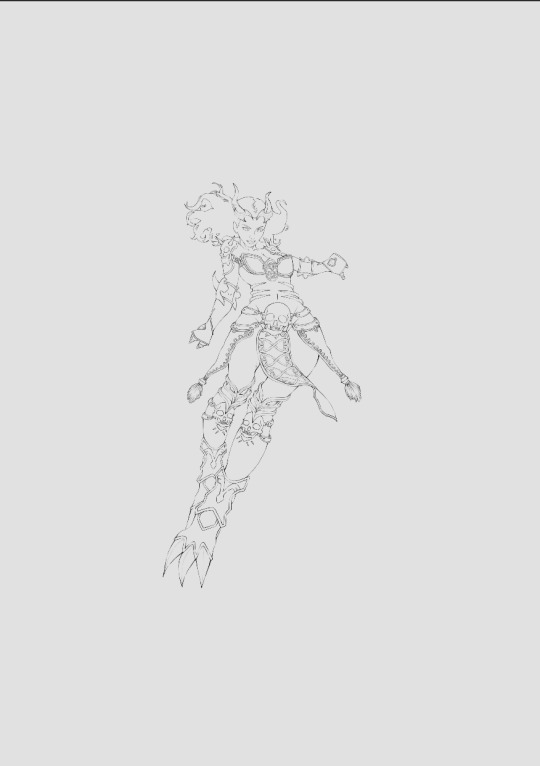
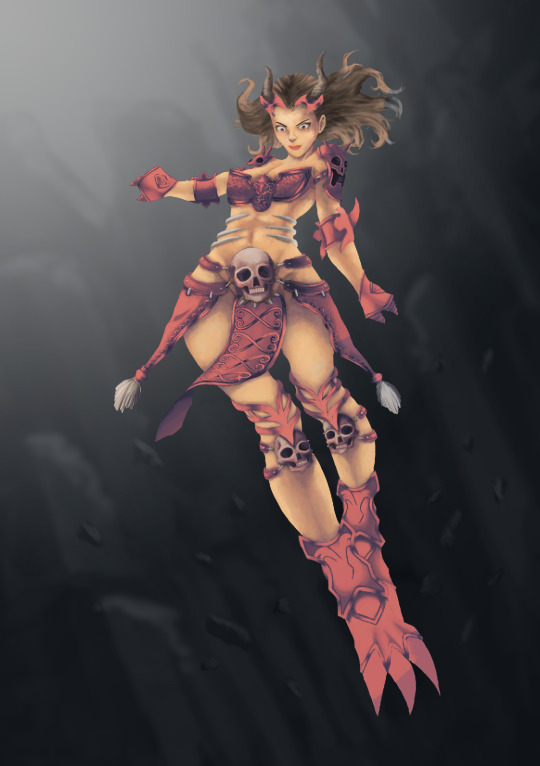
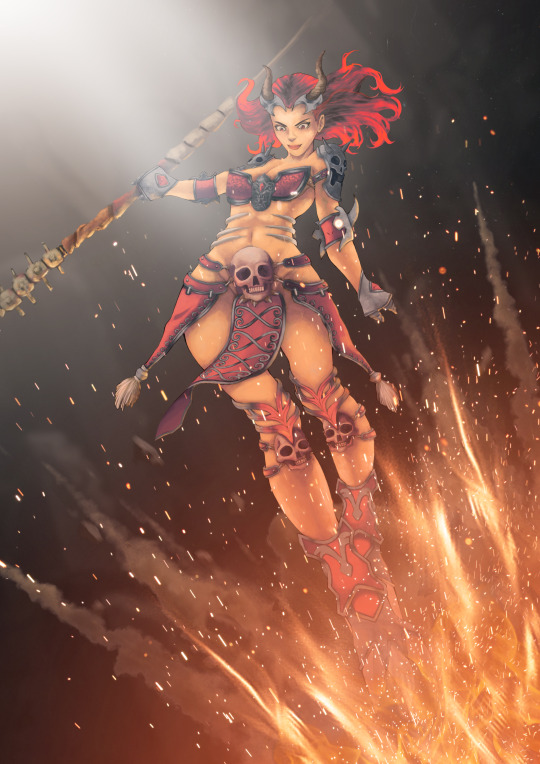
I initially wanted to sketch a drawing of the final character traditionally and was planning to scan in the work that way. However, as I mentioned before, I wanted to push myself to my limit and get out of my comfort zone by doing things. I will be sketching the ideas, do the line work and paint it all in photoshop. However, before I begin sketching, the first step I took for my creation is to plan where the primary light sources will be. In this case, I created a primary light on the top left which came from the light of a portal to get out of the underworld. Another primary light source will be coming from bottom right which is the flame.

After setting up where the light sources are going to be, I then begin the sketch on a new layer. I added features that I had drawn in the sketchbook and implemented to the character to see if I like the look of it.

I then covert the colour from brown to dark grey as I planned to begin doing the outline soon. I’ve also changed the hairstyle as I didn’t really like the short hairstyle I initially created.

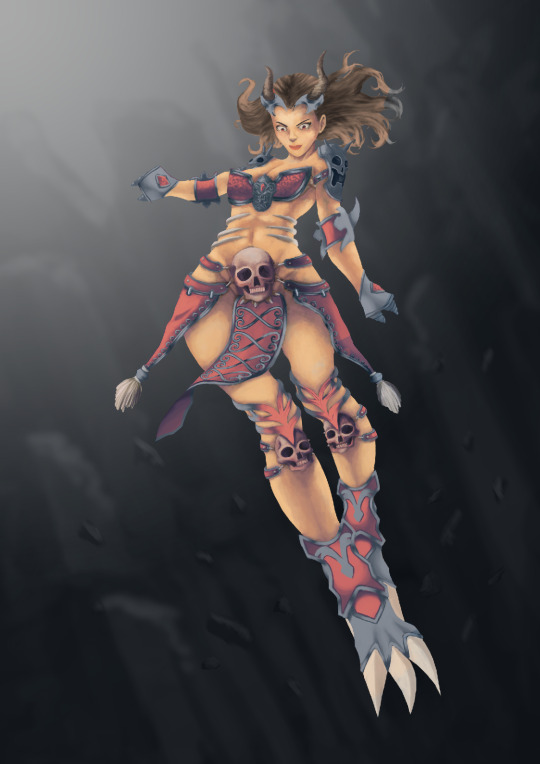
Started doing the outline.

Halfway through, I realised that I didn’t like the look of her chest armour so I am trying to think of designs I could create.
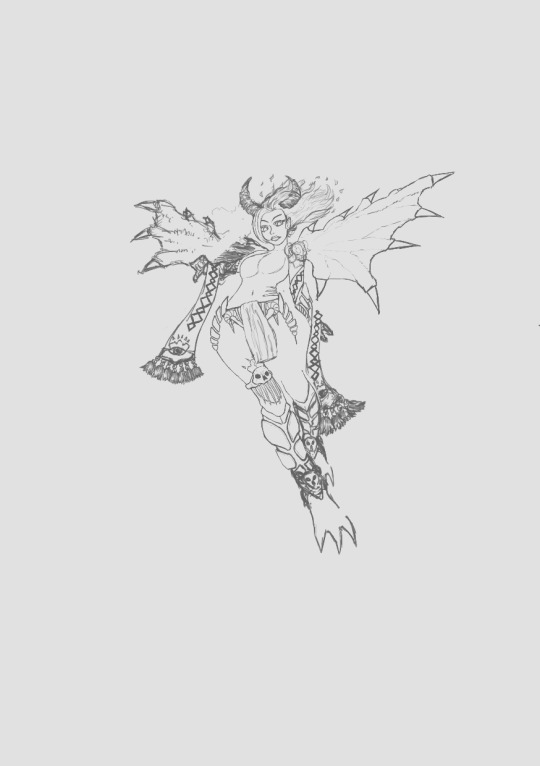
I re-designed her chest armour. However, I soon realised that I didn’t like the other parts of her armour as well which I basically ended up re-designed her whole outfit.

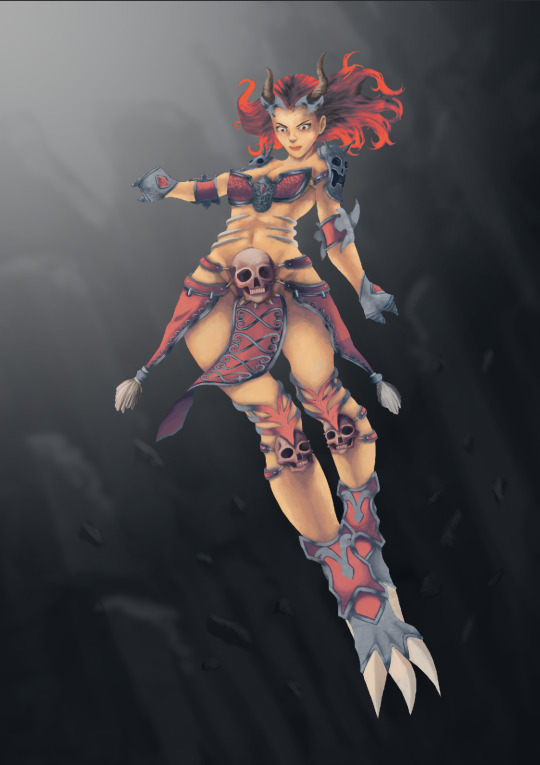
I flipped the canvas to get a better view of the character which I then removed her head as I wanted her face to look more mature and as semi-realistic as possible.

I took my time drawing her head which took a lot of time to get the proportion correct. At this point, I had also removed some of her armours and scarf as I do think that there are too many accessories on her which is kind of distracting.

A new design again.
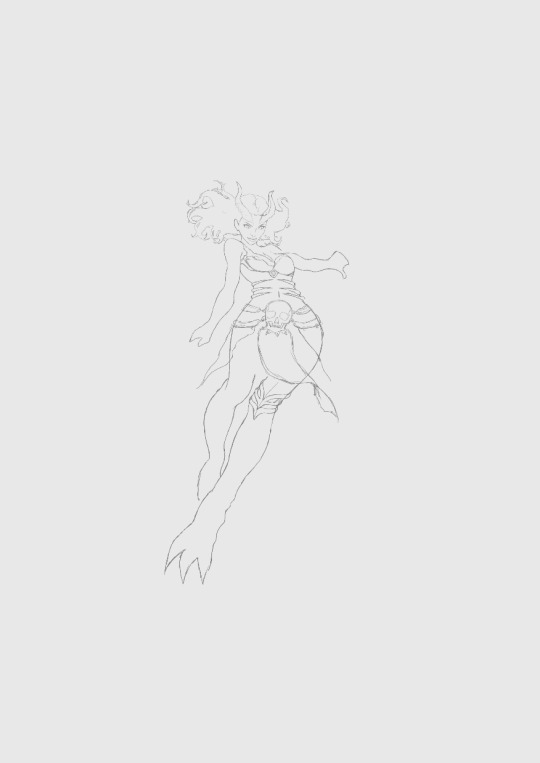
After I was satisfied with how her face looked, I begin to re-designed every armour on her body to create the final sketch version ready to be outlined.

A cleaned outline of the sketch finished.
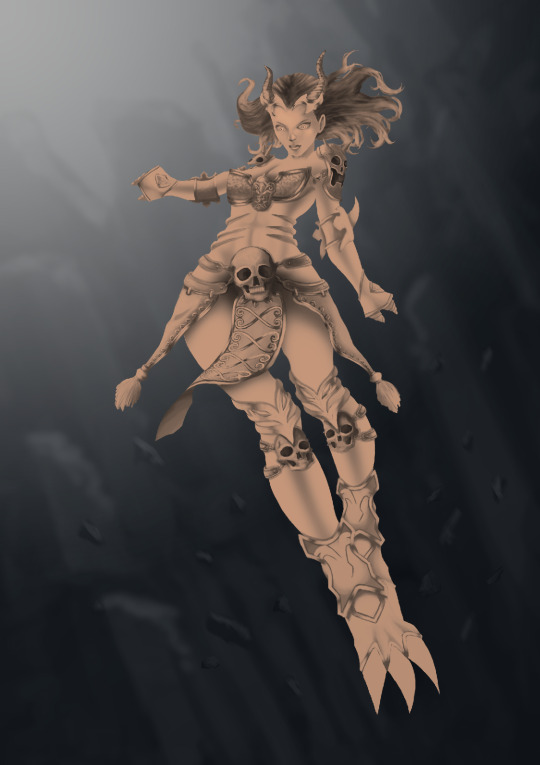
I resized the character to fit the canvas and blocking the whole character with dark grey colour.
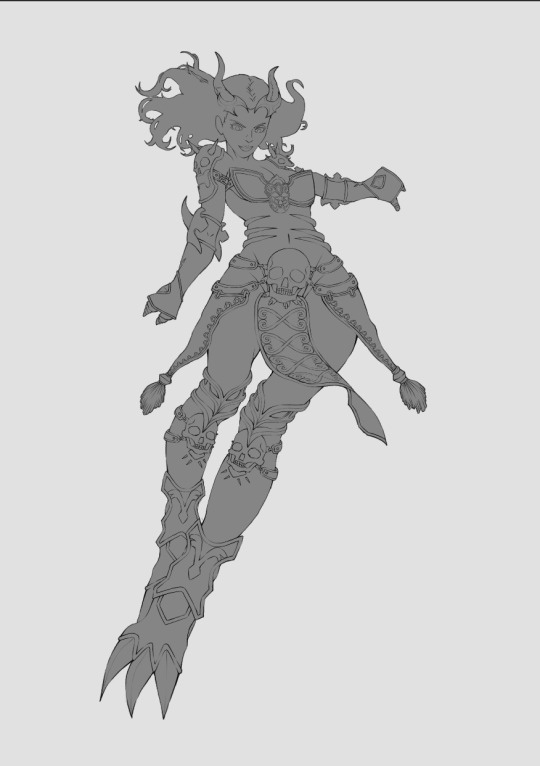
There are many ways to approach painting in Photoshop. However, a method which I prefer is painting in values. I believe painting in values is the way to make every painting successful. Colours are just extras. Even taking the colours away, you will be able to read the painting with only values because it is the most important. Moreover, I believe painting in values is easy as I will be able to plan and determine where the lights and shadows. Whereas painting in colours, I will have a difficult time not only trying to paint in lights and shadows but the fact that I have to spend time trying to find the right colour tones as well.

Next, I painted some details on the horns.

I then paint the hair on a different layer as to not mess things up if something does go wrong.

I then decided to re-paint the skin colour of my character as I thought it wasn’t as smooth as I wanted it to be. I blocked out all of the skins using a grey colour which I will then use it as a clipping mask.

The rendering process for the skin is completed - including the face.
These images are gathered from the internet where I took parts of a particular rock terrain and stitched it together to create the look that I wanted. I noticed that many concept artists used this method to not only get the results that they wanted but to also save time.
I placed the rock images in the place that I wanted to create this slanted rocky hill as it will fade away into the depths.
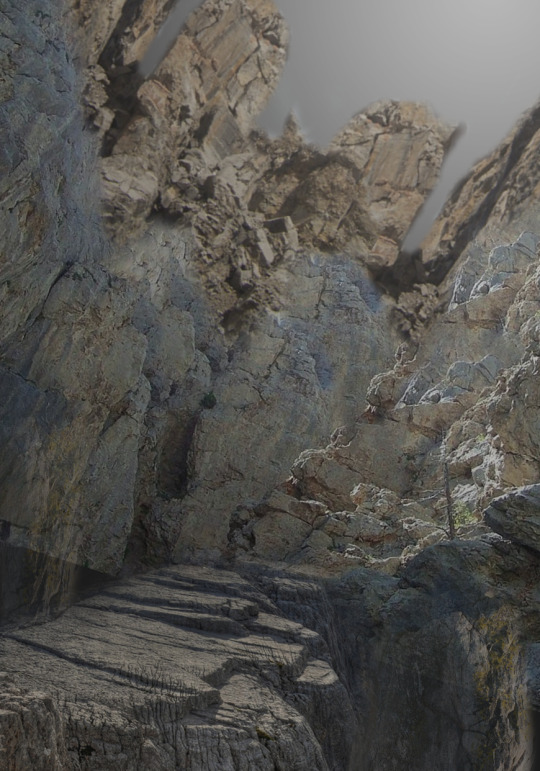
I painted a rough sketch over the images. It doesn’t really have to be perfect, and I don’t need to put in too many details into it as all of this is going to be blurred anyway.

Applied Gaussian blur to the painting.

I paint some of the small rocks, and these rocks don’t need too many details in them at all.
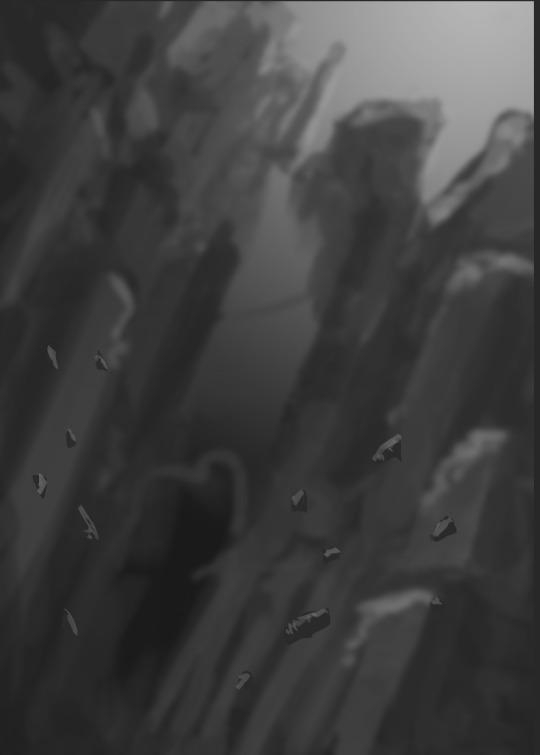
I then applied Motion blur into these rocks as I want the viewers to notice the motion of the rocks where the character is going to be hovering.

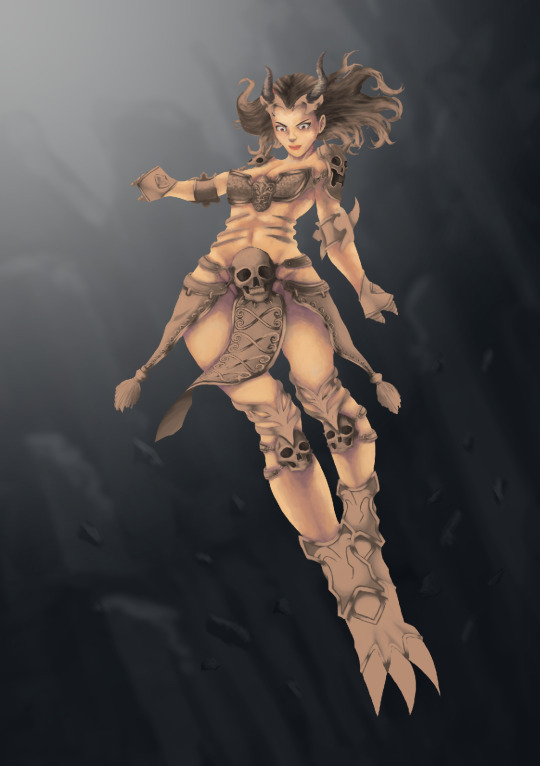
The final process for painting in values where I added the character in and brightens up the scene.

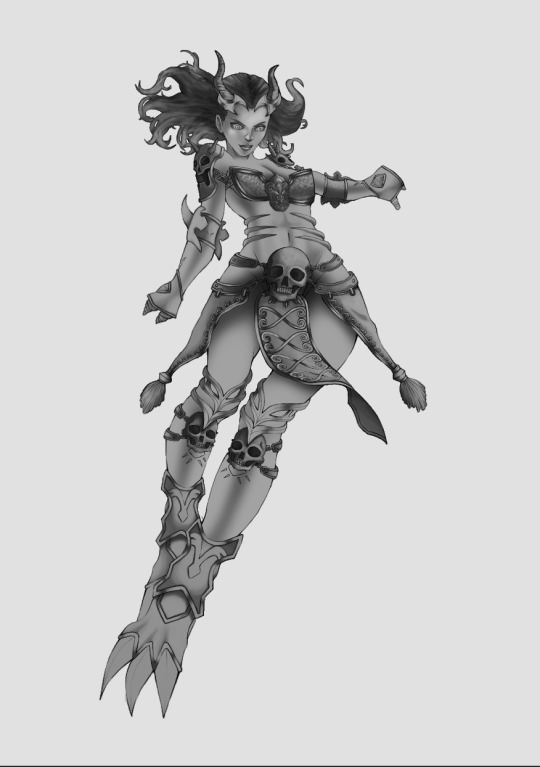
Now that the character has been painted in values and that I have checked that the values are correct. It is now time for me to paint the character in the colours. However, before I begin, since I’m not familiar with how to add colours over the painted values. I did some research by watching Youtube tutorials and see how the artists painted their works.
[video]
One thing I noticed, in particular, is how they keep mentioning that if I just apply colour straight onto the painted values, the colours will look weird and not correct. Therefore, what I did was used a gradient map onto the whole character. This was to give colour information to the painting, and when I do add the colours in, it will look a little bit more natural.
However, there are still a lot more works needed to be done than just adding the gradient map. This was adjusting the tones of the colours, and I will be explaining the process I used to paint my character in detailed down below.
The first step I did was to, of course, add the gradient map. I added the gradient map in separate layers. For instance, the skin, the armour and the hair. To add a gradient map, go to Image > Adjustments > Gradient Map. Furthermore, The reason why I chose this purple to skin tone gradient map was that I wanted the character to have some cool tones on the body parts to show some reflections and bounce lights from the underworld, which is supposed to be purple to cool colours.
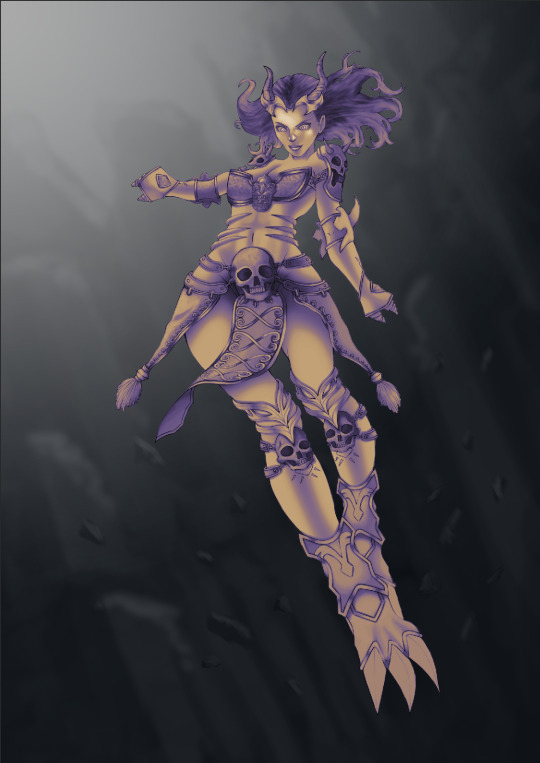
The next step I did was working in layers by layers. I will be starting with the skin tones first and moving my way towards the armour and the hair. For this layer, since I wanted the skin to look a little rough and have this painted feel to it - I decided to paint on top of the gradient map layer. Furthermore, the gradient map provided the best source of colours since the colour was a little purple which is the atmosphere in the underworld that I wanted. All I have to do was pick some purple tones and apply it to the skin to create this bounce lights from the atmosphere.
The next thing I did was adding some highlights to the skin to indicate that the lights are coming from the top left and bottom right.

Once the tones and the highlights of the skin are correct, I then paint another skin layer on top of it to create a more natural skin colour and to add some saturation to it so that the skin tones don’t look weird.
I then paint the armour parts using the brush tool and control select the layer to select all.

I then added a gradient map to the selected layer, and this colour is going to be the primary colour of some of the armour parts.

For all of the white parts of the armour and the clothing, I painted white colours over it but also adding a tint of purple and pink tones onto it to create some reflection.
Next was to add the silver colours to show that it is an armour. The colours I chose was a little darker in blue because of the atmosphere in the background.
I then added a gradient map onto the hair to create this purple to red gradient on the hair.
Although I do like the character without its outline, I believe adding the outlines would make the character look a lot better. However, I won’t be adding all outlines to the character as it’d make the character look unrealistic and flat. I’d just be adding it a little bit so that the form or shape of the character looked better, especially the face.

I then paint a scythe for the character really quickly without the outline. The reason why I didn’t add any outlines was that this was to show the depths that the scythe is farther away from the character. In addition to that, I’ve also set the brush opacity to lower than 50% and painted some areas of the scythe to show that it is faded into the depths.

Next is when I start applying a flame on the bottom right as I’ve initially planned.
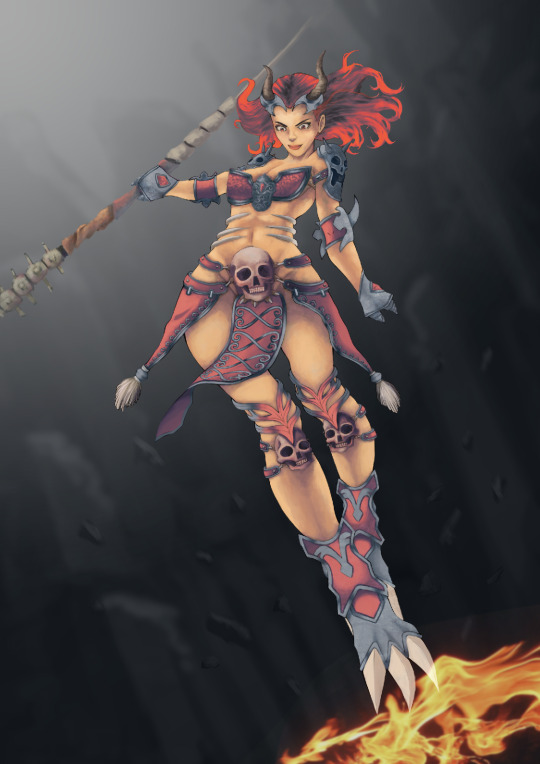
The next thing I did was adding more flames and sparks on the painting to indicate that the character is moving up and by using the flame motion as a guide to where the viewer should be looking.

I then added a warm photo filter to make the skin looked a little warmer so that it would fit with the fire effects. In addition to that, I’ve also made the lights on the top left brighter to highlight some areas on the character.
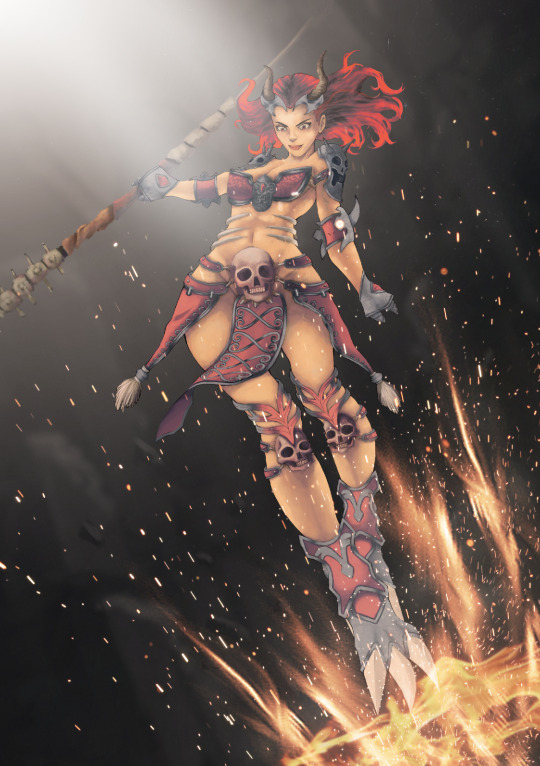
Finally, I then add an orange gradient behind the fire to make the painting look realistic and added a smoke behind it to give some motion effect to the character as if it’s fly through with a heavy explosion. Furthermore, I also added some highlights on the scythe and the character to show some bounce lights from the flames on the object and on the skin to make the painting look better.
0 notes
Text
How to Create a Dramatic Mermaid Photo Manipulation in Photoshop
What You'll Be Creating
Today, we will be putting together a vibrant and dynamic underwater dance scene between two mermaids! With this photo effect, we will take a close look at lighting and shadows, creating simple underwater backdrops and learning how to create a mermaid tail from scratch—no stock images needed.
While we will be using digital painting techniques, I have specially formulated this process with the non-digital painter in mind!
What You'll Need
To complete this project, we are using the following resources:
Underwater Coral
Ballet Dancers
Water Reflection
Photoshop Brushes for Painting Fish Scales
Betta Siamese Aquarium Fighting Fish 1
Betta Siamese Aquarium Fighting Fish 2
Vintage Polygon Light Backgrounds
Suns and Rays
Colorful soap bubbles
Find more resources on Envato Elements!
1. How to Create an Underwater Background
We'll start by creating a simple underwater backdrop. Leaving the background clean and straightforward will help keep all of the focus on our two subjects.
Step 1
Create a 3076 x 4359 px canvas.
Change it to a 300 Resolution if you intend to use this for prints.
Step 2
Create a Color Fill layer filled with a dark blue #0f1219.
Step 3
Create a New Layer set to Overlay.
Using a large, soft round Brush, paint blobs of white light towards the top of the canvas.
Set the brush to a low Flow Rate, 1-15%, to slowly build up the light to avoid any harsh edges.
Use multiple layers, set to Overlay or Soft Light, to layer orbs of light over each other. Doing this will give you more control over the light's opacity as well.
Group all of the light layers together, naming the group "Light."
Step 4
Repeat step three, adding even more light to the canvas.
Focus on creating light all over the canvas, not just the upper portion.
Group the layers, naming the group "Light Enhance."
Step 5
You might notice a lot of color banding; there's a quick way to fix this using the Noise Filter! Even if you don't have any notable banding, I suggest adding this as it adds to the foggy underwater feel of our background.
Create a New Layer and fill it with Black.
Bring the layer below the two "Light" groups.
Go to Filter > Noise > Add Noise.
Noise Settings
Amount: 5
Distribution: Gaussian
Monochromatic: Checked
Bring the Noise layer's Opacity to 53%.
Add a light 0.5px Filter > Blur > Gaussian Blur to the noise if it feels too harsh.
Step 6
Create a New Layer setting it to Overlay.
Using the same techniques as in Step 3, paint more blobs of light.
Focus on creating smaller, more stringy light paths towards the upper portion of the canvas.
Step 7
Create a New Layer setting it to Soft Light.
Create shadows using the color Black and the same techniques as in Step 3.
Step 8
Create a Color Lookup layer.
Color Lookup Settings
3DLUT File: TealOrangeContrast
Opacity: 62%
Step 9
Create a New Layer.
With a medium, soft, round Brush, paint light beams coming from the top of the water's surface.
Paint with a low Flow Rate to build up the light slowly.
If you're having a hard time getting the light rays to look smooth and slanted, try adding a Filter > Blur > Motion Blur.
Step 10
Create a New Layer set to Screen.
Paint a pop of pale Orange #d8966e in the middle of the light ray. Bring down the opacity of the layer if needed.
Step 11
Bring in an image of Underwater Coral.
Place it towards the bottom of the canvas, flipping it horizontally.
Using the Patch Tool, remove the fish located towards the bottom of the coral.
Step 12
Add a Layer Mask to the coral.
Mask out the top portion of the coral image with a large, soft, round Brush.
Step 13
Go to Image > Adjustments > Hue/Saturation and set the settings as follows.
Settings:
Colorize: Checked
Hue: 193
Saturation: 29
Create a New Layer with a 4% Opacity.
With a large, soft, round Brush, paint a very light fog towards the top of the reef.
Step 14
Create Color Balance, Vibrance and Color Lookup adjustment layers, ordered from bottom to top.
Color Balance Settings
Red: -17
Green: -35
Blue: -46
Vibrance Settings
Vibrance: +40
Saturation: +21
Color Lookup Settings
3DLUT File: Crisp_Warm
Opacity: 17%
Group the three adjustment layers, naming the group "CC."
Group all of the background layers together, naming the group "Water."
2. How to Remove Clothing From a Subject
Next, we will be extracting and placing our subjects into their new environment. Our primary focus will be removing the unwanted clothes from our soon-to-be mermaids!
Step 1
Extract the subjects using your preferred method. Find my favorite way in this tutorial!
Don't worry about either of the subject's legs—as you can see below, I didn't even bother doing the male's!
Step 2
Next, we are going to use the Clone Stamp Tool to remove the seam going down the side of our female mermaid.
I like using a semi-hard brush when using the Clone Stamp Tool to keep as much of the original texture as possible!
Step 3
Next, I am going to use the Mixer Brush Tool to remove some of the cloth and unwanted texture on the bodysuit and the armpit area. Do this by dragging the soft Mixer brush over the areas with the most amount of texture. You can also use this to smooth out shadows and highlights.
The more you use the Mixer Brush, the better you'll understand how it works!
Mixer Brush Settings
Step 4
Create and clip a New Layer into the subject layer. On this layer, we are going to cover the seam of fabric located on the woman's thigh.
We will be covering the seam by painting skin over the area; the process is much easier to do than it is to explain, so bear with me!
First, let's set up our Brush settings.
Brush Settings
Size: Medium (Change as you go)
Hardness: 0%
Flow: 10%
Using the Eyedropper Tool, sample colors from the same area you are painting—in this case, the thigh area.
Slowly paint over the area of the seam, building up color gradually. Sample colors as you go, making sure everything is smooth and there is a natural transition.
If you are having trouble hiding the seam completely, duplicate the layer you are painting on. Do this will increase the overall opacity of the colors.
Use a soft Eraser brush to get rid of any harsh edges and additional color/paint.
Step 5
Repeat Step 4 on the arm and chest seam.
Step 6
Create a New Layer set to Overlay.
Using a soft, round Brush, paint White over the subject's natural highlights to enhance them.
Step 7
Create and clip a Brightness/Contrast layer into the subject layer.
Brightness/Contrast Settings
Brightness: -12
Blend If:
Step 8
Create and clip a Curves layer into the subject layer.
Curve Settings
Step 9
Create and clip a second Curves layer into the subject layer.
Curve Settings
Step 10
Duplicate the above Curves layer to enhance the effect.
Bring the layer down to 50% Opacity.
Step 11
Clip a Water Reflection image into our subjects.
Set the layer mode to Screen with the Blend If settings seen below.
Blend If Settings
Step 12
Add an Image > Adjustments > Brightness/Contrast and Hue/Saturation to the "Water Surface" layer.
Brightness/Contrast Settings
Brightness: -6
Contrast: 21
Hue/Saturation Settings
Hue: +180
Saturation: -67
Step 13
Add a Layer Mask to the "Water Surface" layer.
Use a large, soft, round Brush to mask out the edges of the image.
Step 14
Duplicate the water surface so that it's placed over the male subject as well.
Group all of the current subject layers, naming the group "Subjects."
3. How to Create a Dark and Vivid Color Grade
When creating mermaids, I like to set up my colors and contrast levels early on! I set my "Color Grade" folder above all the other layers, where I can quickly turn it on or off and adjust it as I continue to paint.
These layers are ordered from bottom to top so that each layer will go above the previous one!
Step 1
Create a Color Lookup layer.
Color Lookup Settings
3DLUT File: FoggyNight
Opacity: 25%
Blend If:
Step 2
Create a Curves layer.
Curves Settings
Step 3
Create a Color Lookup layer.
Mask out the top half of the layer using a large, soft, round Brush.
Color Lookup Settings
3DLUT File: FoggyNight
Opacity: 24%
Blend If:
Step 4
Create a Color Lookup layer.
Copy the previous layer mask onto this layer.
Color Lookup Settings
3DLUT File: EdgeyAmber
Opacity: 14%
Step 5
Create a Curves layer.
Curves Settings
Step 6
Create a Curves layer.
Curves Settings
Step 7
Create a Curves layer.
Curves Settings
Step 8
Create a Color Lookup layer.
Color Lookup Settings
3DLUT File: DropBlues
Opacity: 51%
Group all of the adjustment layers together, naming the group "Color Grade."
4. How to Create a Mermaid Tail in Photoshop
Now to the star of the tutorial: the mermaid tail! As mentioned above, I specifically created this technique for non-digital painters, and as with everything, the more tails you create, the better you will get at them.
If it's your first time, it's best to start slow with simple shapes, colors, and textures. Then from there, you can continue to grow to more complex, photo-realistic shapes and textures, adding much more movement and detail!
Step 1
Create a New Layer.
With a hard, round Brush set to a bright color like white, sketch out your tail. Just worry about the general shape—no need to make it perfect!
The sketch is just a general guide for our tail; you will likely change it as you'll see below.
Step 2
Create a New Layer under your sketch.
Now, using the Pen Tool set to Shape, trace your sketch.
Once you are generally happy with your path (don't worry, you can adjust it later), create a Light Brown #685550 Color Fill layer.
The color fill layer will take the shape of your path, making it so you can change the base color of your tail at any time.
Note!
While you won't always need to do this, for this particular mermaid, I suggest splitting the tail in two. So you will have two shapes, the thigh portion and the bottom portion. Each piece will follow the same process!
Step 3 (Optional)
If you need to edit the shape of your tail, select the Pen Tool set to Path.
On the upper Pen Tool Toolbar, to the left of the Shape button, you will find the Path Operations options.
To Add to Your Tail
If you need to add to your tail, to make it longer for instance, then you will want to set the Path Operations to Combine Shapes.
When set to Combine Shapes, paths will add to the shape of your tail.
To Subtract From Your Tail
If you'd like to subtract from your tail, to adjust the width or shape, for instance, set the Path Operations to Subtract From Shape.
This option will make it so that the path will subtract from the shape, without creating new shapes.
Use these options to adjust and shape your tail until you're happy!
Step 4
Using the layer mask on the thigh portion of the tail, mask out the top inner area of the tail, blending it into the thigh of the subject.
Step 5
Next, we are going to shade and light the upper portion of our tail.
Create two New Layers and clip them into the thigh layer. Name one "Light" and the other "Shadow."
With a soft, round Brush set to a very low 1-10% Flow Rate, paint some highlights onto the "Light" layer and then shadows onto the "Shadow" layer.
Use the Eyedropper Tool to select colors, using the subject as the Eyedropper's reference.
Tips
If you don't have a graphics tablet, use the Smudge and Mixer Brush Tool to smooth and taper out the edges.
Sample the colors from the subject's high, mid, and lowlights; however, feel free to adjust the colors as needed.
Build up both the shadows and light slowly. Setting the brush to a low Flow Rate is essential for this.
Keeping the lights and darks helps you have more control and a higher room for error.
Use the subject as a reference!
Use as many layers as you'd like so you can adjust opacities and play with layer modes!
For light and highlights, use Screen, Color Dodge, Overlay, and Softlight.
When painting shadows, set the layer modes to Multiply and Soft Light.
Step 6
Download and install these free Photoshop Brushes for Painting Fish Scales.
Create a New Group.
Hold Control and Click your thigh shape to create a selection of it. With the thigh-shaped selection, add a layer mask to the new group.
Rename the group "Scales" as this is the group we will be creating our thigh scales on.
Step 7
Create a New Layer inside the "Scales" group, setting it to Overlay.
Using a mixture of a small, soft, round Brush and the "Pixelstains Fish Scale Brush 03" from the downloaded brush pack, paint a Soft Peach #fdc79b color all over the thigh.
Focus the scale texture towards the top of the thigh, keeping the texture small.
Step 8
Create a New Layer set to Darken.
Using the same "Pixelstains Fish Scale Brush 03" brush, paint Dark Brown #4a2618 scales onto your mermaid's thigh.
Tips
Focus on adding scales to areas where the light hits the most. Darker areas should have fewer scales.
Be aware of the direction of the scales.
Create multiple different layers to paint on, and make good use of Control-Z!
Find some fish or other mermaid illustrations for reference.
Add a Filter > Shaper > Smart Sharp to the scales to increase details.
Step 9
Create a New Layer set to Color Dodge, placing setting it above the "Scale" layers.
Add color to the scales using the "Pixelstains Fish Scale Brush 03" Brush. I used a mixture of a Tan #9b8058 and Green #819058 color.
Bring the Opacity of the layer down if needed.
Step 10
Create a New Layer set to Overlay.
Continue to enhance the light and color of the tail by building up more of the Tan #9b8058 color on the thigh.
Use a soft, round Brush set to a 1-15% Flow rate.
Step 11
Repeat step 10 until you are happy!
Looking at references is my biggest tip for this step, along with focusing on building and enhancing the highlights that already exist.
Use a mixture of Overlay and Color layer modes to keep layering on the light.
Step 12
Finish off the scales by creating a New Layer set to Overlay.
Bring this layer below any "Scale" layers.
Using a small, hard, round Brush, paint white highlights on the edges of the most prominent scales, going down the middle portion of the side of the thigh.
Group the "Scales" group in with our "Thigh" layer, naming the new group "Thigh Tail."
Step 13
Remember how we split the tail into two shapes? Well, we are going to repeat the process above on the bottom portion of the tail!
The steps are the same, only you will be working in a looping motion this time.
Once you are happy with the bottom portion of the tail, Group everything together, naming the group "Bottom Tail."
Then Group both the bottom and thigh portion of the tail together, naming the group "Tail - Woman."
Step 14
Create and clip a Selective Color adjustment layer into the "Tail - Woman" group.
Selective Color Settings
Yellows
Cyan: -56
Magenta: +64
Yellow: -22
Step 15
Create and clip a New Layer set to Overlay into the "Tail - Woman" group.
Using a soft, round Brush, further enhance the highlights of both the top and bottom portion of the tail.
As always, it's a good idea to layer lighting using multiple layers!
Step 16
Create and clip a Color Balance adjustment layer into the "Tail - Woman" group.
Color Balance Settings
Red: +70
Green: +53
Blue: +90
Step 17
Repeat the steps above with the male subject!
5. How to Create Fish Fins
To finish up our tails, we will be adding our fins. Soft, flowy fins are the easiest to work with, so that is what we will be adding, but incorporating hard fins like dorsal fins is a great way to create more visually appealing/edgy mermaids!
Step 1
Drop the Betta Siamese Aquarium Fighting Fish 1 image onto the canvas.
I suggest keeping all of the fish stock images as Smart Objects so that you can copy and resize them as needed, without having to worry about distortion or pixelation!
Set the fish stock to Lighten, placing it over the female subject's tail.
Step 2
Using a soft, round brush, mask out the fish's head and body.
Step 3
Add an Image > Adjustments > Brightness/Contrast and Hue/Saturation to the fish stock.
Feel free to adjust these settings for all of the different fins we will create from this fin later on!
Brightness/Contrast Settings
Brightness: -80
Hue/Saturation Settings
Hue: -11
Saturation: -10
Step 4
Repeat Step 3 until you are satisfied with the number of fins!
Use both the Transform and Warp mode to differentiate the fins, along with Layer Masks. We don't want the fins to look too repetitive!
You can also experiment with using the Screen layer mode along with the Lighten layer mode.
It's also best to use at least two different stock images like Betta Siamese Aquarium Fighting Fish 2.
Step 5
Create a New Layer set to Multiply, placing it below all of the fin layers but above the subject layers. So if you placed fins below your mermaid layers, you would have to create a second layer for those fins.
Let's finish up the fins by painting a dark blue base underneath them; this will make the fins feel more substantial.
Use a semi-hard round Brush to achieve this effect.
Step 6
Repeat the above steps for the male subject as well!
6. How to Create a Lens Flare Photo Effect
Next, we will be adding a bright light coming from the surface of the water. Using lighting and lens flares is a great way to add contrasting yet complementing colors to your work!
Step 1
Create a New Layer set to Screen.
With a very large, soft, round Brush, paint a Light Orange #ff9259 blob of light towards the upper-middle portion of the canvas.
Step 2
Drop in image "8" from the Vintage Polygon Light Backgrounds texture pack. Set the layer to Screen.
Add a Filter > Blur > Shape Blur.
Shape Blur Settings
Radius: 70 px
Shape: Hexagon
Use a very large, soft, round Brush to mask out the bottom edge of the light texture.
Step 3
Repeat Step 2 with the Suns and Rays lens flare pack.
Step 4
Create a New Layer set to Screen.
Using a soft, round Brush set to a very low 1-5% Flow, paint a glow coming from the bodies and tails of our two subjects.
Sample colors from the areas you are painting over. For instance, paint light blue over the female mermaid's tailfins, and a light peach or orange color over her body.
Feel free to bring in other colors as well, like greens or golds! Bring the Opacity of the layer down if needed.
7. How to Paint Dark Shadows
Next up, we will be painting some dramatic shadows to match our rich light source.
Step 1
Create a New Layer right above the "Water" group, setting the layer to Multiply.
Using a medium, soft, round Brush, paint a Dark Green #0e1509 color behind your female subject.
The shadows should be slanted, not too soft, and located logically. Creating defined shadows will often produce more dynamic lighting!
Create a New Layer above the previous layer, setting it to Overlay.
Paint a very subtle, soft, faint glow around the woman's face and chest.
Step 2
Repeat Step 1 above, only this time place the layers above your subject's.
Whether you place them above or below the fins is up to you—you will likely have a mix.
Paint shadows on multiple different Multiply layers, building the shadows as you go, and adjust the layer's Opacity as needed.
Use Filter > Blur > Motion Blur to add more slant to your shadows if needed as well!
Also, use the Blend If function to keep shadows out of highlights.
Step 3
Is there an area you want to catch more light? You can use a Brightness/Contrast layer.
Use a layer mask to keep it confined to the tail fin.
Brightness/Contrast Settings
Brightness: 41
Contrast: 79
8. How to Create Underwater Bubbles and Hair
To finish everything off, we will be adding some underwater bubbles and adding some movement to our subject's hair.
While you can paint your own bubbles, you can also use these premade Colorful soap bubbles!
Step 1
Open up the Colorful soap bubbles PSD, and drag and drop the whole "Wiggling Bubbles" group full of bubbles onto the canvas.
Making sure the "Wiggling Bubbles" group is below the "Lens Flare" group, shrink the bubbles substantially!
Set the group to Screen.
Step 2
Use the Move Tool to position each bubble around the canvas individually.
You can copy, paste, flip, enlarge, and shrink the bubbles as needed. Variation is key, so try not to make any single bubble look the same!
Step 3
Create and clip a Brightness/Contrast layer into the "Wiggling Bubbles" group.
Brightness/Contrast Settings
Brightness: -150
Contrast: 100
Next, to get rid of 100% of the color of the bubbles, create and clip a Gradient Map layer above the "Brightness/Contrast" layer.
Gradient Map Settings
Color: Black to White
To add even more bubbles, without having to copy and paste each bubble individually, try the trick below!
Step 4
Duplicate the "Wiggling Bubbles" group, along with its clipped adjustment layers. Bring the new group above the original group. We want to keep our two types of bubbles separate!
Merge the duplicate group and its adjustment layers together, making sure to reset the layer mode to Screen.
Flip the merged bubbles both horizontally and vertically, as well as shrinking them down. Place the bubbles where desired—I placed them in the upper right-hand corner.
If you find that your bubbles aren't bright enough, duplicate their layers!
Step 5
Repeat step 4 until you're satisfied! I added two new sets of bubbles, for a total of three. Again, try to avoid making the bubbles look repetitive!
Use the Eraser Tool on any of the bubbles that look out of place.
Step 6
Finally, add some depth by creating foreground bubbles.
Start by repeating step 4. Significantly enlarge the new bubbles, positioning them on the right side and bottom portion of the canvas.
Add a Filter > Blur > Shape Blur to the bubbles to remove any pixelation caused by enlarging the bubbles.
Shape Blur Settings
Shape: Circle
Radius: 25 px
Group all of the merged bubble layers together, naming the group "Merged Bubbles". You should have a "Merged Bubbles" group and a "Wiggling Bubbles" group!
Step 7
Next, we will want to add some flow to the hair. I personally like to work with the existing hair of the subject, simply adding to it and giving it more motion.
Create a New Layer.
Using a hair-strand brush, like the one I teach you how to create in this fashion portrait tutorial, paint strands of wavy hair extending out of the subject's current hair.
Use the Eyedropper Tool to pick the colors as you go.
Step 8
Create a New Layer, setting it to Overlay.
Using a soft, round Brush with a 1-10% Flow Rate, paint white highlights in and on the hair strands.
Lower the layer's Opacity if needed.
We've Done It!
These mermaids are just a jumping off point, here to help you cover the basics; there are so many different directions you can go and so many more details you could add compared to what we did here today! And the best part is that the more you create, the better you'll get, going from simple shapes to full-blown complex masterpieces.
Take this opportunity to think of all the different kinds of underwater creatures you could create using these techniques as a starting point. Never be afraid to think outside of the tutorial!
So, as always, keep experimenting with different techniques and practicing, and don't forget to post your version below, along with any questions, comments, or critiques!
Looking to learn more? Why not check out the following photo manipulation tutorials:
Adobe Photoshop
How to Create an Abstract Diamond Lens Effect in Photoshop
Abbey Esparza
Photo Manipulation
How to Create a Honey Bee Themed Photo Manipulation in Photoshop
Abbey Esparza
Neon
How to Create an 80s Neon Horns Photo Manipulation in Adobe Photoshop
Abbey Esparza
Photo Manipulation
How to Create a Ghostly Horror-Themed Photo Manipulation in Adobe Photoshop
Abbey Esparza
Photo Manipulation
How to Create a Surreal Stitched Portrait in Adobe Photoshop
Abbey Esparza
Photo Manipulation
How to Create a Neon Rainbow Photoshop Portrait Effect
Abbey Esparza
from Envato Tuts+ Design & Illustration https://ift.tt/2GCNKmJ via http://www.webmasterforum.ws/rankwyz-discount-code-2015-coupons/
0 notes
Last Seen Blogs

guilleandrade
Guille Andrade - BlockBlog

resolvedbrunette
dum spiro, spero
ghostfightimprov
Ghost Fight (Improv Team)

tabletopbellhop
Tabletop Bellhop
witchunters
Spooky Seas